Transcripts
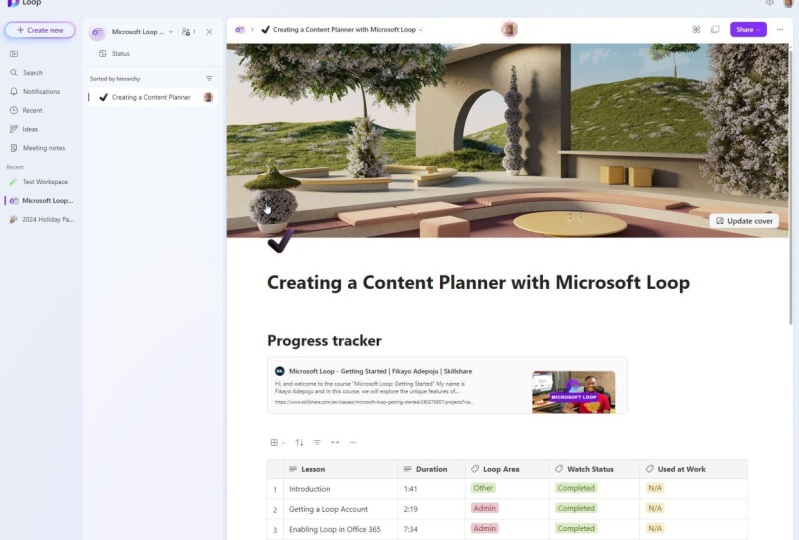
1. 00. Introduction: Hi and welcome to the course. Getting started
with Microsoft loop might have is Caravaggio. On, in this course we're
going to be exploring the unique features
of Microsoft loop and how it can help you organize and collaborate on projects
more efficiently. Microsoft loop is
a powerful tool that helps you
combine documents, spreadsheets and
other files into a single workspace,
which Microsoft loop. You can easily track the
progress of your projects, share information,
and communicate with your team
members in real-time. Throughout this
course, we'll cover all the essential topics
related to Microsoft loop, such as how to sign
up for loop account out to enable the loop
up for Office 365 users. Understanding the
loop interface, creating and managing
loop workspaces. Creating loop pages will also be using page
elements like lists, links, tables, images, and also adding
video to our pages. We will then explore all the collaborative features in loop that enable you to do things like show your workspaces or share pages within
a loop workspace. You can also tag
team members within your loop, documents
and components. After that, we'll then dive into advanced topics such as
creating loop components, which can be shared
across the loop. Documents on Office 365 apps will also learn how to use
more complex components, such as the progress tracker, voting component and task list. By the end of this course, you will have a good
understanding of Microsoft's loop and
how to use it to streamline your work and
achieve your project goals. Do know that this course has
been constantly updated. So as more features
coming to loop, I'm going to be
making new videos and adding them to this course. So get ready to dive
into the world of Microsoft loop and learn
all it's exciting features.
2. 01. Getting a Loop Account: In this video, we're going
to be looking at how to get a Microsoft account is
actually a very easy process. You simply go to
loop.microsoft.com and here you can sign in if you already
have a Microsoft account, but you don't have one, you can just hit this Get
Started button, the one at the top right, or these big purple one. Central idea. You can see it's free. So let's just hit the button. Ask you if you have
a Microsoft account, you can go ahead, but
if you don't have one, you can just simply create one. Here. This basically just guides
you through the process of creating a new
Microsoft account. I can type in a fictitious
email you and say it just adds my company TO go next. Then you enter your password, just type something that is a bit difficult
to guess for anyone. I just typed pass outward so
it should be good enough. Yeah. Name my name you
say, Kyle. You FK. The next, and speak around them contrary to value interested. Pick a random date
of birth, say 1991. We told them that next. Okay. Yeah. I can go further. Yeah. Because I'm using a
fictitious email, but yeah, that's basically how to set up a
Microsoft account. Once you set up the account, you can use this account on loop or any of the
Microsoft products. And once you're done,
you can sign in. Once you sign in, you
have something like this. You have this
default workspace is sometimes comes
with this default getting started workspace. But there was a time I
tried to create another, another loop accounting
income with this. So it depends if my communities default getting
started workspace or not. This is what you
see when you login. So that's how you get
your loop account. Like I said, you go
to loop.microsoft.com and it brings you to this page. Click on Getting Started. If you have a Microsoft
account, you can sign in. Admittedly, if you
don't have one, you can just create
one right here. And that will
automatically bring you to this page where you can
see your loop workspaces, more on workspaces in
the coming videos.
3. 02. Enabling Loop in Office 365: Now in this video
we're going to be looking at how to enable Microsoft loop for
Office 365 users. Now as an administrator
of negative five, you want to make
loop available to all the users in your
Office 365 instance. This is not enabled by default, so you actually have to do some configuration
actions in the admin of Office 365 to
get this started. So the first thing
you want to do is create a security group. We want to create a
security group from The Office traces to five admin. So you go to admin. Admin, and I will post
the admin portal. Now you're in the admin portal. You go to the side menu and you click on teams and groups. Teams and groups. Let me bump this
clean up a little bit so you can see
things more clearly. Okay? So you come to the side menu
and go to teams and groups. I click on active
teams and groups. Activity teams, I'm good. You can see I've created
some groups here. Now you want to add a group. You click Add Group. Now when you're choosing
your group type, be very, very cautious because when
I first created this or when I first tried to implement this process was
really frustrated. And I was because I chose this Microsoft three to five group because I saw that
it was recommended. But what you actually
needed a security group. So you go down and click
security, then click Next. Then you can hide the
name of your group, can see my loop, bodies. Look. Buddies, can add a
description if you want, but if you don't,
just click Next. And here you have your group. Can review it. You can click, click, Create
Group to create a group. Now you have a group. That's fine, so we
can close this. Now you would not see it here and you might be wondering
why it's not here. Let me just call out. This might be wondering
why he's not here. That's because you
need to go into security to see the group. So you see my loop buddies. Now one thing you have to do in this group is
that you have to click on it and come
here and add group, a group owner or owners. You click on Add Owners, and it will display a list of your coworkers or people that are registered
under this instance, then can click one
of them like e.g. I'm just going to add myself. Yeah. I didn't add as an
owner of the group. Then once you're done, you can just close out of
this click once again. I think there was a
back button there, but probably I didn't see it. Then. Now you can go to members,
members of the group. So you have a group owner, now you have to add a member. So another does the
controllers of the group, but you have to add
members and decide to put our actually be
able to use loop. So you can actually add a
whole group as a member, but I'm just going to add
myself again as a member. And click Add. Now if you have like
four or five people that what you want to use loop
this way you add them, e.g. like I said, this is how you enable loop for your office,
Tennessee's Drive users. I've made it in a
way so that you can control access to loop e.g. if you are just
testing it within your organization or you don't know whether you guys
want to do that yet. So, yeah, so we have this y, remember, and we can
now close out of this. Now the next thing
we are going to do is to add a policy for loop, a policy that will apply
to this loop bodies. And this policy is going to
be the one that will actually make loop available to these people in
office density five. Now to do that, you go
to config.office.com. Config.office.com. You might be prompted
to sign him, so you want to just hit sign-in? Sign in. I think you're just going
to get my session my currently logged in session,
so that should be good. Okay, So we have a sign in. Now you can start creating the policy here
from the homepage, but you can also
get there through these customization and
policy management menu. And we bump this
up also so that we can see things clearly,
that's much better. So to create a policy, just go to the Microsoft Office
traces for cloud policy. Now notice that this
is the Microsoft Power Apps admin center is different from this, which is the Microsoft
365 Admin Center. Microsoft's is to have
a lot of admin centers and it can get
confusing sometimes. So you want to click this? Yeah, so policy configurations, I already have a policy yet, but you have to
create a new one. So to create a group together, to create the policy would
just say my buddies policy. Next. We are a group. Here. We can select a group,
so we can select any of these groups, my loop bodies. So we want to go
with my loop body. So just say my, my loop bodies, so does
the group, my loop body. So we click, select my loop
bodies and the save that. Once we have that saved, then we can click Next. And now we go to
configure settings. Now you need to actually enabled through
a loop settings here, but it seems to be
a lot of settings here. So I'm just
going to search. So I'm going to go to
the search bar and say loop, such loop. And we should have
three policies. Now seen a total of three, but it's not displaying the
policies for some reason. Let's clear the filter, okay? Okay, Yeah, now we have them. So they look, policies, create and view loop
files and Microsoft app, that's about loop
that do the apps like Microsoft Word or PowerPoint. Just all blue because you all of his students
is Dr. experience. So I'm going to
click on this and set it to enabled. Apply that. Then create and view
loop files and loop this for loop app itself
when you build out. And finally quit on View
Live files and Outlook, which is kind of
self-explanatory. So in Outlook, we apply
that to enable that. And we click next. Here we can now
review our policy. We can look at the
configurations. We have three policies configured and yeah,
everything looks good. So we can now create
a policy. Good. It tells us that our bodies policy configuration
is now created. I can eat down to
just exit the page. This will bring you back to the policy configuration screen. And as you can see,
my buddies policy is now created and it has a
priority level of one, which I believe is
lower than zero. So with this, you can now have lived experiences
across distances to five. But I'll just yet because
these policies can take up to 2.4 h to take effect. So anything from 90 min, 24 h, you might get lucky
sometimes like e.g. when I did mine, when I
did this loop policy, I think I refreshed after I tried it after 20
min on it was done. Some even say they got
it after five-minutes. So it all depends on our
office thicknesses to five or the mood of his office
decreases fibers in, but not less than 24 h, you will be able to have access enabled for all
your office tenses, try viewed as order for
the office tenants, five users that are
under the security group that is tied to the policy
that you just created.
4. 03. The Anatomy of Loop: So in this video, we're
going to be looking at the anatomy of the loop app. We're going to be doing a
walk-through of the loop up to understand every element
that we can find. Now like I said, this
is the default page. It shows you your workspaces. So let's go into one
of our workspaces. There's going to be just
getting started workspace and we'll walk through. Now loop is basically
made up of workspaces. Everything in loop is
organized into workspaces. And within these
workspaces you have pages. And pages are just
this blank canvas that you can make into any type of documents you
want to use in texts and loop components.
So let's begin. Let's do a walk-through
from right to left. This is my right, So we go from here to here, okay, so forth. Let's start with
the account icon. So you have your
account icon for now, you just can't
change the sign out button so you don't sign
out this way you go, you click your account
icon or you can sign out. Then we have these ellipses
here, you click it. The first thing here is
the version history. Click version is true.
You'll be able to see different versions of
this document. So e.g. if you have made a mistake and you need to go
back to a previous version, to a previous state where everything was all
well and good. You can use this
version history to just jump back to that. This is very helpful in
recovering lost work. So this is how you get
your version history. You go to the ellipses and
you click on Version History. This is going to save you
from a lot of mistakes. Screws out. Let's
close that out. The next thing here
is the Delete button, so you can use this to delete
this entire, entire page. That's why it's in
red because this is something you have to be
very, very cautious of. I believe it warns you. Let me click it and
say, Yeah, definitely. It wants you to confirm if you really
want to delete this page. So just going to
close out of that because we're still
on this page. The next thing here is sentence. So we have settings for
now is to quiet lane. We have the team which
is set to a system. The system is currently
set to light, a light team, so it's
picking light by default. But if I change the
system team too dark, it will select the
dark by default. So this just select the default, the currently active team on the system by going to start with lighting, which
is what we have now. And you can trust to go Doc, which is this very
cool dark feel for those people
that like dark mode, like me, I like dark mode, but everything
starts from light. So yeah, let's just
go with the default. So we have D will go with the system to
stemmer delight him. So loop is speaking, liked. Then we have this
experiments corner where we will be activating
co-pilot later on. For now, co-pilot seems
to be overloaded, so we cannot
activate it for now. So just for you to
know that is where you enable
experimental features. Exclude that out. And next about, yeah, about loop diuretics is about liberating something
about your session. Yeah, Did we get
your session ID? You get your aversion. Probably. They would
have an API later on so that this can become
useful to developers. Probably. Then we have the Share button. You can share your workspace. You can share it
with all the pages. You can share the
link to this page. And you can also share this page as a loop competent to look components are very, very powerful parts of loop
and we're going to be looking at that much later
in this course. But you can from fat,
this old document, this old page, to
a loop component and be able to share it across
Office to consist of five. We have this copy. You can copy it directly as
a live component and share. Now we have this icon which shows the user
that is on this, on this page, rather the user
that is on this document. And this can show
multiple users, if multiple users accessing the document at the same time, this is going to show
the multiple users. So these were, you know, who is currently
on the document. So e.g. if I have like two other teammates
working on this document, are actually see the icon here. So that's pretty neat.
Next is the breadcrumb. Of the breadcrumb that
shows you where you are in the navigation. So you can click back, you can click forward. It shows you the
page you are under, the track or the trace of
the page that you're on so that you can identify where
you're currently walking. So that's also putting it. Next, we have the
collapsible menu can collapse to this icon, will collapse the side
menu with this icon. Close, open, open, close. Next to that is a search tool. So this allows you to
search all your pages in every workspace
that is available. So you can, let's say we
want to search the page. Next steps. Next steps. Yeah. So it is a QuickStart tool that you can use to set a page. Next we have the
notifications bar. The notifications bar is for notifications about activities
within your workspace. This is most likely going to be notifications about
what other people are doing within your workspace
because you know what you're doing so
you don't need to get notifications about that. But if any other thing happens
within your workspace that you most likely did not
do or do not trigger. This is where
you're going to get the notifications and you see it neatly organized to all
and on red so you can check. All education or just
jumped to the ones that you have not attended
to. So doesn't it? Then we have the recent
we have the recent page. This just shows you the most recent pages
you've worked on. So if you just want to jump to the top thing you
were working on before, now, you can just
quickly jump here. This just shows you your
history across all your pages. So this is something that
can really come in handy. Then we have the ideas page, we'll just kind of interest
and this is where you can have more like a
section on his own, is a section on its own, because you can create
pages within this section. But this kind of helps
you to just get one. I've pages where you
just constructed ideas outside of your usual
workspace is sort of, say, a lot to cover and stuff. Yeah. You can have, you
can just type in ideas here and share it
with your coworkers. And it will go back
to the ideas page. You can see that we have to
pay that we just created. Yeah, just now just created it. And it's outside our
regular workspaces. So that's pretty neat. Spreading it recent. Now, let's go to our workspace drop-down
instead is go to workspace. Drop-down. You can click this and we can jump
to our workspace. Let's go back to the
getting started workspace. We're back to where we were before we went
to the ideas panel. Like I said, loop is
organized into workspaces. And within those
workspaces you have piggies on piggies
as well sub-pages. So these are all pages. Everything in at this
level is a page. But if you can also
have a sub page, as you can see here,
this page or so pages. That's why it has this,
this collapsible icon. You can expand and collapse it. So let's go back to welcome. Here we have the add
page or link button. Here you can create a new page, can also link to
an external page. You can link to a
page on the web or I'm sure you can also link to a page within
your office today 65, maybe like a ward or a
PowerPoint presentation. But we'll be looking
at that modulator. You've got to walk through an x. We have this drop-down, this, we are currently in the trivial, can look at it
based on activity. Thinking. He's just kind
of expands everything. But I prefer the tree one because it just makes
more sense to me. It's easier for me to
reason than the other one. So that's, that's
about everything we've been able to walk
through the entire workspace. And now I believe that
you can know what every single icon or
settings is meant for. Later on, we're going to be diving deep into
all these elements. We're going to be
creating workspaces. We're going to be
creating pages. We're going to be bringing
pages from his thesis to five. We're going to be doing
all sorts of things with components and doing a lot of sharing actions with our coworkers within
Office three to five.
5. 04. Creating your First Workspace: In this video, you're going
to be learning how to create a new workspace. Let's first get back to
our workspaces page so we can get to that by
clicking the drop down beside your
current workspace and go into browse all workspaces. So let's click browse our
workspaces. So we're back here. Now we can create
a new workspace. If you're new to loop, you would see a
default workspace or you see a button to
create a new workspace. So, but besides that, there's always this
button Add New Workspace. So there's always
this button for you to create a new workspace. I could just click that. So here we can create
our new workspace. You can style it, e.g. this cava, this top cover, you can update it so we can find something that
fits our vibe more. I'm really feeling this. So let's go with this, or this is also quite cool. So if I select this, yeah, You see, really, really cool. Sometimes you don't
have a specific choice. You can just click
this random button and it will just select
one for you at random. Maybe you have
difficulty picking one. Can just trust loop
to get you on. This feels good. It looks
like one I used before, so let's go randomly get yeah, let's go with something
we river to be dull. But yeah, Jim, just going
to go back to the guy. Yeah. So select that. And you can also select
just so we have this we can also remove it altogether because I don't want to cover. So yeah, just get
that out for me. But covers a cool.
So I want that. I want one. So I'm going back
to this and select that. Oh, yeah, you're typing a
name for your workspace. So let's say Look, practice. Loop practice doesn't
even for a workspace. And you can also add
an optional icon. This icon sit around
here is just, just nice to have. So I'm going to pick an icon. Yeah, I want an icon because
I want so a cool dog. Yeah. From this section
also called dog. Yeah, I'm gonna
go with this guy. Yeah. This one I saw. I think it was
disordered dog. Yeah. This so I'm going with this dog. Look, practice and yeah, you can create your workspace without you conclude
your workspace. Here we are in a new workspace. We are prompted to
create a new page, and I think it's
already created, so you just, just add a title. So let's say my first page, your workspace,
and you can start creating your pages
and subpages. So that's everything to create
a workspace is quite easy. Like I said, workspaces
or are you organized your walk in loop? So if you're working on
a project is better, you put it in one workspace. We're going to need
different projects. You put it down on
the workspace and you can just jump between workspaces using this workspace menu or browse all your workspace
by going back here, you can see we have our
loop practice workspace.
6. 05. Creeating Pages: In this video, we're
going to be learning how to create Loop pages. Pages are the main elements
and loop workspaces are simply organisational
buckets for your pages. Pages are your actual
loop document. So most likely
you're going to see this default Untitled page
when you have a new workspace. But you can create
a new page by using this purple button
with the plus icon. These are euclid, a
top-level page in loop. So let's create one. Let's click new
page, a new page. Give up and your title, let's say my first page. And as you can see, just as we did with workspaces, we can also add a
cover to this page. The cover can choose any
of these amazing art. Select, say that's our cover. To cover and use the random
button to just select a random page cover in case you want to just
help you with that. Let's see, we'll go with this. Let me go to the random again. Yeah, it gives me this. I'll just pick this. Does the same way we
did it with workspaces. And you can also add a big icon to make things a
little bit fancier. We can say, we're going to
do this guy all locked up. Okay? Yeah, So this is how you
create a new page in loop. You have your page title, the main sections of
the page IOP title. We've already dealt
to the EDA where we put the provider and the icon. Then now I'm trying to do that. So you have your p.sit title
and you have your pig body. So you give your page title. And this big bodies where
you do most of your work, well, basically all your work. You can also get a bit of
a head start when creating a page by using what Luke
calls page templates, e.g. I. Can create a new page. A new page. I will. I can just scroll down
to these templates. Down here, we have
the project brief, we have the team
decision templates. We have the project planning templates on the
meetings templates. There's also a button here
to browse or the templates. There's so many templates
here that you can pick from. And this gives you a head start on the
type of document DB or creating a new
document I similar to any of this template types, you can simply just click
the templates, e.g. let's go with the
meeting notes template as unwanted signals for emitted. Let's click the meeting
those templates and say use this template. This will automatically give
us a pig with the template. I was gonna see it
already has a header. It has an icon that
kind of describe what we're trying to do,
which is take notes. Oh, meeting notes, does
the Type Tool and you have a description for the templates will be
most likely remove this. Then you can add the date here. And we have a couple of Edda, the topic of the
meeting, the attendees, which isn't a nice table. You scroll down to meeting
agenda, some notes, let's say some action
points you want to put on action points here that changes direction points
from binds and yeah, some tasks from the meeting
or some relevant links. So this just gives us a head start when we're ready
to create a new page. And what we want to do is already similar to one of the templates
available in loop. So as you can see, we can update anything here. You can change the editor. You can change the icon, even though I feel that
this icon is appropriate, what do you continue
to anything you want? You can change the
title of the page, which will most likely
do probably add a date, let's say meeting match. Yeah. So you're going to change anything within your template and you can remove sexuality, can add sections, you can edit stuff, going move components, and just put some personal touch in the templates
that loop provides you are out and about Loop
pages is that you can come here on the side menu
and click this ellipsis. You can click these ellipses are the right-hand side of the menu, of the page title on the menu. And you will see a
bunch of options. Here you can create
a new sub page, which we're gonna be doing soon. You can open a page, you can share the link. You can make the page look
components and share it. You can rename the
page on style. Let's try it out. You can rename your page and you
can change the icon. And you can also add debate
to a different workspace. Let's say we want to add this
page to another workspace. Let's click that. We can search any of the workspace
is yet and pick it. Let's say I want to add
this to the getting started workspace. I can click Get started
on this page will automatically be added to the
getting started workspace. As you can see,
the page is now in the getting started
workspace is my first page, is actually a duplication
because it will go back to our workspace
loop practice was to have the page so it's not to be moving it
from this workspace is just making a copy of it
in the other workspace. And finally, we have the
option to delete the page. You can delete it page if
you no longer want this. Yeah, I'm sure to give you a
prompt before you do that, but until you want
to be sure you want to delete this page, but there you have it, you have a way to remove depend entirely
from your workspace. Lastly, the side menu, the paid side menu here
you can actually hold on. You can click down on a page and we hold at the
page. You can move it around. As you can see. I can move this dot page
to the second level. Yeah, I'd say I have this meeting taught much
at the second level. I can move it up and
make it a first page. And this menu. And I can do the same
thing for all the pages. I can move this onto
to pay down here. So you can reorder your pages in any order that makes
sense to you by simply clicking down on them and dragging them to new positions.
7. 06. Creating Subpages: In this video, we're
going to learn how to create sub pages. Now it's updated leaves
underneath a page. Whenever the top-level page you can create a sub page within this page just to organize
your content better. So let's go to sub page on
that is my first failures. We'll click on the
ellipsis and say new sub page and use
it in sub-pages, basically a page itself, it just lives under
a top-level page, so it has all the same
elements as the page. You can use a template, it has a title, it doesn't body. You can add a cover just as
we've been doing the cover. You can add an icon. Everything you can do
with a regular page. You can do with a sub page. Very, very funny title. So yeah, if somebody is
basically another page, it just lives on the main page. You also have the same
page icon page options, whether that's a top-level page as I'm calling this top-level paid because as you can see, it expand and it expands and collapses to
review the sub pages. So any page that is
our desktop level, is it top-level page and it
can house or the sub pages. So as eyes that is so pages
just like any other page, continually same options that the regular page would have. Now you can also nest is sub page dean on a
desktop date, e.g. as you can see, I just created another sub page
within this sub page and I can give it another try to and say second level page. And the funny thing is
I can keep doing that. I can keep creating
deeper levels and keeping nest in this sub pages. Now you want to be
careful with this definitely you want to arrange it in a way that makes sense. But loop gives you
this ability just to make sure that you can organize
your documents better. You can create some sort of hierarchy level
for your document. Just like any other sub page, every single page you create is simply like any other page. And as the same options
as irregular page. Let's delete this
as the subpages. Let's get them out of the way so that things can look
less confusing. So yeah, we have top-level
page and we have our sub page. Now one thing you
can do is so pages that you can hold them, you can click down on them and drag them into another page. Shows this border around
it, top-level page. When you see this border
around the top-level page, that means you can
drop this up page into the top-level page. As you can see, this moves for my first page to meet
him, to add much. And if you feel at
this top page has grown enough to
become its own page, you can hold on to it also. We can cut down on it and just drag it out. You
can drag it out. I want to see any of these bars. You can just drop it and it
becomes its own main page. You can start creating
subpages within that sub page. Hey, I am the new sub page. So the main gist here is subpages leave on
the top-level pages, but they are just
like any other page, consists of the same
characteristics as normal pages is just for your
organization or benefits. So you're free to use. So pages in any way that
makes sense to you.
8. 07. Working with Text: So in this video we're
gonna be working with text by taking a few notes. Loop contains all
the basic elements that you need to walk
with texts, e.g. let's say we want to
talk about these costs. So the title of this
course is getting started. Let's say the title of this course is getting
started with loop. We can do for slash, angled and H1 heading and say Getting Started, which loop? So yeah, we have that. Then under these videos I do small description and use
basic texts for doubt. You say, this course teaches you to walk with Microsoft loop. We have our first chapter
are first chapter, which is the workspaces chapter. So I can say for that, let's use an H2. H2, H2. And we say workspaces. We have another adult
level to walk with. This is at a level one. This is at a level two. Workspaces we see here. You will learn all
about workspaces. Then our next would be a
good editor level to also, and that will be pages. What can we pages? And we say here, you will learn how to create pages and pages
so you get the gist. We have our editors
and we have our text, and you can highlight your text. You can, I liked your texts and do some basic
text operations, e.g. you can make this text bold. You can make it italic. You can underline it. Yep. Looks nice. You can move on to land
and less trie structure, structural construction
of the text. You can smooth that. You can change it to
an H1 if you want. That's a bad idea,
but you can do it. You can. Then you can
increase the indent. You can decrease the indent
and can also do what? A cool stuff like
changing the color. Lets it won't change
the color of this to, let's say, let's go with green. So that looks clean. Probably that makes sense in some way for the document
to change it to green. Then you can also go back to text color and do something
cool with the background. Let's give it a blue-green
light blue background. They are definitely need
I were to make sense. So let's try another
interesting background. Let's say if I needed to see the green texts so I
don't know what's up with that text color engineered
to green again. Okay. It's like you can't do both. So if you have a background, you can change the text color. Let's validate that by changing
the background to orange. Okay, yeah, that answers that. You got out of the background or you have a text
color because bolt. And to make your
documents more fun, you can add an emoji. Let's say we want
to add an emoji to, let's say each
chapter, let me see if this works with Muji. Yeah, and would you be
interested? He walks in and edit. So that's pretty cool. Let's get an image for that. So for workspaces, let's
say we have something like, I don't know, I'm just
going to pick something random that fuel makes sense. Yeah. Workspaces as this
blueberry and pages. Emoji, emoji. So to get emoji picker, you can use the search email. So you get that. And let's say four. We pick the other one. No pizza seems to be more here. So let's go for
this, our C thing. So, yeah, let's, let's
probe with a cool volcano. Yeah, let's go with
a cool volcano. So we have workspaces, we have blueberries
and we have pages, and we have it as a volcano. So these are some of the basic things you can
do with your text in loop.
9. 08. Lists and Links: In this video, we're
going to be working with lists and links. Sometimes you want to
add a list of items to your document and glue provides
a way for you to do that. So let's say we
want to add some, let's say video titles under
these workspaces chapter, we can simply do the
forward slash and scroll down to any of the
available list options. E.g. we have checklist, we have a bullet list, and we have numbered list. So let's start with bullet list. Let's start with the
simplest which is a bullet list and say list. The first video wants to
work with this is our two. Create a workspace. We want another
video that says how to style a loop workspace. Next video, how to
delete a loop workspace. Okay, So we have a list
that is as simple as that. You have, at least you
have a bullet list. And like I said, you can also have
other list options. You can convert this to another
type of list, e.g. okay. I don't think the
option oh yeah, yeah, the option
should be there. So if I expand this option in this context menu
with the ellipses and I go to Add-ins and lists. You can actually change
this from a bullet list, two unnumbered list,
numbered list. And if you want to
use it as some sort of task tracking elements, you can go back to
headings and lists and make it a checklist so that
as you get tasks done, you can check them off. As you can see, Luke gives you this nice strikethrough
to show that, yeah, you're done with that. That's how you create a list. There's also another
fancier lists. Let's do the false lash
unless search with list, a task list which
is some sort of templated list and
is a loop component. We are going to be learning
more about communists later. We're working with this
task list much later. So you can just keep that
in mind that this is another type of lists
that you can create in loop. So let's get her out. So we have been able to
create a list from scratch. You can also turn
a list of text or just a bunch of texts to a list. Let's say we come down here, we'll just copy this and we
duplicate it on three lines. We can highlight this
multi pool lines and go to Edison lists
and say we want to make this a bullet list because he converts dark text on
different lines to a list. And as we did before,
we can change the type of lists want from
a bullet list to a numbered list or to a
checklist alkylate data. So now two links are
to create a link. You often would want to
link to an external page. Most likely an external
page or an XML file. Loop gives you a very, very
smooth way to do that. So let's say we want to just highlight this
workspaces. Workspaces. And you can right-click. It already gives us
this which you can expand where it doesn't show up. You can just right-click
and you give you the aspired version
and you scroll down, you will see this link
option to link option. You click that first you
have the links display text, which is workspaces that
we are highlighted. But you can change
this if you want. I'm just going to leave it
at that and just point to the official Microsoft
pages, HTTPS, microsoft.com. Alison said that you can see, we now have this as a link. If you right click on the link, you see the normal
texts options. But if you scroll down,
you'll also see some options to do some stuff or perform some actions
on your link, e.g. you're gonna digital ink
that I did the link. You can copy the link. Maybe you want to copy
it on a document, An open the link because for some reason you can
just click this directly and to go to the page. So I do right-click
and open link. And this will navigate, you should navigate you
to the Microsoft website. Yeah, it is Microsoft
official website and kind of had it this
extra part to the URL. So I'm just going to
copy the full ten now and see if I get
something different. So now I can update
my link to go to the exact location,
to say I did link. I can just change this to that. And yeah, we're good. Some other things you can do is remove the link completely. And there's also some
link options here. If you click on this link
options are options. You click it, it gives
you the ability to show or change the
display format of your URL, of your link. You can make it a URL form, which is the default,
which is what shows here. Or we can make it something
cool like a link preview. Let's look at link preview. You can see this is loading
and it's trying to give us a cool preview for the link. So let's see what it
does it act and bam, yeah, it gives us a
nice Microsoft logo. I guess speaking from
these Fab Icon gives us a nice Microsoft logo here. I'm sure there are some links that will have probably like
a picture or something, but yeah, this is how you can change the display
format of your link. As you can see now,
when we right-click, we only see openly and can copy link and the link options. Now we can actually click
the link also directly, unlike the previous
display format that we could unclick
and we have to use the open link option when
I can click the link directly and it will go to
the specified location. If we change this
back to URL, URL, and you right-click
on it once again, you see you go back to the default set of
options that you have. So this just shows you some of the things
you have to know about the links and how to
work with them in loop.
10. 09. Using Images: In this video, we're
going to be adding an image to our document. So images are one of
the things that you can bring into a loop document. And let's see how we
can add one of those. So I'm just going
to come to the end of this statement and just
hit Enter to go down. Then to add an image,
you do your four slash. Search for image images
under the media section. So let's say let me clear this where Claudius
and do forward slash. Scroll down. And under the media section
you will see image. So click that and it automatically opens
the file explorer. So I can pick an image and we're going to pick this image. Gigs. Yeah. Some cakes, my wife work done. So yeah, so we have this. As you can see here, we can
add some accessibility texts. Let me click out of that again. You can click this to add
some accessibility texts. Let's say, let's
call it yummy cakes. And you can check this box to define this image
as decorative. This is so that people that are visually impaired when
always your time, try to understand this image and just mark it as decorative. Yeah, this is just adding
style to the document. It is not trying to pass
any form of message or so, but this is actually something we want
people to know about. So yeah, you'll make
cakes, I'm just done. You can right-click. So you can call
it, you can copy. You can go back to the
alt-text and edited. You can also see the market
decorative option here. Now, one thing you
are definitely going to be interested in is
resizing this image. And you can do that by going to any of the edges and
dragging on the handles. So I'm just going to go to the top right edge and drag this down because I want this to
be smaller and more visible. Yeah. Directors down. Yeah, good. So you can see we can
see dogma better now and images more compact
within the document. And if you're done
with the image, you are no longer what the
images in your document. You can click this icon here or beside the image
can click this icon. And they consider delete button. You can delete the image
using this button, that is liquid loop
component will, like I said, we're going to be looking
at glute components much later in this course. But if you don't read image, if you don't want the
image any longer or you want to change it
to a different image, can click Delete and that
just deletes the afternoon. He just deleted.
It didn't prompt me if I wanted to
delete the image. So yeah, that's how
to work with images you set for image, sorry, image for slash image, or just simply go to
the media section. Then you pick an image
and pick another cake. My wife is working on
this smoked brown cake. You can add accessibility text. Smoked brown. Mark it as decorative so that people that are
visually impaired and waste your time trying to think it's passing a message. You can use the edges, the edges to resize the image
and maintain its scale. Yeah, I don't think
you can go out of the skill you have to
maintain the scale. So there's no way you can
just independently pull the right side or at a pool it or stretch it
horizontal or vertical, you have to maintain
the aspect ratio. So these are two images. And if you don't
need them anymore, you can always use
the Delete button.
11. 10. Adding Videos: So in this video, we're
going to be learning how to add a video to a loop document. Now, look doesn't at the moment come with
a video component. If we do the forward
slash and we go to the media section, you see we only have a
component for an image, but are they able to get
a YouTube video in air? And I'm going to
be demonstrating how I was able to do that. It's quite very simply, it's
quite a simple process. So I'm just going to go to YouTube and hit
the share button. Then I'm just going
to hit Copy on the URL, the video URL. Then go to loop and just
paste it and paste it in. Then loop goes into work
and converts it to, I think he's trying to
do like a preview here. It was trying to do like
a preview for the video. So you get this. And now if you click on this, it'll just take you to
where the video is. Sometimes it will load the
video player immediately. But Let's refresh this. See what we get. As you can see now
that I refreshed it, it has brought up the YouTube
player and I can just hit play and play the video
directly from YouTube. So yeah, because how are they
able to embed the video to do this is I was able to embed
a YouTube video into loop. I don't know if these walks with other video players like Vimeo and the rest, but
you can try that out. But at least it
works with YouTube and unusual kind of accounts for a very large percentage of the videos that we
access on the internet. So knowing that YouTube
works is quite refreshing. I believe most likely later on loop is going to,
let me just put it off. I believe that most likely
later on loop is going to bring up their own video
component and you'll be able to add any video or even upload a video from your system, does your local system. So that's how they would
add a YouTube video. Youtube videos does
work seamlessly. If you want it as a URL, you can come back here. You can click this,
click this icon and go to Link Options and just do URL, and then just, just
converts it back to a URL. I can switch back. I liked, and it's going down to link options and
doing link preview. And then you get the playback.
12. 11. Bringing in Documents: In this video, we're going
to be learning how to bring Office traces to five
documents into loop. Now, do note that this feature
is only available to loop accounts that are under
an Office 365 account. It is an independent account that you just set up
with your e-mail, then you won't be able to access documents from off his thesis to five because your loop
account is not tied to any office to EC2 instance. So to begin, we type
the outcome and the outcome and is for
finding things and loop. You can find files,
can find people, but now we're only
interested in files. So I'm just going to
reference this document, this Getting Started
with loop document, you see is under
the files section. So I'm just going to reference this Getting Started
with loop file. Click it. And you can see loop
loaded in which some summary of the
document was created by me. The title is getting
started with loop and is a Word document. So as you can see by default, this document appears
as a link preview, but you can always
click here and go to Link Options,
change it to a URL. You can also just go back and change it back
to the link preview, which I feel kind of looks
nicer for every document. You also get this comment
icon. You can click on that. This allows you to add comments. Let's say you have co-workers
that you want them to leave some comments
on this document or your coworkers
just want to leave some thoughts on this document. You can click on this
and say, Nice work. Nice work. Now this may just
living comment, but this is most likely going
to be done by a coworker. Someone else can say, hey, thanks for doing this. Thanks for doing this. Yeah. You can also just add reactions. You don't need to add words. I can just click and say, Yeah, I loved this document
and someone can also come in and gives
you give me a thumbs up. So this helps you
to get feedback on your document and people can just comment on this and share their
reactions in real-time. You can also always click this icon and use the Delete button to
delete the document. But I'm not going to
be doing direct now. But this is just to show
you that if you don't want to document it anymore,
you can hit Delete. Now, do note that once you delete the document,
everything goes. That's all the commands
and all the reactions. Everything goes with this particular document
that you've referenced. Now you can also have
a document here. You can have a document
here as one of your pages. And the way to do that is to get the link to the
document e.g. I. Can click on this
and go to Copy link. Yeah, Because right-click
on this and do copy link. And once I have that, I can make this document a
top-level page here. And to do that, what
I'm going to do is to click this button. Instead of going into new page, I'm going to say new link. I'm going to hit New link. And it's going to tell
me to enter a name. So I'm just going to
say getting started. And I'm going to paste my link into this address text box. So just Control V and
then click Add C loop, just that, adding
that to my document. And now you can see that
the document is now its own top-level page. Now it's on top-level page,
and when you click it, it will go to the office
twisted five document. You can see this is my office to describe document and
getting started with glue and a description
which some Lorem Ipsum. And let's go back to loop. You can also create
sub pages under this, just as you would do with
any other regular page. So that's how you bring
in documents into loop. You can bring what
documents can bring PowerPoint document and you
can bring Excel sheets. And as we have seen, you can also make one of the document a top-level
page on your site menu.
13. 12. Editor Settings: In this video, we're
going to be looking at an interesting set of preferences known as
the editor settings. This can be found when
you use the at symbol. Then you can scroll
down this menu and you see this ellipsis
at the bottom-left. Just click it. And there you can access the editor settings. So let's click that. Doesn't change controls
are the Editor behaves, outer loop Editor behaves. And Aldi and all the
features that you get. So you have things like
texts, predictions, links are just Jones
mentioned and the rest. These are all turned on
and can be turned off. E.g. if I don't want this
to reference messages, emails, and documents, I can just turn it off and nobody
will be able to do that. So e.g. also disproven preferences. If we go down, we see the
ones I've been turned on. Let's say we turn on
the formality option. We see all the options that I've been checked under
this formality option. And we can get more
sun. We can say we don't allow him for my language and we don't allow slangs. And Microsoft is going to make sure that it is
checking for all that. Now, if for some reason
you have mid settings here that have become confusing, you can just go down. There's a reset to default button here, down at the bottom. You can use come down here
and click Reset to default. So this would just be about every certain back
e.g. look at it. Formality that we
turned on is now turned off just as we saw it when we first access
this configuration options. So yeah, these are the editor settings and this
is where you can control things like your vocabulary,
your tone, punctuations, inclusiveness, which is
very, very important, conciseness, clarity
and all sorts of behaviors you want
your editor to exhibit. So that's your editor
settings in loop.
14. 13. Working with Tables: So in this video we're
going to be learning how to work with tables and loop. Now tables are very common
elements in document and we're going to be looking
at how we can bring tables into a look document. To bring table, then you
do the forward slash. And you can find tables
under the general section, just below the edits. I have table. And there you get
a table and loop. Loop tables come with a
default of two columns. And you can click into a
column to change the name. Let's say we change this to
name and we change this to a. So you can just click
into a column to change the name for
your color options. You click the down arrow next
to the name of the column. You see we have a
down arrow here and we also have one
for this column. So you can click this. And here you can rename the
column just as we just did. You can change the
column type, e.g. this age, this is text. This age, I will prefer
it to be a number. So I can click down and
go to ten column type. And I can say change
this to a number. Yeah, So it's now carrying
the card datatype for what I want to use this column for which
is type in ages. Then you can also insert, insert a column to your
left or your right. I'll insert a row below. I'm just going to insert
a column to my left. Yeah. And you can also click
the down arrow to, let's say remove the
column entirely. You can also do some sorting. As you can see, you
can do sorting in ascending order or
descending order. So let's just delete
this column for now, so I still have the
name and age columns. Another way you can add
a new column is two over between the dividers
between the columns. And you would see
this plus icon. And we click the
plus icon is just going to insert a
column in-between the columns that d
divides a stands. You can also over on the column dividers to
resize the columns, e.g. let's resize this. Yeah, this looks nice. And you can also click on top of the column to highlight it and perform operations like sudden it, ascending or descending. And you can delete
the column entirely. Yeah, can delete
complimentarily. Let's resize this column. This column, and let's
another column to the site. Yeah, you see I can also
access the plus icon here, second column here, and
let's just say date. Let's just call that date. Let's give it the datatype
column type to date, so I can have a date
picker here. Yeah. Isn't that cool? Yeah. Can I we did picker here. There are also some general
table icons here at the top. As you can see, I can
hide columns here. You can see the
date column to id, the id column automatically. I can make that
visible once again. And also I can do some
ascending and descending. I can add salt to the table. I can say yeah, for the name, give me all the
data for the age, give me the edges in descending order,
Some stuff like that. So I can just make some general configurations to the table. And also you can click
this icon if you want to delete a table or
make it a loop component. We're going to be learning
more about live component much later in this course. And as you can see down here, we have a new button. This is we're adding a new row. So we click this, you
can just keep adding new rows to your table. So does look tables very slick, very convenient to work with. I think it kind of gives you
this non-brain by default. I don't know if one can
delete this column, but it just kind
of gives you this serial numbering by default. So yeah, that's look tables.
15. 14. Sharing Pages: In this video, we're going
to be learning how to share your loop pages. Collaboration is one of the biggest selling
points of loop does while loop allows you to share everything
from workspaces, two pages, 2 components. So let's begin to
share a pigeon loop. The first thing to do is
to go to this blue are at our disposal Share
button at the top right. I can click down,
as you can see, you can share
workspace page link. For now, I just want to
share a link to this page. So we click on that. And it brings up this
page sharing dialog. Now as you can see here, we have the link to the
page, the loop page, so we can copy this and we
can send it in an email, we can share it with a coworker. But another interesting
thing we can do is control out this page
can be accessed. So like e.g. the name of my organization
is deaf talk with f k because there's people
in desktop with f k, with the link can edit. And I can click this and
control Michigan options. I can say, Yeah, I'll
share this link for it. For now. It is visible to
people in depth with f k, where I can just say, yeah,
just share this with anybody. I don't mind you can
give this to anyone. We can also select people
with existing access and share it with them alone who already have access
to this document that you want to share it with us. I won't share with
specific people where we can enter a group or an email and can also control if these people
are sharing it with, can edit or just
view the page, e.g. if I pick up with
desktop with f k, I click here, you can see they
can edit and you can view. If I share it with
specific people, Then the only option I
have is the edit option. So this way you can control how people access your pages and what they can do on the
page after the accessor. Another way to look at
this share options is to come to the side menu lets you want to
share this page. Click on the Page options and go to Share page
link, share pig link. You click on this shepherd link. We get the same Shogun dialogue with the ability
to copy our link and also to control who has access and what they
can do on the page.
16. 15. Sharing Workspaces: So in this video, we're
going to be learning how to share loop workspaces. Like I said in the
previous video, collaboration is one of the biggest selling points of loop. And just as we've
learned how to share pages within a workspace, you can also share
an entire workspace. Workspace, you go to the top right and click
on this Share button. I click the drop-down and
click on the workspace option. This, like it says, gives access to all pages
within the workspace. Loop. Practice with office doing 65,000 name of this
particular workspace. So clicking on this
would allow access to any invited user to
this entire workspace. Click on this. You can see I'm
already a member. Then I can invite somebody from my office to resist
to five instance. So I'm just going to
type the name of one of my coworkers. Fair? So I'm going to take
your finger and click. And this is the only other is I have on my
instance right now, but you can invite as
many people as possible as long as you keep
searching them and clicking their names. And once I do that, I can see you can also use
the name or the email. I used the name and it brought
up the user's account. So once you have the members, are the users you
want to invite, you simply click Invite. And loop goes into action
and tells you that you have successfully added this people or this person as new members. And if you look down here,
you see we now have, if I just joined us, is now part of this workspace. And it will automatically
have access to this entire workspace with every single page
within this workspace.
17. 16. Mentioning People: In this video, we're going
to learn how to mention other coworkers or users
within your loop document. Now you have the ability
to tag people in loop. You can call the attention of other users or co-workers
within your Office. Three striped instance within
your loop documents, e.g. I. Have a PowerPoint
document here. And I can simply go to
the side and click on this Command button
and say, Will. Will you check this out? Check this out. And I can mention my
other co-workers and say, Yeah, if you check this out
on, doesn't type be fair. It's good enough
for effort and I'm going to pick his name. And it's automatically
added here. And I can hit send. If it will automatically
get a notification that will signal him to
check out this document. And once it's done, you can also add its
own comments and also mentioned me if it wants to call my attention to anything
out a component that supports mentioned
in people, it's tables. Tables actually have
a person column type. So we clicked down.
If you look at the column type for this person. And once you have a
person column type, e.g. for this task table that
has an assignee column, there's any column that has been given the type of person. You can assign these
tasks to anyone. So I'm going to say
this is for me, then I'm going to assign it. Fair to this, but it's
an ad and say, Yeah, this is for if it's going to do the writing of the script. So yeah, tables are also
one of the components that support you tagging order users within your office
trends is Dr. instance. Another component, I
suppose that is text. So with text, you can
also have a comment box. In document box, you
can click it and say, Check this out for spell, check this, check this. And you can also use your ad to find your other co-workers that I mentioned as many people as you want and you can eat sand and they get
a notification that you've mentioned them to call your attention to something
on this document.
18. 17. Creating a Loop Component: So in this video, we're
going to be learning how to create a loop component. One of the biggest features
in loop is the ability to take any parts of your
document and convert it to a shareable live component
called a loop component. I want this component is created once it's live
component is created, you are able to reuse it
across your document and even in other Office traces
to web applications. So let's get started. So it's great to live component, let's say want to have this
PowerPoint presentation on the texts on diet as
a loop component, you simply just
highlight everything. Once you have
everything highlighted, you can then click
the ellipsis icon beside it with a
double ellipsis. And you will see this
grid loop Component, button, Create Loop component. Now ensure that the
border that this disk, which is covering
every single item that you want to make
a loop component. So assure that because
sometimes it might just covered up the document and it won't cover up the or rather it won't include
the text under it. So make sure that every
single element you want within the loop
component is included. Then create. Click on Create Loop component, click the Create Loop
components button. And loop immediately
goes to work. And you see this glowing
border around your elements and everything has been
converted to a loop component. Now once it is done, you
see a loop logo here. So this tells you that this entire area is
now a loop competent. This is now one
single component. There are also some options here that we'll be
looking at later on. And you can take this component, you can click on this
component and move it around. Let's say I want
to move this down, can just click here all down
and move it on this table. I want and we don't
know this table. I can just drop it on
our list envelope. I'm going okay. This is going to be okay. Yeah. Under the table, he said
I've been able to drag this entire component
from OPIA on the table. This entire area
now functions as a single piece called
a loop component. In the coming video,
we're going to see how we can share this out. It updates live all across your office decreases
to five instance and loop.
19. 18. Sharing a Loop Component: So as I mentioned in
the previous video where we created
a loop component, look components are
sharable live component. So it's not only that
they are self-contained, they are also sharable. So it's cooling down
to a competency. I don't want to put that
in the previous video. If you over around the top
right here on the border, you can see this
sharing options. You can see the locations
where you've shared it. You can copy the
component and you can see Whoo As access. So Shelley's component,
Let's click Copy Component. This brings up the
share dialogue where we can get a link
to the company so you can just copy this and
they want to share the document if watershed the
component rather anywhere, maybe in another
loop document or another workspace or another
office to swipe application. This is the link you need,
so you just click Copy. And if you want to configure
some sharing options, you can click this link
and defined would share it with unwanted can do with it
whether they can just view the component or a
digital component. So for now I'm just going
to leave it as default edit and give people that are in-depth talk with
f k the access. So that should apply
for my link once again. And now I can close out of this and I'm going to
create another page. Just go to another page here. That's a new page. And on this page, I'm
just going to dump my loop component. I'm just
going to paste it here. So I'm going to say right-click, paste, paste in loop component. Okay, it seems like
there's some keyboard. So I'm just going to just say
Control or Command V. Now, you see it first appears as a normal link, but
Luke recognizes, does it look component
and it loads it up as a loop component. Now one beautiful thing here
is I can make an edit here. Now detects is display
the journey is a pitch for fundraising
in public schools. Let's say I want to change
this to private schools. Private schools, unless I also added
comment somewhere here. Yeah, I say keep confidential. Feeding, show. That's going to
save.com and submit on a deed of changes from
public to private schools. And I've also added a comment. Now let's go back to the
page where we could add this component and
see what happens. Let's go back to this page. And it was called down
to our component. As you can see, we now
have the comment that was made on the
PowerPoint presentation. And the school is
now private schools. So this is a live
document as long as you share it with
people and you give them the ability to edit it. Any editing make is
going to reflect. Here, is going to reflect everywhere the loop
component is shared, which is just amazing,
which is just awesome. This takes collaboration to a whole new level, which look, this collaboration can
go as far as in emails, in Microsoft Teams,
and in what documents. And as expected, across different loop instances
and workspaces.
20. 19. Using the Voting Component: In this video, we're
going to be learning how to use the voting component. Now the voting
component is one of the more specialized
components and loop. And this component is very useful for collecting
the opinion of your users are co-workers in Office traces to five or
close your loop instances. So the voting components can be found on that, the
template section. If we do our forward
slash and we scroll down, the template section contains the more advanced components that we are devoting
table can be found. So if I click on voting table, like a converging table, and now I have my default
voting table with two options. That is like the minimum amount of options you need for a poll. So let's say I want to make my co-workers or users vote on what we are going
to be having for lunch. So let's say what, what is for lunch is for lunch. So let's say some people
want french fries, chicken. And some people want
to laugh, right? Yeah, good law phrase. And some people want, let's say Burger and milkshake. So bugger and milkshake. Yeah. So we have these three options. Now, you also have a pros and cons column where
you can add notes. You know, like trying
to make your case for each option
or just trying to add some benefits of each
option like, Oh yeah, Which? Chicken and French fries, you get a free Coke. Let's say you had a free
Coke comes with this. And but once you have that, you probably wouldn't get
the employee discount, let's say No employee discounts. No employee discount
if you're going for the French fried chicken,
but you get a free Coke. So this is just to give more
context to the options. Now, these columns
are not compulsory, so you can just get rid of them. You can just say,
Yeah, I don't want, I don't need this, so I don't
need to add pros and cons. I just want the
options and the votes. So we have that. The table looks cleaner. And then people can come here
and we can come and vote. And as you can see,
each person's name is attached to their vote. Now I can convert this
to a loop component. I convert this to
a live component or share it in an e-mail, or share it in a
shared workspace. And other users can vote the options and
at the end of the day, can just collect this and
be able to make a decision. Everybody's going to
see the final results. So you're going to know which option we're going
to be going for. So devoting component is one of the more advanced
components and loop. And as you can see, it is a very useful component in
collecting the opinion of your coworkers or
your users within loop and other Office to
assist five applications.
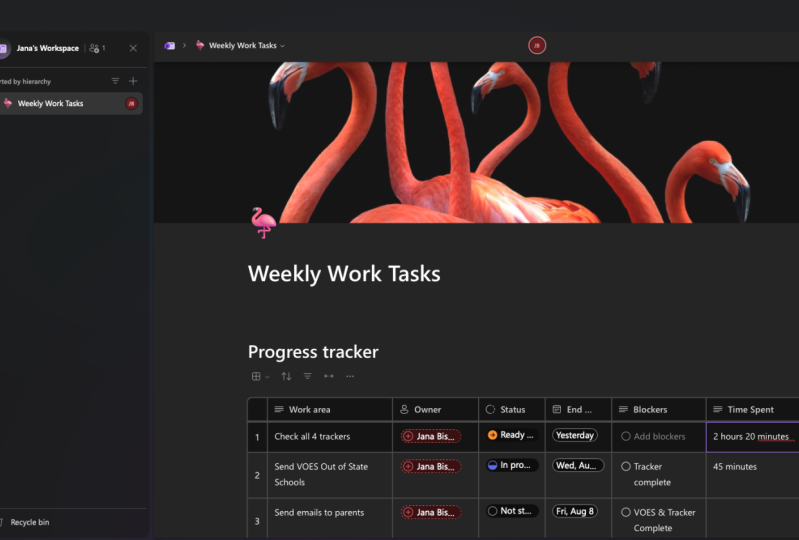
21. 20. The Progress Tracker Component: So in this video, we're
going to be looking at the progress tracker component. Now this component
is also one of the more advanced
components in loop, and it's kind of like a
mini projects trackers, so you can use it to track
your tasks on the project, the due date, the
assignees, and all that. So let us get started to
begin to do a forward slash. And the components coming found under the
template section, which is, this is the
section that contains most of the more advanced
components and loop. Let us pick that. As you can see, we get
the default component, which is a table with
a couple of columns. Now, this walking
their column is where you type in your tasks. Let's say we want
to write scripts. I said we have a video project I want to do is I want
to write a script. I want to record the video. Can also use the
new button to add moguls that we want
to edit video. We have done. Then next we have
the owner column, which is sort of like
the assignee column. These are the people
that are responsible for doing this task. So I can say, I am going to write a script. If you click into
this type of columns, they have the column type of
person, the other person. So you click into them, you'd get the people that
you can assign this to, the people within your
Office 365 instance or your loop users with whom we are sharing
the same workspace. So e.g. I. Have myself and I
have a fair who is also a user in my office
tenants is five instance. So I can say, Yeah, I'm
going to read the script and I'm going to cut the video because
it's better with cameras and all this stuff. And I'm going to edit
the video because I'm better than him in
using DaVinci Resolve. So yeah, we have those
without that filled in. The next column is the progress column is sort
of like your status column. And it has the column
type of label, column type of label. You can use this
to add things like progress or priority labels, and you can add another
label group, e.g. if you have a different type
of libel categorization, something like types of, say, cities in the country. But for now we're
just going to be sticking with the progress, which is the default
that came with it. And here we have
different options. We have not started in progress, we have completed and off track. So for writing the
script is in progress. Regarding the video, definitely
we've not started on it. There's no way we
can start editing the video without
recording the video. So just put that in. Now you also have the
column for due dates. Yeah, we can select. You can say Yeah, we
want this to be done by today, end of today. Then we want to record
the video tomorrow, and then we want to edit the video a day
after that I will attend so we make sure that
the script is finished today. We recorded video the next day, and we start editing on Monday. Now we also have just
called them where you can add blockers. If there's any block
attorney of this task, you can add one for
writing the script. We have no blocker for
recording the video, definitely the script
writing a blocker. Because it would always
script, we can get started recording our video,
editing the video. Let's see. Yeah, we are waiting
on the video, so recording the
video is a blocker. But maybe we are
also waiting for our new Da Vinci Resolve
to be fully installed. Want to make sure you're
using the latest version. So want new Da Vinci
Resolve to be installed before it's as low as does
like a blocker to edit the video goes out
your blockers. Now like just any type
of table in loop, you can delete columns
and add columns. E.g. I. Can come to the edge here, to the end here. Another column at the top here. Does it add? I can add any type
of column I want. I can say, Okay, let me put something like dollar amount of days
to complete this task. So they're going to see, put
big number, say duration. Days to this one should be, let's say a day. This should be one day also, and editing should take
like two to three days max. So let's just say three days. So his max, that is your
progress tracker component. As you can see, it's a very
useful tool when you need to. You need to track a mini-project
like we're doing here. We're tracking the collision
and publishing of a video.
22. 21. Using the Task List Component: In this video, we're going
to be taking a look at the task list
component that asterix competent helps you to track
a simple lists of tasks. Tasks that you have to
do within a day or two, complete a particular target. Now, if you've watched the
video on the progress tracker, disastrous component
is basically just a trimmed down version of the progress
tracker component. Let's begin. So to start with the forward
slash and we can find the task list component
on the template section. So click task list. As you can see, here, we have a column for a task, the assignee on a due date. This is the default set of columns.com with the
task list component. So let's say we want to edit, want to create a video
and published on YouTube. You can say I want
to write script, then we want to record video. After that, we want to edit the video and publish
the video to YouTube. So all this is on
the publishing, a YouTube video. Youtube video. And once we have our tasks, we can assign it
to people within our office to private
instance, let's say, Yeah, I'm going to write a script
than if I was going to record because it's more good which gear and
equipment then editing? I'm better than him. So I'm just going to be Card. And I'm also going to publish
changes my YouTube channel. So yeah, these are all assigned and we can
also add due dates. You can see there's a small
count of how many tasks are assigned to which user
down here we just put in it. Then we're going to start
due dates and say, Yeah, we want to make sure that
it's cooked, it's done today. We want to record tomorrow. I want to start editing on
Sunday to Sunday, or Monday. On Monday. And we
want to publish on, let's say I only did a mostly between
Thursday and Friday. So we'll just say yeah. So as you can see,
we're getting a note up here to sync these tasks with the tasks that every
other person on this list, me as on the Microsoft Planner. And to do so, you can just
go right ahead and do that. I'm just going to ignore
it for now because I'm not or ADA does not just
scope of this video. And as your tasks are done, you have this check box where you can just
check them off. So let's erase could be done. Yeah, wherever the
script now so we can go ahead and we
call it the video. I was recording the video
with tick that off to. And we can do the
same for editing and publishing the video. So does the task list in a loop, you can use a task list to track tasks under
a particular job, under a particular goal
on a particular project. And when you get the task done, you can tick them
off, touch due dates. And you can also assign them
to people within your team.
23. 22. Loop Components in Microsoft Outlook: In this video, we're going
to be looking at how to use loop component in
Microsoft Outlook. As I've been saying
throughout this course, collaboration is
one of the biggest selling point of loop. And you can use loop component not only in loop documents, but also across
applications that support them within the
Microsoft today 65 suit. I want to read
applications is Outlook. You can create new
components in Outlook. You can share loop components in Outlook and send them
to your co-workers on any of the day
make to eat for those that have
permissions to edit it, you will see the update live across everywhere that you have shared the loop component. So let's begin to create
a new loop component. In Microsoft Outlook,
we create a new email. Let's create a new
email. It won't send a new e-mail to co-workers. And if you come down here where the send button is disabled or the send button, because see a loop logo here. It says insert loop component. We're going to be
doing just that. So I'm going to click
on that. And here I have a couple of
Luke components. For now I'm going with
the task list because I want to get my coworkers up to speed on a series of tasks and make them know who
is assigned to what. I'm just going to
click task list. And as you can see, microsoft goes to work
and we are getting a loop component right
inside Microsoft Outlook. So I'm just going
to do the video. Wants to make a video, so
yeah, video number 44. And first we need to
write the script. We need to record the video. And we need to update the video. And I can assign this to
people outside and say, Yeah, I'm going to
write a script. A coworker, if it's
going to cut the video, and I'm going to be
doing the editing. I can also set due
dates on that. This is for today. This is for tomorrow. On agent starts on Monday. So yeah, as you can see,
we are making use of a loop component
right inside Outlook. One interesting thing
that's been going on as I'm adding this assignees, you can see that the email
is being populated with the e-mail addresses
of everyone that is involved in this
loop component. So Microsoft is doing that
automatically because it recognizes that these people are involved in this project. I can also go ahead and add more people or CC more people
within your organization. Now if you notice, when I click this little icon, there's a limited list
of components here compared to what we
have been seeing so far throughout this course. Now, to get the full list, you can go into your
loop component, click into your loop component and do the usual for slash. If you do the forward slash, you get a full list of the components that we
have in lists, e.g. you get a comment
and get a divider, you get voting table, you get the progress tracker. And these are things
that we don't have here. We don't have the
progress tracker here without a divider here, and we also don't have
the voting table here. So for the full list, you go
into your live component and you do your usual false lash,
and you get your full list. You can also create as many
components as you want. You can go up here and create
another loop component. So you're not limited to just this one loop component, e.g. there's also another
loop button up here, which is similar to
the one down here. So if I click outside this
current loop component, and I click this, I can add, let's
say a checklist. The checklist, maybe the eye level projects that we
want to do and all that. And add this to my e-mail. And once I'm done setting up my loop components
within this email icon, hit send and send it to all the recipes that I
have mentioned up here. So that's how you use look components within
Microsoft Outlook.
 Fikayo Adepoju