Transcripts
1. Henna introduction: Hi, everyone. Welcome to this class on intricate
meditative doodles, henna and Mandala inspired Art for relaxation
and creativity. If you love detailed patterns, soothing art or just want a creative way to unwind
and practice mindfulness, you're in the right place. Hi. My name is
Miri an artist and educator who loves combining
creativity with calm. In this class we'll
draw rainbow colored intricate patterns inspired
by henna and Mandala art, all on a beautiful black paper for that magical glow effect. I will guide you step by step to create two
beautiful projects, one vibrant square artwork
and one mini Bookmark or a sketchbook piece both inspired by Henna designs
and Mandala patterns. You don't need any fancy
supplies or advanced skills, some pens, black paper, and a willingness to
relax and have fun. Whether you're a beginner
or an experienced artist, this class is designed to
help you enjoy the process of mindful toddling and create stunning art
you'll be proud of. Grab your materials
and let's dive into this colorful calming
creative journey together.
2. Art Supplies : Let's quickly go over the art supplies you'll
need for this class. First, I'm using a
black paper square, approximately 15 by 15
centimeter for our main project. You can use any dark tone paper. Black works beautifully
for that cluing effect. Next, I'll be using jelly
roll pens by sakura, which have a vibrant bluing
finish on dark paper. They are one of my favorites
for this kind of art, but feel free to use any color gel pens or
fine liners you have. To add some highlights, I'll also show you how you
can use white or silver pens. These are totally optional, but they can give a
nice finishing touch. If you'd like clean
edges on your artwork, I recommend using
scotch invisible tape. Also, this is the
black sketchbook from where I got the paper, and I'll be using it to
keep the papers sturdy. That's it. You don't
need anything fancy, just some pens, black paper, and a little time to
relax and create. I
3. Taping the edges: Let's begin our first project. This will be a square artwork around 15 centimeter in size, drawn on a black paper. The paper, I'll be
taping all the edges to keep the artwork secure
and create a clean frame. I'm using a MDF board. You can use anything
that is turdy enough. You can adjust the border
width depending on your style. Once everything is taped down, we are ready to start drawing.
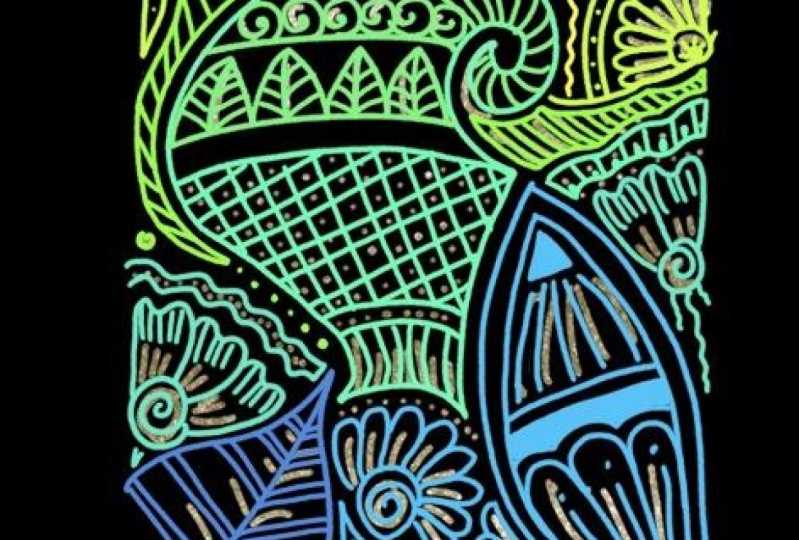
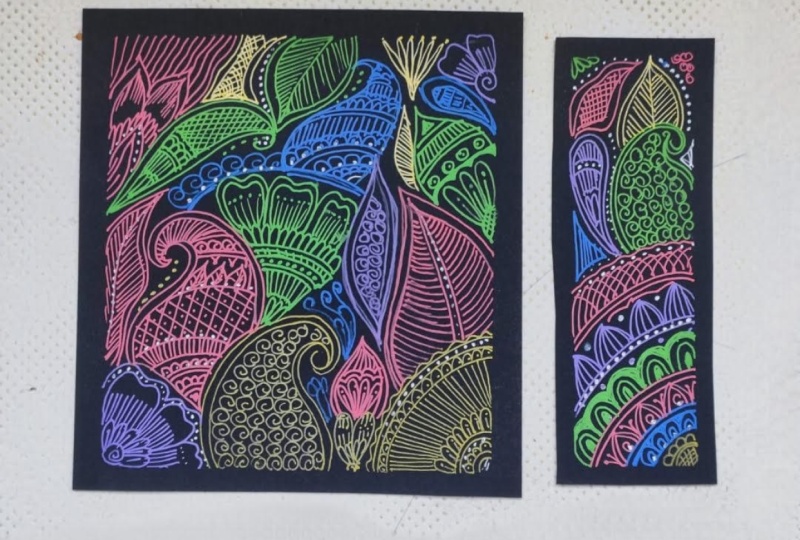
4. First Project: Let's start by building
this piece layer by layer using bright glowing gel
pens in rainbow order. We'll start from the
corner right and slowly expand outward and
flowing symmetrical patterns, just like in mandalas
or Henna art. You can follow
along with my shape exactly or use this as
inspiration for your own flow. I'm beginning with a yellow pen and starting at
the right corner. I'm drawing simple plural
shape with rounded petals. This will serve
as a focal point. You can keep your lines
light and loose at first. I'm adding a second ring of
petals, slightly larger. This will create a
bit of contrast, and also the piece gives a layered feel almost
like a blooming flower. Notice how I'm keeping the spacing consistent
and repeating sheaves. It's a relaxing
rhythm to follow. I'll add a double
boundary to this packing here and start with another
design at the other corner. Just some simple
heart shaped petals. You can do whatever
your heart pleases. I'll also add some sharing
to the petals here. You started from the
topmost part like this. After adding the
double boundary, I'll add another
scalloped arch like this. It almost looks the shape of
a peacock maybe in henatoms. I'll add an inset line
to this design here. To fill this shape, I will just add small soles close to one another like this. You can use any filler
designs for the spaces here. I'm adding a flower. Also to the previous pattern, I'll just add this
dome shaped petals, we'll complete the design with
out a set or the boundary. So long petals here. I think only three
to four might fit. Just filling out the space here, you can do any designs
of your choice. Now I'm switching to orange continuing outward
from where we left off here and drawing a
scalloped arches like little rainbow hums
around each petal tip. These are softness
and structure. I'll add an insect
to this design. I'll add a center line starting from the tip of the
leaf pattern here, and then I will add lines diagonally from the center
towards the center line. You will better understand
what I'm trying to say after observing the
designs and the process. But of course, it's very simple. I'll add another leaf
like pattern here, only that I'll fill
the design with something different,
maybe petals. I'll fill the remaining
space with ki. And now draw a bigger arch
or peacock like motor here. Right at the center point, I'll draw a center of a
floral and then the petals. Then I'll add just
lines equally spaced. Once I'm done with this line, I'll complete the design with an outer set
or boundary line. Again, at a similar distance, I'd add another pattern
with lines or boxes, but a little bigger in size
than the previous ones. And at the center of the boxes, I'll add small dots. I remaining spaces
between them or outside. I'm adding tiny teardrop sheets, similar to motives
you see in henna art. The idea is to fill
space mindfully, balancing detail
with breathing room. Guess you can add some
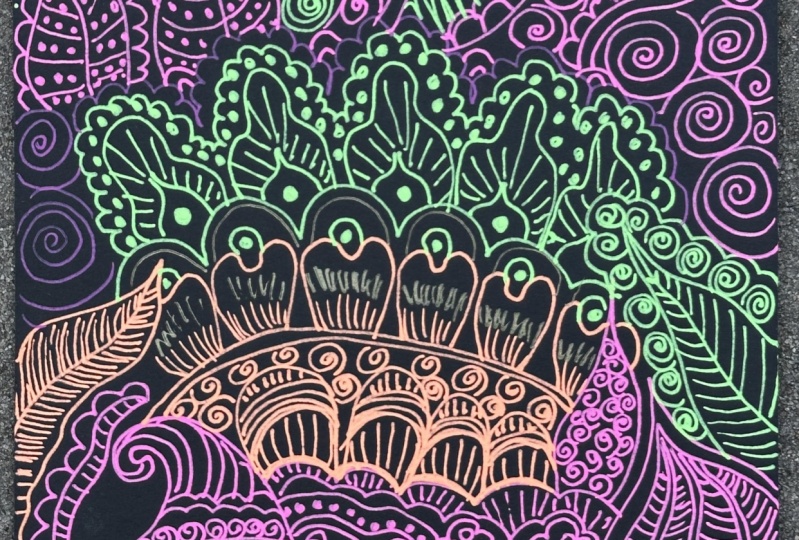
lines like this and a dot. Next up is pink. This is where I start adding looped curves and
pasty like swirls, reshapes low naturally and
add motion to the piece. You will also see me luring
in thin leaf shapes, some filled in,
some just outlined. Try to let your hand relax here. Think of it like letting your pen dance
around the center. This part is very free form, so feel free to experiment with your favorite
shapes or patterns. Next, with the peach color, I'm layering in fan like lines and radiating strokes
to build contrast. I'm adding hardship petals
after the dome shaped petals. I like drawing this
bigger hardship petals. It just instantly give
vibrant look to the design. Also, it will help leak the eye outward and add
energy to the design. I'll fill this leaf shaped petal here with
different designs, maybe circles or triangles. You can use anything that
comes up to your mind. I also start adding
spirals and tiny dots, which are great for breaking up empty areas without
overwhelming the composition. Remember, doodling like
this is about finding flow. Don't worry about perfection. Every small line adds to
the beauty of the whole. Now onto the blue pen, this is where I'll again
do a peacock shaped namuti I add different
patterns in this design like lines, semicircles,
wave patterns. You can do whatever you like. These are subtle details, but they add so much visual
richness when you step back. Think of this part like weaving textures
into the artwork. I'll also introduce some
triangle or diamond shaped motives pointing outward to
give a feeling of expansion. I'll add some swalls
here just to add more of glue on top of
the hardship petals. Now next with purple, I'll continue filling
the spaces here with some curved lines,
dots, et cetera. Also, I'm continuing
the layered loop with flower like petals again, alternating the
direction slightly from the earlier layer
to create contrast. Again, a small leaf like arch sure and some radiating
lines inside it. At this top corner, I'll just add some wavy lines. Let your pen flow
slowly and naturally. This path is almost
meditative and finally, I'm using green to draw
the outermost elements. Here, I'm adding leafy
tips, fine dot work, and gently arcing lines to complete a
circular composition. This outer layer pulls
everything together and softens the transition
between the design and the black paper border. At this point, feel free
to revisit any areas and add tiny details that can be dots, spirals, or highlights. You can even bring in
a white or silver pen to add some shimmer
if you'd like, which I'll do in the next step. We are done with our piece, but to give it the finer look, let's add some highlights
in the next section.
5. Highlights : Now that the main
artwork is complete, let's move on to some final
highlighting and detailing. For this, I'm using a
silver metallic pen. It adds just a
soft glowing touch on top of the colorful design. If you don't have
fun, no worries. This step is completely
optional, but if you do, it's a really fun way to enhance your patterns and add
a bit of dimension. I usually start by adding highlights to areas
where two colors meet, like where orange blends into
pink or pink into peach, a small outline or tiny.in these transition areas
can bring them to life. You can also trace the
edges of your petals or shapes with just one
side, not all around. This gives it a
little bit of depth and keeps it light,
not too overpowering. Another idea is to dot
along the inner lines of your arches or pastelss almost
like stitching or beading. It gives a beautiful
textile like feel, which ties in well with a
henna and mandala inspiration. And in any larger open spaces
like those pans or swols, you can draw tiny stars or dots or spirals to
certainly fill the space. If you used tape for the
edges and have clean borders, the silver detailing will really pop against
a black background. I also like to add
a few spark like thoughts or dashes at the very
center of floral patterns. You'll see me doing that
here with a light hand, just a few not everywhere. Try to move slowly and
gently during this step. Think of it as
polishing your artwork. You are not changing
the structure, just giving it a little glow. Keep stepping back
every now and then to see if anything calls for a
small sparkle or highlight. And remember, it's perfectly fine to leave some
areas untouched too. Balance is the key. Once you are happy
with the details, that's it, you're done. Your artwork should
now feel complete, elegant, and uniquely yours. You've not only drawn
intricate motives, but you've also practiced mindfulness and creative
flow along the way. Take a moment to
appreciate your creation. This is your handmade art, built one thoughtful
stroke at a time. As you finish your piece, take a moment to appreciate
the movement and energy you've created with
just simple lines and colors. This kind of drawing isn't
just about the final piece. It's about the peaceful process, the creative expression, and the space it gives you to
breathe and be present. When you are ready,
gently peel off the tape to reveal those
clean, beautiful edges. It's such a satisfying finish. I can't wait to see
what you've created. Up next, we'll work on a mini bookmark
version of the style.
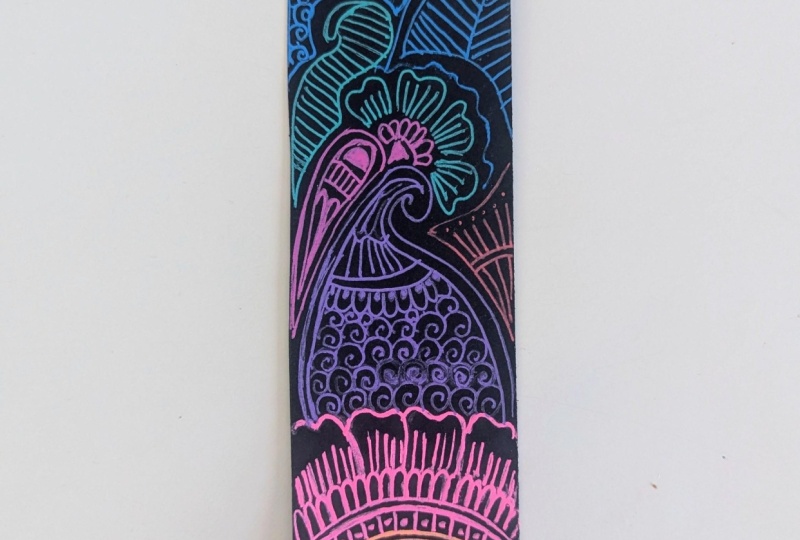
6. Bookmark : Let's move on to
our second project, a smaller piece that's
perfect for a bookmark, a mini artwork, or even a
page in your sketchbook. I'm using a strip of
black paper here, but feel free to use any
size of mamat you like, even a small square
in your sketchbook. The idea is to apply the
same flowy relaxing style from our force project just in a more compact
vertical layout. Once done with the
taping of the edges, I'll start with pink color or peach color from the
center like this, and I add some florals. I'm beginning with the center and using a color that stands
out well against the black. Maybe you can also start
with red or yellow. So this is similar to the curved floral motifs that we did before, like
rounded petals, fanning outward, and then
I'm layering that with arched lines and dots to give the top edge
a finished look. From peach, I'll
change the color to pink color and I'll draw more rounded petals
and after that, I'll draw some bigger
hard shaped petals. This section will help anchor the design and draw
the eye in right away. As they move towards the top, I'm switching to a new
color, maybe lighter purple. And I'm drawing a peacock
shaped motif fire, which are common in henna
and Indian folk art. Also, I'll draw an insight
or a line from within, and then I'll draw some petals starting from the top here. You can just fill
the designs with whatever motives
or shape you like. I'll go with some lines, maybe Teodop shapes,
paste, worlds, okay? The narrow format makes
it fun to experiment. Each segment can feel like a little standalone doodle yet still connect to the whole. Think of this as a free
flowing column of patterns, no need for perfection, just rhythm and creativity. I have to admit that swals
are my favorite of all. I just can't get enough of them, so I do add them in
most of the patterns. In the center, I'm
using purple to draw fan shaped curves and leaf motifs with small accents
like dots and mini wines. These details add movement and
softness to the structure. You will notice I'm
alternating between fill and outline shapes to keep things visually
interesting, even in such a small space. So now, I'll shift
to blue colour, ok? Draw some petals or peacock shaped arches and just
pull out with some lines. Toward the top of the design, I'm switching to a darker green or another contrasting
color you can use, any of your choice, to create a tapered end using longer
curves and final flourishes. This section balances
out the top and creating a satisfying visual
flow from start to finish. You can also add dots, ts, tiny mandala curves or spiral lines to fill any
space that feels too empty. The goal is to let it feel
complete without overcrowding. Now to fill the topmost section, I'll use lighter
green or neon green. At this stage, you
might also choose to leave some negative
space between sections, which helps give the piece
some breathing room, or you can go back in with white or metallic pens to add
highlights if you'd like, but that's again optional. You can add fillers of your
choice or leave it empty. I will go ahead with adding the silver metallic highlight. So just few dots or lines
wherever I feel it's a little empty and need some
contrast and shine. So we are done with our mini
version, which is quick, satisfying and perfect for those moments when
you want to create, but don't have a lot of time. Let's get rid of the tapes, so be careful while
peeling off the tape. Maybe this is the most
satisfying outcome that you might see an artwork
with clean black edges. Isn't it lovely? I'd love
to see your version. So please share it in
the project gallery, along with the main
square piece. So.
7. Conclusion : Congratulations on completing
your beautiful henna and Mandala inspired
google projects. You created two unique
artworks, a vibrant, intricate square piece, and a lovely mini bookmark
or sketchbook design. Now, I'd love for you to share your projects in
the scripture gallery, upload photos of your artwork, whether it's your foot square, your mini bookmark or
your sketchbook piece. Sharing helped build a
creative community and inspires others to join in
and try their own versions. If you enjoyed this class, please consider
leaving a review. It really helps me and other students find
classes like this. Thank you so much
for joining me. Keep doodling and
remember that art is all about expressing yourself and
finding joy in the process. I can't wait to see
what you create next.
 Mayuri, ARTrinkets I Watercolor & Gouache Artist