Transcripts
1. Introduction: Life, much like a grand buffet, offers us an abundant spread
of moments and experiences. Some sweet, some savory, some bitter, some bland. Now we don't have control
over what life serves us, but we can definitely change
the way we consume it. With mindfulness as our spoon, we can savor each bite without rushing and find contentment, even in the simplest servings. So join me in this class
where we will dig into mindfulness and learn to
embrace each experience, irrespective of the
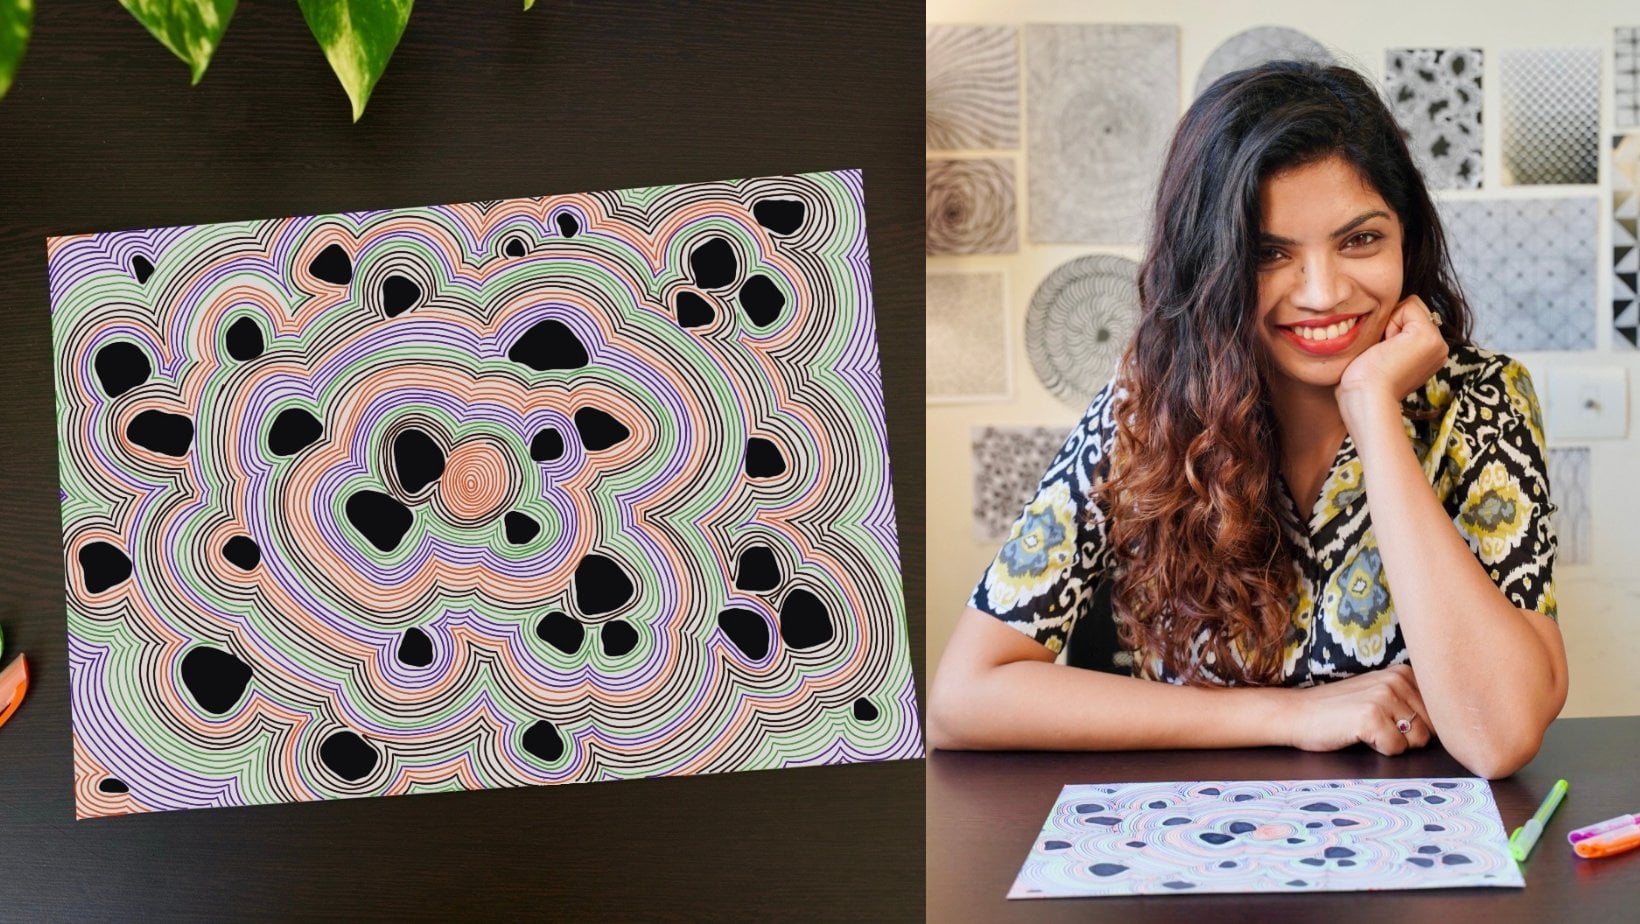
taste or the texture. Hi, am Neha Modi, I'm an artist, mindfulness practitioner, and a top teacher
here on Skillshare. This class is part
two of the drawing as meditation series that I'm
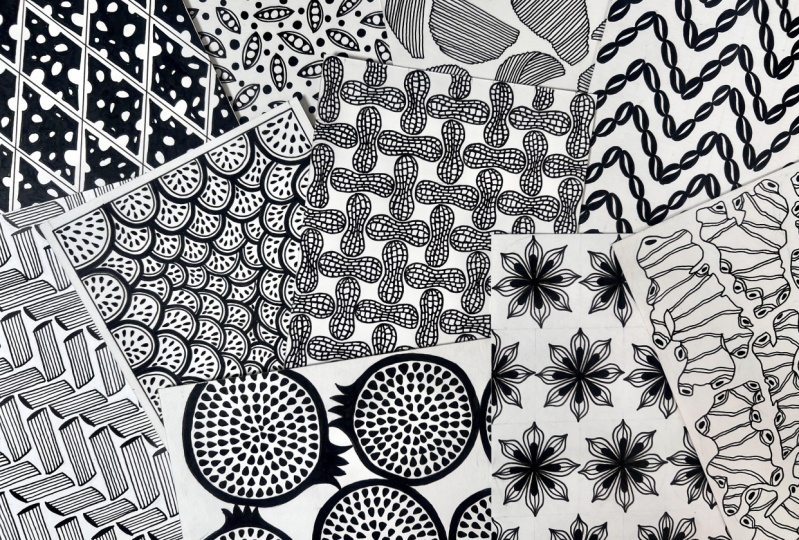
teaching here on Skillshare, and this time, food is our muse. So over the course of ten days, we will explore how food can inspire and nourish
our creativity. Through daily prompts
and guided exercises, we will uncover a treasure
box of shapes, patterns, textures, and details,
and most importantly, learn to draw with compassion instead of the fear
of perfection. With every lesson, you will fill your plate with pattern
design techniques, as well as moments of
calm, presence and joy. No matter where you are
on your creative journey, this daily practice will tickle your artistic taste
buds and will give you a fun and flexible framework to stir meditation into
your daily routine. All you need for
this class is pen, paper, and an appetite
for new experiences. So without further
ado, let's stig in.
2. Class Project: Welcome to the
class. I'm so glad that you have decided to
join me on this journey, where drawing patterns
isn't just about art. It's a gateway to
mindfulness and a remedy to overcome
creative blocks. Now, your class project
is to follow each of the ten pattern prompts and share them in the
project gallery. You can upload one
pattern each day, or you can wait until the end and upload all of them together. Please remember it's not
about flawless execution. There is no strict recipe. So feel free to take
inspiration from what I am doing or bring in
your own variations. What really matters
is that you spend some time noticing
the little details in the food items around you and then translating that
into your sketchbook. Material you need for this
class are few essentials. Fine liners, pencil,
some paper, and a ruler. Feel free to mix and
match brands and sizes to suit your preferences. The key is to have a set of fine liners that allow
for both bold strokes, as well as intricate details. You can also use alternative
mediums like crayons, colored pencils, or watercolors. As for Canvas, I'm using
a sturdy 200 GSM paper, but any sketchbook
or paper will be sufficient as long as it
provides a smooth surface. For mindful drawing,
choose a size of paper that compliments
your available time, as well as your
mental bandwidth. Some days call for
larger sketchbooks so that ideas can
unfold gradually, while some are best suited
for compact formats. And yes, one last thing
before you dive in. Take a moment to set the scene. Find a comfy spot, grab your materials, and get ready to let your
creativity simmer. Think of it like prepping your kitchen before
you start cooking. It just makes everything
go a little smoother. In the kitchen of creativity, there is no strict recipe. Only endless possibilities
waiting to be savored. Get ready to stir
up some creativity. It's going to be a
deliciously fun write. O.
3. Day 1: Coffee Beans: For me, coffee
isn't just a drink. It's pure magic. It brings me joy,
lifts my spirits, and it taste delicious too. That first sip in the
morning when everything is quiet and full of promise
is truly special. I'm sure all you coffee and
even tea lovers would relate to that emotion of holding that cup and taking
that first sip. So that's why for day one, let's brew up a
pattern inspired by my favorite and a morning
essential of many coffee. We are starting day one
with a stripe repeat. Now the stripe repeat is
a simple idea that can also have a more complex
and interesting execution. It can range from
the traditional horizontal and vertical lines to other variations
like diagonal, Chevron, pin stripes,
color blocked, gradient, asymmetric,
and et cetera. Stripes can also
be created using motives instead of the
traditional lines. That's why for today, I'm
going to create a zigzag or a chevron pattern and use coffee beans instead
of lines to create it. These zigzag lines are the
foundation of my pattern. I have divided the paper
in six equal columns of 2.2 centimeter each so that
there is some uniformity. But then I'm doing the
second part free hand. You can measure
your lines or you can do start to end free hand. Pick a root that appeals to you. Feel free to make your zig zags as close or as far
from each other. Experiment with the
width and spacing of the zig zags until you find a rhythm that
suits your taste. In case you want to use another stripe style for
your base, then do that. Just like we all have different
methods to brew coffee, there are different ways
to do this pattern too. Once the base is done, it's time to add coffee beans. Now the shape of a coffee bean
is a fairly simple motive. It's an elongated oval shape. I'm drawing medium
sized beans and making sure that each bean is
connected to the other. The zigzag lines are
fairly the same, and that is why to maintain
the balance and harmony, I'm drawing the same number
of beans on each line. Now, you can draw the
way I am doing or you can play around with the
size of your coffee beans. You can draw one big bean on each side or super tiny ones. What's important is that you stick to what you're doing
throughout the pattern. That will ensure not only a
cohesive looking pattern, but it will also turn it into an extremely
mindful process. With every bean that you draw on the peak and valley
of the Zig zac, you will get comfortable
with the shape. As you repeat the same
action over and over again, you will start to feel a
sense of ease and flow. Especially on the days
when you are anxious, the repetitive
action will soothe your mind and provide a
sense of predictability, which in turn can bring
calm amidst the chaos. Continue drawing
coffee beans along the entire length of
your zi zac stripes. P consistent with the
size and number of beans to maintain the
rhythm of the batter. Now at this stage, this is just a page filled with
elongated ovals. It doesn't look like
coffee beans, right. To do that, I'm going to add two curves in the center
part of the shape. This curve is called the crease. It's the line where
the two halves of the coffee bean come together
during the growth process. Now, drawing these curves
is a very simple process. Just make sure that
the starting point and the end of the two
curves are connected. I'm keeping space between the curves because
in the next step, I want to fill in each
side of the beam. But if you don't
want to do that, you can just make a thick curve without leaving any space. Mindful drawing isn't
about complexity. It's about process, intention and building the pattern
at your own pace. Just like how we
incorporate tea or coffee into our daily
routines effortlessly. Integrating mindful drawing can also be as simple and enjoyable. That's why when you
start this practice, start with simple patterns
and simple subject matter. Choose subjects that genuinely
interest you or evoke positive emotions
so that you can enjoy the process instead
of feeling overwhelmed. Your drawing practice should be a delightful ritual,
not a struggle. Now, finally, my page looks like the one filled
with coffee beans. Now at this stage, you
can leave the pattern as it is and call it
done or color it. I'm definitely going
to fill it in. I'm going to fill the
two halves of the bean. You can use any other color
or any other medium to. I want to maintain the whole
black and white aesthetic, and that's why I'm going to use black pin to color the beans. The only thing that we have
to keep in mind wile coloring the coffee beans is to ensure that we don't
leave any white space. It's a simple condition, but it will help you slow down, pay attention to
the simple action, and make the activity into a mindful one rather than just plain old
coloring activity. Now, much like that daily cup of coffee that sets a
tone for your day, mindful drawing can be a
creative and mental espresso. It's not just about
putting pen to paper. It's about setting
an intention and creating a mindful
space in the of life. The simple act of drawing, just like that first
sip of coffee, can energize, boost your mood, and offer a precious
pause in your day. It really doesn't
matter what you draw, how you draw, or how
long you draw for. What matters is the attention
with which you draw. Every time during
the drawing process, you find yourself driftering
to some other thoughts. Just gently bring yourself
back to the paper, back to the pen movement. Do remember that just
like your daily brew, your mindful drawing is a moment of calm in your
everyday routine. Do embrace the rhythm. Keep moving at a pace you enjoy, and eventually, you will have a page filled with coffee beans. And with that, we are
done with day one. The next time you feel
bored or irritated, then along with reaching out
for your favorite beverage, also grab your favorite pen and settle in for a mindful
drawing session. It won't take long to make. You don't even have to
finish it at one go, but it will go a long way in settling your mind and
helping you relax.
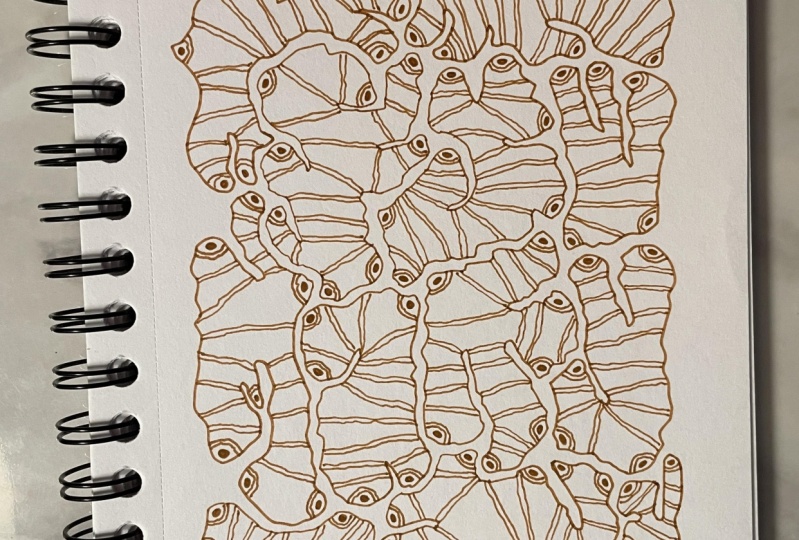
4. Day 2: Ginger : Today, we are going to take
inspiration from ginger. Nature's little powerhouse. Now, the beauty of a
ginger lies not just in its flavors and
multiple health benefits, but also in its shape. The twist and turns and the irregularities make it
such a fun thing to draw. It's like an invitation
to embrace imperfection, and that's amazing, isn't it? The first step here
is to allocate space for each and
every ginger motive. I'm going to do that by making
rough blobs on the paper. These blobs will act
like placeholders. They'll help in visualizing
the composition and distribution of gingers
across the paper. So I'm going to keep
it loose and rough and focus on the overall placement
and size of each ginger. This is going to be a non
directional random repeat, which means that no matter
which way you turn, there is no right or wrong
way to look at the pattern. The plan here is to create a
montage of gingers that fit together and to make sure that the size is
fairly consistent. Sometimes it's fun to
alternate the size of things. But in some patterns, especially in this case, where the motive
itself is irregular, the rhythm in the
pattern comes from the relative uniformity of the size of the
shapes in your piece. So keep all of these factors in mind and mark the space
for the basic motive. The shape of a ginger is
generally elongated and bulbous. The curves, pumps,
and twists along its surface gives it a unique
and organic appearance. When you start drawing, keep
all these elements in mind. Pay close attention to the proportions and contours
of the ginger root. Notice how it tapers towards one end and features
ation at the other. One of the best ways to draw this is to keep some gingers in front of you and try and
capture that on the paper. When we take inspiration
from natural food produce, we are not bound by strict rules or expectations of perfection. Natural items allow for a more fluid and
creative approach. Not only do fruits and vegetables comes
in diverse shapes, but they also have
imperfections like blemishes, asymmetrical shapes
or varying textures. These imperfections
add character and uniqueness to
the drawing process. That is why these gingers aren't meant to be
perfect replicas. They are expressions of your creativity
and individuality. With each motive that you draw, feel the weight of expectation
lift off your shoulders. Experiment with
different sizes and orientations to create a
harmonious composition. Rotate some ginger
motives slightly to avoid a uniform appearance
and most importantly, embrace the imperfections and asymmetry of the motive and
have fun with the pattern. Another thing that you can do is that after
making each motive, stop for a few seconds and
look at what you have done. Ask yourself, how would you like to draw
the next gingere? This will not only
help in bringing variations and more organic
feel to the pattern, but will also help
you slow down. Once the outlines of the
base shapes are done, we can start adding details. Now, there is no right or
wrong way to add details. It can be realistic, or stilzed, or a combination of
both, dots, des, lines. You can add whatever you
feel like to enhance the texture and character
of the ginger motive. Like in my case, I'm
adding wonky lines and irregular bold dots to mimic the natural ridges and bumps found on the
surface of the ginger. I'm just going to
vary the direction of the lines and keep
them loose and fluid to capture the accents of the ginger in a stylized
and playful way. I'm just making lines anywhere
that I feel like making. I'm making sure that I keep certain distance between them, but other than that, I'm
not aiming for perfection. The one thing that I'm
keeping in mind while making these lines is to close the lines from one
end to the another. This simple condition
makes me aware of each little line and makes the process
into a mindful one. I take my time to do that. I allow the lines to unfold gradually and slowly shift
into the flow state of mind. With every line and
mark that I make, I immerse myself in
the present moment. I don't think about how the pattern is going
to look in the end. For me, what matters is the line that I'm making
in the present moment. As you fill in your
ginger shapes, let your lines flow freely. Your lines or the marks
that you're doing can be super random
or really orderly. This is just a fun accent to give the piece more
interest and texture. The details you add will
make the pattern come alive. So use this as the
opportunity to think as to what kind of details
you would like to add. Have fun with it. Allow your pen to dance on the paper and let
intuition be your guide. You know, just like
the way ginger is loaded with all
sorts of benefits, so is mindful drawing. It can soothe you, heal you, nourish you, and make
you feel better. Your sketchbook will
not only become the magical place where failed adventures lead
to amazing discoveries, but it will also become
a way to meditate. So try to incorporate daily mindful drawing
practice into your routine. It won't take a lot of time, but it will benefit
you in many ways. So this is how my ginger inspired pattern
looks in the end. So let's carry this
mindful approach beyond the artwork and weave it into the fabric of
our everyday lives. Thank you for being there today. I'll see you tomorrow. Ooh.
5. Day 3: Peas: Every day household work
can get boring, isn't it? Now, shelling peas is
definitely one of them. But, you know, by just noticing the texture of the pod
beneath our fingers, by hearing the rhythmic
pops and veiling each P, we can transform
this menial task into a mindful exercise, and that is what is so special about
mindfulness in general. In the hustle bustle
of daily life, youo need to dedicate hours
to practice mindfulness. You can bring mindful pauses
into your daily routine by being fully present while
doing each and every activity. So that's why for Day three, let's draw some pea pods to remind ourselves
that there is tranquility in unhurried moments and beauty in the ordinary. Now, the pattern
that we are doing today is called the DTC pattern. It's a pattern where
small scale motives are scattered all over the page. These designs do not have a linear or geometric
arrangement. What are we going to
do? We'll start by sketching some small pea
pods all over the paper. I'm starting with a
gentle curved line to outline the basic
shape of a pea pod. Now, I'm not rushing into adding all the details like
the pes just yet. Because right now it's all about getting the
overall layout right. It's like following a recipe. First, you prep all
the ingredients, and then you add them
in the next stages. Now, DC patterns are
characterized by their tiny scale and chaotic
yet harmonious layout. Make sure to make
small size p pods and scatter them evenly
all across the page. Maintain a balance
by incorporating uniformity in the size and
spacing of the p pods. This will create harmony amidst the seemingly
scattered elements. Periodically, you
can step back from your work to take in
the entire composition. This mindful pause will
allow you to assess the overall balance and identify areas that
may need adjustment. Now, once the main
layout is done, the first thing
I'm going to do is start adding curves
inside the main pod. You can choose to do this
or skip it completely. I'm doing this to add more
depth to the pattern. It's also a very simple step, and that's why it
gives us a chance to immerse ourselves
in the process. The drawing part
is already done. All we have to do is mimic
the shape, focus on closing, starting and ending
the lines properly, and move from one
pod to another. The mind often scattered
with the noise of daily life can find peace in this focused
and repetitive motion. It's not just about
lines on paper, it's about mindful
movement where each stroke is made with intention and
complete awareness. As of now, this
looks like a page filled with leaf like
shape, isn't it? Now to convert it into pea pods, I'm going to start adding. Along with making the
p, I'm also filling up the empty space around the piece to give more to each pod. Now, circles are one of the most calming shapes to
draw, but most of the time, we shy away from them because we think that we need to
make the perfect round. But in this case, because
the circles are so small, there is no pressure to
make the perfect circle. Rather, you're free to bring variations in the size
and the number of. It doesn't have to be perfect. Just make sure that you're
closing the shape properly. Now, it's very easy
to rush and move from one circle to another so that
the pattern gets over soon, but that will not serve
the purpose, right? We are doing this pattern
to slow down to enjoy the mundane and find peace in
the day with mindful pauses. As you engage in the mindful practice of
adding peace to each p pod, recognize the significance
of this contemplative pause. It goes beyond the
act of drawing. It is a purposeful
intermission in your day. Amidst the hustle,
this intentional pause offers a quiet space
for reflection, a respite where the mind
rejuvenates and ready to navigate the rest
of the day with a renewed sense of
focus and calm. Now, one of the traits
of a ditsy pattern is that it's a very tightly
packed arrangement. When observed from a distance, these meticulously placed
elements seamlessly merge to create an illusion of one cohesive and
complete design. To achieve that close knit look, in this last step, I'm going to add ps in the
rest of the space. I'm going to fill these ps with black instead of
keeping it blank. I'm doing this because the black provides a good contrast
to the overall pattern. And bringing slight
variations in the sizes of the
piece and making sure that they are all scattered and not forming
a line at any place. Now the intentional
proximity of elements enhances the overall
intricacy of the DTC pattern. This closeness fosters a
sense of unity and harmony, letting us perceive
the pattern as a singular cohesive entity rather than a collection
of individual elements. And with this, we are
done with our day three dits inspired pattern. I hope you enjoyed
creating this pattern, and it serves as a reminder that even in small and mundane, there exists a
profound potential for peace and clarity. Ooh.
6. Day 4: Cheese: Have you ever wondered why the Swiss cheese
has holes in it? Well, these holes,
which are also called eyes are formed during the
fermentation of the cheese. As cheese ages, tiny
bacteria produces gas, and when that gas gets trapped, it forms these iconic holes. It's like a cheesy surprise, where each cheese slice has
a funky pattern of its own. So that's why for D fo, we are going to draw an agile
pattern inspired by cheese. We will capture
the randomness of these cheese holes so that
we can remind ourselves that sometimes the
unplanned and the unpredictable adds most
flavor to our plate. The first step here is to make
the base for the pattern. I prefer using a ruler, but you can also do it free
hand if you're comfortable. Now in order to achieve
that classic agile look, which is essentially a
repeat of diamond shapes, I make sure that the diamonds are taller than they are wide. That's why each column
on the paper is 1.5 centimeter in width and
three centimeter in height. This ratio gives me the ideal proportions
for the diamonds. However, you can adjust
these measurements based on how big or small you
want your diamonds to be. Now with the base done, it's time to get cheesy. Now, generally, the highlight of an agile pattern is the use of colors and the diagonal lines that cross over the diamonds. But in this case, we won't be
following the exact theme. We will do our thing and yet try to retain some as
sense of this pattern. So the first step is to draw the cheese outline in
each of the diamonds. I'm going to keep some
gap and start connecting irregular semicircles with lines to form the distinctive
cheese look. Now, just like the way holes on the cheese
are unpredictable, I'm also embracing the same
assents here on paper. I'm playing around with
their placement and also changing their size
as and when required. It's a very easy
and relaxing step, so embrace the randomness and keep moving through one
diamond after the other. Now, the second step in this pattern is the
continuation of the f. I'm just going to add
irregular circles and ovals inside the cheese. Now, cheese holes
aren't perfect, and that's the best part
about this pattern. The whole unpredictability
and the simplicity of this motive will help us
let go of perfection. I think it's one of those
patterns where even if you are a perfectionist and get
uncomfortable with a mistake, there is no scope for mistake. Even if there are
some size variations, or you forget to draw less
holes or something like that, it'll just not matter. And that's quite a liberating
feeling, isn't it? So keep moving from one
diamond to the other. Try bringing some
variations in each slice. Keep wearing the size
of the cheese holes. So bake, some small
and some in between. This pattern is such
a good reminder that embracing unpredictability
is not just limited to art. It's a mindset, whether
in the kitchen in our creative endeavors or in navigating life's challenges. No matter the planning, our days are filled
with unknown elements. So instead of fighting them, it's important to
acknowledge them, make space for them and learn to respond to them
rather than react. It's only when we look at the randomness in life
with mindfulness, we can see reason
and strength in it, or if nothing else, just patience and acceptance. So as you embark on
your creative journey, remember to savor the moments. Find beauty in the
unexpected and let your creativity flow freely. In this final step, I'm adding
black color to each slice. I'm doing this for two reasons. First reason is to enhance the depth and definition
of the cheese slices. This isn't just about
filling in the space. It's a deliberate technique
to create visual interest. The second reason to do this
is for mindful engagement. This simple coloring activity
is a chance to immerse myself in the process without the need for active
decision making. The shapes are already drawn, and the color choice
is straightforward, and this allows my mind to ease into a state
of relaxation. The reduction in
decision making process lowers stress level
and helps you relax further as your mind
isn't constantly engaged in choosing different
colors or combinations. So take your time as
you do this step. When you cultivate
a mindset that values a journey as
much as a destination, it gets easier to wander into the creative state and
create more often. By releasing attachment
to the final outcome, you can enhance both the
quality of the work produced and the overall satisfaction derived from the
creative journey. Just as cheese
matures with time, your artistic skills
and creative prowess will also evolve with each
project you undertake. So indulge in low state
creative activities and relish the benefits
that come with it. And with this, we are done
with a very cheesy pattern. Thank you for joining me today. Keep creating, keep sharing, and may your experience
be as rich and diverse as the world of
cheese. See you tomorrow.
7. Day 5: Chips: How many times have you
found the chips packet empty without even realizing
that you ate them all? That empty packet is not a reminder to get
another packet of chips. Rather, it is a gentle nudge to bring consciousness
to our actions, even in the simplest moments,
even while snacking. So to ingrain that thought, the food under spotlight
today is potato chips. This is going to be
a random repeat, which is also called
a tossed repeat. It seems like a perfect match for an open packet of chips. All we got to do is toss
the chips all across the page without a specific
sequence or arrangement. What I really like
about random repeat is that there is a sense of spontaneity and there
is the freedom to take the pattern in whichever
direction you want to. Now, even though it
is a random repeat, it is one directional, as it can be viewed from
only one direction, and that is happening because I decided to add the packet
two in the pattern. Though you can skip that part, and if you just draw the chips, it will become a multi
directional random repeat. Now, when it comes to
drawing potato chips, we are dealing with a
fun and simple shape. It's a rounded oval
with irregular edges. Now we can fill the page
with similar shaped chips, or we can bring in
some variations. Some chips can be extra curly while others can have
more angular edges. You can even experiment
with three D approaches to showcase the folds of some chips while
keeping others flat. When you draw your chips, try to embrace their
uniqueness by varying the shapes, sizes, and angles. This variation will not only
add depth to your pattern, but will also create an
engaging visual experience. Now, to maintain a
balanced repeat pattern, pay attention to
spacing and density. Ensure that there is equal
distance between motives. You can step back periodically to review and adjust so that you can enhance the overall balance and visual
appeal of your pattern. You know, most of us have eaten chips multiple
times in our lives. But how many times have we
actually observed the shape, the colors, the textures, or even the sound
of a crisp chip? That is why this exploration of shapes not only engages
your creativity, but also invites a
mindful focus on the details and
nuances of each chip. We can start by
paying attention to the shapes of the
chips, their position, first on the page, and then translate this mindful drawing
experience to a snack time. Once you're satisfied
with the overall layout, you can delve into
the next step, which involves adding
texture and depth to the chips by skillfully
drawing lines within them. Now, when it comes
to drawing lines, I like to draw curved lines that follow the
contos of each chi. Each line is connected to the previous one to
create a seamless flow. This approach not only mimics the natural irregularities found in real life potato chips, but also contributes to a more detailed and
visually engaging design. The curvature of the
lines helps to capture the subtle variations and imperfections that give the
chips their unique character. In addition to the
curvature of the lines, I also round off
the ends slightly. This seemingly
minor detail plays a significant role in the
visual impact of the design. By softening the edges, we create a more organic
and natural look, which resembles the irregular and imperfect chips
that we all enjoy. Now, while I'm using
this technique, feel free to explore your style, straight lines, dotted lines, or anything else, pick a style that you would
enjoy doing the most. The key is to maintain consistency in line
style and spacing, as this not only enhances the visual harmony
of the pattern, but it also keeps you attuned to each pen stroke and the
overall composition. The repetitive nature of drawing lines serves
a dual purpose. It transforms a simple shape into an intricate potato chip, while it also calms the mind and fosters a deeper connection
with the artwork. These conditions and rules, such as connecting the lines and maintaining
consistent style, helps us stay focused and immersed in the
creative process. Any deviation in
the line quality or spacing serves as
a general reminder to return to the
present moment and give our full attention
to the pattern at hand. One of the most beautiful
thing about mindfulness is that you don't actually
have to try too hard. There is no need to
make anything happen or achieve a special
state in this case. Simply relax and pay
as much attention as you can to what is there
in the present moment. Remember, just like
creating this pattern, slowing down and being aware
makes every experience. So beat while drawing
lines in the potato chips, or while actually
eating the chips, the more we savor
with awareness, the more the flavor
lingers and stays with us. So take a moment to appreciate the simplicity and beauty of this mindful pattern drawing. Let the process guide you from mindlessness
to mindfulness, enriching your
creative journey and enhancing your connection
to the present moment. Savor each stroke, each bite, with curiosity and gratitude. There you go, Day five is done. So the next time you reach
for those potato chips or any snack for that matter,
eat with awareness. Make each bite count not
only to enjoy the flavor, but also to avoid the
disappearing act. Being mindful isn't just
reserved for meditation. It can be weaved
into the biggest, as well as into the
smallest moments. Ooh.
8. Day 6: Peanut: Today, we are going to
immerse ourselves in the fascinating world of
the basket af pattern. It's a symmetrical
design technique, characterized by its interlacing horizontal and vertical strands, resembling the woven
structure of a basket. We are going to draw
this pattern using an earthy and rustic
food, the peanut. Despite this small size, the peanuts have a unique
shape and texture, and I think it'll be
really interesting and relaxing to interconnect
this motive with this timeless design. Let's begin. Now there are many ways of doing the
basket weave pattern. We will do a singular or also
called as the plane ave, where we will repeat
only one set of elements horizontally and vertically to create a cohesive
looking pattern. Now, again, just like other
patterns in this series, you can make a detailed grid or start doing the
pattern free hand. Either way, it will depict
the basket wave style. In my case, I have made a grid where each square
is 1 centimeter. I'm using the space of three
squares to draw each peanut. If you want to draw
bigger size peanuts, then use six or
even more squares, or you can make
bigger size squares. While the first
peanut was vertical, the second is horizontal. I'll continue changing
between horizontal and vertical till the time I
reached the end of this row. Now, a peanut is a curved shape resembling a sideways eight. It's a simple shape, and because it's
a natural motive, it doesn't have to be perfect. Till the time you get
the curves right, the motive absolutely works. Now in the second row, I left two blocks and started
with a vertical peanut. The aim is to not
just alternate, but also start each peanut with the middle part of the peanut
above it and beside it. It's this placement
that will give the pattern that
interconnected basket. So just like the row before, I'm again just changing
the direction of the motive and drawing
it one after the other. When you draw patterns
like basket weave, it feels as if they have
their own orography. There's a rhythm to it, and
it's quite captivating. So bring all your awareness while drawing this
simple motive. And after a while, you will have the foundation of
your pattern ready. Now we are going to start adding details in the peanut motive. In the first step, we will draw short curved lines running
parallel to the outline. These lines indicate
the natural ridges and texture of a peanut shell. Keep them evenly spaced and follow the contour
of the peanut. I'm drawing four curved
lines in each peanut. You can decide the number of lines and eventual segments you want in the peanut based on the size of the
peanut you have made. This is a very simple
low pressure step. Take your time and draw without the need to finish the
pattern as soon as possible. As much as mindfulness is about tuning into ourselves
and our present reality, its benefit goes
beyond the self. It makes us compassionate, and that in return, helps in establishing
interconnectedness between us and others. It makes us aware of what
is going on in the moment within ourselves around
ourselves and with others. And that is why, as we get more comfortable with our own
thoughts and emotions, we naturally start being kinder and more understanding
towards others. It's like realizing that
at the end of the day, we are all interconnected, share joys, pains, and
everything in between. Just like the way the
rhythmic intertwining of strands indicate the seamless harmony
between form and function in a
basket weave pattern. Mindfulness fosters a
heightened awareness of the present moment and the intricate interplay between internal experiences
and external realities. Even though we all live
in our own shells, let's not forget that we are
connected to each other. When we deeply reflect
on the threads of interconnection that
weave through our lives, we can directly experience how we are never ever isolated. Oh. Now the surface of a peanut is not
perfectly smooth, but rather it is marked with
tiny squares or rectangles, creating a unique texture. And that is why in
this last step, we will add lines within these curves to mimic the
natural texture of the peanut. By adding these lines
within each peanut, we are not only enhancing
the visual appeal, but also tapping into a deeper connection with
the subject matter. So as you go through
each motive, allow yourself to
focus on the process. With each stroke of the pen, visualize the texture and
folding on the paper. Be mindful of your
movement and ensure that each line completes a rectangular shape
within the peanut. This attention to detail not
only refines the pattern, but also nurtures a sense of patience and
precision within you. So take your time,
breathe deeply, and let your creativity flow as you fill in the lines
within each peanut. And with this, we are done
with our pattern for day six. As we end day six, let us carry forward the lessons of interconnectedness and presence and remember that
just like in art in life too, tru magic lies in the
connections we make and the moments we share. O.
9. Day 7: Watermelon: Today, we are going to draw Summer's favorite
use, the watermelon. Along with the burst of flavor and the vibrant green and red, what I find interesting
in terms of design is the
arrangement of seeds within the watermelon
and how it creates natural patterns that are
both symmetrical and organic. It also reminds me of picnics
and slow summer days, and that is why I'm
really excited to draw a pattern inspired by one
of my favorite fruit. Today, we are digging
into a scallop pattern, which in simpler terms is a harmonious arrangement
of curved shapes. Now, generally, this pattern is associated with shells
or wave like patterns, characterized by the smooth rounded edges and
repeating arcs. But we are going to
draw these arcs on the paper to symbolize
half cut watermelons, as well as the interconnectedness
of art and mindfulness. As you can see, I'm just
adding one curve after the other and making sure that each curve is
connected to the other. Where one ends,
the other starts. Now, there are
various ways that you can fill the peach with arcs. One approach which I'm doing
involves drawing arcs on all sides and gradually moving
inward with each layer. This is a complex and
unpredictable design style that embraces the
beauty of irregularity. Now another option can be
to build from bottom to top to ensure uniformity and
a more structured approach. Both these parts lead
to beautiful outcomes. So pick the root that seems more comfortable
and interesting. I have used pencil for the first set of scallops
because I want to make sure that the number of
arcs is equal on all sides. Once this is done, I can easily move on to drawing
directly with pen. Because after this step, I just have to connect
one arc to the other and place it in between
the two arcs below it. If my foundation is done right, I don't have to worry much
about the rest of the arcs. As you build up your pattern, if there are places
where you cannot place a arc exactly between two, just like the way it
happened with me at certain places, then it's okay. In a pattern like this, it
might get complicated to place all scallops between
the ones below it. It's not a big deal, and this is not going to impact
the overall pattern. Just like watermelons
vary in shape and size, our arcs may not be identical, and that's perfectly fine. Remember, we are not
aiming for perfection. We are embracing the joy of creation and the process
of mindful expression. These imperfections often add character and charm
to our artwork. It's what makes it human. Embrace that instead of looking at it like a
flaw or a mistake. My page is filled,
and it's time to start converting these
arcs into watermelons. Now, as you very well know, I focus on only one
step at a time. I do this so that I don't break the drawing rhythm of
a particular shape. It's like an assembly
line process, and I do this not
for efficiency, but for mindfulness purpose. That is why in this step, I'm going to start by
drawing two sets of curved lines in each
of these scallops. The first curve represents
the green part of the rind, and the second indicates
the light green, the almost wide part
of the watermelon. Once the curves are done, I'm just filling up the
top layer with black to indicate the green
part of the watermelon. This is a very relaxing step. It's just good old coloring. So take your time and make sure that you don't
leave any white space. This little condition will ensure that rather
than coloring, this process becomes into a
mindful coloring activity. Now comes my favorite
part of this pattern, which is to draw the seeds. So the seeds are nothing
but tiny tear drop shapes. I'm going to follow the
shape of the curve and draw the pointed end of the tear
drop towards the center. That way, each layer
of seeds are placed in such a way that all of them come together for c. As you keep drawing one layer
of seats after the other, it might happen
that eventually you will not have the
space to draw curves, and that is absolutely fine. You can draw one or
two seats in the end, depending on the
space that you have. At the end of the day, we
are taking inspiration from food items which are inherently
imperfect in nature. What matters is that you are drawing seeds and
transforming a bunch of arcs into a watermelon
inspired scallop style pattern. Now, the number of seeds, the arrangement of seeds, their size is all up
for you to decide. This is not an attempt
at life drawing. So be creative and
have fun with it. You can follow what I'm doing or do some other random
arrangement of seeds. No matter the route you take, it will end up looking
like a watermelon. As you draw the seeds following the contours of each
watermelon motive, something fascinating
will start to unfold. Your mind will start to synchronize with the rhythmic
motion of your hand. The act becomes less about conscious effort and more
about intuitive creation. This shift is
crucial because it's where the magic of the
flow state begins. Think about it this way. When you first learn
to ride a bike, every movement requires
focus and attention. But as you practice and
become comfortable, riding becomes second nature. Similarly, as you repeatedly draw these tiny tear drop seeds, your mind finds a familiar path letting you enter a state
of flow effortlessly. So take your time,
savor each stroke, and let your imagination soar. And after a while, you will
have a scallop pattern infused with the spirit of
watermelon and mindfulness. As we wrap up day seven, let's not forget that flow isn't just some elusive concept reserved for some
special occasions. It's right here in
the everyday moments. So whether it is
eating a watermelon, making a pattern, doing dishes, or taking a walk in the nature. By simply paying attention
to our everyday activities, we can tap into
that sense of flow. So let's keep riding
that wave of awareness, and I'll see you tomorrow. Ooh. Oh.
10. Day 8: Pasta: From the elegant strands of spaghetti to the tubular
delights of Penne, to the whimsical twist of fussi. Pasta comes in many shapes,
sizes, and texture, each with its own
unique history, beauty, and place on
the dinner table. Just like the way, it's a playground for
colory creativity. It's a playground for
pattern inspiration too. So before I talk more about pasta and start feeling hungry, let's start the pattern. My pasta choice for this
pattern is going to be Penne, and the pattern
style I'm going to cook it in is the
herringbone pattern. Now created by a series of angled parallel lines that
form a mesmerizing zig zag, the herringbone pattern
has withstood the test of time and remains present
in diverse design styles. This pattern can be created
in a variety of ways. While the most common
herringbone pattern is the 45 degree angle, we are going to create
the 90 degree one, also called as the block
herringbone pattern. Now a 90 degree
hearing bone pattern involves arranging
motives in a grid where each motive is rotated at a 90 degree angle to create
a V or hearing bone effect. I have started by drawing the first set of
horizontal penne pasta. While drawing the
motive, my focus is on capturing its
cylindrical form, and that's why I'm making curve on both ends of the shape. I'm also drawing a set of
two curves on the end of the pasta to create more depth and make
the design less flat. When it comes to the layout, I started from top right, but you can start from
any other point to. The goal is to finish
one sequence of horizontal pasta
and then move on to the vertical set and
then horizontal again. It might seem a
little confusing now, but as we move ahead
in the pattern, you will see how
it all turns out. Now, once the first set is done, it's time to change
the orientation. This time, it will be
vertical pen pastas. The starting point
of these will be the gap created by
the horizontal pasta. Now, the main thing to keep
in mind here is number one, be consistent with the shape
and size of the pasta. Number two, pay attention to the spacing between the
motives and number three, B consistent with
the starting point of each pasta motive. The more you pay attention
to these elements, the more cohesive and well balanced your pattern
will look in the end. This is one of those
patterns that will encourage you to pay complete
attention on the paper. As we are drawing
directly from the pen, there is no scope to redo. Now, this doesn't mean that
we get intimidated by it. Rather, let's take
this as a challenge. The goal is not to create
a perfect pattern, but to make sure that we
are so aligned with what we are creating that after a
while, nothing else matters. It's this heightened state
of focus that will take us to the flow state and make this into a
mindful experience. So go really slow
and take your time. It's a fairly simple shape, and even if you draw slightly
slanted or imperfect lines, it is perfectly okay. What matters is that
you close the shape completely and make sure that the size and
spicing is consistent. Once the vertical sets of pasta reaches the end
of the other side, we will again switch to
the horizontal ones. As you can see, it's an alternate play
of the same motive, and the interesting
part is that each shape drawn previously creates
a space for the next one. Once all the shapes are drawn, it's time to add details. I'm starting with
the simplest one, slowly going through each
pasta and filling in the curves to denote the hollow
tubes of the penne pasta. Ooh. Now it's time to convert this
random shape into a more close version
of penne pasta. And I'm going to do that by using one of my favorite shapes, and that is lines. These lines not only indicate the texture that is there
on the penne pasta, but it also gives us a chance to create a comforting
rhythm for the mind. Pasta is not just one of
my favorite things to eat, but it also reminds me
of Dolce Far Niente, the Italian phrase that means the sweetness
of doing nothing. I feel when it comes to
the world of mindful art, all these repetitive
movements are similar to experiencing
Dolce Fanane. It's a sweet indulgence
for the mind and the soul. It's not about rushing or
reaching a destination, but about enjoying each stroke, savoring the process,
just like the way you would feel while indulging
in a comforting treat. When we take the time to slow down and savor the
present moment, we are reminded of
all the beauty and goodness that surrounds
us each and every day. Some may argue that Do
hava Nana is a luxury, and not everyone can afford it. However, it does not have to be extravagant or inexpensive
activity, nor time consuming. It can be as simple as
taking a walk in the nature, enjoying a cup of tea, spending time with loved ones, or making art just for
the sake of making. In a world that places such a high value on
productivity and achievement. It's important to let go of the constant pressure
to be doing more. It's important to
prioritize rest. A sprinkle of doing nothing elevates not just your
work life balance, but it can also
make you appreciate the simple pleasures of life
and find joy in the moment. So continue drawing and notice how the pattern
starts to take shape, evolving with each
line that you add. And after a while,
you will find a page filled with the
favorite of many pasta. So let's carry this
mindful approach beyond the artwork and it into the
fabric of our everyday lives. I hope you had a
good time today. Thank you for being there,
and I'll see you tomorrow. O. Ooh.
11. Day 9: Star Anise: Spices are like old
friends in my kitchen. Now, just like the
way mindfulness can elevate mundane
into special, the right spices can
elevate any dish. So that is why for day nine, we are going to draw the
aromatic beauty star ase. It's distinctive
eight pointed star like shape, symmetrical design, and intricate
details make it into quite an interesting motive
to experiment and explore. Let's begin. For this pattern, we are going to arrange the motifs in a
brick repeat style. It's a pattern where the
rows are staggered in such a way that they don't line up with the rows
above and below it. This repeat pattern
gets its name from the way bricks are laid
to form a brick wall. Now, generally, for
patterns like these, the squares or the
grid is drawn in such a way that right
from the beginning, the repeat unit is
offset by half in the next horizontal row
to resemble a brick wall. But in this case, I first divided the paper in
equal size squares and then added circles in it in such a way that in
every alternate row, the pattern is offset so that the motifs don't
line up vertically. I made it this way
because I wanted to place the star ans
in these circles. The circles are going
to be the guide for the overall size and
shape of the motive. Now the star ans, as
the name suggests, is a star shaped spice with eight distinct points or arms radiating outward
from a central hub. Each arm is slender
and elongated, tapering to a point. To get that look,
we are going to begin by drawing
a small circle or oval shape to represent the central seed
pod of the star as, and then start
drawing eight arms or points to create the
base of the motive. Each arm is going to be
narrow at the beginning and will gradually widen as
it extends outwards. Now, typically, there
are eight arms on a star s. When you draw them, it's important to space them
evenly around the circle. You can draw rough lines with a pencil to divide the
space for each segment. But I feel even if all
are not equal in width, it is absolutely okay. The goal is to make
eight segments, but not exactly same
sized perfect segments. If you notice a star
and is closely, you will see that all
the segments are not exactly similar to each
other. There are differences. If nature does not equate
perfection with beauty, then why should we
stress over it? Our intention is to pay complete attention
to the pattern and all the key details. The end result should
be rated on how it made us feel rather than how
it looks in the end. Beauty after all
is so subjective. I strongly feel that if the
process is calming or fun or slows you down or just gives you a break from everything
else for a while, then it is time worth spent. It is so important to create just for the
sake of creating. The more you do it, the
more you will discover the beauty hidden under the no pressure
unhurried activities. If you feel that the shape
is a little complicated, you can first try it out
on a rough paper too. You can draw it several times. That will give you
the confidence to draw directly from pen
on the main sheet. Other option is that when
you do the practice round, you can try some
other variations. You can tweak the shape
slightly to suit your style. It's your creative time, so feel free to
experiment and play. Once the base is done, it's time to add texture and details and make it
look like a star ans. The first thing I'm
going to do here is draw curved lines along
the length of each arm. These lines denote
the natural ridges and folds found on the spice. The next element is
to draw the seed, which looks like an elongated
oval or a tear drop shape. Once you have made that, you can draw a
line that connects the end of the seed with
the edge of the arm. I'm adding the lines to
create more depth and mimic the star s. You can add this
step or choose to skip it. It's completely your choice. Now, the shiny seeds are
the highlight of a star s. To differentiate them with
the rest of the elements, I'm going to color them, but I will color them in the last step after
adding all the details. I was really interested
in exploring this spice because from
a creative standpoint, the star and its shape offers a plethora of interesting
elements to explore. Its symmetrical design and intricate details gives you a chance to delve
into precision, proportion, and the interplay
of curves and angles. So I hope you enjoy playing around with the motive
as much as I did, and it inspires you to go on a treasure hunt and
look for spices or food items which are filled with amazing details,
shapes, and textures. So the last step in this pattern is to color in the seeds. It's the final element which
will complete the pattern, similar to using
spices while cooking. Now, both spices and art possess the ability
to evoke emotions, tell stories, and transport individuals to different worlds. Spices standalze the palette while art captivates the soul. Both these process requires
skill, creativity, and a keen understanding
of balance to create something that transcends the ordinary and becomes an
experience in itself. What I really like
about spices is that every culture has its own
unique relationship with it. The way they are used and combined differs from
one culture to another. It's like a personal
language of taste. Similarly, the beauty of art is the little variations each
one of us bring to it. We can use the same motive, the same color scheme, but yet we can leave our own imprint that distinguishes one
drawing from the other. That's why the more we create, the better we get in finding what works for us
and what doesn't. The process helps us find our way and learn about
our visual language. So Experiment with
different techniques, mediums, shapes, and marks, and eventually, you
will figure out your secret recipe to
infuse your art with. And this is how a
brick repeat pattern inspired from the star as
looks like in the end. Much like the way a sprinkle of star anise can
transform a recipe. The sprinkling of
shapes, marks, textures, and motives that you relate
with can transform your. So keep, keep experimenting,
keep making mistakes. And yes, never stop seeking the magic that lies with it. Oh
12. Day 10: Pomegranate: Throughout this
class, we have been cultivating appreciation
for what is around us. Now, along with that, it is also important to feel grateful
for what is inside us. And that is why for day ten, we will work on a fruit. That is all about removing
layers and looking inside. Filled with gleaming
red ruby seeds, the pomogranate is one of the oldest fruits
known to humans, and I'm really
excited to draw it. This is going to be an all
over full bleed pattern, which means that
the entire surface will be covered without
any interruption. All the pomogranate motives will be connected to each other. I will first start with lightly sketching the basic
shape of a pomogranate, which is a round val of a shape. I'm going to add the crown
at the top of each motive, but we'll keep the base flat. Though if you want to add a little shape on the bottom
to, then you can do that. Now all the pomogranits will
be connected to each other, and that is why I will keep changing the size
and the orientation. If there's limited space, I will only draw some
part of the main body. The goal is to have a well balanced multi
directional pattern. Take time while doing
the basic sketch. If you're feeling stuck
about the placement, then rotate the paper and see it from a
different perspective. Try to have different starting
points for the pomogrants. Once you're happy with
the overall layout, you can go over it with
a pen and finalize it. Now that the basic
structure is ready, I'm going to add details to it. The first detail
that I'm going to add is the rind or
the skin of the pom. To indicate that, I'm just
drawing a circle in each shape and filling it with plaque to indicate the
thick part of the skin, as well as to add some
definition to the motif. Now it's time for
my favorite part, which is to draw the seeds. I have decided that I want to draw the stylized
version of seeds, and that is why I'm going
to mimic the curve of the rind and start drawing
seeds in a circle. It will be a set of
concentric circles made with seeds moving from toward. Now you can follow
the same approach or draw the seeds in a
completely different way too. For example, you
can divide the area into quadrants and then
fill it up with seeds. You can also draw radial lines
from the center and fill each section with seeds so that the seeds are arranged
in a radial pattern. Another idea is to scatter the seeds randomly
within the pomogranit, and keep varying their
sizes and spacing. You can even play around
with the style of the seeds. I have made triangle shaped
seeds with soft edges, but you can make them
like tear drop or oval shaped or maybe indicate
them with uneven circles. Experiment and see
the different way you can come up to showcase
a pomogranit pattern. The process of moving
from one circle of seeds to the next
and gradually going inward is similar to
the journey of digging deeper into ourselves to
uncover our true as sense. Just as each seed
represents a small part of the whole Pomo granite
and makes it what it is, each aspect of ourselves contributes to our
overall being. We too carry within us a treasure of goodness,
wisdom, and potential. And to discover that, we
need to keep looking inward. We need to explore our
thoughts, emotions, and beliefs without trying to change or fix
them immediately. When we move without
judging and rushing, we become aware
of the beauty and intricacies of not
just the outer world, but also our inner world, and mindfulness becomes
our guide on this journey. It allows us to see ourselves
for who we truly are, acknowledging our strengths and vulnerabilities with
gentleeness and acceptance. So as you continue your artistic journey and explore the depths
of your creativity, do remember that self discovery
is not a linear path. It's about peeling back layers, uncovering hidden
aspects of ourselves, and embracing the journey
with patience and kindness. And with this, we are done with the last pattern of our
food inspired series. There is an endless treasure that lies within each one of us. So keep looking inward with curiosity, compassion,
and acceptance.
13. Conclusion: Congratulations on
completing the class. I really appreciate the time and effort that you have put in. In the tapestry of
our daily lives, there exist an enchanting world of beauty concealed
within the everyday, often overlooked, yet brimming with intricate details
and artistic inspiration. I'm glad that together we were
able to slow down and zoom into these little details and fill not just our sketch
book quick patterns, but also our days with moments
of calm and reflection. I'm really excited
and looking forward to seeing your versions
of the daily drawings. So please do share them
in the project gallery. Now, if you have any
questions or suggestions, then feel free to share them
in the discussion section. And if you found this class to be a nourishing experience, then please do leave a review. I'll be coming with the
third installment of this drawing for meditation
series very soon, so stay tuned for that. Thank you so much for joining me on this flavorful journey. May you keep uncovering the
beauty that lies around you, as well as within you. I wish you days infused
with creativity, calm, and compassion. Take care.
 Neha Modi, Mindful Artist & Educator