Transcripts
1. Introduction: Welcome to Measuring and Proportion for Figure Drawing. I'll be your instructor, Brent Eviston. Measuring and proportion are one of the most challenging parts of the drawing process to learn, but if you want your drawings to be accurate, then they are essential. Every pose has a unique set of measurements and proportions, and for your drawing to be accurate, you need to replicate these measurements and proportions in your drawing. In this course, you're going to learn a series of measuring techniques that will allow you to do just that. By applying the tools and techniques you'll learn in this course, you will bring your drawings to the new level of precision and accuracy. First, you'll learn how to use your pencil or another measuring tool to extract a measurement from the pose and to compare that measurement to other parts of the body to help determine the proportions of that pose. Next, you'll learn how to use angle sider to triangulate the location of any point on the figure and place it accurately in your drawing. You can use this technique to triangulate as many points of a figure as you want to make sure that you know exactly where to place any part of the body. You'll also learn other measuring techniques in this course, including vertical plumb lines, as well as enveloping and how to use angle citing to block in the contour of a pose. Now, this course builds upon the skills you learned in the measuring and proportion course in the original art and science of drawing series. I highly recommend that you go through the original measuring and proportion course before taking this course. Successful figure drawing requires you to have the ability to draw the figure in proportion to make sure that all of the parts of the body relate properly in terms of their size. This course will give you the tools and techniques you need to accurately measure the figure and to get the measurements into your drawing, so enroll in measuring and proportion for figure drawing.
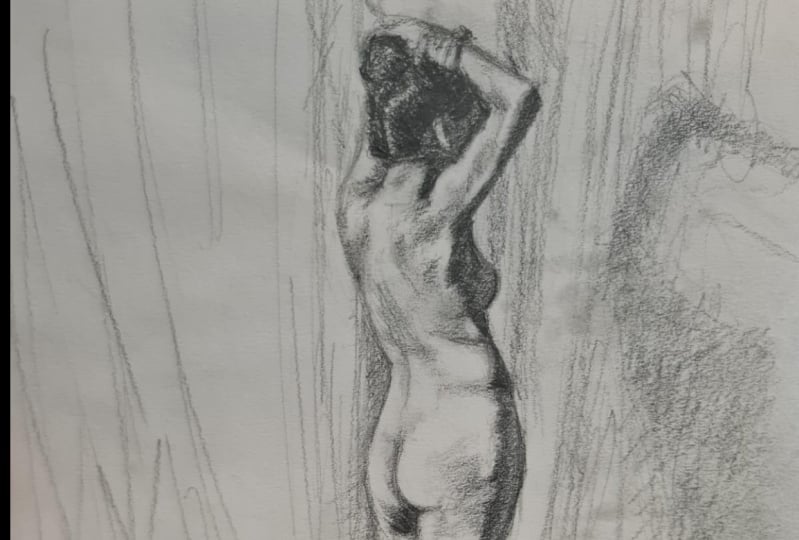
2. Determining Proportions: Welcome to measuring and proportion for figure drawing. I'll be your instructor, Brent Eviston. Measuring and proportion are one of the most challenging parts of the drawing process to learn. But if you want your drawings to be accurate, then they are essential. Every pose has a unique set of measurements and proportions. For your drawing to be accurate, you need to replicate these measurements and proportions in your drawing. In this course, you're going to learn a series of measuring techniques that will allow you to do just that. By applying the tools and techniques you'll learn in this course, you will bring your drawings to a new level of precision and accuracy. First, you'll learn how to use your pencil or another measuring tool to extract a measurement from the pose and to compare that measurement to other parts of the body to help determine the proportions of that pose. Next, you'll learn how to use angle sighting to triangulate the location of any point on the figure and place it accurately in your drawing. You can use this technique to triangulate as many points of a figure as you want to make sure that you know exactly where to place any part of the body. You'll also learn other measuring techniques in this course, including vertical plumb lines, as well as on enveloping, and how to use angle sighting to block in the contour of a pose. Now, this course builds upon the skills you learned in the measuring and proportion course in the original art and science of drawing series. I highly recommend that you go through the original measuring and proportion course before taking this course. I'm going to assume that you already understand the fundamentals of angle sighting and proportional comparisons. Successful figure drawing requires you to have the ability to draw the figure in proportion to make sure that all of the parts of the body relate properly in terms of their size. This course will give you the tools and techniques you need to accurately measure the figure and to get the measurements into your drawing. Before we get to today's demonstrations, there are a few things I'd like to talk about. The first and most important thing is this. I do not teach the general proportions of the body. If we look at a pose where the figure is upright with the arms and legs straight, there are some very predictable proportions that apply. For example, the height of the head usually is approximately 2/3 of the height of the ribcage. One common set of proportions you may have heard is that the average body is 7 1/2 head height's tall. Now, while these are true, they are only true for this kind of pose. If you want to learn them, feel free. But what I've found as a professional is that I rarely, if ever, use these kinds of proportions. Now, I'm sure there are figure drawing instructors out there who would think this is a very controversial stance, but my position is that you don't need to learn general proportions. What you do need to do is learn how to measure the pose that is right in front of you, which will almost always deviate from those general proportions. In fact, in my experience, most students who study these general proportions tend to apply them even when the body is foreshortened, which makes their drawings look flat and inaccurate. Now, measuring can be highly technical and you should expect that it's going to require a lot more practice than most other aspects of the drawing process. In fact, when you're learning measuring and proportion, your drawings may get worse before they get better. This is very normal, so you should expect to do a dozen or more drawings before you make drawings that are accurate. Give yourself a lot of time to learn these skills and be patient. Now, as with most other parts of the drawing process, we would tend to want to start with the biggest relationships first and work our way down to the smaller relationships. This is something you're going to see me demonstrate today. We don't want to start off with the tiny details. We want to start off with the big picture. This guiding principle, which works for the rest of the drawing process, applies just as much here. Now, when you're using measuring techniques, you always have a choice to make at the beginning of your drawing. Do you want to start with the gesture and then start to measure the figure to see how accurate you were and make adjustments on the way, or do you want to start with the measuring techniques before you draw the figure at all, and then start to draw your gesture in relationship to the proportions that you have on your paper? In today's lesson, we're going to be focusing on proportional comparisons. I tend to find it easier to start by getting the basic proportions on the page, like the height of the figure, before I start the gesture drawing. When we get to angle sighting in the next lesson, I will start with a gesture first and then apply angle sighting. But these are just my personal preferences, you don't have to adhere to them. You should feel free to experiment to see what works best for you. Whenever you're ready, let's get started. In my original measuring and proportion course, you learned how to use your pencil or any other straight, rigid object to measure and extract a distance between two points on your subject, and compare that measurement to other parts of the subject to see how it relates in terms of size. By comparing the sizes of different parts of the subject to one another, we can collect a set of proportional relationships that we can then transfer to our drawing. We're going to use the same technique in this lesson, but we're going to adapt it specifically for use with the figure. As always, we want to work from big to small. I'm going to start by determining the height of the figure. To do this, I need to select one part of the body and compare its size to the overall height of the figure. Now, you'll often hear that you should start with the size of the head to see how many head lengths it takes to get from the top of the figure to the bottom, but I find the head small and it can be rather cumbersome to work with. I often use the head as a unit of measurement for other things. But when I'm trying to determine the overall height of the body, I tend to use the length of an arm or a leg. The specific part of the body you choose for each pose will change. The reality is, it really doesn't matter what part of the body you start with, whether you choose a part of an arm, a leg, or the head for your unit of measurement, you can use this process to extract proportional relationships. I'm going to use the distance from the bottom of the foot to the crease of the back of the knee for my unit of measurement. First, I need to get this unit of measurement on my pencil. Holding my pencil straight out in front of me with my elbow locked and my head tilted toward my measuring arm, you'll see me place the end of the pencil so that it appears to be touching the crease at the back of the knee. Next, I'll move my thumb down the pencil until it marks the location of the bottom of the foot. This distance will be my unit of measurement. I'm going to keep this distance marked on my pencil for the next few steps. Now, I need to know how many of these units it will take to get to the top of the figure. To find out, I'm going to move my pencil up so that my thumb is at the crease at the back of the knee. The top of the pencil now marks the location of double the height of our unit of measurement. Hopefully, you can see that the top of the pencil just happens to fall at the level of the coccyx or the tailbone. These kinds of happy accidents happen often when measuring. I didn't plan for this, it just so happens that this is where the end of the pencil lands when we double our unit of measurement. Now, this is very useful information when we start actually doing our drawing. At this stage, when you're first investigating the proportions of the figure, it may be helpful to write these kinds of things down or even make quick sketches where you can record this kind of information so you don't forget. Next, let's move the pencil up once again. Now, my thumb is at the coccyx and the top of the pencil now marks three times the length of our unit of measurement. Hopefully you can see that the top end of the pencil falls just below the acromion process, which is at the lateral end of the scapula. I covered this earlier in my gesture course. If you need some review on these kinds of bony landmarks, please revisit my gesture course. We now know it takes three of our unit of measurement to get most of the way up the figure. Hopefully, you can see that if we add another entire unit of measurement, it'll be more than we need and would go well over the top of the model's head. The question we need to ask now is what fraction of our unit of measurement will get us to the highest point of this pose. To figure this out, let's zoom in and focus on the upper half of this pose. Here we can see our top unit of measurement that starts at the level of the coccyx and goes up to the acromion process at the very end of the scapula. In my measuring and proportion course in the original art and science of drawing series, you learned how to visualize fractions of a unit of measurement. Take a look at our unit of measurement. To get to the top of this pose, would we need 1/2 of this measurement, 3/4, 2/3, or some other fraction? Let's start by visualizing what it would look like if we divided our unit of measurement in 1/2. Most people can easily visualize 1/2 of a unit. This is a great place to start, unless the distance you're trying to measure is clearly much more or much less than 1/2 of a unit of measurement. Now, that we visualized what 1/2 of a unit would look like, let's see how far this unit of measurement gets us towards the top of the pose. Hopefully, you can see that it gets us most of the way there, but not all the way. Next, let's visualize what our unit of measurement would look like if it were divided into thirds. Let's see if 2/3 of our unit of measurement will get us the rest of the way to the highest point of this pose. It's not exact, but it gets us remarkably close. It's close enough that we can apply it in our drawing. We now know that if our unit of measurement is taken from the bottom of the lowest heel to the crease in the back of the knee, that it takes 3 2/3 of these units to get to the top of the pose. Along the way, we discovered that the second unit of measurement hits the coccyx and the third unit of measurement hits the acromion process of the lateral end of the scapula right under the bulge of the deltoid muscle. Before we investigate this pose any further, let's use this information to start our drawing of this pose. I'll start by drawing a vertical line that runs up and down the entire page. Next, you'll see me mark the location where I want the lowest point in the pose to be. In this case, it will be the heel of the right foot. We know that the unit of measurement we're using to construct this pose was taken from the heel on our right up to the crease at the back of the knee. We know from our measuring that the full height of this pose will be three and two-thirds of these units. How do we get that on the page? Because the height has a fraction in it, I'm going to start by marking where four units of measurement would be. I'm going to mark this higher than I want the top of the drawing to be. Starting with four units, dividing the highest unit into thirds and then removing the top third is easier than marking where the top of the pose is and then trying to divide that entire line segment into three and two-thirds. With the top and bottom marked, I'll first divide this line segment into two equal halves. This may take you a few tries. You're welcome to do this by eye, or you can measure it using a pencil or any other straight, rigid object. You can even use a ruler. I like to always use my pencil unless the line I'm measuring is too long. In which case, I'll use a different measuring tool. Next, I'll divide each of these halves in half again. First, I'll make my best guess and then capture the length of one of these halves on my pencil and then compare it to the other to see if they're actually the same length. With the tip of my pencil touching the halfway mark of the lower segment, I'll mark the very bottom with my index finger. I'll compare this distance to the one above it. As you can see here, it's a little short. This means I need to slightly lengthen this unit of measurement. Once this is done, I'll capture this measurement on my pencil again and compare it. Here, you can now see that these two sections are equal in length. With this measurement still marked on my pencil, I'll apply it to the top half of the entire line segment, thereby dividing this entire line into four equal parts. Now, of course, we need this line to be three and two-thirds units high. Now I'll divide the top segment into thirds. Again, I'll make my first attempt by eye, and then I'll capture the length of one of these thirds and compare it to the other. I'll continue to make any adjustments necessary until each of these three segments is of equal length. To arrive at our desired height of three and two-thirds units high, I simply need to remove one of these three segments. We now have a line that is three and two-thirds units high. With these measurements in place, I'll begin my gesture drawing. Now, it's important to remember that most of our units of measurement lined up on very specific landmarks of the body. You'll remember that the top of the third full unit of measurement fell just below the lateral end of the clavicle, right below the deltoid muscle. The top of the second unit of measurement fell right at the level of the coccyx and the top of our very first unit of measurement lined up with the crease at the back of the knee. I'm going to make sure that all of this information is reflected in my simplified gesture drawing. With the basic gesture drawn in, and the height of the pose established along with some important landmarks on the way down, let's see what else we can learn about the proportions of this pose using our units of measurement. Now I've already investigated this pose using the full unit of measurement. Now I'm going to explore and investigate the model using the two-thirds of a unit to see what relationships I can find. I've already demonstrated how to get these units of measurement on your pencil. Now I'm just going to focus on the diagrams. But note that when I'm drawing from an actual pose, I'm going through this entire process using my pencil as a measuring tool. I'm looking for other parts of the body that may be similar distances to this two-thirds unit of measurement. After some investigation, I've discovered that the width of the hips at their widest point is nearly the exact same length as our two-thirds unit of measurement. I've also discovered that from the elbow to the end of the hand is also nearly exactly the length of our two-thirds unit. Additionally, the other section of the arm, from the armpit to the elbow is also nearly exactly the length of this two-third unit. Now, this seems coincidental, I know, but I promise you, I did not investigate this drawing much before doing the demonstration. I simply went through the measuring process I always use when measuring figures and found these kinds of relationships. By investigating your pose, by determining measurements and comparing those measurements to other parts of the body, you're sure to find these kinds of proportional relationships. Let's get this information into our drawing. Here I'm getting the two-third measurement marked on my pencil so I know exactly how long it is. Next, I'll compare this measurement to the hips at their widest point to see if I've made the hips the proper width. As you can see, the hips could be just a tiny bit wider, so I'm going to make that adjustment. Now, I'll make sure that the arms are the proper length. As you can see, I got them pretty close in my initial gesture. But of course, this was partially due to working out the proportions of the height before. This process can go on as long as you like. You can measure as many parts of the body as you like and compare those measurements to as many other parts of the body as you like. As you proceed and as you learn more about the pose, your measurements can get smaller and smaller. Once you understand this process, you can get creative in terms of how you apply it, and you're welcome to apply it as much or as little as you like. Remember, this is just a tool, it's up to you to decide how you use it. Now before we wrap this lesson up, there's just one more thing I'd like to show you. In my original measuring and proportion course, in the first art and science of drawing series, you learned how to use vertical plumb lines to see what parts of your subject lined up. This technique can be applied just as easily on the figure as with any other subject. For example, if we drop a vertical line down from the olecranon process of the elbow on our right, we can see that it lines up with the apex of the crease in between the bottom of the rib cage and the top of the pelvis. We can also see that both of these points are in vertical alignment with the little toe at the end of the foot. Here, we can see that if we drop a vertical line down from the wrist of the arm on our right, it aligns perfectly with the lateral malleolus of the ankle on our right. Again, the more you investigate using these techniques, the more of these kinds of relationships you're sure to find. This pose is not special, nor was it selected because it had these kinds of relationships. I just started with the pose that I liked and discovered all of these relationships along the way. Just as you will discover these kinds of relationships when you investigate the poses that you want to draw. Everything that you've learned from your investigations can be folded into your drawing. Remember for a refresher on the fundamentals for how to use these kinds of measuring techniques, please review the measuring and proportion course in the original art and science of drawing series. Once you've applied these kinds of measurements to your drawing, you can use the exact same techniques laid out in my gesture drawing course, my volume and structure course and my shading course in my art and science of figure drawing series. I've just demonstrated one possible way to measure this pose. But it's important to remember there are a near-infinite number of ways we could have done this. As I mentioned in the demonstration, I could have started with the measurement of most other parts of the body as well. I could have chosen the width of the rib cage or the length of a part of the arm. It doesn't matter too much what part of the body you start with. The goal is that you take that measurement and compare it to other parts of the body to find proportional relationships that you can use in your drawing. This unit on measuring includes three images for you to measure and draw from. For today's project, you can draw from the image we've worked with in today's lesson. You are welcome to apply the same process I demonstrated, or select a different part of the body as your unit of measurement. The other two images for these measuring and proportion lessons are for projects that will be explained in the next lesson. For now, go ahead and open the pose for this determining proportions lesson and start practicing measuring and proportional comparisons. Well, thank you so much for joining me in this lesson about proportional comparisons. I will see you in the next lesson where you're going to learn how to use angle citing.
3. Angle Sighting : Welcome back. In this lesson, you're going to learn how to use angle sighting. Angle sighting is my go-to method of measurement. I use angle sighting far more than any other type of measuring. In fact, in many drawings, it's the only type of measuring I use. But one note, angle sighting is the most challenging type of measuring to master. There is a lot of room for error in angle sighting, but if you want your drawings to be accurate, angle sighting is absolutely worth mastering. Now, unlike proportional measuring, I tend to find it easier to start with a gesture before angle sighting. The process I'm about to demonstrate is what I use for nearly every figure drawing I do. I start with a simple gesture and then start measuring using angle sighting. Let's get right into it. This is the pose we are going to be working with. As I mentioned in the previous lesson, angle sighting doesn't work all that well for poses that are upright. Like the pose that we use in the proportional comparison video. But angle sighting works great for poses like this, where the width to height ratio is much closer to being equal. Now remember, I'm assuming that you've already taken my original measuring and proportion course and that you're familiar with the technique of angle sighting and triangulation. If you're not already comfortable with those techniques, please go back and take my measuring and proportion course in the original art and science of drawing series. Assuming you're ready, let's keep going. First, we need to select three points on this figure. These three points will make a triangle. We want these three points to encompass as much of the pose as possible. The triangle that these three points make should be as close to equal lateral as possible. Triangles that are too narrow in any dimension are more difficult to angle sight and have a much greater margin of error. Finally, the three points we choose should be derived from obvious visual information. What do I mean by this? There's a lot of very subtle information on the surface of the figure. There are many subtle curves and minor shifts in a lightened shadow. We need our points to be easily seen and remembered. The points we select to angle sight should meet some basic criteria. Any apex on the figure you can find where two lines come together to form an angle will work great. Many bony protrusions and landmarks will also work, particularly at the joints like elbows, wrists, and ankles. Other obvious bony landmarks may include the suprasternal notch, the seventh cervical vertebrae, or the anterior and posterior iliac spines of the pelvis. I cover all of these bony landmarks in my gesture drawing course. There are other obvious surface landmarks you can use as well, including the navel, the nipples, or even the eyes. Of course, not all of these landmarks will be visible in every pose. There are many other points you can use on the figure that I haven't mentioned here. Any point that is specific and obvious will work. For my first point, I'm going to choose the apex where the contour of the back of the neck meets the hairline. Now there are many other points I could have chosen that would have worked nearly just as well. I like this point because it's at the top of the figure and it's had an obvious and easy-to-remember location. I know I need to choose three points that create a triangle that encompasses as much of the pose as possible. For my second, I'm going to choose the very end of the little toe of the foot on our right. For my third point, I'm going to choose the very end of the big toe of the foot on our left. Again, these three points seem obvious and memorable. You can see here that these three points create a triangle that contains most of the pose. But again, I'd like to stress there are many other triangles that are made up of other points that would have worked just as well. This is not the single correct solution. As long as your three points meet the basic criteria I laid out, they should work just fine. Before we go any further, let me show you how to use these three points in a drawing. As I mentioned before, when using angle sighting, I find it much easier to begin with a simple gesture before I angle sight. This helps me get the pose on the page at roughly the size and location that I want it. When drawing this initial gesture, I'm trying to get it as accurate as possible with my eyes alone while still maintaining an expressive and dynamic quality. Here is a very basic gesture that's similar to what I laid out in the early lessons in my gesture drawing course. With a gesture drawn in, it's now time to apply our three points. The first point is by far the easiest, we just get to decide where it goes. The first point I'm going to place is the one at the back of the neck where the contour of the neck meets the hairline. Assuming we like the size and placement of our gesture, I can simply place this point at the apex that we discussed earlier. Placing the second point is a little more challenging. Now, this process should be familiar to you from my measuring and proportion course. But here, I'm going to show you how to apply it specifically to a figure. I'm now going to place the point at the lower right of the pose, at the end of the small toe. I'm going to take my pencil with my arm held straight, with my elbow locked, and my measuring eye tilted towards the shoulder of my measuring arm and I'm going to get the direction between these two points locked onto my pencil. Then very slowly, without tilting the pencil, I'm going to bring it back to my drawing to see what it looks like in relationship to our gesture drawing. Once I have a good sense what direction my line needs to go, I'm going to make my first attempt at drawing it. This line should be drawn incredibly lightly. I'm actually drawing it much darker here than I would if I were drawing privately. This is so that you, the student, can see it. Once this line is drawn, I am not going to assume that I got it right the first time. I'm going to bring my pencil back to the pose, get this direction locked on my pencil, and once again slowly bring the pencil back to my drawing to see if the line that I drew accurately reflects the direction between these two points on the pose. As you can see here, the line that I drew accurately reflects the line between the two points on the actual pose. This doesn't often happen, and I'm sure that later on in this demonstration, I won't get it right the first time and I'll demonstrate how to correct for this in your drawing. But for now, let's just take the wind and move on. I know that the point we're trying to place must be placed somewhere on this line. Now before we place this point, it's essential that you understand that this is our last opportunity to scale the drawing up or down in size. If I wanted my drawing to be smaller, I could place it much closer to our first point. If I wanted the drawing to be much bigger I can place it further. You can see that my initial gesture was close to properly placing this point, but the correct location for the little toe should be more to the right than what I've drawn in my gesture. I'm going to move the foot in my drawing back slightly so that the small toe lines up with the line we extracted from the pose. With the second point placed, all other points must be placed in relationship to these two, the size and placement of this pose are now locked. To sum up, the first point, we just get to place. Wherever we place it, it will be correct assuming that our gesture is at the size and location that we like, we can simply place the point in relationship to the gesture drawing. To place the second point, we extracted the direction between the two points found on the pose and drew this line in our drawing. Now we could have placed this point anywhere along this line and could have scaled to the size of the drawing up or down if we so desired, because we liked the size and placement of our initial gesture, we placed the second point in relationship to it, moving the foot and the little toe over just slightly to maintain the overall size and placement of the gesture. Using these two points, we are going to triangulate the location of the third point. Once again, I'm going to hold my pencil up to the pose and tilt the pencil until it is going the exact direction of the line going between these two points. With the angle locked on my pencil, I'm going to slowly bring it back down to my drawing to see what it looks like in relationship to the gesture drawing. Once I have a sense of it, I'm going to make my first attempt at drawing this angle. Now I need to double-check it because I never assume that I've got the angle right the first time. Once again, I'm going to hold my pencil back up to the pose, get the angle on my pencil, and bring it back down slowly to my drawing, making sure the direction of the pencil doesn't change or slant in any way. As you can see, my first attempt at this angle was incorrect. But instead of simply erasing the incorrect line, I'm going to note the difference in angle between the incorrect line I first drew and the correct angle indicated by my pencil. Once I have a sense of how to correct this angle, I'm going to make my second attempt. Whenever I change in angle when I'm angle sighting, I never assume that my correction is correct. I want to check it again. I'm going to go through the same process of getting the angle on my pencil and comparing it to what I've drawn. As you can see, the angle that I drew is now the same as the angle extracted from the pose itself. Now I'd like you to note that I've drawn this line longer than I need it to be. This line extends well past the big toe on our left. This is because I'm not confident that my initial gesture drawing was correct. We may need to move the foot to the left and I want to make sure that the line I drew is long enough to accommodate this. We know that somewhere on this line is the location of our third point. How did we figure out where exactly this is? We're going to triangulate it. Once again, I'm going to go back to the pose and get the angle on my pencil between the point at the base of the neck and the point at the end of the big toe. I'll go through the same process I just demonstrated to make sure that the correct angle makes it into my drawing. Assuming the angle I've drawn is correct, the third point is located where this new line intersects the second line we drew. Now we have all three points properly placed in the drawing. Now I'm going to set to work adjusting the initial gesture drawing to take into account the three points we've just angle sighted. Once this is done, you have a decision to make. Do you just want to get back to drawing or do you want to figure out the location of other points of the pose? You're welcome to use angle sighting as much or as little as you like. Some artists use it dozens of times in every drawing, other artists use it sparingly, feeling comfortable moving forward with the drawing as soon as they've placed three points. With these three initial points placed, you can now use them to triangulate the location of any other point on the subject, creating a constellation of accurate and measured points. Let's say I want to figure out where the knee on our left is. I can go through the same process I just demonstrated to triangulate the location of the knee using the lower two points of the pose in the drawing. With every new point you place, you can adjust your gesture drawing to reflect this new information. The more points you measure in place in your constellation, the more accurate your drawing will be. In addition to accurately placing points, angle sighting has other uses as well. Angle sighting can be used to help block in the contour of a pose. I covered the block in technique in my contours course in the original art and science of drawing series. Simply put, blocking in a subject involves translating the contour into a series of straight lines. In this diagram, you can see I've translated the contour of the back into straight lines. Blocking in the contour of your subject helps add structure to the curves. To help with a block in, you can use angle sighting by holding your pencil up to part of the contour of the pose. Here, you can see my pencil running along the contour of the neck and upper back. With the angle captured on my pencil, I can bring it into the drawing. I can repeat this process to block in as much of the contour as I need. Now, accuracy is important to me, but it's not everything. In most drawings I do, I tend to angle sight somewhere between three and seven different points. But I'm always looking for that moment where I can just get back to drawing freely. There's one thing I love about these measuring techniques. I can use them when I need accuracy in a drawing, but it's entirely up to me how much I use them. Now before we wrap up this lesson, there are just a couple of other ideas I'd like to share with you. So far with angle sighting, we've talked about starting off angle sighting three different points on the figure. Next, we talked about the idea of creating a constellation of accurate points in your drawing. We can also use angle sighting for a technique called enveloping. Enveloping is the act of angle sighting all of the points at the farthest edge of the figure. Enveloping will create a shape that covers and contains nearly the entire figure. Enveloping is just one additional way you can apply the tool of angle sighting. The final idea I'd like to share is that you can combine proportional comparisons and angle sighting in the same drawing. There's no right or wrong way to do this. You can start with proportional comparisons and then use angle sighting or vice versa. You can use either as much or as little in a drawing as you like. But it's important to remember that they should be mutually supporting. If when you use these two techniques in the same drawing, they're giving you different information, you are doing one or both of them incorrectly. I recommend mastering each of these techniques on their own and then experiment with combining them. See you can figure out a process that works for you. As we're nearing the end of this unit on measuring, there are a few ideas I'd like to share with you. The first is that measuring really limits the amount of exaggeration you can do. Measuring is designed for accuracy and exaggerating the dynamism of a pose by its nature is not accurate. If you want to exaggerate your poses, it really doesn't make that much sense to measure them. In an exaggerated pose, you can use measuring in subtle ways, like to make sure that the width to height relationship of the rib cage is correct. But overall, exaggeration negates the measurements and proportions found on the reference pose. Next, you need to understand that measuring is just one tool in your toolbox. If you want your drawings to be hyper-accurate, you should measure a lot. But if you're more into exaggeration and drama, you don't need to measure quite as much. That being said, I still think it's very important to learn how to measure so you can do it when you need to. That way you can have control over what parts of your pose are exaggerated and what parts need to be more accurate. But ultimately, how much you use measuring is up to you. If you want your drawings to be more accurate, measure more. If you want your poses to be exaggerated, you can measure less. Finally, I'd just like to remind you that measuring and proportion take a huge amount of practice to perfect. You need to be patient with yourself. You're going to go through a lot of drawings that don't quite work out before you master these techniques. Measuring is a very precise process that takes a lot of time and practice to master. All too often I have students who watch a lesson like this and expect the next drawing they do will be perfectly accurate and perfectly measured. This is unrealistic. This small unit of measuring is hyper-focused on how to apply measuring techniques to the figure. But as I've mentioned before, I've taught measuring on its own in-depth in my measuring and proportion course in the original art and science of drawing series. In order to take your figure drawings further, I have my gesture course, my volume and structure course, and my figure drawing shading course. Those three figure drawing courses will teach you how to go beyond the drawings in this lesson and how to do fully finished in dynamically shaded figure drawings. Now, let's get you practicing. For today's project, I've included an image of this pose. You can use this image to practice angle sighting. You're welcome to begin with the three points that I demonstrated, or you can pick your own points. Once you've had some experience in angle sighting, I've included a third pose that you can use to practice combining both angle sighting and proportional measuring. As important as it is to practice angle sighting and proportional comparisons on their own, for these techniques to be truly useful, they need to be incorporated into your overall drawing process. After practicing with the three images that I've just mentioned, I highly recommend using the practice reels in my gesture course, in my volume and structure course to incorporate these measuring and proportion techniques into your overall figure drawing process. Drawing from these time to practice reels is an excellent way for you to speed up your measuring process. This combination of accuracy and efficiency will bring your figure drawing to a whole new level. Well, thank you so much for joining me and I hope to see you in some of my other figure drawing courses.
 Brent Eviston, Master Artist & Instructor