Transcripts
1. Course Intro: Hi, I'm Josh appears and I'm thrilled to welcome you to my online course and the artificial storytelling. The main goal of this course is for you to understand how visual storytelling works so that you can create more meaningful images. So I will not be teaching you the technical part because it's perfectly possible to learn that on your own. We will be learning to think and 2D conceptually. We'll be diving deep into our minds and tools so that we can find those meaningful ideas in this online course, I have collected all my knowledge and experience and still this into ten learning modules with lots of practical tasks. In this ten weeks, we'll learn about five basic rules to help you tell great stories with your photos. Practical techniques for generating ideas instantly. Ways of greatness, authentic, meaningful work that will resonate with your audience, will talk about what to do when you get stuck and discover simple tools for illuminating creative blocks completely. We will also discuss why and when to work in a serious and not individual images. As a result of completing the course, you will understand how to tell meaningful visual stories. Train your mind to easily come up with concepts. You won't ever be afraid of having creative blocks. Again. You'll have a clear roadmap of ideas for your future conceptual works. And together we will generate a topic for a series of works for you. And of course, you will also need your creative peers from all over the world to be able to fully participate in the course, you will need, first of all, personal computer with Internet access camera, which you are comfortable with. This is recommended but optional since you won't be required to shoot a lot. Next from two to six hours per week to complete the exercises. And what's very important is intentional self-awareness and thoughtfulness. And of course, lots of enthusiasm and desire to experiment. I believe that the most valuable part of this course is the practical one. That's why I want you to actually benefit from all the materials I gave you and put into practice right away. I've prepared a lot of practical exercises for you. However, I understand that we're all can be pressed for time and have busy lives. That's why I don't expect you to shoot for every task, but at least draws caches and dried explanations to them. So yes, in this course we're going to talk a lot about creating magic, surprising people, and telling visual stories. I know that it must sound very interesting and exciting, but at the same time it might be a little intimidating as well. I guess that you are here because you want to shoot images that are similar to mine. But let me guess there might be doubts. What have I don't have the talent. But if I don't have the ideas, what if my life is boring and I don't have a story to tell, What if I don't know how to tell stories? What if I don't have the right background to set him in the right mode for this course. Let me tell you this. You can shoot like me or even better. There is no such a thing as special talent. You can and hopefully will tell deepest worries him better ways. You can arise your creativity to amazing new high levels, but you need to work for it and the work a lot. And in this course and with this community, you have a very safe space to do this.
2. Module 1: The Mastery Pyramid: Before we dive into the meat of the course and speak past hotel with photography, let me share the mastery pyramid with you. Here a couple of my thoughts on how you can arrive to the stage of when you create. Those are fantastic, meaningful stories we all want to create. Let me share the master pyramid of yeah, this was created by me and it reflects my viewpoint on recombinant great photographer or any other type of art is. So you can either agree or disagree with it. But this is how I say it. First, you have to recognize the interest in your area. You have already found yours visual art, either photography, videography or any other form. But you already have a deep curiosity about expressing yourself visually. And then comes the practice stage. Can also call it the creation stage. When you're interested and have small wind and your area of interest, you are motivated to explore this area more. This is the stage when you create our lot experiment in discovering, failing, copying, imitating, surgeon for yourself and your style and doing it all over again. At some point, your visual art begins to be clearly recognizable. And this is what I call the style stage. At this stage, you know a lot about your craft and can play with it already. You also get an understanding about your visual preferences, which visual elements you want or don't want having your works. And only after that, you can create those meaningful images, those impactful masterpieces were all wanting to create. This is the level of where some of us get stuck because the visual part of the stylist there, you have the work that we create does not bring the fulfillment that we want to get from being a photographer in the first place. What he needed, the stages, the learning they experiences, they are realizations. They resolve the issues from the past and the overcome traumas, self-development, if you will. Those things help us become better artists and make our work deeper and more authentic. And while you're doing all that work on yourself, you can create those meaningful images that you are learning to create, those impactful masterpieces. And this is my definition of mastery. Being able to create deep, meaningful work that resonates with other people and makes an impact. And please don't be intimidated by the word Mastery. I believe that it's available to all of us. And again, come in a variety of shapes and forms. Two masterpieces don't have to be on museum walls. If that's not your goal. They can simply make the life of other people more beautiful, warm, emotional, comfortable. But most importantly, they will be a way for you to express your unique self to the throat. And they will make you a happier human being. But only if you do all the work, which won't be easy. But real art is not supposed to be. This is why it's called Art. Many of you are at the level of wanting to somewhat at the level three of this parent. If you are in the very bottom of this ladder, just know that it's okay to be there. Just give yourself time and let yourself explore the artist within you. It will all come with time. And my hope is that the artificial storytelling will help you with us.
3. Module 1: What is Conceptual Photography?: In this lesson, I want to say a few words about what is conceptual photography and how it is different from other types of photography. I'm sure you've heard the term conceptual photography a lot. We all understand what type of photography this course is about. However, still, there is no clear definition to it. Some people call it conceptual sum, finite sum, creative, some dreamlike or fairy tale like tetra. Others speak the word storytelling. However, there are three basic features that differentiate this type of photography. And they are, first of all, conceptual photography is staged, meaning that you consciously select the models, the location props to create an image. It always uplink, go and search for a scene in the streets. You don't capture real life moments. It's not a documentary or rubber Taj. With conceptual photography, often you imitate some sort of an environment that helps you to introduce some concept. Therefore, when speaking about conceptual photos will be talking about different elements of an image like co-location, light, colors, a tetra. Next, conceptual photography always has an idea or concept behind it. This is the y that the photograph is created for. Usually there is a topic, a theme, or a problem that deeply interests the photographer. That's why he or she wants to shoot this particular image. Sometimes this idea or theme reveals itself only after the image has been created, but it's always there. Nevertheless. The next conceptual photography is open to interpretation. And that's the best part of conceptual photos. They're like novels that will be interpreted by the reader base on the reader's background and view of the world. The interpretation can sometimes be very different from what the artist had in mind. This is what usually makes such images intriguing, entertaining, and thought-provoking. You can tell stories with any type of photography, not just real fine art. It can be Street, travel, portrait, fashion, or even food photography. In our next lessons, yet, we'll be focusing on conceptual photography mostly. If you have tried shooting a conceptual image before. Do this simple exercise, take your conceptual photo and show it to three of your friends. Ask them what the scene, the image, what's this tour that pops up in their minds? What kind of emotions do they feel when interacting with the air fall? You'll be amazed by how different the answers might be from each other and from what you had in mind when creating your work.
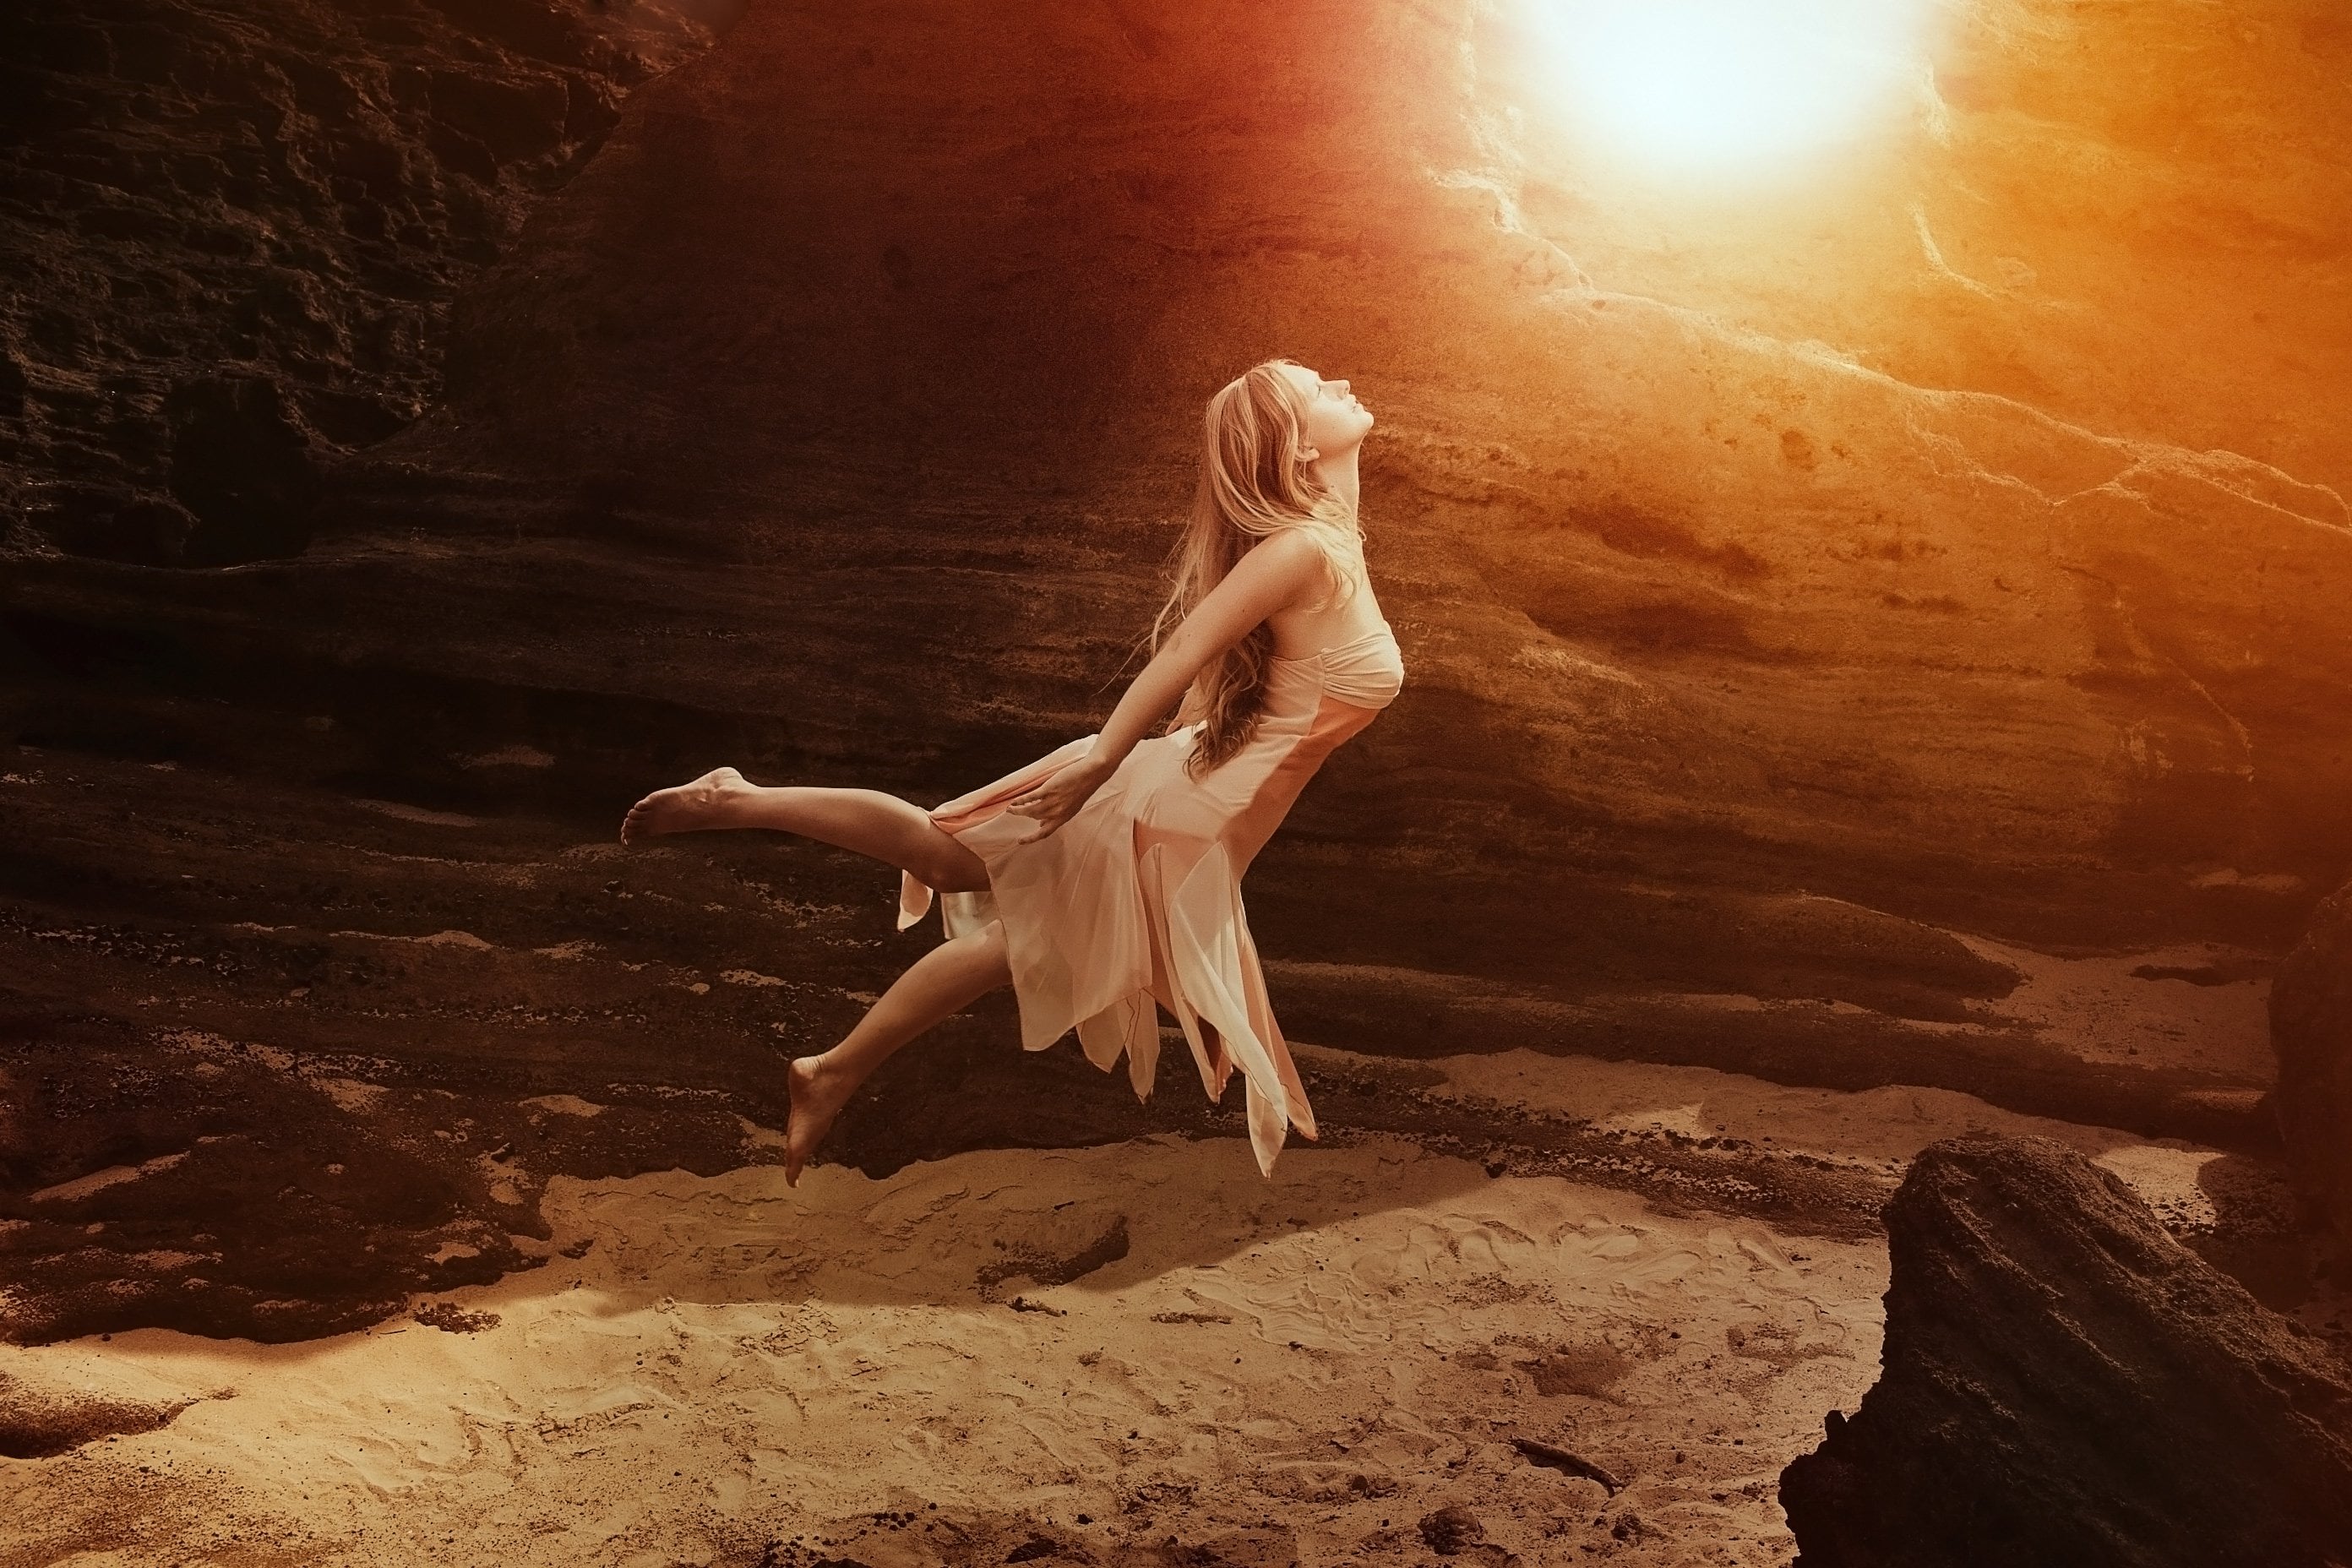
4. Module 1: The Importance of Being a Storyteller: It's not a coincidence that in today's contemporary art world, which includes photography as well, galleries, curators, brands are assertions for photographers who are able to tell great visual stories. Good storyteller letters are in great demand. Let's take a closer look at why that happens. Visual storytelling has become sort of a buzzword today. Yet there's still a great deal of ambiguity about what visual storytelling is and why it's important. The term is relatively new and there is no generally accepted definition to it. Wikipedia advantages as very simply a story told primarily through the use of visual media. Yes, the term is new yet visual storytelling existed for ages. Since humans first walked on the earth, they have told stories and visual stories came way before the written and spoken ones. Remember the cave drawings? Yes, these were the first visual stories. Here you can see the world's first cave paintings in a cave in Indonesia. It was created 35 thousand years ago. And by the way, texts was invented only 32 thousand years later. After the animal Han stories, we came all the way to today's visual arts such as photography, picture books, comics, video games, Instagram, Snapchat, Hollywood, 3D movies, and virtual reality. So besides being the first means of human communication, why is storytelling important? And why should you have it as key component to reemitted? Here out my top six reasons. And first of all, a story attracts attention and led to keep it. In today's world when humans are buried and all sorts of visual information grab their attention becomes crucial. Status show that human attention span has become less than that of a goldfish. Just think of it. Today, it's eight seconds. That is a whole second less than the nine seconds of attention span of average goldfish. And if you want your work to be seen, you need to come up with something that will immediately catch your audience's attention and hold it. And the story is the first thing that speaks to the viewer of the image. It keeps us interested in what's going on in the frame. We can then guess what happened before and what will happen after that, what is shown in the image. We can come up with a whole narrative for the main subject while we see a photo. That's why historian 3x viewers and draws them into an image. Second reason would be a story makes people remember your idea. Yes, stories are remembered much better than facts and therefore are easily reproduced and passed on further, we forget names and faces. We forget what we learned in high school algebra. Well, because it was high school algebra. But a good story, we want forget it. This largely happens because tourists picked to our emotions and when we connect facts with emotions, they are remembered better. Ever wondered why Coca-Cola and vantage of the contemporary look for Santos. And he uses it up until this day in it's commercials. Let me give you another example. And both of these photos include red tape, yet the photo on the left does have a story. We can interpret what's going on and the image in multiple ways. We can think of what happened before the image was taken and what will happen in the future would definitely centers thrown motion that's coming from the image. At the same time. When we see the picture on the left, we don't feel any emotions on the facts are represented here. Now, let me ask you this. Which one of them will you remember better? I think the answer is clear. And now the third reason as story is impactful. And like a simple image that only gives random data or facts as storytelling image inspires people, makes them think and feel. In other words, it can have a bigger impact on viewer. Often a story makes people change their beliefs, attitudes, and opinions. Just think about it. Once again. It can change people's beliefs, attitudes, and opinions. Great stories help us illustrate facts and help us understand some phenomenon better. Through this, they also can easily transform our behavior and facts alone cannot. Theme, which is you capture, can be not just about you. Perhaps you want to shine a light on a social cause or an injustice, or simply made people recognize or become aware of some things going on around them unnoticed. In these situations evoke in strong emotions through storytelling, photography can make social changes or compelled people to act. Let's take a look at this photo by Tyler shields as an example. Here's what he says about this image. Belly requires a level of dedication most people are not willing to give. There is something about pushing past that point where people say you're crazy and you know that you're doing exactly what you're meant to do. Success doesn't come without hard work. Now think about it. Would those words or some stats about dedication of valid enters make the same impression on you as this image. I highly doubt that. Now the fourth reason, it helps you stand out and brings commercial success. Now, getting back to what we started with, yes, rant, galleries, collectors and dire buyers. And even, or maybe spatially couples looking for a wedding photographer will route more for those pros who can tell a solid story with our work. Why? While let's face it, photography without storytelling is just a commodity. Any photographer who is technically good, but takes photos of just facts. And here you can think of webstore picks, passport photos, crime scene photos can be easily replaced by someone else who does the work faster, cheaper, or better. Now, if you ask me, can you be successful commercial without storytelling aspect being present in your images? My answer will be yes, especially when you create those commodity photos like Webster picks, look books, passport pictures, and on many photographers who can get technically perfect shots of anything. And the story is not as important for them. And they don't have to send out their main technicians. How whatever the truth of live is such that technicians can be easily replaceable. Why? Exactly because they are not unique. Anyone can do what they do. Storytellers are different. You might like or dislike the storage detail, but you will definitely recognize their images and remember them. Now, if you want to put your work on gallery walls, stories told Naughton, random individual images. But in coherence series of works will be what curators will ask from you. Galleries know that in order to buy, art, collectors need to connect with that. They have to understand it. This is why I've included a whole module on telling your stories in series. And by the end of this course, you will have a shiny brand new series of your own mapped out and ready for shooting. Reason number five, a story bonds you with your audience. In the digital age, we're more connected than ever before. Yet so many of us feel disconnected. Why are we on social media every day? And what our surgeon foreign Google, a human connection and more experiences told through stories. Often the strongest connection emerges when people's histories that are similar to their own, Those stories help them feel not alone. For example, if Dane or Bill, who had a deep trauma and year story which reproduces their situation. They might understand that the things that happened to them also have happened to other people. And if those people were able to overcome the hardships than Jain and bill will be able to do that too. And this is also why the best photos are based on personal stories which are hard fell by the photographer. This is one, a deep connection between the viewer and an artist has established. And this brings us to one of the most important reasons to tell a visual story. Reason number six, a meaningful, heartfelt story allows you to find filament in your work. Isn't this what all of us are ultimately looking for? Self-fulfillment, which by definition is satisfaction or happiness as a result of food developing one's abilities or character. This reason is not often talked about, but I feel that it's tremendously important if you're committed to photography or any type of visual art, not only as your profession, but something more called passion, calling life path or something else, your work will only bring you fulfillment. You are completely aligned with the stories you tell. I deeply believed in that. If you are not afraid to go deep inside yourself, find those stories which speak your truth and have the courage to tell them publicly to the world. Those visual stories are most impactful, most remembered, and give you the most contentment with what he do. Finding those stories requires work. You will be able to find them by looking inwards and understanding yourself better. This includes your choices, motivations, your values, your interests of course, will be doing exactly that during this course, together with you, is visual storytelling limited to just conceptual photography? Of course not. So for this lesson's exercise, I ask you to find three examples of photos that are not conceptual, but still tell a story. They can travel wherein documentary, family or food photos. It's up to you. Summarize the story in one sentence and upload your images with short summaries of the stories told them them to our learning space. Meanwhile, congrats on finishing the first learning module of this course. Now, what I want you to do is to reflect on what I have just learned and tried to understand what was your biggest takeaway from this module. What I want you to do next is to go to our Facebook community and share it with others. Because this is the most effective way that you're going to learn. In our next module, we're going to dive straight into five basic rules of great visual storytelling. I cannot wait to share them with you until next time.
5. Module2: 5 rules of great visual storytelling: Rule#1: In this model, we gotta speak about five basic rules of great visual storytelling. I have chosen these five because I think that they apply to any visual story. And in my opinion of them, the most important ones. This list is not limited, of course. And if you know any other rules, please go ahead and make a shout out. In our learning community. There are a number of roles for storytelling and writing, and there are also rules for visual storytelling. I've tried to come up with a combination of those that you can apply to make in the story's inner images more prominent and compelling. So what are the five basic rules of creating great visual stories? And first of all, great visual stories appeal to our deepest emotions. I'm sure you have experienced a variety of emotion to yourself when looking at a particular image. So let's dig deeper into vests. Psychologists generally agree that there are six basic emotions. Anger, disgust, fear, happiness, sadness, and surprise. The best photographs are those that can evoke your deepest emotions. That can make us excited to laugh or cry or feel empathy for someone else. Here's where we first arrive at the notion of self-awareness, which basically means knowing yourself and being aware of your personal emotional triggers. Being able to understand yourself is crucial for impactful storytelling. The more you understand how or when your own emotional strings are pulled, the more you will appreciate how that works in other people. And the more you'll be able to use those emotions in your stories, peaks are direct repeat actor puts it like this. What you are trying to do when you're telling a story is to write about an event in your life that made you feel some particular way. And what you are trying to do when you tell a story is to get the audience to have that same feeling, you need to consciously be able to recognize these various emotions in yourself. And think about the why, why you feel in a certain way when you're looking at an image? Or take a wider look and ask yourself, why am I feeling this way in this life situation? How might you be able to take the why behind your emotions and tell a story? Continuously questioning yourself in certain stamp, your own emotional reactions to images, life situations and stories told in different ways. When you do that, you learn to tell more authentic stories, yourself. Stories that can actually move people. The interesting part about photography is that it can be emotional without actually show when emotional expressions in people's faces in a creative conceptual photo, they emotion is often communicated through the environment, location, color palette, props, depth of field. Tetra. Take a look at these two images. On both of them, you will see houses in the countryside. Yet emotions that you get from looking at them are totally different. The image on the left is more likely to evoke happiness and joy at the same time, the image on the right seems to be gloomy and sad. What makes these images so different? Think about it. I'd say it's the use of light colors, season, location, and maybe you can think of something else too. If yes, please make a shout-out in our online community health, the image on the left is shot on a sunny summer day, houses surrounded by beautiful greenery. The house itself looks very preteen neat. The colors are very saturated, right? On the contrary, they image on the right uses a faded color palette. There was taken on a cloud and gloomy autumn day. There are no leaves on the trees and no live in the forests surrounding it. The houses obviously abandoned. And it makes you think of loneliness and even death. Perhaps. Another example is from food photography. Who these are two meters of Donald's. However, feelings that we gather from them are completely different and the image on the left seems to bring, has feelings of joy, hope, and tear. It probably can remind you of a morning on a spring day, it's very light and write the image on the right brings positive emotions too, but of a different kind. It's Moody. It's probably will make it think about it. And dark winter evenings, a cup of hot chocolate and the pair of woolen socks. Do you agree? How's the difference in the emotion's conveyed? And again, it will be through the color palette, through prompts or lighting and location or background in this case. Now let's take a look at these two photos. What kind of emotions do they evoke near the image on the right has all the bright saturated colors and therefore looks tearful justice the one on the left. Yet there is a slightly different shade of an emotion here. And the emotion can change as we will look at the photograph for a longer time and try to understand the details. Yes, there is a couple of very ordinary dots here, but there is also one disturbing detail, a chain between them. It might remind you of handcuffs used by the police. And this association can bring yet another wave of emotions. To me. The image on the left is a reflection of pop culture with all its pros and cons. Also, this chain element can make you think of addictions. People have food addiction being one of them. Do you agree both of these are food photos, but the one on the right is also conceptual and it has an element of surprise that immediately grabs your attention, will talk about surprise elements in the future lessons. So to summarize, in visual stories, emotions can be conveyed through light in color, palette, locations, or backgrounds, props Is that it? Of course not. Now, let's take a look at these two portraits. In both of them we can see the beautiful face of the famous fashion model, Natalia the Danelaw. Yet the fuel that we get from each of these images are profoundly different. Take a minute and compare the two photos. You'll notice that the strong emotions in the portrait shot bipolar row receipt, which we see on the right, are shown through light, location or setting, clothes or its absence. In this case, makeup and hair style, bows of the model, expression on her face, the direction of her look, the angle from which the photo has been taken. Does this list missed something? If you have a suggestion of what can be added to this list, please share it in our community. So now you know by which means you can add a certain emotions to her portrait. And what details you need to keep in mind when you tried to communicate your emotions to the EU fewer. Now it's time to practice. And our first exercise in this learning module is understanding emotions in photography. What I want you to do is to take the six basic emotions, anger, disgust, fear, happiness, sadness, and surprise, and find one image that illustrate each of them. So six images. The image can be anything, documentary wrapper, dodge advertising, wedding picture, whatever. But it has to really convey an emotion. Pointed out the elements that communicate that emotion to the viewer. Is it the color palette is a dislocation? Is that the expression on the subject's face, right? All those elements next to the picture and upload your six images to our learning space. In the next lesson, we'll be talking about rule number two. All great stories are clearly structured. What it now.
6. Module2: 5 rules of great visual storytelling: Rule#2: So the second basic rule of great visual storytelling is that great stories have a clear structure. So how does this structure look like? Great visual stories have, first of all, your subject, the character. The main question here you need to ask is who? Then as setting the situation, that character is n. And here we answer the questions of when and where, and then narrative, plot, what's going on with the character? Ideally, it's some kind of a transformation. Questions that we ask here are what and why. Your subject is a character your viewer can identify with and placed themselves in new subjects shoes. It should be at least someone who the viewer will be emotionally invested in. Your subject, your hero, l, leading character should be noticeable and significant within the entire scene or frame. There are a number of ways to do that, either by focus and depth of field, by composition, leading lines, sub framing, or by crop. And your image will be getting back to those and explore on them more closely in the following modules, your setting is the location where you take the photo. It's up to you how much of it you want to show in the image. But the more you show the location, the more information you provide about the character and the situation he or she is. And maybe that's why I rarely take close-ups allowing the location. I'm sure going to be the part of the story. Next narrative. The narrative, the actual historic, can be shown in the form of movement. Both clothes, props, makeup and hair style, and other details that are present in your image. All of this will give your viewer more information about the character and what's going on with the character. Your subject saying and narrative is basically your shoots a DEM. How the story's told, written this information the viewer understand or comes up with his or her idea for two major things. What the story is about, that means what you can actually see happening in the image. And then the next one is what the story is really about. The concept, the idea behind the chart, the thought a photographer is trying to communicate through the image. Let me give you an example from my works. So the character in the story is a girl or a woman. She's sitting alone on the seashore. The setter here is open sea, which is common, peaceful, basically perfect weather for a sea trip. The atmosphere is sort of mood in gloomy due to the cold tone of the photo, the narrative. She's sitting at the embankment hold in a cage with a paper ship inside the looking at the calm sea. So what is this story about? Very plainly, it's about a girl that has a paper boat and a cage. What does the story really about? Here comes the interesting part, the interpretation. Why is this interesting? Because in conceptual storytelling, photography, the story can be interpreted in several different ways, in multiple ways. Actually, often conceptual photography uses symbols which can also have different meanings and in different situations will go back to symbols and talk more about them in the following modules. Here is my interpretation of the story. It's a story about holding yourself back, about NOT lighten your dreams come true about staying safe in the cage. So the paper boat represents a dream and the girl doesn't want to let it float in the waters of the sea, even though they are con. However, this story can be interpreted in multiple different ways. And what would be your answer to the question? What the story is really about? I would really love to know. So please share your take in our online community. This lesson's exercise is on understanding the structure of the story in a photo. So what I want you to do is to find three photos in European telecom pound storey tried to see the structure of the visual story and write it out. So you need to answer the questions. Who is the character and what is he or she like? What's the setting of the story, when and where it's happening? What is the character doing? What is happening to him or her? And how then watts, the story is about. And the big one was the sari, is really about. I want you to upload the three images with nodes to our learning space.
7. Module2: 5 rules of great visual storytelling: Rule#3: We continue to talk about the five basic rules of great visual storytelling. And in this lesson we'll be discussing rule number three, which goes like this. Great stories have a clear purpose. The main questions to answer here are, why must you tell this particular story next, what's the belief burning within you that this story feeds off? Third Vonn, what greater purpose does this serve? What does it teach? When you have a real purpose for talionis story, your story will have a bigger impact on the world. Integrity with what you create is key. I deeply believe that if you don't understand why you create what you create, why shouldn't those images is important for you? You stories will not be as powerful and even more, you won't be able to sustain you Photography and artistic real long-term. However, if you do assign some sort of a meaning to your work, you have a reason to go on anon with it continuing to make an impact? How do you find that meaning? You will ask, my short answer is, while looking inward and understanding yourself better, your choices, your motivations, values, and your interests of course, will be doing exactly that during this course together with you, can your image a battalion, a story without you knowing what kind of story that is and why your town it, the answer is yes. In fact, some visual artists, including me, start this way. They get a burning desire to create a story, but they don't consciously think about the emotions their viewers will have when looking at very limited. Perhaps you will be very familiar with this as well. Do you know the feeling when you simply pour your emotions into your artwork without thinking of any particular reason why you do it. What's the impact of your work will be if you are not in your head right now, know that you're not alone. And there is space for this type of creation to, in fact, is hugely important, especially in the very beginning of your artistic journey. Yet, when you mature as an artist, your soul longs to assign a deeper meaning to a random image. You can come up with a meaning for visual, sorry, even after it has been created by thinking of what was influent New York read Ed will talk more on how to do it in the common lessons of the course. Now, off to rule number four, great stories are simple and focused.
8. Module2: 5 rules of great visual storytelling: Rule#4: We continue to talk about the five basic rules of great visual storytelling. And in this lesson we'll be discussing the roll number four, which goes like this. Great stories are simple and focused. Don't get lost in the details. Do notice when people tell stories that seem to ramble forever and never lead to anything boring the hell out of whoever's listening. A visual story is the same, if not worse, too many details and you lose your viewers attention. People are busy and exposed to way too much information today. Delta, where to focus right and clear the structure of your picture, your composition is key for this as a good photographers now, and the way you arrange things in your frame can speak volumes by itself. I'll give you a couple of quick examples here. For instance, eliminating unnecessary details and add a negative space to your image will help the viewer focus more on your subject and less on everything else, including other images. Let's compare these two images. Which one of them are likely to remember? I bet it's the image on the left who work by Rodney Smith, one of my favorite photographers. And why do you think you'll remember it better? Well, because it's focused and lacks zillions of unnecessary details. And the same time the image on the right overflows with information, too many colors, too many accessories. You get the idea.
9. Module2: Module2: 5 rules of great visual storytelling: Rule#5: And the last but not the least of our rules is the rule number five. Great stories are surprising and unexpected. Yes, the element of surprise is a visual storyteller secret weapon, or maybe not even that secret. Why would he already mentioned in the previous lessons that with incredible amount of visual information pouring on our viewers from the real world, internet, billboards, magazines, tetra, The biggest challenge it becomes to grab their attention. What makes visual stories compelling is when our perceptions of reality are challenged or changed in some way. People haven't changed much since the modern form of storytelling we're born. Most are still waiting to be shocked, mystified, and amazed when we expect some object in the photo to look one way, but it looks completely different. Life itself feels more interesting because we get to experience a state of all. That's fine as a real images hugely attract more viewers. They have an element of surprise. Many great photographer matters, starting with unrecorded every were influenced by surrealism, though work does not contain any levitated objects are surreal scenes. To understand how you can use surprise, we can start with the simple definition. The element of surprise is best described as their current of anything in your visual story which is deemed by the reader to be unexpected. There are many ways to achieve this. We'll dig deeper into the magic tricks and learn about the exact element of surprise I use in my images when we'll be talking about the elements of an image in the following lessons. Now, let's see a couple of examples. Both of these photos have groups of beautiful girls in them, but one of the photos will be more memorable than the other. Why? The photo on the right is the work of Michael Dell, come, a fashion photographer from former Czechoslovakia. How does it grab attention? It's then usual composition, lack of unnecessary details and truly unusual pose of the models. It makes us wonder why this tendon this way, what is going to happen now? Now, you know all the five key rules for telling great visual stories. And they are great stories appeal to our deepest emotions. Second, great stories have a clear structure. Third, great stories have a clear purpose. Fourth grade stories are simple and focused, and fifth grade stories are surprising and unexpected. Now, understanding the characteristics are great. Visual storytelling is important, but it doesn't mean that you have to start greed and meaningful images from the very beginning. It takes a lot of time and practice and a lot of thinking too. At the moment, you've been creating photos for just the sake of their aesthetics, there is nothing wrong with it. In fact, I've been doing that for at least five years before I felt the need to dig deeper. However, if you want to fully express yourself and impact your audience, a good story is crucial. Now it's time to exercise. For this one, I want you to shoot images that evoke emotions in the viewer, but do it without a human being present in them. Take two basic emotions, happiness, sadness. Think about how you can create an inventory that will touch your viewer. What colors come to your mind when you think of happiness? What kind of light comes to your mind when thinking about sadness? Think through what elements help you introduce the emotion into your image and put them down after creating an actual photo. As a result, you need to have at least one image promotion, one for happiness and sadness. They don't have to be technically perfect. That can be phone picks, even as the primary goal is to convey the emotion for this task, upload our images in our learning space. Congrats. Now you have finished the second module of our course and now know everything about the five basic rules of great visual storytelling. Which one is your favorite one and the one that you will start implementing today in your works. Go ahead and tear this in our Facebook community. Now, next week we'll be discussing styling your remedies and learning what other elements of an image beside the surprise one that we have just talked about, you need to keep in mind when telling your visual story until next time.
10. Module 3: Why Style?: Now that you know what a great visual search and be like, let's take a closer look at how it can be created. In this learning module, we gotta talk about this tile of a photo shoot and it sounded. And we're going to talk about each element of an image in more detail. If you have tried shooting stage portraits before, you probably realized that it's nothing like just grab new, Cameron, head into the streets in search of real life scenes. Telling a story in the way you want to tell. It demands a lot of planning and preparation. And in fact, it's true not only for conceptual photography. Whenever you are doing a family newborn wedding product or interior should, it has to be carefully planned and prepared. It also includes understanding the style of your future shoot style and relates to your ability to arrange and aesthetically pleasant scene. Style plays an important role in telling your story. When it comes to style in a photo shoot, that can mean everything from wardrobe, the props, environment, backdrop, and even down to the nails. Not every photo should have the budget to hire a stylist. Of course, when I work on my personal art project, I usually tell them myself. Bigger client shoots are usually done with a professional stylist as a part of the team. He had from my experience, more often than not, you're going to have to learn the basics involved with styling. A photo shoot. Style usually consists of several basic elements. I call them elements of an image. And they include, first of all, model if you work with people, of course, location, next one and scholars, light makeup and hair, props, wardrobe, and the element of surprise. Can you think of anything else? Let me now, in our online community, the key thing to understand here about these elements is that in the end, they work as elements of one puzzle then into match so that your visual story is told cohesively and coherently before we can make any styling decisions, you have to know what message are feeling you want to express with the photos you are trying to tell a story. So every element within the set should effectively follow that storyline and be cohesive. There are too many varying aspects in the photo. It can impair Massey and failed to catch the attention of your viewers. The smallest detail can make all the different neural orange. The difference between a forgettable photograph and elastin image can come down to the clothing choices. So let's talk about every element in more detail.
11. Module3: Image Elements: Model: In this short lesson, we will talk about the main character of your story, your model, the person who's partnered together, taking, I know that many of you should self-portraits all work with clients. These points will be valid here as well. So don't get distracted by the word mortal. If you've never worked with one. These points can actually refer to any subject. So if you're working with animals or products, you might also find them useful. There are many ways of adding visual narrative to how your model appears in your photo. We'll discuss several of them. So how can you visually add narrative to your subject? Perhaps the first thing that comes to mind is focused in your agreement on the main character of your story. At the same time, things that are less important will be more blurry or out-of-focus. This will only be true if you create a shallow depth of field. So do take that into concentration when creating your image. The next way to add narrative to your subject is to compose your shot, the wave that will draw your viewers attention to your model. It doesn't mean that your model has to always be in the center of your image. So you can apply various composition rules here. Next, we can play with depth of field. The more shallow it is, the less important the background is for your story. And the more you want your viewer D-pad tension to your main character. Let's take a look at these two images and tried to answer the question, who is the story about? The image on the left by Tim Walker definitely tells the story about three people. All of them are in focus, their bodies filling the frame of the image and the shot is composed so that they're equally important for the viewer. As for the image on the right, the portrait of Jean-Paul Sartre by unrecorded reason. It's clearly just about one person. There is another man in the image, but he's cropped out and we don't see his face. And his face is not important here. He's used as means of directing our attention to the main character of the portrait. The blurred background is not important by itself though. No doubt it adds to the whole atmosphere of the photo. It's primary purpose though, is to add to the narrative about the subject of the portrait. You can also use cropping as a way of Danny's story. When your images tightly cropped around your models facing body, means that the rest not that important. And you don't want to add any narrative through the choice of location, for example, cause it's simply one be seen. The next way of adding a narrative to subject is appearance. This is a broad one, cause it includes facial features, height, body type, hair length, and color, and of course closes and makeup. We will talk about those a little bit later on. You can also add narrative to visual, sorry by the bows of your main character and keep it in mind when directing your model on location. Here is another example to portrait of monocle diluting. The person is the same, yet the stories told by the photos are completely different, right? The image on the right seems much more intimate and technological, mostly because it's so close, everything unimportant has been cropped out. The image on the left is given us a lot more information about Monica. Public image installed through the Bose dress hairstyle and other details. But this photo tells nothing about how she feels. So keeping all of it in mind, how do we select a model for our future photo shoot? I suggest asking yourself one question. Do I needed a leading character or a prop? And here's what I mean by that. When I think through my future photo shoot, I ask myself, do I need my model to be able to express some emotion? Or do I need her to simply be there as a prop? Cause? There are two types of shots that I do, close-ups and sort of environmental portraits. One, my model blend with the environment, background or the situation. So if I need a prop model than I would only care for the shape of her body and her hair length and color and what should wherein of course, when I'm plan and a close up, I'm more picky with the model choice, cause in this case the modal will have to be able to act a little, if not a lot. And I'm sure you know, that not any person can easily pull an emotion in front of a camera. I also loved well-known models have interesting facial features and preferably goods can. In this case, I will most certainly do a test shoot and see what my model is capable of doing in front of a camera. Now you know how you can add visual narrative to your main character. You can do it by plane with focus, composition, depth of field, grabbing, appearance, and pose of your models. In the next lesson, we'll be talking about the location of your photo shoot.
12. Module3: Image Elements: Location: In this lesson, we're gonna talk about locations for a future visual stories. I will share some tips and tricks on how I find my locations. And we'll talk about what to pay attention to when you organize your fire ships. Locations where you will shoot your image. It can be indoors and outdoors. Urine occasions overshoot can be anywhere. It can be your room on backyard, It can be streets, construction sites, bridges, anything. In eighty-five percent of cases, you don't need a fancy studio or a beautiful castle to create an image that tells an interesting visual story. Though it can help, of course, assertion for cations is called locations cowering. I do it very often. What I do is I simply walk about the areas of my CD and take pictures of interesting buildings, walls, bridges, trees, et cetera. If you do the same, I recommend you to create a folder on your phone or computer where you can store all those locations so that whenever we get an idea or a client request, you can just go to that folder and pick the location that heats the mood or the color of the shoot. Location will be a big part of your visual story, depending on how much of it you want to show in your image, it will set the basic mood and atmosphere of your photograph. Let's compare these two images, for example. And the one on the left is more romantic and tender. The one on the right is more futuristic, surreal, and sort of tough. The atmosphere in both the mitosis created by location. First of all, other elements add to the feeling that location sets from the very beginning, location will always determine the style and the color of your future photo shoot. So if that's the starting point, the very image, you need to keep that in mind when thinking through the colors, wardrobe and prompts for your shoot. If that's not the starting point, then it should match your ID and style. Let me give you a couple of useful tips on how to choose the right location for your photo shoot. First of all, when you find a new location that inspires you, think of what your character can do in this space, how he or she can interact with it. If you come up with answers to this question, you will already have half of your story ready next. When choosing a location, you need to think, if you're props, models, and wardrobe will survive in it. For example, if your prompts a made of paper, they can be easily blown away by the wind or ruined by the rain. So if you're like me, live in the area where it's likely to rain anytime of the year, it's safer to shoot with paper prompts indoors. Another thing to take into consideration is the location, accessibility. We will be able to shoot their anytime. What is the best time to shoot their light wise and crowd wise, because if it's too crowded, the shooting process becomes much, much harder. The Leiden location is very important because this will be the light you will see in your image. So let's say you want to shoot with ambient natural light and you choose an indoor location. And let's say you're occasion is a public space with lots of opera yellow electric light. In this case, it helps to find out if they can be turned off, otherwise, the electric light may ruin your naturally lit image. So when you pick your occasionally, it's good to come there with a camera and do a test shoot with a friend or even with just your bag so that you know exactly where your model will be placed and where you will be standing. It will save you lots of time during the photo shoot itself. And your model won't have to wait until you find the perfect spot. Also, you know the space better and it might help you avoid unpleasant surprises like locked doors, direct sunlight where you don't need it, etc. Now you know what to pay attention to when you choose a location for a future photo shoot. And in the next lesson, we'll talk about a hugely important and deeply loved by me image element, which is color.
13. Module3: Image Elements: Color : In this short lesson, we will be discussing colors of your future photo shoot and how would they can influence your visual story. Colors that they use in the shoot are immensely important element that sometimes gets overlooked by beginner photographers of all the forms of nonverbal communication colors, the most instantaneous method of conveying messages and meanings. Think of it before humans learn to appreciate the aesthetics of color, there was far more practical aspect of communicating with color. Often, our very survival depends on their ability to identify necessary objects and Warren signals, whether they are animals, vegetables, or minerals. And cholera plays a vital role in the identification process. Colors, teammates in the work synergistically with all the senses. It symbolizes abstract concepts and thoughts, didn't express fantasy or wish fulfillment. It can also help you recall another time or place and produces a highly emotional aesthetic response. The interesting thing is, so much of the human reaction to color is subliminal and viewers are generally unaware of the effects of colour on them. Yet, we, as Creators, should be aware of the effects, the colors that we choose for our visual stories, producing our audiences. So how can colors help us tell our visual stories? First of all, color can help you emphasize details. For example, when you use contrasting colors to draw your attention to a person or object. Next, colours can also create a mood or an atmosphere, will take a look at a couple of examples in the few seconds. In addition, colors can strengthen your composition. Let's see what kind of narrative colors can add to shot. And first of all, colors have the general mood of the image. There are lots of theories and ideas about how color effects Moon's composition and therefore photographs at the most basic level, color can be separated into two very general categories. Cool and warm. Cool colors are those on the blue, green, and of the spectrum. These colors invoke feelings of tranquility, peace, and calm. On the other end of the spectrum are the reds and yellows or warm colors. These colors are more inviting. They invoke feelings of happiness, optimism, and excitement. Depending on the context, they can also make a viewer feel angry, irritated, or even hungry. Ever wondered why so many fast food logos are red or yellow. Color is a powerful tool when it comes to adding a certain mood to your image. Mood is usually added by using light or dark colors. Dark colors are often used for creating a more dramatic effect and brighter colors for a lighter and happier feeling. Compare these two photos, bipolar oversee and Tim Walker. What kind of mood do you get when looking at each of them? Bolt saturated colors make your photo more emotional, undramatic. They call to action. This is why saturated colors are so often used in fashion and advertise the photography when you use faded colors with low contrast, it adds a more dreamlike feeling. Muted colors, megafauna o less dramatic but more mysterious and intriguing. Sometimes cholera plays its role in composition as well. Bowls saturated colors like red or orange can grab that tension of the viewer, for example, and set it in the right direction. Take a look at this emitted by Tim Walker. What's the first thing that catches your eye? Yes. It's the dark saturated for accepting of the wound stress, which contrasts with almost colourless who shaded environment. Also, colours can visually put subjects and objects in your image back or bring them to the front. Usually all the cool colors like blue or purple made things look as if they're farther away from you. The warm colors like orange and red will bring your subject closer to the viewer. You've just learned about the next element of an image, colors. Now you know how colors can influence our moods, direct our rise and help us compose our visual stories. In the next lesson of this module, we'll speak about the hugely important element of an image, which is light.
14. Module 3: Light: The next important image element I want to talk about is light. This one is crucial. After all, photography is called painting with light. Though, I must admit I tended to overlook it for a long time simply because I have chosen my tab of Light Years Ago and I'm very comfortable with it. Many photographers devote their whole lives to study in types of light and how they affect the mood, motion, and general atmosphere of an image. Books have been written on this subject. In this lesson, we won't go too deep into the technical parts and understanding the light. My goal here is to make you aware of how the light that he should with can change the impression of your visual story on the viewer. And how it can either help you to unfold your narrative or bring the whole idea you were trying to convey. Light has extra ordinary Bower to create emotions, intifada, all different qualities of light, like brightness, contrast, direction, temperature, and so on, all carry their own emotions. And dark backlit photo with high contrast sends a very different message from a bright, airy forest at sunrise. And in photography, your light to complement your subject. If you're trying to photograph and intense and dramatic waterfall, your light should contribute to that wound, not distract from what you are trying to say. The same is true if you're photographing a fun habit portrait the light into the reflect those emotions personally, I prefer working with natural light. I have tried to work in this 2D or many times he had just find that I can get the exact mode I want to convey in my stories with studio lighting can be different and that's totally fine. One thing I want to address here though, is that if you're like me and don't have any formal education in photography, who might be under the impression that you have to know how to work with studio lights to become a real photographer. And that's totally not true. This was one of the limiting beliefs I had, one starting out. What I didn't know is that natural light is still considered to be the best light possible. However, since it's very hard to tease and control often for photographers, that's why they use all sorts of lighting gear and modifiers to imitate that light the right way. There are many advantages in work in a studio. First of them being that you can work anytime for however long you want. He never depend on the weather conditions, time of day, et cetera, till I prefer to chase the sun and clouds and work with natural light the hard way. But again, that just mean, let's take a look at the unique emotional impact carried by different depths of light. Although some parts of this are subjective, others are nearly universal. I suspect that you'll recognize many of these themes in your own work. One of the most emotional field types of light is dark, intense lighting with lots of shadows. This works well for all sorts of photography. Moody portraits, powerful landscapes, and sombre documentary work. Conceptual photos as well. Dark light is popular across the board with a good reason. Quite simply, it's unique. Dark light conceals information from viewers, making a photograph appear mysterious and depending on the subject, potentially omnibus or find, you see men and product photographers captured dark images for high-end advertisement. Since, again, in does such a good job of conveying emotions. So the emotions that dark, light can help you to convey our powerful, omnivorous, refined, intense summer, the obvious counterpoint, bright light carries its own set of important motions. Say that you want to capture thermal area photograph. Would you rather take pictures under a dramatic storm or an Durant bright Hazel late afternoon sunlight. And this shouldn't be a tough question that afternoon sunlight will give your photo a much softer and area or quality. The same is true in other cases. For example, maybe you want to capture happened optimistic image. If that's your goal, you probably won't go out and search of deems street corners of night. They just won't fit to the mood that you are trying to get into your photo. While a brighter scene might, however, bear in mind that there are always exceptions to the rule. Although right light is pretty common, it's still worth sticking it out. In many cases, if you're after a certain dive of wound like area optimistic, bright light will be what you are going for. Here are the main emotions that can be conveyed by using bright light in your images. And they are optimistic, airy light. Daniel Carroll, the next type of light is high contrast. Many good photos make use of high contrast lighting. Dust, the juxtaposing extremely bright and dark regions of the image right next to each other. If you have a Dark Mountain silhouetted in front of the sky, that contrast. If you have a bride bond against a dark shoreline, that's contrast. Contrast occurs when right and dark elements are right next to each other. Many photographers suppose that high-contrast images draw a lot of attention. Some called them punchy. They're dramatic and traditionally drama conflict, which high-contrast is great illustration of, is a powerful tool in storytelling. So high-contrast images do stand out from the crowd. Get personally, I believe that using high-contrast light is not always a good thing. It depends upon the image, but if that's your type of light, go head and work with it, there is never a right or wrong. You can find contracts by searching for non diffused light. In other words, a sunny afternoon or an unmodified camera flash will likely result in high contrast images. Although this does depend on your subject, of course, photos made on a sunny afternoon tend to look particularly dramatic and intense. The key motions of high contrast lighting are dramatic. Loud, vibrant, punchy and char. Yet what's worth mentioning is that photographing people in bright high-contrast light, meaning that Saturday is particularly challenging. That includes getting really harsh shadows on people's faces, which can in many cases even changed facial features visually. So keep that in mind. The next type of light is low contrast, and this is my favorite type of light, ambient and deem this is the lies that in my opinion, looks most mysterious and dreamlike. It's soft and channelized. The low contrast light helps me to create the dream in peaceful atmosphere. I'm always after. This light is easier for me to work with in post-processing as well. However, you should remember that this slide is flat and less dramatic. It will add less motions to your photo. If you're photographing a quiet, gentle scene or you want a soft mood for your conceptual photo, my top recommendation is to search for a low contrast light. So how and where very simply issued on a cloudy day or indoors with no direct light coming from a window. What do for any particular reason you have to shoot on a bright sunny day? Well, I'm an expert at desks. So here are a few useful tips. First of all, to the time, right? So if you know you're likely to have to work with bright sun, the first thing you have to do is to choose the time and the right so that the light is a bit softer and allows you to get the feeling that you want from it. Usually is early morning hours, 4D times before sunset when the sun is not as high and the shadows, those to present look much nicer. Tried to evaluate when it would be more convenient for you and your model to suit and understand exactly how much time you have in that sort of light. If there is absolutely no choice, you have to should, on a bright sunny day, I would suggest surgeon for a shadow, a place, or you can also wait until you have a cloud cover in the sky. However, even in the shadow, the light can be different. So it's useful to make test shots and evaluate the lighting situation in different spots of the shadow. And this sometimes can be quite challenging for me since the background is extremely important in my images, but worth doing nevertheless, another useful thing is to bring your reflector to the location. It can either create a shadow or light up the parts that appear extremely dark near images when using the reflector placed at opposite the light source and then adjust the angle to direct the light exactly where you want it. You'll also want to move the reflector closer to your subject for stronger light and further away for a softer effect. Yet with refactor, you'll always need help. Someone has to hold it. One more point I want to make about the soft lighting is this. Many photographers think that a low contrast photos won't stand out as much upon the first grant. They don't shout for attention. Yet from my experience with the overflow of high-contrast images. People are searching for something where their eyes will rest. Something suboptimal, gentle, soft and damping. And in addition, I find that many people would rather have something comfortable on low contrast on the walls of their homes. Just because high-contrast images will often disturb them and we want to have peace at home. It's not a universal rule, of course. So don't just take my word for it. 2s the light option that will help you tell your stories in the way you want to tell them. Successful light doesn't always need to extract immediate attention. Instead, it's the light that matches the character of your story, the plot of your narrative. The motions that low contrast light brings to your visual stories are subdued, dangled, solved, quiet, unmuted. So far, it should make sense that brightness and contrast strongly impact the motions of a photo. But what about the direction of light? There are five primary directions of light. I'm putting it in the simplest possible way here. The first one is backlighting than front-loading side lighting, and it can be left or right overhead lighting and underlining. The first four are fairly common in most types of photography, from street photos to landscapes. The last one, underlining might be used for more mysterious or even spooky images. On top of that, you might have multiple light sources, typically for us today work indeed, high-end production photography's setups may have more than a dozen different light. There is really no limit aside from simple practicality, but dusk, the direction of light impacts your photos motion and their answer is yes. But the specific way to facts emotion is hard to generalize since it depends upon so many factors and upon your direct seen, sometimes backlighting will be high contrast and dramatic. Other times, say, on a foggy day, it had good cause the atmosphere to light up with bright sun beams. There is known here in consistency. That's even true. If you're capturing the Portrait under controlled conditions, you can get many different emotions from a single direction of light. For example, I altering the diffusion of your flesh. What about the color of the background or even the motion your subject is conveying. All of those factors mean that backlighting or side lighting, just to name a couple of examples, want always carry the same emotions from a photo to follow. So this is something you'll have to approach on a case by case basis. Look at this scene, analyze the interaction of the light, and see which elements of your photo it highlights. Usually, that's a good way to tell which emotions it is most likely to convey. And the important thing here is that the direction of light doesn't back to photos and motions, but not consistently in one way or another. You need to experiment on location and think carefully about which mood the light is creating. Now that you've seen how light can carry motion, it will be easier for you to introduce those emotions to your visual stories. However, what I want to underline here is that there is no right or wrong type of light for your photos. You can and should take photos with all different types of light because your stories might be quite different. With time. You might stick with one particular type of light like me. Or you can varied anytime you want into. What's really important is to pay attention to the type of light you're capturing in a particular photo, since you want to make sure it complements your story and enforces your message as strongly as possible. In the next lesson, we will speak about three more elements of an image. And those are props and wardrobe, and makeup and hair.
15. Module 3: Props, Wardrobe, Muah: This short lesson is about the details of issued, namely props or objects that might help you tell your story and to elements that give us more information about the main character of your narrative, the clothes she or he wears, and how her face and hair lu. So first of all, let's speak about props. Props are objects that will help you tell your visual story without words. They can be either a readymade and bought from a shop or might be made specifically for your photo shoot. Both a good, personally, I prefer working with fairly simple prompts that don't require huge financial investments and can easily be created by myself. Will talk more about prompts further on. Meanwhile, I want to point out one important thing. Prompts are usually objects that have some additional symbolic meanings behind them. And symbols are one of the things that make conceptual photography so captivating Symbolic Objects usually have not just one, but several different meanings. And it becomes entertaining for the viewer to guess which one the author of the image had in mind when creating it. Next important element of your photo is what your model is wearing heavy. Ever thought about how much information clothes can give us about a person, about his or her tastes, backgrounds, social position, interests, and even traits of character. This is the first thing would judge when we say a person for the first time. Keep that in mind when you tell a story about your character visually, what will address communicate to your viewer. Also, your wardrobe can add a time setting to your image and either send the whole visual story to the past. If you use a vintage coders or to the future if your model where something oven guard, and of course, wardrobe and accessories need to be very relevant to the location, makeup and hair style, as well as to work well with the whole color palette of your story. The same will be true for the makeup and hair style of your main character. I by no means and CCed on you haven't makeup and hair down professionally for each and every one of your photo shoots. What I'm trying to emphasize here is that if you're shooting a close up, the right makeup can increase the effect on the viewer. Your assertion forum at the same time, make up her hairstyle that doesn't fit the overall style of your photo shoot and does not support the story behind your image can easily destroy the impression that you want to produce a new fewer. Say yours should in the romantic girl in the field, the lightest salts and dampened the wind plays with her vintage dress shoes barefoot. But if all at the same time, we should be wearing heavy and dark evening makeup, it have all the chances to make a wrong impression on your audience. Now we briefly went through all the main elements which comprise the general style of your photo shoot. We spoke about modals, the occasions, colors, light, props, wardrobe and makeup and hair. As I mentioned, the forest style and takes place in almost all parts of stage photography, either conceptual fine art, but also wearing family portrait or even interior and food photography. However, there is one last element which will be mainly unique for conceptual portraits and that surprise. In the next final lesson of this module, we'll talk about my favorite types of surprise elements that can be found and youth in conceptual images.
16. Module 3: Surprise: This lesson, we're going to talk about ways of surprising ever your, with your photos. And I will share MY list of favorite magical tricks with you, which is by no way is complete. If you know some more visual loan is, which can be surprising for your viewer, please go ahead and share them in our Facebook community. But we forward jump to the magic tricks. Let's understand why surprisingly, irradiance can be so important. Let me share this quote by Martin Parr, magnum photography with you and engage. You never heard of Magnum. I highly recommend you to look it up. It's the most reputable photo agency in the world that actually specializes in US and documentary photography. And Riccardi AB reason, who I mentioned many times in this course, was one of the founders of this agent. But getting back to Martin's quote, he says that elements of surprise is a key to a memorable photo and they really want again, elements of surprise is a key to a memorable photo. So why does a documentary photographer insistent that in the previous module about five rules or great visual storytelling, we're already briefly touched on the important of surprisingly viewers today, when the amount of visual information and poor and on us every day is enormous, viewers seek for something surprising and entertaining when we, as the audience, think, when now everything about the world, can there be any more amazing moment? And then the one which shakes you out of your all known state of mind and makes you believe even for a second, that there is still something mysterious left in the world. So the best visual stories have those that donors into 200. And again, a child's imagination sees no limitations. And if the visual stories fresh and surprising enough, neither will we as adults and in good visual story will destroy limitations. The stories that capture the strangers or even a shock will be remembered the most for me, editor, surreal element, my images hugely important also because I find that it helps me express my not so common view of the world over the years, I've collected a list of surprise elements that I go to when I think of great and your visual story, we'll take a look at it in a couple of seconds. All the magic tricks are listed here, can be used in, as tools for bringing an unexpected attached to your work. This list is by no way complete. We'll give you the idea of where to start from and what to explore. And first of all, my absolute favorite, but also sometimes might be a bit hard and costly to prepare. And this is multiple objects. You can either have a loss of identical objects in your photo or multiple objects of a similar kind, like different cups and plates in this particular image. Of course, some of you may argue and I will support them, that you don't need to have all the objects or subjects in place. You're going to one and the same object multiple times. And that's true. But only to some extent, there are cases. Let's say if you want to have a pile of objects when it's really. Easier to get the objects to location than to try to create that pile in Photoshop. The next surprise element is unusually big or small objects. Images tend to capture a tangent when the size of an object or a person used in them is different from what we're used to. Always unusually big or small objects will attract a Danton and make people wonder how the effect was achieved. I personally prefer to work with objects that were made unusually big or small, specifically for my Photoshopped. But of course, you can now many good anything using editing software. So it's totally up to you. Next one, we'll be miniature world. This element of surprise is very close to the previous one, in which the majority of objects and people aren't normal size yet different. In this case, you turn your subjects into a fumble Lena, and place your subject in a world of giant objects. The mediator world always makes your image extremely attractive, but only when it's done right. I believe the Darrel Robertson, a well-known photographer from Canada, is the king when it comes to creating miniature world. So I highly recommend you to check out his works. The next surprise element is a limitation when objects, people or animals that are generally not supposed to light levitate, it looks very unusual and instantly grabs your viewers attention. You can get creative with levitation and apply it to either people, hair, objects, or animals in your image. Just like with lots of other tricks, levitation demands a lot of previous planning and later on composite in, in Photoshop. The next surprise element is a very interesting one and demands a lot of knowledge of different materials. I call it onstage effects. What I mean by onstage effects is everything from smoke to dust, and from using actual physical colored film filters to torch slides to create interest in lightened facts. Things like sun flares flashes the light painting, underwater shooting and the like will always look unusual and therefore surprising to your viewers can the next thing that will attract a lot of attention to your photo is using animals, especially not the usual cats and dogs. Our ancestors needed to detect animals for survival in order not to get killed. They developed brain regions that detected animals, and we've inherited those mechanisms. That means that even today animals capture a portion of our finite attention. Animals especially do so when you photograph them in an unusual proximity and interactions of humans, the big challenge connected with using the surprise element in urine does, is that animals can be quite hard and expensive to get on location. And of course, you can take them from a stock image, but it will also take a lot of skills to make such a composite look believable. And this is water. All after that, as a real image looks believable at the same time, the next surprise element will be unusual wardrobe. It goes without saying that the way people look. It's out of the ordinary, will immediately grabbed the viewers attention. And the next element is unusual makeup and hair in our photos, closely connected with the previous one, but more specific to the face of your subject. It does work better with close apps because you want the makeup and hair style to be seen in all the detail. If you're using this one, remember that it should really go out of the way and sort of disturbed reviewer for achieving better results with this one, I strongly recommend to collaborate with the professional. Both of you will get a chance to experiment and try something new, which is always good for your development as an artist. Next comes composition. A not so obvious, but a very strong surprise element that you can add to your photos. You can create a surreal effect by arranging elements in your shot in an unusual way. Often, if things and objects in the image are carefully organized, this alone look surreal because it can very rarely be found in real life. This is why a lot of attention to compose and my shots and making sure all the details there have their own places is because the order that a add to my Images is surreal and itself look around you. Real life is never in perfect order when an image is trickling, organize, it looks surprising. The last but not the least surprise element would be find an unexpected connections between things and places and building images on associations. Sometimes you can find visual similarities and thinks that would never be connected in real life. Those when done right, will immediately paused people and make them stumble. Here. Don't even always have to manipulate those images. All you need is a Kenai that sees patterned and connects dots. Before we round up the list of surprise element, I want to give you the last bonus one for me is the use of idioms and metaphors. Here's what I mean by that. You can take any set phrase from your language. You're like and connected to something else and tried to visualize it when you make IDMS or popular metaphoric phrases visual, it always entertains people and it makes them stop and reflect just like Spanish artists shaker does with all the metaphors and idioms connected with love and heart. Can you guess what those are? So this is a list of my favorite magic tricks that can make your images look so real and surprising. It's nowhere close to being complete. And if you have your suggestions, please post them in on, in our online community. Now, after we have studied all the elements, It's time to learn to recognize them in their role in photos and other regional story. So for this exercise, which is on breaking images into element and understanding that connection of these elements. I want you to select three images of your favorite photographers and write down all the elements that you can find them. Them, not all of the elements might be present. And that's okay to the point of the exercise is to learn how to break and imaging to elements and understand how all of them are connected to tell that story. Which of these elements represent the character, the setting, the narrative of the story told in the image. I want you to answer the questions. Who is the character, what he or she is like, and what's the setting of the story, when and where it is happening? What's the character doing? What is happening to him or her? And how, what the story is about and of course, what the story is really about. Is there an element of surprise in this visual story? If yes, what is it? Read it out, then I want you to applaud the three images with commands to our learning space. I hope you enjoyed learning about the elements of an image and Tyler photo. Now, I want you to get through the conscious about which style elements are most important to you when you're trying to tell you a story. Really think about it. Some people can care for locations, Bose's light for some people, those things can be unimportant at all. Which ones are most important for you. And remember, you can always experiment with that when you shoot and see how it goes. Now, it's time to practice what you've learned until next time.
17. Module 4: Why Use Symbols?: Today is August figure valid symbols and visual storytelling. Why is it important to have symbols in your visual stories? We're going to discuss types of symbols and we'll speak about how you can create symbols of your own. We will also talk about some bullet cliches. We all use them. We all don't want to use them though. So this is going to be the topic of our lesson. First of all, what is this symbol? Here is what Wikipedia says, a symbolism mark, sign, or word that indicates signifies or is understood as representing an idea or object or relationship. Symbols allow people to go beyond what is known or seen by greed and a linkages between otherwise very different concepts and experiences. All communication is archived through the use of symbols. Symbols take the form of words, sound, Jeter's ideas or visual images, and are used to convey their other ideas and beliefs. In fact, many symbols official, they're all around us and we use them every day without being conscious of it, even, for example, in some cultures, particular colors are associated with gender, such as paying for girls and blue for boys. Symbols and visual arts represent concepts or ideas not necessarily directly connected with the image, but understood by the viewer on the basis of horrors or his background knowledge, some symbols are immediately obvious, while others require the viewer to put more effort into grasp and their meaning. And this might be the entertaining part of seeing art. The primary function of symbols in an image is to add a median in a way which is not immediately clear. This way is more subtle than using texts and your perimeters, for example, let's compare these two photos. Both of them are sort of about the same topic, yet the photo on the right leaves us less room for interpretation. It says what it's about very loud and clear. The photo on the left is more subtle. The more you look at it, the more connected and emotionally invested in you become. There is a bit of mystery behind it. And we really want to understand what this broken face thing is about. This is power of symbols inaction. They show downtown MSA in that the one photo is better than the other. Of course not. But I suggest that the one that uses more symbols will draw more attention and will be remembered more. And that's why using symbols in your conceptual work is so important. It helps the viewer to perceive the concept and understand it better. Symbols in your work will help your viewer answer the question what the story is really about. Indeed, symbols may convey a message which otherwise would be difficult or impossible to convey in the work of art through symbols and author can easily draw connections with the viewer. You both will know something that a certain phenomena or object can stand forum, let's say you use puzzle pieces in your image. Your viewer might immediately associate them with a problem or a challenge based on his or her previous experiences. This is how your connections are formed in the very basic weight, as I have already mentioned, symbols have huge interpretation of potential and add them mentioned to the worst possible impact. That's why so realists like ingredient dolly, we're using them all the time in their work. And of course, they're fun to decode. Understanding them might turn into a true puzzle for the mind. This means that your viewer will stay with your image longer and again, will be more emotionally invested in it. Now let's get really specific and talk about symbolism and photography in particular, can you use only prompts as symbols very far from it, symbolism can be introduced to a photo in a variety of ways. We've talked before about meanings of colors. For instance, this is one type of symbolism that you can use to build on a theme or a hint at an emotion. Shades of blue, for example, are calming and make people think of sky. While orange is an exciting color that is sometimes used to represent the ambition beyond colors, the use of light and shadow can be symbolic. We have already talked about the different emotions that can be attributed to different types of light. Now let's take a step further and attach certain symbolic meaning to it. High-contrast images can represent good and evil, for example, or day and night duality of positives. And so much more than, than there are objects of course, and these are the most commonly used symbols. What kind of an object can be symbol? You'll be surprised, but practically anything, usually any plane item that we see around us in everyday life can have the symbolic meaning. The meaning might be brought by what the item is used for or by where it can usually be found by the qualities of the item as well, like softness, sharpness, glossiness, whatever. For example, let's take a few simple items. What can a book symbolize while it's traditionally knowledge, wisdom, story, learning, but also maybe imagination and memories of course, and that's just the tip of the iceberg. Another example, stairs. They can make your viewers think of a bath or some challenge that the character needs to overcome, maybe a dream that a character has dependent on the surroundings. They can also make you think of some mystery. Yet another example is a qij. The first thing that comes to online whether we see it, might be trapped, prison control, lack of freedom, constrained. Yet at the same time, some of us might think of it as a shield or a means of protection. Isn't this just fascinating how one simple object can remind you about so many things. Memories, past experiences, stories that we've heard and saw before. And here we're ready to build our own stories, interpreting the image in front of us. That's the power of symbols in action.
18. Module 4: Types of Symbols in Visual Stories: In this short lesson, we'll be talking about the types of symbols that you can use in your future visual stories and how each type can help you make your visual narrative much stronger. Traditionally, symbols can be divided into universal ones and culture-specific universal symbols are those that are understood or interpreted by the majority of people in a similar way regardless of their cultural background. For example. And we can take our objects or items like birds, book, heart, son, star, three, fire of flag. And basically all the emojis that we use every day can be called universal symbols. These symbols are generalized and are widely recognized across a variety of cultures. When you incorporate basic universal symbols into your photography, there is a good chance that many people will respond to that universal meaning consciously or subconsciously. They will be able to relate to that image. And this is what we are after when the image resonate, people pay more attention and remember it better. Of course, the next group of symbols is culturally specific. Cultural specific symbols will be understood only by representatives of a particular nationality or any other culture group. For example, in many cultures, a goldfish is considered to be a symbol of prosperity and wealth. In Russian culture, a goldfish will also symbolize dreams coming true and impermanence. This is because there is a popular fairy tale in which a goldfish acts as a genie and gives people what they desire. But in the end, when they ask for too much, the fish takes it all away. This is the traditional grouping of symbols, yet there is one other type that's also worth mentioning and that's personal symbols. And these are the ones that we create ourselves. And those ones may or may not be interpreted by others. In the same way, each of us can have highly personal symbols based on their unique personality and history. If you saw a baby bird, director rosebush, you might associate roses with death. That's how symbols work by that very basic type of thought process known as association. We associate this with that. This reminds me of that the lines of association generated by symbol may readied in many directions. If you're familiar with Harry Potter story, you probably remember the Patronas created by Harry when he was trying to protect himself from demanders. It was a deer. In many cultures, a deer is a symbol of wisdom, gentleness, and softness. In some, it can stand for protection for Harry, in this case, a deer became a symbol of his family, namely his dad. So this is an example of a personal symbol, but things get a lot more complex and a lot more interesting. When an image contains a variety of possible symbols, symbols can be combined. Then you have symbols interacting with symbols, meanings, interacting with meanings. And it's not just the elements of an image interaction with each other, but also the don't, colors and composition that add to the symbolism and meaning. How does it all fit together? Again, there may be a whole variety of ways to answer that question, and they will vary from one person to another. That's why we're fascinated with great works of art. They're filled with all sorts of meanings. What are the different things it could symbolize? No right or wrong answer. Play with possibilities. Let's take this image by Brooke shading for example. Here she plays with a variety of symbols like water, storm, lantern, light to name better view. Another example is the work of Rodney Smith. What symbols do you see here? I see an umbrella balance, circus, garden, trees address, and what are you. Now it's time to exercise. And in this lesson we'll be exercising on reading symbols in photos. So for this exercise, I want you to find three examples of conceptual images. These can be the photos that you have for previous lessons or some new ones. They can be both, either yours or by someone else. Which objects or image elements look symbolic? Do you read them down? Are those symbols universal, cultural, or personal? I wanted to put that type next to each symbol. The more symbols you can find, the better and the more interesting the exercise becomes. Well, coming up next, we're going to talk about symbolic cliches. Should we use them in our visual stories? Are not. Watch the next lesson to find out.
19. Module 4: Symbolic Cliches: The next topic I wanted to talk to you about is symbolic cliches. And I think you would agree that this is a very tricky topic for many of us, me included conceptual or fine art photography is built on symbols and cliches as well. We see suitcases, lanterns, vintage dresses, flowers, trees in every other photo, people stop being surprised by them and they don't longer capture their attention when there is an overflow of those, would you agree images with cliche symbols will not have as much impact on the viewer. Let's just face it. Everyone is used to seeing one and the same thing over and over again. It stops being kept dividing anymore. Why does this happen? Let's get a closer look at that. It all goes back to what we feed our bandwidth. And first of all, the images of a look at, of course, while let's say you are interested in tab photography and everywhere you look, you see bows, new pardons, photoshop composites of babies in basketballs and nests alongside the post newborn images are the photos of small children and forests and fields bathed in an overworked golden light. You may think that since everyone seems to be photographing this way, it is basically what clients one, and this is how your photos should look like. This is a sure way to find yourself lost in the sea of sameness. The same thing is happening with the conceptual limiters were seen everywhere. For example, I truly admire the work who broke shading, and I love her activity as an artist, as an educator. However, in my opinion, it has some side effects. Here's what I mean. Her work is really popular and many of us get caught at looking only at her images, but being inspired only by her art results in us using the same symbolic cliches. And this is what we get as a result. All of this, the images were shot by different people, but they could easily be mistaken for the work. So just one artist. Would you agree? It happens because when we see works of only one artist, one style and similar symbols being used all the time. We get an idea consciously or subconsciously that this is how our photos are supposed to. And there is no such a thing as a supposed Luke for a photo. Just think about it. There is no such a thing as it's supposed to look when you learn from others. Never forget that those things are only guidelines, but not the rules set in stone is your photography and you're here to create your own rules. At some point, the thing about standout photographers is that they stand out precisely because they're not doing what everyone else is doing. The truth about working in some specific genre, conceptual photography included, is that you don't have to fit in seriously, just think about it. You don't have to fit in. And many of us are trying to do exactly that when using symbolic cliches. So no, there is nothing wrong with using cups, books, and browser lanterns yet when you use them, remember that first, you are not supposed to have them in your emitters. And then second, that it won't look as original as you would love it too. Unless you do use the object in a new and typical way, maybe even the way it has never been used before by others. So when you want to create truly impactful art, tried to find new ways of using old universal symbols. This won't come to you instantly. Of course, it might take years to understand what story you're trying to tell on what kind of message you want to send to the world. This will come with maturity. That thing that I want to communicate to you today is that you should be aware of the cliches and consider possibilities of avoiding them to make your art stand out, I want to share this example with you, though it's not strictly photographic. Here are two images and where we can see flowers. The one on the left by Margarita Karima is incredibly beautiful. It's aesthetic value is amazingly great. However, the one on the right by Banksy, though, not as aesthetic, will produce a deeper impact on the audience. I'm not saying here that producing aesthetically beautiful images is wrong way, yet. We are here to learn to tell truly impactful stories. And that's why I wanted to expose you to this idea of going deeper and not just for aesthetics, it might not seem fair to compare these two images. And I understand that, however, I still think that it's a perfect way to illustrate my idea. You can definitely use symbolic cliches, but try finding new unexpected ways to use them in. By the way, there is nothing saying that you have to use established symbols within your own work. On the contrary, creating your own symbols is how we as culture develop new symbols, ideas, and meanings. So don't hesitate to create something of your own and use it to tie your body of work together. For some photographers, the symbol is an object that is always included in an image. Maria's father of art shows swimming pool to be her symbol, and she uses that dozens and dozens of her images. When it comes to choosing symbols, it's very hard to go wrong. Simply two things that mean something to you. Here are a couple of examples from my works. At 1, I decided that are a guardian birds in my images will represent the emotions that can be overwhelming but fully eaten at the same time. Another example is the use of twins or duality as a representation of the self-talk that we all experienced in our heads. Sometimes have an internal fights at other times trying to come ourselves down and attempting to find inner peace. Here's one more example. It's my series that I call paper cuts. I decided that Caesars cut and paper reminds me of a transformation and sort of getting rid of something that doesn't serve you anymore. So the answer to the question how to use symbols is simple. There is no right way. There is no way to tell a photographer or any other kind of artists how to use symbolism. You yourself can look at the words of others in order to better understand the meanings. But in the end, it's always a personal choice. The symbols you choose should feel right for the work that you're doing. For this lesson exercise, we have finding symbols and their meanings. I want you to choose three items that you see in your room. Objects that you find interesting like a box model, candle, lamp, clock can be literally anything but something that is easily accessible but not too obvious. Now come on with symbolic meanings for all of them, think, what can they symbolize and how viewers can interpret them. I wanted to write down these three meanings for each of them, then think again and tried to come up with three more meanings and associations. Dig in deeper and discarding the first things that come to mind will help you create more original stories in the future. I want you to share those images in our online community with commands on what symbolic meanings they might have and your photos don't have to be nicely shot at this point. They simply need to give an idea of what type of an object Perez. So feel free to go with phone photos as well. Now that you know what types of symbols can be as new visual service, it's time to try to introduce them to your work. Check out the task for this lesson. And I cannot wait to see you what Hugo creed.
20. Module 5: Generating a Visual Story from a Single Starting Point: In general, I found that there are three ways of building a visual story. The first one, when gallery I'd have a theme or topic. For example, there is some problem that interests you and you want to express your point of view on that problem. So you know exactly what kind of message you want to communicate through your work. Another example would be taken part in a photography contest that has a topic and you need to create something within that topic. Next, when you have some visual reference or collection of references and you want to try to introduce some ideas from those references to your work. Let's say you found a cool photo on Pinterest and you want to shoot something like that happens to everyone, right? Another example would be referencing illustrations, fine art pieces, culture, you get the idea. Next way to start building a visual story is when you find some element of your future image and you want to shoot with that element. For example, you run into a beautiful occasion and you want to shoot something there, or you found an interesting object, like, Let's say a vintage typewriter and you want to read some story around it. We'll be talking about the first two in our following learning modules about working with inspirations and discovering content. Today, we'll be exploring how to build a story from a single element of an image, like location, prop, wardrobe, model, or makeup. So this is exactly what I mean by a starting point. Any of the elements of an image we talked about in the previous module can be a starting point of your shoot. Your starting point, again can be addressed a prop, a person allocation. And naturally, this initial element will be your primary inspiration and source of ideas. All the other elements will have to be put together by you, like puzzle pieces. With each endeavor element, you'll need to ask yourself certain questions and play with associations. Maybe you go to your memories and remember stories that you read or heard. Don't worry though, if you feel that you don't know any interesting stories to go to, everyone does. Even though often we think that our life might be boring when he tried to answer the right questions about your starting point, ideas will come up. This process is in many cases, very natural. So what are those right questions? We'll deal with the quality of your starting point and the ways your main character can interact with it. Flipping give you an example. You found an amazing vintage dress you want to shoot with. So you answered the question, what the main character is wearing, but what story can you tell about your character to enter that you can take a closer look at the dress and understand what kind of information it can give you to build your story. For example, what kind of addresses that is a dramatic or sexy. What kind of social status can it tell you about? What would be the circumstances in which the dress would be worn? Like season, location, time of the day, what kind of a person would wear that dress? Qualities of this dress can be turned into symbolic meaning. What can this dress a symbol of answering those questions will help you in creating your story and select all the other elements of your image. So one by one, you'll figure out how your model should look and who it should be, what kind of occasion you'll be using for the shoot William be shooting in the morning or during nighttime. What kind of props you need, and so on. Let your imagination flow and don't get discouraged if your ideas seem too cliche of this point, you can start from there and then develop something more original. The key point is to begin imagining and building that story. Let me give me a couple of examples from my own work and let's see if you recognize your creative process in mind. So here's the first one, my starting point, and for this image was a surprise element, an idea to put a mediator paper castle on the head of a girl. So I borrowed this idea from an illustration that you see on the screen. And my inspiration process was bribes, very similar to what is familiar to you. I was just browsing interesting stuff on Pinterest and saving potential ideas. I really like the idea of a castle representing a thought process. This is how I interpreted it and decided to try and introduce this idea to my photo and not a very easy thing to do. Do you agree? The original illustration seems to have a whole study on her hand and it is hard to imitate that in real life. So I decided to limit it to a castle. My next step was to understand what my future Castle will look like. Again, I browse the images on Pinterest and here's what I found. After that I got real abashed and above this should and I started looking for people who could help me to build the beautiful crop. There is one thing I'm not really good at, as there is working with hands. When I found the decorator who loved the idea of making it, I had my first problem solved. Now my dad's and becomes to build a visual story around my prop. That means that I have to find all the other elements for my future visual story, and namely subject, my model, location, colors, wardrobe and makeup and hair. So I mean also to answer the questions who, when, where, what, and why. I selected all the elements so that they support a dreamy mood of the main prop, paper castle. I knew that my image has to be a close up so that the castle is seen clearly and in detail. That's why I decided to work with Theresa, my model. She has amazing facial features and made an awesome printers. I got a pink, for instance, like dress from secondhand shops, from re-shoot. It gave my future image a color setting I was shooting during wintertime, so I was doing that indoors at home where I have a plain white wall for close up portraits, makeup and hair was selected so that they support the whole style of the future image. Dreamy, magical. Here's another story that I built around a prop. Temporary, the two from a famous brand and disclaimer, I don't do men and brand collaborations, but I really wanted to show you how the rules that I teach you here could be applied to your friend collaborations as a content creator, if you are one, that the two brand allowed me to choose the products. And I met his action of one that I liked most of the color wise. This particular black brunch with leaves appealed to me because of this monochromatic and allow monograms, as you know. Now again, what can I create around it? What should my other image elements be light? Initially, I was thinking of the area of the body that I could put the two on so that the final photo will still be my style and not to brand it. I still always want to have phases in my images yet put into two on the face is a bit too difficult. So I decided to go with the hand and put it close to the face. When I did that, I thought that the shape of those leaves should be somehow resembling the shape of the model's eyes. And this gave me a push to search for an Asian model and make a preferences with ILA enters by chance, I found a gift wrapping paper with a pattern that almost repeated the design on the temporary to two. So this became my background and determined my color palette, which is now totally reduced to monochromatic one. Now the last thing was to decide what my model will wear. And naked shoulders seem to be a perfect fit here. So I chose a simple black top. I really hope that you'll find these examples useful for your future work. Now it's time to exercise. For this exercise, I want you to choose one of the objects from the symbolism exercise that you completed for the previous learning module. This will be your main prop. Now tried to create a story around it, building the whole picture from the initial element. At this point, you don't have to shoot anything where learning to plan your future shoot. So you can play with either a one or several symbolic meanings of your object that you have written out for the previous lesson. Try to answer the questions. Who, what he or she is like, when, where, how, what is he or she doing? What's this all about? Like, what does your story about and what is your real about? If you're finding this hard, try this simple trick. Write a list of things you won't have in your image. Often things that will get your unstack will show up. In most cases you'll be conditioned by the size, color, and use of the object, or by its additional symbolic meaning. For now, you don't have to care about the dev and actual meaning of your story. Try to select all the other elements of the image so that you understand the process first, if you don't have them attend, which is natural, most cases try to imagine them. You need to make a list of how your location model, wardrobe and other elements will look like and draw a sketch to illustrate your idea. Define the character, the setting, and the narrative or your story, what motion will it conveyed? As a result, you will have a sketch that you can later on use for your future photo of your sketch and uploaded to our alerting space. If you have time for great, an actual image, go ahead with love to see actual photos even more.
21. Module 5: Building a Story from Multiple Points: Now, that was the first step of constructing an image from a single initial element. In real life, a trailer happens like this. Very often you'll be conditioned by your own resources and let me explain it. Let's say you have a friend and you feel that she would make a great model for a shoot. Your other friend has access to an amazing empty space with red and yellow walls and you'd love to shoot something there. Both of these offers are a limited time because say both of your friends leaves soon and you won't have access to them. Now you already have three starting points. And the first one is model, which is a slim brunette, colors, red, yellow, and black of the girl's hair. And your location. It's an indoor space with a certain light and certain for floor at a certain style. And you have to accommodate your ideas to all of those. You need to connect all the three into a story while finding the missing elements of an image. In this case, it's going to be makeup and hair, wardrobe prompts and surprise. This might seem a lot more challenging. And there is ended because you are conditioned to give all of those in mind when planning your future photoshoot. Yet, it's very possible and I'll show you how in a second. Here's an example from my practice. I was in Paris for a week and they're really wanted to shoot something. When I discovered this amazing location, I also assertion for models and found Christina, who was happy to work with me and was available so that we could schedule a shoot in time. Now I have my certain point color, which is pink and black. Since Christina is a brunette, I have a model, slim Burnett, and location, futuristic style with no furniture. My task now becomes to connect the starting point into a single story. The same time I needed to figure out the props, the wardrobe, makeup and hair, my surprise element, and how I'm going to shoot this all. So this is what I came up with. I decided to use paper origami props since they are easy to make and easy to use, but most importantly, easy to bring to the location which is a public space, a university. I was thinking about the shapes of our gummies and decided to go with planes this time, since I felt that they would look more appropriate in this case, I already mentioned that I love monochrome. The dress I was looking for was ever been colored with no patterns on it and sort of timeless. In this case, I was like in my model hadn't suitable dress in case she wouldn't have the trends. I would search for something in stores like H&M and Zara and then return the item after the shoot. Another option is to check secondhand stores, of course, as for the makeup and hair, I decided to go with shades of pink and loose hair, plane and non dragon. Too much attention from what's going on with the girl. Now, get into the surprise element. I chose to, in this case, I decided to use an unusual limbic paper plane. We'll immediately attract people's attention and also wanted to add a minor one, which would be a pleasant surprise when the viewers hold their eyes on the photo for a bit longer. So I decided to make the little planes fly. What this story is about, it's about a woman who's somehow can transform regular braid planes to giant ones when interacting with them. But what is the surreal about I interpreted like this. It's about hope and how people can have with the power to transform and elevate everything around them when they have the right attitude and mindset. Let me show one more example. This image was drawn from three or even four initial starting points, makeup and hair style, location, surprise element, which is closely connected with the selection of props. In this case, the first starting point of this image was a model Sabrina, who I wanted to work with. Sabrina has a very interesting phase and also she had right green hair at the time. So my actual initial conditions aware of my model and her hair color. The next starting point was location and interesting futuristic building in Hamburg, Germany. I loved it because it was plain, but so real and industrial. My challenge was to create the story connecting Sabrina's green hair with this futuristic location. This is when I remembered about an old inspiration of mine that I found long and goal at 40 by Rodney Smith that you can see on your screen right now, I loved the idea of cutting paper with Caesars to reveal something otherwise hidden, but I wanted to do it my way. So my props were paper and scissors. Now, I needed to figure out the missing elements, color and wardrobe. At this point, you can already guess that those were obvious for me. I've selected green to keep the monochromatic field and found a suitable dress for my model. Going back to the basic questions from our rule number 2 of creating great visual stories. We can put it like this. So who is the main subject of my story? It's a girl, what that should look like. She has a green hair and green dress. My requirement for the makeup and hair here we're very plain, new dies and red lips. Where does the story happen? Mylocation is some undefined who touristic place with hard straight lines. Now back to the big questions. What is she doing? What is the story about? She's holding a piece of paper cut in the middle of the scissors. What is disorder really about? I can tell you mind and predation. But in fact, in most cases, it for the abandon viewers and their previous experiences and associations. My story goes like this. The girl wants to discover something new, something that she was hiding from the open herself up to this, cover herself either way and show it to others. That's why she made that window in a piece of paper. Adrenal love to hear what kind of stories pop up in your mind when you see this image, please share your ideas in our Facebook community. When you create a story from a single or several starting point, understand what element of the image are most important for you. Answering this question will help you concentrate on the right things and emphasize them more in your images, which is a first step to finding your unique artistic style. Now, I have another creative challenge for you will be learning to generate ideas from several starting elements. So, as I mentioned before, will rarely only have ones aren't an element of an image in real life, usually we need to combine several elements from the very beginning. This exercise will help you to learn how to do it. Below are the list of three categories of image elements. Your task is to come up with an image idea which has one element from each list so that no elements are repeated or write down short descriptions of your images and cash them out. So your choices for the color image element are blue, red, and green. Then I give you the choice of objects, and these are Caesar's light bulb and chair and look for occasionally we will go with the fields treat or room. As a result, you will have three sketches of images that you can use for your future photoshoot. You have time tried to shoot at least one of the images with those elements right away. Upload either sketch photos or your final images to our learning space. And don't forget your description, which elements you use and what is the story you are trying to tell. Use examples from the lesson in the following model, we'll be talking about one of the most exciting topics, how to work with inspiration and where to find it so that it never runs out until next time.
22. Module 6: Ideas and Inspiration: In this learning module, we will talk about a fascinating topic. Find inspiration. And this is the question I get asked the most. Where if I raise price the problem. So I will share some of my inspiration sources with you and we'll show you how to use them without blocks the copy and ideas from them. What town? Before we talk about finding inspiration, I like to say a few words about ideas and how they can be defined when applied to conceptual photography, the word idea can stand form first, the content. What is the story really about meaning the artist's idea that he or she is trying to convey and why he or she is creating this piece of art. It's the idea behind. As an example, we can take the famous photo of a plastic bag looking like an iceberg. The artists main idea here is that pollution due to the growth of production will soon destroy our planet's nature and will literally have plastic bags floating in our oceans and set of icebergs. The word idea can also stand for the execution and visual realization of the content, how the story is told and presented to the viewer. Think of it as a collection of trend in interior decoration ADS, for example, often you will spot or get interesting ideas that don't have any particular concept behind them. Example from my life for a long time, I was fascinated with lamins, how they looked and photos, and knew that I wanted to shoot something with them, but I didn't know what exactly. After a while when you live with your idea and tried to connect it with other elements of an image. We'll come up with a way that you will executive in your shoot. Now, back to inspiration, the main topic of this lesson. And by inspiration here I mean two things. First of all, it's a creative force, meaning I see something beautiful and it motivates me to create something beautiful myself. My new creation will not necessarily resemble the piece that I'm inspired by. And the second meaning is reference. I see some particular ideas story that can be used in my next image. The first one is clear. Everyone wants to feel inspired and create something. Yet, when it comes to the second one, there might be doubts. Do you agree there are ongoing discussions about referencing other artists in your work and about plagiarism. Every one of us wants to create truly authentic and original works. That's why you're taking this course in the first place. In the next lesson, we'll talk about my take on copying and working with inspiration will answer all the questions, including to copy or not to copy, watch on.
23. Module 6: To Copy or Not to Copy and how not to Copy. Layering Inspiration: Today we want to make a deeper dive into the topic of copying other artists and if it should have a place in your creative practice. Indeed, it's the most frequently asked question when people discuss in regards to being inspired by the work of other people to copy or not to copy. Some experts value that color green or stealing ideas is the common practice and there is nothing new under the sun. Others on the contrary, will urge you not to copy under any circumstances, only produce original work. Both of these answers can be quite puzzling because you might be somewhere in between. Of course, you want to produce original content which you will be recognized for. However, you also understand that best stories and ideas are universal and appeal to a great number of people, meaning that they are not new. I believe that there are two aspects of copying. First, copying as a way of learning the craft. Think of it. Any graphs can only be mastered by copying something. This is why in art school, attending museums and trying to reproduce the work of some great master is a common practice for students. You need to know the rules in order to break them. When you copy someone else's work, you sort of deconstructed, cut it open as a frog, and study all the separate elements and how they were put together. Let me give you an example. Here is a work by Dario caval. He is a young photographer based in Madrid, Spain. With his photograph, he did a simple exercise. He tried to recreate a network by rename agreed. While doing it, he tried to find all the elements of the image, and he tried to make them match the original painting. And this included models, props, wardrobe, light colors, and the location as well. When he do such an exercise, you sort of get into the mind of a person who created the work inspired by and you learn a lot from that in this regard, coping is a way to become a skilled craftsmen. Transition from a craftsman to an artist comes when you begin to connect things that were not connected before, you take the ingredients of your previous knowledge and combine them in a new way. That's when the artist born. And by the way, for some people, transition never happens. They stay on the level of a craftsmen and that's okay too. Now, there are situations when our brains copy some elements of a particular style almost unconsciously. So what happens is we tried to copy others, often not even realizing that we do so because we think that our photos should look similar to the ones that we are inspired by non because we want to steal someone else's idea. Let's say you're interested in child photography. These are the works created by four different people, but perhaps you would agree that they could be easily attributed to just one. It happens in other photography areas to hear a few examples from wedding photography. Note, I don't say that the images look bad. I actually love these photos yet, they lack individuality. And by the way, conceptual photography is not immune to this either. Here, the situation gets even worse. Sometimes with Whedon and family images, you can still object. Clients do want the type of photos they see in their friend's photo albums. But conceptual fine art photography is usually self started. In most cases, there is no client that orders and particular kind of an image. Yet people in this area continue creating images that look sort of the same. What you need to remember is that stand out, photographers stand out precisely because they are not doing what everyone else is doing. Sometimes this means being brave and following a less popular bath. So be inspired by others, but don't compare yourself, admire their work, but don't try to emulate it because you will only end up looking like a poor imitation of something great copied to learn from them, but not to become them. Let me share a quote from Peter Lindbergh to support this statement. And he said, I have not taken inspiration from fashion shows. I don't even really go to too many fashion shows and have not for 15 years because I don't want to be inspired by the same things as everyone else. If everyone is inspired by the same things, then of course you do the same pictures. Let it sink in for a moment. And there is no such a thing as opposed to look for a photo when you learn from others, never forget that those things are only guidelines but not rules set in stone. It's your photography. You're here to create your own roles at some point. Now, back to the second aspect of copying. And it sounds like this, stealing ideas and connecting the dots. Perhaps, you know, the famous quote that has been attributed to many people, but most frequently to Pablo Picasso. Good artists copy, great artists steal. What it means is that there is nothing wrong with utilizing ideas that you see in someone else's work. If you manage to use them better than the original and make them you're wrong, adding your perception and experience. Another quote that supports this point is from Austin Kleon still like an artist, what a good artists understand is that nothing comes from nowhere. All creative work builds on what came before. Nothing is completely original. Starting from the movement of data into realism, artists begin to notice that images around us affects our psyche and form our perspective of the world. In other words, our brains record and protests, all lots of visual information. It's already there. Go brain remembers things that you saw in the past, even if you're unaware of it, just think about it. The things that affected your emotionally, you will be more vivid and will tend to pop up in your creations more often. Now, your task as nar desk becomes to combine the visual information recorded in your brain in an unexpected way to illustrate or express an important idea. Once again, your task becomes to combine that information in an unexpected way. An idea that is important to you for this or that reason should be presented in a fresh way. And that should be an idea that again triggers you emotionally. So in today's world, are there's a whole and photography in particular becomes a way of connecting the dots, selected and connecting various pieces of information and introduces them in a fresh way. That will serve the needs of contemporary society. Think about different chefs cooking a meal. They can have the same ingredients, but the end result will taste and look different from each of them. There is a huge difference between wholesale plagiarizing and paraphrasing a piece of visual information to express an idea between simply imitating someone and using an idea in a transformed way to express a thought of your own. For example, Salvador Dali was inspired by virtually everything. Many of his inspirations came from ancient Greek sculptures, for example. But would never dare to say his work wasn't original, right? But let's go even deeper into the history of art. Rubens, the famous Flemish painter, borrowed ideas from acclaimed Italians like Tisha and Vanessa tin thereto, Caravaggio and Michelangelo. However, no one would even dare to say he stole something. They call it influence what Rubens did. He took elements that heel liked in the work of those artists and combine them, thus creating something fresh and unique for his time. If your work clearly inspired by some other artists, it's important to state honestly though, it will be beneficial for both of you, you and the source of your inspiration. And if the source is a contemporary and not an ancient Greek poet or Renaissance painter, he or she might even be flattered that his or her work has such an impact on other artists. So once again, by connecting the dots, I'm saying be inspired by other artists. Take ideas from them, but connect them with your own background, memories, views of the world, your current life situation, and transform them into something unique of your own. The key to success here is to be inspired by NADH, one particular person, but many people at once. And this is what I mean by layering your inspiration. You need to feed your brain with more and more quality information that you can generate ideas from when you create. Don't just look at one particular photo or one particular photographer with admiration. Find many people whose work you like and find them in many areas of art, not just photography, to create more interest in visual stories and generate more authentic ideas, you need to take a look outside of photography and get inspired by other forms of art. It can be anything and will be very specific to you. For example, it can be music or literature, theater, dance, etc. And of course, other visual arts that includes design, cinematography, illustration, classical fine art and so on. We'll be talking about how to work with inspirations from photography and other forms of art in the following lessons of this module. But layering inspiration should not stop here. Go further and incorporate your interests and hobbies event. Are you concerned about women's rights, environmental situation or childcare and UCT do like sports or outdoor activities, merge tiny little threads from all of those areas in one to create your images and they will be unique. So my bottom line here is, this is how I see copying and been inspired in plain words, when you understand what your wife to shoot and why you'd like to shoot it, and why it's important to you and what you want to say with your work. You're simply not able to plant the copy. Anyone who might still be utilizing this a bad element that is, or from other artists. But the job creation process will turn into connecting the dots, the dots of the visual inspirations that you have seen, the moods and topics that reflect your interests, the technical tricks that you've learned from other photographers, your personal experiences, events that impacted you emotionally. And though dots when you learn to tap into them, can be blended in a unique way only because this is what you are unique, we'll be diving deeper into the ways of searching the answers to those questions in the following modules. Now, I want you to practice the smart way of coping for this exercise. I want you to try and recreate a 40 or any other visual work of art, like illustration, painting, you name it, and tried to get as close to the original as possible, copy everything, colors, lighting, props, location, et cetera. You don't have to take a portrait. Try and working with the still life to make it easier, upload your original inspiration and yours out of 40 in our learning community, write down the most challenging part of the exercise and your major takeaways. Meanwhile, in the following lesson, we'll talk about the smart ways of being inspired by photographs without bluntly copying them.
24. Module 6: How to Be Inspired by Photos, but Not Copy Them: All of us are so used to looking at the works of other photographers were constantly bombarded with visual information. And huge portion of it is photography, Instagram, Facebook, Pinterest, billboards, magazines, on Windows, boxes of cereal, vadose are everywhere. I believe that looking at the work of other photographers can both good and bad. So why is it good? We do need to know what's happening in the industry, what new methods and techniques are being used, where photography is going? Which photos have been favored by the public in commercial space, especially if we have photography businesses. Now, this influence can also be bad. And if will look at too many photos, our brain records only those. And we unconsciously begin to reproduce images that we see over and over again. Meaning we can copy other people's work without even knowing it. None of us wants this to happen. Great. So how do we continue to collect references without blindly copying them? And here are three things that you can do. And first of all, look at more photos and more photographers. Yes. You heard the tract is crucial that you don't get yourself locked in the work of just one or two role models. Take a minute and make a list of at least 10 photographers whose work you like, the more names you have on the list is the better. Now I suggest creating a folder for each of them and collecting your favorite photos of theirs in that folder. It can be a folder on your computer or Pinterest board. You can be also a real nerd and create a paper folder with photos that are printed out. He need to do this so that you can later on look at a valid representation of a whole body of work of an artist. What kind of photography should you look? In my opinion, it's very important to know the history of photography and what the grade matters were doing before you. This knowledge will help you understand why contemporary photography is the way it is. Studying the history of photography doesn't have to be complicated. For example, when I made up my mind that I wanted to become a photographer, I decided that I should know great masters of the past. For that, I simply found a few articles on the web, about 100 best photographers of all time. I read a paragraph about each and every one of them and started their work by creating Pinterest boards for each photographers masterpieces. I still use those boards when I search for inspiration. And here are a few of the people I found back then and who inspire me until today. First of all, this is Julia Margaret Cameron. She was one of the first female photographers and first photographers to create dreamy images back in 18 sixties. I highly recommend studying her work, especially if you're into creating images that a fairy tale themed. The next one of my favorites is unrecorded rezone. He's a celebrated god of composition and celebrated street photographer who came up with the theory of a decisive moment for taking photographs. I mentioned him already several times in this course. So if you haven't yet. Go ahead and Google him and his work right now. His works have very spontaneous but carefully composed of the same time. So in many cases they look so real, although he was a street and wrapper dash photographer, the next artist is Rodney Smith and he is one of my biggest inspirations ever. I think you can definitely tell it from my work, playful and some real his photographs are in the pages of Time, Wall Street Journal, and The New York Times, among others, I get inspiration and ideas from his work all the time. Here's an example of my photograph that was very much inspired by the works of Rodney Smith. As you can see, you don't have to be very literal when been inspired by a photo. Always introduce your own interpretation of Nadya. Another photographer I admire a lot is Diane Arbus. She famously took images of marginalized groups to work with a wide range of subjects, including members of the algebra DIY community, strippers, carnival performers, new Buddhists, children, mothers, couples, elderly people, and middle-class families. I love the motions in her works and how she manages to show real people who live in Manaus but often left and noticed only because they're different. This attention to the weird Fox alone makes dance work look surreal and very attractive to me when you study photographers of the past, dances, look at their works, but also read biographies and listened to their interviews. You can get tons of information from that alone. I also think that it's crucial to see where the contemporary photography industry is going, what kind of topics are used, what kind of media are employed, and what the modern standards are. Don't get me wrong. I don't see that your work should follow all of those. Being educated will allow you to level up the quality of your images in ways that speak to you. The mode here is a shortlist of people whose work I close the following depreciate. And first of them is polarization and Italian fashion photographer living in Paris. He's famous for his unique lighting techniques when he combines the window wide and flesh in a studio environment. You'll see many of his works as examples in this course. The next one is of course, Tim Walker. He's an acclaimed matter of surreal portraits and one of the most famous fashion photographers live in today. If you dive into his world, it will never stop to fascinate you. I'm using Tim walkers iconic images everywhere in this course as examples to the next one I want to share with you is of course, put Oldenburg known for his memorable cinematic images. He is recognized as one of the most influential contemporary photographers. These are just a few of the great masters whose work I'm sure you heard of or at least saw. But of course I follow the people who are a bit less iconic but are not less inspiring. And here are the few names. One of them is a leg or preschool. As a real fine art photographer from Ukraine, he is a master of creating colorful and dreamy images that drag you're into his visual narrative. Assembly. Don't want to stop looking at those. In fact, one of my most popular images will actually inspired by his photography. Next one, Gabriel Isaac is a photographer from Sweden. He creates a real and melancholic scenes where he invites the viewer to interact with the inner world of salt or fingers that symbolized our own unconscious states. His work is very peaceful, monochromatic and minimalistic, and I love this about it. I also admire the plane minimalistic works of Nile Oswald, the way she plays with composition rules fascinate me. That's why I wanted to introduce you to her work as well. Another favorite of mine is Sony Music. Her works are an explosion of color. Her mind doesn't seem to have any boundaries. Do you agree? Now, when you've collected the urine aspirations, the next thing to do is to analyze it. As a result of the previous exercise, you need to have at least 10 photographers whose work resonates with you for this or that reason. Now the important part that's often missed is trying to understand why the work resonates and especially which parts of it speak to you. Do you like how a master plays with light or iPhone to have a color palette. Maybe it's the subjects or moods that make you really like the work. Ask yourself, what do I like about this image and what I don't like? Elements of his work I want to add to my photos, make a list for each photographer. For example, I liked photos of Rodney Smith. Why? Because they look so real. There is Mr. in them, the composition is perfect. What do I want to borrow from him? Are those same things. At the same time, I like the photos of sand numero stick. Her works are surreal to and burst with color. I don't think that I would like to add those really bold, saturated colors to my work, but I like how her images break some boundaries or perceptions. And I want to learn that from her. I understand that about all the photographers. I can blend all the things that I like from many photographers into my own personal style. This blend will be unique to me and to my work and will never look like a simple copy from someone else's image. Another example, you like architecture for those, but you are not actually a huge architecture Fan. Why do you like those photos then? Mainly because they look organized and simple. Maybe because some architectural looks so real mail because you enjoy the colors of those photos. Entering those questions will help you to understand yourself and your photography a great deal and will make you look at it from a different angle. However, although you can get a lot of inspiration from the work of other photographers, is really important not to get overwhelmed and be focused on the, on that. Remember, our brain records everything. And you might be second in the ideas. You see someone else's work subconsciously and then rub, reduce them. In Europe, it is totally sure that it's your own creation. That's why from time to time, It's really important to shut down all the photography inspirations entered from different sources. But now it's time to exercise and understand what inspires you for this lesson's practice, I wanted to create a list of 10 photographers you admire the molt whose images you'll look at and think, I want to shoot like this. Next for each photographer, read out at least three things that make you like their work. Is it the composition, colors, boss processing? It will also be helpful if you create collections of the photos for your personal reference. So you can do it as board on Pinterest or as folders in your computer or phone. After that takes some time to reflect why you like those particular features and how you can introduce them to your photography to communicate your storage better. Yet, I firmly believe that our inspiration should never be limited to photos on when we'll need to source inspirations from other types of art. And this is exactly what we'll be talking about in the following lesson.
25. Module 6: Sourcing Inspiration from outside of Photography: Amy labor with one sad photography is like this baby that needs to be fed all the time. It's always hungry. It needs to be read to taken care of. So how do we feed this baby, if not with photos? Where else can we source our inspiration from? We already mention that you can be inspired by other forms of art and we'll talk about that in a second. Yet, don't stop there. I also suggest looking at your broader interests in different areas like sports, politics, health, psychologists, spirituality, you name it. Now I want to talk about ways you can draw inspirations from different areas of art, other types of visual art, primarily, what can that be? And first of all, fine art, of course, go to exhibitions in museums, will look through books with reproductions. Fine art is on the web, so you can find it there too. But don't just look at it actively studied. It's important to be intentional here. What can you learn from studying fine art and also any type of gallery contemporary art? And first of all, the poses of people and especially the position of hands. As we know, hands can be the biggest problem for a model when posing, many fine art pieces will give you lots of fresh poses AD is for your photography. Next, understand how light and shadows are painted and interact in an image. Study, color combinations and tried to understand how they add to an overall mood of the piece. Did the painter use muted colors to create a more romantic and peaceful atmosphere? Or was his goal to actually disturb you with his work, or even put you in a state of light shock. Can you apply those combinations to your work to achieve the same effect? Another thing I wanted to mention in regards to find artists learning from cultures and in art installations, contemporary art breaks all the boundaries and use all sorts of materials to express their ideas. So why not borrow those ideas from them? Things to notice here, when you see an installation or a contemporary art, objects are materials which were used, how they look in a different light, how they can be combined, what can they symbolize? How people can interact with them? If you look closely, a visit to a very small exhibition can turn to an analyst source of fresh ideas. Your next huge source of visual inspiration can be and should be watching movies and series, actually, any type of videos including music ones. Cinematography is closely related to photography, yet it's very different. So there is a lot of things to learn from great movie directors and directors of photography. And here's a great exercise that you can do while watching movies and short films. Pause them and next screenshots. You can later analyze those screenshots. From that analysis, you can understand how to build an atmosphere, how to compile a certain style, the use of details and accessories, how to use the light and shadow or even borrow actual ideas. For example, I first started working with our gummies after I saw the animation movie coupon the two strings, I was fascinated by the fact that such a plain object, a piece of paper, could be turned into a thousands of different ones with lots of meanings. Or next source of visual inspiration is designed. It can be any type of design from anterior to web and product one. How can you be inspired by design? Again, you can attend designing submissions, look through design magazines and window shop at design stores, look for ideas of unexpected usage of things. Often designers use materials or objects in unusual or even surreal ways. Here's the U-turns to collect concepts. For example, I found the idea for this image in interior design magazine about five years ago. I didn't use it the exact way it was presented in the magazine with botanical illustrations. However, instead, I used pages from a regular book and mine that it was my pre Instagram work. Now, it looks like everyone is using books and pages in their visual content, which is not a bad thing, but definitely doesn't look fair original either. Next, and perhaps my favorite one for visual inspiration is illustration. What I like about illustrators and their work is that they are often disconnected from reality completely. And we, photographers are usually very much in reality, even if you want to create a surreal photo from the very beginning of its existence, photography had this documentary component to it, and it was created to document real life. And I love this about photography. I enjoy creating photos that look real, but our surreal at the same time, I like to shoot everything in the same place, never changing backgrounds of my images. However, I always have to think about how I will actually should the scene and it's sometimes a blocks my imagination. Illustrators don't have those boundaries. For them, everything as possible. I love to borrow ideas from illustrators and recreate them in my photography, in my own way. Often I will live in th, the original meaning and message of the illustration. But this is a part of inspirational layering. You don't simply copy but paraphrase it with your own rules. Here's an example of how our borrowed an idea that I saw in the work of Italian illustrator and Nicollet to call it, these were the visual sources of your inspiration. However, your inspiration can come from anywhere and any form of art, beat music, theater, dance, Literature. And perhaps many of you have been inspired by music pieces before for those who weren't. Here is an exercise from an American finer photographer, Rob Woodcock. Take an hour or even a couple, stay alone or go outside and take your earphones and an album or your favorite artists with you and just listen to the music continuously notice in what kind of images rise in your mind. Those would be the ideas for your future works. You can listen to both music without words and songs with lyrics, and try to actively imagine what the band or musician is talking about in the song. This practice brings me at least 23 fresh ideas everyday. The next popular source of finance operation is of course, all literature, novels, short stories, poetry, and so on. One of the most direct ways to inspired by literature, but definitely not the only one, is by using actual plot and stories. Let's take a look at how the popular fairy tale about the printers and the P is reflected in the works of five well-known contemporary photographers. All of them have similarities. Of course, this is how you recognize the plot. However, the atmosphere and the impression that these photos produce a euros are profoundly different. Rodney Smith creates an image board printers in a fairy tale forest. It's dreamy and magical and peaceful as well. Eugenio program code tells more of a high-fashion story using vintage interior props and wardrobe. Image by Brooke shading is as always mysterious and dark. Rosie Hardy created a shot from horror movie almost showing us how must the printers have been terrified by the bruises that target as Ferdinand Goldstein's photo, it clearly mixes elements of pop culture and rubber Dutch photography. So interesting and amusing to see those interpretations. Do you agree? So these were their artistic sources of inspiration. What else can you be inspired by? What are your broader interests? Iron does sports, politics, health psychologists, territoriality do like nature or animals? Many artists are inspired by nature in different ways. Here's how it works for me. Usually when I'm out for a walk, I look around and see some interesting locations and demons part does shoot something there. For me, this location is the starting point of my chute and the beginning of my visual story. Recently untaken inspiration from the detail in nature, the way certain things look, how organized or disorganized they are, the colors of those objects. And these can be very simple things like rocks, fruit, flowers or tree branches and leaves. Always little things, not big locations like fields or beaches. You can also try to draw ideas from there. Now let's get even more practical. What are your hobbies and how can you incorporate them into your photography? Let me give you an example. This is Veronica. She is also known as cutover kicker on YouTube and Instagram. She's a professional dancer and dispassionate about needing and your interests in photography came exactly from there. She wanted to create interesting images of her knits. Now, not all of her audience knows about her needs and hobby, I believe because a neat in lead her to a bigger love creative photography. Now there is one more inspiration source that I'd like to share with you. This is typical enough mentioned during any torques on Photography inspiration, but I feel that it's a huge one and you need to consider it as well. My inspiration and motivation to create often comes from people and meaningful interactions. If you've been following me for some time, you know that I'm a huge proponent of collaborations. And besides all the other benefits like creating projects in a bigger scale, you can get inspired by the work of your collaborators and by the process of co-creating something together. Let me give you an example. These two images are solely the product of my collaborations. I wouldn't have created them otherwise, even more so I would never thought of Crete and something like that. See themed him. It was a collaboration with the newest trader, Irina cool Cova. She approached me with an idea of working together. I decided to try. And this started the process of searching for different ways of connecting our creativity. Before that moment, it never occurred to me to add illustrations to my images. The image with the diode flower umbrella was a product of my collaboration with a florist, LN and Bostrom. Yolanda wanted to make something really unusual with flowers and we started searching for ideas together. Here's what we came up with, and I'm really grateful for this experience. On a final note about inspiration, I'd like to meet and bring you back to stories. Stories about people who are driven to create a huge portion of my inspiration and motivation comes from constantly feeding myself with stories like that. And it doesn't even matter what those people create and they end as long as it's something constructive and non-destructive. Let me explain and give you an example. I'm a huge fan of J's gyrase live show on YouTube. James Jarvis is a world-famous photographer and enterpreneur, but I'm a fan of a history. Oh, not because I like his style of photography. Not at all, but because he's constantly creating something and helps others to do the same on the show. He dogs to the world top creatives and asks them about their struggles and how they managed to overcome them. I see all these people, this high achievers are not super humans that are exactly like you and me, but they put in the hard work into whatever they do. And it motivates me to go on with my art and do the same. However, those are just little helpers. I deeply believe that if you need to constantly motivate yourself to do something, then probably it's something does something is just not for you and you have to find your thing. Your deep motivations should come from within, from your desire to express yourself visually and share it with people only when you understand why you absolutely must create something. You can sustain it for a long time and find an answer to this question will not come immediately to you. It may take years, so don't get discouraged if you don't know it yet. I'd like to finalize our talk about inspiration with simple yet powerful advice. Get bored, get inspiration from ARDS and people's great. However, if you're constantly only consuming content, you end up not creating anything yourself. You also need to take breaks and get bored. Inspiration to create comes from those minutes of boredom. When you don't look at your phone, when you are not watching TV and are not talking to anyone. Not surprisingly, many people report that they get inspired. The showers or while driving, or worst of all, in my opinion, is right before falling asleep. The reason for getting inspired at those moments is scientifically studied and has been used for decades by most successful creatives and good. And Einstein, for example, you need to get yourself into the Alpha state of brain activity. This is when you are not actively thinking, but are relaxed and calm your hardest Britain and beaten slowly. You can put yourself in this condition by sitting down and trying to meditate. Usually, you can't completely clear your mind from thoughts. But the brilliant ideas finally have a weighing. The idea of stillness that's becoming more and more popular nowadays has a very practical application for artists. So if you have been pushing it away, give it a try and die guarantee that you'll see immediate positive results in your creative practices. So now you know how and where you can get inspiration for your future works from. Now, it's time to practice. Choose two of the following exercises and upload your results to our learning space. The first one, it can be watching a movie or a music video and make screenshots of the episodes you really liked. Think about why you like them. Is it the visual component is an emotional one? Write down your answers. The next option, think of the three major attractions in your city. Why do you lack those subtractions? Is it the visual component again, is the story connected with them? Is it some sort of a feeling that you connect them with them right out those enters option number 3 and read a fairy tale or a short story. How would you describe the plot in one short sentence? Write it out the next option. Take an interior design magazine. Doesn't matter if it's old and you look through the trends, what are the basic features? What can you apply to your photography? And turn into a concept? Write down your answers. Option number five, big three natural objects. You can pick them from the park nearby or from a grocery store, doesn't matter. What do you do you like about these objects? What are the most prominent features? Daxter color shapes, something else? Take a close look at them and write down your associations. What do those objects remind you off? So your answers to the questions in these exercises are the details that you can use for your future images. So again, you can pick two exercises from the five-minute and above and complete them. You can get to the three other three later when you have more time. But if you are good on time, do all five, share your inspirations, upload your images illustrating your answers to at least three questions. Your written enters in the command to the images. I'm intrigued to see what inspires you. Now guys. I know that it was a mouthful, but just remember that you don't have to be inspired by erythema at once. Tuesday inspiration sources that are right for you and explore them in depth. This will help you to understand yourself better, and this inevitably will result in you producing more meaningful and more authentic work.
26. Module 7: 2 Ways of Attributing a Concept to a Photo: This learning module, we will talk about an advanced topic, creative concepts. And we will be trying to find an answer to the question what your story is really about. If this sounds interesting but a little bit intimidating, know that you are not alone. And I was there too. It happens just because you keep telling yourself that your life is boring and that you don't really have any stories to tell. But know that those are just lies. I will show you how you can create meaningful stories by digging deep into your mind until, and finding those concepts. Watch on. And I cannot wait to share them with you. Within Harvard, 10 years of my artistic practice and after interviewing over 50 photographers working in the same conceptual area, I have discovered that there are two ways of attributing that concept to your work. You can come up with a concept for your image before or after creating your photograph. And both ways are okay. So what I mean by before creating is that you come up with a concept, topic or a problem you want to talk about before even planning your photograph, you pick something that resonates with you on a deep personal level, and only then you create intentionally paying attention to every single detail. Yet there is a second waited through the concept to your work and that's after creating, that is your executive idea. What's your process? After the image is ready, you try to answer the question, what pushed me to create this particular work? I'll be teaching you to find content before you start creating the work in the following lesson. Meanwhile, let's get clear about the photos you created and continue to create just because and for the coolness or beauty of it, know that it's fine to let yourself explore subjects without attributing a certain concept to it from the very beginning. In some cases, it's even necessary from heaven interviewed many recognize photographers in darkness. I now realize that create an meaningless but, and I put meaningless in quotes. But aesthetically pleasant work does for the beauty and strangeness of it. An important step for creating that deep, strong work which will impact people on emotional and cognitive levels. In addition to that, let's face it, a huge part of creating any type of art is subconscious. If we try to control everything and take the intuitive part of creating out, it won't be art anymore. What's important to understand is that often the work that seems to be meaningless to you at first can still be viewed as conceptual and tell a clear story. In the very beginning of the course, we talked about how a story can be told in any type of photography, even when you photograph flowers or donuts. Remember, in the end, it all comes down to the meaning you attribute to your work yourself. Yes, you are the artist and it's your right and responsibility actually to get conscious about why you create, when you create, Why do you want to take those images of pads, couples, flowers, happy faces said women and vintage dresses, headless guys in water, whatever. Let me give you a personal example. Concepts were very tricky part for me in the beginning of my photography breath, when I started to try out this type of photography, I just wanted to create something unusual and surreal, basically something that would look cool. I didn't have a real story behind any of my photos. And if you recognize your story in mine, know that this is normal. This is the stage of discovering and building up your interest in a certain area of art. Later on, when I matured as an artist, I began asking myself why create, what I create a connected the images that I had with my interests in psychology and human relationships. And their realized that I was communicating things that we're touching me on a deep emotional level subconsciously. And eventually I was able to come up with actual concepts and stories from my past works. So if you want to go to the next level and you do because you are here. And in our visual storyteller stripe, you'll have to start asking yourself some really deep questions. Like, why do I want to create work like this? What kind of value can add green to people? What kind of value does it bring to me? When you start to understand those things, you will realize that there were actually deep stories in your work, but they came through your mind subconsciously. Now it's time for you to put them into words and attribute them all the meanings that you find important? Yes, try to interpret your own work. Tried to look at it as though you were a stranger. Those questions are really big and most probably you won't be able to immediately find answers to them. It takes some people years. And by the way, answers can change in the course of time. So don't get stressed about it right away. Simply tried taking time to think them over and write down your answers, then go back to the questions in a week or in a month. This will keep you centered and committed to your photography practice. Because when you do find answers to those questions, when you know your why, you'll be able to sustain your creative practices and will never get tired of working for clients. So your goal as an artist becomes to raise the levels of self awareness and consciousness about yourself and the stories you want to tell. This is when you begin to get more realizations about the things that are important for you and why they're important, then you consciously want your art to be transformative for the viewer while still being open to interpretation, let's practice what we have just talked about. Take a look at your past works. Look for those that you created for the pure aesthetics or strangeness of them. Pick three images. Now, go back to the moment when you were creating and ask yourself, what was I thinking? But most importantly, what was I feeling? The answers to those questions will give you clues and hints on the concepts and stories that can now be connected with your past work. Please note that you should only go for the stories and concepts that truly resonate with you now and that don't seem fake. It's important to be completely honest with yourself while you're doing this exercise. Another set of questions I want you to ask yourself when looking at your password is what type of things, objects, people you like to have in your images. Why do you think they are present in your work? What do you want the viewers to feel when they see your work? Which of your works you are connected with the most emotionally, especially, and why? Answering these questions will help you understand yourself and your work better. In the next lesson, we'll be learning to find concepts for the works that you are planning to deliver in the future. It won't be easy, but it will definitely be fun. Watch on.
27. Module 7: Inward Concepts: In this lesson, we'll be talking about comma num with personal or inward concepts. Before we dive into that, I want to remind you that with this course, my goal is to teach you to start getting conscious about what stories you want to tell to this world. Why is this important? First? Because when you understand why you create your works, your work's bring you fulfillment and you are more likely to find the people who will resonate with the message you are putting out there. And this includes galleries, collectors, followers on Instagram. Moreover, if you're already working on a plan and to work with brands and clients, this will help you to better serve your customers. When you learn to tell stories in your personal projects, it would be much easier to transform this process to your commercial work rans, magazines, and even individuals always have a message they want to convey to their audience. That's why I want to dig, integrate in general concepts for your images first and then get down to find an actual ideas for his shot. What's the first step to find an concepts for your work? Let's take a look at how concepts can be classified. I like to divide concepts into two big groups in Word concepts and outward ones. Inward concepts include everything connected with your personal life, with your memories, your hardships, and happy moments, your family background here, emotions and basically your psychology, outward concepts reflect what's going on in the world around you and how you react to those things will be diving deeper into those in the following lesson. Meanwhile, let's talk about inward concepts. Searching for inward concepts, you need to be thinking over the questions like, what are worried, biggest struggles in life? What challenges have you had to overcome? What was your emotional reactions to them? What did you learn from them? What was the worst or best thing that ever happened to you? Why was it the best or worst thing? What are your biggest fears? What are the things you are most grateful for? What are your dreams and aspirations? What are your goals in life? Why did you choose those goals? And they totally understand that those questions are really big ones and they're not easy. Perhaps this is the first time in your life that you ever had been asked those questions. However, when you actually sit down and take time to think about those questions, you'll begin to understand yourself better and eventually will be reflected in your work. Moreover, analyzing yourself will give you an abundance of concepts for your future images. And not just images, but the whole series of works which were aiming at. Let me show you a couple of examples of photographers working with inward concepts. For example, I created this image when I wasn't the middle of a serious psychological transformation. And the standard that there were two of me, the one that everyone around me, meaning my family and friends wanted to see. And the real one who I actually wasn't side but didn't allow it to show because it didn't fit into the way people around me lived in the image. I'm trying to harmonize those to. The interesting part is that I didn't have that. In mind when student the image, it came to me afterwards when I question myself why this image was so important for me to shoot. Later on, I found that this topic was very interesting and I actually can develop it in multiple ways. And it's not about the good and evil in us. It turned to be about the internal dialogue that all of us have. Sometimes that dialogue is cruel and punish ourselves. What I was attempting to do with my work was to put that inner dialogue, a positive one, and so that we find in her piece, Here's an example from another photographer. He either Evan Smith, when she had a baby, that gave her a whole new meaning to her life and made her re-evaluate many things about her mother-daughter relationships. Those thoughts are reflected in this series that you called, seen, not heard. Another example is from a finished photographer. Wilma horse can actually speculated on the topic of growing up and changing and created a whole series of images where she reproduce her old childhood photos. The next step of discovering your inward concepts might seem even more complicated. Some of you asking yourself about your life values, why is this important for an artist? Well, values are a part of us. They highlight what we stand for. They can represent a unique individual assets. Values guide our behavior and of course, should be reflected in our work when we own our, our personal core values consistently and let them shine in our photos. We experienced fulfillment from shooting and we're prepared to do it for as long as we can discover new core values requires some personal psychological work, which includes looking back to your most memorable experiences in life. It can be done with a specialist guide and mentor coach on your own. And there is a number of articles on practical steps on how to discover your personal values. I do recommend you to check them out when you discover what you really value in life is, we'll do magic to the images that you create and you won't ever be worried about copying someone else's work as your work will be reflecting you fully. Now, let's do some practical work and see that diving into your own personality, memories, feelings, and beliefs can be a tremendous source of artistic inspiration and provide an abundance of concepts for your future images. So this exercise is called coming up with inward concepts. And I want you to pick three questions from the list below, enter them as honestly as possible. You won't be sharing your answers with anyone. So be honest when answering each question, make at least three things. So the questions are, what are your biggest struggles in life? What challenges have you had to overcome? What was your emotional reaction to them? What was the worst or the best thing that ever happened to you? What are your biggest fears? What are your biggest dreams? What are the things you are most grateful for in life? What are your goals in life and why did you choose those goals? After you have completed the list? Look at them. Which one triggers you emotionally the most? 2s that one. This can be the basic concept of your future project. For example, if you choose fears in your future projects, you can explore the topics of like types of fear and fear. That fear plays an important role in the development of every human being than it can be ways of overcoming fears, or it can be what fears can do to people and so on. Don't be afraid to be unoriginal with the concept. Remember that good stories are universal and your viewers will need something to root for in your work. In the next lesson, we'll be talking about outward concepts and how you can find the ones that you care for the most.
28. Module 7: Outward Concepts: In this short lesson, we'll be talking about the outward concepts. What I mean by that is what's going on in the world and how it affects people and you personally. This will include global processes that we're witnessing like political, economic or technological, psychological, sociological, and ecological trends and tendencies that are happening in everyday life around you. Here again, I suggest you go back to your broader interests and not only interests but concerns, issue to care for and passionate about. And let me give you an example. We already mentioned this famous photo by Jorge Gamboa. Clearly the photographer was concerned about the ecological situation in the world. His simple image is very powerful because it plays with associations and aims at making people think of the current state of the environment. Here's a different example from a Canadian photographer, Dean and Goldstein. She decides to speculate on how the life of Disney princesses could be like in the modern world. Through this series, she addresses many issues that are not just limited to one topic. We can see her dodging and upon politics as well as psychological and sociological problems. In her other series, Dina draws our attention to how the modern capitalist societies organized. Her images are add posters that sell things like ideas, revenge, love, or even shopping. But what if you're one of those who cannot connect with the global issues? What if you do resonate with something that deals with your personal life and past experiences, but doesn't call to solve the problem of poverty or world hunger. Know that you're not alone and you are not an outcast or not been linguistic or too self-centered. You are concentrating on the things that touch you that in the deepest emotional level. And when you try to process your own emotions connected with something personal, like a family drama, a childhood trauma, or something like that. You serve as an example to other people that dealing with hardships is possible. Many viewers might resonate with that kind of work because those things happen to everybody. Or let's say, you are passionate about life of Guinea pigs in Hungary in medieval times. Yes, it's a weird example. But if you really connect with this topic, you know why it's important to you. And when you create art related to that, it will touch people who have the same interests. The beauty of today's world isn't diversity. It's okay to be different and the part of a smaller group at the same time. Well, what of your art is happy? Is there even a place for it in the world? Because often it seems that to be considered deep and profound, a concept has to be connected with some kind of a problem. And my answer is, of course, yes, there is a place for happy art that doesn't go off to solve in any global issues, but helps you see the beauty of life and appreciated more. My favorite heavy artists are eNodeB is and Danielle Rwanda. The arts can seem to be a light to some people, yet it serves a bigger mission of making the bill value life and the little things in it. As a conclusion, I'd like to point out that in the end of the day, it all comes down to one question, how much of yourself you're willing to put into your work and share with the world. Many of us, myself included, are not too willing to state our opinions publicly because in most cases, we're afraid of being judged and disapproved off. However, it's very important to understand that it's never possible to please everybody and you should never attribute too much power to other people's opinions. Be sure that the cynics and haters have their own more important dishes to care about. Yet, you begin to open up and share your actual points of view, the world, you are much more likely to build meaningful connections with people who will care and you will much more likely to hear me two in return. And ultimately, isn't this what we all all looking for? Connection? I will be honest. I still have a lot of struggle with sharing and stayed in my opinion to my art because it's much easier to create dream images that show fairytales and offer an escape, but not actually make you think or face things that are going on around here. It's also much easier to produce an emotional piece of art and not understand why you made it. It's easier not to do the work on yourself. Trying to understand your personal deeper intentions is much easier to just say, I made it, hell knows why. Now you people showed like it and connect with it for whatever reason. But then how can we expect the viewers to connect with our work if we, ourselves are not connected with it. Now let's practice discovered in the outward concepts that mean something to us. Take a newspaper or go to the Latest News page of any popular news website, look through it and find at least three topics that touched you the most emotionally thing them over and tried to put each of them in one short sentence. And these sentences, the, the basic concepts for your future projects, pick one of them, which speaks to you the most and tried to expand the topic. For example, you can list several problems within one big ischium. Say, if you're thinking about environmental pollution, you can break it into types of pollution or into effects of pollution in different areas of the world. That's just an example with rather negative concept. You can also take some positive trends and break them to more detailed pieces. Now, I know that that was a bit of an advanced topic, but they just couldn't pass it in this course. Are really wanted to get conscious about why you're shooting. What do you shooting and what kind of methods you want to put into this world. Because only then you will be able to sustain your creative practice for a long time. Only then you will be motivated to shoot again and again and again. And this is what we all want to find fulfillment in our work.
29. Module 8: Practical Ways to Unblock Your Genius: In this learning module, we will talk about the topic that many of you are so worried about creative blocks. And I will show you how to get rid of those quickly and effectively. I will also focus on practical techniques of how you can generate ideas easily anytime. Let's begin, Okay, well, let's talk about the scary monsters. Many creatives are so worried about the creative block. And first of all, let's get clear on what it is exactly when you know what a monster looks like and where it comes from, it becomes much easier to fight it. In other words, you need to understand the problem and be aware of it so that you can deal with it effectively. Creative blocks or barriers to inspiration can be described as the inability to access one's internal creativity. The condition ranges from difficulty in coming up with original ideas to being unable to produce creative work for days, weeks, or even years. Creative block might be experienced by anyone for a number of reasons. Many writers, artists, musicians reported periods of stall creativity at some point in their careers. For example, Francis called Fitzgerald was among them, however, often simply becoming aware of when, how, and why a creative block develops can help a person to address the creative block and prevented from returning. So let's dive deeper into that. In this module, we'll be talking a lot about ideas. So let me remind you in which meaning I use this word by ideas. I mean how a story is developed in an image, the visual execution of a contract, for example, in this image, the core concept is to show the fragility of a relationship between two people. The main idea here is to use the giant paper winks to unveil this concept while talking to many photographers, I have concluded that artists usually generate ideas in two different ways. The first one is when you have a starting point, like we discussed previously, a location dress element of surprise that you want to try out, or maybe it's a model's face or a cool prop. And then you tried to connect some kind of a story or contact with it. That has been my way for many years. This will also, in many cases, be the way you built in your visual stories. In case you're working with brands, for example, often they give you a product and ask you to create something interesting with it. The second is starting with a story or a concept. When you already have a problem that you want the audience's attention to be attracted to. Or if you want to share some deep personal experience, but you don't have any image elements or starting points. I believe that both of them are fine and have the right to exist. Yet both of them have several potential greatest challenges or types of blocks that I want to discuss with you today. So when we practice my way of creating an image from a starting point, then chances are you might get caught in just the static component of your future image. So your story will be weak or not present at all. This happened to me many times. Antidote for this one would be to never forget about the symbolic meanings of colors, props, locations, poses that you're using, and trying to align them with your values, opinions, and views. Simply paying attention to how this or that meaning of a prop, for example, resonates with you and which emotions in you get triggered not to be overwhelmed by the sheer statics. Ask yourself questions about your starting point, as we discussed in one of our previous modules, for example, I mentioned how I attributed a personal symbolic meaning to my oregon and birds. When you have a clear story in your mind that you want to share with the world you might still face to potential obstacles. And those might seem like real creative blocks. The first one, the blank canvas syndrome, when you face the fact that your story can be told in millions of different ways and you don't know which of them to choose and where to start. But it's not the only potential challenge. Once you've come up with the coolest way to present your story, which is not actually connected with the locations, prompts, et cetera. And then you have at hand, you might get called in the ideal world and wanted everything to be exactly as the image you have in your head. And this might be both good and bad. On one hand, it will push you to learn new things, find new cool props and locations, new people to work with, etc. It is extremely good, of course, on the other hand, you can start procrastinating, telling yourself that you don't have this or that for your ideal image yet. And many people just stop right there. They come up with an ideal image in their head, but they can't have it in reality due to some real-life limitations, and they simply don't create it at all. But we don't want that, of course. So here are my suggestions on how to deal with these two potential obstacles and antidote for the blank canvas syndrome is to set limits. Consciously limit yourself. Use of some particular prompts, locations, colors, so on. Remember the exercise that we completed when building the story from three elements. Now, you can set those elements for yourself. Again, be intentional when you said the lemons and constantly ask yourself why you choose this or that particular element to be present and not absent from your image, go a bit further and create a set of rules for your future image. Keeping in mind your resources, locations, models, props, and what you can create with them. Here's an example from my practice, my alphabet series. It's a column ration project with the styles Jane Christopher son who lives in Saint Petersburg, russia. And most of the shoots were done there. When we started the project, we decided that the rule would be that there is always two main colors. The format will always be square, and the letter will take the biggest area of our shot. When I started the series, I evaluated my resources to reduce basis with paper background of various colors are relatively cheapens and Petersburg and finding models is usually relatively easy. St. Petersburg is very close to Helsinki, So the project look doable from the very beginning. Now, when you have the ideal image syndrome. Search for substitutes of elements that you are lacking. Yes, you'll have to compromise, but you also need to always remind yourself that have done is much better than non-existent. If you can't find the perfect location, lists, all of the locations that are accessible to you in real life and see if you can shoot there instead of your ideal place. When you make that list, don't think about the image that you want to create. This will not allow your creative mind to offer original solutions. After you listed all the places, take a short break and then look at the list once again, visualizing your future image shot in those places. Trust me, this time you'll be able to choose a suitable one from the list. And you can do the same thing with other image elements too. Here's another example from my work. I kept the idea for this image in my mind for over a year. I kept surgeon for a perfect location. I thought that it should be filled. However, I couldn't find such a felt, but I found a suitable wall and the shot finally came together. Core thing about creative blocks is that you need to understand that they usually happen from too much thinking. Yes, you need to come up with a meaningful story. Yet, when you might get too busy and tired, it can't function creatively anymore. Therefore, let me share some way. You can reset your mind so that it can come back to being even more creative than it was before. And first of all, you continue your environment, sometimes changing the setting, changes your thought process. Go to a nearby coffee shop instead of sitting at home or take a walk around the local park, traveling also helps a lot. The next way is to shift gears, stop thinking about new ideas and do something else not related to your photography. Your thought process will be still running in the back of your mind and it might get unstuck easily and provide you with a brilliant idea while you are doing some random thing. Newton and Apple, our committees and the bathtub examples are around. The next way would be to change your medium. I found this advice in the book Big Magic by Elizabeth Gilbert, simply tried to find a different creative outlet. You can draw, paint, play, musical instrument, dance, or starting you DIY project. It often helps to uncork your blog in all the mediums right away. The next one will be to isolate and be in nature, often creative blocks happen because we get too much information. Or Dr. too many people watch too many movies, look at our screens for too long. When you block that distraction, your mind, go quiet down, it will get bored, like we talked about before. And the last thing is to block time for your creativity. Yes, you need to actually set the times for it in your calendar. Studies show that your brain cannot be logical and creative at the same time, creativity needs immersion, yet we want ideas to simply pop up on the middle of a busy day. And you can even justify it by saying, I do get ideas in the shower or when fallen asleep. Yet, notice how those ideas come when you're relaxed. What if you took several hours to just let your mind wander? What if you took a couple of days a week to just create a week per month or several months per year. Some artists do work in cycles. Painter ammo differs, for example, takes several months in a year to produce her paintings, and the rest of time is spent on teaching and business-related things. But you don't have to do that right away. You can start small. We'll just Lexend days in a week and then slowly extend those creative period and see how it goes. So now you know how to reset your busy mind to be able to let the brilliant ideas in. In the next lesson, we'll discuss the actual techniques for generate NADH. Watch on.
30. Module 8: Tools for Generating Ideas: In this lesson, we'll be talking about five powerful techniques that you can use to always be able to come up with new ideas. Let's get straight into it. You can generate ideas by brainstorming, reframing, by asking questions why, and doesn't have to be this way by visualizing imagined in the final result and how it feels by imagining, how would I do it if I were someone else? And by meditating meditation and clear in your mind is a great technique. Now let's talk about each of them in more detail. So brainstorming, the primary objective of brainstorming is the creation of as many ideas as possible with an emphasis on quantity over quality. One of the key elements of this process is that brainstorming is inclusive of everything that the murders, regardless of how odd an idea may seem at first, but it's important to keep it intentional. That's why brainstorming works best when you have a starting point for your image. Like a cool prop, for example, or topic Like loneliness over tacked on animal rights. The easiest way to dig ideas for brainstorming that comes to mind is to go online and browse for works of photographers who you admire the most or like. I sometimes do go through my Pinterest boards. It's effortless and quick. It's very rarely satisfying since the chances that you will create original work of art based on someone else's work are extremely low. So finally, adaptation and shut the internet down for a while. Here's what you can do in stat. And first of all, write everything down on paper and draw individual elements of your future picture. Also helps give every ADL and image a voice and a place on the page. Just thinking things through in your head is not enough. You have to see the ideas on paper. So if you are brainstorming for props, right? Book, Flour, toilet paper, and so on. If you're brainstorming for surprise elements, tried to wrap those in words. And yes, I literally mean growth line over a hail or roses so CAN in gasoline. The next way would be to play with word association. Come mom with a sequence of words, each of which is an association from the previous one. For example, you start with the word book. The next word that comes to mind is say story. Then when you think of a story, you first might think of a princess and so on. You can raise the bar and make it more challenging, disregarding the first association that comes to your mind and taking the second or the third one instead, you'll be surprised how far you can go from the initial word while still staying within the limits of your topic. This exercise will help you to find the original ideas that fresh combination of everything that you've seen or heard before that we were talking about in the very beginning of our course. Next, what you can do is to split your brainstorming over several days. This allows you to return to your ideas with a fresh eye. The next step would be to talk over your ideas with a friend. Having to verbalize your ideas out loud to someone else will motivate you to put them in plain words so that someone else could understand them. It's not even the response or reaction that matters the most here, it's you trying to verbalize when you hear yourself explaining an idea to someone, you yourself understand the idea better if finance Bears Ears is challenging, make a voice note or record a video. In some cases you don't ever have to watch it. The act of verbalizing your ideas will trigger your mind to create more of them. And the fifth step would be once again, turn off the Internet and shut down all the destruction. Turn off your phone. Music is fine, but otherwise, brainstorming should be you a piece of paper, a pencil, and your thoughts. The next technique is reframing. And here, I mean, you should ask questions. Why, why does it have to be this way or trying to look at things from a different angle. And here's what I mean by that. We can all get stuck in certain tracks of thought. They may be so comfortable that we don't even realize that they're holding us back. So to have fresh ideas, we need to break away from established patterns of thought and start to see new path paths. Instead, you are likely bring a set of assumptions to each and every situation. Many of them may turn out to be true, but challenging your perceptions can also open up some exciting possibilities. When you think of a certain way to create an image, constantly ask yourself, does it have to be this way? Simple example, you want to create a conceptual image on the topic of loneliness. One does you mind tell you to create, well, let me make a wild guess and say that you want to photograph a girl in a long vintage dress in the woods, loose hairs, sad face. Maybe she hold something in her hands like a lantern or a candle. Now, I want the challenge that and ask yourself the question, doesn't have to be like that. Does it have to be a girl? Who or what else can it be? Does your subjects have to be in the woods? Where else can it happen? Does there have to be a candle? What else can your subject hold? You get the idea, if this seems a bit complicated, tried to come up with replies for what you would never want to have in your image when you're writing a list of those things, usually the things that you actually want to have in your pictures, bob up. Another thing to do would be to find several emitters that you dislike and tried to explain why, what would you make different in this image? And you can get lots of ideas this way. The next technique is visualizing. Imagine the final result and how it feels. When I start getting ready for a shoot, I always have my final image in mind. I visualize the scene and understand which elements I need to get in place so that it looks the way I would like it to I advise you to do is not to simply met in the scene, but make that mind image as detailed as possible. I want you to hear it, smell it, touch it, and feel it in your head. And then record everything that you felt this visualize and experience will dramatically increase the believability of your visual story. The next technique is imagining, or how would I do it if I were someone else? So by imagining here, I mean, putting yourself into someone else's shoes to solve your creative problem, you have a list of your favorite photographers. Pick one or two of them and ask yourself, what if I worked in Walker, how would I should that how would I approach this topic? How would I work with this person? How would I should in this type of light, when you imagine yourself to be someone else, the most important thing is to attribute his or her personal qualities to yourself. In many situation creative blocks emerge when we have limited beliefs about our own abilities, that we're not smart enough or not talented enough to come out with some original idea. However, if you imagine yourself to be a team walker, you'll feel like a photography superhero and will act accordingly and so will your mind. And our next technique is meditating. I put this word in quotes because I'm no workloads to a professional metadata and I never took any classes in it. I do what I call creative mind walks. And this does wonders to my art. I get fresh ideas everyday. What I do is in the morning, after my workout routine and shower, I turn on some common music and sit down with my eyes closed for about 20 minutes. You need some time to concentrate and start thinking of your daily chores. But when you focus on the sound and simply let your mind wander, images will start to come into your head. It's good to have a notebook or a scheduled with credits so that you can record those images right away. Another way to meditate like that is to put on an audiobook and set of music. When was the last time someone radio story? Yet, you don't see actual images going on with the narrative. Your mind is forced to create them. I find this meditative listening more effective than reading because your eyes are not occupied and your mind can completely focused on imagine in the scenes. So these were my ideation techniques. Try those one by one and either one of them or a whole combination will bring the desired result. Have you got your own? I'd love you to share those in our Facebook group. In the next lesson, we'll talk about the important next steps when you have just generated your brilliant ideas. What time
31. Module 8: Collecting, Sketching and Storing Ideas: So when you have an idea, what do you do with it? Especially if you don't have a chance to executive immediately. Often simply put an a down is not enough. Let me show you some advanced ways of collecting and storing your ideas so that even when you feel less creative, you can always go back to your stock and pull out something amazing. So first of all, I want you to capture ideas and write them down and sketch. Whenever you get a new idea, write it down and tried to be as detailed as possible. What will be going on in your image? Who is the main subject where everything is happening, then make us catch. You heard that, right? Your sketch doesn't have to be a masterpiece. It's purposes not dummies people with its beauty, but to simply record the idea in a visual form so that you know how your future image will be organized and how all of the elements of the imitable look like. It will also illustrate what you have just put down in Zack's form. You can also start with a sketch and then explain it in additional text. If you collaborate with other creatives, this sketch will later on help you to explain your ideas to others better, because even a badly drawn picture is worth 1000 words, then I want you to be able to do that anytime and anywhere. Setup practice of recording ideas and have something to record it with. Always with you. If urine defense Notebooks great. Take one whenever you go and keep it on your bed stand. But these is thing you could do is to have a node or evenness cat on your phone. This thing is always with us. The next thing I advise you to do is to have a storage system in place. When your ideas begin to pile up, you need to store them effectively so that they are not wasted and simply disappear. Collect all your physicals, catches in the folder, organize your phone and pencil nodes in one place. So what I do is I keep all of my ideas in a Google spreadsheet that I can access from anywhere. The spreadsheet has columns for each image, elements or answered the original idea description there and a photo. Oh, my sketch as well. You can have a different system, yet it's very important to have that system in place. It will be your saver. When you get that creative block, you are so afraid of, or if you're very simply get a client request for a creative photoshoot, it's sort of like putting your ideas in a bank, like money because you don't want to be broke one day. Now, let's practice ideating and putting your ideas into scatters. So for this exercise, I want you to take the contact lists that you have prepared for the previous module. Pick one concept from each list and manage the content that you found with the surprise elements we've talked about in module number 3 to remind you, here are my favorites, but you can add yours, of course. So there are multiple objects, unusually big or small objects. Liquidation miniature world on stage affects animals, unusual makeup and hair composition, uncollectible things or metaphors and items. You should have two sketches as a result, take peaks of both of those sketches and share them in our community. If you have time, create images according to your sketches and we'd love to see the final work even more. One of our goals and promises of this course is to help you start a project or a series of works in which you explore a topic that's meaningful to you and that will also impact if yours. Next week, we'll be exploring on how to do that step-by-step. I can't wait to show those steps with you now that you have the tools for generating ideas, I want you to apply them to practice. But the major thing I want you to understand from this particular module is that your creativity should be your priority. And this is simply a must if you rely on it for a living or if you hope to do so in the future. Meanwhile, sharing biggest takeaways in our online community, it's always very useful to understand what you got from ever particular module.
32. Module 9: Why so.. series?: In this module, we will talk about creative series. Now, I know that it might be a little bit advanced for some of you. Some of you have already tried gradient series before. Others don't know where to start. What on. And I will give you the practical steps how to create a series from scratch. And I will also tell you about how and why working in series can be beneficial for you, especially if you want to be successful commercial as an artist. Well, let's begin. So yes, in my opinion, almost every image can be turned into a series, but it wasn't always like that for me. It took me a lot of experience and talking to our crowd to understand the importance of creating a connected body of work and not individual limiters. So if you're a total new being created series, don't worry, god here, and I'll walk you through the process. Here are the top four reasons why you should consider working in a series of works. First of all, Series allows you to explore a concept in depth and show different sides of the matter is series gives you an opportunity to explore and examine particular ideas, themes, issues, compositions, concepts, or topics in deeper and more meaningful ways. You investigate them from a greater variety of perspectives. Often it's not possible to do within just one or two photos. It's like you're looking at something under a microscope instead of simply throw an occasional pest. And Luke, the closer you look, the more you see, and the more you see, the more fascinating your explorations get, ask any experienced artists and they will tell you that the deeper they go, the more involved and committed they become your getting an a journey and never want to stop. What's also important is that a series can allow you to tell a more complete story by showing the sequence of events or illustrate transformation. And this is sometimes next to impossible to do when you have just a single image. This is a series of mine called BARDA fly. In this series I showed transformation of my main character. There is a sequence of events here, just Story Behind series. Life situations live in deep emotional impact on us, which stays with us for years and often goes into subconscious, would take an emotion, usually in a negative one like fear, aggression or anger, and carried with us further, not even realizing that we have it yet, it does affect our behavior, perceptions, thoughts, views of the world, and even how. It's never just one experience that influences us. It's always the combination, the layers which with time turn into so-called emotional baggage. And this baggages burden in us. At some point, this baggage can make us feel stuck completely when we feel depressed enormously stress are deeply unhappy and not be enabled. Understand why we think the way we think and why we do the way we do. Psychologists say that, hey, if you have a memory that's more than 18 months old and it still causes an extreme emotional reaction in your mind, it means that this past event is holding you back from living your own life fully, often getting back to those painful past events, dig in them from your memory and experience in them once again, in your mind, accepting them and transforming your initial emotional reaction to them is the only way to go on living. Project reflects the process of accumulating emotional baggage and getting rid of it in the end, becoming better and wider. So when you want to illustrate some phenomena as a sequence of events, a series is simply irreplaceable for that, the next reason to work in theories is that serious help you connect with the viewer on a deeper level and in fact, create a whole experience for your audience. When you have a unified series, you become, in a sense, the expert or authority on whatever thoughts and ideas you're sharing with your art and knowledge and experience you gain from working with this topic allows you to communicate the results of your exploration in more impactful ways. In other words, you are becoming more convincing to your audience. The truth is that people have an easier time understanding, appreciating and being moved by what you are up to when you make an effort to present it to them in detail. When you offer them a brief or incomplete enter through only one or two works, it can give the impression that you don't really have that much to say. Your goal when creating a series should be to make your viewer say, Okay, I get it. I see your point. I know exactly what you're thinking, where you're coming from and why this is important to you, and why it's worth me taking my time to reflect on and appreciate In a way, you can compare making art in series to write in a novel, very few ideas can be adequately expressed in cinco chapter compared to how thoroughly they can be treated in an entire book. The same is true for visual arts. A single photo oven has no beginning, middle, or end. We can only guess at its greater purpose, storyline, or the message it's intended to convey. And in the overwhelming majority of cases, lack of those is unsatisfying for viewers, especially more experienced ones. You need to keep that in mind if you're intending to sell your works to collectors, viewers need more, a fuller context and understanding. The art comes from what inspired it and why it exists or where does going. Remember that I said that exploring a topic can become a very exciting journey for you. Now see what happens when you take your viewers on this journey with you. What do you think your viewers will remember better and experience of looking at a series of works or a moment when they spend on looking or just one photo. Take a look at the series by flora borsa, for example. She tried to imagine how a real life models of those painters would look like. And she does take us on a journey. We really want to see what's the next one in this series. The next one and the next one. And it becomes entertaining as well. Another very practical point is that working in series will help you market your work easier if you want to work with galleries, publish your works magazines until one, you have to come up with a series. Pretty much any established gallery show on the current work of an established artist, present a unified selection or body of work. It's almost like they're saying for this show, we're presenting one product or idea or concept in a variety of shapes, sizes, and colors gather is doing it because they know that people need to understand art to buy it. Just think about it. People need to understand art to buy it. The majority of cases, galleries look for cohesive, coherent, unified bodies of work and not a load of unrelated images. It works sort of the same when you publish your work online, your Rodin's decided to follow you because they like your body of work, not just one or two peaks. And what's more important is that they want to see more and more of the same work with some variations, but still with the same basic elements. And that's the problem with men in photography account on Instagram for example, photographers and not only beginners, but also established ones, started uploading whatever work they've done throughout their history. But if all those works look very different from each other, people don't have a reason to follow you. They don't want to see random stuff. They have lots and lots of that in their everyday life. In this case, work on a series and publishing your works one-by-one can sort of be compared to a TV show which people want to see every unit. The last but not least of our four reasons to work when the series is that a well-thought-out series proves your commitment. It demonstrates that you have chosen a bath. You know what you're doing, where you're going, what do you have to do to get there and that you're prepared to finish it. Most importantly, it also shows that you have the ability to think matters through all the way through the very end. This is how pros, understand a fine art photographer can distinguish him or herself from the mediocre imaginary out there. That's the kind of art that they are constantly on the lookout for. Think of it this way. If an artist makes only one or two or something, no matter how good those images are, the expert might wonder, does she get lucky? Can finish what she started, can to do it again, again and again. Should I even bother to invest my precious time in looking at her art? People who know art assess it by numbers and isolated work of art is nothing more than a start for them. You're going to start something, you'd better be prepared to finish it. So again, these are the top four reasons you should think about when working in series. First of all, it hadn't helped you to explore the concept. Second, it will connect you with the viewer better. It will help you to market your work and it will prove your commitment. Now, you might ask, should always be working in series and their answer is no. Your individual images may still be your way of tapping into a certain matter or topic and experiment with it. You have to test the water sometimes and see if you want to get deeper into the sea. When you find a topic that really interests you, then you can elaborate on that and create a series of women is from your first single work. I know that working in series if you have never tried it before and might seem a little intimidating if your mind is not used to create it in series, it's okay. And it shouldn't be a reason for you to stop taking images little by little, you'll learn to understand your art better and work in series will become a breeze for you.
33. Module 9: 3 Ways of Creating a Series: In this short lesson, we'll be discussing three ways of creating a series so that you could try one or all of them for yourself. So how can a series of photos based tablet? From my experience, there are three ways to create a series of works. First from a single individual element, next, from a group of images and from scratch, Of course, let's first talk about create a series from a single individual image. You can start with a single individual image, understand the story behind it, and discover the topics that you were gotten in that image. Then you can develop one of them's into hell project coming up with variations. But they give you an example from my work. I already mentioned my paper cut series. It wasn't planned to be a serious from the very beginning. First, I just wanted to experiment with the new material and an interest in hair color. Then I thought that there's actually something interesting here which can be developed into a whole project with variations. So I decided to varied colors, locations, models, and the ways of k1, the paper. Yet I decided to keep several things in tact, establishing the rules for my series. My rules here we're keeping the image monochromatic, keeping paper and scissors as my main props, the hair color of my model should always match the general color of the image. And for most of our models, I decided to add the red lips to the makeup look. Another example is the project I shot in collaboration with a stylist. He gained new demand. It also started from an experiment. We decided to try to work together on a single photoshoot. It worked out very well and we tried to think how we can develop this individual image into something bigger and more cohesive. And this is how the circus of objects appeared. We connected the works by a single topic, circus, and then similar color details read elements in every image. And also we added image pairs. Those pairs were the final add on to the project and it actually connected everything together. The next way to start a series would be to form a group of images. If you already have a few images in your portfolio, but they are disconnected, tried to take a look at them and see those connections. Even though you were not putting them consciously there, your subconscious mind could have done it for you. Now you need to reorganize those images and recognize these connections and perhaps attribute new concepts to them, draw them out and turn them into a cohesive story. Here's what you can do your portfolio and tried to systematize it. It helps if you can actually print your work out and then look at it, finding similarities, common details, themes and topics between individual images. Watch out for details like colors, props, locations, and Wardrobe. If they look too different, the images might not work together well, even if the topics are relatively similar, this task might be hard at the beginning, but it will definitely help you to understand your own work better if you find those similarities in just two or three images, which is usually not enough for a series. You can use them as a start if you're a particularly fond of those couple of photos, try to think about the stories in them and develop them into a serious finding variations in the initial topic and coming up with solutions on how it can be explored further. Here's how I created my escape series, which in fact was the first ever series that I created. I printed out my images at some point trying to figure out how some of them could form a coherent group. So I connected them on the basis of the main character being immersed in some kind of an activity, the project mean myself also started from several individual images which were not originally connected. After some time when looking at my portfolio, I realized that for some reason I like to shoot with doubles. And this led me to the topic of duality and self-talk. It is however, much more productive to develop a series from scratch. This way, you have more control from the beginning. This is the best way because it allows you to plan more and therefore your work will be thought through much better. Every detail will be in its right place. We will be discovering how to start a series from scratch in the next lesson. Meanwhile, let me give you an example. I already showed you my synesthetic letters project. We started together with a stylist, jane Christofferson, wanting to share our peculiarity of seeing letters and numbers and colors in our minds. This phenomena is called thymic synesthesia. And when after known each other for five years, we discovered that we both had it. We decided to create something around this topic. From the very beginning, we created a set of rules for ourselves and we're trying to follow through with those, even though it wasn't very easy sometimes. And the best thing about this way of working on a product is that you can always go back to some particular thing and redo, re-added or reshoot it so that it matches the whole project. Before we explore the steps of creating a series from scratch, let's get clear about two important things. First of all, how many images should be in series? This is a very personal choice from my experience, and it will be very personal for every artist. Yet, the basic rule of thumb would be not less than five and not more than 20. Another question is, can anything called bare series? And sometimes we organize a shoot and we have about 10 or 15, or sometimes even 30 images from that shoot. And many of those are just variations, but are not significantly different from one another. They don't show a topic from different angles. They don't add anything to a story. If you're showing a sequence of events and they simply almost repeat one another, that's not a series. In a real serious, each individual image is valuable on its own, but when combined with the others, it tells a bigger story in a more profound way. In the next lesson, I'll be explaining you how to create a series of photos from scratch.
34. Module 9: Creating a Series from Scratch Step By Step: In this lesson we'll be talking about the hardest but the best way of greatness series from scratch. So where do you start? I suggest taken five steps. First, find the topic, then set the roles, said the timeframe, then evaluate your resources and assess the results. So let's dig deeper into that. Step number 1, finding a topic of theme. We have already discussed how you can come up with topics and themes that are meaningful to you when speaking about Craven concepts, your topic should be something you're passionate about that is both open to variation and yet very specific. At the same time, successful series should allow each individual work to be able to stand out on its own, yet simultaneously relate to the rest of the other works. In some way, it helps you develop a concept idea into serial material at the very beginning. This allows you to understand how your work within the series will look like from the first one to the last. This is where sketching out all of the works within the series is important. See whether the sketch is hold your interests individually and as a group. If they're not quite as fascinating as you thought they would be, you need to rethink your approach. It will also allow you to make changes to the concept itself early on, step number 2, established rules for your series. These will help you create both conceptual and visual cohesion for the overall series, your rules can include format, models, props, colors, landscapes, details, locations, and so on. Make a list of rules and stick to them from the very beginning to the end of working or a series. Not only do the rules keep you on track, but they can create both conceptual and visual cohesion for the series overall, once you finalize the ideas behind the series ticket with them, this isn't always easy, but forcing yourself to maintain a high level of focus and discipline without getting distracted will result in the greatest value of your final work. Now step number 3, evaluate the time you need for your project. And remember, do you want to complete the series or at least create a certain number of works that make up a serious together. I think you do. I'd say it's great to have at least four or six images to call your project the series after have those, you can decide if you want to explore the theme more deeply or not. And this age, you need to understand how much time the production of which part of your future series will take. If work in a series takes too much time, it's often put off and is likely to be unfinished or forgotten. Now step number 4, evaluate your resources. Here's what I mean by that. And first of all, your team, including stylists, makeup artist, decorators, and other collaborators. If you want to keep images within certain boundaries, you want not only your own style, but also the style of your collaborators to be coherent and consistent throughout the whole series. Next, you need to understand the budget that you're willing to allocate for this project. Try to understand if you can easily get the prompts, locations, and models to be able to stick with the atopic, yet making variations within it. For example, if you decided to create a series of portraits of girls with suitcases to illustrate a topic, Live journey. The central point of view series will most likely be the suitcase and the girl, which is quite easily obtainable. If however, you decided to create a series of portraits of that girl with a suitcase in the world's most recognizable capitals, cities like Paris, Rome, Tokyo, It's attract. You need to be sure that you have the budget to actually take those trips. Will your model next? Everything else that you might need while working on that project. And here I mean prompts, occasions, models, and other elements of the image. They need to be easily accessible to you during the whole period of your work. Meet a week, a month, or a whole year, otherwise the project might end up unfinished or abandoned. And finally, step number five, evaluate your results while you are still in progress. When you have your first work's done, put them together and review them. See you, they still look good and coherent if they don't try adjusting them to one another without sacrificing the general topic or theme of your series. And yes, sometimes it means reediting or reshoot and part of your project. And the key thing here is to take those things lately as necessary steps for creating a bigger and more high-quality body of work. Work in a series can rarely be done in a short time and wild concentrated in one series, your mind can sometimes get tired and want a break, and that's totally okay. You can still experiment and greed wherever you want outside of the series and then go back to the big project. It also might be interesting to work on several series simultaneously. Next week, in our final learning module, we'll be exploring the mindset of a successful artist. It's a hugely important topic because all of the tools and all of the talent will get you nowhere if you don't believe that you can achieve your goals and stick to your course. Now, I hope you understand why working series is so important, especially if you want to be successful in Russia as an artist. And now you're also equipped with the tools of how to create a whole series of works from just a single image or from scratch completely. And there's always a really want to know what was one thing that he remembered the most, Please go ahead and share it in our online community.
35. Module 10: It’s Your Baby and Your Responsibility: So guys, we've been on an amazing journey together. And if you haven't been able to complete all the tasks, don't worry, they're there for you. You can always go back, you can re-watch. You can reduce the tasks. In this lunar module. I want to share some very special things with you. Thanks That helped me on my artistic journey. Those are the things that helped me sustain my creative practice. Those are the things about mindset, the right-minded for a healthy and sustainable visual, storyteller oriented type of artist. Let's dive straight in. I titled this lesson, it's your baby and your responsibility for some of you. It might sound like a little strange title, but let me explain what I mean by that. When you finish your work, when you put that final edit in touch, doesn't it sometimes feel like your creation is your baby, like you want to protect it from harm and that you care for it as much as humanly possible. In this short lesson, I'll be pointed out why it shouldn't be like that and which responsibilities it brings with it. Let's dive straight in. So there are several core mindset strategies I wanted to discuss with you today. And I'd like to start with create for yourself first. The core thing I want you to understand is that despite all the words said in this course about connecting with your audience, it's incredibly important to realize that first of all, you create for yourself and not for others. And a node sounds very controversial. After all the lessons you have gone through. However, it's true no one in the world will care for your work as much as you do. Least don't expect them to. People have their own lives and their own priorities. They might, and I'm sure they will appreciate your art, but you are the one who will care for it the most. And this is how it is, this is how it should be. We came here because of our personal desire to create. So first of all, we do it very selfishly for ourselves because we want to do it, not because someone needs it. Yes, you need to find a balance between the two eventually. But in the very core, do it for yourself first. Your art won't fulfill your personal needs to express yourself and your ideas, then it won't feel satisfying and you won't be able to go on with it for a long time. This is why you always need to check yourself if you enjoy your creative practices, even when they get hard. If creating a piece doesn't feel good, maybe you need to reconsider mind here that it can be difficult, but it can still feel good and you can still enjoy it. The next strategy for success is realized and why you need to do the work of understanding your own work. Women in this very briefly before. But I also want to underline it here in the mindset section. It's crucial to understand your work, the one that you create now and your best works too, because it's your baby and your responsibility to know where it came from and how it will make its first steps into this world, and how it will make, and how it will be accepted if we don't do the work of trying to understand, analyze Daddy, our own creation. Stan, how can we expect others to invest their time and energy in doing this? Why should others pay attention if we don't? So the practical steps here are first to constantly go back to the big questions. And those questions are, why do I should, what I should do? I enjoy doing it? What does it bring me? And do write down your answers for yourself. First of all, the next step is writing an artist statement. This is a short passage which briefly tells about you as an artist, why you chose this type of art? What inspires you and what you are trying to convey through your works? Yes, for those of you who heard of it, I know it might be a pain to write one, but it's necessary if you want to get serious about your art, even if you're not planning to become a fine art photographer, it's important to have a short message for your clients of how you feel about your work and why you do it. And again, it helps you to build that connection. Could you think people would like to go to Mark who says nothing about him or his on his website and doesn't even have an image of himself or Karen who shares that. She enjoys being around people and captures the pressures moments of their lives, loves working with children in particular, as she is a mom of two herself. The next step would be having a written description of your series and collections. Even for individual works that would be important. They don't have to belong, but they are necessary for people who will be interested in your work enough not to simply glance over it. Take the time to understand it and to try to tell others about it, write about it in magazine or put that on gallery walls or buy it. People will only invest time and money into a piece if they connect with the story of it. And it's your job to tell that story to them in as many details as possible. Now, does that mean that you can completely control how your work will be interpreted? Absolutely not. This is conceptual photography we're talking about. And openness to interpretation is one of its core features. People will see their own meanings, stories, and symbols based on their backgrounds and experiences. And we should never want to take that away from them. Yet, when an interest in your asks, What do you want to say with this image, we must have an answer. Otherwise, how serious about your own work are you? In the next lesson, we'll continue to unpack strategies for creating a mindset for success. In particular, we'll talk about the importance of seeing the value in your own creations and understanding how they impact others.
36. Module 10: Your Art’s Value and Impact: In this lesson, we go on with the core mindset strategies for success. And this is the third one. And it goes like this, value your art. The thing I want you to always keep in mind that your art becomes valuable only when you evaluate yourself. Once again, your art only becomes valuable when you evaluate yourself. If you don't see any value in it, then how do you expect others to even bed tension? Many of us are distracted by the Cinderella artists fairy tale, when an artist was randomly create and stuff, but not even realizing how brilliant it was until a magical galleries, million followers or journalists and clients appeared out of nowhere and finally opened her eyes to her own genius. This does not happen in real life. People begin to see value in your art when you do the work of understanding yourself and showing your commitment to sustain your creativity. But most importantly, when you begin to actually see your creations as valuable, take a look at your photos and ask yourself, what kind of value do they bring to me and to the world around me? And be sure that they do. If you are struggling with seeing the value in your creations, let me give you some hints. Your work is valuable because first of all, you invested your time and passionate it. You did the work of exploring a topic and telling about it to others. You carefully planned and organized the shoot so that the image came out beautifully in the way did when looking at your work, people get a certain type of an emotion. It may be joy, peace, sympathy. You can take people on a journey, have an experience when interacting with your work. And this experience can lead them to some conclusions or might plant new ideas in their mind. Your work inspires others and changes their mood, your work and help people tell their story when they put it on their walls. I could go on with this list, of course, another important point is to understand the value of your gift. If photography comes fairly easily to you, it doesn't mean that it is the same way for others and that it's not valuable. And I was caught in this trap for a long time, completely disregarding my effort and my natural abilities, I kept telling myself, but I didn't do much. I just clicked the button, just the gear. It's the beautiful model. It's just the nice prop and I just got lucky. I'm not telling you to set up your nose high and to become arrogant. I'm simply insistent that you should try and truly value your natural abilities while still saying humble and being willing to always improve them. The next thing I want you to understand is how your work may be making an impact on the others we've talked a lot about and back then people, but you might still have doubts. How can my photos actually affect someone? I already gave you some hints when explaining the value of your work. Now let's take a closer look at the ways that you can impact people with your photos. And first of all, you can change their emotional state. You can make people smile, wander, or experienced the tickin sense of surprise and how cool is that? Next, you can offer a solution to a problem, or if not a solution, you can raise awareness and educate people. Third one, you can offer connection and understanding that they're not alone. Never forget that people often feel lonely and if they recognize some part of their own stories in yours, they will feel better and less isolated. So many people hide behind shame and not feel in normal. And this can happen to any of us on any type of scale and around any type of thing. Some people will internally call themselves a weird freaks because of some past trauma. Others will do the same because their hobby is an end farm that they hide under their bed. Yet when they see something in your work, when they can relate to, they will suffer less. You can inspire people to create something of their own, no matter in which rail, yes, people might look at your remedies and say, Oh my God, this is so beautiful and it pushes me to try to make an amazing photo to, or it might be not a photo, but address a hair cut, a cake, garden, anything, you will pass the positive greater energy onto those interacting with your work. And this can then be taken lightly. And the next one, your passion and commitment for servers and example, and permission to others. And this way of embedding and others is very often overlooked, but it shouldn't be. Take a look at my story on the thought that I could create some real photos. When I saw that a photographer from my CD was doing the same and was absolutely killing it. Now I was able to become a real fine art photographer myself, despite the lack of support from my family, despite the fact that my parents advised me to see a psychologist who when they saw my images, despite the fact that I had the safe and promising corporate job, which I didn't hate despite the fact that I had two babies and changed countries while learning Minecraft, despite all the self-doubt and lack of self-esteem, despite all the lies, I was thalamus how, that this is not a real job and it will not let me allow to support myself and my family. And yet here I am and I'm no special. And now the fact that I go on Twitter and my surreal photos and feeling good about myself, but I give you permission to do the same. You will see that this is possible. Yes. If this is possible for me, it is possible for you too. Today.
37. Module 10: Scare off the Big Monsters: Failure and Comparison: In this short lesson, we'll talk about our fears, fear of not being up to the standards, feeling of not being good enough, and fear failure. Let's dive straight in. The first thing that we might be afraid of or worried about is not fitting in and not compliant with all the so-called rules. So the idea I want to bring home for your today is that there is no rules in art. I know we've talked about so many rules and do's and don'ts in this course. But the end of the day, there is no rules that you have to follow. There is a fine line between dynein all the rules and get entrapped by them. I think the key here is to understand the essence of which role and to know exactly why you want to follow it or break it. And this includes all the rules, rules of storytelling, composition rules, rules of color theory and whatnot. I'll give you a personal example. When I was starting out, at some point I realized that my face reduction wasn't that great. And I took a couple of Skype lessons from successful fashion photographer whose works are really liked. This lessons, they were precious. I learned a lot and they began to practice the knowledge that I got and I got better and better at reduction faces. And I also learned some other tricks. Yet, I followed all the instructions and it was great. However, I didn't understand why those instructions were in place, why I had to make my brush opacity to 45 percent in this case and its flow to 20 percent in that case, I simply blindly follow the rules and it took me years to start breaking those rules and playing with the tools in Photoshop and understanding why those rules were set and what effect I get when I'm break them. Now, I see the same thing in one of my photographer friends. He practices a lot, learned a lot about editing, shooting, and so on. But he can't step away from those rules, though. He doesn't actually know why they are in place. That leads him to the lack of understanding what kind of impression he wants his photo to produce and his audience. And I'm not saying this is wrong. I do think that for some people including me, it's necessary step. However, if you can get conscious about why each rules in place, you progress much faster, the next big fear is not being good enough when compared to others. Comparison is a big issue in general, but for us creatives, it can be essentially painful and destructive. And that's why I find it extremely important to discuss it here and offer you the smart way of comparison. Comparison in art in general, and photography in particular, is a tricky thing. You needed to grow. Otherwise, how do you know if your skills are on a good level? But at the same time, it might kill all of your motivation to do the work altogether. And that's why I want to share a couple of thoughts on converting your work to the work of other people. And this is the key. You're comparing your work and not yourself to others. You are unique and valuable as a human being. And your personal value is not in any way connected to the quality of your work. The fact that someone else creates better images doesn't show that they are better or more talented than you. It proves that they are more experienced. They worked more on their art. He doesn't mean that they were born this way or that it comes naturally to them, even if they have some inborn abilities, those are usually worth nothing without hard work of developing them and gaining mastery Minecraft. So it only means that they worked harder and they still do. And you can do that too. You have the very same abilities. Things are possible for you to know that it's very easy to discard someone's effort by just calling them talented or gifted also puts you in a very comfortable position of making that someone special and telling yourself why even try, I won't be any good at that. Anyway, it's much easier to do that. Then actually dare to try and put in the work. And yes, I know you might have three kids, a full-time job, a sick parent, but at the end of the day, if you're willing to put in the hardened to work, if you are ready to put in the hours make time, you will create amazing images. And the question here becomes, are you willing to work for it? Are you ready to put in those hours? It's not the easiest path and no one says that you have to do it. If you want to take pictures as a hobby, it's fine to its total, okay? And there is no need to stress about it. The key here is to shift the focus from, I'm not so talented as they are. So why even try to, I'm not ready to really put in the hours and the communist good as they are and even better. The key here is taken responsibility for this decision and not making someone outstanding and super heroic. Let me give you an example from my personal life. I mentioned in the very beginning of the course that when I was starting out in photography, I tried many types and it was particularly successful in awareness and family shoots. But when he compared my work to the family photographers, I was looking up to the time I realized that I simply wasn't interested enough to grow in this area. I simply wasn't motivated to become a world-class family photographer. So I give it up and focused on my fine art imagery that still keeps me ignited here. I'll do anything to make my work better and deeper than when you actually compare your work. You learn, you take notes and what can be done better in your art. So that improves in every single area, light color working with models red-eyed, you can never arrive in your craft, but it makes the journey more interesting, doesn't it? So when you compare your work to the work of those who do better than you, you grow. This kind of comparison will actually make you a better photographer and a better artist. The next big fear I want to address today is the fear of failure. So many people message me on socials every day saying that they sometimes are not creating just because they're afraid that it won't work out. But in fact, you see it won't work before you even try. You will fail that effect. You need to accept it and then you need to learn to love your failures. Which the mindset from, it shows me that I'm a loser. Two, it shows me what I need to improve in the future. These fears what stops us from trying new things though this is exactly where we can become better and learn new things. There were so many times when I've chosen a nice bath and then I ended up with real Adele images here I also want to mention the fear of sharing experimental work. So often some of us get caught in wanting to be admired and the proved all the time. So when we don't see people like in our work on social media, it turns into a complete psychological disaster when you find yourself afraid of putting your work out there, remind yourself about the why, your why, why do you did it in the first place wasn't to get public attention or to fulfill your personal creative needs. If the answers, I did it for myself and you are happy with the work, why should you care about what other people think and decide? It's also good to remind yourself that they don't actually think about your work that have lots and lots of things are there roan to worry about kids jobs, have you name it? So as you might guess, I'm a super expert and being afraid of making mistakes. And with time, I found several practical things that helped me deal with my fears and I want to share them with you today. So the first one is, you need to imagine the worst case scenario and understand that it's not that scary. This tactic will help you in many situations in life, not just art. I mean, really, if you shoot something for yourself and it doesn't work out, what's the big deal? No one dies. So there is nothing to worry about. Yes, you might have spent your time, money and resources, but it's never in vain, considered an investment in your education because this is exactly what it is. Next, if you're about to work on a collaboration project, let everybody on the team know that it's an experiment and do it in advance. Say that you'll be doing your best, but there are stations should not be very high. My next tip is to never experiment on client projects unless they give you complete freedom. Consider offering your experimental work as something extra as an add on to what your clients ordered and expect to get from you? Yes. Failures happen and that's life. You will have them. But if you will set your mind to welcoming the negative results and learning from them, you won't be as scared. The crucial thing here is to always understand or write down, verbalize, formulate what you learned from your mistakes. Otherwise, the experience will be just painful and useless. And who wants that? When you experiment, don't try to do many things at a time. Make a list of what you are afraid of, art wise and phase those things one by one. This will take a lot of pressure off your shoulders and will allow you to focus more on learning from failure if there is one. In the next lesson, we'll talk about how you can organize your time so that you become a more productive artists. Watch on.
38. Module 10: No Time to Procrastinate: Creative Time-Management: In this final lesson, I want to give you a few tips on time management. I hope you'll find them useful. And first of all, I want you to make creativity your priority. One thing that I hear a lot from photographers and creatives in general is I have so many ideas, but I don't have the time to shoot all of them. Yes, it's true we all have busy lives, France, families, bills to pay various obligations and so on. Yet, all of us have the equal number of hours in a day. Well turned out to be a game changer for me in dealing with lack of time is the shift of the perspective from I don't have time to it's not a priority for me at the moment. Whenever you feel that you want to do something, anything, but you just can't seem to get to doing it. To admit that it's not your biggest priority right now. And this is okay. However, now you understand if you really aim at creating more meaningful photography, it should be one of your priorities, right? So your mind automatically starts finding those opportunities to actually devote time to your art. And you have time, it's time to find it. Here are some time management tips to sustain your creativity and first of all, analyze your day. Yes. I mean, try actual time tracking. Where are you wasting time and how could you use that time better? Maybe you listen to the news on the radio when commuting. But you could instead listen to an audio book and get some ideas for your future stories there. Maybe you can cut off, watch Netflix or playing games. Maybe you could wake up an hour earlier. The key is to understand that when you make something your priority, that time magically appears, the next step is to actually block the time for your art in your calendar. Only when the time is actually blocked near calendar, you can achieve any results in this area, even if it's just 30 minutes per week, you need to turn your creativity into a habit. And yes, it takes self-discipline like development and a good habit. But if you're serious about your art and keep reminding yourself that Why am prison all the time about you will be able to successfully turned into a daily practice and don't forget to have conversations with your loved ones, explaining them why this is important for you and tried to make it work for everyone. Another personal example, I'm a mom of two beautiful girls. And if you're a parent, you know that your kids, especially if they're a little want to be with you all the time. So you're like me, understand the struggle between the burning desire to be an artist and creator endlessly and the wish to be a great parent and develop all of your time to your kids. Mine that I began my photographer journey right before my elder daughter was born in. I've been there so many times. There is no point of even counting. I felt a normal guilt until I understood these three things. And first of all, yes, they do need their amount to be there for them and with them. But they also need a happy mom and mom who feels content and fulfilled the kind and loving mom when I don't get an opportunity to create, I'm not happy, I'm not fulfilled and my energies completely drained. I'm constantly tired and I'm very far from being ever kind and loving anyone here with me. And yes, I am the world to them, but I cannot replace this world. The do need time for themselves and also with other family members and friends. And that's crucial for their development. So instead of feeling guilty for not been with them 24, 7, I decided to make sure that they do enjoy and get most of their time when they're not with me and at the same time when I am with them, I may Sure I'm actually there, present, listening, caring, and understanding. I try not to touch my phone or work. And then no matter how hard I try, I will never be perfect. I will screw up from time to time, and that's okay. This is called life. I will try to learn from my mistakes and I will do better next time. Next month, I will be a better mother than I was today because I do care about mangroves and I want to improve. And so will you, meanwhile, beating yourself up, will not do anyone any good. I hope it helps you, my fellow, fellow creative parents. Here's another reason why you should turn photography into a daily practice. You need to shoot a lot and become extremely productive. And what's more important, you need to make mistakes. Yes, you will make bad photos, but they are the natural steps to creating great ones. The more mistakes you make, the more you'll learn. Do treat every bad photo as a lesson, not a failure and discouragement, not to go on. And you will see wonders happen into your photography style and record the embryo's own once said that your first damn 1000 photographs, how your worst, just delighted sinking your first ten thousand photographs are your worst yet many of us expect to be pros in a couple of years or sometimes even months, understand that quantity leads to quality. This is a story from the book art and fear by David Baylis, the ceramics teacher, announced on opening day that he was dividing the class into two groups. All of those on the left side of the studio he's had wouldn't be graded solely on the quantity of the work produced, all those on the right side, solely on the quality of his procedure was simple. On the final day of the class, he would bring in his bathroom scales and weight, the work of the quantity group, 50 pounds of pots rated and a 40 pound of boss B and so on. Those being ready for quality, however, needed to produce only one pot, albeit a perfect one, to get. Well came the Gradient time and a curious factor merged. The works of highest quality were all produced by the group being graded for quantity. It seems that while the quantity group was busily turning out piles of work and learning from their mistakes, the cool regroup was set theorizing about perfection and then had a little more to show for their efforts than grandiose theories and the pile of dead clay. So yes, you need to turn your photography into a daily practice. But before your object, let me explain. When I say turn photography into a daily practice, I don't mean shoot every day. If you can do it, That's perfect. However, let's be real. Most of us have busy lives, as I mentioned, families, friends, studies, and very possibly day jobs. So no, I'm not insisting that you should shoot every day, but you do need to at least go and look through your raw materials and try to edit them. I don't think it makes sense to just go there and should without reviewing your results this way, you won't be able to learn much because you're only doing half of the work that shouldn't part. Those images are not finished. They'll, until you review them, choose the best one to understand your mistakes and create a plan on how to correct those mistakes during your next shoot with this said, do intentionally block at least 10, 15 minutes for every day. And if it's possible, block more time in your calendar. And during those 10, 15 minutes, either should new images or review and added the ones that you have already shot. My next recommendation would be to find an accountability partner, someone who will not necessarily be your closest friend or in your closest circle event, but someone who will understand and support you on a regular basis because he or she shares that same values and those goals. Yes, it's an incredibly useful to get out of your artistic shell every once in awhile, if not all the time, Find creative peers who you'll be working with on the same project. Those periods can be photographers or artists from other industries like designers make up artists, illustrators, florists, or even bakers. When you work with someone, it automatically makes you accountable and pushes you to keep your promises, which is sometimes really hard to do when you're on your own. Would you agree scheduled shoots and create timelines? And as a final thought on the course, I hope you feel inspired down, inspired to learn more, but mostly to create more. However, inspiration is often short-lived. It's there when you're learning something or see some amazing art. But then it disappears. I've done my part. I've given you inspiration and some tools. Now you need to do yours, get intentional about your stories. Understand your why, turn your art into a habit and be mindful of what and who you surround yourself with. Start every day with thinking about what can you create today and ended with evaluating your results. And I'm sure your visual stories will make an impact that you want them to have and will in their turn, inspire others to create. And this will be your way of making our world a better place. Now, let me give you two practical exercises. In my opinion, will help you make a productive leap in your art. And the first exercise is called creating a roadmap for your artistic development. So I wanted to go back to the list of tenth photographers whose work you admire and underlined one thing that you like the most and they'll work and will love in some way to introduce to your creative practice. Make a separate list of those 10 or fewer things. It can include things like learning to shoot underwater, studies, studio lights, alerting to work with colors, and so on. These are the things that need to be improved in your work. This list will be your basis for the future development roadmap. Number the things in the list according to their current priority for you and for your work, write down what your actual actions will be to get better in this or that. For example, to get better at using studio lights, you need to find the studio with equipment where you can create and practice those. Now we need to create an execution plan on implementing those things in your work set time frames for your two main priorities. For example, I'll do seven studio portraits in the next month and defined what you can do to begin getting better in those areas in the next 48 hours so that your plants are actionable and not doesn't paper. So let's say you want to try adding l levitation element to your photography. And you need to pick an actual date when you'll be doing your experiment. It's very handy to have a deadline that's blocked in your calendar so that you know how much time you have for the preparations, then think through all the process, what you will shoot and how he didn't have to figure out everything on your own. There is now a YouTube video for every single thing on the web. So you can check out how other people are already doing, what you want to do, and then get everything ready for your experiment based on your deadline, make a plan of things you can do within the next 48 hours to actually do your experiment. And if you're trying this exercise, I really want you to share this list with our online community. So for example, your 48. Our lists might include things like watching YouTube video began over the props, choosing a location for your future shoot, thinking if you need assistance or not. Now, after conducting your experiment, don't forget to analyze and evaluate the results. I can't remember how many times I made the mistake of trying to shoot something, but not even going back to my experimental files to understand if it was actually worth it, the comfort zone tends to suck you back in even after you tried to step out of it. Remember? So evaluation of results is crucial for learning when you've tried it with one element, move to the next one. And again, in my opinion, it's important to make it one step at a time so that you don't get overwhelmed with the new information and keep your intentionality in everything. The second exercise I want you to try out is with dealing with fear. Think of your creative work and what's stopping you from taking it further? What's your biggest fear connected with it? Are you afraid of sharing your actual thoughts and opinions? Are you afraid of people judging your future work? I afraid to fail your experimental project and waste time and resources. Write down your biggest fear and tried to explain why you have it, then imagine the worst thing that could have happened connected with that fear, and then the best possible thing, let's say you're afraid of sharing your new 40, which is very different from what you did before. What would be the worst thing that can happen if you shared it? And what would be the best possible outcome? Create a scale for your future actions that causes your fear. And number one will be the best possible outcome. Number ten will be the worst possible thing. After that, come up with the missing age scenarios. Number 2 being very good, but not ideal. Number three is still good, but a little worse, and so on. And number nine will be very bad, but still not as bad as Dan. Now take a look at your list and realize that you're most likely to end up with some options in the middle and not the extremes. The whole process of working on your fear makes it less stressful and allows you to actually start taking action in the right direction. Guys, Guys, I'm so proud of you. I'm proud that he made it to the end of the course. It wasn't amazing journey. And it means that you are not simply interested in snap in pretty far out. You are committed to create a meaningful and authentic work that makes an impact. And that impact can be anything. You can make people smile or you can make them aware of things that they weren't aware of before. Or simply your photographer can serve an example and permission for someone else to do something creative too. And that's beautiful. That brings purpose and meaning to your photography and while to your life in general. Once again, I'm so proud of you and I cannot wait to see your future creations.
 Dasha Pears, Surreal Fine Art Photographer