Transcripts
1. Course Introduction: Welcome back, guys. With my next course, it will be about modeling a fishy house. It will be a special one. As this fishing cuts, we're gonna look awesome. I'm going to show you the whole process from creating the great box, creating all the details that that you want to stand out from the crowd. So if you love the war police now, if you want, stand out in the mobile business off creating, you know, some unique art just and running this course, Let's share my experience with you and share my techniques. And you're gonna learn so much after watching all my lectures. So what you waiting for? Just enrol. Now let's get started.
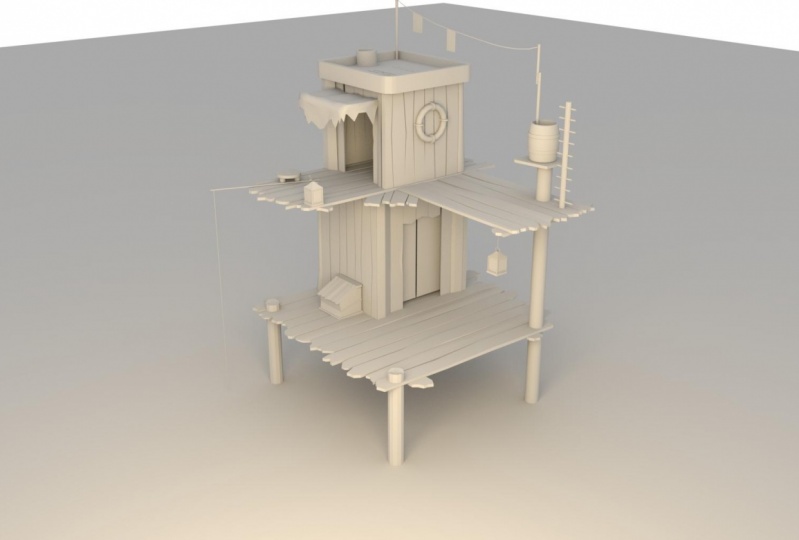
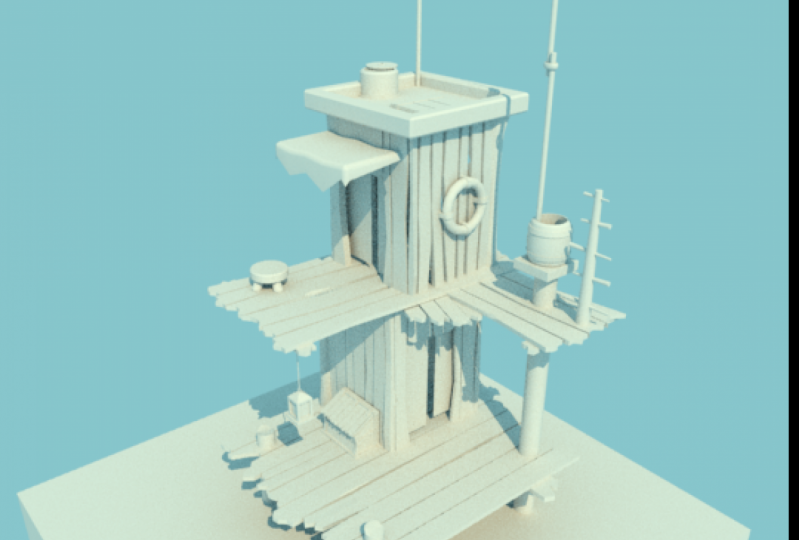
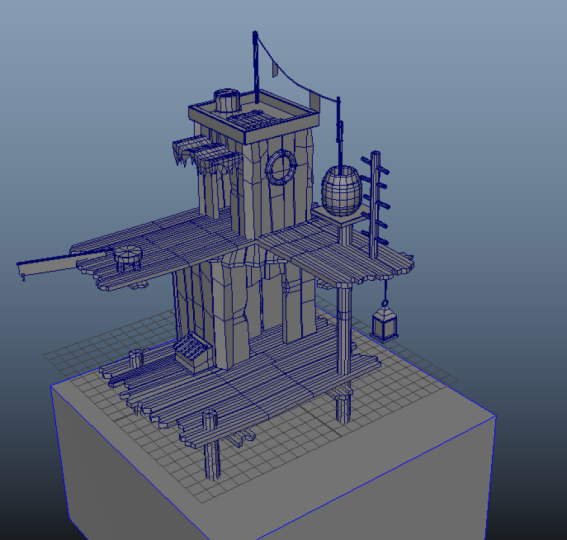
2. Gray box: Hello, guys. And welcome to my next tutorial. I'm gonna be moving a fishing house in war Pallister for games. So let's start with the modeling. So, first, where you need to do is go to file, click you seen so that we can create a new project. After that, I'm just going to save the scene and call it like fishing. Underscore House. All right, so the project is set up. So now I'm going to start more link. This is my custom shelf that I've created. I'm not going to show how to create a custom shelf. You can read it in the mile documentation. So let's start creating the gray box first. I'm gonna create the cylinder, which we're gonna be using for our base of the fishing house. It's a little bit high, Polly, so I'm going to reduce it a little bit. So the subdivision access. It's 20. I'm gonna put 12. Yep. And it's looking nice. Include, So let's start aligning the pillars under the grid. I'm gonna put four of those viewers so that we can have a pretty nice base for the fishing house. And keep in mind, I'm gonna center them based by the centre grid. So by 00 off the grid and I'm gonna count four squares. So I'm starting to positioning old for pure, depending under its up middle off the grid right now. Just moving them a little bit. So I'm gonna still like them and just move it a little bit to the right. So it's four squares from that part, too, And I'm gonna do the gate and mirror it on the left side. Four squares here, four squares here. Foursquare Scheer for squares here and four squares. Here. Everything is good. So this our base, it's a little bit not symmetrical. I'm gonna all I need to the grid. All right? It's looking good. Just a little bit up. I'm gonna skill them a little bit. So they have bigger lands and size them a little bit down. So they're thinner again. Move them a little bit down. So let's continue and create a cube which will define our floor for the fishing house. The 1st 4 Keep in mind that you always need to start creating shapes with gray box just to define what and where it is. How how high is the prop. And what is the actual shape? What is the actual object for? So I always recommend Start with a great box. Now I'm just going to start defining the woes of the first floor again. I'm just copy and pasting a simple que and I'm aligning them just to find the right size in the place for my 1st 4 walls, and you just need to play around with it with the size with the movement. We're where the peace need to be. As you can see, I'm always thinning the walls, moving those position. I'm gonna shrink this pillar, and I'm still defining the world's. I'm pretty much I think, that this space is good right now, but if you always find space of the of the world not so good, you can always move them. This is the shading molds that I often the use. I always see the wire frame when I model and always plays the camera with the perspective of the game debt, you get 1/2 in your engine, and as you can see and modeling from that perspective and always trying to find that angle and see what it is, this coop we define a chest where the person will stock some things like maybe fish fishing cooks or stuff like that. Let's move the pillars a little bit for their death so we can hear more space on the first floor and moved them a little bit back. That seems to be better. Let's move the chest a little bit. The chest is good right now and duplicate the first floor so we can create where the second floor will be again. I'm observing from my in game camera. This will be my perspective and I'm start shaping the second floor. What I'm going to use right now is I'm gonna split the geometry so I can extrude and create from that face under their shape. So I go to edit mish extrude. As you can see, just click on extrude I hear it in my hot key shelf. So our extrude just like that and this is the definition of my second floor, the starting point of it. And right now I see that this low was a little bit further and I need but pushing back a little bit again. I'm just playing around with the shapes and with the forms and duplicating boxes everywhere . You know, duplicating from the previous things. I also use reset, transform and freezes command. I definitely recommend that, you know that And sent reprieve center, pivot point. And right now, I'm gonna start creating. That's up for their of the first floor of the house of the first floor. And I'm just gonna split once again twice. And I'm gonna just move them a little bit like that and extrude from that point so I can create the door shape. All right, so we have the door ready and we can continue on making the gray box wannabe. It's a little bit too short, so I'm gonna make it a little bit higher again. I'm just gonna combine those two walls, walk in, select the verdict, sees together and move them easily. And I think this height is good, but the door needs to be higher. So I'm gonna move it a little bit like that and I pretty much love it. That's but a bit down. I'm going to create new cubes, aunt again, We move it like that and this will represent the person like the size of a real person so I can compare if he can't, he can't enter inside the door. So always keep a reference of the characters in your seat. I'm good in the Put it on your there and I'm gonna co it person. I'm gonna put some green, maybe or whatever calvary color you want, so you can see it better in the water frame mode. Let's write it. You Yep, that's better. And this will represent the scale off the objects based on my character. I'm just gonna fix the bucks, and it's a little better. Just gonna push over to be the second floor back. Maybe just a little bit. Yeah, just just something like that. And this The back wall should go a little bit for their He may be the base platform a little bit further. Yep, that's looking better. Always work with the great backs and always try to see from a different angle how it looks . So you hear the observation of the whole model and you get the shapes of the whole motto again. I'm just gonna play with it, trying to find the best shape that I like. You should do that too. And as you can see. I'm just selecting ver disease and moving them around to find what I like again duplicating another box. And I'm gonna greet a center like a wooden crates over there so the shape could be more interesting. And I'm going to scale down a little bit, just like debt. Pretty much looking good. But I just mistaking the rotation so rotating and again and look like Look, look at that. It's just interesting shape. I very much like it and it just break up the whole second, Thor and make it more interesting. Save your seen often. Don't forget that. And again, continue playing with the verdict. Sees moved that. Move this. Always compare the scaling to the person. And I'm just gonna create a box for the water debts I'm gonna have. All right. This will be representing my water in the game again. Just moving the faces and scaling. Scanning. It's a little bit so I can get the best shape that I like. And this pretty much is my water. You can see. You can see that right now the house is getting some good shapes and good See what's interesting forms and good height right now, I'm gonna just duplicate the first floor and start working from there again. I'm gonna combine it Goto mission and combined objects, and I want to rotate him. Rotate them minus 90 degrees so I can give my door facing the platform for the fishing. Where were you? Be able to fish, right? I'm gonna praise the fishing from there again. I'm gonna fix some of the forms. I don't like those verdicts Ease as they don't fit with my 2nd 4 So just gonna fix it like debt. And I'm gonna scaled down a little bit My 2nd 4 I don't want to be so hi again. I'm gonna just duplicate my character and try to fit it into the door. So I know that the scare was right compared to the first floor and everything is cool. Just keep your characters therefore reference. Now I'm gonna make the top the roof off the second floor again. Just simple boxes. Nothing fancy. Just try to find the shapes, the height definition and see what of the model That's this top priority when you making the gray box. That's why we call it a grey box. Because you built everything from boxes. And again, I'm just shaping out everything. All right, so right now it's looking good. The first and second floor pretty much like it. And now I'm gonna move the ramp a little bit further, so it could be a little above the water, and and it could be over the first floor a little bit extended over. Now I'm gonna create again in your cube, move it a little bit up, and I'm going to start creating some interesting shapes. Hold a barrow over there on that platform, and maybe I'm going to make a wire, which we hold some coats, some washed up floats on top. So this is my barrow. This my platform for the barrow? I'm gonna create a leather and right again center the pivot when you duplicated. So this was represent my barrow with me. Just split insert edge loop to just split your cylinder and create the borrow shape, just like dads. So is the little bit all right? Moving a little bit down, I'm gonna need to size the platform to fit the barrel. You're right. And I'm gonna just extrude a little bit so I can get him a bit of a top shape just like that. So you can get the barrel again. It's a great box. I'm going to work on its later on. Just making the shapes and defining them. Now we're gonna Butte a veto rather from that pool again. It's little bit that so I'm going to shrink it up. Sign, make it tender. Okay. Pretty much like to see words. So this is pretty much it for the part. One of creating some of the grey box. We'll continue on in the next video. Thanks for watching.
3. Detail the first floor with wooden planks: All right, guys, welcome to the second part. We're going to create the details for the first floor, which will be wooden planks. Uh, I've just created a new layer and added my cube, which we will represent the water toe that later so I can easily hide it with that the I come. So I'm gonna start creating the wooden planks by creating a simple box ends from that own. I'm gonna start splitting the box so I can create the detail inside the wooden plank. So this is my simple rectangle, and I'm gonna try to insert, like, maybe four loops. Yeah, I'll create four. And then I'm going to go into the verdict, smote and just push around. The verdict sees so I can create interesting shape, different shape, always tried to create some pretty nice and sharp edges so it can define the plank just like that. I like that. I'm gonna make it a little bit finger from the heights, and I'm gonna move it in my gray box so I can fit the scale and just re scale. It's a little bit like that. Move it a little bit back and I'm gonna move the back of the plank and this pretty much looking it. I'm going to move the front a little bit back, and then I'm gonna hide my gray box. I don't need any more. With control age on my PC orc amount age on your Mac. Then I'm gonna go and create some shapes on the back. I'm going to move it again on Lee the vert sees in Vertex malt just like that, pushing and pulling around, creating some interesting, different shapes. I'm gonna try and maybe I'm gonna extrude these face and try if it we work, I'm going to move the edge a little bit back and a little bit to the sites, and I don't think Yeah, just let me check the form pretty much. Don't like it. I'm gonna reverse this, and I'm gonna try with inserting more loops. Great. This shape. I'm gonna insert two loops and I'm going to shrink it a little bit when they aligned their first. Then I'm going. I'm gonna move them a little bit left to the right. So I want to have some curvature in the black which will greed. I pretty much like it. Then I'm gonna go and duplicate it and starts creating another shape with from that duplicate, it's It will be pretty much easy, straightforward process again, this pulling and pushing the verdict sees creating different shape than the 1st 1 All right , I like this sharp edge a little bit more like that's that's pushed a little bit further so we can make a gap. Inside. It is you can see I'm always trying trying to create a different shape because different shapes were great different. See what's and if you're using this from a perspective side, for example, in the game from top view, those shapes were great. Very interesting. I catching details. So just like that, I'm gonna shrink it a little bit from side and maybe pull it a little bit back. As you can see, we have two planks which are completed completely different. It was a copy from the 1st 1 Then I'm going to start making the 3rd 1 again, pushing and pulling the the verdict sees. I'm going to move the middle overseas a little bit. I'm going to start creating a different shape in the front with different lens just like that. Let me align. Those were disease put pushed a little bit further. I'm gonna be a little bit extreme. Maybe on this, just like that, you can see it's completely, completely different shape. You always should aim for that. And I'm going to start hardening the edges so I can define the would shape and fix my previous because they just are soft. You can goto, Mary display and hard edge. Just select each edge and put and make the function the work. Just click on the hard edge. I'm doing this by clicking my G button on my keyboard G button. Well, activate the last function used. I'm gonna do that on all my planks so I can define the route more just like debt. And you give sharper edges, which is what I'm looking for. All right, I'm gonna fix this a little bit. I want to create a little bit different shape. Yet you can see how it helped the curvature works. I'm gonna work here a little bit. Maybe it was too much. Yep. Something like debts. Fix the 3rd 1 It was too extreme. I don't want like to extreme and always check. Check, though. Check the forms. When you create something, zoom out and check how it looks. Let's go with the 4th 1 It's gonna be different. Of course, all my blanks should be different and they will ask a lot of detail when you have your motto inside the game and it will be catching. Don't rush it. Just take your time and create the forms with this simple method off, push and pull, the verdict sees you can create a lot, a lot of different details from the same motto as you can see. I don't put anything all I don't split anymore. I just move the Virgie's and create different shapes on right some way fourth blankets looking good. I'm just selecting. They're just right now, So I hear four blanks right now. They're looking good. That means duplicate all of them and just move them so I can work faster. So right now I'm just delete this one. Equate this one to be a bigger one. Maybe not just just like that. Yep. And I'll create once more. And as you can see, when you have different sizes to add of that to the detail, So try creating something like that you see that? Those little plank in the bag we create, like, different feeling. And again, I'm just Bush and pulled over disease. Nothing special. I'm discovering the the base. The based pillars. You're right. Just pushing it bowling around. Okay. Gonna like this form? Yeah, that's that Looks good. Right? I'm gonna fix right now. The small plank. Maybe that dads pull those out. He was sharp edge. Make it a little bit back A bit further. All right. You cannot. Nine. Those two. Yep. And I'm gonna check again how it looks. I don't like this form, so I should boiled boo. It's a little bit bad because you have two big difference in the plank in the front and in the middle. And it's not pleasant. It's better this way, I think. Let me try to create a little bit of of differences. We're gonna pull this up so I can make a difference. And as you can see, when you press seven on your keyboard, you're gonna have to see what again? I'm going to move some of the edges on this plank and I'm playing with it. Which old? The planks. And now they look good. Now I should create two more plants which will be at the bottom of it so I can imitate. Like, for example, you can put nails on it so it can hold all the planks. And it will create another detail to the to see what? And this is logical. Like in architecture, you give some you need something to called old planks. Except for the purest of the pure is we want to hold the two planks on the sides. So I'm creating two planks under the base so they can hold up all the other planks again. Try to pull and push. The vergis is in different directions and create uniqueness. That's super important ends. All right, I'm gonna pull this. That would be for the town, and I'm gonna check again. See what's Maybe it's not good. This. Yeah, I'm gonna pull some of those so I can give credit card edges. All right, this is looking already pretty nice. Let me just try to move a little bit of this, because right now it's boring. You care the same bottom. All right, let's make it a little bit sharper. Yeah, that's that's better. Okay, so This is the based technique for creating super simple shapes. But from war shape, I've created, like, a lot more different shapes, and it's super easy. All right, I'm gonna try to pull this up. So when you see it from from the top, you can also see the blacks just popping out in the back like debt, which is a cool effect, a little bit up cause you can see Yeah, that's breeding. Nice old, small details matters. This'd is something that I should read you. So this will be for the part to creating the details and creating the eluded planks. And I'm waiting you in the par three by
4. First floor building & box details: Hello, boys and girls and welcome to part tree in this part. We're gonna start they telling the first floor and the box. So we're gonna start with creating planks over the cabin on the first floor and make it very interesting, like the shapes and stuff. And then we're gonna make the box. So first, I'm gonna copy this pure and put it at the edge of the cabin so it could be the holder of the body. It's just simple copy paste and just move around. The world sees a little bit. So yeah, this will be for our foundation. As you can see in the edge, it will be the end of the wall and you need to President softens edge, Justo to make it soft. As you can see, it's carbon. So again I'm going to split a little bit so I can make a different shape. More interesting this move it around a little bit. So as you can see to see what is going to take part and it's going to look a little bit different. Not so read your so this is the first. And now I'm going to create a new leg and we'll start refining the cabin by placing my blank over the gray box. Just move it up. I'm just hiding. This would control age and I'm start. She made shape of the door playing again. I'm just working in the verdicts mold, and I start splitting is before this in your function that I'm showing right now. You just go to edit mesh and search for chance for Vertex. And when you chant for the Virtus Diverted sees into a split it into four before this points, then you need to make it hard edge. And you give a beautiful details on the plank like it's good off from the edge. So champ for Vertex and then harden card in it. Get right now, I should connect the edges so I'm going to mow ticket and just connecting those two dots, those two Virgie's so I can have a clean mesh that's super important to keep your mess clean and again, I'm starting to shaping everything up. Let's move it a little bit up. Or maybe not. All right, let's let's right. Let's try again, Okay. Something like Dead's. Yeah, it looks nice. And as you can see, the detail is very neat. The pampered vortex. It will look awesome from the perspective. And right now I'm going to duplicate it and move it to the left. Again, I'm gonna freeze transformation and I'm getting up. Put in skills e minus one. So I give flip it over. Yep, and just move it a little bit to the side. I always tried toe leave gaps between the planks because that's how if you the cabin was built the 1st 4 again. I'm just shipping out the edge detail, and it's so it can look different than the previous one. And again, I'm going to create a new thank which will represent my top the border of the door again, just putting it up there and fitting it in. I'm gonna turn on the war free mood so I can see it better. And as you can see a you leave a gap over there, this will be felt from the perspective that's did the camera will be, and again I'm start splitting the plank. Just Bleidt. Once in this move a little bit edge and again, I'm going to duplicate it super easy so I can have it. Have the same shape. I'm gonna freeze transformation on. Maybe I'm gonna receded. Like, use the skills. He tu minus one. Move it in the middle. Did you give two planks representing the top of the door? I'm gonna change a little bit the shape. So they're not the same again. Breaking up the consistency, making it more interesting. Just a little bit. Nothing too fancy again. As you can see, it's pretty along. And I need to put it down a little bit to scale it in order to fit in the door. And pretty much this was about our front. Right now we're going to continue creating more planks for the side of the Kevin again, Just rotating it 90 degrees and moving up to the side so I can make the wall trying to fit in. Check it again. It's not good. All right? Something like this. Little bit of back. Maybe a little bit more. Yeah, I liked like that. Let me just change a little bit. The shape again. Pulling the verdict, sees. Okay, that's looking good. I'm gonna merch goes to because I don't want to have that detail over here, So I'm going to edit mesh merge, and it will combine those two overseas. And I'm gonna delete They won't the others. And again, I'm gonna make a little bit of interesting shape just to fill it. Trite tried different shapes, the one you like pull and push a lot so you can find it out. And then I'm going to continue on by duplicating the same thing and making another shape. As you can see, it's my My technique is super straightforward. I'm just using few functions and a lot of time. I'm just duplicating in creating different shapes from the splits that I made. So and I always tried to, so to make meaning my splits, like you can see we have only one split in the middle, but you can do super different variations from that. As you can see, I feel like five plants and all of them looking different, So this will work out this my final for the wall. Let me just finish up just like debts and movies for a season bit, and I think it's pretty much good at this point. As you can see, it has a nice curves. It is broken. See what's and stuff, and it looks good. But the one thing that I don't like is the scale of the cabin. So I'm gonna I'm gonna try move a little bit a little bit to the front so I can hear, like, more space out of there. Yes, something like this. Maybe it's better. And I'm gonna ko p one more plank and just fitted there in the age. I'm going to make it like I get the border at the edge of the of the cabin. I'm just selecting the edges and moving them around from the top perspective again. I'm going to stick this edge and move it a little bit back like that. Those Gordon sees. And I think it's looking pretty cool right now. Let me check it. Yep. I have a pretty nice It's plank. I'm gonna just shape with a little bit more. I don't feel the edge to be three like that. I wanted to be, like, a little bit more smooth like this, so I pretty much think this will work out. I like its. And the scare was better than before. The space in the cabin. I'm just going to soften their just again. All right, so now I'm going to create a plane which will represent some curtains on door so that I want something interesting on the door to happen and not to be, like, empty and so you can see through the through the wall to the back wall. So I'm gonna create some curtains in the front door from the left, from the right. I'm just shaping up a plane which read later on, we gonna paint, like, for example, red curtains or something like this. So you just need to create simple, plain shape it a little bit like that. Maybe maybe we can make to one from the left and while from the right this will be better? I think so. Just move it up and shape it a little bit again. I'm gonna freeze transformation and just put it minus one or just duplicated. Come on. It will be easy and displaced like that and leave a little gap in between. So this will be a cool detail when we start fading, and I'm going to finish up the wall to the right as we moved a little bit of the scale of the cabin again I'm gonna merge those two because I don't want the same detail on this plank, and I'm going to start making a little interesting shaping debts, move it a little bit up and maybe shrink it from the right to the left. It's looking better right now. All rights. Let me check with the wire frame old? Yep. I pretty much like it is. You can see we here so many variations in those plans that you cannot tell that they were duplicates. I'm gonna try to fit my player. See what this Kio is. Hands? Yep. It can enter. So I'm gonna continue finishing up my wall. I'm gonna push the little bit back. Fucking he have, like, more consistency and more space on the cabin. Okay, so we're going to continue with the bus. What? I want for the boxes shape to be like in the in the gray box, something like that. But I want to define detail on it. So I'm going to start splitting and I'm going to start making again some Kurds and some interesting shape on it. As you can see, this girl is a little bit too much. Maybe like this, it's better. I'm always rotating to find out which is the best angle. Now I'm gonna create the lid. I'm going to create a lit on the box. But first I'm going to create Holder. I'm just gonna align it so it can fix the scale from the scale. Moved a little bit back. This will be a blank which will hold the nets. And now I'm gonna just flatten it up like debt again. It's more with a little bit further because it was not the winds correctly. All right, bits the lift. I'm going to select older edges, and then I'm gonna go and use a new function called Bevel. If you're part and extra loop and I'm gonna up the segments to to ends, you can see by playing with those numbers you can make different beveling on the edges pretty much like this result. And you give a nice lit holder in the in the face of this blank on the top of my box. Now I'm gonna create a few planks which will represent my lit for the bucks again from Steeple Cube. You shape it up, place it there, split it, create interesting shape with this playing move those vortices at once in over shape for the most part of the late and just and I'm just gonna align it, make it a little bit thinner. Yes, it was like two fat in the previous. And maybe the bucks should be a little bit shorter and a little bit not so tall. Maybe just like that, The Detroit move them a little bit up. Okay, I think that's better. And right now I'm gonna position my legs. I'm gonna change the pivot points to the back, and I'm just going to start rotating and check out my degrees. I'm 27. Let's try 25. 20. It is suddenly 25 is good, and I'm gonna move it to the left right now. It's too long. So I'm gonna backing up a little bit this late and compare it to the to the books and again rotated Beth to 25 degrees and move it a little bit further rubs. I make it too short. I think they just tried to place it up, Fix live in the skill. I'm just gonna move the verses and just place it up. It is gonna be easy just like that. Select those words, see system and move them up so it can fit the degree. And it could be, like, more different. It won't be so accurate like nothing in real life. It's so accurate. And then I'm gonna just duplicate it and try creating the different shapes for each of the wooden. Let's again moving down, back and forth, changing a little bit to see what, and I'm gonna need maybe two more to cover it up. The size is not right a little bit, but I'm gonna fix it right now, okay? I'm gonna push the little bit back so it can fits and I'm gonna push. Let's hold holding plank a little bit back something like this, and you can see by simply duplicating them and just changing a little bit. The shape from the perspective you debts my game would be It will be nice. And now I'm going to make clips for the lid. So something called him up and again, I'm just gonna rotate it and created from keep 25 degrees and I'm gonna bevel the upper edge give and I'm gonna play with the fraction a little bit like debt bill. This one too. It's pretty much good. I'm gonna duplicate so it can hold each of the flags just like that. Okay, so we have holder for the thanks, but maybe the middle are too much. This is better. Only at the edges, Like it's it's one. And now I don't like the bottom of my box. It's too boring. So I'm gonna add a split, and I'm going to make an edge so it can have a bottom. Just select older faces. And I'm gonna use extrude function, go to edit mesh extrude. And I'm gonna pull up a little bit to make that edge about just like debts. And I'm gonna delete the bottom faces as you want. Ever see them? And I'm gonna figure this edge a little bit. It's too much. And on the other side, it's too much cobalt and our boxes now with the get shape. Good. See what? Very simple. Modelling with very efficient. So this is pretty much it for the part tree creating the 1st 4 building like I called it in this part cabin and the bugs details. So I'm waiting you in the next part for take care
5. Second floor base & cabin details: And though, guys, and welcome to the next part part four, second, four base and cabin details. So we're going to start creating some base bowling's for the second floor, and I'm going to duplicate them from the first floor and just rotate them 90 degrees, the white axis. And I'm going to start just moving them and placing on top of the gray box just like that. So I came here. The shapes and everything fit. I'm gonna move the Virgin sees a little bit back, and I'm going to do debt. Sing wits The second plank. Just move it to the bottom and alliance with the 1st 1 again. Move the first word disease. Just a little bit changed shape. You can do it a little bit further, just like that. And I'm gonna move the Turkish flag again next to the 2nd 1 just to make the floor base on the one side fit. Great. Okay, so just move it a little bit up. So they live perfectly and again, go to verdicts, mood and start shaping the second for blacks changing their their see words there and their definitions. By moving on, Lee divert disease. Nothing special. So I always to change shape so you can have unique things. This will add an extra detail to your environment when everything is a little bit different than then the others, like there is no actual 100% 100% symmetry in the world. So pretty much like worry. See, just to move, move it a little bit to the left, again go into vertex mold. Just shape it a little bit. As you can see, I'm just playing with the overseas, moving around, just checking my shapes from the far sight. I'm gonna again duplicate one plank and just place it's on the bottom as it will hold those three plans. And this will be playing holder at the bottom. Just like with Dan. It's on the first floor again. I'm gonna delete some disease and some edges. So here are clear later, topology. I don't need this this waas. So I'm just gonna removed him on, believe the word sees and I'm going to start shaping again overseas the shape of the plank so it could be different and moved back a little bit so you can see it from the from the original perspective, like this and pretty much like it. Now I'm going to create another planks, Hands make them in the middle again. I'm just duplicating nothing special. I'm gonna make a triple duplication and just shape them a little bit. Just like that, it's important to change. Also, the size and scale is you can see a middle small plank. We'll add an extra detail to my floor, second floor holders. And again, I'm just shaping diversities as you can see it pretty much like it will be. Think, Dad. All right, maybe just fix this one to be more straightened. I just wanted to. As you can see, I moved one further. One back, another further and stuff like that. So it has very nice. You would when you're looking at it. No, I'm going to mesh combined. So I combined over the four objects and just retain them 45 degrees and I'm gonna start and place them on my grave, Boss. Colder. Just like that. I'm going to skill them a little bit down, move it again, delete this one and start placing them and finding the anger that I like. Maybe something like this is good and place it under could be better just like that. So it feels like it's be neat. The 1st 3 blanks, the 1st 3 plans that we've made. So it has a logic. It's gonna be side them, you know? No, I pretty much like this. And I'm going to continue by duplicating the tree. Those three Thanks. Rotating them again. 90 degrees? Why, uh, they were 90 degrees. So we're gonna but zero and go on. Plays them again on your grey box. The gray box is super important because right now, without the gray box, everything will be messing our heads and you won't feel the shapes and the volumes. And with great box, it's pretty easy. I know where my boundaries are. So I pretty, you know, pretty much faster, doing everything like a winding holders blanks and making the in the size and shapes. And again, just playing with those Verdecia He's playing with the edges and just moving them and creating different shapes so it could be unique. Each blank should be unique. And this will add the extra detail Did you want so like like, for example, this simple model. But with all those extra details that we're adding once somebody is looking at this model. Who said, Yeah, this very simple model, but it looks great, but he has this little crispy detail in it, and that's the thing that will make the difference in the end between you and the other guys that are making war Bori game assets for games again. Just moving in moving those gore disease. Very simple technique. I'm not showing anything. What crazy adverse stick me. But I like it like that so I can hear very good control over my geometry, and that's pretty much it for the planks. As you can see, you're very different shapes. They're consistent and they're looking nice. From From this perspective, I'm just gonna fix those two words, see, so we can have a gap. And again, I'm just gonna duplicate and creates the base Colder playing. Putting it be needs moving it a little bit so it can fit and moving divergence a little bit back. And those clear a bit further, changing the shape just the flu like debt. Oops, just those two cities make me go further buying those two something like debts. Or maybe not. It's too generic Let me try another sheet. Something more edgy. Maybe this one should be boards. You just need to experiment a lot with those things. Try and look from different angles. So catch what you see and fix it on the gill. Trying to create something unique right now. Just make them like a size. It's more shrink them up because they're like, smaller plans that they're just holding the big ones. All right, I pretty much like this result. And now I'm going to start creating planks for the second cabin on the second floor and I'm going to start by duplicating my first lore in this way, it will be very easy for me to create it. I'm going to send through the poet and more than those duplicates I click controlled the orca Mandy and keyboard to duplicate. And I'm gonna combine him so I can't easily select old overseas together. When you combine older thanks. And I'm going to start fitting them. Rula, you give pretty fast second floor. I'm gonna rotated 90 degrees. But right now the world is nuts. What I want to be so I'm going to separate the mish and move the wall again. I'm going to center the pivot and move those planks to the other side. You know, we give the world the Kevin ready I'm gonna copied is pure. You sent him the pivot copied, and I'm gonna need to rotate it 90 degrees and I'm gonna fit it right there. Don't worry about that. The second cabin is identical to the 1st 1 We're gonna change this again by shaping the Virgin sees one by one. So pretty much the corner leg look like debt. I want one more and the back. So I duplicated freezing transformation. And I'm gonna put in skills in minus one so it could be rotated so it could be flipped. All right. On it was funny X maybe, but I'll just leave it like that. It's OK, right? So now I'm going into the words Vertex mood and start shaping the planks. So they have different different volumes and they don't look like as the first floor again I'm going to shape the pure is to so everything should look different. And I'm going to jump for one of the verdicts like I showed you before then. Hardin edge, goat mash, cartage and I'm gonna connect those two with multiple, too. It's done. So I can't give a little interesting shape on there on the border on the edge of the Ludin plank just like this one. And just like that one, I'm going to fix this one by merging those words. She's because I hear this one on the first floor and I'm gonna delete those two overseas and start shaping it a little bit. All right, that looks nice. Has change some of the other blanks and fix the little bits and the border edge. All right, let's fix those on the door. It's right. See if they look identical to the first floor. I need to duplicate in place plants on the other side. Because as you can see this through this, we're gonna be visible from our perspective. So I'm going to duplicate them and place them over there. So I feel up. Whoa. And now my cabin looks get. I'm gonna just continue working on on the courtesies so I can try some other shapes. All right. That's pretty much good. From older angles again trying from with the wire frame old to see how it looks and pretty much satisfied with this result. No. I'm going to greet the shelter above the door. It will consist from two Ludin. Thanks. And a cloth. Those two Ludin thanks will hold the cloth in the south will prevent some from burning the skin of the fishermen. Wow, He's fishing. So I'm going to place one at this side? Yes, drinking a little bit. I want them to be tiny. So you know, Not so fat. And I'm gonna try pretty much like this. I'm going to duplicate and maybe make three just like that. All right. And now I'm gonna create just a placeholder for the cloth and this place holder. Well, we're going to start it by creating this plane and this. Move the edges. So it fits. Loading the wooden holders just like death from front. All right, I'm gonna move it a bit, just like that. And I'm gonna start creating some geometry from this late, but using the extrude function, I want the volume to be just like this. Something like that. I'm going to start moving the validity so they fit our holders, and I'm gonna use split function to create some some interesting shapes in the cloth again . This will be my starting point for it. Later on, I'm gonna simulate it in Myer so it can photo pretty nice. But for me, the gray boxes and trying to shape everything with with simple shapes and not be final, super important as I can see the volumes and where this detail will go on and if I'm gonna like it or not. So that's why I'm creating everything with great boxes first just to test it out, how it looks. And if the idea we work or not. So in this, in this case, I'm not losing too much time spending on detaining both and creating some some more complex shapes. As you can see, I'm just Onley moving overseas and creating a shape a cloth shaped that everything is falling a little bit, you know, And I'm using, as you can see, basic tools. Nothing fancy. No, I'm just plating some faces, you know, to create some, run them shapes and trying to find some interesting shape. Just like this, as you can see, is creating a little edge. I think Dead's and moving the word sees created real nice. She all right. And this is only for testing the gray box. If the idea will be good, I'm not spend too much time. We need I'm going to spend, like, maybe for less minutes. This creating those shapes. No, I'm extruding from this edge, just extruding emerging diversities so I can create the connection. And this four edges not so drastically cut. No, it looks better again. I'm gonna just create some interesting shapes on that side, too. By most, cutting the face and everything is testing. Just try it. Try. Ever try again? So this how you move forwards, creating those shapes again, I'm gonna try increase, um, good shape. Or here I'm going to select those two edges and I'm gonna click on the bridge. Or maybe, yeah, the the bridge functions should work. Yes, maybe nuts. All right, I'm gonna It's not working for some reason. Anyway, I'm gonna expects through this and just connected connect the world system, march them at it. Measure, merge and let this one, maybe, or just put it down, not dilating. It may be to work better, just like dead's. And I'm gonna cuts one more time, and you can pretty much some good interesting shapes own here. So I think put in a cross above the door and placing three holders were work, and later on, I'm gonna simulate this and it we will look even better than this. But right now it looks good. I think it's right. No, ghetto it up and rotating it. Make this. That's not good. All right, so I think this looks good. Like a great bucks. You won't be able to see the Ludin. Thanks. So I'm not taking to make Sir Simon there. It looks nice. It looks clean. I'm just taking it from every angle that I can again place. I'm gonna turn on my person so I can see the scale. And the skill is just about right now. The only thing that left is the roof. I'm going to use these great box, and I'm gonna extrude inside of it. Just a kid getting like that extrude one once again, Bush it now and this pretty much could be my roof. I'm going to split a little bit. I see. Should we do so some details or maybe nuts? Let's try to bevel the edges and that's creating some loops I'm gonna slicked the border edges, and I'm gonna try to bevel them so I can give them a bottom go to edit Bevel. This is pretty much a lot. So I'm gonna go into the options on the bevel, not the bridge. Here we go. And I'm gonna change the white to 0.1 on a so you can see it looks nice. All right? Pretty much like how it looks right now with bell edges. All right, so this will be for this lesson on. I'm waiting you in the next one by
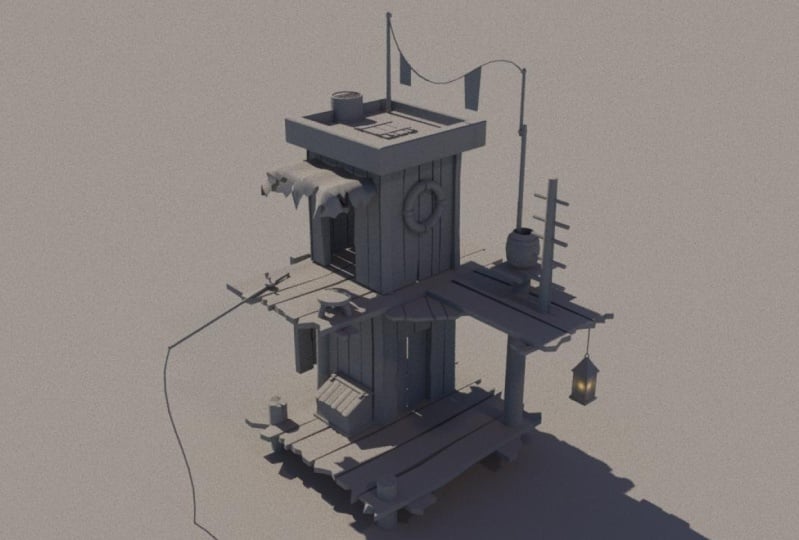
6. Roof Hatch, Life belt, BBQ, Barrel, Laundry Holder, Lantern and chair: Welcome back, guys with part five, we're going to start by creating the roof catch, and I'm going to start again. It's just simple. I'm going to duplicate those planks and rotate them like they were 45 degrees. So I'm gonna put zero, or maybe 90 and 90. Then I'm gonna place them on the top of my roof, and I'm gonna resize them to be a little smaller so it could be suitable for a hatch. I'm going to move them on, aligned them to be straight, may be removed, this one, and I'm gonna just put three of them. All right, so this will be the start of my roof hatch. I'm going to play like before with vour disease to create some different shape and fix something. All right, maybe just ring them a little bit. So they take a 18 tinier. All right, and I'm going to start making some I running, holding on the hatch. I'm going to place this cube over the hatch. I'm gonna resize it just a little bit recited mawr. Move it on the top from the hedge. Then this will connect my tree planks together so it will be logical. And this we will represent in Iran holding on my three planks. They will be just placed in the bottom and in the top of the hedge. Just like that, I'm gonna move those words. He's a little bit out so it can cover it up. And yep, I'm gonna make another ironing. So it could be the mechanism. The mechanism for opening the hatch again, Just freeze the transformation, rotated 90 degrees and I'm gonna place it on one side of the hedge so it could it could be open from the bottom and just place it it that one and the one corner when the hedge and do want and and fix it so it could be s'more and it will fit to the hatch size. I'm gonna push those forces a little bit down on. I'm gonna make it just like this with a little bit of van Gogh and make it's more placed in the center of duplicated and placed on the other side. So when you pushed a hash from from the bottom, it will open at this side. I'm going to fix a little bit more just like that so I can have a little bit of difference , all right. And I'm gonna move attended minuto and hopes I'm gonna combine it so I can make the size changes just like debts. Maybe more than a bit further ends. This will be our hatch. It looks nice. And I like it how it looks from this angle, and it does good detail, and it's up of my 2nd 4 So now what I'm going to do is I'm going to create ah, life belt and place it on the 2nd 4 War. And I'm doing that by creating a tourists and placing the subdivision axis like what's right with 16. All right, so it's not that much of a poorly count. It's recounted and 20 bodies. I'm going to place it on the wall, just moving yet. Zooming All right. It's pretty big. So I'm gonna side with a little bit and just place it over there just a little bit smaller , okay? In the middle. And now what should create our holders because it cannot stand on the wall just like that. So I'm going to create a cube, and I'm gonna create four holders each side off the life belt. I'm gonna just place them to be inside the wall. So you get feel the realism on the idea of holding it down. This move, this face will be down this one a little bit up, and I'm just gonna go to edit mesh and devil. Let's try again. Just bevel and try with the settings with the segments wanted tipped. All right? With the friction, I'm gonna put it 0.5 point eight with three segments. All right, that's look looking nice. Going to shrink a little bit to make it to her. And this is my bottom holder. I'm gonna just get a little bit. So you feel this the shape and just duplicated and place it on four sides, top bottom, left and right. Those will be. And I'm just going to rotate it my minus 90 x and just put it on the other side just like that. So my life built is ready to rock. And again, it's very good detail to your 2nd 4 All right, so we're gonna we're going to continue. I pretty much like the shape how the hatch and how the life belt get into those. 2nd 4 Make the details of it. And now what I'm going to do is I'm gonna create a barbecue so fisherman can fly, hiss, fish and cook it. So I'm going to start with cylinder. But it's 16 for the faces and I'm gonna delete the bottom faces because way will never see them. And I'm gonna extrude a little bit from the bottom so I can make the edge shape, all right? Just like that's shrink it a little bit and it's too high. I'm gonna make the bit That's so too again, you just beveled the edges. And right now I'm just gonna but later hole inside so you can put the woods and the ash trails will be inside. What? Where the fire? Well, g o how just extrude just don't words so it can have a good hope. And I'm gonna fix some of the verdict sees Maybe make it Lismore. But it's too big again. I'm gonna push this for the Dell. I'm going to scale it up and I'm gonna place it onto my roof. It will be at the border edge of the roof just like that. It's too big. I'm gonna make it's more. Maybe it's too. Its limits sounds looking pretty much good. Let's try to find the right place just like debts. And I'm gonna need to rotate. My catch goes when you open it, you gonna hit, Keep the barbecue and it's not logical. Maybe just like that? Yep. It's looking cool. From that perspective. I need something the inner edges. So I'm going to select all those ages. Goto most display and soft edge. You can see it has smoothed edges right now, and it's looking pretty damn awesome. Now I'm getting it. Make a little detail in this barbecue. I'm gonna make some irony blades which will hold the fish when you cook, like in the real barbecue. I'm gonna create it from those this cube and make it like tenor, and I'm gonna shrink. And I'm gonna use just skill so I can make it all the way across the barbecue, and I'm gonna make it just just seeing tomato, maybe, and arrange them so they hear even spaces between them. All right, I'm gonna freeze the transformation. It's duplicate and skilled him on the other side, just like that. All right, Let's see how it looks. It looks good and I'm gonna just try to fix a little bit of this. You would. But maybe it's not looking good right there. And I'm gonna make on the other edge, let's say a lid or something like that on the bottom image. So it will look more interesting in that way again. Just a simple cube and try to fit it fitted there, just like that. Ledo's so you you can place here the cooked fish, for example. If you're cooking two fishes, you can place here there fish that is ready. I'm gonna shrink this edge, and I'm gonna split and move it like that to get the shape of the barbecue. And I think this is an interesting detail into a break up the barbecue in the forms. Let's see from far, yes, but were free mood. Yeah, it's look pretty damn awesome, I think. And it's nice that we're going to continue by creating a lather next to the barrow so the fishermen can get him on the leather and, you know, place he's boundary there and we could make Yeah, we could start it by creating or duplicating the cylinder. It's it's just moving a little bit further and just changed a little bit. The shape just to be a little bit smaller. Just think that's looks looks good. Okay. I'm gonna Bevo again the top edge, and I'm going to start creating the leather by duplicating and rotating minus 90 degrees. I'm going to need to battle the other edge to just breast G. And it will devil and I'm gonna place from the bottom to the top step by step so the person can climb, make them a little bit smaller and start from the bottom bottom center. The pivot just like that. Maybe. Maybe that's enough. OK, place the 2nd 1 duplicate those two for in one list. Just like that. I'm gonna fix a little bit of spacing because I don't like it like that. All right, so pretty much it looks good. Let's start fixing a little bit of this. The holder of the barrel just changed in the shape a little bit and soft stuff solved the edges and it. All right. That's right. Now I'm gonna It's going to move the really see sorting here. More interesting shapes on the leather and leather wood and thanks again, Just move them a little bit inside outside. Just play with shapes and try to find the best shape that you like and break up the See what? Right now, it's pretty. They're pretty much look the same. So I'm gonna try to be extremely diverted sees and create something breakable. Just like that. Yep. It looks good. I'm gonna lead the barrel because I don't need a placeholder. And I'm going to start creating a new borrow by creating a cylinder. And I'm gonna slept top edge in the bottom edge and again it it mesh bevel. All right, I'm gonna move the bottom. Word sees, and I'm gonna start splitting. I'm gonna split a little bit more, so I'm gonna have a better volume of the barrow. Maybe just like that, I need a middle split. Have the shape, right. Okay. And again, I'm gonna slick thought edges. I'm gonna delete the bottom ones, and I'm gonna just select again top edges. And I'm going to extrude the side so I can hear the empty space inside. Just just a little bit like dead's. That's good here. Space. And I'm getting up change a little bit. The skill. Let's see and I'm going to start creating some meto rings in the barrow by duplicating it and just creating a bevel from the from the bottom. Ito edge and from the top middle edge. All right. Just like debts. That's fig fixed friction, All right. And I'm going to select only those faces, and I'm gonna leave them, and I'm gonna delete the rest. So those those two will be my rings, and I'm gonna place them on it. My original barrow, I'm gonna skilled him up, and I'm going to start and select the faces pretty much. This is the ship that I want. I'm going to save the faces and go to extrude option, and I'm going extrude inside. And let's do that for on the bottom. All right, so we have our rings. I'm going to move the the new edges a little bit downwards and aboard so I can have more than fine edge. This will be visible from from top down. I'm going to combine this and I'm gonna make it. It's over. Maybe just like this. All right? And I'm going to scale up and place it on the platform that we hold my barrow again just moved up there and you're gonna skilled again because it's too small. We're going places like death. And we have supercool barrow, which will hold our water to make the boundary wash your floats, the quotes of the fishermen. Okay, so, being enough, I'm gonna need smooth the edges against select mish display A soft edge top wants to g on my keyboard, and we're ready. All right, so this my barrow, it looks good. Like the shape Let me take a look again. Take a look from different angles, guys. So you can have a good picture of how the proper looks fix the size fix if anything you don't like and always take your time to look at it from this different perspective. This is very important. In order to to have it perfect in your game, I'm going to fix the little bit of the bottom missing here one face and I'm gonna fix it by using the boldly going a pen to a fenced, bold angle right in the mix too. Just click on the one edge and on the other, and it will connect. All right, just make the ball a little bit like dead on with a little bit down. All right, so I think my barrow is pretty much ready. Like what I see. And let's continue by creating the poles and the wires for my laundry. Like I told you before, that we need somewhere to play the clothes. And I'm gonna make this pure Gail Golden, maybe inside the barrow. So what? We hope my wire for my laundry and one and the roof. Just like that, I'm creating different heights. So when I place my wires, I'm gonna have very interesting in nice shape to go from up to down to all the way to the rather that you need to climb. And I'm gonna create like, a second wooden bow and make it more interesting like there. Why, together just to extend it. So one is the short one, and it's not enough. So the fishermen get one more wood piece and just tied it up so it can connect to the roof to the roof ball again. I'm just gonna try and create a little bit of different shapes by moving those overseas. And let's start creating the wire. It is pretty simple. I'm gonna create it from a plane and just split and move it because we want to be a war poorly. That's my I work full. Make it first, connect the edges. Then we're going to split and create the curve. You can do this like, very different, with very different tools by, but I prefer to make it with the plane and here, the absolute control of the body count. And it's a pretty goods used the prototype like this. See if it works very fast, not to get fancy intimating like curves or stuff like that. So I pretty much like it, and I like the shapes, and what I'm going to do is split on the different places and start shaping it up by selecting the verses and moving in down just like debts. To create an arc like the wire is a little bit like wire rope. Whatever. It's a little bit del, and again, when you get into the texture in process, this will be a simple black line with enough a channel, and as you can see, we have nice rope over there, which is from the roof to the barrow holder. And again, I'm gonna create some planes that later on the picture artists. We will just drop cloths in the Alfa Channel, and I'm going to place them on the wire just like that, for example, T shirt orgies or something that fishermen is using. And it's dirty, and he washed it out. It will be a simple pulling off a plane in which you just draw whatever you like to hang out on that rope. And this pretty much very optimizing for mobile games like you have to try anguish. But you care very complex, shaping it. So I like how it looks like. Let's make it a little bit longer. Yeah, that's that's look pretty nice. And it's very nice touch adding details to your to your mother right now. The only thing that is missing is to wipe up toe wrap up two women basis again. I'm using a super simple technique. I'm just going to create a plane and just going extrude what EJ and rapid or around then duplicated and make it and the bottom. So I'm just going first, move it on my too wound up yours just like that. All right, make it a little bit senior move it off the heart disease. So this will be my starting point from here Edge. It should be pretty much war bully soul. Don't be worry about it. It will be just a black rope around it. And you are not going to say pretty much a lot from the distance that our in game camera will be. So, like I said, it would be metric. So you don't have to worry too much about it. It's so really shaping up to be pretty good. Just like that's I'm going against something. Marriages a soft edge. So, yeah. So this is where it wraps up at the top. The rope Right now, I just said that periods right now we're gonna need to wrap up the bottom. I'm gonna scare it up like debts, and I'm going to start moving. The vert sees again. I'm not going crazy with the detail s. It won't be very seen from far away, so I can't have those harder edges and not so smooth geometry getting just moving the edges right now to fit over there. All right. It looks pretty much good. Just couple more fixes and it will be ready just like that. All right, I'm going to duplicate it and move it to the bottom. That's right. Now you hear pretty decent rope crossing it around and wrapping up those wooden thanks and just want left in the top roof. So we get going to just finish the top rope wire. Now just shrink it down a bit, rotated just like that. Move it a big deal and scale it up. So this is pretty much looking good. I'm gonna just make the edges to fit, so they're not too off it's like that from That's good. Let's check the view. All right, So this is pretty much for the laundry and the ropes, and I think they aren't very good detail to the whole picture, which is very nice. And now I'm going to create a little lantern which will hang up from the second floor to the 1st 1 So in the night, fisherman has some light, as you can see, just the simple cube, and I'm extruding the bottom, and I'm gonna extrude the top and just drink it up so it can start creating the shape one more time to make it a little bit more smooth again. Just moved a little bit, Del. And let's try to shrink the top again. Just like debt. Yes, we have a smooth shape right now. Okay, so we need to select all the faces over here in just extrude inside. Just gotta go toe extrude. And what they need to do right now is I'm gonna I need to turn, keep faces together off. Just don't get off. So it gonna start moving the faces separate so I can have the course for the water just like that. All right? Just fix scale out of it. Okay, so we have the holes ready, and now what we need is to create a handle. Where a rink we hoped and a rope will stay over there, make it a little bit more smoother. Maybe. Dead's chick ticket again? No way. I think it need to be a little bit longer. All right, Let's let's check where it should be. It's pretty pretty good. Maybe with a little bit backwards key. Make it a little bit further and make it a little bits more because it's too big. All right, now I'm going to create a a rope that we hold the lantern. It will be coming from the 2nd 4 and I'm gonna hold it. It should be very small, Like a little rope hanging up just like that. All right, It looks pretty good, but I think the connection is not so good. So I'm gonna need create maybe a ring. So it to ads, Better details on the holder. So I'm going to create a tourist again. Just drag and drop it. Fix the radius, and I'm gonna make it 14 to 10. Rotated just minus 19 degrees on Z and scale it up and place it on the bottom, off the rope and on the top on the lantern so it can make the connection. All right? It's breathing much. No, it's pretty much like maybe a little bit down. Let's see. Maybe the rope is too fat. Let's shrink it down a little bit. Make it. It's more. All right, Broom. It's looking pretty damn good. I'm gonna move it a little bit, Del. So it can give better Lent, maybe and moved their ink a little bit up. Just hold it on the tip on the top of the No. Just like that. And It's looking pretty damn good, I think. And it adds an extra crispy detail. All those small details that we're making right now is gonna make the whole model to look good and to feel life. So that's pretty much very important about small details over here. So the last thing that we're going to do is we're going to create a little cheer for our fisherman where you stewed still on Just waiting for the fish to be catched. So I'm gonna create a cylinder and again, just beveled edges. And this will be our base of this two of the chair. And I'm going to create a new cylinder and please the subdivision access to 10 stuff in their ages. Get and just create, delete the Baracus. We're gonna not see it. All right? I'm going to create a little Andrew. So I'm gonna make this chair to be with three legs, not four legs, and I'm going to start creating a little interesting shape on the chair just like that. Like it's an old one. And I'm gonna place the first leg under the chair, just like debt changed the viewpoint to the top. All right, let's try from the tubs. You? It's not looking pretty good, like that's maybe move the words is a little bit back. So what? Can he have a good angle? A little bit up again? Just fixing the shape with the Virgin sees. This will be my first leg. Just make it the little bits. More maybe like that. But no, that's right. That's right. Fix the little bit again to shape with overseas. I'm going to place the center of the pivot in the middle. I'm gonna say, Say it's freeze transformation and I'm going to start taking it. But minus conduct 20 degrees, 20 degrees. So I can't hear the three legs it it it's even parts and even angles. And I'm going to start just moving them a little bit around so I can have a little bit more interesting shape and not so symmetrical. I'm gonna go to MASH combined, and I'm going to place it on the edge of the second floor where hero stay still. Hold the fish, Catch the fish. All right. It's pretty big right now, so I'm gonna have to scale it up just like there to make its more. Let's turn on our person so we can see the skill and just rotate it from this perspective where the legs will be seeing Maybe just just like that, it's better. Two legs to be visible. And this is pretty much about this part five. Grading those details. I hope you enjoy it. And I'm gonna be seeing you in the next one. Take care.
7. Finishing up the details: Welcome back, guys with the final part. Part six Finishing of the details. I just removed the shed, the cloth that was on those pillars. So we gonna starts creating our final shared. Our previous one was just a placeholder. So I created simple, plain and divided 16 by 16. As you can see, maybe we can have 20 by 20 so it can have more Nestea. Now I'm just going to shriek, get up! And just a line. It's above the wooden. Thanks the holders. As you can see, I'm just scaling, scaling it up so it can fit out there. Just move it. And he have the nice proportions from the both sides and from the front. Maybe something like this. I'm just going to shrink a little bit, Jake from all angles, guys always check from always goes, rotates in the camera and find out. You feel it's good. And now I'm going to start putting some faces. And this is because I wanna have some river parts from the cloth. I want to have some nice see what's and some good details in it. So I'm just going to start and the leads are face from here and there, as you can see, just selecting different parts and just the leading faces in that way. And I'm going to create some edges and they're gonna fold down. So what I'm doing right now is just selecting the verdicts. Ease and start creating some good looking shapes, because when we created the plane, it's so squares and rectangles, and we need to break this up and I'm going to start creating some flow shapes, some good curves and so sharp edges. As you can see, I'm just working around by selecting the only divert disease and just shrinking them and moving them four words backwards. Up and down, just on one axis on the X and set. You don't need to use the green Wanda the why, As you can see, I'm just experimenting. Moving around with Morrissey's create different shapes to create unique shapes. It's kind of, ah, of a little bit of time consuming process, but you're going to create very nice variations of the shape which in India, and it will bring up a lot at that, a lot of attention to the detail in the viewer, and it will be noticeable for sure So I'm just gonna gonna continue Move moving those vortices from the right side until I find out that over the shapes are following following from one to another. As you can see, it looks more like a cloth. I'm going to need to do that and the bottom part and on the left side to I'm not gonna be focusing too much on the upper site, maybe just some small details, but nothing fancy as those parts will be more visible. The bottom, the left and the right. And again, I'm just moving. The word sees creating full shapes, creating some sharp endings. So when you simulate the cloth from the mire, simulations hold, all the pieces will come together and they look just fine again. I have a lot off square shapes and rectangle shapes over here, so I need to fix that. Go there, tweak those words, sees this my way off creating the this kind of cloth because I want to give a full control over it. And I want the Shet to look interesting. That's why I'm creating this by hand. And that's why I'm just moving all those of or disease by hand because I want to hear that custom detail in it. The reason that I put 2020 on the resolution Waas to care for good resolutions for the folding. So now go to unclothed and click on creates and clothes. But first you're gonna need, you know, to delete the history again, and growth creates, enclose. And right now we have the end quote Paar meter. And when you see relate, nothing is happening. So we need to select the damp yours and define them as a passive collider. And no, everything will start simulating. It looks still ugly. That's why we need to plead tweaks and per meters. Let's start testing like Let's there's friction, all right? It's doing quite nice job. Let's try with 300 something like that. You can stop the simulation. It's any frame. I'm just gonna scaled up a little bit so it can cover from the side. It's still sliding. Let me try again. All right. As you can see, it's Whiting further like forwards, and it's gonna go and slip at some point. So let me just move it back or just find the perimeter, which will define the sliding Could have been just jacket out pretty fast. All right. Okay, So this is the cover and stiffness. There are tons of perimeters which you can play with, so it's pretty difficult at first. But when you try and simulate a lot of the cloths, you gonna you gonna make it happen? So I'm gonna put to stick nous to so it can stick it that place, and this will fix my my problem. So again, guys just scroll down and test some of the power meters, and you're gonna find the result that you want. I'm gonna scare it up again because I want to cover more ground just like that, and I'm going to start simulating again. As you can see, it falls pretty nice right now. It's it's ducks, and it looks good. And I need to fix some of some of the Verjee sees because I own, like, some of the forms again. You can fix it and started simulation again just from pressing the play bottom. I still don't like how it folds over here. Let's bring back. Let's start tweeting more the shape. Maybe this could work to move it like dead's. Maybe so. Door edges to rotate them more than like that so they can hold this. All right, I still have some problems in this area, so let me stop it. So I need to do is I'm get up, move those over disease, and I'm gonna go to modeling. And my where is my hold on to that? I just find it pretty quick. I hear it in my quick tab, but I want to show you from here, Append to Paula. Go in Mesto and just connect those two and connects Connect also those two just like that percenter. No, I'm going to move a little bit diversities so I can create this shape. And again you can start simulating. Find out if it's looking good. Stop it. Fix it And vice versa. So pretty much looked nice. I can't fix that by hand, Indians, But it's right. Let's try some. Something else leads the leaders faces and let's move. Those vortices over here simulates again, so I don't have this edge. All right? I can just maybe delete those faces too, And right now I'm gonna have what I need. Also, I'm gonna delete those, and I'm gonna fix this shape not to be so square just like that of the verdict sees and put them a little bit back, maybe daily this one here and started the simulation again. All right, this is looking pretty much what they want right now, but I still have a little problem over here. I'm just going to delete those faces, too, because I don't like this shape, and I'm gonna That's right. Issue relates again. Me seeing really single. All right, I don't like only this edge, So I'm gonna delete those and I'm gonna start and try to make sharp For as you can see, I'm simulating and just fixing on the go What I like and what I don't like Have you seen this edge looking? Get from this angle again. Check your mother from oh, and goes and from the your your basic anger which is the eyes of matric If you like before right now I'm gonna lead the history and there will be no more simulations. I'm gonna delete the and cloth. It will create one more from the previous and I'm just gonna delete it. And now what I'm going to do is I'm going to start and try to model it by hands. You need just to the reads everything from the enclosed simulation in the out finer. And right now I'm just going to move the ver tee's and fix some of the issues that I don't like. It's pretty much not so high police, So okay, have a full control over it, and it's not much of a big deal to fix it by hand. If some of the simulations are not working, just how do you want it to be? All right, just morning. Those words sees a little bit if you're a face that I don't need, so I'm gonna delete it's and I'm gonna fix this area. Just look more natural, all right? It's looking good. I think we can just move some of those two. It's pretty much easy work to do that, but it takes time. I don't like this edge. Oh, so I'm gonna select all the varieties and try to rotate it to fit the anger of the fort and the angle of the photo. So just rotating it and placing it a little bit inside, It's good up. It's gonna feel good. You can also scare it out a little bit, and I'm gonna fix this edge to all right. That's pretty much looking good, Can, Let's see. Yeah. From this perspective, I think this is looking good. So now what we left to do is we need to create, like, some small details. I'm going to start with the pillar, and I'm going to just, you know, channel for the verdict, the vortex to create a little, you know, interesting shape, like before. Like we created. It's on the first floor again, just move them a little bit and make the edge to be garden, all right? And I'm just gonna connect them with the multi. So just like that, and hard in the search to okay, Or maybe not. I'm just just gonna cut on those two. And I needed to connect. You know nothing. So you have a little interesting shape which will break up the pure over here and what we left to do. It's pretty much some of the details. I'm going to create a cube which will imitate my water in my engine. It would be a simple cube, and I'm going to simulate the water inside unity or on the Rio engine with a shader. So no need to give a complex form or a complex shape. A simple square will do the trick, so don't worry about it. Destroyed. Fits the skill. No, we're going to continue to create a fishing rod for our fisherman. So I'm going to start with simple cylinder and extruded up. I'm gonna decreased subdivisions because it's pretty high right now. So let's try with 10 to be like a little war bully, and we're gonna rotate it on X. This will be our rod, and I'm gonna place it on the 2nd 2nd 4 Let me just through I get up and place it off there and you shrink it a little bit. Try to fit the size. Now I'm gonna create the Rio again by creating a simple cylinder and placing it in one of the ends of the rod. It's pretty big right now, so I'm gonna need to squeeze it up to squeeze it down. Excuse me and place it on our fishing rod in one of the ends. So we pretty much look nice. I'm going again. Decrease the subdivisions to maybe 12 so it can have a little bit more geometry and softened ages. So I'm gonna check it how it looks from this perspective. And I'm going to start creating the handle of the rial. So again, from a simple cube just placed all over there at the rial and I'm gonna placed in the center of the real just squeeze it down a little bit so it could be a good size, and I'm gonna just to placate it and all right, I'm I'm gonna extrude the face. It will be better. So I'm going to extrude a ports just like that and get that me. Just select my top face, extrude It's to it. All right, Here we go extrude and try to exclude to the left side something like this. All right, extrude one more time and extrude upwards and increased the skill of this end again. I'm just extruding and as you can see, very simple fast shape just by extrusion. I'm going to soft in and around that some of the edges over here by selecting the verdict sees and I hear my hand off the Rio ready. All right, I'm just gonna string down a little bit. The rial and such size it up. Okay, so now I need to combine this and place it on my second floor. Just put it down and pleased however you, like, just again tried toe, create a nice see what interesting angle. As you can see, I've created a little cheer. In the meantime, it's super simple, just great sitting there and for the legs. Use assuming there and rotates. Rotated by 45 degrees and you have a chair and I'm placing the fishing, the fishing rods in here in the cheer, something like this. So, for example, he can be sitting on the chair waiting for the fish to be catch in the hook, just like this rights. Very much like words where it's placed Caving J Anglos. Now we're gonna create the rope of the fishing hook the string. But I'm going to create it from a simple plain and in the game engine. We're just gonna draw an Alfa texture, and this will decrease our poll account. If if we if we want to make it for example from geometry, it will take a lot of triangles. So this is a matter that it's very optimize herbal for mobile games for example. So I'm just placing this Blaine where I need my string to be. And after that, I'm gonna make a super simple texture in for the shop on creating there for channel for it . So So that the streak on Lee will be visible and the rest of the poly plane won't be visible. But this picturing work and it's another matter that we should talk in another tutorial. So just place the plane simply like that, and imagine how the hook will be hanging from the fishing rod. All right? Pretty much like this. And now I'm going to create the hook itself. We need a hook. So I'm going to create one from a simple cube, right? Just shrink it again. I'm just shrinking down by selecting my verdict sees and try to create a nice sheep. This will be my base for the hook which will stay above the water. I'm just gonna bevel it so I can have smolder ages, and I'm gonna place it under my plane where the string will be drawn in for shop. So I'm gonna draw it to be connected with this part of the hook. Just like that And now I'm gonna create another plane that we'll represent the actual hook . And again, I'm gonna draw it in 40 shop and use an Africa chano in my textures so I'll save a lot off Borda. Count in the game, agent. So I just duplicated the top lane, and I'm gonna place this plane in my hook part again. Just rotated from ho angles to see how it looks because I'm creating it on the how on an Anglo. So it will be a little bit difficult, but you should check it out from all the angles. Let me try to select a size your center of the pivot. Okay, The first part will be little strength. In the second part will be my hook. Just like death. All right. Again, all those place we will be painted in for a shop with Al Pacino, so don't worry about it. This is the way that we should do it for basic optimization again. I'm just gonna delete the bottle face of the water so I can save up some poor accounts and I'm just gonna try to break up a little bit those pure so I can have more interesting shape over here. Let me try and push that a little bit, Del. All right, so I can hear a little interesting shape. I'm going to create a. Not in this would by splitting a little bit of it. It's extruding one, maybe two of the faces or just pulling them back. This one work. Let's try something else. Let's strike downwards. Maybe just like this or in the middle. That's trying to meddle again. I'm just good up extrude this and try to make it interesting just like this. Like it's it's growing up from this blank from this pure that may fix the angle, Maybe something like this. So you have a little interesting shape over there, just breaking up to see what? Let me just fix those to avert disease and to off the top. All right, that's looking pretty good. You can hang your clothes over there. So this is the end off part six. And sadly, the end of the entire course. Thank you guys for and rolling in the scores. Thank you for spending time watching my tutorials. I hope you've learned a lot. I hope this will help you it grow like artists again. Thank you for your time and see you later in my next courses. By
 Ivan Yosifov, 3D Game Artist & Animator