Transcripts
1. Get to know your instructor and the course: Welcome to unity Mobile Game Development course. In this course, you'll learn how to model texture, stuff you're writing in Maya, in unity for mobile games. My name is Ivan. I'm a co-founder and art director. Most games and how we live in you trace course. I began my career as a treaty generalist, working in the film industry and Hollywood out a few years working there, I'll transition to game development. And for a couple of years, I've worked with some AAA studios. Baleen was always my band should help my own game development studio. And back in 2012 with a colleague of mine from the university, and we started our first company, estate games. We develop cup of games and publish one of our best game with electronic arts after working for two years in esters games with soda company, and start a new one code, seven books games. And I can proudly say seven moons games, one of the best mobile indie game development studios in Europe with more than $20 million in total as not a single dime spent on marketing. In the end of this course, you will have a mobile game rarely seen, waiting for a programmer to write down the code and then submit to the mobile stores. Feel free to take a look at the description of the course. And I can't wait to see you inside the course. Thank you.
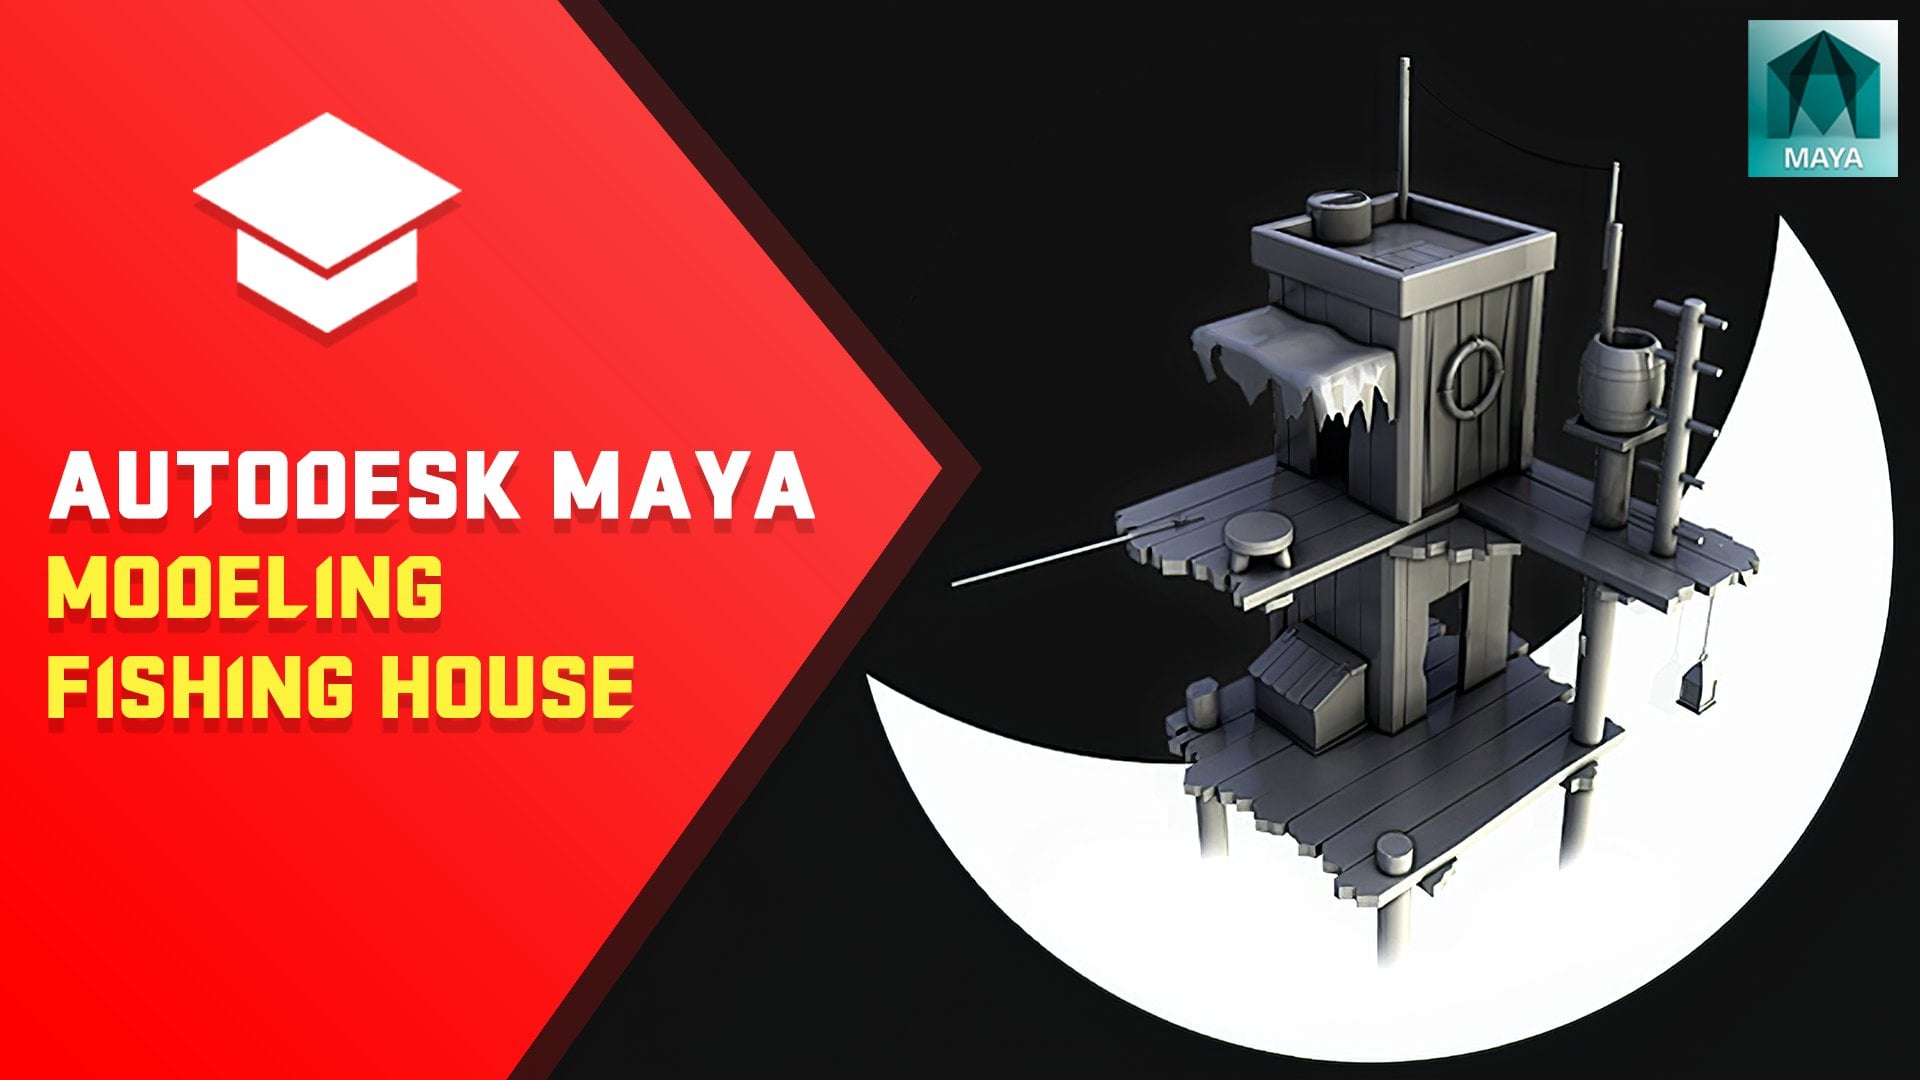
2. Modeling the base of the island: Hello and welcome to lecture number one. In this lecture, I'm going to show how to model the base of the island. So let's get started. First, I'm going to show you which functions we will use outcome. So I'm gonna go to Edit Mesh and I'm going to be using loop two, and I'm going to be using the merge function. You can go to the custom tab. From those tabs. Just click on the custom tab, go to Edit Mesh, coat on your keyboard, control and Shift, and then click on Extrude. And it will create a shortcut in this toolbar. So I just created a shortcut for Extrude. I'll be creating one more for control and shift on your keyboard. And click on merge. Those two functions. I'll be using all the curves. And they are the main functions that I'm using to create the or polymers. So let's get started. Let's start Model the base. So first, I'm going to go to create a polygon primitives. And I'm gonna create a queue. Again. I'll be creating cubes a lot, so I predict control and shift. So I added to my toolbar in the custom, and right now I can access it more, more often. So you click on create a polygon cube on the grid. And you will be getting into creating the queue. I just derived the width and height. And this is, we're going to start. So I'm going to move it to the sender like that. And I'm going to start splitting and moving. I'm going to use a lot in the face, the vertex, and the object modes. So let's go, let's shrink the base level bits like Dennis, I'm gonna move it. So if we want to look at that and I'm going to move this a little bit. I want to have like small form which then split. And I'm going to start splitting once meant split second time. And so I'm going to select the basis right now. Those two faces, right now for my right, like a little bit. And then I'm going to select this face movements. Because I want to create an edge here like this. And I'm going to select this face and keep it two more times, 11 more. And I'm going to write down the button. I want to close the whole island. So right now, it's a little bit too far. And I wanna make it a little bit. Okay? So I'm going to select those vertices and I'm going to move it a little, a little Cohen. And I'm going to keep making interesting forms. So I'm going to keep right now. So I'm going to speak one more time over here. And I'm going to split one more time here because I want to make the congress making this face and this face. And I'm going to exert again from this face. So I have a premium interesting shape over here. We can see some nice edges. So this will do for our site. And so right now as we go along, so this is not a final thing. So right now I'm going to the left side. The same dose faces symmetry over here. You can see those spaces. How? So? This shape, this one. You see, it's kinda nice. And what not to do right now is extended island to false. Because I wanted to be more interesting. I'll just select those two faces in the bottom and click again. And we're going to do, I'm going to extrude a second time. Right now. I'm gonna select the bottom of those those two phases. And again, I'm going to exclude Madonna omentum. Lansing's em, a lot farther from the base of these elements. So we have some interesting shape. And to make it more interesting, and I'll select this face and again the next. So as you can see, we started like interesting one. And it's not complicated. You just try and make some forms. And that's base. The basic worlds. So I don't like this. It has a lot of symmetry. Like depth. Maybe those skills. Because I didn't like. So this is our first Ireland. Right now. I want to make an alarm which will fill up this gap. So I'm going to use the keyboard. And I'm like this is different from Gunnar to my side view. Same. Then I'm gonna select the getter moved down and the bottom. So the height, the height to be the same for surprise mom to this piece is very important because when we made the bridge and the buildings, which should be the same, of course, you can make different motto a little bit more logically that the bridge, and it's okay. If you want, you can do it. Right now. I'm going to fill up this gap. So I'm gonna split again against the things that I prefer to be small. So and then right now, I'm going to exclude again because, you know, I want some interesting shapes. So I'll select those two faces again one more time today. And right now I'm going to select this one. And I want to make it a little bit further from the previous silence. I want more interesting. So this is, this is you can get to the bottom. Fu Bang skill. I want to create a little edge again over here. So what I'm going to select those faces and just deleted. And I shaped like this. Right now. I have two holes over here. Because I don't get faces. So how are we going to connect them? Select edge. I'm going to go down to the bottom. Then this is very important to vertices, two vertices, and they're not together. So I'm going to use the merge auction that we created. Fingers along here. And it's closed. So I'm gonna bring it like this. A little bit to the upper side. Run now. Interesting shapes at the bottom. So I'm going to split those faces, for example, sound. And right now I'm going to assume this one. So I can create this shape over here. So I'm just like you're connecting islands because we need space for the bridge. In the next tutorial. Something like this. The candlelight. Right now, what we do is a little bit more details. Floating islands. So just go push. And then I'm going to just be creative. Find the best. It's the logical one. Snag death. I want to add one more small, small, one more floating. Okay. Those are kind of short and once deeper edge. So I think this is the islands in the progress. So don't worry, right now what we need. So I'm gonna select those meshes. Mesh combined. So I'll combine all the meshes control. Or if you are using a Mac here. And right now, I'm gonna make it more and better pushes. And I'm like something like this because I'll be using unsymmetric. That's why from this view on this is placed so just the geometry. I'm just double-clicking. Just double-click. Select. Just double-click working a little bit. Because this is so much insight. And you can see I just double-click and I select the whole mesh. Current is right now. And just don't like this one. It's okay. So this is the basics of how I created the base of the islands. It's quite easy. It takes some time and you just need to be creative. The idea of where to put those ions, how to be creative? Just try. Try to many different forms than mine and puts a task, homework. You should create three different shapes of this. So be creative. You can make them like for Long Island or just three pieces of small or whatever you want. And just be creative and try to create your own base on the island. So this is four for this lecture. And in the next one.
3. Modeling the buildings: Hello, and welcome to lecture two. Right now, we're going to build the tower, the bridge, the buildings. So let's get started. So I'm going to start before, but I'm going to turn out, turn on wireframe and accessing bitumen on this. So I can see the wireframe of the base. So I can build out first, I'm gonna build taller, then I'm going to be able to draw the bridges. So let's start. I'm going to make a polygon. And I'm gonna make it just like this. So here I'll build a bridge. Here will be mentors. So I'm gonna make it bigger. And I'm gonna start by creating the winners and the top. So I'm gonna select this face and this face because those will be visible, the other one. So I will just select those two faces and go to Extrude. Click on the icon, and then click on the middle one. Let me see right now, there is a problem because it's not looking like Windows. So I'm going to back, back and I'm going to show you how to find doing those. So again, select the two faces and then you need to go to Edit Mesh and keep faces together. Keeping the faces together. When it's off, it will extrude on the quotes and create their own phases. So I'm just going to, I'm going to do it. And as you can see, I'm creating my dad's smaller dinner. I need insight from the Windows, so I'm going to assume loss more so I can put them back, down, back. Just like this. It looks nice. And so I'm going to move a little bit. And one must commit. And center like this. And one most split here and the center like this. So right now, I'm going to double-click. So I can select the whole loop. And I'm going to click here. And right now I'm going to code control key on my keyboard. And those two lines. And I've removed the others. But what I need to do right now is go into the vertex mode because I left on the geometry, I believe, are still there. So then, so I right-click select the geometry. So I believe right now we want to select this face. And I see it in the center. So if I select scale and just move though, square, center, align everything, I'm just doing the same thing here. And making this custom because I like everything to be symmetrical, just a little bit to be offset. So right now I'm going to put this out there. We'll select them. We're gonna push. So I get the shape of the window. That's right now, I should connect those edges. So I'll remove this one. This one. And now I'm going to go to Edit Mesh and click on show modeling tool. And just click on. A modeling tool kit appears in the right side in the panel. And I'll use the. So. So I can click on this, click here and press Enter. And it will connect this edge to this vertex, vertices, to this vertex. So this vertex to this vertex, and this one. I'm optimizing my mesh right now. This one, this one. So I'll say that. Let's okay. So I have the windows on. The light. And so right now, it's looking good. I'll delete this face and this face because you want to see in the engine. So it's ok. This will be our perspective. Kinda. Everything behind won't be visible. So those windows are looking great. I want to make an edge so I can get more detail. So I'll double-click on those and double click on those. And then I'll use another function called Bevel and go to Edit Mesh. Bevel, pick on some auctions. You just meet with factor outright with 0.1. looks nice, but I want a little bit more. Alright? So if you can see from above. So we're ready when our windows. Lets make a hit two vertices. Again, select this face. You can. And of course, again, one more. Push. Double-click the edges. Barrel and saying, well, I'm just going to watch my mesh. So our taller or Windows. So what I'm gonna do is I'm going to add the other part of the tower. I'm just select this face. And I'm just gonna select Run Now, I'm gonna put a little bit longer and construction. So right now, the door. I'll select this face. So right now I'm going to move it to the ground. And again, select option and just kind of push it back. And this is the block. So that when that face mode and I'm gone is this one and this one because they only this one, so I don't need them. So I'm gonna delete the bottom face. And one more thing. We don't have symmetry over there. It's not aligned properly, so ongoing. Select all my vs. wants. So when I need to make an oval shape of the door. So again, I'm going to start with my first bottle. Like this. Who wants moles? So more? Here? In the middle. It's very simple. Went out and go into the vertex mode, select all the vertices and pull them up. And those who will then push further. And I'm just pushed a little bit. That one's killed by an actual arc. So our door, What I need is a good demo a bit. So you get an edge, but you have some artifacts which are fixed by simply. I'm using this tool. And so far, so good. A point I need to do right now. So it's the same as for the towers and this is thanks to them one by one. And I'm going to, I'm going to go in vertex mode. I'm going to select the whole geometry. But as you can see, I believe some vertices that I should not have a faith that is not connected to another phase. It will automatically, it will delete your seeds because they're not connected or not connected. So again, I'll use them in our modelling tool kit so I can connect it to those two vertices. Vertices at the bottom. Oops. So just smart person and call this one. This one. This one is again the convention on here. So you can just great. So, okay. So right now, what's left is the construction over here and at the edges and the bridge. So first I'm going to make the constructions over dense, like carrots looks. And we wanted to center, center. It's aligned properly. And I shouldn't those edges. Just select, Align mine, my edges and select them. And so I can align them properly. Select the select, I mean the scale modes and just moments. So right now, then nots squared. So I'll maintenance. Okay. It's quite squares. And again, I'm going to, I'm going to use again the skill to move them. And this structure, it should go like this. You can make them bigger, smaller, wants more interesting shape. And right now the mesh. So I'll make this connected connected series. Ok. So, so right now the top of the other structure. So what I'm going to do now and now, because my work, I should delete those edges. I will recommend them afterwards tomorrow. So I can select my scale. We're ready. The edges inside. And I'm gonna recommend because I have two loops here. And now connect one to this one. So I can send them good faith and connected to the same vertex. But now what we should do, and again, just six through them. So you can form this structure to make them bigger. And right now I have my structure. What's left is shouldn't be quite. So let's start with the bridge. Polygon primitives are created once there. So this will be my bottom. And right now what I'm going to do, I'm gonna move my pivot points to this vertex. So I click on my keyboard. And if I click it, I'll just move my pivot points. If I'm, if I'm clicking, if I click it once, it will activate, deactivate. So I'm going to hold it. So I can't move it. Realtime. Then I'm going to hold on the keyboard and the function to snap to vertices. So on the keyboard, the keyboard, I just connect this. While holding this pivot points. You can see how it goes from this vertex. So I'm just snapping it to this vertex. And now I have it snaps, snapped at this point at or points. So I'm snapping coding on the keyboard. And right now what I'm going to do is I'm gonna duplicate it. Duplicate once. Then I'm going to hold again on the keyboards. And I'm gonna snap it to this one. Control for duplicate code. And I'm gonna make 66. So I'm gonna select them all. And I'm gonna go to mesh and we're going to go to combine. Right now, they're separate Mencius. So I need to go into the vertex mode and select them. I'm going to click on merge vertices. So I merge them. And I'm starting to think like that. I won't need those spaces as you want from the plant created my first, there's another thing that I know. I need to go to modify and pecan center pivots so it can censor my period pumps. And so I can move it here just like that. So I have my models retina, duplicate them and move them aside. So we called the bridge. And I'm going to quote the key on my keyboard and then move the pivot points. And then I'm gonna call it the snap, those steps. So I can just forget. I'm gonna go to attribute editor, sorry, to the channel box. And I'm going to rotate 90 degrees. Otherwise, we gotta move them back. Just right now. This is empty. And I can just type minus1. Just flip it again, my VT on keyboards and going to snap it. And already starting. Right now, I just want to, again just double-clicking. Now Eclipse. So right now, I should just finish the grid. I'm going to select the subset of those. Select again. And right now, it's quite simple. I go to my login function. So the function is working like this and this. And then click right. Now. This edge, this edge. Again. Select the bridge. In the upper-left selection. This bridge selections. And bridge one more time. As you can see, it's kind of wide, so I'll just make it light or something like that. I think my long. So right now, I'm going to select those and combine those together. I'm going to make it. So it's more like this. Right now. It's not connected. So thanks for keeping it. Okay. So I can have a little over just like that. One more. One more. Just to make it o Just like this, passion with nouns. Okay? And now I need to make the bridge. Select this vertex. Keyboards. And snap, snap. Snap, snap, snap. I need right now to merge those words. So I just click on merge function. Merge function. I'm going to split off a few times. So somewhere from here. So some more seriousness. So as you can see, those, we have our bridge rating, whichever building ready and just tweak a little bit more with the forms. Just play with it. Like if you don't want the stairs, you can do something like this. You can play a little bit more with them and just have fun with them. Again, you have a homework to make three different types of buildings. You can experiment with every you want to. Try to make it as simple as possible, as beautiful as possible. Because a very complex stance. Very much over here. We're trying to make some very simple ring. So this about the building lecture, and I'll see you in the next one.
4. Unwrap, Texture and apply Materials: Hello, and welcome to lecture number three. I will show you quotes on rough texture and create your materials for the model. So let's get started. First though. I'm going to open hyper shan't go to rendering. And I'm gonna create my first material taken the one Burns. And I'm going to name it. I'm going to go in the material. Then I'm going to create a new material and make it green. And one model material. And those materials. So now I just select the grid or right click on the bricks material and material selection. And I assigned the red material and kick on the building, a sand material. But right now, our windows and door also has great material and I want to change that. So I go in this window, this window, and the forces of the door. Then right-click on the gold material and select a sand material selection. Now, another material for the windows from the door, and we're pretty much taller. So these will be our grounds. I will create one more material. And this material will be for the parts that under the water. So I'll select the bottom parts, right-click a sand material to their wedding. And I created a new material. Or show you. First, I'm going to do some modeling. I need to create a leader lying on the grass because I want to make some waves touching the shore. That's why the split polygon tool and just doesn't the one-way or I'm just move on. I want to write this. I click Control and create the shore line that we hear a mistake or if you are just place them. So the easiest way to create the shortest and select all the data. And this is the height of each bin. And so, and so and select all of them and move them a little bit. Just like that I want them to do. And then I delete the bottom face to optimize the mesh because you won't see them in the game. And just press Delete. And I'm sure so and double-click on each of those geometries. Again. First, I'm going to apply them. And as you can see, 00 the geometry has the class material. I'm going to click on this face. And on the next phase. On the left, I'll double-click and I'll select the faces. Again. I'll select double-click on the second one. Double-click. And as you can see, it's the looping around. And I'm just gonna line the material. We're ready with the materials right now. Displaying. So it will show the mesh. I'll move this a little bit down because white is not visible or not visible. Now, moonless night. Yeah. Here. You also have the same problem. So, so printing much debt right now, and we should make our mesh. So I'm going to select all of my meshes. Go to o. As you can see. I'm just gonna go to Create Tama automatic mapping. This rule, do working with voting and we're not texturing like we're not Joan details in the movies. We're just using a simple tower. So we're ready with our mesh, has the materials. And right now we should create textures on the grass, for the bricks, for the door and for the short. So I'm gonna open up the OB thought and I'm gonna show you how to create those textures. So this is my first show and documents. And so this will be our role, our white line, our Sure. So our meat texture of two hundred, two hundred, which will be just white. So I'm going to say for web, in those settings, I choose PNG. I click on saying, let me create that folder. And I'm going to create my first texture. So my first lecture, I will make. And then I'm going to one, again, 200 by 200. Right now, I'm going to create the doors. So I'll be using, so I'm gonna just before one RGB code. So this is the RGB code 25263. And the leg can discover a lot and are just as disco in the bucket. And this will be the color of our door and windows. So I'm gonna save File, Save, File, Save. And I'm gonna call it doors. So also, what else do we need? The grass. And that's pretty much it. This material. So right now. Go the bricks. Kind of arrange something like dead code. It's nuts. I will add an effect to it and go to noise and texture. Here's the percentage, 12.5% of uniform noise. So this will be my great texture. Bricks. And the one thing. Let's choose something like this. Okay? Again and noise. And again. This can be changed when we boarded. The monumental textures in Unity. Tweet him there. But this is the basics of creating the grass. And we already have our textures and materials, though. We don't need a connection between the material and textures right now in my app because it's useless. So that's pretty much cover the materials and how we made the textures. Also, one more thing is to optimize this and their needs grounds. Because those faces, right now, you'll ever see them in the game, so it's over. So I'll just remove them. Oh, optimizing your mesh is very important for formula and just their own any kind of devices. And when you put animation effects and stuff like that. So you should optimize constantly whenever you can. So our model with the UV mapping, texturing, applying the materials as I showed you. In the next lecture, we will look beautiful mentee engine with the right setup of lightning, camera angle and few effects. So this, this lecture and the next one.
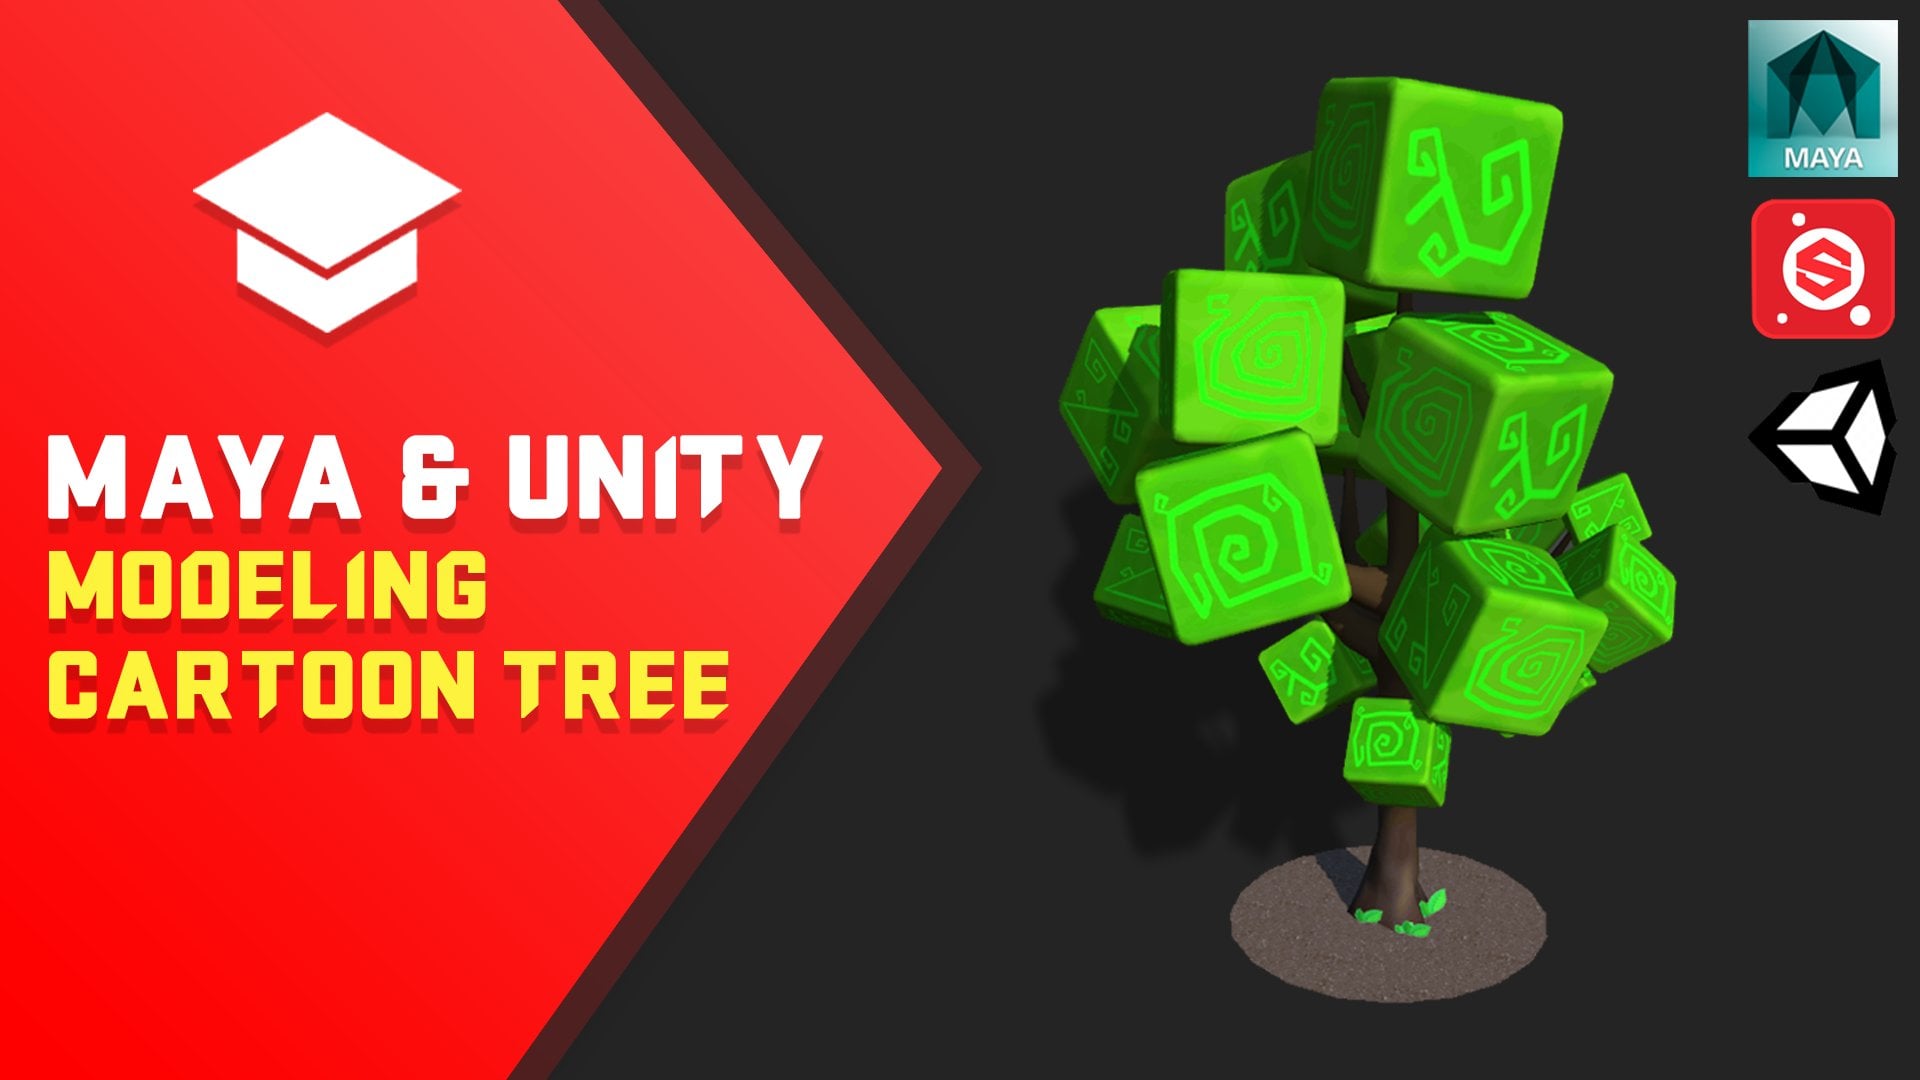
5. Add flowers, birds and background: Okay, welcome back. With the next lecture. In this lecture, I will show you how to make the background color to yellow flowers and some birds. So let's get started. Let's start with our backgrounds. Our background is very simple. You should go to create polygon and create a plane. Just drag on the, on the grid and you have a plane. Now, what you should do is rotated 90 degrees on X and place it behind the scene. Just like that. I'll scale it a little bit, shrink it like that scale is something like this. This will be old background. So you're going to, what do you see from this angle? And the background will fill the rest. So this how we do it. One more thing. We should add a material to the background. So go to your hyper shade, create a new Lambert material, double-click it, and let's give it a cower, like something like this. Again, select your background, quote the right button, and assign the material. So this our background, it's ready. It's very simple. Now how we can model our flowers. So go again to create polygon and playing. I'm creating this. And right now I should split. Go to Edit Mesh, Insert Edge to o, insert in the middle. And the Meno, and some loop. Oh, answer to more loops, right? So I can make the shape. I'll go into the vertex mode. I'll delete those two vertices at the end. So I can start making select dose with them a little bit higher and try it now. Just moving the vertices. And you can see we start getting. So right now. I'll fix that a little bit more. A little bit back, dead. And we should duplicate this and move it around. So again, controlling when your keyboard and put in an rotate y minus 90. It's okay. Again, Control D minus one. Again control. To 17 and we have o slower. So again, select 00. I go to Mesh combined. You see there's a layer article were there. When the geometry of the gain inside of the other. We'll get rid of that by selecting those two vertices. Go to Edit Mesh, merge it mesh, mesh merge, Edit Mesh, merge. This, select them. And I'm just scaled up a little bit and move them. So I get in good shape of them. And again, I'm just merge the center. And right now I need to go to modify central pivot. And you can see that our point here is ready to be placed in this scene. For example. Let me show we replace the flowers in Unity because I want more freedom. It's kinda cool. So this is the flower. Again, we should go to when you read texture editor and make an automatic mapping. So we hear the flower map. One more thing about the flower, because it's only one phase. Let me go to the Display polygons and go to face normals. So at the moment, our plant his one normal per phase, you see the green line where it's going. So this will be visible and this will be rendered in the pension. But this side doesn't have a green line and going out of it. So this won't be these go in the engine. This will be like this will be like invisible geometry. And we need to fix that. Because when you have an angle like this, this will be invisible and this will be visible. And if you look in the engine, so what I'm going to do is select this, duplicate it, go to Normals and click reverse. So I have the same geometry, but the normals are reversed to look down. And this will fix our problem. Then select the two geometries, go to Mesh combined. And that's it. We have normals on both sides. And again, display volcanoes based normals. And we're ready. So this is about our flour. Let's give it a material. Again. When you Lambert, double-click, right-click asigned material, double-click. Let's choose color, like which one, which one? This is kinda crappy. Okay, let's try something that purple. Alright, that's good. I like. So our, our flower, Israeli, our background is really only the bird's left. And I'm just gonna open Safari. And I just type flying birds in Google and I get that image. So I'm just right-clicking, coping damage, open Photoshop, and paste the image. So right now I have white and black birds. I'll go to image adjustments in the world. So I have a black background with white birds. That's what I'm looking for. And right now I'm going to make a new texture, 200 by 200 pixels. This will be my texture with birds. And right now I'm just going to sell like three types of them. Like this one. Click control C to copy it. Over here. Again, I'll select another one. This one, control C, control V. One more, one more here that, that let's give this one week. We can, we can get it just with two. So let's use two of them. Select those two layers. I click Control on my keyboard. It's there to get the box. Right. Click Enter. And I'll move this a little bit. You know, select pixels just like that, and create a new layer with black. So I have two birds in this texture. Right now, the texture must have 32 bits. This means the texture need an alpha channel in order to read the transparency. So I go in Photoshop into the channels and ad, and I click this button to add an alpha channel. Therefore, therefore channel is working like that. If you have blank, nothing is rendered, but if you have white, it will render. And it depends on the capacity, for example. So let me show you. I'll select merge the two layers. I'll select the layer out Control and click Control. And I'll go into the channel, going to the alpha channel control V. And right now I have a 32 bit texture, which I can use right now and go to File. Save As we are looking for target formats. Now, exported into your own words. You should check that the alpha channel is collect, say, 32 bit per pixel. Click OK. And this is our texture. We go back into Maya. Let's import our textured C. How do we have a material known? So we create a new one. Call it like click on this checker. Click on File, click on the folder. And let's find our texture. Here we go, the texture is loaded. Right now what I am, what I need to do is to create the plane. Might create a plane. Then right. Click on the material, just hold the button and click on the material. And you have the birds, but you have the two of them. But, you know, just one of, one of the birds. So I go to windows, UV texture editor. And you can see in the movies are getting the information of the hotel. I don't need that. So I select right-click, go to selected. I'm just using those tools, scale Tate and move them like this. And this bird selected. I'm going to flip them by using desorption clip selected. And you have the birth of flipped it. And as you see, we have a bird duplicated with control. Move it a little bit. Select again the move them down to get the information from the other texture. Here we go. You ready for the game? This is pretty much it about the background, the flour and the birds. I show you a couple of techniques how to do that. And if you want, you can add more details you can get from Google or just draw an image of like stars, some stuff like that, and just place it in the background on a plane like this. When the birds or create trees or something else, it's up to you guys. So this is pretty much it for this lecture. And I'll see you in the next one.
6. Export the models from Maya to Unity: Hello again. This is our last lecture in this section. This is our last lecture in Maya. We will export now the models that we've made. And from the next lecture, we will be start using Unity. So there's a few things here to keep in mind. So first, I'm going to select my buildings and my bridge, select the grass and the water beneath the grass. And I'm gonna go to Mesh combined. And I'm going to combine these in one single object. Because and one like that, I want to be constructed as a whole one. And I want to optimize this as much as possible, because when you place one object in Unity, it's one draw call for the object, one row for the material and will draw texture. So this is the best thing you can do. So I'll go again to edit, delete o by type history. And I'm going to go to modify central pivot. And again to my 5x increase transformation. So this will be one piece that we'll explore. The other piece will be the background, the flower and the birds separately. So I'm going to select this. Two buildings are gonna go File Export selection. And I'm going to choose the FBX export format. If you don't have the FBX available, you should go to Window Setting Preferences Plugin Manager and tried to find a bx exporting FBX Pando. This one, the x. It should be loaded and outflow. And it will work. So again, select this mesh file, export selection, FBX export, export selection. I'm going to place it in my folder, in my MDX color. In the settings. You should turn on smoothing, smoothing, mesh, and triangulate. You should turn off the animations. I don't eat and animation, and I don't include an animation in this geometry. So this pretty much what should be turned on and turned off. And I'm going to name it. And I'm gonna click export selection. And it's done. The same for the playground. Just select, selected. Again, monophyly, increased transformation modifies center pivots. File export selection. Export selection. Again, it will save the settings that you exported. So as you can see, there is no animation. Check back. Export selection. Move to the next one is the flower. Again. Chris transformation, center pivot file, export selection. Export. Export selection. I'm going to do the same for the birds for the first one, crease transformation, center, pivot, file, export selection, sports. One. Select the other one. Same. And this is pretty much it. We're ready. We exported all the acid there. And in the next lecture, we'll create the project in Unity, will import the assets. We arranged, the folders and everything. So this is pretty much it. It's very easy and straightforward process to export your meshes and to be ready for integration in Unity. So see you in the next lecture.
7. Import and setup the project in Unity: Come back with the next lecture. In this lecture, we'll import and setup the project. So let's get started. First, click on new to create a new project. To identify the noble here, I'll name the project location. Three dots. Over here. Make a new folder. Click on Tools. Could you just click Create Projects? And Unity will create a new project and start working with that. So this fresh new project, and there are few things that I need to set up. First, go to File BuildSettings and select iOS, and click on switch. What form? Click on that. And now we're working with iOS platform. And another thing is that a standard curiosity package. So I got assets import package. And now just import the fact from the unit. Just click on effects. And it will import package with Q effects that we're using in our project. So just click on Import. We'll wait just a few moments. Okay, so it's done thus are important. Right now, we will create our folder. Click on the assets, then right click in this window, go to create a folder named my folder, as I'll be placing my artwork here. Then double-click again, right-click, create folder, create a folder. In this folder, I'll be placing my mesh. Again. Go create folder, create one more folder. Create textures. So this will be my folders for, for this project. I'll create one more folder. And here I will be placing my scene. So let's go back to our folders and select our ABX that we've exported in the best tutorial. Just drag and drop them. Import all the b axis. And you can see it. It created Material folder. Double-click. It, selects all the materials, drag and drop them in a folder that we've created. Right-click on that folder, click delete, so we don't need it anymore. Now go into the Materials folder and you can see that our materials are there. Next step, open the texture folders. Just click on it and we'll add our textures. That folder. Again, we'll wait a little bit. I've created one additional texture called background. Just short, call it. It's just blue with noise with 20, with 12.5%, just like the breaks. So you need to create that texture in Photoshop. So those are our textures. And this is our process of importing our assets into unity. This is the end of this lecture. In the next lecture, we'll start placing our meshes in the scene. So stay tuned and I'll be waiting you in the next lecture.
8. Add our mesh to the scene: Hello again and welcome to the next lecture. In this lecture, we will place our meshes. So let's get started. It's quite easy. So first, click on the background 1s, then o with my left mouse button and drag it on the scene. So our playground is added to the scene. I'll do the same for the others, for the birds and the buildings. And after that, I have all my mesh. I'll select this and positioning 0-0. Now position everything like that. You can click on that hold shift and click on the background. And I multi-select three objects and I click 0. And they're on the same coordinate system. And the moment, right now, I'll start arranging our missions. I'll select the building and move a little bit further than the background. So I can have the building in France. I will select it, flower a little bit further. And now start arranging flowers. Here. Make it a little bit small. Create, go to GameObject, object, create empty, and rename it. Right. Click rename. And in this empty, empty object, first we need to position it to 0. And after that, in this empty GameObject, we will place our flowers. So select this one, drag and drop it into the flower holder. Right now. Duplicate. So I can place them. So right-click and then duplicate over here. And I'll start placing flowers. Change the scale, change the rotation. Duplicate again. Rotation. Same. Place. Some duplicate. Here. I'm using a hotkey control and you can use it if you want. I won't play much flowers. I just want to feel a little bit. So it's too much over here. So this one, this one, I just break it up a little bit. Here. Of course, you can model different flowers so it looks more, more good. Care for different objects with different forms. So okay, we had ours ready. Right now. We need to place the birds, but we will place them after me, put our materials on our objects, and this will happen in the next tutorial. So this is the end of this tutorial and I'll be awaiting you in the next one.
9. Мaterials and textures: And welcome to the next lecture. In this lecture, we'll create our materials and set-up our shaders. So let's get started. First, go to the Materials folder and click on the background. From dropdown, you can see it's type shader than standard. From the drop-down menu will change the standard shader for the background because this is a heavy shader and it's better for PC with a new one. I'll use unlit texture shader. Right now, our backgrounds turn white because we all have a texture put in the background slot. So as you can see here, it says non-textual. So we need a textural here in order to get the color. We're going our textures tab and drag and drop our background over here. Right now, we have nice blue texture for the background, and this material is ready. Let's continue with the next one. With the birds. For the bolt material, we need something transparent. So I'm going to choose, Right now, I'm mobile material, particle additive. This material is transparent. It's what we need. So after that, go to textures, birds, drag-and-drop. And as you can see, we have our birds over here and they're transparent. So the next material about the bricks. So the bricks material should be quite simple. We use a legacy diffuse material. Legacy materials are better than mobile dequeues materials because you have an option to control the cower. And let me show you first, let's connect our texture like that. As you can see, it's changed the tower and the bridge. And what I mean is that you have a slider and you can change the color of the texture, right? With this input in real time. So I'll be placing it a little bit like that. Just white. So let's continue with our next material, the door. For the dorm material. I'll be using the same shader, legacy shader. Again, go to texture, drag-and-drop. I'll just make it more white. It's a little bit. Let's continue with the flowers. For the flowers, use again the diffuse shader. Lets do it again. Let's choose that. Make it white. Okay. Let's continue with our grass texture. As you can see, I didn't import my texture. So I need to go back and import my texture. I drag and drop my texture over here because I missed it. Texture right now. Again, legacy shader diffuse across over here. Just make good. And what is the material? This one. So we go to the store and for the shore material, I would like to place an unlit color just so I'll select unlit. And it doesn't need a texture. You can control it only with color. So I wanted to be like waves. And for the water, select quarter material. I didn't create a new texture for it because I don't need it. I will use the background texture. And let's select legacy shader, transparent. And I'll drag and drop the background texture, right? And I'll just select white and just pull the alpha channel a little bit just like that. And as you can see, it's starting to get transparent. This is the effect that I want to achieve. This we will look like it's underwater. Right now, as you can see in our game scene, it doesn't look any good. But in the next lecture, we will start stopping lightning, make it more core, set up the camera and everything else. This is basically about stopping the materials. We will tweak them in the next tutorials to make a better look. But overall, this is how you setup your materials and textures. Thank you, and I'll be awaiting you in the next tutorial.
10. Setup camera and lightning: Hello guys and welcome to the next lecture. In this lecture, we'll stop the camera and the lightning. So let's get started. First, I will select my main camera and change the projection to autograph it. After that, I will just rotate it a little bit like maybe 30 degrees. 125 should be positive. So please 25. And just move it a little bit like this. So as you can see, our scene is a little bit smaller. So what I'm going to do is create an empty object and co-ed. And I'll place the buildings and the flowers. Drag-and-drop scalar. And i was killed them. Something like this. And I will start moving with x, y, and z. So I'm going to place it in a scene. And the other thing is that you should work. I'm working on on iOS, so I'll be working on iPad resolution. You can add up from here, from the plus. So this my resolution, this game, it will looks on the iPad. I think that this is a little bit too small, so I can just pump it up to be like something like this. Alright, five is okay. So this is the, okay, now, it looks cool. Let's turn the background a little bit further. And then you just scale it with a little bit. So you fill up the whole scene. As you can see. Right now, I'm changing with iPhone, iPad Pro. And everything looks good right now. So we've setup our background, work, superpower, our meshes. Right now. We need to place the birds. First. We need to rotate them minus 90 degrees and will see something like this. Now start placing some tense. Here. I'm just rotating and moving. Again. Duplicate. You can move a little bit. So I can get another painter. Duplicate, duplicate. One more over here. I'll place. This would be our birds. Again. Seem to be cleaned, creates another game object and put all the birds inside. So I arrange my seem very, very keen. Okay, so now we want to stop our lightning. Will use two lights, a directional lights, and a few, right? So what I'm going to do is I'm going to skip my directional light. I'm going to choose a little bit rotational, godlike, 41, let's say one to two minus 21, something like this. This will be our angle before the light, or I'm going to choose it a little bit differently, like this. And one the shadow not to be so. So this is the original light from the scene. That's good, that looks good. I'm going to select the bounce intensity to two. And I'm going to make shadow and I'm going to make the light. So what we need to do is to make our lightning. And this will be our settings and the moment. So basically, this will be the settings for hours. For the first slide. Again, we will make another light code. I'll just duplicate this one and call it. It will have intensity 0.01. a, balanced intensity or one. I will change the color a little bit to be like that. And the directional lights to that. And I'll move the fill light to be failing to be filled. And what we need to do right now is to make our geometry available. For the light mapping. What do you need to do is go to select and click on the Static option. Click yes. You just need to click on only on the scalar. This is the end of this lecture. See you in the next lecture.
11. Bake the lightmap: What were your lighting tab? And here we will set up our map. So for the Skybox, none for the Skybox and for the ambient source, I'll use, I'll just color, pick my bluish from the background. It will look good for the ambient g o to be baked. For the, for the precomputed realtime GA. We don't need that movement. A bakery solution. I'll keep forward. I'll keep the padding. Ten no, keep the compressor on. The ambient occlusion to be turned on. Ok. So it will have savings of 120. I'll turn on the final gather. It will work with this default settings 256, and I'll make my size to two k. I'll turn off at directional lights, and I'll select non directional light map. My settings for default parameters will be medium. And then I go and click on built, like map. What it says. You need to save the scene before baking mindmaps. So I click on save my scene. As previously, I've created a folder for this. So in the same folder, I'll make my seen code like save it. We have our flatMap start baking. As you can see here in the bottom, is the progress of the white map. It's baking right now. And we should start working with that. This our first test. I'm not a 100% sure that everything good, but you should sit up and tweak everything in the process so that we can achieve that nice and cool effect. The light mapping will take some time because it's his desk with the processor. And bam, now we have an ugly quite map is that we need to tweak a little bit more. Few settings. So first, you go into the building step in the MX folder and there is a check generated light map. You need to check that and click apply. Go to flowers. Click that clip. Why? The other thing don't need light map. So right now what this will do, it will create a separate for the light map. Let's remake it again. Click on Build. We wait a little bit longer. So our white map is ready. And you can see we have some good effect achieved. But I don't like few things. First, I don't like the camera angle. So I'm going to rotate it a little bit like that. Little bit more. We're going to move it like that, maybe a little bit. And the other thing is, I don't like the background, so select the backgrounds and the back CO2 inspector. And what we should do is we should tell the texture. So let's try with 50-50. A little bit. Too much. I want to see some noise back there. Something like this. You can see. It's kind of good. I don't like the buildings either. So I'm gonna select tricks. Again. I'm going to play with the timing. Your kidneys too much. Let's try with here you hear some noise. Tree is good. Then we're gonna play with the grass. Green a little bit more. Like make it three. The other thing is, I don't like they have like very sharp shadows beneath them. So what I'm going to do is I'm going to return the Static option from them, so I don't need the shadows. Again, you can do. The other thing is that you can just cast shadow from all the meshes. So you select the first flower shift, select and select cast shadow. Cast the shadows. So what else I don't like? And let's see. The transparencies is a little bit too much. So I'll just use a little bit less transparency for the Walkman, something like this. Now, I start liking the shapes. So right now we have a book over here. Our faces, faces are flipped, those two. So I'm going to show you how to fix them very fast. So go to the building's right-click review in Finder. So dx to open, drag-and-drop our MDX in Maya. So the problem is that those two phase, so I'm going to select those two faces. And I'm gonna go to Normals reverse. And our faces are fixed. Right now. What I'm going to do is export the file, export selection. Export selection. And I'm going to find in my project, we'll call it project called Art. And I'm going to overwrite it and override the buildings export selection. Yes. And it's fixed. So right now, when I fix this, we need again to make the light map. We're going to click again on the build settings. We're going to wait a little bit and the shadow of the flowers will disappear. Also. As you can see, we have the bridge pigs and everything looks better right now. So this is our tutorial about making the lightening and stripping the camera. We've set up everything. Just one more thing I want to tweak. They want to see it once. That's good. So this is the end of this lecture, and I hope you enjoyed it. You can always play with the settings when the lightning, with a type of lightning-quick everything. And in the next lecture, I'll put an effect on the camera so it will look better. So, see you in the next lecture.
12. Add camera effect to polish the scene: Welcome to the next lecture. In this lecture, we'll add a simple effect Hall camera. So then the scene looks more beautiful. So I go to the main camera and select Add Component. And I'll take, I'll use the blue optimized because it's mobile friendly. So as you can see, our seniors like nerve and I'm just going to tweak few settings in order to get some nice fact. For the threshold, I'll put one intensity output, 7717149. And I'm going to be using the blurred type standard. And as you can see, it just look saturated. But when I turn it on, it looks more cou, it has all the colors are brighter, fresh. So this literal fact brings a lot of life to our scene. You can always play with that and you can see It's making a brighter, it's making less saturated. You can play with the intensity. Of course. Please certificate however you like those things. I told you, I find them like the best for me, at least for my for my taste. 6.711. So right now, our scene has a lot of color and light. If you still don't like any of the blindness in the grass, you can tweak it like make it six. It looks more clean right now. I'll show you how to make the light bulb cleaner right now. Go to Life map. Go to lite maps. Click on this, and it will direct you to the light map texture, texture. In order to make it to look more smooth, you need to change the format from compressed to true color and click apply and you'll see the result right now. It makes it more smelter, get compressed. You see it's a little bit not clean. It will, can appear light map, look better. Of course, it will take like four megabytes of memory of your device. But it's not, it's not something big. This is how you clip an effect to your camera to look better, to look saturated. The scene has some beautiful colors and also clean up the white map. So this is about lecture. I'll see you in the next one.
 Ivan Yosifov, 3D Game Artist & Animator