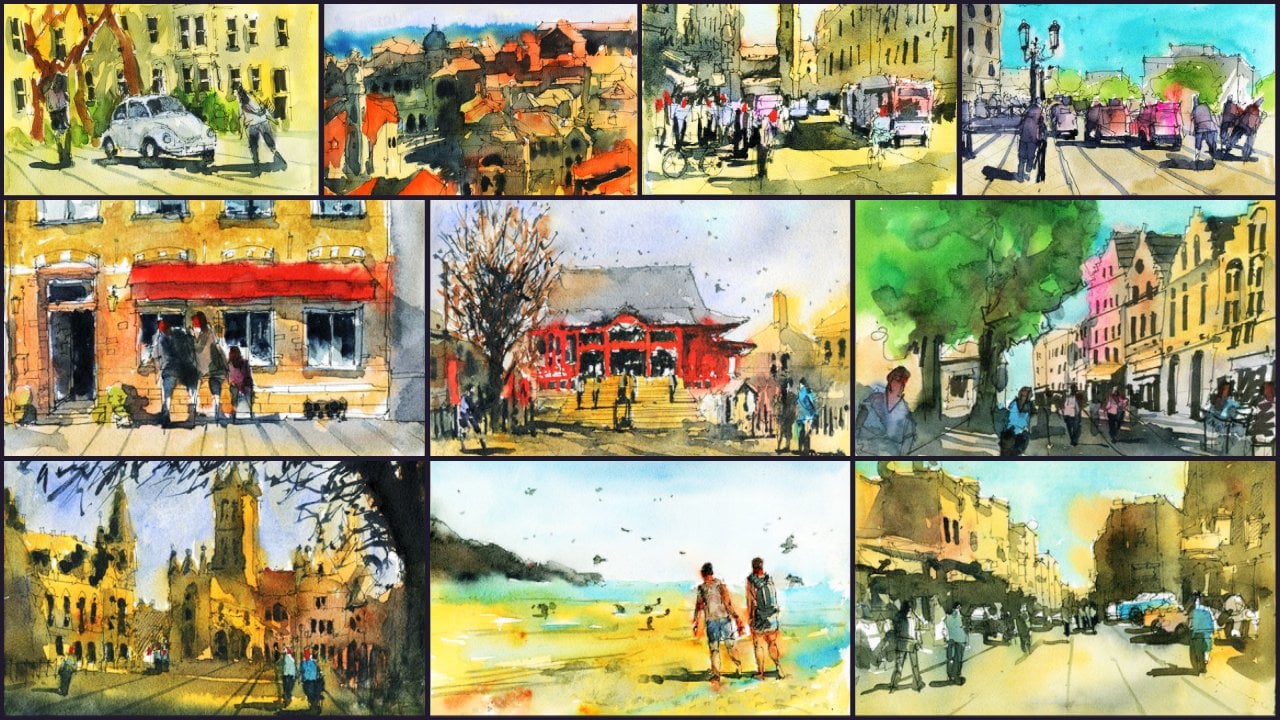
Transcripts
1. Introduction: Welcome. In this
comprehensive course, you will learn everything
you need to know about how to paint urban
landscapes in watercolor. Urban landscapes are
fascinating and unique subject that combined a
number of smallest subjects, including people,
buildings in nature. Creating a sense of
place is important. But being able to tell a story, you can pose a powerful
emotive painting is a skill that will take your urban landscapes
to the next level. This course we'll show you not only how to paint
the features scenes, but how to transform
any photograph into an urban landscape. There are seemingly many
different techniques and processes involved when
painting an urban landscape. As a beginner, difficult
to know how to even start. Hold your hands and
take you through my entire process
from start to finish, beginning with the
initial planning process. In the theory and
exercises module, I'll show you how to
identify and compose a scene in your mind before
you even start drawing. It's important to select an
appropriate subject that will translate over to Rich,
an interesting painting. A talk about what
elements look for, how to sketch, how to
identify a light and shadow. Next, we'll go through all the essential
watercolor techniques required to paint
an urban landscape, as well as the crucial topics. In this module, we also
have many opportunities, watercolor theory
and techniques by completing simple painting
studies together. In the second module,
urban landscape elements. We'll go through how to paint the central elements found
in every urban landscape. In particular, we'll
cover how to paint buildings, people, in vehicles. This will give you
the foundation blocks in order to feel confident painting entire urban landscape with these various elements. In the final module, painting along instructional
demonstrations, you paint a variety of urban landscapes in different
countries and contexts. This will provide you
an opportunity to create your own
beautiful paintings from scratch and apply your knowledge from
the previous modules. So join me in this course. You'll be painting some
beautiful urban landscapes. No time at all.
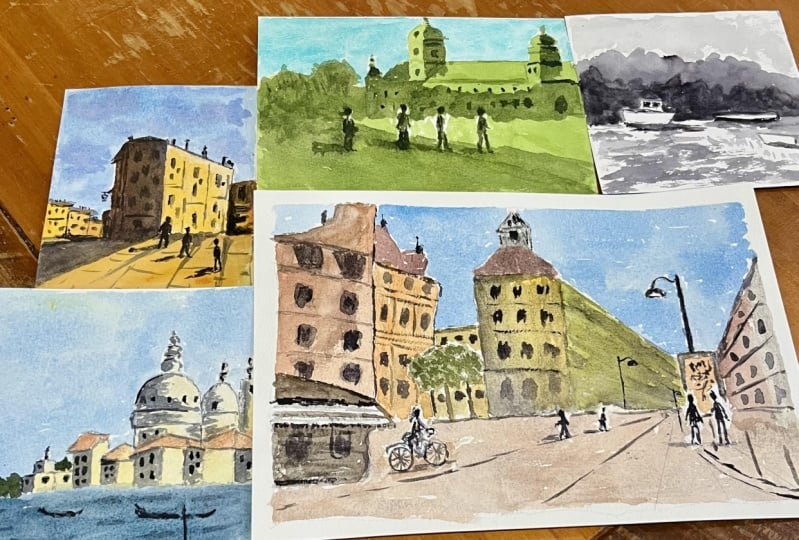
2. Materials Required: In this video, I want to
show you the materials, the central materials
that you're going to need in order to complete
this course. And this goes for pretty much
any watercolor landscape, but especially when we're
talking about urban landscapes, I'm going to be going through
the colors and just some of the brushes and things like that that I think
are most important. So as you can see
here straightaway, I have a little sketch book now, I made this one myself. But essentially I recommend using 100% cotton
watercolor paper. And the reason for that is
when we're doing a lot of these large washes
when we're getting in areas of wet and wet
works softer shadows, you'll find that the
cotton paper can handle the additional washes
being wet for longer. And just the effects turn out looking a lot
better than if you use a cellulose or
non cotton paper. The reason for that
is because you often just lift off
the previous layers. It just doesn't handle
enough of the paint. So if you can get yourself some hundred percent
cotton watercolor paper, now, I have mine in cold
press or medium texture. So there is a slight
little texture as you can see here as I
turn the page over, that's visible under the light. That just allows
the paper to have a little bit more
character when you're doing some dry brush strokes. Also when you're doing
large washes as well, the paper handles it better, takes a little bit longer
to dry and you get some nice softer gradations. Really essential. Now I'm painting on an
A4 size sheet of paper, which is about one eighth sheet. Now you can paint from about one-eighth sheet
to one quarter sheet. That's about the largest I go one-quarter sheet these days. So you'll see when I'm doing the demonstrations that I
use a combination of both, but mainly one quarter sheet. I find that just give me a little bit more wiggle room for those larger shapes, get it. And also get to use those
larger brushes as well. So that's about it for paper. I'm going to go just over here. What you can do is
you can actually get your own larger sheets of
watercolor paper and just the entire full sheets
and just tear it down into smaller parts
and sticky tape it onto a masking tape
it onto a little bit of wooden board or
plastic board as well. So I just have mine in
this sketch book here for some of the
sketches that I'll be doing in this class. But usually I do have
the loose sheets of paper which I sticky tape down just makes it a lot easier. When you're painting like
this font and the paper just buckles and moves
around too much. Okay, so going on
to the paints now, you can see here
is my palette and I'll just go through
the different colors. So over here I've got a bit of quinacridone, yellow over here, a bit of hansa, yellow light is going a
bit of yellow ocher here. This is pyrrole, orange
and purple, red here. I've got a color called
quinacridone, burnt orange. It's a granulating orange color. It's not too common, but I tend to use that. It's a little bit more subdued. I've got color here
called Buff Titanium, which is like an
off-white color. Cerulean blue. I've got some gouache and things
floating around here. Get rid of later. I've got a
bit of lavender paint here, which is like a
light lilac color. I've got here a
bit of turquoise. I've got a bit of
ultramarine blue, burnt sienna, burnt umber. I've got a couple
of greens here. This is Daniel Smith, undersea green, and
overhears a olive green. And pretty much these
ones over here are just three different types of purples that I use now
it's not so necessary. I'm just quite into my purples. That's even another purple here. I have got a little bit of
black and neutral tint. So the way I structure my
palette really just goes from lighter to darker and
from warm to cool, apart from these two huge
earthen colors as well. So you just see me squeeze out
little bits of color here. Sometimes I just liked having a closer on the palette so I can get them in a mix
them a little bit easier. And usually when I
mix a dark colors, I tried to get it a little
bit more muted down as well. So having a few different warm, cool colors together
on the palate makes it quite easy for me to
modify that medium. That's our wash in the center. So two really large mixing wells here really helps if you
have large area to mix. If you don't have
that, you might have a plate at home and
those are really useful. You can grab one of
those out and use that even a couple of mics on. So if you just have
some paints on a pallet or even you squeeze
out your paints from the tube onto a
separate plate and then use the second
plate to mix them. That's also pretty good. Some people also have pre-made
palettes and that's fine. Just try to make sure that
it has larger mixing areas, especially for larger
paintings which are all classify quarter
sheet and above. You want to have enough
mixing area in there so that you can mix up a
large quantity of paint for some of those washers just
stops you from going back having a re-mix it again and
again. So for this course. I'm not gonna be using all
of these colors really. I'm only going to be
using a few of them. So over here you can see
some of the yellows. I predominantly
use yellow ocher. It's a very subdued
yellow, not too vibrant, and it just has a nice warm towards find that some of the
yellows like Hansa, Yellow Medium, this can be
a bit jarring to the eye as at times it's just too vibrant, overpowers
everything else. If I ever used that,
I tend to just mix it in with a bit
of buff titanium, just dull it down a little bit. Or I might save that really
high saturated area for some highlights on my scene or just some areas of interest. Here I've got this
Quinacridone, yellow. This is a great color that I like to use because it implies a warmer golden sunlight around golden hour,
just before sunset. I find this is the really
nice color that I, that I use often in
terms of the oranges, you've got the quinacridone, burnt orange, and a bit of
that power or red here, even if you have
yourself some rosy red as well, That's
completely fine. Over here. I've got myself a little bit
of this buff titanium which I use to get in really
light areas of sidewalk, maybe some beaches, that
kind of thing as well. Areas of the sandstone
where it doesn't have much saturation and
very little contrast. So I find that really helps Cerulean Blue use that
pretty much for the sky. I don't touch either of these
really for this course. So that's lavender in
a bit of turquoise, ultramarine blue,
quiet, an essential color that's very important
for mixing your darks. As burnt sienna. Great for getting in those
rooftops of some buildings. Cake. It's kind of like a
reddish brown color, quite a nice, nice light
brown color that I use. The burnt umber again is just a nice dark brown
color that I can use to add a bit of warmth into my grades when
I'm mixing them. Of course, there's a
couple of greens here, more so darker greens. And what I tried to do, if I need to paint any trees that are perhaps a
little bit lighter, I'll just go ahead and mix that green with a bit of
this yellow here. Sometimes the hansa yellow
is great phone and get some more contrast
and saturation. Really bright grassy green, those to mix very well. Otherwise I can use something
like my yellow ocher here, which produces a little bit
more of a desaturated green. Purple is a great, I've got a few different purples
here from different brands. I've got a Daniel Smith
imperial purple here. I've also got a pinker purple. I've got another purple here
from Daniel Smith, amethyst, and also another
Daniel Smith purple, just carb azole violet. Now they're all quite similar. The only thing is that a couple of them
granulate, which I like. So the Daniel Smith
imperial purple and the pink or purple as well. And I just have a nice sort
of granulating effect, which I'd like to add
into my background is it's more of a
personal preference. Now these are quite nice
for mixing upgrades and getting in the corners
from those grades, you want to make
a cool gray or I can actually add in
a little bit of the ultramarine blue as well
to get a similar effect, especially want to cool it down even more than the purple. Now have inconvenience
colors that I have a little bit
of, like I said, the neutral tint and the
black here lamp, black. Lamp black is really just a
quite a dark black color. And I use this to get
in strong contrast. And also I can mix
a bit of gray out. It is just water it down and it makes quite
a dull looking gray, which I do use
from time to time. Neutral tint does
the same thing, but it just doesn't have
that granulation effect. When we're talking
about shadows on the sidewalk, shadows
on buildings, often I'm mixing
up a bit of purple and a little bit of red,
a little bit of black, little bit of the, the browns on here just to get
myself a nice shadow. Often I try to bias it with
a bit of a bluish shadow. And the reason why just
a cooler shadow is because normally the buildings are more of a warmer color. So when you think about
things like yellow ocher or this golden
quinacridone, yellow. If we get a bit of this purple is shadow going over the top, you can get some beautiful
looking vibrant shadows. So that's why I tend
to use purples also in my washers when I'm going
over doing the shadows, but essentially
you're contrasting warm colors with cool colors. Sometimes what happens
when you're painting? You might go over some
areas of complete light. And the only way to
bring it back is to use this course as
a finishing touch. At the end it's an
opaque white paint. This is an Australian brand, get whatever y you can. Some people also use
a bit of acrylic white. So that's up to you. If you've got something
like that available, you can go ahead and use that. I just tend to use
gouache because again, it is technically
still a watercolor. I want to keep things. In the same medium, but a great little thing. And you can also mix it with
some of the watercolors. Like if I want to mix a bit of yellow into the white gouache, I can turn that highlight into a warmer sort of
highlight as well. So depending on the quality of light that you've got
and if you've got lots of yellow buildings with reflected warm light on them, perhaps some of these
white highlights are going to look a
bit out of place, so a little bit too sharp. So that's why sometimes
when I'm mixing a bit of yellow into that
gouache as well. So here are my brushes in
the center and some of the miscellaneous bits
and pieces that I use. Now I'm going to go through
some of the brushes first and I'll explain why
I've got everything else here. So as you can see, I've got an assortment of
round and flat brushes. I don't use all of these. I'm thinking about
most paintings, I'd probably use these
three mop brushes. The most. Mop brushes are basically watercolor brushes that
hold a lot of paint. Now, I, depending
on which one I use, it's based on the paper. So if I've got a
large sheet of paper, I'm gonna be picking a
brush that sort of fits in, especially looking at what I'm painting from painting
a larger sky. I don't want to be going back using this little brush
going back and forth, back and forth constantly, I'll probably pick a medium
mop or the larger map here. The great thing about these
brushes is that they have a sharp point and that allows
you to cut around objects, cut around buildings, figures, things like that just to create a little bit more
separation in your colors. So really important,
those mop brushes, you'll also notice that I
use a bunch of flat brushes. He's a couple of
synthetic flat brushes. Have these need to be replaced? I've got to find some soon, but basically these ones here, they last long term
synthetic brushes and they allow you to get in nice sharp areas of
contrast in your painting, especially if you're
doing buildings, because if you
look at the brush, It's shaped with
such a sharp angle there when you're
putting in the shadows or painting in that area. It's lot more easier than say, picking up a round brush and trying to paint in the
shadow, it's more wobbly, whereas this kind of gets sticks to the paper a
little bit more and it's easier to control and getting a sharp shape,
things like boxes. If you've got a boxy house or something like that
and you want to get a part of it on. In shadow. Flat brushes are fantastic. I love using them for
that particular reason. You have some other brushes. These ones are just
synthetic round brushes. I've got so many of these
and these are great for getting in small
details like figures, power lines, that kind of thing. They come in all
different sizes, okay, So you can pick yourself up a few of these that will help you. And apart from that, I've got this, these two
brushes left to talk about. So this is a rigor. Rigor is a good
brush for getting in a little tiny,
tiny little details. Usually things like smaller
trees, power lines. If you've got perhaps
little highlights that you want to get
an ink wash later. This just picks up
barely any paint, but you can get a thin, sharp line with them. So it's a useful little brush
I use from time to time. This one here is a really
large watercolor brush, as you can see when
I use that when I'm painting large areas of sky. So if I want to get in perhaps some cerulean blue
through the entire scene, I'm gonna be using this, and it's fantastic
because I don't really need to go back to
the palette too often. I can mix up a large amount of paint and just
go straight in. What are often pair this with
one of these mop brushes, just so that I can get in a little bit of sharpness over
the top of the buildings. So make sure you
keep that in mind. What I often do is
that I often modify the amount of water on the brush based on
what I'm painting, this is really crucial. So e.g. if you're painting like a darker tree
or something like that, and you don't want the
water to run too much. So you might want to pick up
a bit of paint and you see, look at the brush and look and see how much paint is on it
if it starts to drip off. I just tend to debit
down on the towel. You can use a cloth
like this or you can use a paper towel disposal, paper towel, whatever is fine, just something that can alter the level of moisture on your
brush that allows you to control the wetness of the brush and the wetness of
the wash so that it doesn't go all over the
place when you get in. So you see especially when I'm talking about
dry brush strokes, right then when I'm getting
in tiny little details, windows and things like that, I often pick up a lot
of paint on the brush, really thick paint and then
I'll just draw it off here. And then I'll go into the painting like
that and that makes, makes it so that I don't
get a gigantic glob of paint on my painting
and just ruin it. Okay, so the towels really
important, often understated. And I'll talk more about
that later in terms of mixing your colors and
consistency of paint. Over here, a few other
things, container of water, and they tend to use one
container of water just to keep things simple, 500 meals. You can also go up to one liter. Actually, I think this is a
one liter container of water. So probably better to use a one liter because it just
doesn't get dirty as quickly. This is a little
spray bottle here, and I use this from
time-to-time to re-wet parts of my painting just gives me some extra time if I want
to add some more color, not done with an area yet, or I'm just waiting to go back
into an area and I want to keep a little area
of that still wet. So really important, making sure that you have
something like this. You can use empty
perfume bottles as well. Just anything that
produces a fine mist. Otherwise, you can
pick one up for a couple of dollars through a whole variety of art shops
or even your hardware shop. Here is a hairdryer. I use this in-between washes. And this is really
good because it just saves time in the
middle of washer. So especially when you've got
a really, really wet wash, I tend to wait and let
that wash soak into the paper a bit first because if you use the air dry too quickly, what happens is that it will
start shifting water around and causing it can
sometimes cause a mess. So wait till the papers
kind of starting to dry and you don't see any
large pools of water. If there's large pools
of water on the paper, you probably use too much salt
would get a bit of tissue and soak some of
that up if possible. But generally speaking,
your paper should, there shouldn't be
pools of water on, there should be starting to dry. And that's when I
pick up the hairdryer and I finish it off, saves me from waiting another 10 min for that
to complete the draft. So these are the
materials that you need. And that's about
it for this video.
3. Paint Consistency: Now let's talk a bit
about paint consistency. Paint consistency is very
important with watercolors. And the reason why
is with watercolors, we don't really use
any white paint. Generally speaking, in
order to lighten the color, we need to add more water. Okay, so here's a
quick little swatch, a quick little example
which I'll show you. And you'll see these
a lot on online. But there's, you start off
with a really dark paint here. It's mostly just paint a
little bit of water in there. I'll start off really, really dark like that. Okay. I'm going to add some water into this mix, a little bit of water. Drag that to the
right-hand side like that. More water. You can just see. As I continue adding water to
the brush, you get lighter. Lighter values. Okay. So the consistency,
how much water you have in that brush really dictate whether you have a lighter or darker color of the same paint that
using the same color. Okay. Now, if you have paints
like this, this color e.g. which is pretty dark, you're gonna get a
large range happening. If you're using a
color like a yellow, it doesn't really work all
that much with a yellow. There's not a huge tonal range. So if I use this
yellow quinacridone, yellow straight from the
palette, pretty light. This is probably the
only yellow that I can dilute down and
it works quite well. You can still get some, some tonal differences there based on how much
water yet in. Okay. So as I move on, just
adding more and more water. You can kinda see
that a little bit of, a little bit there, but it's not as pronounced
as you can see here on top. And even less so when
you're using color like lemon yellow, for instance, I mean, it's pretty much almost the same tone
no matter what, how much water you add into it. Very, very difficult to
get too much variation. So that, and then
maybe like that Just bit of water with a bit of yellow mixed in
right at the end. Okay. So notice me just going
backwards and forth as well, drawing that brush off. Because if I have too
much water in there, it's just going to
make a big mess. And this this is something
that takes a lot of time knowing how to pick up the paint and pick
up enough water to get that paint to a nice and
lighter consistency, some more water in that paint and picking it
up and then also drawing that brush because if
you go in there and just dunk that paint straight
into the bottom, you're going to
get a large bloom. It's going to spread too much
and certainly cause a mess. But you can see what's
happening here. Now, let's try something
fun and I'm gonna go pick up this whole
area is already wet. I can go back in here
and I can pick up e.g. bit of dark color, a
bit of this purple. And I'm going to pick it up almost straight
from the palette. So it's pretty,
pretty pretty thick. There's only a little water in there and I can
drop that in here. Look at them, Look at that. Look what happens. You get soft sort of effects. On this left-hand side here, it's dried so it doesn't
move around so much. But on the right-hand
side here you can see it's kind of
starting to spread. Now, what if I add more
water into this mix? It's add lots of water in there. Let's pick this up. I
haven't dried my brush off. I've just picked up this paint
straight from the palette. Let's drop it in here. Now look what happens. One, it's a lot lighter. And to the spread is
more uncontrollable. By adding that extra
water in there. You're just getting a lot
more paint dispersed all over the place rather than get these thinner lines
that still spread. But they mostly stay
put in the areas and conform to that
same area that you've touched the cake and still see these
couple of lines here. Whereas here it just
because all over the place. So consistency of
paint, very important. If you want more control, wait for the paper to dry first and then go in
with your second wash, whether it's a lot of water
or not so much water, if the, if the paper
is completely dry, you can get sharp edges. But if you're painting
wet into wet, in this case where the
paper is still dry. If you use more paint to water. So 80 to 90% paint to ten
per cent to 20% water, you're going to get
more defined shapes even though they spread. If you use more
water in your mix, you're going to get
lighter shapes, lighter, more abstract
shapes are just spread out. And this is why people get
frustrated in watercolors. Because you often using the wrong consistency of
paint at the wrong time. If you want to paint
yourself a Cloud, you want to paint it
at this point here, maybe 0.1 or point to here. You're going to want to use maybe not such a dark
consistency of paint, something in the middle of these 250 per cent paint, 50% water. And that will get you a nice, softer sort of cloud shape. Like maybe, maybe these two
or something like that. But if you want to paint
something like a tree, if you want to paint
something like a shadow or a person
walking around, you want their limbs to look sharp and stick
out from everything else. You want to paint a
boat that just sticks out a darker boat, e.g. you're going to want to
wait until the paint has almost dried or pretty
much dried like here. Step four, step five. And e.g. now this top one stopped
has already dried so I can get in shape
and look at that. It stays put. Regardless of the consistency of paint I'm using,
That's pretty light. Or I can just go darker. It still stays put. It's these little boat things I'm trying to paint in here, even if I use just all this, a lot of water, lots of water. Check this out. It's
still conforms to what you've added on with your brush. It's not going to
move from there.
4. Timing: In this video, I'm going
to be talking about timing and also the concept
of paint consistency. How to make sure that you've
got the right consistency of paint on your paintbrush to
achieve the right result. A lot of watercolor is, find it very difficult
when they're starting out. Because you just get this
uncontrollable sort of effects. When you say you're painting
a little bit of color here, you pick up a bit of paint
and suddenly blooms, goes all over the place, or it creates too
much of a sharp spot. So depending on what
you're painting, it's really important to
understand how wet the paper needs to be and how wet
the brush needs to be. So what I'm gonna be doing
first is I'm just going to wet this area of the paper. Okay? It's a bit of water
and I've got a bit of grain there externally, but it doesn't matter. The whole point is
just to wet this area. And you can actually
see the outline of the width of the
paper because I've added in a touch of
gray just so that you can get a general gauge of it. Now, if I pick up some paint, a little bit of gray, alright, little bit of gray. I'm just activating that with about ten per cent
water and 90% paint. I'm just going to
drop this in here on the side like that. Okay. Notice what happens. The paint is rapidly spreading. I mean, it just depends. Move the sheet of paper round, but it just continually,
continually spreads. I'm going to draw off
the paper a little bit, and I'll draw it off
the paper slightly. I'm going to pick up
this same area of paint, the same concentration of paint. Drop it in here. And what you're noticing is that
it doesn't run as much. That's because the paper
has dried very slightly. So it's become a bit more depth. And when the paper is more dry, you get sharper sort
of effects like this. And in terms of the
paint consistency, I'm using quite a high level of paint on my brush in
proportion to the water. That's really important as well. If you are going into an area and you want to
create some win-win it fixed if you want it to be a
little bit more controlled and the shapes to not
spread out that much, you want to use less
water on your brush. So in this case I'm using that 80 to 90% paint and
only ten to 20% water. If I went in there and mixed a lot of water and
then added it here, go all over the place. So it's very important to keep that high level of
paint consistency, high concentration of
paint on the brush. And if it's too much, if you've got too much
water on the brush, simply just dry
off your brush on a bit of tau as I'm doing here, or you can just add in
some more paint in there. Okay? So let's draw this quickly. Okay, given that a little
dry, Let's go in here. And again, it's a
little sharper. And again, let's put in some
more paint to the right. Okay, sharper yet, this will probably
spread a little bit. Right at the end. You get really sharp sort of
marks like this to the point where you can see the grain of the paper come through
if you're using a type of textured paper. Okay. So I've used pretty much the
same consistency of paint, which is mostly paint, about 80 to 90% paint ten to 20% water in all
these little swatches here. But the variable
that we've changed is the wetness of the paper. So you can try this same
exercise by yourself. And what you can do as
well as just paint e.g. for different squares,
foursquare's. And firstly, drop in some
paint in the first square. Wait a minute or two. Drops and painting
to the second square in a minute between
each of them. Just adding some more paint, see what it does. What this does is actually
train you to understand timing and understand what happens when you put your
brush into a bit of paper. That's a varying
degree of wetness. Very important because
if I want to paint something like some clouds
or some distant missed, this is what I want to achieve. I want to make sure that
paper is pretty wet. And before I go in there, if I wait until this step, it's going to look
like a tree trunk or something that's just too sharp. We're even here. So the timing of when you go in to the paper in
terms of its wetness, is going to dictate
whether you get the shape that you want or not. So this is a quick
demonstration of that. I'm going to go through
a little bit more.
5. Understanding Values: In this video, I want to talk a bit about values
and we're gonna do a value study on a
black and white seen, which I think is
the best practice when you're starting out learning how to identify
different kinds of values. So let's go ahead and
give this one a start. We look at the reference photo. You can see basically
all the trees in the background are pretty
dark and K behind the boats. And of course the top of the trees are a
little bit lighter. So let's go ahead. I'm
going to draw it in. Again, just a quick little
rectangle like this. And we can put it in line the
edges where the tree start. Everything in the background. We've got all this stuff here. Hey, whatever it is, I mean, all the way
down like that. There are some lot of parts
of the tree light here, but they're still pretty dark. So essentially the
darkest elements of the painting are all
in the backgrounds. If we look at the largest
components of this painting, it's basically just
all of the boats. So we've got a boat here. Okay. I'm gonna do this
quite quickly as well just to get it out the way. So that's the top
part of the boat. And you've got the bottom
part which is dark, has a shadow cast to
the right-hand side. There's also some darker bits in these little windows
there of the boat. You've got another
one in the background which is pretty light, right at the top, like that. Then as you move down, it becomes fairly dark. Then you've got
another one here, really light as well. Okay? So you have essentially, you've got essentially
the darkest values. Rod in the background
here behind the boats. I'll do a quick shading
with the pencil. Normally I don't do this. But it's just to highlight the darkness
of the background. Vocal these boats and things
here in the foreground, I just want to outline
that one a bit better. This one too. A lot of contrast and shadows. And in the front there are some little bits of grass and shrubs and
things like that. These are the mid tones, so they're neither
really dark at the back. There, basically
in-between the lightest of the lights and the
darkest of the darks, just bits of grass and
things like that there. You will notice that
the trees are also composed of the same
sort of mid tone. Plus this, I'm really lot
parts of the trees as well. I'll other light area of
the scene is the sky. So let's go ahead and
we'll get this in. I'm gonna pick up
a small mop brush. Maybe like another little one. Just use, I'll just
use the mop brush. And what I want to do is I'm going to pick
up just a dark color, just neutral tint, something
simple, one color. And I'm gonna go get in
the dark area at the back, can make sure that I've got
enough water in here as well. It's still you can afford to put in a fair
bit of water in there. The neutral tint tends
to go a long way. Okay, look at all that. There's this darkness
here behind the boat's going into
the background. Let's go all the
way and you can see it just kinda cuts cuts around
the boat area like that. So really just this darkness. You can see. It goes up further to the
side of the scene two, the side area there. Then as we go up, it
gets a little lighter. Notice also I'm just leaving little bits of
white on the paper. This could just, this is
just to show a little bit of those really light highlights
in this background area. So with the sun just
hits these trees, bit of water now I'm just
dropping a bit of water in and you can mix that onto
your palette like that. Just pick up the pick
up that lighter wash. And I'm just going
to fill that in. Bring that down to just blend a touch with the
darker color underneath. Like this. Pick up a bit of paint as well. If it's just too dark
and look at that. You can just get in
this mid tone softer. And I'm also just leaving a
bit of that scratching us their background for
some bits and pieces. This same wash I
can work my way in also into the foreground
and the mid ground. So this area here, this, I don't know, these shrubs and things. They're pretty light steel, but they're not as light
as the boats there in the middle or
another midtone ran the same value as that area. So going in there,
add that Liza, the middle values of the scene and you find
there's a lot of mid values, but you can, if you use one main mid value,
that's generally enough. Okay. Look at that, and not only that, but you've got some
in the water here. There's a little bit of,
a little bit of darkness. They're almost the same
value as that here. And of course there's
little shrubs and things like that as well. You can just put in a few
scratchy bits of things here. Doesn't matter,
something like that. Another thing we
need to do is get in some of the debates of the
boats here at the bottom, this dark is pretty much the
darkest area of the scene. From the trees in the back. You can see a bit of a
shadow underneath that boat. Not only that, there's a
shadow onto this boat as well. Going to the right hand side. There's one under
this boat as well. Just casting a shadow to
the right underneath. Of course I've done this
a little, little sloppy. But you get the point which is dark in the back
of that boat slightly here. And apart from that, the sky is another thing. You can just wet out
of it that's too dark. Sky is. Again, it's not as dark as as the stuff in
the foreground. Okay. So you want to just get
a little light wash. It's mostly just water
and a touch of that gray in there to get in
a bit of that sky wash. So it's not as dark as this mid, mid value, and it's not as
light as the boat as well. We've gotten these
tiny little you can see tiny little windows on the back of that
boat like that bit of line work there. Okay. So already with this
quick value study, you've learned how to vary
the amount of paint and water to make sure that you can create areas of darkness,
areas of light. Identifying and looking at the scene and thinking
to yourself what areas actually liked in which areas are the
lightest and darkest. So that's what
identified initially. The background here,
dark and the boats, pretty much the lightest
area of the scene. Sky is pretty light as well, but not as light as the boats. So you always just
looking at everything relatively and making
that decision, then you're getting
that paint and mixing more or less water depending on how dark
you want things to be, less water, then it's
going to be darker, more water, it's
going to be lighter. And you're going to
need to experiment around with different
mixes, okay, for this one. Again, like I said, if I'm
using really dark dark wash, I can still put in a
fair bit of water with neutral tint because
it's quite dark. But e.g. if I was using
green in the background, that might not be able
to achieve that level of darkness if I was
using too much water, even 20% water in that green, you're going to need
to experiment around a little bit and try
these value studies. Also use bit of scrap paper as well to make sure
that you've got some different different mixes of paint on your brush
to just test and see. And so that way you're going
to know how much water to mix in to get a
particular value.
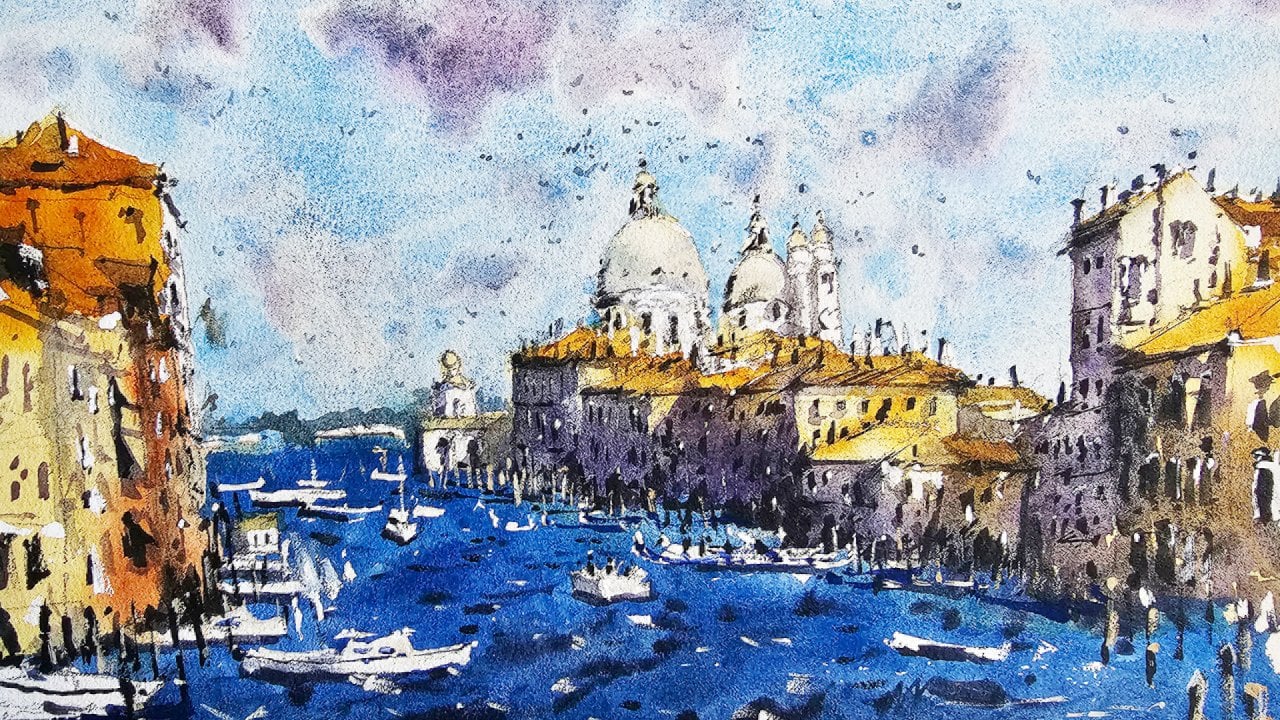
6. Understanding Values Extended: What I wanna do now is I want to go through an exercise
to show you how to identify large shadows and basically just large
areas of shadows, large shapes on buildings
that you can then use to form a easy wash over the
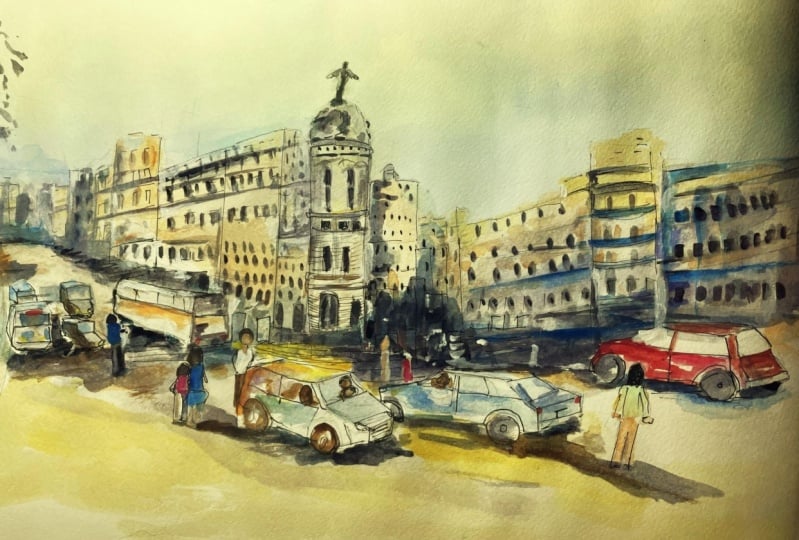
first wash once it's dried. So this is really important with street scenes identifying
that light source. So we're going to use
this reference photo here to just highlight it. And I'm going to again make
this quite a simplified St. just to highlight my point, a scene of Venice. And I'm just gonna put
in a line here where the buildings I'm
going to go in. Let's simplify this down. You've got a couple here. Bits in pieces. I always look at the buildings and try to think to myself, what shapes are they? There's a rectangle,
there's a square. Simplify it down. Here. I'm getting in that left side
of the buildings now here is where I'm starting to
put in that shadow shape, that left-hand side there. Got more buildings here. And again, I'm not aiming for accuracy or
anything like that. Just simplicity for
now to highlight my point side of
the building here. So again, it'd be a partial, partial view of
everything really here. Just trying to get in the
rooftops of the buildings. The mechanic cutoff, not
able to get the mean really. Here. This is the dome at the top here and top of the don't like that. Simplified down, of course. Second little dome here. Again simplifying down. Okay. There we go. A little windows
on then and tower here. Oops. Like that. Now the light is
going to be coming in from the left-hand
or the right-hand side. So what's going to happen is
that you're going to have a little bit of the shadow on the left of the
building in here. What I can do with just color in some areas and the left sides of these buildings that
indicate this darker shadow. And I'm joining it
up like look at how I'm making the
shadow is large. This darker shape sort of emanate through the
rest of the scene. And I might have some
underneath here as well, some darkness underneath here. So this is the that
large shadow shape. Large dark value that
you want to try to identify when you're doing any type of
watercolor landscape. Basically, you want
to just identify the light source and make sure that the shadow
matches that. So you can see how the shadow
just goes all the way up, even on the side
of this building. And a good way to
also figure out whether to simplify a
scene down to values. You can convert it
on your computer, just black and white. Now I think you do look at
a look at a photograph and just squint your eyes
squinted or photograph. It simplifies the details
and brings out the contrast. So really, it makes
it more easy to see some of these
bits and pieces, this darker shadow that runs
across all the buildings. So that's what I'm doing here. And here across the ground, you will find as well
that there is actually, there's actually a bit
of a bit of darkness in the water that actually connects onto the shadows
of the buildings. But it's kind of like a
lighter, still fairly light. Well, we can conjoin that
on a little bit like that. Okay, so we've got
that in like that. Let's go ahead and work
in the lighter areas. First. We've got all the
docs planned in from working it out from
that reference picture. So I can go ahead
and pick up some. I'm just going to
pick up some of these general would you call
it titanium color. Drop that in there just
for some of the buildings. Okay. Don't need much at all. Just a light wash light
little wash like that. And another thing I can do, it's probably add
some burnt sienna on the rooftops like that. Touch of burnt sienna and
some of the rooftops. Okay. Maybe a little bit of warmth. Just pick up a little
bit more warmth to drop into the
buildings as well. Touch of warmth
into the buildings. Simplified down. Okay, now let's work out the
rest of the values as well. The sky really light
wash of cerulean. So I can just pick up a bit
of that cerulean blue from the palette and drop
that straight in. It's mostly just
water in this mix. But with cerulean
blue, you do find that at the end of the day, it is very, very light anyway, there's no way you
can get that dark. Bring that across the scene. Here. Just cutting around the dome. Like that. Okay. Pretty light the
values in the sky. I pretty much just
as just as light as the lightest values
in the buildings. Drop that in and make
that bit of that blue. Okay, fantastic. And we can go into the
water now and just adding, for instance, some darker blue. I've got some ultramarine, which I'll mix up
with some black as well in dark color with purple. Maybe. You just want to call a sort
of color running down here. Okay, let's just get that
cool color. Like that. You kind of got like
a mid tone here, a middle, mid value
here, and the water. Lightest values
on the buildings, especially the whiter
side of the buildings, have not kept the
100% white of it. Again, you can just leave
the paper if you wish. But I've colored all into
simplify this two washes. And a bit of the
light on the sky, which again is
mostly just water, and give it a dry hay. So now that everything is dry, remember that large shadow
that we penciled in before? Large shadow shape. I'm going to pick up
a bit of dark color. You can mix up some
purple bit of black. You can mix up some gray as well by mixing you three
primaries together. So I might example, pick up a bit of this red. Let's mix in a bit
of blue and a touch of Hansa, yellow like that. And that will give you a
kind of a grayish color, maybe more blue like that. And we can get this in, get that shaping all in one go. And again, we want
to make sure that the concentration
of this is right. I'm just adding in a
little bit more water. Okay, and this makes it easy. So you can now just go on top of these
buildings like this. And also in the shadow areas
of the buildings here. Here the left-hand side of them. Like that. There's also even
these little windows and the buildings like that. That's how simple it is. You just connect up
the shadows and also the areas behind the
building like that just joins on like that. The little bit of details on
the buildings through here, this is maybe a little shadow on the left-hand side of the dome. Just exaggerate that a bit. Here, underneath here and here. But as you can see, it's just one shape that
just joins on to everything else
and allows you to create a little
contrast in here. Okay? So just one big shadow shape. Drawing off the brush
and bits and pieces. Sometimes when you've got
too much water on there, you don't want it to to
mix around too much. Just add some dry
off that brush. And here you can start putting in things
like darker colors. I've just picked up a bit
of darker black here. And I can think,
okay, well, why not just add in the sharper, darker areas of the,
of the buildings. Now, here, we're here in a couple of
windows or something like that. Okay. Mostly starting already to dry underneath the
rooftops and things. You're gonna get a bit of
extra darkness like here. Tiny bits of this stuff here, these little windows
that you can just imply by dropping in
a bit of darker paint. Sometimes on this side
of the building as well. You're gonna get a bit
underneath the dome, a little bit of
darkness like that. That even in the background, you'll notice there's actually some shrubs are some trees. Now you can pick up. It's really just to be
green, desaturated green. I'll just drop that in here. In the background. Carry that through
the scene like that. Kinda looks like this. Some trees or something
often in the back. Okay. Now notice the water does need to be dark and the
beauty of extra. So I can go in there and just dropping a bit of more water, more darkness into
the water with another layer of purple or blue, whatever over the top. And that's how you sort of
alter the values as well. In the scene. Can leave out a bit of color
there for like some boats or something like that to parent, but just a couple of
shapes like that. Join that onto the shadows of the building and touch
as well like this. Okay. Quick dry, a few little
finishing touches, picking up some darker paint. And I might just want
to maybe draw out some color on these
pretend boats that I've put in here at the front so I can maybe get in a gondola
or something just a bit more more of a
something like that. You can make this a sale like a master or whatever as well. Okay. So just kinda play
around with it. I think I want that actually up the top there.
It doesn't matter. Mask. Now you can put in a few
other darker darker boats and things off in
the background. Okay. Something like that. Even put in a person up here just standing on the gondola perhaps and they are holding on, could turn that into
like the little paddle. Okay. Sharper shapes for the waves just running across the scene. Simple little waves. This is with the final really
dark value you can see. So I can just go over the
top of everything with the blue and bring out, bring out some final, final shapes and details. So if we review what
we've done here, you can see all the way in the
background of these birds. We've got this
really, really dark value that's contrasts
against the boats. This is the large dark
value in the background. You also have a
darker value here in the foreground
and the midground, not as dark as the background, but maybe as dark as
the trees at the top. And so we're kind of
carrying that down. The page is a little bit
of a join here where it joins onto the boat and then
joins onto the background. But you can see as well
that shadow just joining on the darker shadow joining
onto the lighter shadow. Again, altering the
amount of paint on the brush and making
sure that we've got less water on the
brush if we want a darker value and more water if we want
lots of value here, this is a monochromatic
study and then come over here and we're looking at this painting that
we've just done. You can see here, I've
obviously just got an older, lighter values here
in the background. The sky on the buildings or
this warmth of the buildings. The k, this little statue
here in the background. The water is more of like a mid, mid, mid value, midterm. But the sky and the buildings there got
that in, in one wash. A little bit of the water
had to do that a second time just to darken it a touch. Then we've gone and gotten that large shadow
shape as we can see, it starts all the way to the
left here with these trees, joins onto the little
part of the buildings. Behind the buildings starts going through to the
left side of these, these sort of rectangular
buildings here, here, here, up until the
domes, even like a, but notice how they
interconnect with each, with each other and we're
getting it all in one go. Then finally at the
end we can add in some little dark spots to
bring out the final dark, darkest areas of your scene.
7. Techniques - Washes: So what I wanna do in this video is I want to
go through and talk about the different techniques
that you'll need for this class when
painting urban landscapes. And these are most of the techniques you need
for any watercolor, landscape, or even portraiture. 99% of the time
there are a couple that I won't cover, but again, the ones that I'll cover today, we'll get you through for almost every painting
that you decide to paint. So let's start off firstly
and talk about washes. So there's two types of washes that I'd like you to understand. The first is a graded wash, and the second is
just a flat wash. Will do the flat wash first, it's just a bit easier. And a flat wash essentially
means using one paint, one consistency of
paint, one color. All the way through. So over here, I've got a bit of ultramarine blue that
I've just mixed up. And what you wanna do
is make sure you've got enough of this color. Having a look at the page here, I've got a fair bit of a
quarter of this sheet of paper, so I'm going to
need enough paint, so I don't have to go back
and mix some more coloring. Again, try to create this same mixture
and you want to have enough in there that
will get you through. That's very important
because if you start mixing other colors in there, going back and trying
to remixes same color, you never gonna get
the same color, one. And it's going to
also cause a bit of an issue because this
will start drawing as well while you're
trying to figure out what the paint mixture is. So I've got about a mixture of maybe 60% water and 40% paint. And I'm just gonna go start up the top here, look at that. Just 11 little line up there. And notice as well that I've got the paper
and a slight tilt. This helps the water
flows downwards. And watch what I'm doing. I'm picking up that bead
just underneath like that. And it starts to
come down again. Can you just picking up that
same bead of water all the way through and you're trying not to touch
that paper too much. That's why it's important to use a large brush like this one. This is like a
watercolor mop brush. And it stops the, stops you from essentially fiddling around
the paper too much creating texture
where you want it to just be completely
flat like this. So paper tilted, same
consistency of paint. And we're trying not to
touch the paper too much, just pick it up
right underneath, right underneath where the, the BDS look at that. We've got pretty much the same consistency and the same color all
the way through. That's your flat wash. You
can do this with any color. I've just chosen to do
this with a bit of blue. Now what we're gonna do is
we're going to do graded wash. Graded wash starts off darker and then it gets
louder as you go down. Or alternatively, you can
start off light and go darker, going to use blue again
and ultramarine blue. I'm starting off with a
very heavy mics at the top. This is probably 90%, 80 to 90% paint and a little
bit of water in here. Look at that. It's really, really dark. What I'm gonna do straight away, I'm going to pick up a bit of lighter paint by mixing
some water in there. And I'm just going to drop
that straight in underneath. And look at how it
starts to blend, starts to get lighter. I'm going to add some
more water in here. Okay, so you slowly
increasing reward or content. By this point it's
maybe about 50% water, 50 per cent paint, but at the top it was
mostly just paint. Okay. Some more water. And I'm going to
continue down like this. And right at the base, I'm almost I'm just
going to pick up some clear water like this. Okay. So you can see
get fairly light at the base compared to the top and have a bit of a smoother
gradation as well coming down. Okay, let's try it again, but we're going to use, we're gonna be using two
different colors. So I'm going to
firstly grab some, Let's get a bit of
that blue again. And we're going to try
to blend them together. Okay, so we've got
some blue start off right at the top,
blue, ultramarine. Drop that straight in there. I'm gonna come down the page. Now, as I move down the page, I'm going to pick up
I'm going to pick up some yellow or orange, maybe a little bit of orange. I'm going to drop that in here. And you can see it
just start to blend around this center point there because the
paint is still wet. I can carry this further
down like that. Okay. A little bit more in
the center point there. Help it blend it a touch. Okay, That's essentially it. We can even do another example. Let's practice again with just
a graded wash, one color. We can maybe just
use, what can we do? Maybe use a bit of mixture, some grayish color
on the palette. I've got a lot of water in here. Let's use some neutral tint. Just a bit of gray,
dark gray or black paint because that's
really, really dark. This is Payne's gray
actually. Really dark. Value up the top. It's almost the same
as the paper itself. I mean, I don't have
any water in it at all. It's a little bit now I'm just dropping a bit of
water into that mix. I'm going to carry this down. Okay. And again, just
carry that washed down at some more water. Carry that down at
some more water. Carry that down at
some more water, a little bit more water, carry that down and
some more water. And just keep on moving
the water down the page. This one's turned out
a bit better than the one on the top, right. Okay. Whoops. Like that. Carry that down the
page like that. You've got this
kind of transition between the darker paint and
of course the lot of paint. Down below. I've got a couple
of examples here. We've got a few graded washes, and that's your usual flat wash. The graded washes important for some of your urban scenes, especially when you want to
imply that there's a bit of a sunset or maybe some
darker clouds at the top. It's starting to get towards evening where
the sky is pretty dark. You might even have like
a bit of yellowish, orangey color or pinkish
color on the horizon line. So you need to understand how to add more water into your
mixed create a lot, a lot of wash. While the paint
is still drawing.
8. Wet in wet and Wet on dry: So we're going to try
a couple of things. Now. I'm assuming this top one
has almost dried off, so we can play with
that in a moment. But we're gonna do some
wet in wet techniques. Wet and wet is a really important technique
when you're trying to get in soft shapes. So things with
undefined borders, little bit softer
sort of borders, things like clouds,
things like some shadows, soft shadows on the ground. So what you wanna
do at this point, these areas are starting to dry. Now. You can go in straight away. Or what I like to do at
times is I will just give the paint a little spray with a little spray
bottle like this. What this does is that it just
wets the surface slightly, but it doesn't mix all
that paint together to create create a lot of mess and create blooms
and anything like that. So it's just slightly
wet on the surface. And I'm going to
pick up some paint. And this is a really
important stage. You want to make sure
the paint is thicker. So over here you can
see it's very thin. I don't want to go in
with this consistency of paint is going
to cause blooms. That's about 50% paint or even, even less like 40 per
cent paint, 60% water. So we want to go in with
more paint, thicker paint. So I might pick up
e.g. a bit of purple. I've got a few purples
to really choose from. And I'm picking it off
straight off the palette. I'm mixing it with
a little bit of water or you can use it
straight from the palette. Just depends how dark you
want these areas to be. And I can just drop it
in like this. Okay. Just dropping that paint
and see what happens. Okay. This could be, I don't know, it could be like a cloud or
something like that. Alright. Bit of darker paint and move that around, shift that around. Okay. This could be just a
big cloud or who knows, but as you can see, the borders are quiet, soft, and you get these misty like effects
when the paper is, the paper's wet.
Let's try again. Let's let's go ahead
with a different color. Let's make some more
brownie black color. Brownie black color. And we can do it here as well, just dropping a
little bit of color. Sometimes you might
want to use this to indicate distant things
like distant mountains, distant buildings,
all barely visible. And because it's, because the edges are quite
soft, as you can see, it doesn't really, it doesn't really stand out too much. Okay? Create even some little
shadows like that. That's like a little quick
shadow here in the foreground. That's something we
don't want it to be. Too much of her, too
sharp of a shadow, but you want to increase
the darkness down in front. You can do something like that. We can have a play around here. Now this this area
is slightly damp. And so what that
means is now it's not going to spread
all that much. So I can go ahead and pick
up, Let's see what happens. In fact, it's pretty
much dried off, but it's kind of like a
damp little bit damp, especially at the base here. You get a little bit of
fairness around the edges, but it's mostly, it's
actually mostly dry. Just at the base here. A little bit of fairness. These could be, I don't know, some buildings, so
just make it up. That now going through and say, looking at the final one, we're going to be picking
up some darker paint. Doesn't matter really now. But this area is completely
dried in our first flat wash. So I can actually go in
there and do something like create some silhouettes of buildings or whatever.
This might be. This building here in
the foreground here. Okay. Another one. Just notice how it's sharp. You don't get all this softness and color moving all over
the page like in these two. And these two, because the
paper here is mostly dried, it's kinda Deb and this one
here, it's completely dry. You notice that you get these
sharper looking shapes. You can use this
to your advantage to create an paint things
like little building, sharper buildings in the
background and use it to create details like that. That just could be some
buildings in the background and, um, it could be, I don't know, like a road or something
like that as well. Okay. So it really depends on what you're, what
you're painting, but it's important
for you to practice these techniques in
terms of your washes. And I'm working in those washes again by dropping
in some extra paint to create some software and weird effects and also waiting for it to dry at
different points. And getting in some different little
sharper effects like this. And you want to, at some point wait for it
to dry at different levels. So you might want to wait
for it to dry 50%, 60%, 70%, completely dry it 100%. And then you can
get your brush and then just see what happens. I find that if you paint into the areas while
it's about 90% dry, it actually looks better. I find it's better
when it dries anyway, just looks a little less sharp
and a little bit blended, blends in a little bit more
so it feels more natural. So you find a level that works for you with the
sharpest techniques.
9. Other Techniques: Okay, So with these
same examples, Let's go ahead and figure out and work on some
other techniques now, first one I want to
show you is dry brush. Dry brush is important when
you're creating little, little details, little textures. And for this, I'm going to
pick up some darker paint, just some neutral
tint you can mix up whatever dark pink you watch. Anything that's close to a gray can mix the three
primaries together. And I'm picking up that paint
straight from the palette. And then what I'm
doing is that I'm actually drawing it off on a little towel and I'm getting
that brush fairly dry. Now what I can do is I can say putting on a pole
here something, a little little light
pole, the street. Okay. Okay. How quick that is. It can use more paint and
get the brush pretty dry. And as you can see, this, the faster you do
those brushstrokes, the more of the paper
that you expose, it kind of leaves
these tiny little, tiny little areas where on the paper where it
skips like that. This one in the
foreground as well. We are a few here
in the background. You smaller ones there in the
background like that. Okay? And it just creates a
little bit of texture, a little bit of detail. Especially when you're painting
small things like that. What you don't
want us to get in, a really sharp looking one. And all of a sudden it just looks out of place
with everything you can do things like
putting Windows as well. And I'll pick up a little
bit of a bit of paint. And the brush is fairly dry and I'll just
feather that in. Just wipe that brush off
pickup bit of paint, wipe it off on a bit of
tau, then just do this. Drop in the room windows. So you can see it looks
a bit more textured. It's not completely colored in. Okay, hard to see, but there's just a
little bit more texture that you can see running
through the paper. That one's a good one. A little bit of dry brush. You can go back and
forwards between areas as well,
something like that. And another thing you
can do is you can use a scumbling technique
where you just pick up a bit of bit of paint, dry off that brush. And you're just kind
of flip the brush three areas like
this, like that. And you can create
little textures and details on the buildings by bringing out the
texture of the paper. You can see that
just a little bit of the texture of this, of these buildings and it works quite well if you're using this technique for subjects
in the foreground, it just gives them a
little bit more texture. And also if you are
painting things like rocks or whatever, works really well to very subtle sort of
technique and the mouth and thicker paint you use Look, you use pretty thick paint. That and this will create
just a little dry marks. And it's the way
you do it is you just the flicked that
brush all over the place. And it could, e.g. indicate things like trees or it could be like a
tree leaves or who knows. But I think it's important to use this
technique at times. You can even use it
in the background, just a few little things
to indicate details. And I'll make it makes
sure that I go lighter in the background as well
then I do in the foreground. It helps to push it, push
the scene back further. One thing I'd like to do
when some lessons a lot like to add a sense of smokiness, a bit of atmosphere
in the background. And what I'll do here is I
pick up a bit of gouache. This is just some white wash I talked about in the
materials materials section. And I can just pick
it up like this and drop it in to an
area in the back. Let's just give it
a little spray down there and look at how
we just spread it out. And it appears there's a bit of smoke or something
there in the background. A little bit of white gouache, and I do add in some gray sometimes as well if I want
it to look a bit more smoky. Okay. It could be missed,
it could be smoke. But you can create a
little scene where it just looks like there's potentially something at the back there. Just a bit of smokiness. And it helps to dull down
some of these colors as well, blend together with the lamppost to create a bit more mystery. And I'm just combines
everything together nicely. And when this dries, it's
actually a lot more dispersed. But that's how I create smoke. Just a touch of gouache
in their works. Very, very well. Something I do from
time to time is that I also use some
lifting techniques. And lifting techniques
are important if you want to create a little bit of highlight on a building or just
blend areas together. So what I usually do is
that I pick out a brush. This is actually a brush
that's used for blending. It's called a filbert brush. You don't have to
have one of these. You can use a normal
round brushes as well. And what you can do
is I just pick up a bit of water on the paper, on the paintbrush and dry the, dry the paint brush on a, on a towel, bit of tau
so that it's fairly dry. Then what you can do is just scrub away at areas like this. Okay. E.g. if I want to
create a tree or something, I could just scrub away
the paint and bring it bring it up with or
something like that. Dry off the brush
again. Continue on. Scrub off a bit of
that paint like that. You got to wait till the paper is almost completely
dry basically. Otherwise it's going to just
spread all over the place. And you can see here just
a little bit of water. And you can move and
shift this around, okay. If it's not loud enough for you. Another thing I suggest is to carry a little bit
of tissue paper with you and you can actually lift off additional paint with this. Just depends how obvious you
want that lifting to appear. I mean, for this one,
I've just haven't bothered using too
much of the tissue. Just more wanting to get it wanting to get it
to stick out a little. Let's do it again. I'm going to pick up bit of
water and I can just add in a little bit of that water
and just scrub away here. It's getting another
tree shape or something that bring the never this is the tree trunk
or whatever up there. Bring that across like that. Okay. It more scrubbing and just
creating shapes of these tree, some really subtle
shapes of these trees. Okay. Just by adding a bit
of water in there and just scrubbing around here, I'm going to create maybe another two branches
going off as well. Is one going up to the top. Okay, you can really
create a lot of detail. This type of thing. It's
really fun technique to work with sometimes. Sometimes if you've
just got an area that you've gone into dark,
don't have to worry. You can go back in and pull out some highlights
from the buildings and they'll just start
popping out of the darkness, similar to how these
little trees are. Again with the tissue. You can dab that tissue in
and look at that comes out, looks a bit more a
bit more obvious. Just feather the base of
it a little bit to help it mixing with the ground. Okay. But that's it, that's your
essential essential lifting. I can also do some on this side so I can pick
up a bit of water. And let's say I want
to just scrub out a little bit of paint here to
create a window like that. Little bit of light. There you go. There's a bit of a
window up the top here. Maybe I want to create
a bit of highlight for the building here and down
the side of the building. Okay. Notice how I just got to
add in a little bit of water and just scrub
not too much water. If you use too much water, it's going to turn into a mess. Okay? Just gonna go all over
the place you want to use just enough water on that
brush and dry it off on a towel so that you don't get gigantic globs of water running through
this entire scene. Here. E.g. I. Thought to myself, actually some extra highlights
here might be good. So I can just scrub
away this area. Let's have a look
what it can do. Maybe bring back some of that light their side
of that building. Maybe here, just scrub
a little bit there. More water. More water. Move towards the base. If I'm imagining
some light coming in from the center of the scene, you get a little bit, a little bit of this
light coming in reflecting off the
buildings like this. So watercolors to a
extent can be corrected. You don't want to
be relying on this. You want this to be a kind of finishing finishing thing
right at the end of the scene. I'm going to talk a
bit about scratching. Scratching is a little
technique that I like to use to also bring
out highlights. And normally what
I'll do is that I'll actually wait for the
paper to dry about 80%, 70 to 80 per cent. Re-weighting this paper. Normally I don't do this, but this is another
way that you can scratch out and lift paint. Also. Just the paper needs
to be slightly damp. If it's not damped. If it's not damp enough, you're not gonna be able
to lift that paint off. It's just going to
scratch away at the paper if it's too Deb, what's going to happen is that the water is just
going to run back in to those areas so
I can try something. Let's have a look. I might try up here
actually know or even here. I'm just looking at where
the paint is dried. You just having a look at the
areas to see here, e.g. I. Might be able to scratch
off a little bit there that so you can see how just with a
little blade that I have here and the
paper is almost dry. You can scratch
off a tiny bit of color to indicate a tree
or something like that. They're these areas and
I pretty much dried. So there's not much
I can do there. But any areas that
are slightly wet. You can use the
point of a blade. You can also use a plastic
credit card as well. That works quite well. Okay. I just have gotten used to
using a little blade for this. Okay. And you can actually bring out some little highlights where the paper is dry down the base. You can also just scratch
onto the surface of the paper and review a little bit of the
white of the paper. And you are actually
removing parts of the paper at times
by doing this. But this is a little way, a little shortcut
secret that you can use to just get
back a bit of the, the highlights whenever
you're painting. Okay. Middle highlights. Tiny little bits here. Okay? It's an alternative to using
gouache right at the end. Just these little bits of highlights and I
like how they appear. Sporadically. They're not like a sharp all
the way through highlight. It's kind of like a lot just hitting parts of it and
becoming separated. So that's one way Now we'll go into here and
this area has yet, it's, it's **** now. And notice how you can really just go in there
and scratch off, scratch off some
paint fairly easily. Just sort of move
through that scene. Here. I can scratch off a bit more. Okay. Bring that up. Okay. So there are things
like you can create, like traffic poles. You can create little highlights on the sides of
buildings, larger ones. Sometimes you can
create these little, little guiding lines
on the buildings as well to indicate the
perspective of the scene. That the sides of the
buildings and Windows, you can scratch off
a little windows as well on the buildings. Okay. So it's another
technique that you have at your disposal when
it creates texture, it creates some different
marks on the paper. Because when using watercolors, I think having a variation of different marks
is really potent, greets you at what makes it
look a lot more interesting. That's about it for
this technique session. The main things that
you need to remember, the wet and wet and the
wet on dry techniques. Also some of those washes, the flat wash and
graded wash that we did in the beginning,
cover this more, in a lot more
detail with each of the demonstrations so that
you know how to apply these techniques specifically to the scene that you're painting. But hope you've given
all this ago and even try it again a second
time round if you are still feeling you
need a bit more practice. All this stuff here is
really important because if you wait until you get
into your painting to actually practice doing
these techniques, it's gonna be very difficult to treat for
you to pull it off. So make sure you
practice a little bit. But again, remember
you're gonna get a lot more practice even in
the demonstrations later.
10. Colour Theory: Okay, In this video we're gonna be talking about color theory. Little bit of the basics, some of the mixing
techniques that I use, and why they're important
in order to compose, making sure that you're
painting has an interesting, vibrant mix of colors. So what I'm going to
firstly do is we're going to talk a little bit
about color theory. Now, if you look at the main colors here that
I use on my palette, I have them all organized
in terms of warmer colors. Warmer colors, meaning things
like yellows, oranges, reds, even this color
here I would classify as a warmer colors
has been off-white. Then it starts going towards the blues, okay, excluding say, some of these browns that goes blues purples and then finally, a Payne's gray, which
is like a bluish gray. So these ones are consider, with the exception of your
browns, cooler colors. It's important in
your paintings to have a balance of
warm and cool colors, especially in a usual
scene from a photograph, you often have things
like a blue sky and in the buildings maybe a little bit more of a warmer
colors for the Greeks, the ground, especially if it's a sunny day, you get a bit more. Yeah, just some warmer
colors in the ground. So you're going to need to
make sure you understand how to balance out these
colors nicely and effectively. So let's firstly go through a little bit of the
colors that I use. In terms of color mixing these two elements
of color mixing this how much water that you put in the actual paint itself, the dilution level of the paint. And then there's
also a little bit of color theory side
of things to say, if you want to mix
yourself a green, green, if you look
at the color wheel, on the sides of green, you have a blue and
you have a yellow. If you ever want to mix a
certain color or you need to do is essentially look at
the two colors besides it, assuming it's a secondary color. So primary colors are things basically your blues,
reds and yellows. With a blue, red and a yellow, you can pretty much mix
any other color out there. So let's have a look. And I will say, let's mix up a purple. So I've already got a
few premixed purples. And in fact, I actually have my secondaries already
pre-mixed it just for me, it makes things a lot
easier so I don't have to go ahead and mix it up again. But you don't need to do that. All you need is basically, here's just a bit
of ultramarine. And say I want to mix in
a little bit of yellow. In here, we can make
ourselves a green. Let's pick a bit of this. Here. This is a bit of
hands, a little bit of Hansa yellow mix that in
with that blue like that. And we have ourselves
a bit of green, a little bit of green here. And of course, it really depends what type
of green you'd like. I mean, if you want
to mix a green that has a little bit
more darkness in it, a little bit more of
a bluey tinge to it. Just add more blue. Okay, so I'm just adding more blue in here
and then you're getting more of a darker, leafy green, even
something like that. And you can see
just by darkening, spreading a bit more blue, you get a darker green
like that, more yellow. And of course, you're
gonna get yourself a very, very light, very,
very light green. It's almost the same
as the one above. I find with yellows, you have to be really
careful because you can often accidentally mix, mix some green with it if you're not if you're not
careful enough. So the few different
greens, I mean, you can even mix in a little
bit more of that blue. Let's see what happens. Just mixing some more of that
blue and we can get more of this darker sort
of phthalo blue. It's definitely more towards the blue end, but
it's still green. Okay? Or is that one's more
balanced at 50%, 50, 50, blue and yellow. That's more yellow to blue. And that's like a
little bit probably about 25% blue and the
rest of it yellow. You'll find that with
these darker colors like blue and what have
you don't need a mixing too much tends to overpower
and it makes things quite dark unless that's
what you, you want as well. Let's go ahead and I'm
going to mix up myself. A bit of, oops, should be doing that, but
let's mix up a bit of purple. I just picked out a bit
of purple by itself. So I've got some blue. Okay, let's pick
up a touch of red. So again, on the color wheel, we're looking at
purple and what's on the opposite sides
of purple or red. And this blue. I'm going to pick up bit
of red here, drop that in. Okay. That's kind of
purplish like that. And it's kind of really
light purple color, desaturated purple. Okay, let's put in a
bit more of that red. And it really just depends as well on the specific
read that you're using. Okay, I'm just mixing some
more of this blue in there. Just a bit more of that blue. And here we have a bit
more of a darker purple, bit more blue, more
Ultramarine in there. Okay? So you can get some
darker blue in there, okay, compared to that more
desaturated purple there. Now, an interesting thing in terms of making colors
look a little bit duller, we need to do is just mix the opposite color
on the color wheel. So if we look at purple,
What's the opposite of purple? We look in the opposite
side of the color wheel. It's actually yellow. So I can pick up the yellow, the palette and just
drop it in there. Drop a touch of it in there. You don't even need
to do this because you can actually go back the palette and mix some yellow into this
purple here, e.g. we just mixed a bit
in there like that. And even have a
bid on this side. And you can mix yourself up a really desaturated purple here. Okay? The saturated purple, Let's mix up a
saturated purple game, bit of blue and a bit of red, ultramarine blue
and a bit of red, bit more blue in
there, a bit more red. Let's have a look. More of a saturated one. So let's compare that. Really, really, really purplish compared
to that one there. I've actually tried
before just to drop in a bit of
yellow in there. And that's the saturated that
one quite a bit as well. You can see it looks a
bit grayish like that. One. Tends to get these kind of
grayish brownish colors. And why is this important? Because what you find is say, if you are making a
painting a shadow and you don't want it to be
too Gordy color. You don't want it to be
really, really purplish. Make sure you add in some
of the complimentary color, a little bit of the yellow
in there that can help. It's also just a
stylistic thing. I, I tend to just use the
colors a bit more saturated. I'm moving towards using less
saturated colors though. But that's something that's, as I said, a stylistic
choice for you.
11. Colour Mixing: One thing to keep in mind
with watercolors as well is understanding the amount
of paint and water mix. So if you e.g. have yourself a lot of
water in your paint. So let's pick up, I'll just clean this off first. But let's pick up, say a, a bit of gray. We use some gray, right? And this is just a
Payne's gray. Okay. If I put it in a lot
of water in here. So I've got about ten per cent
paint and about 90% water. In this mix, you're gonna get a very watery and
lighter mix of gray. The more water you add in there, the more lighter
the paint will be. Essentially, I love to
have large mixing areas. Also for just being able
to mix large washes, having the freedom to combine
multiple colors as well, especially when you're
painting large. Now let's have a look here. This is a blend of
that 90% water, 10% paint, very, very
light, very light gray. Let's add in some more paint,
a little bit more paint. Let's try this now. It's darker. A little bit more
paint into the water. Now the paint concentration
is increasing more and more. Okay, like that. Some more paint. It's adding a bit more here. Just getting darker and darker really. Let's try this one. Oh, this one's
getting pretty dark. Okay. Let's see if we can add some
more and see what happens. Pretty dark. Here. I can't really fit it in. I can put it in here maybe, because that's pretty much the darkest tone and
darkest value you can get. Experiment around with
different colors and see the different values that
essentially you can get. And this is really,
really, really important. And some colors will have a larger range of
tones and values. Usually the darker colors
will have a huge range. Whereas if you pick up something
like a yellow or orange, we can experiment with some
orange, e.g. just here. This is find a clean
bit of area like that. Let's mix a lot of water in
here and drop that in here. This is a light orange. Lots of water, even less
water here, maybe like that. So lots of water. And maybe I can even get in
a lighter one like that. That's pretty laterally the lightest you'd want to
go with the orange. And as you add more
paint in here, watch what happens is you get some darker mixes
of this orange. But really the darkest
would be this. There's not really much
difference between this and this. It's hard to even see camera that's only
slightly, slightly lighter. So you might be able to get 34 different values
out of the orange, but with the gray or dark
blue or even a brown, you can get even ten
very distinct values depending on how much
water you mix in there. So this is a really
fun exercise to do and to try to mix as well all
these different colors. I always like to do little exercises where
I will draw squares on the paper and use this
as a little testing, testing areas for mixing colors. Okay? This helps you to understand on a practical basis how
colors mixed together. So it's important
you practice quite a few of these little things. Now, another thing I like
to do is let the colors mix on the paper itself. What does that mean? Well, well, firstly, I
can just wet this one. The other one I'll leave. Okay. But I'm wetting this with
just some normal clean water. Alright. Let's say we want
to get ourselves in a blend of orange
and a bit of purple. Got a bit of orange.
I'm going to drop in some orange
there. Look at that. It's just blending in
nicely in the ground. This is a ground area or
whatever I have here, a little bit of that
orange and say up the top, I just want to add in a
bit of purple orbiter, this bluish gray color. Okay, Look at that. You can just blend
that in and let them mix and come
together themselves. Okay? Can even just getting some darker elements like these are just add
extra paint up the top. Extra elements of darkness
at the top like that. Okay. Make some downwards, even downwards into the orange
down here at the base. With this way, you
can really get so many different
variations of color. Then you can get here
on your palette. When you're mixing
on the palette, you're basically just trying
to get an exact color. You're trying to control the variables a lot when
you're doing it here, you try to get things to
blend together and create variations and a
lot more interests. I use this at times to
create extra details. Let's try on some completely
dry paper, see what happens. I'm going to use pretty
much the same colors, maybe a bit of purple in there. Let's go with a bit of
purple color at the top. That purple. And let's say I want to, we'll mix some more of
this orange in here, a bit of the orange
reddish color, e.g. down below. You can mix that in. It's still the
paper is still wet. In the in-between. You get most of the mixing
in the center area. Okay. But then the rest of it pretty much stays whatever
color you put it, unless it runs into that area, that one is a little
bit more uncontrolled. This one is slightly
more controlled because you are starting out with
dry paper to begin with. So sometimes you
might want to, e.g. getting a bit of the sky mix and then
drop in a bit here for some distant mountains or something like that
because you don't want the sky to just end the mountains to blend
together too much. So that's a good
way to control it. Let's try a few different mixes. Let's try some fun mixes. Let's few different colors
like this here could be some brown I've just
picked up a bit of brown are found
on the palette. Let's drop in some
of that brown. And then let's drop in
some corners a bit of this gray color in here. Let's see what happens here. Darker, darker color. And what you're
doing. You're trying to see some patterns here. When you're mixing some
darker colors with some lighter colors and just
feathering it into areas. And seeing what happens. Seeing how much
the paint spreads, and how much do
you need in there. This mixture of paint is still
a lot of water in there. But at the same time, you've got a lot of
darkness as well. Right at the bottom, I could
pick up something like a got this color here, which is a lilac color. I'll try some of
this lilac color. Okay, it's a lighter
lilac color. Let's mix that in and
see what happens. Okay. You can find some interesting
mixes that just look good together that you didn't
think would really work. We wouldn't have thought about. So it could be something they're two or
three different colors in there. Okay. It's important when you're
mixing colors as well, that you're not using
too much water. If you put too much
water in here, everything is just
going to split us spread out to a huge degree. And let's go and I'll
show you what happens if you just completely wet
the bit of paper dropping. Now this is okay if
you're doing things like sky washes or perhaps something that doesn't require
much control. But watch what happens. It's completely papers
completely wet and say I'll pick up some orange and
I just drop that in there. Look about it just mixes quite
a lot all over the place. Some more of this gray and
just drop that in like that. You get more fluidity. But less control. A lot less control. Because all this is essentially going to run into each other. So it really depends on
what you're painting. I tend to wet the
paper and leave it to dry a little bit though, if I'm doing large washes where
I'm painting like e.g. a. Sky wash and then a bit of
a sunset normally actually wet the paper quite a lot like that because it makes it faster. If you can see how fast the
paints just mix on the paper, you can easily get in a mixture of a sunset, sunset scene. So a bit of sky, cooler sky and some warmer
colors on the base. So these are a few examples, just a bit of
practice where we've talked again about color theory, a little bit about mixing on your palette and
also on the paper, talking about warm and
cool colors as well. And making sure you've got a good combination of both
warm and cool colors. Let's go ahead and do
a quick demonstration highlighting warm
and cool colors.
12. Colour Mixing Demo: Okay, This is a little
scene where we have ourselves a building
and a bit of a walkway. So let's go ahead and work out. How are we going to get the
different colors and choose which colors and understand
a bit of the mixing as well. Okay, so I'm going to just
draw this in real quickly. Just like a box shape like that. It doesn't have to be much. This is just
demonstration purposes. It's getting a bit of this
shade or something here. Windows, bit of some more here, some chimneys and
all this stuff here. Here you've got a bunch of these buildings
that just overlap, these warmer colored buildings
here in the background, like a little
indication of that. But apart from that,
not really that much. There's a nice
little shadow being cast by the building
actually over here. I'll just color that in a
little bit to remind myself. And joins on the shadow actually joins onto
the building itself. Got a bit of the side of the building sort
of showing through there as well as you can see. Side of the building like that, that darkness there. Okay. Some figures, but roughly
that's what we've got for a quick little sketch. And what we're gonna do firstly is think to
ourselves, Well, what are the cooler sides and what are the cooler
areas of this painting? What we've got the sky.
That's pretty much, it's almost it and
maybe the shadow. Okay, so let's firstly go in and getting some colors
on the buildings. I'm going to work and have
a look at the buildings. And C Look, we've got some
maybe some yellowy colors. We've got some orange, yellow. Yellow is back here as well. And I'm not going
to worry too much about it and pick up
a bit of this yellow, yellow ocher here and got some oranges and
yellows in here. It doesn't matter. I'm
just going to get in a bit of this orangey looking color for the front of this building. Very light. Something like this. We can dial it down. I'll just put in a bit of whatever is around the sides of the palate as well. Just
something like that. Just a bit of an orangey color. The slides here of the
right-hand side of the building, they're going to
be lighter because they are facing directly, directly facing the sun. So this is going to be lighter and this is going to be a
little bit darker actually. Here. This side of the orange, orangey color like that. And I want them to just
blend together as well. Some more yellowy color
here coming down. Now, got a bit of this
off-white color as well here, little bit of this
off-white color like that. And in the background, you've also got some
of these browns. Like I think this is
a burnt sienna color, which is a kind of
a reddish brown. You see a lot of that
in Italian buildings. So this is just a bit of
that brown touch of that. Some of it will mix. It doesn't matter the
touch of that brown. Let's go over here.
On this side, I've got to put, let's put a bit more of this burnt sienna here. And I'm keeping it
pretty light as well. Lots of water in here. In fact, I probably
need more water. I'm just going to
lift off a bit of that paint so it's lighter. Bit of that burnt
sienna in there. Look here, there's
a bit of yellowy color for these buildings, like a touch a
yellow or something. It's too saturated. So I'm going to drop in a
bit more of this white, off-white color too desaturated, attach even a bit
of gray you can mix in as well just to D
saturate that color. Okay. A yellowy gray color
and some more here, just a bit of a warmer
color. In this building. It's got some warmth
in the ground. I'm just going to pick
up a general warm color. Just a bit of this that
we've mixed up already, but with some tiny bit
of white mixed in. So it's just an off-white color that I was talking about before. And they also they also drawn
onto the buildings a bit. So you can see there how
it just sort of joins on to the buildings,
come downwards, okay. Even play around with
some of the gouache in there to add in a bit of the gouache as it creates
more body to the paint. And especially down at the base, I don't have to use
too much water colors. A little bit of gray
in there as well. I'm thinking it's
just should have some more grayish
tones in the ground. More in here. Just move that across as well. Just a bit of that gray while
the paper is still wet. This is what I was
highlighting before that you can do
all this stuff or the paper's wet because
it's going to spread. It's not gonna look
look out of place. So that's done. Let's go ahead and get in
some color in the sky. I'm going to pick up a
bit of cerulean blue, nice little bit
of cerulean blue. And just makes it a
little bit of that. Makes this add a touch. And we'll drop that in the sky. Very light wash of that blue. And some of it may seep
into the buildings as well, but don't worry about it. Okay. The building should have
almost dried already, so it's not going to
make a difference. But what you can
do is cut around them as a touch lightly. See how I just left a bit of white on the top side
of the buildings. That's a little trick
that I use to just create a bit more separation between
the buildings and the sky. Some more water up
here, a bit more water. I just want that
to be a flat wash. Flat wash. But again, you can do
things like putting clouds. If you want some clouds in here, I can pick up some purple or whatever grayish color that we have here on the left
side of the palette. And I can do
something like this, adding some cloud-like shapes
running through the scene. Okay. Soft, wet and wet effects. Okay, So we've got
some variation. We can drop in a bit here
as well because the, the, the paint hasn't dried yet, so we can get away
with just adding in a little bit of
that stuff already. So look at that. It's
already we've got all the warmer colors in here, or the buildings
and the grounds. We've got some cool
colors in the sky. So the cerulean
blue and a bit of this grayish purply Cloud. Okay, So let's give this a dry. Everything is all dried off now, I want to mix myself up
a grayish blue color. I'm mixing up a
bit of blue here. I've got a bit of Payne's gray. I'm mixing as well. Okay. Maybe a touch of
yellow in here too, along with the purple
so that I can get a nice dark gray color and nice balanced gray
color as well that has some of the warmth in it. Okay. But more blue. More blue. Now I want to
make sure this is darker, but I don't want
it to be too dark. I also, this whole area needs to be joined onto the shadow
underneath the building. So let's try this.
Not dark enough. We need some more blue, maybe a bit more purple, more blue and some more grey. More yellow running
through in here as well, just to dial it down. Let's have a try that again. Getting there. And I'm just modifying this and adding some more
purple and some more of these grays to just darken it down a little
bit to the point where I feel that's
around the right level. So I still want to see a bit
of a yellowy wash behind it. I'm just going in
and you can see the side of the building here
that gets hit by the light. It's quite sharp that side, so I'm just coloring
that Olin. Okay. Yeah, you can see
that left-hand side of the building as well. All fairly dark. In fact, it's darker there, so I can mix in a bit
more neutral tint to darken that further down
on the left-hand side, it gets really, really
dark back there. I can just dark and then
even more like that. Okay. Go back to
my normal mix of purple and feather that in. Okay. So you can
see just a touch of that predation where it goes from dark to
light, lighter here. The shadow as well. I want to get this in with
a fair bit of darkness. So using the same mix because
it is really dark and creating a sharp shadow here
on the ground like this. And helping it to join
onto the building here, to the base of the
building here. Moving it all across
the scene to here. Just goes outside of the outside
of the scene in general. Okay. So they have it, you've got some bits
and pieces there. Another thing you
have is perhaps a little shadow
running here as well, just a smaller one like that, leaving a slither of lie
in-between like this. Okay. You've even got some
darkness underneath here. I'm using the same
mix that we've had, just been cut around and create a little bit
of darkness in there. Okay. And I'll put in a little
bit of yellow as well in this mix to lighten it up a bit. And just adding some darker bits of color behind here for
this building like that. Okay, It's kinda hitting
the side of that building, this as a sunlight or whatever. Even underneath the rooftops, you've got little bits
of shadow like that and tiny bits of like separations
on the buildings like this. Tiny little separations
that I can imply. Like this. There's all kinds
of things here. But at the end of the day, just wanted to put in a few
indications of some windows. So you can see here
just some quick, quick little windows
that I'm putting in with the round brush. Okay. On top of the buildings, look, you've got these little
bits on top here, these like chimneys and
stuff like that, like that. Now work on, again this
side of the buildings with a few little
marks and details, little windows, quick
little windows like that. But it's mostly in the sun. Bit of that there
but you're leaving the warmth there. Okay. As well. I'm just going to get
in a bit of the ground. This sort of
sensitive perspective in the scene like that. So bit of line work like this. Okay? So it kinda looks like
you're walking in, going into the scene that way. Little bit of some bricks and things as well
that you can just paint in with everything dried off. You can see in this painting already there's a balance of the cooler colors in the sky. Some warmer colors
here on the buildings, also some slightly cooler
colors for the shadows. Okay, now, what I
wanna do is just put in some small figures
and tiny little details. And I'm gonna be using just a bit of neutral
tint for this, just a dark color. And you can do things like also getting the windows
just a touch of darker color there for the for some of the
windows and details. Okay, just have a
bit of a play around and work work in here, some of these things. Okay. Some balcony or
whatever they think. Just work on some of this detail as much
as you want really, but you using the darkest
values here and tones of color. It's, it's just, it's just a bit of neutral tint
or a bit of grayish color. Okay. Make sure that
I don't overwhelm. Don't don't mess up the color scheme where
everything else. But this is to get in
the sharpest values. Okay? There we can even put in
some more here and that other side of the building
to really bring out the, the darkness and things here. K bits of darkness
underneath here, it's pretty dark as well. We can just darken
that up a bit more. Some of these windows
like that, like that. The bits and pieces of the
rooftop like that. Okay. The stuff here on the
roof there to the left, keeping them on
that the building, the left side of the building
is actually a bit darker. So that's why I'm trying to
go back into it attached to two perhaps getting
some of those details. Okay. Scratching out work
that these tiny little windows and stuff on the buildings that I
missed out before we can get some of this stuff in. Maybe some of the separations in between the
buildings as well. I can just imply in
darkness underneath, in some areas for shades
and things like that. Figures that's put
in some people. I'll put in someone here
just in neutral tint. Neutral tint. And then you're just walking. Another person here. In here, especially in the darkness. A little bit of extra
darkness helps. You were just walking
around in the scene. And of course the
shadow underneath them. I just need to add in a little
bit of color like that. Okay. Can even add in another bit of shadow
here in the front. Just pick up the color and
do something like this for an imaginary shadow
that's coming in from another building. That little lamp here. Something like this little lamp on running off the side of
the building like that. Tiny details with
these rigger brush. Okay, nice little
exercise to do. And it teaches you to
mix on the palate. Getting those areas of controlled
color to start off with the sky and especially the sides of these buildings
where you want to draw out the maximum contrast, mixing on your pellets. Better for that. Then if you want to
put in some clouds at the top, noticing here, I'm adding that in while
the paint's still wet, so we're getting
some of that mixing happening on the paper. And also we're mixing
on the palette as well. Near the end, we've used
mainly really dark paints, which doesn't require
much mixing it all just a bit of five, 10% of water added into the paint at those
finishing touches. So obviously not the
most detailed painting, but it's a great little exercise that you can work on with
any reference photo, not just, not just this one.
13. Understanding Composition: I'm going to talk a bit
about composition now. And I think this is a
very important topic because a lot of
time composition is relating to your
particular vision that you want to get
out of a scene when you look at a reference photo, often that reference photo doesn't speak to you completely. There's a few things you
might want to change around. You might want to
change the perspective. You might want to change the
figures are the buildings. You want to change,
areas of focus in there. So this is one of the best things as an
artist that you can use at your disposal to be able to create that
perfect looking sin, because you can never find a reference photo that looks
perfect in your eyes anyway, sometimes you get lucky, but a lot of the time you don't. I've got a few squares here and we're gonna
do some exercises and see how we go with these. I'm going to use to
reference photos to highlight this
particular exercise. And the first reference
picture you can see it's actually a portrait
style orientation, so it's running up
this direction. But you might look at this
scene and say to yourself, I don't really like
that sort of thing. There's too much of
this foreground. I do like the buildings
out in the background. So that's what I'm
kinda thinking anyway. I'm thinking we have 0. Half of the scene is
roughly just road. I don't want to put
that in, but I do like the top part of it with the buildings and
the cars and things. So I'm going to turn this into a landscape style orientation. Okay, I'll put the
horizon line here. Just just planning it out. And we might put the
building in the corner. And one of the most
important things to remember is the rule of thirds. And it's something that is talked about in
photography a fair bit, but it also applies to painting. You can see I've
divided the paper, this little segment here up
into thirds, okay, 123123. And the idea of the rule
of thirds is that you want to put your objects of interests in these areas
where the lines interconnect. Now this isn't a rule that's set that you have
to follow all the time. But I think as a
beginner to good one, to get started with
the follow anyway. So e.g. I. Might have
the building here. The front of the building
comes off in the distance. Here's the side of the building. On the right-hand side there
you've got a big tree here. Sri, their buildings running off into the distance like that. Okay. Bit short with the ordering. Doesn't matter. Bit of detail underneath the
building, some darkness, some of these shades
that you have these little night at these little shades at
this P on the sides. Windows, of course
needs some windows. Just get some more of the side of the building in like that. That you've got
some shadow here. And this is a good
opportunity for you to plan out the darkness where
all the light is. Your painting here as well. I think I might put
in some darkness for some of these trees. Often the side of the
scene might have a car here or something coming
in from the corner. Or not. A tree or something. There's a person
just walking here, putting a person there. But I do like these cars
off in the distance. And I want to draw on that a bit more and put in some more cars. Just want to play
off that a bit, putting some more cars just
closer by in the foreground, have them overlap a
bit with each other. This one should be maybe
a bit taller like this. Okay. But you've just
playing around with everything and seeing how it
works out the composition. Because nothing
set in stone here. We never hear there's some
type of other building, e.g. you might think, I
don't really like all these trees here. I might like this one here. But I like I like
these other buildings. So I could invent some here, putting some elements of roof, rooftops or something that
just putting a few windows. Okay. This could be again, that little, a little tree or something here.
Now the tree here. And what are we doing down here? Maybe we can put in the
side of a car or something that just driving
through the scene. Just something simple.
Doesn't matter. Some perspective
lines like this. And all of a sudden. I mean, it's not perfect. But we have ourselves an original composition just
from the idea of thinking. How can we make it
more interesting? I'm going to make
the CMO interesting. Bye. Removing a lot of the
foreground and the other one. And shifting elements around. And also placing the
elements in areas that intersect using the rule
of thirds might be e.g. a good idea to put a figure, India in one of the areas
where it intersects just one figure closer
in the foreground. Like this. Well, you might not
think that's a good idea, but I thought, why not just put one in
there and see how it works? Okay. Some little poles
or something here, some little traffic poles and light lights running in
from the side of the scene. Suddenly we have a little
composition that we can use and turn this into
an actual reference. What Say? Say we want to make it closer, even closer than that. Well, we can do that. Putting that horizon
line there again. And I can say, stop putting in the building here and make it larger, larger. And now we've got this side
of the building as well, coming down over in
the backend side. Here, here, here. Yeah. Oops, horizon line
should be maybe, maybe around here
now. Be closest. So just to experiment around how it would look better like this bit closer up and
maybe have less going on. But we've got a few cars, like another car here,
another car here. I have a figure here walking in from the front
of the scene or, and another one here. Okay. And you can think to yourself, well, maybe this is better. Maybe I like, maybe I
like this scene better. This composition better. Oh, just a simpler sort
of seeing like that. They tell him or interpersonal
story with the figures, maybe these two
friends and they're just having a chat
and this person is carrying around a little shopping trolley or
something like that. So a couple of options there from that same reference photo. Let's have a look
at another one. This is a very
complicated scene. So I think I want to
simplify this down. I want to make all
those buildings in the back reduce down to one shape. And I want that building to the right, a little
more detailed. So let's do that. Can just put in the details of this building and
goes up like that. Some type of loops, some type of clock tower here. Okay. Might be
running out of room, but we'll see a dome
up here like that. Okay, it kinda goes out the
paper, but that's alright. Here side of the building. And again, another another kind of part of the building
there that like that. That there. And I do like how the light is coming in and sort
of casting a bit of shadow on the building
in areas so I can just color part
of it in like that. Do like that. Shadow pattern. So just remind myself,
color that in. Okay. Of course we've got
windows and things on the on the on it as well
and bits on the roof. It's tiny little details there. There's even something
here. This is like a another dome here
in the background. I didn't see that one
sticking out like that. Okay. Some more windows here. Let me go to larger
entrance like that. Just write all these buildings
aren't going back. She's just so much detail. Let's just simplify this down. Okay. I have some rooftops
and things maybe. But apart from that book,
I just want to simplify. Maybe I want to tell the
story of this building. Not all the rest of it. This large tau, not tau,
this monument here. I'm just going to
make it run out of the scene so that you
can't really see it. But the rest of these
buildings look simplify down. That's just a silhouette
here off in the distance. Whereas here we've got the main story and maybe
put in a figure here, person here, just walking. And another one here,
just walking as well. Walking around in the scene
and fewer, few people. It looks like quite
a busy scene. Really. Lots of figures
walking around. And e.g. this could be some large
shadow shape on the ground, a soft shadow shape here. Running across the ground. Large shadow shape, perhaps. You've got a bit of a
slither of light here. But these buildings,
maybe a building off to the left is casting
a shadow on this side, but it's leaving a slither
of light through the center. Leaves you a few
things to think about. That's for sure. But I think this is a much
more interesting composition and a much more
manageable composition. And to try to figure out
and draw all the details of these buildings and then
be left with a hole, this stress and how to figure
out detail everything. Okay, so that's one, Let's say we want to focus
more on the building. So I might want to lower that horizon line
and touch there. So I've got enough
room for the building. Okay. Start Here. Look, kinda bring it
up like that there. And getting the details of
the side of the building. You know, that that this one's gonna be
tricky in the center, like that there. Okay. And I probably should have with the bit of paper just giving it a bit more room at the top, but that's okay. A bit here at the top. That top of the clock tower. Getting in a bit of
shading as well. Okay. Maybe I wanted to just
shade this side better. Here's some more, more side of that building that's
sticking out there, this other tower here in the distance.
Something like that. I'm bringing that
down further and have some extra details here on
the side of the buildings, just a little entrances and
windows and stuff like that. Okay. And here there's just trees, nothing else, just trees behind. And we're going to have some people walking
in that could be someone here and one here. Maybe it's more
personalized meetings, a couple of friends here just catching up or having
a bit of a walk. Maybe the lights
different as well. We want to change that
lights so that it's kind of coming out this way. So we've got darkness
here in the foreground. And there's more darkness here on the right-hand
side of the building, but it still makes
sense that shadow still make sense on the
right-hand side of the building. But we've got some shadows
of the figures as well, blended in with this
large shadow here. Okay? So there's a lot of options. And as you can see, I've used in the beginning
of the rule of thirds. But at the end of the day, I thought to myself, what do I want to be the subject of this? See what I want to focus on. And do I want a more
personalized scene or do I wants a sweeping
landscape with a lot of stuff going on and just
a wide overarching view. So for these, these
particular scenes, I've actually gone
ahead and done two. And here you can see I've
zoomed in a little bit. Usually when you zoom in, hit more personalized things
going on in more details, especially with figures and cars and things off
in the foreground. So it's really, it's
really up to you. But have a practice and use these techniques that I've shown you on different
reference photos. You can use the ones that are
in this particular class, or you can use, you can
use your own as well. And I think that's
the whole point. Like you guys to experiment
around with your, with your own references and realize that you can
do this with anything, any reference, not just
the ones that I provide.
14. Understanding Perspective: Alright, in this video
I'm going to give you a crash course on perspective. And this is mainly just
one-point perspective and a few principles of basically
the horizon line as well, which I think is gonna
be really important for you guys if you want to
make sure that scene looks completely dead
on as if you're looking at it straight from reality. I think a lot of
times people end up making scenes just look a little bit too elevated or
going down on a decline. And it just doesn't match what's going on in the actual
reference photo, figures are too large and the background too small
in the foreground. I'm going to show
you a few tips, and this is going to help you
make things a lot easier. And your paintings
improved significantly. So let's go ahead. I'm going to draw in
a few of the squares. And basically it's going
to be three squares. I'm going give you three
different examples. The bottom square, Let's have a look here
at the top square will just be figures with the
heads on the horizon line. And we can have a couple
more here as well. So e.g. if we put all the figures, if we say have some people
walking here, okay? Another person walking here. Here. There's also some small figures here just
in the background, real tiny ones that are just walking around
in the distance, but their heads are all
roughly on the horizon line. Okay, even big ones
here in the front, we have a big one here
close to where we are. Okay? Or even a larger one here. The shoulders of a
figure just starting to come into the scene, e.g. okay. As long as the heads are all lined up on the horizon line, it's going to make sense. Okay? It's only when you get some in the background
that are too big. Okay, that's when it's going to start to confuse the viewer. I'm just putting in some
imaginary buildings and stuff like that
here in the background. Alright, so let's
have an example. Let's look at an example where
for the purposes of this, we're going to make it
look like the figures are going on an incline. So gotta figure here
in the foreground. But one's going further up. Okay? Yeah. And there's one here
walking around up here. But the ones closer. Okay. Actually further down. So what this appears like now is that the figures are walking up, walking up a hill of some sort. Okay. So have I don't know, some buildings and
stuff up here as well. So this is fine. If you are painting and
seeing that has an incline, otherwise, it's going to
look a little bit odd. And it's not going to match
your reference photo. The same thing goes, is
sort of when you have a figure that here, we've got some of them
just getting smaller. Okay, further down. Their heads just go further
down near the horizon line. Okay. This makes it look like the figures are walking
down a hill of some sort. So there's a big difference. And I think with a lot of the scenes that
you see out there, they'll mostly be in this sort of this sort of orientation. This is because it's
easier, I think, for us to make sense
of that scene. Most of the times when
we're walking around, it's on flat ground, but
it's not always exact. And sometimes you get
people that are a little bit bigger, a little
bit taller, e.g. there could be a child that
could be smaller child here in the foreground
and the head is smaller. But that makes sense because
the child is small and maybe holding the hands
of this adult here. Okay. So you really have to take
in mind that these are just for average height adults. Okay. Let's have a go at a few
other little exercises. With a normal
one-point perspective. You have the horizon line, which is the area where the sky meets the Earth, the ground. And you normally have
a vanishing points. So it's a point where
everything starts to disappear and get a really, really small and the distance. So if we can imagine
this is like a road goes off
into the distance. Alright? And we have, we can have a car here and put a
little car here with some wheels driving
off into the distance. Okay, I can put another
one maybe next to it. Just simplify that car
down a little bit. And as you can see
that the cars, as you get further up in the
back, they become smaller. And this is what you have
to imply. With perspective. This is decreasing sense of size as we move all the
way off in the distance, you can almost, barely see
those cards back there. So e.g. if this is
a road which is. Which is what we're drawing. I'll put another
car here as well, a larger car, maybe
closer to us. Yeah. Okay. This is logic car. Logic car. Right? It's gonna be bigger near the foreground and the ones in the background, I'm
going to be smaller. The same thing goes
for things like poles. There could be like a pole here, light pole across the side of the scene. Another one here. The closer they are to us, the more the larger they are. This one here probably
coming out of the scene, even coming out of the scene. But once here at the back
are going to be smaller. See, maybe smaller and smaller yet as they
move to the distance, you can barely see
what's going on. Okay? And same thing
goes if we draw people. Remember, a person is gonna be a little bit taller,
generally speaking, a little bit taller
than the average car, maybe at this size like that. Let me get some shadows
going to the left or not. Okay. A little bit taller
like this, then the car. Okay. Unless they're a child, the child is going to
be around this tall, standing next to the adult. Okay. Now, what happens if
we're moving backwards? Same thing. We're going to make
everything smaller. Smaller figure walking around. They're even smaller figure
walking around there. But the proportions
remain the same. The height of the person
will still be greater. Will be told them the
car, similar to here. Okay? So if I decide to put in a
person here in the background, but let's say I
make them too big, make the head too big, and the body too big, and the legs like that. This looks out of place. It looks like we've
got a giant walking around comparison to
everyone else in here. And the same thing
goes if you've got the cars of this size, and I'll put a person
here, an adult here. They're going to
look too small in comparison to this car. So we have to make sure that everything is everything
is in proportion. Okay? The only way to
do this is again, to put in the perspective lines, putting the horizon
line and start putting in the cars or the buildings, whatever shapes that you
have in there first, and then making sure that
everything else matches up. So if you've got a
really big building in the background, e.g. big city city off in the background or
something like that. Okay. What you don't want is to have a person that's too big
up here. Like that. Taking a look gigantic. So of course, you want to
have a tiny person here. Maybe even, not even be too hard to really put them
in unless you've got them closer here
to the foreground. Really, keep in mind and
make sure that everything, everything matches in the
proportions with each other. Because otherwise, if you've got elements that
are out of sync, your painting is not
gonna make sense. And this is where it all starts. Let's try scene with a really high perspective line there. Horizon line here and here. In this particular scene. Okay. We're kind of looking looks like we are looking from
the bottom upwards. Okay. It's kind of like
an advantage point of someone's smaller. Like kind of like a child. Or what have you. The,
the buildings could just be so tall you can't really
see what's going on. Okay. Yeah, some
figures here. Yeah. Like that. Alright. This one here is the complete opposite where
you're looking almost down. Like a top-down
view, vantage point. Top-down view, the low you
put that horizon line. You can have a, a horizon lines all
the way up here and it's going to exaggerate that. And it's very rare that you have scenes with horizon
lines like this. I tend to put them
roughly in the center or just above the center or a little bit lower
than the center. That gives you a good
balance of both. And that's when we
look into the world. Usually the horizon line is
roughly roughly at eye level. So we want it to be kind
of in the middle and the heads to line up
on the horizon line. That's going to give a
more realistic perspective from the average person. Generally, we don't view the world like this unless
we're standing up on a mountain or we're seated somewhere on the ground
or something like that.
15. Draw and Paint Buildings: In this video, I'm
gonna be showing you how to draw and paint buildings, people, and vehicles. These are probably the most
common subjects that you see in our reference photo in an urban landscape,
wherever you are. So let's go in and
I'm gonna show you a couple of ways
that I paint buildings. So firstly, let's go ahead and get in a bit of
a couple of squares. I think this will be,
this will be the best, best thing to do. So just like that. Okay, good. Now, horizon line,
horizon line here. I'm going to paint,
I'm going to put in a few buildings here
in the distance. And what I want you to realize
is that a lot of the time, you don't have to get in all the little details
of the buildings. All we have to do is connect them up and create
a bit of a silhouette. So little sketch didn't
really take much time at all, but I'll pick up
some neutral tint. Okay. We're just going to
get this whole set of buildings in with
one quick wash. Okay. Like that. One. Wash, bring this one
closer like that. Okay. And we can just get in some little perspective
lines maybe like this running through the scene there. So there we have it. We've got some buildings here
just in a wet and 11 wash. But what we can do
is I can also add in some little indications
of windows here. This paper dries really
quickly as well. So as you can see, some little windows
and things like that, you can just drop in. And that's one way that
you can paint buildings. Another way. The second
way that I use to paint buildings is to actually
use a couple of washes. E.g. might have a
building like this. Okay? The clock tower. This is a same reference
that I used before. Anyway, clock tower. There's another part of it here. Like that. Yeah. And of course another
part of the tower here that just a bit of time drawing
this in so I can get into the details of the shadows. Okay, this might just be some trees and bit of a building
here in the background. Maybe a person putting
a finger here. Couple of people, another
person here. Okay? So what I'll do in this stage, in this example is
that I will get in a lot of colors
of the buildings. So normally when we
have these buildings, they're going to be
sunlit in the daytime. So you're going to have some of this warm color
running through it. So I will add in this warmth. Yellow, bits of yellows and things in here,
just warm colors. It doesn't matter really what
he's in it for this stage, just practice along with me. Like that. Warm colors for the building's. Not just that hold
the ground as well. You're going to have some
warmth here on the ground. Ice. And just some of the buildings off in the
background as well like that. So I'm going to
carry all this down, just join it all up so that
it comes through the scene. So we've got all this
warmth in there. I'm also going to just
for the sake of it, I'll put in some sky, bit of this turquoise. Be the sky. Just to make it look nicer with a bit of coolness in there. Oops. I can't put a turquoise
there in the sky. Now, let this dry. Once this is dry, I'm going to start putting
in the second layer. For my buildings
simplicity sake, I'm just going to use
some neutral tint, a bit of grayish color, maybe some yellow mixing a bit of yellow there
to warm it up a touch. Good. And let's go ahead and put in some of the darkness here on the right-hand
side of the building. Yeah. Here, just a bit
of this darkness. There are here as well, here. And maybe here as
well on the building. You do find that
there's actually a softer shadow running across the building
down at the base. I'll just imply that as well. That in here, just the shadows. You can really see. There is this sense of
light on the buildings. Some details in there. You can also put
in these little, tiny little indications
like these windows, dropping them in like this. Little windows running through the scene for the clock tower and maybe the front
of it as well here, these little windows
and things at the top, the little spires on top
as well, the tower here. Okay. Normally I wait until
the paper is completely dry before I put in all
these really dark spots, but these paper dries very
quickly so I can do that. So really you have two steps plus an additional one
that I'm doing now, we're adding in just
the final dark spots. And of course here in
the background you might have some these tree, I'll just getting an indication of some of those
trees like that. Just some quick little
things like that. And for this building here, I'm just going to color it in. Okay. Maybe leave a bit of
the roof exposed there. Alright, for the foreground. Let's join it up
with the shadows from not just the buildings, but whatever is
casting a shadow, probably building anyway,
from the left-hand side. So we can get in
that large shadow. And it's okay if you getting little bits of leaving bits
of the yellow behind as well, I don't have to worry
about coloring it all in these tiny little bits
of yellow there are good. Okay. There's some figures
here as well. So you can just use that in a little darker color
like neutral tint. Connect up the legs of the
figures here and here. Now the figure here, here, walking through, walking
through the scene. Like that. Detail for the head of the
figures, maybe like that. Some shadow for them, like this. A bit more darkness for the shadows behind just to
create some variations. Can even get out some little
tree branches if you want some little quick tree branches
or something like that. Okay. Quick little things. Okay. But you can see the way that I've done the
buildings just in a few quick Goes,
few quick washes. Okay. We've already implied
a significant part of the building and we can tell what's what's, what's
happening in there. Something you get a
little bit of shadow underneath and parts
of that area as well. Okay.
16. Draw and Paint People: Alright, so let's do some drawings and paintings
of some figures, some people. Now, the way to remember
how to draw them in the proportions is
that you want to make sure the head fits
into the body. The entire length of the body, roughly 7.5 to eight times. So you've got the head here. So you got 1, 2, 3, 4, 5, 6, 7, and 8. 1, 2, 3, 4, 5, 6, 7, 8. Okay. That's roughly the
height of an adult person. Okay. So the head will fit
into the entire range here, 7.5 to eight times. Now, of course, with
smaller figures, sometimes you might
have children that might be half the size. Here, the heads
are always larger. Children's heads
in proportion to their bodies are always
a little larger. So you, the rule of this is
little bit different here. So children's bodies.
So in this situation, the head is not going to fit
into the body 7.5 to eight times due to the size of the head in relation to
the rest of the body. For the most part, you're going to be
following this sort of guideline for all the
figures that you paint. So let's go ahead. I'm going to show you just the way that I paint figures now start off with the
heads first, like this. Well, it's putting
the head first. I find that's the easiest
point to start with. And then you can
get in the body. That leg here maybe in
a lake back here. Okay. It really depends on what
the figure is doing. Okay? Now, the way that I paint figures also is
that I look at the head. So if you want the
figure to look like they're walking in a
particular direction, then put their head in that
direction, like they're here. Okay. That way walking
in that direction. So that could be the body that leg coming out the front and a leg coming out the back there. This person's walking
towards the right. So we could have a foot here at the front and a leg
here at the back. So these two figures
are walking opposite other way to each other
here as well and I'm here. Okay. Sometimes they just out the front down the
bottom like that. Okay. How about a figure just standing up straight,
just looking at you? Just put in the head like that. Shoulders square on. And then you put in the legs
like this. Could be walking. Another way you can imply
this is have one of the legs just in front
of the other like that. I've got that leg in the back
and the other leg in front. So this one is just
standing straight on, whereas this one's
walking into the scene. Or it could be
walking towards us. And that's independent as well. How much detail you put
them up, putting the shirt, and then we'll look like
they're facing towards us. And the more you slide the head, the more it looks
like they're running or going in a particular
direction or the bodies, even if the body is like this. Okay, that could be really liked that they're running
in that direction. Let's try it. Let's try that again. Like this. Okay. There's a bit of urgency. It looks like that
person's running. That when I'm behind, this person's
really just bolting there in a big rush
to get somewhere. What you don't want to do
is make the heads too big. Okay. Unless unless
they children. Okay. Let's their children. So the child, a little
boy or something. If you have an adult with
head, that's really big. This is when the figures
start to look funny. You start putting in
the body and the legs. And it looks really weird. It looks too strange. You can get away with it if
the head smaller. I think they had smaller, but it just looks it just doesn't look right if
the head is too big, okay, It's also easier to
enlarge the head, put the head into
big to start off with the kind of
stuck with that. So always error on the
conservative side. When you are putting in
the heads of the figures, you want to make sure that
they're not too large. Because then you can always
enlarging them afterwards. Also, painting a group of figures is sometimes
important scenes. You often get a group of people walking together.
This is how I do it. I'll put the heads in like
this and then I'll just join the bodies along
with the heads. Okay. So it looks like a group of
people walking or whatever, just a crowd of
people like that. Maybe from a upward
bird's eye perspective. But if you've got three people walking together like this, they'll just kind of
overlap group of friends or something like that. Okay. Legs in here. Like that. Bunch of friends
just walking about. It looks like they
kinda joined together. Can add little bits and pieces
onto the figures as well. You can have like a bag. Sometimes figures
will be holding suitcases or they could be backpacks on or
something like that. What else could you do? You could have people
that are holding onto like supermarket trolleys
or something like this. In try just put one in here. Supermarket trolley like this. Just put the legs in first. The wheels underneath. This person could be walking
into the distance. Okay. May the head almost too big now? So it's always important to keep the figures
looking a little bit different and you can put
hair on them as well. You can even put hats and
stuff on the figures, make them look a bit
more, a little different. It gives them a bit
more personality because if you do them all the same, It's fine as well. But again, I think
it just looks better if you add some extra details on those figures to make them look just like different ones, different people walking around. This exercise that
I'm doing here, really, really recommend this. I've done so many paintings
of these figures in this way that when it comes time to actually
put them into my scene, didn't really have to
think too much about it. Main thing I need
to think about is the positioning,
where to put them in. I'm not thinking about
the size of them. Whether it's right,
the size is right, or whether they're too detailed
or not detailed enough, or whether they're in
the same position. They will run it running or
walking, that kind of thing. Because I've done
all that already. Spent a lot of time doing
what I'm doing here. Okay. So that you
so that you don't have to worry about
all that stuff. Shoulders of the figures
are important as well. Always make sure you've
got the shoulders in. Often in a scene as well, you're going to have a shadow
underneath the figure. You need to look at
with a light source and figure out where the
shadow is coming from. Light source is directly above. You're going to get a shadow underneath the finger like that. If the shadow, the light source
is coming from the right, you're gonna get a shadow
running to the right like this. That's the left.
Shadow to the left. Sometimes you're going to
have shadows coming in from an odd angle like this from the back, the back-end. So something like that. These shadows don't
make sense because they're all in relation
to each other. They should all be the same, but just giving you an example of they're from
different scenes. So this one here, shadow
running to the right. The, the light source is
coming from the left. And you joining the legs
up like that as well. Making sure that they connect on to the shadow
like this. Okay? Sometimes you're gonna
get shadows that just come downwards again from, if there's a light source
coming from behind, or even some downward
reflections if it's wet ground. But this is a basic, and this is pretty much
everything you need to know to get into
some basic figures into a scene without
much effort at all. Just using essentially
a little round brush. And you can really get in
a lot of different details and imply quite a few
different stories. People just walking
around in the sharps, people running to go the bus
stop or something like that. Group of friends together. So really recommend
trying this out yourself. It's got a bit of spare paper and do some figure painting.
17. Draw and Paint Cars: In this video, I'm gonna
show you how to draw and paint cars and general vehicles. I think this is important
for any urban landscape. Now the queen central
vehicle that you need to draw as
one that's either facing towards you straight on or going off in the distance. And you can see the
top of the vehicle. I've got in this
sort of windscreen, which is generally a
little bit darker, but sometimes you get that
reflection coming off it. Okay, So you've got
this kind of almost rectangular but
with curved edges. And then at the base of the car you've got
another rectangle here. Rectangle. And this is where you
have the tail lights and the bumper. But most importantly,
is that you have the wheels underneath
the car here. And the shadow. You need to have the wheels and the shadow connecting
together in this way. If you don't have that, it's gonna look like that car is not really grounded at all. So this is one that's just
sort of going into the scene. Maybe going into the scene. So we can also get one on
a bit more of an angle. We can get in the
windscreen kinda like this. Notice I've created these lines of the windscreen here at the back of going off
on a little bit to the left hand side because I'm
going to make it look like we can see more
of the right side of the car in a couple of the tail
lights there, the bumper. And then of course we have the front of the car like this. And the rooftop joining on. Can't really see the
front of the car. But you've got the wheel here. Now, the wheel here maybe. Okay. And, uh, we'll hear, join up like this.
And then you have it. You've got a car,
basic car just again, going into the scene, but you can see a bit more
of the left hand side of it. More of the left-hand side of that car might have a light source coming
in from the right, casting a shadow to the left. Okay. Let's do the same
thing with the cough. When other car facing
to the left like this. Windscreen with the lines, the edges of the windscreen
facing towards the right. And then we'll get into some of these tail lights
like this underneath the car that we use that
in front of the car here. And joining up the
wheels again like this. Then we haven't we've got
another car driving towards that driving towards
the left. Okay. And again, I'm gonna put in
some darkness to the left of the car because of
the light source, which is basically we've indicated it coming in
from the right-hand side. Three cars, one going forward, one turning left,
one turning right. And really, that's all
you need for most scenes. Okay? The other thing you might
have is maybe a card like facing sideways, like this. Alright? Facing sideways. You can just put it in
sideways like that. There. Again with the top of
the car like that. General shape of the side
would profile the car. The wheels is to round
wheels at the bottom. And again, just
joining up the shadow underneath so that it looks like it got a bit of
darkness underneath the car. Some people like to put in windscreen and things like that. I'm just going to
put in a couple of windows to the side of the car. Sometimes you would in a
bit of the door like that. But one thing you find is
that the front of the car, wherever the car is driving, it's going to have a bit of the nodes that just
points out like that. So you can tell that's
the back-end of the car, maybe an exhaust pipe here. You can pop in there as well. Something like that. Okay. So you use this same thing also to turn the car around
if you want it to, facing the opposite direction. But these four cars
are pretty much the only things
that you ever see. The only orientations
that you see the cars in. So how do we paint them? Well, let's just use one color. And I'm going to probably use another sheet of paper.
It's just gonna be easier. Pickup bit of darker paint. And I'm gonna go in, let's
put it in like this, the top part of
the car there and the windscreen coming in, then the bottom part
where the bumper is. And we can just get in the bottom part of
the car like this. E.g. we can put it in the
side part of the car as well, just like what we
were doing before. They're they're they're okay. Join that on. It looks
like a car as well. Okay. Maybe it's a bit of a
light source coming from the right-hand side.
Let's go again. The top part of the car again
with this sort of shape, this funny-looking. It's almost like a
rectangular shape with the top squeezed in. The bottom is boxy. Look. And at the end of the day, if you even if you color the
whole car and like that, as long as you've
got the wheels at the bottom, it's
gonna make sense. Lot of these ones you just
have coming towards you. You can't really
see all that much, even something like that. Or in the distance, might have a few cars that
are just really far back, but you can make
out the tires like this and join them
up at the bottom. Now the car sometimes they
overlap with each other. So you've got a few that are running along with
each other like that. So those are a few
simple sort of cars. I mean, you can even
do one here that's facing the left-hand side, like I was mentioning before, with the full Drive or something and a couple of
wheels here, the base. And again, just putting in
some shadow to the left. Simplified sort of vehicle. And of course, the one facing to the right
as well, like that. Okay. Having practice with these, and I'll give you more examples
to play around with in the actual
demonstrations later on. But challenge yourself and
try to paint a car with just one wash. You'd
be surprised at how, how easy it is to just
simplify them down to these little shapes and have them still look like
cars. At the end of the day.
18. Paris Exercise - Drawing: So in this scene, we're
gonna be doing a exercise, a exercise in
one-point perspective. This is the only type of perspective that you'll
be needing for most of your street landscapes
and urban landscapes. And here what I'm
doing is that I'm just creating little square frame or whatever to
kinda get started. And what I'll do in the demonstration of
this entire scene, we're going to talk to
you about perspective in relation to what I'm drawing. I think it's going to
make a lot more sense that way than to try to explain things from a more
theoretical point of view. So let's go ahead
and get started. So you can see this scene here. And one of the big
things you need to do when you first pencil in
your reference photo, need to add in the horizon line. What's the horizon line? Horizon line is
essentially where the sky meets the ground. Street scenes. It's basically the point where
everything vanishes. This is also called
the vanishing point. So if we look all the way, where'd all the buildings
finished roughly here, but behind where
that signpost is lady standing around
roughly here. Okay. So just mark that out. Again. This is
about a quarter of the way through the scene. If we look up we looked
through the scene, this like we separate
it into half. It's about a quarter of
the way through there. We can just draw in a bit of this line indicating the
horizon line, just like that. Okay, really important
to get this one right. You're gonna make it too high. And especially if you want to make sure that
the reference photo, the painting looks similar to the reference photo
once you're done. Okay? If you have it like this way, what you wanna do is you want
to draw a whole bunch of lines that are stretching out
from that vanishing points. So e.g. here, you can even
use a ruler for this, I'll use a ruler just as
an example to show you. So say if we draw that
line here, like that, all these lines are going
towards the vanishing point. Okay? So what you wanna do
here is create this sort of effect on the ground with all the lines heading
towards the vanishing point, we can draw in the
bits and pieces now, so here there is some type of a signpost or whatever,
but she kinda close. It's like here is a figure, There's a lady
here just walking, but we can change this around even if we don't have to have it exactly as the reference
photo was. Another girl here. She's looking down on
her phone or something like that and pants. Some other person here
behind. Maybe just walking. Okay. But the important thing
is that these buildings, notice, I'm going up into
the corner of the scene. Always look at where the
buildings finish off. This one finishes roughly up
in the corner of the scene. And as we go into the
distance where we're at, where it goes into
the vanishing point. Notice how everything
becomes smaller. Buildings, everything starts to curve towards the
vanishing point. So let's try here. We've got a building here in the foreground are
pretty large building. It's got to move top like this. Now the part of it just
sort of coming out there. I don't know. It's quite
a complicated building, but I'll simplify
that down here. There are some shades, some sort of shade there and underneath as well like that. And then here there is a
bit of areas sticking out, is someone that's a
cyclist here as well. Billy miss almost missed
out that cyclists and just outstretched
couple of wheels like that. This cyclist. Okay. I'm on the path cycling towards the vanishing
point off in the distance. Okay? If we start working on
these other buildings, we've of course
got this one here. That's again, a
little bit tricky. But in the center of the scene, this is where the other one just starts like roughly about here. Where we've got sort
of comes up like this. Top of the roof,
kinda like that. There's something here there. Like that. Running down the side. Everything curves towards
the vanishing point. Look at how small the
buildings get off in the back. And you can imply
some of them sticking out and that mostly
they just end up looking like this and getting smaller as we
get into the distance. Of course. But this is the
front of the building and there's a whole bunch of windows and things on the
side of it, doesn't matter. And here we can just work in this building,
it's simplified. I'll just simplify it like this and just get it in with a few quick
little strokes, brush strokes at that. I don't want this to
be too complicated. This particular scene. Few little bits
and pieces there. But one thing to
keep in mind as well is where you put the
heads of the figures. Now the heads of the
figures should be just above the vanishing point. What you want to
keep them roughly around the same level as well. If you're assuming
that of course, this area of the ground is flat. If you start making the figures, the heads off in
different directions, not direct directions
with different heights. They're just going to
start looking funny. E.g. if I put in someone in the background with the
head like that big, okay. It's just going to look weird. It's gonna look like this
giant walking around. But if you put someone I
had large head in here, the front, making sure the head is the same
height as the other ones. It looks like there's a person that's walking into the scene. Doesn't a person that's
walking into the scene. Alright? And even a smaller person
off in the background. So long as you put the
head in and around the right place, makes sense. Someone just walking off
in the distance here. Smaller figures just
walking around. The reason why the
cyclist is a little bit taller because
it's on a bike. These ones should probably be
a little further down here. Okay. We will further
down, doesn't matter. Okay, roughly around
the same point on the horizon line is fine. If you have figures in the backgrounds with
their heads are really high. What that implies is that
we're going up slope. And on the opposite
side of things, if you make the
figures heads go, get lower, lower than
the horizon line. As we go into the distance, it makes it appear
that the scene is starting to, we're
going down a hill. So having them roughly at
the same point here on the horizon line indicates that the figures
are at eye level. People are level. It gives a natural looking seeing kind of
like what we would see when we're walking around,
generally speaking. Okay.
19. Paris Exercise - Light: And this is an important
thing you need to do to make sure you have a
sense of depth in your scene even before
you start painting. The perspective of seen
as really important. To keep in mind these tips. Now, we're gonna get into painting now and I'm
going to show you how to imply certain things that
are closer and further away. Now, for this, I'm going
to just use one brush. I'm gonna do this
pretty quickly. I'm just going to pick up
some warmer colored paints. I've got some yellow, I've got some orange and stuff here. So I'm going to go
into these ones in the foreground, lighter colors. This is just a bit of yellow and a bit of white
mixed together. I've got some orange
in there as well. Okay, So all I wanna do is just keep this fairly light. Alright. Might have some orange running
through the center here, some darker orange or
something more vibrant orange. That okay. And that one there might be
in the light or something. I'll just leave
that this one here. Let's get into some more. Here's what you wanna do
is in the foreground, I tend to increase the
concentration of paint. This helps to bring shift the object or
whatever closer to us. Noticing here, I'm darkening
more than out there. A little bit more darkness
and come around here. I'm just going to cut around this shade or
whatever it is there. They're just a little shade, some more gray like that and a bit more
here even like that. Okay. So we've got more, little bit more darkness, tiny bit more
darkness here. Okay. And I'll go through this one
more time as well later. Okay? Because we were just getting in really the lightest, one of the lighter
tones in here. Some more stuff up here. Who knows what?
Just a little bit. But as we move out into the background, I'm going
to show you something. We're going to put
in some more colors, but we're going to keep them
lighter on the palette. I'm going to mix up some
yellow, light yellow. Really just almost just
the lightest color with barely any
painting it at all. Look at that. As we go into the distance. Building start to get
lighter and less visible. As we start moving
towards the foreground, you get darker buildings and
then more detailed as well. Okay, so that's why you can
see here I've added more, a little bit more darkness, and even here on the
right-hand side, a little bit more of that, a little bit more of that gray. But as we go out in the back, I'm mixing up more
lighter colors and getting them to just
blend together nicely. Let's look at the ground now. The ground is like
a grayish color. So I'm going to just pick up
some gray off the palette. Just to be the gray cut around
that figure a bit there. I don't want too much
in here just to, just some nice mixture of gray are putting a
bit of gouache as well. I find that bit of
white gouache helps to give it some more body. Especially when the
ground is so light. Touch of that. The gray in here and look at whether people walking
doesn't matter. Just go over the top of
those people and I leave a bit of highlights on
them. That's all we need. Now the sky, pretty simple. All we need for the
sky is a little bit of cerulean blue, cerulean blue. And I'm going to drop
that straight in. It has to be pretty
light as well. I'm only using about
10%, 20% paint. The rest of it's just
water. I'm going around. Let's go all the way to the
top of the scene first, I want to try not
to mix any of this in with the rest
of the buildings, but you're gonna get
some mixing anyway. No problem. That, that's just across and
join that all up together. Okay, good. Alright. So what
we've done here, the big thing that we've
done is we've made the stuff in the front little bit darker and a little
bit more detail, especially here in the front
than we have in the back. The back, I've just started to decrease the concentration
of color a fair bit. Now, let's give it a try.
20. Paris Exercise - Dark: Now this is all dried. We're going to work a bit more on the shadows and the darker
values while trying to preserve the same effect here of more detail on the front
and less detail in the back, more softness in
the back as well. Little mop brush I'm
going to use for this. We have to figure out where
the light sources as well. I'm going to actually make sure that there's a bit of a shadow underneath a
lot of these buildings. So let's go ahead and mix
up some shadow color. I've got some neutral tint. Neutral tint color. I'll put in a little bit
of yellow as well to just warm it up a touch and a bit of purple and a bit of yellow mixed together to
get some kind of neutral gray color. Right? Now I'm going to look at
some areas of the painting that I want to imply and
adding more darkness. Now think here in
the foreground I want some more darkness for this building
underneath the buildings so it more neutral
tint in there. And I will just add in
some of this stuff here. A little bit of detail
and what have you. I'm good. And just carry that around here just to
make it a touch darker. Underneath this section. I also like to leave in
a few bits and bobs. There'll be two lights
in there as well. You'll notice also this shadow underneath the building here. It's pretty dark and it runs across the
ground. Just in front. Just behind where
the cyclist is. Okay. But there's a little
shadow there. Okay. Caused by the building. Okay. We will shadow
cast by the building. Even on the road, you can see there's
some markings on the road like this that just
go off into the distance. So you can just imply some
of this stuff already. It's not 100% there, but you can actually see
a little bit of this, this little sidewalk,
this waiting area where the people were waiting
for the lights to change across the road. And I'm going to again imply this light
coming from the left. Okay? So a lot of these
buildings here, you might get the beauty of this light hitting the sides
of the buildings like that. Coming downwards. There. Your darkness on the
side of that building. Parts of the buildings
just with a roof, rooftop site as well. Underneath the
rooftops and things, you get a bit of shadow there. Like that. I'm just implying
some small details there. Here. These little structures
or whatever they called up the top. Really light gray, still
trying to use lighter colors. Okay. And this building here,
it's also similar. It's quite another to
make it a little bit darker than the
ones to the left, but I'll work on it. That just a bit of that lighter
or darker color, sorry. There bring that down like that. Just one big wash. And this building here
in the front as well. We're going to need to
darken that slightly. So I'm gonna go in here. I want to make sure
that this building is the darkest part, really just at the front. Okay? This will help to
bring it forward more. Making sure you leaving some of that previous wash
in there as well. To imply some highlights
and stuff like that. Right? Mixing in
nicely and we've got a little bit of color Going on. Darkness going on in there. As we move out to the back. I'm going to just put
in some lighter color, lighter shade of gray here. Really right, as we
go into the distance, I'm just going to use really some water off in
the background. Water off in the background. And not only that, I'm
going to soften this area, putting a bit of water to just encourage it to blend in
almost to the sky at the back. So that I don't get really any contrast out the back there, just a lot of light. But here in the front, we get more darker bits. These buildings here
are pretty light, so I don't need to
touch them at all. I actually like this. How it looks right now. What we can do is
also start putting on a little bit of
the darker colors around the base
of the buildings, you know, just while
the paint is still wet. Some of these bottom parts of the buildings,
as you can see, they have some darker bits
that we can drop in as well. Just wet into wet. Some parts of them. Even the windows on some parts of the buildings
like maybe here or whatever, you could just get some little indications of these windows in while
the paint is still wet. Slightly wet anyway, it
will hopefully just look less detailed and just a
quick little sporadic moves. So a little bit of
darker color in there. We can also do that here. Just put in a few
little windows on this building and look at
that. Just drop that in. Like this. And even on this one here. Yeah. Like that. Some of these other parts of the buildings
like this on the on the top you can see there's
even these little chimneys or whatever they are sticking out the top of these buildings. Not even sure exactly what they are, but
it doesn't matter. You gotta do is just getting a little indication
of all this stuff. The separations
of the buildings, you can also imply
at the same time. Now, I love painting
wet into wet get using this to
sort of mixing. Okay, here's some little windows I just thought I would
drop in quickly. Okay. Couple up the top
here and also the top of the building
and the little bit of a shadow here as well. That window. Details like this. Okay. This other part of the building to
the right like that. Okay. Bit of darkness there. And of course, some tiny little details for the sides of the
buildings still like that. Little bit of separation
for the buildings. Floors or what have
you there as well. You can just flicking
a bit of paint running through some of these areas
to get in these floors, the indications of these
details down here, there. But notice how in the
background it's blurry, it's still wet off
in the background. So all I'm doing is
just dropping in a few of these
little indications of windows out in the distance. But I'm not going to
really imply them much. They're going to leave these on a lot of these
just wet into wet, especially the ones
off in the background so that it doesn't
look too detailed. The same thing goes
for these buildings here on the right-hand side, I'm going to just use a
very light little washes for some windows. Then as we come closer,
it's getting darker. The windows, the little
windows get darker and darker. Then you have more details on the sides of the buildings
and stuff like that as well. This is a way to imply depth. But all the way
back there you can see it's just mixed together. There is this sign board
here and I'm going to just put it in or perhaps
I'll just get rid of it. Let's just get rid
of it altogether. And this can be part of
the background buildings. I think that looks better. Sometimes you need to get
rid of stuff like that. If it's just doesn't just disrupts the
harmony of the scene. So we'll get rid of that. Okay. Really, all we have left to do is to put
it in a bit of color for the people who are a little bit of little bit of warmth
and vibrant colors. Even I like to put in
for some of the figures and have you walking
through the scene. We can put it in a bit of
blue for this person here. Here, these little bits of blue, they'll just stick out more. Okay. Some darker one here. It's a darker color
here as well. For some of them. It is
just a figure on the bikes. I need to get into bike later. The heads too big. I'll have to get that in
later and just wing it. Okay. Good. So let's give this a quick dry.
21. Paris Exercise - Details: Now the smaller round brush I'm going to go in and getting the final dark bits and pieces, bring the painting together, the details, so the figures, I'm just going to pick up this neutral tint and I'm
going to get the legs in. Dry brush, try to dry brush on this, some
of the stuff on. I don't want it to be too, too much going on. We kinda lost some
of these figures, but I think there was one here, I just walk in and another one here just standing as well. Another one maybe
that side as well. Okay. Not a big deal. Here's another one,
couple of legs like that. There. Of course we've got this
one here in the foreground. We can't forget about this one. And I want to just getting a bit of darkness
on the right-hand side of the figure to indicate the light source coming
in from the left. Okay. The light
source coming in from the left can do this for the ones out in
the back as well. Just to touch of color to the right-hand sides
of the bodies. That really white,
white like this. There we go. Good. Could be another
figure there as well. The tail. We've got this
figure in the bike. A little circle for
the wheel and for the other wheel there. And just try to get in details, quick little details
for this figure. Arms outstretched, holding
up the bike, of course. Simple little figure there. Bike is another figure
here in the distance. Walking around another one here, just the legs I'm putting in body a little bit of
a head maybe as well. Remembering to keep the
heads on the horizon line, roughly on the horizon line. A little bit of hair on
some of them as well. Like just pick up some some
color and just drop it in. Get in here for the figures. The darker color helps to kinda bring them out and make them look like they
actually people. And also the shadow is on the ground would be
good to just get in and touch the shadows. Coming off. Joining that onto the legs
of the figures as well. That okay. So as you can see, we're pretty much almost
at the end of this scene. I'm going to put in a
few more little windows and details here as well, some more neutral tint. And we can actually just
detail these windows more. Do things like actually adding some frames and stuff for the ones here
in the foreground. Little bit more.
Darkness here for this side of the building
to bring it forwards more. Just something I wanted to do. And implies some of the
stuff that's going on. Just a little bit of scumbling
and moving the brush around to create some
extra darkness in there. Okay. You can see it's
really quite dark. In this section. Bits and pieces up here
as well with some of the some of the windows. I put in some more
darkness here actually, right-hand side
of this building. Really, really create
extra contrast. We've also got some trees
and stuff in here as well, so I can pick up a bit of green, just gonna be the
green on the brush. And I can just create a touch of these trees or whatever
shapes here in the background. Just drop them in. A little bit of green.
Running through and behind the figures. Using the side of the brush to make sure that it's kind of. You got this scumbling
type of effect. Down the base. It's
just darker as well. The trees just add some more darkness
than the base of them. Have even got little
lamps and things on the street that you can
indicating there's one here, you can just put one
in behind this figure. It kinda comes in like this
and circular lamp like that. Again, there's another
one here in the distance. And I actually think this
looks so much better without that sign that we'd
had in at the start, that signpost right
in the middle of the scene really gotten away. I can get get one
in here as well. I think that would
look better with one here, something like that. Okay. Signpost. Another
signpost but a little lamp. Another one here. Just a little one indication
of one over in the distance. If I want to get in
that power line, I think I'll think
I'll skip on that. But I will put a bigger one
in here in the foreground. Just get one in like this. Okay. There we are. And let's have a look over here. I think I'll
actually put in some sharp at tree branches as well. If I can. Might be able to
do it with just this brush. Just some sharper tree branches, runoff in some directions,
different directions. If it's too much, just pick up that smaller rigger brush
off on the rigger brush works best for little
detailing like this. You don't have to worry about how hard you press on the paper. It will just figure it out. That not too much though.
Something like that. Just some more
perspective lines. Outline these perspective lines
a bit more on the ground. Remember they're
all going towards the horizon line and
the vanishing point. Put this person in a
bag or something to hold onto like that. Just darken behind this
figure as well with touch. And these ones to create
more contrast will then soften a bit there. Just put in some
more darker windows or something on this building. Okay. Good.
22. Paris Exercise - Highlights: I'll just do a little lifting in some of these areas
as well to create some contrasts in this area
behind just in the buildings. Just to create a bit of
light and some variation. Okay? Variation in turns. Even in these
buildings out the back here to the right as well. You can lift off a bit of paint. And it creates this kind
of smoky effect as well. When you lift off apart from, you can put in
some white gouache in there and shifted around. That helps to blur
the distance a bit. Push it further back. As I'm doing here. Little bit of white, a little bit of white
gouache. To that. That also helps to make that distance appear
further, further away. I'm going to mix some
white gouache with a bit of with a touch of yellow. Get myself a yellowy
highlight color. Let's put that in.
Something there that is a highlight
for that figure. To the left of the figure. The shoulder like this. Just put in a bit of highlight
left side of the figures. Some of them will blend in
a bit more. Doesn't matter. I've not completely dried that previous wash so
that it just looks more looks a bit more natural so that
it blends in better. So she leaves figures
out here in the back, it's very difficult to
tell that they're there. So little little color
in there does help. And we just sparkle. For these little lamp
posts and things as well. You can bring them
really bring them out. And just the little
bit of I don't know, she's an indication that maybe
some yellow underneath for the lamps as well
gives them their life. A little bit of that yellow
down running down the side. Of course, some of the
buildings as well might have a touch of that yellow on areas of it that you might
want to indicate out like this touch of that
yellow in areas. I'm just bringing out. The sparkle in here. Does help. Will
something like that. Oops. Computer this area as well, this part of the building could do with a touch
of light on it as well. Just maybe here and
here indications of it. That light coming
through from the left. Little bit of that Touch and Go really for
some of this stuff. So you can see how in
summary, what I've done. I've made a lot of the stuff
here in the foreground, darker, little bit more
detailed with the buildings, even the figure
there with the bag. The figures in the back. They're still not
to the too much lighter because there's still closer in the mid ground here. But if we look at the buildings
off in the background, it really start to decrease
in complexity and in values. Also the lamps, they
get a little bit more scrawny and difficult
to make out as we go into the
distance as well. So it looks like it's
getting less and less detailed even if you
just cut off the scene and just look at this
part in general, That's probably where you can see the most pronounced effect. But of course, including this side, that's
what you wanna do. You want to increase
that level of complexity in detail
in the foreground? Use a lot of wet
and wet techniques. And really just
the loudest values out in the back of your scene. That's going to give you, in combination with understanding
a bit of perspective, a scene that has a, an element of depth and
element of realism to it.
23. Sydney - Drawing: Alright, we're going to be doing this street scene of Sydney. And the first thing I
wanna do is start putting in the horizon lines are where the buildings touch the ground. And let's say that's roughly about a quarter
of the way through. So I'd say, Well, here's the
halfway point of the page. We just mark that out there. And half of that
is roughly here. I'm going to just draw in a
little line coming across. You see the cars and the
distance just disappearing off over there is a strong
sense of light in this scene. We want to preserve that
means leaving parts of the top of these cars
visible and they overlap. You can see over in the
distance like this. And a roughly around
this point here, which is, I'll say a little bit to the left of
the center of the scene. This is where we've got
some of these buildings. We know if some of these go
up like this, like that. What I wanna do is make
these buildings in the background a lot smaller
than the ones in the front. Okay. So there's one over here also just measuring roughly
where they finish off. And I know this one
finished off of that here, which is three-quarter mark, part of the PayPal, two-thirds about two-thirds of the way up from the
bottom of the page, this little building there. Another thing you want to
try to do if possible, is to get in this sense
of three-dimensionality. So I'll just put in the side
of the building like this. Okay. So that's the
side of it there. You might want to do it
on this one here as well. A bit of the edge, edge of the building hiding
behind like that. Okay. Okay, here we go, and that's another
side of the building. This is important so
we can get a bit of that light catching
onto the building. Little light just catching
on the back here. It's difficult to
see what it is, but there is some type of
tree or something there. You don't need to really
outline it too much. Here. There's even another one, the building just cutting
in front like this. You're going to
remember as well that this whole block of buildings is almost
like a silhouette. You, while you leaving out
bits of the light on there, most of it's going to
be quiet, dark anyhow. Okay, so important to get these drawings in relatively
accurately as well. Let's get this running and
it goes all the way out, disappears off the top
of the scene like that. Okay. Again, a lot of
these buildings are just they're just
silhouettes here. And we can actually later on cut around some of
these buildings or pull out details using plastic card or something, something
rather afterwards. Okay, so even if
you don't manage to get in all this
detail of the buildings, we still have an
opportunity later, but just indicate as many
of these as you can. Okay, here's another one coming into this large
one to the right. Just one big block. What I like to do
as well as getting these little side parts of
the buildings like that. Like this. That helps to indicate that
three-dimensionality as well. This is breached. Crossing over will put
that in afterwards. All this stuff is really
just one big shape, okay, coming down like that. And here there's even like
a bit of the bottom part of this store there. Just like that. Here, there's another
one here as well. With that, the other one here. At this point, you can
sort of make things up enough to make it exact
as the reference. But that goes all the way into this section
of the building, that one big building. And you've got some
separations here, and also some windows, which we will indicate
out later on. But for now it's all just
one big shape and I want to keep it, keep it that way. Okay. More these little
details inside. Some lettering restores
are not going to bother with all the
details in here. Just remember just one
big shape, one big shape. That's good. All even details
further down below, which I'll just draw
some of these down. But of course,
there's all kinds of trees and things
in here as well, which we will in later. Okay, that might be worthwhile just getting in
some details of this car. Now here in the front, There's the side of it
like this. Back of it. Here. There. That's the
back windscreen bit of the rooftop of the car. It's like an SUV of some sort. You've got the tire
that's turned going into the seed there and
the back tire here. Okay. Circular shape, thing like that. Bumper of the
backside of the car. There we have it. That's a car. This I'm just kidding that
we'll a bit better. Okay. And there we have it. We've got a car turning
into the scene, carving into into the scene and getting some of
this indication of the some indication of the
shadow as well. Inside. Oops, this should probably
be a bit more here. Maybe do something like this and the shadow just running
behind it like that. Loved the light
source of this scene. And we want to make
sure that you're portraying that light
source accurately. The back of the card is
even these little bits and pieces like the lights, their license plate, the bumper. Don't need too much
detail for that. Okay. The roundness of the
wheel. It's important. When screen where you can
spend all day drawing this in. I just want to make sure
that there's enough detail for this side of
the car because we are talking about a car
that's in the foreground. So there's gonna be more detail that we have to
imply with that one. That looks that looks
semi decent for a car. Don't want to spend
too much time on it. There is a car behind here, but I think it's
necessary to put it in. I don't think it
would just start to complicate things too much. We do have an
overlapping car here. And that's why I like
to draw the cause and in the back first
because it makes it easier. Then to put in these ones, you'd only need
to do is just cut around the car in the back and just work
your way through it. Like this is another car will
roughly coming out here, touching the ground like that. Again, more of
that shadow coming and going behind
that car as well. Okay. Good. We can put in another one here. There's really so many of them. Just want to pick
out a bunch that you think will be good. And I'll put these in is sort of rectangular
shapes like this. Now the rectangular
shape for the car. No, there's the windscreen. Roughly the same spot
as this one and I put them in near the
horizon line like that. There's the windscreen of that car and some of the
lights there in the back. The wheels underneath
like this as well. Here's another wheel like this. Okay. It's kinda this rectangular
shape for the cause. There's the other
one here as well. One to the left. There's also overlapping
causes another one here. Like that view
underneath it as well. There. Now the chi here, this is, this looks like
to be peak hour traffic. You don't want to be
driving around this time. Sydney. Good. Okay. I'm putting this curb leaving
indication of it. And here is where I just
want to simplify this down. And let's put in some of these buildings who
started off roughly here, go up into the sky
a little like that. This is the start of
this apartment block or whatever on the left. There's like a song or something that
sticks out actually. Side of that building
like this, K. Here's another one just
coming out like that. And the top of the building, roughly here, some bits and pieces on top of the building
and it just comes down. Okay, shown trying to
simplify this a bit. Behind that, behind
this building, we've just got really the same old stuff is large block of buildings
here to the left. Okay, so I'm just going to
block that out there. Alright. And here we've got some kind
of shop front coming in, comes cross that side of the shop like this,
stops off there. This is going to be a nice little opportunity
to put some light, reflected light and
they're here as well as a little shop
front area like that. The sign of the
shop front anyway. We're just planning
where everything goes. And of course this is leeway
to change this afterwards. This bridge comes
across roughly here. The distance. It's interesting kind of breach. I was deciding actually whether to put it
in there or not, but let's give it a crack. There's also all these polls
and I want to exclude, maybe put them in
right at the end. With less, less sort of make it less obvious because
there's all these little things hanging from it. And I think that
detracts from the scene. This year. Infinitely. It looks like a bridge. Of course, we've got
people walking along the bridge here, on
top of the bridge. So that gives it
a sense of scale. People just walking along
the top like that there. Make sure you put a
foot forwards and a foot towards the back. I always like to
line up the heads as well on the rotate the head is depending on
which way they're walking. These ones awards to the left. So the heads, the slides
it a little bit to the left hand side. Like that. Maybe another car
he would be good. Just one in front of
that one there as well. Something like that. Not only that you've
got all these cars just disappear off into
the distance and it's just these like little
silhouettes of them. But the yellow part of the
top of the cost or the sticks out illuminated by
the sunlight and I want to preserve
some of that later. Get the top of this
building in roughly here. This is that building
closest to us. They're all these bits
and pieces in here. We don't need to worry
about that just yet. Here underneath this
and other bits of the sharp the doors, the windows of the shop
as well are visible. Um, but again, I don't want
to outline them too much. There's even a sign, there's a billboard
of something there. There's some figures. Let's put in some figures
as someone standing here to the side and talking
to someone in the front, right here facing each other. These two people just
facing each other, having a conversation
and waiting for the lights to change over so that they can
potentially crossroad. You get this shadow of these cars and it'd
be better like this. You find that the shadows as well of the cars will branch
out because the sun's there. It's going to branch
out to the right on this right hand side and branch out more to the
left on this side. So the shadow is coming
out there for that car. This one's right in the center, so the shadow will be
right behind the car. This will be nice to do
in the kind of wet and wet technique so that it's not too obvious and we preserve that
beautiful softness. Inside. Here is some of
these windows that I add. We can put in here. Some of these windows
will see how we go later. This will be a k
to start off with. And we'll go and perhaps modify them if
necessary later on. But just in that top part, you can see this kind of perspective of the
building as well. Okay. Going up like that, similar to this side. And just put in a few little
windows or something. In areas like this,
this bit here, something they're already,
this is looking decent. I liked the drawing. I thought maybe I'll
just put someone here walking walking away from the scene or something
like that into the scene. This can be an opportunity to get a bit of a shadow for them. These would be
interesting as well. I find this shadows of the
figures can be a bit tricky to do in a scene like this, especially just trying
to practice and see making those shadows kind
of what you call it, consistent with also the cars. Okay. Well, there we go. It tends to be that
little slither of lie in-between where
the legs meet up. Here. That's a little bit
of that shadow. These ones can just
go a bit like this. I guess. It's good to just have
a little practice. Play around with these before we actually get into the painting. Then I don't have to worry about the positioning
of them so much. And I think we are almost there. I'm going to just put in some more figures
like this person here could be a figure here
just walking like that. Maybe playing with their
phone or something. Here's another person, maybe
just behind the car there. And one thing you want to keep in mind
is that with the cars, you know, roughly when
you're standing up, you're going to be a little
bit taller than the cost. So this is why I made these
figures little bit taller. And this is a large car, there's just some kind of SUV. So usually those tend
to have more yeah. A bit more height on them. Okay. I'm almost tempted to have one walking
in the center here. Why don't we put, we put
one in the center here. I know this seems an odd
place to put a figure, but I think it just is going to make it look a bit more
interesting so that we don't have all the
same things going on. I just don't want to make
this one look to mechanical. Just walking across like this. Okay. Maybe I'll modify the
head a little bit. The tilt of the body
so that it just is tilted a little
bit more for widths. Enjoying this up
a bit like that. And then the rest of
it's just shatter. That's the shadow of that car. Just remembering to
leave as much light as we can in here as well. So this is why I'm just using
this this pencil works. Plan out what I'm
going to be doing. Here. You can put in a few more bits and
pieces for shops, Shop France and
stuff here as well. Sometimes it does
help to just put in these little variations of what's happening here in the
distance and the background. Alright, that's enough drawing. Let me get into the painting.
24. Sydney - Painting: We'll get started on
with the painting. And first thing I want to
put in this whole white, and I'm gonna be using a
color called quinacridone. Yellow. Mixing up very light mix
of connecting or yellow. Indian yellow is also a good color that you can
use if you don't have that, just use any other yellow. And I'm not worrying about
the colors of everything yet, of everything else can, we can go over the
top, but it is really, there's limited colors in this reference photo
that we're putting into. Nice, I'm feeling here nice. Golden color that is really just emanating
through this entire scene. Up in the top, there is
beauty, this golden color, and then it turns
into a beautiful, this reddish color up the
top, which pinkish color. So I'm just picking
a bit of red, tiny bit of red feather
that into the top. Light. Red. Not too much in there. Just to let it settle in a
little there at the top. Then I'm not going
to touch it anymore. And let's work on the yellow. Bringing this all
the way across using this launch mop brush
makes it so easy. Just goes through
the entire scene, release, yellow, yellow
everywhere, all over. Here. What I'll do is also a
drop in some other colors. You can also leave these, see these tiny little
sections where the brush, the paint hasn't
really picked up. It's sort of gone over the texture of the paper.
Just leave that in. Don't have to paint every
single thing in there. Okay. Something like that. Like that. Maybe a bit more of that red over
here on the left-hand side. You can drop in some
different colors so that it's not all the
same through the buildings. I've even got a bit of this
other orange, orangey color. They're not dropping a bit
of that orangey color. Going around. Just leave perhaps touch
of color for those, or touch or the white of the
paper for these figures. But not the rest of it.
Don't need to worry about it. Even here. Just cut around these
figures attached like that. Don't worry about
the cars. Let's just go over the cars here. More vibrant yellow
here as well. I've got a bit of
this hansa yellow. I think it touches this in the sky area here
would be nice just to, to create some extra
little contrast and extra vibrancy
off in the back. I don't want too
much of it though, so I'm just being
mindful of that. But I will drop in a touch
of it here and there like that. Let's go down. Let's work this
into the pavement. Okay. Some more little bit of
red in there as well. Perhaps. You'll notice I'm not just using that same color all
over the place. You have to vary it a touch. More yellow here at the base. And I'm using a stronger
yellow as well here. Because we're closer
to the foreground. And it just helps to
create a sense of depth. If we're using slightly
darker tone near the front. Good. Alright, let's give
this a little dry. Alright, starting
off rod in the back. Now I'm gonna be mixing up
a few different colors, mainly just a beautiful
purple and a bit of black. And perhaps touch
a brown as well. And I want to get in a, just a cooler color, I suppose in here
for the shadow. And let's go head but starts straight off with
that building in the back and I'm just
dropping this in. This is a bit of
I'm a little bit of that color back there, like a pretty light. And using a small flat brush, it just helps to get in the shapes of the
buildings better. Okay. There. And leaving the left
side and the building unpainted to portray that light. Can you just over there, e.g. it's a very subtle color. There's not much
in there at all. I'm trying to make it a little
darker but not too dark. Something like this. Okay. So everything in the background doesn't need to be
a little lighter. Small mop brush could also help. In areas. Having a look there. It's just putting a bit of
color here for this one. Okay. Oops, side of that
building like that, I'll just leave out. Okay. I'm just working
my way from top of the page down that building
here on the right. As we get closer to all the
staff here in the front. This is where we
just got to be a bit more mindful of
what's happening. So we can get this party in. That building is also part
of that building here. I'm accidentally gone over,
but it doesn't matter. They're here. It's a little sign of something, sign board or whatever. There. This one here. You just cutting around some
bits and pieces really. There is whole building here
to the right is quite dark. And I can just use more
of this purply color, purple in black color, and just putting that color, slightly bigger mop brush. And I'm also wanting
to go significantly darker in this area if possible. And this is just going to create a greater sense of depth. In this scene. We've got more darks
running in the front of it. Okay. So coming through, look at that just around these parts of the
buildings as well. We can just cut around
them like that. Here. This is part
of one as well. And just cut around that one. Darkness, more darkness
coming through. I've only purple is
a good color for this type of stuff because we've got all these
yellow back there. So the complimentary of the
purple makes it look nicer. And just cutting around there. I'm playing around with
this until you have a sense of detail
begin to emerge. It takes awhile for this tap and those cutting around
everything helps. And just referring to that reference photo as
well from time-to-time. There. This is another one here. Look that underneath. Now you've got a bit
of this darkness using more black. And it'd be the purple. Now together. I want
to create really the strongest contrasts
right underneath the cars, near the cars and the buildings
at the base like this. And just cutting around the
cars that they stick out. Okay. Good. All this stuff. Just
cutting around it is usual. And here's some people. These figures I'm just painting here and just
darker paint like that. Yeah. The silhouette of this building. Okay. I'm just going to join this
one down a bit like this. Along with the cars and all
that stuff at the base, will pick up some darker color, a bit of purple, and use this little flat
brush and go ahead and. Leave some of these bits
of orange and things where the tops of
the cars, okay. You can just cut around them to touch like the spank them up. Using the edge of
the brush for this. Because there's
actually some shrubs and things going on over there
in the distance like that. Melts off. Let's cars off in the distance. K, h, it's getting some of
these buildings to the left. Left these long. The dark. Dropping a bit like that. Because the light is stronger running towards the
right-hand side, really. We do get a teeny bit of reflected lights on these
buildings to the left as well. Which is why I'm
leaving in a touch of slither of color
in there as well. Because that just
bringing this down, but making it fairly
dark as well. Just make little highlights. Things in here as well. There could be a bits and
pieces of that building. Ways. I tried to join up both of
these as well, if possible. Left and right side and
this bridge is going to be a good way to do that. Actually, if I can
just start to put in a bit of that now, like that. Because it melts together
if we do it at this point, rather than waiting too much, waiting for an older
to put it in later. Just a little bit of
that to start off with, and we'll go from there, figure out the rest later. Okay, good. This should be probably
darker in here. Let me just darken this off
the touch in this section. More color in there. Good. What I might do is
try to exaggerate the light on the car. And you can just play
with this a bit, e.g. see here I'm just getting in some of the
windows and things, but I'm just seeing how
it will look if I put in maybe some more of the
color in the back of the car. Like we use more of the darkness in the back of
the car and leave some of it. The left side of the car with
more of the light on it. Shape that car bit better. Just a bit more
color on that car. Detail it better. But you really just coloring
in the back of it darker. He's the tire off the
back wheel. Okay. And another car here in front, this one is going to be dark. The back, like that creates a negative
shape for this car. The back as well. What it does have a
nice little kind of orangey color on the top of it. So I want to get
some of that end. Keep that in there. Okay. Good. There are a lot of these cars. A quiet quite simple
to indicate actually. We need is a bit of
light on the top of it and the rest of it
is just darkness. And the wheels at the bottom
connect up kinda thing. So here, this is the
bottom part of the car. And we use here
connect up like that. Top part here. Bit of light there. Here. We'll do the same thing. Bit of light maybe on
the right-hand side of the car like that. Bring that down. The wheels here. Okay. That's a car. Yeah. A bit of the shadow on the
left side of it like that. And then bring it back down. We use connecting
up at the base. We've got these figures as well and I might as well just put in the legs while we're
at it like that. Let's figure just walking
across the scene. Leaving the shirt will perhaps indicate the car behind
this figure or something, something or another
to help bring it out. Further. The cause and the distance is kinda start
to blend together and it's difficult to tell what 100%
is going on in the course. I do need a bit of something underneath the base of the car. They're just the wheel better, better indication that we'll we separate these
windows out of touch, swirl something here. The shadows of all
these cars and the figures are going to be
quite important as well. But let's just focus on
getting in the figures, the legs of the figures like this one here on
the right first, just waiting here for the lights to change or
something like that. And then we've got
another one here maybe like popping out behind
the back of this car. There can be a lake. Okay. This one's probably
just waiting to cross the road. This person. Okay. Let's try to do this
all at once here. Now, remembering
to keep the light, picking up some of this purple
color mixed with black. Purple and black mixed together. Perfect. And just joining up the
wheels a bit like that. This shadow is going to
come towards the right. Phone, buy this car. And also this larger car
here. Joining that up. Joining up this shadow
underneath like that, turns into that part of the car. We need more of that.
Something like that. They're just exits
out the scene really, it's that shopper, a soda. Thin shadow. These figures as well look
at that just maybe some indication of the shadows of them going towards
the right hand side. Good. Now one thing I noticed
is that there is a bit of softness of shadows
down to the base. I'm going to just, um, I'm going to just spray down
here a little bit here. And I realize now
that these figures, probably the right size, this one is a little too small. I'm going to have to extend this figure out of
touch the size of that, figuring out a little bit or reduce the size of those
ones on the right, let me just spray bit
of water at the base. Of the water at the base
we get some softness. And I can decide on what
to do. These figures. I think we will have to
just enlarge this one. The legs kinda go up
like this more perhaps. And I'll have to figure out what the top of this
figure will look like. A little bit later on. We can also just reduce the
size of these figures to by just cutting, cutting a bit off like that, bringing them down further. This may look a little
bit teeny bit smaller. This one I'm going
to have to extend up a touch like that. It's ambivalent somewhere there. It's always important
to make sure that they are proportionate to each other. The figures. Again, just figure
out what these, what we can do with these
ones make them a bit larger. And because of this, I'm now going to, the figures look a
little bit different. This one here we can
still have the legs of them come down like this. Together, but just
have them further up. That I can be the heads
like roughly here. The heads should
more or less lineup. Okay. With everyone else. All the other figures. Okay, let's put in some
of these shadows here. We saw the car running like this. One. This shadow here just
coming out behind and tiny bit of that forwards. Okay. Spray that section at the bottom down a
little bit as well. Just to get a softness. There. More softness. You have marks in there
that are kind of more damping down the bottom there. The shadow of that
figure like that. Okay. The car here also
that do that shadow. And of the figures as well. I'm going to work underneath this sort of building as well to create some extra details
on the left-hand side, remembering to leave a bit
of space for the heads of the figures that we hear. More here. Cutting around the sort of sign boards and top
part of the stores. That I mean, it's really yellow running
through some of these windows, a little bit of that yellow, but apart from that,
they're all quite dark. I can switch over to
this larger mop brush. Do some of this work. Yeah. I'm not fooling around
there too much. Good. Just cutting around some of
these windows like this. Like this. Here is darker yeah. Apart. This area catches the sunlight. Leave that out. Often what you leave out as more important
skill in this sort of start getting into
some details with these two shops and
things on the background. I don't have to color it all in. And I can leave a square here or something
and the rest of it can just be lighter, like this. Left-hand side of these
shops that's just getting rid of more
darkness in there. And you can just leave out
areas of yellow as well. To create details. Look at how this p is
starting to really take form. Just going to redo
these shutters, Let's just make them quick. This joining on to that
softness on the ground. And this one here we
can probably get this, don't do this one again, just get a more stronger shadow of that car on the
ground like that. This one here just again, create a bit more
contrast like that. And I want to soften off this area touched just
spray bit of water there. Some softness in this shadow. Milton to the ground better. Okay. The important thing I think is to preserve some
of that light. Go behind this one a bit. The shadow underneath
this car has been, there should be more
darkness underneath his car. A couple of little figures
here on the bridge. Just put the silhouettes
of the mean. Just walking up
ahead on the bridge. I'm tiny, little
detail like that. Just to draw out
the bridge better. I don't want to overdo it
just the bottom wherein more finishing
touches Let's put on some little areas of darkness
of charges he used to bring out parts of the painting
here where the cars are. I'm just going to redo areas so that we can bring
out the darkness of it. In the background there. Extra contrast details
on the cars that you can just put on this right-hand
side of the cars. Okay. I'm really just getting
in these final darks. I'm using black really. You can mix up whatever
color you have on the palette that will
recreate a really dark color. And if you've got a red, blue, and yellow, you can mix
those together as well. Nice. Gray. Is this section there, I can just get that in. You call it this
part of the sharp. You'll find it on the
right-hand sides. There'll be these stronger
contrasts of darkness. Back there. Also, you'll find is
things like these windows, separations of the buildings. Just try in a bit of this
detail for this building, he is indication of a window, just some light that
I saved before, many tiny bit of color there. That this can be the
edge of that building. And really I can maybe darken this bit here. Some more bits of darkness
underneath these areas. Extra verticals. Let's do some on this
side, some extra details. Okay. This can be a window or something that window there. Gouache. The highlights, heads and shoulders like that, just dropping a
bit of that wash.
25. Madrid - Drawing: Alright, let's get started
with the drawing fully scene. And the first thing I'm
gonna do is put in the area, the separation where the road, the ground meets with the
bottom of the buildings. And if we have a
look at the scene, it's roughly mean it's
you could say it's almost a quarter of the
way through the scene. So if you mark the
middle point and K and then divide that
roughly by half. I mean, it's just a little
bit less than a half really. I'm going to put
that in and just stop putting in a
line crossing over. It's just straight line
joining up the left and right the scene roughly
a quarter quarter of the way like that. Okay. What I wanna do is get
a rough silhouette of these buildings in the
center of the scene. Right in the middle. Going up is where these larger part of the
building comes through. And we've got the dome. Again measuring the
top of the dome. I would say again, the top of that dome is about a quarter of the way
from the top of the scene. So we could we know
roughly in the center, we have a good measure,
roughly in the center here. And away from the
top, roughly here. A bit more to this side. And here I can just start putting in some
little basic details. There. There's 333 floors, isn't there? One can just separate this out. Roughly 123 and then the dome that goes up on the, I'm just going to be a bit more careful with this
structure of it. The details, okay,
is like top there, just the top part of that. Just getting a little
indications will silhouette really up the top. Like that. I mean, a lot of this, a lot of this. I'm going to reduce
down the details and make it more of a
silhouette like shape. You can even see there
are a few windows here. Here, maybe one over
the other side, but I'm not going to not going
to indicate that too much, just little bits and pieces. Bring this down. You can see further below you've got more of these
little windows as well. But the main thing of these
pillars that come down, there's like three pillars, general pillars like one
to actually there's 43. And then another one that's
kind of a round the back ends of the like that. Some windows in-between. Okay. Yeah. Yeah. A lot of this is gonna be
done with the watercolors, but just the marking
out of it is so important as planning technique. It's in pieces there
finishes off actually. There's some kind of structure here to the right-hand side. I'll just get that in. It's
like a part of a building. And on top of that, I mean, it really looks
like there's some something else going on here, maybe construction or in
some top of renovations, it's hard to see exactly what it is,
but it doesn't matter. Simplified down. We can see this, some of these entrances here,
the base as well. So I'm going to get in a
little bit of that, like that. Now, the whole left hand side of the scene really just goes all the way down and then
disappears off in the distance. And Dan here and I'm trying to just see if I can
simplify this down a bit. Larger, sort of
doesn't go that high, but this section
here just goes up to this part of the building using other parts of this tower. Here, this front
part of the building to judge roughly how high the other bits and pieces or should be in the background. A lot of this stuff
I'm more just making up in the distance. I don't want it to be a huge. A huge impact because as we
move closer to the scene, we also want there to be extra
details in the foreground. Closer to us there. And it's another separation
of a building here. There's one here. That's kinda like a edge section of a building like
that disappearing off. Probably more like
this. Like this. Lot of this will again just be a silhouette off
in the distance. I don't want to dedicate too much detail and
effort for that section. Can even see some
buildings and stuff. The left-hand side,
we don't need to really indicate those. You can see even
running through these, these like Windows as well. Windows and things here. A little quick
indication of that. Linking all this should
be done in a quick note, a quick just a quick wash. Really. Don't just needs to
be the bid I hide. Make sure we detailed better. Helps to mark out
where everything is. These little doorways
at the bottom as well. I think they quite important
to put in some of them. It's a bit of darkness and whatever going on
there, the back here, you've got some
building or whatever off in the distance. There. See some floors and
soldiers dark the base. And then again you can
see just all coming up roughly two here. Looking at the dome, we've got some other
buildings like this. Part of a building
that sticks out this larger section there. Like a few floors, I suppose, of this
building here. Of course is one larger building coming over here over the top and disappearing
off into the distance. The background. This light is going
to be important too. But on closer there, you can see just all
these buildings. They have separations running
through them and I'm not going to bother with
all the details, just bits here and there. As long as they get
smaller as we go into the background
and you can see they just have bits that stick out as well on the
top sometimes like these. Just some elements
where we can get in some highlights there as well. I'm not going to bother with all the tiny bits and pieces. The pencil, wait until
we go on with the brush. Brush work. Here we've got a bus or
something like that. We can see here just like
this shape of the bus here. We'll get that in. Kind of like the back-end of
the bus stops just before the door of this front
side of the building. And you can just
put in pencil in like the little wheels here. Other than that, if
you can see it's just a box on wheels. You need to draw in
there, just a little box. And there's even cars. There's a car just
in front of it here that we can get in like this and drop it in the box. A little box on wheels. How I think of these these
cars underneath them. I just connect them up, connect the wheels up a little because there's going to
be shadows under the, these cars here as well. Look, you can see
it's the bus is a bus here that's getting pretty close and it's just facing us. It's roughly in the
same spot as the car, but it's actually significantly taller or something like that. I'm just going to put in. Little indication of that. They're the front
windscreen of the bus? Yeah. Top of it could be a bus
or a truck. Who knows? Here as well. We've
got another car off in the behind down here. Another one here, perhaps. Another one here. All of them are just for
purposes of this scene, just a little shapes, boxes that joined together. This is another bus even coming in the
opposite direction. And it's again, that
sort of boxy shape. Okay? You don't have to
get all of these in mind. You just gotta get some of them. This is car that's
pretty close to us here. Getting the side of it and the windscreen far getting in the front windscreen
makes it easier. You can picture where
everything else fits in. Once you get in that
front windscreen, lights. And then the side of the
card is a wheel here. There's a wheel here. Underneath is a wheel there. That's a car, a little car. It's another one
here on the side, just kind of behind like that. The back windscreen
like this scene, backside of that car. Join that up. There. We haven't got another car
just in the background. Okay. Now the car here, When screen there behind, just looking at these
boxy, boxy shape. That's the main
thing is boxing us. That as another one. Not too pleased with this one. See if I can just
shape it better. The front of it better anyway. There you go. Just give it a bit more boxy. This should be the same thing
goes for this one as well. Just extra structure to it. I mean, it's not the
end. We can change it still in
watercolors laid off, but it does help to have
a good foundation block. Okay. That's good. That's enough cars
and apart from maybe a few out
here in the back, I can just get some heat, maybe just waiting at
the traffic lights or something off in the distance. Implying a few there. Okay. I like the shadow pattern
on the scene as well. So just getting some of this beautiful shadow
that runs through. I also thought perhaps we
can put in a person figure. Question is, where are we going
to put this figure? Here? Figure standing on the road. Maybe walking through
the scene like that. Can have another one here, maybe almost just walking or
running through this scene. In this area. Another figure there waiting to cross over perhaps
into that side. I'm just trying to pick
out spaces where I've don't have any cars so
that it just looks better. I don't want to have too
many of them as well. Maybe one here, just waiting in this area like that. Okay. Good opportunity to make some of these shadows for them as well. Read through the
legs of this figure. Just want to give it maybe some more some more level of movement. Okay. So even a bus here, I could barely see it, but it's behind that
car as well, like that. I think this forms a good
basis now for our painting, I can see even some trees
and things coming in here. May put some of
them in afterwards. But let's go ahead and let's
go ahead and get started.
26. Madrid - Light: So first thing I'm gonna
do is I'm going to put in layering a nice wash for
the sky and the buildings. So I'll pick up a
video of cerulean. Nice wash of
cerulean blue first. Larger brush. If you've got a large mop brush, just anything that
holds lots of water. And I'm putting in a lot of water for this wash,
mostly just water. About 90% water. It's going straight to the sky. Very, very light wash of blue, blue feather that in like this. And be careful not to go
over the building as well. You just want to make
sure that you've got a nice separation
between this blue and then the warmth of the
buildings later on. Okay, So I'm just
making sure that a lot of water on this brush
to the same time, cutting around that building. The dome. The dome is less of
an issue really. It's just some of
these other buildings and bits and pieces. But I don't want to
overthink it as well. Keep it nice and fresh looking. Look at that, just cut around and when using a large brush, that's also one of the
advantages in that you don't tend to overthink things. Because you can't, you just, you don't have the luxury
of fussing around. The sky wash should just be really light color for
this particular scene. You don't want any kind of
really dark areas of the sky. That's gonna be the lightest
area in here. Okay. Just cut around these
bits and pieces as well. Going back to my palettes quickly to pick up
more of that paint. Okay, here we go. I sometimes like to put in a little bit of darker
blue at the top of the scene to create
some extra depth. Normally. I just feather it in like this. This is a bit of
ultramarine blue. A little bit of it, not too much k and this should
hopefully work. Work its way down. Little large brush. It really makes it easier. Okay? Otherwise you just
need to overthink things. Looking good. I mean, it's up to you whether
you want to add also some smaller cloud shapes. E.g. I could think to myself, I want a bit of purpley clouds
or something like that. So I can mix up a bit of purple. Just a bit of lot of purple
and just think, okay, well, I'll just drop,
drop 1 billion like here. Like us get to a
cloud in like that. Like that. Yeah. Okay. Just a bit of purple. Keep it interesting. Just feather it in while the
paint's still wet like this. And finally, adding some
little ones further down helps create that
interesting sense of continuity and makes the
clouds makes these top ones look larger as well by having some smaller ones
further down the page. I don't really know, overdo it. So I'm being quiet, sparing here with some of these little clouds
and things like that. Just a little bit of
something there in the sky. Do the trick. I'm going to work
on the buildings. And let's start
putting in some color. I'm gonna go with
this color hue, which is called Buff Titanium, like an off-white color. Let's drop that into
this. Here the building. And again, it's
mostly just water, maybe 80% water,
roughly, top of color. I'm looking for maybe a bit
of yellow ocher in there. You can use that to just
get it to warm up a little. But apart from that, you don't need to
do all that much, just a bit of that
it might mix into the sky as well as you
can see touch of it. But don't, don't worry
too much about that. And the top of the building
is a cooler tinge to it. I'm going to pick
up a darker kind of purplish color with a bit of cerulean and
they're not sterile, inserted bit of ultramarine. Just drop that in like this. Maybe getting a B, this creaminess at the
base first of it. Then we'll go in over
the top like this. Maybe I've got a smaller brush. This will help smaller brush. K bit of purple, bit of blue mixed in there. We'll have to do you have
to do the top of it later? Hey, just something like that. Some of it might
mix into the sky, are all just as
often it down later. It doesn't matter.
Just a bit like that. The main thing for this
washes year just getting in that first quick sporadic detail and warmth for the buildings on. I don't want there to be
too much else going on. Okay, So mostly
these light colors bring that down. Here. It's just coloring
all these buildings pretty much the same
color and a bit of bit of yellow ocher as well
in spots to just warm up. Just warm up the scene. Here, a bit of blue
Buddhist Suilin or like a, a cooler color running
through that building. So I'll mix a bit
of that in there. Y-naught, the rest
of the buildings, just these same color. This buff titanium,
white color like that. Cow quickly, I'm doing this. If you've got a large brush, as I'm using here,
it makes it so much easier to get this done. So you want to always make sure you're picking
the right brush. Something that's something
that's suitable. What you're painting. A bit more on the left side, that's getting the rest
of this stuff here. I need to paint over it
in as well as you notice, I've just left some bits
of whites and the paper. It's going all the
way down until I hit roughly those cars. Let's see, this blue and I'm dropping in some areas of these
buildings as well to get some coolness in the
sides of the buildings. Another thing with this shadow on this side of the buildings, I was thinking of making
it part of it softer. So I can cherry pick
up a bit of purple, darker purple, and a bit
of black mixed together. And I can actually just
drop in an indication of the shadow on the
buildings while I'm here. Just a soft shadow
because this will blend in and create create that
shape of the shadow. While the paint is still wet. I didn't want to just darken
that down more though. This good. If it starts, if you think
it's dark drawing too quickly, you can also just spray it with a little spray bottle,
as you can see here. That just gives you
a bit more time to continue on and play
with these affects. The softness of the
shadows I think is something I wanted
to put in here. Just my personal take of it. You can do it after as well
and create sharp shadows. But this is just one of
the things I wanted to do. Looking at that reference
photo and just making sure we've got enough strength to it. Not darkness to it as well. Okay. This building here is
pretty dark as well. This one here, It's actually can see the floors
and stuff of it too. I'm just putting a few little. Brush strokes like that. The base, I'm just making
it a bit darker here. Okay. Bit of darkness at the
base of this thing here. Add the building. Just cerulean. I'm just layering
over the top with just slightly cooler colors. Hopefully contrast
helped contrast with the yellows on there as well. Starts getting a
bit out of hand, just make sure you
lift off that paint. Main idea is just
getting in some of that shadow shape on there. Okay, good. So some of this stuff
is already beginning to dry off while that dries off, I'm actually going to put
some color into the ground. And I'm going to
pick up this kind of same what you call it, golden bit of buff titanium and a bit of yellow,
lighter yellow. I'm going to drop some of
this into the ground here. And it's definitely a little
bit more vibrant here. But I want to create, move some of this
stuff down, like this. The foreground. And I've created a little bit more
vibrancy here as well. Tiny bit more vibrancy
me to cut around these figures and
cut around the cars, like you can see here. Cut around them. And just bring this all
the way down the page. This is going to be a
lot super-important. Need. The cars goes all the way, all the way into the foreground. More vibrancy like this. There we go. All the
way to the foreground. In just a moment, we'll
do this big shadow on the top of it all as well. Just having a look to
see how this is feeling, that area is starting
to dry nicely. To smaller brushes. I'm going to add in shadows and some basic shadows
of this building. That milky white color. Then I'm mixing in
with some purple. And I want to get in some
sharp looking shadows. Okay, it doesn't
matter what kind of color use versus
long as it's dark. And that's a little sharper. But you can see it hasn't
completely dried yet. So there are pits, bits of these buildings that are still slightly wet and you'll get some Fourier
edges in areas, but you should be okay. I think having a mix of
some theory edges and some sharp edges is
completely fine. They're just putting
in a bit more of that. And he is a bit of
this building there. Okay. What I'm trying to do
is preserve a bit of light on the left side
of these buildings. Okay. I'm kind of like the light peeking through areas
really in the background. It's so vague, but you can imply a bit
of that. Just like that. Softness back there. So here we go. This is getting closer to
the front of the scene. Now, just putting in some of the details of this building. You can see some of the
light on it already. You want to leave some of that light on, really important. But at the same time, this element of darkness
on straight underneath is going to create
some better contrasts. It's getting some extra purples and things here
for this building. Just bits and pieces. I'd want to preserve. I want to preserve a lot
of the color on here, the back ground
color this world. So don't want too much going on. As I move down. Woods as well. I'm going to mix up
myself some darker color, darker, neutral tint in there. Like I was saying before, just find some darker bits you want to imply and dropping. This is mostly paint and a
little bit of water on here. And you dropping it in as the as the paper is still slightly wet in air is dry the brush
off a little bit as well. And this allows
you to just get in a more subdued bit
as well like that. So I'm just indicating
these windows. Okay. Just a few little windows. Draw the brush off and then
drop it in and you'll see some areas they do look
more sharp than others. Because the paper is at a
different stage of drawing. The ones at the bottom are
a little bit more theory. Some picking and choosing
some of these areas that I want to just drop in a bit of these windows
because I'm going to have to go over the top of it
again anyway afterwards. These are just some
bits of darkness. The base here swell in the background here. Now you've got more dark
areas right at the back. And this little flat brush helps to actually draw
out the contrast of these so much better detail
than I have to fiddle around. The larger brush. Spray that down a little here. While we're at it, let's put
in some of the shadows of the like cars and stuff just a bit with the
backside of that car. Windscreen here. Example of that one. Light, really just light colors where you can see some
potential shadows. Light source coming from
the left-hand side. Okay. You don't have to call
them all in as well. We can just leave it
white. I have a side. Okay. I'm gonna get in these large
shadow on the ground with a flat brush and some purple. And let's go ahead
and just do it. Drop that straight in. You can see it's just, I mean, it's just coming in really firm. But we might simplify that
shadow will be at now, I want to leave more light. So something like this. You can see running through
the legs of the figure. Maybe coming up across here. Just get it in. Cut around that figure as well. I want to leave some of
it showing so that I can get some proper
thylacine afterwards. Okay. Excellent. Okay. Let's give
this a little dry.
27. Madrid - Dark: Final step and we're
going to put in little details to finish
off the painting. For this, really, I'd like
to use small brushes. So basically little round
brushes like these ones, like a three to a
six round brush and a little flat brush. They are all synthetic brushes. Work really good to
get into details. And the first thing
I'll probably start with is just the
top of that building. Because we need to
get in a bit of this indication of this
little statue on top. So I will drop some paint in. I don't want it to be
too obvious as well, but I think it deserves
some attention for sure. Oh, I need to do is
just make it look kinda like a person standing
up the top there. Okay, Try that,
brush off a beetle. Wings, wings like this. Simplified down. Something like that. As soon as it starts
looking okay, I'd suggest to leave it. I have a tendency to overwork
things if I'm not careful. So it's a very common
thing with watercolors. You can see the top of this dome now and I
pick up a bit of this, whatever paint on the palette. This is, in this case a bit
of purple and a bit of black. And here you can do things
like just drop in windows. Like there's a window
here, into here. This little separations in the
buildings as well that you can start to
indicate and put in. Okay. It's just small details
that pull together the scene give it a
better sense of identity. But you don't want to overdo it. Yeah, there's like a
couple looks like this. A bunch of windows here as well. There's another one here. Here's my little round brush. This will help give
it a different feel. Round brush. The pillars. I think. I'll just try to getting in a little
indication of those pillars. Simplified, of course. Just spray it down a little bit. Okay. This building
here in the back, I'll just cut around a
touch like this to draw out the shape of the main part
of the building in front. So just dark and really
a bit of that background of touch for that effect. To get that effect anyway. And I'm going to just put
in a few little if e.g. this is the doors indication of them down
the base like this. Now you cannot even
start to put in little details for the buildings and the top of the buildings. I thought there's actually
some softer shadows running like this
chunk getting quickly, that there's some soft
ones that run towards the right-hand side
of the sunlit areas. Put in some windows have indications of
windows like that. Just running through the top. These areas like that. This finding some small bits
and pieces to indicate. Like that. They'll run through the entire
back area of the scene. Now actually indicate a
little bit of the detail, those buildings of
what's going on in there with a few
little brushstrokes. Just going in there
quickly. Mostly just paint. You're picking up a
bit of that dark paint on the palette and tapping on, moving on really over the
top of those softer shadows. To get these effecting. As we move into the background, who find that it just gets more difficult to see
what's going on and you don't have to indicate
a whole lot back there. Darken that down at
the back like this. So often this doom bit of water. I'm going to add
some water here so that it has a nice soft edge. Okay. Work a bit on the buildings here to the left as well, again, just with a bit of
dark paint and picking out a few little spots. You want to indicate further? This is just sort of a
side of the building. I thought I'd drop in a bit
of line work like that. A little bit on the sides
of these buildings. You can just feathering helps give the painting a sense of dimensionality,
depth, detail. You see just around
these buses and stuff, cars and things like that. I'm dropping in some
extra paint is actually, is actually some trees here. I've got some green
on the palette. And I'm just going to drop
rid of that green in there to replicate some
of those trees. In this section. Just indicate that
they are there, but without much effort, just dropping them in
quickly like that. Okay. Let's work a bit on the cars. I'm going to go in with some darker paint and work
on the base of the cars, just the wheels dropping them in like this
underneath the cars. I'm just looking at
where you want to further elaborate on what's going on in here and there, e.g. this window, you could
start to just draw in parts of the window with the
brush painting parts of the window like this. Okay. That's all it really takes. The the the back
side of the car. So you can see and maybe do a bit of a shadow
underneath that car as well. Like that. The figure cut
around that figure. Therapy to this line
work for the actual car itself is like this, does help. We can put it a bit
for this car here. Well, main things,
the wheels getting in some darkness where the
wheels and then connecting, connecting it together
on the ground like this is really connecting up in. Also got small these windows that I can just
indicate quickly. This bus and the background
is can be tricky. There's a lot going on there. I'm just going to
darken it a touch. Apart from that. Warrant. Tried to put in too much
detail there for it, a little bit of color there. Have a look at this bus here. Does need to be darker
in the back area. So just color that in here, the wheels on the bus
that's connect them up. Such the back end with just
some darkness like this. We haven't got a bus. Of course all these are going
to have shadows as well. So let me just get in some part of that shadow running
towards the back like that. This car here as well. Look at that in just a bit
of color off for the wheels. And you're good to go.
Connect it all up nicely. As you can see, soften
that quickly down. Here. Another bus or something
off in the distance there, which I thought I'd
quickly indicate. Okay. It's amazing how little
you need to put in there to indicate that there is a car or bus or
something like that. It's a shadow underneath it that starts to pull it together. You can see like that. That just takes a bit of contrast. I thought I'd check in
near to the cars and things to draw them
out more effectively. Just extra black. There we go. The shadows or so for
these these cars, perhaps just running almost towards the front of the scene, I don't want to overdo it, just something like that. All right, In some
of the figures and details for the figures as well, getting a touch of
color for them. First, I'll get some cerulean or some turquoise color
to a lighter color. Suppose for some
of these figures, because they're near
to the yellow parts are actually putting
a bit of red as well. Red and blue maybe change it up. We've also got this
figure here on the right. A little bit of
color, that figure. Okay. Then I'll grab
some darker color. A bit of neutral tint
is putting some legs that kinda just walking through the scene. This one you use just maybe
standing static like that. Shutter. Having a look around to see what
other little bits and pieces I could add onto indicates some
further detail. And you can always just find things a little bit more on this area would be good. Just some tiny bits and pieces. Pick out some areas. Okay. Pizza contrasting
dark areas inside. Again, this we are
at the back here. Contrast that creates
a sharper edge saw to this building like that. So I can just draw out the
front of that coding better, dark and often hear
better as well. Putting some windows and things
in these back buildings. Notice just the
extra darkness and some parts of the buildings like this top part there as well. You can just start to at times, I'm putting little
bits and pieces like that to finish it off. It looks too strong. I will just soften it like that. So often it off with that brush. Lot of this, I just want to
do more dry brush down and that huge amount of detail this door and there's just so much
going on in there, but I don't want it to overwhelm windows and things off here
in the back buildings. It's like a traffic
light here as well. Something like that. I'm running some little shrubs
coming in from the left. I'll get some of them in some green and
some darker color. Okay, So it just feathering
in a bit of it like here. Coming in from this side
really just not too much. I like to just exaggerate
the branches a bit as well. They really look like a tree or something
like that coming in. I find, especially with
these watercolor scenes, we're removing a lot of detail. I've said this a
few times before, but sometimes you go to
adding an extra details to compensate for what
you take out the scene. These can be just under
leaves or whatever. Just one shape, one
big shape, really. Sure. Darkness and the edges. Add on some color for
some of these cars. Just a bit of blue,
yellow, something. Warm it up. You can be kind of warmer. Boss has slightly darker
blues in there as well. You didn't have to
call them online. Just some of them. These cars here. Basic, so much detail
in them at all. You've read for the heads of these figures indicate a heads. This. Details on the buildings just
in a lighter wash of color. Dye more diluted down. Finally, a touch
of white gouache. Some highlights. Probably go in some of these
cars first, like this. Keep it quiet spearing
sparingly, just apply it. I don't want too much on there. And so it just helps to
bring back the sum of these white areas here, shoulders of that figure, the top parts of these car. Anything that you think could help bring back a bit of light. Again, don't want to overdo it. On the shoulders of this
figure and the head. This tops of those cars, this one here, even there are some little
cars back in the distance that you can
potentially just bring out slowly like that as well. I don't want to
overdo it though, as I mentioned before, just little bits in there. These doors and things I can just I'm getting a
little highlight, a little bit of white
running on like the corners and things, even the dome, just a bit of gouache and the left
sides of some areas. You might get a bit
of light coming off. Sometimes I like to mix it
around with them to cerulean, bit of gouache with cerulean. And then you can get some different
variations of a color, lighter colors off
in the background. And I know this that'd be there as one or just putting
a bit of blue section, dial it down a touch and adding a few little
bits and pieces there. I don't know, just to
create more interest and a smokey feel helps to kind of blend those two
buildings together as well. Actually, these like poles, traffic poles and things
running through in areas. Okay. And that's finished.
28. New York - Drawing: Alright, so let's
go ahead and get started on the drawing. And the first thing I'm
gonna do, as always, is pick out the area, find the area where the
buildings touch the ground. So we want to figure out
how much ground we want. In here. There's really not much. The majority of the
paintings chest. He's buildings. I'd say. We can probably put it
up here, roughly here. It's putting a little
line going up. This is really important to
put in as your first step so that you know where the
buildings and the cars, everything like that
starts and finishes. Okay, so we've got the
main star of the show, the smack bang in the
middle of the scene. I'm going to go ahead and just roughly paper and a pencil in where we want the
building to stop. I'm actually going to stop it
a little bit further down. Okay. So that it doesn't
go too far up. Because when we have it too
close to the top of the page, the buildings, just it just tends to look a
bit awkward I find. So just getting a silhouette, I'm going to come down. And they seem like that just
has to be fairly accurate. But don't spend all
day figuring it out. Something like this. All this is going to be
some kind of silhouette. Once we're done with it, I'm actually going to
create more of an angle, slightly more of an
angle like this. Be more like that.
That's better. Some people like to use a ruler. I just do it by hand, gives you the
practice. We've saw. It's a little wonky and areas, let me just sharpen
that up and touch. Good. Putting in a bit
of indication for the structure of the building. Um, you can actually see there are windows just running
all the way down. I'm not even going
to count them, just going to
simplify these down. And at the end of the day, when we look back at this, it's going to look, I'm just going to look more like a
silhouette than anything. The top part of the
building. Here we go. The windows are kind of
tricky to draw them all in. I wouldn't bother really, we're getting them all. Just indication rough
little guidelines. And as you can see, the I started to flatten out
a bit near the front. They become more pointy at the top. There we go. Main star. And roughly about halfway up, we've got a building
here running in. You see the side of it as well. Coming in from the side there, we've got more buildings
off in the back one there. This one here. It starts to get difficult to ascertain whether a new one begins and what have you
as you move further back. But just improvise. It's only the ones closest
to the front that you need to pay attention to
more the rest of them, they just formed
silhouettes anywhere. There's no need to detail there. You've got this nice
buildings is a larger one. This one goes up a bit more
and we've actually got this dome, which are, which I actually
quite like going to emphasize this a bit and
we'll finish maybe here. Simplify down different
layers of it. Kinda like three slightly increasing boxes on
top of each other. And then the top of the dome, which is just this shape really. Okay. We have it
dome underneath. We'll simplify that out. And watercolors, lighter. I have all this
would just be dark. And let's work on the buildings here to
the left-hand side. It's sort of mimics the right-hand side
buildings, anyhow. Like that. This is one building here. It cuts in front
and actually has a bit of an edge to it
like this side to it. There. From that, everything else is just large blocks of buildings. And that's a big one here. Large building. Then there's another one here. Just, again, as you
move into the distance, everything just starts to get smaller and
smaller, less detailed, and you can barely see
what is happening. Often the distance. But simplification
is your friend here. That should be the
only one I'm kind of worried about
is this building. Because being the main
star of the show, It's important that
we get it right. And I've got too many lines here that are kind of
just wishy-washy. So just get rid of that and work my way through
it just to create a bit more of a sharper
edge for this building. There you go. That looks better already. Sometimes doing it and broken lines just don't know,
it just looks better. That Let's work on some of the bits and
pieces in the foreground. Now in these cars are a
huge part of this scene. I want to make sure we've got some detailed
in for these cars. I'll start off with this one
here first is a large tech. See, here are about a
bit of this pencil. Get the back of this car in. Can you make it fairly large? Sitting on the horizon line, the windscreen comes down. Please. Note that you can see the
side of it like that. And it comes down a
bit more like this. It's like an SUV taxi thing. Like that. One wheel there. Another wheel there. Will here. We will hear. Okay. There we are. I'm going to just
connect this up on the underneath as well
with touch like that. It looks better. Tail lights. That window separator looks good on point front of the car. Like that. Okay, Excellent. There we go. We got a pretty decent
looking car here. I always try to treat them like boxes, really
drawing boxes. I always draw the one
rod at the back first. It makes it easy then to get the ones in front
that's sort of overlap. So here we can see this. There's a windscreen
at the back, backside of the car again. And here, the darkness and the again the side of
that car that just comes down and forms another part of that car that we have
another another car. And a bit of darkness underneath
it like that as well. There we go and do another one. Right? Two cars in there. The one at the back is
the most important one. As you move forwards, it just becomes a little easier to get into
details because you don't have to over emphasize what's happening in there as
you go into the distance. More so just the back
of the car I think is the important thing and
this boxy shape of it. You've got another
one here that's just kinda facing forwards. You can only see the
back of it really. So I like the idea of that one. Just put it in and see the side of the car a
little bit like that. Apart from that, it's not much else bit of darkness
underneath there. There is a boss
big bus in front. And I can see Saad of it as
well side of the bus here. So we can just get
that in touch. Just a box. We got to look at them
as box on wheels. Darkness for that one, and a bit of darkness
underneath as well. Maybe car or something
out in the front. I'll put the person here just
walking across the scene. A few figures
actually like that. Just to create a
sense of movement and just to be genus in here. The way I sort of draw
the figures is lean the bodies over to the
direction that they're walking. So you can see this one's
walking towards the right, this one's walking
towards the left. And the front foot in line with the front part of the body
and the second back foot, sort of outstretched as well. Could have a person, just, oops. Person also just over here. Walking a bit more
slower to good. More cars in the distance. And other one here, just getting a bit of that
detail underneath it. This is the footpath. Just getting a bit of
that perspective. Okay. I please have all
these lines that run towards an
imaginary point here. The distance. Draw the lines
towards that point. Going on just in this area. And I think that should be okay. We'll work out the rest
of it as we paint.
29. New York - Light: Okay, First things first,
I'm going to pick up a bit of this grayish color, putting that straight
onto the page, just put a gray leftover
from my previous painting. It's kinda funny because
I'll looks almost monochromatic in some
parts of the scene, but I'm going to add
a bit more color into what actually these are just
this is just a bit of gray. I've picked up off the
pallet a little bit of gray. And I'm going to
actually drop in some cerulean blue in
the sky as well, because I just think
it looks better with some of this
Cerulean in the mix. More nice, a sky color. And mixing it with the grey creates some interest.
Here as well. Could be almost as overcast, slightly overcast day,
something like that. It's just dropping in a
bit of that. Cerulean. The top, move my way down
and just pick up more of that gray color and work my way around these
buildings or touch, I'll actually want
to drop in a bit of a little bit more vibrancy
in the buildings. I'm just darkening and a little bit more at the base as well. So that I can potentially create some contrasts
with the building. Buildings. Not all of them, but
maybe these ones on the right-hand side
where we've got some light coming in,
just something like that. This could be a
storm or something just brewing in the
distance, Who knows? But just using this large brush and when you paint
with a large brush, whether it'd be a mop brush
or something like this, you are forced to simplify
and not overthink things, which is what I, I really like. Dropping a bit of this up here. That could be like a
storm or something. Some storm clouds. I'll make some more over
on this side as well. Join them up a bit more cerulean and just running
down on the left. Is that just cutting around
the buildings a bit. Going down there. Maybe I'll go with a
bit of extra gray, little bit of extra
darkness in here as well. Keep it consistent
on both sides. I mean, it's quiet,
subtle really. I mean, it's just a bit of
extra darkness at the base. Normally I actually put
more darkness at the top. But I want to emphasize
some more of these, these buildings
here at the bottom. Just trying to get in
a few more kind of larger cloud shapes,
if possible. Blue and beautiful blue peeking through
the sky like that. While it's all still wet. I mean, this is the
perfect opportunity to do stuff like this. Flicking paint as well. Let's put in some more
colorful the building. I'm going to actually stop putting in a bit of
yellow bit of this. It's kind of like
a golden yellow that I've got the palette. I've also got some of this
other stuff which is buff, titanium, and off-white color. Just dropping in a
bit of this in areas. Don't worry about
painting everything and just leave out a bit
of Y if you can. You don't have to
paint everything in. And I'm just trying to meld, blend in the top section of the scene bit more
with the bottom area, and also putting more of
these warmer colors near the base. Mop some of this up. Started to pull a bit there. Some more, little bit more
yellowy orange color here. Like that. You've read even to
make it too saturated. Good, that we are. Really just the light
colors in this wash. We don't want to get in
anything more detailed in here. Just a bit of warmth, light, and that's it. Okay. I'm going to move down to
the bottom of the scene. I'm going to pick up a bit of
yellow, tiny bit of yellow. A lot of water. Just to getting some
light on the ground. Vibrant, some of this light over here cutting
through the cars. I just put a bit more
saturated yellow. Running through in some parts. Doesn't need to be too obvious, just something like this. I'll move all this down the scene as long as
it's got a bit of this warmth in the
ground and it's very lot you using mostly just water, 90% water, ten per cent paint, carry all this stuff down. You should be good to
go. All the shadows. I'm going to
actually do sharper, so we don't need to
worry about that. The cars, I'm going to do a bit of orangey
orangey yellow. This one here, beautiful
orangey yellow, like that. It will mix into the ground. Perhaps. We can even just color the whole thing
because it's gonna be all darker colors
behind, in front of it. Anyway, after we got
a bit of warmth, that one bit of warmth
maybe for this one and the East kind of
cabs running through here and mix it up a bit and putting
some of this is something for this one here. Blue in there. This one kind of like
a grayish color, just something to dial
it down a bit like that. Notice how I've also just
left some of the roof, the side of it as well. White. Okay. Colorful. These pedestrians. Blue. Just some cooler color. I'm just very at a bit, maybe with some purple allele. This one purply blue color. This figure. Purpose of using this brush
to keep things loose. And we'll give this a quick dry.
30. New York - Darks: For this next step,
we're going to go in and do the buildings all in one big wash and bring that shadow down the foreground. I'm going to pick up
some purples that I have premixed purples. And you can use a gray even, but I'm using a purple, maybe a bit of
neutral tint as well, which is just a darker
pre-mixed gray. And the purple
just adds a bit of coolness in there as well. Sometimes a bit of ultramarine does the trick,
something like this. Okay? And I'm going to go really
just straight into it. It's just put it in that this large building
in the background. Some of this has started to spread around externally off not being careful
enough, that's okay. It will start off at
the top here like that and just work our way down. Okay. I want to just keep it one color, one big shape. For now. We're adding some
more colors later. Okay. Drop that in. I'm
trying to get into the right-hand side a
bit better as well. Just nice and accurate. That bring it out
as touch there. Okay, Good. Top it's done. We can
now just relaxing. Move on to the bottom
part. Like this. And I'm going to just putting
in some of this color here. And I know that initially in the reference photo
you've actually got a bit of light on the
side of that building, but I'm not just deciding
not to put it in there. I want to simplify
this down much more than how it appears. Okay? These are some buildings in the background and I'm using in the concentration of paint, probably 50% paying 50% water. I tend to use just
enough paint to make sure that the silhouette of those buildings
looks strong enough, but I don't want
it to overwhelm. And that'd be the darkest
because actually the cars, the wheels and stuff, That's the darkest
area of the scene. We want to save those highly concentrated
mixes right till the end. As we move down the page. And let's move this
one down like this. We've got more here
in the back and also just watered down this paint as we move further
out the back as well. I want it to be darker. I'm slightly slightly lighter than the than what we have on
the front of the building. Okay. Simplify that. All the way down like this. Leaving some of the white
left on the paper as well. That helps to create some
highlights for later. Just leave some of those in. A bit of a yellow bits of
the yellow left on as well. That works well. Good. And I'll just work my way up and getting bit of detail and
color for this tower. But look how quickly
I've done that. I don't want to spend
all day on that. It's closer as well. So this needs to be a bit
darker here on the left. Now as I move further
down the page, I'm beginning to go darker. And the reason for this
is I want to create just the maximum contrast
with these cars here. So if I can drop in some extra paint in
here, that's be ideal. But before I get too excited, I just want to finish
off these buildings, the silhouette of
these buildings off in the distance here. Okay. And to cut around these
cars as well, met two kinds of
buildings and things running into the distance
and simplify them down. Use that to cut around the car. Here, this yellow car, the foreground. Okay. That's good. That's my flat brush. Continuing to work our
way down this side and cut around these car
shapes here as well. Really with quite a dark
color. It's just black. Neutral tint. Technique I'm using is just create
extra contrast. Bye, maximizing the tone. The darkest tone here. Okay? So this can be an area of focus that once it
starts to look okay, just leave it and continue on. Even here, I think a bit we can do with a bit of
extra contrast as well. That's just cut around
these bits and pieces here. Ended up a bit odd. We go good. Okay. Now time to put in some
details for the cars. I'm going to use the
same flat brush. You can use a round brush,
whatever brush you want. And I'm going to just
drop in the shadows. So the, really the dark
has parts of the costs. So you can see here
it's like the wheel, okay, In the back
side of the car, lots of water but also lots
of concentration of paints, probably 80% paint, 20% water. Just putting in that wheel, Thai are there at the back. There. I'm getting in that
maximum contrast for the darkness underneath the car and the wind
screen as well. There's a lot of darkness in
underneath the windscreen, in the windscreen self as well. So just something
like that. Okay. You can soften some of
this off later as well. E.g. here it's kind of a
slightly darker yellow, just mixing a bit
of black with that yellow and drop that in here. You can see it's just blend
that down a touch like this, but still retains the yellow. Good. A bit there for the windscreen, the side windows amines, we'll still retains
that yellowy Hugh. Darkens it down by
adding just a bit of a darker paint, really. That's all you doing. Okay. Rework that top part of the car so that it's sharper. Let's work on this
car here in front. And again, it's just a
darker color in the back. Okay. So using this
darker 80 per cent paint, 20% water mix, cutting
around that car. And it's really, really dark. And again, you're
getting in that wheel, the sides of those wheels, and the darkness underneath
the car like that. And you're joining it up. Okay, maximum contrast. Like this. I'm going to just
getting the wind screen, but leave a slither of light
on top of the car like that. You see that? Just a little sliver
of light right there. Or I can just cut
around like this. Good. There's even some
little side bits of the car that you can indicate that it takes just a little,
something like that. And then the shadow
underneath connecting up, you can see the wheels touch of lot underneath
the car as well. I'll do this one in the front again just a little bit more. That one that helps to bring out, draw out the contrast and where each cost which
starts and finishes. It's quite interesting. An interesting technique. And leaving out, leaving
out the yellow as well. To preserve parts of the
scene super-important. That look at that just a bit of the black from
the wind screen. I'm going to mix some of
that black with a bit of yellow now to darken off this back
area of this car. Because it is darker. This one on top here as well. It's kind of like a
grayish, grayish color. This bus drop some of
that color in there. It's actually pretty light. See if I can leave a bit of light on the top
of it as well like that. And it does help
to just draw out a contrast with the
car underneath it. Just by cutting around that car, leaving a slither of
law on top of that car. Just bring that down. And K Now back to the
darker paints again, just a lot of the black
that we've premixed before. I can see underneath this car There's quite a bit of darkness. I can get the wheels
in like this. Join that up. There, we have it. We've now got another part
of that car loops like that. This truck as well in front or it's a bus but it
looks like a truck now. Just that darkness underneath
it joining together. Okay. And suddenly you've got a little bit of extra
detail like this. Let me just join that
out with the car better. Like that. Trick is to
leave a little bit of a light underneath the
car. It'd be the light. I'm trying to just
get this shadow in for this car bit more. Work on maybe some shadows running in the other
side of the scene. It's very sharp looking shadows. This car in front as well. I'm going to just
do it darker. Okay. Whoops. Too much paint. The darker sort of
shaped like this. And this will bring
out the white truck and work on the wheels, just darken the wheels
down like that. And then you've got again another car off in the distance. Okay. You've got this car here. I can just put in a little
bit of gray paint there. The wind screen again. As I move down, again, just getting that dark
paint. Connecting it up. There we go. We've
got some wheels. This can be one here as well, just dropping in those wheels and making it look like they're off in the
distance like that. And I'm not even coloring in a coloring in the top of
those costs for that one, just leaving them
the same color. The previous wash. Okay, a little bit of
detail for the figures. I will just put in
some of the legs really dark color as well. Like that. I don't know. I find the quicker I do these, the better it tends to look. Moment I stop fussing
around too much. Lose the plot. Okay,
there we go. Leg. Okay, the shadows. I'm going to have to figure
this one out as well. As we go. This is a big shadow
here in the foreground, and I want to get this one in. And also over the top of
that we'll get the figures. The darkest shadow of the figure is running, running through. This car does have a shadow
that just runs a bit more towards the back
because you can see. So I'm going to
cut that up a bit, runs to just make it run through
the legs of that figure. This dark green underneath some parts of the
car to draw out this shadows that are that just this negative painting
that brings things, brings out the details. Okay? Having a look through, just
reassessing what we need, what else we need to do. I think we will go and do that large shadow
and large mop brush. I'm mixing up purple
and just a bit of that dark color on the grades
that I have here as well. The shadow is not as dark as the darks on the car and
things like that as well. It's it's probably about 60%, 60% paint and 40% water. Sharp cheddar. Make it
coming roughly from here. And it's important to try
to do this in one go. You can. Okay. So they're just
trying to figure out roughly where I want
it to come through. I know that it's just
dark here. Good. Then I'll color in
the rest of it. Now. Move it down the page. As I move further down as well, I'm adding a bit more paint, little bit more darkness. As I get right to the front, It's just I'm applying a little bit more paint
right at the base. Helps to, again, create a sense of contrast
in your scene. Would have extra
darkness at the front. So that's why I do it like that. Too much, but just as significant bit of darkness
at the front and sort of shows a bit of this gradation affect the paper should
the paint should run down. I can remove a little bit
of paint here as well, just to create a softness
and parts of the shadow. I need to, but
something technique with a bit of paper. Okay. Great. I'm just going to spray few little
water droplets in areas of the painting. This is just to create some
contrasts and little effects, I guess, when the paper
has just about dried, I'm always in the
process of drawing. I find that just adding a little future
droplets of water on there cause these micro
blooms to appear. And it just looks interesting. Little more interesting
when the paint dries, I don't want to
overdo it though. Just a bit here and there. Okay, Let's give it a try.
31. New York - Highlights: Final steps, bringing
out the little details. And we'll put it just a touch of red for the heads of these figures to
indicate where they are. A little bit of red for them. This will just dry off. While I'm working
on the background. Buildings for the buildings, work with the principle
of less is more. So. As you can see here,
I'm just mixing up a bit of neutral tint, bit a darker color. But I'm also just
drawing off the brush. So we've got a pretty
dry just a dry brush. As you can see. We're going to start
probably over here first. Let's just work on a few light touches
for this this dome. And I'm just working
on shaping it a bit. Okay. Not, not adding
too much in there, but shaping it around and drawing in the floors
of it as you can see, just these little floors. As you go down. Just try your best to pick out a few details like because of these tiny little
windows or something here, I can just simplify
and sticking quickly. And we do the same thing
here because I just little areas of
these buildings here and the distance and
just picking out some small details so you
don't want it to overwhelm. You just want to imply something that's
going on in there. I'll actually put
in some gouache to add in some colors and a few bits of interesting
effects and stuff later on. Look, there's even like
parts of the building that you can indicate
and get detail, detail out a bit like this. In some little windows. This simple form that down lines running in the
background just to show the hypothetical floors of the buildings and things off
in the distance like that. You can even do it here for the one here in the foreground. Just a little touch. That just gives the building
a bit of perspective. While you add in these windows. Large one's going
to be a bit tricky. But same thing goes as
before, simplified down. When all of that brush
mainly at the end, because you can really start to mess things up if you give
this one too much tension. So close to the
middle of the scene. So just picking up a
little bit of paint. It's fairly watered
down as well. And I'm indicating the floors. The floors anyway,
not all of them, but some of them like that, makes it look a bit
more three-dimensional. And then you've of course got the little windows and things just running down
the front of the building. And it all, all it takes is just a touch of paint
on showing here. Just a touch of paint them. In other areas down the side. You can just indicate windows and things
like that as well. But I'm not gonna
do all of them, just a few here and there. I want this just to be in the background and
to be noticeable, but not to take over
everything else. Some more windows here. Little indications
of windows off in the distance is not much at all, just tiny bits and pieces. And of course you can, again just imply some of these buildings
off in the distance. So you can see better
detail for them. Let me just finish off
these figures as well. Darken down the legs. I'm kinda lost the art
before and of course, adding a touch of
shadow for them. Okay. That join the legs
together with the shadow. Whoops, this simplify it down. She put a few little fees guiding lines running through
the painting as well. Mentioning before some of
these directional lines. Another thing I've
noticed is that there are these little street
poles as well. So we can pick up a
smaller brush like a rigger brush and go ahead and work some of these
in a microscope. Put one here.
Something like that. There's one. There's maybe another one here. That, Yeah. Here is another one. Here. Using the brush to just draw little details in. He's trying to find
a few little bits and pieces I can add on some hair for the figures. Difficult to see. Just something that is touching here. Bag or something. Just literally just, these are just a little
touch up details. Here's the building to help balance it out
of it because we've got so much detail below, but really not much
above as well. I'm just a touch of
that will be good. Wonder, maybe some birds flying
about will be also good. At some interest. Little bit. Create another layer of contrast in areas
of the buildings. Some spots to bring out the main building in the center of darkness
around the edges. It's a bit of extra shadow or
something as well for some of these buildings
would be good. A lot of these are
really just in the dark, but they are being one color. They just tend to be 1to1. I mean, looking a bit boring. Okay, I'm gonna
finish this off with a bit of gouache wash. Just to bring out the final
highlights of the scene. Using it straight from the tube. Light here, top of
this figure's head. The shoulders. Here. Just on the shoulder. There we go. Another
visual light. Shoulders and the back. Here. You got to use it
sparingly as well. Don't go overboard. Now I can put a little
bit on the car, e.g. like, bits and pieces like that. I'm bringing out some
extra little highlights. But you again, don't overdo it, just a little touch of it really that you almost can't tell. It's there. Even some of
these buildings you'll find that the light has
disappeared from some parts. You can bring bit of it back
by doing what I'm doing here is using the gouache, dragging a bit of it through. Suddenly got a little bit
of contrast or a little bit of white back
into the buildings. Even do it a little bit here. Some parts like that. Little bit of cerulean blue. I'm just picking out
a bit of cerulean blue and mixing it in. And this creates, just allows me to create a
bit of a different color for the for the quash highlights here in
the background, I can just slowly add
a touch of detail, a little highlight or
something like that. They're good. I just thought I'd
put in some of these. Are kings and the road. Not necessary, but why not? That's finished.
32. Venice - Drawing, Light: So let's go ahead and get
started with the drawing. And I'm gonna put in where the bottom of the buildings are. And you can see right
in the background the cathedral and the Santa
Maria del solute. And then we've also got
an area at the front. We've got some closer buildings. They roughly around
the same location. Obviously the ones
in the background with a little bit further back. I'm just going to stress
out of it further. Okay. Let's go here. I'm
going to just pencil in roughly this building, just a little indication
of the building itself. We've got this pylon
here, this pillar. And it's kinda statue, I think that's St. Mark. And I'm gonna go and just draw in a little bit
of detail like that. All this is just accomplishing
is more just getting in a little indication of
where everything should be. Now, I'm always just looking at the sheet of paper
and thinking to myself, am I leaving enough space for the rest of the
scene of this one? I've kinda broaden a
little bit further. But roughly it's about a quarter of the way
through the scene. If we have a look at this
little building here, goes about a quarter
of the way through. I can maybe a little bit less, but I have enlarged
and that a tiny bit. And here I've just
put in this wooden, wooden Jedi that goes out. There's a kind of
another thing here. It looks like a little I'm
not sure what they're called, but little heart or
something like that. I'm just putting in
a quick indication of it like that. Okay. And the interesting
thing is that we've also got these these lamps. I think I'll get
it in afterwards. I want to put in
the details off in the background of Santa
Maria della solute. And I know it goes roughly about here where
the roof of the hut is, the bottom part of that. There is just a rectangle. Look at it as a
rectangle like that. This side here we've
got another part of it. Okay? Just getting a bit
more dimensionality actually than what's
in the reference, but I think that
will pay off later. There's a circle
on top like that. Just enlarge this
area a bit as well. Let's get in this
sections again. The roof part, like that. It's going to be two parts
there. It's interesting. Then we've got like
a back section to it that just
runs off like that. I'm going to be the 3D. Look, just a box really
again on its side. If you simplify things down, That's all you really looking
at on top of it as well. There's another looks
like another part of the building like
this, like that. Just simplify that down. And I'm gonna go
ahead and get in this top part of the building, that sienna color. Okay. Just a boxy shape like that. The bottom part of it. They're just running like that. Okay. Touching the ground
and be like, okay, good. Let's go put in some of these some of these like bits
and pieces for the dome. Okay. Just that, just
get that dome in there. There's a tower running
up here as well. So just I'm gonna go put that indication that tower and do this side of it as well. We can get in bit more
detail like that. And of course, this
part here like that, this dome should be tiny bit, a tiny bit smaller, actually doesn't hit that tower. You can just alter
bits and pieces as you continue drawing. Okay, there we are. That's part of that dome. We've got the other one
here which is larger. It just pretty much
touches it as well. Top part roughly here, taller than the other one, and larger as well. Okay. So we need to make
sure I've got that in. At least the proportions
need to look somewhat accurate on top of
the taus as well. You do have these
top parts like this. I'm just going to indicate
that touch of that flares out a bit
to the side like that or something like that. And a lot of this stuff I think we're going
to actually just get in silhouette afterwards. I don't want to put in too
much detail back there. K, right hand side
of it like that. There's some buildings over
on the right-hand side. A lot of that stuff's
kinda obscured. And then we've got a
tree just runs there. Another tree here as well, which forms the side
of this building. So I can just go in and get
some more that building in lots of little bits and pieces
that we can just indicate, but not really have
to detail that much. This is like another sort of
top part of the building, the dome or something
like that there. Door here, we got
to the door here. The separation in-between
simplify this down. I've got this, again, this pillar that runs all
the way out this statue. Just a little indication that that little pillars and things running down
there as well. It's not too much. The drawing. I want to get lots of
this in afterwards. Okay. Let's get in this
lamp post, like this. Market is one lip is another. Ear is like That. Lamp. Simplify that down. This is that Jetty P or whatever
that runs off like that. It's also some buildings off really far in the distance side. I don't want to
indicate them too much, but just something like that. Okay. Good. We do have
another which you call it, set of lights here, a little lamps like this. They're running down the page. And here we got
another one to just running up with a bat
here and start just getting in some of these
some of these lamps. There we go. That's
another little lamp and I will just get
the base of it in more like that. Okay. I'm hoping to get some
some shadows as well. I'm going to start
placing in some figures, some indications of figures, like a walking across and around into the scene
or what have you in. I think it's good
also to just play some that are just
walking sideways. E.g. having a whole
busy looking scene of people just doing
their own thing. And as we move into the back, you'll notice how the figures, you just make them smaller disappear off into the distance. This is just a bit
of scribbling wide. I don't want to spend too long trying to get in all
these little details. We can do that with
the brush later on. This is just an indication of
the legs and where they go. Could be smaller child
or someone here. Just change things up a bit. Sometimes you can
get their hands to come over making it look like they're holding onto
something or changing up. Just the way that these
figures are walking. Quite a lot going on in here. You can even get a bigger
one here in the foreground, because that can be a big one just so we're standing
here in the foreground. Another one here as well. That's feeling and
first washing. Before that I'm going to
use a large mop brush. This is like a
goat's hair brushes, a lot of paint on there. Or you can pick up a lot
of paint on there anyhow. Hey, I'm gonna go with all the light colors verse I'm going to pick
up a bit of this color, which is called buff titanium. It's just a light wash
of an off-white color, which I believe is the color of all these buildings out in the back and even
in the foreground. Or just want a
light wash of this. Let's see, Just go all
the way up into the sky. I'm trying to just
touching go with this here because I want to
keep it as light as possible. Drag that down. This wash that we're doing here. The purpose of this is
just to get in some color, some nice background color. We don't want anything any
detail in here just yet. Okay. So something like this, maybe on the lights, it's put a bit on the
lights as well like that. Bits in the background. There's also some
yellow ocher which you might want to pick
up some times. A touch of yellow ocher in here keeps things
interesting, though. I don't want to get
too carried away. And this huts kind of
like an brown in it. I'll just drop in
some of that there. This is just a bit of burnt sienna and you
can also drop it into some of the rooftop
areas like that. You think there could
be some little bits of brown and stuff
in the distance. It's just a simplified version really so that we've got
some of this stuff in there. Okay, good. And let's just carry
that wash on further. I'm going to use this same
kind of off-white color, but I'm also going to
mix it with a touch of this yellow to warm it up. Just cut around these
figures as well. I want to, I want to
paint all the mean. Just carry this wash down. Remember, just it's a very, very light wash of color. Just to get rid of the
watts on the paper. Almost not even there. Barely see it. Look at that simple quick
little wash of color. Now for the scar, I'm
getting some cerulean blue. And maybe I can as well pickups. Tiny BU here, which is
like a purplish color, but mainly just
this cerulean blue. She's got that.
That's all we need. Just a light blue for the sky and all this stuff
to just bet blending. Essentially. I want that to blend in
with the buildings a bit. So it can carry this
down and look at that, just simply touch
it on that error. You might get a tiny bit of
blending where it meets. But don't worry, I'm
cutting around these lights here just to expose
a bit of that white. Just a potential highlight
for later. Here. These are trees and things
back here actually. So that doesn't matter. I can actually get
them in with a bit of wet and wet work in a moment. Here on top of these, say just on top of
these little domes. You can actually just cut
around a bit like that. It will seep in as
well. But don't worry. I'm thinking of making those everything in
the background kind of a lighter silhouette or darker
and darker than the sky. Look at that, just carry
that on. There we go. We've got finally
got our washing. Blue sky. Just want to even
this out a little bit so I don't see too much of those brushstrokes and
bits of dried paint. Just tend to find this
cerulean blue tents does dry with some extra marks
and things in there. Can also pick up a bit of
another color and just drop it in like this for the potentially like a cloud shape or bit of variation the sky. What else to do? It should get lighter as you move down the page. Okay. Quick dry.
33. Venice - Darks: Okay, so what we're gonna do
now is that we're going to work directly on buildings
in the background. And I'm going to change the shadow pattern
so that we've got more shadows on this side
of the building making it look like there's light
source on the right-hand side. I think that's gonna be
better so that I can get in some of these
shadows and things, maybe a larger shadow
shape as well as this shadow for these, these two lights, I
just want there to be more dramatic contrast. I'm gonna be using these two
brushes. Which one's best? This one picks up bit more water to little mop brush on
the right-hand side, left one's just a small, small little round brush,
synthetic round brush. This is some cerulean. Cerulean, some
ultramarine as well. I added in here to just give
it a bit more, more corners. And we've also got some black. You just mix some
of that in there. Keep it interesting. Okay, we're going
to test that out. Let's leave it. That's the right consistency. So we're thinking really just it's mostly
just water in here, but because the
paint is so dark, even when you dilute it out, you're gonna get this
going to look dark anyhow. So we want it to
still be transparent. I would say about 50%, 50%
water or even less paint. I'm just gonna go
around this thing here, cutting around that. I'm trying to be quick
with this as well, so that I preserve some of
the freshness of this scene. Like that. They're here as well. The shadow on the left side, left side of this stuff. Good. Let's have a look here
on this tower as well. Probably going to get
a bit of shadow here. This is just using the, this is just using the
synthetic round brush mind you. That area. Let's have a look at this tower. Maybe a bit of
darkness underneath. Even you, you will find is
just a touch of darkness to the left-hand side of what we try to create
this shadow pattern. They're just bringing it down. But at the same time, just cutting around
some areas of light and really indications of what's happening back there. It's not a whole lot
that we can go off. She were changing around those
shadow patterns as well. Okay. Yeah. It should be more. Making some of this stuff up. Figures here in the foreground looking at I'm cutting
around them as well. Darkening off at the
bottom, the touch. Okay. Coming around here to make it a bit of this on
the dome, just like that. There we go. Let's
be better bit on the dome as we go up as well. Do you think that top
of the Dorians just need some more darkness? Even that the tail
would like that. Join that up better. Just helps to Martha towels
a little bit better. Know how to explain it. But more of this
darkness on top. K, extra darkness. It's the top of it that I don't have to redo
that one a bit later of smudge the retouch. Good. Let's have a look on this side. I can darken here, just leaving some more bits of light on the buildings
as well. Back there. We've got some of this green, I'm going to pick
up some of this green to add in on
this right-hand side. This tree. Blend that on one of the two blend onto
the building a bit. Cutting around the figures
again so you can see. Okay. So now I sort of granulating
green just comes and cuts, cuts right over the back of
this building that they have. It's kind of like the part
that touches the building. Just going to be
more of this purple down the base here as well. Just get some darkness for that. Okay, good. I'm just trying to put in
some little minute details for the separations and
some of these domes. Just more wet and wet view in areas without too much
overworking there. Good. Excellent. Get some of this burnt sienna, yellow, maybe a bit of raw
umber mixed in together. And just see if I
can get in through this color for the hot here. Okay, I'll leave a bit of that light on the
right-hand side of it. Much it off like that. Then the buildings you will notice as well in the
background is a tiny bit of this burnt sienna on
areas of the rooftops. So I can just only indicates some of that
without too much effort, just dab it on areas. Let it, let it sink
in and do its thing. And it should fingers crossed, create a nice little blend, natural blend in there. That me doing too much, getting too involved
in that whole mix. Some of this stuff in the
background to hear here. Good. You can also see some of it
on these little Jimmy column. These areas, wooden poles
and the Jedi or whatever. So just, we'll just put in a
few quick marks like that. I'll go over the top
of it probably later. I'm gonna get a chance. There's also some potential
water back there. I haven't indicated it, but you can see what
we can do later. But I just want to get into
this crisscross pattern or suppose back there. Good. I'm going to spray this
building a bit to get some, a soft shadow onto it. Let's pick up that same kind
of purplish color that will playing with before and just dab it in here and get a soft
shadow running across the building that I didn't want to stop it
from spreading too much. Something like this. More more Okay. Good. Here on the ground. I'm also going to play around with
some of these shadows. So say mop brush, picking up more
purple purply color. You realize there are some other bits and
pieces in there as well, some browns I can just mixing
some ultramarine blue to accentuate the kind
of coolness in there. Let's have a look. Okay. I'm going to just cut
around these figures in some areas and preserve
some of the light. I want to get in. Maybe a large one here, large sort of shadow shape. I can just soften off
this edge as well. We know it's just a soft bit
of softness on that shadow. Okay. True darkness in the foreground as well as some of these areas could do with a bit
of extra darkening. Okay, and I'm going to just work on another potential
shadow here. That's basically the statue. Shadow of the statue moving across to the left
a bit like that. Hey guys, straighten
out the shadow would touch this angled. We're just going to put in some little colors on these figures, some
lighter colors. This is a bit of that.
It's kind of like a purply light purple
color, lilac color. There. We can have a play
around with a few of these other figures and
just drop in some paint. Doesn't matter exactly
what color it is. But I do want to make sure that I've got a blend
of different colors. Perhaps with some
of these figures, just dropping it in to get rid of some of that white
or whatever on the paper. You don't have to call
them more in some of them, I'm just going to
leave white like that.
34. Venice - Final Touches: It's time for some
finishing touches and final finishing touches, a small round brush and
a small flat brush. And go in here and pick
up some darker paint. This is just some black, got some neutral tint as well
as there's a good color for this type of a final
finishing touches. And I think what we'll do first really depends where you want to start
and start anywhere, but go here, e.g. when you use a figure there, then another with the legs
in for that figure here. Here. I'm just tap really
just dab on an area. One area, it just looks a
bit too tiny, bit too wet. You can just spray it down a
touch to dry me with that. But I think always a good idea to just keep the
paper dry as you can, as dry as you can for this part, especially if you're just, if you're not too experienced
with painting figures, just makes you able to control
this paint much better. Hey, look at that. I'm just using a little flat brush there, but you can also use a
round brush like this. Okay. Doesn't matter. Just get the legs
in the background. Here. You maybe that's this
figure they're here. Just get it to skip over
the paper a bit as well. So as sometimes like that nice little sporadic
couple of little brushstrokes. Their legs. Because when you're in the sun, especially it's going to have little jagged
bits and pieces. More figures. Another one here. Here. Oops, that one looks a bit
too much, but doesn't matter. Okay, good time for the more of these little
bits and pieces on here. I'm actually going to darken
this pole little bit. I'm going to add some
kind of grayish color. Working this out,
something like that. So that is darker than
the background like that. But you still got good amount of paint in there to distinguish it from
everything in the back. Like that. Just one
little thing like that. Do the trick and go kinda comes into
the ground like this. There's something here,
some steps or whatever, and also a little fence I
think surrounding that onward, overdo it. Here's a window. Window here,
something like that. Trying to do my best to keep it. Quite quick. Spontaneous droppings in some
more darker paint in there. Another window or door here, I should say, like that. Okay. Can just nail, pick up a little this paint that's left palette and
just use the paintbrush to draw in tiny little
indications like that. When the building of the some dark areas
really want to overdo it. Had these little pillows
on the buildings as well. So you can just do
this kind of thing. Just pick up a bit
of darker gray. Just draw some lines
downwards like that. That should do the trick. Not all. Not too much work, just a
little indication like that. Can even see at the top there, there's more of these
little bits and pieces. Indicate them. I'm going to
work on the back buildings. They got rid of that darker
paint dry off the brush. And I can just quickly
go in here and getting some details for the the
cathedral here in the distance. They have to be much just a
little thing here and there. Good. Just putting some shadowy, dark areas to separate out
the buildings or touch. Show just bits and pieces
of that going on in here. And also maybe increase the
contrast a touch as well. Please figure this here, just the heads of the figures so that the
background is darker. This tiny little
brushstroke that help to draw out the details. Moving almost into
the foreground. Now this is the hot, we've got that just
touch on like that, drawing a little bit
of the detail without overdoing it. With this. Use the rigger brush
with a darker color. The flat brush again, just crisscross
some of this away. I'm just going to put in
some details for these, these lights, dark paints, just lamp black I'm using here. Just connecting it all up. And I'm drawing some detail
as well for the lamps. Are you can you read this page? Is just a couple of quick. It will land areas let
simplified down here as well. Let me do worry too
much about the detail as you go towards the back. Putting a few more v, little imaginary pylons
that are sticking out. And the extra interest
in that area. Tree as well just emphasize the sum of the branches
and stuff off in the distance is kinda fence or whatever they're going
to get this shadowing. This one years ago. I think it should be okay. Actually. Maybe
another one like this. Just to indicate the
source of that shadow. A bit better. Software. In the shadows of the fears. Welcome, Nice. Some of
these figures a bit more, especially the ones in the
foreground of thought. I'd put a bit more blue. The left-hand side. Some of them. Okay with that. Coloring the heads,
just some red. Indicate where they were. They are a touch of goulash back here. Just to get a smooth
key sort of effect, perhaps with white gouache
spread around a touch. Drop that Guassian
let it do its thing. Just kinda helps to blur out that background
a little bit. I want to push it back. While I'm at it.
I'm going to just put in a few little bits here and there with some
darker paint just like this. Tiny little floating around in the sky near the cathedral. Darkness. Dry. In a final finishing
touch of some gouache. For the heads of the figures. Pieces you want to indicate. Just a touch of
gouache like that. And it brings out some
highlights quite quickly. Just try to do it sparingly. Doing it on the right-hand
side of the figures As well enough to do it. And
all of them, just these ones in the foreground they could do with a bit more. Soften this down a bit. What help also to soften
this area where the feet, legs just joined with
the torso so that it blends a little nicer. Here on some
connection to someone. Doesn't matter. Just profusion. Finishing touches
really with the black. Bring out some highlights. Just areas of darkness. Mean. That's finished.
35. Manhattan - Drawing, Light: Let's go ahead and start
off with the drawing. And I'm going to put
in the bottom of the buildings roughly
where you can see them sort of go off or away
into the background like that and then come out. But roughly it's about here. You've only got a little bit of tiny bit of space at
the bottom, I'm really, I'm thinking whether
I would actually want to change this up a touch so that we've
got more at the base. Raise it up a touch. Roughly here is where
the buildings are. And I think I'll start
off actually painting, drawing the buildings in first. I'm going to go up and
actually do this one, this larger one here. I can leave enough room
at the top of the page. This is the bigger building. And then we've got
this one here. Roughly the same size. I'm not getting I'm making
sure that I'm leaving enough room because
this building actually comes all the way down to
the middle here like this. That it's roughly the
coming down like this. The center of the
page, as you can see, that we've also got everything else so we can
just start putting in some of these other buildings
off in the back. Biggest one here, just behind. Going to get this all the way. Know that it sort
of comes up here, touches the top of
the building here. And then we've got
another sort of squarish. And the bit that
comes up like that, It's not a huge deal. Something like this. This is going to be reduced
to just a silhouette. I want to make it a bit more
interesting afterwards. Just some granulation. Now this building to the
left starts just above this area of that building,
this corner down. For simplifying this
down, actually, more of a rectangular shape
that just bringing this down, we can see it just goes
off into the distance. You can swell and see
exactly how far does get a little there and then it's covered by tree
bits and pieces there. That's about all you need. I think anyway, for
those buildings, we can figure the
rest out as we go. Maybe the bottom bit here, we can just mark in a bit of the that area of the building
and that kind of thing. But apart from that, I
think we should be good. Let's put in some and it's
putting the car here. Their windscreen, I'm enlarging the car
a little bit as well. It's a two lights connects up. A base of the car, joins on with the wheels. And then it just
as we will here, we will hear probably
close to the back. This connecting up. Okay. That's a car simplified
sort of car. Just redo that we'll touch more. So just circular. There we go. That's better. Wheel two wheels. That you're gonna be enormous, shadowy green cast
to the left as well. That car. Good. We've got a person
here that's showing a bike. I can just get in some
quick little indication of that little shadow there for that person. Will do notice there's
a big sort of shadow cast to the left all
the way back there. This is good. I'm just going to pencil that in
roughly where it is. Maybe we have one also here. Cutting through that. All the way,
something like this. Here we go. Some figures. Let's put in person here. Just standing on the sidewalk. Another to the left, kind of goes out of frame, but I can just draw more in some people just
waiting here, the lights. Okay. A little perspective as well. If you imagine a dot right here, just draw these lines
going towards that dot. You then have these kind of perspective lines
going through the scene. Here you can just
start putting in these pedestrian crossing
the nose like this, following the guiding
marks on the ground. Okay. I mean, it just goes
all the way back there. Disappears off and we're going to do it all too much
in the other areas, but just, just around here. Okay. More figures. Lot of this stuff with
the figures are I can add them in
afterwards. No big deal. I do want to put in some cars and just some interesting shapes of the cars moving around
in the background as well. So I'm going to just place it in a few of those like this. Overlapping cars. Boxy looking shapes
back there with people people walking as well. Walking around. The scene. Looks like a car or
something like that. Side. Something there to
indicate that's a car. We use. Neith. We're ready to get started. I'm gonna go in with a lot
of this yellowy color first. And then we'll just want
to get a light wash running through the buildings. As you can see. Nice yellowy wash
running through. We've also got some brown bit of this burnt sienna that
you can drop in there. Okay. For this washer, I'm not concerned
about the exact color. I just want to get in
a really light color, base color for what's
going on in here. Around the figure
touch like that. Because a lot of this, I'm
actually going to get in with a big sweep of color
later as well, kinda similar to
what I'm doing here, but I'll be leaving some
bits and pieces exposed. The back ground color. I'm even doing that here
with the Yellow Sea, leaving some of the white
of the paper there. Here. Just putting a bit of that
color for this building. And b to the y, just leave a bit of that
white on the paper as well. Keeps things interesting. For the sky. I'm going to
pick up just cerulean, just to touch us cerulean
and get that in quickly, loses a bit of a
bluish color up there. I'm happy. Maybe a bit of this
gray drop that in as well. I just want this all to go in. I can cut around some of
these bits of the building so that it doesn't mix
completely in as well. But also, don't worry
if it does mix. I think in some areas it's actually good to let it do that. Kay. Just coming across
the right-hand side. This Yeah. Yeah. Good. Some more purple
maybe at the top. Something. Just a few little
darker strokes. Feather in. That mix. Too dark. Okay, moving down. We go here, we're going
to just get some same, same sort of yellowy color. This is just yellow ago. Got drop that into the ground. Okay. Give it a quick dry.
36. Manhattan - Darks: For the next step
and give me using a smaller flat
brush and a larger, the same large brush that
I use in the beginning. If you go to large mop
brush that works fine. Going to work on some
of these shutters and find ways that I can
actually get the mean, especially these ones in the foreground and
a little bit more of a softer way. Then I'll blend them
into the back of touch. So let's mix up a bit. I'm going to mix
up some purple to purple, blue and purple. There's a bit of brown
in there as well. Doesn't matter. Let's just drop
this in like that. Have sprayed the sprayed
this down a touch. Let's see if I can
just get in a bit to this side to get it quickly in that shadow on the left
side of that building. And whoops. I'm just sure I've got this in fairly
accurately like this. Okay. That's just that bit on the left side
of the building. And I'm gonna do the same here. But this is gonna be a bit more of a softer look
on this building. I want this to
blend a little bit. Okay? That the blend a bit
nicely soft and down. But because I still want
some light on that building, touch a light here. Okay. Notice strong won't get some, it'd be brown and just
add that in there. This is a bit of burnt sienna. Drop that in there
quickly because we've this building is kind of got
that color on it anyway. Something like that. Okay. Good. We know on the left-hand
side of the building, It's just pretty
much the same thing. It's bro I will leave some
little spots in there. Okay. Just bring this down. And you can just make some
little cutouts and things in areas just leaving the
previous Washington. I'm gonna just getting that
building here in the back though is a few
little brush strokes. Just trying to simplify
these ones in the back and touch. Bring them down. Smaller flat brush for
this one on the left, I'm going to getting
a soft shadow. Again. Spray that, bit down a touch and just drop
in some of these color. This is just a bit
of the purple. Okay. It was pretty nicely like that. Just darker. And carries on a bit to the left hand side of
the building. You can see. Okay, Good. Little bit of details
for the back buildings. Small purple and
black just mixed up 50 per cent
purple, 50% black. And then watered
down quite a lot. Needs to just some
windows and things are around indicate there. Building, some separations
between some of the buildings. Okay. I'm going to start putting in
really lots of dark colors. Right? In the distance. Here. We can see the tops of the
rooftops of because in areas and that's to create
some maximum contrast. Just a lot of darker
color in there. If I can just spray
that a touch as well. Notice there's all
these little bits and pieces on the
building as well. You can see here there's like these tiny little windows
and things like that. This is a good time to sort
of play around with this and getting indications of this. Opaque paint hasn't dried yet. You've got a good
opportunity to just indicate some of this stuff and
also the separations on the building like this. You can just kind of indicate
what's going on in areas. You don't want to
overdo it, but yeah, I find that it just melted
nicely and you don't have to work into it much later. You do it this way. Tiny
little bits on the buildings. This is just like the
windows and stuff like that. That you do have someone the brighter side
of the building. So you can just get
in a few of those. This simplified down. Okay. Some more darkness here. Where the building, the
bottom of the buildings are. Good. Helps to create extra contrast like I was mentioning before. Um, the trick is just to leave some of that previous
color in there as well. Can even create a
car here like that. Create details. May not actually be there. Good looking into the
buildings to find maybe some little windows
and things that you could indicate.
Indicate on them. It's kind of just picking out areas of darkness
and the buildings little separations and windows
and just dotting the main quickly without
much thought. Keeping keeping it basic. I'm somewhat faithful
to the reference photo but not having to
overthink everything. What I'm trying to say, it's putting a bit of extra
darkness on some areas of the building is like to
the left hand side of them basically. Want to overdo it. You separation better. Okay. Working on these cars a
bit. A fetus as well. I want to get some colors in. This is some blue, little
bit of blue that I've got. It could be this
other color as well, which is kind of like
a lilac purple color. And just drag some of these
through the car like that. I want to get some of
that coolness in there. In the background. You might have something similar
here just with that one. Just a bit of color
in areas of the cars. This could well be some
yellow or something near dab of that yellow. If I can scratch out
some little highlights and things on the
building as well, just little bits and pieces. Windows or something. Some little lines for the
structure of the building. Quick ones. Really. This works well while the paper is still wet. Can't do it any other time. Just some scratches out of little bit of scratching
out of the color there. Can just scratch out like a
top, something like that. This could be building, buildings off in
the distance, e.g. okay. It's a little trick. Soften the shadows a bit. Actually went to Colorado to touch will lift off
a little bit of it. It was too dark. Touch it up to remove it. Schoolwork on these cars and
purple and black together, it makes a great shadow color. I really just to get
the darks and so they're just gonna
go getting the wheel and hope to blend it in
nicely with the rest of the car already starting
to come through. Okay. They can add
just blending in, creating the shadow
underneath the car. Okay. Joining the wheels up. The moment it starts
looking like a car, when you want to stop. Stop and let it do its thing, just let it be. Okay. That's looking like a shutter. Good little shadow. Leave that. Let's have a look. More cars here like I just got an indication
of it before. But there should be darkness
underneath it like that. Need the car. A little bit of a
shadow to the left. Also the figures rule. Emphasis on some of
them like this as well. I've changed this
figure actually just make it look like standing, walking into the scene. That's a little
bit easier to do. Okay. Another couple of cars
that will need to be just indicated again
with this purple. And the shadow underneath
the car is the big thing. You see that just that
little shadow underneath. This isn't completely dried yet. I'll have to come
back to it later. Work on these figures first. And just indicate
the legs walking. Some of them walking
cross the roads and the more King standing
even like that. And the shadow are connecting the figures and the
feet on the ground. Patristic touch a detail and beats detail in the car. Getting some colorful
figures, matter what color, but I want to just blend it in to make sure that the legs
are not just sticking out. And keep it keep it kind of fun. Just a bit more. Let it
blend in to the legs. As long as you've
got the legs in and they look fairly sharp. It's not going to
run. You're gonna get some of this color. You put it above, coming
down the page a bit. Okay. I wanna get in get in a bit of a shadow
over the ground as well. Maybe here. Here in the foreground because I've
not put the one in the back. I actually think it
looks better like that. Or I could change it
around and just get a smaller looking shadow
running through in there. I think I'll just
go with the one in the foreground for now.
We'll see how we go. I'm picking up some
of this purple color. Just going to go in trying to blend it on the shadow of
the car as well. That I'll give that a drawing, getting a very soft shadow
at the back actually.
37. Manhattan - Final Touches: You're going to mix up a bit
of this purple and black and just put in some shadow running in the
background like this. It has to come from
this building. We need something to indicate that over the top
of all this stuff, all these figures and
everything like that. It looks a bit,
little bit better. And you notice I've left a bit of that yellow in there as well. Okay. See if I can draw it on
maybe a softer one here. Of course, we've
got a few bits and pieces to add on as well, like these telephone
pole, north poles, but these street lamps just
see if I can get one in here. Simplified down. You've got them all all
over the place really. But I just want to indicate some of them that okay. Another one here, e.g. maybe just not really there, but one in there anyway. You notice near is
you get these kind of these little bits like
this for these windows, I'm just going to drop in some
color from the flat brush. And the flat brush has the
shape already of the window. Which makes this
quite easy to do. Dilute that purple down
a fair bit though. You've even got shot size, it just run across as well. So something like that, even know it was do we have
in here something here? Finally, some finishing touches. A little bit of gouache to
bring out the highlights. Using small round
brush for this. Straight on little bit on
the car there to the right. This careful not to
overdo it as well. It starts to look artificial. If you add too much on. It'd be the hair or
something for the figures. Some of them wash the street lamps. Little touch there as well. Here's a kind of something
here on the windscreen, just spread out some of these quarter on the
windscreen attention like that. Figure. In the shoulder. Here. In this car. This car, they're kind of guy here
just in the darkness. It's amazing just what a
little bit of gouache can do at the end of your painting. Bringing out some small details that you didn't even
realize were there. So to just use it in areas
of the buildings as well, I wouldn't recommend
doing it too much. Just in some parts. Soft off that beat on
the car looks too harsh. Just picking out just
a few more pieces. And I can alien little bits of quash sparkle running through. Also just create this feeling of smokiness with the gouache. Just watering it down and spring it through the
background like this. Just in some areas. This will be good. Here. You have that down
at the back there. More here. Just a smoky sort of effect. I want to overdo it though. Okay. It's finished.
38. Paris - Drawing: Okay, let's go ahead and
start off with the drawing. In this reference photo. I'm actually going
to edit it out and change things
here and there. I don't really like
these bits and pieces of leaves coming in over
the top, like so close. So I'm gonna get rid of those. And firstly, just looking
around and buildings, looking at how much area we
want for the ground as well. And I'm thinking
actually we may put in a bit more of that ground area. I'm going to just
put it is putting the horizon line or the bottom part of
the buildings here. This is really
where the bottom of the Eiffel Tower Stotz
from the background. Okay, and then we've got
some, some of these little, somebody is little marks here
just for the perspective. This is the kind of
the area of the road. We do have a building
running up here like this, just disappearing off over
to the back-end there. And there's also these trees, shrubs, larger tree here. I'm just going to indicate
that in like that. I'm a bit of detail for that building. Is a van or something here. Just try put sunk
indication of it. Just a square or rectangular box shaped like that
will do just fine. You can even see the little
shadows on the building. Here. There is some kind of a balcony structure
like there as well. Okay. Just quickly indicates
something like that. That's basically this whole
big shadow on the building. On the ground here you've got these little
pedestrian walkways, pedestrian marks, but I'm not going to worry too
much about that. I want to get this car
in the center here. Put it in. This is
the windscreen at the back and the bottom
part of the car. Windscreen is actually a bit
smaller, just like that. And we can get in some of
the tail lights of the car there. That's about it. Really, that's about it. I can just work out later. Everything else. There's a man that's
kinda just leaning over. Can you see just leaning over? And by asking for directions
or something like that, then we can indicate that get the legs
coming down like this. Leaning over their heads more front like here actually. Let me get that in. There we go. Better hits, just
leaning towards the car, legs like this. Asking a question or something
to the person in the car. I will work on a few other
cars here in the distance. I'm not going to
leave that door open. I mean, it looks like
it's opening the scene, but I'm going to change
it around a bit. You can also see in
the background is more cars and just
overlapping of these car like shapes in the,
in the background. So putting you in
a few of those, this little truck here also a bit of darkness
underneath it. Okay. Great. Some more people,
It's getting someone just walking across
the road like this. There. Someone there. Someone just standing
here, perhaps. One here. Like that. Kind of walking across. You can even put a larger figure here in the
foreground like this, even just walking
in to the scene. Okay. There's also this building
here to the right, which I'll get in let's
get in indication of it and runs roughly actually more past the center of
the scene like here. Okay. I'm going to carry this
all the way up and we know it kind of
finishes further up, like here near the
top of the page. I think that could be a dome or something. I'm just going to Invented, it's hard to
see exactly what's there, but I will invent it
and maybe it is a dome. And the main thing is
that I want to separate this building out and
into two big sections. The section on the right and
the section to the left. And over here is where there's
gonna be a lot of shadows and separations
in the buildings. Lots of complicated
structures in there, but we don't need to worry
too much about all of that. We just want to get
an indication of it. Look at that, just that bit of that curvature of that building. And the interesting thing
is that we've got here like a really large
front part of this, of this cafe or something
like this red in there. So I want to emphasize
that as much as I can. And you've got bottom, bottom bit like that. That's a little bottom
part of the cafe. There's even another part here. I'm going to emphasize this
side as well, like that. A, we can just make that come all the
way down, sort of run. Here. This is more of a
residential building, looks like the left. K coughs. I think it says something about
that coughs Castile cafe. You've got people just
walking around in there as well and
maybe people just sitting down at the table
could be like a bar or something that they're
just sitting down in the distance here. Let's sit them
down or something. Good. Just important to
make those figures in the background a
little bit smaller. Maybe a few smaller ones here
as well in the distance. Hits too big. Kinda get the figures the slant in the direction
you want them to walk in. And let's have a look here. We've got some, another tree or something running
through the center. There's another one here. Simplify that down. A lot of this stuff. You can't tell
exactly what's there. It doesn't quite matter. But this tree, these
two trees helped to bring out a bit of the
lights on the buildings. Here. We've got the Eiffel
Tower, we've got it. And I'm going to do this
in quite a loose style. I don't want it to
look too kitsch. So if we just getting a little more of a silhouette
of it in the background, I think that'll, that'll
do the trick rather than something too obvious. I might actually reduce
this down and touch. Just giving you this
sort of bottom part of the Eiffel Tower like that. This is all just going to
be a general silhouette. Mind you don't want it
to be too detailed. Ended off roughly here. All the way off in the
distance somewhere. It's smaller up the top. Something like that. Let me just fix up the
top part of touch. With, with these
well-known landmarks. You just have to put in a touch more detail in areas then as it resembles what you're
trying to draw in there. There we go. Pretty basic. You can see bottom part of it. Their soldiers just gonna be a silhouette in
the background. I like the simplicity
of it right now.
39. Paris - Painting: Let's get started
with some paint. I am going to pick up a
bit of a warmer color. So this is just a
touch of yellow ocher. I mean, there's also some other
paints here on the paper. The palette, sorry. This is a bit of a yellow. It's like a buff titanium. It's more like an
off-white color. But my aim here
is just to get in a wash of warm color
on the buildings. Might get in a little bit
of red in there as well. Just to, just to warm it up, a slight just a touch there. That all the way
up to this dome. I think that dome is
actually going to be more of a more of
a cooler color, but we'll see how that goes. Okay, some more red in here just to maybe get in
a little bit of this pinky. Q. Yellow, dropping
some more that yellow. And the paint is basically
ten per cent paint. The rest of it's just
water going around here. All this stuff actually
read down the bottom, but I will play with that later. Just want to get in a
nice milky colored, warm colored wash through
most of this scene. We can even do it there. Let's just do it there for the watch him a call
that the plants, shrubs and things as well. But one here to the left, this large building,
Let's just get this one in here as well. Just the edge of it. Yeah. And maybe some red again, just mixed in red with
a bit of that white. Okay. I'm going to actually
try to get in some of the shadows wet into wet. These little bits of cutting
around for the figures. Also this truck or
whatever the news, any large brush to do this. I'll just pick the largest
one that I've got. Now I'm going to move
down the page as well. But before I do,
I'm just going to spray the top of it
a little so that it doesn't dry completely. I want to blend in
some color in the top. Okay, I'm thinking
a nice vibrant red. I've got some pi will read here that same stuff as before. Makes it a bit of water into it, maybe a bit of orange as well. Orange and red. Really like a more more vibrant, just putting in some orange in there as well, orange and red. To get myself something
that's, that's quite vibrant. Good, something like this. But it's still a transparent
enough to work with. Okay. So that's the red. I'm good. Like that. Now further down. Further down, I think it's more it's a different
color actually. But I'll look, I'll
just get it in anyhow so that we've got, now, I'd like this red and I think I want to draw
more attention to that. Just make all these shades red. Notice just how
strong it is as well. I really want that
to show through. I'm going to swap over to a smaller brush to cut around some of these
areas around in here, I'm just going to
pick up some more of this pinkish color and blend some of this
down the page on this. Get a bit of this
coming through here that just a softer color running through,
maybe a bit of that, white as well, like this. Okay. Some more of this same color, like this off-white color. I'm going to put it
into the ground, but also mixing a bit of
grayish paint that I've got just a slightly
cooler gray paint that's already pre-mixed from, uh, from, uh, the
last wash that I did. Another painting. It's
just a combination of all the paints I had
on the palette before. But yeah, it's just
a little darker. Let's drop that in there. Okay, good. I want some more vibrancy, little bit more
yellow in there, too. Boring. There we go. Keeping this part really
as light as I can. Okay. Don't want it to
look a bit gray for the road. Look at that. Just dropping it in. Yeah. Yeah. Yeah. Good. Tiny bit of spraying up that top part. And just start working on just want to spray those
buildings a little bit more. I'll start working on a bit
of the color in the sky. And I'm going to pick
up some cerulean, blue wash of cerulean. I'll just mix that up
a bit on the palette. Very light wash of it. Want enough of it for the sky. I've got a bit of this
white color here as well, and I can add in a
bit of that just to give it some extra body. Okay, and then we got it, we've just got a bit of this
kind of milky consistency. Drop that in. Just cerulean blue,
bit of white in there. Mostly water, lots of water. Nice big wash of that color. Okay, cut around those trees. Know that the
buildings we've got the Eiffel Tower
right there as well. I'm gonna get that in later on. I'm also in some areas, I think it would be
good if we can add in a touch of color or the trees. Use the fan brush, maybe. This is some green, green purply color, bit of green here in the corner. Green and purple mixed together. We can also mix, grab a
little bit of this yellow, creating more of
a lighter green. Let's put in some of that. There are lots of
water, lots of water. To just mixing with the sky. The fan brush makes
it a lot easier to work with as well to just keep things loose and
sporadic in areas. Some of this area has not dried yet on the building that's okay. There. At the bottom of these trees, you've got like extra weight, an extra darkness for the trees. So that's what I'm
trying to do here. Just getting some of this while also encouraging it to blend, leaving some of the yellow, yellowish colors up
the top as well. I don't want it to all
turn to this color. There is also another
bit of green here, as you can see, just on
the side of the building. And this is for
the tree here too. So this is just more
wet and wet work. We can play around with. It's up to you how much emphasis you want to give these two, don't want to overdo it. Okay. Light wash. You can
just drop in a little bit more here and there will be
more darkness in, inside. I've just mixed a bit
of purple into that, into this green to
darken it down a touch. Good. Let's give it a try. Okay, So we've got that first washing. So really the next step here is putting in a lot
of the darker colors, the additional contrast for the shadows here
on the building, I want to just get
more of the light showing also for this
side of the building. So I'm thinking
I'll just actually do a bit of wet and
wet for the shadow on that side of the
building and then get the whole right side of the
building and shadow as well. Okay, so let's mix
up some color. I've got already some purple
here, which I'm liking. There's just lots of
purples in this mix. And I find with the
purple and yellow you get a really beautiful mix of color. I'm going to stick
with this, actually. Stick with that purple, maybe
touch a brown in there, could do us some good. Okay, Let's have a look. Let's just drop
in a bit here and also perhaps spray the top. I don't want it to
go over this shade, but they're kind of
over the top like that. Okay? And this way I can get in some softer shadows,
perhaps here. Okay. Using the same wash. Maybe it's a shadow coming in from that right-hand side
or something like that. There will not get a bit on top of this
dome as well like this. Coming to the left.
Look at that. Just a bit of that shadow
moving down. Okay. It's all just creating extra darkness on the left
side of the building. This leave out some of
this tree so that it's not all completely obliterated. When I can go in
here, look at that. But a purple. And as we get down
to the shade area, I'm going to go darker, some more purple and
get some more of this darker purple in here. Okay, good. I'm going to just use this to
cut around this shade here. That there's even this tree, but I'm not going to
bother with that. I'm going to go
ahead and, um, Ciao, this shade a bit like this, just doing it all in one go. That's the plan anyway. Like this. Okay. To getting the
sharpest contrast. I mean, this whole area here is like it's a green
and stuff in here as well. It's a green. Just just want to rejig
that attach that. It is something in here. Okay, just make that more green. And I'll carry this on this building all the way to the back and
it's all wet into wet. As you can see, it's
all wet into wet. It's a large shape
for the building. I'm good. And you can see how it just
goes all across the ground. And you've got also got another flat brush
that will be handy. This smaller flat brush. Here I'm going to do
is just kinda do a bit of cutting around the cars and underneath as well here to getting extra contrast
what's happening? It could be something
going on down there, really all there is
a little cafe or something just
cutting around some of these figures as well. Okay. Two figures. There can be people just at
a restaurant or something. Here. Okay. All in one. Wash. Some more green or something in here as well just to get in this tree in the
background like that. So I just want to blend, blended in backgrounds
and there's another whole so tree
here, touch of color. This is going to draw out some of the
building to the left. Just a touch of darkness here. That really just, I find more darkness
at the base helps to create more contrast
for these cars. I want there to be
a lot of contrast. I'm using some black
even here to cut around the car shapes. Okay. We've got some also
little bits of shadow on the building here. I'm gonna get that in. Just
a touch of that shadow. Running through that building. Kinda cost by the
building to the right. Okay? But letting some of that paper show through
is important as well. So that you've got a bit of that background wash in there. Okay. I good. This might also be a good time
perhaps to put in some of the details of the awful
tower and the backend. I don't want it to
look too obvious. I'm going to mix up a kind
of a grayish blue color, just a bit of gray
and a tiny bit of this cerulean leftover. And I'll see if I
can get in some kind of resemblance of it
in the background. A little bit darker like that. Now I want it to just possible just blend in with
everything else. I'm using this little
flat brush as well. To do it. I'm trying to get into the
silhouette of it first. It might blend in a
bit with the building. That doesn't matter,
just let it be. We even got a bit of the
bottom part here which is blending into the sum of
the tree area in the back. This is actually fantastic. Keeps it looking natural. And coming up. Again, just a beauty. This work like that. Okay. Lighter at the top. Almost what I kinda wanted. Reaching the heart. Okay. That's looking good. When looking very loose. Whoops. Don't want that
color a bit more of that. Gray. Yeah. Just a few things
you can touch on, like while the
paint is still wet. You can imply some darker areas within within it
like here, here. Just in some areas
here are there. To give it some extra
structure. You see what I mean? Just blends in nicely
without too much effort. Even the top part of it, like a little tap here and there for something
that might be going on. And Destic. I'm continuing to work on this. Let's put in some shadows
and things on the ground. Connect it all up nicely. I've got some of
this purplish color. I'm actually going to make
some more blue in there. Give it, give it more coolness. And getting a shadow and a harp hopefully also try to get it more
angled like this. See, I just want to
change the angle of the shadow to kinda straight
in the reference photo. I'm just outlining
where it is. Okay. Like maybe here. Yeah, onwards. Okay. With light color
for this shadow, you're just really putting
in mostly water, but, um, maybe 20% water and
the rest of its paint. Got a bit of this car maybe
just caught by it like that and runs all the way through the center of these cars and what
have you as well. The figure here, just darkening
this whole area down. Just one wash of color, connect it up to that
building as well. That's where it kinda shadows cast directly into
that building. And here we're
looking good so far. Here we go. Shadow.
I'm not only that, but you do get other bits
and pieces of this shadow from the tree coming
to the right. So I'm going to indicate
some of these as well. As you can see just a touch of that shadow. You're
on the ground. It's sort of, it's
just cost and it blends in with the shutter
here in front of it. I like how it there's
a bit of variation. And we just continue to just
move some of these alone. Like that. It looks like it's cost
from a tree or something. You can see there's some
kind of line work like that. They're there. Okay. I want to put in
some more down the bottom, like another now the shadow perhaps blending
with everything. So I've just put in a
bit more of this color, blue just mixed with
some purple watery mix. And look at that.
I'm just dropping this straight in to the bottom. Getting a little looser shadow moving towards the left as well. Spray that down to touch. That will spread a
little like that. Okay. Things interesting. Bit more
darkness here at the base. There we are. I don't want to get
rid of all lights. I'll probably just leave that. Now. We can also start scratching out little windows and things if
you get a chance to as well, I'd use a little
knife to do this. Like here. Perhaps you can just
figure out some bits of, bits of areas that you can scratch out to
bring some detail. But at the same time, what I'm doing is picking up darker paint and looking
at areas where we could potentially put in some windows or something because
the paint is still wet here and it's not
going to really spread much. So it's a good time to add in
some little indications of the floors and
details and things in it just blends in nicer
without too much, too much of a fast. And the windows don't all line up exactly as per
the reference photo, but it doesn't matter at the end of the day,
you just got to. Take it and make something out of it so
that it comes out unique. I think the main
thing was that I wanted two sides
of this building, the right side and
that left side here. That has a bit more of this sort of the side of it here. Exposed. Okay. A few more bits and pieces
running through it. This is great, fun when
the paper is still wet, you can play around with it and add whatever
you want in there. I'll just blend nicely and
take on take on a form. You want to do this while
it's all wet as well, so that it's easy to get more of these little
impressions rather than, rather than anything
too literal. Just dropping some more. These little windows
and stuff here as well. Look at that. This building. I will put in some details. That's like a little
balcony or something. But there's also the sides
of the buildings like this. You can see just sticking
out the windows like that. Little bits of detail. Sides of the building too good. Goes off into the background. You can't see too much about
what's happening out there. That will be k
implies just a bit of light hanging off that
building that define a touch of it on the rooftops and stuff you can help as well. Just to indicate
bits and pieces, details on the roof. I'll do it on that side too. That just brings it out better. You know, this,
this tree as well. Let's emphasize that better. I've lost some of that. That tree, some more green here. Let's use the fan
brush for this green. More of that here. Green mix of color. Little bit of yellow, I think would be good.
Bit of yellow. White. To break up this. Break this up a touch. Get some lighter
green spots on top of the they're just use that to
blend some of this as well. Yeah. Peter, something going on. Okay. I'll give this a try.
40. Paris - Final Touches: Time for the finishing touches, I'm going to pick up
a dark mix of purple. Also got a bit of
black on here too. I'm going to mix that
down so that it's quite watery but
very dark still, so that I can get some
really final dark values in. So let's take a look. I'm going to start probably
with this car here. I'm going to just
put in a bit of color at the back
of it like that. My way down just crosses over onto this
shadow here as you can see. The darken this
car down a little. And I can put in this indication of the
wheels at the base like that and a bit of the shadow running towards
the left, just like that. And we got a car. Might just add in another line like that
to detail further. But apart from that, really, move that much to it. Okay. Can also put in a smidge of
color in the wind screen, just a bit of water.
Hey, like this. Smudge that a bit in there. Do the same thing for this car. Down. I'm just using
some black here. Lots of water mixed in there. And you can see where
it hits the ground like their joins on with
the car to the left. Ones in the back as well. They should have just
create a user to create these little negatively
painted shapes and areas. I don't want to overdo it. So you have to be
careful in terms of how much detail you
put for these cars. Another one in front. This is the person that was
leaning over here as well. I'll put it in the legs of
that person just like me, they look just like this. Meaning of talk. The person in the car park
and that shadow down a touch. This vehicle again, another darkness at the
bottom bit of darkness. And there's more
up ahead as well, additional cars and things. This person it's getting
the legs of this person, just one here and
then maybe another leg going towards
the back like that. So this person just
looks like they're walking into the scene. Or that shadow here on
the ground to like that. Some more people here. Again, just using this
same darker color, you can mix up any dark color for this just as
long as you've got more strength in it than the previous washes that
we've played around with. Trying to do the legs with just one or two
brushstrokes if possible. Now you can see into the
restaurants as well. And this is where I want to perhaps bring out a touch
of extra darkness and in places to further emphasize what's happening
back in that section. Okay. Another car in front like that. Just indications,
potential detail. Then all these little
more shadows as well. Touch color for the figures. Move. This lavender color may be here. And I can put in some, some yellow as well. The top like that to create some more brightness.
In this section. And just blend it
along to the legs. The legs join onto the torso. You don't have to
color them all in as well. It's up to you. Here. I can put in
perhaps even some of this blue color or this
blue color for this figure, there are a few them. Change it up. A
touch can be kind of a yellow color there as
well. Doesn't matter. Oops. You've read for the faces. Picking out a touch
of this red near is see if I can get in. I'm shadow for the
shade as well. Just running across like that. Indicating a bit of this as
if the year we've just got some darkness on this side from the from the light source
coming from the right. Simple thing like that. Okay. In some more little
details as well for the building touch of
things here and there. Just a little bit
of darker color. E.g. might put in some
window is up the top or something like that. Outline the floors. Bit more. Or some
of the windows, like the frames of the windows, you could do something
like that as well. It's just like your
final just tidy up, I guess, of all this stuff. Separators of the floors and
things with these buildings. I've put in a few little
scratches here as well for the shrubs maybe coming in from the side and around the
buildings that can create a negative shape for the
side of the buildings. You can see here this just to keep it
light and not two. Here I can put in a
bit more darkness. The trees, it just adds
in a secondary layer. Over the top of the
previous shrubs. Maybe some more hues
will just another layer. You feather that in like that so that it just
looks like some leaves darken the bottom
of those shades. I think that would, that's
going to make it better. Shadow, more convincing. Just kinda cuts across. Darken down some of these
cars and things as well. E.g. this one be a touch of coolness speck
there would be good. Yeah. And do it for all of them. Just a few. Some more bit of feathering up here
as well for this tree. Would be good. Give it a
bit of volume at the base. That's better. Let's see. It's just
coming from the h's and you leave
that beautiful, warm up the top bidder, those lighter leaves at the top. And you just build
detail by doing this quick little brush
strokes like that. Kind of what we, like we
did down the base here. Similar to that new array. Dry. I've got some white
gouache on the flat brush. You can use whatever
brush you'd like. I'm just choosing this one. And look at this figure
in the foreground. I'm just putting a B to B, the light and the
right-hand side, the back. The figure like that. Little bit closer to the
foreground. This one here. Okay. Kinda gotta be used
this quite sparingly. You don't have too much too
much going on in there. Yeah. Look at that car, a little bit of gouache and
Chappelet car like that. Okay. You can even bring out cars that aren't actually
there like that. You know, these,
these little shapes, these little bits of white here, foreground and the
background, sorry. It could just be cause
piled up in the distance. Easy. Light on the right-hand
side of that car. Maybe in this one as well. This figure touch a Guassian the head and right
side of the body. So it still looks like he is leaning into that car or touch gouache for that figure. That one that doesn't take much truck here as well. Why not just get rid of that feather in a
bit of it on top. Nothing that you can also mix in a touch of gray into the squash. Beautiful black, e.g. whatever you've got
left on the palette. And you can create the kind of a grayish color that you can use to bring an extra
details like there's like a little ladder here are suddenly you can
see it just go up the building and
simplify that down, but that's something there. You can go into the
buildings as well when adding some extra color. E.g. here, we can just put it in a bit of
that to grayish color. It's just finding
some highlights. You want to add in. I guess as a finishing touch
on that a bit more. There. I do want to potentially
add in some smoke, like a fix if I can
spray down this area, touch like that and just
dropping a bit of squash. Some smoky effect
in the distance. Lift off some of
this color here. There could be some
smoke or something, especially running
through the cars. And what have you as well. The more white here as well, just I don't know. It could be exhaust or
something from the cars. Just to be just smoke. Help to break up the darkness
off in the background. This this really dark color. It will dissipate
a bit and start looking more gray
as time goes by. I'm kind of lighten
lighten it off, but a little bit
of that in there. Okay. Maybe I can scratch
out a lamppost or something. Some little details. I'm just spraying everything, giving it a fine mist thing. I can do stuff like create
these little branches, scratch out these
little branches for a potential tree here that's
coming in from the side. That they could be
even one back here. Oops, kinda tricky
to get those in. It's not completely dried yet. But little little
bits of detail. Separations, I guess. Okay. I don't know if they
just look a bit like tree branches or something. That would be nice. Touch to add in there. I'm finishing touch, just
recover some of that paper. This is just a little bit
as scratching out to form. Maybe the side of that building create a bit more of an edge. There. Can't do much at
the top, but mostly here. Okay. And I'll call that finished.
41. London - Drawing: So think I'll put the bottom of the buildings
roughly about here, just going to draw in
a little guiding line. Okay? So mainly for these large building in the center to the left
of the page. Okay. Roughly about here. On this side you can
see there is a car. I just put in the
back of it like that. And quick little
indication for the side, I'll get data that
a bit more later. You can even see
another one here. Okay, I just want
to make sure I've got it something here
in the foreground. We've got a person here as well. We'll just get a bit more detail in for that person later on to maybe put in another figure here and another one closer by. Like that. Just planning in
scribbling in and just experimenting around
with the composition. I always like to
change things out, touch so that we've got
a few things going on. And it looks a bit more exciting than the
reference photo. So this building can be
a little bit tricky. There's a lot of detail on here, and not only there, but
also in the background. You can see there's actually more buildings up
here to the right. So probably the easiest
thing I wanna do is figure out roughly a quarter of
the way through the page. Yeah, about a quarter of the
way through the page here, you can see that's roughly where all these buildings sort
of connect up at the back. These large building
here in the foreground. And the building to the
right-hand side of it as well. There is little bit of a
connecting point there. But I just want to get in these smaller buildings here
in the background, just a silhouette
of them for now. Here is actually a little bit of a a rectangular like shape, doesn't matter what you
put something in like this rectangular shape
for that building. And then on top here we've
also got another building. It's quite interesting,
so at least white domes or
whatever, the top. I'll figure that out
a little bit later, but I just thought I'd put in a Buddhist scribble
there to get it going. There's all these
traffic lights in the middle just
covering things up, but I'm going to ignore
them for the meanwhile, let's have a look at where the building actually
comes in from the top now, again, trying to find
patterns in here. And the middle point
of the scene is here. And I'd say the top of the building is about halfway
between the top and here. We can just put in a
general mark like that. And this is just the top of the left hand side
of buildings of the main dome here is
actually a little bit larger and runs roughly, let's say roughly about here. Okay, I'm just putting little vindication
of it like that. At the moment, all I'm doing
is just trying to get in a quick scribble of
where everything is. Alright? Quick scribble
where everything is. It doesn't have to
be perfect. Okay. This I think is the dome I was just playing around with before. Interesting. Dome. It sort of goes up like a
witch's hat, like that. Oops, something like this. I'll refine that a
bit more in a moment. But this is just a quick
little indication first, and that comes down. Okay, so we wanna get
in the whole side of a building like this, right down to the ground. And we can see that it actually
goes around the corner. And we've got another bit of sort of coming up
like that as well. You're just taking
bits and pieces. I'm not trying to copy
the entire thing exactly, but I'm taking a
little elements of it that I can putting the
side of that building. There's a whole lot of
stuff going on here. There's so much that's little
bits of the rooftop. Okay. You just putting these little
squares shapes like that, carrying that down to
again, the ground here. And the interesting
thing is that we've also got a building
in the background behind which is difficult
to actually locate. I mean, you can just, we can just make it up. So we have this part here. There's maybe some chimneys
or something behind there. Okay. I'm going to
use this as a kind of more and more
of my advantage. Maybe just darken down that building a bit in
the background. We'll see how we go later. Okay, but we can see it
actually comes out like that. And ducks behind there. And there's always sort
of white, white building. And you can see it
all just come down and get a little bit closer to those
buildings, to the right. I'm just going to
scribble like this First. There is also this kinda looks like a clock tower or something here in the distance. A little indication
of that clock tower. And there's a clock
here, of course. I might actually detail
this a little more. I can get in a bit
of the side of it or something like that perhaps. But everything else in
the background there is just these buildings
connecting up. Okay, It's not difficult to really draw that little
silhouette in there. The difficult thing
is actually penciling all the little components
and bits and pieces. So here in the background I've actually spotted a
car and I'm going to move it forwards a little bit and just want to make
sure that I've got, I just want to get another car here and the distance really. So this is the
back-end of the car. I thought I'll put a we'll
want to put a wheel here, put a wheel here and here. And these can just join up underneath like
that. That's a car. That's a little car. And not only that, we've got a figure in front
of that car like this and just walking
across the road. Okay. So a couple of legs there. That's a car in a figure. The light source is
something that we need to figure out as well. I know I want that light
source running to the right, but I don't want it running at such a sharp angle was kind of to the right
and to the back. So I will just change
it up a bit like this. So it still goes
off on an angle, but isn't so so much of an angle that it goes directly behind, like
in the reference photo. I think it's just going to be
better if I do it this way. Outline that windscreen and
a little more like that. Okay. The car, a lot of
this stuff in the car, I'm actually just making up
here because the reference is not cutting out
a fair bit of it. So there's the wheel, wheel here as well, like a simplified down
just going to 3D out this we'll touch to make it a
bit thicker. On that end. The right side where
there's maybe a bit of a shadow or something. What have we done with
the back of this card? Looks a bit all over the place. I'm just going to make
it simplified like this. Join on to that. We'll of course,
really important. And there we go. We've got that shadow that runs underneath the car to
the right hand side, started just shade and
adding a bit of a bit of these values while I have
the opportunity to do so, the legs of those figures, that figure as well here are actually putting
another figure. And I thought I'd put
this one in a bit closer. And notice how I'm putting
the heads roughly on the same area on
the horizon line, just where the buildings
touched the ground. Really important as well. Okay. Here is someone just
walking in the distance and Lake also towards the back. Maybe this person is
walking towards the camera. It's hard to see really,
something like that. Okay. Normally I don't
really draw feet in there, but why not? I'll just indicate
something like this. The ankles and then
kind of a pointed foot like that. Like that. Maybe just the foot going up. We'll figure it out
as we go along. Here we go another figure. And as we get into the distance, you find that there's
not as much detail that you need to emphasize
with the figures. I just tried to put their legs a bit further apart like that, make it look like
they're walking. There's a bit of
movement going on. This figure just sort of
moving into the scene. Like I said, this car again, starting to emphasize a
bit more of the detail. Okay. Just just some
heavier line work, but really not a whole lot of
extra stuff going on here. Just putting in like the windows and stuff like that of the car. Like that. It just comes out of the scene. It's really not visible
exactly what's there. But I do want to get in
that wheel of the car. And of course that back-end
of the car like this as well. Okay. Maybe if I get it that wheel on the other
side just in underneath the car too. Welcome this. We'll just a little bit more a bit more to the right perhaps, like here. That's better. Okay. Like this. It's kinda difficult to see
underneath the car anyway. It's just darkness. Deal with this later
with the watercolors. That as long as there's a bit of a shadow underneath the car, you're good to go like that. Simplify that window
down a touch as well. That area That's a car. Let's have a look at
this car here behind. And so I thought why not just get in the back
of it a bit more? Obviously like this. Again, a shadow underneath
and the backend of the car windscreen or the cost
showing behind like that. Even over here you've got
some type of a van okay. That's going off into
the distance like that, driving off to the front. So Let's put that in. There is a window
to the side of it. You can tell that's a car
over in the distance. Few more bits and pieces
there which are not, not so concerned about. There is this
interesting detail here, trying to figure out the
perspective of this whole scene. I'm thinking maybe if
I can get into a bit of this sort of
thing going on here, these perspective
lines just running off over into this area
here like that. It's going to look a bit
better like this. Okay? So I'm just imagining some lines coming out
from that point here. Just drawing a whole bunch of lines connecting
up to that point. It starts looking a bit
more three-dimensional. At this stage. Simplifies it down. I don't want to get all
this stuff on the road. And there's also a you can see
here like a traffic light. I'll just put
something in here in the front like this to
indicate that traffic light. But I don't want it to become
a two obvious feature. Just something here
on the ground. Traffic island or
something like that there. I mean, there's a bit
more detail in there. Now, let's start
working on some of the background components,
some more figures. Let's put in another one, just walking into the
scene like that. Maybe just walking in there. But we need to start
working out this building, this how many floors is 1234? So we can separate this out. 1234, simple, four
floors like that. And of course, the other side, it just goes down and that same sort of
way you can see the side of the
building like that. Now we can do things like
work out the windows. So here we might say there's
a couple of windows here, couple of windows here. We're also got a couple
of windows here as well. The light, again coming
from that left-hand side. Some just indicating
those windows very lightly underneath. We've got some more details. There's some kind of like
it's a tavern or something. Let's put in the front
part of it like that. It's going to be quite dark. And the side of it there, there's a kind of
a sign like that for the side of it actually
goes all the way down, doesn't matter. Extend that out. Okay. How many more sets of
windows are there? Well, we've got another two. Yeah, It's basically
another 2.2. 2.2, 2.1. Quite similar. Let's put in, this
has got some kind of rooftop here and there, like an inner part or whatever. We can do things like
separate them out. So he'll just putting a little
line, separate that out. Now we know we've got to
put in two other sets. So I'd say we separate this, this one right here
into, into two parts. So we've got here in here,
basically like that. And we can just do
the same thing. There's another window. There's another window here. It looks like that
one's sealed up. Another one here,
another one here. The most important thing
is to make sure that there's a structure to
the windows to make sure that they line up so that we don't have
a window too far down. You know that they're all
lined up on the same row. So now it makes more sense. This here is the bottom part
again of this is tavern. There's some kind of thing
there is that there are these little column bits and pieces that connect
them up at the bottom. I'll just invent, try to invent some here
like that. Okay. And they just get a bit smaller maybe off in the distance. Like the bottom part
of the buildings. And I'm like that. And you can see some spirits
are connected at the bottom, some more bits there. Look at the end of the day, I'm not so concerned about all the little details in there. I just want to make
sure that we've got enough enough darkness there
under under the buildings. So we've got some of this in, we've got look at these, some of these sides
of the buildings. You'll find that there
are these little. Windows, you can just see the indication of
them on the side. A lot of this is just so dark
that it's very difficult to see exactly what
is going on in there. Okay, so just a line
there should suffice. And here we've got
just one more window, one here like that.
What else do we have? We've got two more here, so one underneath this part and another one here, like that. There's two more
underneath here. And really that's about it. I mean, there's a few other
bits and pieces on there. But for the most part
we good to go for that. Started the building
bottom part of it anyway. Now we're going to
just work a bit on the top part of building. I do feel that there's a lack
of detail in some areas, so I'm going to just put in some small details
like you can see here, these little I don't know. It's like an air the building that just
sticks out of the roof. That just a touch of detail there to get in the
top part of it. And there's another
one here that just, just think of it as like a little box sitting on
top of the roof top there. And there are some bits and pieces just running
behind there as well, like this. Okay. Good. It's like a almost like a
chimney but it's not there. There's also another building
coming in from the left, not a huge deal again, this gives you an opportunity
to get in some shadows on the right side of the
part of the building. Even here you can put it in
a little bit of a shadow. Let's just outline
that a little bit. More heavy. Heavier. I don't want to
lose that later on. K. So let's have a look here. There's another sort of chimney, bunch of chimneys
and things here, just simple, simplified,
things like that. And then it comes
down like that. Then we've got this part here. This is important. This dome has to be
somewhat accurate. Okay, so that's the bottom part of the main area of the dome. And then we've got
it Just coming up in this interesting
fashion like that. You can see these little
bits and pieces in there and the top part
of the dome here. Like that. Excellent. It's
pretty basic for now, but it does the trick. Okay. It looks like a dome. This part here I
think I'm gonna have to just refine that, a touch like that. Okay. Almost like a bill. Looks a bit like a bill. Okay. We'll figure that out as we go. Later on. I've got that building out. The background here. I'm probably going
to make that darker. This white building as well. There's all kinds
of stuff on here, but I want to simplify
this down into, again, these little rose on
the buildings like this. Just little bits
and pieces on there that it's all just going
to be dulled down color. Okay? So we have most of the
details in here already. Don't want to get in anymore
for this clock tower or not. That's the question. We can have it just sticking out the side just as in
the reference photo, but something simplified
down like this. Cut around that with the blue. Some figures maybe behind, walking off in the distance. All this stuff here again, I'm going to just simplify down, not much to do in
that section at all. Just something to keep it
looking three-dimensional. Those buildings. Here is a, another sort of
building like that as well. Here in the foreground again, what we were talking
about was this sort of interesting kind
of white dome here. The few beats like that. Okay, Getting the
other one as well, because it goes off the scene, It's hard to see it like that. Simplify that down, please. Okay. There we are. So I think what I'll do is just rejig
this part of the dome. I've made it too dark. I want there to be
enough of it in there, but at the same time, not all of it just
be pencil work. Okay. Area. It looks a little better. So let's go ahead and get
started with the painting.
42. London - Lights: So first things first
what I would do is get in some of the warm colors
in this building. I'm gonna be using
a small brush. And I see a lot of this
burnt sienna in here. So we're using some
burnt sienna and also be using this color yellow ocher, dropping some of these
nice warmer yellow ocher in there. Like this. Just cut around some
of the windows. I might want to get
in a hint of blue or something in there maybe
reflecting the sky, but don't make it too obvious. Be quick with it. Cut around a little part
of the window like that. Some of them if
you don't get it, don't worry about it at all. Just just get that color and
that's all you need to do. Some more of this yellow ocher. So she up here,
there's a bit there. There. You can see just around the back of the
buildings as well. Here you've got some
yellow ocher and parts of it that stick
out of the buildings, the top as well. A lot of this stuff is just
gonna be gonna be like pretty much this yellow color with some burnt sienna in there. Maybe a tiny touch of orange or something that might be helpful. Okay. I want this to be pretty
light and vibrant. And given that the light is
bouncing off this building, quite obviously, I'm just
coloring it in like this. And also the rooftops you
can see here there's, this requires a touch of color. The easiest part of
this is just to, at this point really. And it's also such a
crucial point because you are making sure
that you're getting in the right backing
wash. And if you don't get this in accurately, I find the rest of the
scene can often just look a bit out of place, especially the docs and you put the darker colors in later. Okay. The background buildings, I
think I'll actually get in. Maybe just thinking whether
I should get them in lighter or potentially darker. Yeah. We'll see how we go. We'll see how we go. Might be okay to just
put a quick wash of color on that building in
the background for now. Just lighter. Lighter though. This is just a lighter version
of the yellow. This is all. I've also put it
in a little bit of this color called buff titanium, which is a off-white color. So just a touch of that. The background buildings has some something in there,
a little bit of color. You can see it all in these white buildings
here in the back as well. So just leave a touch of
white on those buildings. As we move down on this building here you
can see there also. Again, there's the opportunity
if you want to just drop in a bit of a warmer color. So this is some this
is a little bit of little bit of burnt sienna. Just mixing some of that
burnt sienna or up to drop in to parts
of the buildings. And this will create a
little interesting effect. Okay? This like this, and create a bit of
color variation. So it's not all the same old yellow running
through there. We've got touch with this
brownie color as well. Another quick thing I
find is just picking up the spray bottle and giving it a good spirits
every now and then, sometimes you might get
a bit of water that just runs off and creates a balloon. I think that
actually looks quite nice because this building
does look a little weathered. So implying some of
that is important. So just coming down like this, the bottom part of the building, I think I'll just get in with
some yellow ocher again, just because we haven't put
in any of the darks yet. So a little touch of little touch of warmth in
the background will help. Maybe some of these
buff titanium as well just gets
rid of the white on the paper and create some little a little bit
of color in there. Okay. Here, just bring that down. This building here. Let's put in a touch of
brown on the side like that. Brown and yellow mixed
together like that. Simplified down. Of course. I will just do the
same thing with these other buildings to the
right bit of yellowy color. It's really just indicate the white on parts of the buildings. This one, I'm going
to leave completely white, more yellow. They're carrying it all the way down to where those
figures out where the cars. Start and Stop
roughly about there. What I can start doing
as well as work a bit on the on the bottom part
of the painting. Okay. So let's pick up some grayish color I
have like a bit of black leftover from
the previous painting. I did have a located just
to kind of a grayish color. And we have to make
these quite light as well because the ground
is pretty light, so I missed the same
tone as the buildings. I'm bringing this down. We got small, this gray, smooth that gray mix
that in like that. I just want a light
wash of gray river, the grounds and
create this sense of it's kind of like a
cooler gray is sensitive. This youngest of the road, the feeling of the road. Okay. It's like a cooler gray. There's probably some
purple in there as well. But mainly it's just all your primary colors
mixed together. It's not much at all. I probably should
use a larger brush. Just kind of get away with it. Get away with
something like this. Good. Okay. Good. And let's work a bit on maybe some of
these buildings in here, but I didn't want to
just drop in a touch of darkness in there as
well, just at the base. Some parts. Yeah. Leave some of these for later, some of the shadows. Okay. But this is just a soft
looking maybe like a soft looking shadow while
the buildings is still wet. I can add in quickly like that. Be careful with it. Gone too far into the car. But the good thing is I
can actually just turn, I might just turn the car, the turquoise
color. There we go. Just blend that in. Light, bluish color. Blend that in. There we are, That's better. This car here behind deny or we might put just add some
darker blue for that one. Let it mix in this one here. Why not just put in a
bit of color as well for just a touch of cooler
color like that. And grew adding the shadows and things later on for the sky, I want to put in some
nice thick cerulean blue. So I'm just picking
this up straight from the palette starting
at the top of the scene. Large, broad stroke. I'm going to work my
way down the page. And we need lots of water here. I have enough water, I think. Okay, here, here, more water. Just picking this
out really quite liberally in dropping
that cerulean blue in. Okay, but when we start
getting to the buildings, just gotta be more careful. Cut around them. If you get a bit of mixing through the buildings,
that's not an issue. Just continue on
and do your thing. I do also at time
just encourage it to blend together the
buildings a touch, but I'll give that a moment
first before I do that. Going around here. Larger brush, use this one. Just makes it quicker. Okay? That then I'll use
the mop brush. The end bit. Like I said, you
notice it's sort of blends a bit as well, but blends in with
the previous wash, the blue, but it doesn't matter. Just continue on. As usual. I left that building
on the right white same with this
little clock tower. Looking pretty good. So far. Let's have a look at what we can do here
with the figures. You can leave some of
them just white as well. I forgot to get into that
color behind this figure, so I'm doing that now. And for the other
ones, It's up to you. I mean, you might want to put
in some red or something, some warmer color for this one. Like this. And this one here, you could say I'm putting
a bit of a warmer color or just a bit of something
on the palette. I'm sticking with a
bit of a warmer color. This one, maybe some
blue, blue here. That kinda running,
keep it very light. And that's okay. I'm gonna give this a
quick quick little dry.
43. London - Darks: Alright, time to have fun. We're going to put in
the darker colors now. And what I'm gonna do is mix up really some
cooler colors. I've got ultramarine blue here. I've also got some purple. I've got a bit of black,
I've got a bit of brown. Mainly I'm gonna mixing
more of the blues in here, the ultramarine
blue and the black. Maybe you just change it to
purple every now and then. But any cool colors kind of need to down with a
bit of black in there. Perfect. Absolutely perfect. Okay, so let's go
ahead and start off. And really I want to make sure these mixes about
50 per cent paint, 50% water, so fairly dark, but there's still a sense
of transparency in there. We want to make sure that I want to make sure that's clear, make making sure that there's
enough transparency there. So I'm going to
start off probably around here now this sign or whatever on the
side of the building, it needs to be nearly dark. And I'm going to use
more black in here, a little bit more black. This is a little flat
brush that I'm using, just coming across like that. And around some areas you'll notice I'm just
going to cut around. So here I'm just leaving a bit of the
yellow in the background. The background
color of the yellow cut around some of that. Leave a bit of it to show
through and continue on. Okay? And that's the thing people
forget about leaving in the previous wash. Got this
beautiful yellow there. We want to make sure some of
that at least shows through. But more water. Water in here. We can see it just run
around the side of the building here and
then maybe here as well. Look at that. And again, this part here, I'm just making this up, this little section
that runs down. You've got this one here. I'm actually don't
have enough space. I want to just create it
here actually about here. Okay. Moving this across,
we're trying to get it in all the shadows and dark areas in with one
basic big washing. The great thing about these
flat brushes is that you've got tiny points on
them on the edge. And this allows you to
get in more details. Okay, So I kind of use this
sharp a bit to getting small details while I
use the flat bit to get in the sides of the building. These kind of rectangular,
longer sides here. You've got things like this
window here at the top. Now I can just put in a
touch of color there. Okay. Here, there. For that window. On the
right-hand side of this building, there's so much
going on in here. But I'm going to
simplify this down. I'm going to just get in mostly, mostly kind of a purplish
wash running into this scene. This we can leave bits of
that yellow in as usual, more purple perhaps, that
darker purple shadows. I love using purples and blacks and also a bit of
this ultramarine blue. The ultramarine gives it
a tiny bit more corners. Sometimes I get to go too
overboard with the purples. Okay. So drop that in. Remember to cut around
and leave some of that previous wash.
As you can see, you just in some points letting
it take over more water, drops some more in up here. Here. You remember this is
just a big shadow on the side of the building. Okay. Here there's some
kind of like again, that structure at the top
there of the building. Just putting a little
indication of that like that. Something there. Another structure here that that they're finding bits to draw out of the building
and loud to stick up a bit. These tiny little
chimneys or whatever. Okay, using that
yellow to create a highlight for potential
shape or something in there. The rest of it, as you can see, is just this massive color. And if I can actually spray
this down to touch here, so I can get this to run
to the left-hand side. I think that will be good. Okay, so that it's softer,
transition like that. So nicely sort of transition
over to that shadow. And then we've also got
things like this dome, which I'm going to indicate, like I mentioned before. Extra darkness up the
top here as well. It's really, this is
sort of dark section. Hugs that part of the
dome there. Okay. Here as well. And a little bit
at the top here. Touch of gray color. It's going to make it a bit
of white into that black. And just get some of this to
merge a touch only slightly. Maybe on the right-hand
side of it as well. Like that. There we go. I think
I'll leave that for now. We'll keep continuing on
with the rest of it though. Here we've got the
windows again, more of this darker
black color for me to indicate the shadows that
you can see on the Windows. Tiny little shadows and
you find them mostly. If you look at the buildings, mostly on the top pot then
on the right-hand side. Because again, that
light source is coming from the left of the scene. Bit more here, here. Here. That alright, good. Just going to darken
that pot down and touch underneath the
building as well. I do think that some more extra darkness and bits and pieces
is gonna be helpful. So cutting around these figures, as you can see, I'm just picking out areas underneath that. I can darken like that. Of course, you've got
all these other bits and pieces under there. But simplifying it down. More darkness, small black, perhaps in here as well. Here, it's really
just quite dark in that area. Needs more water. I've picked up too much paint
in there and it's gone. Gonna be funny. Just mix up a bit
more of this paint. Area, pretty dark there in the background and
nice crisp background, which forms a nice negative
shape for the car. I'm going over parts of it. And at the same time
I'm just leaving, leaving bits of the yellowing or for some parts
of the building. More here. Again, utilizing this advantage with black to create another negative
shape for this figure. There. Especially under here as well. There's so much, there's
so much going on in there, but the simplest way
is just to get it all in with one wash leaving in a bit of
the previous wash. And that will create
the illusion of detail. Okay. So we're not done with
that building yet. We'll continue working on it. And there's also some lighter, shallow shadows or that I'll
put in after this has dried. I'm a bit concerned
maybe the shadows on the building and not dark
enough on that right-hand side. But this is another thing
that we can do it just adding a bit more paint while
this is still drying off. Not only that, but
there's also this building here in
the background that needs also some extra shadows. I'm going to use some more blue here for this building
here in the back. Okay, more of a bluish shadow and getting some of the
floors and things like that, It's all just merged
into one big shape. Lot of this stuff here
is just one big shape. That's the back of the van. I will just leave
that lit up slightly. Okay. Some more blue.
More blue in here. Okay. Maybe cut around this
section like that. Okay. Good. Continue on. And this right-hand side here for
the buildings as well, we can just putting like a large shadow
shape just running across and covering
this building. And I'll just cut around, see these figures here as well. And then that is actually
more darkness at the base. So I can just put in extra
black at the base and then just blend that up
a touch like this. Just becomes soft and
shadow or whatever. And let me get this one coming up a
bit more here as well. This seems like a
part of the building, this darker section like that. There. The yellow showing
through as well. Just leave that leave a little bit of that yellow
showing through here. I can just emphasize
again the buildings. This could be a bit of
that building here, the shadow of that
building here as well. I can get inside of that. Remembering that
the light source is coming from the left-hand side, potentially hitting
creating a little, little bit of shadow here and then forming
hidden the light, the light hitting the side of the building and
creating a shadow here on the right-hand
side of the buildings. I'm good. Just wanting more blue or something here in this
side of the shadows. So while the paper is still wet, I'm trying to just alter
that a little bit. And also getting it to merge a touch onto
the right-hand side. The building. Here. Be good. I'm okay. Just some more
extra detail there. Notice how I'm just getting
in this shadow with one big, one large shape. And it makes it so much
easier when you do that. I'm decision comes as to what I should do with this
large shape and background. I was thinking initially
of just getting it darker, but I think we'll
leave it as is. And what I'll do is indicate some of the
details on the buildings, on that building
in the background. Okay. Maybe this could be like
a shadow or something like a little bit
of darkness there. Blend it down a little bit, just dirty it up a little
so that we don't have too much light on the back. And let's have a look. What else do we have?
We've got the cars. We've still got these
buildings here to the left. I think I'll work on
chimney area here. Let me give this a
quick dry first. Cerulean blue in for
some of these windows, light touch of cerulean,
not, Not much. I just want to create
a little sense of maybe the sky reflecting
in here in the Windows. It's not present in
the reference photo, but I just decided I might
be a good thing to do. As long as it's a cooler
color, you'd be okay. I've actually mixed in a
touch of gouache in there. I find that it can help go over and override
that yellow a touch. Just a very light wash of
that blue there. Okay. So some more detail
on the building. I'm gonna go ahead and add in over here just some of
the details for the Jimmy. So I'm going to mix in a bit
of brown over the purple and getting this darker sort
of section like that. And it's getting
this side like that. That this could be another
section as well here. Underneath their bit of
darkness, that shadow there. This actually runs and
further like that. Good. This is really to
indicate a bit of light bouncing off the edge
of that part of the building. Continuing on to the
right-hand side. Here, there's a lot of light, but there is on top of
these chimneys or whatever, just little indications
of bits and pieces. You can actually pick up that
brush and start putting in some small details as you
can see me doing here. I'll really try to
be quiet sparing. When I'm doing this. You can pick up a smaller Round brush as well. Let's makes it less obvious that they just indicating the roof of that building
in small little details. Here. There's top of this
top of this dome. Kind of simplify that down, but something like that. Okay. That little bit of darkness in here, join up that dome, give it more volumes as well. Separated out from
the background. Touch. Suppose just make
it come forward. It's more that right-hand side. Good. There's some little details here like on the sides of
the buildings like this. I want you to call it this
little line running through the floors and really
such a light wash here, it's almost, I'm just using
some using that brush, picking up bits of that
diluted paint, drawing it off. And then going through
and adding in these, these very subtle shadows on
trying to find something. Let's see, here, we can
pick up into this paint. Very, very diluted down. It's probably like
ten per cent paint Because it's quite dark. You can still see the shadows
fairly, fairly easily. The right-hand side, oops, that's too much too dark, but I'll deal with that. Smoke that up a touch. Still has to look
somewhat transparent. There. There. Another thing you
can do is put in an indication of a shadow on
this side of the building. And you think it's not
possible, but actually you can, you can spray down a bit
in the page like that and start picking up
some of that color, a bit of the blue in there,
a bit of that purple. And let's just, let's just get the scene
quickly like this. Look how it just blends nicely. Because you've sprayed
down that bit of paper. Okay. I think it makes the building look a bit more interesting. Bit on the top as well. Using cotton paper as well, you don't get too much
disturbance from this. It won't really lift up the
previous layers of paint. So this is nice. It just runs through
and does its thing. Okay. Just a soft shadow on the
side of that building. Like that. I've had a play around
with that section for a while now I'm going to just work
on the bottom part of C. Leave the top to dry and
do something on its own. Let's have a look here. So these figures and
the shadows now, let's work on the car. So again, just bringing up some of these black
purple paint, I'm going to put in a
touch here for the wheel, Right-hand side of the wheel. Underneath the car
like that. Here. There's probably going
to be some more darkness on this front side of the car. Like that. Soft enough. Softness off a touch. Then we can get in this kind of shadow shape
underneath the car, running towards the
back, like this. Okay. That the car I wanted to just make
sure I'm leaving enough light back there as well. Awfully close to eliminating it. So here I can just also put
in the legs or the figures. So there's a couple of legs. And again, the source, the light source
joining that up, running towards the
back end of the scene. Work on this one as well. Same deal. Put that leg in like that. The other leg in as well. And again, work on that light running towards the front
of the scene like this. Okay, here we got another
figure walking around. Same thing goes. Now the figure there and
connecting the legs up as usual that you kinda just work across
all these figures and at some point
connect them all up the van or whatever. I could just put a bit of
darkness underneath it. It could be something
the car as well. You'll notice there's
a bit of darkness underneath these cars. So just emphasize this here. This is like the shadow
underneath the car, the wheel Right-hand
side of the wheel, and underneath it running towards the side of
the scene as well, that we always in more detail on that one
and then this one as well. Let me just soft enough
these legs here as well so that they blend
in with the torso better. Now you can also just
get them wearing things. Could be wearing some
suit or something. Important, not to get
rid of all the light, to keep some of it in there. Very crucial to do that. I've got some figures,
we've got some cars here. We would probably want to I'd say anywhere we'd
probably want to get in some darkness
on this car, There's some windows here, but not only that, because the light's coming in
from the left-hand side. We do need to just
imply extra light, maybe here on the other side of the car, the right-hand side. And then just blend it out. Blended out of touch here. Okay. Create that sense of light hitting the
back end of that car. There. We joined
that all on nicely. Shadow on that right-hand
side of the car like that. There are some figures
back here as well. I just forgot about them. You can just see them
off in the distance. So putting an indication
of them like that, but apart from that, it's not really
much to do there. I'm holding a bag or
something like that. Owning a bag, suitcase. Who knows? The way you
angle the heads as well. You can make it appear as if the figures are walking
in a certain direction. Sort of leaning to the left, like this one walking that
way, leaning to the right. Okay. Good. Locking how that shadow of
the building is turned out. If I can just work a bit on some of this stuff here
on the ground as well. Just a touch of color for
this. I don't know what it is. This traffic island or what
have you somewhere here. Okay. Simplify that down a touch. And then I can actually
put in some kind of traffic pole running up here. Some more black. And where will we start at
roughly here. Maybe here. Yep. Okay. Run this upwards. This is up to you. By the way, this is
kind of a little bit risky because it's so dark and we know that it's sort of
starts, ends about here. Traffic light anyway. There there's not
much you need to do it imply it just got to put in a touch of detail for the rectangular bit
there, the white. You've got the three
bits that poke out like this left-hand side. Let's do the same thing, just this dark
section like that. And a few little
bits that stick out. And then you go, That's the
traffic light for sure. And I've made this really, really dark so that it
will stick out the scene and just enlarge it
a bit at the base. Make it a bit taller. Okay. Shadow as well. Running to the right. I'll do is just put in a, I want to put in some shadows here on the ground than not. It's just not enough stuff
going on in the foreground. There is actually a
big shadow in front. So I'll put in something here. This is just a bit of blue
and purple mixed together. And softer and softer shadow
feathering it in like this. Okay. And I'm using it
hopefully to just join up the figures that
touch here as well. More black. They're neutral tint in their neutral tint to
cool it down a touch. Here. Here we can just move this shadow towards
the front a bit. Something just
outside of the scene. Casting a shadow and creating
a bit more of a contrast, which will make it
look more interesting, my opinion, this scene. Okay. It'd be nice and feathering. Feathering it through. I'm good. Good, good, good.
Darken more. Yeah. Watch for darkness. Okay. We'll give this a quick dry.
44. London - Final Touches: Finishing touches, I think
I'll actually adding an indication of the front
side of the wheel here. It looks like there
could be a wheel a little bit closer there. And let's have a look. What else could we
potentially add in here? I think some of the
perspective lines will help. So I'll draw in painting a few that
run through the scene. Just like this very light
little perspective lines to help guide, guide the viewer
through the scene. Once already a bit dark,
but it doesn't matter. One more here. Maybe. It looks a little better now. Okay. Do this Clotel. Let's put in, let's put in
some hands here cans with a tower that okay, and a touch of the the circle. Okay? Like that. What you're doing here is you're just playing this
kind of touch and go thing where you're
adding in little details. Okay. But I'm not overemphasizing something like this is already looking decent in terms
of that clubhouse, you just want to leave
it and maybe you think, okay, it just a little shadow
here on the right side. Good. That looks good. So
now you just continue on this tower here,
this building. There's a couple of
little things that we can add in here like this heart. It's mostly just diluted
down a bit of darker paint, 20 per cent paint,
ten, 80% water. Touch it that there
to add on some of his darkness so that the white and the light just
comes out this way. You have to do it. Okay. He's a few
little windows and things that I can just
indicate quickly. I just practicing the
air and then do it. Think about it and just
continue on one goal. And that's the trick. We start fiddling
around with it too much. Just lose the plot. Doesn't look like it anymore. You just picking this
up and you're drawing essentially with the brush. Down below, you can see some of these buildings have
like windows and things. So you can just
touch on in areas, create a little bit
of detail back there. And the flat brush
makes this really easy. That's why I like
using flat brushes for this type of thing for windows because you
just need to tap on. That's all. Because essentially that the flat brush shaped a
bit kind of squarish anyway. So we need to do here is just put in a few tiny
little contrast like this is actually
another traffic light there. But I don't really want to
get in all the detail for it, but just something going up like that could look
like a traffic light. You're figuring
out small details and little intricacies in here. Now here as well, look, I can just mouth
through and getting a few details in for the
sides of this building. This is just pure black. And I am connecting this up a little bit to create
extra darkness, but also extra
detail in this area. For Windows, because
it's actually pretty dark on this,
in this building. Harsh looking shadows
as well, my juice, so I'm trying to integrate
these is difficult. I find we do have a
bit of softness there, so this will just Let's join up a bit better. A bit of water here is soft
in that soft turn that off. That final, really just the final
layer of detail in here. Okay. I can mix it all together. Left-hand side. Over here. They could be a few little
bits and pieces to add it. I don't want to
overdo it though. So maybe this little
rigger brush could be a good middle ground
here to indicate in some little details underneath the windows
or things like this. Definitely is tricky. I go by that whole
adage of less is more in this type
of scene as well. Speaking out a few
details near the windows. Dry brushing Amman when
dry brush, I mean, pick up some of the paint
dried on a bit of towel, dry brush and a bit of tau. And then go in and do
what I'm doing here. Just feathering in
some small details these little separations
of the buildings as well. Look, you can even do that. But like I said, I don't paint them all. Lena, leave broken lines and areas and it looks
more natural that way. I found it looks more
natural that way. Anyhow. Need to
soften this part. Touch underneath. There. Just a little bit of softening, I think would look better. Blending as well. More of that shadow. Coming over to the
right-hand side. You do a bit here as well, just make it look like the light is joining onto the right-hand
side of the building. Very difficult to do, but
you're using light paint, just feathering and over-the-top while your brushes pretty dry. Still. That creates
creates a little bit, a little bit more of a
subtle shadow effect. Okay? Especially in these
corner windows. Tricky. But it does join on. Shadow does join onto that
right side of the building. So I'm doing my best to
lend a bit like that. Then starts looking okay. Use you just want to know
when to stop as well? Just for me, it's
about keeping keeping consistency throughout
the whole painting so that there's not an area
of it that's too detailed. Okay. So that other parts
of the painting also work. Shadow part is tricky. The trick is also just to make sure you're
leaving enough light. Leaving enough light as well for that side
of the buildings. Little bit, a little
bit of water. Spray this down a touch. Flick a bit of water in there. Why not? Scratching out as well? Just with your fingernail. You scratch out a bit of some highlights or
something in here. Scrubbing away the
window is a touch to encourage it to blend
more onto the building. I can also just scrub
away a bit here, perhaps exposing
some light as well. A bit of a light. That light in here. Just some water and
a little brush. This is a filbert brush. You can use any sort of any sort of flat brush
or round brush to do this. I find filbert brushes
are just good. They're meant for scrubbing out. Okay. Yeah. I just find that when there's
any particular spot that looks maybe too sharp or too contrasty. You don't want that there. This brush works quite well. To remedy that. It's also adding a
bit of weathering, weathering effect
onto the building. And I'm finding because the building just has
some textures on it, I'm not able to haven't been able to
capture them previously, but with this filbert brush and just a bit of
scrubbing away, it makes it look
a little bit more weathered, which I like. We are almost there. Let's put on getting a bit
of red for the figures. The heads of the fingers
touch of red, light. Red. Maybe with a
bit of gouache, pink or something in there. That there we go. I'm here. Okay. Here. I'm just going to
use some darker color for the hair figures. It's not necessarily really, I mean, you've got the heads in there,
you should be okay. That white gouache. And again, we're just making
sure that the light, getting a bit of
that light on top of the figure and also on the back of the figure like that just indicates the
light source from the left. Here. Okay? Here maybe like that really just brings out
some final bits and pieces. And you can do it here
for these little hairs, the traffic lights and
things as well, as well. Just side of the pole like that, hitting into the ground. And, you know, the trick
is again, like I said, you kind of skipping over areas. Like the car could bring out a bit of that light on top of that cost
still like this. Okay, Here. Here. These figures here, walking around the distance. That little highlights for the, if you look inside
the actual Windows, there's these little frames
and he barely tell but just tiny little frames and
things for the windows. I'm not gonna do all of them, but you can sort of pick
out a couple of them and add some of those details that I think you've got to be quite careful though
you don't want it. You don't want it to
want to overdo it. Just a bit light here on
the left side, like that. Just scrub off the ability
stuff so that it's more just want it to be softer. Here. Do this before the sides of the bits underneath
the building anyway. Um, a lot of lot of stuff
that you can do in here, but you've got to be mindful of not overdoing it. Right? And I'll call this one finished.
45. Melbourne - Drawing: Let's go ahead and get
started with this scene. And one of the things that
I've noticed straight away and it took a little while for me to actually see that is
that the shadows, they are not really consistent. I think this is a photograph where there's two pictures that have been mixed together,
edited together. So the shadows of the figures
in the front go towards the left and the ones in the
back go towards the right. So I think what we're
gonna do is just make the shadows are all
go towards the right. It looks pretty similar anyway, apart from the ones
in the foregrounds, it's not gonna be big deal. Another thing is
that the photograph, you can see the buildings on the sides, a bit squashed in. So I'm thinking I
might straighten them out of touch as well. Often when you take photographs, the camera lens just distorts the buildings and things
on the outer edges. So we're going to
need to fix that up. So let's firstly get in this
area right at the back. So I'm going to look kind of
putting it in about here. And this area rod
at the back where the cars are coming
down on that slope. Slope from a distance. I'm just going to draw
a quick line like that. And it's roughly look, it's hard to say maybe a third
of the way into the paper, a little bit less than
a third of the way. So just roughly
something like that. And you can see there's little lines just
sort of running all the way into the backwards. Like this, these kind of see
the tram tracks as well. Just running off into the front. As you can see. I'm just trying to make them
converge at the same point. That's tricky. Like that, just gives the scene
a bit of perspective. I like the figures that
are walking here as well. And notice that the
heads of these figures also below the
horizon line there. And that's because
there is a bit of an incline going up the hill. Let's let's leave it as that. Okay. I'm gonna go and get into this building to the left first, and we'll put it, put the side of the
building in first. It's just like a rectangle. And I want to mark out roughly where the top
of the building is, maybe here, maybe about there. And we've got the side of
the building like this, rectangular shape like this. And the top of the
building is roughly around the same height as the bottom part
of the building. So the tower. That's what I mean. So let's get in the building. It's this box shape,
as you can see, going all the way, all the way towards
the back of the scene. Like a boxy shape. And one of the
things you'll notice is that all these trees, there's so many of these trees
running through the scene. It's hard to tell exactly where all the buildings
start and finish. But I do certainly
see something here. It's like a building that's jutting out
the back like this. I'm going to get this one
in something like that. And I'm going to just
emphasize it a touch. There's also some
type of a tower here. It looks like the top of maybe a church tower or something. You can just see
peek out from there. It makes it look a
bit more interesting. We have to have to get
these buildings in. Now. I want to get
in these Tower and I'm just going to start
indicating where it is. Get it to come up like that. And this side of
the tower as well, I'm going to bring this side up. Straighten out the
building a little bit too. Okay. You can see it's kind of
curve towards the right. And again, that's just an
artifact of camera, cameras. So they look at that, You're just getting
in that tower. The top part of that
tower sort of runs here. This section like that. We want to, we want
to make the tower look somewhat like
the reference photo. I think this is an important part of
this particular scene. And this is the
town hall building. So we want to put in a
bit of effort there, making sure we've got
some of the details in. But again, I'm not
entirely fast if it's not super realistic, just as long as it looks
like we've got towering, something like that. Okay. The side there. And take much at
all to just get in that section a little flag or something on
top as well there. And you can actually see the little areas that
are broken up here. Here like that. The two parts of the tower, you've got some kind of some type of a window
or something there. You've got the clock
over here in the center. All bits and pieces
on the actual tower. There's another one here on
the backend of it like that. Another window that we can just Scribbling like that. The aim here really is just to get a quick indication
of all this stuff. I don't want to spend too
much time drawing it on in the only reason
I I tried to get inaccurately so that we've got a decent reference for the
watercolors afterwards. It can be tricky when you don't know where
everything lines up. So that's why I really
encourage everyone to make sure that you get in a
reasonably accurate drawing. But at the same time, don't spend all day doing it. At the bottom of the
tower of this building. You've got here the bottom part and you can see it's pretty dark and all the way towards
the back there and his cars in the distance. Okay. Just lined up. All kind of parked along the street or
something that gets smaller. As we go into the distance. This is going to be nice just to just merge them
on kind of like that. You've also got cars
that are further up like that on the
hill in the distance. I'm also trying
to make sure I've got some here in the front. Haven't got a reference
for this car, but you all you gotta do is just make sure
you've got a bit of this boxy like shape
like this and the wheels underneath the car like that
and you just join them up and that's a back
backside of the car. Like that. You might have another car just running forwards here as well. So I can just put in
something like this. Again, the wheels, they're
back of the car, like that. There we go. We've got
another car and the shadow running towards the
right-hand side. I'm going to keep these
shadows pretty basic as well. All running in that same
almost horizontal direction. As you get towards the front. E of course get more
these cars that are just closer down. Okay. Let me just try to get
in maybe a side of this car like that. That kind of making it look like they're
going up the hill. And until you can
barely see them up in the distance, they're
really important. This implies this sense
of the senses. Incline. I guess there's a car here, but I'm going to actually put in a figure walking in front here. Leg and the other leg running
towards the back like this. And I'm doing that just so that I can cut around
those cars a bit. I might have another
one here as well. Look at that. Just another figure. It's hard to tell
where they're walking. This one could just
be walking into the scene or or what have you. Most of these people
were just walking across and getting in a bit of motion like that
and you tip the head, look at how I just
tip the heads in the direction that I want
them to appear to walk. Ok. Chip the heads in
that direction. And one leg forward, one leg back. Like that. Some of them are much
more forward as well. It just depends on how fast some of these
people are walking. There's another head, this
busy sort of scene and k, and you can also put
ones in the background. Like that. A few figures here
in the background. There. Stop putting in this one here. The leg in the front and
the leg here in the back. You so I'm kinda looks like
she's moving quite quickly. I don't really like this one. I'm look like half haphazardly walking in
whatever direction. So I'll just put that
leg in a bit better. Like that. That's more data, more, little bit more intention and
how that figure is walking. And I could put in another
figure here as well, maybe like a shorter one. Okay. Just walking. Having a bit of a
straw, not really. Going too fast and getting that car right
behind that figure. That overlapping shape for the
wind screen there as well. You might have some people, some figures here just
waiting by the side or are just beginning
to walk into the scene. Two might just,
might even just be standing there happily
standing there. These two could be
having a bit of a chat. There on the side. Something like that. But we've got people, the sense of this kind of crowd of people walking through. And maybe I'll put
a smaller one here. This again could be a
child or or who knows, get them to hold hands a bit. It could be a child and a
parent walking across the road. Another figure here, the closer to the front
of the scene as well. Like that. This creates a sense of depth. It makes it look like things are getting smaller as we move into the background. That's a lot of life going
as a lot of figures. And I'm actually
tempted to make the, should I make the loop will get the shadow in and definitely get the
shadow enormously. Just trying to decide on the
direction of the shadows. And also, um, whether
I want to put in another figure closer to
the front of the scene. Look, I think I'll just leave it as that for the time being. Let's go ahead and put in
some of this stuff here. Look with a German coal
is kind of building here. There's another
building that goes up. It's about as tall as this
one here in the foreground, but it's so far back
that you can't see it. It's it's quite blurry, bluish color, so I'm just
going a bit lighter. A little bit lighter there. We'll get that in
with we'll get that in with the with a
bit of light paint. Push it further back in
the, in the distance. Is actually a tree
or something here. This is up to you
as well whether you want to put in all these trees. I'm tempted actually to leave a part of that building
peeking through here because I think we've got a lot of trees and a
lot of stuff going on. I'm tempted to just
leave a bit of light peeking through the
back there in the midst of all these trees and
chaotic looking shapes, arrays that raise that
Building a little bit higher. And I'm going to get the
edge of it in like this. Just again, trying to get in the sense of
decreasing buildings, size of buildings moving
towards the back. Some of this stuff. Again, it's not in
the reference photo, but I find that it does add to the believability of the
scene. Once we're done. This is some type
of building here, larger building, and
there's the edge of it. This will be good as well
to get in the shadows, because the shadows are going to B on the right-hand
side of the buildings. So we're going to get a
bit of darkness on there. Okay, look more convincing. Let's have a look. There is a smallest
building here. Look, it's not a big deal, but I'll just get it
in any way like that, running into the
background or something. Okay. Good. Alright, so those are
the buildings in here. There's so much going on. And of course we've got these trees on the
road side as well. Now we just gotta get into this bigger because structures again, just a rectangular
shape or Israeli, just a square shape starting
all the way up here. Big building and
it's because it's so close and bring that
down like this. There that's the side
of the building. This is going to be the building just pretty much in sunlight. There's, it's all going to be pretty pretty bright in here. There's also some type of
I don't know what this is. It looks like some kind of
store, something in the front. I don't know. This I
know is a station. What I wanna do here is perhaps getting a touch of
detail at the base, the kind of mimicking
what we've got here on the left-hand side. Maybe there's some stalls
or something underneath. Maybe something like there. Okay. I just want to modify that. It's going to look a bit better. I think. We've got more buildings
in the background, but let me just get in the
edge of that building first. Like this edge of
that large building. Whoops, get a better,
something like that. There's so much detail on it. And the only thing I wanna do is just getting
a quick indication. I'm not interested in all the little windows and how they're
structured exactly. What we might work on them as time goes by, but
it doesn't matter. We simplify down. You have to do that.
Learn to do that. Otherwise, you just going to be overwhelmed with what goes on. The scene. Here in the back-end. Again, you've got
some buildings like this and maybe the
edge of it there. And I'll just do the same
thing that I did on that side and drag out some of these buildings and
details in this section. I mean, there's even
this building here. Looks like it's got a bit of shade on the
right-hand side like that. But the rest of it is just it's just covered
behind the trees. No, we don't need we don't need much
detail in there at all. Okay. Good. So we've got most things in here now I'm probably the other
guiding line that I would want to work on is
just this section where we have like
a window here, window here, a couple
there, couple there. We've got this separator
over here as well. We've got sections like
running through the scene. It's actually this clock tower. Separators actually come all the way down as you can
see here, like that. Then there's just a few
down the back as well. Okay. Fantastic. I think we pretty much
good to go for this one.
46. Melbourne - Light: Alrighty. So let's get
in a bit of colour, bit of warmth in here. And I'm gonna be
using this brush, just a little mop brush and
some of this yellow ocher. I'm also going to mix a
bit of this buff titanium, which is kind of an
off-white color in here. Also some of this golden color. And I want to get in some of
these golden color because we've got a strong sense
of light on this building. And I think a bit
of that gold will just help to bring it out. And emphasize that. Here this is again
that same wash. These more saturated color, you use some more
vibrant yellow. You find that it just
automatically draws attention. Sometimes save that
part for areas that I want to just emphasize
more than others. And for this scene, it's more the light
that I want to get in. So just a little bit
like gold in here. Why not just pop in a touch
of that through here. This, this scene as well. You will notice
that there is a lot of browns running through the buildings and the shadows is actually running
on the right-hand side of the buildings. But we're not worried
about that just yet. It's just that I'm just creating
some variations in here. And then we can go in
and get the shadows. Afterwards. Let's get in. I want to get into
top of this tower as well with a bit of that yellow. Maybe just tidy up the
sides a bit as well. Like that. I'm a
bit of that yellow. I'm using this, this flat brush because it makes it a bit easier for me to get in details. I'm using some brown,
some darker brown. And this bit is
actually light brown. I'll have to soften
that quickly like that. Drag that out a bit. But the other side is pretty
much a little bit darker. So we can just drop
in a bit of that, that kind of spread in
there and do its thing. The few brushstrokes
once it looks alright, let it go and do its thing. Here on top again, same deal. A bit of structure there. Then on the left-hand side, some more yellowy
color like that. Okay. Reshape this a touch as well. There we go. Looks pretty good. Let's continue on with the
rest of this down here. More of this yellowy color. It's not it's not
a specific yellow, but it is definitely
a desaturated yellow. And you've got the cars here. So this is what I'm doing,
just cutting over the top of the cars and don't worry
about the trees as well. Because one thing you find is that it's very
easy to mix green, but it's very hard
to get rid of it if you accidentally get
it into the yellow, a bit of a yellow in there. And because we know this
whole area is going to be green anyway, no big deal. Okay. All these buildings, I want
a degree of warmth in here. And then for the ones
in the background, I'm going to soften down
at in a cool down, sorry, and add some more blue in there. But all of these ones in the
foreground look at that. I'm just kinda coding them. Yellowy colors, lot
yellowy colors. The ones on the left,
as you can see, it's a lot more vibrant. I wanted to draw
attention to that one. This one's just
needs to be in here, but I don't want
too much going on. Okay. Maybe a little bit of golden, they're tiny bit of
gold on that side. Okay? And count across like this, all these trees and stuff here. Again, we'll get a
teeny bit of green in just a little bit of green
and yellow mixed together. I'm going to just mix
up a real light green to getting I don't
want too much in here, just an indication of it. This is kinda just going
to blend into the sky. We don't want anything. Don't want anything.
Too obvious. And year. In fact, the trees are
a kind of quiet light. Reflecting off a bit
of white as well. So I don't want to
get rid of all that. And that beautiful
wash, soft wash. Some of the buildings
here in the background. We want to get in again
with some bluish color. I'm going to pick
myself up a bit of ultramarine blue and mix it down with a touch of
purple and a bit of black. And let's just
work on this here. That's too dark. It needs to be more like
five per cent water. Five per cent paint, sorry. In that section. Perhaps more cooler, more blue in there. Okay. Just get that in like that. And you can see even
to that right side, you can get in a bit
of that blue there. Some of it's going
to spread through. No big deal. Okay. Just as long as
it's pretty light, the sky does need to be
lighter than this building. These buildings in the
background though, because the sky is the
lightest part of the scene. So make sure there's
enough strength in there. So that when you get in
this rule in blue rod at the end, it's not
going to look funny. So this is all
gonna do its thing. I'm going to quickly go
into the foreground, pick up some yellow,
bring this down. Look at the, look at the figures and everything cut
around those figures. I'm going to use just
some yellow ocher. A bit of yellow ocher. Getting this beautiful light running through the
back of the scene. We could just weaves through
everything nicely like that. And as we get closer to
the front of the scene, maybe a bit of gray
mixed in here, which is just got a bit of darker black that
I've picked up in, mixed in with that yellow
little bit of that gray. Alright. This mostly just water. Remember that just water? Because you don't want to get in any darker areas right now. While we're still trying
to figure out the shadows. And that's best left
for later. Okay. So look at that just to, just to touch of
darkness here in the front to give it some
strength at the foreground. But apart from that, that's
all good in the foreground. Let's go into the sky. I'm going to pick up some
cerulean blue and drop that in. Remember, this has
to be really lot. This has to be the largest
part of the entire painting. So maybe just still use these bigger brush,
bigger brush here. This just makes it
easier so that I can get this all
in one quick go. Okay. Just drop it in there like that. Okay, light, the lightest
wash is almost maybe one to 5% cerulean
painting there k. As you get around
the buildings, you might want to
use a smaller brush to cut around bits and pieces. I'm getting as much as I can
and then I'll switch over to small round brush that. We do just blend that in at around the buildings. They're here. That side of the building. I always like to get in the the, the yellow is first because
It's so easy to mix this mix green in here if you're not
careful. There we have it. We've got some of the sky. We've got all the sky. The only thing I might want
to just change up is adding some clouds and some
slightly darker clouds. I'm going to mix a
little purple and just dropping a touch of purple
in some areas to get in. Maybe your clouds and irregular clouds shapes
or something at the top. Join that on that
soft clouds shapes. This is just the little purple. Okay. To just make it more
interesting up there. So just a quick thing like that. Further down the page
you'll notice there's also, you can also get
in smaller clouds, just a bit of a bit of
ruffling the paper like that. You always want to make the
clouds further down softer and smaller as well. The clouds at the top, you want to go a bit darker. That's a pretty large
cloud shape up there. I think I'm going to
leave it as that. Okay. And while we're here, let's put in some
colors for the figures and perhaps some
blue for this one. Let's see what else can we do? We can get in a bit of pink
or something for this one. Some of them you can just
even leave the color, the color of the
clothes or sorry, the white on there as well. Don't have to color them all in. Okay. I'll leave that one white
and maybe these two. And let's give this a quick dry.
47. Melbourne - Darks: Okay, time for the fun part. We're going to get
in all the shadows. So the first thing I want
to start off with is the building to the
left, the shadows here. It's just a personal choice. Okay, and I'm mixing up some
purple and a bit of black. And we want to make
sure this mix is about 50% paint and
50 per cent water. If anything, kind of orient towards the site of
water, 60% water, even the shadows
on the building. A pretty much probably a little lighter than the ones
here on the ground. And K because the sun
is still catching it. So I'm going to test this out. Let's start off the top here. And it's an opportunity
as well to kind of get in some of the details. So here we've got the
top of the top of it. That look, you've got a
bit of shadow here. Yeah. I'm just a bit of this touch and go
technique that I'm using. And at the same time detailing, creating a bit of
these dark bits. So even in here,
you'll notice there's actually quite a bit
of darkness inside, inside the clock
itself like here. I'm going to cut around
the yellow like that. This is, again, just this
beautiful purplish color. You are leaving
parts of it as well. Okay. Look at the bit of the
yellow that I can leave on. In areas. Mainly, I think you've got more darkness on the right-hand
side of the building. But take your time with this. Go around and cut around
those clock faces. It's definitely a bit
of darkness in here, but it's not overpowering. And remember to leave parts of that yellow,
I keep saying that, but it's definitely something I always used to forget to do. Look at that more bit
of darkness in there. You can get in some of the
details of the structure, the architecture in there as well as you can see
just these kind of bits run down the building
and connect up like this. And you do this all
at the same time. This is actually a bit of
a shadow that just runs like that, like that. And then you've got like we saw the darkness on
the right-hand side. Just melts together. That is put in here. Here. That, um, and like I said, it's what you leave out that
makes a big difference. Leaving out the yellows
in areas helped to create extra extra contrast in there. And also fuel. If you want to drop
in some more paint at some stages like here, just go ahead and do that. Okay. Let it that it makes
in and do its thing. Okay. A couple couple of coming down lines coming
down like that. That right-hand side of
the building in a bit of light running through it. Okay. Let's move further
down the page. Over here, you've got again
bit of darkness there. At the base like this as well, just painting in some
dark areas underneath. And it's actually a little bit
darker under here as well. But I'm mostly just
using the same paint. Okay. I can also just getting
a touch of color for the windows or whatever in here. A little indication
of this like that. This is really dark paint. And I'll go through and just getting this sort of
shadow like that. And hopefully there's
some of this will mix in as well. Like this. Little bit of mixing
with that shadow. Move down the page. That, oops, there's actually some more
windows down the bottom but miss them out and
we can do them later. That's alright. Just wanted to create some
softer looking windows. Different shapes running
through here, here like that. So have a look. It's in there that the whole right-hand
side of the building on just getting with
this darkness here. Bit more of the purple and
a bit of the black as well, running through that area, you'd have brown as well. Perhaps. I think I should put some more ultramarine or I really want to
darken this down, make it more, much more cooler. And you notice as well, the, the trees here are
also kind of sunlight. They've got a little bit
of sunlight on them. And my goal here is just to cut around them a
little bit and getting the shadows of the buildings and things off in
the background. We can get in this
one here like that. This sharpness of that
building, another one here. Even in the background, look
at that just a little wash of blue or cooler paint to get in a touch of that shadow on the
right-hand side of the building so
that it makes sense. Okay. To dark fact, you probably want
to go lighter for these ones in the background. And you can already see the light source start to come through from that
left-hand side, the scene. Bit more here underneath
the building as well. I'm going to go pretty dark. I'm just going to go
darker, black in here. That this is to get in really the most strongest
contrast. In here. It's mostly just a black cutting around the figures
as well in there. Leave a touch of it
in areas just to indicate some details in there. May have to be dark
and again later, but see how we go. Dropping a bit of paint there. At this stage, all we're
doing is just getting in the obvious kind of
shadows on the buildings, the mid tones and also working
further down the scene. But this building here as well. I think one of the things we need to do
is make sure we've got some some kind of shadow is running down
the side of it like this, indicating the
floors or whatever. It can't be completely
yellow in this way. And underneath, again, the
buildings you will notice, look at that just a touch
of darkness to bring out this sort of contrast and the bottom part of
the buildings like that. Okay. This stuff here and just
want to spray down and little encourage it
and maybe to blend. Getting these, I don't know, these little trees apps here. I like how it's sort of bloomed
a bit over on this side. Spraying a bit of
color through there. Like that. It's even doing it on the
side of the buildings. They're a little bit as well. So that is looking decent. Just soften part of this. On the buildings. If it's just it looks too too much of a harsh
line running through there. I'm good. Good. Now, let's work a bit
on the figures and the cars. Darker paint, I'm
going to use some purple and black just mixed up. And let's go into
this figure here, the legs like that, like that. And you've even got
these two because here in the foreground, look, I can just put in
some legs of the V, two figures standing
by the side there, that bit of darkness. This one here, just kind
of walking into the scene. This one here as well. If you can do it in one go. That's the, that's
the trick really. You can just get the
legs in, in one go. I like that. Again, indicating the
motion of the legs. And by putting one obviously in front
and one in the back. This one, this figure just looks like they're just
standing in one spot. So we can get that in
quite quickly like that. Not only that, but these
cars here as well. More little bit of purple
and a bit of black. And here I'm going to just
put in some little something underneath the cars that getting them to line up
a bit on the ground. There. They're like that. Just get that 1 mol. Like here. There we go. That's better. You want to leave
a little bit of light underneath the car, the golden light
that we've created. And the direction of the shadow is running towards the right-hand side as well. Okay. I'm the cars in the back. Kind of tricky to do
at the moment because that is being sprayed
down a touch. So I'm not gonna, I'm not gonna go into that
section just yet. What we can do is
the figures here. So look at that. Just a little touch of color, joining the legs
together like that. This one here joining
the legs here. Shadow coming directly
from above to the left, from the left and above. That just joining on the leg
to the shadow here as well. Look at that just really running towards the
right-hand side. Whoops, these ones as well. Everything has to match and
make sense. In this scene. It can't just be conscious, be shadows running in
opposite directions. So this is a bit of the wind screen I thought
I'd put in there. This one is well, they're a little bit of darkness here for the
bottom of the car. Perhaps like getting
some indication of the tail light or
something like that. Just darken it down a bit. Okay, Good. Let it just sort of
blend nicely together. That black we'll kind
of go up into the car. Let's get some bit of red and white in for the faces or
whatever color. You'd like. Just some something
in there like this. The heads of the figures. Okay. The arms maybe here as well. You can get some
arms in the side. That simplify down, of course. Okay. There we go. It looks
like this and people, I can put in some like bit
more on the legs as well. Some of them could be wearing shorts or something like that. Just get a bit more
warmer tone in there. Maybe it's summertime for the foreground as well. I want to go over
the top of this area with a shadow shape running to the right-hand
side of the scene. So let's give this
a quick dry first.
48. Melbourne - Final Touches: So one of the things I
want to do is to get in this softer shadow that's
running through on the ground. I'm going to start
off in the top part of my palette and mix up
a bit of blue and purple, bit of ultramarine
blue and purple, also a bit of black. But if I can get more
ultramarine there, I think better just to
water that down a fair bit. Let me just have a play
around with this shadow. Now, I can get that
coming in like this. Some more, little bit more neutral tint and now are black. It's probably a mixture
of 50 per cent paint, 50 per cent water, not
much in there at all, coming in like that. And I can see still cutting
around the figures, this transparency of this wash. And I'm going around these figures and getting in some kind of wash
in the background. It's like a middle tone really comes through the
legs of these figures even. And even goes over the top
of some of these figures. I'm using this small brush
because it makes it a bit easier to cut around the figures and everything
that's going on in here. Now I've got that tricky
bit out of the way. Pick up the larger flat brush, and let's do something here. Okay? Now, of course there's
bits and pieces where the light just
peaks through an area. So just let it skipping parts. It's just the largest sort of shadow shape running
through here. Good. I think that looks
pretty good for the shadow in the foreground. I like to put in a bit of extra darkness right
at the front though, just a little slight
gradient like this. Okay. While this is all drawing, I'm going to work on these cars and things in the background. A bit of darker paint as usual. And I'm going to go
straight in with the backs of the cars that we were thinking
of putting in before. Okay. Just bring that
down to the ground. More of that boxy
shape of the cars. They don't need to be too dark because they're off
in the distance. Just a little lighter than
the ones in the front. But still there, of course. The wheels just
joined the wheels up. Oops. This underneath
the cars there. And of course they
the shadows that sort of run to the right
hand side of them as well. Like that. Looking good. Let's work on the buildings now. I'm going to work on just
getting in some details. Really the darkest parts of
the scene and touch and go. Okay, this policy
of touching CO, is like the most important
thing because it can be easy to over detail or just getting too much stuff in here and
suddenly it just looks messy. That's a window like that. Window here. Just
one brush stroke. One here, one here maybe. Okay. You know, you've got a bit
of this separator like that. Just bring the bottom
part out and touch. Okay. Then these little windows that we had put in before
putting a couple more here, the side, this clock tower. Let's just do it. Something like that. This one as well. Okay. The little bits of the
building here as well. You're going to have touches of windows and things on the
side of this building. So just getting a little
indication of that in like this, Some more minute line work to just bring out the
structure of all this stuff. So easy to just overdo it. At this point. It'll buildings and things here. Maybe peeking through the trees. And also on the, on the buildings
in the background. Some little indications
of the, you know, it could be the floors
or it could be like these broken lines at
points really help. You can see them
in some areas that just quick little dots to indicate like a Windows or
something off in the distance. Okay. It doesn't have to match
just quick things like this. And they help to create a little bit of detail
on the back there. Make it look more interesting. Even in these buildings
here in the foreground. These could do with a
few bits and pieces, like windows and things. Just indications of Windows here as well. Look
at all these stuff. Windows and k. Still
pretty light color. I'm using mostly light mixture of purple for these windows. Okay. So we can get them in quickly. Good. Bit more of this. I just want to get
into a bit more darkness within the background. In some parts like here. You see like the bottom parts of these buildings and areas, they just looked darker. This is a kind of a bus
station or something. Here. Let's just bring some
of these darker paint in as well around these two
figures like that. Just tidy this up
a touch as well. It's really just a
lot of darkness in the background
that's kind of just permeates through and creates sharp outlines for the
tops of these cars. So I'm trying to get a
bit of that in. Okay. What I'll do actually use some
gouache to get in some of these bits of the trees and extra foliage and
things like that later. This will do for now just a quick indication
of it like that. But I do want to get some
more in on that section. Getting a bit of shadow or
something for the figures, some of the figures anyway, the right-hand side of
the figures to create more dimensionality
and get that sense of light and shadow
happening as well. So what I've done is I've just squeezed out a little bit
of white gouache here. And I'm going to use
that to bring out some final highlights and
bits and pieces on the scene. Again, I'm going to use a
small flat brush for this. Okay, just mix a bit of this up. And what I'm gonna do is also mixing a tiny
bit of yellow, little bit vibrant yellow. And this way I can get in just some color back
onto the buildings, a bit of a lighter color, lighter yellow on to some of
the areas of this building. So here's an example. I can just perhaps
dropping a bit like this. Oops, versus just dry off that brush a
little. Look at that. And I can get in this bit of light that's coming through from the left side of the scene. A bit more here. Like that. Just in some areas of
the windows as well. That especially on the left-hand
side of this tower, I do feel that we've missed out on some of those highlights. So a touch of this
yellowish squash does help bring back a, an element of that
light that we want. Just drawing with the
brush to get some of these little highlights. These little highlights
to come back. That here this seems to be some little bit more of light around the
base as well here. So we can bring some
of these back. Kay? Is that like poles on here? Get a couple of them to
run up there like this. More. So on the left-hand side, you've got the left hand
side of the building. You've got all that sort of bit of gouache highlight
and things like that. But maybe here as well, you might get a bit
sort of peeking through that building there, on the top of that, here, on top of
the cars as well. A bit of light, bit of golden light just
peeking through in areas. Also the figures. Bit of that golden light on
the back of the figures, the back of the head
as well as they walk, walk through this scene. Here. Can even just use almost
complete white. Not a big deal. I want to just double down this color a little bit and get some something into
the right-hand side of the building as well. Just some touches of paint. Little highlights in areas. I want to spray this area down a little bit just to touch, soften up that bit of gouache. There. Get it to
maybe spread a touch. They're like to the right here. Just some bits of highlights. Again, i'm, I'm going to mix
this squash with a bit of green in getting some
little indications of these trees
running through here. It's just a bit of green
and a bit of white gouache. Maybe some yellow. I can mix in a bit of yellow
with that green to keep it, get it more vibrant like this. Okay, so I can just
feather in some nice, I'm truly tree shapes in here. But here. Spray this a bit down as well so that
it blends better. Okay. Some of it coming down underneath there
as well would be good. Blending a bit
onto the building. It obscures detail, which means I don't need to
do much less section. Maybe a bit more here
as well. Like that. Have you see if I
can scratch out a tree trunk or
something in here? Something like that. I'll I'll actually
getting going there with some darker paint as well. But this is just to get in perhaps some little
branches and things. And you're gonna get
just going to wait and wait for the paint
to partially dry. And then you can go in and
do this sort of thing. You kind of just waiting
to, it's just damp. You able to scratch off a bit of this to create
these branch like effects actually around here
is pretty good near the black further down here. That looks quite nice. I'll pick up a little bit
of darker paint and put in some small branches like
indications of them anyway. Just coming through
all these green, the right-hand side of the bits, a scratching out work. You can just imply some
of these darker branches. And also as they go
towards the sky, you can do this sort
of thing as well. Okay. Let me get in a little bit of these
perspective lines on the ground and just pick up some of this
bluish purplish paint. And the they start off
right in the back there. Come through the
scene like this. Look at that. Just maybe another one coming in here. That even the touching
gouache might help as well. Seeing is yeah, there's just a lot of
darkness here in the ground. Just keeps, gives
it a bit of depth. Makes it feel more
three-dimensional. Maybe one coming
around here as well. Okay. Just a bit of these tram line line thing I was moving through the scene. I'm gonna just getting a bit of this running down through
the scene like that. They've quite unique
to Melbourne. Sort of join up. And they just go through the scene all the
way into the back. Help to create this
sense of depth as well. Perhaps I'll get one
up here as well, just closer to the
top of the scene like that. And we're finished.
49. Venice - Drawing: Okay, let's get started
on the drawing. And I want to always start
off with the part I think is the easiest and
that's the separation between the scandal land. I'm going to put that in about here. It's not in the middle. It's kind of just below the center point estimate where
it is roughly about here. And this is where
all the buildings in the background start. Okay. So I'm just going to get a rough indication
of where that is. Who's made a bit of
a mess on this line? Let me just redo
that one quickly. Sometimes I'll just draw
it in segments like that. There we go. We've got certainly all the buildings
off in the background. This one here, I'm just
going to separate out. This is the palace, I think on the left-hand side. And right in the
center of the scene, we have this pillar. And it goes up roughly to
about the mid section here. So between the, the
separation between the sky, this line here and the
land, they're finished. This is just about here. So I'm just going to get
in a indication of that. Like this is quite thin from this view,
something like that. And it comes up
actually like this. And you have on top here. I'm putting that in Monument. Indication of it come down
like this. There we are. Okay. Something like that. Going up. The rest of it just
sort of coming down. Over on this right-hand side. I'm gonna do the same thing, just a quick structure similar to the other
side like that. I can just bring that
down like this. Okay. I'll just get this figure
standing on top here like that. And that should be good. And also the buildings here
on the right-hand side. So they come in
roughly about here, near the top of that tower
and then dropped down. Here. There's also some statues and bits on top
indicate like that. And of course these pillars
and things just running down. This is going to be done
quite quickly afterwards. I don't want there to
be too much going on in this section,
something like that. And same here for the palace. I want to separate
this out into the roughly like three floors. The bottom floors,
little bit tricky, you've got these arch. But again, I'm just going to
try to simplify this down. That a lot of this is just going to
be a silhouette. You can see them all join up. Just honestly like this, like that. And just get them to
run down like this. These little pillars that run down there. Okay? Lots of complexity up here, but roughly just putting in
some of these bits like this. And you've also got pill is
just these running down. And this is just gonna
be important because we were gonna get the light coming through
in the back section. Okay. But you can see on top here
these also these little Areas up the top,
join up pillars. And here we get near the top. Couple of windows
here and one here. Okay, good. And the buildings
in the background. These can be a
little bit tricky. There's a lot going
on here and so I'm just going to simplify it down. You can see here actually
the base of the buildings. Okay. You good. Um, and we have the tower that runs up
roughly finishes about here. So just get it in. It's just like a
rectangular shape. Okay? It's just a
rectangular shape stretching up towards the sky. And the top of it, they're
just getting a few bits. Something like that. Okay. Some windows as well. This okay, there we go. Something off in the distance. The rest of this stuff here is, it doesn't mean it's
not so important. But it is good to getting a little
indication of all these. Anyway. You can see e.g. here,
this is like the side of this larger building
that just runs up. Here. There. It's kinda hidden behind the
hidden behind like that. There's a door here. It just comes down like this. Something like that. You can sort of see it
there in the background, but it's not obvious. There is some kind of something
here in the foreground. So just put that in
like that little house, little ticket booth
or something there. And the right-hand side, just some more of the rooftops. Now here's another rooftop that Here it's kinda like a larger one that
just stretches all over to the right-hand side like this. Then you might have another one just coming
over cross here as well. And like this. Okay. The rest of it, we can
just sort out as we go through with the painting. Now, I like these
figures and, um, I wanna get some of these
figures in, but before we do, let's get into some
of these lamps. Now. Let's simplify it down. There's one roughly here. The base of it like
that sort of increase, decreases in size as you go up. Like a simplified down. And you've got it
Just coming up. Here. There's one
lamp like this. One lamp up the top here, the one to the right, there's a couple of
actually there's just overlapping with each other. Like that. We can sort this out, get it in a bit more
detailed afterwards. Want to get a bit
of shadow running down the page, a little bit of Your tiny bit of shadow just
running down afterwards. But you can also
see there's a few more here in the background
like this one here. I can just put in some
quick indications of of it here as well. And they just sort of going
into the distance like that. I wonder whether I should
put a bigger one in. Thinking. Could do so. See what
we can do maybe. Could we get one in here? I mean, it's not really
in the reference photo, but I do feel like it because we don't have much
there in the foreground. Something something larger would help me just drag this down until the foreground roughly where I want it to be. Maybe here. Here we are. Lamp. So we've got a few lamps are
leading into the scene. Let's put in some figures. So there's a guy here just
sort of standing about. And he's not doing much. It's just really just
standing standing right here. And this one, this person here, it looks like he's just pushing
a trolley or something. So we can get his arms
in slightly behind this thing here is body, but in front of it, he's got
this kind of thing here. And you can see there's a
couple of wheels there, so I'm going to
just put some okay. He's got his arm coming
around the back like that. Can be his leg here in the back. You just load this a
touchdown like here. It looks like he's
pushing a trolley into the scene or
something like that. It's a little big. As matter. Here we've got another figure. I might just reduce
the size of this one. Actually, this guy is
just looking a bit too large compared to
the other figures. Here's another figure going in, walking into the scene back
to the left like that. Some shorts like that. Now the couple here, to just be walking
again into the scene. This guy is wearing some kind of hat area, another figure. You're just telling a story
and giving it some life. Because there's so much
going on in the background. I think you just have to pick
out a few that you like, few figures that you like. And up for me, I just sort of make
up the ones in the background because they don't require much
too much effort. Smaller the distance. Maybe some real little ones off in the distance like this. Really small ones help
create a sense of scale. Legs almost just
become one line. I don't need to even
add much in there. Figure in the foreground. Maybe you get a child here
just walking as well. Family maybe. Okay. All right. I think that's good
for the drawing. Let's go ahead and get
started with painting.
50. Venice - Light: So what I wanna do, I
want to start off with a darker wash in the sky and up the top and
then blend it down, I think, to more
of a golden color, just indicate a bit
of a sunset scenario. But the first thing I'll do, those thing I'll do is just getting a little bit of
color for all of these, all of these buildings. So this wash is going
to be quite interesting because we just want to
get in the soft colors. I'm going to spray down the paper just
completely with water. Even the ground. I'm going to spray bit of
water in here as well. Might seem like a lot of water. But I do want all this to this wash to
really blend through. Nice soft wash. It's getting at the base. The yellow. I'm going to
use the current acridine, yellow plus a little bit of red, tiny bit of red and
quinacridone yellow. Just wanted to get
a nice golden color with hints of red in
there, pink in there. Keeping this pretty
light as well. Let me just test this out. And I'm with the buildings, they're going to follow
the same color as well. Really quiet paper
is really wet. Look at that. Going through and
not really bothering with the Anything else as well. I'm just gonna go over
the top of everything. Bit more golden color. You can also get semi
known the buildings and the bits and
pieces like this. Especially this one here, maybe a bit more gold like that. Okay, I want this
to be fairly wet. I'm using a large mop
brush, watercolor brush. Okay. Let's bring this up. As we go up. I'm going to
tilt the paper a little bit. And adding some of this
kind of a mix of me, I'm going to pick
up some purple, little bit of purple and a
bit of ultramarine blue. Spirulina blue, sorry,
cerulean blue and purple. Let's just drop that in
and see how that looks. That's looking decent. Just want to test that color will actually bring
this little bit of that up, this color. As I tip the tip the
painting upwards, you see that the everything
just runs further up. That's what I want. Okay. Maybe some of these blue, little bit more ultramarine blue in there to darken it down. Okay. I'm just trying
to be careful and potentially cut around some
of this stuff as well. Like I don't want too much
of that purple in there. I've already got it into
the tower unfortunately, but we can avoid most of that. I got darker, little bit darker up the top. And this kind of creates
this sunset like effect. Slight gradient. Just blend a bit more
of this downwards. This should flow down
the page anyhow. Hey, I want a nice even wash through this through
this whole area. Bit more at the top. There's a lot of
water in this mix. This first wash is really important because
it establishes. The soft, softness
of this scene. The lightest tones
that we have in here. In here. Some more at the top, a little bit more darkness
of the purple up the top. Little bit of blue as well. And it just melts in. We got to this graded wash. The paper as well
at the moment is just on a slight slant, which makes it
easy to work with. Now the bottom of the
paper is probably, it's probably dried, so I'm
going to just spray it down a touch bottom of the paper. I'm gonna do. I'm gonna get
in the opposite effect. So I'm going to start off with the yellow and warm
colors at the base. Okay. Is it that warmth at
the base? More red? Hey, there. I'm not going to bother
with the figures. I'm just going to
go over the top of them to get to make sure I've
got a nice washing here. Good. And as we
move down the page, I'm going to feather in some
some of that purply color. Purply blue color as well. Yeah. What a soft fuel like that the paper is
warping a fair bit. When you use a lot of water, that's just what happens. You can see quite easily the color blends
nicely like that. But at the same time I
want to leave in enough of that light further up. And that's more of an exaggeration of
the reference photo. I'm going to actually go in, in that area a little bit with some with some darker color. Afterwards. The paper's still wet. This is really the best time
to do this sort of stuff. Getting some nice soft
transitions between the colors. Especially in the base
where I just want it to blend a bit better. Create a bit of
darkness down the base. Okay.
51. Venice - Darks: Because it's completely dried. Now, what we're going
to do is getting all the shadows for
the entire scene. So basically, you can see the darkness here
in the foreground. There's a bit of light just peeking through
in the back area. But apart from that,
it's pretty soft. So I might get in a soft
blend out in the backwards, back, in the back, and
then also down here, the right-hand side
of the buildings have a bit of shadow and
things like that on them, which I want to get in. Same with the silhouette of this building
here to the left. So let's go ahead
and get started. I'm going to pick up
a little flat brush. I'm gonna start with some purple going to
mix up a bit of purple. And what else do we have? We've got we've got
some black as well, bit of purple, but a black here, just make sure I've got
enough water in there. Touch a brown maybe as well. A bit of ultramarine
blue in there as well. Okay. Nice mixture of cool color, suppose is what
you could call it, just generally cooler color. And it's about 50
per cent paint, 50 per cent water. It's fairly thick,
sort of blend. I'm going to go straight
for the top here. Doesn't need to be probably
a little bit lighter, something like that, good. Right through the top. And I'm going to work my
way in these buildings. The left. Keeping it pretty pretty accurate in terms of the line
work where it hits the sky. This okay. I can put in some
more, maybe a bit more black or something
in there as well. That let's bring this down. This is all just the silhouette here as we get near to these little pillows
and stuff like that. I'm just going to do a bit of tiny little bit of cutting
around work touch here. And then we can get in the pillars that
run down like this. Just simplifying them down. Just with 11 brush stroke hopefully should be
enough for this. Look at that. There's the edge of my
flat brush I'm using. Yeah. It doesn't have to be perfect. But it needs to show through
the background area. You can see here
as well just some little markings like that for the boundary of the part that you bring that
across again like this. Just a little silhouette. And as we come down the page, again, we've just
got the bottom part, which is the same sort of deal. Especially ran this side. There is more sharpness. A little bit more
sharpness anyway. That's another one. Pillar anyway. Extra maybe a little
bit more purple, little bit more darkness. Yeah. Water like that. This one here, last one. Okay. And actually inside
the buildings There's all this darkness, darkness in there which will
have to get in afterwards. But that's a good start for what we what we want just to quick wash there on
the left-hand side. I'm going to work into
these buildings as well. Little lighter and a bit more, little bit more brown
in there as well. Just some little bit of brown. Oops, too dark, it needs
to be a bit lighter. Let's write this. Drop in some purple there too. This is just to create a bit of a sharper contrast
for the shadows. Another thing to keep in
mind also is that the, the top of it, the top
of this tower is cooler. It's got a bit of
bluey tinge to it. So I'm going to drop in a bit of a cooler color like that. This feather that in nicely comes out of
the sky bit better. Just work on. Welcome
to shadow a bit more. I'm adding a bit more corners. These windows just add in a
quick few details to join up. Join it up. I don't really
want to go back in there again if I don't need to. Okay. Because it's all
in the background, it's too much work to continually keep
fiddling around with later. So this is just a bit of the
brown that I had before, bit of that burnt sienna, and I've mixed it in
with some purple. For me, it's just creating
a quick roof area. The roof. Let me just put it in a bit
of this cooler color there, join that up here as well. Like that. It's just crying and
create some kind of pattern of light and dark. The shadows on the right-hand
side of these buildings. If I can connect them up, it just looks a lot
better this way. This is a bit of purple again. Just getting that over there. Use the roof. These
roofs just have a bit more of this brownie
tinge to them. So that's why I'm just
getting a bit more. In fact, these ones on the top, more of a cooler
tinge, doesn't matter. It's a little darker like that. And just blend this
in nicely there. Here again, we've got a
bit of this darkness. The front of the building. It's all in the
background anyway, so not a huge deal, but just some softer shadows in the background
really does help. But look, it's building. Q in the foreground,
probably should have a bit of shadow
on the right. Like that. I'm just trying to get in some extra details
what's happening in here. And a lot of this stuff here
is just pretty dark anyway. It's not a whole lot
to add in there. This building here
is just quite dark. More purple. They're sort of mixes and comes down closest to
the foreground background, I mean, there. Okay. The rooftops, little hint of color on top and just to darken
them down a touch. Okay, great. Good. So let's work a bit on everything else now
here in the foreground. And what I really like is some of these reflective colors. And what I'll do is just sprayed down
the bottom of the page like that. Cover this up. For that reason. It just doesn't
mess around with. Mess around with
everything above. A little bit of a bit
of water at the base. And what we're gonna do, this is going to leave a little
bit of light in the back. But we can pick
up some color and getting kind of reflections in the ground like
this, like that. Okay, coming off the buildings. So they look a
little bit sharper, then suddenly they
get softer like that. Okay. And not only that, but
the figures as well. So we can put in the
legs of the figure's, a little bit of the legs which joins onto the top
of the figures. That, but then the legs
kinda just blend down. Even this little fella
here just carrying away the bits and pieces. Bit more blue in there. Okay. I really like how
that's blended nicely. Well. So bringing this
down, look at that, just pick up your darkest darks. Barely any water
in there at all. Drop it in and you can get
some beautiful reflections. Okay? I wanna do this for pretty
much everything here. Let's have a look. Let's
get in something like that. More purple actually,
could be nicer. More purple, purple, little
bit of black in there. And all this sort of just
blends down the page. We can get in some more details for the legs of the
figures afterwards. But just a touch of this
to begin with is good. The ones in the
back doesn't really shift around that much.
It doesn't matter. Okay. Just these ones that
are a bit closer. And even the lights and
stuff here you get a bit of reflexive stuff happening
down the bottom like this. That's just starting
to come together. More water in here, get that they've just mix it
around a bit better as well. Too saturated this spot. I'm just going to mix
that around the touch. Some joining areas
as well at the top. So it doesn't just
put a bit more in. Maybe a larger brush,
larger flat brush. This feather in some
general bits like that, I can always add some more, more reflections and
things in there. If I over judge this. Hey, nice little reflection
lot that is good. Um, something in the
background off notice is that there are some
little shadows that may run across like this. You can see him just
across the scene. So I'll just feather that in this larger shadow
that runs across the back-end. You just runs across here little bit of it at the back
spray to just loosen it up. They're building to the right. I'm going to just add in
some light shadows in there, water down this purple paint
and carry it down like this. Just indicates the separation of some areas in the buildings. But I'm just going to
mainly leave the light in there because it's it's
catching the light. Okay. This is just a little
flat brush I'm using for this is a bit of this
part that sticks out. Use well, the base of the building
somewhere here. You can even and even just
getting a bit of the dam would reflection of that
building to that bits and pieces on
top of the as well. Just indication. Good. I'm gonna give this dry.
52. Venice - Final Touches: The final steps here, I just want to bring out all the remaining
details of this scene. I'm going to be using
a blend of just a bit of black and a bit
of purple brown. Again, really the aim here
is just to create a dark, dark color and
even neutral tint. We're quite well, probably
60 per cent paint. 60, 70% paint, 40% water. This will allow you to get in
really sort of dark areas, as you can see here. Underneath these arches. There are just some
extra dark areas that need to imply like here. I'm just trying to
do this once that getting that in
larger one like that. Going over the previous wash. And I'm adding an extra details up here. Even you might get a bit
like arches that just show through a bit of
darkness as well up there. And k, even here, these little areas
are quite dark parts. So I can just go in,
re, emphasize this. This is what gives it the
structure and detail. Okay. Little bit more detail. Each of these little
pillars so that they just drawn onto the shadows more, little better. Okay. What have we got here on top? I mean, actually
underneath this so much, so much going on even here, there's actually a lot of
darkness in the background. I can get that in like that, just little indications
of that darkness. But there's also,
as you can see, the yellow peeking through
in the background. So you're leaving,
leaving areas of that previous washing
of the papyrus periods purple and also of the yellow. Okay. Something like that. We got up the top over here. There's a bit of Just a bit of detail for the top part here, just like a little
line maybe like that. Just even k. And now is a couple of windows here that
we want to put in. One roughly about here. One roughly about here. Getting the indication
of it like this. This window. The other one also similar. That actually looks
a bit better. Just a rougher edge. I can just smooth this
one out of touch. That's better. There. I'm going to just work in a few little windows and things in these
background buildings. Okay, just using the flat brush here as well, just
outline that a bit more. And also on the right-hand
side of the building, a bit more darkness
with that when these two little windows at the top underneath here as well. Okay. I'm good. Actually, a little bit darker and some of
them are darker. Maybe just depends. These ones here,
just a few windows and dark areas in
these buildings. Actually forgotten to go in. This is dominant, a dome. The distance r, I
can get it in now. Darkness on the
right-hand side of it. These things you can
do like you can also just dark and down
areas if you feel like it just would look better. Like that, create
extra contrast. Here. I do think this would look nicer with extra
contrast in here as well. So I'm just going to feather in a bit of purple to separate out the roof from
the bottom part of the building like that. Here. Why not just
do it here as well? Still leaving in part of that
background wash as well. Darken down this
attached as well. Okay. Some more windows and stuff going on in the
background here as well. Just a little few little
dabs of paint that. Okay. Another thing that you do
notice over in the background is that these there
are these kind of we call them wooden dolls
and things sticking up. I'm going to mix a bit
of brown with black. And getting some of this
stuff just running, running into the
background like that. They just sort of stick
out of the water. And also some of these also
form part of the fence. Okay. But they they kinda run through the entire background and I'm going to just indicates some of them. Okay, good. What I'll do is just
work a bit more on the these two
little towers as well. A bit of brown in them. Yeah. Like this. I'm gonna do this one
wash, one quick sweep. Okay. Just keeps it more accurate when
using a flat brush. It would top part. You're just adding
a little bit of color at the top here as well. And top part of the statue. I need to get that to blend a
bit on with the rest of it. And also sporadic enough. That's good enough, the
tail doesn't matter. Here. Same deal goes. The figure on top means
statues at the end of the day, they just, just people, right? So you want to just sort of make it look like
a figure or a person. Same as the ones below. Just a silhouette. Right? Now the remainder of this size, I think it's just
getting in the legs and details of the figures
that also these lamps. So I'll actually start with
the figures, bit of black. We've got, we've
also got us look. I mean, just a lot of this stuff where it blends down
the page anyway. So we don't need to really get
too much in just the legs, just a darker kind of
indication of the legs, the separation of them, which I think we'd lost
out before a tiny bit. So this is going to help. Okay. I'm just using the
edge of my brush for this, so I'm only gonna do
this with the figures. I don't think it's
necessary to do it with the these polls. I can just get them
in afterwards. This is the person pushing a trolley and these legs
behind the trolley. So just to mark of that
on the ground like this leg to the front and late coming out the
back for that figure Here. Here. This figure here as well. This is a figure here yet standing off in the
distance there. Another one just
walking in the back. You just indicating
the legs of them? There's a few more here as well. And this one here, right-hand side. Let's work on these these lamps. Some more water in here. Okay. Pretty dark. You're the one in
the front first. Saved me a bit of time. I'm having to do
you do the ones in the back and then realizing I need to cut around
everything else. Yeah, that's a lamp. And of course, some of these
ornamental bits and bits, pieces coming off
the side like that. The background ones as well. And the base here. Moving to the
background, you don't need the detail that much. Little bit of darkness underneath these areas
of the buildings. Maybe there's some little
shadow or something like that. This light shadow,
white little wash. Let me get these figures in a bit of extra color and personality into some
of these figures. I find a bit of white gouache
tends to work quite well. Yeah. And I'll mix it up
with other colors as well. There's actually some lamps
to the left-hand side. You can barely see it, but
there are a few lamps, like potentially one
running around here. So I can just indicate
that I'm kinda copy the one right there. Maybe another one here. Kinda gets to the point we, it's hard to see exactly what's happening with all the
lamps and things like that. But yeah, this is okay
because it's quite quiet, dark here in the foreground,
difficult to see. We're going to have
another one here next to it, like that. Another brief indication
of that lamp. Other one here. I'm kind of bits
and bobs of things. Something even
here, look at that. There's some type of
fence or whatever. It's hard to see.
These minute little details I can help
translate over. Okay. I'm getting a little color
for this figure here. The top of the figure. These two here, walking through. And the child is, well, just a bit of darkness. On top of the figures. I'm not concerned
about the clothes that the color of the clothing
that they're wearing. I just want to make sure
some of these figures stand out against the light. Just a bit of color in there, this one as well. There's a guy here behind the trolley just
pushing that trolley. It's hard to see him. I'm just adding a little detail a little bit of detail on the trolley or
something like that. It could be carrying
a box and there, for instance, something is just pushing around his leg behind. Maybe a bit of hair
signifies head like their arms like they're okay. It if darkness on this figure. Well, I'll watch you use
some quash later on too. I don't want to get all
them in super dark. Some of them I just want a
bit of extra light showing, showing through if it is. But because it's so light, especially at the back
there kinda helps to get some of them skipped, some of them in darker red, in a bit of white. I'm just mixing
together just to get an indication of the
heads of these figures, just drop that in
quickly like that. Oops. The face is really some of the squash
white gouache that I'll mix up with a
touch of yellow, little bit of vibrant yellow with the white goulash crates. Just a lighter yellow,
yellowy, opaque color. And I can get this scene. We'll try to get this in
for some final highlights. And thinking where
I can start off, even like in the building. Buildings off in the back, can get some little
tiny indications like this. Touch and go. I don't want to overdo it, but just finding some areas
that you can draw out of this darkness and create
extra details on as well. So I mean, look at that. Just a touch of washing their allows you to reshape
things as well. Funny enough. I find if I just touch and go in areas that
actually looks better than if I spend too much time
fiddling around with it. I mean, this separation here, like that, a bit of light
that I've regained. Also within the
lights themselves. I think this is good. Like here. The lamps, I mean, like a bit of opaque paint. It just look a bit
more brighter. I suppose. More present. Especially in these
dark areas here, get a little bit of
a little reflection on the left side of these lamps. Little bit of light
coming back here as well on the left side of the these little
areas like that. Just be quick with it. You can bring back a quick
indication of light. Don't know how necessary
it is to go in here, but I want to dress dry brush on some little bits in areas. And this is just for me to keep it consistent
across different areas. Little bits of gosh. I can straighten up these
arches here as well. That color, that white. That's straighten them up. Okay. I'm getting a bit of blight
on these figures like that. This figure I'll just make just a little bit
of wash in here. Yeah. You can bring out little details on the figures and make some of them
stand out better. Okay. Peter Brown or
something for the hair. Darker color. Here on these figures. Alright, and we are finished.
53. London Street - Drawing: Alright, let's have a
go with this drawing. And I really liked this
scene because we've got a really strong shadow shape running across this
building here. And we've got a little
bit on this building. Not too much though. It's kinda coming
from the right at the back right corner. So let's get in this area
firstly on the ground. So one of the little bit of
area where the figure is, people are just
walking about here. Okay. It's a sliver, the base. It's not even a quarter
or a bit less than a quarter of the
way up the page. And we can simplify this down. We know that this
building starts roughly here in the
center of the page, the left-hand side of it anyway, maybe center right of the page. And then we've got that
side of the building there. We've got another building in the background to the
back-end like that. Now another part here that
just runs towards the back. Look at that just bits and pieces that we can
imply and put on. Now this right-hand side is large building here
comes in and it's really just a really just
a shadow shape. Not much in there at all. And this is what's casting the shadow that we're
getting crossed the scene. There's even buildings
off in the background. It's hard to see, but there
are smaller buildings off in the distance and a bit of
trees and stuff like that. There we go. That's the side of the building and coming down like that. This is the front-facing
part of the building. I don't like these
billboards and stuff. I'm actually going to
change this around and make some little windows there. Instead. Maybe down here, we'll leave it, it's darker and it's got
some bits and pieces, people sitting down and
what have you here as well. Okay, As figure person here, just walking in the foreground. Like that. You've got some of
this stuff here on the sides of the
buildings as well. Then we'll look at that just
little bits and pieces. This building here probably put some nice little windows and stuff on it as well like that. Okay. What have we got
another building up in the distance there, but they all running down like
this, the end of the day. Side of it like this.
This is too messy. Let me just draw
this bit like that. Okay, sides of the buildings. There's also this is
pointed sort of one coming up the back years and
27 building here. Something more buildings off in the background. And you kinda get to
the point where they just clumped together
a lot easier. Like that. See the sides of them can
barely see what's going on. But this one here is
the important ones coming in from the edge. You've got this dome shape. I'm going to just lower the dome slightly so that it's not two obvious and
too high up there. There's a little window
up the top, like that. Comes all the way down
to the ground here. And then we've got the edges, the sides of the building just stretching out like this
machine and get rid of these buildings here to
make room for it like that. There is another white
building behind there, but apart from that, not really much much getting in the way. Yeah, it's funny enough. There's no nothing on top of the dome that let's
bring this down. And we've got We've
got a few floors, but I'm just going to
get in this area here. Bring that to the back
like this window there, and a few windows here as well. Here, here, here. Like that. Because this area like that. And underneath there is the
shops and stuff as well. So we can get in some
indications of that. Easy. Okay, Let's get in
some of these people. Now, I'm just going to scribble
in a few of these heads, which is people walking in
the distance or they could be people closer by As well. There's a couple
here, couple of here. This one here could just be walking towards the
right-hand side. You can even get
figures that are quite close to the
foreground like this one. Like this one here. Closer to the foreground and larger bodies as well like that. Walking in the distance. Okay. Good. Some more, just a little
detailing on this building. And nearly there just at the perspective
of this one here first, just going in a bit. We're really coming into the
foreground almost like that. Okay, some windows and stuff. And we're ready to go.
54. London Street - Lights: Okay, first color I'm
going to start off using is a bit of yellow ocher. Right onto the buildings
themselves like here. Look underneath the dome. There. Here, just cutting
around the figures. As you can see. Cutting around those
figures and the buildings, skinning and enough
of this color. I've got a bit of this
quinacridone gold as well. Let's put in a bit of that. Okay. It's a pretty light color. The mixture is mostly
water in here, I'd say about 80 to 90% water. We can come down here this bit. I'll leave, I'm probably
going to get in a soft shadow there later on. Some of these buildings
you'll notice are kind of just white in color. So I'm going to leave
some of that in getting more of this this kind of milky color in
areas of it. Okay. It's just an appellate
called buff titanium. And I'm cutting around some
of these other buildings, leaving in leaving
inhibitor the white there. You've got a lot of this shadow and stuff coming
through here as well. But we want to just
make sure we've got some warmth in here. That's all. We would warm color like that. The front of the
building. Let's let's get in the same sort of color. Doesn't matter. Just as long as it matches
up with everything, the shadows when we
go over the top of the buildings after it's
gonna look a lot better. We just want to get
in some soft colors. At the moment, just
mostly water in this mix. Darker building here on
the right hand side, I'm just using a bit of this purple on my palette
to just get it in. Because there's a
figure there as well. A lot of these stuff
here is pretty dark. I'm just going to drop in
some dark color in there. And also some green for the
trees off there as well, just to blend it in like that. In the foreground,
I'm going to make the ground just to a doc, a slightly darker gray. But you'll notice that
it's still around the same tonality
as the buildings. Okay, so this is going to
preserve this sense of light. We make everything just
to dock at the moment. You're not gonna be able to
get that get that lighting. Okay, this is the goal
of this particular wash. Oops, I forgotten to
getting a bit of this dome. Slightly cooler
color at the top. Well, that okay. Maybe darker there. I'm also going to just
drop in some of these purple here to get in a soft
shadow on this building. Sometimes a flat brush
is good for this. Just try it. Like that. Bit of a softer shadow
coming into the scene. Okay. Make it a bit here as well. Just a little bit of that
underneath the dome. Softer little shadows. To simplify this
down here as well, we can just get in a bit
of a softer shadow there. I'm good. Let's get in the sky. I'm going to put in just some
cerulean blue at the top of their list of water. Going to leave a little bit
of white on the edge of this so that it doesn't all
just bleeding there, that little bit of white here
as well on the roof. There. Other areas I'll just
blend my problem. Um, that okay. Good. I'm just smooth
off some of this. Maybe a touch of purple in there to get some
darker cloud or something, just an indication of that
cloud working its way through. And they've bit here maybe just to give it a bit
of extra interest, you that the base
some more as well. Little bit of that. Okay. Good. Let's give this a try.
55. London Street - Dark: Let's go ahead and carry on. And I'm going to put
in all the shadows of all the figures and of
the buildings and things. Now, remember the shadows
are going towards the front, front to the left. So if you look at the people, The shadows are off to the left, but in the front as well. Let's go ahead and
get this shadowing for this building first. And I'm probably
going to just use, here is my little, little mop brush to small
mop brush like this. With a nice point. I'm going to mix myself
up a bit of purple, a bit of ultramarine
blue into that purple, as well as a bit
of black as well. A little bit of black. And brown would be good to go, just a nice gray color. But I will vary this as well. So look here, there's
a little There's a section here that covers
part of the building. Okay. Then you've got
it go across like this. It's just a big shadow shape. And this also touches on the left side of
the building there. So this is going to be quiet. I'm going to need to make
this a little bit darker, probably. Like this. Okay. There. I'm bringing
this down like that. Nice wash, maybe some more, Let's get some more
blue in there. This mixture that bringing this down and carrying
this across there and leaving bits of darkness showing through
and light as well. See this better slither of white light in the middle there. Let's, I'm just
gonna leave that. I can leave little windows or something like that
in there as well. Okay. Now, the proportion of paint is about 50 per cent
paint, 50% water. This large shadow just covers pretty much
the entire building. And then as you get down
to the further down, it actually gets
a little darker. And I'll just alternate as
well between using this, this little flat
brush I find this is great for getting in. It just extra darks. This is like a kind of barrier
or something here I think. Should imply some, something. If water, a bit more
water in that mix that down extra darkness
around this area. So I want there to
be more darkness at the base of the building here. Get that to blend in nicely. There's a figure here as well, kind of just walking
in the front. So making sure to cut
around that figure. But more or less
just quite dark. In this area. There are people
sitting in there as well. We'll have to get in some
indication of that later. Getting another building here or something. Let's have a look. All these buildings
out the back as well, they need to have a sense
of darkness in there. I'm going to add a
little bit more water to my mix so that the shadows just become lighter at
the back like that. And just cutting around or the figures might
use the flat brush. Now. So it just makes
it easier to create these shapes that sometimes you, yeah, you just got to use the brush that works
most effectively. Depending on what
you're painting. Just drop in a bit more here. Let's have a look here. Bit of this shadow
on the left side of the house,
building in the back. Now here we go. We've got all this stuff
here in the foreground. I'm just going to
get a light wash of purple and just
get it in like that. You find actually there's
actually a lot of these little windows and
things running through here, and you can just
indicate them with a bit of darker color. And just dropping it
in like that without much without too much effort. Okay. Underneath here it's
gonna be pretty dark, so I'm just dropping
in extra paint here. I'm also just making a
few things up, like here. There's actually maybe
a bit more darkness here where that shadow
is just underneath. You've got also some
Windows running through this this darkness
like one there. And then another window
here, perhaps here. Here. The shape them a bit. Better. Don't need to
be perfect with these. Dry, dry the brush off a
bit and then you can do these little marks to mark out the floors
of the building. In the top part here
of this building, dome, There's a bit of the
details of the dome as well. I'll just dropping some
indicators of that like that. Okay. They're just drawing with the brush essentially. Here on the side. You've got some more
opportunities to get in these little like
windows and things here. I'm just putting in a few like that darkness at the base of the buildings here to draw out some of those details there and also helps to
cut around the fingers, creates some extra details. Now even here,
there is some kind of part that sticks
out of the building. Just exaggerate
that and bring that across to the right-hand
side as well. Underneath the buildings,
extra darkness here as well. This building to the right
really needs to be darker. Okay? And just get
some more of this in. There's also a building
here in the background here that's just darken down. I'll get that in quickly. There's nothing really. It's just a just a
silhouette back there. Okay. Finding some other areas, I can just bring out some of these darkest contrasts on heirs of the buildings and
you can even see this sum. I've not put that,
put that in here, but there's actually
additional details on top of the buildings, like just parts of
it that stick out. Simplified down. You can't really tell
what's there anyhow. Unless you pay very
close attention. That soft shadow that
runs through as well, the left side of that
building looks pretty good. Little markings like this to indicate windows
on the buildings. Look at that just
a little quick. Little things like
that. And also on the sides of the
buildings like this, you can see tiny
little ones as well. Like that. This little towel or whatever bit of shadow there. Here, I'll just make
up some windows. That could be one,
another one here. Here. And because this
area is still wet, it hopefully will blend into
the previous wash as well. I do feel it needs some. Line work like this too. Yeah, that's better. Some
little marks like these to give it a better sense of
perspective. Like that. Again, just getting in the
small details of Windows under the rooftops, you've
got some little bit of color, a little bit of darkness, and even the top of the
root, the areas here, they're just going to just kinda have a bit
of color up top. Okay. Dropping a few more
windows and things running by the sides
of the buildings. Good. I want to join this up here on the ground with a bit
of darker shadow. Okay, So we're gonna just get
this coming in like that. It's darker shadow from
outside the scene. I'm mixing in actually a
bit more black in there to just make sure that bottom of the buildings
combines better. And I'm just gonna go over. And perhaps this figure
might have a bit of a shadow on him as
well, like this. There we go. Things in shatter. Good. Let's kinda just mixed. Mixed downwards. Okay. Good, good. Shadow for some of this stuff
here on the ground as well. Where people are sitting in the inside and that
kind of thing. I'm good. Now, time to get in the figures. I'm going to put in a bit
of darkness for the legs, for these ones anyway that
are just in the description. So to me, like there there's
a couple of legs here. Here. Here. Yeah. Like
this, these figures here. But I mean, that
could be a figure, leg of a figure or
something there as well. It's hard to tell. More just the torso really. Let me just dial this down. A bit of yellow or
something in here as well. This could just
be a figure Here. Bit of darkness. The figure here, the left-hand side,
just a little bit of darkness on the left
side of the body's. That this is a way to kind of
join up the black as well, the down and underneath
the figures. This is where we need
to get in the shadow. So I'm just going to join it up and create a bit of a shadow running
forwards like that. Even this figure might have
a shadow running forwards. Here. Is the origin showing
the origin of it? There? Yeah. Okay. Just here as well for this figure, the foreground to the right. Adding a bit more contrast
in the background to bring out the details of the, of some of these figures. Shoulders and the heads and
things like that as well. Okay. Yeah. It's going to be
a person they're putting a little some
just little touches of color near the these
areas of the roof, like the corners and
things where there might be I know it can be
chimneys or just Things sticking out of the roof. I think this is good
to imply part of this. Anyway. I know it's not really there, but I want to add a bit
more detail in areas of it. More shadow underneath
the roof top. One here. Some liberal perspective
lines on the ground. I'm just getting the lines to converge at imaginary point
here on the horizon line. These little lines
on the ground. I'm doing the same here
on this side as well. It's kinda like a two-point
perspective scene. More color under here and
little shadowy shapes. Shadow under here
and some areas of the the roof the roof or
the side of the building. Some of this stuff. I'm just adding in
water as well too. Make it a bit more conjoined
and we Interesting, Okay, bit of water in there to soften off some of this stuff. You can even do it
here to bring out just a little bit of light and beats in here by
lifting off some paint. Mainly you've just got
that large shadow running through a green tree or something back there. And there's also
a tree here which we put in a bit of indication, but are getting another
quick wash over the top. Give it some extra texture. Okay, now some final touches, just a bit of gouache to
bring it all together. Alright, I'm going
to bring out a touch of highlights on this. In this scene. Let me just put it
in a tiny bit of pink or the heads
of these figures. First, I've got a
little round brush. And this just serves
to as an indicator. Well, the faces, the
heads of the figures. Okay. Touch. Yeah. Okay. Much hands or something. Base here. Just indicates that it's okay. That's fine. Okay. Let's put in some of
this white gouache. White heavy. I'm just adding a touch
of water to activate it. We will touch of water and
dry off that brush quickly. And let's find some
little highlights. Touch some of these
buildings like bits and pieces that you
might want to bring back into the equation. Again. I can just add in a bit of gouache
on top of the head of this figure and the side, what side of the body like that. This could be a person in the shoulders of
the person maybe just walking through here. I did have a person walking
through here as well. So just to touch
her that gouache on the backend of the head and
like that, it does help. Okay. There's someone back
here would be to quash on the heads of these figures in the fall
in the mid ground here? The head and on the shoulder. Yeah. Helps to just bring it out. Bring out the details
of the figures better. Here. Shoulder like that. The rest of it is
just up to you. I mean, it's you don't have to really do too much with
it if you don't want to. But little highlights on the window sills and
things can help. Bring back a little bit
of that sparkle in here. Smooth details as well. Spring back a bit of light
on some of the buildings. Wanna do it all over.
All over the joint. But yeah, there's there's some of
these like I know what these are like little poles or
something, distance the dough. Just creating, making a
few things up here and there. And we're finished.
56. Prague - Drawing: Some type of long exposure
and you can see all of the light emanating from
the center of the scene. And it sort of hits the
side of the buildings, closest to the light. But around the edges, you've got a bit of darkness. So if you look at the, say, the front of the buildings and the right-hand side
of the buildings. On the right you can see there's bits of shadows and
things like that. So we're going to make shadow, the shadow effect a
little bit more apparent. But firstly, we need
to get the drawing in. I'm also wanting to
maybe make it look like there is some reflections
on the ground, some wet reflections or
something like that. So one thing I wanna do
is I want to just raised the horizon line and a little bit now you can
see just the pathway. It doesn't give it
too much pathway. It's mostly just buildings. And I'm thinking I might actually raise
this up a little bit in. Another thing with
this scene is that it is a little bit compressed. So I'm going to give it a little more here and that's still
going to give me enough room. Maybe around here, it's
still going to give me enough room to put in the buildings and
things off in the back. Okay, but little line like that. Same goes over to the left. This is the most important
part of your, of your sketch, the starting part of
your sketch anyway, putting in this
large guiding line. You can also see there is a center point
roughly about here. Mark that center point. And then it just joins up here
with the side of the wall. Okay, so I can go ahead
and draw that line connecting up All the way, all the way to the center point. Something like that. Also comes down here. The wall just comes
up and touch this. And smaller as we go up.
Something like that. That little bit of that wall. Just having a look to see roughly the how
accurate this is. And I'm gonna give
a bit of room here. And just for the center
of the arch way. And we'll go and get in the
other side of the wall. So coming down the page like this and just put
that in the corner. Rough. Oops, probably. We should give it a bit more more like that. That's better. Then it does come down all
the way to about here. So you can just see
hits the edge of the page kinda
similar to that one. And then it just goes up. This is subject to
change as well. Later on, if you do
feel like it's not hitting the mark or you might want to make
it more prominent. That is also doable, Okay? Another thing I think
I might actually just increase the
height of it a touch. I think it will look better
with just a little more, tiny bit more height. And you know, you've
got these statues here. And they actually are
old recreations of the original statues that
were here in the first place. And I don't want to get
in too much detail, but the way you
make these statues, essentially you joy
statues that you can basically just
drawing the people. They are essentially people. But you just want to make sure that you position
them correctly. Statue ends about halfway
through the page like here. So I'm going to just
put in like the head of the statue like that,
something like that. Like that coming down here. Standing on this area like that. There's something new feet
to that statue. That's fine. That's all you need. Something quick like that. Okay. We can just straighten up this one a touch and
add a bit more of the base on a neglected to add in enough
of that base, I think. Here comes that wall again, just to alterations, tiny little alterations
you can change around. Here on the left-hand side, you've got another statue
ends a little bit higher, and it's actually forward
slightly closer to us as well. So it's probably around the one that the one-third
mark of the scene. Okay. Again, it's not super
important that it is in the exact place
as the reference, but I think it's fairly important to have it
closer than that one. So we can have a sense of depth. Increasing depth in the scene. Look this, I don't
know what this is. Looks like. Might have to zoom into
the reference to have a quick look at what's
happening in here. There's a lot of detail in here and I'm just going
to really get it in with more of a silhouette
type of look to it. You can see the statues finish a little bit further
up, like roughly here. So I can just zoom in a touch on the statue and just see what have we got in here? I mean, this just
silhouettes and we can't really tell what
even know what that is. The look. These are kind of like animals or something down the side. Okay. This has a bit of
a step here, like that. The bottom of it here you
can see this squarish base. Okay. Just get draw that
squarish looking basin. That's all you need. Everything else is just
a simple silhouette. It looks like they're
part of the statue. This, I'm going to sort of just standing up, appearing forwards. Something here as well. Again, quite hard to see what
is going on there exactly. Okay. But again, this
is all just gonna be as simple silhouette. Once it's done. Now, I'm gonna go bring this up a touch like some
kind of animal here. There. And then there's a bit
of something on top, but then you've got to
top areas of the statue that these two figures just
kind of pairing off on top. So just putting them in here. And this one is sort of
peering downwards as well. Okay? Like that. Simplified down, of course. The important things is to get the heads and the shoulders in correctly so that it actually looks like as a person there. Okay. That's all you need. That's all you need
for those statues. What else do we have? We do have actually a couple of other smaller statues off in
the distance is one here. This tiny one here. Let's sketch one in like that. That's the bottom part of it. Side. We get another
one in here as well, kind of adjacent
next to it as well. And again, it's
just that same sort of the same sort of detail, but a lot smaller in
the back as well. So we don't want
too much going on. A couple of smaller
statues there. Of course, you start
noticing things now like the lamps, okay? And you've got a
lamp right here. It's going up and up. I do want to enlarge
and just make this one a bit bigger than
how it appears. We zoom into the lamp and
just also tried to get into details of it better like that. Something like that. And a bit more of the
bottom part of the lamp. Okay. It's little smaller. Now you've got a couple
other lamps here as well. I have this funny-looking
base like that darker base. Here's one like there as well, just on mounted to the wall. And pretty small one here. It's kinda further back
than the other one. So you can't see too much of
what's happening in there. But it's enough detail. It's really, it's
really sufficient to imply what we need to, which is just a
simple little lamp. Here's another one
off in the distance. Again, difficult to
see what's happening. And maybe another one
off here as well, just to keep them matching
with each other like that. Okay? So that's a lot of the stuff in the foreground I think what
we could benefit from, as well as some figures. I'm going to put
in a figure here. Let's have a look. Maybe I can put it in a couple
of figures here as well. Just walking into the scene. This overlapping a little bit. Legs. Okay. This one's a touch closer. I can get an a foot at the front like that and this
foot at the back. So it kinda looks like that person's walking into
the into the scene. Okay. We can have
another figure here, also kinda just walking
towards us, e.g. towards the viewer. And this stuff's gonna, I'm gonna get in a little bit of reflections for
the legs as well. Okay. Have to wait until
a little later on. I'm also just thinking to myself whether I want to put it
in another figure here, just slightly larger one. Why not? We're going to add
another one just here. Okay. Walking into the scene. That off a little bit and create a bitter better kind of
silhouette of that figure. It could even be walking across that venom couple of arms just walking
across the scene. We go Something's something
similar, simple like that. Okay, good. That's enough for
the foreground. I want to go and work a bit on the background now and
we've got that line there, thankfully, of where
the buildings stop. We know where the
buildings start. We want to figure out
where they kind of finish. Now over here we can
just use the guides of the actual paper to
figure this one out. So I'm actually going to
bring this building to the right team somewhere
about here, okay. These buildings to the right. There's a lot of detail on them, but I'm going to try
to simplify this down. We know they finish about
halfway through the scene. Because if you look at the statutes roughly about
halfway through the scene, and we want to make sure that the buildings are
about the same height, the top part of the
buildings anyway. Okay. Let's just simplify it down. Something like this. Something like this. Okay. Increase the size of
that wall as well. I think basically just needs
to be beefed up a touch. I've given this a
lot of room at the, at the bottom of the painting so that we can get some extra
reflections in. Okay. I'm going to widen these are touch like that so that I can get in these kind of
triangular parts of the roof top like
this simplified down. There's actually a lot of a lot of stuff
going on in there. If I can just reduce them, like the size them down as well, I've gone too high up. They should be
roughly around here. One that and to like that. And let's get in this
side of a building. Just on the side there. There's a couple of windows
and things there as well. Just cancel. Couple of those windows
in like that. Okay. The side of that in as well. There's also
interestingly, there is like a tower off
in the distance. You can barely see
it, but you can actually tell that there's
a tower sticking up. I really didn't see that before, but I'll leave that in there. And this can be something
to just cut around later, later when we do the
watercolors, darker sky. So it just creates a bit of interests there in
the background. If you want to, you
can actually detail this building a lot
more afterwards. But for my purposes, I really just want to simplify
this as much as I can. So under that
building like this. You've even got a building
that comes in front. Like here. I just want to darken this statue
here, the front as well. It can be easy to just lose track of what
we've got in here. If we're not careful. Couple of windows. Now what this building
is, it's kind of looks like it's closer, but like it's a side of a building or
something like that. Yeah. Difficult to really tell. But it does go out of the scene actually to the right-hand side. So we can leave that. I think that should be enough. Now let's get in
the middle part, the star of the show. Just start drawing
a line across there where we've got
these kind of arch. And we know the
arch starts roughly near the start of this
wall to the left. Okay. This is actually a building right there that you
can get in already. Okay. Little building
there on the side. Pretty small building. That building in. And let's work on this arch. Now. We know the top of its about here near the start of the
rooftop of this building. Yeah. That and I'm just going to
bring this down to here. Okay. Yeah. And here there's a little
archway on the inside. You can see it's running
down the page like that. Darkness of the shade
that in like that. More detailing on this arch. Good. Let's get into the
top of this tower. We know the tau finish
is quite high up. I want to reduce it
down a little bit as well so that it doesn't go too high up and to
the top of the paper. So roughly where does it start? Around here, the
center of the series. The center of this arch. This is where the
side of it comes up. And then of course
we've got a bit of this light on the edge of the tower like that. There we are. The detailing. Spend as long as you
need on this part. I find that you want extra
details in here if possible. Because it's such a crucial
element of this scene. The actual tower. Okay, little bits of detail, but you've essentially got this area near the
sides here like that. And little bits of dark and
light areas inside like that. And then the top part of course, which is this going
up like that, coming down, It's
like a triangle. And then we can get
in this H like that, coming down like that. There we are. With a steel bit of room to
spare on the top of the page. And it's actually a little taller than the reference photo. The reference photo is
compressed a bit as well. But I think that's a
pretty good indication of it at the moment. Here's some little tiny
little features on the side. And in this little window here, I'll get that in a
window here as well. That in some marks like this. These markings on the
building helps with the. With the perspective there. And these bits, these little
spires on the side as well. We can just put some
of these in like that. That's one. We've got another one here just to maybe around
the same height, slightly more that area. And of course here we've got another one that just
runs directly up, something like that. Okay. I think that's
looking pretty good. For now. The only other
thing I might wanna do is just straighten up this side of the
building and touch. Feel like it's just a little
bit too wonky on that side. Little eraser here. This tidy this up a
bit more on the left. Just a bit of darker,
sharper as well. Same thing, touch of erasing. Smudge that area before,
but doesn't matter. Checking if it's
straight as well. K little bits and pieces. Now, for the start
of the bridge, I'm just going to
put it in a few of these little indications of
the top part of the bridge, 123, something like that. Or top part of the bridge makes it look a
bit more medieval style. Now, I'll come down here
and just drawing on the left side of the star
to the breach roughly here. And look how I'm see that little separation in the building here
that I've drawn on of new realize that matches up with the left-hand side area of this roof is building
roof area here. That's what I'm doing. I'm just adding it
on is what this is. It's just some
kind of structure. I don't care. Just want to get it in there. Quick indication like that. We can work it out later
with the watercolors. Of course, you've got Windows, one here, you've
got another window. Somewhere there. You got another window here. You've got a window here, even like a window anyway, couple of windows here. Let's have a look behind this. A little bit of
detail here is like this part of this structure. That it's just another part
of the bridge and it finishes just above just where this
one starts, really like that. Something like that. Okay. It's coming off the top as well. Like that. And behind this, like just some buildings. When importantly there are some dome-like structures that I think are important to get in. They just create a bit
of extra interest. Here's another
dome-like structure, another building
in the background, just some more interesting
architecture that will create a little bit of
detail in the background. Okay, that's one. And then you've got one here. It just overlaps and forms not a dome up
the top like that. They're just overlaps
with the buildings. All the buildings is
even a little open area, the circular window
or whatever on there. This is another one here, just another door or window like that and bring
that down as well. This is just simplified down. Might put in another
dome here just to shield off this area touch. I've made this one too small and so I'll
put another one in there next to it
like that so that this light can kinda come off
the front of this building. I can make it darker
at the front. So we have got a lot of the
details in so far. Okay. I just thought I'd put in a
few of these little windows here while I can. Not only that, I'll
just going to outline this figure statue because starting to just lose
track of where it is, I don't want that to happen
because I need to make sure this is in pretty
accurately afterwards for the watercolors to
darken it down. So all these buildings in the
back of pretty much done. I mean, I've just got to get in some of the buildings
to the left. And we're pretty much
ready to go here. We've only got a few
more left to do. We need to fit one here, a building down here,
the left-hand side. Yeah. Okay. And now there's just so
much detail in here, we just have to
simplify it down. Okay? It's enlarge building the x just runs through to the left here, is just before this
statue. You can see it. Just this larger building
that runs through. Just to raise this
line here as well. We don't need that. Need that line. Mostly for the center
of the scene here. And we've got actually
an area where the see the top part
of the building, this window pop out the
top of the building. There is a oops. There is a top part
of it like that. That just a little attic or something like that
on top of this building. Trying to imply darkness there. Okay. Just getting in some
detail in this building. Bit more vertical line and a more accurate
vertical line to k, That's part of this
house to the left. A little bit more detail here
because it is closer to us. Window here. Well, there's some little
bits underneath it, but it's not a huge deal. This building,
however, does have some windows on it right there, and some of the lights, lighter Windows as well. A lot of this stuff. I'm really going to have to
be careful with it and try to just get it in fairly loosely, especially these
background shapes here. Not important. Here is this building again. It comes up and
then you've got it just sort of go
across like this. And up there, we got another
one coming up like that. That then you've got
another one coming across like that. Okay. Let's get this top
of the roofing. Join up roughly here. Oops, maybe here. Okay. Now the part of the roof to the left as well. This is just the larger
part of the buildings. As you can see to the left. Hopefully we can get
this all in with more of a quick silhouettes
and wet and wet work. I don't want too much in here. Window here behind as well. Nice little window. And another one here. You just trying to pick out a few little details here and
there to bring it together. Kevin, this is not so important. I think that's a
pretty decent drawing. We can go ahead and
get started now.
57. Prague - Light: Okay, so to begin, what I'm gonna be doing is just giving the paper a little
bit of a spray down. With a lot of Justice. Mr. I've got here, but I've also got
another paintbrush. Just makes it easy to use the MR and the
paintbrush together. But yeah, if you
don't have never missed or just use a
normal paintbrush. And what I wanna do here
is just wet the paper completely because
we want to get in some nice wet and wet effects, some wetting the paper first. And the point of this is, so what we can get a soft
gradation in the sky. I want to get in a little bit more
darkness down the base of the sky and teeny bit
more light up the top, just to imply that the
sun has maybe just set a teeny bit more light up there and moving
this water around. And I really got
to make sure that the paper is completely
saturated and you will find that
this will walk, the paper will warp
slightly as well. Okay? I'm using 300 GSM paper. Once you've got that paper pretty much
completely saturated. What we can do is start by
picking up a little bit of light paint. Okay? The page now
completely saturated. And I'll pick up
some lighter paint. And I've got a bit
of this color. This is just a bit of buff
titanium white color. Drop a beat in there
for the top of this, this part of the painting, canvas tower, I'm
going to drop in a little bit across the
sides and down here as well. I'm going to try to make this, make sure that it's
not too vibrant. But I want to save
those vibrant parts for some areas where perhaps I'm going to draw
extra attention. Can I've got a little bit of
yellow ocher here as well. The yellow ocher is great to warm things up in
certain areas like here, maybe there's even
a little bit of brown touch of brown
ocher as well. We can just drop the
parts of that in. Okay. So firstly, just to focus on the lights and the lighter
sections of the scene. If it goes into the sky, don't concern yourself too much. Just try to get in a nice
little warm wash and you'll find that it will
go all over because the paper is just pretty
wet at the moment. There's no way you're
gonna be able to control much of this, but what you will be able
to get in is a very nice, beautiful soft wash
over everything. Left-hand side is a
bit more saturation, so there's actually
touch of yellow ocher. Then I'm going to pick up here just to warm this
up a little bit, going a bit of this gold, golden color as well
that I can drop in here. Just for these,
this building here, I didn't just touch
it at yellow. And also got a bit of
darker color here. It's a touch of gray, a little bit of gray. And I'll mix up and just
dropping here as well over the top of the buildings. Even here, the rooftops
of the buildings as well touch it that gray. Do find that a little
bit of it over in the background on parts
of the buildings. And I'm purposely just using this larger brush
because it makes it, it makes it forces
me to paint in a loose manner and not get too obsessed with all the
colors and all the, all the little details. This building to the right, a little bit of that
yellow in there as well, a bit of yellow ocher. We noticed that times that I'll just pick the paint off
straight off the palette. Okay. And that's when it's usually
a duller sort of paint. Otherwise, I'll actually
mix here of mixing, mixing a little bit of
this yellow and just to make sure that it's
not too vibrant. And let's get into some of these reflections and warmer
colors in the ground. I'm just going to
reflect some of this some of these
warmer color down the page like that. Good. In the sky. I'm going to put
in a little bit of a cooler color down the base. So I'll actually mix up a
bit of purple with a bit of black and also a bit of brown, so that I can get
a cooler color, but I don't want it to be
just overwhelmingly purple. Combining these three
together, brown. This is brown ocher
bit of black, lamp black and a
bit of this purple. I've got myself a kind of
nice mixture of all three, but it's mostly like
a cooler color. So I can just start by going
in at the base, like listen, why don't wanna do
as well as maybe it just turn the page a
little bit so that the paint doesn't flow,
doesn't float down. And then picking up
this I'm picking up this wash which is
going in straight. Like this. Little, little bit of
cutting around work. As you can see. Crops
amine over here, too. Little bit more darkness. Okay. I'm going to close. And just holding the paper so that it runs up with
the touch like this. This will make sure that it doesn't go into
the buildings and start disturbing the washes. Now I'm going to
continue doing this. And what's going
to happen is that the colors in the buildings, the warmth from the buildings, is going to slowly,
slowly creep upwards. As you can see. The dark is part of the painting
will be right at the top. It more darkness like that. Feathering that in. I do want to get a
bit more contrast around those buildings as well. It's tricky, but you just
have to keep on using this technique bit by
bit and feathering, feathering in that paint. And also I'm using
the paint quite dry, not too much water in there, and that allows me to get in a softer effect and the bloom or spread too much
on the palette as well. And the paper, I mean, that just makes that back in to have a bit of
tissue paper as well. If you can just dab off areas, little mistakes that you make. But around the buildings
like a little bit of yellow that's going
up into the sky. That's actually, that's actually caused by tilting the paper upwards or touch a
little bit more blue. Or I think we can, we can
put in some ultramarine. Now bit of the ultramarine. I'm going to give
the ground a bit of a spray as well just over here so that it stays wet. Don't want that to dry
too quickly. Okay. While we work on
this top section and getting these colors
left-hand side as well. I do want some more separation with the rooftops like that. If you keep the
brush relatively, it's wet, but there's not a
whole lot of water on it. You will notice that it
doesn't spread as much. Colors, just don't run
all over the place. In the areas of
focus where you want the most intensity is where you want to use
the dark has colors. So e.g. maybe you want to
put some more here. Just to get out that
tower a bit. Okay. Here. Here, put in a little
bit more paint. And that section
put in a bit here. Even here. So suddenly he's kinda turn into Cloud like shapes as well. Cloud shapes. You can see here. Here as well. I can just drop
in another spirit of color and let that spread in. Because the paper
is starting to dry, you notice that the paint doesn't run all that
much now at the top, more or less stays put. So you get a soft blend
where the sky is. Just really what I want. I don't want to whole lot of mixing around
and mess happening. Top of the scene. I want to
put in more darker colors, black and purple, to a
darker concentration of it. Feather that in a
bit of ultramarine blue to cool it down further, even arms getting a
bit tired from this. Okay, But while
the paper is wet, you will notice
that it just blends nicely and finds the paper, the paint just finds its way into all the nooks and
crannies. Very nicely. Okay. Some darker bits as well. One I'll just add in some
darker parts of the sky, some little indications of
darker clouds and things. Just play around with it. You have some stronger
concentrations in areas as well, and that helps to
bring out the light. It's quite a lot of work. This just continually add an ad while the paper is drying, but it's the only way that you can get
nice and beautiful. Little gradations like this that don't look
too out of place. Softer, kind of
softness in the sky. And with enough separation
for the buildings as well. Separate and shift this around, especially if it starts
drawing a bit too dark, I can just feather feather it in a bit more so that it
doesn't dry too funny. Touching. Go. Really start to get there with
this. With this guy. Some more black apps up the top. Just another darker
cloud or something like that up here. Doesn't matter. I'm going to work a bit on the
buildings and just putting some color in there, e.g. here I might, I
thought to myself maybe a bit of brown
on the side of this building while the paper is drying would be good just
to get in a touch of that. Because shadow, something
here on that side of the building,
something like that. This is just a touch
of brown color, brown ocher that we can
get in the front of this part as well, like this. A bit of brown ocher with a bit of burnt sienna mixed in there. The burnt sienna just gives
it a touch of vibrancy and areas can just cut around. This is the start of the bridge. Okay. I think
that's too vibrant. I'll mix some more normal
brown in there with a bit of this buff titanium color. Get that feathering. Bid up the top as well there. What we're doing is
we're putting in some shadows, some
little shadows. While the paper is still wet. Here as well. There's
a tiny bit of shadow maybe in the left
side of that tower. Touch here as well. Just soften that off and
let that go in there. Some of these buildings
out in the back as well, there's some softer
shadows on them too. So this is a great time to
indicate any of this stuff. Here. Little bit of shadow
here as well. I'll, of course later on I think I'll sharpen
this up a bit, but I think it's a
good place to start. I'm trying to really picture the trying to picture the
shadows on the buildings. Okay. Left side, you've got a lot of that right side of
that building exposed. But it doesn't matter
a whole lot right now. All I'm doing is just
putting in some softer ones, softer shadows in
the background. We'll actually get into
some sharper ones anyway. Okay. There are
these ones just look pretty pretty dark as well, slightly darker anyway. But the back of the, you can see here
this just a bit of shadow on the back
of these buildings. So why not just drop
in a little bit of darkness quickly like that. Okay, let that feathering
form part of that building. There's bits and pieces in here, just simplify it down. Okay? What's going on in
the background here? There's maybe a little bit
of coolness here as well. That little tower, good rooftops, these
buildings, little, little bit of coolness in there to like just a little
bit of grayish, cool gray dropped in there. It starts drawing off too much. Just use this little
spray bottle. Use little spray
bottle to undo it. I'm going to put in some cooler gray color facade of
this building as well. Just getting a bit of that
gray color like that. This wall, this link touch of this grayish color
again is gonna be good. Bring that all the
way to the front. I'll redo this again
any way light up, but I think this is
just a good start. Good start to place it in there. Okay. Good. At this point, you know, again, we're not really
putting in details. We're just trying to get in
some of these mid tones, not the super sharp shadows. We'll get those in a bit later. Okay. I'm down the bottom of the page. I actually want to
feather in some purples, but I also want to get in the reflections
of the buildings. I'm going to feather in a
little bit of this purple and remembering to leave some light running through the scene
as well, really important. The light comes from
these lamps as well. Spray this down quickly. Sprayed down a bit. Okay, And what I'm gonna do is just pick up bit of dark paint. Get the, get the scene. I'm facing downwards just on a slight angle now is the
top started to dry off fine. And really, the idea is just to put in some darks
here in the bass. Now the shadows
were the figures, all the reflections
with the figures I'm not worried about yet. We can do that later. Just
re-wet the whole thing. But again, just getting in
the soft little reflections, soft little bit
darker shadows here. It's really important for this wall as well,
just outlining it. It's really just putting
in all the lighter tones, but then also some of
the mid tones as well. Okay? This statues be a
little bit tricky. Putting a few little bits
of gray in there as well. Why not? Okay. So this is looking good. I think it's looking decent. We will draw this one off. And then we'll start
with the second wash.
58. Prague - Dark: Okay, Now we are on
to the second part of the whole process
and that's painting a large shadow shape over everything that we
see completely dried. And really what I wanna do is
make sure that we get this. You can see the shadow
coming in right at the front here is a soft shadow joins
up with that building, but there's also soft areas of light on some areas
of the building. But I find just getting
a way to connect a big shadow shape all in one go is the most
important thing here. So let's go ahead
and get started. I run it, just get Going
on this side here. And the most important thing, Iraq in any way is
mixing up yourself a nice cool gray color. I'm going to mix up a
bit of this purple. I'm going to mix up
a bit of brown and a bit of black together. My usual go-to for shadows. You can also mix you
three primaries together. I've also got some neutral tint. You can even add that if
you've got neutral tin, great shadow, color, fine. If you mix up a few
of your own colors, they just look more interesting. Now, I want to mix
this up so that we've got a good amount of it so that I can carry
that through the painting. And I don't want it to
all be the same as well. So I want some parts
of it to be cooler. In some parts of
it to be warmer. Here on the left-hand
side you can see it's more purply, more bluish. Even. Then on the
right-hand side, I've got more kind
of move a warmer. Warmer gray? Yeah. Okay. Warmer gray because I've mixed in a bit of
brown in there. We've got a nice combination of colors and also we want
to make sure this mix is probably about
40 to 50% paint and the rest of it just water. So it's predominantly water, still biased towards
the water side. But keep in mind that this
paint is pretty dark. So we don't need too much
of the paint in there, about 40 to 50 per cent. So let's give this a try. I'm going to pick up
this little bit here. And let's find a place
that we can start. Let's go right here.
I've got a flat brush. This is just going to me just makes it a
little bit easier. And I can put in the edge of the shadow here
of this building. You're getting a bit of
sharpness in here like that. Okay, comes down. It's actually a little
bit There's actually a lot of light running down the side
of this building still. Okay. What I'm going to soften
that off in a moment. This little lamp cut
around that lamp. There you can still see
these tiny little lamps. Alright? And apart from that, I'm just going to
darken down some of these areas to get in an
indication of this shadow. Okay. But, um, preserving the light on the left-hand side
of the building, see here nice little
sharp edge like that. Cut around that light there. And even inside the look
inside the actual arch itself, there's a little bit
of light in there, so I want to preserve some
of that color around it. I think that kinda weird to the figure is just
where the figures are. I'm going to bring that
wash all the way down. There's actually a
couple of figures, statues here as well. One statue there. I'm going to cut around
the only so that I can remember to put it in
later in a darker color. Using this flat brush
all the way through. It might even be able to add some darker paint
near the base if you want to really draw more
attention to that area. And you've got over here, you can see this whole this wall really just runs
all the way down. Good. Now I'm going to connect this onto this side of the building. Just a bit of warmer
gray color as well. Okay. I'm going to just find
a way to join this on. We've got a little bit of a warmer color because
this building is not these two buildings
here to the right and not exactly to lie. I mean, they've they're actually slightly darker even
though they're yellow. And I can just soften
off an area like that, just getting a little area
of contrast. That's all. Here is basically
where the starts, the the actual side
of the bridge. Okay. So everything else here is
just some warmer color, a little bit of gray, warmer gray color
running through. We can also just leave in
little highlights like that for potential windows
and things as well. You don't have to
color it all in. Okay. This is this actually should be quiet dark this rooftop there. Okay. I'm going to soften off
this part like that. And if you have a
little filbert brush, it makes it a lot easier. You can just soften off this edge so that it
blends a bit better. And even a bit patchy. I think that would be nice to
create some extra contrast. The side of the building, maybe blue in there as well. You have to do this stuff
while the paint is still wet so that it blends
appropriately together. Just going to bring this in, this part of the bridge
to the left like that and bring that down
to the ground there. You can see he's bringing that dark inside of that bridge down. The side of the building
is in the light, so I don't need to touch that
really. Just leave that. Even on the top here
you will notice there are these little bits of the structure that
darker at the top. So I can just add a
touch of that color. Like that. He's soft Nano for touch. A lot of this stuff actually
will getting in beginning in with a final wash. Later on, the final wash, but just a little final
finishing touches. Okay. Good. I'm gonna go ahead and just continue to work on
that one to the right. I'll use a small mop brush for it just so
that it's quicker. This you can even just leaving parts of that building
if you think that it helps create extra contrast, like tiny bits of the
building like this, like for the, I don't know,
some windows or something, but I'd blend it together. There's actually a building
that two bit closer, but it just looks
too too too out of place side of the bridge. All right. Thanks. Sure. That I've
got enough of it in to run through the scene like that. It's just about connecting
all these shapes up as well. Okay. What have we got here?
This side of the roof again and the building. So I'm going to just get that in with the quick wash like that, cut around that statue, touch. Released figures out,
just cut around them. This is just the
drawer out again, a bit of light on that building. It'd be the light
on that side of the building will darken this building and a little
bit in the background to help bring out the details of the light. Soft and off. This will be more light on the left-hand side or
just soften that as well. Kay? Darkness under the
bridge as well. Now just get that in quickly. We'll go give it
another go later on. But I just want to get
in a nice joining on bit like that. Okay. Good, good, good. So I've got a bit of a
light running all around, seen as a bit of light reflecting
even off this building. Here. The rooftops a bit darker, so I can go in and
just get in some of the little bits of
darkness on the roof. And also maybe a bit of darkness in the background
of these areas. This, I don't know,
this silhouette of a building off
in the distance. I can just use that to create
a bit of cutting around. For the other bits
and pieces in here, like that structure here, the shadows already on there. I don't think I need
to do too much. Here. Darken down the rooftops a
little bit cooler color, a bit more coolness down the side as well
here near the foreground. Bring that, bring
that down the page. And it will also leave a bit of the light here on the
side of the building. Maybe just actually
dial that down. A touch shouldn't be so obvious. Especially in this area
behind the statue. That down, okay. It's this area that has a
bit of extra light in it. Then the rest of it, I'm just going to
grade down a bit here. So there's a little bit of
that lab reflecting off the building like that. Even this building here, There's probably no need for me to just leave it
completely white like that. I'm going to go over
the top of it like this and leave a touch
of it unpainted. This will just join
the buildings on. So we've got this more
organic looking shadow shape running through
the entire scene. Here comes the bridge. Using a large mop
brush for this. As it go roughly here. Moving in like that. Actually, I may need
to expand this out of touch like that. Sometimes you just need
to modify things here and there because we've changed
the perspective slightly, have raised the horizon line. Okay, Good. So we've got all the shadows that are just blending together. They're mostly, not mostly, but they're all just mid tones. Okay, great. Now, one last thing
I'm gonna do, a bit of water at the base for the figures so that I can get
in some little reflections, little reflections
of what's going on. So let's just spray
this down a little bit. Realizing that probably
some of it will spread from the from the, what you call it the
sides of the bridge. And I'm just gonna pick up some purple and
a bit of black. Let's drop in some quick
little reflections for these figures. Just running down
the page like this. Quick little
reflections like that. Because that paint is still wet. It nicely joins onto the
legs and creates this. You can see this downward
sort of reflection. We can get a bit on for
the buildings and things. So just in areas where you see maybe a bit
of darkness above, try to reflect a bit
of that darkness down. If it just blends in
with this wall as well. I think it's kinda look better. And keeping in mind
as well, the statues, lot of these statues
is just gonna be dark afterwards anyway. I'm gonna get in a lot of
little darker paint for them. But the important
thing is also just to make sure you're leaving some of the the previous sort of
yellowy wash on there. So it's not all the same color. If it's not dark enough, just make sure you get
back in there again, you're using like a dry brush when you're doing
this to you don't go in there with a really wet
brush because it's going to cause some blooms. Can really just
keep on doing this indefinitely until you're
happy with how it looks. Some, a larger brush
would be good, actually just the larger
flat brush like this. Okay. It's tricky because it tends to dry a lot lighter as well. So you got to redo it quickly when you start
seeing it dry, too light. At the same time,
I'm also trying to darken a bit of the
foreground just to make it, just, just to make it look a
bit more three-dimensional, give it a bit more depth. If you've just got
some darker colors here in the foreground, that's going to help to do that. Okay, as long as
I've got myself, some of the shadows
are the reflections, whatever of the figures
I'm going to be happier, don't want there to
be too much going on. That's a figure. I would just make sure I
get their legs in so that I can quickly connect
them to the shadow, to the reflection below. It's tricky. Trying to do this. You should go all the way down, all the way down the
page and correct them and fiddle with them because
the paper is still wet guys. You don't have to accept what what's on there
until it's completely dried. You only got one shot at this. But while the paper is wet,
do what you need to do. Just dark and the
reflection a little bit for these statues only because I know they will be significantly
darker later on. When I go through and add
that final wash in the scene. So I want it to be
the right value. I want the shadow to
be the right value. And mind you, we can always
feel around and play, play with a few
things here or there. But if we get it in
the first time round, it makes it makes it
look a lot better. And then you can
see here I'm just trying to get in a touch of the darkness of the wall, especially where the
wall touches the ground. Picking up some black paint
and I'm going in fairly, fairly dry with the brush so that it just doesn't
spread too much. Let's give it a try.
59. Prague - Final Touches: Alright, so for
this final stage, I'm gonna be using the
smallest synthetic brushes, little round brush and
a little flat brush. And we're gonna be using really the darkest bits of the paint. So it's again, I'm just going
to mix up purple and black. And it's mostly paint, maybe 70 to 80 per cent paint. So I want to almost
at the darkest points that you can get it. Okay? And what we're gonna do
is just start putting in the final finishing touches. And one thing I've
noticed is these statues, they do need some
extra work on them. So I'm gonna go ahead and just paint some of these statues, especially this
one here closer up and work on a little bit
of the details of it. It's just a
silhouette, remember, so we don't need to
floss or anything, but at the same time I want to want to make sure I
depicted accurately. So as you can see, it's pretty much
the darkest area of the painting and there are still some lighter
bits on it as well. So you can just leave out a little bit of light
in bits and pieces. As you go. Imply what's,
what's happening. Okay? And take a look here. This is this part here. Joins on, comes with a down. Mostly just a silhouette. I don't need to
imply much in there. Brown, bit more brown actually. Like that. And it just joins on here. Okay. To the bottom of the bridge. And there's also a bit
of this bottom part of the platform that
it sits on as well, that needs to be
incorporated in there. Okay. Here is that wall
all the way back there and just need to really make sure I've got
this wall in a bit better. Or at least a few little
dry brush strokes running in here anyway, to indicate where it
touches the ground, where it sort of finishes. That is even a couple of figures here in the
background like this. These two little statues. We can just get in a little bit of darkness there for
the statues like that. Darker actually has to be
darker than the background. A little bit. This is the lamp. Another lamp here
off in the distance. Can get in some little
details for the lamp. Okay. Couple of like that. This one here as well. We can just get it in a
bit of the details for it. And sum the intricate
details inside the lamp that just kind of draw it in with the brush. That's
all you're doing. Okay. That's that's good enough. There is a lamp here as well. I can barely see it, but it is off often the
distance I can just put it in like that and always
bring back bits of the yellow as well
if it's too much. Okay. And again, just,
I'm going to put in a little bit of
color underneath, a little bit of darkness
underneath to further bring out this bridge. It's actually. Not sharp enough. It's hard to see exactly what
is happening down there. But this is why
this little bit of dry brush I'm doing here
makes it worthwhile. You can just feather
in a little bit and slowly bring out details. Okay, good. The statues as well here
look or we can just go in and start putting
in a bit of the details. Essentially, like I said,
it's just a silhouette. If you can get it all in one go. That's the ideal situation. Okay? Literally just sort
of going off and seeing what I can get away with. In here. Here we go a little bit
more detail on the sides of the buildings to get in tiny elements of shadows
and bits and pieces. Okay, so e.g. here, I've noticed behind this building is actually it's actually
a lot darker. So I can just go in and get
that in with a quick wash. Like that. This is actually, this actually
joins onto that building. So that's okay. Like that. Just mixing a bit of
that cooler gray color. And you have it. What are these rooftops? Just do this one quickly. Dark of rooftop
behind like that. You can also start to get in a little bit more of the
details of the building. It's not necessary, but you
see how you can cut around and imply that there's
a little bit more of, a little bit more structure in detail to this
C Look at that, just sort of cut into it like that and just
give it a bit more. Styling, a stylistic
sort of look. The architecture is
actually quite tricky. This is just a
quick way to do it. There's even, you can see here just these little marks
across the page like this signifies the
part of the building. There's these little
bits here as well. They can be like
Windows or whatever. You just put them on with the with the flat
brush like this. That much that much
modification at all. Just pick up that paint straight off the pallet
and just drop it in. You can get in some little
indications of these windows. Make sure you keep
your brush is dry as possible as well for
this so that it doesn't, we don't get too
much spreading of the paint all over the place can be quite annoying if it starts going everywhere
and you lose, you lose control over
what's happening. Okay, Let's have a look. What else can we do like e.g. here I can just start putting in a few little bits and pieces. All the building, even like
on the sides of the building, you can see this tiny
little tiny little areas of it that just
darker like that. Okay, and you can
just imply this sort of effect. Connect it up. And I go back in
again and get some of those darker sections
in like that. And also the top part of the
building you see here just leaves spires that
go up into the sky. Use a good opportunity to work, work than the n quickly. Okay. There's even a
little shadow here. I can barely see it, but
I'll just put in something. They're little windows and little bits here that
can be a little window. Here. Again, another window. I think there's probably
something around the back there. I can't tell exactly, but, you know, there's a lot of little things
going on in here. It's difficult to see exactly what is happening, but I can, I think the dry brush might
be better for this just to indicate some details. But I don't want
to I don't want it to overwhelm what's
happening here. Whoops. More on the more on the
actual bridge itself, the arch archway here. Just going to drop in a bit
of paint around the edges. And this is going to
bring out the light a lot more actually on the bridge. In the bridge actually there is a little bit more darkness
in here, like in there. And then actually it goes a
little more darker in here, but still very yellowy. So I can just imply touch that, just darken that down on
the inside like that. Good yellowy color. That in there. Back to the purple and
the black mixed together. Here's another,
something I can bring out these buildings
in the background, these tiny little windows
off in the distance and some little work
for the the tower, top parts of the towers
or the domes like that. Okay. Separations and the
buildings can help as well. It's all pretty much a
lot of light back there, so there's not much I can do. But I can put in
this building here, can just see the rooftop
of a building or something coming across behind. And that will form a tiny
bit of negative shape. Here for the the light side of the tower is putting some of these bits and pieces
on top as well like that. That's okay. Getting a really light
wash of something up here just to dirty
it up a little bit. It's not actually that
so much light in there. There's some little
bits of gray into mixed with everything and just makes it look more natural. I think when you do this so that the light
still sticks out, but yeah, you've got some darker bricks and
stuff in there as well. I think that's important. Too much sharpness can
just be a bit jarring. Okay, Let's have a
look at this building. There's a bit of that. There are these couple
of darker spots, windows and other
dark spot here. We're just picking
out really the the windows indicating them
with dark, darkness in there. We drop that in
quickly like that. Couple smaller structures or Windows like that up
the top here as well. Now it becomes tricky to see
exactly what we're painting, but that kinda looks like a shadow or something.
Behind that. Also is a darker building which has just a little bit darker. So I can get in a touch of that shadow here, that there are more black as well for these little
spires are points that go up. To the sky. And some of these, I'm
actually going to get in with a touch of gouache as well. But just good to start
off with something, an indication of something in their first maybe a touch of darkness underneath
this building as well, something like that. A bit more darkness
behind it and join up that darkness maybe
with this shadow here. Small bits in pieces. I think this is a this is a
statue I forgot to put in, just get that in quickly. At this building. The window here like that. Now the window behind
and a window here. Just a little darkness
underneath the rooftops. I'm going to darken these
rooftops down a touch. Separate them from
the sky a bit. But I still want it to be
a quick wash like that. And some of the previous
wash left there like a Buddhist of the
visible light still on there. This is kinda like a
completely horizontal line. Whoops, that bring that
down, connected up. Again, I think another sharper, sharper thing like
that would be good. That building still showing
through that other wash. I can create some extra shadows. So just some indications
of some shadows like that. A pretty light shadows
but still can even do it here by getting a little bit
of a something like this. Small little windows
where we can put them in. A lot of stuff going on in the
rooftops of this building. And I will just indicate like some tiny bits of
darkness in here, but I don't want to do too much. I think it's just to kinda help balance out
everything else. Even here you can see this
like I mentioned before, this little buildings all
the way in the background. Continue modifying and I'm
going to add some more brown into the buildings. Touch a brown that in here. Width, re-wet some of that
area and just feather, feather a bit of it in. I just get more
darkness and also the brown and this significantly, I guess it's part of the scene to keep the color
schemes exactly as they appear in the reference, but it is a bit warmer than
what I've portrayed it. I'm going to actually go
over this one as well to join it up a bit and
create some more warmth. That left-hand side. This slide, slowly working your way through it and
creating more detail. That's what brings your
painting together. Once you've got all those
larger washes in there, It's this little stuff, little bits of fixing
up and modifying. Forgotten to put
some windows here, I will just add someone
saw this building that was wonky at the bottom. That looks better. Good. I'll add a touch more warmth
from this building as well. Um, and finish that one off. The distance here. That up a little bit. More darkness up
in there as well. You can see it's just a lot of this slow slow work starts
to bring things together. I'll put on, let's put on
some of the details for these figures or get the
silhouette of these. It's pretty dark to see
what's exactly going on. Maybe put a bit of red for
the head of this one here to the right will be read. And for these ones to
just a touch of red. I think there's
one here as well. With these figures, we just want to make
them pretty dark. I don't want to imply too much. We can actually get in
some of the gouache, some gouache afterwards to further bring out the
details of these figures. But for the time being, just focus on getting a quick
little silhouette of them. As you can see. The legs, I'm just going to feather
in the ground like this. Just a quick little
something like that. There's one here as
well. Look at that. Just head going forwards
or something and a couple of legs like that. Quickly going through. I think these ones are gonna be interesting because they're more contrast it against the
light in the background. So I want to make
those pretty dark. And this one as well, we've got to make sure
this one is kinda darker. The moving closer to the
foreground, of course. Here's a lake and
here's another leg. Here. Oops, too, too big, but we'll make do here. Another figure, perhaps walking to the right or something, or planning to walk
towards the right. So just a bit of
detail like that. Really just trying to further the brushstrokes in
so that they don't overpower and blend
in a little bit with these reflections
in the ground as well. You can see little, few more, little
finishing touches again with the with the darker paint. Okay. Give it a quick dry and some final touches
with the gouache. I'm going to pick up that
same little flat brush or a little round brushes. We're going to
work well to K and it's getting a little
bit of these highlights. Okay. I'm going over the shoulders of the
figures like that. Um, this one here. A little bit of highlights, lighter highlights for some
of these bits and pieces. Mix a bit of blue, cerulean blue in
with the gouache. Get myself a touch of Bluish looking color. Maybe I can just feather bit
of that into this figure. Tiny bit of that in
for that figure. Just to put some color in
there and keep it interesting. Bit more detail.
Back to the gouache. And I'm also just use this to bring back some
little highlights on the buildings. At the top. Here. Little bits here as well. Little touches of light. I'm mixing a bit of yellow
so that I can just get the lamps is little
color of the lamps in something like that. Because everything else
is quite desaturated. So when you put in
a bit of yellow, really pops out like that. See, you can also just bring out little highlights
from the figures and bits and pieces from the, from the yellow reflected
yellow of the lamps. Just, just mixing, mixing a
little bit of yellow with the gouache makes it look
a bit more interesting. And these little
spots of color show up in areas on the buildings. On the statues on top of the this little side
of the bridge as well. See, you can just get a bit of light running off
in areas. Okay. Touch of that on there. More white lips coming up to
the top of this building. He's spires that have
extended up here as well, forgotten to get some
of this stuff in. But these background
bits and pieces, you can go here just
dropping a few bits of gouache in there as well
to lighten it up in areas. Create a bit of extra
detail. We're done.
60. Burano - Drawing, Light: Alrighty, So this reference
photo is a scene of Borodino. And I really liked
this one because everything in the background
is basically silhouette. You can see a whole
bunch of colors here. But I want to simplify this down really so that it's just
a lot of gray back there, perhaps a bit of
light on the building right on the middle
right-hand corner. But apart from that, I
just want to highlight how simple it is to get the
shape of these buildings in, make them look like buildings. Work on. Some of them went into wet. And also getting these
figures beautiful, nice warm light here on the ground as well,
just preserving that. So let's go ahead and get
started on the drawing. And I'm going to firstly look at roughly where the buildings connect them with the ground
and they're about here. There's a sliver this much. We have a look here.
Probably. I mean, it's not even a quarter of
the way we went to half of the ways that we could probably
put in line about here. Okay. It's not a quarter,
but just under a quarter of the way
through the scene. You've got that in, and that's the most important part you
need to estimate correctly. You've got figures, you've got people just walking
around in here. But what we wanna do is getting these buildings
in the background and notice how the
building is also join on the right-hand side
to the foreground, some figures and
closer up figures. So hopefully we can get into
some indication of these. Think is closer to us as well. So I want to work on
firstly, this building here, and it goes up out here nearly half the
way through the page, and then about a
third of the way in. So let's have a look about
a third of the way in here. A third of the way. So always look at
the objects and figure out where
they start based on basically the
size of the paper. So you can see roughly
goes in but half a wave, a little bit, little bit
less than half of the way. And I don't have to worry about them because we know
that it hits the ground. It's a little bit, we've got
this interesting rooftop goes like this and comes down. Another thing that, that comes down again like this. There we have it side of the building and
actually fair bit of it, it's just kinda cut off
behind this building here, which is, let's have a look. And it goes, let me
simplify this down. So this implies one down. I mean, so that
one coming up like that like that roughly. Okay. It's like a couple of buildings, just a couple of
couple of the MAC. The rooftop is, they're
difficult to see the rooftop. But it has this sort of
shape as you can see. Underneath, like that. Probably goes up a
little bit more there. These are just two buildings. Will make them come
all the way down to the ground like this. Notice how this line on the second building here finishes about halfway
through the page. Again, we're using the
paper and the guidelines, the natural guidelines
of the paper to just help pinpoint
where to put the objects. Very important thing to do. Okay, so here is another one. This is a little
shade or something. Still. I'm putting this in. But whether I actually
keep it or it just turns into a hole, simple shape, It's
really up to you. I'm, I'm thinking I might actually simplify
this down a bit more. Have some darkness
underneath there. But a lot of this will
just be one big shape. I'm just going to get all of
us, all of it wet into wet. And then on the second wash, we can bring out some of the
sharpness of the details. There's another one here. It's a simplified building. Really. There's like one that a
lot of these buildings, they come in and they
look so complicated. And I think at times you just have to simplify
them down and find a way to just find the basic shapes that here you can see it's
kind of like this. And see it's almost like
a triangular shape here, comes up like that. That's like a roof
part of this building. And then it just
comes down like this. And we've got side of
the building here. There's even a chimney there. It just pops right up here. And it's just a squarish
shaped chimney. Could be important as
well because we want wanna get in a bit more
of this 3D shape on the left side of the
chimney is helps to just basically make it look a bit more
three-dimensional. That comes down again on the
side of the house like that. We have it there. There. There. And we've got all this stuff in the
foreground coming through. And actually the umbrella runs up to about the middle
of the page here. Some kinda get it more of an angle at
more of an angle here. These are kinda like the
how would you call it like the little umbrella bits
underneath like that. It will kind of umbrella frills. And behind there are more buildings and more
bits of detail and things. This is actually some
top of building there. They can't really see it, but there are some windows on here in the background
and there's even some type of shade here. I didn't miss that
out like that, just a little shade
like that and another one even here like that. Some of these little bits
are important because they bring out the
lights of the scene. And especially when we want to imply extra details and
the source of light, the direction where the
light is coming in. Little things like that really, really help the buildings. There are actually
little windows on it. I will not spend a whole lot
of time doing this because my main goal here is just to get a silhouette
of the buildings. This tower is well comes up
here and she had forgotten, but there is a tiny little, um, there's another part
of a building key actually kinda just
goes off behind. Whoops. Just rub that out a bit. Like a slither of a building
just running behind that house and down
and there's like, looks like a chimney or
something like that. Simple. But behind that is, of course, this large tower. And we want to also estimate roughly
where does it finish? I'd say about here,
there's a bit of room at the top of the paper, so I want to leave a
bit of room up there. This is, again, just
gonna be a silhouette, so I don't want to spend
too much time on this. Here's a bit of this 3D sort of the tower like that as well. Finding ways to just
simplify this down two guys. So bring that down
like that. Okay. Probably the left-hand side
here is just a bit too wide. Touch to touch too wide. I'm going to just work on this a little bit more like that. Tiny bit of that
side of the building sticking out to the left. That the song is actually kind of tricky to draw because there's a lot more
precision involved here. And here the base is, well, a little bit of this side
of the building coming in. It's barely visible
with soldiers can be a silhouette at
the end of the day. But little separations help and just implying details in here. This is a capillary is
little windows up the top. Okay. Let's have a look at down below. How can we get in? We've
got so many figures. I mean, here in the foreground
there's racks of clothing. It looks it's really hard to
tell exactly what they are. They could be kind
of like towels, rugs, racks of clothing. I'm not exactly sure
what they all are, but this is an opportunity
that I can use to get in some colors and imply that they are perhaps clothing or
something like that. But we have figures. And this is different because we've got
the figures up here. And you notice that
their heads roughly just above the horizon
line like here. But the figures here sitting down into their
heads are going to be lower than the horizon line. And also they're gonna be larger because they're closer
to the foreground. So always keep in mind
in terms of perspective. In terms of perspective. What makes sense? That's kind of like a
nose or something that figure the head side, side of the head there. He's an arm in the back
of the clothing there. There's another figure here. Here with these head. I'm doing here. Heads like kinda off on a bit of a clunky might be eating
something or whatever here. Okay. Now the person's head here. We've got another person here. Probably be more straightforward
to draw the chin here. Some Sienese. Okay. There's another
figure also here. They're all just
sitting at this table. This one's too close,
but they're all just sitting at the table together having nice lunch. We can get in more details
because of course, the closer these figures, a closer table is
actually further down. You can just see it
come out like here. And there's a bit of
darkness under the table. There's a person here as well. I'm just going to get a
facing knows maybe in the math here and just
the hair running behind. So it looks like a bunch
of people just sitting together having a good chat, having good chat, and
hanging out for lunch. Okay. Let's have a look. This one here is a bit, is a bit awkward, but can put an ear here,
something like that. This figure, this person here. I'm just sort of closer. You can almost see a hand here. Just put in an
indication of her hand. So very loose. Of course. I don't want to spend too
much time doing this. Adding in these details. The table here, occasionally
just running across. Joining up, joining up everyone. Okay, good. So there's a bit
of a story here, but there's something going on. More figures. One, I'll get into some more
figures here in the back and simplify these so far
these down as you can see, some legs, sometimes some people walking off in the
distance as well. They get smaller
in the distance. Always remember, that's
something you need to do. Make sure that figure
is becomes smaller. Because if you
make them too big, they're going to
look like giants hanging around in
the background. We don't want that cup
with another figure here. Just correct the leg a bit. And there's a couple just
walking here like these two is getting some hair
there for that figure. Walking together. That lots of lots of
stuff going on in here. It's really up to
you how much detail you want to add in
for the figures. This is interesting. There's like a little
umbrella, Yeah, like that. I'm going to emphasize that more more a little bit
more of an umbrella. Okay. Stem of the umbrella
there as well. Figures sometimes
in down and stuff, but that's just more of a quick, quick thing that we
can add in there. Like how these two almost
look like they could be conversing are
talking about something. So I can hand moving up
or something like that. But I think this is a
good start withdrawing. Good plan. We can now go ahead
and get in some color. So first thing I'm gonna
do is work on the sky. I'm just going to put
in a nice light wash of cerulean blue. Very light wash of cerulean blue starting rod
out at the top. It's mostly just
water, 90% water. And moving down, I'll cut
around also the tower. Very important to cut around the buildings because
we don't want any blue really in
the not yet anyway, Once we need to put in firstly
a warmer wash of coloring. So this is just to get a bit of that sky in not too much detail. Just a little bit of cutting
around the buildings. Don't need to be pedantic
about it because some of it's going to mix in
any way into the buildings. I don't want it to be too sharp. That's a thing that you
gotta be careful of as well. The board is a two shot
between everything. It just looks it
looks unnatural. So what I mean by that
is, you notice here look, it's just kind of wet all
over and all the areas. So I might want to go in and add some color now
to the building. Before I do that, I'm going to pick up
a touch of purple. And I want to drop in some, something into the sky, maybe with some
neutral tint as well. Just a little bit of a cloud and indication of a
cloud or something here. I'll just change up
the sky a little bit, make it look more interesting
than just soft clouds. I don't want them
to be too dark, but the ones at the top
tend to be a lot larger. So then you can drop in
some small ones here. And then it starts
to make sense. Something like that is fine. So I want to go
into the building. This is just some burnt sienna. I think that's just
a really warm color. I've also got some
normal brown here. Then I can mix in just
some raw amber. Ok. And we'll bring that down
and look what happens. It sort of. Some of it goes
into the sky wash, but I don't want too much
of it to go in there, so I'm just cutting
around a bit. Some of it will go in the game, but don't worry yourself,
just continue on. We just want to get a quick
wash of color in there. It's all we want. Quick wash of color as you move down the page becomes a bit easier because there's nothing
really touching the sky. But further down. Look at this. We've got a bit of orange
that's printed in orange here. And here. She opportunity
to get into some, some quick little colors. Here. I'm just gonna put in some yellow ocher for
this building here. But if you a little bit of
brown underneath, there we go. All I'm doing is just
putting in some of these warm colors and
make them do the thing. Not concerned about
accuracy here. Here I've got a little bit
of this buff titanium. It's kind of a whitish color. I'm going to drop that in
and leave this umbrella out. Getting maximum contrast
for that umbrella. Really what we're
doing is we're putting in a nice warm wash of color. Very, very light as well. You're talking I'm
talking basically, most of it's just water. 2010, 20% paint is the
max you want to use here. Put in some colors as well. This is some vibrant orange
I've just gotten here. Some of these buildings
have notice that just got more orangey kind of filtering. It's on here, it's just move
on to the right-hand side. Down here, cutting around
some of these shades as well, these white parts
of the building. This is actually funny because we've got
some blue in here. So I just put of ultramarine
just to cool it down. A dull it down a bit. I'll add in some
black in that area, so it just becomes a cooler,
cooler, bluey color. Up the top here. I'm just going to blend
that in like that. I'll probably darken that
a bit more later on. As we come down further to
the front of the scene, I'm just picking up more of
this buff titanium color, which is again just
a off-white color. You can mix these up
yourself even if you've just got some gray, just dilute that gray down. Should be sufficient. Okay. I'm just trying to get in a nice neutral wash of color. The k has a bit of warmth to it, but it's mostly this
off-white color. And you'll notice like
all the figures here, everything here is has
this grayish light, grayish tinge to it. It's not much saturation
or detail in there at all. Okay. Good. So that's about it for now. I'm gonna go and
give it a quick dry.
61. Burano - Dark: Hello again In this second
wash. And like I mentioned, most of this is just gonna be a grayish or dulled down color. To mix that, you
have a few options. You can mix a bit of brown
with ultramarine blue. Okay, That gets you a
nice neutral color. So raw umber. If you've got a bit of raw
umber or burnt umber and a bit of ultramarine That works quite well to get in a grayish color mixing something like that
up here on the side. Okay, so that's one example. Another thing you
can do is mix up a bit of the three primary. See blue and your red and your yellow does
the same sort of thing. What I tend to do
nowadays is I have my own pre-mixed gray. This is a bit of
Payne's gray here. And neutral tint
works well to also got a bit of lunar
black on the side. And what I'm doing
is I'm just mixing myself up a neutral color, a bit of red in there,
tiny bit of red. Just warm that up. So I've just got a gray color. And on the side you can see I've also got some blue
bluish gray here. Good. Because you
want to alternate the gray so that
you don't have the same gray running through
absolutely everything. It's always it's always tricky. Okay. Good. So you're talking about a
mixture of 50%, 50% water. And I'm going to actually use a more darker one up the top
here with a more brown in it. Remember, we're doing this
all in one wash coming down. Look at that which
is going to get in this side of the tower. Coming down. And look, I'm trying
to do this quickly, but at least with some conviction in my
brushstrokes here. Okay, there, look at that just a bit of this
and you can leave out a touch of the
previous wash as well, like what I'm doing here, getting little highlights
on the building. Okay. But mostly you just
want to polymers even. Look at that. I'm using the paint quite thick
on here as well, so that it doesn't run. Just does the job gets in there, stays where it's meant to stay and bringing this
down. Okay. Look at that. And you notice look,
I'm just leaving again, some little highlights, little yellow highlights
and areas as well. Not all over the place, but just in parts. To keep it looking interesting. We want it significantly
darker than the sky. Okay, there we go. We brought that all the way
down into the foreground. Now, sorry, the
midground buildings. Okay. Let's have a look. Let's work on these ones now. The rooftop here, I
think this needs to have some type of sharp shadow, just like the
reference indicates. Sharper sort of shadow if
I accidentally gone too far up to the sky like this. Okay. How it just cuts over the
top of that building, forms a nice sharp shadow. And also underneath the
building here you've got a bit of shadow. Okay. Let's be the shadow. Putting a bit more
here and here. Bit more here. There we go. That just becomes
a darker shadow forming on top of this building. I'm going to try not
to fiddle too much around with it as well. You can. If you're not careful, I find starts looking unnatural
when you do too much. Coming down. And I can see here
underneath, you know, you've got this brownie color. I'm mixing a bit touch of blue into it as well just to get in a little more coolness. Okay, That's why I love having different kinds of
colors in here. Different kinds of grace. Because when you mix the mean, you can get these
beautiful blends just happening on the paper. Okay. Coming down here, I've haven't had a really
remix anything. Just pick it up
straight off the page. The palette, sorry, like that. Look and I'm just cutting around here the figures as well. Okay. I might actually mix up a
little bit more blue and purple here just
to more corners. Okay? The big thing
for me is just making sure that I've got this
all these buildings. One big sort of silhouette. And cutting around
these shades as well. Doesn't have to be perfect. It doesn't have to be perfect, but it does have to
look intentional. Your brushstrokes have
to look intentional, like this, like deliberate. Even if they're not perfect. There's a lot of colors
in these buildings, a lot going on. But notice how I'm just
simplifying down everything. Here. You can see this
building coming up like that, enjoining onto the
tower a little there. This is just one color. Okay. Here's where I might
want to exaggerate something. So this could be a bit of darkness here for this
building or the rooftop. But I could leave the
right-hand side exposed a bit more to create
generate more lights, make it look like
there's more light on that side of the building. Okay. Is is kind of the building sticking
out here in front? I can just play around with that and just get this better, better sort of side of
the building like that. There I can start putting in the side of this
building like this. And again, just play around
with the light that could be reflecting off parts
of that roof here. And on the side of
this roof here, that could be some light here
on that side of the roof. And not only that,
but this building, we could have more light running off hitting the side
of this building. Okay. Bring that all the
way down to the figures. The figures might just
actually soften this a bit. And just soften, add a
bit of water in there. That blue gonna get in at touch of this
shadow here on the side of the chimney or whatever
you call it there. Look at that. Just running
down the side of the house. Easy. So it seems looking around. What else we can add on here. Okay. That's looking, I think that's looking decent for those
background buildings. I'm going to just
work on these spirit of the umbrella,
this shade here. This is going to be again, one large shape, okay. Running down in
the foreground and I'm cooling it down
and also darkening this touch so I can
get extra contrast. Make it come forward little bit. Darker. Buildings here
in the background. Just soften this off
the beaten add-on, a bit of water there. Okay. And again, all you
have here is just all this bits and pieces of
the fabric and everything. It doesn't matter
exactly what it is. I just want to create a shape. Basic shape coming through here. Connecting on,
connecting the buildings on the foreground a bit. Usability is funny. Off white color as well. Sometimes pick up red
and a bit of white, mix those together and we
get a nice colorful face. You can also mix in a bit
of brown if you'd like. It's up to you. Just a quick little indication there of the faces
of the figures. Okay. Good. I'm gonna get in a little shadow across the ground though. So for some of these buildings, and you can see
that they just sort of stretched towards
the left like this and cut through the center
of some of these figures. Okay, So mostly these buildings here in the back
that you need to do, you can see that shadow. The shadow is just run towards the left side of the scene. Connecting on with the figures and in the middle of
them anyway, like that. You can even emphasize
a bit more, have them, have the shadows come off
on more of a tangent. As you can see, what
I'm doing here, just a bit more of a, of an angle, sharper angle. In the reference photo, they going off more on a
more of a horizontal angle. Notice everything just
joins on with each other. In the shadows, join on
with everything. Okay. Still this is still
the second wash. We've got more to come. More to come. I'm
going to get in a bit of darkness where the hair and things like
that for these figures. Okay, and again, it's
not to detail much, it's just adding a bit
of darkness in here. And because it's
so dark in here, it's very difficult to tell what color the hair everyone has, but you can put in a bit
of new indications like this lady look like
she's got some kind of windy looking here. This one he used well
but D saturated. So I've put in some, some gray first and then
I'll add in the color there. Like that. You might play
with a bit of brown, for instance, for
this lady here. So a lot of wet-in-wet work and not not much detail at all. Just a bit of wet and wet work. There's actually a
lot of this stuff. A lot of this stuff
is just is just gray. It's gray colors in here. You're bringing out details
of the figures in there, but really, at the
end of the day, we're just indicating. Okay. Good. Let me just join up
this table as well. Nice light wash of color. It's not even any specific
colleges to be gray. And you can see all the figures and everyone
off in the background. And here's your opportunity. I mean, I just pick up a bit of neutral tint straight off. And it's quite a
dark neutral tint. And I'm going to go in
and getting some colors, some details for the
legs of the figures. So this one here, having
a look at the reference, we can see it's kind of
just coming down like that. And the other one, Let's
have a look like that. You can simplify them down. You don't need to detail much, just use a sharp edged brush. I mean, it can be something
like a flat brush like what I'm using now it
just be a normal round brush. Round brushes tend to be
what people usually use. I've started to actually
flip and change too, to flat brushes recently. Just like the shape
that it makes, seems to be more
irregular at times. I don't mind that. There's a couple there. You don't need to connect
up all the legs as well. You can just have them skip over the
edge like that. Okay. There's another figure walking
in the shadow like that. Okay. Dropping a bit of water
and that's getting a soft shadow running to the
left-hand side on an angle. Just join them up. Just a bit of little shadow just joining up the figure
on the ground. These figures on the ground, like that, running off to
the left on a basic angle. One here is well,
maybe like that. Simple, simple little things. Okay, Got it could
be another one. Another one here in
the distance as well. Implying stuff that's
there up to you, whether you want to put
any colors and things for the shirts and clothing
as well, we fit for me. I like to drop in
a touch of color. In areas like the
left-hand side. I'll leave the
right-hand side exposed to emphasize that
feeling of light. But for instance here
I might think, hey, this person might look
nice wearing a bit of a cooler shirt,
cola colored shirt. So adding a touch of
that in there like that. Okay. This person here
on the right-hand side, I'll just dial it down
and add on something like this just to be pink
or something. Warm. Woman color. Lift off some of that paint. Such a touch of color running
through there, something. Okay. What else do we have?
Got a few more figures here in the distance. These two figures as well, just having a bit
of a chat there. Okay. Good. I have noticed that
there is a shadow just joining here on
the ground as well, just the tables and
things like that. There. I'm going to go in and
add in some more of this darkness into this
area while it's still wet. Even in the background
of this figure, there is a shadow cast
by the buildings. So there's not really
any light behind. Simplify. Simplify this down. Touch a blue back here. Right? Let's give
this a quick dry.
62. Burano - Final Touches: Okay, time for the
final little details. I'm going to pick up
some neutral tint. You in the palette.
Just darker color, dry off that brush. And it's just touching go from
this point onwards to get into some final
bits of darkness. So start off here on
the, on the tower. So probably a little bit
underneath here would be good. Underneath the triangular part and I can just outline the triangular bit as well
a little like that. Okay. It's, I find that this little dry
brush that you add on at the end brings
everything together. And you just have to
use it very sparingly. It's kinda like
detailing really. You just detailing
with the brush. While we say drawing is
so important because you end up having to do the same thing with
the brush anyway. But the trick is you applied on quickly and then
you just let go. You don't hang around there for too long
and try to detail everything because it
starts to look overworked. Coupled windows like that. It's tricky to find
that balance side, that nova side here. And then just finding ways
to simplify this down. Little details in there
without going overboard. Okay. Something connecting
up to the sky, these little the top of
the tower like that. We are potent that you dry the brush off
a little bit as well. First, here I'm just going to add in a little bit of
darkness on that building. All this is I say this just
touched and go type of work. There's something here you
can see these sort of, it's like a little window
here, funny shaped window. It's just something like
that. Not much at all. Touch of shadow, extra
shadow underneath here. Third one, I'll just
emphasize a bit of that. Not only that, but
also here like that. Um, it's kinda tricky with
the sides of these buildings, but you can get inability. Outline of the roof like that. I mean, you can even
see some little windows behind something
like that as well. Less is more, in this case, this is definitely more
underneath here as well. You might find, I see anyway
that there's extra contrast. So I'm going to
have a go at that, just adding more darkness here. Underneath. The advantage of this is also you can cut around these figures and make
them pop out more. But like I said, I'd just like to do this
touch and go thing. Not too much time in there. Can even just spray
it a little bit. To encourage it
to move slightly, just blend in better. Here's some windows to separation between
these two buildings here there's like a couple of windows or more than
a couple of hours, a few windows and you
just drew room in. Just like that. More here. Here's one on this
side of the building. And I don't want to make them look exactly like the
reference photo as well, because I'm gonna be doing that. I'm going to be trying
to make that look like a window for too long and it's going to disrupt the
flow of the scene. Here, I've just tried
to add in a bit of dark color around the
edge of that figure. Okay. What else do we have? Little bit of this darkness
up here for this umbrella. Here we can put in a better color hair color for the figure, like this one here in the front, just a bit of darker
color for the hair. I've just picked up some brown. This is the point
we just detailing. You're not I'm not trying to put in too much in there,
but same time. You want to make sure that anything that you
might have missed out or not implied enough
is present here. Everything here is
actually pretty dark. In the foreground. Figures, these figures just
sort of sitting around and you can see just some of their clothes and things
like that as well. Just blend on, melt into things and I
can pick up liabilities. This is some cerulean blue. Or I can mix with some gouache. And getting this denim and a collared shirt that
these ladies wearing. I mean, you can't really see it. But there's just a touch
of corners in there, something like that. Okay. And also this lady,
she's wearing some other shirt on there. Okay. I'm getting some new features
for their faces as well. Let me just quickly
getting some little bit. Not much, but to see These two are just
sitting closer. And this lady here is
wearing some darker glasses. Glasses. The hair brown hair depends how long
you mean you can spend a lot more time on these. But for me it's just I just want to imply
what's happening in there, not sit here all day. You can also see underneath the table here There's actually a really sharp line and
dark, darkness under this. I can just blend that on that and create a bit of contrast like
that on the table. And this is just a
bit of drawing that I'm trying to do as
well with the brush. Outline, the table,
the touch like that. Can do it for things
out at the back. At this dislike, it'd
be umbrella as well. You can just do
something like that. Little umbrella here. Put on a few little birds
off in the distance. Maybe just a few up the
top here. New tower. A few more further down. To spread out of touch. A touch of white gouache.
Finish this off. Bring out some highlights. Some of the heads of the
figures in the shoulder, the back of the figure as well. We can get in like that. Just a quick
indication like that. Little bit of blue in it. If the gouache mix together sometimes helps if I
just drop in a bit underneath the buildings
and these dark areas. Just to create some interests, areas of interest
in the buildings. The frames as well have, some of the frames
of these windows have little bits
of white in them. You can just drop in a
bit of a little color like that. That's finished.
 Watercolour Mentor (Darren Yeo Artist), Art Classes, Mentoring & Inspiration!