Transcripts
1. Chapter 1a Rabbit: Hey guys and welcome to
mastering the models. Shoot video three, creativity. Thank you so very much
for buying our products. Now, this video is a real special one because I
can talk about techniques, I can talk about lighting,
coaching your model. And it's all the stuff that, well, it's pretty
standard, right? Of course it's not standard because everybody
does it differently. But creativity, that's where the soul
of a shelf comes in. That's where you are
talking from your heart. That's the part where you, which your creativity
in the shot and go from okay to wow. Now this video is divided
into several chapters, and you can watch those
chapters in new order. We put them in on the video. But you can also watch them
in any order you like. So if you see something
that you like, just go to that part. And we also have a
part on retouching. So enjoy the video and make sure you tell everybody about it because this is video three, and we want to weigh
more to become so enjoy. And if you have any questions, just find us on social media.
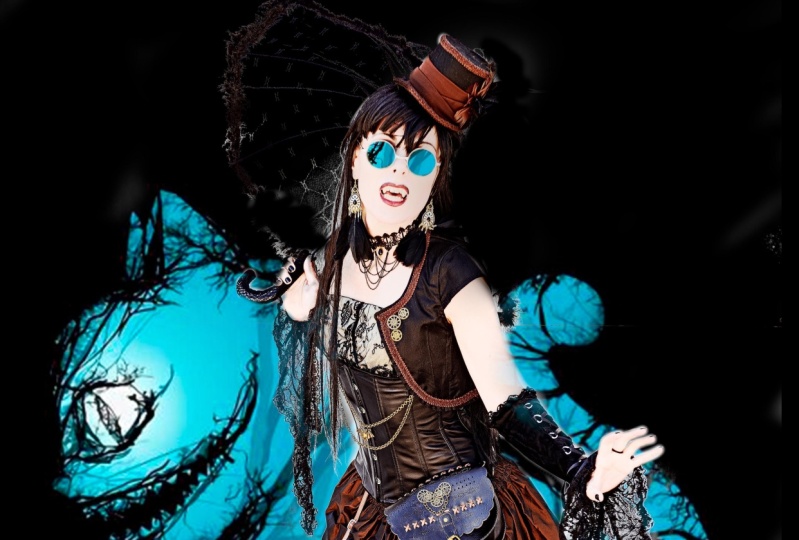
2. Chapter1BRabbitretouch: Hey guys. So I'm going to show you the
retouching from this image. And I chose this image actually because there's something
wrong with this image. And I will tell you
very quickly why. During the photo shoot, what you saw us do
is because the head of the bear was actually
tilted backwards. We use some towels to cover the backside of the bear
to make it look forward. As you can see here, I took one or two test shots where you can actually
still see the towers. And after that, we
covered the towel shop with deferred that
you can see here. Now, this is one of the test
shots and believe it or not, I actually like a test shot
better than the final shots. Now, I always tell you
guys fix as much as you can on location because you don't want to spend
hours in Photoshop. And I'm now stuck
with the problem that I will be stuck in
Photoshop to retouch this, because again, I love this shot and the
other ones are okay, but this one just
has his hazard all. You can see the little tail. I loved the expression
in her posts. I love the way to
bear looks here. I love the lens flares. So this is the image
I have to work with. Now, how do you
remove the towel? Now, what you can actually do is if you look very closely, you can see that you can
copy some further over here and make sure
that it looks okay. But then you will
get something rough. And again, I'm not
a Photoshop wizard. So if I do this, it will look a little bit rough. And I actually did it
already to show you guys. So here we go. This is what I did. I copied some of the
fur and adjust clone it in here and making sure that
I still kept some of this. Now, how did I do this? I actually created an
empty layer and I used to clone tool on all layers, as you can see here on top. Now, if I use all layers, I'm actually cloning on an empty layer, as
you can see here. So this is what I
actually cloned. Now, for me, this is believable, but the problem is,
it's way too harsh. I need something
to wrap around is like the lens flare
because in your original, you can actually
see the lens flare wrapping around the firm. So how do you create
something like this and make this
believable again, the first thing I have to do, and that's the final
part of this retouch, is makes sure that this area
is a little bit less rough. So I use a low
opacity on my brush. There we go. And then in the middle flow, just make sure that this area is a little bit
less than divined. Go. But now when I zoom out, it's still doesn't look right. Now. You see the light actually
wraps around the subject. So we're going to
create it in Photoshop. You're going to make a new
layer, an empty layer. And I'm going to take a big
brush with white paint. And I'm just going
to place it over the areas where I retouched. There we go. Now what I'm gonna do
is I'm going to use a Gaussian blur to spread out that light because I'm actually
painting light. Now, zoom into 100 per cent and make sure
it looks believable. The more I blur, the more I will see from
the original image. And I want, of course, as much as possible from
the original image. This is a little bit too much. Now you can see that
I Photoshopped. So take the blur down. We go. This looks pretty believable. So now when I press Okay, I actually now solve the
problem that I saw the towel. Is it the perfect solution?
No, of course not. I should have solved
this on location, which I actually did. But somehow. And
sometimes it happens. I just like to test shot more so we have to
work with this one. Now, this is one thing that I always do and a lot of
Photoshop retouching, don't do this, but
it's the way I work. As soon as I finished
something and I know I'm done. I always do a layer flattened image to go
to the second part. And this is where we're
going to actually add a little bit of contrast by using a plugin called
McPherson intensify. Okay, so for the next step, I'm going to add some
extra contrast and detail, make the image pop. Now, I love to plugin called megaphone
intensify for this. Now if you don't have a Mac, because this is
Mac only software, you can go to to pass labs and download clarity it we'll
do approximately the same. The first thing I do is
always create a new layer, duplicate layer in this case. Then go to Filters, go to make fun intensify pro. The pro version is actually also has plugins into Photoshop. The non-profit versions
are just standalone, so I always go for
the Pro versions. Now the first thing
I will do is I will go into my presets. And one of the presets
I love, and by the way, all these presets are for
sale on my website for €7.50. So this is a perfect
starting point. And after that you
have to fine tune yourself like I'm
going to do now. I always love this one,
the poppy drama tree. As you can see, it's
really enhances the image. This is the before. This is after it gives you
a little bit more pop. But now let's say I
want a little bit less in the mid tones. You can always go into adjust
and just fine tune it. And this case I know
in the mid tones I just want a little
bit less contrast. Let me go before and after. Now you can also change
the shadow so I'm a little bit more shadow detail. Just play a little bit more with the midtone Contrast and want
to see where it ends up. And I'll actually like
it up a little bit more. There we go. This is cool. Okay. You can play with a lot of these settings and
they're really nice. The thing getting
you can change. I like it a little bit more
aggressive in this image. There we go. And it's all actually
fine tuning the preset. But that's where the presets are four and you have to find them before and after really
loved this and press Apply. Okay, and here you
have two effects. Now what you will
immediately see, and this is one of
the problems because a short F22 and I
changed my lens onset. He said I have a lot of dust or my sensor and actually a
lot more than I expected. Now, you can clone this all out or you can heal it all out, but there's a better way. And I'm going to show
you that very quickly. I'm only going to
show you the start and then the end result. Otherwise it will take
probably too long. You take your brush and
you go into Quick Mask. Now you make the
brush really small. What you do is you just dip over all the dust particles
and do that very fast. Well, okay, At first glance, this looks really
bad and I will make a note to myself,
clean sensor now. But in all honesty,
it's not that bad. Normally there's a lot of
less dust on my sensor. So I do have to clean my sensor, but I'm using a filter called
intensify from Mac fun. And that's really
gives you a lot of detail that you normally would never ever
see on an image. I think 99% of these dust particles will never show up if you don't
use the filter. The filter really gives
that pop in my image. So I love to filter, but makes sure that if you use the filter and you're
shooting on something like F22 that you take into account a little bit
of time to clean it up. So I now selected all
the dust particles, including the ones
that are very, very faint because megaphone intensify really gets
those also into your eyes. And what I now will do is I
will de-select my Quick Mask. There we go. I will go into select an inverse because I only want to dust
particles to be selected. And because I'm on
a separate layer, I'm going to use Edit Fill. I'm going to use Content-Aware with color adaption
and just press Okay. It takes a little
bit of time because it's a 60 megapixel file. But after this,
this problem area, I still have to go through with my Healing Brush because
this is just to dance. So there will be
some dust particles that are actually copied from other areas in which Photoshop thinks that
it's cleaning up. Now this area will
be 100% clean. Okay, so now the sky
looks pretty clean. Now let's zoom in. There will always be
something left because it was rather heavy on the dust. It looks okay. Some smaller
parts you just heal away, which are healing brush. Especially on this area, there will be a little bit
left because there was way too much dust to take
it out 100% correct? A few. But the other side will
be probably very clean. There you go. This is 100% clean.
Okay, Very nice. So now we're gonna go to
the next step and that's where we can attend
to the image. Now, 40 tinting of the image. Now, when it comes straight
out of the camera, It's okay. You see that the image
looks pretty nice. But I always think
that's straight out of the camera is a little
bit lacking in show. I don't know how to explain it, but I always love to
turn my images and maybe that's because I
love analog photography. And with analog photography, you actually choose to film role for the look that you want. With digital, all the files
look exactly the same. They're perfect. As you can say, perfect, right? There are different ways
to change your images. Now, two of the plug-ins
that I use the most are DHL film Peck and
aliens skin exposure. Now for this image, I love to work with aliens can exposure because
I have a certain plug-in that's actually connects to a certain image is a little
bit difficult to explain. I can never say to people, You only need the actual film
pick or you only need to use aliens can exposure because both have
different looks. And for this image, I've actually created a preset
and aliens can exposure, which I think will
fit it perfectly. So first we duplicate a layer
and then we go into Filter, and we go into alien
skin exposure seven. Now these settings you can actually also
by on my websites, I've several packs
like for example, for DHL film bag, for analog affix Pro. And of course make fun. And aliens skin exposure. Now you can, of
course just click. And I was as a joke,
All these two clicker, you click into it until you
see what you like stuff. But in my case, I already
know what I'm gonna do. There's a filter here
called red pulp. This one. Now I really loved this one. Here. If you see the before
and after you see that it's a pretty big difference, especially in the rats. Love that. Now, let's say I want to open up the shadows just a little bit. You can still do that
here in your settings. You can open up the shadows. You can play a little bit
with your highlights. You can really costume
make the look. You can store this, of
course, as a new preset. In this case, I'll undo it because I only have one
image that I will retouch. The only thing I
have to check if, if there's no noise because in this image I don't
want any film grain. So I will put my overall
film grain to 0. So one more time, the
before and after. And I will just press Apply. Now for me, this
concludes the image. It now has the look
I want is retouched. It has to pop that I
really like my images. And if I would've if I would
have taken the towel away, onset like we did in
the later images, the whole retouch
would be pretty fast. The longest time is actually spent on removing the
dust from the sensor, which was very clear after using the Mac phon intensifying. So this is my final image. So here we have two before
and here we have the after. So as you can see, if you take care onset that your
lighting is correct, that you meet it
everything correctly, you don't need a
lot of Photoshop. In essence, the only thing
I do is sharpened my image, remove some dust, and make sure that the
tinting is correct. And the tinting, by the way, I will do for every
image separately. There's only one more thing. You see this. There's a slightly
different color between this part and that part. And that's 100% true because, believe it or not, this
is a different glove. They actually lost one of
the gloss from this suit. So we use the one from the bear. So now how do we create
the same loop here? Well, that's very simple. You go to 100 per cent view and you take your brush and
you go into color mode, now, lower the opacity
to about 50 per cent. And what you actually
do is you sample a color and you
just color it over. And there you go. Now it's
approximately the same color. So that's about all
for this image. Now there's one more thing I sometimes like to
add to an image. And I've been looking at this
image and I really like it, but somehow I think it needs a little bit
more of tinting. And one of the programs that I love to shoot tethered
width is catcher one. Now capture one is a very, very powerful role
comfort or actually all my RAW conversion is done in DHL optics or in capture one. And in this case we use capture one for the
row comforting, but not in unpacking capture
one, I'm looking at it. In catch one, There's always
something called Presets. And you can find them here. Up here, you see
the little piece and it's actually my presets. Now, when I go through my presets and I go
to the warm vintage, I have to be honest
that I like this look a little bit better than
the standard look. So this is the standard look. When I use the warm vintage, It's really adds a little bit
more warmth to the image. And of course, to make
sure you can also try a few other ones that I don't like this as much as on the image as the warm vintage. I actually like the warm
contrast even better. Go. Now because it's
a raw converter, I can still tweak this look. So I go here into my settings. I actually add a little bit
of contrast and protect my highlights just a little bit more or a little bit less. Let me see what I like. More like this. There we go. Now, this is my final image, this is my final tinting. And it's weird that they
use a two-step process, but sometimes the quality
of aliens can expulsion. Do you show film back is
stunning and it's great. But I still use capture one to make the finishing
touch, for example. And I don't know if I can get this exact same look and
capture one as I doing. Aliens can exposure
or DHL film back. But somehow I find if
you combine the two, you get a really unique look. The only thing I
now have to do is make sure that I get a tiff to store and an Internet version. Now, these are
recipes and capture. One, tiff is actually a tiff
uncompressed pro photo, which I store all my hard drive, That's my main original. And the Internet
version is a jpeg. On 82, longest side
can now be 1250. And we use this on
an output folder and we actually put
our logo in there. Okay? So now the only
thing I have to do is process and then the two
images will be created. So one tip for storage and
one JPEG version 40 Internet.
3. Chapter2lensbaby: Hey guys, Now one
of the problems is, of course, creativity. Now, this whole video
is about creativity. And you can do creativity
with your lighting. You can use smoke,
you can use styling or weird outfits like,
let's say a rabbit. But there's also some creativity that you can do with your gear. Now, one of the things
that I really like is the lens and now
actually have on my camera. This is a Lensbaby, but this is a very special one. This is one that you can
actually twist around. Now probably, you know, lens babies from those
lenses that gives you that, that weird in the
middle focus where everybody goes like,
Yeah, that's weird. That's a Lensbaby. And although I do like them, I don't really use them a lot. The one that I do like
is this because this is actually not the one where you put it in the
middle somewhere. This is the one where
you actually shift, or sorry, you don't
shift U tilde. Now, with all the
technical cameras or medium format cameras, you had lenses called
tilt and shift lenses. Now those lenses
made it possible to shoot something
that's actually under an angle and to create
it that it's straight. We all know those
problems, right? You walk somewhere, you see a nice building, you shoot it, shoot it slightly up, and you see all those
comforting verticals going up. So the building looks
more like a pyramid, the hen, what it's
supposed to be. Now, the Tilton shift
lenses make it possible to make those buildings
appear totally straight. So it's an architectural
lens, right? Well, you can also use them for some creative stuff within
your model photography. Now we have Nadine over here and we have the
Lensbaby on here. And what I can do is I can
just change my plane of focus. Now normally when you shoot
an image like this on F4, like we do now, It's a very simple matter of almost
everything will be sharp. So let's start out by just shooting it like you
would normally do. I'm focusing on my model
now remember these are manual focus lenses.
There we go. Awesome, Great. So when using the
normal focusing, you will see that there
is depth and field of, sorry, there's a depth of field almost all over the image. Now what I will do is
I will break my lens. Don't worry, it's
built for that. Okay. Inch and up just a little bit. Look straight into the light. Awesome. As you can see, the effect
is totally different. Now you can see a whole
blurry effect on the bottom, just like with a
normal tear glands. Now, it doesn't shift. Now on these cameras, it doesn't really matter
that it doesn't shift on a medium format cameras
and extreme changes, that's where the
shift comes into play because otherwise you have
dark areas in your image, but with this lens,
you don't need it. Now you can also make
it a little bit looser. And now you can move
it around a little bit easier or you can tighten it. So you can really
just set your focus. If you want to do
something close up, you can actually make
it into a macro lens. So let's go really
close to our model. We go, This is awesome. Now I can come really close
and still get a nice effect. Okay, ice up towards the
light, please. Awesome. So now I have like
the macro effect, but this effect isn't
strong enough for me. So I'm going to tilt my
lens actually even more. That's nice. Awesome. And I can see that the
effect is really strong. Don't want the effects strong. I will just go back to the
middle position in the EVF. I can actually see
exactly what I'm doing. That's pretty nice. That's cool. Chin down just a little bit. That's awesome. Great. So as you can see,
creativity with lenses can also be really fun. So we're gonna do
a few more shots. I'm going to stand all
the way over here. I'm going to create
some more effects. And make sure if you move back, you click that back out to
actually still in macro mode. Really nice meeting. And always keep telling you
models, he's doing nice. That's cool. Awesome.
That's nice. And a few in landscape mode. I always loved landscape and remember you don't have
to move it up and down. You can also move it left
to right or up and down. You can do whatever you want. Just be creative
with your focus. That's nice. I can even make the
blurry areas around. There we go. That's really cool. Okay, so now how do you focus? Of course you have to
do manual focusing. Now, many were focusing
with lenses like this. On an O fie F, that's
an optical few finer, that's what most
cameras nowadays have. A little bit tricky. So what you can
do is you can use the Beck display now on the
Baptist play on some cameras, on most actually, you can use
an option called peaking. Now with peaking, you
can exactly see what is in-focus and what is out focus. Now, because I'm
using a Sony camera, I've an EVF, that's an
electronic viewfinder. And in this case,
that's awesome because now I can actually see
everything that's in-focus. I can see bright yellow. So if I turn around my focus, I can actually see
a bar moving over the wall until the
eyes of the model, until the eyes of the model start blinking pure
yellow and denser. And I know she's in-focus. So that works pretty well. So more creativity with lenses. Try this lens. It breaks, but it's designed to break. So don't try it with a lens that isn't designed to break because, well, it can also
be very creative. So let's go to the next thing.
4. Chapter3lensflareandmist: This is a trick that
I really like to get some real move into a fixture if you don't have
a smoke machine handy. Now, the setup is really simple. We have one stroke on the back, we have some prompts,
and we have our model. Now we're going to light
the model from the bag, creating a high-contrast shot. Now how do we meet or
something like this? Well, if you have my
light meter video, you actually know that
you always have to aim the light media towards the area where the
light is coming from. One is correct on your model. Sounds complicated, right? It isn't. Now let's say I want this
side of my model to be correctly lit and I'm using
an incident meter reading, I would actually
meet her like this. Meaning I would meet it a light falling on debt
part of her face. Now in this case because
I want backlighting, I will actually meet or towards the light source
anymore studio setups, you will always need it
towards the light source. So let's power the meter on. Aimed towards the light source. I got to meet a
reading of f 11.5. F 11.5 means f 115
tenths of an f-stop. Let's say I want to go to F6. So I'm going to add five clicks, 12345, iPhone remote
control in my life meter. So if you don't have
a remote control, you have to walk to
your strokes or use an extra Skype Word or
any other system you use. Okay, Now we're on F6. So I'm going to set
my camera for F6, ISO 100, and we're just
going to take one shot. I'm going to show
you how it looks. And then we're going to start
adding some atmosphere. Going to choose for a lower
angle because I'm shooting up at one delight
inside my frame. Now I have to coach my model. Actually looks a little
bit towards the light. So can you look a little
bit towards light? Very nice. This is already a cool shot. Can you take the hair
a little bit away from your eyes? Really nice. Focusing on the closest side. We go. Now you can already see some
spots on my lens, right? This is dust. I always leave a little
bit of dust on my lens. Now, a lot of people
clear their lenses with with brushes or little
bits pieces of cloth. I always keep my lenses
a little bit dirty with dust because if
I'm shooting back lit, that dust will
actually show up in the image and it creates
a pretty cool effect. I think if I want
to clean lands, I can always clean my
lens very quickly. For example, if I don't
want that effect, but the dust won't show up
when you normally shoot. It will only show up
when shooting backlit. By the way, that's really cool. In-between tip, if you're buying a second hand lens
and it has scratches. And photographer who sells
you the lens as well. You will never see
that in normal use. You want unless you start
shooting back lit scenes. So make sure that if you
buy a lens like that, you test it with
a back-lit scene. And if you see the
scratch down by lens, okay, So there we go and
chin up. Just a little bit. Very nice ice tray
that really cool. But now let's say we want
to add a little bit more. A little bit like
there's a smoke machine, but there is no smoke machine. Now the oldest
trick in the book. Take a few son who would
take a deep breath. Just breed over your lens. Focus on your model to shut
and you get this really cool, diffuse light
quality. Very nice. Now as you can see,
I have to refocus, and that can be a
little bit tricky now this camera focus
is pretty fast. But if you have a camera
that starch hunting when there's a lot of
missed on your lens, which this one also does. There's a trick
that's even better. And a week. Can you please come here? There we go. Just leaves
the camera there. And now you come from behind the camera and you're going
to breathe on the lens. So what I'm gonna do is I'm
going to refocus on my model, making sure I have the
composition that I like. There we go. And I'm going to ask any
week to do the honors. There we go. Now it's way easier to
control because now I can pre focus and
I know you can, you do it again and shoot. So really simple trick to create some extra atmosphere
in your photo shoots.
5. Chapter4projector: Now let's talk about
creative lighting. You have different ways of
lighting your subjects. You can, for example, use
strokes like for example, the big strokes in the
studio or your speed lights. And you can take those strokes, of course also on-location. The advantage of those strokes is they give a lot of power, meaning you can shoot an F6, F11 to fight the sun, or you can set them
on a lower output. Another option is
constant lighting, like the lights that are
now actually lighting me and we'll studio use
less panels from let-go. You can also use those
in photo shoots. The problem with those is they give a little bit less output. Meaning if you want to
freeze motion, well, that's very difficult
because you have to keep the shutter speed low. And of course the
output is not F22 on 125th of a second or 12
thousands of a second, which you will actually
need to freeze motion. But for a portrait,
they worked fine. It's constant lighting,
great quality. Now, of course, you can also
use different light sources. For example, light bulbs, fluorescent tubes isolates
or whatever you want. But one of the most creative light sources out
there is of course, a light source which
you can manipulate, which you can change, which you can make, do
whatever you guys want. You can actually probably
already see it here. And now standing
in front of one, and it's called a projector. Now some of you guys
know a projected from a home teeth are set up or from your business meetings
where they showed us boring slides from Excel
or PowerPoint or whatever. We're going to use the projector in a totally different way. Now, first of all,
you have to note that the projector is not the same, like any project or you base the same, they
are different ones. For example, I'm
using an epsilon. The reason I'm using the
epsilon is because it has a Wi-Fi transmitter
to my computer. Now, that means that I
don't need any wires. Well, of course I
need one wired power, otherwise it won't work, but you don't need another HDMI cable. So that's very
nice. You can move the projector everywhere in the studio where
there's a power outlet. Now, where do you
have to take care of when you buy a projected
for this kind of stuff. Make sure you buy one that
has a high NC lumen output. And that's very easy to explain. The higher DNC lumens, the more light output. Now, if you go figure, you will actually figure it
out yourself, of course, because the lower
the light output, the higher you have to crank
up your ISO or have to open up your shutter speed or your aperture and
you don't want it. So you want a high-end
syllabus. Now, what is high? Well, anything into
three thousand, four thousand insulin's
will do just fine. The fun part about trajectories, if you can connect
it to your desktop, you can actually start
painting your light. For example, we now
have setup where we use Photoshop with a
big black canvas. I'm just going to paint the
light with a white brush. So we're going to call
in our model Nadine. We're going to turn
off the lights in the studio because then you guys can actually
see what's going on and we're going to start, well, let's call it creative light painting with a projector. It's a totally different
way of using light, but it's very cool. Okay guys, so we have
our model Navy in here. And as you can see, Photoshop is actually projected over an 18. Now, if you want to make
advertising for Photoshop, this is actually pretty cool. But we want to advertise for
Photoshop at the moment. So what you have
to do is you press the F key and you will actually
go into full screen mode. But first I want to show you what I'm going to paint with. Now. I took a brush over here, a very soft brush
with white collar. White collar, well,
actually it's a wide brush. So we press F, F, and now we're in
full screen mode. Now as you can see here, I'm already moving my
brush over my model. And I asked my model, of course
to close her eyes because this is the very irritating. If you have to say
they're open your eyes constantly and if that projector shining straight in your face. So I'm just going to paint
my light where I want it. Of course I want
to paint her face. And how you can slowly see her styling appearing
like magic. Now the fun part is if you have areas where you
don't want to paint, you just use black paint and you can take the
pain away again. So in other words,
you're really painting your lighting and if
you want a light out, you paint shadows with black. You could, even if
you're really creative, new something in the
middle, like middle gray. And you can actually create
different types of lighting, which we're gonna
do in a moment. But first let's put
the outline's there. So we're going to
paint her dress. Another tip is
make sure that you paint from the area where
you're going to shoot. I'm going to shoot this
under a slight angle. So I'm actually now
taking notice that I'm painting the way
that I want to shoot. Because if you don't and
you move around your model, you have the chance that you can see some stuff leaking
on the background, which you don't want
in the picture. There we go. I forgot a
little bit of area there. And if you look at my screen, you can exactly see
what I'm painting in. So you can actually
also see where it goes wrong or where it looks right. Now again, because I'm
shooting under this angle, I can be a little bit
more sloppy on this side. But I have to be more
careful on this side. Because this is the
angle I'm going to shoot under wikis under a
slightly different angles. So you will get a
slightly different look with when the pictures come in, you will actually
see what I mean. Very nice. Now I'm going to change
my brush to black. As you can see now I'm painting in the areas because I was first looking at the model and I'm just painting in the
areas from the screen. So I'm going to press F, F and make sure that
your background color is already black because now I can just switch between
my colors so I don't have to go back into the
full-screen and assumed mode. I'm going to remove some of the excess light on the sites. We go cool. Now as you can see here, hence, needs a little
bit more light. But if I'm not careful, I will spill over on the back. And this is the fun
part about painting. I can actually make my
brush much smaller. Press the X key
again to go back to white and really fine
tune my selection. You could call it a selection. We're now working
on a real mask. It's okay if there's a little
bit of spill because again, I'm shooting under an
angle in a moment. J not going to notice this. Okay? Now let's say we want
the face to be popping out a little bit more and the
other area a little bit less. So what can you do? Well, with normal strokes, you can use something called grits to mimic light fall-off, or actually you create
light fall off. With this. Well, you can use a little bit of gray instead of
standard black. So let's change the
background color, not in black, but
let's say middle gray. So press Okay, go
back to F again, to full screen mode. Press the X and make the
brush a little bit bigger. And now what I'm
gonna do on the side, so I'm just kinda take away
a little bit of the light. And I'm creating light fall-off. This is pretty cool, right? But we can go much further. Because with normal strokes, which you can do
is you can control your light fall-off
like in a circle. With this, I want a little bit less light,
for example, here. Really make her face pop. But let's say I want a little bit more light on the white. So just press the X again. And I will create
more light here. Just debit over here. And by changing the
pressure on my stylus, I can actually really
custom paint what I want. It's almost like Bob Ross. For you guys not
knowing Bob Ross, use Google little bit more. And India and I'm
almost painting everything in the way it was, except some areas here. Okay, So now how am I
going to shoot this? Because now it's
time to bring out a camera and shoot this. Now the setting I'm going to
use is actually manual mode. I'm going to try for
an atheist of seconds. And I'm going to shoot
on F3 point to my ISO, I'm going to use on auto. In other words, the camera will figure out what is
we'll need to do. Now. Why don't I meter dish? Well, you can meter it, but you know how to ISO does a pretty good job
with this kind of stuff. Because I'm shooting is Sony. I can actually see
my viewfinder. Exactly what I'm gonna get. So we take the
first shot, we go. I didn't look a little
bit more towards slides. Really nice. That's cool. I'm going to go a little bit closer to shoot a
little bit more angle. Focused on the ice and
make the compensation. That's nice. Chin down just a little bit. There we go. Awesome. And a few nice close-ups. That's cool. Again, as
with normal photo shoots, keep coaching your model, but do realize that looking into a projector is not really nice. So keep it as quick as possible. Thank you very much. Okay, So this is the first set, but we're going to try to
add some extra move by using some colored
gels and some smoke. Okay, so now we added some extra strokes
I'm using to ELC. And why do I use the EOC is from Allan Grody.
Well, very simple. They have a high output
modelling light. So I don't have to stroke. I can use the modelling
lives of the EEOC to give the extra color
I want in the scene. Now, as you can see, it is a totally different look. Now, I will first make some
pictures without the smoke, and then you can
see that it already brightens up the scene a lot. So we're using the projector
for the white light, and we're using the two
eLC from each side, one with the blue gel. One with the red shell
to give a little bit of light on my model with
a little bit of color. Now, one thing that
you have to be very careful for is the nose. Because we using
lights from the side. It means that if she
looked straight on, you can see that she has a
really nasty knows coloring. It's not a no shadow, but it's like collar on a
note that I don't want. Now, if I asked you to
look all the way there, you can see that when I'm
shooting from that angle, actually the color is
gone from the nose. So make sure that you
really take notice of that. Now, if it happens during a photo shoot and
you are in the heat of the photoshoot. Go on. Yeah, It's going, Greg,
nice look that way. And you still have that
little bit of light. You can always take
it out in Photoshop. But I think that
when you're on set, take the picture as
perfect as possible. So in Photoshop you only
need minor adjustments. Okay, I'm gonna shoot under
an angle and we first got to shoot again without the smoke because we're going to
add smoke to the scene. Really nice guy and I didn't
look a little bit down. There we go. Now the blue is out of her nose. Very cool, nice close-up, maybe one with the lighting. And we go really nice. But now for the final part, Let's add some smoke
and really make this image rock,
give it some smoke. And first from the
back, of course, fill it up a little
bit higher because you really have to steer the
smoke in front of the light. There we go. And a
1.5 in front of her. There we go. When working with
smoke makes sure that it doesn't read her face. Because then you have a problem because then the
focusing will be off. Smoke will add as a reflector. So you will actually
get a white image. Really nice. So now we have a little bit too much in front of her face. I'm going to blow a little bit. This is more like a
mist, like smoke. Very nice. That's cool. Nice. So I'm adding smoke. We already added a
little bit of magic. But let's take it one step
further and let's start using the strokes
on strobe mode. So how do you set this up? Well, in the previous setup, we shoot on Auto ISO mode. And you already can see
that when you using smoke, smoke excess a
diffuser reflector. And even as a reflector, meaning your outer exposure
will change a little bit. Now because we're
using the strokes on the normal setting, meaning they will
actually power up and give a really
pulse of light. It means that we now set
everything on manual mode. And in this point, I chose for 1 eighth of seconds
ISO 400 F 3.2. Now that setting is fixed. If I shoot and I still want
a little bit of change, Let's say in the output
of the projector, the only thing I have to do
is change the shutter speed. Because if you change
the shutter speed, you actually control
the ambient light. If you change the aperture, you're controlling the strokes. Now, the strokes
I've already set up, I did a quick test shot
and this is what I like. So the only thing
I now have to do during the photoshoot is changed my shutter speed if I want more or less light
from the projector. Now should I use a light meter? You know, I'm very much
about light metering, right? Well, in this case, I didn't use a live meeting. I don't tell you
very quickly why. This is a feeling shot. This is special effects shots. This is not a shot
where you have to have perfect exposure on the phase of the model and we're shooting tethered
to the computer. So I just took a shot
that I really like. And DOE settings
I'm going to use. Now, if I want the face
to be correctly lid, then I will use a light meter. But in this case
there's so much going on and it's just let
me put it this way. We just mixing everything together too, a
look that I like. So that's why we didn't use
a light meter for this one. So let's start. We're
going to add some smoke, and then we're going to
start using the strokes, the color on iodine. And let's make some
rocking images. But first, we're going
to turn off deadline. You can actually see what a
constant lighting does for the scene in a week
or you turn it off and let the guys
see how it looks. And now it's dark and you
can only see Nadine and the light changing
my shutter speed to let in a little bit
more ambient light. I'm actually also playing
with my aperture. The combining the
two really cool. Chin up just a little bit. Some of the images
you can throw away because there's a lot of
smoke in front of her face. But just keep shooting. You're not shooting film, so it doesn't cost you anything. That's really cool. And of course make sure that
you change your angles. Now going to sit a little
bit closer to NAD. Actually, I'm in the set. Closing up a little bit more. Really nice. Yes. That's nice. The smoke is still there so
we don't need any new smoke. Let's try some really
low angle stuff. Now as you can see, it's
pretty simple to strobes. Gels, colored gels, a projector, and a model, and smoke. Simple. Now, but it started out really simple and that is the cool thing about creativity. You start out with
a really simple id, id, light painting
with a projector. And then you start adding
strokes with modeling lights, and then you start adding smoke. And before you know it, you create a symphony of
Light, smoke, and projection. And that's the fun thing
about photography. The only limitation is here. If you break down
with limitation, you can use any light
source you want and you can create some
really cool stuff.
6. Chapter5lightblaster: Now for this segment, I'm
going to use something that literally blew my mind
when I got it in. Now, you all know
from the bus, right? When you looked at the
old 40s and 50s glamour shots that on the background there were these
beautiful patterns. Now they were actually
pretty smart. So what they did is they used, for example, the offers,
flowers or whatever. They put it in
front of a stroke. And that will actually cast
a shadow on the backgrounds, or they use Venetian
blinds to cast shadows. Now, in the modern
days, we can of course, use projectors now
after they are called cold gobo projectors. Now those go, we'll projectors are actually pretty simple. They use a metal plate with patterns and those patterns
are projected on a wall. Now, those are pretty expensive. So when I got this unit and this is called
the light blaster, I first was a little
bit skeptical like for this kind of price, can you really get something
that's interesting? But the product just
works. It's awesome. Now how does it work?
It's very simple. In this case, it's mounted on a 1200 watt stroke
from Alan Rome. And it's universal. You can mount it on
any stroke you want. It has a mounting bracket
and you can tighten the nuts over here and it will really
fit on your reflector. Now, this is the actually the
light blaster unit itself. And insight dares to
gobo in this case, we're going to use stars. Now, the front part,
that's the important part. You can mount any
Canon lens on this. And of course, if
you use converters, you can use of course
also Nikon or M4, E2 or like or whatever you want if you have a
converter, it works. The only thing that's
very important if you have to make
sure that it's an open aperture and take the
fastest lens you can get. Because the light will actually traveled through the reflector, through the light glancing
through the lens. That's a lot of trues, right? So it takes away the
quality of light, sorry, not the quality but
the intensity of light. Now, in this case I'm using
a one-point eight lens. So that means I've a
very wide aperture. If you put a 5.6 lanes on there, there won't be any light left, it will be very dark and you need everything you
can get in light. So make sure you use
a one-point for lens. The other thing is, some
lenses are stuck on apertures. I believe nikon has a system where it's actually
stuck on an aperture. So make sure that if
you get the converter, you get a converter
that opens up the Nikon lenses
to full aperture. Again, don't use 2.81.41.2
is those are awesome. And if you already
have a Canon system, you can use your own lenses. Now my case, I'm shooting Sony. So I bought the cheapest, literally the cheapest
Canon lens I could buy. And it's a, I believe
it's a union or you know, or whatever you
can pronounce it. It's a 1.8, it's
a very cheap one. It's about €65, and
I connected it. Now as you can see, there's
a lot of light spill, right? If I put it on now there will
be nothing on the screen. So what I'm actually going to do is I'm going to use this. This is included in
the package and you just put it over your reflector
and the light blaster. We go and make sure
that it's light tight. Tighten it very, very securely. There you go. And also on the back, you can see it's
real simple to do. Now, the only thing you
have to do is focus. Because the pattern on the
backgrounds can be focused. And that's the cool
thing about this system. You can make it
more like in-focus, or you can make it more surreal a little bit,
the out-of-focus. So now we're going to use
it on our model Nadine. And first we're
going to start with only the light blaster
as a main light source. And after that, we're going
to add a spot on her face. Now, how do I meet or
something like this? Well, you know, I always
use my light meter, right? I'm miss the light meter. In this case, that's
pretty much impossible. So I just have to wing
it because I can't meter if I don't know what's hitting the model and
it's just all patterns. So for this time, we just leave the light
meter in the case. Now as soon as we start adding the stroke on the model's face, That's when we start
adding the light meter. Now one more important thing, this part is plastic. So don't, and I repeat, don't leave on your modeling
lights unless you like the smell of molten
plastic? I don't think so. So how do you set it up? Well, we're going to turn
off all the lights and week is pointing the camera towards the backdrop which
we're going to use. And I'm going to show you
very quickly how you can set it in-focus
and out-of-focus. And then I'm going to turn
off the modeling light again, turn on the studio lighting, and ask Nadine to come on stage. Okay, guys, so now you can
see it totally dark studio, of course, the camera picks up some light, but
it's pretty dark. And in the backgrounds
you can already hear the fence off the 1200 watts. So I'm going to turn
on my modeling light. And as you can see,
these are the stars. So that's pretty cool, right? So now what I can
do is I can focus the stars or I can
de-focus to stars now, as soon as you have the
effect that you want, and in this case, I
want them really sharp. Turn off your modeling light
again because otherwise you will smell some plastic
if you forget it. Now, it's not
something that we'll start smelling in like seconds. But just be careful
because there's a lot of warmth coming
from the modeling lights. Okay, so now Nadine is onset. And again, it's very difficult to see
what you're doing because you don't have
a modeling light. So we actually took
some test shots, as you can see here on the
back because I want to make sure that Nadine is
actually getting light. Were to go projector or
delight blast in this case, you have to make sure of course, that the light hits the model on the
areas where you want, for example the
eyes or the body. So make sure that in-between
you always check this. Shoot a little bit
slower if you're a fast shooter and make sure
that every shot counts. So let's take some
shuts off Nadine. And I love the kind of circus. Look. You go, That's nice. Awesome. And again, as always, keep talking to your model, keep telling her
she's doing fine. Because C can see which issues, what you see through the lens. And if you want to
take your shots and want to keep the energy
of your set flowing. You have to make
sure that your model constantly knows he's
doing more fine. Really nice. Keep talking to your model. Keep that energy
flowing in your set. Really nice meeting. Awesome. I love
the double faces. Really nice. And even if you take
a shove that you don't like, don't
tell your model, just keep telling
her she's doing fine and all the
shots are awesome. Loved that one. Really nice. Okay, So now we only
use the light blaster. So let's see if we can be a
little bit more creative. And also use a spot on
the model and maybe use some color on the light
blast to give that real like a duotone effects. So we're going to use a red
gel on the light blaster. And we're going to use
a spot on the model. So we made a setup now
completely different. I'm using a red gel on
the light blaster and I'm using an Ellen grooms snoop
with grid on my model. So their face gets the normal
light color and actually the background is colored
bright red with the stars. So it's going to be a funky
shot, a little bit different. So let's take some
shots in 18. Awesome. Going to change
my composition to make it a little
bit more daring. There you go. Really likely to get the model
on the side of the frame. Love it. Nice. That's cool. Mr. Miyagi. We go lower the
head just a little bit. There we go. Awesome.
More close-ups. Love it. I'm always focusing on the eyes and then
making my composition. So I'm using a
center focus points. Now with the Sony, I
can actually also use the OK button and make the camera to look
for the eyes of the model. But that only works on
certain E mount lenses. And it's a really cool
in handy technique. Works a little bit
faster as you can see. I'm using the Okay button to
find the eyes of the model. And then I can just use the
trigger to take the picture. The shutter button, of course. Heads. Nice. Keep it at doing. Awesome. Really cool. Okay, final shot. One more. All right, I go one more
because you're doing so well. Awesome. Final shot. And other final
shelf, really final shot. And another for the final shots. Now why do I say so
many times final shot? Because every time
you say final shut, the model will give
her best because he thinks this is the one, this is the one where
I really have to work. So don't do the trick
too often because then the model doesn't
leave you anymore. Thank you so very
much in eating. Oh, that's cool. Do that one more time. Awesome. Okay. So you think we're done yet? No, no. We're going to use
some smoke with backlighting with
a light blaster.
7. Chapter6lightblasterandsmoke: Okay, now for this next setup, we're going to use
the light blaster on the back and I'm
going to use smoke. May have to worry about smoke. Now, why do you have
to worry about smoke? Because there's a lot
of stuff going on. Now. Smoke x as a diffuser reflector. So it can really change
the light source. Now if I make a shot like this, so without any smoke, I could actually
think that I have way too little light
from the background. And I'm already shooting
on ISO 200th F4, and the 1200 watts
is on full power. Now, light blast, of course, takes away a little
bit of light. But this is ridiculous, right? And that's because I'm
using it as a backlight. Now as soon as we start
pumping smoke into the scene, the smoke will actually start
working as a reflector, but it will also take away a little bit of the
harshness of the light. So smoke is awesome. Now, you can think about it as when driving on the roads
and there's a lot of fog. What you will actually
do is don't turn on your headlights because
all the smoke and all the fog will
actually reflect the light back so you
see a bright white wall. So this is also
where we take notice when we light our
model from the front. Now, I will use light
under an angle, because if I use light
straight on my model, it will actually reflect
back from the smoke. Well, we're going to do
this very, very slowly. We're going to start
with setting up a shot with only
the light blaster. So I'm going to change
my aperture around. I'm not going to use a
light meter for this. And as soon as I have
something that I like, I will look at my aperture
and I will try to mimic the stroke on the front
on that aperture setting. Sounds confusing. Let's start and we'll
show you what I mean. Okay, as you can see, we already put some
smoke in the room. And the reason for this is I want a nice curtain of smoke. So I don't want
smoke to be only in certain spots like you
normally do with smoke. I really want a
curtain of smoke. So let's take one test shot very quickly and see if I like it. And as you can see,
the beams of light will actually start
projecting on the smoke. This is really cool. Okay, in 18, awesome. That's nice. Make it funky. There
we go. Awesome. You can even do full buddies with smoke because it actually mimics an area that's
flooded with light. You go. So that's really nice. Okay, So now what
I wanna do is I want to make sure that
my model jumps out. So we do have to
add another stroke, and that will be on
the face of the model. And in this case
I have to look at my aperture and that's F4. So the first thing I set up, It's the smoke with a
background because I know the light blaster
is the weakest. So the backstroke is
actually on full power. And that gives me
the effect that I really like at the moment. So now I check on my camera. It's 125th of a
second, of course, because we're using strokes, It's F4 on ISO 200th. Now the only thing I have to do is make sure that that stroke, and that's an eLC 500 from Ellen grown with a 70 centimeter
octa with a grid. So it's really focused light
and have to make sure that that one is on F4, ISO 200th. Now why do we use an EEOC? The EEOC is the new
stroke from m1g Rome. And the cool thing
about the EEOC is it can go really down low on power. So in essence, I can
actually get 2.8 from those units
pretty close by. And because I'm shooting
on ISO 200th and I need a wide open aperture that's not really wide
open, but it's F4. I'm going to need a stroke that Camille really down in output. Now here you're
going like Frank. Okay, We bought the light blast. Now we also have to buy eLC. No, of course not. The cool thing about
allied blast is you can also mounted on
your small strokes. Because if you use it
on a small stroke, all the power from the stroke is directed straight through
the light blaster. You get way more light outputs. So on the studio strobes, well, it's a little bit figuring
around with settings. And you lose a lot of light
on the small strokes system, you get a lot of light
from the light blaster. But in the studios you can see
here it works pretty well. You just have to be a little bit smart about setting
up your lighting. So we're going to meet
our deadline on F4, and then we're going to
make the final shot. Okay, so now we're going to
meet her delight to make sure that it's F4, ISO 200th. So you put your light
meter on ISO 200. And in this case, I want this area of my model
to be correct in late. So I pointed towards
the light source. Remember, as I explained in the video
mastering the model, shoot the light meter. The light meter is an
incident light meter, meaning is meters, the light
falling on your light meter. So you hold it in front of the area that you
want correctly lit. So in this case, if for example, and I don't know why, but let's say I want this
area to be correctly lid. I actually hold it in
front and meet it a light. If I want to front
to be correctly lid, I hold it like this. But in this case, and that's
also most of the times in the studio because that's
how you set your lights up. We want this part to
be correctly lit. So there we go. 2.89. Now that means that I'm 1
tenth of an f-stop away from F4 because my light meter is set up in one
tenths of an f-stop. And my strokes are actually also controlled in 1
tenth of an f-stop. Now 2.89 means 2.89
tenths of an f-stop, and it's almost F4. So the only thing
I have to do is add one-click or my stroke. And I can do that for
you to remote control, which is now inside this iconic, now this is the 478 with
the syndrome system inside. But you can also of course use a separate Skype board or you can use a pocket
veto system or whatever. But I'm using Chrome. So really like it that they
now bill it inside the 478. Test it again, and
now I'm on F4. Exactly. So now I can take my
shots and make sure that my model is correctly lid and the smoke is
lit from the back. So let's create some magic. Okay, so now I set
everything up. Be careful with
opposing of your model. You don't want the
glued on effect, meaning lighting your model from the side, making it flat. Now, lighting your model from
the side making it flat. Frank, that doesn't work right? Because you're always tell them, if you like, from the side you
have three-dimensionality. That's correct. But in this case, you also have to make
sure that your model makes poses like this where she looks a little bit
away from the light. So you can create a nice
contrast interface. And remember, shadows
are to solo for sharp, it creates three-dimensionality, so don't be afraid of them. So let's take one test
shot without the smoke. And as you can see, you create a nice dark area on her face. And you create a
nice light area, meaning you have
three-dimensionality in your shot and there's still
a little bit smoke left. But let's up the end the a
little bit and add some smoke. So any week is using a remote control for the
smoke machine on the right, and that actually only
covers the floor. Now, men who are in turn has
the other smoke machine. And he's actually
going to fill up the story, the top part. And at 1, you will
actually point a smoke machine towards Nadine and make sure that
also the floor is covered. Now, if you're the
photographer that just puts a smoke machine out
there and presses the button. I can tell you now, you will
be disappointed because smoke you really have to
control like your lighting. So okay. I know we go You ready to
do the floor part? Okay. Press the button and minnow, you just fill up the back. There we go. And move it around just a little bit. There we go. Okay, so let's see the very nice wall of
smoke behind my model. That's cool. Nice knitting. I remember to keep
coaching your model, even if you are very occupied
by looking at the smoke. Keep coaching your
model because C doesn't see what you can
see through the lens. So you have to make sure
that it keeps it flow going. Really nice, needing awesome. So let me check very
quickly on a monitor. That looks really nice. Menno, can you put a little
bit more smoke on the floor? So we're gonna do
some full body shops. Little bit more. No, we go
so a little bit more. Okay. Now all the way up Minow and aim it towards the
back of the model. Nice. Love it. That's great. Awesome. Nice needing, love it a
little bit more on the floor. Amino. Really nice. Okay, a few more
close-ups meeting. That's cool. Awesome. Okay, thank you.
So as you can see, you can create
really cool effects by adding a little bit
of the light blaster. Of course, without
the light blast, you can also use the smoke, but you won't get those
nice stripes in the smoke. And that's the cool thing
about the light blaster. It creates that gobo effect. And let's see if we can do one more thing that's a
little bit more creative with this setup
because we kind of use a blue gel on the back. Okay, so we edit a blue gel in front of the light blaster. Now remember you can
put whatever you want in front of light blaster. So there are gel packs that
you can normally use on your strokes with a little bit of gaffers tape or duct tape, you can actually mount
them on the lens of the light blaster as you
saw in the previous screen. So in this case we
use blue because I like the blue a little
bit more with the smoke. So let's see what works. Let's see if it
works. There we go. Okay, a little bit more smoke. Nice. We're going to wait for
the smoke to build. Very nice. Awesome. Changed my own position to get a little bit more of the effects of the live stream. We're gonna do one
more full body. That's nice. A little bit more
smoke on the floor, Menno, towards the
feet of the model. By filling that up, I don't
see my floor anymore. And of course the light
fall off also takes care of that because
we're using a grid. Remember a grid
is focused light. Really nice. Meno can have a
little bit more smoke on that side of the model. Make it fast because smoke
is getting towards me. And as soon as the smoke is
too much in front of me, I can't shoot anymore. One, the focusing
won't work anymore of the camera because it gets
confused by all the smoke. And of course, the light will reflect back because
smoke is a deflector, but also a reflector. There we go. Awesome. They deem, as long as I
can, I keep shooting. The Sony focuses pretty well. So I can keep going
for a little while. Now it's getting a little bit more troublesome. That's nice. Awesome. Final shot. Remember
there's no final shelves. Cool. Okay, one more. Give
it a lot of expression 123, and go, Awesome. Thank you so very much. As you can see, creativity is
many, many things combined. Outfits, styling, lenses, some simple techniques like breathing on your lens, smoke, light blasters,
men, projectors. You can do whatever you want. There's one thing
you have to do. Pull that switch inside of your head and that
switch always tells you it can be done or
it will look weird. If it looks weird, just
delete the images. But I promise you, if you turn that switch from might be too, should be, your creativity will grow and your images
will be awesome. So thank you so very much for watching and see you next time.
 Frank Doorhof, Learning with Frank