Transcripts
1. Introduction - Mastering Keyshot: Hi there, My name
is texture man, an IMC, GRPs, and free
freelance designer. In this course, I'm
going to teach you how you can create product
visualization like this. I'm going to show you
all the secrets behind creating realistic
3D renders in Quito. I had experienced in product rendering and
automotive rendering. Also, how to create animations. This class is
designed for everyone who is passionate
about 3D rendering. And one step up the level of reality product
visualization. In this mastering Kishore class, you will learn everything
to create your own renders. You will learn how to set
up seeing from scratch, how to create camera, how to create lightning, how to create materials. I will give you introduction to Photoshop retouching
with useful tips and tricks and much more like depth of field and
close up rendering. If you are ready to become
mass in Kisho, let's render.
2. KeyShot Overview - Import 3D model: So this is the key shot. And I'm going to show
you my workflow, how I'm going to create
these product visualization. And I will be giving you an explanation how these
tools are actually working. And I'm not going to talk in about every tool in the key
shot because I don't really believe you have to
know every tool in the Kisho to create stunning
product visualization. And I just don't want
to overwhelm you with lots of information
at the beginning. So first step, as always, is to import our freely model. Right now doesn't
really matter if we are going to import are open. So I'm just going click on this open and I'm going to
choose my FBX file type. And the reason why I'm going to choose this one is because I save a little bit more color information
into this format. So double-click on this and I'm going to stick with
the default settings, and I'm just going to
click on the Import. It will take just a couple of seconds to import this 3D model. These freely model
is really simple. If you've got something
with too much polygons, it will take much more, longer. But this is really
simple 3D objects, so it will take just
a couple of seconds. This is how it looks
in the Kishore. And the first, what
I'm going to show you is the basic
navigation tools. When you click and hold
your left mouse button, you can rotate
around this object. If you're going to hold
your middle mouse button, which is the Scroll button, you can pan around. And if you're going to scroll with these middle mouse button, you can zoom out or zoom in.
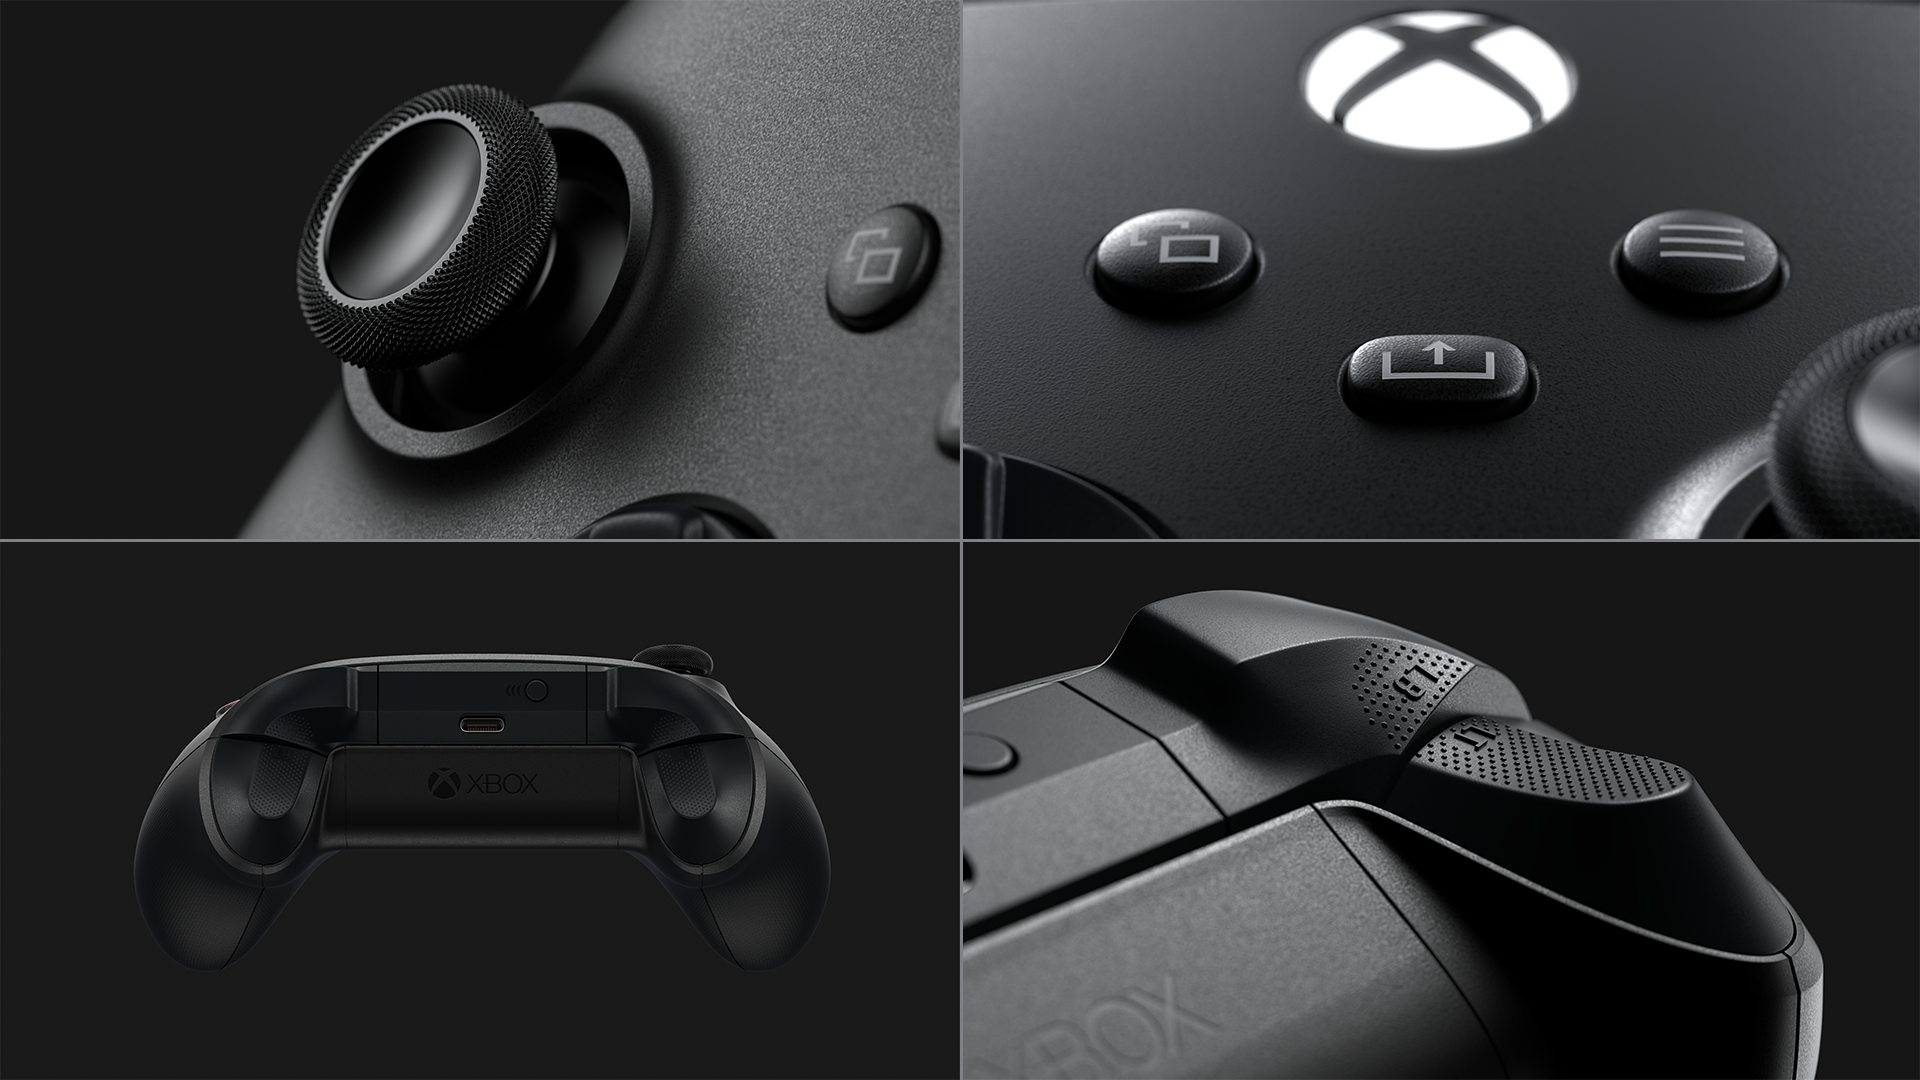
3. KeyShot Overview - User Interface: He showed that gets really
simple user interface and you've got workflow
from left to right. So that means a routine, but you are going to
add to the scene is on your left side into these libraries window
and everything, what you are going
to adjust or edit on your right side in this
project window, e.g. we can add to the scene
new materials, color, texture, environment,
deck plates, even new freedom models. So let's start with
these materials. I'm just going to drag and drop these hard plastic material. Something to like this. If I'm, if I'm going to
adjust these material, I'm just going to
double-click on this. And now I can adjust
these material. I can also adjust cine, camera view, environment,
lightning, and image. This is like
postproduction in T-Shirt. So I'm going back to
these material and now I'm going to adjust this
material a little bit. So in this first, I can change the main color. I can create these controller
invite color red or black, but I'm going to choose
the black color. I can also change the
reflectivity color. I can make these color red, but I'm going to
stick with divide. And these sliders, the file, the overall look
of this material. So this first sliders, if I'm going to push
the slider to the left, I'm going to create much
more shiny material. As you can see, if I'm going
to pull the slider more to the right side and create these value
much more higher. I'm going to create
rough material. So I'm going back to 0.1. And the second slide define
metabolic of these material. So if I'm going to push this slightly more to the left side, I'm going to create much
more plastic material. And if I'm going to push the
slider to the right side, I can create much more
metallic material, e.g. if I'm going to bring
this value much, much more up, I'm going to create something like
aluminum or Chrome. And if I'm going
to push the slider back to the shiny position, I can create something like polished aluminum
or polished chrome. As you can see. This is the end of
the basic overview, and now let's focus on
creating actual render.
4. KeyShot Camera - Move Object Tool and Camera View: Alright, so we need to move this 3D model and we also need to create brand new camera. I'm going to show
you two options, how you can move these 3D model. You can go to the scene, select this 3D model, and you are going to the position and click
on the Move tool. And now you can move these
3D model in the scene. Or there's the second option, you can just point with your
cursor on your 3D model. Creek, right mouse. Click the right button on your mouse and just
hit this new model. And now we are going to bring this 3D model a
little bit more up, just a little bit about
the ground, like this. And also I'm going to
use this rotate tool. And I'm just going to rotate
this object little bit. Alright, This is good. Now I'm going to
create camera view. So I'm going to the camera tab, click on this button,
which is our new camera. We are going to call this
camera main camera front. Now, we are just going to match our reference image so we
can move around like this, or we can use these
sliders, e.g. this is simple, the distance, this is the rotation. This is the inclination, and this is the twist. So I'm going to
rotate like this. Alright? Maybe little
bit like this. I'm also going to use this inclination to create
something like a hero Look. This is really good. And I'm also going to use these. And actually I'm going to
write number like this. I'm going to turn
on this grid to make sure this is
exactly in the middle. I can make it by my hand
or I can right-click on my mouse and just
center and fit models. And it will be exactly
in the middle. So I'm going to turn off these quarters grid and we can choose the perspective
or orthographic view. But I'm going to choose
the perspective and I'm going to adjust the
focal and by myself. And we can, we can move the slider to the left
side and the right side. And basically, if you're going to bring this
value more to the left, it's much more in
the perspective. If you're going to bring
this to the right side in much more like
orthographic view, you can use the lower
values for buildings, buildings or car, e.g. 45 mm or 50. But if you're going to render
small object like this, you want to use maybe 60, 70, 80, maybe even more
like 90 or 100. But I'm going to use the
hundred hundred millimeters as the focal length. And this is actually look exactly like from
the reference image. So that's really good. So if I'm really happy
with my camera view, I'm going to click on the save and load the camera position. That means you can't really move around this
object right now. So you need to go back
to your free camera and now you can rotate and
do the basic stuff. And if you want to go
back to your camera view, you just click on
the main camera from and you are
back in business. So this is pretty handy
and you can set up much more camera views and you can just switch
between them. So this is how we can
set up the camera view.
5. KeyShot Lighting - Physical Light vs HDR Image Light: Now we need to create
the light pink. There is basically
two options how to create lightning in key shot. We got option number one, which is the physical
light in Riga. Option number two, which
is the HDRI image light, we are going to choose
HDR image lightening, but I'm also going
to demonstrate the physical light so you
can see the difference. So I'm going to the
free camera and I'm going to be the
rotate in the scene. I'm going to edit our
geometry to plain. Alright, I'm going to the scene and I need
to scale this plan. So I'm going to
select this plane and I'm going to make
it much more bigger, something to like this. And I'm going to bring this
plane up about the 3D model. And I need to change the
type of this material. So I'm going to double-click
on this material. And I don't want
to diffuse color. I need something like the light sources and I
need to choose air Allied. I need to fight color. And also I'm going to
change the intensity, the changes from the
lumen to what you can see now displaying
illuminated 3D object. So I can also make it much more lower, even more brighter. Alright, I can also
change these types. Two years light or point light, or even the spotlight. Spotlights got lots of options. So I'm going to demonstrate
this one a little bit more. You can see how this is
illuminated right here. You can use the beam angle
to make it much more bigger. You can use the fall. I'm actually going to
bring this value a little bit more up so you can
see what's going on. Even more up. Maybe like this. Alright, so you can
see what's going on. You can see how it's changing
the spotlight angle. I can also make the fall off. You can see it's much
more softer now. Then you can also change
the radius. Alright? So this is how it looks, the soft light or spotlight. But I'm not going to use
these physical light pink. So I'm going through
the scene on the plane, right-click on my right
right button off my mouse. And I'm just going
to be displaying, Yes, I'm going back to
my main camera front. And now I'm going to create
my HDRI image lightening.
6. KeyShot Lighting - Environment Settings: First step is to change
the background color. So I'm going to the environment and I'm going to
use these color, not the lightning
environment options. So click on the color
and we can change the red or the blue or
green, whatever we like. But I'm going to choose
the black, almost black. So I'm going to bring this value little bit more up
to create something like gray color,
something like this. And I'll say I'm going back to my free camera because I
want to show you something. And you can see
these ground shadow. We need to turn this off. So we need to go
to the environment and we need to turn
these ground shadow. Or you can also see there is
couple of different options. So I'm going to show
you what is going on. You can use the
occlusion ground. You can use the
ground reflection, which is reflection on the
ground from these 3D object. And you can use the
flattened ground because the environment
is the circle. And when you turn this on, it kind of like the sphere
with a flat bottom. Alright? And the lighting is a
little bit different on this bottom part
as you can see. Right? But I'm not going to use
any of these options. Alright? And I'm going back to my Camera, Main Camera from just click and now we can set
up the lightning.
7. KeyShot Lighting - HDR Image Map Overview: So we need to go to
the Environment tab. We're going click on
this button which is art or create new
environment map. We are going call this
main environment fraud. Alright? And now we're going
to edit this canvas, which is the lightning map. We are going to the HDRI editor. We are going to use
highest resolution. We are going to change these. We can also use the white. And now this whole HDRI
map is one big light, but we don't want
to use it this way. We want to turn these
completely off so low lights are
reasonable in the scene, there is no light
linking these HDRI map. I'm going click on, Okay, and now I can create
the lightning. I'm going to click on this
button which is add new pin. And this is our first slide. And you can see there is the light coming
from the left side. And it's basically these
light on this map. I'm going to move
this light around. You can see it's also
changing in this viewport. So there is two options, how we can position
in the lightning. We can use, we can move
these light just like this. Or we can click on this, which is the set highlight. And now we can click
on the part where we need to have the
lightning, e.g. we won't highlight these
right-side of these controller. Just click on this right side. And now the light is positioning
exactly on this point. Or we can light up this front, maybe just this edge right here. And you can see we
got just this edge. This is like really easy how
we can move these lightning. And now there is
couple more options. We can change the type
of these light pink. We can change it from
circle or a rectangle. We can also use just
half of the size. We can also increase
the size or decrease. We can change the
brightness or intensity. This is not the watts or Romans. This is just the
value for the spleen. We can make it
much more brighter or even like really satellite. Alright? And we can also
change the angle, which is the rotate delight. We can create
something like around the corner curves
because nothing in the real life is
complex and sharp. So we can create these
Philip on the edges. We can also make
these light soft. So that means there's not
going to be these hard edges. You can see now
they are soft and also these light
in the viewport, It's completely change
from hard to soft. We can also move the slide
with these values right here. You can see how it's moving up and down,
left than the right. Alright, we can also
change the types. I'm going to point this light on the front and we can change the type blend Alpha or screen. But we are going to use
the simple for now. Alright, and this is like the basic overview
about these HDRI map. I'm going to delete these light.
8. KeyShot Lighting - Create HDR Image Light: Now we need to check our
reference image to see where is delighting and from which direction is coming
onto these objects. You can already see
there's couple of light. So let's reread, reproduce
this in the key shot. I'm going click on this
button again, add new pin. And I'm going to use
these rectangular value or rectangular type. And I'm going to make
these much more bigger, something to like 50. I also need bigger brightness. Something to like five. And I'm going to use
these from edge fall off. And I'm going to
bring these to one. I'm just going to
move around just like this to find where I
need to put the slide. Okay, I'm going to use
these set highlights. Now I'm just going to
drag it to the side. Write something like this. We are just using
basic material. This is not our final material. We just need to set
up the lightning because lightening is a
really important thing. And when you got
the bed light pink, you can try so much
hardworking and materials in the never going
to look really good. Light pink define materials. If you've got bid lightening, your materials, never
going to look real. So again, I'm going
to move this pin. Alright, I'm going to
use this slider to match it from the reference image. I really like using these
sliders because they are really sensitive and you can
use really impressive. And I would say, so
I'm going more to the left side or actually
maybe more to the right side. And I'm going a
little bit more up. Alright? I'm going down. Okay,
This is really good. I'm going to
duplicate this slide. And I need to make these
light little bit smaller. So maybe like 35, but I need a little
bit more intensity. Alright? And I'm just going to move
this light right here. And again, I'm going
to use this slider to match exact position
from reference image. Alright? Maybe like this. And a little bit more down. Alright, this is
looking really good. So I'm going to duplicate
this slide again. Duplicate, and I'm just trying to highlight
these bottom part. I'm going something like this. And I need these light
to be much more bigger but with the less brightness
or less intensity. So just like this. And I'm going to again use these sliders,
something like this. And alright, this
is really nice. Is just the salt lightening
from bag or from behind. I'm going to duplicate
these light again, bring it up, and I'm going to highlight this part on the top. So I'm going to click
on this tool set, highlight and highlight
these top part right here. And I'm going to move it a
little bit more like this. I need to, I need to
have these light, much more smaller, much
more bigger brightness. And I'm going to again
use these sliders. So maybe like this. Actually good. And a
little bit more down. Alright, This looks really good.
9. KeyShot Lighting - Lighting Presets: Now we need to turn off
the set Highlight Tool. So I'm going click
on this Done button. Because we are done with
editing these AGI map. We also need to render these AGI map in
higher resolution. So I'm going click
on this button and it's already rendered. It was really fast. And before we start
creating our materials, we need to create or setup
the lightning preset. So I'm going to delight new tab and we got a couple of
presets right here. And I'm going to
explain it a bit more. So you got the performance mode. This mode is going to turn off completely shadows
and a reflection. So it's really good when
you've got loads of 3D objects and you want
to move them around, you got the speed. And if you are going
to use the basic, this is like the step-up, the quality, and you've got really nice results
in fast time. So this is really
good and you can actually really good rendering
with these basic mode, urine if you got
really slow computer. And these products,
interior and jewelry, these are the photorealistic
lighting presets. When you got turn of the
turn on these products, you've got full shadows
for our reflection and the light bounces
are more directed into these 3D object or
subject of the scene. Using the interior. The light bounces are more
spread across the environment. If you are using the jewelry, this is like the best of the
best phone in the key shot. It using the full power, but it's really slow. I'm not really using these one. The best. The goal for me is this product. You can actually
really good rendering with these product mode. You can also render with
these mode interior. And you've got a
really nice results when it comes to
quality and the speed. So for me personally, this is the best of the best. And now we can start
working on our materials.
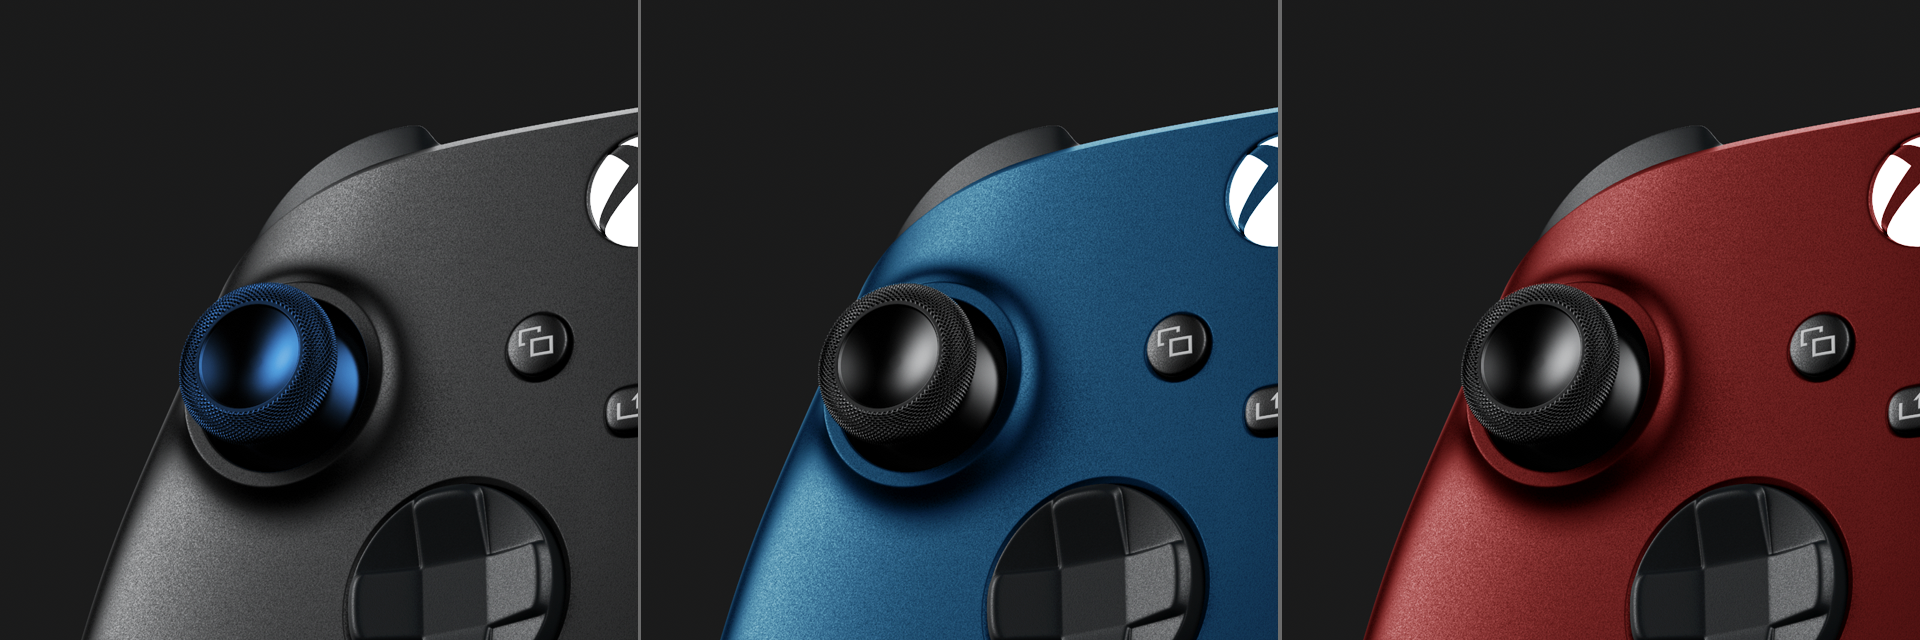
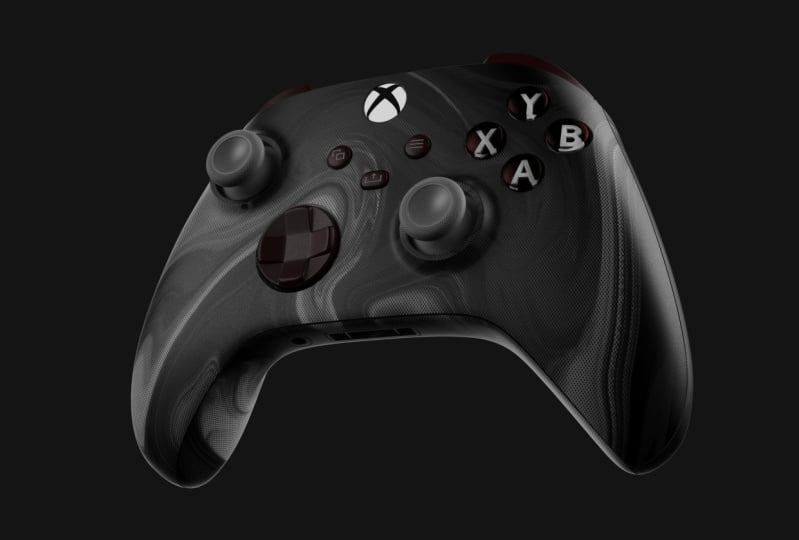
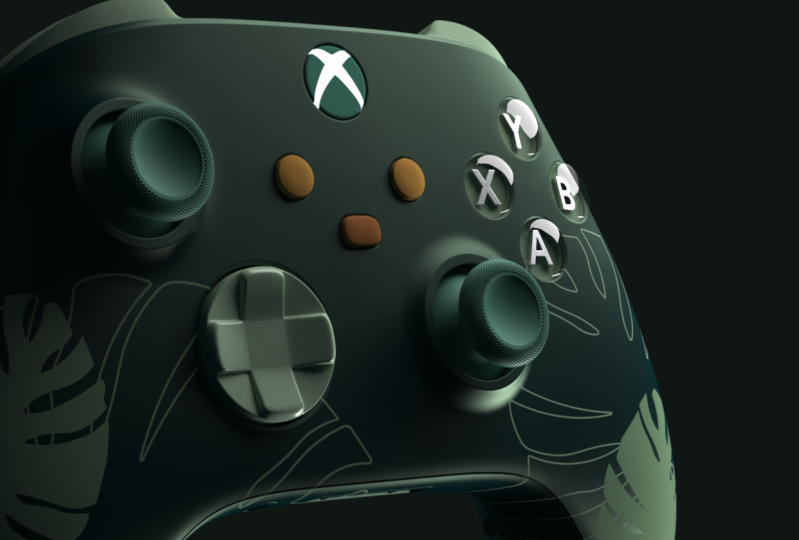
10. KeyShot Materials - Main Plastic Material: When you look at the
reference image, you can already see the main
material is some kind of hard plastic with some kind of sparkles or noisiness in it. So we are trying to create
something very similar. So go back to the key
shot and we're going to start with some kind of
plastic or pain material. So I'm going to use this paint, rough paint made blade
material, just drag and drop. And as before, if we are
going to edit this material, just double-click on it and we are going to
change the color. We want something
completely black or almost completely black,
something like this. Dark gray color,
very, very dark. And we also need to make these material a
little bit more shiny. Alright? And I'm going to stick
with refractive index 1.5. And now we are going to create the noisiness and bumpiness. So we are going to
the texture and you can already see the slot Bump. And we're going to click on it. And we are going
to use the texture which is built in,
in the Kishore. And we are going to
use noisy texture. And I'm going to my free camera to make
it much more closer. Again, double-click on this material texture and you can see these noisiness
before and after. But we need to scale this
texture a little bit. So I'm going to use
something like this volume. So it's much more
smaller, more subtle. And I also need to change
these bump height. Something for like this. This is alright. And now we are going to
create the noisiness, we created the bump, bumpiness, and now we are
going to create noisy. So go to the material graph. And this is our noisy
texture into the bumps load. This is the main paint color, and I'm just going to drag
and drop this texture. So hold Alt, drag and drop. And we are copied this texture. And we are going to
use this texture as this roughness number. Alright, so I'm just
going to drag and drop and use it as a roughness. You can see is not looking really good, is
completely rough. So we need something like the
converter into this line. So click on this line, right-click on your mouse. Utilities colored the number. I'm going to clean my graph. Alright? And you can
see we get our texture, we get the converter, color to number and
the scholar to number. Basically convert the
color, the number values. If I'm going to
double-click on this, you can see the zero is the bug and one represents
the white color. So we need to change
this output right here. And I'm going to make
it much more shiny. So I'm going to use
something for like this 0.2. And I'm going to bring this
value almost completely down. I'm going to show you
what's happening when I'm going to bring, these are zero. Alright, you can see it's tiny, but I'm going to use
something like this. Alright? And you can see we
get some kind of noisiness or sparkles in this material
and it's really nice effect. I'm also going to
use this texture, same texture as
refractive index. So just drag and drop
refractive index. And I'm again going to use this color to number converter. So click on this line. Utilities colored the number. We are going to
clean this graph. As you can see, it's
nice and clean. Double-click on this
and we are going to use something
similar as before. But we're going to
bring this value much more up, something like this. And you can see it's completely black because
this value is one. And we are going to use
something like 1.7. You can see these
particles are much more visible and that's really,
really nice effect. So this is how we can create
easily these Material. I'm going back to my camera
and you can see it looks much more realistic and looks much more to the closer to
the reference image. So I'm going to my free camera and I'm going to show
you the details. We are going to wait
a little bit for the samples and
you can see we got the noisiness and the bumpiness across the whole controller. You can see these in these highlight is
really nice effect. So this is how you can
create the main material.
11. KeyShot Materials - Joystick Material: Now we are going to create
materials for these joysticks. So we are going to the scene. We're going click on
this left joystick. We are going to hold
Control on our keyboard. Make multiple selection. Click on this. And now we got the
double selection. And I'm just going to find
these paint, shiny material. Just drag-and-drop
to our selection. And you can see these
material is applied. So we need to edit
these Material. Double-click on this joystick. We are going to bring these
value almost completely down to create something
like soft rubber material. And I'm going to bring a little
bit more roughness to it. And I'm also going to bring
these values a little bit more down to create
soft plastic material. Just a little bit. And you can see how it looks. It's really nice.
12. KeyShot Materials – LED Button Material: Our next material is
going to be these LED. So I'm going to my
camera free camera and I'm going to make
it much more closer. When you look at the
reference image, these two materials
are combined. So I'm going click
on this controller, hold my control on the
keyboard and click on this. And we are going to link
these material together. So we're going click
on this link button. You can see these two
materials are linked together. Now I'm going to click
on this part right here. And I'm just going to find something like
the light material. I'm going to the
MAC and I'm going to choose one of those. So just drag and drop. Alright, double-click
on this material. And we're going to use
completely white color. We are also going to use less intensity,
something like this. And we are also going to make
this visible and shadows. Now you can see how it looks. We can also change this
color to whatever we like, or even the intensity. Alright, maybe a little bit more so you can actually
see what's going on. Alright. And I'm just going to bring
this back to the one. This is our LED.
13. KeyShot Materials – Transparent Plastic Buttons: Now we're going to
create materials for these four
transparent buttons. So let's go to the free camera, make it much more closer. Go to the scene for selection. And we are going select
these four materials and we need something like
clear plastic materials. So I'm going to the
plastic folder. I'm going to open
this clear folder and I'm going to find
Shiny, shiny plastic. Just drag and drop. Now. I'm going to make sure
this is completely black and this is
completely white color. Alright, I'm just going to hide these four transparent
materials. Right-click on my mouse and I'm going to make
the height selection. And now I'm going to apply this color materials
for these leather. So I'm going to the
plastic and the rough, and we're just going to
apply this material. So we are going to use
the yellow for this one. We're also going to
use blue for this x. This will be the green, and this will be the red. Alright? And I'm also going to address
this roughness for all of these materials to make it
a little bit more shiny. Alright? What I'm going to do,
I'm going to bring these values a little
bit more up on every letter to make
it more yellow, magnitude, more bluish, and also make it more
green, just like this. And this bottom material will be something like shiny plastic. We are again going
select this part, just drag and drop these
plastic shiny material. Alright, I'm going to make sure this is almost completely black. And now I'm going
to right-click on my mouse and show all parts. And you can see this is
the transparent buttons. And I can also show you
what else you can change. So double-click on these
transparent material. You can change the refractive or reflectivity color to make
it like a red plastic. We are not going to use that. And you can also change these
roughness value to make it looks more like
a first material. We also not going
to use this view on completely
transparent material. So this is how you can create
the transparent buttons.
14. KeyShot Materials – Material Label: Now we are going to create materials for these
three buttons. So I'm going to the
scene and I'm going to make it much more
closer, just like this. And I'm going to select
these three buttons. But I'm not going to drag
and drop the new material. I'm going to use these
exactly material has got the rest
of the controller. I'm just going to adjust these material a
little bit more. So I need to unlink these material from the
rest of the controller. And I need to link just
only these three buttons. So lean material together. Now, if I'm going to
edit this material, as you can see, I'm just
editing these three buttons. So I'm going to double-click
on this material. I'm going to do texture
material graph. And I'm going to make
these noisy texture a little bit smaller.
Just like this. I'm going to make this
bump map a little bit smaller, exactly like this. And now I'm going to create the label for the icons
of these buttons. So I'm going to bring
the new material. So I'm going to find the rubber, rubber material,
just drag-and-drop to these material graph. I'm going to clean this graph. And as you can see, we got our new rubber
material right here. So I'm going to bring these
rubber material down. And I'm going to delete these noisy texture because I don't really
need it right now. And I'm going to bring these, bring these rubber
material as the new level. So bring it, bring it to this
material at as the label. And now we can see
the whole button. It's changed
completely as rubber. And we need to
define what will be the base material and
what will be the label. So I'm going click on
this rubber material and I'm going to make it completely white so we
can see what's going on. And I'm going to the
texture and I'm going to bring my opacity texture. So I'm going to open my folder and I'm going to bring these
texture to my opacity. Alright? And I'm going to change the mapping type because this model is
completely UV unwrap. And I'm going to choose the UV. And you can see we
got these buttons. And I'm going to turn
off these repeat. And this is alright, actually, the only thing I
really need to change is the change the color
of this rubbery texture. So I'm going to change
these diffuse to make it a little bit more
darker, something like this. And I'm going to change this reflection color to make it a little
bit more brighter. Just like this. Alright. Maybe I'm going to bring
these a little bit more up. Alright, This is good. I'm going to the texture and I'm going to create the bump, some kind of outline
of these icons. So I'm going to bring these
exactly same texture. So I'm going to hold my Alt on my keyboard and just drag and drop these
texture to my bump. As you can see, we already
changed these material graph. Now we got one texture as
opacity and second bump map. And you can see what's
happening right here. But I'm going to
double-click on this bump. And I'm just going
to make it a little bit more, less visible. And I'm also going to invert it. So maybe like this. Alright, or I'm going
to try it like this. And I'm going to invert
it just like this. This is look really good. Maybe a little bit more. Alright, This looks really good. And we got some kind of
outline on these buttons. So this is how you can
create these buttons.
15. KeyShot Materials – Soft Plastic Buttons: Now we are going to create material for this
button right here. So let's make it closer. Go to the scene, click on this. And again, we are
just going to adjust existing texture or
existing materials. So we're going to
unlink this button, double-click, and we are going to make it a
little bit bluish. So I'm going to click
here on the blue color. And just lightly blue to
make it looks more like a soft plastic with
different ends of the color. So this will be like 28 and
this will be like dirty. And you can see it's a
little bit more bluish. And I'm going to myometrial
graph the edges, these material a little bit
more and I'm going to scale the bump map a little bit more. So something to like this. I'm also going to scale
these noisy texture, make it much more smaller. Alright? As you can see, this texture
is really, really small. Just a subtle, alright? Actually, maybe I'm going
to bring these values a little bit more up these bump. So maybe just like this. Alright, this is good. And now I'm going to edit. These are roughness value. Make it a little bit more soft. Alright, this is good. And also I'm going to change
the refractive index. So maybe like this, and this will be also like
really small volume to make. It looks more like a plastic. Now, it looks much more different than the rest
of the controller. Let's add a little bit more. So let's create a couple
of more materials. But before that,
I'm just going to my scene and I'm going
click on this button. These upper triggers
are the same material, so I'm just going click on this and I'm going to
link them together. Also this. Now you can see they are
a little bit different. And that's really nice.
16. KeyShot Materials - Trigger Button - Combine Two Bump Maps: I'm going to add some more details to
these triggered top part. So I'm just going to
click on my scene, select all those materials, and I'm going to unlink
and link them together so I can just work
with these top part. Alright, and I'm going to
double-click on this material. And I'm going to open
my material graph. And I'm going to look
at these textures. Alright, they are good. So I'm going to bring
one more texture, and I'm going to combine
two textures together. So I'm going to open my material
folder and I'm going to bring these great texture
into this material graph. And I'm going to combine
these two texture together. So I'm going to call this line, right-click on my mouse,
utilities, bump it. And now we got like two slots. And I'm going to bring
these new texture to the bumps, lot number two. Alright, and double-click
on this texture. We are going to use
a mapping type UV. Alright? We need to invert this texture and make it much more subtle. Maybe like this. And you can see how it looks. Maybe even more like this. This is really nice. And this is how we can create these group effect on these
remote Xbox controller. Alright, That's really nice. Now we're just going
to continue to create materials
for these big side.
17. KeyShot Materials – USB Type C Materials: Let's create the materials
for these USB type C ports. So I'm going to my environment and I'm going to add
a little bit rotate these environments so I can see a little bit more
on these big side. Alright? And I'm going closer. I'm going click on this, and this will be like
Chrome raw materials. So I'm going to the metal. I'm going to open
the Chrome basic, and I'm just going to drag
and drop these material. Alright? This will be like
the plastic material. So I'm going to my
plastic folder, basic. And I'm going to use the shiny, not the clear about the basic
hard, shiny drag-and-drop. Double-click on this material. I'm going to make it more like the Blake and a
little bit rough. Even more just like this. I'm also going to
click on this pin. Alright? Again, I'm going to
select these pins, sorry. Alright, these are the pins in. I'm going to apply something
like the gold texture. So I'm going to my metal, precious gold, and I'm going
to use this, polish it. Double-click on this,
and I'm going to make it much more
off just like this. Alright, This is good. I'm going to make sure
I don't forget to edit these all materials. So I'm going click
on this bottom part. Alright, this is the Chrome, this is the plastic,
and this is the gold. So this is our USB Type C.
18. KeyShot Materials – Split Surface for Materials: Now we are going to separate the small faces
because these needs, need to be in their
shiny plastic material. So I'm going to the scene, I'm going to click on this part. I'm going to the tools
split object surfaces. Alright? And as you can see, I'm going a little bit closer. And I'm going to make this
splitting angle less, so something to like five. And I'm going to show you
what's happening when I'm going to increase this
value right here. So I'm going click on this, this, and this and this. Now, I'm going to
increase this value. And you can see I'm
increasing the selection. And if I'm going to
increase it too much more, I completely lose the control. So I'm going to
choose something like 20 or maybe just 50. This is good for me. I'm also going to select
these letters right here. Alright? And I'm going to increase
this a little bit more. 35. 35, looks good to me. Maybe even less. There are t. Alright. And I'm going to click on these buttons pretty sure faces. Now it's completely separated. I'm going hit Apply. And now I'm going to
apply the new material. So I'm going to the plastic or actually I'm going to paint. And I'm going to choose
these paints shiny. Just drag-and-drop,
double-click on this and I'm going to make
it much more darker. Just like this. Alright. Yeah. It looks like a shiny,
it's completely separated. Yeah, it looks really good.
19. KeyShot Materials – Finishing Materials: Now we're going to finish
all these materials. So I'm going back and
I'm going also to my environment and
bringing it back to zero, my front view. Alright, this is a
little bit more darker, so I'm going to
rotate these again. Bring more light into
this position down there. Alright, something like this. And I'm going to edit this material down
there a little bit. So I'm going click on this. And this will be
the plastic basic. Again, I'm going
to use these hard, shiny double-click on this, bring it down and
make it more rough. Ride. And I'm also going to click
on these pins. All right? Right, they, they are,
these are the pins. And I'm going for my
gold color again. And I'm going to use this one. Just drag and drop, double-click on this and make it more rough. Right? So I'm going
back to my main camera. I'm going to the environment, and I'm going to bring
it back to zero. So we are back in
business and I'm going to my free camera and I'm
just going to finish this, a grip on the backside. So go to the scene,
select these material. And I'm going to double-click
on this material, and I'm going to
my material graph. I'm going to bring my texture. So I'm going to
use this texture. Alright? And we are just going
to do the same as before. We are going to combine
these two textures together. So I'm going click on this bump, and I'm going to
click on this line, right-click on my
mouse, utility bump ED. Alright. And I'm going to bring this new texture to my
bumps load number two, there's like this,
double-click on this. We are going to choose
the UV, alright? And we can already
see this texture, but we're going to invert this texture and make
it much more smaller. So something like this. Alright, maybe
even more smaller. And I'm going to
invert it again, then be sure how it's facing. I'm going to decide, alright. And I tried these
negative value. Alright? It will be just like this. All right, This
looks really good. And yeah, this is our
final final material. So I'm going back to my camera. And these are the all materials.
20. KeyShot Tips and Tricks – Light and Materials: Before we start creating the final adjustments
and rendering the scene, I'm just going to show
you some tips and tricks. If you think you've got
too much dark the scene, you can go to the environment
and increase the brightness of this HDRI map, e.g. free. And you can see
there is more light. You can also increase the contrast, create
different look. You can also rotate this
HDRI map just like this. But I'm going to stick with
the zero because we set up exactly lightning for this
scene and this angle. So we are going to
stick with the zero. You can also change
the materials. You can go e.g. to these plastic tab or the plastic folder and you
can choose the basics. And you can apply
either know e.g. these red plastic material. And you can create your
own style just like these. Or you can go step away or
step up these rendering. And you can go to
the gold folder. And you can apply these
gold rough material. And you can play with
these textures, colors, and materials little bit more
to achieve your own style. And let me know down in
the comments section, which would you prefer the most?
21. KeyShot Rendering – Final Adjustments: Right now I'm going to create
the final adjustments. So the first step is to change the aspect ratio of this image. Go to the camera analog, this camera go to the image. We are going to the
resolution presets landscape and 1920 by 1080. Alright? And I'm going to
use this distance slider to make it look. From a little bit
bigger distance. I'm going to save the
camera, lock the position. And now we set up the new
camera with a new aspect ratio. Now we are going to
the image tab to create a final
adjustments right here. We are not going
to use the basic. We are going to use the
photographic style. And you can already
see how it's changed. We can use the liner
low contrast or high contrast
response curve value. But I'm going to
use the liner and I'm going to use the
sliders instead. So I can make these render or this image more darker
or much more brighter. But I'm going to introduce just a little bit of brightness. I can also use the
slider to make this image more
warmer or cooler. But I'm not going to
use this right now. And I can also adjust contrast
by myself completely. I would say flatten the image and make Total high contrast. But I'm going to use this to just a little bit,
something like this. I can also use this curve. It's similar from the Photoshop. It works with the
same principle, but I'm not going to
use this right now. And we can also use the color. We can saturate this
imagery a little bit more. You can see these
colorful others, how they are going to change when you are going to change it. So we can also see these bluish trigger and this bluish controller
right here. But I'm not going to
use this as well. And we can use the noise. This is really handy tool. If you are rendering noisy image and you've got
steel noisiness and noisiness. Even when you got like 400, 400 samples, you can use the noise in your image
will be completely smooth. But I'm not recommended
using one value. It's good to use value something
like 0.50, 0.4 and less. Because when you are going to work like material like these, we got loads of noisiness
in these plastic. And you are going to
use this as well. You can see it's
completely smooth and we can't see anymore these
noises and bumpiness. So we're not going to use
these for this scene. I'm going out like this. And we can also use the bloom. This is also really cool. We can use the bloom
intensity, e.g. we can use the pixel size 20. We can see the whole
image is completely blue. And if we are going to
play with this threshold, we can just bloom
these MSU light, which is really nice effect. But again, we're not going
to use this right now. We can also use the written yet. This is really familiar. You can see we got a little bit darker these edges,
as you can see. But again, we're not
going to use this. We can ask is the
background color which we all were using. And we can use also from
plate color or texture. We're not going to
use this as well. So these are our
final adjustments. And now we can focus on
rendering this image.
22. KeyShot Rendering – Render Settings Explanation: This is our final scene
and we need to render it. So go to the Render,
click on the render. And we got a couple
of options here, so we can render a still
image or animation. We can change the name
of our final render. We can change the file location where we are going
to save our images. We can choose the format. I'm going for the PNG,
which is loosely, so we're not going to
lose any kind of quality. We can also save
in this PNG format our transparency channel
or alpha channel. And we are going to render
these in higher resolution, which is for K. You can also
try to render these eight K, but I'm going to stick
with the four K. I'm also going to
select the layers, and I'm going to select
the layers, the cloud. And this layer is really useful. You can use it in
the retouching. So I'm going to cover
this a little bit later in the Adobe Photoshop, how we can write
out the whole image with these ground layer. And we got your options. Now, we can select if you
want to render these default. So that means when we are
going to render the image, we can't edit the scene. We can't change the materials. We can change the
textures or angles. If we are going to render
these in the background, which is the pro mode, you can actually edit
everything in the scene. You can change the materials, you can work on your angles. You can also change the
3D model if you want. So this is the background. And if you want to render these scene with
multiple computers, you can send these
to the network, but you have to get the
special license for this. You can also change
the core count, how many you want to
use for the rendering. I'm going with the
full power as always. Now we got free
controls right here. First control is
the custom control, and this is the most
precise control, what you can use
in the key shot. These custom control
will provide the best images with
smooth, soft edges. And you can also control
everything right here. If you're going to use
the maximum time or maximum samples he
showed will use these settings right here from the Light tab and
the Lightroom presets. And you can't really
edit too much in it. So you have to make
adjustments right here. And what it means 256 samples. It means your
image, final image. We're going to be refined 256
times with these settings. You can see I'm rendering
these image 28 min. I get almost, sorry,
over 7,000 samples. So it's rendering pretty
fast because we got simple materials and
simple 3D model. So it's going really fast and we can also use the maximum time. This is really good when you got deadline or something similar. So we set up this e.g. to render 6 h. It will be rendering 6 h and
then it will stop. Now, we can also use
the query or the query. And if you got like multiple, I don't know, multiple scenes, multiple variations
and you want to render them overnight or I don't
know in the specific time, you can click on this job and it will add these
job to your rendering. You can see I got much
more seen into this query and I don't know in the moment where I got
time for the rendering, I will process the, I will hit this
button process query, and it will render
all of these images. So you don't have to use it. You can just simply go to the option and
render it right now. So these are the simple overview of the rendering settings.
23. KeyShot Rendering – Final Render Settings: I'm going to show
you two renders, one with the maximum samples, a second one with
the custom control. If you are going to use
the custom control, I recommend that the settings 256 samples because your image will be really clean
without the noise. And you can use 14
or 16 or imbalances. If you've got like
really sharp edges and it looks really ugly,
really computerized. You can use internalizing free. And these will not increase
your rendering time. If you've got like
really bad shadow with lots of noisiness, you can use the one, you can use the two or three. This is the basic setting, but I always using two or three. And if you've got like
really noisy texture in the corners and in some kind of error like
that, you can use. These tools are free. This is the basic one, but if you are going
to use two or three, this will diorama typically
increase your rendering time. So I recommend using the
slider very carefully. And if you get still really
ugly edges, sharp edges, you can use the
pixel bureau lower, but you have to get like
really highest resolution. Increase these
because when you are, when you are working with less resolution or low resolution
and you increase this, your imagery lose the quality. So I recommended to use
maybe two pixel bluer. If you want a sharp shadows, of course you're going
to check on this one. We want a sharper
texture filtering when you are looking
for from the angles, you've got the bump
map like we regard. And when you turn this on, it's more refined, it,
it's more visible. So these settings
is really good. If you want to decrease the quality of global
illumination cage, you are going to
turn all these one, but I'm going to turn this off. So this is the settings
for the custom control. And we are going to
render these with maximum samples and
B are going to stick with these rendering settings. And I'm just going to make
adjustments right here. I'm going to use the 16 over imbalances and free
global illumination. So this will be the settings
for maximum samples. And we are going to
compare these two vendors.
24. KeyShot Rendering – Custom Controls vs Maximum Samples: These are the final renderings. On the left side, this is the Render with the
custom control setting. And on the right side, these render is with
the maximum samples. And you can already see the difference when you
zoom into this image, we add much more
smooth rendering on the left side,
especially the edges. They are really smooth. If you're going to compare this against these maximum
sample settings. And when you look
at these buttons, they are looking really good. But on the custom control, we got a little bit more
softer these letters. And if you look at the yellow, blue, green, and red color, you can see there is no noise on the maximum samples
regardless of the noise. But the good thing is we render this image
just under 10 min. And when you look at the
custom control settings, we render this image almost 2 h. So what's the difference? We get smoother image
on the custom control, but we pay with the time. And my recommendation is to use the maximum samples and
you can bring up e.g. 512 samples, not 256. And you will have a little
bit more cleaner image. And we can also render these right image in
higher resolution. And still we render this
image much more faster. And then in the custom
control settings, I can also see the bump
map is really subtle. So I'm going to increase the bump height value and I'm going to
scale these Bump Map. And I'm also going to increase the maximum samples value
from 256 samples of 512. I can also increase
the resolution, but I will still render these final renders
in for K resolution. So let's re-render the image.
25. KeyShot Rendering – Final Correction: Welcome back to the key shot, and now we are going to
create these adjustments. So I'm going click
on this bump map. I'm also going to
my free camera. Zoom it a little bit more. Alright? It just like this. And I'm going to
my material graph. And this is my bump
map for the noisy. I'm going to increase it
just a little bit. Alright? And I'm going to make
it much more visible. Just like this. I'm also going to
increase this bump map. Alright, sorry, I'm
going to increase these noisy texture
so it will be corresponding with this one. It looks much more better. I'm going to also change these buttons because
they are almost the same. So just like this, I'll say I'm going to
bring up this value. Alright, this is good. And also these
buttons right here, so make it a little bit
bigger, just like this. And these also going to
be a little bit bigger. Alright, I'm going
back to my camera. I'm going to render
this image again. So go to the render tab, make sure it's already set up correctly with the four K
resolution and cloud layer. I'm going to do option. And I'm going to use 512
samples, just like this. And I'm going to render
this image one more time.
26. KeyShot Rendering – Final Renders Comparison: This is the random number
free and you can already see we get much more cleaner
this button with less noise. So 512 samples was enough
to clean these buttons. And as you can see, we got a little
bit more visible. This bump map, which
is really nice effect. And it takes only 20 min, which is double the time, but double the sample. So it looks really good.
27. Photoshop Retouching – Introduction to Retouching: This is our final render and
this is our cloud layer. I'm also going to show you how this cloud layer works
in the Photoshop. So we need to go to
the Adobe Photoshop. And I'm going to show you
this layer, clown layer. Alright? And if you are going to select
these magic waiting till, you can now easily select these individual parts by color. E.g. if you are going click
on this green button, you are just selecting
these green button and you don't really need to create another layer mask by
hand into Adobe Photoshop. So this is pretty handy. Now we are going to
retouch this image. So I'm going to hide this layer. And I'm also going to convert this layer
to a smart object. Right-click on our mouse, Convert to Smart Object. Now we are going to the filter. We're going to use the
Camera Raw Filter. Alright, I'm going to
make these much more bigger so I can see
what's happening. And I'm just going to edit
this image a little bit more. So temporary true. If we are going to create
a cooler image or image, I'm just going to
make it a little bit more color just like this. And maybe a little
bit like this. And if you don't know what these sliders are
actually doing, you can just move
them to the left and right and you exactly know what's happening
in your image. So this is good
about the Photoshop. And this is really good. I'm also going to bring a little bit more
contrast to this image. Alright. These highlights are
looking really good. So I'm going to bring
them a little bit more. All right, a little
bit more shadow. Also. I'm going to increase a little bit
more these white, which is the white
color of this image. Alright. And I will also increase these black
color just a little bit. Now, we are going to
work with this texture. And you can see
what's happening now. It's completely not
visible this bump map. And if I'm going to
bring this texture up, you can see this bump
map is too much visible. So you need to be really
careful with this slider. Maybe like this. Alright. And also the haze. Alright, This looks really good. I'm going to show
you how this looks before and after the change, before, after, before and after. I'm going to bring up this image a little
bit more closer. And the reason why we
convert these layer to smart doorbell trick is
because right now we got history in this layer
and we can go back for these Camera Raw Filter and we can edit these again if we want. But I'm not going
to edit this again. And I'm going to edit these
buttons a little bit more. So I'm going click
on this cloud layer. I'm going to select
my major grain tool. I can have hidden these layer or selection and I'm going to
click on these buttons, and I'm going to
bring these curves. I'm going to make it
even more closer, or actually maybe even
more just like this. And I'm going to play with
these slider or this curve. So I'm going to bring a little bit more contrast and the destroy these
noise even more. Or hide these noise
a little bit more. So just like this. And it's also much more nicer. Maybe this highlight
a little bit more in these black, little bit more. It looks for me
much more better. And I'm also going to edit
this button right here. So curves, bring these
just a little bit down. And these just a
little bit more up. Just like this. This looks for me better. Maybe I'm going to decrease these blood volume and increase these
highlight while value. Alright. And I'm also going to edit these whole base
plastic material. So I'm going to click on this controller curves and I'm just going to play
with these values. Just a really loves the beat. So just a slightly, we don't want to destroy
these nice render. Alright, so this is
looking really good. So this is our final render.
28. Photoshop Retouching – Tips and Tricks: I'm just going to give
you some tips and tricks. How you can edit this
image a little bit more. E.g. you can edit
individual colors. You can click on these
parts, e.g. these joysticks. And you can go to this
button right here and you can bring up something what
is called Color Balance. And you can, you can completely change the
color of this part. So maybe I'm going
for the red color. Alright, something
for like this. And I'm also going to
edit these a little bit more so it will look
much more realistic. Maybe a little bit more down. And I'm going back to
these color balance. Alright? Just like this. And now you can
see you can change the individual parts
and the colors. You can also create
something like the monochromatic versions
of these buttons. E.g. you can go to
the hue saturation. You can completely
change these buttons. You can make them like the
stealth, something like this. Alright, if you want. But I'm not going to
use this this way. And I'm going to edit these
buttons a little bit more. Maybe like this. All right, This
looks really cool. So before and after. So this is how you can
create your own style. So maybe this is
not the perfect. We can edit it a
little bit more. So maybe I'm going to
destroy these levels. And I'm actually going
to bring up the curves, these curves in maybe
just like this here. Increase this value. Megan, going back to this color balance and I'm going to play with these little more. Alright, this actually
looks really good. So this is how you can
create your own style.
29. Bonus Content – Second Camera Angle Overview: We create the stunning
visualization in the key shot. We create all these
realistic materials and this camera view. But why stop right now? So in this bonus content, I'm going to show
you how you can keep up working on this 3D model. In the key shot, we can
create more camera angles, are more camera views. And we can also create
more lightning, which due to the different work. And I'm also going to show
you how you can use depth of field to create even
more realistic images. Let's start with this top view. So go back to the
key shot and we're just going to our camera view and we're going to
add new camera. And I'm going to call
this Main Camera top. Just like this. And I'm going to
rotate this camera and I'm going to hit
zero to these twists. So I will straight this
image a little bit more. And also right here. So it's now completely straight. And I'm going to use inclination
something to like 65, which is really nice. I'm also going to turn on these quarters grid
and I'm going to make sure it's completely
in the middle. So maybe like this. Alright, This looks really good. Maybe a little bit more up. Alright, I'm going to
turn off this grid. Now. I'm going to address
these focal and make it much more in orthographic
view, something like this. And I'm going to make
it much more closer. So maybe like this even more. Alright, I'm going to
use these sliders. So maybe like this. And I'm going to type here 675, and these will be alright. So I'm going to save this
camera and log this camera.
30. Bonus Content – Second HDR Image Lighting: Now we are going to work
on these light pink. So I'm going to environment and I'm going to add
new environment. I'm going for the
highest resolution. And also I'm going to
change this color. I'm not going to use
completely black. I'm going to make this color
a little bit more bluish, something to like this, e.g. alright. And maybe even
more down like this. Alright, this is
looking really good. So let's create an
atropine lights. So add new pin. I'm going for the
rectangular design. And I'm going to make
sure this is much more higher is brightness
or intensity. I also need the fall off. Alright, I'm going to use the set Highlight
Tool as before, and I'm going to highlight
these top part, right? Just like, just like this. And I'm going to make sure this is complete
but in the middle. And I'm going to use the slider
to see what's happening. So maybe like this, this is also really nice, but I'm going much more
for this top area. Alright, This looks really good. I'm going to
duplicate this light. And I'm going to make these
light much more bigger. So I'm going to
scale just one of the side. One of the sides. So just like this and
I'm going for a t, I'm going to decrease these
intensity brightness. Alright? And I'm going
down just like this. So maybe like this. And I'm trying to highlight these sides of these controller. So again, I want these to be
completely in the middle. And I'm going to use
this slider for down and up to see what's happening. So maybe like this. Alright, I'm going to duplicate this slide and just drag
these light, light again. So maybe like this, 90 and I'm again going
to use this slider. This is actually really nice. Alright, I'm going
much more down. Just like this. I'm going to
duplicate this layer again. And I'm going up, I'm going to make sure it's
completely in the middle. And again, I'm going
to use this slider. So maybe like this. All right, just a
little bit more. Just a little bit more. So this is looking really good. I'm going to
duplicate this light. And I'm going to make
sure it's again, complicit in the middle. I'm going to increase the size. And also the brightness, e.g. something to like
double like this. And I'm going to
use this slider. Maybe like this. Alright. This looks really nice. I'm going to create
another light. So click on this
button. Color or light. I'm going to make it smaller. Also, I need these fall off and I'm going to increase
the brightness to ten. And I'm going to bring
these completely to the -180 or you can bring it to the hundred
and 80 is the same. So it doesn't really matter. I'm going to highlight, Alright, I'm going to highlight
this part right here, so it will be the zero. Yeah, it looks really good. I'm going to hide it. Sorry. This is highlighted. Alright, and I'm going
to duplicate this slide. I'm going to move it just
right here, does zero. And this will be also zero. And this is the final,
final lightning. So I'm going click
on this button, which is going to render these HDRI again in
high resolution.
31. Bonus Content – Final Adjustments and Render Settings: I'm going to my image
tab right here, and I'm going to create
the final adjustments. So I'm going to increase the brightness a
little bit more. Just like this. And alzheimer going to
increase this contrast value. Goes like this. Sorry.
Just like this. I'm not going to use boom
the noise or anything else. I'm just going to stick with these settings and
I'm going to render, I'm going to, I'm going to
render this image as a PNG. I need the cloud layer. I'm going to the
options maximum samples and I'm going to
use 512 samples. I'm going to delight knee tap. And I'm going to make sure this is exactly in the
products settings. But I'm going to increase
this rate bounces and also these
shadow right here. So now we can render this image.
32. Bonus Content – Depth of Field Introduction: When you look at the
reference image, you can already see there is the difference in the
focus and in the bluer. So what is the depth of field? Depth of field is the value between the camera
and the objects. And we can define this value. We can define which kind of
part of this controller will be in the focus and which
part is going to be bluer. So let's go to the key
shot and let's render.
33. Bonus Content – Depth of Field Camera and Render Settings: First step is to
create the new camera. So we are going to our
camera top as before, we're going to add new camera
and we're going to call this camera depth of
field is like this, and we're just going to create the Antarctic
camera angle. So I'm going to move around
this object just like this. I'm going to turn on
these waters grid. And I'm going to
use these sliders to match it from the
reference image. Maybe twist a little bit. Alright. I'm also going to increase my focal length to make it much more in orthographic view. So maybe like double 200. Alright. And I'm going to use this
slider for the distance. So maybe even more closer, just like this. Hundred and 65. Alright, I'm going to rotate
it a little bit more. Looks really good. So maybe like this. Alright. And also I'm going to
use this inclination. So maybe like this. This is looking really good. I'm going to move this
controller just a little bit. So maybe like this. Alright. This looks really nice. This is exactly what
we are looking for. So I'm going to turn this
off and I'm going to save the camera and
look the position. So we get like 50, 50 look or the camera. So we get like 50 per cent
of the background and the 50 per cent of the
controller in this view. And I'm going to
unlock these camera. And now I'm going to, now I'm going to edit
these depth of field. So I'm going to turn
this on and you can see it's completely boorish. So we're going to click
on this focus distance. And this is exactly the same as the set highlight
in the lightning. And now I'm going to
click on the part which I need to be in
the focus. So e.g. this button, and you can see
this button is in the focus. So I'm going to click on
this controller right here. And I'm going to play
with these f-stop value. So if I'm going to
bring this to two, you can see I'm giving much
more focus to this object. So I'm going to bring this
set or something to like three or even more, five. And you can see now
it's like they're large area of focus. But we are going to use
something like 2.53. And I'm going to wait
a little bit for the preview, how it looks. I really liked this free number. So we jot these joystick in focus and the rest of
the controller is bluer. And that's really nice effect. It looks even more realistic. It looks like you are create the real photograph
he didn't render. So it's a really good, I'm going to save this camera and looked at position again. Now I'm going to create a little adjustments
to the scene. And I'm just going to
a little bit increase the brightness to
something like this. And I'm going to play
with these, sorry, these contrast value, but I'm
going to stick with this. This is actually really nice. So we're going to render
this image as before. So go to the render. We are going for the PNG for
K resolution cloud layer. And we're going to
use 512 samples. We are going to our Lightroom
presets right here. We're going to make sure it's in the product and
we are going to increase rainbow sees and
also global illumination. And now we can
render this image.
34. Bonus Content – New Depth of Field Camera View: Now when we know how
to use depth of field, we can create copper, couple more angles, and we
can create more close-ups. So let's go to our
camera or new camera, and we're going to call
this close buttons. Alright, and now I'm just going to move this camera
just like this. I'm going to make it a
little bit more straight. So I'm going to use
also inclination zero. I'm going to rotate
this the front. And I'm just going to use maybe
more of these focal lens. So 125, I'm going to
use this inclination. Just like this. I'm going to turn on these quarters grid and I'm going to make it
much more closer. Alright, Just like this. Maybe a little bit more. So, maybe like this, this inclination,
little bit more closer. Alright. Just like
this and distance. Maybe like this, or actually
maybe just like this. This looks really good. So a little bit more down. Yeah, this looks really nice. Let's turn these grid off. The camera.
35. Bonus Content – New HDR Image Lighting: So go to the environment,
new environment. We are going for the
highest resolution. We need, the black color. We are going to add new PIN. As before, It's the
same, same workflow. And we are going to increase
this brightness to ten. We're also going to
use the soft edges, so we need to turn these on. And I'm going to click on the set Highlight Tool and
I'm going to set highlight. So I need to come into
the light from the side. And I'll say I'm going to use this slider to move it a
little bit more precise. Maybe like this. This is actually really nice. Yeah, This is good. I'm also going to
duplicate this light. And I'm going to move
it something like this. Or even more up just like this. But I'm going to decrease this light pink because
this is our main line. So we don't want to destroy it. And I'm going to
use this slider. So maybe like this and
a little bit more up. Just like this. This is really nice. Going to duplicate this
light one more time. And I'm going to bring it
somewhere around here. Maybe more like this. I'm going to create the
highlight on this edge. So set highlight and
click on this edge. Alright, I'm going to increase
the brightness to ten. And I'm going to click on this edge right
here, something like this. And I'm going to use
this slider to move it a little bit more
to the left side, alright, and little bit more up. So this is our light
pink click on Done and render this HDRI in
full resolution.
36. Bonus Content – Finishing Depth of Field and Render Settings: Now we are going
back to our camera close up buttons and we are going to turn
on this function, the depth of field. I'm going to use this
focus distance tool. So I'm going to
click on this button and I'm going to play with
this value little bit more. So I'm going to use
more of the free. Alright, this is really nice. You can see the effect. Maybe I'm going to increase
it to something like four. I'm going to wait a little
bit for the preview. Alright, This looks really good. So I'm going to save the camera, the camera position, and I'm going to render
this image again. So Render makes sure
it's in the PNG for K resolution cloud layer
options 512 samples. And again, lightning presets, product 16 Re imbalances and
free global illumination. Now we can render this image.
37. Bonus Content – Bump Map vs Displacement Map: In this video, I'm
going to talk about the bump map and
displacement map. And bump. Bump is the fake geometry displacement
map, It's the real. And what I mean with this, if you are going to create a really close up images
of this controller, e.g. something like this. You can see this bump map, this group, it's
completely fake. It's got no geometry. Just the fake effect is really
good for either no shoots with the long distance
when you are not too much close to
these free model. So you spend less time to
render the whole image. If you are going to
use displacement map is much more heavy and you will spend a lot more time
to render image like this. If you are going to check
these three angles, volume, this is like the basic because
we got everything set up. The basic without the
displacement map. So if you are going to
double-click on this material, we are going to material graph. And we are going to turn off this bump map of this
group right here. We're going to delete this line. And we're going to bring
the real displacement map. So we're going to
right-click on our mouse. We're going to do
a utility, sorry, we are going to the
geometry displays. We are going to
bring this texture to the displacement map. And we are going to
displacement Bob, bring to these material. Now we got this button right
here, just the pop-up. And we are going
to click on this. And you can see how these value three angles are
going to change. They are going increase. So click on this. And now he showed with calculate the geometry based
on this group texture. And you can already see
it looks completely agree and this value
is completely beak. So we're going to play
with this a little bit. So we need just a little
bit of these height. So we are going to decrease
this height, as you can see. Alright, maybe we are going
to create it a little bit more bigger, just like this. Alright, this is too much, so we're going to
stick with this. This looks really nice. And you can see it's
in the low resolution. So what we can do, we can
decrease these triangles size, so it will be much more precise. And we can also increase these three angles
size, e.g. 12th. We're going to
execute the geometry. And you can see how it looks. It's much more softer, smoother, and this value is even
much more higher because we bring up a little bit
more resolution to this. So I'm going to clean this graph and you can see how it looks. Alright, is looking
much more realistic. And now we can create the
close-up image from this side. So let's work on this.
38. Bonus Content – New Close up Camera View: We are going to our
camera at new camera, I'm going to turn on these
quarters grid as before. And I'm just going to
match the reference image. So maybe like this, or actually just like this. Alright? And I'm going to use these inclinations are these
azimuth value right here. So maybe like this. Inclination, just like this. Also, I'm going to use these a little bit, maybe like this. And I'm going to play
with this distance value. So maybe like this, alright, even more. Just like this. And I'm going to make
sure it's in defocus. So maybe like this. Alright, This looks really nice. This is all really good. We just like this. Alright. Now I'm going to
turn off these quarters grid. And I'm going to
save this camera and the look, the position. And now we're going to
work on the lightning.
39. Bonus Content – New Close up HDR Image Lighting: Click on environment, and we're going to
add new environment. We are going to choose
this highest resolution and black canvas so no
lights in the scene. Now we're just going
to add new pin. We are going to use
the circular design. Much more bigger brightness. And of course we are
going to make soft edges. Now I'm just going to click
on this side right here. So maybe like this, this looks really good. And I'm going to use
these sliders and make it a little bit more
from the reference image. So maybe like this
also goes like this. This looks really nice. I'm going to
duplicate this light. And I'm going to click
on this side right here. I'm going to make
it less bright. So I'm going to move
it a little bit more. Alright, again, I'm going
to use these sliders. So maybe like this and
this will be more. Already looks good, but I'm going to duplicate
this light again. I'm just going to bring
these light little bit more. This side right here. So click on this. Alright, maybe just like this. Make it less bright. And again, you use
these sliders, these even more the spot. So it looks really good. Little bit more up in yet, this is really nice. I'm going to create
the final adjustments. So I'm going to image, I'm going to increase my brightness or the
exposure of the image. I'm going to increase
my contrast. Now. I'm going to play with
the depth of field.
40. Bonus Content – Finishing Depth of Field Camera View: Bec, the camera. And we're going to unlock this camera so we can
edit this camera. And I'm going to use
the depth of field. I'm going to click on
this, the focus distance. And I'm going to
click on this button right here, just like this. And again, I am going to play with these value
little bit more. So maybe like five or
I, this is too much. So I'm going to try the fall. May be free to free. And you can see how it looks. This is actually really nice, but I'm doing 4.5.
Click on Done. And we're also going to render these environment in HDRI
map in high resolution. I'm going to wait a little
bit for the samples so I can be sure it
looks really good. And yeah, it looks really nice. So we are going to the render. And again, we're going to
render this image as a PNG for K resolution clown layer
options, 512 samples. And we are going
to our lightning preset and we are going
to make sure it's in the product with
the 16 rain biases and free global illumination. Now we can render this image.
41. Outro - Final Renders: So this is the ending and
these are the final renders. I'm just going to
say big thank you to all the students who
watched this course. And if you've got any questions, let me know down in the
comments section and I hope I will see you
in the next course. Have a nice day and
have a nice render. Bye-bye.
 Texture Man, Rendering All Day All Night Long