Transcripts
1. Course Promo: Hello and welcome
to this course. I'm using generative
fill within Photoshop. Generative pill is Adobe's
answer to image based AI. Now with this tool, you can
expand the edges of a canvas. You can add elements
to your image. You can remove elements
from your image. You can change the
style of an image. The possibilities are endless, and it is such an
exciting new tool. Now this course is
going to show you many different ways that you can use this tool to improve, change, and completely
revitalize your images. There's 15 lessons
within this course, comprising of two class projects where you
will be able to use the skills you'll learn in a course to create
your own images. So I'm super excited to go on
this journey with you guys. I can't wait to
see what you guys create to please upload
everything from projects. Anyway, it's really exciting. So let's just jump
into the first lesson.
2. Lesson 1 - How to access Generative Fill and the Lesson Resources: Hello, welcome to the course. I'm super glad you
joined us and I'm really excited to see what you
guys can do in this course. Now, in order to
continue in the course, you're going to need
access to certain things. The first thing
you're going to need is access to all the images. Now, I provided a text
document which will give you links to all the images
which are going to be free. There are some images
which are my own and I've also uploaded those images. So every single image that
I use in this course, you will have access
to either via a link, which I'll give you, or via a direct download
of the image. Also, you're going to
need access to Photoshop. Now, when I recorded
this course originally, generative fill was only
available in Photoshop beta. Now generative fill is
available in Photoshop beta, but also Photoshop 25
and any future versions. Generative fill is free to use as long as you have an
Adobe subscription. However, after November 1, they will be bringing
in a credit system where you get 1,000
credits a month. 500 credits a month. It's dependent on
your subscription. So make sure to check, and
I'll upload a link as well in the resources section
so that you can check how many credits
you're entitled to. Other than that, there's
nothing else you need. So let's jump into
the next lesson where we'll look at
using generative fill in Photoshop to expand the edge of the
canvas of our image.
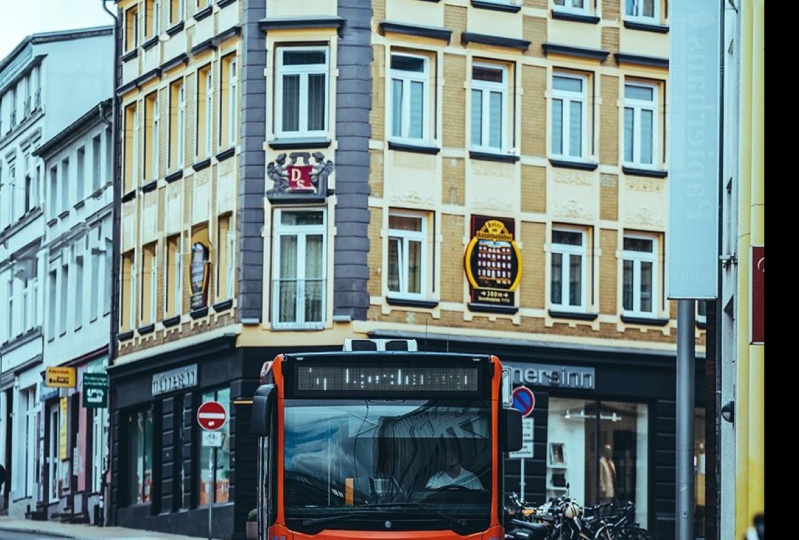
3. Lesson 2 - Expanding an image with Generative Fill : Okay, I'm welcome to the first lesson where
we are actually, and finally, inside of
Photoshop, 2023 beta. Again, depending on when
you're watching this, you may be in an
even later version, but I'm in 2023 beta. Now I have an image here and
I have another image here. Two photographs of which are going to be available
for you to download. What we're going to do in this lesson is
we're going to look at what's called
generative expand. So before we start actually
typing in prompts, we're not even going
to begin with that. This time what we're
going to do is we're going to look to
expand this canvas. So this is a photo that
I took portrait mode. But let's say I want to
turn this into landscape. Well, I can do that. If I click the crop tool, you'll notice at the top
this is all changed. Now we've got our fill method by here and we can say
background default, which will just
fill it with white. When we drag this out, content aware fill,
which is something else. It's not very good version of kind of using what's
already there to fill here, but we want to keep
it or make sure it's got generative expand. And all we need to do now is
if we pull out like this, let's make it a little
bit bigger. There we go. Now we can type a prompt
in there if we want, but if we leave it
blank, it's going to use the information
it's already got. So if we just click
the tick icon. Okay, you'll now see that
we have three options. Next to our layers panel. We've got our properties panel. If you can't see it,
just got a window and turn on properties in here, you'll be able to see there's generated us three
different variations. And what we can do now
is we can click through and we can pick whichever
one we feel is best. Actually, I'll be
honest, I like them all. I'm probably going to go ahead and stick
with the first one. Yeah, I really like this. What we can do now
is we can see here, this is on our layer. This is the additional
that it's made, which is really, really cool. Okay, well let's have a
look at another example. I've got this one by
here, a drone shot. So what I want to
do with this one is I actually want to
zoom out some more, make this probably square. So I'm going to go and
get my crop tool and I'm going to change this
to one, to one square. So I can just go like this
and maybe bring it up. And then it's going to
extend it now up and down. So let's go ahead and click Tick and see what it gives us. Perfect. And I've now got this photo in three
different versions again, and it's made it
completely square. I think my favorite is going
to be one of these two. I think I'm going to
go with this one. And let's go back to layers. And again, we've got
from this to this, which is really,
really cool and it looks really well done
and it looks real. So that is the
generative expand. Get your image, go
to the crop tool, make sure your film mode is on. Generative expand, expand out. Oh, I'll just turn
it off square and back to width and
height resolution. And let's pull it out
here. And there we go. We've also got more now, so if we turn these
two off, that's it. That's amazing. What you can also try and do is
when you're doing your generative expand
is you can try and type something in the box by
here and see what you get. That's it for this video.
In the next video, we're going to have a look at removing elements
for generative fill. So I look forward to seeing
you in the next video.
4. Lesson 3 - Removing objects with Generative Fill : And welcome back.
Now in this video, what we're going to do is we're going to have a look at using generative fill to
actually remove objects. So this is one of the images
that you'll have a link to. And we've got a
bike in this photo. I don't like the bike, so I'm not going to use the
crop tool this time. I'm going to come up to
the second tool by here. I'm going to hold my click down. And then I'm the one below. I'm going to hold my click
down and go to the tool. And what I'm going to
do is I'm going to hold Alt or Option
key and scroll in. And I'm just going to
make a selection and draw around this
bike quite loosely, but you want to make sure that you do get all the
bike in there, just something like this. And then what I'm
going to do is I've got this little
generative fill box. You've got a few options
along the bottom, so you may want to hover over and kind of have
a look at these. Now, I'm not too fast
on going through these. You know, you can create a
mask from that fill selection, all of this stuff invert it. But I'm actually
going to go into the generative fill function and I'm going to type remove
and click Generate. And just like that,
that's not the best one, but if we come
across, look at that, it's removed the bicycle, I didn't even have to tell
it to remove the bicycle, it's just gone ahead
and it's done that. I think this is my
favorite version. So let's come to
layers and here we go. It's remove the bicycle. That is honestly insane, If it didn't do quite
a good enough job, what you can do is you
can just click Generate again and it'll generate
more variations. You may want to type
in remove bicycle, or remove object to see if that gives it
something better. It is all about
playing around and seeing what gets you
the best result. But honestly guys,
that is insane. It's done that in
literally seconds. So let's go ahead
and try that again. We've got an image here
and I want to remove, let's say, this little
silver pouring jug by here. It's a bit more complicated
because it's behind this. So we're going to
want to be quite careful with our mask
in this instance. So what I'm going to
do is I'm going to use my lasso tool just to kind
of roughly draw around. And I'm just going
to come up here and I'm not going to
cross over there, I'm going to come up and
just go loosely around. Okay, we've got a selection, but we want to get
this in there. So what I'm going
to do this time is I've still got that
selection selected. So I'm just going to hold
my click down and go to polygonal, polygonal lasso tool. Now with that selected, if I hold shift, you'll see that a little
plus button comes up. So hold and shift, I'm
just going to click, and now I can let go of shift and I'm going to click in here. And basically this will just
kind of let me use loads and loads of clicks just to
get quite tight around this. There's many other ways
you could have done this. We could have used
the magic one tool, we could have done
many different things. But if you're new to Photoshop, then I'm just showing you
just various different ways. So now I'll come back and join up and we've got that selection. So again, I'm going to go
ahead come to generative fill, and I'm just going to try
typing in remove and generate. Okay, so let's have a
look at the results. For some reason we've
got something by there, and this one, if
I click through, we've got actually we've
got another one of those little small cups
which aren't actually mind. And here we've got, I think, replaced it with a little bit of a bowl of potatoes or bread. I'm actually going
to go for this one. I don't mind that being there. So I'm going to go ahead and now here's the
before and the after. If you didn't like having
the extra cup there, what you can do is with
this layer selected, go back to properties and
just try generate again. So I've got ahead and done a few different generations
and mine isn't moving, But let's have a
look, a little trick. I've got something
which is quite small here that it's
replaced it with. So what I'm going to do is
I'm gonna come into layers. I'm gonna hold shift
and hit command or control E to
merge these layers. I'm now just going
to do the same again And I'm not going to
use my polygonal lassu, I'm gonna go to my normal lassu. And if I just do a relatively
tight mask around this, what I'm hoping is the removed
function will now work. So let's try again. Go
remove and generate. There we go. So now
it's removed it. However, the other two options
are still quite funny. So this is the thing
with generative fill. It's really, really cool. But sometimes getting it to do exactly what you want it
to do can be quite hard. So a few workarounds
are often needed. And what I did last time is I merged the two layers because there was something
in there smaller by selecting them
and control command. And then I drew round
again just to remove it. And this is our final image. So we have gone from having
a silver jug there at the beginning to having
it completely removed. So that's how you remove
things with generative fill. Next lesson what I'm going to
do is I'm going to set you a class project where
you're going to have to re, utilize
these skills. Look forward to seeing
you in the next lesson which will be our first project.
5. Lesson 4 - Class Project 1 : Welcome to your first
class project class, project number one. So what you're going
to do for this is I'm going to give you an image. You'll see that image
on screen right now. And using the skills that you've already learned in
this course so far, your job is to see
if you can remove the wires within this image because they're
quite distracting. Go ahead, give it a go and
let's see how you get on. And don't forget to post your results because I
really want to see them.
6. Lesson 5 - Adding Hair to a Model with Generative Fill: Okay, so I hope you guys
enjoyed the class project. I hope you found it
useful And helpful. So what we're going
to do in this lesson, we're going to have
a look at adding hair to models or actors. I don't think that
generative Phil is really, really, super good at this, but it is getting there. So it's really important
that I do show you this. So what I'm going
to do is I've got this photo here again.
You've got the link. I'm going to get my lasso and I'm going to draw
something like this. So I think his hair would be, remember to go a bit
above as well and come around close to his
ear and up like that. Now what I can do is
click generative fill and go wavy hair style. And click Enter. Like I said, I don't think when
I've tried this in the past that it's
really, really good. But it's definitely
definitely getting there. So by the time you watch this, it may well be super good. Okay, so here's the result. That's still probably
better hairstyle than me. Let's go through. I'm
like in this one, I think this one's
quite fashionable. What we could try is we could try and enter down
here or in there. But I'm going to go down here. Thick, hurly long hairstyle. And basically, I
think, I'm hoping that that may give
me a bit more hair. Okay, so some quite
funny results here. Let's have a look though. I'm okay with that one. And this one, again, is okay. Yeah, But let's
consider this guy, even though these
hairstyles may not seem 100% there or they may to
you, let's just have a look. The lighting, he's
being lit from this side and this side of
his face is in darkness. All of these hairstyles are certainly picking up on
the lighting, arguably, this one a little less, but all of them
certainly are looking at the lighting and blending
really, really well. I think this one or this one
is probably my favorite. So let's go and have
another look at this. Let's see if we can do it when somebody's wearing
a baseball cap. Well, let's do the
same thing again. Let's go quite tight
around here now. It's quite close
to his eyebrows, so I wonder how it's
going to deal with that. So let's go round and like that. I'm just going to add
in hold in shift. I'm just going to add in a
little bit more down by here. And there we go. So I'm
going to go generative, Phil, and I'm going to
say messy hairstyle. Okay. I think that's actually
done it quite well there. I would say even better now. This one? No, this
one no, as well. But I do think this
one is pretty cool. Let's have a bit of a zoom out. I think that's holding up quite well what you could
do in this instance. I'm just noticing that the
black point of this is not, is much darker than
the black point here. Arguably, it's as
dark as his eyes. But what you could do
with this is now go ahead and put in a curves. If you're used to all this, what you could do is hold
alt between these two. So this curve now that
allow comes up and is now effecting just that
come back into the properties of the curves. And let's just
decrease some blue to make the hair just a little
yellower to fit in there. And possibly increase
a small touch of the green arguably. I think we should be doing
this in the shadows by here, something along
the lines of that. And if we zoom back out, that is now much better color corrected into the actual
yellowness of the shot. And you can see it now. We took, got a really cool hairstyle, just really, super quick. I mean, that is,
that is awesome. Obviously, if we click here
and go back to properties, the other ones didn't
really hold up, but the first one certainly did. And I'm sure if we generated a few times with a couple
different prompts, we would get something
that is super awesome. Okay, so that's it
for this lesson. Now in the next lesson, what we're going to do is
we're going to have a look at adding jewelry
to actors and people. So I look forward to seeing
you in the next lesson.
7. Lesson 6 - Adding Jewellery to a Model with Generative Fill: Okay, and we're back. So we got another image
here of a lady on a laptop. So I want to give
her a necklace. So let's go ahead, get our lasso tool. You
know the drill. Let's draw in something
along the lines of this. Let's come up, it doesn't matter that we're going
over her hair, but there, let's make a little bit
larger at the bottom, so there's room for
something to dangle. Let's go diamonds necklace. Okay. So this is
looking pretty cool, I think because I went
wider at the bottom. It's really kind of looking into that and taking
that on board. Again, it's doing
that here and here. So I think this one's
probably the best one. You could go ahead
and you can try and type in pearl necklace. So let's go and do that. I've found that sometimes if I type it in a pure
and click Generate, it still looks over here. So this again, it's a bug
that's gonna get figured out. So I'm just going to
type it over here and go Pearl necklace
and click Generate. Cool. So let's
have another look. Here we go. We've got probably very similar results
here. Yeah, awesome. So they're quite cool as well. So now this model has whatever necklace she wants
that is really awesome. Let's go ahead and
look at this one. We've got an image
of a man here, and he's looked like quite
a successful businessman. Maybe not yet until
we give him a Rolex. So let's go around here. Let's draw just loosely. I'm not going to go tight to
the edge of his arm because I'd imagined that you'd see
a little bit overlapping. But here, so I'm just going to go something along the lines of this and I'm going to type
in expensive Rolex watch. Okay, so this is starting
to struggle now. So we've got the buckle and
it's not looking very good, and that's a little bit better, but also not doing very well. So what I'm going to
try and do is I'm just going to type in Rolex Watch. And if that doesn't
work after generating, I'm just going to
type watch and I'm gonna see if I can
get it better. So you can actually see here, I've done 24 generations. And honestly, I think the best one I've
probably had is this one, which is one of my earlier ones. Now I'm really glad
if you zoom out, you probably wouldn't
notice it too much. But I am really glad
that this happened, because what I think is
really important is to acknowledge how
powerful AI can be. But also that
sometimes it is really difficult to get AI to do
what you wanted to do. So this isn't a bad thing. I do think that AI will
certainly catch up with us and it will be able to perform these
things even better. This is certainly
the early dates, but it's also important
to know that having Photoshop skills for this
craft is really important. We can't look to
rely solely on AI. So see if you guys can
come up with something. What you could potentially try is you could potentially try scrapping this and possibly
redrawing the mask. Maybe make the mask a little bit wider and
see what happens there. Perhaps that'll help.
And you know what, I've just tried that
on my first go. I've got at least a watch strap that is looking a lot better. So I reckon if I go ahead and
do this a few more times, I think I'll get something
that's working really well. But this is another
important thing to realize that if it doesn't
work on the first attempt, try redrawing the mask. Try again, start from scratch. It's all about not
relying 100% on the AI. But again, you need
to make sure that you are guiding the AI as a tool, very, very carefully steer it towards what you
want. Okay, cool. So in the next lesson, what we're going to do is
we're going to have a look at adding clothing onto a model. So you can see
we're slowly doing more more and building up to
bigger and bigger things. So I look forward to seeing
you in the next lesson.
8. Lesson 7 - Adding Clothing to a Model with Generative Fill: Okay, and welcome back. So we have two images here, This one and this one. Now on the face of it, this one probably looks
like it might be a little bit harder because we've
got hair over his chest, these sort of bands up here. And his arm is crossing
over his chest. So to add a shirt onto him might actually
be quite difficult. So what we're going
to do is we're actually going to
start with this one, where at least we can see
on this lady by here, we've got everything sort of separated, nothing
crossing over. So this one should be easier. So what we're going to do
is we're going to go ahead, I may, in this instance, use
the polygonal lasso tool. So I'm just going to
come in with this, go around and click
in the shape of a T shirt or whatever
you want to add. Rest, top dress, whatever. It's completely up to you. I'm
just going to go ahead and add a sort of T shirt
shape within here. And come up, just give it
the general shape down, but you can also say whatever
color shirt you want. Absolutely. Up to you.
So let's come in here. And there we go. Now, because I've used
the polygonal lasso tool, I just find it easier to
draw with what you could go ahead and do
because it's also going to regenerate
some of the sand. Probably what you
could also go ahead and do is come in to
select and modify. And just give it a
bit of a feather of about five pixels just so when it generates
something new, it's not really sharp edges, it's something you can
do every time anyway, so I've just done that and I'm going to go in with
generative fill and type T shirt
and click Generate. Okay, so let's look
at the results. I'll be honest, that's not bad. It's a little bit kind of
shrunko waist quite a lot. But there have a look at this one and that one as
well, that's quite good. It's again, quite fitted. If we turn it on and off, you'll see it has shrunk her
waist quite a bit there. Now, that could have
something to do with how I drew the mask again,
thinking of earlier. So I'm going to give it
another regenerator. May draw the mask again. And I'll join you in a minute. Okay, so I'm happy
with this one, but here this generation again, has shrunk her
waist a little bit, but it's not too far from
what we started with. And it's also shrunk
her shoulder. Now, I did do another version where I actually went really, really wide with the mask and these are the kind of
results I was getting. It was a lot more loose
and a lot more kind of, well, not working as well. So again, just bear
in mind your mask could kind of be having an
influence on your generation. So I'm gonna go ahead with this one and I'm going to
zoom out and just imagine earlier we removed somebody's hat and
we gave him hair. We could obviously draw around this and change the
football to a basketball. Later on we're going to be changing the background
of an image. So honestly, this could
be so, so powerful. Let's have a look
at the next image. I'm going to try the same
here, and I'm going to try and add a shirt on this guy. And we're going to see
if it holds up as well. Because some people
may think that this may be more challenging
and it might well be. But let's find out
together, because again, it's really important
to understand the limitations of this
AI as good as it is. So let's go ahead and let's
just start drawing a shirt. Now you can see I've made my
selection and I've actually not even cut out this by
here. This little gap. I've just gone for the
whole thing because I just want to see how
clever this AI is. Can it recognize where his arms are and that
there's a gap there? Well, let's go ahead
type in Generate. I'm going to type short sleeved
shirt and click Generate. Honestly guys, that
is pretty good. Yes, it hasn't got the full
gap there, for example. But there could be a bit
of shirt overhanging. Of course there could. I'm not even going to click through yet. Let's just have a look
at this. Compared to this, that's not bad at all. I mean, it has moved
his arm because again, we drew around everything. So let's moved the direction
of his arm down there. That's not terrible,
considering it took so consider it was so quick. And look at the hair, it's
even built the hair back in. I would arguably
say the worst part of this is the
little button thing, but there is almost like a
little hole in his shirt. Everything else is insane. So let's go back to properties. Let's have a look at
this one that's cool. I don't think the texture on
his skin here is holding up, but you could obviously,
you could just go ahead and you could lay a
mask that and erase it. Let's have a look at this one. Yeah, I mean, it
sure could do with some iron in the pattern
isn't holding up. But again, these two honestly,
really, really good. The white one I
think is amazing. You could really quickly correct that. So this one as well. Now let's say we did
stick with this one and that texture there isn't
really holding up. So what we could do
is we could come here and we could get our magic
one tool just by here. And I just by hitting
W click within here, I'm holding shift and we're basically selecting
all this color. I'm going to turn
my tolerance to 32. And what we could end
up doing is undo. Just make sure that
we've got all of this. And I'm just going to
go for this for now. And basically on my layer mask, not on this, but on my
layer mask I could draw in. Let's get a big brush and I'm going to
draw black in there. And essentially what
that's going to do if I hit Controlled to deselect
is it's basically saying, I'm going to hide those
pixels where you draw black. Now that I've de
selected, I can draw anywhere and basically
paint his skin back in. But you could come in
and you could come down and you could basically
draw all this skin back in. Do it obviously a lot
more neatly than I am. And you could then
reveal the bits that you want to reveal,
just back underneath. Okay, and then we've got that. Now let me undo all
of that and come back to this generation by here. Because again, we were saying that there
was a hole there. So again, if we like this one, what we could go ahead and do
is we could go and get our, let's say our spot
healing brush tool. Zoom in and we could
just draw in here. Okay, just click okay there. We could just draw in
here and say, right, just just figure that out and it's not possibly
holding up completely, but we could get
some other tools. So let's merge these, select them both control
and I may go ahead and get my clone stamp tool which
is by here hold alt. And I'm just going to
come up here and just paint the more of
these pixels in. And you can see I
go there, reselect. I'm basically very, very rough. Cause I am rushing, I'm
fixing all that there. And you zoom out
and it's all good. So really, really powerful. I'm surprised in one sense, that this fixed up a lot
better than this one. But you can see just how
powerful these tools are. So I'm going to leave
it there, because in our next lesson we're going to do something even more exciting, where we're going to add a
reflective lake to an image. So I look forward
to seeing you in the next lesson. Cheers.
9. Lesson 8 - Adding a Reflective Lake to an Image with Generative Fill: Okay, we're back now. These two images I'm going to be giving you myself because
they're my own images. So this is from a
skiing trip last year. But what we're going
to do is this is actually in this skiing
resort in teen in France. This here is actually a lake, but it's frozen over in this
one and it's got snow on it. Or at least I think it is. I think maybe the lake
is actually by there and I think this is
actually ground. But anyway, it doesn't
really matter. I'd love to put in
a lake here and have it reflect the mountain
and all these things here. So let's go ahead and try that. So what I'm going to do is
I'm going to carefully come in and I'm going to get
this lasso tool again. And I'm just going
to draw around just around here quite loosely. I'm going to draw around here because this
is where I want my lake to be and
just come back round. I accidentally messed up a bit. There's a whole shift
to add that in. And I'm going to type
in reflective lake and click Generate.
So here we are. We've got some reflections Now, I did actually generate this twice. I wanted
to add something. I wanted to add lake water
and ripples because the first three were almost image
reflections like like a mirror. So now I've gone ahead typed in lake water comma ripples,
and look at these. I like this one and
I like that one. And honestly, if you
zoom out that really does hold up for
literally 30 seconds, you honestly can't complain. Now I've got another image here. This one's a bit more of
a sort of high up shot, and I feel it's probably going to work better
here because you've got the sort of where you'd expect a lake to kind of meet houses. And you wouldn't necessarily
expect to see one up this high because these
are high mountain. So what I'm going to
do is I'm just going to draw loosely around here. And I'm going to
try here as well. And we're going to see
again how it ties up. So I'm going to go general
to fill lake water and ripples or let's go
ahead and try it without ripples to see
what it does, okay? So for literally 30
seconds even this is not a bad result because you can tell that we're really high up. There isn't a lot
of detail in here. So you can also have
a look at this one. I mean, it's added its own
islands that is really cool. The reflections are
ultra real because it's such a massive mountain
from such a distance away, it's really got the
scale right by there. Let's have a look at this one. Again, I'm not, I don't have
any issues with this one. I don't like where it
joins because you'd expect there to be like a
tree line or something there. Whereas these ones
are a lot better. And honestly, that's
pretty good as well. For 30 seconds, you cannot
complain about that. Cool, so I mean, that one I've
found really, really cool. But in the next lesson, what we're going to do is
we're going to have a look at changing the
background of an image. So again, hope you
enjoyed so far. Let's jump on into
the next lesson.
10. Lesson 9 - Changing the Background of an Image with Generative Fill: Okay, so here we are. We're back again. Now I've
got this image here again. We'll have the link
to it. And I want to, well, I've just read it
from there overnight. I want to remove the
background or replace it. Now what you could do
is you could go ahead and you could kind of select that background
for yourself. Maybe a bit difficult with
this little antenna coming up, or you could argue you've
got more control over it. But what we're going to
do is we're going to have a look down here at this
little removed background. So if I give this a click, what you'll notice
is it should make a selection or it's actually removed the
entire background. However, I don't like that because if we turn
this layer mask off, disabled layer mask,
you'll actually see that it's kind of gotten
rid of the table. I only want to alter
the background. So what I'm going to do is
I want to actually keep, like we said, this little
window silver here. So I'm going to come in
and I'm actually going to draw around that part which
isn't currently being kept. So let's just go in
there and just come across and there
we go, like that. And I'm just going to come down, just draw a little
box around it. And what we can do now
on our layer mask, not on this but on our
layer mask, right click. And we'll enable it again. And we can get our brush tool, and basically we want draw white now in where
we want to see it. So if we draw white
back in here, we're actually
bringing it back in. So that was a little bit of
a quick way of doing it. You could go ahead and
select and modify feather by five pixels because
it was a bit of a blurred end on
the edge but there. And also if you look
really closely, hit control or command
D to deselect. We want to get a really small
brush still on the mask. And you may want to just
draw this back in like that. And that was basically a
quick way of doing it. Sometimes depending
on the image, it'll remove exactly
what you want. But again, we can't look
to rely solely on AI. So we've now separated this from the background and
we want to actually fill the background.
So how do we do that? Well, we need to select
these transparent pixels. So first let's go ahead and just go and
create a new layer. Select them both, and
hit control E. So you've got all this on one layer. Now what we can do is we
can use our magic wand. So just come here, magic wand. And I'm going to say expand
this by just a couple pixels. So let's go select Modify. Expand by two
pixels. There we go. Something like that. And
click Generative, Phil. And I'm going to put
Beach and click Generate. Okay, so this is what we've got. We've now got a little bit of
a beach in the background. Let's click through,
and you can see it is actually trying to build
something where that antenna is, so you may want to
generate a few times, but you can see we have
successfully separated this from the back and it is
doing quite a good job. You can click through
and carry on generating, and this is now generating
something in the background. So we've got another
example here, possibly more complicated, but because it's a person, we may actually be able
to select the subject. So let's go ahead and see if
we can select the subject. Okay, look, it's done
that in 30 seconds. So now that we've
selected the subject, we could go ahead and
remove background. But what I'm going to do
instead this time is show you a different way we've
selected the subject. So if we go to Select and inverse now it's
selected the background. So I can click Generative Fill. And I'm just going
to type a temple. So we'll put a temple in the background and click Generate. Okay, so let's click
through and okay, the images are
quite a bit large, so I mean, that
one's not too bad. You can see it's in the
entrance to a temple. You can go ahead and
maybe let's go for, I don't know, let's go for
something generic like forest. Okay, so that's pretty cool. Let's click through. Yeah,
that's fine as well. Yeah, I like that. It's got
some depth of field there, so let's consider this. You probably thought this one because it's like a cube and just like a sort of
rectangle wing window sill. Lots of simpler shapes that
this may have been easier, but actually we did use a different method
this time with this one. We selected the subject, then inverted it, and
then use generative fill. Whereas this one we clicked, remove background, and then we did a couple things
with the layers. So yes, there's two
different ways. I do prefer doing it this way, but it's important
that I wanted to show you both ways to do it. And again, because the AI is trained on loads of
images, actually, it's trained on hundreds of
millions of photos of people, whereas it's probably not got as many images of a
radio on a window sill. So actually this one
was a lot better at actually recognizing
where the subject was. So that is how to change the background of images
with generative fill. And in the next video we're
going to look at changing the style of an image with
transparent generative. Phil. Really,
really interesting. So let's go ahead and jump
into the next lesson.
11. Lesson 10 - Changing the Style of an Image with Generative Fill: Okay, and we're back with probably the most exciting
lesson in this one, to be honest, because we do have a cute little puppy here. I could probably leave this on the screen for the
remainder of the lesson, and you'll probably be happy. But I'm not going to do
that. I'm going to show you a really cool technique
now using this image. And there is also another image for you
to play around with, which is this one which
we may not even get on. Because again, what a cute dog. So what we're going to do here is we're actually
going to play with the strength of generative Phil. And I'll explain what I mean. What we're going to
do is we want to translate this to a
watercolor painting. But if we just go ahead and just do it by just by selecting normally it'll just generate a completely new
watercolor painting, so we need to use
a quick mask mode. So with this
background selected, hit Q, and you'll
notice that goes red. Now let's go in here and
click this top color. And I'm going to come
and type 50% in here. And it's going to go 50% black. So not white, not black, 50% gray there, right in
the middle. And click Okay. What this is going
to do is if we hit Alt backspace,
it's going to fill it. It's going to select
the whole area, but it'll acknowledge
there's 50% dog and 50% new. Think of it like
that. So hit Q again, so we did Q, change the color, Alt backspace, and then Q again. And now we've selected. So
let's click here and type in water color, and
click Generate. Okay, so let's click through. These are pretty cool,
they're quite nice. You can see that it's certainly acknowledging the dog is there. That it's the same
composition and same shape, but it's certainly put
its own style on there. So what I'm going to do is I'm going to double click
here and I'm going to type 50% because that's the shade that we
used, wasn't it? Now let's say we want it to be a lot similar, a
lot more similar. Well, let's go ahead
and click Background, hit a Q, and click down here. And now this time
what we want to do is we want to make
it a lot darker. So let's go to
like, I don't know, 20% in the black. Okay, well actually
let, why not? Let's go 12% and click Okay. Now let's go Alt backspace. Let's just turn this
top player off and hit a Q again, and generative fill. And let's type in watercolor
and click Generate. Okay? So let's click
through because you can see that this is very, very similar to
our original one. So, so similar it's
almost just put, almost like a filter on it. Now, this one, I can't
remember what color we were. I think we were at
12% weren't we? So let's just lay the list. 12% and you can see the
difference between the two. Even 50% acknowledged
that the dog was there. But 12% is staying very, very, very true to the color, to the composition
and to the image. Just click through here. Now I just typed in the
one word, water color. You could type in literally
whatever you want. So I'm going to do
another one now. I'm going to hit then make
sure this is selected, sorry. And then I'm going to
come to this and I'm going to go all the
way up to the white. And I'm going to go
like 95% Click Okay. And then hit Alt
backspace and Q again. Now general to
fill, I'm going to type in watercolor
and what you'll find is it's 95% not
looking at the dog. And so when I type watercolor now it's probably just
going to generate a random watercolor splodge or random watercolor
painting completely, completely different,
because it's only 5% looking at
the dog, 95% new. So let's have a look at
what it generates, okay? You can see
completely different, it's 95% something new. So let's just go
ahead and type in 95% So that is how
you can use the, let's put these in order
so you can see now that's how you use generative fill
the different strengths. Now you can go ahead, let's
go back and hit Q again. Let's go, I'm just going to
go sort of round about 70, but there, there we go, 71. There you're 70. Because you
could try stuff like Pixar, Disney Pixar character,
stuff like that. So let's go ahead and give
it a Go Alt backspace and then generative Phil and Disney Pixar style,
and click Generate. Okay, so this is
really interesting. Not quite what we
were looking for. I mean, that's a bit like
bolt. No, definitely not. So something that we
need to try around with there is we need to try
around with Disney Pixar. Was it really listening
to that or was the problem the strength
of what we were doing? Do we need to do that again, but a little bit weaker? Maybe come down to a
sort of 12% range. Play around with those
different colors. Maybe Disney Pixar style, it's not quite picking up
on. And you go for cartoon. I'm going to pause this
and I'm going to play around with a few and I'm gonna tell you what
worked for me, Okay, so here is probably
the closest result I got. I don't think it's
quite there with the Pixar and the
cartoon style yet. But you can see, obviously,
if you do acrylic style, anything like that is
really, really cool. So I used for this one
sort of 70% black, which was sort of 30% of
the original image then. So that's what I used
there and the prompt I was using was cartoon
vector illustration. I did try Disney
Pixar and all that, but it just isn't quite
there yet for that. But it's still
really, really cool. So I've gone ahead and I've
had a look at this image. I'm not going to show
you the process again, but you can certainly
play around. I went for a promptier of acrylic painting and
I really like that. I think it's just really cool that's generated that so quick. So I hope you guys
enjoyed that lesson. I hope you play around and create some really cool things. Now in the next lesson, what we're gonna do is we're
going to have a look at removing background
people from photos. Because if you're taking a photo on holiday
and you want to upload it to Instagram or whatever and there's
people in background, that can be really annoying. But that is where generative Phil can really help you out. So I look forward to seeing you in the next lesson. Cheers guys.
12. Lesson 11 - Removing Background people with Generative Fill: And we're back. Cool, So
here's an image of a girl. She's outside some sort of temple or mosque or
something like that. And unfortunately there's people in the background
and there's birds. So this is where generative
Phil can really, really help. So let's zoom in. And we're just gonna worry about these people by here because I can go through and do them all, but it'll just take too long and you'll get the point
by the time I'm done. So I'm going to go
ahead and I'm going to get the last and I'm first of all just going to
draw a perhaps this guy, I'll encompass these
birds as well. Just going to draw around
them as well and go up there. Now I'm just going to
hold alt and minus the silk key bit out here because I just don't
think I need that. And I'm also going to hold
shift and just plus in a little bit of
his leg by there. Cool. I could also go ahead if I wanted to and
include his shadow. Because again, I don't
want to shadow there. So hold in the plus. I'm just going to go ahead
and then go Generate to bill and type in remove
and click Generate. Okay, so let's have a look. Funnily enough, I'm not too surprised because it
analyzed the image. It's actually drawn
in more pigeons. But now I'm not really bothered. I'm probably gonna pick
the one with the least. So it's that one but there. So I'm pretty happy
with that one. So let's go ahead and
just click off next. I'm going to focus on this man, and I'm probably going to do a few of the pigeons
and birds as well. So I'm going to do a
little bit of work and I'll see you once I've unpaused. Okay. And we're back now. I have completely
removed everything. I only took me, honestly, about probably about
10:10 minutes. Because what I did is I removed, obviously there were
some distractions which I didn't like. There were also some birds, loads of birds on the floor
and there were these people. So this is where we've come
from and this is what we've got to for your perfect
instagrat photo. Really, I'll show you
a quick breakdown. I've done about, it must be 24 instances of looping
stuff and typing remove. And honestly I don't
think for any of them I had to go through more than
the initial generating three. So I basically,
let's turn them off. Kind of not one by one, but you can see that I
did do one big there, let's turn that off. But I did, starting there, I did one sort of
big group then, a lot of these kind of
little ones on their own. Because I felt if I just
circled everything, I'd circle a lamppost. And if I spent time kind
of doing everything, then I felt it would be better. I did all these ones together. I felt it would be
better just to do it bit by bit. So those
are the people. And you can see then there
was a lot in the birds, so let's just turn them all off. And you can see that I did start sort of doing one by one, looking down here, one by one. But then towards the end, I did get more confident in
doing them in larger groups. And you'll see that happen on this side. Sort of big group. But then, and then I thought, so it, let's do the whole thing. And there you go.
And then there are a couple birds flying there. And then I just thought
we've come this far, let's get rid of a few distracting things
that are sticking out, and here's our final image. So that is really,
really, really cool. Now what I am going
to do is I'm going to let you kind of have
a look at this image. So it is again
just kind of going through circling
and going remove. You'll probably find it
quite difficult once you remove this guy to do
all of these down here. Because I don't think
the AI would have kind of enough knowledge to
know what should go there. But honestly give it a
go, see what happens. That's a little bit
of an extension task. What I will do at the
end of this video is I'll give you a 32nd sort of time lapse of me working through here so you can see
how I was working. But yeah, this is
really, really powerful. We're starting to really harness the power of this AI now. So that was it for this lesson. Now in the next lesson, I look forward to
seeing you because we are going to remove someone
from a group photo. So taking what we're doing here, but bringing it
forward literally closer to the camera
and building on that. So I look forward
to seeing you in the next video and
the time lapse.
13. Lesson 12 - Removing People from Group Photos with Generative Fill: Okay, well, I hope you enjoyed the elevator Music
in that last video, and that brings us smoothly
onto this video where we're going to have a look at removing someone from this group photo. Now, I haven't pre planned this, so I haven't got any idea
who I'm going to remove. I don't want to remove
anyone in the front. I want to remove someone in the back because they may be a bit more tricky or arguably
more tricky in the front. So let's go ahead and
remove this guy by here, because they'll have
to rebuild this lady. So let's go in, and
you'll probably know the drill by now is it's going
to be the same as before. But obviously it may be a little bit different
because we were moving small people
in the last one. And now we've got a lot
more detail in this that we want to work with
because it's a lot larger, so any imperfections
will really stick out. So what we may find is we may find that we may need to
do it a couple times. Maybe adjust our
masks, for example. I'm just holding. Plus I want to get rid of these
shadows as well. And I didn't include
all of his hands. But it'd be interesting
if we could leave the laptop on the table. So, you know, you may
find that you need to do this a few times and try
a few different things, a few different
masking techniques. But yeah, let's have a look
and let's just include that. I think that'll
probably be there. So yeah, what I'm
going to do now is I'm just going to
go and generative fill and type the move and let's just see
how it cops with it. Okay. That was literally, honestly it was 25 seconds
and this is where it's done. Not a fan possibly, of the hand. It's not perfect, That
hand isn't perfect. But you know, with a little
bit of Photoshopping, you can have a look at that. And also this is
just the first one. I'm confident if this is where
we started, that's okay. But I think she's I think the proportions are
out a bit there. I prefer this. And her arm just gets a
little bit wider there. So let's have a look at
this one. That's amazing. I mean, turn this on off. That is honestly amazing. I mean, I'm potentially not
a fan of this table there. That corner looks
a bit weird, but, you know, based on what
we've done before, we could go ahead and
we could fix that later by merging these and
just drawing over the top. So let's go ahead and see if we can remove someone
from the back. So let's remove
this lady by here. So we will have to cross over into this lady's
hair a little bit and down here and up there. And so basically this one actually may be a bit
more challenging, because all of a sudden we've
got to rebuild 123 people. So this one may be a
bit more challenging, but honestly, I don't know. I really don't know
whether it is going to be. So let's go ahead and again, just go generative fill and
type in remove and generate. Okay. Honestly, for 20 seconds and for the first image that is, I mean, that's almost perfect. His arm arguably gets
a bit thin but there, but like I'm not too fast. That is perfect. And yeah, I mean, I'm probably
going to go put that one. Not a fan of what
that is, but there. But again, we can fix that. So let's have a look.
Let's zoom out. This is what we have got. So we've gone from this to this. I mean, really, really
quick. So what I'm going to do now is I'm
going to merge these. So ship select and control or command E,
bring them all together. What you could have
done actually is you could have duplicated
them all and then merged these
ones at the top of command E. So that's a copy. And then you can turn these ops. You've always got them if
you want to go back to them as a safer way of
working. So there we go. Let's now work on this one, because I'm just not a
fan of this but here, so I'm just going to go ahead click in here and actually I'm going to get
generative fill. And I'm not going
to type anything, I'm just going to
see what it does on its own because I just don't
like that angle there. Okay. So by not typing anything, it's looking at the whole image. And I'll be honest, I
mean, I do prefer that. Again, you could probably now
build on this, merge these, and I may come in and
just say this bright bit because it is a bit
distracting, this bright bit. By here, let's do our old friend from the last lesson
and let's go remove. And just like that it is gone. I think I'm going to
go with that one. So we fix that side. Now I just want to
fix this side really. And I'm just going
to come down here, I'm going to try and go quite tighter on this because
I don't want to really intersect their suits. I just want it to focus
on this back a bit. By here I'm going to
go generated Fill. And again, I'm just
going to click Generate. Now it's interesting. You can see up here,
if you look here, I've actually had a
bit of a warning. It says the generated
images were removed. Please review and try again. I don't know why it
sometimes does that. It could be a bit of a bug. It may be generating something that isn't, you know, very nice. Now that notice was going
over my two screens again, I don't know why it
always does that. However I can figure it, it doesn't, it doesn't
pay attention. So what I am going to do, so I'm going to try
again and just make a bit of a different
selection and just come around and I will go over into their suits this time. So I'm just going to click Generative Fill and
see what it does. Okay, and I've got
that again now. You can request to review
if you really want to. You can view the guidelines, but honestly, I'm not too bothered with the
boss going on there. If you want to to, you could use your Photoshopping
skills to get, I don't know, get your
clone stamping tool hold Alt and kind of paint. Let's just go and paint your color sort of in down here and just
do it like that. You could do it manually. But again, we could
have gone back into our previous generations
which we saved. And if we turned these on, we could have gone in here and we could have
just generated again. But in all honesty,
the main thing was removing two people, and it has done a really, really, really good job of that. So I hope you
enjoyed that lesson. Guys, join me for the next
lesson where we will be doing a sky replacement
with generative fill. And then we are nearly there, we'll have another lesson and then our final class project. All right then folks,
cheers for joining in, and I shall see you
in the next video.
14. Lesson 13 - Sky Replacement with Generative Fill: Okay, You probably know what I'm gonna do in
this lesson, don't you? Yeah, I'm gonna use my
selection tools and I'm gonna select the sky. Or am I? I could go ahead and
select the sky like this, but that's a bit of
a long way to do it. What you can do is you can
come up select and go Sky. And hopefully I'm hoping this
selects the whole Sky now. Otherwise it's
gonna make me look silly. Yeah, it's got it. Let's just double check though. It's got all around there. Perfect. Could I'm gonna add
with my magic one selected. I'm just gonna click down here holding shift and I'm
going to add that in. I'll have to come and
subtract that as well. So it got us most
of the way there. Okay, cool. What I'm gonna do is I'm gonna get my magic 12. I'm gonna bring it down
to about 16 tolerance. And now I'm going to hold Alt. And I'm going to
click through just to minus out some of these bits. Again, you don't have
to worry too much. This is just, this is
just to show you what I would do if I was working
really professionally. But, you know, this
is just a lesson to show you some of these
techniques, isn't it? So I can come here and I'm
going to do this one perfect. Okay, cool. I'm happy with that. So we've
selected the sky. It's a bit of a boring sky. Let's go ahead and type in
stormy sky and click Generate. Okay, so let's have
a look through. I mean, it's definitely
generated a new sky. Let's have a look and see. Again, I'm not a
fan of that one. That one's okay, but
let's turn it on and off. All right? It's doing, it is doing a little bit of
a thing next to here. It's corrupting the sides a bit. And I don't like that and it shouldn't really
be doing that. But again, it's trying to build more architecture onto it. It is really, really
good sometimes. But again, you just want
to bear in mind that AI isn't always going to do
absolutely everything perfectly that you wanted to. So what you could do is
you could go to select and you could modify
and contract. And you could contract
by two pixels, so it's not like
as close to here. So it may not try and build in. My experience it will. But let's go ahead and type stormy sky again and
see what it does. Okay, so we've got
a few things here. Cloudy sky, that's all right. That's all right. And has actually done it a
little bit better. But again, if we actually
turn this off and look at it, you can see it probably is doing a few things
to the sides here. If we really look in, and again, I'm not completely
happy with that. That is the limitation
I found with sky replacement in AI. However, there is a bonus
thing that I'm going to show you because
you can actually do this in Photoshop anyway. And bear in mind if we
do out this cloudy sky, it's not changing
the lighting on the buildings to compensate,
especially this one. You know, the building
should be a lot darker. But there is another tool inside of Photoshop that'll do that. So if you're going to edit
and then where is it? Let's just make sure
this is selected. So edit and sky replacement. You've actually got
a built in tool, so it's going to go ahead and it's going to do a
bit of a selection. It may not get it
completely accurate, but you can kind of,
you know, alter that. All of a sudden I said, well look, we've got shift edge. So if we shift edge up here, it'll kind of eat in more and you'll want that sometimes
for lighting purposes. But you know, you
can kind of go and modify that and you
can change your sky. Let's go to just a different blue sky than what
we had before. All this kind of stuff, you can see that lighting is
again eating over. So you could fade the edge less or more, that
kind of thing. And you can shift it
just a little bit off. And again, you've got all
of these different skies. So let's go.
Spectacular. And also you'll notice it'll
change the lighting, So let's just go ahead and
output it to a new layer. And just turn it on and off. You'll actually be able to see that the sort of
color down here, if we zoom in just here, as I turn this on and off, you can see that
it is affecting. So this would probably, in my opinion, be the better
way of currently doing it. I haven't faded it
properly there. I could go back into the settings and
have a look at that, but that is probably your
better way of doing it, because this image here as well. I loaded this earlier and I gave it a bit of a go just
before the lesson. And this is what I was getting. I was getting that it
was actually adding again onto the slope down here. If I turn it on and off,
you can see a slope is adding onto the motorcyclist. I do anticipate,
possibly by the time that you come to watch
this, it may be fixed. So have a play around, use
the other tool as well. Again, edit Sky replacement. If I come in here,
it's going to do a lot better in my
opinion because it's not using generative AI. So it's not a kind
of g guesswork, it's a different method
of how it's working. So I could again, just play around with some of these settings
and go ahead and pick just even a nicer bluer sky in this occasion
would be a lot nicer. And again, playing around
with the settings, you've got the mask in settings here that you could
kind of play around with, sort of paints of stuff. Anyway, I'll let you guys
kind of have a look at that. So that's it for that lesson, for replacing Sky
with generative Phil. In my opinion, it's got
a little bit of a way to go like I felt it
does with the hair. But again, this is
only getting better. So I look forward to seeing
you in the next lesson, which will be our
last lesson with generative Phil before
our final class project. Look forward to
seeing you guys then.
15. Lesson 14 - Generating Full Images with Generative Fill: Okay, so I haven't actually got anything open in
Photoshop this time, and that's because we're
going to use generate, fill to generate entire images. Sounds pretty cool. So what
you'll want to do is get a file new and just
make a new document. I'm just gonna go
print and let's go. So I art an illustration, 1,000 pixels by 1,000
pixels. Okay, cool. What I'm gonna do now is
just go ahead select. And he probably guessed
it, generative. Phil, I could just
click Generate. And I wonder what it would do. Again, that's really weird
because I gave it nothing, absolutely nothing to work on. Just white, just a white canvas. I didn't even give it a prompt. And this generated, I mean, that's pretty cool,
isn't it? And that one. So what you could
literally do from here is you could
go ahead and think, okay, let's use the
first technique and do generative expand. Cool. Okay, so it's done some stuff there you
could think, right? Okay, I want to add a hot
air balloon or a car. Let, let's add a car. So you could almost
just say, right, okay, I want to add a
car somewhere in there. Let's just kind of come
down here as well. Otherwise, it's just
gonna look really, really weird. There we go. So add a car in
here and all of a sudden you have got something completely new
which you didn't before. Now you may want to kind of draw the car kind of
somewhere out there. So it's a small kind of car. I've completely screwed that up. But you may want to do a
car somewhere out there. But you've got something
completely new, so let's try it again. Let's go to a file
new 1,000 pixel grid, and let's go ahead
and say I don't know, park bench and click
generate, Judge. Okay. So that's not
what I was looking for. It's got very much a close
up, but that's okay. What I'm gonna do now is again, I'm just going to use
the generative expand just to give us a
little bit more. And let's pop out like
this and click the tick. Cool, So I've got my park bench. I think I'll go for
this one again. I could just use
generative expand. I could start drawing
something in. I could say, man
sitting there, dog. Anything. So that is the true
power of generative fill. You can start from nothing
and build something. So I really hope you guys can
have learned a few things there that you don't necessarily need an image to start with. You can apply any of the skills that we've
used throughout this. So maybe half
transparency generator filled to change of the style to a vintage photograph or something like that
or a pencil sketch. So yeah, I hope you
guys enjoyed that. I'll see you in the
next video which will be your second
class project, so I'll look forward
to seeing you then.
16. Lesson 15 - Class Project 2: Well it's class project number
two. We're nearly there. I hope you've enjoyed all the content that you've
watched so far. So what I'm going to do
in this class project is I'm gonna give you two images and it's completely
free reign up to you. I want you to do whatever
with these images. Think back to some of
the lessons we've done. We've expanded the canvas. We've removed things, added
things changed the style. The world is your oyster. I'm super excited to see what you do with
these two images. So please, please,
don't forget to upload your results and give a
little comment of what you did so we can all
share Best practice. As I mentioned, I'm
super looking forward to seeing what you do with these
images, but also from me. Thank you for joining
in the course. I hope you enjoyed, I hope
you learned loads and I look forward to seeing
you in future courses.
 Jonathon Parker, Passionate MoGraph and VFX Lectu