Transcripts
1. Introduction: Welcome to this course on a Beginner's Guide to Wildlife Photography. If you're a beginner, you want to get into a wildlife photography, then you're at the right place. Now, as a part of this particular course will be talking about various aspects off wildlife photography for a beginner or even a little advanced user on how toe get into this and take it forward will be starting with different kind of equipment. What camera? What lends to buy for wildlife photography? What off this? Which equipment makes sense? Then, if you want to get started, obviously allowed to start visiting various national Park centuries, so we'll talk about that. How do we explore? Find out both from a budget point off you and from a subject point off you. Which of the well known parks where you can get started, how to go about looking the PSA parties. Then the game drivers comes into picture different options off safari boat, safari, safari by walk or even the regular safari in the Gypsies will talk about attack. Then comes the next aspect, which is subject knowledge, so subject knowledge is everything in photography, so we'll go deeper into understanding about the various subjects, the behavior last bits, the natural history. And once we studied that, using that knowledge, how do we get in the concept off? Pretty visualize in your images individualizing based on the subject knowledge, predicting what may happen and using that to convey a story. The story telling images What we call after that with this whole concept will move into what we call a signature shots. Every particular park has something called us a signature shot. Really get a species with the bag drop off well known location in the park. That's a signature shot. How do we look on that? You look at that. Then as you go forward, we look at the various shooting techniques, So if you're to shoot from a gypsy if you're carrying multiple equipment, so how do you manage it within the gypsy so those things will see under the shooting concepts. Then comes the court ethnical concert, the technical aspects of photography again with the camera, the various set up. What kind of exposure? What is a bunch of product, which one to be used by eso, the whole combination, all the court technical aspects of photography. We will get into that. Once you understand the technical aspects, next comes a very important part, which is composition. So we look at composing the image with whatever equipment you have. So how do you compose it? Horizontal, vertical background. So all those important aspects related to composition we'll go through that Mex comes carrying the equipment in your vehicle. What can off care. You have to take weight with respect to dust. Then care for yourself itself wearing a mask any off those. So how does that happen? That will go to that. Now, once you have this image is good images. All these things you go through next comes post processing. So how do you copy this images into the system, then completely finishing the post processing off your images from your camera to the laptop. How do you process? How did the finishing touch with the impact? What you want? These things will go through it. Finally, we'll talk about the ethical aspects off while a photography very you draw the line when it comes to while a photography. What toe? Take care off the subjects than even the safety off yourself. Safety of the subject. Keeping the distance. So all this things, we look at it. Finally, once you go through this intercourse, what next? Now how do you take my photograph T while a photography forward? So that is something which will discuss. So if you see, this is a complete course, the Beginner's Guide for Wildlife Photography. And I'm sure this is something which is going to help you become a better violet photograph for so let's get started.
2. Equipment: equipment for wildlife photography. The basic question. Which is the best camera? Or which is the best lens for wildlife photography? If I had to give you a straightforward answer, the one what they can afford is the best camera or the best lands. That said, you can also use whatever camera lens you already have now. What really matters is your skills and not this equipment. That said, Let's look at like what kind of equipment is actually suitable for wildlife photography? I mean, like a house of already off camera and lens is out here. Let's consider each one and see, like, What is it that we have to look for when more the purchased a camera or lens? Let's start with the camera. Let's look at what kind of features we would like to have any comes to camera. I mean, like, how started photographing? I have been doing photograph e even from an entry level canon 1200 b or, for that matter, the Nikon 3500 on the Nikon 3300 and eight getting really beautiful images. So let's look at the various camera features, which is basically suitable when it comes to wildlife photography. The 1st 1 whether you want to go with a full frame camera or with the crop since the camera . So obviously both have their own advantageous and disadvantageous. So the full frame camera off ust like you get extremely better image quality. So the sensor says, if you consider the sensor is quite large, so obviously better image resolution contrast colors clarity. That said, the crop sensor has its own at one stage of getting you that extra reach for your way like photography, because sometimes you may not be able to afford the big alliances now, so deciding between the crop sensor and the full frame is the first perimeter we have to choose. Next comes the very important, with the use of performance off your camera. Now generally in wildlife photography, you have action either early in the morning or late in the evening. Now that Australia I also performance plays a major role for wildlife photography, so do on land review and check the use of performance of the camera because that is again a deciding factor as to which camera you have to sell it. Next comes the auto, focusing one of the important aspects because wildlife photography getting those walls, imagers, everything balls don't how fast your camera is capable. Toe achieved. Auto focus now Which in Britain Auto Focus If we see that again multiple para meters to consider what kind of auto focusing points this year camera have. How many auto focusing points this year? Camera support. So through the viewfinder, when you see like, what is the coverage off the auto focusing points. So currently, if you take you in the mirror less cameras, which is basically capturing the market. So certain minerals cameras How auto focusing point. So the interview finder, like 1995% off coverage the House, whereas some of the existing DSL last, you have just a small factor off focusing points. So the number off focusing points the coverage off the focusing points area. This matter in deciding what kind of camera you want to purchase. That said, the auto focus speed off. The camera is dependent on what kind of auto focusing sensors are associated with the auto focusing points. So you have the cross tape, the non cross type deal, cross step or two focusing points, so you need to do your homework steady about okay, Water, The different kind of auto focusing sensors which the particular camera supports. So all this, our court technical aspects when it comes to understanding about your equipment. So once you do this basic homework, next comes basically the birth straight again. For white left action photography, the number of frames per second is again a very important perimeter in deciding what kind of camera you want to purchase so higher the bus straight, the better. So even if you consider the top of the line cameras currently at this point of time, if you consider the one the X mark to obviously that shoots at 14 frames per second and then the middle locked off from senator if you enable it, it's just 16 frames a second, then similar on the concert as well. And then you have the Sunni in nine, just coming to the market, which can shoot a 20 frames per second. So to capture the action burst straight Number of Prince was second place, a major role. So you have to summarize as to when you're trying to choose a camera. So obviously full frame was this crop factor. I also performance the auto focusing auto focus in speed or two focusing points or two focusing viewfinder coverage. I also performance. I think we did mention that apart from the burst straight Okay, so if you see these other different factors, you have to consider when you're trying to buy a camera. So the budget also is a major deciding factor when it comes to processing the right camera . Okay, so don't worry too much about Canon or Nikon and Sony. Don't worry too much about that. Invest in a good lens will come for the next. So based on these factors, what have explained good shoes and a robot? What camera body would like to go for? So I said, like right from the mid range, which is the 1200 deep, or the inter level of the mid range, the 70 mark who comes into picture. It is a semi pro body off the Etienne Cannell off, for that matter, the 60 Mark two or the Fighting Monthly Friday mark for the one day X Marco. If you see the category goes up like this So similarly, one of the Nikon said, for why life at this point of time. The the 500 is a fantastic body, which is a large area off coverage, off focusing points, so that is the first deciding factor. Next comes work leads to purchase. Now, As I keep saying, Invest eight people sent off your budget on the lens and 20% on the camera bodies. Okay, so lens. If you see again, that is the major deciding factor. Because lens is what basically, finally gives you that quality walk images. Let's look at the different options for a beginner, if you ask me. As I said, if it's extremely tight on your budget, this is the best option. The inter level 1200 years, the 1300 d same thing on the Nikon safe and then the 55 to 50 lens. So anyone with this entry level combination have been able to shoot some awesome images. So not only me, even people who come in my photo tools in my workshops with the entry level body, they have captured some absolutely creative mind blowing images, so the photography skills is what really matters. That said, let's look at the next range of plants. So 55 to 50 is a lens. I would recommend for a beginner if you're to get started with the next one. Obviously, if you consider weed the canon or Nikon, the 840,400 corner is a good one or even once before that. If you ask me one of the most one off the must have lenses. For while a photography is the 7200 especially for the kind of habitat shorts, what he can get. And since it's a 2.8 lens, which had come in low light, auto focusing performances absolutely brilliant. So the 7200 is one of the option. Then comes the 104 100 are the 8400 on the Nikon site, then from a budget west again Nikon if you want to consider than the 205 100. So this is an absolutely brilliant lens when it comes to while a photograph of the 205 100 Nikon end up. In fact, at this point of time, the 205 100 combined with the Nikon D 500 is a killer combination for Nikon uses. He went from the common point off you. You have the 104 100 or, for that matter, the third party lines. If you want to consider the time around or the Sigma 1 56 100 is an absolutely brilliant choice. Pure value for money. I mean, like, imagine getting a 600 millimeter range for us less. That's in the range of 70,000 won. Like enough. Okay, so these are the inter level mid range options below the one, like you're not have the court. Next comes based on your budget. The biggest I mean, like wildlife photography. If you're serious about it getting into seriously, then obviously these are the lenses to go for. So this is the 402.8 lens. Then I use the 800 millimeters by 8000.6 lands in the in between ones. The 500 millimeter in the 600 millimeter. If you see based on the budget, you have these different options Now, when it comes to image making itself, if you consider the combination that really want to go for a prevalence or go for a zoom lens, so obviously with the room lands, you have a lot of flexibility for composing. Whereas the fixed focal length your fixed so that you zoom in or zoom out are based on the situation. You just have to shoot with what framing composition you get. OK, so each of this Lance's you get a different kind of combination off competitions what you can make. So I say, Keep saying there is no one single equipment or one single combination perfect for while a photography, Sonia. But choose the kind of Flynn's to the kind of camera what you want, what you can afford rather and go with that. Because at the end of the day, competition skills is what really matters. Now that we're talking about the tambor body, the camera lens, the next very important aspect is the accessories for your wildlife photography. Now the various accessories, which I use for my while a photo proficiency. It's right from the planning board, which I use on the beanbag, basically for the kind of flexibility I get to move it around in the gypsy, then depending on the gypsy, and if it able to remove the center seat I go with, basically report itself. So obviously the flexibility is very good. And then the other exercise, which they used to supplant the man through the clamp I use combined with the bald head so that again you have a lot of flexibility. And apart from that, the Mona part is something which you can consider if there are multiple people sitting in the gypsies. So if you see the camera, the lens accessories for wildlife, there is no limit to what it can buy what you can purchase. So it all boils. Don't do what you can afford. So I say Keep saying the best camera. The best lens is the one what you can afford. So use this knowledge. Do your homework and see what camera lens you want to purchase or use, for that matter. Good luck with that.
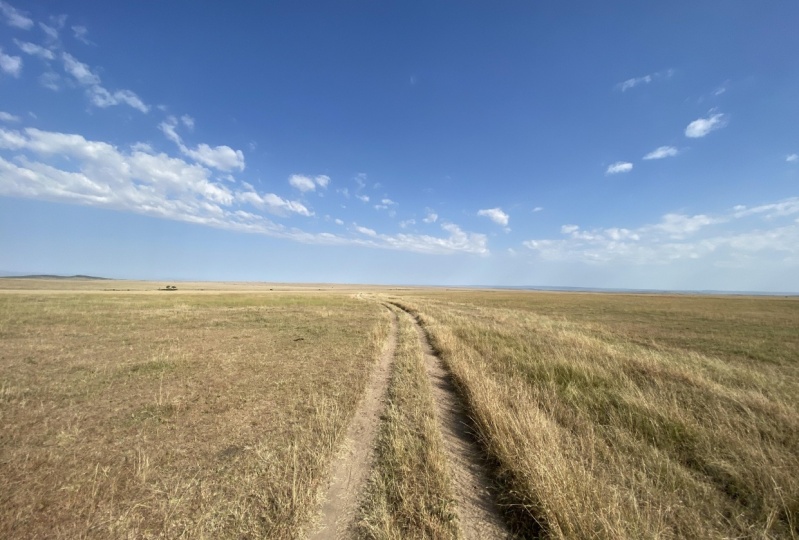
3. Best Locations in India to Shoot : we went through water, the kind of equipment suitable for wildlife photography. Now that they'll identified and then decided what kind of equipment you want to use for wildlife photography, Let's look at the next step. Now. How do we start? I didn't defend what parks to visit. Obviously, for your wildlife photography, you like to start with getting various national parks, sanctuaries, reserves all the various books available. Now, how do we get started with that? So as a first step, what I would recommend is do a search. So over the Internet, A lot of data. Now, if you look at this particular link on Wikipedia, so this gives you a list of various national parks off India. Now, once you I didn't defend all the various national parks up in there. You look at the list. The next thing you have to do is identify a park which is close to your destination. Now I understand that when you get started with wildlife photography or even for that matter, with the equipment travel, other things which are involved as a part of my life photography. It is indeed a very expensive hobby, so let's try to evaluate both the budget options and then, yes, where do you have to spend money to get your photographs Now, even the budget option if I talk about to get started with that identified those National Park centuries where safari options are available. So once identified, the destination so suffering options, which means tourism is a lot in those national parks or centuries. Now, once you find out, do your homeworks a lot of these things required to spend some amount of time on the Internet searching around contacting your friends, establishing contacts, finding all the information Now, next option. You identify a particular park, find out what kind of accommodations are available around those parks, so villain parks have results than even now. High end resorts medium budget results, but yet accommodations, hotels lot off this various facilities will be available. Now that is something you can look at now. Are there certain destinations where you don't have any off piece, but then the Forest Department has forest rest. House is then doorman trees, so other kind of options are available for you to stay identified that make a note off it. Then comes the other part, the suffering options in the cost. So find out what kind of safari is available in that. What kind of vehicles are available? Are the Gypsies available? Or is it like Cantor's, which are available? So you need to do a little bit off homework on identifying the transport option for your safari? And, of course, the associated cost with that. Next comes understanding what the park timings are. Many off this national parks. How times based on the season. So in some most winters or even monsoon, you need to find out whether the park is closed. Whether the park it's opens, very option is available. Do this one work. Many make a note off this. Now The next important aspect is getting the safari plummets. So many off this box, you have to book the safari Valiant at once 1 20 days in advance. Team had to book the safari permits. Find out about that. So once you identify what park you want to visit, what National park century, What visit? So make a note off it about the safari timings. How to get the safari promise. There may be multiple option oneness. You go online book your own safari permit are. The other option is a combination that result very identify to go and stay sometimes like those resources to help you with getting the safari permits. So that is something you can look at. So once identified, the park timings the safari for Miss all these things. The other thing is the species related to the particular park. Now there are two ways to do it. One is like you identify what Parkwood National Park century you want to visit and what kind of species are found over there. So you go there to try to shoot. Whatever's pieces should get in the park. Now. The other option is find out what kind of species, what subject you want to shoot. And then there are certain parks destinations where to get them at ease. You get more opportunities to shoot them, so that way you go to that destination toe, find the species so part based species pay. So these are the two different kind of safari options available to get started with your wildlife photography. Another very important thing is once you go to a particular park, do not get this hearted that you did not find much species. You don't find much animals. In fact, like I took 10 years to see and photograph my first wild tiger. So that's the kind of patients we need to have to get into a wildlife photography. So once you do all this various exercises you can identify very want to go. How you want to get started with your, well, a photographic. Next, let's look at some of the popular destinations within India with respect to wear working of species. You can get what our question is you can get and those parks, which I very frequently visit. Let's look at that next.
4. Sudhir's Favourite Destinations: Now let's look at some off the most frequently with parks by me and also the various destinations working a species. You get there well, for your way life photographic. Let's start with Phantom born in Pakistan. So that's the place which have very frequently with it, because the species found there right from the tie goes to the lepers. Sported there. Somebody here, Neil guy and then barking deer. A lot of the species. They're very cooperative, and it'll give you time for your photography. So that's a destination, which I would prefer for getting started with. Next comes the other one, which a very frequently with it, which is bundled a tiger reserve in central India. Madam British again, a beautiful park with different kind of habitat. Both straps, bamboo shoots, even you have salt trees over there, so beautiful habitat. So that's another place which I would highly recommend. After that comes one of my most favorite destinations in India, which is can attack a result with the kind of grass meadows what you get over there, any species you get in the meadows, you can make some absolutely beautiful amazing images, so that's a destination which I would highly prefer over a lot of other places in India. Next, the other favorite destination off mine, which is Corbett. So the cover terrorism in Turkey. And if you see us again, wide range or species right from the elephants in the Tigers number all the common species you confined. You get them there and the car, but it's more well known for the kind of bag drop the lines, keep what they get. So that's another place which you can explore. And the next one, which is one of my other favorite parks, is Kaziranga World Heritage Site and obviously famous for the Indian one horned rhinos. Apart from that, you again get all the common species, including the swamp deer over there, the water of a fellow and some off the destinations on the glass. Plans for to get in the back, Drop the elephant grass again. You get beautiful images out there, so that isn't a some again very nice park to visit. Next comes if he moved us out. India, another favorite destination off mine, especially, and it comes to the accessibility for me personally. It is company end up, of course, companies will run for the leopards on the tree again, a favorite image of my nature making company, along with tigers and elephants, especially in Somers. Hundreds off elevate elephants congregate near the cabinet backwaters. So Cabinet, which is located in the inaugural A tiger reserve, so practice another destination that you can explore. Next comes in Maharashtra. Taraba Tiger result well known for the tigers again, a lot of other common species. So if you see a lot of these destinations, even though their mega centric this are excellent places or person it for you to explore your while a photography. Then if you move to a different kind of species for the black books and even milk I the kind of high. But that villa there is another favorite destination off my especially the kind of habitat with the grasslands is beautiful. In fact, wherever that is also known for the place for the Raptors roosting so especially the Harriers. So it it has a record, a world record. The maximum number off Hadiya's roosting at one single point off place. So it has a new entrant, the Guinness Book of World Records, so well over that is the other destination you can explore now we move further into good drop. So you have the little runoff, much greater enough cash for the wild as the world a static as again, a beautiful destination to explore now as a beginner in photography. If you want to learn act, he's on foot, explore the park on foot and still do a lot of wildlife photography. My other favorite destination is poor, So Bharatpur again. Birth for National Park in Afghanistan is a place which you should explore toe. Get into wildlife photography in general, and apart from that, you have a lot of other destinations for the in good again in Gujarat. If you move, you have given national park, especially for the static lands. So in India, that's the only place where to find the sharp declines. That's a place you should explore. So this way, if you see like, there are a lot off national parks, tiger reserves, sanctuaries available, especially in India, where you can get started with your wildlife photography. So go ahead, explore this various destinations and decide I really want to go next
5. The Safari / Game Drive: let us now look at the different kind of options available for your Why left Safari generally like if you see I'm in the gypsy, so the different options, what we have are going in the gypsy for your safari. Then we have large vehicles in certain part off the country and even abroad. And then we have can't us a huge buses, which go into the forest, scaring a lot of people. Then boat safaris a lot off places where you do the safaris beside the water bodies, rivers. So you have the board safaris and against certain reserves. Walking safari is allowed so it can carry out equipment by foot. You can shoot and also certain parts. You have the cycle safaris, radio alot, toe going. The cycle vehicles are not allowed. So these are the different kind off safari options, which are available for year where the photography. Now let's look at the timings now, as a part of your way left photography, you need to do a little bit off your homework. So find out which parks centuries reserves in the country or the location really go. How, what kind of safari options and the next important thing is to understand about the safari timings. So depending on the season but in somewhere winters for any off the season, the safari timings will change winters. The suffering timings unless and in so much the duration is very long. So you need to find out in each of the park water the safari timings and then plan your safaris visits all those things accordingly. Now, once you finish with the safari timings, then comes to safari permits. Now, this is very important. Well, we're all in a lot of folks. The safari permits, so you will have blank and get us a fire departments at least 1 20 days in and once so there are certain blocks where it is just 60 days. So you have to again find out which kind of national parks results. How? What kind of safari permits? What is the duration in advance? Your to get this thing's booked now for your safari permits. There are multiple ways you can get it Booked oneness. You can visit the tourism website where you can go online, enter your details and book Your own safaris are in most cases, like I get my safari bookings done through the results were estate. So they do this evening for me at phenomenal cost. Once we understand about the kind of safari options available, understanding about the advance permits and then the safari timings. Now let's look at the different safari options itself available when it comes to the timings. Generally, in a lot of parts the regular tourism timing, which is morning am till 9 30 10 11 A lot of this box have tourism like the safari in the morning, and then we have the repeat washing off it in the afternoon again from afternoon, three o'clock to six or 6 37 depending on some more winter, this variations will be dead. So there's the regular safari, what we call now the other option, especially, which is very good for us. Why left photographers are the free less of parties and 1/2 days safaris on superiors in the regular safaris when you take the permits so you get a zone allocated. So if I have to talk about Bondo, go take yourself So you have the three means owns the Dallas Zone, the Magdy Zone and the kettle is on. Apart from the before zones. Now, in the online safari permits, you can book which particular zone you need. And in the morning evening safari. Whatever the zone is allocated, you just have to stick to that. But in case off half day or the fullness of Faris so there is no zone option, so you can go into any zone you want. So you enter in one particular zone, and then you go into any zone what you want, so that is a fantastic option. And then the other very important thing is in full day safaris. You get toe enter 15 to 20 minutes earlier than the regular safari vehicles, and you get toe exit 15 minutes or 20 minutes later than all the safari vehicle exists in the evening. Now here, the major advantages based on animal movement, you're vehicle. We were the first to get to the scene, and they get that 15 minutes window and then while I photograph it is 15 minutes is like one full year. I mean, it's a lot off time for you. Okay, so this is with freely. Sephardi comes into picture and then once the regular safari vehicles the morning so far I believe from that till the afternoon so that enter gap, you have for yourself so you can position your vehicle. You can steady the animal behavior, so there's a lot to learn outside of just well, a photography. So this is the freely safari, and in certain places they offered 1/2 day safari a sweat. So in case off half day safari, very similar to full day except by afternoon known, you have to exit the park. So this is a different options available now. Comforted the regular safaris. The full day safaris are obviously very expensive, so it's basically trying to balance between the cost. Then the kindof flexibility want to get with respect to this for less of Paris. So understand about the difference of Bari options available a different kind of vehicles walking safari, both safari any off those things, and accordingly, you need to plan your safaris for year. Well, photography
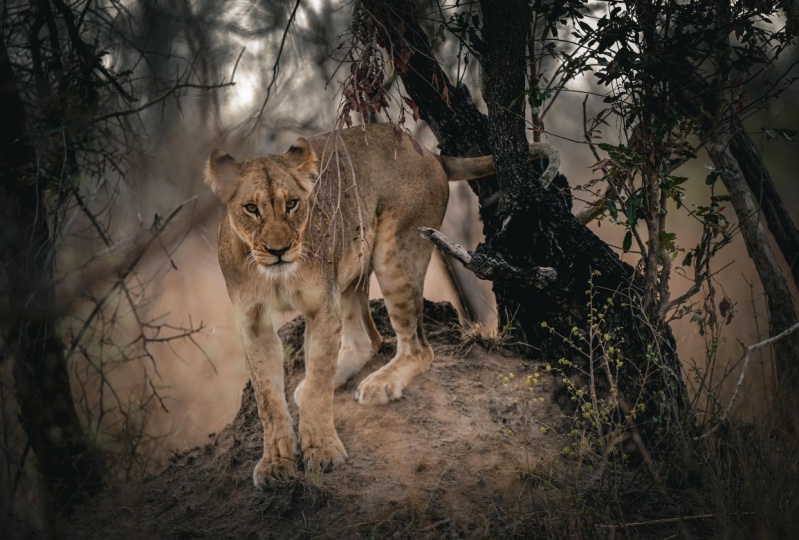
6. Introduction to Subject Knowledge: beautiful Bagram and carbonates birds calling All right, so one of the important aspect when it comes to become the better, while the photograph is to understand, with the natural history behavioral aspect off your subjects. Now, with this yourself experience, I have around it what they call us. The full important loss of photography, the 1st 1 being subject blondish or the natural construed the 2nd 1 being understanding the core fundamental concepts of photography. Olivetti's camera settings White Balance, Your Exposure Panel para Mitos Metering focusing composition All this with this fundamental concepts of photography, then, but a lot is a Mr Analytical equipment shooting technique and family. The foot hilarious post processing. So if you look at all this four plus subject, knowledge is the key to becoming a better photographer or, for that matter, really fantastic images. Now what exactly is behavioral aspect? Off subject behavior knowledge? What we call I have here. If you see in the backdrop so it's looking isolated in a tiger country, then we start hearing alarm calls. You know that was the spirit of moment jumble. One of the things when it comes to any of these predators is that active one letting me. This is subject knowledge on that thing. The subject on is something which I spent in the field. What a beard. Gordon with binoculars. Keep watching them to. Sometimes they just keep on the camera, everything down. And just keep looking at your animals. Looking at this subject, how the machine. Now, if you have to start doing back, then work, understand what we call us, The circle of fear. Every mammal bird especially, have what we call us the circle of fear. This means if this is your subject, there is our subject. The Sarah knew the animal will panic at the rendering of attack Audited gin dismissed. So be it. So back is what you call it the circle of few better ways to approach this one smelling pick your 10 approaches subject so approaches slowly. If it becomes a lot, stop and then I will continues. It's natural to have been continued to approach. This is one way. But our Davis you step foot at the same place and with a similar pursuit. The animal is basically working fortune small, the most super fuel Bill Burkett and look it approach you. So this is a break physical off year. And once the animal becomes confident that, yes, this person is off no harm, he will not cast me income any of those things. Then it was company. It's natural behavior, and that is where we can start making some really amusing images. Now this knowledge is the key to making really good images. Now let us look at some of the examples about understand different animals, different subjects and terrible behavior. Last books to see how we can make really good images. So let's look, listen of this examples.
7. Subject Knowledge – Tigers: now let us look at some of the examples from Comes through real aspect. Let's have been subject tigers. So we are in their work. And princess, let's talk about Angus. You know our territorial, especially when will focus, especially when it comes to milk Vegas, their territorial gentleman sort off around 25 30 script kilometers. When we enter, anybody know which does It belongs now, one of the best when it comes to understanding the desert last bets the concept of backing the tiger. So certain places certain parts with the song is really soft. The safari tracts of resolved. That is where we can track the tiger using pug marks. So once you're in for a particular area, entered the park for your safari, we can practice taken with the pug marks and based on your experience based on the belle of the Dates experience, you can find a puffer fish, the front Marcus in the morning. What? It's a few minutes before a few hours before it was the flu. This evening. This is something that you can easily find not now about, Vanessa said IHS, like every time, has his own territory. So once is your bag marking can't predict a stroke. This is a milk marque or a female magma. If it's a 1,000,000 the tiger of that you can comfortable in this direction. Now I've been thinking strictly practical the mark that one thing is always use the same. But so if you just a different point is the point, Jenny, that was with the same part. So if it's bring if it takes a life and you know at what point is going to come out now, this is the experience of the drivers, and the guards comes into picture. So wherever they go in off the national parks, I always had the best reverend guy who have this kind of knowledge. So this is the other part when it comes to tiger tracking. Now, if you find a take, that is a terrible just sitting there for very long term for the sleepy, we can start projecting its behavior so generally what happens before the table gets up and starts walking. If you're certain indications. So this is something you're noticing a lot off tools. If ever there sleeping for a long time, you go out with a lot of patients that were in the building. So before it actually becomes active, stops in certain sense. Like if you start running over and they start yawning when it's a little bit difficult, get up. But let's not get up. But, like, it'll wake up and start making this morning. So Broussard indications that the private at some point you go, no, get up and start walking. So yawning is one of the things, and if it wants once with Mr Shot, don't really got into it. You on things under 23 times. So this is again and their behavior that aspect when it comes to travel. It was just 1/4 from sleep. Now the other part was predicting with special for this looting at a particular place they got once he gets up, but that is going to move in, that direction is going to move in the other direction so that tension can come into picture. And then you can flesh your vehicle switch that whenever it works, the head are not any off this competition complete plan, and we can pick. So this is a book that would be your last bit of the tiger Now, especially when better cups with Vegas. And if the cops are alone, they're not at to recall. So I don't think that's understandable. Tiger Tiger Cups, especially if mothers with cubs were going to be extremely active, beautiful run around, very mysterious the U. S. If the mother is not dead that the paper cups we just loop there will not be active will just eels around. So those situations, if you find out that the mother is also good along with the perhaps, we can expect some actions. So this knowledge of it is important for us action photographs, especially when they're in cups and tiger cups. Sometimes when the flu with water bodies, everyone say their kids. So one thing we notice one thing I have noticed. There's the tangles in the floor for more than a couple grand challenge into the plane, the police. So we're seeing this in a lot of us. The fighters were small cups with mother being around when they start jumping around, running around the drug with actual climate will jump on top of each other that extremely colorful. So those things which you have to basically credit, know about the behavioral aspects that at that part? The Tigris Generally, you know, the big lesson aspect of Baghdad. Is that really only morning? And you knew this when they're very active. So that was basically surgical. Do it up. But this U s entered in a lot of free Lucifer. This way from even appear were inside the park, blocking the Tigers. The Tigers No one would have seen. It's like, especially when they have a lot of the safari vehicles that told it just loses the real aspect. Subject knowledge. Your call. And it's very moving in time for the president is to move around. You can agree This is a tiger somewhere. Very glug and spot ideological coming over there. Multiple calls. Okay, so that was looking through that active in the morning late in the evening, which is true. But then the other aspect of the tiger is generally once that springs and can get school. Morning. 9 30 10 o'clock. Water the vehicles moves out camping. Asylum calls. Okay, let's finish this. Okay, So the progress, like once the supportive very loose. What this calls every day from vendors in the front. This is fantastic. So once the little used that it's with the Tigers at most after the morning safari times that they got most. So let's continue this the Tiger concept, but they don't want to shoot.
8. Subject Knowledge – Leopards: So let's continue with the other behavioral aspect off the animals. So obviously we got excited about the whole tiger alarm calls all those things, and that was fantastic. And that is what happens when you're out in the wild. You can never expect, or you cannot predict what may happen, what you will get. But after some extent, once you understand this, various animals behavioral aspect, you should be able to plan your shots next. One toe the leopard. Let's understand about what leopards did behavioral aspects so that this knowledge will help you become a better photographer. Plan your shorts accordingly. Now, when it comes to leopards, it a lot off parks. Leopards are territorial, similar to the Tigers. But the problem is it's difficult to track the lepers like the tigers. With respect to the pug marks we have to go. So the pattern is not fixed like the tigers. Very knowledge, Okay, probably the biggest. I want to take this part, but the leopards you can't credit because the lepers to go around everywhere. No, in any off the forest. The leopards are afraid off the tiger, then even other predators like the wild ox. If it exists in the park, and that is where the lepers majority of the time there are increased, like on the trees, and they prefer not to keep walking on the ground a lot. Now that is one of the things we're doing. Safari. You have to keep an eye open on the tree on the ground so you'll have toe give wearing that Now. The other thing, when it comes to love poses like if they have killed and they're on a tree, so they will stay there for a long time. So then you can plan your shots. They're like the cooperative subjects. They not remember any where, of course, if little bit disturbed, sometimes what happens? They get down from the tree again. Get back after a little bit off time. Now the other thing, both with respiratory leopards and tigers. It's like in the forest, like in many of the forest. There are certain leopards tangles, which are very bold. Now when you say the bold, that means like they're not afraid of the vehicles. So generally what happens? You're the safari track, so this leopards tigers. They don't like to walk inside the forests. The reason being is deplore their very soft and don't want in time is therefore that is really prefer to work on the soft soil, the much track off the safari tracks and that is really can actually track them with respect to the bookmarks. Now these bulls, tigers, Aleppo's they work had gone. So once you identify. So this is where again the subject knowledge comes about this species in a particular park . So which kind of tiger slippers in that territory are basically more bored and they will walk down. So once you understand that and, you know, find the leopard is were crossed the road and make amount of the road you need to give the gap so that wants to start walking under. Lord, you can get those head shots. So these kind of be here last bits off the tiger Leapers will help you get better imagers
9. Subject Knowledge – Elephants: now the next animal effort to look at other elephants. The gentle James elephants. Unlike the leopards or tigers, they don't run that. We're looking at the vehicles. It listen most of the cases, so they're cooperative subjects, so you can plan your shorts. According it not other aspects. When it comes to elephants, especially if the cops are around is you can expect that they make charge of the vehicle, so keep the distance. Plan your short composure shorts accordingly. Expecting the devil in charge Now, generally, it's the arts with the charge and not the mother. So that is something which here to watch for not other thing. One of the fantastic things with elephants is they have this dust butts so toe make sure, like the small insects on the skin to get rid of them. So elephants and really what they do they have this month butts much bots than even dust. But the help so different kind of. But to cover themselves with the site. So that is something that you can expect, and if they do it once guaranteed that they're going to repeat it. In most of the occasions they do it. 34 times so you can plan your shorts accordingly. Not other behavioral aspect when multiple elephants the meat say there are two hurts coming from the front. And this one is going from here when the meat they communicate with each other with Texans . So what they do is like the lift the trunk, they go close to each other. So these are all those movements which you should be aware off and issued. Plan your shorts accordingly. Now, when it comes to overall elephants in the water. Now this is where a defense loud, plain water. So those are the shorts, Veriato. Wait. So if you see a difference approaching what our bodies, any off those weight around plan your shots because once they get into water, they start ruling around. Then how bout against now? The other thing with elephants is like their ice. It is quite poor, but they have a very strong sense of smell. So when vehicle approach any off those, you will notice that the trunk it goes up. So that is where the start smelling. So that's the other thing which you can plan in your shots. So these other different things the behavioral aspects, your understand about your animals
10. Subject Knowledge – Wild Dogs: now that we're seeing tigers, leopards, elephants, Let's want to the other predator in the park, which is the wild dog? No, whale dogs generally are in the back. So certain times like leopards and tigers, the solitary were asked like wild dogs, the generally are in the back and sometimes depending on break away from the group. They are solitary as well, not one of the main behavioral aspect when it comes to where adults when the hunt. So the hunting pack and what they do is they just keep running behind the subjects. So the make very tired. So they're excellent learners. So just keep running, chasing the animal. And once they get tired, then the attack that this one day and the other ways they just surround their subjects like spotted deer, somebody else and even some maybe even go for tigers, leopards, small ones. So, in fact, tigers and leopards are quite afraid off, back off the docks. So that is how they do. They plan their execution, this around the subject and the hunt and bring it down. Now the other aspect, when it comes to well, dogs hunting is on. Let the leopard and tigers who go for the throat in case of wild dogs. They start eating the animal when it's a light, so they bring them down. So the bleed them that basically so there's not eating from the back to the back side of the animal is really soft. Tissues are and start eating the animal while it is left in the back. So once the hunt happens, so this knowledge will help you plan your shots because you will get amazing shots off the hunt, bringing them down, and also wants to start eating even if your vehicle, depending on the distance, they're not gonna be. Of course, you need toe, maintain the distance and then plan your shots. Not once they finished the hunt are in case if they're finished, the hunt have had this tummy full, and then you again come across a pack of wild dogs here, guaranteed oneness there just lazing around. But then, when they're not in the hunt more, they start playing. So this is the other thing can expect with Wild ox opens the playing around the jump on each other. They come greet each other a lot off those nice behavioral aspects you can plan and shoot when it comes to well, docks
11. Subject Knowledge – Sloth Bears: Now let's look at the next animals, which is the slot a slot bay. Ah, similar to the title, oppose their nocturnal. But unlike again the tigers, leopards very can generally see them even in the daytime. So seeing a slot during the daytime is quite tough. Now again, like the elephants, the eyesight and the vision off the slot best are very poor. So sometimes they tend to come very close to a vehicle without them being aware that you're around as long as you don't make any noise, now wants the completed close. And if this sense, of course their sense of smell is very strong. So once they can smell your the consensus that something is around, chances are they will stand on the two legs. Now, this is something with sure to be ready for, so get your settings, Everything right? So when they come close, they stand on two legs. So that is one kind of composition you can try. The other kind of photographs you can plan with the slug based are during the breeding seasons. Now, what this lot based does is the carried A in once on the back what we call us piggybacking and once I mean they're very small. Two months, three months. That is when the candidate. So I need to plan your shorts for the duration Onda slot based finding them in daytime stuff because again, unlike the leopards, tigers which may stay around, sleep under a tree in the shade. Unlike them, the slot basically just head back to their case, so he will not find them at a little point in the
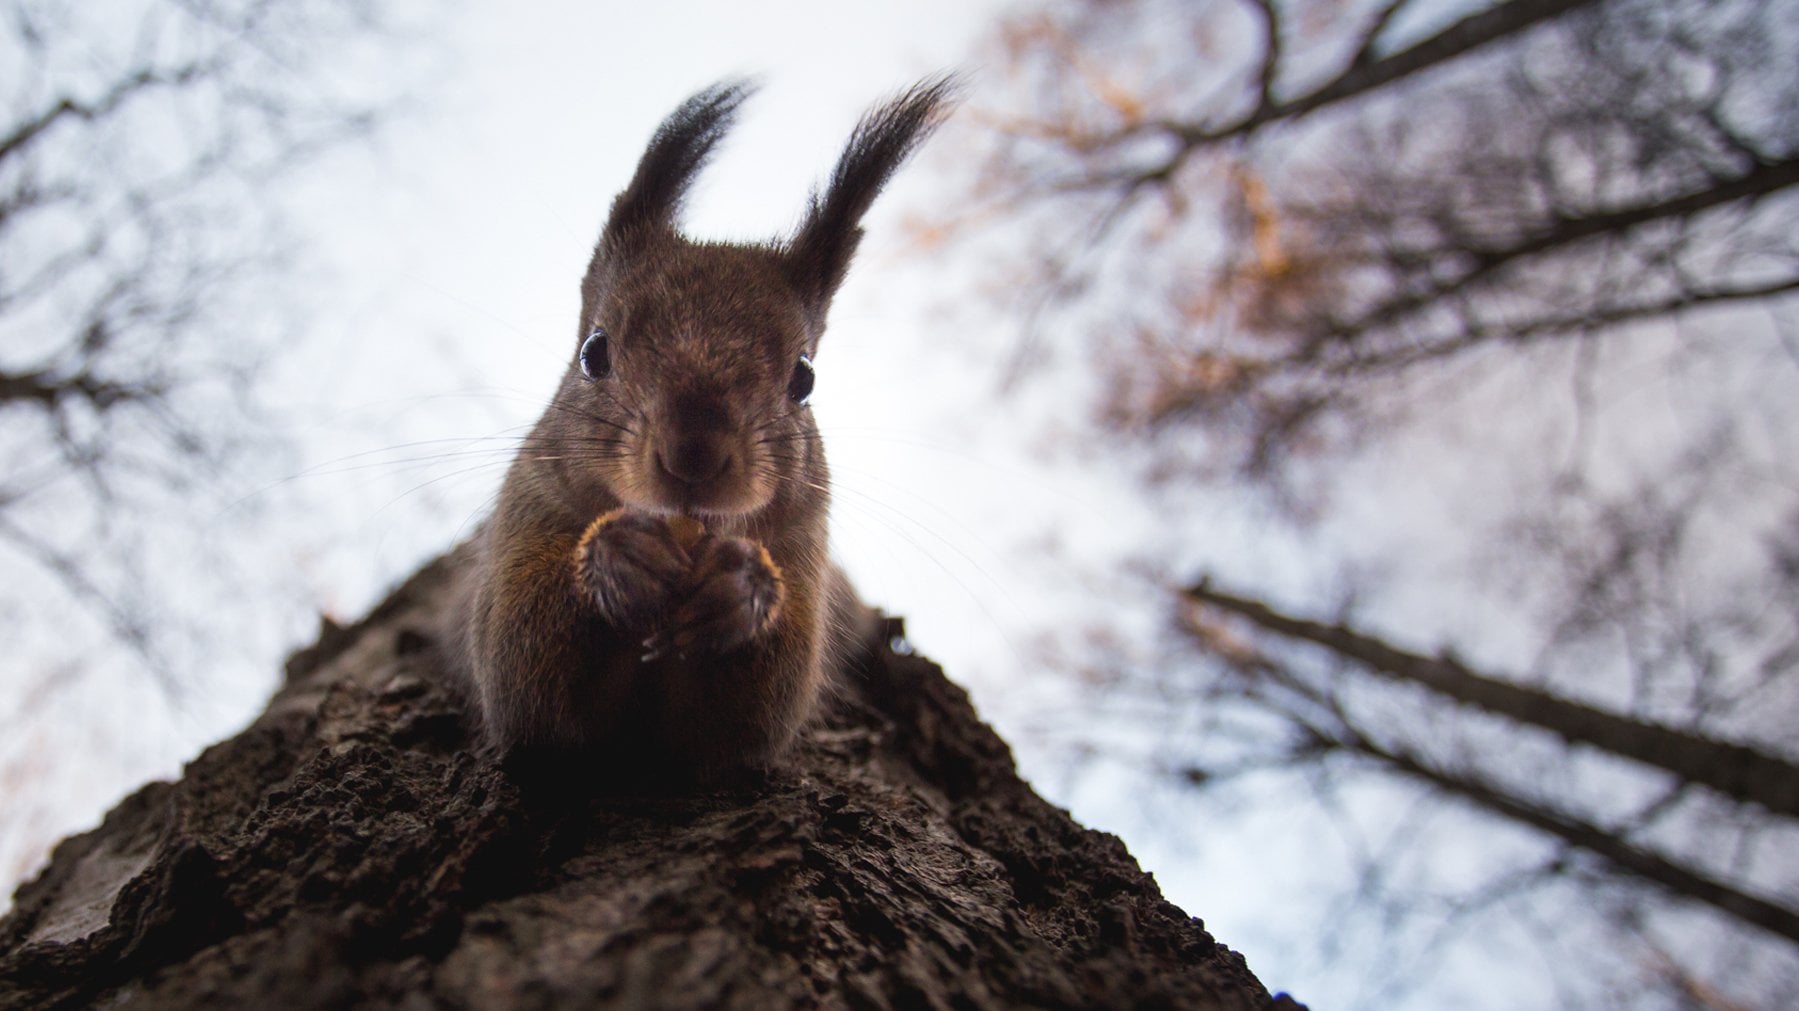
12. Subject Knowledge – Other Animals: moving on the other remaining mammals in the park. The common ones like the spotted deer, somebody here longer or any other species. If you see they're actually very interesting to shoot, it's a lot of times what we do. While a photo emphasis. We always keep running behind the cats. Our doing that spend time with your subject, especially the common ones like the sport ideas. Somebody here and you can get some amazing images, especially like in the behavioral aspect. If you see if the somebody here are the SLA spotted here is approaching any three plants which have leaves coming up. So generally they go after fresh lease. So one behavior, what you can expect when they get closer. Toe this trees is they tend to stand on two legs to feed on them, and if they do it once, chances are they won't be back. So that's the other planning what he can do now. Other be here'll aspect, especially when there are birds around common. My nurse jungle minus any off these birds around. They tend to feel on in six on this common species from somebody s port ideas. All this. So did you could actually make some amazing images off the behavioral aspect and the interaction between the birds and the spot India's so they tend to come sit on the head on the antlers on the head and the feet near the eye on the head. So those close up shots is something again you can plan no moving on. Arguing with Lung goes so well respected, lighting the back lighting. So Longo's are fantastic subjects. So if you come across Longo's and even sported deals with antlers, which are velvets, what we call the back letting will be fantastic. So spend time with these common subjects, and I'm sure you're going to get some amazing images. The other thing, when it comes to sported years, somebody else alum calls. So be here RL aspect when you're trying to find leopards or tigers. So this knowledge again goes hand in hand so generally sported dears, even if they get a little alarmed. Then you start getting the lump calls, so alarm calls off the sported years 100% we cannot trust unless you hear them continuous. So, for example, if a predator is on the move, chances are you'll hear a sported here. Call it one place followed by another. Call it a little for the place. Are my people sported? Here's the start calling. Then it can be a little bit guaranteed that yes, there is a predator over there. But then coming to the somebody years or even for that matter, Longo's so dig you. The alarm calls only on direct sight. So now if I could name the species sambar deer lingers barking deer Neil guy a lot off these mammals only on direct set off a predator the given a lump all. So if you hear alarm calls off the species guaranteed there is a predator and you may want to wait at those places. One of the other aspects, when it comes to the behavior off these animals, sported there somebody else during the alarm. Call our when they're alert. Is the Eerste actually Corp the years to go off, The tail goes up and then you can see their foot like they stand the foot like that, take the foot up, and then this tamping down. So these are indications. Sometimes they would not give the call. But these are also indications that there may be a predator and we could plan your shorts accordingly. The sported years during certain seasons. What they do is actually they decorate themselves with the beads and small plants. Some of them they put on their antlers. They recorded themselves to attract the females. So many off this there somebody dear sported dear Onda in a place like can attack reserved , embarrassing us. They look absolutely fantastic when they decorate this and in the early morning light the globe. So these are things were taken plan. So this is how the subject knowledge will behavior Last bit off various pieces, Of course we went through tigers, leopards, lot best defense, some of this common species. But what you need to do is like once you're open the freed, take your time to understand steady. These animals understand they'll be here last. Make a note in your mind so that next time when you come across this species, I'm pretty sure this subject knowledge is going to help you make better remainders and help you become a better photographer.
13. Planning Your Shot: now that we're seeing the various behavioral aspect off the animals. Now let's look at holy. We used that knowledge into pre visualizing your images to get really good images. Now, if you look at the habitat behind me now, we're in the Tiger country and here one of the things what I can expect it stood for the tiger to walk across the grassland. Now, obviously, if you look at the height of the grass and the tiger walking, chances are you will not be able to see the complete tiger now in the Tiger box across. It's just the head, which is risible, so you need to pre visualize. Look at the bag drop. Look at the overall habitat competition. It also depends on what kind of Flint's you're using. So if you're using a wide angle lens, you shoot with the habitat. If you're shooting with a long tail violence, then you just go very close up and just head short dusting. She can get so that is the whole concept off pre visualization, where you have to bring in the combination off your subject behavior, the natural history, all those things into pre visualizing your images now, as they keep saying the whole concept off pre visualizing shooting to get really good images is to shoot, not what is happening now. So your image is not what is happening now, but what may happen after a few seconds off for a few minutes. So it's completely the whole concept off predicting what may happen now if there to give you a simple example off Tiger. Now we know when you're trying to drive. If this is safari track and you hear the alarm, call the tiger walking in. So that is when you need to stop pre visualized and predict where the tiger may walk where it can cross the road and then take your equipment so sometimes, like you go with multiple equipment, have an 800 millimeter 720,402 8000.8. Also the very entry level 55 to 50. Now, when you're having multiple off this lenses, you need to pre visualize. Your vision has to be like if I look at this habitat with an 800 millimeter, what I'm going to get so that way you need to plan your shot could. This is the concept of pre visualization. Now let's look at some of these examples. So here in this particular photograph, if you see off the tigers fighting now, this is when these two tigers was just sitting over there relaxing the siblings. But they're getting to the adulthood now. When this happens, this start fighting or the territory. So this is more off a play fight. So here the two tigers, they're just sitting with each other. And after some time there was a little bit off aggression. And then, as you can see, this suddenly started to fight. It was a play fight. So in this example, if you see, I used a combination off different kind of shutter speed all those composition to get the kind off image, what a wantedto get.
14. Previsualize – Tigers Crossing: now, one of the other famous images off Vegas is obviously the tigers crossing the route. Now, in most data safaris, what happens is like their jeeps on a the side. So one of the things is depending on your position with the vehicle. This part, when the tiger crosses the road, you may get vehicles in the bag drop as a part of your composition. When you pre visualize you look at the scene, find if there Taylor crosses here and the jeeps are at the back. Is it possible to award the vehicle depending on what kind of equipment you're using to shoot off course? If you're using a lens like the 402 point it, you can get a tight closer and you can try toe award the vehicles in the backdrop. But if you're using a wider perspective, 7200 or even much waiter, then it's difficult to award the vehicles in the bag. Drop that time even before the tiger starts working pre visualized. Get your composition so that it is okay to include the vehicles because that is part of the habitat. So don't a word things in those situations we cannot award the background. You cannot award things, make use off it and make it part off your competition. So in this image, if you see that data crossing the road, the vehicles in the backdrop or in the other image the tiger coming had gone with the vehicles in the backdrop so composed in such a way to include those elements and make it part off your framing. So this is have you need to pre visualize plan and eggs Goodyear shots.
15. Action Photography-Spotted Deers : next, let's consider in the kind of example for pre visualizing. When there are a herd of sported here on one side of the road and they want to cross and go to the other side of the road, there are chances if they're a little alert. If they're a little scared, then chances are they run and across the door. Now when they're running one things. What you can expect is they want to make a good high jump award just running on the road. So for that against three visualize, we do expect them to jump. Get your camera settings right, because if they want to jump, you want to cast them in action when they're up in there, so you need to plan to have a high shutter speed. So going toe your camera settings, I use a combination. Make sure look at the scene. Take a few sample shots. All these things here to do it much in and 10 to 3 seconds is very hard to get your settings right to go ahead and execute. So at the time they will make the jump. You're ready with your competition. You need to get your shot
16. Clicking Macaque+Rim Light Effect: Here's another classic example off a pre visually shot. This is what we call as the relating effect. So in this case, this was photographed at Bharatpur, where us on the track. And I saw this racist make cox coming from behind me and has seen dispatch off late. And I knew that if they were cross that patch of flight, then I got my composition, my execution, that image what I'd pre visualized. I'm going to get that. So what I did is like I looked at the place where their sport late, the late coming from behind. Actually, the back lighting is what we use for this stimulating effect. I got my exposure triangle parameters, right. Metering, exposure, compensation. All this I gotta track. And I waited for the moment for the seriousness Macaca, rhesus maycock to come into the patch. As soon as it came in, I got my shot. But then the bonus was the small baby again coming into the frame. So this completed my image. So this is how you need to pre visualize, predict what may happen. So as it said, your image is not what is happening now, but what may happen after three seconds after three minutes, even after three us. So this is have you pre visualize and execute your images?
17. Spotted Deer Behaviour: pre visualized images in case off monsoon time. Now what happens is like if it has rained and the animals are wet One of the things what you can expect from a behavioral aspect and again pretty visualizing pre composing your inmates. It's once the rain stops and then this animals when they become active, once they get up, the first thing they're going to do is they're gonna shake their body. So they're gonna shake their body. The water Sprinkles like the water coming over the body. Hi. Should the speed freezed action that is a shot, which should be really good to see. So depending on what equipment you're using, you can do a close composition or even show with the habitat off the animal shaking the water off the body. I should have speed freeze it Backlighting is something we should really make it even more amazing. This is another kind of short. You can plan execute once you understand about, be here unless backed off the animals. All right, so let's look at this other scenario about in wildlife photography. How important is it? So basically, pre visualize and compose your shot. So here we see the spotted deer with its for moving. Now it's completely wrecked there, in the water there, walking to us The Bund. Now here is where the fund is now they get up, the bun there will shake backlit while they're completely. But look at this. They're going to shake on top. There you go. Come on, Shake. Yes, You see that? So those are the shots you really need to wait for And look at this once more. Yes, And then the interaction comes into picture. So why left water? Refugees all about understanding your subjects, pre visualizing and then executing the shots. Now, of course, a lot of other para meters comes into picture. I mean, I saw the scene happening and immediately started recording for the video for the video tutorial. Now, obviously, like if you go a few steps back the moment you saw that there in the water, they won't go. They're going to go on top off the burned over there, and then they're going to shake its board, their body toe Sprinkle off the water from the body. So you need to pre visualized this descent. The competition most important arrival all the various camera settings right from what kind of white balance you want to shoot. So currently it's late in the evening, the sun going down sunsetting Nice golden light we have Obviously I want to increase my white balance to get the nice golden colors. So white violence is the first parameter You need to work on the second exposure triangle para meters. Now it's going to Sprinkle off the water from its body. So you need to have high shutter speed to freeze that whole action, The water coming out of the body. So that is an awesome shot. What you want to aim for? So obviously you need to have high should the speed for that. So that's the next one. So in the exposure triangle parameters, so you need to have high shutter speed. So I revert the perimeters to get the highest rate of speed off course based on what kind of meeting you use, what kind off framing you're trying to compose, what exposure compensation you're trying to do So all these aspects you need to work on, and then a rave at the correct settings get the provincial a start, and since they were actually continuously moving in the water you're focusing obviously has to be air several. Our auto focus continues composition, misplacement of the subject. More to the left, you're And of course, these are the very basic camera settings you need to arrive back and then composition placement as to say You need to decide now This is how the overall behavioral aspect off your subject and then the concept off that associated with pre visualization with the camera settings. If you see all these various things, they come together. And that is when you get those 12 images. So if you want to be a better photographer, you need to get all these things together and then execute as per the plan, Good luck.
18. Previsualize-Tigers in the Grassland: No, Here is the situation. There are a couple off beggars sitting in the class land over here. So if you've been reading year for quite some time, this is the concept Off pre visualization comes into picture. If you see this open area just behind me and then the class. So we expect the Pagels getting from the grass and then walk towards us. No, If you stated relating, I'm safely light is coming from behind. So the latest coming from behind me and then so it is more or less stable it now the option . So this is here. This is really you need to bring visualize and decide worked in equipment or other What lens? What focal Inti want toe shoes? I have the very basic kittens 55 to 50 on the 1240 and have the 7200 Lynes 7200 F 2.8, linds of the 400. Mm. If two point it, Linds, Anyone? I'm the commitment. No. If you look at what the radius options were tohave, this is what I need to dissect. Okay. What is the competition I need now? If the tiger comes out with the eight minimum negative, very close up shot. And if you see to say Lady Backdrop, is the class a close up shot off that will inoculate Good, not a great image. So the 18 11 is ruled out? No, then comes to 402.8 400 point. It would be a good choice if the tiger walks in the open a little bit. Nice clothes Update shot. It's an okie kind of his shot because again, God with side waiting, it's a taken image with no background. It's just as you can see, it's just a flag by growing just the class. For me. That's not my shot. So given this particular situation that lends what I'm going to use this the 7200 obviously it is the 55 200. Say any off. This, too will work. So in this what happens? You have the flexibility. So since it is a zoom lense 70 and then you can shoot a little wider perspective. So if you see the hype attack, there is grass. It is grassland and then a little bit off the greenery trees over there and beyond. That is just a sky blue sky, so the shot composition. What I would probably make is if the tiger comes out, keep the tiger to the lower portion off the frame. So when it comes to competition, don't keep it in the center. Lower portion of the sea. Lower portion off the frame tiger to related if it is walking from right to left, give the table to the right, said floor composition should across land the trees and in the blue sky. So with the resemblance, 7200 lands are the 50 feet off of Dylan's. What I would do is get a habitat short. Now. This is where we need to continuously work. You take a habitat shorter 70 millimeter showing the date of the background, and in this it's okay. 200 millimeters. Zoom in the little and get your shot. So this is how liquid you're waiting for your subject. The pre mutualization. You have to think all this aspects and then, obviously the camera sitting. No, if you look at the video camera setting, I would go with this. It's the flat late. It's around. It's only 10 15 now. So flat late. I'll keep a white violence in the range of fighters in 400 Kelvin or fighters and 800 Kelvin so that he gave me a little bit off natural colors. What out exposure? Compensation. I'll go with evaluated metering. And overall, if you see the tonality, it's flat. It's not a brighter tonality, its not in dark tonality. So I'll keep the explosion, composition and zero. And the focusing points, if you see, says the tiger will be moving. So I want to keep my focus on the Tigers and select just probably the cluster of the group focusing. And then here's servo or autofocus continuous. So this is how you need toe aerial at the latest camera sitting, what equipment you want to choose. So all this radios, things comes into picture, and then we wait for the subject to come out. So we are running out of time. You probably have another five minutes. We will play our look and see if the data comes out. Of course, I need to commit my body to shoot a country just with the nets. So let me just read here and hope we get the Tigers
19. Previsualize - Monkeys' Behaviour: understanding the animal behavioral aspect combined with the concept off pre visualization combined with the technical aspect off auto focusing, these things can come together to get you some awesome action images. Now, if you understand the first part, which is the behavioral aspect, look at this particular image, where the bombing, because is jumping in the air. Beautiful background, freezing the action. I've been able to capture it. But then how did they captured this image? Because sometimes what happens like when the monkeys are jumping from one point to the other point that time. If you try toe auto focus on your subject, chances sound like the focusing, maybe slow. The focusing may trail, and the action is already happened. Now this is where the concept, this history, the pre visualization, with the subject knowledge and in the focusing aspect, understanding that comes into picture. Of course, let's take once one point at a time order focusing. So we know like depending on how fast your camera is, how fast your lenses, what kind of a poacher you have, what kind of relating you have you in the situation? Chances are when the jump happens, you may not be able to achieve the auto focus. So how do you get good focusing in these situations were here. You notice the monkey is jumping from one rock to the other rock now similar things if you take a pre visualized a lot of times like Longo's and even bombing because the jump from one tree to the other three. Now, when it comes to the animal behavior aspect, if there are my people of this monkeys together and if the 1st 1 walks comes and then jumped from one point to the point of From one block to the other Rock and continues very high probability, all the other monkeys in the group over there they are going to take the same part, and that is what happened in this case. So how did they achieve proper or two focusing the composition? Everything in this if you notice there's a rock on the left side, and then this a rock on the right side. So the monkeys came from the left set. It jumped to the right set. In fact, even before I started shooting this monkeys. So there were a few schools which actually took the same path jump from one block to the other rock, and then the monkey started coming. So in the macro few seconds when they looked at it, I knew that this is the part of the monkeys are going to take toe jump from left from left side to the right side. So since, like I know it's difficult at you auto focusing while it is jumping in my case what it is very simple. I pre focused at the rock on the left and in the right. If you look at the plane off auto focusing, its almost parallel my focusing plane. So if you have focusing from the front, it its battle to the focusing frame. So when the monkey jumps from one point to the other point on the Rock and they re focused on the left truck or on the right rock, the depth of field you have and you're going to get proper sharp focus. So what I did in this case, a free focus on the rock turn the camera into manual focusing or, for that matter, turn the lens into manual. Focusing now is the focusing is achieved. All have to do is get my composition, right? So I composed it in such a way that both the rocks are shown so that, like, you know, a sense off proportion direction that the monkeys jumping from point A to point B In this case, I composed it kept everything ready. And all I have to do now is wait for the monkey to come and jump. And I knew, like when they look back there, at least like 10 to 15 off this monkeys. So even if you miss a couple of shots, I'm pretty sure that I will get the shot. What I have planned for so I had to do is wait. Once they started coming like a composed, sometimes like zoom in, zoom out. And that's the advantage of a zoom lens. Very can Campos. And they said What kindof like Orel Habitat or close a portrait world and in fact, how my people of this images were some of them. I zoomed out, and some of them I zoomed in. But if you see all the three different aspects off, I love photography subject behavioral aspect, pre visualization as to what will happen, crediting what will happen understanding about auto focusing and understanding about. If something is feeling, what is the work around? So in this case, it was manual focusing. Refocus on the rock and you have your focusing sharp, sharp Patricia getting get this kind of combinations. And this is where I keep telling people photographers that getting the subject knowledge, the four important pillar support or refute what I keep reemphasizing is important to make better images in my left photography.
20. Lion in Rain - Capture its Behaviour: the next one again. The concept off. Pretty visualization animal behavioral aspect. I mean, like, if you want to be a better while a photograph for this combination is extremely important where you know the animal behavioral aspect. You can predict what is going to happen next and be prepared for that. As I keep saying, your shot is not what is happening now. But what is gonna happen after five seconds, 55 minutes or even, for that matter if I us now here. If you see, we were in the Masai Mara and it started raining heavily and we came to know that there is a lion somewhere close by. We went over there heavy, heavy downpour off frame and the lion was totally live. It absolutely no movement. It was just leaping lazing around. But we knew at one point off time, once the rain reduces or the rain stops, and then if the land has to be active, the most important thing, it is going to get rid of the water on the body. So it is going to shake its head guaranteed. So majority of the animals mammals, like we have seen it in the past spotted deer going in the water. It comes out, it shakes his body to get rid of the water. So even lying, for that matter, Tiger, for the kind of district it is gonna shake and get it of the water guaranteed the same thing. We knew about it, we expected. What is what happened? Three. Visualize. And now this is where you have to decide what kind of shutters pretty want to use. Whether you want to be creative uses slow shutter speed for the whole shake motion. Blood which is happening are used a high shutter speed to freeze the action. So in this case, we decided to freeze the action. And then we waited for the lake moment. And as you can see, like step by step, we knew it was gonna happen. And as expected, the lane shook. It said, And this was a pre visualized image, an image that she wanted to shoot for a long time, especially if a lion with the huge main and then shaking it said the water spraying around . This was a pre vigil estimation. I have waited for a very long time to get something like this and I was quite happy with the combination of all these things coming together. I got the image what I wanted.
21. Leopard Behaviour: in this video. Let us understand the importance off the local knowledge which is your driver and guide Knowledge. Subject knowledge. Then how do we use this knowledge to predict what may happen? And how do you plan your shot now? We came to know that in this area the leopard had medical off a spotted deer. So we came all the way here and aspirin. Initial information from the guide and the driver. The leopard had made it killed and the kill was on the left side of us. So if you look at the habitat behind me here, it's dry, very dry. And this a water body on the side. So generally from animal behavior point off you understanding about these suspects generally Lake of the Tiger or the leopard? It's the making kill near what a body. Simple reason being after the consuming, that eating a lot of futures directly in the body and there to cool down. And they keep going to the water body to drink water. Now, when we arrived here, what has happened is like from one side of the road, the leopard has taken the kill and it's moving to the other state so on to the right off me we see the kill lying over there. If you look at the kill, obviously the leopard has completely eaten the killed. So it has completely eaten the kill. Now what do we do in this situation? Now let's study what is happening over here. One, The Phillies over. It's a huge male sported yet which means obviously the leopard is full. It's stomach is full. It is not going to go in search of a hunt again for sometime. Very high probability. The leopard is definitely sleeping somewhere in this vicinity. Now the way we had to predict the vivia Wait, So I mean obviously why left? Photography is all about prediction, pretty visualizing and you need a lot of patients now. What I feel is the leopard is somewhere in this vicinity. And if you look at the weather is a little cloudy. So this is speak somewhere in the month off me. It's little cloudy and harvested. The leopard in the Swiss city is going to get to the water body at some point of time. So once the sun goes up, chances are the movement will start and we see, like there are supported years around. So if there is any movement of the leopard, did you start hearing the alarm calls? And that is where you need to wait to get your shot. So generally, what happens in wildlife photography when the safari So people come have a look at it. Okay? The sported here kill this year, they look around, okay? There's nothing that's more chances are they just move away from here. But to get that one shot, it's all about waiting. So what we're going to do now is we know the leopard is in the vicinity. We have to wait. Probably like even we wait for the sun to come up and then we plan our shots. Then when it comes to the actual composition, pre visualizing. So I'm having an 800 millimeter lens. I have a 72 100 lens and also I'm carrying a phone minimum of 2.8 lens. Now, among all these three radio equipment, if you see the very high probability is the 7200 lens will work very well. I mean, if you look at the habitat, if you try to take a close up off the leopard with a lot off grade habitat died branches. You may not be able to make a good wolf image, but for me personally habitat shot. So even though it's a lot of dry in between, if you see we still have a lot of greenery around here, drink patches off leaves. You still have it. So my preferred choice off lens in this kind of a situation, if the leopard comes back or walks towards the water body, or if you see again behind us if it walks. So for treaty pretty visualize the composition at the back. The leper crossing the road here with the tall trees, the 7200 millimeters F U C with the habitat keeping the leopard at the lower portion showing the road, the tall trees, the forest that is my previous list sort. So in my life, this is how you use the local knowledge. Understand the animal behavioral aspect, Then predict what may happen and then three. Visual is your shots. All these things come together for that one single wall shot. So I'm going to continue waiting here, hoping the leopard comes and engaging. Fight if, in case if it comes back on, gonna show the shot. So that's right for now,
22. Signature Shots in the Wildlife: meanwhile, appears something called as the signature shots. What is the signature shot personally for me with the taco, which should make the shots, it should convey a particular location. So even we thought, trying to find out where that location is by looking at the place, you should be able to tell where this has been photographed, of course, taking into a contact to have visited those places. And then it easily shows that the image shouts and say, This has been shot at this location. Practice what we call us, the signature shot. Now let's look at some of the examples, which are personally photographed and well known destinations in India. Way we capture some of these so called signature shots. Let's start with one of my favorite destinations, which is bundled with terrorism. Now, in bond overtaking itself, you have the Rajveer a damn. So here, one of the famous images, the signature shot. What recall is the tiger walking on this raspberry jam? People, we wait for that to get that kind off a particular shot. So that is a signature shot off this particular destination. Let's look at the next one. We just rent. Um Ortega deserve so in the end number takers. So you have this Raj Public and Avellan photograph off this place. A signature shot is the tiger crossing the Raj public. So there's an A land and it's a small strip off stones and other things were that take of walks across. So this is a alone a photograph. Pay the tiger if just cross that in Catholic, get onto the other side. It generally uses that particular part that the whole habitat showing the tiger crossing the public That is a signature short from that particular location. Next, if you mourn on the readiness location just cannot take the result. So cannot take result have the balancing us which is endemic to that particular location. So early morning, Mr the Morning light. Sometimes the bottle singles they decorate themselves and then in the mist with the grassland That is a signature shot off Khanna So anyway left for talking a free show This image if he looks at that here she looks at that they'll be ableto Conway that yes, this is from Khanna. So these are the signatures shorts which you had to come off it. Let's move on to the other place, which is carbon paganism in Corbett again, the famous images, the violent images are the elephants in the color grasslands. So with that and then that I'm gonna river in the bag drop that is a beautiful one for each of them, if you see are more off habitat shots rather than the close up. Another personal favorite image of mine from Corba tag reserve is the tiger crossing the Ram Lunga River. So the blue waters off ramp Hungary were then the White stones on the banks. Now that is the signature shot off Corbett a gazelle. If you move again towards some, we have Kaziranga So cause rancour well known for the Indian one horned rhino. So there with the elephant grasslands in the backdrop and then the long crease, the long flower increase. If you see that against a very nice signature short, limited, available only in Khazanah terrorism. And then you go down south in a car, not a cop. There you have the leopard sleeping on the tree, LePore sitting on the tree. I mean, this is again a signature shot off cabinet inaugurated. A good is up and again you move further towards Gujarat. You have the little runoff catch and the greater and of course, we're again of alone. Famous images from those places are basically the setting sun against the wild, a static us. Now each of these images, if you see, are what we call a signature shots. But you can easily look at the emergency. This has been photographed at this particular location. So you come up with your own list of signatures, shot off a particular park sanctuary and see how we can go there with the habitat captured the short and convey the more the essence off the place using this concept off signature shots. Good luck.
23. Concept of Story-telling Images: the storytelling image. What is it? Let me give you a very small example. Considers Have displayed around 100 photographs in the room A little. Enter the room and you go around the room for, say, 10 minutes. Look at all this 100 images. You come out and after 10 minutes. If I ask you what are the images you remember from the truth? It's like a memory test. You're going to remember and convert those images which created an impact on your mind. Those images we should remember which conveyed a kind of story to you where you were able to connect with that image. These are what we call as storytelling in majors. So a storytelling images one which has a lot of elements and generally they're not portrait . So they show the habitat. Were there different elements which comes together and convince slowly parakeets so it can miss a story in the teammates. The one single image with talks a lot practice what we call us a storytelling image. Let's look at some of these images now. If you look at this first image off mine so this if you see here, so we have the guard looking and staring at the Tigers. Or look at the other way to do Tiger siblings looking and stating at the garden. Now this conveys a lot off story. Obviously they, of course, the other very important thing is this is the first image off a tiger in the world, which which have shot after waiting for more than 10 years. So this is a very classic signature image off my now if you study this image, there are multiple things which countries obviously, if you look at the guard, it's just standing over there. It's not afraid off these two tigers, even though the goal is the foot off the tiger, it is just standing over there, not afraid off it, because the goddess confident that it's too big for this to sibling taters to take down. If you look at it from the Tigris Point off you, the tiger is just waiting over there. It doesn't know what to do. The Tigers are not attacking the guard because they're still to young to attack the guard, and it knows if they attacked the guard, they will be taken down. So if you look at the habitat, the bag drop everything. So the elements various elements to fall into place. This is what we call us, the storytelling image. Now, if you look at the second image another award winning image off mine off the leopard, sleeping on the tree now I composed it in a vertical way to get more depth in the image. So here, in the same is because of the composition you can see. The leopard is sleeping at a very high polished in the tree at the very height. Now, obviously, the lepers are afraid of the wild ox tigers of the predators and majority off the time you see them on the trees here. If you look at this particular image, you see it so will relax its sleeping so obviously like it probably had a very nice meal. And it knows, because off the height at which it is sleeping, it knows no other predator can get close to it. So it is relaxing. The more created in this image is that very can no. The leopard is least bothered with the outside world, even though the photograph first, a lot of us were there photographing it. It is just leaping, relaxing In fact, this particular image If you see the leopard was sleeping on the street for close to 12 us morning, right from six. Game till evening, six pm I mean, there were other Forest Department folks to stay there who are monitoring it. They even conveyed to us after the safari timing. It was still sleeping there. We went back in the afternoon safari. It was dead. We had to leave it and entered the park in the evening again. A classic image. If you look at this third image, you see this whole herd off spotted deer. Look at the years. Look at the years. Look at their force. It can miss a story. It tells that yes, this these sported years are alarmed. I didn't know that There's something out there and they post convinced the story. So this is how they are in the alert position. If there are predators around so it can miss a sense off story, it can, with a sense off what is happening around there. Now this last image another favorite image off mine. This is the title. What I give India the country off God's tigers and plastic. I mean like this is a sorry image for me personally, you and this is the current state off A lot of for parks where we litter the park with plastic lot off other dirt inside the park. So we need to be more responsible towards our environment. And this is a very, very powerful image. So this photograph of the tiger eating this plastic the chips packet with the back drop off some of the stones basically the gods what we call. So this is from random. Ortega is up. So here it convinced the story about right from tourism perspective to the tigers were even humans and tigers. The co exist together, the temple in the backdrop. A lot of people go there within the temple to do their food job. Apart from that, the tiger in the small water pardon eating the plastic shows the sorry figure about current state off a face in the results in the big box, tourism is a big impact where we need to be more responsible towards it, where we don't have to litter. I mean, imagine what happens if the tiger eats this plastic cover. It's definitely not good. Very high chance intimidate. So this are what we call us. Storytelling images, those images which created impact and the one factor comfort off it. So go ahead, create your own stories from my left and see how you can convey that sense off story three of us. So if you look at all this various images, what we saw, especially in terms off competitions, the judges look for these kind of images. So it's not a close a portrait off a tiger or close supported off a leopard, which will be award for you, of course, the drama. The lighting matters a lot, but generally, like I have judged a lot off competitions and even for me personally, these kind of images, which can be a story, is what we look for US judges. So go ahead, create your own storytelling images and see how you can make a difference both from a conservation point off, you are creating the war factor for the viewers
24. Shooting from the Safari Vehicle: for the safari. The most important aspect. Your vehicle outside, off Karnataka, in India, rest of India, in different parks. You have the facility to take on inter gypsy for yourself. If you look at the way the Gypsies are in regular ways, you have the center seat here, so we have the seat here, here, So two plus 24 people will sit or three plus 36 people will sit now for serious photograph . It is important that you get the center seat removed. Of course, this is not permitted in all the parks, so you need to find out where these things are supported where it's permitted. Get this done now once I get the center seat removed. So here, as you can see, we put a bidding on the floor. So that act is you can sit. Not as off now. Yes, I'm wearing my shoes. But let me tell you, the best way to shoot in the gypsy like this in open is without the shoes barefoot, because you get a lot of flexibility to move around and then position yourself so that your very first in shooting with the shoes on, sometimes what happens your shoes gets stuck in between the equipment and other things. Now, if you have a closer look at the gypsy, know the way I lay out my whole equipment hold. I organized myself in the equipment. Let's have a look at that inside the gypsy. If you see the way I lay out my stuff, it's like once I started safari, whether it is early morning or late evening and afternoon, I decide whether Boots is Mikey equipment with just McKellen's If you see it, I'm carrying my 7200 lens at the 400 F 2.8 lens. Then now my 18 of them in here and been off course another body, second body. I always got another pro body, but currently I'm carrying the 1200 day with the 55 to 50 declines. So what I do is I laid out over here. It's when I'm probably alone. Or even if I was second person. The gypsy relay older equipment in such a way that we know what a weapon. Is that what part? Now the other accesses. What I'm carrying, if you see, is a planning part, so planning for extremely useful toe plan the shots, liquid flexibility and moving around. This is very useful. Then comes the clamp, the clamp with the fluid head. So this will get fixed at one particular place and it's the flexibility you will miss it. But stability, composition and then handling especially Big Lance's. This is absolutely fantastic. Mexicans, basically, once we lay out, as I was saying, once they get into the safari, whether early morning or late evening, what I do is I decide the main camera water help. So the main camera, the two pro board, is what I carry. I decide early morning what lands I should put on this obviously very early morning. The lightest less so in 18 11 will not be of doing its job because of the lower leg situation in that situation, what I do is the pro body one day X, or only expect which carry. I put that under 7200 lends 7200 404 100 lands. Reason being if you get any subject for the lower leg, this lenses are the ones which will get you the images. Okay, so this is the layout off the gypsy or up off course in the gypsy like we do carry water, sufficient water and even food any off those which is required for breakfast. So those things are again kept in the gypsy, currently for the shooter have removed. Now again, when it comes to shooting, One of the reasons why we get the center seat removed is for shooting flexibility at eye level. Anything we want to shoot me, go look and we shoot. And even if this had done so, if the tiger in the office walking from the back, then we keep it to the state and we start shooting, for example, If this is the one, let's a have I could keep it over here, if you see. Okay, so So if the favor is walking her down, I go like this. I feel so you have to go as low as possible when it comes to getting the high level shot or even below the island. So this is one of the techniques. So if you see here the lens scholar, it holds over here and we shoot it. So the shooting technique is something which share to evolve on the flight. Once this is done, If you look at the gypsy again. So the clamps, other accessories it good. Different parts with the beanbag. I keep it on top over here are at the back over here. Then I put the clamp on top of that so I used my enter gypsy from high twice a standing tall are going down Even if you see a carry me try putting the vehicle and they use it So under this secondly report for certainly waited all the longest jump around Do you think this that they could behind me? I don't know, but they didn't get a lot. So if you see I can't even a secondary to report for a smaller camera body so that when it comes to composition, these are important exodus. So that's pretty much about the gypsy. The vehicle, What, anyway even carry a secondary being back, which gives more as support to keep the equipment. So the camera lens the big lens affair to keep it I need a cushioning support for that Have this secondary being back. So these are the accessories what they keep within the gypsy here. Now let's look at how exactly? In an efficient way we use each off this Mossman accessories for your shoot. Let's look at that
25. Using a Tripod in a Vehicle: when it comes to shooting techniques, it's important that you get your shooting technique absolutely right. No people ask me, Hold way, get sharp images. Let me tell you one of the biggest misconception in photography is how you should. Speed will give you sharper images. That's totally wrong. So it's really the shooting technique which matters when it comes to getting sharp images. Now let me show you what I do, especially when I'm trying to shoot the report. Now the very first important thing with shooting in the gypsy like this, with the center seat removed, the school space is to make sure he should barefoot. So even though I wear my shoes and come for the safari, I remove my shoes. Keep it to the same simple reason being with all equipment, everything around. If you want to walk around, sit this way. You can just keep your foot, stand here and there, move around. So you have a lot of flexibility for this, whereas if you're wearing a shoot, your shoe may get stuck in between these caps so you don't have the flexibility, even if you certainly want to sit like this and shoot the barefoot. You can feel it. Actually, when you barefooted the flexes, its flexibility is there. The first thing is shooting with a tripod. My set up in walls carrying a good sort report heavy duty to report to give me all the stability. Then I use the Schadler FSB eight fluid head. So this is mainly for shooting radios, but I use it for my still, because of the stability, the flexibility which will be showing now here is the main equipment which is generally use . So I used this report set up especially for the long lens shooting technique. Now how the 800 millimeter lens mounted on the one d x and this is a clamp meant for the Sheckler fluid head. So I want so before it mounted. So what I do is I first pre visualized as to where my subject is gonna come over here or here. Which side now if you see the based off the gypsies over here, Okay, so this is the best of the gypsy. But this site So this gap, what we have this is not good. It still needs to go low. So if a tiger is walking, if it had done low level And what I do I is the clamps. So full it Take off these things. I love these things. Okay, So make sure all the links are fine. Okay, so there you go. No Flattened flat on the Lexx. This is weird. You don't make sure things can't discourse over there more This being back. Okay, take it out. So Okay, so this if you see here, has gone completely flat. Fair enough. I keep being better Support. What? This is good. Now this is very close. What I want to do So move it as close as possible towards the site. No, this is ready. So get millions. So these are all the clamps, the quick release camps Lamps Lock it. So there you go. So I'm ready for my shoot. So with this checked up with this set up so I should be able to move on water angle. I want to shoot. So place it in such a way. If the tigers coming over there, You know the barefoot really helps more on move the equipment. Always You have to keep moving around. Anything behind this This area you need to keep it free. So there you go. So this is the lens color. Losing it so that I can shoot were tickle. Also in this position. So will we. I was sitting. So once I have on the basic settings done so in the vehicle, so feel free. However, you want to look at this now, this is where the barefoot really helps. So look at the thing. Well, I level Okay, so this as you can see here, the gap is very less so. You need to get to eye level of the subject. Now again, if you're shooting here, certainly. Like fair enough. You're shooting here. Some action happens on that. Said you need to be really fast. Quick, lift this Things I don't I don't There you go. Okay, so this lends goes. That said, make space for yourself in the back. Cute. Longo's So this whole moving around, you have to be really fast. So once you do this within the gypsy Okay, So you're shooting at 11. All this now imagine a situation where dispense what you see. So somewhere behind said there are bushes and beyond that is just subject. So the tiger is there any mammal, for that matter. It's there. You need to get the height again with this long lens, right? Handled All those things are a little tough. So if you want to get good images, Then again, this whole try protector comes up. You need to be really fast. Watch. So take up. This goes here, then immediately. Get up. So, since you need to know, extend the lex. Okay, this locks in this do next goes down so all the three legs are known. Locked, immediately lifted. Okay, so So this things that you see, you had to be really, really fast. Okay, So place it still it's not enough. This one more section of leg that can go up again on this. Okay. So make sure everything is stable. There you go. Okay. So you need the heart. You have the height. Then you stand up and shoot off course. You need one more level of height. So one most section off the leg is still shot. I can extend it. Then what I do. There you go. So once I have this site, then you can stand on top over here to stand on the seat of the gypsy. Then with proper support, one more section comes up, you get the height. So if you see carrying the tripod So if you look at this world set up carrying the tripod in this kind of open gypsy for stability. So since this is a fluid head, since this is a fluent head, even any movement refer to shoot action. Look at this floor. So this is solid, very smooth flow. So that is where the fluid head comes into picture. So with the fluid head, any kind of action, whatever you want to shoot finding shots, this is quite easy. And also we do us if you want to shoot this ability for not broke quality videos, but yes, still very good. Excellent quality will use to shoot the set up is all you need. Let's look at the other technique off using the report in the gypsy. So again, unlock it, Losing Unlock it, keep it down. All this you got to be really fuss so short in this report section go One more section, okay. And then from the CMB released this locks and let it go completely flat. Okay, And then this I keep it here. So if from the gypsy if this is the position you need to shoot from the front. So if you look at this this you can do it with any trip or so you have excellent support over here. Keep it like this. Take their equipment. Losing this. Losing this state dating. Lock it. You're all set. So with this now, anything in this area you want to shoot banning any off those things, you're all set. So these are the different ways how you can make use off a tray for in the vehicle. So as you saw, go low here, flatten it. I literally can shoot you need the height. Extend all the tripod. Lex, even stand up on the back seat over here if required. Do it from the friend. If you want to shoot. This is the other technique. So a lot of the shooting techniques, if you see, is something which year to evolve while shooting the vehicle. And you need to really innovative Keep thinking, holder. Make use of the set up. The tripod is the most important aspect here when it comes to stability. Never compromise, Assistant, You need to be really fast. So now that we understand about how to shoot with the tripod, let's look at some of the other accessories.
26. Handheld Shooting Technique: now here's the technique to get shop images while your hand holding the lens. Now this is an 800 millimeters cannon lens mounted on the one day exported. So obviously these are heavy equipment. So doing handled, you need to get your technique absolutely right. So especially when I'm walking around, I keep the lens on the shoulder. I walk around like this and then if I don't handle photography, this is the technical use. Now, normally, what I do for 100 photography, I turned the land scholar. So the lens scholar, this not so I turn it. I take it up, so this is a good position for handle. But there is a particular situation where, how to shoot it with don't. So here, when I'm holding the lens like this in the hand, the thumb refuse E is free so that with the come being free, it issues for manual focusing. So if you want to do manual or auto focusing, not auto focusing. If you want to do manual focusing, then obviously this is the position. But in normal situations for 100 photography, this is the technique I use so again turn the knob losing it goes up. Lock it. Okay, so here, if you see, I cup my lens. So I used the hand like this. Hold it. So you need to make sure your center of gravity, you get it right. Hold it. So this is the first step. Now, the second step is just standing position. So if that is the angle you're going to shoot, Take one leg forward. So basically, like, free yourself, losing up at east. Okay, one look forward to get the stability. Now, once this is done, you see here the position. Okay, so hold the lens and then stuck your hand in. So if you have a closer look at this position here, the Hank tax in it, it's not free. So there is no gap over here, So take it into the time you're here. Hold it tight, OK? And then the right hand holding the camera, This should not be loose. This again. Rocketed. So if you see my position, Okay. So I'm trying to shoot their everything that didn't tight. And then I press myself against the you find her. So the i is into the viewfinder, I press against it. So my entire body is totally still. So look at this position. So one leg forward. So the hand in this position shooting So the entire body no acts as a support as a reporter for handling this. The very important technique in handle shooting. The final important technique is when you're shooting just at the time of shattered release . Hold your breath back is very important. OK, so if you see one side done once I'm done with this, I want to walk around. I just basically the shoulder like this and it's easier Walker. So the other thing is, keep shifting it So again, sometimes I walk holding it like this again. It comes back on the shoulder, so make sure like you don't strain just one part of the body. Keep shifting the weight. Well, you're walking around. So this is how I basically shoot, handled when I'm standing and shooting with long lens. So the same thing. So we thought any kind of accessory, a fair to handle photography from a gypsy. Let's see how to do that
27. Handheld Shooting from a Vehicle : Here's another technique when it comes to shooting from the vehicle. Obviously considering there isn't at the seat here and 1234 off you're sitting. So you're subject to the left side. So general way people shoot with long lenses. They try to hold the lens, the shoot like this very important. Whenever you're shooting with the long legs, always try to take some kind of his support. Now here. Given this scenario, if I have to show the different kind off support or the way the shooting technique works, the oneness. Look at this handle here, the side gypsy bar. So place your hand over here. Take it here. It's the same kind of handle shooting. What I explained instead of standing, it is sitting here, shoot like this. So you get good flexibility. You do this if you want to go a little. So obviously this site is against static. You can't go low, you can't shoot like this. So in that situation, if you want to go a little love, then you can keep the logo here. So keep the leg and then you can keep the lens on this so you can adjust the height like this. OK, and then go. Look. There you go. So this is one of this. The other technique with hands, obviously with the sidebar the angle districts. If you want to shoot in that angle again, the lead comes in. You want a little height? Same position. Okay, so here you see again, you're taking support for your hand, keeping it on the leg and then shooting like this. Okay, There you go. So this is so depending on just sitting in the vehicle, you don't have any other accessories handled. If you want to do always century, have a solid support for your long lens to make sure from a composition point off you. Image sharpness point off you. You give good stability for year. Let's so this is one of the technique which is very useful.
28. Support Long Tele lens in a Vehicle: Now comes the other challenge when you're doing handled photography, when there are four people sitting in the vehicle. So in a gypsy like I'm here my co passenger on the photo reference with me here and then two people. Now I explained about in case if you get the subject to the right set, then you keep the lens, you keep the leg appear and then you shoot like this. So you have the shooting technique. Are you move like this? Keep the leg shoot. So this is one position. If you're shooting on the right side. Now, what if the subject you're trying to shoot is on the left side? So here you can take much support. So one of the technique what have come up it is to take the support off your other photograph for his shoulder over here. Now, consider we have the subject on that set, and he's shooting over there. So once he shoots, he takes his normal position to shoot. So this is where the cooperation between the photograph first comes into picture. Okay, you shoot over there. So here what? I do so this hand. I take support off this and then placed my hand on his shoulder. Okay, there you go. And then I shoot. So here, even with the long lens hiss shooting is not compromised. He continues to shoot, but I take a support off him and a suit like this. Now one of the things again cooperation between the photograph forces. When you're shooting, you need to implement that. So he should not be terribly, because if he breathes heavily, my whole lens will go up and down. Or if even if he moves a little bit also my equipment shake. So this is where we work with each other and we should. The same thing applies to him. So if the subject comes on the right said a fair shooting with the long lens. When I'm shooting here, I bend on, give him a little bit of support. So the back What? Yes, that I use now the other thing. If ah go passenger, your friend is not a photograph for and he's just sitting here. There's another way to take support from me. So in this situation, what happens if you're to shoot on that set? So you tell him toe argue decay and put up, Bento J. Okay, so you ask him to go a little forward, so it's in their back, if you see here. There you go. So you get the stability issued like this. So if he is not photographing, if he is not a photograph for take help from your co passenger, keep your equipment on his back in this position, and we can shoot. So these are the different ways where you work with each other. Takes support on the shoulder on the back. And make sure to give proper stability to your long linds.
29. Long Tele lens - Workarounds: Here's another technique of using some accessories what you have for a person sitting in the gypsy or in a vehicle in the French seat. So here, if you see this limitation for moving around so obviously, like your other fellow photo deficit at the back of the gypsy, you're stuck here. But this is a good position because you're sitting with the driver. You can tell him the position. How toe position the vehicle for better angle now. So the way I privacy if I open the gypsy here. So the way I travel is the long lens goes work to collect this. So if you see, here it goes vertical both the lex on either side of the long list. So this is always sit. So here, Once they sit, let me just close the door now. So, Doctor, So I sit. So if I had to shoot no so I can easily drive around. I don't carry it on my lap or any off. Now I sit, I keep the lens down. If I see my subject, I immediately take it out like this and then I start shooting. Now, if you see here, this is not a great way to shoot a long lens. It is heavy. I can't take support. Of course, if you ever bean that you keep the being back here, you shoot. That is different. What if you don't have a being back? I'm a very simple and very fantastic solution for that. That you keep it back here. Don't. So here. This is very a handkerchief comes extremely and very simple. All you do is you see the bar. You see this bar here by a simple not Okay. So a simple lots of the length depends here. Your handkerchief is good enough, right? Make sure it is very stable. Their yard. So in your lens. If you see the lens scholar instead of the lens collar being down losing it, keep it up. Lift it. Just let it look at this. Okay, so this way, if you see my whole shooting position Now, there you go. Anything on the shoot? Super. So the kind of flexibility you have. So you And if you want a plan, anything moving slowly, you can plan along with it. So if you see, even if I leave the whole set up, okay? Of course. little bit supporting. It stays. So this is quite strong. It can support your 800 millimeters with the one DX body. So this is one of the techniques which really works where you don't have a Tripodi confused . That report here are being where you don't have handled the contra do, but you need the stability you don't want to lift and basically take the weight on yourself . This is very simple. In fact, in vehicles like the Cantors, other places where the country's anything and there are bars running on top off you. So in those situations, in some of the workshops up what I have done this I've used handkerchief or even belt so you can take your belt, put the bait around those bars or the rods running across your vehicle, put it and then use it. Okay, so this is quite stable. Another technique which I have come up with to give you good stability for your of image making.
30. Using a Clamp in a Vehicle: Now, let's look at the second accessory. So this was the Sheckler FSB eight fluid head, which are used on top of the type are now depending on the flexibility I carried this clamps. So there are situations. Say, if there are more people in the vehicle, you have this other seat also here, and it is not possible to carry the report in those situations. This clamp is extremely helpful. So this is the man for the clamp. Just search for man for the clamp, and you should be able to get it is around 4000. I in are in the range off, like 70 80 years dollars, that's all. It's not expensive, but extremely helpful. Now, the way I used this clamp. So here. I mean, the kind of things were to carry on the supported right. So if I just come to these things over here, so tees off this accessories extremely important. Especially the ₹1 coin. If their toe tighten the screws off the plate. I need it. Okay, So now I carry my span restaurant, so let me just take this out. This make sure don't leave. Lose this most most stuff. So put this back and this goes back into the back. So then here what I do. So I had the clamps, or this clamp already has the set. So when you order this clamp, you need to make sure you need to order this cut as well. So you've pressed this, You released it. So if you look at this stud, okay, it has two different kinds off mounting points. So the small one and a large one. So you're prepper and up your, uh the clamp, the clamp for this one. If you see, it's the larger head. So it goes back in. Press this cool right on this. Okay. And here, if you see this grossing over here now. Okay, so this practice signal. So this will accessory is now ready. Now, this is really in your vehicle, gypsy, Or depending on what vehicle you're trying to shoot, you need to figure out where this can go. So here, if you see this bar off the gypsy, this is one place this handle off the gypsies, the other place. And he went this bar, this body, you see, there are multiple off this locations within the Gypsy American place this. Let's have a look at how I use it. So So I just put it off here. So I need to get the angle right daily. Go. OK, so this is done. So of course, if you see the angle is little kilted that this Fine. So sometimes you get a long stretch, you can put it there to keep it straight. So this losing sup So I don't need this week. And then I think my long links now and the same vessels, it's locked. Okay, so these two knobs are losing, and then my let's call a novice losing so dairy go. OK, so of course you need to get this center of gravity, right? So losing it, open it. Okay, lock it again. Okay. Very good strands. So if you look at this again when it comes to eye level shooting this so this other situations where you don't have the flexibility to carry a type are in this situation. This clamp, it's over here losing this different controls for the fluid head. There you go. Okay. You can comfortable later. Completely. Sit at ease. Shoot. Of course, with the long land shooting technique, one of the important things as you always need to hold your left hand over here and then shoot so that any vibration you can reduce it. There's a standard long lens shooting technique, so there you go. So this is one day what he can shoot now the same way. If you're sitting in the vehicle, let's let's look at hope to make use of this clam to shoot if you're sitting in the vehicle . So let's have a look at that. Continuing on the various shooting techniques we saw with the lamp put onto the bar at the State of the Gypsy. How you can get to a level now. That scenario works very well in this situation, where have removed the single seat of the gypsy. Now, in the standard situation where there are full photograph person, both the Gypsy seats are there. So 1234 So four off you're sitting now In this situation, you're using the long list and long length stability, sharpness of the image, composition, all the aspects. If you want to get it, really right, then the other technique for shooting is using the same clamp, so in sort of the bar over there. What I do is I put the clamp to the side handle over here, so if you're sitting on the left side, you can use the left. Sadie, feel sitting on the right, said that one. But for me, since I'm more off a personal shoots from the left side because the left hand edge of the stability. So I'm more comfortable shooting for the left set and not on the right side. So when that I'm in the gypsy with multiple people, I tend to choose the left position now coming back to the long lensed ethnic. So I had the same plan, everything. And at the Sackler fluid headier on the man through the clamp. So this let's lock it in. So the way I used this is put it on the clamp. No, I locked it. So if you see here, this is the position off course. You should not travel with this kind of set up this. You put it on the clamp once the vehicle is totally stationary. So in this situation, if you see, I can easily, like position myself not disturbing other person. This gap is still there for the other person to sit and he does his shooting Now here in this set up so I can get beautiful shots. So there you go. Now, if you see a complete stability, it's an 800 millimeter lens on the one day X body and again any of the planning affair to do It's very easy. But here, of course, with the backseat one of the limitation this it stops you. So anything coming at the back, you can't that this really have to be really fast. So if you feel OK, the subject it's moving. It is going to go to us. The back. You want to shoot on the back, then you need to be fast enough. No lock. This was set up losing this. Take this out on other way to travel this. It should always go vertical like this. So if you see, this is how it travel in the gypsy with the long let's so even with four seats, everybody open the vehicle. I used to being back down there. It goes like this. This is the best way to travel, So keep it here immediately. Losing this ticket out so subject is going to move at the back. So let's with the clamp over here now. So this is another excessively which comes with the clamp. Were any of the flat surface you have? You need this accessory so that it fits over there now, since it's it is a round bar, I take this out. Of course. Be careful of these accessories. Now, I put the clamp over here, so of course, if you put it at this place, your legs doesn't go here. So you need to be calculated about those things. There you go. So you put this sick. I'm gonna go up, look sick. Position yourself. There you go. So you need to adjust your height so that you were at eye level of the viewfinder. So doesn't it? There you go. Very stable. He won Always make sure everything is statement. Okay, You can easily leave it. It's really stable off course when the vehicle is not pulling very important. Now losing the main two knobs in the fluid dead. Now, here again, if you see if your subject is said the back, you're the flexibility. So 52 Okay. There you go. Ready to shoot rock n roll so anything on the anything on top of the tree And if you look at the positioning So this clamp this set up even if multiple vehicle in the multiple people in the vehicle this set up works very well. So this is how you can make use off the clamp and also you need not have a fluid head. So on top what you see here, This could be any ball It, for that matter, it could be a member. Lee head also. So if you look at the clamp, it can take any kind of ball had been Burnley head for the support. So this is how you make use off this accessories. And the shooting technique, as I said, is very important when it comes to getting good shop images with good composition. Good luck.
31. Beanbag and a Panning Pod: the next access city when it comes to getting your shooting technique right to get crisp shop images with good composition is being back. Now. Obviously, my order of preference for shooting is toe Have ah report if not a report among the part, then the lamp, What they used the other time. After all these things again for more easy flexibility, the being that comes into picture. So let me show you generally have the beanbag issues. So one of the common ways in the gypsy when you're sitting is you take the being back. You keep it on top of the platform Here, keep the lens. So you have the long lens. There you go. So you keep the long glands. You should like this. Of course, you have the other seat here you'll be sitting like this in the gypsy will be shooting. I love. So this is one of the ways you shoot with the being back. Now, let's look at the other vessel used to being back and disadvantages off it again. The beanbag it goes over here. Okay, then the long lens. So if you see I live it, it stays. It's stable now. even when I'm shooting from the boat. This is the technical use now. But what happens here is subject is totally still stationary. You're shooting. This is good. This endless good. It still gives you the stability. But the problem is like if the subject is moving and you start moving your lands along with the subject, notice what happens generally in the long lens. This is your focusing, Glick, and you're planning with the subject. You move the lens. Look at this. The focusing ring is rotating. Now, when you ban your lands, the focusing ring rotates. Not good. Your subject will go out of focus the worker. And for this is obviously you rotate your lens. Scholar, Rotate the rim, scholar. Keep it on the bean back. But if you see here sorry, You don't get the flexibility. So you don't get the stability to shoot. Not good. Now this is where for this work around. The finding part comes into picture. So this is an extremely useful, important accessory. Be careful. So this is an important accessory when it comes to I left photography. This is very simple. So this is a universal clamp. What happened so the universal Lance plate. This goes well. And then if you look at the way this is designed, it'll just laid into it. So there's extremely light. There you go. It's late into it. A locket. So here, if you see No, this is Look, this conduct eight. Okay, So here, with this kind of hits set up, this whole thing locked. Okay, so I have the lens. I rotate this clamp up, the bad the same vis Place it on the beach. You see you. This is done. And now look at the flexibility. The ease off use with the plate. The planning plate, the planning port on the being back there's Gap. Absolutely no issues. So still subject. You shoot it. And if the subject is moving, you just move. You can plan it. Look at the gap over here. So even with this set up, if the subject is behind the bushes and auto focus is not working look at the east. You conduct manual focus, look through the viewfinder, do the manual focus and you're ready to shoot. So this is how useful death overall, the planning police now the other way used the pining ports I'm using, like this. Same sitting in the vehicle. Okay, so this lens again goes off, makes base. Sit Here. You have the being back. You have the being back here again. Very good. See the east? A few. So the flexibility off moving is there when it comes to the planning. Frank planning part. So again, you move it. I can lose in the horizontal. The lens scholar. I can lose in it and then work. Tickle. Horizontal is really can shoot. Now. The other thing is fine. I need a little height. I want to do handling. So just for a few seconds, I need to stand up and shoot. No problem. Give the beanbag low. Okay, So another shooting technique with the lens up, the bad it comes over here, used to support you. Shoot. So as you can see, even with respect to the leg, this kind of support is very important. As much as possible. Almost straight to take support for the long lens and a while shooting. Just handling this. So if you take photo handle like this, these are very heavily in says there's going to be shake you loose the image quality How dare you go? So this is the planning part. Extremely useful is it to get, and you can move it around along with the being back all year to do is keep the being back first, wherever positioning. Whatever angle you want to shoot, keep it. Keep the planning part on this and short. So even if you see for carrying around, also, it's easy, so even handle. If you and I just carried like this with the planning particle carried, So that's the accessory I would highly recommend along with some of the other accessories. What we have doctor about, that's when the fighting part.
32. Carrying the equipment in the field: Hi. I'm currently here at the No Taleb in Gujarat. In the little run and in two decision. I'm going to teach you the very basics. The important aspect off. How do we carry around such heavy equipment in the field? Threw out. If you look at the habitat behind me Fantastic water body with a lot off bird activity. So I spend at least three hours, four hours, five hours walking around our meeting at one place. So how do we set this up? So that with ease, we thought much strain we carry on this equipment. No, What I have here is basically a lens plate especially made for the fluid headwater have. So let's mount this. And how do we carry around? Let's check it out. Now, unlike the regular Wimberly head or any other kind of bullet, what I have here is basically a fluid head. This is mainly used for movie making, but this is very flexible and fantastically and comes to still photograph. Yes, Well, now what I want to do is like I'm going to mount this. So this lens plate is specifically for this particular fluid head. So I used the Schadler FSB eight fluid head. So I snap it in, and then from a center of gravity, I move it around, Lock it and I have two knobs over here, one for planning and one for the building. I losing both off them. And if you see it has fantastic flexibility with respect, it doesn't fall. Nothing happens. So what I'm going to do here is now once how this whole thing set up, I won't unlock this now, this whole thing is absolutely stable. Now the very important aspect on how we carry this around in the field. If you look here, I have a bad over here, Since I want to put it on the shoulder, keep walking around everywhere. This bad gives the support and is quite good. Now, the way I carried around this, like this whole set up, comes on my shoulder. So I go down and then just lifted. So as you can see this rest here on this whole set up, you have to balance it on your shoulder. So docked, like with just one hand, we can hold this. The other hand will be free. And if you see at the back here this hand also gives support to the back legs. So this gives support here, and I basically hold it. So I push it around like this site, push it rather and then with this set up, I can keep walking around throat the field. No, I send when Then keep walking. I see something. All I do is like I just go down like this. Place it down. Very important aspect. Especially from the back for your back. Don't ever bend like the central to lift it. The important thing is always go up and down like this. Go down. Don't put your shoulder in lifted. Walk around. Okay. And again, Go down. Put it down. So this technique has worked for me in all these years with very list train very less straight on the shoulder and on the back. Okay, So this is how you carry around the creeper. And, of course, some off your borders. The kind of trip or what you use may have a center column. If you have a center column, little bit will have to push it around. The column go. So are the very important thing. If you're in the bird photography try to avoid tripe or which has a center column. So with this kind of technique, you can carry on the report and worker on the field the entire day with very illustrate good luck.
33. Aperture Priority, Lowest f Number: a poacher priority. What does it do now? We have the exposure triangle parameters. A poacher. I s O and shutter speed. Now, in case off a poacher priority the baby more or the same old. What happens is you set a particular aperture and forgiven I s O the camera gives you a shutter speed. Now, when it comes to my left photography Obviously shutter speed is something which we had to keep a note on all the time because take you on to freeze the subject or you want to basically get a motion. But any off those things works in case off shutter. But then what I do is I use a poacher priority. And generally I keep the A poacher to the lowest F number. Now, this is an important trick with your to remember for wildlife photography. What happens in case of while a photograph? Generally the subjects are a little far. Of course, there are situations. When the subject comes very close, I will talk about it separately. But in most of the scenarios, the subject are quite far. So obviously the main thing Richard to keep in mind is the depth of field as well, apart from the shutter speed. So what I do lowest f number keep. And then the depth awful is taken care by the other perimeter, which is camera to subject distance, of course, the focal and also is another perimeter. Which efforts now? Since the subject distance is a little far, Morse off the cases in wildlife. You have pretty good depth coffee in respect you off what Lindsay use. So I generally shoot with the 7200 lens 104 100 lens. The formula left 2.8 lens. The 600 afford lands and then even the 800 millimeters f 5.6. Let's in all this various range off lens is what a photograph. I always 99% of the time always keep the lowest F number supported by the lens. And then I play with the air. So to get a particular shutter speed. Obviously, all this scenarios work very well. When help one single subject. So lowest f number. Keep a particular I s o check. Watch the SPDR getting that should do for you. That's the magic sitting what I always recommend now the other corner case, the other scenario is if there are multiple subjects now, if there are multiple subjects, that is when the depth of field will come into picture and then you'll have to start playing a pressure. So from the lowest F number, you start incriminating the aperture and then calculate what kind of depth off will you get for that kind off a poacher? So this violence ng act you will have to do when you're shooting in aperture priority mode , so justified to summarize the overall sitting what I do and F lowest F number, and then play with the years. So to get a particular shutter speed, the setting will work majority of the times. Now let's have a look at some of the images, and what kind of settings have put for this image is now in all this radius analysis. If you see right from what I was shot from a 72 100 lens for the 104 100 lens, or even a foreign millimeter F 2.8 lens or even the 805.6 lengths. So all this radius images, if you see the lowest F number, has worked very well Now let's look at this other scenarios where there are multiple subjects in the free and you end up increasing the F number to get a good depth of field. So that would the subjects I did some focus So as you saw these examples. So this is how, in a poacher priority you've worked with the perimeters main thing to keep in mind, Doctor Field and, of course, shutter speed. So once you understood the theory of reciprocity which has already been explained, used that concept to play with the air, so to get a particular shutter speed. So this combination in a poacher priority is something which I use a majority of the time and has helped me a lot.
34. Shutter Priority: the next one is shutter priority. Now what happens in Ceta priority, which is the TV more in Canon, the yes Morning Nikon and similar in Sony and other cameras. Now, in case of shutter priority, What happens is you set a particular shutter speed for the given us, so the camera will give you a corresponding a poacher. So obviously, when it comes to my left photography shutter speed on the most important criterias for perimeters to use. So your thought process Whenever you're seeing anything, that talk process always has to be watched a two speed I have to use. Now this depends on multiple parameters to arrive at what kind of shutter speed you want to use now in this case, So any scenario you take if this movement happening in your scene, then you have to think about your speed high shutter speed to freeze the action or low shutter speed to capture emotionally. So whereas if the subject is totally static, so in case of product photography, what we do so if the subject is totally static. So in that case, what we have to do is to ensure that any set of speed will work, but a shooting technique comes into picture. A select what kind of shooting technique you're using. Host table your whole set up a soap, as you can see. Always make sure I keep my camera on a well mounted like groups. Terry, go. Yeah. So multiple controls. So if you see, I always showed it on a stable try part. So obviously, if something is totally still, I don't care what kind of set a speed I'm trying to use. So this is how the shutter speed comes into picture.
35. When to Use Shutter Priority: in my life. One of the reasons why I personally don't use shutter priority is there is a small issue, but set a priority now. As I said, in case off my life, it is always the shutter speed. We have to keep thinking in our mind now, given the scenario where the light is very low. So currently I met I also 200. So sometimes this is where as big nurse like we tend to miss some of these combinations. So I'm currently it. I also 200. I'm inside a priority more considered. There's some action happening in front off me, and I need a shutter speed of seven by 3200 to freeze that. End that action now, since I'm in short a priority more, That camera allows meat to put the shelter as one by 3200. So currently I'm at one day 3200 off a second. Now I use is 200. So sometimes we don't look at Dia. So So when we're in a hurry, we tend to put a particular shutter speed and then start shooting. Now I met I also three tell I make sure to speed one. About 3200 say there's some action happening in front of me. I go ahead, look at it and they start shooting the action. No. If a playback they made and see, of course, in the playback in did you not see the action happening? So if you play back the emergency or other When he heard the camera alone Me to shoot because I put one by 3200 Click, click, Click the camera. I lost me to shoot. But here, if you see the images, don't vote, Doc. That is because through the viewfinder and I'm seeing the aperture is blinking. So a poacher blinking means that the amount of flight here is not enough. The aperture of two point It is not enough to give you a proper exposure. So in a while, when this action is something we missed to see this point. So that is one of the reasons I don't tend to shoot in set a priority more. I used the theory of reciprocity shooting a poacher priority and then basically get the shutter speed. What I want now all said and done, really used sort of priority now, obviously in case of planning or if there to keep it in a simple way if you need to shoot at the particular shooters were constantly through it that this when I moved to set a priority. So if I'm doing some kind of a panning shot and if I need a constant shutter speed off, say 1 25th of a second or on the 30th of a second, then in that scenario, I moved to set a priority. Keep it at that and a steady the lighting condition. Check what I assume I'm I'm able to use on what I also will give me what are but accommodation. So these para meters check beforehand. And then I started the shoot. Now, obviously in sports photography, action photography, any off this locations or if you're trying to do a zoom bust, So even in my life, we can do zoom burst to get very nice effect off static animals. So in these scenarios, I use a constant shutter speed. So they're a guard. Put that value and shoot it. So in this situation, I used short a priority more interesting, all the other scenarios I tend to use the poacher product more now that said yes. Even in such a priority, more you have an option where you put it in auto, your so and then still get a particular shutter speed what they want but playing with diet . So now that is a little hard one sitting and that I'm going to cover it in a separate chapter in the same where life photography tutorial. So that's about TV more or the team or our sorry in Nick on it is called the S Born, so it's always confusing. The various terminology is what we use. So that's how we basically make use off the shutter priority mode to get what kind of image we want.
36. Best Shutter Speed: what is the best set of speed to use for while a photography? Now this is one question which hunts a lot of photographers because there is nothing called us. The plate should to speed. Now what happens is obviously we know shutter speed is the duration of time. They started this open, so short respite either freezes the whole action. Or, in case like you want to have a panning effect or a blur effect than a slow shutter speed does the job for you. Now with this background, how did we arrive at what is the best or what is the rate shutter speed for you? Well, a photographic Now to a river. This answer. There are multiple scenarios, multiple para meters. We are considered now two main things. One issue need to find out if there is any kind of movement happening in the subject or any kind of movement happening in the scene are if things are totally static now, when it comes to nature photography landscape, so there's not much happening in landscape, especially if there is no movement. So for those still images, so any kind of shutter speed will work, so it's more of the depth off really hard to keep in mind. Similar thing. Oppressed your wildlife photography. Now, if you consider this particular scenario where the tiger is just looking at you, it's not running. It's not moving a lot. It is still so in this situation, a very high shutter speed does not make much sense. So especially in why I left you get your subjects during very low light conditions. So you need to play with your S O this issue it you need to evaluate as to what I know shutter speed you need tohave. So if the subject is totally still static, don't worry too much about what shutter speed here, using the very important factor over there is you need to help the solid, stable platform for your equipment. So make sure like your aural equipment is on a paper or a bean bag, which is solid so that even that's low shutter speed. There is not much shake liquidating this, so that is one part off your camera setting. No, the other part with shutter speed is too slow Shutter speed via slow shutter speed for different kind off effects panning effect, or to show emotion blur or even, for that matter, zoom bust were doing so. Any kind of creativity want to put in. So in those situations we use slow shutter speed. Now, given this scenarios off, decision making off slow shutter speed and fast rate of speed When when it comes to the order, creativity. So go ahead and again use a stable platform for that. Let's move on to another example, especially in lower leg situation. One of the common mistakes which a lot of photographers they do. It's just because the light goes down automatically, they try to increase the I s so obviously like with the increase in Esso, your image quality made IP especially like midrange entry level cameras which are not high performing with respect to the I S O. You need to be careful now look at this particular scenario. So we found this leper very, very late evening in Masai Mara. So here the leopard was set just sitting on the bun and giving us the post. Now, this is where your subject behavior knowledge comes in when it comes to combining the shutter speed on the subject knowledge. Now, in this scenario, if you see the leopard is just sitting, looking at us on the overall set up my 800 millimeter or I think I use the 400 millimeter for this. So whatever leads the talents I used, I make sure they keep it on the proper stable report. Of course, there's no trifled over there. So I mounted this whole set up onto the bar off the vehicle and then a shorted. Make sure there is absolutely no movement in the vehicle now. This image, if you see when it comes to the behavioral aspect, as I mentioned, so at some point of time, any off the cats, so be it. The leper for the cheetah or the Tiger Lion any off this cast when they're just relaxing, sitting, not doing any serious activity in those situations. What they do is like they may keep looking here and there, but that shot duration off time like at some point, they just stayed at a particular place. It could be looking at the camera on a vacant away from the camera, so keep looking through the viewfinder, so you need to keep focused. So the way I did a show you so It's just staying focused on the leopard and I could see it moving, so it used to just keep moving. It said I was waiting, waiting, and at that one point off time, it just stared at me in the camera. So we were staring at me in the camera. I was like, looking at it. Click. Okay, just one click now the other mistake people do, especially with respect to slow shooters. But in fact, this shutter speed, if I remember, was very low, probably in the range off one by 25th of a second or something. Of course, the correction to speed is displayed on the image watcher, desperate I use. So if you look at the shutter speed, extremely slow shutter speed. But if you look at the image pretty shop, that is because the common mistake, what people do and keep looking at it, it is still this is the kind of mistake they knew where the spray and the three saying like , If I short 10 15 20 images, at least one image will come shop. That's a lot wrong perspective. Shoot one. So keep looking at it. Emitted. It is looking at you everything comes to a standstill for that one second, then you hold your breath. Take it easy. One shot. That's all it takes. So when it comes to slow shutter speed animal behavior, the last word comes in. And if it is still not doing much, even slow shutter speed on this kind of her stable set up makes sense. So as a photographer, take a call. Look at the behavioral aspect, far short of speed. Associated speed, you can decide. So I said there is no right answer and that really important point here to remember. If there is absolutely no movement in the subject, there is no need toe increase. Di Esso. Keep the eso at a low level. Go ahead and shoot. Here is another example when it comes to shutter speed or deciding as toe watch at a speed you need to use. So one of the common mistakes against people do a lot of bigness is the feel that if you have a high shutter speed of fashion, the speed you will get crisp, sharp image, your image sharpness will improve. That is totally incorrect. That is wrong, So image sharpness is dependent on a lot of other factors, including the quality of the lens, the camera you're using if you're using any kind of filters, which is a big no, as for me than the camera to subject distance also comes into picture keeping this paramedics in mind If you look at this particular image of the street Lincoln Frog meth. So this was photographed on a 500 millimeter with a 1.4 converter and then the oral subject was quite close. This was the minimum focusing distance. So here, if you see all the 33 Lincoln Frog mouth the family so they were actually on, they were not the all three off them. We're not sitting parallel to the frame, but it was a little tilted. Now, at minimum focusing distance with the 1.4 converter. The depth off feel I was getting is very shallow. So the right said word in the left side bird, if you see they were little getting blurred off the left, one was little getting blurred out, depending on where I focused. Now this is where I wanted to increase the depth off. So when they increased the depth of field, so obviously the shutter speed dropped. So I didn't want to increase their. So because given the scenario way of the street Lincoln Frog, most of the state, the lighting is obviously very low. Of course, this is a process d made with proper exposure, color, correction, everything. So it looks nice. But in reality, where they were sitting, it was quite dark. It wasn't shared. 80 up. Now, with the increase in f number, I shorted out on F 11 or probably F 16 again, the right perimeter is displayed on the image. So with this shutter speed, our sorry with this a poacher, and then I s so off. I think I also fifties what I shot to our noise with the combination off these two in the blue light. The shutter speed I got was 2.5 seconds. Yes, 2.5 seconds Is the shutter speed What I got for this particular image? But if you look at the image, it is crisp shop. You can actually count every individual here on the street. Lengthen frogman. Now how did they shoot? The shooting technique comes into picture, obviously a solid tripod. And then they used Gimble head of Wimberley Gimble head. Then on top of that, what I did is I used the middle Lakoff insanity. So middle lock up, especially if you're shooting a T shirt. Dispute off lower than, say, 1/10 of a 2nd 1/15 office again. It is important you enable the middle lockup. So the middle Lakoff us enabled. On top of that, I used a cable, at least because I didn't want toe Press, Distrito release button and proceeding that will introduce shaking the image at such low shutter speed. 2.5 seconds. So that is where I used a cable release. So with the cable, I looked through the viewfinder. Everything is finally in fact, I waited for three us because I wanted to make sure the ice are open off all three off time . And when it comes to the ethical practices, make sure do not disturb the bird. To get the shot literally. I waited for a full three are or three us to make sure all the three eyes are open at some point of time. I was looking through the viewfinder all the time, relieving the shutter release button with the cable waiting and the movement Open click Got the shot. What I want. So if you see even the 2.5 seconds, it is pretty crisp and shop. Now here's another classic example off using high shutter speed. So in this scenario, again, the subject. Behavioral knowledge. Beautiful. I mean, like you're in nature. You get all kind off alarm call. So certainly some kind of a sound and you get distracted to see what is happening. Okay, coming back to this image. So this is basically a black book jumping now, this was photographed again using a very high shutter speed because I wanted to freeze the whole action. Now shooting this image also took a lot off time when it comes to understanding the behavioral aspects. Now shooting this running it's not so easy where you need to understand what the behavioral aspect were descending at what point of time it is going to jump working to focusing points . So a lot of those technical aspects comes in. But freezing action like this request, I should have speed now the other kind of image here again if you see a different having ah , dust. But again, you want a freeze the action. You need to have a high shutter speed. So as a photograph for you, decide when you want to freeze the action to show it. And when you want to blur the overall effect using slow shutter speed, you do it. So if you look at these images, the panning shots, so any off this planning shots off the subject, running is obviously at a slow shutter speed and also this other one off the spotted deer running and running across the road here. Photographic bharatpur. I wanted to show a sense of movement, so I did an intentional blur off it, running using the slow shutter speed. And I didn't move that camera along with the subject. I just came at the road, so while it is running a slow shutter speed, it is blurred out. So that was an intentional blood. I did so. As you can see, you can get really creative about shutter speed. Slow shutter speed has a spoon and one day, just fun. Effect impact. It conveys a story, a sense of motion in the image. On the other side, high shutter speed freezes the action so pretty crisp shop no shake or any off those things comes into picture distraction. So any of those things, though, that is very used high shutter speed. So go ahead to be vigil Estuary majors looking at what is happening and then decide whether and when you want to associate the speed and when you want to use high set the speed. So this is so you need the work calculate array at what is the best or what is the rate shutter speed for you to use given the scenario based on the subject knowledge also so good luck with that.
37. All about Manual Exposure : we have seen how a put a priority works hosted a priority works. Now let us see the situation about how to use manual exposure now, when it comes to the whole concept off manual exposure. So this is very a total understanding about meeting also comes into picture. So we have seen the three different kind off meeting, which is the spot metering evaluating or the matrix metering and then simply waited hours metering. And, of course, the partial metric. Not the three, the four different kind off meeting. Now what happens is when you're in manual more so you will have to decide which me drink. You want to use a row at the exposure triangle perimeters in the manual mode. Now let us take spot metering. So in case of sport metering, the camera takes the reading from a particular spot. The way I use the manual exposure is to look at the scene, try to understand the tonality and then a radioactive manual exposure. Let's look at the very scenario. So here we have the spotted deer, a couple off them, sitting here with some painted stork in the foreground. So a world, if you see the tonality here it is not very bright. It is not very dark. So here, if we have a rabbit, the exposure triangle parameters, let's take one step at a time. Now, currently a Mac on a poacher off F 2.8. So let me go into the every mart. So let's see how to arrive in this or other in the manual mode itself. So I am in the manual mode now, so manual more. If I look at the scene, the kind of a poacher, what I will need is, since it's 400 millimeter and then the distance is quite far, if you see so, ah, picture of 5.6 is good enough. So what I'm going to do? Ah, butcher and keeping attack F 5.6. Once the approach, it is kept at a 5.6. So the shutter speed. If you look at the scene, what is happening? Nothing much happening. The spotted years. They're sitting the painted stocks, also just sitting in front of them, standing in front off them, and there's no much action happening, so if you ask me, it's just shut the speed off around one by 500 is good enough. So Ah, poacher. A 5.6 shutter speed off, one by 500. So let me put the shot dispute as one by 500 off a second. There we go. Now with ah picture of 5.6 and the shutter speed off one by 500 off a second. Let us look what I s So we already have. So currently am attire So 200 now. But these three parameters in place. So if I go into my info and press half the shuttle is button half of fibrous. So at the back I see the exposure indication now in this exploiter indication currently facing it is almost at zero exposure compensation, Of course, in the manual more there is no concept of exposure compensation. So the indication what it shows is based on the tonality in spot metering. So let us see where the spot is. So generally the center or two focusing point is the for sport metering. So let's look at this. So overall, if I see it's more or less a little bit on the darker tonality. So what I'm going to do is like I'm goingto adjust the shutter speed, so I purchase Fine. I s 0 200 is fine. So let me a little bit player on with the shutter speed. So let me increase the shutter speed by 800 and then let's see, take a shot. The coolest look. Good. So the best way, obviously Stew did. Using the history Graham I play, but the MIT check the history, Graham Overall tonality the curves in face off history. Graham, this is good enough. So if you look at a raving, get the manual exposure. So I go with the currency. I said a particular aperture. Then I set a particular shutter speed to get the combination right. I player on little bit with the I assume off course. In reality, when you're tryingto a rivet, the exposure tangle perimeters. You can decide you can sit two parameters and play around with the third perimeter. Okay. Not much happening over there. So, in manual exposure, more so these three perimeters, along with how the exposure compensation indication is showing up, you have to check, so want to check put all these three parameters together, and as long as the light is in same direction. Not changing much. Don't worry about exposure. So this exposure is good enough probably for the next half. Inner, because the light is not going to go down very soon. It's afternoon at around three PM here, and the light is still very soft. Nice slating. We have so used this exposure. And for that stuff in our work, more on the composition expects. Forget about their exposure. This is so I drive a manual exposure.
38. When to use which Shooting Mode: So we have seen what is approach a priority, What a shutter priority and then manual exposure. So all the three different program, all the three different exposure Moore's we have seen. Now the big question is when to use what kindof metering now given the scenario. So in my case, if I had to give you my example majority off the time, especially if I'm in safari. So if I'm driving around or let's say I'm moving So which means the light is not constant, so the background probably is not constant. So obviously the subject where I get so I get it among the bushes. So there is a lot off uncertainty when it comes to all this release parameters of what lighting subject says of the subject. How far is the subject from the camera background distractions. So a lot off this para meters are they always? I don't have much control in the safari now. In that situation, especially playing with lighting, your subject may you may get it in light, immigrated in shadow or immigrated in the combination where the subject is going to move from light to shadow with these kind of situations for me personally a poacher product of works very well, because I keep the aperture to the lowest F number and then I player with the IRS to get a particular shutter speed. So in this scenario, obviously approach a pretty works. Ready? Well, so you're moving around a lot. So in that situation, I use approach a priority. Now shut a priority. Are those situations where I need that constant shutter speed? So birds flying are, for example, like I trying to do a panning shot are trying to do a zoom burst. So any situation where I need a constant shutter speed because what happens is depending on your meeting. More vivid evaluative or matrix sport metering Center weighted average Between our partial meeting any off this meeting more if you are in interpreting it. Sorry if you're in a poacher pretty more, and even though you say that you will be using the theory off reciprocity. Still, when you try to plan and move your camera along with the subject, depending on the background, depending on the tonality in the background lighting. So when you're bombing when you're moving the camera, your shutter speed is going to keep changing. So obviously, like if you want a constant state of speed, that's not the best option. So that s where I moved to shoot a priority more so set us priority, Karen, piece you the constant shutter speed irrespective of how the background is, how the lighting is off course. When you're continuously shooting, you're a poacher. May keep waiting and depending on what kind of I also, you kept your camera and so that also will keep waiting if it is arto yourself, so shut. A priority is for those certain scenarios where I need that constant garin teacher to speak . So that supports a priority that should have priority. Now we'll go use manual exposure. Now, if you consider this scenario where this party gears are sitting and I'm basically the light is coming from behind me the subject, if you see that is frankly so, since the light is coming from behind me on the subject is frankly so I'm not going to change a lot my position. So I'm wait. I think at one place for some action toe happen now in those kind of scenarios where you're actually waiting for some action toe happen are any movement to happen on the subject? Expect the subject to come in this area. So if I say there is constant lighting, So in this situation, what I do, I go into manual explosion More so the best way to arrive at the manual exposure is in the fast way issue going toe approach a priority set a priority which evermore you're comfortable with, and then go into that. Get all the three perimeter so you can go in approach a priority. Said the lowest F number. Set a particular I s O And check what shutter speed you're getting. Of course, you need to go into the meeting. Check what? Meeting you're back, work with the exposure compensation, and then get that final exposure triangle parameters. So once you have all the three perimeter's going to the manual more, you set those values, you're done. Okay, so I'm waiting at one place. So this is where manual exposure works Very well. So these are the three different exposure mortuary, a poacher priority shutter priority and the manual exposure. And as I've explained, given those different scenarios, so you go and choose what kind of exposure more works well for you. Given the situation
39. Theory of Reciprocity: let us know understand one of the very important concept of photography, which is the theory off reciprocity. Now I'm in a poacher priority. More so to explain the theory of reciprocity. What I've done is the stuff value have changed it. So in my camera I go into the middle option and there is the exposure level increments option. So if I go into that so I'm using the one day X mark too. So can even Nikon off Sony Emi cameras will have this particular setting about exposure level inclement by how many stops you want to change it. So the various options we have are 1/3 stop, one stop and half stop by default. It is better to be at 1/3 stop now to explain the concept off the theory of reciprocity. I'm going to change it and put it to full one Stop. I'm currently at one stop. So what is the stock value? Just to quickly give you the answer. So if the shutter speed is, say one way to 58 off a second and if I say increase the shutter speed by one stop, you double it. So that doubling is basically one stop. So one way to 51 stop is won by 501 Stop this one by 1000. So you incriminated by one stop so faster ship to spill. Same thing. A place for your a poacher If 2.884 a 5.6 f eight f 11 If you see the difference, that is one stop. Same thing for your eyes. So as 100 204 108 116 3200 goes on differences one stop. So the increments I have made it. This one Stop. I'm in a poacher. Priority. I also 100 aperture F 5.6. Now the lens is honest, stable tripod. It is looking at something. I'm on an 800 millimeter lens. It is looking at something. The lighting is not going to change. So if 1/2 descent a release button currently it is showing me a certain speed off one by fine it off a second. So if you check the exposure triangle parameters have won by 505.6 s 100. Now this is at an exposure composition off zero. So certain amount of flight is entering your camera on. And also I'm in evaluating or the matrix metering more so for evaluated matrix metering more at an exposure. Compensation of zero at eso 105.6. Aperture on getting one by 500 shutter speed. I mean approach a priority. Now what is gonna happen is from 5.6 I'm going toe increase the a butcher, Increase the F number toe F eight. So obviously, what is happening? From 5.6 I moved f 81 stop light is getting cut down. That means less amount of flight is now going to enter the camera. So if the camera has to compensate so from one by 500 off a second, the shutter speed will decrease by one stop. So one stop has to be compensated. Now, since I'm increasing the F number by one stop less like this coming So that same amount of flight. If it has to come back from one by 500 the shutter speed should become one by 2 50 As per the theory, let's see whether it happens. So from F 5.6 in a puncher priority I'm changing toe. If it look at the shelter speech one day to 50. So one stop. You increase year shutter speed decreased by one stop from f it. I goto f 11 What should be the shutter speed again? One stop. Increase their test to go by when go down by one stops a one by 2 50 becomes one day 1 25 Does it happen? Let's check it so effect I change it Toe f Levin. There you go one by one, prettified I goto f 16. This becomes one by 60 and from F 16 and F 22 this becomes one by 30 from 22. I go to 32 on my 15. So if you see this is the concept off the theory off reciprocity where if one number goes up, the other number come stone. So it basically balances to let the same amount off light into the camera. Let's go back to the original, which is 5.6 at one by 500 now, Currently at I'm I am it s 0 100 So if I increase the sensitivity from eso 100 if I goto, I also 200 act an aperture off the same F 5.6 Then if I increase the sensitivity so double the sensitivity, that means it's more sensitive to light. So shutter speed one by 500 will become 1000. Because I increased it by one stop diet. So let's see whether it happens. So I go into this is sitting. So I also should be 200. I doubled I S O shutter speed data go one by closing off a second. Then again, if I increase my status, I s so from 200 to 400 it becomes 2000. There's everything in photograph. He works in half and doubled. This is the concept of the theory off reciprocity. Now, if there are multiple subjects in the frame, you need a larger depth of field. That means you want to increase the F number but still retain the shutters with just one by 2000. Very simple. So from F 5.6, I change it by two stops. Let's say s 11. So I increased the F number by two stops, which means the shutter speed decreased by two stops. If I want to get back the original shutter speed, I increased the eso by two stops currently decide. I also 400. What is to start from myself? 408 100. 1600. So let's do that. So I changed it to 1600. There you go. I'm back to one by 2000 off second. So this is the concept of the theory off reciprocity. And we are going to use this theory of reciprocity extensively in wildlife photography. So how to use it? We look at it in future chapters.
40. Understanding Camera Metering: made a link, one of the most complex parts off photography and extremely important when it comes to a left photography, because there are a lot of scenarios where you have to decide which metering to use the holders meeting works. Metering completely works on light. So what happens is there are two different kind of mirroring incident light metering system and, of course, reflected light metering system. All our cameras are based on the principle off reflective light metering system. No incident late metering system. That device calculates how much light is falling on the subject, whereas in case off the reflective light metering system, the camera or the device calculates how much latest reflecting from the subject. Now what the camera does, the camera needs some basic assumption to give you the exposure triangle perimeters. So when we say you need to meet her from that particular area, so what we're trying to say, it's like find out what the exposure triangle perimeters are Now. What the camera zooms is that everything reflects 18% off light. So if there is excitement off light falling on the subject, the camera assumes that 18% off light is reflected from the subject. Now this assumption is wrong because we know from the principal off light the theory. The saints off light black reflects less late white reflects more light. But what does the camera zoom? The camera assumes that everything reflects 18% light or the medium tonality What we call now that is where the fun begins when it comes to concept off metering. Now, this particular chart, if you see this, is the Ansel Adams Onal shot. So if you see this particular chart, the left most status dark right, most is bright center is medium toned. So what the camera does is the camera trains toe, expose everything as 18% great or metal. That is what the camera does. So if something is very dark, that camera tries to make it as medium dark or grace in color. So, of course, when it comes to the whole concept off metering, so the cameras is more intern ality the grayscale. So rather than kill us now, of course, if something is really bright, the camera again place to make the test medium bright. So if you're shooting something dark slot bear, then if you go with metering. Just based on what the camera tells you, chances are the black color slot bear matter. No, Toby. More white is more grace color break Or if you're shooting something white color, a white color subject polar bear and that if you're trying to shoot and go toward the camera, is telling you a chance to study to end up becoming more gration color. Now this is so you're meeting works. Now let us look at the different kind off metering system available.
41. Types of Metering Modes Available: So we have a different kind of metering, which is sport metering, evaluating or matrix metering, and then sent related hours, metering and finally, partial metering. Let's look at each off them one at a time. Sport mentoring my favorite. This is where the concept off meeting can be clearly explained. Now consider a particular image. Now, If you look at this particular image and judge the image based on tonality, you can see that the subject iss more dark in shade. So the banality we say it's on the darker shade. So if you go with exposure composition zero, then the whole subject will get exposed as medium told, so that dark will actually turn out to be more medium connecting medium color. What we see now, another very important point when it comes to the whole concept off sport metering is the camera evaluates how much light is being reflected from that one single or two focusing point. Generally by default, it is the center or two focusing point. That's why it is called sport metering, because it meet us from that one particular spot. Now that 80 off sport generally is in the range off one person toe 3% off your area off your and they're free now sport meeting. If you see it's obviously very good when it comes to photographing a subject off uniforms, tonality. If there are too many tonalities in the subject, sport metering will not work very well. And also, if the subject is quite far, it will not work very well. Now, if you consider the inmates, as I said, wherever the center or two focusing point is looking at, the camera calculates how much latest reflected from that center point, and then it tries to exposed that as a medium tonality subject. Now you have to compare whatever tonalities subject you're shooting, so you need to look at that tonality. Compare it with the Ansel Adams Journal shot and then match as to where that tonality subject false. Is it very dark? Is it dark? Is it medium? No. Based on ho dark, the subject is compared to the chart you will have toe under exposure image by so many stops now, Doctor. So the exposure compensation and meet during the go hand in hand. So that's what sparked painting. Of course. Now, if you're shooting something on the bright side, so obvious to the camera internally makes it as medium tone, so you will have toe overexpose it by so many stops based on based on Again. The answer. Let them zonal chart and see by home and stopped. You want to over expose it? No, this is so sport metering works, So let's see how evaluated or matrix metering works. Now the whole concept off evaluated or matrix metering works on the principle off, dividing the entire frame into multiple segments. In fact, it is also called a segment metering. The camera divides your entire frame into different segments, calculates how much light is reflected from each off the segment, and then it averages it out, giving more emphasis to where the center or two focusing point is looking at. Now. If for her toe give you an example, you consider this intercede. If you look at the scene, so the light, if you see amount off light reflected from each off this place, the finality so someplace it's dark someplace is probably medium toned someplace. It is very bright, so if you say in simple terms, let's just consider shutter speed. So if you consider shutter speed depending on home State is being reflected from each off this area. Each day they will give you a differential to speed someplace where it is darker. You get a lower shutter speed. So of course I'm assuming we're in a future product more and the constant so only parameter which will change this year. I used up. You shut the speed so anywhere. If the patch that area is dark, then obviously you get a lotion to speed somewhere. If the overall tonality is very bright, then we get more shutter speed Ayesha to speed medium tonality and average speed. So the camera wanted us. So it uses this concept this principle to calculate homos latest being reflected from the entire segment and have seen from different segments and it averages set out Now One of the good things with evaluating or matrix metering is that if you look at your in taxing visually, you can pay to calculate and they mutate. Average it out as to what is the overall average tonality off my entire scene and then used the exposure compensation at minus one stop minus 2/3 Stop minus one 1/3 stop are for Nikon Sony users is minus 0.3 minus 0.7 or 11.31 point seven minus two stops, same thing on the plus side. So this is how the evaluative metering or the matrix metering or even the multi segment Mitri works. Next comes passionately. No partial me drink is very, very similarly a sport meeting. So in case of sport metering as a said, your meeting area is in the range off 1.2 to around 3% where a special meeting takes an average of four on 13 to 14% off your friends. So that's the only difference between partial metering and sport battery, then the file final meeting. What we have is your center weighted metering, So the center weighted average metering is the next one. Now, in this case, what happens? It's against in literary of elevating, but what it does, it gives more emphasis to the center portion off the image. So overall again, the intestine you see camera goes emphasis to the center 80 off the image and then tries to expose that seen as a medium tone or 18% grace subject, then again used the same chart look at that tonality at the center portion. What it is used, the exposure, compensation toe overexposed or under exposed. So any off these two things you will have to do now this is so each off, the four different kind off meeting works in your camera. Now, next step, let us look at now that we understand how the various meeting works. Now let us see, with some practical examples, inward scenarios. What kind of mentoring works well in wildlife photography?
42. When to Use which Metering Mode: now that we saw the four different kind of metering. So let us initially as beginners. Let's look at sport and evaluating or metrics are multi segment metering. Now the big question is, when do we use what kindof metering? The answer is very simple. No. Generally, if the subject is static, you're not moving a lot. You're at one place waiting for something to happen, the latest you need from constant in those kind of situations you can go with sports meeting now, another very important criteria when it comes to sport metering is that the overall tonality of the subject you're tryingto meter. It has to be quite large in the frame, and it should not be very far because, like it calculates the area around 1.2% off here enter frame. So that is where it is important to make sure what they were trying to spot off. Whatever you're trying to meet, a rather is quite large in the fridge. That is the first point when it comes to sport matrix. Now that said, these are the very basics. Now there are a lot off advanced concepts were recon, use the concept off exposure locking radio meter at one place use that value on the other side. So there are a lot of this advanced concepts off exposure lock and reusing it, which you can do very well in sport meeting. That said, as beginners, let's go with the simple ones off using sport monitoring at the place where the subject is quite large and, as I said, static not moving much now. But when it comes to order while left photography, especially if you're moving around in the gypsy so the world perimeters are not constant. If you see like the late keeps changing and then the handle of shooting keeps changing. Apart from that, the background variations will be there and you don't know what say's off. The subject comes into picture. Is it a huge animal, or is it a huge animal which is very far, or is it a small animal which is very closer? The sales off the subject in the frame again is not fixed. You can't predict it, So with so much radiation is happening, I mean, like, I don't want you to spend time calculating this meeting. All these things you need to be really fast in the field getting this perimeters because I want you to spend a lot off your time on composition and not on this very fundamental things. So that is where personally for me, evaluate or matrix metering works very well. So the way I work is I look at the intercede. So based on what is happening in the scene, I look at the frame and then the overall tonality like dark area bright area. I do that overall calculation. It's beautiful. So I do the oral calculation and then say, like, what is the average tonality off the entire frame? I do that calculation and then, based on the oral tonality off the frame, I decide. So using again the Ansel Adams zonal chart, I descend with that I want to overexpose under exposed what kind of exposure compensation I want to use. So I go ahead based on that immediately used to exploit your compensation and then be ready for the shot. Of course, all this sport metering evaluated metrics the same scene, so the lighting overall composition seen whatever we have, you can achieve the end result the same end deserted can achieve irrespective of what meeting Maria shooting. So even though this particular chapter is more on what meeting more to use when in reality you can get the same end result using any metering more. The most important thing is toe. Understand as to how metering works, how you have to use the exposure, compensation and then go ahead, exclude the shot that it's more important than tryingto figure out sport. Evaluate anything. So the fundamental concepts the court understanding is what really matters. That said, Use your knowledge. Use overalls. The tunnel at the other things was what I said. Go ahead and then arrive at what meeting works best for you.
43. Challenges of Spot Metering: another important point. Where to remember when it comes to spot metering is it's difficult to use spot metering when this action happening, action happening and subject moving. So it's quite difficult because it calculates the oral meeting from that one particular sport. If had to give you a classic example, how do you spot metering on a zebra? I mean, like, it has a black strip and a white stripe. So depending on where you're focusing, point is you like to do the exposure compensation accordingly. Now, if the zebras moving so you don't know whether you're spot is on the white stripe or on the Black Strip, it is very difficult to find out or, for that matter, tiger. It is a black slip, white strip and orange or an alloy sh depending on the order, all of breeding plumage what it has. So if you'll kept this variations, using sport meter is quite tough. So that s where in this scenario I go with evaluated metering, take the average off the whole tonality and then I work my sitting
44. Focusing Modes to be Used: the next very important setting off your camera a very simple decision, whether you want to shoot in one shot or air servo. Or for Nikon Sony users, it is auto focus, single or auto focus continues. Now, if you look at the way these two focusing more work now. One shot is meant for static subjects now, especially if your subject is just sitting at one place like we got a lot of sported deals here, where they're standing at one place and feeding continuously. Not much movement happening. So in those kind of scenarios, one shot works very well. So the concept off one shot is, once you have pressed respiratory, least bottom, you hear the beep? Of course, if you're beep is enabled in your settings. Once you hear the beep, that means the focus is set. So the camera to the subject distance is set. So since the focusing is set so it stays dead, you can love the focus. You can do the re composition all those things and shoot so one shot or auto focus single is extremely good for static subjects. So if you look at some of these examples in all the scenarios. If you see the subject is static, not moving at all. So since it is not moving so one shot will work credible. And, of course, the very power. Other powerful feature off the one shot more is the ability to recompose. So what you can do is even though you used the center or two focusing point, you can lock the focus and you can recompose. So that's very easily achievable when you just have British Italy's but keep it pressed and then moving to the same. So that is called recompose. So focus locked off. Focus recomposed. So from a splay spent subject placement point off, you keep it to the left. Keep it to the right top down wherever. Even if you do not have an auto focusing point at that part off the frame, silly can go ahead and then use the focus lock mechanism and recomposed your limits. Now this is a major advantage when it comes to one shot. Our auto focus single. Now, the next one, this ai servo, or auto focus continues. Now this is the most important sitting when it comes to wildlife photography or, for that matter, action photography If you're subject, it's moving continuously moving running off, for that matter. The other scenario. Video photographing from a moving boat. So in that scenario, since your continously moving, you have to be in the auto focus, continues or hear server more. Now. The way your air servo or to focus continues works is that the focusing is continuously on . That means the focus is always on on the subject very over your auto focusing point birds everywhere. It's a very, very er. Auto focusing point is focusing act. The camera continues to try and achieve that in or to focus. Of course, I used the word try because it depends on a lot of factors when it comes to countenance focusing on the subject. Now, if the subject is moving, action running, any of these things happening. As I said, you need Toby in a FC off here server mode. Of course, there is 1/3 perimeter. Let's look at some of the examples where I have used the A, F. C or the air Server more so if you look at all this various examples you can see there is actually happening running, flying, jumping all this different scenarios. Now, in each of these things, this is where auto focus continues or air serval comes handy. So you saw one shot and of course, the area said, or auto focus single, our auto focus continuous. Of course, there is this third focusing more as well, which is a I focus or a FAA autofocus auto. When I explained the concept, it sounds really attractive, but this is a more which I would just don't add waste for anybody to use again. This is my personal opinion. Now, the way this area focus or FB autofocus auto works is if the subject is static stationary in this example, if you see it is the static not moving. So here, the spotted here is just standing at one best not moving. So if you use a I focus, or if a the camera internalised switches over to one shot, or if if s more, and then if the subject starts moving and you start moving the camera along with the subject internal, it's with just over to the A F. C. More auto focus, continuous order several more. Of course, If you listen to this cell explanation, you will definitely feel that this is the best more toe work in. But unfortunately there are a lot of factors, especially the cameras or to focus capability or sensor capability, where it sends us that the subject of started to move. So there are certain situations where there may be a like there may be a like a set. Were the switching over from one shot to the server, More may happen may not happen. So in those kind of scenarios, those friends for the submitted moving you move the camera along with the subject, it may go out of focus, so that is where in high end pro borders off defied. The forests are one days when the X mark so many off this there's no intermediate. It's just zero or one. Go with one shot or go with the yes. So these are the two scenarios now, based on the situation as a photographer, you need to decide as toe rich auto focusing more. You want to use off course like you go with one shot more than certainly the subject starts to move you. You may not have time in the field to change over to the server. More Now that is where the concept off back button folks sing work that will talk about it next. But just as an intro. So this is so your one shot are are to focus. Single are here server or auto focus. Continuous works based on the situation. You decide what focusing more you want to use.
45. Auto Focusing Points in Canon: in the previous chapter, we saw the different modes off auto focusing. So for moving subject for static subject, we decided, Now comes the very important aspect when it comes to your wildlife photography focusing points. What are the different kind of focusing points available when to use What kind of auto focusing points? How do you play around with out of focusing points for your composition? So these are the very key aspects for wildlife photography, So let's have a look at it. So currently I'm on my one B x mark toe, so I would like to cover the high end camera. So that way beat any off your canon or Nikon. Of course, I'll be talking about in the con camera as well. So once we go to the video sort of focusing points. So some of this advanced auto focusing point options are available even in the mid range, and inter level pro bodies like the 70 mark to pass off now Fighting marked referred remark for and probably on the 80 that I have to check. So that said so let's go ahead. And of course, the one the X So that said, Let's go and look at the different auto focusing points, and then when to use what kind of auto focusing points. And, of course, as I said, the composition aspects. So the very 1st 1 the very first auto focusing point, is the F point selection. If you go into that, the 1st 1 is the manual select, which is the sport if now the sport, if, as the name says is for single or two focusing point and then it actually has a square within the square so we can move out of focusing points. So if you see the square within the square, this is very useful. When you want precise or position or two focusing on that this is purely for static subjects. So if you're in the one shot more, or of course, when Nikon again will come to that. So if you're in the one shot more than this particular a of point er to use if you're subjects behind, bushes are, for that matter, if you have your subject in a very small opening, where a larger a point will not work. So if I could give you a different example outside of wildlife, So if you're wearing a helmet, and if you're wearing a helmet or a cap and the cap is covering your eyes and just the islets, little off the eyes seen and just go through the small opening to get an auto focus. That particular one, which is your first spot if it's what you need to use, as it says, very small area now, when it comes to the whole concept of competition, so you should be in a position to move around here. Auto focusing point. So in one short. So if you want to place the subject to the left side, move the focusing point of the left, going to place it to the top more to the top. And, of course, your whole concept off to focusing. You should be able to rotate it horizontally, vertically and move. You're focusing. Points upend out, so let's come back. So that is the first kind of auto focusing point, which is the sport if the next part of focusing point is the default or two focusing point available in all the cameras. So it is the single point. If the one point eighth now, this is the default one, a standard one where you can sell it one single or two focusing point and get processed auto focusing point on that area. So this kind of auto focusing point is the default and again most useful in static shots. So when you're in the one short more so, this auto focusing point is what you need to use. So it could be any off your animals just sitting somewhere, not moving, sleeping static, not moving So in any off those cases. This auto focusing point is quite helpful, of course, even if the subject is very far. So each off. This auto focusing point selection also depends on the size of the subject in the frame that is very important. And the other important thing what to say in my life is always get. You're focusing on the iof your subject. That is what you need to do. Let's let's look at the next auto focusing point. It is the expand. If area now the concept of expanded area is still you had the manual selection, so the center or two focusing point, if you see, is your single point auto focusing point and then it is surrounded by four other or two focusing points. That is what we call us the if assist auto focusing points. So here this is used in scenarios where the subject is little larger in size in the frame and even if it is moving. So this is quite helpful even in the server mode. A. I serve a more where the single out of focusing point is what this used to us. You are to focus, but the surrounding auto focusing point is going to assist you in your focusing. So the next one, if you see, is the F area settled. So this is very similar to the previous Give eight expansion. So this is the other expansion more, but with a large, more number of auto focusing points which are there to assist you. So here they are, around eight out of focusing points, two assists along with the centre one. So next if everyone, of course nowhere to be used. This so these are used in areas with the size of the subject is quite literally, fear focusing on the face. So if you want to focus in the face, which is moving so apart from the 1st 3 out of focusing points. All the rest of the ones is more for the servo mechanism are sorry. Apart from the 1st 2 or two focusing points, the next set of auto focusing points are more for the air servo. With this action photography happening, order that action happening and you're photographing it. So that is about the expense if area even in this explain area. If I said the single manual focusing going to have and then the eighth points around, that is the assist. If points the next one, if you go is the zone. If now, if you look at all the 61 or two focusing points off your won the X mark group. So it is divided into basically three zones so left center and right, and in case off the zone F that is further divided into total line. So top one middle and in the bottom one. So 123456789 Again, it is divided into nine zones now, depending on the size of the subject, depending on whether the subject is moving, running what is happening. So in that situation, you will again have toe use for composition, mood auto focusing points for competition and used this points. Now, how does this auto focusing point work? If you look at all the various nine auto focusing points, what to have, unlike the previous F area? Cerone. So if it s around the center, one or two focusing point is the one who just used for auto focusing point assisted by the surrounding ones. But in case off the zone, if the 90 f point for the camera will dissect to use any off the 90 of points, so every individual off the 98 points are used for focusing, and the camera will use any off the nine points for focusing. So in this case, if you see one of the disadvantages off this particular if points is that like if the subject is very close and if something goes on to the right side off the auto focusing point. If the right most auto focusing point is used for focusing, which could be the year off, your subject not die of the subject, then that very close focusing distance the depth of field. If it is not there, that would go a little auto focus. A rather here, I could go a little out of focus. So the Zune a f working in that the camera will sell it any off the nine auto focusing points. And after that, the next one is again the large June. If so, in case of the large zone. If what happens this year and they're focusing points is divided into three vertical zones , and you can use any off the zones again if you want more on the focusing point. If you see here, so any off the three off those owns is what he should be able to use. And finally again, in this particular case, the scenario I can think off for photographing. It's like if the Tigris coming had done vertical, you're shooting or even horizontal one long subject to have Good Dept. Ophelia want to get or rather faster or two focusing you want to achieve that is a good one to use next. The large auto focusing point, if you see, is the auto selection. If so, that is the auto area. If so, in this situation, although auto focusing points are used to focus or rather, in this inter 61 or two focusing points camera will automatically Celic any off daughter focusing points. Of course, the whole concept of auto focusing depends on the light. In the contrast in the subjects of Based on these parameters, camera will decide which auto focusing point to use for focusing. So the large one again is quite helpful in non distracting background. So if there are distractions in the bag, chances of the camera will focus at the bag drop so that you have to be a little careful and ensure that you don't use this all the time now again in case off cannon. So the last four auto focusing options, if you see that, has to be combined with the different auto focusing cases which are available. So in this situation again, different parameters comes into picture as it said, the size of the subject in the frame, the lighting conditions, how fast the subject is moving in the frame, and then, apart from that, the background distractions in the bagger. Nor is it a clean background, so this different para meters has to be considered before you decide weeks off this auto focusing points you want to use. So this is about the different auto focusing points available in Canon. Next, let's mourn toe the Nikon system, which is very similar to the so the system astral. Let's do that next.
46. Focusing Points in Nikon: we saw the different kind off auto focusing points available in Canon now is system off the con and also similar kind off. This set up is available in Sony cameras as well. Now, the way you need to get access to the different auto focusing points is in the friend. There isn't a f button, so right here in the front of the camera, there's a small bottom at the lower portion. Press that button and then you'll get the auto Focus continues option as well as the different auto focusing points option. Now, one very important point is the various sort of focusing points. What I'm going to explain now All of them are visible only in the A F C. More off the camera, which is auto focus continues because all the all the options of auto focusing points you lose in this action subject moving. So that is where you need to enable the If Seymour, if you're in the auto focus single mode, only the three different order focusing points will be seen. So let's go ahead with the A f C. More so the very first auto focusing point. Okay, it is the top down off the camera area. No, the very first auto focusing point is the single auto focusing point. So this is the default auto focusing point, which means just one single autofocus important disused for you focusing now, once you select the single focusing point, then if you go into the info screen and then again from an auto focusing selection. So to move the focusing point, you can use off course this estimated through the U fender. Yes, I can see it. So use the joystick again, depending on your camera model to move around the auto focusing point. So for composition, move it. Left, right, top dumb, you have toe move it now moving for So that is the one single out of focusing point. The next auto focusing point is the dynamic idea for the dynamic area nine auto focusing point. Now, this is very similar to the cannon. If area more the F expansion. What we saw in Canon This is similar to that the dynamic area, so you use nine auto focusing points. Rather, the camera uses the nine different auto focusing points for selection. Sorry, this is similar to the zone, if not the FAA the expansion. So airfare expansion is similar to the group. Actually, sorry about that. So here, if you see the large eight of the dynamic area focusing point if you see the nine off them . So the camera will use any off the available line auto focusing points for focusing. So the next one, if you see again moving forward the 25 again, the dynamic Area 25 and then there is 72 finally won 63. So all this various different auto focusing points mechanism, if you see so the various if 630.40 have camera chooses any off those selected A of 0.70 Duke, or even so, for that matter, the nine. So within those nine out of focusing points, camera will select any focusing point, depending on the light contrast to achieve focusing on the subject. So, obviously, like when it comes to action photography, you can use these focusing points. Of course, we'll go back and see each other auto focusing points with what scenario when you can use. So let me just finish talking about the different auto focusing points again. The in four press. So after the ones who get three points if he moved. So this is where the next one you see is the three. D three D is absolutely fantastic. So the way the three D works in the calm is the camera can detect the difference between the color off the main subject and in the background. If there is good variation off color from the main subject of the background, three D focusing works extremely well, so the subject continues to move. And if there is contrast in color difference between the main subject in the background, camera will keep jumping between the auto focusing point to ensure the camera continues to focus on the main subject. That's a fantastic option, actually. Next we move further. So after the treaty, we have the group focusing point. So this is very similar to the canons. If expansion area where you have the center active auto focusing point on the surrounding ones with the group, what do you have? The surrounding one is the assist points. That is what it does. So it's more off. It helps you achieve the focusing status it aids in the auto, focusing using that one single or two focusing point and then finally, apart from the group, you have the group horizontal. So all the horizontal out of focusing points the form one single group, same thing honorable for vertical s felt So the vertical So all the focusing points which are lined up vertically. They form a single group to help you achieve your auto focusing. And finally, the auto F area. More so, Auto F area similar to the canon camera, uses any off the all available auto focusing points women comes to getting the subject in focus. Now, if you go back again, press the info, you need to get it right. Okay, So now if you go back and check the different focusing points, Singler focusing points is good for subjects which are static, not mooring. Just waiting at one particular point. Get your focus on the of the subject. This is a good one. The next 19 area is when you want to achieve focusing way. The size of the subject is a little small, weighed up. Getting the single auto focusing point on the subject is difficult. In those situations. The dynamic area nine is useful. So that of course, the other point which are to be very careful in. But the zone F off cannon, as well as the dynamic area of off Nikon is if you are very close to the subject award using this because the camera uses any off this nine or even 52 any off those auto focusing points for focusing. And if you're very close to the subject chances that you want to focus on the I and the camera will choose the here so that I will go a little out of focus. It'll be blood so that you have to be careful. So that is about the nine 25 72 1 63 So the 80 off implementation depends on the size of the subject. Home father subject is from this from your camera, the background. What kind of distractions are there? The lighting? All this comes into picture, then the three DS explain is extremely good, even for action photography, where the means subject color is different from the background. So, for example, if the tiger is walking or for that matter, even it's very bright. The Bagram is bright, and the subject in the front is a dark slaughter but it's walking. So if you see the dynamic range, we're sorry. With respect to the tonality, off the subject and the background, there is a huge variation. Three D works very well. Of course, if it is a cheetah walking in the grass line off my semi rob we bought the colors are almost the same. Sorry, this focusing what will not work? So this is where you need to figure out all this various options. And of course, the last one. If you see after the three d is your group, the group focusing point is preferable in a lot of cases. Books in flight. Where do you want to focus on I of the subject? The head, but get a larger area for focusing. So the group is quite helpful in those situations or even from mammal fotografia. Fair to see with the size of the subject is quite large, and you don't want the focus to keep shifting between the end of the year. The group again is quite handy, and the last one which is your of course, then the horizontal vertical also comes into picture. So depending on something is running vertically like this very fast. Then it goes. So something dear off kind of a subject. Tall subject coming to us running torture in the vertical group comes into picture. So anything standing tall or anything which is more off horizontal, the vertical and the horizontal group focusing is extremely helpful. And then one of my favorite one, which is the last, which is the a failure of the automatic selection. So this for births in flight or for that matter, I have used this option for action photography within Masai Mara when the huntress happening. So in this situation, if the background is completely open, not much destruction open area in those situations, any hunt sequence you want any, um, cheetah running or any of the shooting tigers, for that matter in central India, photographed using these options where background is non distracting. Then as longer. The subject continues to be running or walking in the open area. Auto area AF works works extremely well. So here you go. So this is for the Nikon system. So big Canon or Nikon. What is very important is to understand each off this different auto focusing point option and then in while a photograph you need toe correlate. Very confused them so apart. Apart from that. So the other very important aspect overall, with respect of focusing is competition. So moving this auto focusing points so you need to figure out. So mammal photography were left photography auto focusing is the heart off your image making. So get this options right and will make sure that your auto focusing is right and you get your action for other a fee.
47. AF Distance Switch on the Lens: let us know, understand a little bit about auto focusing and then see how to use the focusing distance indicated in the lynch if you look at your lenses, depending on what kind of lens you have, So this is the 800 millimeter lens, and it has different focusing distance indicator on the length it says six meters to infinity, six meters to 20 meters and then 20 meters to infinity. So this is the minimum or two focusing distance indicator. Now the baby use it. It's OK. Once the bat, let's understand how the camera accused auto focusing now, depending on the late in condition. And in the contrast, the camera accused auto focus at a very high level now keeping that in mind. So if you're trying to focus on this subject, especially in case off low lead situation, there's going to be a lot of hunting so low late. The subject. There is not much contrast in that case. When you focus like the lens, the camera start sending like 00 we'll hear that sound with the camera. Cannot auto focus Now that is where the camera water does is depending on this indicator for example in this lens, it is currently put at six meter to infinity, which means when the camera starts or two focusing the focus hunting it starts. So camera will try to focus on the subjects of the movement. It cannot at you auto focus. The camera start searching for the subject late from six meters still infinitely and up. So, for example, have the 7200 millimeter lens here and the indicator, it says 1.2 meters to infinity and then 2.5 meters stoop infinity. So you have this different indicators and also have the 402.8 lens down here. And that indicated, if indeed it says seven meters to infinity than 2.7 meters to seven meters and then full. The full range, obviously in this case, is 2.7 meters to infinity in case of the 400 millimeter, 2.8 lens. Now, how do we use this particular focus distance indicator in practical situations? Now, if you're pretty sure that the subject you're trained to shoot is quite for a said like, especially in lower leg situation. So in case off Lolek situation, if the subject is definitely beyond six meters or let's say if the subject is beyond 20 meters. So let's not go with the 800 millimeter lens just to read rate six meters to infinity, 20 meters to infinity and between six meters and 20 meters. Now if you're pretty sure the subject is going to be beyond 20 meters in Lola situation, especially by then, my recommendation is to move the switch toe 20 meters to infinity, which means when the camera traced to hunt for the focus, it will not even pray to focus between six meters and 20 meters. So this is the range with auto focusing. It takes a lot of time to find the subject and focus. So if you tell the lens saying Don't even try to focus from six meters toe 20 meters, then it in the setting off 20 meters to infinitely camera will start searching for the subject from 20 meters and beyond. So obviously, in that case, the auto focusing is going to be pretty fast, so pretty fast anyone a cure it for the printed because the hunting will not happen. But there isn't brought back off this particular setting so once you know, the subject is not going to come within 20 meters. We used the setting and we shoot. But the problem is if you forget to put it back to the standard off six meters to infinity , you get something fantastic. We're extremely happy, cheerful and you just keep on driving. And then you get a tiger within 20 meters and you tried to focus. The camera will not auto focus because the subject is within 20 meters. And at that point of time, Sansa serve Your mind will not tell you that you need to go and change. This will be struggling cameras not focusing and you miss your shot. So this focus distance indicator is an extremely useful setting, especially for Lolek situation, because the focus ending will not happen. So the next time you look at this subject to the concept of pre visualization comes in very a British A that the subject is going to be beyond 20 meters. Keep the setting off for that matter, say the subject is just sitting ST ng on the kill a tiger or the leopard Wild dog is feeding on a kill. No, let's situation again. So Let's situation late evening, early morning. It's reading on the kill and the distance is, say, between six meters and 20 meters. And it's better to keep that because it will not go beyond 20 meters. Started focusing again. We'll start something. So this is an extremely useful indicator, especially for faster autofocus it. So the next time you're out in the field, how we look at their length and see, like what kind of focusing distance options you have the minimum focusing distance, the focusing distance range and depending on how far you expect to get the subject or, for that matter, how far you're already getting the subject, go and use this for Lolek situation and a pretty sure auto focusing will be fast and you're gonna get your shots in a good, good amount of time, I would say.
48. Shooting in Auto ISO: in one of the previous chapters, I did mention that I always shooting a poacher priority and used the theory of reciprocity to control the shutter speed. Of course, there are always work arounds, even though in wildlife photography shutter speed is one of the most important parameters. As I said, I always shooting a poacher priority just dia. So to get a particular shirt to speed. That said, there is a work around to shoot, even in. How do you the stranger attacks on boats over here? Okay, so, as I said, he won instead a priority the reserve way. There is every work around to still shoot in shutter priority and get the shirt desperately want without compromising on the exposure. Now, if you look at the current scenario, the light is extremely low. So once the lights start going low, that is when the challenge comes in in wildlife photography to get the correct shutter speed what you want, especially a little highest rate of speed. Now let me see what can have set up a help. So currently I'm in set a priority more and say for the given situation, I want to shutter speed of 1001 by 1000 off second. So the area I'm looking at it's quite dark. So let me just go into the live you. So the scene where I'm seeing of course it it looks bright. End up in the old city. That's fine. Now the place where I'm aiming at, there are a lot off trees, bushes and extremely low light. There's no sunlight. Now if I need a shutter speed off one by 1000 In the normal scenario issued, I'm currently it. I s 0 401 by 1000 off a second shutter speed. So I'm actually shooting at 800 millimeter. So down If I shoot at the dark area, let me see. So camera is going to allow me to shoot there to go camera? I lost me to shoot a while. It's totally dark. If I play back and see, the scene is totally, totally dark. Now if I still want one by 1000 off a second shutter speed and still make sure I'm in shutter priority itself. There is a small worker on. So what I will do is I'm gonna turn the I s o in tow or toy. Assume Now there's a small catcher. So a normal situation If you turn in tow Auto, you're so chances are of course, the camera may end up giving you a very high. The camera may end up giving you very high. I s O and then pay around with your a poacher. We don't want that to happen now. This is where if you go into your settings, so be it. Kind of Nikon Sony any off your cameras? So if you go into your ISA settings so there is going to be arranged, you can set the auto range so under air. So if you go into the auto range so you can set in auto IAS soap, what is the minimum I also the camera should use And what is the maximum I s. So the camera canoes Now that is where you need to figure out what is the shoot herbal. I s off your camera in the sense so every cameras and limitation when it comes to I s o capabilities, especially the nice performance. Now there is a technique where you can find out what is the upper limit. I also you can shoot in your camera and still end up getting quality images. So, for example, in my one DX mark, So I decide maximum. I don't want to go beyond 6000 year. So what I do is under the maximum. I go and set saying 6400 ISO and the minimum asset it has 100 days. So So typically the range what I've kept for or Toya Soto work is between 100 eso and 6400 eso. So I said it, I say OK, now then I go into my eyes so sitting So I s o go all the way down and put it in our toys. So now currently I'm insert a priority under our toys. So on my shutters police one by thousands, off a second. So now if I go back to the low light and then shoot There you go. I got the kindof lighting what I wanted So here if you see at one by 1000 of a second, the camera actually has used. If I go into the info I see I also 6400 So it is basically the upper limit. What I have kept So this is how you make use off this ad one. Setting off. Setting a cap for your or Toya so still work in the shutter. Priority more. Put the kind of shutter speed what do you want for your shots and then work around this going very high and then getting noise in your eyes. So find out in your camera of Were the or Toya's arranges said the minimum and the maximum , and you're all set to shoot inside a priority with the shutter speed you want. Putting the camera in auto, you're so
49. Best out of an Entry-level Camera: let us look at this example off the butterfly. Now the combination. What I've used is the 1200 D with the 55 to 50 lens. Now what is very important to understand among the four pillars of photography is the third pillar of photographic, which is understanding about your equipment. Obviously, in this case, it's the shallow depth of field. What we want now. He won the technical aspects. The code for inimical aspects of photographic comes into picture. Now the equipment of the lens. What you have is the 55 3 55 to 50 lens. So obviously to get a shallow depth of field, the three para meters to get Charlotte up, the field is obviously the focal. And off the lens you're using so longer the focal in the shallow Dr Phil, you you will get so that is what I've used the 1st 1 So in the 55 to 50 lens zoom lens, so have gone at 2 50 millimeter to photograph this 1st 1 Now the second important paramount perimeter to get a shallow depth of field is obviously the camera to subject distance. So if you're very far away from the subject. Then you get a larger depth of field. That means, like more area is in sharp focus. If you're very close to the subject, you get a very shallow depth of field, so the background will be blurred out. So that is what I've used. Second point. So I've got very close at minimum, focusing distance out gun. And I photographed this the third parameter, which is a poacher which is responsible again for the depth off so larger the F number more areas in sharp focus smaller the F number. You have a shallow depth of field. So again, in this case, are Porcher have used this F 5.6. So if you look at the combination to 50 millimeter very close to the subject and in the butcher off, if I pawn six. So this combination gives you a very shallow depth of field and at 2 50 millimeter to get a large magnification, and that is where I'm able to get such shallow depth of field. The calos, even though it is into level camera, it all boils down to your skills in post processing and exposure values, settings and off course, overall impact which gets created is also because of white balance. Get this radius Parliament us right. And as you can see, you have a wall of image from the inter level equipment. Let's look at this other set off images. Now this is We're like photographing frog goes against. Not necessary that you need a long silence. The enter level will still work. Now what really matters is how you compose how you create those totaling images. Now, when it comes to the concept of storytelling images, it is always the wider perspective which works very well. That means a lens like the 7200 millimeter or the 50 Fecteau 50 lands. Now, in this case, if you see what I've done is the tiger feeding on the spotted here again from a rule after composition, I've placed it more to the lower side, a little to the right, showing the habitat at the bag drop. So it's a wider perspective. Have shot using the same 55 to 50 millimeter leads, and then again from a processing point off your make sure I'm able to get back to colors with proper white balance setting, even enforce processing. Now, the other image. If you see here off the tiger walking now in this case has zoomed in a little, so it's not the wider perspective. It's a little bit zooming. We'll have focused more on the Tigers but still showing a little bit of the forest in the background. So it's not a complete portrait, but it's a little in between and again, it has worked pretty well. Next comes the complete closer. So here, in this case, the Negro sitting quite close to us and then in 250 millimeter completely zoomed in on the Tiger and evaded for certain action toe happen. And then we know I mean, like again the pillow pillow number one and it comes toe Orel photography. Understand your subject behavior. If the Tigris cooperated, just sitting for a very long time, guaranteed it is going to young at some point off time. And as you can see here, I waited for that, got all my exposure triangle parameters, right, and I got a yawning tiger. So, as you can see, even from this entry level equipment, you are able to get some awesome images. It all boils down to their skills understanding about the concepts off photography, understanding the four pillars of photography. And in this last image, if you see here, is again habitat shot showing the behavioral aspect off the sport ideas. So in this case, there was country as alarm calls coming, and the sported years were alert and they were looking around only some predator around again. Composition. If you see the smart ideas have been placed more to the left Lord portion showing the habitat, the grassland, the forest in the bag drop more to the right side. So it all boils down. Toe the composition skills. What you want to convey, how you want to come with the story, using the available equipment, what you have, So go ahead. Even with your until l equipment, you should be able to make some awesome images in wildlife photography, but get your skills right
50. Tigers Fighting -What Went Wrong?: let us know. Look at this particular image with the Tigers are fighting now if we stated this so let's have a look at what went wrong, what went right off, for that matter. What was the thought process behind making this image and whatever had pre visualized? Did I get it right? Let's look at that now. If you study the inmates with zoom in a little bit, look at the face. So obviously it is not shop, so you can see that there's a little bit of blurred motion, but we just happened. That's mainly because of the slow shutter speed if you study the exposure triangle perimeters off disk image. So this was shot at, and I also 1000 poacher off F eight, which yielded a shutter speed off one by 1/60 of a second. So, since I was shooting in aperture priority more, I said a particular a poacher. And then I also and the camera gave me a sort of speed, which was won by 1/60 of a second. Now it's very obvious that this shutter speed it's not would enough to freeze the whole action. What happened in this case is. When you went there, the two tigers were sitting one behind the other. Since there's a little gap, I wanted a larger depth of field and I was photographing this with the 400 m f 2.8 l. I s to Lens. So obviously, to get a larger depth of field, I moved the aperture to F eight. I was shooting it. I also 1000 when the mortar to FB it automatically the shutter speed dropped. So in this case, I got a few photos. But then certainly Buddha Tigers started fighting. And whatever setting I had, I just had to shoot with that. Now this is the mistake which happened. I did not realize or I did not expect, that they're going to start fighting. So in this case, since those sitting quite and then a shutter speed of one by 1 60 was good enough to freeze or to get a sharp image of just sitting. But when they started fighting, action happened. Obviously the chateau spirits, not enough. And that is where the blur happen Now. These are the kind of mistakes which happens, and this is where when it comes to pre visualization, especially for action photography. You have to make sure you have a pretty decent short of speed. In fact, if you look at the theory of Precip Row City and if you try to work, don't with the a poacher and see what kind of a corresponding shutter speed we could have got. If I got my sittings right, let's try that now. I also 1000. We will keep it as it is a purchase F eight and then the corresponding shutter speed is one by 1 60 So if I bring it all the way to say if 2.8, so from effort, if you count the number of stops So if 5.64 and then if 2.83 stops dog. So if we reduce the aperture by three stops, I can increase the shutter speed by three stops. It is again from a mathematics pond off you. If you see like, say, one by 1 60 let's consider it a C one by 200 just for the calculation purpose. Three stops. So when about 200 408 116 100. So I would have got a shutter speed off our own one by 1616 100. And that would have been good enough to freeze the whole action. Now, this is the kind of calculation you have to do in the field. Everything comes down to the exposure triangle perimeters off your aperture. I s a shutter speed. You need to get this right it for still photography or action photography. So in this case, in a picture of F 2.8 off Buddha Tigers fighting, I would have still got a good depth of field which would have yielded a shutter speed off one by 1600 Brilliant for prison. The action. So I was not ready for the action happening. And my camera sitting was more to get a larger depth of field. That is where the camera settings caught. Mr. That said, if you look at it more from an artistic point off you, still the little bit of blurred has worked well because of the action which is happening. The blurred motion it is shown So a sense off movement, a sense of fight is being captured here. So that way I'm still happy. Well, what does that Okay, so that way. I'm still happy with the image. What I got Okay, beautiful. We're out here in nature. All kind of sounds natural sound effects were getting us the background for this video coming back to the image, if you see here. So even though the blood has happened still, for me personally, it's a nice image. But when it comes to action for the roughy, shutter speed is the most important parameter. And you need to make sure you get the highest rate of speed. So accent photography get your exposure, tangle parameters right, And you should be ableto get the image what you plan.
51. Click Tigers Climbing a Tree: action photography, individualization, the camera settings composition. How do we make sure all these things come together to get that one image? So let's take this particular image is an example where the tag has jumped onto the street and let's stay, did this and see what went right, what went wrong. And then, like ho, I basically corrected this in the feet. Let's take a background about what happened. So we were in rentable take a reserve. We were driving in the safari, and then we saw the Steger walking in the woods. So we stopped and we take a few photographs, photographs off the tiger walking, and then when it approached the particular tree. And just before that, if you study the videos exposure triangle perimeters. So obviously the tiger was just walking and going early morning. So if you look at the various exposure triangle parameters early morning, I was at I also 1600 and then a poacher off a 5.6, which gave me a shot of speed off one by 400 off a second. So in this case, the tiger was just walking, and then I went ahead, took a few photographs and one by 400. The exposure tangle parameters is good enough to freeze the action. The movement walking It was brilliant. Now the unexpected thing happened. So the tiger, when it came close to the tree, it just jumped onto that. So of course, it little bit first step it, like, claimed onto the tree with the two legs and then jumped up. This was unexpected. A lot of beginners. The common mistake. What they do in these kind of situations is for stuff like you have a tiger in front off you, you're excited. On top of that, the tiger jumping onto the tree like you're super excited now on in that situation, or happens like whatever sitting, whatever you have, you just start shooting it. And that is exactly the same thing. What I did, like unexpectedly, that they could jump and what they're asserting. However I was shooting, I just started shooting it as it is the competition now, what other things which went back here If you study the image, obviously the tiger placement composition horizontal does not work then and then the placement off the tiger and the tree. If you see it's more towards the right and more towards the left, and this lot of space on the right composition might not a great image. So the main things which have gone wrong and this is obviously the composition exposure triangle parameters has worked very well. No issues. Now comes the next part. Understanding the subject behavior last bit now in these kind of situations, even if it is about tiger like which climbs onto the tree to market the trees with the close off, for that matter, in the claim that tree like this, you do get a few seconds time. A few seconds is good enough in while a photography. So since the tiger was still on the tree like this for a few seconds immediately, what I did is I knew the competition. What are shooting was incorrect. Immediately added a vertical. So as in a Samoud vertical, this is the image What I got as you can see here from a composition point off you vertical the long tree it's seen. The tiger is completely seen, placement falling. The rule of third tiger. It's a little bit lower to the portion which is going up to the vertical tree height and more space on top, Clearly from a rule after composition front a few I was ableto place the tiger to the lower part Goto composition, right, the lighting exposure triangle. Everything was fine. And as I said that I don't give a few seconds. And with the vertical composition, I was able to get the kind of image what I want. So lesson learned. Obviously, like any beginner and even professional, Sometimes we do make a mistake in the feet. But the important point is understanding the behavioral aspect. And even if it gives a few seconds time, you need to be really fast in thinking. OK, what is the mistake you're doing? How you need to correct it in the field. That is exactly what I was able to do from horizontal. All it takes is just turn the camera vertical and the composition what you want, you're going to get it right. So you need to be quick in the field fast. Think and then execute dot So it's a beautiful email. So if you look at the before and after the horizontal, not a great one Vertical. This is what I wanted. So this should be the thought process in the field. When action photograph is happening, when action is happening, you need to think fast and act fast.
52. Jumping Blackbucks - Settings : the jumping black box. So let's they need this image and understand. What does it take to make create these kind of images? So this is where your complete knowledge on the four pillars of photographic comes into picture. So let's take one at a time and understand. How do we create this images? Number one, Understanding the subject. Behavioral aspect. Now here, if you see like this was photographed at well over their national park in Gujarat and these black books jumping, I noticed that they do this only in the mornings, at least. The visit during when I went in the month of February, so I never noticed this black marks jumping in the afternoon after them. They were just always disc raising or just lazing around. So number one point. It's early morning. We have this jumping happens, Okay. Next comes the other part about the exposure triangle parameters of the court for nominal aspects of photography itself will a number two. So let's look at the exposure tangle perimeters, what we have used. Obviously there's action happening, and I want to freeze the action so I don't want to do any planning over here, so it's freezing. What I want to go Obviously need a high shutter speed. And this image waas photographed from an 800 millimeter with the 1.4 con water. So from an exposure triangle perimeter. Since this F 5.6 lens with the 1.4 converter, my lowest F number is already at F eight. So since I'm shooting a poacher priority more, my lowest f number is no f it. Now I need to get the exposure triangle perimeter to get the high shutter speed to freeze the action approach. It is already sick. So the other perimeter had to play around with this. I s so so the I s I used this 3 20 because the lighting was right enough. I used 3 20 ill admission dispute off one by 800 when this black box did run and the jump. It's not extremely very high speed. Very cannot pres action The way that jump it's like this Lord jump which happens and one by 800 is pretty d central frizzed action off course. You're welcome to increase the Yes, true to get a faster shutter speed. So that's about the exposure triangle parameters Next comes the meeting itself. So generally for wildlife photography. I shoot in evaluating meeting more, or metrics, meeting more or also called this segment metering. Now, in this case, if you stayed in the oral average tonality off the entire image, it's little bit medium tone. But the bag road backdrop, if you see it on the brighter, said So this is where I used an exposure composition off, plus 1/3 or plus 0.3. Now that comes about the exposure composition and mitri So V. I rode out the exposure triangle parameters and then the metering and exposure composition . Now comes the most important part, especially in wildlife. In action photography. Auto focusing is the most important aspect now, since action is happening. Obviously we have to use years. Several auto focus continuous more, so that is fixed. Let's leave that, I said. Now comes the most challenging, which is auto focusing points. Now what kind of auto focusing points we have to use in this case Now, when it comes to entry level cameras, you may not have too many options off different kind of auto focusing points, so you may have one single or two focusing point are enabling, although the focusing point richest or if now, if you stayed in the oral inmates. So since there is not much of distraction in the background, you will have, like an auto F very enable all the auto focusing points that will still work very well in this case. So entry level camera or mid range camera, where you don't have too many options off using different or two focusing points, you can stick toe auto if and in this particular scenario, you should be able to get it. Now let's move towards the mid range of the high end camera bodies very have different options off using auto focusing points if I name them both for common of Nikon. So you had the group focusing point in Canon, and the corresponding one is the expand area. If now the way, both off them. Workers like you have a small set off auto focusing points. So in this case, the black but jumping black but running so the group are the expanding area. You can easily put those or two focusing points on the face off the jumping black bug, so that will work. Next comes you in effect, take or two. If so, even in my dreams, hand cameras or two. If look at the scenario, it's like overall, like non distracting background. It's just the black Book, which is jumping so auto ADF will work. And also in case off Nick on the dynamic area or two focusing points, you have the D 9 15 21 They also will work. Now. This image is a classic example off which auto focusing point works well in this particular example, any off this different kind of auto focusing points work very well. So that is about which auto focusing point to use. So you felt to somebody technical part off it. Exposure triangle perimeter metering, exposure, compensation. If more air points the court aspects, we got it right. Now let's move towards the composition aspects. Now, when it comes to composition, I'm trying to follow the rule of thirds. So if you divide the entire frame into three by three grid and if you look at the placement off the jumping black buck, so I have placed it more at the intersection of the points on the right up most corner. So the three by three grid. So as for the rule of thirds back in this case as giving me a better viewing impact than placing it to the lower portion or to the left. So here, if you see it's a classic composition which shows the grassland below and then top. So how high the black? Because jump, you're able to see it in this case. So that's about the composition. And then when it comes to the shooting technique, since I'm shooting with 800 millimeter on the one point for extension, so obviously like I can't do this handle. So I have a stable report. So in this case, I had a get sort report of fluid head. So that way the planning at is I was able to do so. Then the food will ever photographic post processing. So sometimes early morning, you have a lot off his. So you should understand about post processing to see how you can get back the details in the inmates. So I used the D hits option wherever I get fog mist haze in the image so that be his option can be used to remove that. So if you see like when you're trying to create an image. All the four pillars of photography comes into picture. So if you look at the next black book jumping, this is a tight friends. So this was a very challenging one because like, it is grand and I have to get the competition absolutely right off course. I did not get it right the first time. Because when I'm following it, sometimes the leg used to get chopped off. Or sometimes the friend Lex used to get chopped off. Or sometimes the jump was not right. So that is where, like, I had to shoot it in continuous more country nous burst more so that way. Like I got one frame which had previously list which I wanted so composition wise, I was able to get that out of focusing point. The auto focusing points water explain for the previous. That works very well here. Off course. One small point over here. It since I was using one bx mark two along with the 800 the 1.4 can water. Not all the auto focusing points get enable. So you need to steady your camera, understand your camera equipment as to what kind of auto focusing points are available in your camera based on what lens you're using or if you're using any accessories. And if you look at the third image, this was another different challenging inmates because in the 1st 2 cases, the black book was running parallel to the frame. So for me to plan and get it, it was very easy. But in this image, if you see the black but is coming towards me now when the black book is running toe worse , you don't know where it Children how it'll jump now here, the auto focusing point again place a very, very important rule. So if you study all the three images, obviously, if you're to get crisp shop Image Action captured the rule of 34 to follow placement of the subject, which is again tied here. Auto focusing points comes into picture, so it's important to understand the different auto focusing points bid again. The group of the FAA, the expansion of the Zone F or the dynamic area or the auto F understand how each of this auto focusing point works. Look at the pre visualization look at the pre visualized image what you have and then correspondingly used those kind of auto focusing points, and you should be able to get your provisional estimates. So while a photography action photography, it takes a lot to get that one right, inmates and your knowledge subject knowledge, exposure at the fundamental aspects of photography. Shooting technique, post processing. As you can see, all these four pillars come together to get you that one single wall shot so good straight out. Get these things right the next time you're in the field.
53. High-key and Low-key Images: beautiful. There are opportunities everywhere in wild. You just need to wait, watch and click. No, The next topic we want to discuss is about the high key and the low key image. Now this is very creativity comes into picture more than the creativity. If I have to say it's basically the challenge off metering challenge off lighting, understanding, lighting, understanding, meeting. This is extremely important when it comes to the whole concept. Off hike images and Loki images. What is a key image now, if you look at this particular example, so how exposed for the subject. What it means is if you look at the original image, so if you go with an exposure compensation off zero in evaluating meeting more and then let the camera handled export here you will see that the means subject comes dark because the camera exposes for the background, which is the sky or the overcast sky. Or, for that matter, it could be just the bright light in the bag drop. So if the subject is sitting in shade and then the backdrop is very bright, then the camera explosives for the backdrop because that's the major portion off your image and the main subject comes dark now. To get the current exposure for this kind of situation, you will have overexposed by two stops in evaluative metering. More are matrix metering, all for that matter, segment from Italy. Now, if you look at this example after overexposing the staggered image, you can see all the bright, nice details of the tiger. But the background is heavily overexposed. No issues this because the camera cannot handle the dynamic range off board the foreground as Phyllis the background. So using this what he called the drawback off the camera. So we create this hike images. So where the main subject is properly late, properly exposed, then the background is really over. Exposed to It's like the product photographic with the widescreen in the backdrop. So in, while also you can do product photography off your subjects. So this is what we call us a hike, a subject or a hiking image. The opposite off. This is the Loki now, in case off a low key. What happens? It's the exact opposite now in the high key makes, The background was bright white. Now, in Loki, it's the opposite. The Bagram is dark. OK, so it's the shadow area. Now. The concept of shooting low key image is using sparkling situation. Now, when the subject is walking on, the subject is stationary. Subject is in bright spotlight, and in the bag drop is shadow area. So in that situation, what the camera does if you go with exposure compensation off zero and then what will happen is your main subject will be heavily overexposed. And then it'll basically exposed for the background, which is again drunk. Now, here in this situation again, evaluated metrics are segment metering. So in this situation, what he had to do so you love under expose by two stops so used exposure compensation under exposed by two stops and then exposed for the subject. And in this situation, if you see the Baghran goes completely dark. So this is a low key image up again, if you see both off, these are extreme opposites, but more creative when it comes to photography. And this is something which you can get out of the box. But that said, 100% out of the box, getting a proper hiking. Loki is a little difficult because, but it gets a rating. Religious grilling is so getting this out of the camera 100% is a little difficult that this where post processing comes into picture. So even if you look at this the before and after, so there is a slight variation with the proper post processing off the inmates, you need to get the details or the contrast other things and produce the bad blond highlights. You had to basically violence it. So this is the concept off High Key and Loki, which is more off a creative area for a few photography and with challenges your technical knowledge on metering and light.
54. Compose Extreme Close-up Subjects: in wildlife photography become across a lot of situations where sometimes the subject comes very close to us. Now it respect you off the kindof lens. What we're carrying it could be an 800 millimeter 605 104 100 off, for that matter. 7304 100. Once of this extended family, you consider any lens what, you have respiratory off the lens. Now this is more about how far or how close to subject comes. Let's talk about those situations where the subject is extremely close to us and we're not able to get a good composition when it comes to trying to cover the interest. Subject your entire animal. That's absolutely fine again. This is where we break the rules where we don't have to show the entire subject extreme. Close up shots. Have a look at the spot. India. So I was shooting with my 800 millimeter. Or rather, it was the 400 were limited with the two ex con water, so I was extremely close up and there was no way I can get the complete spotted here. So here, in this image, if you see I waited for the sported dear to bring itself like then the extreme close up And then the very important thing is to get the catch light the eye contact. So this with a nice green background extreme close up, I was able to get it basically like trying to print It's back. This is a good one, which I like. So this way you can chop off the edges. You can chop off the parts off your subject. As you said, no need to show the entire image. Let's look at the next one. This was photographed at Masai Mara Zebra again. This is an 800 millimeter which is a 400 millimeter into two ex con water here I wanted to capture the pact owns patterns off the zebra. Now, when you're painted, capture this extreme close ups, even you can think off situations as toe. Very confused. This image is very confused. This photographs so you can start creating patterns off the an animal. So the mammals 40 photograph just the skin packed an extreme close up. So this is the syriza started and this is zebra extreme. Close up the patterns. Absolutely brilliant. Let's look at the next one. Now, in this situation, that Tiger was sitting very close to us. So it was a little bit down the devastating again with the 800 millimeter, I was just able to shoot the body parts off. The tiger cannot get the whole tiger in the frame, but that's okay. So here, as you can see, I waited for the tiger. Of course, the other thing is that Tiger was not even looking at the Tigris facing on the other side. So how do you make creative images with the tiger? Is not even looking at you here? As you can see, what I have done is an extreme close up and just the great portion of the year have included. Now. It's not easy to notice this sport. Let's what we called the headlights on the Year of the Tiger the white patch. It's not commonly seen because sometimes the years are flat and doubt. So here the tiger was a little alert with the years of extreme close just composed only part off the tiger here. And this is the kind of composition what I was able to make. And then, during my recent visit to Borneo in Indonesia. So I came across the orangutans. So here again, Oregon tons like we get toe, shoot them at extreme closer prints again, I went creative. Just show the body parts. So here in this situation, if you see I tried to capture just the hands just the lex So close up off that again trying to create the pattern. Show the various like pattern off the legs or the hind, for that matter. Vertical horizontal composition Go complete. Extreme closer. And then even now in Africa, When they came across this cheetah and ah, the cheetahs like cub, they were close up again. 800 millimeter. We were able to go very close. A rather like we're sitting with driving with shooting. Both of them were playing with each other came close and the sacked right next year Vehicle here again I waited for the correct I conduct because one of the things well photographing cheetahs have noticed the eyes are not properly seen. So sometimes because of the light you get the black patch, that's all. So getting a good eye contact is very important and in this extreme close up composed it in such a way that I'm able to get the eye contact off both the mother and the cup again. A very tight crop, but absolutely fantastic for me and then moving on to the elephants. Now, the other problem with elephants is they being so huge, massive. And if you're going around with the lens like 800 millimeter, what do you do? There is no way you can capture the entire elephant, especially when they tend to come when they tend to come very close to you. In this case again, I just started shooting body parts so that tests I tried to capture the whole elephant in different way horizontal close up off the dust. And then since it was feeding the vertical, that tusk and the trunk itself so that I was able to capture. And then at one point, I was having a good eye contact with the Tusker and just the headshot headshot, including the task and then the next part what I did. So this waas in a Corvette, this particular image, where the behavioral aspect of the elephant, if you try to understand, so when they're trying to feed on the class, what they do is they kick the grass with the leg and then once the grass is losing the it takes it drunk and just like capture simply just catches the grass with its trunk and then it feeds. So here, if you see, I got that close up extreme close up off just the trunk and then holding the grass and pulling it out. And then again, similar kind, often image off the trunk and then both horizontal and vertical. So if you see, this is a different kind of competitions you can make when you're very close to an elephant , no way can get the complete elephant within 800 millimeters. And finally, one of my personal favorites, Tiger, if you get so close to the tiger and again, 800 millimeters. So this is where if you see a majority off this images are made at 800 millimeter on. I get a lot off this question saying like you do why left photograph you mammal photograph you with 800 millimeter? Is it not to longer for Clinton? Only thing like what do you do if you get your animals extreme? Close up? This is what I don't look at this. This is one of my favorite images were just captured the tractor off the tiger, The skin. If you see the stripes with the bag runoff, the Lloyds skin. Beautiful. So this is so break the rules off composition. You don't have to show the entire subject and other things like a wide describing part off the subject. I mean, just the leg gets topped off. Not a good competition. Extreme close up going Just the body parts left right back the tail. This the fall. I mean, there are different kind of body parts What we can capture in there cooperative. And you're extremely close of your subject. So the next time you're quite close to the subject or if you're having a long focal length and you're not capturing the Inter subject, don't worry. Do not stop shooting, go extreme close, and then shoot the body parts and get this extreme close up images
55. Getting to the Eye Level: no. When it comes to composition one off the very important aspects is to always straight to shoot at eye level now when they're doing bird photography. And if you look shooting birds in sure what our bodies, what we tend to do is like with a title like completely flat on the ground, I level and then we shoot. But how do you do this in case off left photography? So obviously, like in the safaris, there is no beacon. Get down and sleep on the road and try to shoot. I level. It's not permitted. It's against the rules, so we're not able. We cannot do that. So but still, how do you get high level below eye level shots? But if you look at the kind of sect of water for me Gypsies, when I go on my safaris, so we tend to get the center seat removed. So once we get the center seat removed, we can go completely low on the floor, off the gypsy and at a very low angle. We can shoot now. This is red again. Understanding the animal behavior last but comes into picture. If you look at this particular photograph, off conquer T. I mean, this was one of the most favorite famous tigress off Bondo Tiger reserve. So if you see one off the I like she lost one of the in the battle and with a single a she raised her cups toe care and lived for the very long time. Okay, so this tigress, if you see walking on the road and the behavioral aspect off Conquer T was actually never used to leave the door. If he starts walking on the road head on, she just continues to walk. Now that that's where the prediction pre visualization comes into picture. So we saw her approaching walking on the road. And then we took the vehicle little far and published in the vehicle so that, like, at eye level, below the eye level from a long silence. So this particular image was photographed using the 400 millimeter F 2.8 lens. So when she's coming close for the 400 close is obviously the zoomed in motion so horizontal vertical were able to take and then completely out of focus background beautifully. Majors in the gypsy. This is our shoot. Now, if you look at the other image off this jackal from happening? Not really Take it is up so inaugural in company. There is no way we have gypsies, so the vehicles over there is totally different and there's no way we can go below eye level those shots, it's impossible. So here the technique what I used it's like with noticed this particular jackal walking on the road again. The same principle applies here generally the jackals, the wild dogs, tiger, leopard, many off this mammals when they're walking under abroad and if there is no disturbing distraction, they will not leave the road. They will just continue to walk on the road. So in this case, what happened like the Jackal was walking on the road and we noticed So what we wanted to do is get a high level below island. So we drove further, and at one point that road basically went up and then a little bit it went down like this. So what we did is we took a vehicle and the down portion so deviated at the lower portion off the road and we knew the Jackal is gonna come. And of course I had Mother works of participants along with me, and it told them, could keep focused at that. But particular down the Jackal is going to appear appeared over there. Get your settings, competition. Everything right, Take some sample shots is to have you want to compose. So the Jackal is gonna walk at that point. How do you want to place it? Depending on what? For? Collect your using horizontal vertical composition. Keep it ready. So everything really deviated. And as expected, the Jackal walked in. So this was during the monsoon time and beautiful greenery, the green grass and the green background we have. And once the Jackal came, it looked at us. We got a shot and then we continued. So these are the kind of high level shorts, but they can shoot. And a similar technique was used in cabinet again for this Mongols. So again, it was a little down, so we were at the top angle. But then, if you look at the road over the reconsidered, the rudest actually going down the point with the mongoose is standing again with 800 millimeter lens. I was easily able to get blurred out of focus background. So If you see these other kind off images what you're to make now, we're ever certain places very can actually track. You can walk in the park, which is allowed so in those situations, if you see here, this is how we should We completely lay flat on the ground and we make some amazing images . Another example. If you see all the a level below a level shot, even the difference if I have to show you what kindof impacted tests on the image. Now here's a wild as the shot IQ world as what does rap act little runoff catch? So this particular image, if you see like it was standing and shooting and then, like you get the background itself at the bag drop not a big impact. So we're able to go low and shoot. And in this case, if you see an out of focus blurred background, the A static well, it's actually stands out beautifully in this particular composition. So that is how we tend to shoot and finally image off the jackal. A pair of jackals eating the sported year killed at can attack a reservation, photographed a couple of years back here again it Waas center. See? It was removed at one point of tomatoes permitted. We were able to sit completely low and then try to get this 11 shot. So there goes a shooting. Technique is absolutely important to get while kind of a composition in your images. And some of the shooting techniques for eye level below a level is comes with pre visualization prediction. What may happen, your vehicle set up and then finally understanding about your subject and getting things ready. So there you go. So these are the waste. I try to shoot eye level or below 11 images in wildlife.
56. Eye Contact and Head Turn: as a part of your composition. If you want to get life in your image, then one of the very important aspects is to get eye contact off your subject. What exactly is that eye contact? If you look at this particular tiger image, it is looking a little down. So you're not able to see the ice off the tiger properly. That is what we call us and eye contact. We're asking this image the same tiger sitting in the same position with a little bit off head turn. If you see, you can see the Castlight, the glowing. I mean, this brings up so much life into your image. This is what we call as a catch light and getting a proper eye contact with your subject. Now, if you look at some of the other examples, this is a hippopotamus which I photographed in Tanzania and because of the angle of the sunlight on the hippo, even though I was shooting at eye level, there is not much life the war factor, that in practice missing because if you look at the area, it looks like this one dark patch. So there's no Castlight. The globe is totally missing in this image. Now here's another one where the dragon is looking to us. The site. Even though I can still see the eye off the tiger that eye contact for me It's missing because I don't see the catch late again. That expression off the subject, the expression of the tiger comes alive with the Castlight. We're just getting this thing in this image now. The same previous tiger looking at us, it's like here in this case, if you say this 50 50 we're, ah, 100% eye contact. It's not there, but still you can see the yellowish part off the I still for me personally, it doesn't work, and the next one here is totally out. Now, as beginners in photography or people like If you have got into why left photography? This is an important part to remember. If you're subject the sitting of the title is sitting, do not simply just keep clicking the image. Get die contact. So here, in fact, the tiger, if you see, has closed its I. So if not a good one now the other part, when it comes to your subject walking towards you, let's take the stage ahead on for example, you hear that tiger is walking towards us and you can actually see the eye. It's clearly visible. We have very good eye contact Where us like when the tiger want a little bit further and I continue to shoot here. If you see again, it's a little bit blinking. It has closed it. I closed its I not a great one. So the eye contact is missing in this particular image the habitat composition, exposure, white balance every single parameter off the concepts. The fundamentals of photography in this case is fine. But I contact this missing and the tiger continued to walk further again here. If you see, we have excellent eye contact. So this is the whole concept off getting a good eye contact again. The next step, the tiger takes forward. No. So if you see the the tiger don't photographic works. Is the tiger is walking towards you like right had gone into the camera. It continues to work. It looks likely for some time. Then it looks done. Walks looks up, continues to walk, looks done walks. So if you see the sequence of the state of images what I just showed. So that is what is happening. So understanding the subject behavior also is quite important. Now the next one. If you see the barras sing us, there's no eye. Contact this head turn where it is not looking into the camera. But still, this is a beautiful image the composition, the lighting and the symmetry. If you look at the way they had turned both of them being alert. Looking back, this is still a good composition for me now the next one. Here we have a fox in Indian folks photographed actor, the greater enough touch beautiful like eye contact. I can see the glitter the cats like in the eye, whereas the next one it looked a little bit towards me. Because of the side lighting, you have got shadow on the face again. It's not a great image. And finally, the spotted deer, a common subject which we shoot here again. There is absolutely zero Castlight. Even there is not much brightly falling on the spotter dear, and if you see it's close, it's like a black patch doesn't look. So next time we're out in the fleet, especially like a close up or report it. Also, if you're trying to shoot, always make sure to get a good cat slate. Good, Hector. And finally, the combination off. This is what we call us a getting a good eye contact. So this brings out life in your inmates and this is an important part. You have to remember for your way let photography.
57. When to Zoom In/Out: that's a part of your equipment. If you're carrying a zoom lens doing every left photography, the big question is comes days like, When do you zoom in and when you zoom out? So basically, like at what point do you decide you want to go up for a close up portrait of the subject are create the storytelling in majors what we call us showing with the habitat showing the environment. Let us look at some of these examples, which will help you understand when you can zoom in when you consume order. When you shoot, zoom in and when you should zoom out to get a habitat shot. Now this is a rhino photographed in cars running up in this case, like I have zoomed in close up. But if you see it's not even a portrait off the right now, the background greenery is seen. For me, the image still doesn't stand out. It's in between. I'm I mean, this particular mission personally for me doesn't work because it's not able to convey to me the story conveyed to me the location. It's just a little bit close up off the rain up, whereas the next image if you see off Buddhists rhinos feeding. I mean like the vertical gives you nice depth off the background, conveys the location, the habitat. And then, if you see the layers off the place where it is feeding just the flat grasslands behind that is the elephant grass, green color and then behind that is the street like the branches spreading across very nice creativity in this image. So for me personally, these other storytelling images which shows the habitat, convinced the location and overall artistic view the latest represented I allowed this. So this is really if you see the difference between a close up off this Raynaud and then assumed or question, I prefer the zoomed out washing. So this is where the importance off a zoom lens comes into picture. Another one that you see here again, the rhino close up with the minus around them. This is again neither a complete close up nor zoomed a question, but because of the way the rhinos position here. Still, up to some extent, this image works were asked this other rhino image. If you see it's a little zoomed up from the same location. If you see the same minus over there but showing more of the habitat. One of the forest behind the Reynaud again. This for me gives more pleasing effect compared to the previous one. So this is so array at the storytelling in major. So this is a array going to zoom in. Zoom out. Now look at this classic image from Bondo, Gauteng Rizzo, where if you look at the size of the tiger, it's a small speck, quite small in the frame but showing the inter habitat. Sometimes what happens even you might have a long turbulence. So even if you have a long turbulence, chances are in case if the taggert is like far away from you, then it's a probability. Very good. Still shoot a landscape image of the tiger showing the habitat as it has been shown over here in this case. Now hear this particular image. If you see was photographed using a 72 100 millimeter lens, that's one of the best lenses when it comes to getting your subjects in the habitat. So this is again a zoomed a question. I love it. So moving further again here, we can look at this. Three different images of the tiger. Now this close up If you see this shows very nice clothes A portrait off the tiger eye contact We have the Castlight, the look of the tiger with the years up alert Congress a nice story. It's good. But then this image cannot convict you Where the Tigris look it and where is it at this point off time. Whereas the next image if you see here, it's in between. So you are able to make out a little bit that yes, the tiger is somewhere sitting in the cave with the boat rocks you concede top down the opening. So you know the Tigris sitting in the cave. Whereas this 30 minute if you see more zoomed abortion, it shows you the enter habitat The tiger in this cave looking over whatever comes in front offered in the street to the side. So it shows his house, the location, the habitat. So this is where sometimes even a zoomed in Russian works very well zoomed out Washing also works very well, So this is the major advantage off a zoom lens. The next image, if you see, is basically like showing the habitat off the sport or deer and then you can make out that minor is sitting on top of the head. So the zoom out washing if you see like showing a little bit of the forest but in practice , missing form in this image. So the impact is missing and hope we can get that back. The zoomed in washing If you see here close up which shows the behavioral aspect off how the minus basically interact with the spotter, dear. A lot of times what happens is this minus come sits on the sport idea and starts feeding on insects on itself. So this close a portrait. Nice catch late eye contact with the spotter dear and at the same time, even the minor as well the common mine up. So this is again a zoomed in version which works very well. And the next one another classic example showing the Hain up. So here the high now made a fresh kill off the wildebeest right in front of us. I mean, they hunted in the back, brought it down it waas the Hart building like it waas not so great image for us because the right in front ofus we saw the wild beast going down and here, since it was feeding on a fresh the close of the blood. If you see this is still a close up close up off the hind of feeding on the daily beast, you can see the red face. But in this, if you see that, even I can see the other hina, the rate state part off another hand that you can see. But if you look at this image where I again completely zoomed in with an eight millimeter lens, the previous one lost more from a 400 millimeter lens. This zoomed in at 800 millimeter. You can see a complete close of portrait. I mean, the fresh blood, the Castlight, early morning golden light. This portrait close up is much better compared to the previous one. So if you look at all this various sequences of images basis rate As a photographer, you need to take a call when you need to do a zoom in and when you need to do a zoom out. Of course, if you have a fixed focal length, very not able to zoom in zoom mode, that is with other creativity comes in to see how we can compose with the given limitations off the lens Now, even sometimes, like if it is a fixed focal length. Still, you can do a zoom in. Zoom out where, of course, not the lens, but you. So if you're shooting from a gypsy like this, then you can go close. But then you can tell your person the driver of the naturalist guide with you to say Go back a little. I need more space so the zoom in zoom out physically can do. If you have a fixed lens, are the best option for me is to carry always a zoom lens so that in the field you can choose the habitat or the close up. So that's a call us a photograph or have to take as to when you want to zoom in and when you want to zoom out
58. Bad Compositions: we have seen a lot of images. We were talking about how to make good images beat with respect to the background wheat with respect to the rule of thirds placement of the subject off, for that matter, the head turn eye contact. Zoom in, zoom out. So we're seeing a lot off. These kind of images were have shared the tips, how to become a better photographer, how to get better in majors. These concepts let us look at some of the images as to like this is like what I call ah, bad composition. I mean, obviously important enough. There's nothing called It's good or bad or but these set off images, which doesn't work for me. And let's look at these images to find out why doesn't work the very 1st 1 I'm like getting a scene like this is quite trade. Where we have seen here. We waited for a long time in Taraba, and then we saw a leper walking across with the small baby monkey that America love for the longer baby and was carrying it obviously in action. I shot. We started shooting, but if you look at this particular scene and this is the only angle. What? We got the leopard walking across with the killing the mouth. But then if you see there is some kind of out of focus three branch in French, which it looks like a fallen tree out of focus, not good. The left secretary. If you see that it's again and out of focus blurred one takes over the attention. I mean, like the way a composition has the workers like when you view the image you I have to get that attention. The image rather needs to get the attention from you were definitely Look at the main off get the main action means main point of fuel it with actions happening. But in this case, like if you see when you tried to view the leper carrying the baby even keep your first vision that I breaded Lee goes into the out of focus branch doesn't work. So this is where this particular image doesn't work for me. Let us look at the next one the swamp deer here in Kaziranga So here again beautiful image The background is good delighting the composition of starting on the composition, the lighting, the white violence, exposure the technical aspects of photography. Everything has worked very well. But from a competition point of view, the world factor is missing. Simple reason. Look at the legs chopped off the legs. So sometimes, like when you're doing handle photography, these things happen were like you look at the main subject, the Baghran, and attracted Click and some of the lower portion of the legs. It gets chopped off point number on. The second point is there's no eye contact. Okay, so I contact catch lettuce, clearly missing in this image. This image you want a beautiful background, a nice bouquet. Mitch doesn't work for me for these aspects. The next one I mean, like this was shot with a fixed talents and obviously I could not zoom out. But these are some of the common mistakes what we do as beginnings in photography, where you see like the eye contact with the tiger is good. The state the look, everything is fine. But the back said, if you see out chopped off the field so cutting body parts like this part off, it is not good even down. If you see left to dump the hind leg. If you see again. That is a little chopped off. Not good. So these are the composition things we should watch for, even in the next tiger image. If you see the tiger standing and staring at us, I played a vertical competition again. Handle. So this is the issue with handles, photography where you will not get or you may not get good proper composition. Because when I was doing Candle, I was looking at the State House using the center or two focusing point and because of the center or the focusing point and the center or two focusing point on the face of the tiger eye of the Tiger, of course, that this radio focusing point has to be. But with this combination, if you see the back side of the tiger, it is chopped off, cutting the it just lifting the parts of the body touch the frame off year composition. It's not good, it doesn't work. And then here also in this case, like from a competition point of view, Tiger being placed at the center of the free. I mean bad grown is not a while background. You need that good complementary background to enhance your image again. Competition for me personally, This doesn't work. Placement at the centre than the left city. See a part of the tree and the Bagram. If you see what we call us, a very, very busy background doesn't work. And finally, what is distraction in the major? Keep talking about distractions and limits. Look at this. So we have Amal Abad James acquittal here. But then they create too many branches, especially the one writing friend Top. If you see it hits your eye. The out of focus branches generally doesn't work in most scenarios, like when you're trying to show even with the habitat with the environment. So if all the elements in that are completely in sharp focus, so you have a larger depth of field, everything in sharp focus that becomes part of the habitat and they're in those situations , it may work well, but in this particular case, it clearly doesn't work for me because of the distractions off the out of focus branch right on top. So this is where as a photographer, you need to judge what is good, what is back from a competition point off you, and look at this next set off images off the wild dog. So this is some of the common scenarios become across where big wild ox sported here. Sometimes, like you get them nice. But then the bad drop will not be complimenting. And sometimes the backdrop bushes or the plants are. If you look at this particular habitat currently like big summer, everything is totally right. So again, that affected the complementary good. Bagram you don't get so here. If you see the greens, the grease in the backdrop is the party. Um, yeah. So it's extremely close to the wild ox even hear the whalers interacting, yawning That is sleeping But the bag road doesn't compliment Well, because the backdrop is very close to these well, dogs. And then the world factor is lost. It doesn't work. And then the final one here If you see the next one, if you see here against water, Dear competition wise exposure wise, I got it right. But then look at the lower portion. This is again a common mistake. What we do where if the subject is a little bit in shadow and then foreground, there's more brighter, like when you include the combination of the break area along with the shadow area. The dynamic range doesn't work in the camera and you end up with these kind of images where the effective is lost. Okay, And then finally another one off the somebody here. This clearly doesn't work for me. Simple reason. Let's say if you see the out of focus tree, it blocks my ambition and they look at the image identity. Do not look at the somebody here. I look at this. Bark off the tree, which is an out of focus, just doesn't work. So if you look at each off this various images, what I presented, this is what they call is a bad composition. Nothing to do with your exposure. Nothing to do with the white violence or the meeting focusing point? Not many, but of course, certain points. Certain places, depending on are focusing points you used. The composition gets chopped up, so you have to be careful with that. But otherwise, composition, distractions, background. These are the things which your toe watch for and see how you can avoid certain times you simply can't avoid. Let go of the images as it said. So doctors work, so get these aspects right in your competition and see how you can improve your images.
59. The Art of B&W Photography: while a photography and black and white images. Now, when when do you think the black and white image works well now again, black and white photography itself is a totally different art of photography again, nothing to do with just why, like any Johndroe photograph, if you take black and white in itself, is an art. And, of course, the most important artistic point off a black and white photograph is your hold on post processing. Because the end result off a black and white image. It's motor with post processing rather than the court technical skills. Of course, I expect you to get the proper exposure right in the first place because the white balance all of this aspect doesn't work because that comes in force processing. When you play around with the grayscale, let's look at this particular image. Majority of the times the black and white works very well for clothes. A portrait are showing the habitat. So these are the two images, which works very well, and one of my personal favorite image off black and white, is off the lions. So here in Masai Mara, if you see the two lands working head on So this is where when I started sometimes like the whole concept of black and white photography is, you need toe pre visual s the image as black and white in the field itself. When I'm composing an image, look at it. Look at the habit at the bag drone and also what focal and amusing. And then I take it to set in the free. This in black and white will work very well and iterated Campos and get that output. So here again with the lion walking had done with another line in the French. So I focus on the back line and the pre visualized image for me was to get just one part off the lane in South focus. Or rather, just to show one night. Not sure both dice. So this black and white has worked very well. And this is the typical images where we show the close up portrait. So when I said close up extreme, close up just a part of the body you show. So this land extreme close up works very well for me now the other can of black and white images which works well with elephants, elephants and then a little bit off open sky. If you see you can try to create a nice high contrast inmates. It works very well. Now black and wait. One of the best places or one of the best scenario situations to shoot black and white is when there's good playoff light and shadow. So if you look at this particular image, photograph that Corbett where the two elephants are fighting, so there's dust in the scene. Then there's shadow, the nearest later the backdrop. So if you see all this religious combination off light, shadow dust creates a magical black and white images again, Issa said. Like believe it light So side lighting. Black and white photographic close up. It was very well handing hand. Look at this head on. Walking off the elephant, the Tasker from Corbett Tiger result. So with the side lighting again, I converted it into black and white or rather pre visualized this as a black and white image in the field. Beautiful composition. I love this, and the next next one is the orangutan from Borneo again. Here, the interaction, if you see in the free, even a solid. This was a pure like high key image where the backdrop was bright light, and then the Angleton and the baby was sitting in the shadow area and a previously list this to be a hike image. But I wanted to show the interaction off food or Angleton's, and I got the image of what I wanted and finally, the other one. If you see it's more of the giraffes, so giraffes, zebras, so these are some natural, beautiful, like black and white images you can make. So this is again the high key image were both the giraffe's walking together and with the occasional tree at the bag drop and then the open sky. So again, here, if you see like, it's not a closer portrait, a little bit showing the environment and then more off the sky. If you see those creates like magical images, then my other kind of image, when it comes to creating black and white, is to again play with light and shadow. Were this nice lady just on the subject and then high contrast black darkness on the subject. So this beautiful image of the mill guy walking towards us like it was walking up it turned and started walking towards us was shot in Bharatpur National Park and the natural arc around it, if you see because of the part where it was walking, has created beautiful image in the black and white with the early morning fog has worked very well and another image from butter Pulitzer flick with the early morning fog and then the trees in the backdrop, um, in the water splashing. So it's a little bit off a sellout image, but the playoff light shadow and then the fog has made wonders in this particular image. So this is how you decide in the field, whether you want to use that particularly amazed and make it as a black and white liquor. And sometimes, yes, it does happen like you look at the emails like during post processing, and then you take a call. Let me see how this looks in black and white, but a lot of times you need to do this planning in the field decide. This is my black and white image. Get the competition execution and get it right in the field rather than later trying to say I want to process this as a black and white. So black and white itself is a different art of photography. Get a good hold and post processing and, of course, the competition aspect.
60. The Concept of Rim Lighting: playing with light or rather playing with back lighting. It's one of my favorite situations because that can help you create some really awesome images. Now we know that like the back lighting is generally used for creating salat imagers late in the evening, during sunset or early in the morning during sunrise, but then late in the evening or early morning after the sunrise. So just before sunset you have the light which is coming slanting the slanting angle, and that is a fantastic lighting to create what we call us the relating effect. Now the relating effect can be very useful where every house subject we just for around it . Now look at these images where the sported deer have antlers, the velvet endless. What we call this is a classic example to create some wonderful awesome backlighting with the relating effect. Now, one of the important aspects to get the relating right is the angle of shooting. So generally what happens when you're driving and going and you see the back lighting at one particular angle. You will actually make out the stream lighting. You don't even have to look through the camera, your naked eye itself the glow around the subject you'll easily able use easily. You'll be able to see it that this one year to stop, of course, from a technical aspect, if I have to convey about what kind of exposure we need to shoot if you're in evaluating metering more or metrics or segment metering more, a little bit off under exposure is what you have to do. So if you look at this particular spot, a deal with the antlers. So in evaluating metering, Modi under exposed it at one to third stop. So vertical composition again backlighting beautiful and my one personal prayer it off this to sported years. It's not one but double bonus for me with a crossed each other, and this was more of a pre vigil estimates because one was treating and other walking it. So I knew like at some point they won't across each other, and they kept me composition ready with the proper camera settings for exposure when the cross, like I composed and was able to get it like to antlers with the backlighting. And then they're emulating absolutely beautiful image and in fact, relating works very well in case in case off Long Goose. So Longo's are actually classic example for relating effect. And of course, you in the bonus McCall's. And this is again another favorite personal off mine, which a shot in Bharatpur where this one monkey was walking and I prepared my shot everything ready to shoot. And at the same time, this other baby monkey just came into the frame and completed the free. Sassa conceded. All this image is the meme lighting effect with a combination off backlighting and just be slanting can give you some really magical imagers with with proper technique and with proper lighting conditions. So next time, early morning late evening you come across this kind of subjects, be ready pretty vigilance and plan your relating effect images.
61. Making Creative Images - 1: as a way left photographer. It is not necessary that you need to have a frame feeling subject showing the complete subject in your friend. Sometimes what happens given the situation giving the light given the lighting, given the equipment, what you're having and a lot of these parameters comes into picture so you can go beyond the bone. Please think outside the box and see how we can make some creative images. Let's look at some of these examples and see, like, what was the thought process? The story behind making these images. Now, the 1st 1 if you see this was photographed at Bundy poor. You're returning back from a late evening safari and the girl was standing and staring at us extremely low light. This was outside the park. It was late evening 6:40 p.m. And then I was using the 400 millimeter lens, so I had an extreme close up. So what I did, it's like I under exposed it a little bit. And even though using a white balance of 6000 Kelvin gave me more of the bluish cast because if you look at the x exposure triangle perimeters, I also 6400 at F 2.8, giving the shutter speed of one by 30th 1st 2nd you can imagine how low the late Waas. So here it's a sellout image with the blue is kind of a background because off the white balance, being 6000 Kelvin and still not getting the warm tone and a still halt and a close up is what I call us, the creative image, not showing the full body, not showing the details. The next one. If we move on, this is the close up, off a static line shouted Good National Park, now here in this situation like I was using it 800 millimeter lens and there was a lot of grass plates in front off the lion. So what I did is I position the vehicle in such a way that I just focused only on the head off the lion. So here, because of the single auto focusing point and the single auto focusing point on the eye off the lions sleeping line. So and also because of 800 millimeter and the shallow depth of field, if you see the grass blades in friend off the lion is totally blurred out because of the shallow depth of field, because off which I was able to create this image just showing the face and most importantly, where life photography we need to have eye contact so you should be able to clearly see the eye off your subject again. A classic example. Close a portrait need not be framed feeling, but then penetrate through the glass plates. Focusing point is extremely important. Now let's move on to the next image off the wildebeest photographed in Masai Mara. Very important for creating these kind off. Awesome in majors with beautiful colors, especially for sunrise and sunset. Make it a point to keep the white violence at 10,000 Kelvin. So if your camera supports a manual white balance, keep it a 10,000 kelvin. Otherwise still like you can keep it. Act shared. And then I expect your toe photograph shooting draw mode because off the power what it has capable, it is what it has in terms off post processing. So in post processing, you can pull the white balance all the way. 10,000 kelvin or even beyond to get this beautiful warm colors and another very important quick tip when it comes to getting correct colors in your photograph. Well, if you look at this particular image, if I process this in a ruby camera or as it is, so this is the color. What you get is a little dull, not representing the true colors. What I actually saw order in the way in the wild. But whereas the same image. If I process it in the canon DPP, the Canon digital photo professional see the kind of place where to get. So as a photographer, you need to even understand about post post processing which image you have a process in which sort rate. So there is no fixed formula that everything has to be processed in one single image. So here the colors and that's in the colors off 10,000 Kelvin and getting the trade colors using the appropriate software is quite important and, of course, from a composition point off you. Placing all this will be based at a little bit lower, enjoying more off the sky with the beautiful colors. So that's my creative shot in the wild beasts in Masai Mara and then moving on my other favorite image from Khanna National Park or can attack the results. So here again, the subject is not frame feeling. It's more off the creativity but including the habitat showing the salt grease in the backdrop. Apart from that, the early morning sundress coming through and the icing on the cake is the balancing are decorated. So from a behavioral aspect we know this bar a single they correct themselves, sometimes to like please the female. So here it's done. And then I had this small gap off grass, and between that is where these to borrow singles were standing on the position. The vehicle used a wider perspective off the 7200 millimeter lens showing the habitat and the sun rays, and I created this image of course year. I had to wait for a longer duration so that I get proper like hitter and I contact off the subject. So even though if you see the female is looking to one side and the male is looking towards the camera, still, it's a good head turn from both the perspective. Moving on now. If you look at this image, the orangutan from Borneo. So here this is what we call us a hiking image. Now. In this situation, the orangutan and the baby were in shadow area, and then the backdrop was extremely bright. So, obviously, to get the high key media works over exposed the image by at least two stops. If you're shooting an evil way to meeting more or matrix metering or multi segment. So he had my intention was to CAT should the overall of interaction between the baby and the mother, the emotion, what is being shown here? So that is what I wanted to capture. And if you see like, even though surrounding is totally overexposed blown out, I'm still able to get attention focused on the interaction between the mother and the baby . So this is what we call us and Nike image, and this is where you break the rules of photography. It's not necessary that everything has to be properly exposed in the image. Again, creativity comes into picture by over exposing the image moving on again, a classic example that we don't have to show the complete subject in your friend. So this is the elephant feeding from the column in corporate. Gregory's up. In this case, I was photographing with the 400 millimeter F 2.8 lens. Sorry. There you go. So this is 800 millimeter lens. So since it wasn't 800 millimeter lens and elephant extreme close up. So I waited for the right moment to make sure, like whatever it takes the grass and feats. Okay, including the tusk and then the behavioral aspect off the elephant. If you understand. So what? The elephants they do they do is like the kick the grass. So they kick the crash to get the grass out, and then they hold it in the trunk and in the feet so that if you see I've been able to capture with the indifferent Lex, it's little bank and then it is feeding. So here, as you can see, the faces not seen years and not seen the ice or not seen So break the rules off competition go creating, but still convey the behavioral aspect. Create your images, the storytelling images and the next one is a classic image from random Bored one of my personal favorites here. If you see this image breaks all the rules off competition, bigger is not in sharp focus the sported years in front is not in sharp focus. It's just the center glass plate is in sharp focus, but this is a classic storytelling image where you can see the spotted deer. It's alert the years out of its alert, and the tiger is just continuing its own businesses. My *** one business walking. But then the stool sports ideas are in the shadow area a little bit still out again, blurred out of focus. But if you look at the feel of the image it can is generally what happens in the forest. Sometimes, like Tiger, to bind their own business. They're not in the mood to hunt, but then the spot ideas are always alert. Keep an eye under Tiger, where it it's moving and the playoff light and shadow and then the blurred out of focus image. If you see for me one of my personal favorites from random, Ortega is up
62. Making Creative Images - 2: if you move one here again, it's a common subject, the sport idea. But for me personally, the enhancement in the image of all effective in the image is the inclusion of the greens generally like when I go to shoot in the monsoons. So I look for this kind of images, look for the common subjects but include the out of focus greens are on the subject and then the wild factor. If you see this image again the greens that enhance the image and then even the quoting off the sport Idiot, the browns. If you see again, that is high contrast. It looks beautiful. So monsoon images, inclusion of the green is another kind of creative American work on it. So moving on again if you see here with respect to this black books, from well over there now this is again a classic example for me were keep saying is the backdrop which makes or breaks the image from a composition point off you. Now again from a composition point off you. If we look at the black box. So a common mistake, a lot of beginners they do is like they used the center out of focusing point and place the subject at the horizontal center of the frame. A lot of times that doesn't work because you include a lot off foreground or below the image. A lot of space is included. Not good. So in this guest, if you see the line off black books, I just brought a little bit below, showing Mawr off the shrubs, trees in the bag, drop in the mist and then a little bit off the Skype again, A beautiful image. Early morning, misty image from the Levada again, one of my personal favorites from Ron Timber from well ordered The Black Book Century. And the next one is more off a fun in major what we generally do. So this is the concept off zoom bust. So when you come across common subjects, or even I have done this on cheetahs and elephants as well, the concept of zoom burst is like used a very low shutter speed. So in this case it is 1/10 of a second. So use a very low shutter speed and you're shooting. Technique has to be really good where you don't make any kind of movement. Of course, Tripod is always the best scenario. But in wildlife, when you're doing a safari all the time carrying a tripod, it's not possible. So handle shooting technique has to be really good in this case, what I did. It's like slow shutter speed of 1/10 office. It can and will, continuously shooting in burst, more zoomed in and zoomed up. So when you're zooming in and zooming out a wider perspective, the zoom burst effect is got. So again, it's not necessary that you will get this in every single image. So if you try to understand how this works, the timing has to be really good. Where the sector opens and by the time it closest zoom should have happened. So that has to coincide, and that is very shooting burst more to get this kind of an impact, then moving on. So this is again a classic example of what we call as the use of negative space. Now these are defense from a Samar up and again, a classic signature image. What we call where we include this occasion, a tree and then the elephants. Now, if you look at the size of the elephants, they're tiny they're very small. And then the oral cloud formation and the bag drop again Use off white balance and a little bit off contrasts, you see, has created the magic for me here. So including so much off the empty space is what we call us, the negative space. So this is again hope. He used negatives place in the image by keeping the subject extremely small. And generally what we do is we keep the subject one corner off the frame or one lower portion of the frame. So the whole negative space, the openness is seen so that this worked the concept of negative space have used for this particular photograph. Then moving gone off again, a classic monsoon image from company naturally take results where the Tigris moving away and there's a lot off Langton up. So here, if you see in this particular amazed the Tigris not facing us. It's moving away and completely immersed in this lantern up. So here, if you see like, I waited to get one single auto focusing point on the tiger to get it in sharp focus on. Then, at one point, like I waited for the tail to go I mean, like, of course, I didn't know that the tale is gonna go up. It was just a coincidence, but like I was always looking through the viewfinder and ready for indicated creative shot . So composition wise again, Little bit of the left lower portion showing more off the greens in the background. So rest everything is blurred. Auto focus. But just the tiger is seen. So this is another kind of creative image. And then when it comes to safari vehicles, including the safari vehicles in your composition, So a lot of times, like become oppresses come across this situation. We have been in tiger safaris or like even a defense, it could be any kind of safaris as a part off tourism. The vehicles are there in the bag drop. So sometimes we always play to avoid the vehicles not necessary. If you look at this image again, using the negative space and also from a composition point off you, I did not include the complete occasional treat. So just a part off it and then on top, the branches coming out and the elephants at the lower portion and then the safari vehicle where person in fact, I think it's photographing. It's a photograph or vehicle. So including that in the compulsion. If you see a classic example which Congress tourism so this image can be used for any kind off tourism related promotions. So again, using the negative space. And finally one off my personal favorite where I get the title s manicure. So this is the hand off a bonnet. Maycock. It's a mecca. It's not a longer it's a mecca. Look. And here, since the macaw was extremely close to me and it was just carrying on with this natural behavior, I was with a cannon 800 millimeter lens extreme close up back this really I decided to just include a photograph, the body parts. So this was the situation where the maycock extended hand and roses clashing it like this. So on top, you can actually see other part off the hand. It's scratching its hand and since well scratching the other hand, it come down like this. So I decided to go extreme close and just constantly on the hand and then captured this. So if look at the nails very well trained, it looks nice. It looks like it has the kind of pretty effect. As you can see, this various list off images, what we went through. So there are no rules in photographic as a photograph for you should know going to follow the rules when to break the rules. And none of this images show the full subject frame feeling or the complete body part. So if you look at the various images we went through breaking the rule of competition and then breaking the rule of exposure and then breaking the rule of sharpness bloody made, still making creative images and then showing only part off the animal body parts Cut it. It's OK, zoom in and show. So this is how you think out of the box, Go beyond the boundaries, break the rules but still get into the creative art off nature photography
63. Subject Placement: let us look at the next aspect off composition, which is subject placement. If you look at the particular sported here, which is feeding on the weeds in the water here now, how do we decide what kind of competition works? Well, the rule of ter clearly states that you can be read here and there frame into three by three grid. So once you divide the inter frame into three by three grid the placement points or more off those intersection off these grades. So that is what we call as the placement point or the point. Now look, let's look at the different ways. Hold beginners. They composed image and water. The issues with that. And how do we improve on this competition Now, if you look at this party, dear feeding in the water here so as you can see the different kind of competition, that's a beginner. One of the mistake. What we do this We use the center or two focusing point now by using the same grotto focusing point. What will happen is your composition will get compromised. So with the central toe focusing point, your competition will become something like this. So as you see here. This is not a great competition with the spotted here being placed right at the center. So the background is not seen Well, the foreground lot off wastage of space in the foreground. So with the spotted it at the center, the war factor in the image is missing. So let's look at the placement off the spotted here. Where do we need to place it now? The rule of thirds says give more space in friend of the subject in the direction it is looking at walking act that is the rule of thirds. So in that case, so here what I need to do is move the sported dear more to the left side of the frame. So from a composition point off you, this is nice. So with moving the subject to the left as you can see, more off the bagged road backdrop got included. So by including the backdrop, you see some courts over there streaming of goods going over there. But still for me personally, the left side, lower portion off the frame. If you see there's a lot of wasted of space, so a better competition again asked the rule of thirties instead of keeping it at the horizontal center on the left. So what we need to do is let's bring it down a little. So if you keep the subject here, okay, and make sure you don't miss on the reflection. There we go. So this with a little bit off reflection, it's a beautiful competition on. And look at this to complement it. We have another sported here coming in. There you go. So this competition click, click, click, click, click. This is what you need to do now when both off this part ideas are coming together. Okay, so this competition most placing the friend, the more placing this is moving. Now again, the lighting on the left side, if you see, is a little compromise. Practice the odd. That's the shot that is your shot. Now the complex city increases with multiple sport ideas in the frame. The whole complexity increases because competition you need to get it right, with light on both off them properly lit. That's where the waiting game comes into picture. You need to spend time with your subject, so composition for me, if you see not at the horizontal center so the little bit off reflection off booed the sport. Ideas are being seen over here, so this is a very good competition for me, where most based on top of the subject, lower said Not too much of space. So you need to avoid the horizontal center. So this it's a waiting game toe. Make sure we get the correct lighting on both off them at the same time. So competition this works for me followed the rule of thirds placement of the subject. Take your time in the field toe. Think very want to place the subject. This is a beautiful composition, showing both the sport ideas together, the mail with the enclose, the well read antlers and then the female on the left and then a little bit off habitat in the bag drop. So this is how you need toe work on your competition placement, which is a very, very important aspect, and it comes to competition. Good luck with that
64. Distractions in your Composition: distractions. This is the number one reason why a lot of photographs They don't look good here. If I look at this particular scenario, I'm trying to shoot this pelican. But if you see here, there are a lot of distractions around it. So the pelican is good. It's on the bun. But in front offered the branches. It's not looking good. So then on the right side, if I move, have another pelican here which is in the water. So it has a nice complimented background. So it's reading over there. Nice. Then they move more to the left. There we go. So let's get this back and focus. Beautiful again. So here again, if you see this pelican walking towards us, let's get static. Beautiful. Okay, again. Here. Some action happening now again. This is a beautiful scene. So we have a nice complimentary background here. So this board the pelicans moving together. So if we just follow this pelican now, this is a nice scene. Oh, yes, it comes in the open. This is your friend. So these are your frames if you check this out. So pelican in water with a nice complimentary background. So compared to this. So these are your shots where you see the behavioral aspect and then you can start shooting , dipping in the water. All these actions, you can see both off them going around together. So these are your shots. We need Taubate. So the bad grown is one of the most important next. Now, if you see this is not a great one, these images not very great because of the distracting background what we have. So here, as you can see, background, is one of the most important aspects. When it comes to composition, it's always the background which makes or breaks your image. So I asked resource here, you need to wait for the right moment to make sure you have a complementary background. So don't stop looking at the subject. You need to go beyond the subject. Look at the background, check the background, make sure the Baghlan enhances your means subject and then compose and shoot. That's so important. The backgrounders. So next time we're in the field, don't just stop looking at the subject. Get the subject the background. And here again, if you see the pelican is now on the mound, this is absolutely fantastic background what we have. So even from a composition point off your placement of the subject, if you see it's looking out to the right. So I need to move more to the right. So this is the composition. But on the right said we see again, there are distractions. Probably not a great one on. It's going to fly beauty. So there you go. Flying and flying is one lined over there. So these are your shorts again. There regards Lance se joints, the other set off pelicans over here. Super So it's all and anticipation and more pelicans landing. So let me get ready for the landing shots Now there again, going to be. So while you're composing, basically, these are all the various aspects you need to keep in mind the background being one of the most important things. So let me continue shooting this Millikan. So next time in the field keep this important points in mind to always stay the background . Our distractions get a very nice complimentary background. Good luck with that
65. Shooting around Water Bodies: This is beautiful. Now, one of the main things. What you had to do when it comes to working on your subject. And if there is water reflection, you have to take into account. Now this is beautiful. Great gated. So there always remember whenever did this water any subject close to that? So if you look at this particular scene, let me just show the scene here. There you go. So if you look at this scene here way, we have a sported dear and then this reflection. So even on top, another sported dear. And then again, the reflection is coming in. So always remember So this is something which you have to keep in mind. Let's get this composition right If you look at this scenario over here, So the spotted deer, it is drinking water and in the reflection, beautiful. So this couple off more sport ideas on top. But the main thing which you always have to keep in mind when you're photographing near water especially like if tiger comes to drink water, keep this in might take a walking on the bun and this water below. So wherever there s water work on the concept off getting that reflection. Right? So in this scenario now, if I just had to take a few photographs Beautiful. Now it been strong toe. Take the drink, The water, I get it. Then since the subject is cooperated from a composition point off you, I tried to take both horizontal as well as vertical images. So if you look at the overall reflection or sometimes you may want to stand and shoot so over from a shooting angle, going to law also probably will not work. You may have to stand and shoot, so those scenarios also comes into picture. There you go. Fantastic. So always remember when you're composing in image if this water always aim for the reflection
66. Shooting Angle while on Foot: the next important decision in, well, a photography or your angle of shooting if you see. So I have a spotted deer right in front of me and I'm shooting from the appear. And if you look at the angle, it's like top down approach. The impact on the image is not that great. So this is normally hope a lot of beginners. They shoot wherever the standing, even in the gypsy. Anyway, they just start shooting like this. So this angle doesn't work because you're shooting top down. The background is the ground itself, and the quality will not be that great. The wall impact in the image will be missing so quickly what we had to do. Now I need to get down to the high level off the spotted here so quickly, Lester. So in these things, if you see, you have to be really, really fast. So this is with the kind off report what we'll be using that also comes into picture to go to be fast in making sure you radios the height off the diaper and then still, I need to go flak. Still, I need to go low, keep an eye on the sported. Here it is still there, losing the locks off this avery with the lock and then mix up. Very good. So I tried to get a tripod, which is totally flat. There is no support here. What? They did this moving. No problem. So there you go now, like report. Lexar. Totally flat. I'm going to lift this. Go down. So follow me. So here you go. So if you see me now, I'm totally flat. The let's start totally flat. And now from this angle, of course, you need to change your angle on the left and right to get a good view, if it And now with this suspect. If, well, look at this. Beautiful. So when you go completely low at eye level, so obviously the kind of image what I can get is absolutely breathtaking. Because here in this situation, what happens if you see is that there's no distraction at the back. So the sport idea stands oak. So since you're at eye level sometimes probably even below eye level. So obviously you have the sported a standing above the horizon for you and it pops out so beautiful colors, tonality, lighting and it's dating. I mean, who said, Well, it photography's easy, so you really need to work hard to get these kind of images. So while the spotter Davis walking away, minding its own business. So let me show you some other examples about the difference in impact when it comes to shooting at eye level below the eye level. In these examples, if you see about the impact off the image of the world factor and the inmates because off changing the angle. So here ihsaa the a shot equate as photographed in the little runoff catch. So here, if you see like when I'm standing and shooting, the shooting angle is top done. So since the shooting and stop down the impact, this lost because it's the ground what you see in the background. So the impact is not great. But at the same time when I went completely flat on the ground at eye level, or this actually is below the level. If you see here, the impact is totally different because you have a non distracting background. It's open, beautiful, clear. It really stands out. So even in this case, if you look at the Black Book again, just the hunt's coming out off the grass. So this again I went at eye level, went down, shorted some creating image, and he wants some of the other black book images. If you see here all short at eye level so that there's no destruction of the background and it really pops out now, how do you do this kind of high level photography when it comes to Vegas? Now, a lot of situations to get the tiger walking head down on the road now in your gypsy when you're shooting from the seat like you're sitting regularly generally are sitting on the seat and then shooting again. The shooting angles stop done. So in my case, what I do for my serious photography. So there are a lot off parks in India where you can remove the center seat off the gypsy, so I get the seat remote so I go completely flat. I can go completely love on the floor off the gypsy, and then from there I shoot. So because off this difference in height of areas, sitting on the seat and shooting, getting rid of the seat and going completely low on the floor of the gypsy and then shooting. If you see there's a huge difference. So these images of the traitors working I don't If you see this has been shot with this technique off, going low in the gypsy and shooting at eye level and because of using the tongue long talents. So the impact is different where you get that I level below a level short with a non distracting background. Of course, I get a lot off queries. If I actually got down from the gypsy laying low on the groaning photograph the stables. Obviously, that is not something which you're permitted to do. And obviously, with the tiger walking in front off you, you don't want to get donate. Shoot on the ground. Okay, so these are the techniques. So when it comes to shooting angle, keep these things in mind. So it's just not about the shooting angle off, moving left or right to get the right angle with a non distracting over the complementary background. It is also over going upend off so horizontal and vertical movement to get the right angle of shot. Keep this in mind the next time you see your tiger walking head down or, for that matter, even Tiger making a kill. What? It could be a simple sported here as you. So what I photographed keep this important things in mind about the angle of shooting.
67. Head Turn and Eye Contact: the next important aspect off wildlife photograph when it comes to composition, is getting a good hitter and eye contact. Now, here, if you see this particular sported here, I know if we are doing a lot of examples in this tutorial, only relate related to sported here. Because at this place, currently, that is what we're getting. And that is still okay. You're trying to convey the concepts here using the subjects were getting the subjects, at least. Okay, So if you see the spotted deer over here now, what is this meaning off getting a good eye contact and a hater. Now, let's keep watching the spotted deer find it is just laying down over there. Let's get it down a little bit in composition. Now, see if the exporter delist looking towards the camera here. This is a good head. Done. Let me just just this a little. Okay? This should do. Let's roll it again. So now the sported there is just looking at this year. I'm talking. Probably. Now see, it starts to move Now Here. This is not a great hitter. Now there is shadow. No. Now the other thing, when it comes to your head Turness at a particular angle. You will actually be able to see the cats late in the I. That is the eye contact. So now the sport idiot keeps moving. And, of course, if I just moved a little further, if I found the camera to the left, there's also the fund over there at the lower portion. Now, if you look at the form, the head done is quite good. It is looking the entire light. The front lighting is on the face, or there you go, so it just bends down. Now, if you keep looking at certain angle, it's not a great position. See, now. Now it's looking away from the camera, so this is not good. This is good. You see those multiple movements. So whenever the subject had starts to move, there we go. So this is nice. It's looking at the camera. Click, click, click, click, Click This area remainders continue to click. This is still good. The head turn. The eye contact is pretty good in this image, so it's quite cooperated. So those kind of situations where it looks away from the camera, that's not a great one. So the common mistake. Which again? A lot of photographs as we do. Yes. We just continue to keep clicking like the spray and Pray article. So it's there. The subject. Click, click, click, click, click. You just continue to shoot it that it's not a good practice. So you need to wait. Keep looking through the viewfinder. So in this point, I get out off my live. You keep looking at it. In fact, if I just take a shot off the spotted deer Now, this is OK. The behavior nice. So let me just continued to shoot. Now the isis close. No, this is not good. This okay? Now you see the cash right over there? No, There is no guys late. No, this guy Slater. So I'm just shooting continuously to show you what does eye contact What is not in contact ? Getting the catch Light the shadows in now. This is not good again. The ears shadow was on its face. The lighting. You need to really work on the lighting. This is good again. You can see the guy slate now. I don't see the cats light. There you go. I mean, like, you keep monitoring your subject. Keep looking at your subject. The header it's keeps keeps happening, so the angle of the hitter that, combined with the reflection of the light in the I will give you the catch late. That combination has to go hand in hand, so wildlife photography You need to constantly stay focused on your subject. So these small, small movements is what is going to get you the correct image you want. The next time, stay glued to the viewfinder through the viewfinder. Keep looking at the movement, which is happening. Get the correct hitter and then the eye contact. Now let's look at some of these images. The examples where there is no eye contact, no good eye contact, no cats light or a bad head. Tough. So if you look at this combination off images, each image like where I had conveyed which one is good and for what reason, it is good. And then which one is bad? And for what? President, despite or rather more than the world bad, which doesn't work if you see the combination, its overall proper good competition to get the war factor in your image, the head turn Castlight is one of the very important aspects off well, a photography
68. Using AF Points: I have subjects over here. Now, if you look at this particular spotted deer, let me just look at it through my viewfinder. Okay? So because of the long turbulence, I just have one single spotted here. Now, when it comes to placement off the subject, generally by default, we use the center auto focusing point. Now the problem with using the center auto focusing point is chances are you always end up placing your subject at the center, off the frame I for just shoot this party, dear, using the central off a crossing point. This is how the competition is going to be very flight, not great. If I play back this image, I mean, like, if you look at the foreground below, it's where State of space. I mean, there's not much punch in the image. Not a great competition back is because we ended up using the center or two focusing point . Now the main important thing when it comes to composition is you need to know how to play around, move year or two focusing points. So none of the previous chapters on the technical aspect we saw the different kind of auto focusing points Now you need to find out in your camera based on the model, how we can move your auto focusing points to the left to the right top down, because the competition that is very important now in this situation, if I want to keep the spotted deer more to the right off, my friend. So what I do is I go into my auto focusing points and then moved out of focusing point more to the to the right. So I used the right most auto focusing point that one more over there and then composite. So in this situation, because off moving more to the right, I managed to get both the mother and the fourth in similar posts. So any composure subjects you need to move your auto focusing point. Of course, this is extremely important, and Newt and you need to be really fuss. You need to find out in your camera, which is that option to move your auto focusing point. So in case off ai servo, it becomes even more challenging because you cannot focus, lock and recompose the way you can do it in one shot. So understand how to move the auto focusing point around placement of the subject. Top dumb left, right wherever we want to do. Very important. Find out which option is available to move out of focusing points. Learn. Understand that, and even in your sleep, you should be able to know where the button is to move the auto focusing point. So that is how important understanding and moving the auto focusing points are in your camera to get a good composition.
69. Playing with Light: photography is all about playing with light. In fact, photographing itself means painting with light. Now for your way left photography. It is very important to understand the different kind off slating which is available now for out those we have, Ah, mainly four different kind of flighting conditions. Frank lighting side lighting backlighting and then the diffuse lighting. So, for example, if you currently look at me, the sun is definitely falling on me. So my entire body is lit. So this is frank lighting Now, if you're shooting from here and then if the light is coming from the same So this is the angle your I'm being shot, the light coming from the side, just one part of the body will have sunlight. The other part will not have. Suddenly there's going to be shadow on this. So a playoff late and shadow is what you get inside lighting and then the turkey. Enough lighting. It's backlighting. So where generally the still house are even they're emulating. Effect any off this kindof images if you want to make the back letting you have to use and then the food kind off lighting is the diffuse lighting were There is absolutely no sunlight, typically monsoon. Once the rain stops, the cloud clears. You have bright, ambient light everywhere, but no influence off. Dad. It's unlike So these are the four different kind off lighting conditions. What you have. Of course, you are the other kind of lighting conditions, which is the harsh lighting condition. But they're also you can be creative. Now if you look at this various kind off lighting conditions, what we have, let's take one at a time. The 1st 1 which is friendly now in frankly, since the entire body is properly, this kind of flighting is extremely useful to get close up. Portrait off your subject to show all the details in your subject. So if you look at some of these images, which are all frankly, you can see there is absolutely no shadow at all in this thing. So this is where you will have to wait and get the front lighting. Now the other thing, which you have to keep in mind when it comes to friend lighting is even a slate done may get shadow on your subject that you have a wide that. So all the greatest example what I showed you were for Frank Lighting. Now the other one is given the situation you need toe. Keep looking at your overall environment, looking at the habitat. So sometimes you have a subject which is friendly, and if you're able, you fear it's possible you move ahead and pick a side lit off it. I would even go around to take a backlit off it, of course, as long as the subject is cooperating now in case offside lighting. As I said, since one side off, the subject is lit and other set of shadow area. This is fantastic for any kind off creative shots. So obviously like if you look at this image where half of the elephant ist let other office dark shadow area, the playoff light and shadow creates a three dimensional effect. It's absolutely beautiful. Be creative, play with light. Then the third kind off lighting is the back lighting. Backlighting we all know is absolutely fantastic. Force allowed images. Apart from that, I mean some of this example of Salat. If you see you can play like anything, you can create magical images when it comes to settle out images. Apart from that even the relating effect. What we call, especially with Longo's any off the animal, which has for around it, so you can have creative lighting for that, the back lighting and then the concept off rim lighting. So you have to play with their exposure metering. All those challenges comes into picture. So that's the back lighting. And then my favorite kind of flighting is the diffuse lighting. So in diffuse lighting, it's ambient light everywhere. On with a good white balance in the range of 5400 Kelvin fighters and 800 kelvin, you get more natural colors of the subject. Okay, that said, since I'm talking about white balance, especially for sun breaks and sensitive images, take this sensitive shoot at 10,000 Kelvin. So the sun rays are sunset. If you photograph them, shoot at 10,000. Kelvin the Aural Hughes. What to get the orange or the red hues where to get it, get enhance so you get more warm tones in that beautiful colors you get. So that's a very important tip when it comes to photographing, backlit or for sunrise and sunset, another diffuse coming back to the diffuse lighting. So in diffuse lighting. Since there's right ambient light everywhere, there is no direct influence off sunlight, so there's no light. There's no shadow or any off those the subject and it's evenly lit. The enter subject is evenly lit in respect to your from which angle you should. So if you look at some of these images which have been photographed, in fact, during one soon the white bread colas it really stand sort. And as you say, this is one of my favorite lighting conditions. The fifth kind off lighting is basically in the heart slating generally what happens post a certain time once the sun goes up. So you start getting shadow on the face itself. So even with the islets, you get shadow below the eye. So where the eye contact dismissing the light even for titles, working had gone many off this kind of images. Basically, the shadow comes on the face and the wall factor in the images lost. So what do you do in case off harsh lighting situation? Directly vesting is toe await photographing it, or unless you can get creative to show the habitat and do something converted to black and white that is something which you can try it out. But generally Haas conditions directly. You take a look shadow coming in the war factor this lost. As you can see, you need to understand light. Leave it like so. Look at the environmental. Get the situation you decide you want before you approach the subject. Before you left the camera, you need to look at the direction off, son direction off light and then decide if it is friendly back. Cliffside late. What kindof lighting it as based on a river, the camera settings and go ahead and complexion image.
70. Equipment Care: let us. Now look at my complete workflow, right from how we were prepared for a particular safari. The various homework, what I do with respect equipment, camera settings. And of course, finally the equipment care during the safari and even after we come back from the suffering of the first point. So before I get into the safari like why? While I'm in my room, what I do is I make sure my camera batteries are fully charged in the CF card, whatever from the previous shoot water. How I make sure like the previous shoot, all the images were copied onto my laptop or hard disk. Excellent. This what I'm carrying? And then once that is done, I make sure I put it back. Format it very important to former idiocy of card, which means, like with your camera, everything is fresh to start again right from the scratch. Now, when it comes to your camera itself, I make sure you in the camera's settings, restated in the sense like I keep it. Toby s I S O offers a 400 in a poacher priorities what I shoot and then the lowest F number . So now M. Brady with the basic settings. Now, once this basic settings are done, then the main checklist as to water the radios things I need to carry for the safari. So how a step ical mental checklist right from master said, making sure your cameras are fully charged, then your lenses multiple instances for carrying all the lenses are with you the main important thing. The accessories said with me like I carry my beanbag, my planning board how multiple being backs what I carry. Then it could be even sunglasses hack then even say for that matter, my scarf like to protect myself from the dust. So all the small, small accessories, the complete checklist and make sure everything is ready and then they get onto the safari vehicle. Now the other thing will carry multiple equipment in a safari vehicle. If you look at this set up, this is the general typical gypsy in which you travel. So currently on I'm sitting alone. What generally happens is like a hammock Oh, passenger here and two people in the front. So totally four people and a lot of time I've seen people with the carry their camera backs . That's a very bad thing to look out If you look at me currently like even though they're not my course Poco passengers are not there. You and I alone like I mean, I m carrying way too many things in the vehicle, especially this volume bag workaholic. So once I m to the equipment, where am I going to keep this back? So what happens is we try to suffered in between the seat below the seat we try to do it. But then this reduces your flexibility during the shoot. If you have more or you cannot do it so important Tip is as much as possible. Get rid off your camera back. Do not carry it in the safari. Okay, so the camera But it goes away. I don't carry the camera back Now that is gone. Now how we basically organized my space within the vehicle when I'm carrying multiple vehicle And how my co passenger here, the way I travel is like especially the longest lands in this case. I have my 807 5.6 lanes. So this ghost were tickling doubt. So as you can see, here it goes, vertical it down This is my sitting position and the lens camera. Everything between my legs it goes, stop and I have the other 402.8 lens beside me. And in the 7200 lens beside me, of course, typically carry multiple bodies and travels. If you see now, this and test place is the former co passenger to sit, and he has his space here to keep this equipment. Of course, the combination, the viewing your travel has to be like If you're having multiple equipments the other personal size having multiple equipment, then you see if you can adjust yourself so that, like anybody traveling with just one set off equipment is beside you and then if he's having multiple equipment, let him go in the French a little bit off this adjustment you need to do now once all the set up is done. So obviously, like I have my beanbag, I place it, of course, during driving, don't keep the beanbag chance specifically for now within the vehicle, like how do we take care off the equipment, especially from the dust? What I generally do, or what I generally recommend, is the best option is you get lens coats so you get the dust. Cover rain cover for your equipment. By that, that is the best option. What is available or what it's possible now what if you do not have a rain cover or a dust cover? The next option is carrier includes, so it could be even a plainclothes. According one a towel. So carrier own stuff so that during the suffer you cover it now, in case fine, you forgot to get your own towel as a work around. What I generally do is very with the result. I mean so from the result a request for a double. Okay, so then if you see, I make sure like I cover the equipment. So while I'm driving, I covered the equipment, even the one I'm having vertically. So I carry multiple troubles. I cover it. So this is one of the options to make sure your protector equipment, especially mainly from the dust, which comes during the supporting. So let me take it off for now. Now, the other option for covering your equipment is in. Guess you're having a shower cap. So what I do is for the lengths within the friend. I put it. I cover it with a shower cap and also the camera body. So sometimes, like if you want to protect the camera body because like generally what happens that just goes in between the buttons, which is not good. Okay, so I cover again. This with a shower cap. As you can see, like a lot of these are makeshift. So on the fly you go up to a particular destination. You have to do with what best you can get now the other option, which also do ihsaa. You have the laundry back. So in a lot of results you have a laundry bag. Sometimes I look Canada laundry bag and then this is also sources a good way to, like put your lands inside, cover it and carried. So these are all workarounds. But you have to plan all these things and make sure during the safari you take your off your equipment by covering it with clothes. Dust cover mainly good, practically from dust. Fair enough Now, once we're done with the suffer, you're done with the shoot, all the various things you're done head back to the desert. So once you go back to the resort. What I again dough is I have a boat blower. So I think the blower and make sure blow the dust away on the lens. Main thing is obviously on the camera. So everywhere I use the blower to get rid off the dust. What is settled on the equipment Now, here's a very other important thing What I do and it comes to leading my camera. And again, this comes at the word of caution. Okay, so you need to check whether your camera is with the seat only if your cameras with a seal . What? What I'm about to show you. You can do that. So what I do is like once I go back, I just take the camera body, Put the lens cap in front, take the camera body into the bathroom. So into the washer. I take the camera and then Sprinkle water on the body. So what I do is basically a lot of excessive just between the buttons. So I need to clean that. So then I Sprinkle water on the camera body, take a baby toothbrush, and then between the buttons, I'm gonna basically clean the camera and I have a plane that have according clothes and immediately Trey off the body again. As I said, you can do what I'm showing you. You can do this only in case if your body is with the seat. OK, so I use the top of the line equipment like the Canon one DX when the x mark toe. And, uh, I do this all the time and I've been doing this for the last 6 to 7 years since the time I bought this body's so world. If you see, this is the kind of care what I take for my equipment, Rather I mean, beat cleaning it, carrying in the vehicle, carrying in the gypsy or whatever vehicle you have. Now, the other important thing, some of this high end. What is if you see the l series lenses, what have then even camera bodies like If you're traveling in the gypsy rough terrain, lot of jumping happens. Sometimes the cameras also jump. And some of this equipment, the high England says, basically are vibration free or water. How do I put it? Basically, even with all the shake, everything happening, So not much damage happens to this equipment that said Yes, I always make sure I carried cushioning separate, Beanbag said, to give it a little bit off protection from all the has shake and the jumping which happens in the vehicle. So that's pretty much about how do I manage my whole safari within the given space limitation, with my co passengers taking care of the equipment. And, of course, finally like once they go back, copping all the images to my laptop. So that way I'm again fresh for the next shoot. So it is very important to have this kind off a fixed discipline workflow. Maintain your equipment, Get into the safari, Go shoot, come back at the end of the day, what's important is you need to enjoy what you're doing and then carry on with your shooting.
71. Your Health During Safaris: We're talking a lot about equipment, about the technical aspects of photography, composition, ethical aspect. Ah, and what? Not about where the photography. So this particular tutorial is a little different. Let's talk something else. Let's talk about you now the first question overall when it comes to the health aspect, how fit are you when it comes to doing while the photography off course up there is this very simple and, ah, a small test which I tell all my participants to find out, like how fit they are. So the simpler test is like you have to sit completely like on the floor and we thought, any kind of support you should be able to just get up straight without any support. If you're able to do that, then yes, you're perfectly fit for wildlife photograph. Er you and perfectly fit when it comes to general health, as such makes moving on, like with the kind of equipment we carry around in the field. So you got to be a little careful with your health, especially with your back your neck Now, well, this is one of the things anywhere left. Photographer based, less attention toe. Now, when you're trying to lift the equipment, you got to be careful. These are all very heavy equipment. So a general standard when it comes to carrying the equipment lifting, don't directly just bend it, go down and then lift the equipment. That is very important. So main thing is, obviously you're back lower back and your neck practice with a lot of stress is basically put upon. So, for example, when you're shooting so the kind off position if you see so we go down, we tend to go down and shoot. So we keep shooting like this down. Obviously, at this point, lower back, there's a lot of stress. So these are small things which you have to be careful about in the field. So in my case, I take through very regular exercise yoga zone on the Syrian mascara. So to keep the oral flexibility off the body and make sure there are no muscle catch or some off this now the muscle Cats X actually takes me to the next point. Look at the habitat. It's extremely dry. So we're in the peak summer over here in India, in central India and one of the very important aspects and again very much neglected by a lot of wildlife photographers. This you need to stay hydrated. Very important. Now we tend to lose this attention because, like we're focusing on a wildlife on the subjects, and this is something which we miss especially like you're doing long safaris in some most or, for that matter, even full days safaris. What we do. So one of the things is we carry a lot off water and just a word of caution. Our carrying the plastic bottles. It's always nice to carry this kind of stainless steel bottle, so where can refill and take it into the park? So that's about staying hydrated to make sure you're regularly taking a good amount of fluids. Otherwise, like it has happened to me personally with, I tend to get much muscle spasm and then once the muscle catch happens like it's extremely painful, and it stays for a very long duration. So these are some of the things we share to keep in mind. The next aspect again, If you look at the most feared, the ambience, the environment, it's extremely dry, and it's going to be extremely dusty in the park so it's not good, especially when there are multiple Lakers going one behind the other. So make sure you carry some of this dust mask like so it's very easy to get them so extremely good protective taken breed well, I mean, you regularly get this dust months in a lot of stores, so this is something which I would highly recommend now the next. Expect again. When it comes to some us, it's hot air. So big heart air off this living and drying in the extreme party. Early money saving afternoons So you get to attend. You tend to get a lot of heart and directly into the eye, so that rice of the eye fluids and I and that leads to a lot off burning sensation and eye irritation so that this really I always comment to carry sunglasses. Even when you're driving even late evenings, it need not be for bright sunlight, mainly to avoid the direct hot air as well as like dust. So this is something which I generally carry always and apart from the sunglasses. Other thing is getting a hack. This is again very important from does and also with direct sunlight hitting your head. You got to be careful. So there you go. Make sure you're properly protected. Always like inviolate photography. It's important to take it off your health as well. So don't neglect apart from the wildlife baker off yourself, your health and enjoy your photography.
72. The Story of Tiger and Gaur: No. Here we have goals feeding, getting on with their work, carrying on with the natural behavior. So if you look at this, we're not deserving them, so they're not really attentive looking at the standing. That's not the case. This is what he could make some really wonderful images. So know the first thing that lose stated relating situation. Now this good lighting. Thats good lighting on this card, Erica. So let's try to see what kind of images we can make here now from a settings point off you . I'm currently using the 18 because since its cooperative quite close, I'm going to get some really close off Patrick Creating images were I don't have to get the entire got in free. So if you look at the car institution here, so the goddess feeding I can go down so certain parts off the court, I can just shoot. If it's thought so. Here's no. So this is one. We're just I can shoot just by Bush in, and also I can turn the little. And then the cattle egret ordered the behavioral aspect of the cattle egret. So, as you can see so I can shoot the cattle igra tests will. This is a good composition. I'm gonna come back to the guard. So once the subjects are cooperative, you could plan the friend kind of composition. It's just not with the long lines. Now I take a few shots, so let's try No, since the goddess Fuding like this Okay, notes got up. So I am just taking close up off just the since the year. A close up of that is what I'm going to shoot here and here. If you see now, the cattle egret will always be close to the place where dis feeding because what happens is when the guard is feeding the insects that come up and the cattle egret goes for that. So there you go. So we could make some really good images off the cattle egret as well. Here the interaction between the gold and the catalytic, those of the other images you can do. But in my case in 7800 it's difficult to get both off them in the frame. So those are the situation where you changed to a 402.8 72 100. Get with the habitat. She can think off creating multiple kind of images. Different compositions? No. So here I'm creating a different kind off limits. This is a good one. We're stood up the in the gold of the back waltzes and little active. It's alert leather that my lovey now the other kind of competition and trying to do here is just a close up off the for portion with Okay, so now that the girls are moving back, even really move, we have to change our position to make sure we have the right position. That right angle for shooting. So this is still good? No, the lighting is beautiful. That was a good one. The lighting just under I Those are the kind of shots you need to get any toe. Wait, keep looking at your subject and then from your composition actor. So the position of a vehicle to make sure we get the shots. And of course I'm just shooting with one single lens. But in reality, when you have cooperated some tips like this working compositions so carry multiple camera bodies. Multiple Ince's So 7200 and 2.8 lands for the habitat on the subject is a good. One 402.8. That close up portrait again. That's a good one. The 800 millimeter extreme. Close up where you just shoot parts of the subject. That's a good one. So this is how you need to work on your subject with respect to the combination. Now, let's look at the various Congress sittings what I was using. So if I go into my info to show the display off the camera so because of the low like feeding more here I was Okay. This attack that I believe Let's go there. Did you go here? We have the bigger looking at the car. So there goes behind us. The taker is stealing the gold. No, I'm trying to make some nice clothes images off this. So let me just show you the close up of the tiger through the camera. I need my beanbag now. So there we go to the banker, just staring at the car with. So if you have the data here, so obviously with the 800 millimeters group, it's a tight close up portrait. So let's take some shots. This is beautiful. The tiger is sitting down, able to get some hard ism to shorts off it. So the tiger is just sitting over there waiting for the guard, The gold out of the back, John Society, me on. Now the beggar is sticking its stain. So from a competition point off, you know, if I have to stay with the tiger, the six things I'm shooting, it s 1000. If I 10000.6 white balance of 6000 4 years ago, I did mention that it means on you need to be ready for this kind of situations. Since the tiger is just sitting there, it is going beyond again. So we need to be ready for this action shots physical. So the tape it is here. It's a miracle that that was out here. There you go. The take it is going to stock the cards now what kind of competition will have to do so we just read. So now I'm shooting with 100 2.8. So the competition is good. Now, the other kind of competitions. If the tiger moves school, so compose it in such a way that you get the baker and the car. So the day that is continuing to stop the cars, it's moving fast, so we have to be ready to move now.
73. Photographing Wild Dogs: here we have, Ah, back off wild dogs just relaxing lazing around on the rocks. So if you look at the situation not much happening there resting on top of the rock, it's a beautiful scene. So let's look at the various technical aspects as to how do we arrive at a good image? In this case, let's not with the white violence. So the white balance, if you see in this case, so it's the lightest, bright sunlight. So I will go with a white balance off around 5800 Kelvin. So that's the first part I sent you to 5800 Kelvin and I'm done with the white balance. Let's look at the exposure triangle parameters now when it comes to the exposure triangle parameters. Overall tonality, if you see, is medium. It's not very dark, it's not very bright. So when it comes to the exposure triangle perimeters, I am currently let's check the settings. See, I'm currently it and I also off 6 40 so I'm shooting in a butcher priority. More so in case of a poacher party more, I want to keep a poacher to the lowest F number possible So I go ahead. Keep the lowest f number possible. So which is F 5.6 for a combination of I s 06 40 and the lowest A pleasure of 5.6. So if they're focused, I'm getting a shutter speed off one by 1000 of a second. Pretty good. Since the lighting is good enough, we have a pretty decent exposure triangle perimeter. And what about the meeting? Now, if you look at the habitat overall, it's like medium, but it's not very dark. It is not very bright. So generally, like my kind of shooting is evaluated meeting more or the segment metering off the matrix metering. And for this situation, I will keep an exposure composition off zero. That is good enough. Now, if you look at the auto focusing point so in this situation I will go with single autofocus in point because overall habitat, if you see here, they're way too many rocks. Way too many distractions. So if you enable more or two focusing points chances, the camera will focus somewhere else and not on the wild dogs. So this is a classic example where one single order focusing point will work very well. Now, once we have all the technical aspect sick. If you look at the behavioral aspect, not much is happening. So I don't have to worry too much about changing it to a servo or all. The focus continues. What I have is good enough. Not Composition is the key aspect here. How do we make a walk? Image? Look at the equipment. What I'm having. I'm having a 400 millimeter lens that know how My 7200. And then finally, I have my 800 millimeter lens. Now, if you study the habitat, obviously there are multiple compositions what you can work on to start with, like I'm shooting with the 800 millimeter. So with the 800 millimeter, have what a beautiful Kloza put it off. It's sitting on the rock. So once I have back particular shot, then I want to move to enter the 400 Willie Maker off the 1,007,200 Weaker. Now, if you look at the habitat, a wider perspective will work quite well in this case. So showing the habitat, the rocks, the formation and then the tall trees. So this is where since the wild dogs are cooperated so we can go with both the horizontal as well as a vertical composition. Wild out is just sitting on the rock, sleeping on the rock rather on We change the position ality to get a different angle love. So there you go, looking into the camera. These are beautiful close up shots from the 800 millimeter now, since the world of the still cooperated generally like a travel with multiple bodies So in this case, let's quickly change the body. So I'm gonna take off the 800 millimeter and then let me quickly put the 400.8, Linds, I generally travel with multiple bodies and so attached to multiple answers was, in this case, life for the shoot. I just have one lens. So I just change the lens from my 800 millimeters performed at the 8000.8. So let's look at what kind of competition we can do. So again, I met I also 6 40 The same settings very go now with F 2.8. Let's see. There you go again. The wild dog looking into the frame. This is beautiful. So if you look at the competition off the radar. Let's try to get a good focus on the world down here. Okay, There you go. So this is the view what I'm getting from the 400 millimeter. Beautiful. So if you look at the patterns in the bag, drop so from the 100 millimeters just now, half off. What? The 800 millimeter waas. If you look at the composition with the world of sleeping and beautiful backdrop So if you see it's always the backdrop which makes or breaks the image and then if you ask me here now the well don't you still cooperate You? I play a working cholesterol, So this is very important in the field where you need to be fast enough. This is beautiful, especially the vertical. All priests at the bag drop. If you see vertical composition works quite well. Fantastic. So I included the rock. So it's a little common mistake. Let me immediately show you a common mistake. What a lot of photograph. Please do. So in this case, the always right to keep the auto focusing point at the center and with the center or two focusing point. Generally, this is the image what they get in this image. If you see this too much off rock, what I included, this is not good. This is not a good competition, and correct competition for me is a listed a little. Keep the world doctor the lower portion of the free, and then get more off the dock. Empty space that is beautiful now that we're done it with the 102.8 and the 800 millimeters . So let's quickly shift over to the 7200 and see what completion and can do. Okay, so now this is with the animal. Behavioral aspect also comes into picture where the world is not disturb. It's relaxing, it is sleeping, and I'm able to change my equipment and shoot for Let's look at this. So obviously now, with a 72 100 lynch water, have, let's try a different popular. And so if you're having a zoom lense, the best option is obviously to make sure. So if you're having 7200 or Karenga zoom Lins, the best option of the best thing to do is all the zoom in. Zoom out composed different images at different zoom lens, so Now with a 70 millimeter, I get a completely white prospective again. I'll show you the common mistake and then how it has to be fixed. Common mistake. What people do is keep the centre focusing point and shoot. This. This is not good. So proper elements of 17 men for me again is keep the world of sleeping on the rock at the lower portion of the frame and then show more off the trees in the bag. Rob, So you do it again. Well, there you go. This is a beautiful competition for me. Yeah, well, I keep the wild doctor, the lower portion showing the rock and then the whole place. Whatever the 200 millimeter, Let's see at 200 millimeters again, I'm trying to get a lot more support. Castle. There is no harm and moving it toe fake. Even though this is the 2.8 lens since zoomed in a 200 millimeter, it's better to get a larger depth of field more. Did it if it similar kind of competition, keeping it the lower free showing the habitat in the back. This is beautiful, seamless, straight vertical composition. Now, now in a vertical competition. What I'm doing is the three to the left off the frame, some including it. I don't want to cut it off little bit if I cut it off. If you see what happens, the world gets to the left of the cream. Not good. So it's okay to include a little bit off the tree. Which one's palate? The A frame vertical, Keeping the world doctor the lower portion Again. It's a beautiful image now. This is how you arrive at your composition. However, the inter settings off the camera and then go ahead. Experiment, experiment, experiment multiple focal in good and change. The different opulent composition is the key. Zoom in, zoom out. Horizontal, vertical, all the various angles, various competition. You have to try now if we just play back and see the various images, what I've been able to make from this cooperated Well, look here. So as you can see horizontal vertical zoom in, zoom out. This is how you need to work on your subject, work on the cooperative subject and make some awesome images
74. Photographing Five Pythons - 1: all right. So via come to know that there's a bite tongue basking in the sun here. So let's get to that and see, like what kind of composition? What kind of settings we need to have. What kind of inmates can we make out off it? So let's try to find it. So I also have my hatred of him here. Of course, when it comes to snakes, what I'm talking it will not disturb them because snakes they can't hear. So me talking is absolutely fine. Only thing is walking the vibration. That is something which would be careful about if you just watch the python. So I know how much? 800? Mm. As for Les mis 7200 both off it tohave. So let's delete first, so they should not fall. It's stable if you study the overall scene here. So the fight on is basking in the sun over there. So let me just get my settings everything right? Obviously, if I just show you through the lens over here. So with bite on ISS, There you go. So it's basking in the sun over there. This the by Tom. Now, if you stayed at the scene. So the head is on the left side outside. There. Now, hold will be composed, this particular scene. So I help multiple equipment. So I have my 800 mn 7200. So if have to compose, I have to decide what composition I need to make. Now the good fingers with the lens, like 7200 F 2.8. So I will have to work. The lighting direction is like this, so I move a little back. So if you see here, I have this hump. So I stand on it, I can see the python. So this is a good angle to shoot with. So let me see this competition. So, um, I 7200 and let's see the sitting bright latest if 2.8 lands. So since I need a little larger depth off leak and with the wide angle off this aware angle , obviously, really? Wait, what toe have 72 200. So at 70. Mm. So let me just zoom 70. Mm. So 70. A lot off coverage is coming. So even at F 2.8, I will get a pretty good depth of field. So let's take one sitting at a time. So Amit F two point it. I saw 1 60 So if I have pressed the shutter speed is like one by 3200 which is good. So let me take the poacher to F 5.6 at eso won 60. It's bright and sunny, so white balance. I'm going to keep it at 5800 Kelvin while it's moving. So at 7 p.m. And they shoot. So I'm just checking conditions. Okay, there you go. 17 million. They shoot. Of course, the bright Ah, mud over here to see it is getting overexposed. So what I'll do is I'll under expose it a little. So minus 2/3 stop or minus 0.7 should work well for this. So there you go, recompose. Now there are different way you can compose. The same is so generally as bigness. What we do, they just keep the pipeline at the centre and the shoot. So if you see this is the frame what you get But a better way to compose this is to keep the python. It'd lower level and show a little of the habitat of the back. Look at this image. So this is an image what I would prefer over the previous one. Because when you play back in the first image to lot off foreground, shown on the background habitat is not seen. Whereas the other one If I go the second image if I play it shows a little bit of foreground. And also it shows good amount off background. So coming back to the settings. So that is that 70. Mm. Now, let's try to get a little closer off this. So these women. So there you go. So this is at 70. Mm. What? How? No. At 17 moments, you see this away? The coverage. So let's try to zoom in a little and try to get a better composition. This this competition should work well. So this is Ah, a little close up off the python's. So by this time, if you see the head has gone down, so it's actually moving down, so the head has gone down, it's moving down. That is fine. So of course I'm no making this video. I'm talking. So in real life, of course, this is not happening. You have to concentrate on your subject and get the competition. The side on all these elements very fast. And you have to be very quick in the field. Of course we have this, Batic it so that we don't get close to the snake. So there you go. So this is with the 7200 and 2.8, and both at 70. Mm, under 200 MME. So what kind of composition we can make now? The other thing. So now that we have the situation, the other thing what we can do is how can you make some nice creative images if you have a long let's now the other very, very important tip when it comes to my left, photography is it is not necessary that you always have to show the index subject. Find you have a wire ambulance, villains like this, it despite and show the habitat. But how do you get more creative when it comes to competition? Now, that s where the 800 comes into picture. Or a 600 millimeter, 500 millimeter or with the converter. That's where it comes into picture. So let's look at what is it that we can do within 18 minutes, and we'll just keep my 7200 down here, Okay, so let's try to get the angle. So the light iss like this. So it's more off vacillating or sorry. It's more of frank lighting what we have. So have it on the white board. So if I see now, from an angle point of view, this is another thing which are to work on. So the report looks being short. So if I go like this, the angle water see is different. So let's try to see what it may just we can make with this. So again, the main things when it comes to the settings. So I'm not. I was a 205.6 white balance off 5800 Kelvin. I'm shooting in a poacher product mode so we can make some really creative images here a while. So its head that's actually come up. This is good. There you go. Great for the head. Well oh, well, that's the second bite on, actually. Ha! So the head of the first bite on his down What I've actually shooting now is the second pat on the head. What you see there? So let's go. Let's have a look at this. Bite on here. There you go. So the spite on is moving slowly. So that's the second bite on what you see over here. Moving slowly on the first bite on close buddies. I believe so. Now see, this is really need to wait. What kindof images you can make. So said these are good shots. Click, click, click, click tickets. What he should be doing because they're dis clean. And there you go, the head off. The other one is coming up. So they're saying hello to each other. Well, this is good. Well, there's 1/3 point on there. Wow, this is beautiful. Look at this. The third point on coming into the screen, All three of them saying hello to each other. These are good images. Let's try to take some of these images now.
75. Photographing Five Pythons - 2: so obviously now from in height, it's going low. This is really, really fast. Lock this set up. Extend the legs off the report, so you need to get a little height. So this is how you need to work. Okay? The hit oil off them have gone down, so let's look back. So with this itself, let's try to make some nice images now at the back. So this is really need to study as to what is happening in the scene. So the back you see, the whole layers like this coming together. So, through the Internet movie, see all four, all the heads together. Now this one is coming up. So with a little under exposure. Very good. The patterns one beside the other. This is beautiful. Now, of course, from a focusing point off you. Okay, Booth hits are up there. This is beautiful. Let's look at what is happening here so slowly. The heads are moving together. They're moving up. This is nice. Now, the other thing is I've been shooting horizontal. If you look at the competition, vertical actually will look good. So from 5.6, let me just move. If it to get a little larger depth off like so goto if it and the hits together. So this isn ice creative with all the patterns, so you need a larger depth of field. I goto f 11 f Levin and let's shoot this fantastic. So, as you saw as you saw, you will have to decide as to what kind of composition what kind off equipment you want to use. And then, apart from that, what kind of camera settings horizontal work, tickle? What kind of approach you need to shoot all these various things you have to decide. So here we have five tons together. Now, let us see how we can work on this scenario. If you look at the scene so they're more work ticklish. So I have a 72 100 lens have the eight millimeter lens. So with this, like obviously I want to make some nice close up shots off it. So now from a trip, what? Want off? If you see now, the height would have. It's not that much. So I need to get a little height. So if you see the word tickle, the height, the angle, what I'm trying to see so still the height off the tripod, the length is little less so. That's the first thing you need to work on on your angle. As like what kind of competition you want to do. What kind of angle? Leaning so immediately? What I'm going to do, I'm going get the trip for ups. So here, if you see no, we're actually able to see all the hits which I'll come up now. So 123 off them together. So now the in collection. So this is the one. This is beautiful. Get this interaction while the aggression coming up. So this other bite on this come up now? So we have multiple of this by tons here from them. So this aggression well, so it's aggression is being seen here. So these are the things which you need to capture in. Why life? So this kind of action moments wait for it? Yep. So there you go. So it's showing the aggressive behavior. So you need to be in burst mode and then keep shooting like like like like like we have to shoot what from a composition point off you. So I'm tryingto get both horizontal and vertical compositions. So the aggression There we go. This is a vertical shot. Immediately changed the angle. Go for the horizontal ones. There you go. So when the subject is cooperative, you need to think as to hope you want to compose the image. So now that we worked on the composition when it comes to camera sittings, so let's see what kind of settings we can take now. This is where your understanding about the depth off will comes into picture. Remember, for the depth of field, there are three important parameters. The opulent of the lens being used camera to the subject distance. And then finally, the aperture comes into picture so longer the focal length they have shall adopt a fleet. Further away the subject issue. Have large adapter field closer the subject. You have obviously shallow depth of field. And with the lowest F number against shallow depth of field, larger F number gives a large in the field Now with my people hits around. So if you see there are fight by tons here. Currently the three hits are unable to see foreheads. I'm able to see now. How do we capture all of them? in sharp focus. Now, this is where, since I'm using a large chocolate if I shoot at 5.6 So let me go vertical for this. So the hits over there. So at 5.6, if I shoot this and play back, as you can see, the back portion of the body is already out of focus. So from 5.6, I go up a 14. Same thing. I repeat, you need to get both of the hits together. Focus in between. So that's the other important tip. Don't focus on the head because at the center of the frame, here were tickled. Shoot. There you go. So here, if you see at 14 everything is in sharp focus. So this is how you need to work on the field competition angle of shooting to get the kind of image, what you want
76. Using Correct White Balance: How did we arrive At the correct white balance. Off course. When it comes to photography, there is nothing called us the right white balance. It all depends on what kind of mood you want to create in your scene. So currently, if you look at the scene off the spotted deer sitting here, let's write different white balance and see what kind of impact it has on the image. So what I'm currently going to do is change my white balance all the way to 2500 Kelvin. So Act 2500 Kelvin. If you see this is the kind of colors, what I'm getting so lower the white balance, you get more blues casting nearly miss. So obviously this is not a great one. So next what I'm going to do, I'm going to change the white violence and keep it to 5000 Kelvin. So, generally 5000 Kelvin. If you see at 5000 Kelvin, this is the kind of image what get? It's very flat. Nothing much happening. Extremely flat image is what you get. So here's the tape. Currently, if you look at the lighting, the sun is going down It's more off a sunset time with the spotted deer over there. So let's try to increase the white balance. So, General, for how does anything below 5000? Kelvin, you get more blues cast about 5000 Kelvin. You start getting more warm colors. So this saying what I want to do now increase the white violence 8000 Kelvin. So 8000 Kelvin. So, obviously, you have to be in manual white balance to adjust the Kelvin temperature. So at writer at the white balance off 8000 Kelvin. As you can see, it's more warm, so the colors are really popping. Good. Now the warm colors, the sense it Kalish er getting now from 8000 Kelvin. What I'm going to do now is go all the way to 10,000 Kelvin. So at 10,000 Kelvin, if you see the colors are absolutely beautiful. So if you look at this, this is at 10,000 Kelvin and then this is that fighters and Calvin and then the next one if you see this one, is that 2500 Kelvin. So, as you said, there's nothing called Esther, right? White violence. As a photographer, you need to decide what kind of white balance makes sense for your shooting and especially for sundress and said, the higher the white violence, you get more alloy sculler, warm colors, the golden light. You should be able to reflect that. So this is so I revert white violence for your photography, and as a photographer, you decide what's right for you.
77. Pre-visualising and Animal Behaviour: here is my previous list image. If you look at the scene behind me, so we have the road, then the early morning fog and then the trees, which forms a natural arc. Now, one of the privilege A list images for me is there sported ears on the other side and I know they're going to cross now. Even this is really the combination of your subject. Knowledge also comes into picture. Now, if the sported years are going to cross, there are multiple kind of images. What could make If you want to show a sense off moment, then you might have to go with a little, little less shutter speed where, when the cross chances are, if they're running cross, you get a little bit blurred motion. Okay, so but the whole background being static. So you just composed in such a way that the background everything is static. You don't move the camera with the spotted here. So here we are. Don't train toe pan the image So but still everything being static. And then the spotted deer running across the road with a little bit slow shutter speed. So you get a blurred motion so a sense of motion is basic elation late? It's running the other kind of images. You can freeze the whole action. No way. We're waiting for the sport idiot to come because, like I already see a few sported years on the right, said, If we pan so we see the whole park, the forests and the fog. So few spotted years from behind the tree. I can keep that. I can see them coming now, coming back to the main competition. So the pre visualized image, as I said, is now the spotted. This is going to come run across. So obviously from a competition, I'll be standing in the middle of the road. And then I want to keep the sport ideals at the lower portion of the free, more off the ark being displayed. So when you're waiting for the seam toe happen, the best thing is take a few sample shorts to check your competition, not even before we get to the competition. The first Inglis, you need to decide what kind of settings you need to help. So let's go one sitting at that time so that were ready with all the settings where the time or subject is in place. Of course, while I'm talking to you all, I want to make sure I don't miss my subjects. No. Still no moment. Okay, so let's look at each of the settings one at a time. The very first thing is white violence. So for this kind of early morning fork situation, we need to decide what kind of white balance we need tohave now for our doors, the lower the white violence a majority of the time always shooting manual white balance. But if your camera does not have manual white balance, no problem. The presets are they're the closest presets is what you need to choose, which I will convey. Given this scenario with the low light for autos, white balance below 5000. Kelvin, which means below your sunlight Daylight. So below that, if you shoot, you're going to get more bluish cast in the inmates. Now, that could be one of the nice images. So currently, let me keep my white balance. That's a are on 2500 Calvin, which will be close your tongue, stone. So let me just composed this image and show you so with the So let me just move to the middle of the road here. So because this is going to be my composition, look at this. So here totally blew it. So when we play back this image, so it's totally bluish in color. So this gives a totally different mood. Asphalt. Nothing wrong in this colors. But then that is a total. And find it Calvin, which is close to the Johnston. What they can shoot in the preset. If you don't have manual white balance, then what I do. I'm gonna move the white balance for all the way to the other extreme with this 10,000 Kelvin. So the closest you can get So if you don't have my Neil White balance, is the shade off reset now Act 10,000 Children. Let's see what we get. Look at this one more. Look at this. So this is more warm. And this Alltrista nice mood. So for the current scenario, with this lot of folks, I want to keep my white violence more towards the 10,000 Kelvin or does the shade. So that's the first batter McDevitt already set. Let's let's look at the exposure triangle perimeters so I say said, if the sporty dealers won't run and cross, so you have to decide whether you want to freeze that action A show in motion blur. So in this case, since the lightest law, you need toe work on the exposure triangle parameters, especially the air. So to get a good shutter speed. So let me say, if the sport today is going to run, I need to set us. We're off. See one big to 58 off a second to freeze the action. So that is what I want to inform. So in my shooting, more I'll be at a poacher priority more. So I'm going to move my camera into a bush a priority. And if you look at the overall scene and the equipment what I'm using, I'm using a 72 100 millimeters f 2.8 lens. So for just came at 70 millimeter. So my aim is to get one back to first get off a second. So what I do in a poacher priority? I currently am it, and I saw 1000 to 50. So if I am and check at 1000 to 50 I'm getting a shutter speed off one by 3/20 off a second . So one by three trendy It is good enough because my minimum required is one by 2/50 of a 2nd 1 by 3 20 is pretty good for what I want. So this is so. I work on the exposure triangle parameters the exposure, compensation If you see overall, it is very flat. So I'm shooting the metering more. I'm shooting an evaluative or my truck's metering mode. So I keep this constant so that the oral fog if you see the tonality is very flat the 18% gray or the 1,000,000 tone What we call currently that is the kind of banality what we have so exposure, composition and just keep it to zero. So it explodes your composition. Zero. There you go. So I was at minus 1/3 time. No, I, uh, explosion compositions here I'm getting one way to 50. They start to speed what I want And next comes what can afford a focusing point I should be using now since I've decided, If it turns, I want to freeze it So I will use for this distance I will use a group or two focusing point. So in case off Nikon, you go with the GOP, the group or two, focusing point and in case off cannon. So depending on whether the camera supports that, so I'll be going with the expand ADF or they expand here, Fada surround. So any off these two so currently am at expand area. If so, I'm at that auto focusing. And there he goes, so any to wait next when it comes to the composition. So since you want toe, keep your sport radio at the lower portion of the frame. So my auto focusing point I need to move to the lower portion of the frame. So I looked at the viewfinder and I used my jaw stick to move the auto focusing point of the lower portion of the free. So that's pretty much sick and obviously, well, freezing of the spotted a. This running. I want to capture it little bit moment I want to do. Then my auto focusing More has to be in a servo or for the Nikon are the ones who users Auto Focus continous FC. Now these are all the perimeter cells, said suggested. Recap on the parameters white balance. I am a 10,000 Kelvin, or you can go for shared exposure triangle parameters. I s 0 1000 to 50 in a poacher priority more at in a poacher off F 2.8. Because I'm shooting at 1 25 millimeter F two point, it will give me still a nice depth Fulfilled the effect What I want and shut the spirits Getting one by 2 58 off the second. So exposure triangle parameters a set exposure composition zero metering is evaluated or matrix metering and then auto focusing more is air servo our auto focus continuous. And then the auto focusing point is the group what are selected. So there you go. How all my auto focusing points all my camera related seconds the key ones ready And And now have to wait for the subject. Of course, I took a long time to explain this, but in reality all those things you need to do it in three seconds in three seconds you need to get the setting right. Wait for the action toe happen and you should be a little clique. So let's wait. And hopefully we get are seen. What we want off the sport ideas. Running and crossing, walking and crossing with the revisionist composition. What have about showing the arc off the trees, the fog, Bagram, the road, Everything. Placing my subjects business. Porter dear. At the lower portion of the frame, I'm ready waiting for the subject. So let's wait and see what I get. So the wait has been worth it. So with all the pre visualization and then the Vegas Cam related settings, everything I've waited here for quite some time. And the pre visualized image off the spotted there running and going where I wanted to show the motion off it at a slow shutter. Speed that one. So you saw. They may just what I got. So this is how you need to work on pre visualization. Decide what kind of camera settings you want to use and depending on what kind of equipment you are carrying, what focal NT want to compose and shoot? So all this perimeters, all those decision making in 0 to 3 seconds, you need to get it right. Be ready to shoot that. That's where I'm pretty sure you're going to get the shot. What you planned for Good luck with that.
78. Behaviour and planning your shot: All right. So let's look at this other scenario about in wildlife photography. How important is it? So basically, pre visualize and compose your shot. So here we see the spotted deer with its for moving. Now it's completely wreck there in the water there, walking to us the bun. Now here is where the fund is now they get up, the bun there will shake backlit while they're completely. But look at this. They're going to shake on top. There you go. Come on, Shake. Yes. You see that? So those are the shots you really need to wait for And look at this once more. Yes. And then the interaction comes into picture. So why left water refugees all about understanding your subjects, pre visualizing and then executing the shots. Now, of course, a lot of other para meters comes into picture. I mean, I saw the scene happening and immediately started recording for the video for the video tutorial. Now, obviously, like if you go a few steps back the moment you saw that there in the water, they won't go. They're going to go on top off the burned over there, and then they're going to shake its board, their body toe Sprinkle off the water from the body. So you need to pre visualized this descent The competition most important arrival all the various camera settings, right from what kind of white balance you want to shoot. So currently it's late in the evening, the sun going down sunsetting Nice golden light we have Obviously I want to increase my white balance to get the nice golden colors. So white violence is the first perimeter. You need to work on the second exposure triangle para meters. Now it's going to Sprinkle off the water from its body. So you need to help high shutter speed to freeze that whole action. The water coming out of the body. So that is an awesome shot. What you want to aim for? So obviously you need to have high should the speed for that. But so that's the next one. So in the exposure triangle perimeters, so you need to have high shutter speed, so arrive at the perimeters to get the highest rate of speed off course. Based on what kind of meeting use what kind off framing you're trying to compose. What exposure? Compensation. You're trying to do so. All these aspects you need to work on and then a rave act. The correct settings get the provincial a start on, since they were actually continuously moving in the water. You're focusing. Obviously has to be air server. Are auto focus continues composition, displacement of the subject more to the left. And of course, these are the very basic camera settings you need to arrive back and then composition placement as to say You need to decide now This is how the overall behavioral aspect off your subject and then the concept off that associated with pre visualization with the camera settings. If you see all these various things, they come together, and that is when you get those 12 images. So if you want to be a better photographer, you need to get all these things together and then execute as per the plan. Good luck
79. Close-up vs Habitat Shots: the big cushion. Should you go for the close up shot or you want to go for a wider prospecting showing the habitat. Now this is always a confusing point, especially when you have a zoom lense like the timer on 1 56 100 or, for that matter, the Nikon 205 100 of the common 104 100. So the common question is, Comes is how much to zoom in or how much to zoom out. Now let's look at this particular example where there are two sported ears feeding in the water. So the female on the left, the meal on the right, and then the backdrop us if we have another spotted deer. Now, this current view, what you see is from the 800 millimeter lens. So with the 800 millimeters, it is a little closer off. Just the two spotted years, beautiful reflection and even the backdrop. The other spot. Today it is being seen now the same one. If we composed with a 400 millimeter, let us see what kind of competition we get. So here I have the 402.8, so they 800 millimeters on the 400 appointed with 50% less. So let's look at the composition from this. So here. If you see, I take a few shots. There we go. So this if you ask me, compared to the one what you see here. So let me take a shot off this from the 800. Mm. So 800 millimeter. So the kind off value, So have. So at a 5.6 I'm shooting. So this is a close up. That's a close up shot. And if I play back the one from the four under two point, if you see their small drama in the image shorted 402.8. There you go. This is a beautiful competition. And the inclusion off the out of focus three on the right side brings in more drama killers Tonality in your image. So ask for me if you ask which is better. So both a nice closer portrait, a tight frame as well as the habitat. These two images works very well, whereas in between. So sometimes what happens if you see the image from the 800 millimeter? This is a nice close up. It's not a complete close up. Also, it is still showing a little bit off the habitat, whereas if you try to close cropped this image into this, this will not work. So if you see here by a little bit cropping they maize doing a close crop, it is just a spot idea. This nothing much happening in this image. Vera's zoom out show a little bit off the habitat. You have a beautiful frame, even the same frame composition. If we try from a 72 100 F 2.8 lens, let's look at what kind of composition we get. So I have changed now to the 7200 millimeters f 2.8 lens. So the same scene. If I try to not shoot it with this with the proper composition off placement to the left. There you go. So here it shows a much larger habitat. But obviously, in this particular frame, if you see the right secretaries costs more obstruction. In the view, of course, the right secretaries strips were not there. Then this would have been a much better image for me. So this is what we call us destroyed. It eliminates, which shows the habitat. The subject, the backdrop, the environment in which the subject tries. So it come it conveys a complete story can compared to a complete short, close up photograph. So let me try some more hope. But vertical does a vertical work. Nope. The vertical doesn't work well because if you see their student off sky in the image, not good. So this in the 7200 lens working, so was a 200 millimeter. Same thing. I zoom out at 70 millimeters. Now this doesn't look great because there is the street right in front. Obstructs my view. Not a great image. Too much of sky 70 millimeters, Not good. So anything about 200 millimeter is a good composition for this? No, this is how you basically work on the competition and choose whether you want to go for a tight frame. Are basically show a little bit off the habitat. So the close up versus the habitat is always the big question mark. Choose your composition accordingly, especially with the zoom lens trying to be a little careful. It's not necessary that he should always zoom in to the complete focal int not required and of course, the very good parties, subjects like this which are cooperating. You can zoom in, zoom out work with different compositions. Zooming. Was this a habitat shot? It's a call. You have to take us a photographer but captured it in such a way that you are able to convey some kind of story, All right.
80. Correct Shooting Angle: one of the very important things when it comes to composition is getting your shooting angle right now. Here. In this scenario, if you see we have a sported dear just sleeping on the bunt, let's look at the bag. Drop a common mistake, which a lot of beginners they do is they just look at the subject now when it comes to the whole concept of competition, your region should not stop just at the subject. Look at the subject. Look through the subject. Look at the background that is very important. So given this scenario, if you look at the sported ear here, it's sleeping. It's just sitting on the bundle there. The backdrop is not very good, too much of destruction. Of course, this can still be a creative image, so if you look at the competition so it could still be elated. Creative image with the pattern of the trees in the backdrop. But the spotted deer, if you see it, distracts it. So this particular angle, where I'm currently standing and shooting this angle doesn't work. So since currently in this particular park, I'm on foot, even if it is a gypsy in the safari if you have the option to move upend on, so try to get different angle for different kind of composition to make sure you have a nice complimentary background. So here, obviously this competition doesn't work. So let's try to move to a different angle and see if a different angle doesn't make any difference. So I'm gonna walk. If I can privy July's. If I move more to the left than probably, I'll get a nice, clear background to the right. So let's move from here. Let's move further down and check out if another angle works. Placement of the subject more with respect to the angle of shooting. So we're further. That said, we checked and the angle was not that great because there's a lot of destruction in the background now. We moved a little further, and from this angle, if you see the sport and here here now, so obviously it is just sitting over there, and the backdrop is absolutely fantastic. So even though this a little bit off the crease, the distance is quite far from the spotted here. So if I just take a foot off this image with the antlers and in this competition. This is still a beautiful image, showing a little bit of the habitat and then even the backdrop. So that said, if how about we still move a little further and then the location where I am standing here ? If I see little further, if I move, I can actually go down a little. Now the angle of shooting It's just not the sideways angle. It's also the A pendant. So here I am, standing at a little height. So if I want to go little down, try to get eye level so the bag drop is beautiful with the habitat here at a further place , I can go down and then the report height. Also, I can produce it. So let's try that and see what kindof angle what kind of competition, what kind of bad blood do we get? So let's go a little further and then go down. Let's do that. All right, so this particular angle we saw it doesn't work, so let's go ahead. Let's move a little further and seek what kind off angle works. Okay, so let's go this way. So, while walking, you have to keep looking at the subject whether this angle works, It could be small openings were to get, but no, Let me come further down here. All right? So if you look at this particular scenario here, so I have my subject at the back. Okay, So here, if you see how the subject at the back over there, I have a small opening here so I can actually walk down. So I suspect, like, in this particular park, you can shoot on foot. The mammals birdlife everything. So we're currently headed but a national park. So you look at this. Don't push in here so I can go down and then to get level off that I can even reduce my Lex . So the tripod, Lex, I have the 123 off the legs extended. I can reduce. Go low, get to the eye level. So let's try to see what kind of view what kind of compulsion we get by doing that. So let's do that. So this is the next position. So I was at the first position, the background with the police. Not great. The second position became not great. Further down again. Okay, But here, when we came across this particular place from top. We saw that this particular angle works. And then what I decided is to get down to the high level. So from the eye level, if you see this is the kind of shot, what they're getting. So in fact, the sported there with antlers looking, that said beautiful competition, even the background priest in the distance. If you see that is actually adding drama to the scene. This is beautiful. So I'm gonna click this shot and so you beauty Wow! And also with the great coming beside it. That's an other short, awesome short what I got super. So as you can see, this is how you need to work on competition with the angle of shooting. So if you go further up back, so even when you're doing your safaris in the gypsy, you need to keep looking at the concept. You need to keep looking at the angle angle of shoot. So you need to pre visualize so from far itself, you should be able to figure out if I move in that direction with the backdrop what kind of angle we get, what kind of competition we get. So as I said. It's just not The subject is the subject and the background which matters a lot. So you need to keep working on these things in complexion. So your thought process has to be not just the subject, the subject, the background is the background, complementing the subject. So that is how you need to work on the angle, move back forth and get the competition what you want.
81. Understanding Light: as a part of composition. One of the very important aspects you need to keep in mind is lighting conditions here. If you look at the scenario, I have a spotted deer which is feeding on the grass. And if you look at the camera angle of me, I'm being shot. So the light is on me. So the camera angle is frank lighting for me. But if you look at the sport idiot, I'm shooting. It is at a side angle that Mr I'm shooting in the single. If you look at the oral angle at my lens, pointing at the sported here over there. So it is more off the side. Lighting is coming now. If you look at the scenario here, the sport idea is feeding. But now, if you see the spotted, it is in shadow the French face off the sported Edison shadow. Now this is really when it comes to side lighting, you have to wait for the correct lighting so it's more often matter off waiting for the right light. The head turn there, you see now the sport idiot! Now this is the angle said that point. This is lifting the head now. OK, it's looking at me here. No, against going back to feeling There you go up. So when it shook its head, as you saw, that is angle. This is the angle. So if you see that is a little side lit where the light is coming from the left side hitting on the sported dear. Those are the shorts which year to plan for now again, when there is continuous movement action happening. So you need to stay focus as to when you need to press distinctively spartan. Now, if you continue to absorb the behavioral aspect of the spotted yet here it is, trained toe. Pull those grass weeds from the water and reading on that. Now, at some point of time, this is the shot. You see that? Ah, well, look at this. Look at listen. This is the shot you have to click. So if you saw this is how you work on the lighting conditions. So, with more side lighting, you have to make sure there is no shadow on the body off the subject. So it looks at you. There you go again. It is looking at me, these other shots. So this is how you need to work on the lighting condition. So bid side lighting, friend lighting backlighting. It is always important to get light on the face off your subject. So in this case, some parts of the body may come in shadow, especially when it turns. But that is absolutely fine. As long as the face is in good lighting. That is the short which you need toe get. So this is all your work on lighting when it comes to composition aspects.
82. Post Processing for Wildlife Images: post processing for wildlife photography. In this particular chapter, I'll give you a brief about what we can expect in all the rest off the post processing chapters. Now I would like to remind you that this is not going to be a full fledge tutorial about how to process your images for wildlife photography, because we do have a separate course itself about post processing rape from processing your raw files, converting them into J pig even, for that matter. So the various concepts of post processing we do have a surprise tutorial. Of course, we do have post processing tutorials apart from the adobe camera, raw and photo shop, even capture the next day for all the Nikon users out there and also canon DPP for all the cannon users out there. So in this particular Siri's off chapters, what I'll be doing is taking you through my steps off post processing when it comes to were left photography. Now, my whole process, when it comes to where left photography is to make sure I take represented. The finally made, as is a select what I saw in the feet, nothing more, nothing less off course I may add in a little bit off contrast punch to give the dramatic effect sometimes so. But that said like, I don't get into the concept of manipulating the images. So for me, nothing, no adding things and no removing things. Of course, the minor changes of manipulation, what I generally do. It's more off cloning where if there are any distractions, say, in this particular made from top, there is a small brands hanging down. I just Clooney top. Remove this one more distraction here little bit. I Clooney talk again. The whole concept of post processing is there are no guidelines and rules. So as of I left photographer, it's left us like, Oh, you want to process your image. Of course, if you want to get into the whole art off, manipulating things like adding a smoke effect, making the Bagram blurred. I mean, you're welcome to do whatever you want, as long as you're fine doing it. So I say, Keep saying I always shoot and process for myself and not for others. Now that said, what you can expect in the rest of the chapters is taking you through the whole process right from once. I come back from my shoot. Hold way. Copy this images onto my folder. How they shot list the images. What kind of filtering process I used Two basically delete unwanted images. Beyond that, the simple adjustments off like, oh, contrast White balance. It basically brings in so much impact your majors, and then even sell it to processing will be talking about. So they have a lot of situations where certain areas may have to be corrected. Only that particular area what we call us targeted adjustment. So we teaching you like or rather, the process what I follow. I'll be teaching you that apart from that, even understanding the tools so right from using the shadow tools, the highlights, tools. So when do we use what, what kind of impact it pass and how much we use. So we're talking about that. So apart from that, even targeted adjustments like when it comes to your eyes. So in wildlife photography, you need to have good bunch. Would I contact what we call? I'll be teaching you those aspects as well. So beyond that, even what happens is in a lot of situations to get his in the image so How did we get it off the haze or even a lot of dust which comes in into the mix, not the sensor dust, but like a vehicle moves and there's a lot of dust and that if it gets into the inmates, it looks very flat. No contrast, No life. How do you fix that? Said a lot of these kind off simple aspects off post processing Is water going to talk as a part off the next series off chapters in this post processing section?
83. Filtering and deleting bad images: Now let us start decision where I would like explain to you my complete process. Once I'm out from the field, what do we do now? This are basically the radius images which is shot in Clanton board recently in the month off June. So we did a freely safari, basically three full days. So obviously a lot off images. So I just have a few few images from the end yet series So generally what I dough if I to show you my to stop. So this is the fuller once the back. So what I do is I basically create year wastefulness. So each year, like, obviously keep visiting multiple destinations. So I created a particular years. So for example, I have the 2019 Fuller over here now in the 2019 4 Look, if I go inside so of course I said this of the different years 2019 If I go in. So here what I do its destination And what month I visited that particular place. That is going to be the name off the fuller. So here, if you see the June ran Timber already won the Amboseli and Masai Mara in February a did or in the month of March ended. Cabinet. So this is how I basically keep this different name. So if it is zooming into these various for less, you'll get a better idea. So again, let's go back. So let's get into the June Brunton boat. So here, if you see again for various trips, I carry multiple bodies and multiple Ince's. So my format. What I do on my way off storing the images, it's like a create individual folders based on the camera board is what I'm carrying. So in this case, if you see I'm cutting my one bx the Canon one dx Marto and also the Sunni AL for a night. So these are three different borders What I carried. So each individual camera bodies how the CF card is because of the sea fast. Whatever. I used the card reader to basically transfer the images into these folders. Now, once that transfer the images into the folder, next comes the filtering process. So how do we believe the unwanted images? So let me take you through my process. So next what I do if you see here. So I have the one DX have the one dx tooth. So in this case, again for just suman. There you go. So I create another full of one day X shortlist and then one b x two shot list. So here what? I does all the shortlisted. It may just gets into this folders. So let's again get back now for my processing for my filtering. This is the application what they use. So this is the adobe camera Adobe Bridge. Rather so from the adobe second software. So this is Adobe Bridge. So it's more of an image management application. So on the left side again, if you see here so the Raiders fold us the year ways folder recon, see So and within that, I have the June rant on board and then the one be extra folder. So here what I do in case off one DX go in and then the whole filtering process starts. So let's start from the beginning. So there you go. So I have this CDs off tagged images. Now one of the things what happens when you're so many similar set of images it becomes a little heart of shortlist, which for new one, so that s where I have a very strict guidelines. Now what I do is like once I open, the inmates generally haven't overall overview. Look at the inmates right from different parameters, like sharpness. Obviously, that's one of the key parameters for me. So how sharp is they, mates? And from a competition point off you. So obviously, placement of the subject. How good is the background? Other than the distractions in the frame are their body parts which are chopped off. How is the eye contact? Was the lighting and then even the head turn? So how all this various different criterias to basically finalize shortlisted image? Let's go through the process. So what I do is I look at this image. Since there are similar images, I go up and down. So Hector, not good. So, for example, this is the major, like lower composition Like it. So what I do know I drag and drop it to the one d x two s list on the X to shortlist Fuller Just tropic. Then carry on this again. Intense stare to the right. Find a like it. Right, Left. Whatever. Then again, this goes into the one day extra short list. Then again, look at this. Not good. Not good. No, I don't like this up on the other. It's right. If you see it's not completely visible. I don't like it again. The head term, the licking its not good. Ah, wow. This is totally out of focus. Then this. If you see the back, bush of the body is too close to the frame again. Nope. Estate keep going down. This is a nice state. So from a political point of few, this I like. So what I do is this image again. It goes to one the extra short list. So for what has happened, this right from the top next next next next have kept on. Looking at them are not like this particular image. I liked it. So what's will happen now is once I move this image in the shortlist Fuller from here to the top. Whatever images have seen, Bill it. So what? I do so from here. So again, this image, I don't like it because it's too low, left said again. It's more or less chopped off. There's not a good amount of space. I don't like it. So from first inmates to the top. Oops. Sorry. So again, I know that it may. So I did the first image in top, so come down. So shift and click all the images which got selected Delete that. Okay. So I can just delete all this. It may just goes to trash. Done. It's over the system again and go back. So this image here, if you see from a spacing Yes, I like this image. The other one is there. So between these two images, effort to select from a competition. If you see right down here this huge rock Nope. I don't like it. Okay. Safe again. Have to zoom in a little. There you go. So this rock is blocking my view. Auto focus not good. So are gaining for located next image from a composition that the rock has actually gone down a little. So I've given this so this again gets shortlisted. And then from here, Okay. It was just one Inmates deleted, gone. Okay, sure. So from then, what happens again? This is a sleeping tiger. Don't like next. Next, Next, next. No, no, no. Of course. In this case I'm explaining. And then I'm trying to do the job, so it's going to be a little slow, but in reality, it's gonna be very fast, so no, no. So this is out of focus. No, no, no, no. Don't like it. Um, no, I still don't like it. Next. The stare, but okay. Let's see if we have something else. Ah, I keep shooting this kind of candidate majors now and then. Okay. So, No, no, no. Okay, this probably let's see for anything. Els? Yeah, This if I'm OK with this. So this again I moved the shot list. So there you go. So my whole process off shortlist, what I do on the filtering process is intense. So obviously again, if there are my people images, which I am a little bit doubtful about, what I do is I copy those images as well. So even the multiple images 123 I copied the other thing. What I do is now this image. If it sell it, I want to check if this image is really shop, is it worth saving it or short listing it? So what I do is like depending on whether you're in Windows or Mac in case off MacInnes Commander. In case off windows, it is control. So what I do this command l it goes into full screen. I click. Then it zooms in 100% so that I can take the sharpness quality. So overall, yes, If you see because off the lower led situation I I s O that just if you see are not Crispin shop now the other thing is in low light situations, respected working equipment. Then you're shooting technique also comes into picture. You have to make sure you select those images with a crisp shop. This I can give it a pass off course depending on if it's just we're posting Facebook. Instagram posting doesn't matter. But when it comes to really high quality for print this image may not work because it's not that critical sharpness. What we call is missing. Look at the edges, but still fine again. I like that again Click go back escape goes back to my original format. So again, next, Next, next some kind of a creator. Ok, not good. Not good. Not good. Nexia, Go, go, go. Nope. Nope. Okay. So it looks so once I finished one particular set from the same scene. Then the next one comes. I'm gonna go back, delete all those images. So this is always go ahead, filter my process, filter my images. So I said the greatest criteria right from the image sharpness. And then they had come to the whole concept of competition framing. I see. Without that, any distractions have a chopped off part of the body placement of the subject. Is it good, bad and out of focus images coming in which arrogant distractions background? Is it complementary? So if you see all this, various factors comes into picture. When it comes to fishing. My images once a filter, that image, how all the shortlisted image. Then I sell it one of those images and then the whole concept of post processing starts so that my gender quirk flew off post processing. We'll see that next
84. Right Application to Process RAW files: before we now jump into the whole concept off post processing. What we'll do is let us understand some of the post processing tools applications available out there. Of course, in the previous chapter, we did see how do we go around figuring the images. So there I used the other beak of Adobe Bridge suffered I use. But once that will draw the images when it comes to the actual processing, before I choose what application to use, I first look at the image what kind of collapse it has. And since I know like in the field what kind of collapse it already had. There I choose, like so are rather like the same. Okay, in adobe camera raw, always the colors and in other applications always see coming to the point. Have a look at this image. So here this was shot in one soon, So a sported here it was actually vibrant green. So what you're seeing is the raw file, as you can see in adobe camera raw, with no changes applied. So if I just open the raw file here on the right, and if you see everything is the default values I have not made any changes. So let's cancel now. The same file. So what you saw? So let me just minimize the foot off Photoshopped. For now, this is Adobe camera. So what you see here is, as you can see, the raw file in adobe camera. Raw up. Now, since this is a cannon file, I opened this in Canon DPP digital photo professional motion for And if I open that file in this Look at this. Look at the Weibring. Greens off this. So this again. I'm not tested. Everything that raw as it is, no changes applied. So this is in Canon DPP. I go back. This is in basically adobe camera raw. So if I want to show you this in foot of shop, side by side, also in photo shop, what I have done, Or rather from adobe camera raw with thought, making any changes to any off the adjustment clears just directly exported to foot the shop . So this is adobe camera. This is basically candy. People look at the change in colas. So the punch in the image automatically the best made itself in cannon DPP. It's more colorful, especially for the monsoon images Of course, this does not hold good for all the images. That is very hard to be really selective when you want to use what kind of applications. So for common files with that, he won't use Adobe camera raw or can DPP. That's a lick, of course. 90% I used Adobe Camera raw for Nikon guys. Whether you want to go with Adobe Camera raw again, all this is for raw processing. So our A B camera or captured in next D again Canon DPP capture next deepwater free software as off today, available from the respective websites and if it is a Sony file. So, in fact, recently I've started using Sony. The Sony Alpha nine have used it extensively on for against Sunni whether you want to go with Adobe Camera rock or the capture one. So the face when you have from capture one so that again, if you want to use, you can use for Sony specific files. So let's go back. So this is for the cannon. So let's minimize for the shop. And let's look at another image from canon DPP, especially for sunrise sunset images. Now the whole magical sunlight sun city may just happens when you use a white balance off 10,000. Kelvin, We all know that. Look at this colors here. The colors have totally dropped down. I mean, the punch original punch the nice orange reddish hues in the sky. That is totally gone. This is adobe camera Raw. So, what you see here, this is our A B camera. The same file. If I open it in Canon DPP, look at the colors. So this is Canon DPP. Let's go back. This is gonna be camera. So if they're too short, you side by side in photo shop. I've exported it without making any changes. There you go. So this is from adobe camera. Raw, directly exported toe photo shop, we thought are playing any changes. This is definitely from Canon DPP again, up without applying any kind of changes. Look at the difference in the colors. So that is for Canon. Let's move on though. The Nikon file. So let me use the spotted deer. So this is again adobe camera raw spotted here, the phone feeding and this is adobe camera raw. And if it opened the same in capture and next day look at this. Okay, so again, the Hughes, the vivid colors is back here. If we compare it in foot the shop, There we go. So this is adobe camera raw. As you can see, the colors are a little flat. The vibrant colors, the spotlight, what we have in the white brain colors. This is captured. Next look at this. The vibrant colors, a little back. One more example. So this is the leper, which is just walking again. The monsoon colors. Beautiful internment of July. I shot this. I think I used a Nikon D four. If I believe if I am right, let's look at the Nikon Nikon D four s is what I used for this. So this is again adobe camera raw. The same thing If I use it in capture in its D. Look at the colors, the vivid colors of the monsoon. It really, really pops about. All right, here. So the same thing. Let's look at it in for the shop. So there you go. So this is definitely exported from adobe camera raw. This is from captured. Next, you can see the difference. You can feel the difference and which is the other one Okay again from Canon DPP. Let's go back to Canon DPP. This is a cannon files. Not Kanan Devi Sati Adobe Camera. This is one of my favorite images from Karnataka result. I mean, the original colors punch is totally missing. This is, as is the raw file as seen in adobe camera. And let's open this in Canon DPP. Look at this. The colors, the punch, look at the background, the early morning golden light, the back lighting and then the oral reddish colors off the grass. What you get in winters in Canada, it stands out again. In fact, open it in for the shop. So this is a B camera raw, and then this is from Canon DPP. Look at the change in the tonality, the colors. So as you can see, there is nothing called as the best application when it comes to processing your images, especially this kind of corner cases son breasts and set images and then some of the white Brent colors. What you have beating monsoon winter color if you see. So this is where as a photographer, you need to be in the position toe pre visualize how original image was how the original it's seen Waas come back. Look at it in this specific applications again, all this specific to the raw files. Look at it in this applications and then take a call when what kindof application you want to use. I really want to go with the third party aerobic camera, which is part of the obese set off applications are the preparatory one like the capture, the next taken and DPP or face one for Sunni. So it's not an easy job. But of course, all these things will come with experience or a period of time. But at this point of time, you need to a little bit select which one you want to use. Good luck with that.
85. Complete Workflow: let us Now look at my gender, Rick Workflow. Now, when it comes to generate workflow, what I do is like the very basics off processing is what I do now that I've freed her. The images are shortlisted, The images are here If you look at this particular remains So this is basically a huge tasker which I captured in Amboseli. So let's look at the various steps What I do so basically process disk image Now the sister raw file and defer to just show you the finished file. This is a witness. Look at the difference. So generally what I do, I try to pre reach Elice the end result What I want to showcase off course depending on the radius. Candlelit ascetics in the field, right from a white balance toe. The exposure triangle parameters exposure itself over exposure under exposure. So there is going to be some kind of variation in what he had captured. So what you see in the field and what were captured there is going to be some kind off data difference. So here I tried to fix that, or for that matter, I put it in or toward violence captured and have not got the right colors and punch. That is where again, post processing comes into picture to get back that punch. Now let's look at how I process this image. So there you go. So I accept the inmates. I do a right click and then say Open it in camera. Raw. So there you go. So this is the camera adobe camera raw. Let me just make it a little larger here. Okay, Cool. So if you come on the right side off the screen So let me just zoom in and take you here. There you go. So here, if you see here, are the tedious setting feature. Generally play around with the white violence where I increase the temperature manually and then the exposure parameters like overexposure and direct butcher. The contrast Highlight shadows, whites, blacks. If you see these other very basic sittings what I take it off to start with. Let's go back to the full screen now. I stayed with the maize and then I decide. Fine. I want to do a little bit of crop. So I used the crop tool so generally, like I take the entire area up, then hold the shift, and then I decide what kind of cropping I want. So there you go. I want to place it little bit to the left. And then Now if you look at this image, this a small issue at the back. If you look at this line, it's little tilted. So do we want to fix that escape? So I go on top again, Take the straightening tool and then right. Andi. Ah, let's go back. Okay, this looks a little better. Okay, So off course you know the horizon in the back of ST it. But then I think the elephant has got tilted. I don't like it. So let's go back to the original one. Let's look at this. And again I go back to the crop so reduced the crop a little. I want to keep the elephant more to the left off the frame, or rather, the right off the frame. I don't want to make it basically center so fine. I decide. Like, this is the cropping I want to go with. Then again go back with Hank tour, and then I play with the white balance. So I currently this 5700 kelvin. So if I 750 radio city to get the blues a little and then I believe the contrast. So I increased the contrast. There you go. So into the contrast, a bit exposure again a little bit or exposed it They're going within the colors And then if you see I generally play the contrasts again, let me zoom in a little for your benefit. So again, if you're the right, sir, if you see here the contrast plus 48 ID, I increase the contrast the same time. Generally I pulling the blacks. Okay, there you go. So again, let's zoom back to the original. Very good. So increase the contrast. A bit the same template with the blacks in a steady the image. Whether I want to see if I want to reduce the highlights levitate Nope, Get it back. So there's the beauty off the raw file. You can just play around however you want, and then all the way down. I includes the y prints a little to get back some nice bunch. I don't generally do a lot of vibrance because I want to keep us natural as possible. Let's increase the contrast a bit. Well, look at the greens now. The punches really, really coming up. And then if you play with exposure, you can look at this point of time. I'm happy with this image. The based emits toe. Take it further in post processing. So I come down here so toggle, this is before their ego. It's very flat. And also the white balance was a little different. The lighting, the goal relating is dead, which probably I have removed it. That's fine early morning light, because I want to basically get the blues and also the natural color off the elephant. So this is after so before it after your scene. Fine. If you want interest over but a little bit. Yeah, there you go. I get back my golden colors or increase the white balance to fighters in Kelvin. Now open the image. Of course, the or is it limits down here? If you see it's a lot more bluish, but it's OK, so let's go toe photo shop. There you go. So it's still opening, so there's a problem if you have ah, slow computer, Of course, I'm looking from the external hard disk and a lot of for the things find So fair enough. So I get into photo shop. So I exported the image into photo shop and then minimize this. So there you go. This is my the shops green make sure have good. I want a space for my working called So I studied the image again and then some of the basic adjustments. No, What I want to show you is like my V of processing for posting on social media. Because generally a lot of us process every majors for process for social media. But of course, if you're in the habit of printing the images and your whole dimension is gonna be totally different so here I'm going to reduce it toe 19 to 0 toe as the x axis. The longest side wanting toes arrested. Really? What they do it, mate, made Seiss. I keep toe 19 to 0 pixels on the longer side and generally want to exaggerate comes resolutions. Generally, 72 doesn't matter, so it's OK again. Commonplace place scoops. I see 100% the first, Then I go into my level correction and this lot of gap on the right side. Hold on the old key. Okay, there you go. So the moment the big sisters coming in a stop and then the middle a little bit. Want to bring the punch before after? This is fine. Okay, so there's a basic processing the nice Kikkan filter shop. But I use smart shopping in my case, so I use a shopping amount off. Katie looks good. Okay. See? And then that's it. So for this image, I don't want to do anything else. So off course, if in case you have a little bit off nice in the image I used the need to meet with you, use it a supplicant, so I could connect, emits it, opens up in another application. But still, I'm right inside. Hello. Be for the shop. I click an auto profile again. I don't want to find you. Most of the things I liked the software handled, So they're going up light at the back. Whatever noise was a little bit. It's gone on happy this image so And it con moto profile. So from pro fort rgb I change it toe s rgb. I'm done. Of course. I put my logo and other things. So once it is done, command shift s I say the file so filed. Save us and then let me just put it in the district foot now. So it's gonna take time, so just save the fight. So that time of saving, I want to make sure I keep the quality est Well, So generally, two megapixel are two MP. If I This what a post on the social media. Good enough. So there you go. So these are the very basic steps off post processing what has followed for this particular image. Let's take an example off another image. So let me just close this. Go back to my bridge. So of course, if you see the process remains the one what I already had. So here the white balance is a lot reduced. That's okay. I mean, like, you get a fair idea about what I do. So let's take this in. Major. This is an image that really love. So this is the rough. I look at the difference. I mean, this is weird. I increase photographers to shoot in drop because raw is extremely, extremely powerful. Whatever you know, you can do a lot more than that when it comes to post processing. So of course, your camera has limitations. So in the field what they captured 100% the dynamic range exposure perimeters. A lot of those factors comes into picture. So again, right click open this in camera raw cool. So against a leader image, the contrast is missing. So as a first step, go ahead, put it in. So take it up. As you can see here, I'm getting the background colors. What I want. Then they increase the Y. Princess will a little to get back the colors in the backdrop. That is what I want. No, that are done that. So let me go into the shadows and bring up the shadows. So there you go, the power off the shadow and highlight. So just the tiger in the back off the tree that has no popped up. So blacks let me just increase, decrease, get more bunch in the image. So let's see if I want to reduce the highlights. Yes, So if you increase, look at the bag drop again. It's gone. It's become more bright highlights and bring it down. So anything else I want to do. The contrast is okay. Exposure of the things I take it up in foot the shop so ass off. Now I'm happy with this. The temperature white balance is 6000 Kelvin. Fine by branches. Fine. So I click on open image and they take it to foot the shop. So as you see some very, very basic steps off processing is what I do when it comes to adobe camera. Raw from adobe camera raw. I get it to photo shop and complete my processing. So there you go. So I have this image here. So when it comes to vertical images, I keep the height at 1002 100 pixels. So get the full screen. Now from here on, noticed. Weird. I do the targeting and just targeted adjustments to do corrections to specific area off the photograph up. So that is where I used the adjustment clears. Now, one small thing is here. There is a dot in the bulk of the tree. So let me Okay. So let me use the content over tool and get rid off it. There it goes, called back to my handle. Then I go in tow. My leers. Let's get most base. So I click on layers and then the adjustment levels is what I do. Now comes the most important part. So when we're trying to do targeted adjustments whatever part of the image you want to basically make corrections to So when you make this specific adjustments, go ahead and push it to the limit. Don't worry us too. Like what is happening to the rest of the image? Just concentrate on that area. So here, what I want to do is basically, like, let me increase the contrast of the bag, drop a little bit. So I used to make down to increase the contrast of the backdrop, the colors, the greens and the orange. I tried to bring it out a little, So this I'm fine with that. So in this, what happens? I go into this levels and, uh, you said command, I Well, if you see the lower cities again, Brighton. But from a contrast, I'm fine with the whole image. A stick to it. I create another layer for the levels. This time I want to play around with the tiger. So the rest of the area I'm not concerned. I just want to play around with the Tigers. I want to brighten up the take it a little so used old option key and tried to increase the brightness. Go back some mornings. So don't worry about what is happening to the rest of the image. That's so the image is getting heavily or exposed. Doesn't matter their legal. So for the tiger, this is what I want to get. Yes. So this is what I want to get for the tiger. Fair enough. Let me get a little bit off punch. That's fine. So once I make this adjustment, I go back to my layers. And then I used the command I in was the selection. Use the breast tool. Of course, all this is explained in detail in my full flaps post processing tutorial. I would increase you to have a look at that. So use the breast to, and as you can see, I'm gonna brush only the part of the tiger. I make sure the opacity is fine. Dairy go so decreased the size of the breath. Let's get those details back in the tiger brightness. Cool. So let's go back before after before after. Okay, so if I want to increase the brightness off the bark off the tree also. Ah, a little bit here. This is school. This much is fine. So again, this is before after before after. So if you see the just off the tiger, there's a hell over there. So that's not good. I used the X. And you see this? It just not good. There you go. So I tried toe a little bit. There we go. So it's it's not good that the it just the hello basically stand sort. Cool. So I'm happy with this. Next. I want to make sure the eye pops out the rest of the things. I'm fine. I'm going to create one more adjustment layer increase. So there you go again. Forget about the rest of the major. I want the guy to prop up a little one more. Little Yes, I'm OK with this. Go back to my layers command. I control I to inverse the selection. Use the brush tool again. Reduced the size of the brush. Okay, X. There you go. Wow. Cool. But just right in the eye a little. So if you have to see the difference before after you see that I It popped out before after . So once this is done. Cool. So yeah or all. I think I'm happy with the image. So I think, like, let me bright in the tangled a little bit. Let's do that. So let me create another Lear on Da little bit. I want to take it to be right. Yes, something like this. Okay, cool. So again And go back to the layers. The mind I So that I do the adjustment only to that part off the area. There he goes with this colors off the tiger. I want to prop it up a little. The alloy each other things so I don't want again over the area again. Released the size of the breath. This is good. So careful to the edges Where the hell should not stand out? There you go again for after this is before after cool. So once I'm done with everything Layer Latin image. And of course I do my sharpness with the shop on Smart shop on. Now let me just make it 200. Let's shop in a little and then background. I need to make you want to reduce the or alloy see kind of a thing. What have in the backdrop Radio sit or to find you the redistricting. Just a plate dairy. Go. This system controls that before, after this school off, a little bit donated. If you see here control just it means zoom in. You don't. If you see this part, this is not good. So let's try to take it up. So this is the clothing. What I said a little bit off these kind of manipulations just to improve the image so content of Italy, I use super. There you go, country Tawfiq. So let's come back from the original. So of course, stop on the left side Here if you see again which is the country? Never told This is a small, small things here to watch for. So on the top, the branch of the tree Let's take it off Super. That should be okay. Some more Look, it cook there to go. So this is the finished image on. Let's go back and get the origin limits. Let's again open the raw file. Let's put everything to default. Oh my God! Open the image. Let's do a side by side comparison. It's probably the colossal. A little order. That's okay. There you go, se, But said we keep it. So this look, that's okay. You should get a fair idea. Hopes we know. Show both of those, please. Okay. There you go. Cause there you go. So you can see the before and after from a comparison point off you. Okay, let's get this year on and get that adults. Yeah, literate off struggle here and there. That's OK. There you go. So if you see this particular image, this is my aura steps of processing. Of course, like it's a part of this tutorial. When I did a little of the colors, other things I worded. So the Y prints off the agreement is a little overdone here. You may want to reduce it a little, but from a comparison point of view, if you see this is so the actual scene mostly those bright The tiger burning over there running morning, Tiger Tiger burning bright, whatever. So it was beautiful. Seen what I had. And in fact, this previous they had seen this situation on the new Next day the tigers are going to be around the same place. So the next day I went with my 800 millimeter lens and this was a pre vigil estimates, which I got. So here it goes. So this is the basic steps off. Post processing water follow. And if you see this is again from a one day extra camera, nothing wrong with the camera. The lens is just the scene. The lighting conditions, the original Worrell. Things were not in line with the kind of image what he wanted to make. And in post processing, you get back what you want to show to the audience, to the views. Okay, so cools. Then let me just show you some of the other three majors. The monsoon image again. This is a raw file. This is the processed filed again in similar lines. I do it again from a contra sponte off if you'll get this. So this is the raw file. This is the process file. Let me quickly show you how to do this. Open the roof. I very simple. So increase your white balance, and then the contrast. There you go very simple. And decrease the blacks so that the sellout stands out. Vibrancy want to increase their ego. So again, this is before this is often so if you see the white balance and then the contrast. This gives a lot off punch in your images, and this is a very basic steps of processing water for low on a lot of things. What you see, it's not manipulation, but this is the concept off correction. Okay, so this is done. Go back to my Yep. The same thing again here with the elephants in Masai Mara. So this is the before this is after play around with the white balance, playing with the contrast. As you can see, these are some of the very basic steps off post processing water. Follow the general steps to basically get and showcase what I want the viewers to see hope that was useful.
86. Shadow and Highlights: let us know. Look at the next example. We re faced this situation a lot in where life photography so generally what happens is like if the subject is in shade and then there is bright light on the other side. So a mix off shadow and then bright like that world exposure. The camera cannot get it because the camera cannot handle the dynamic range off the particular scene. So how do we handle that in post processing? So let's look at that. So here we have the tiger here in shade, so let's look at the down image. First, I open it in camera raw. So if you'll steady the whole image, the tiger was sitting in the shadow area and my exposure was set for the great idea. So how do we handle it? So on the lights and again, if you look at the various controls, the most important one is this highlights and shadows. These two. If you see the highlights and shadow back, these were going toe. That is what we're going to use now. The very basic steps, what we'll do. Okay, I increase the exposure a little, make the image or all bright. So I get back the colors get back the brightness rather than exposure. And then they increase the contrast of But I want a little bit contrast. Fair enough. That's OK. And now here if you zoom in on the tiger. Okay, so there he goes If you zoom in on the tiger So there is a little shadow on the tiger so that I want to get rid. So the shadows later on the right I just show you the difference How it works, declares it a lot more Shadow comes in other side. There you go, the shadows con Okay, at the same time what has happened if I now go into the full view down here? If you see that area and overall this area also, if you see here Okay, so those areas, it has got overexposed. Now that is where the high list legislator, what you have? I bring it down. Okay, let me push it on the other side to show the difference. See, that area is not totally brightened up or exposed. So highlights later Bring it down. So the shadows later is completely on the right side. Highlights later. Completely on the left side. So here, if you see, I'm able to balance the overall tonality off the missed the bright area, the dark area get back and then a little bit off Bibles if you want. And once you do this again, you can play around with your exposure or exposure under exposed. You can play around once you're done with this. Fair enough again. I open it in for the shop. Open the image in for the shop. Okay, so there you go. Minimize all the other things on. Let's get back the other Theo things. Okay, There you go. I just docket back into the shop now my standard one. So I go into the image adjustment or let's say the candles resist image toe 19 to 0. Get back. So the regular standard steps my levels. So that's OK. Okay, then, my sharpness, filter shopping, smart shopping. So 80 100 Generally what I keep again? A little bit nice. See if you feel you can run the need image on the top area. So the need Tim, it's automatically calculates where there is nice and is going to find Eun and give you the final image Okay, I'm happy with that. So, of course there are for this most mall post processing corrections. Where if I want Oh, poppet, the I I can do that. But the shadow highlights. If you see this is a way use so the before and after, If you have to check it. So this is the after image. Let's go back to the original raw file on. Then let's take all the default. Look at this opening made in photo shop. Okay, so open it. There you go. So this is the before This is the off. So this is the power off the highlight and shadow slated. What we have in the adobe camera raw the power of profiles. Let's take another example. Let's go back. Said this is another scenario which we generally face. So in this situation, what has happened is the tanker is sitting in the cave. So where the tiger is a currently sitting, so that area there is basically like shadow. And then there is direct sunlight on the rock. Don't hear. So obviously that is overexposed again. The dynamic range of the cameras not been able to handle it. So no issues the same process so overall introduced the exposure. And then the highlights bring it all every non dairy. Go look at this. Okay, so the overall the or exposed rock is totally fixed. Now the other thing. So if only can increase the contrast and then get the punch in the little. And then if you're used to shadows toe, increase the area the shadow area Super dairy. Go. And you're welcome. Being crystal vibrates a little if you want. Don't overdo things in your processing. So again, if you look at the before after this is before, this is often There you go. So this is the part off the raw file as well s. This is how you basically used the shadow and highlight tool. So of course, with a combination off your exposure, the contrast and even the vibrant some of the others latest As you can see, these are the very basics. Laters. What they use to recover the details. What was lost in the field because off the camera couldn't just handle it. Okay, so let's look at what next
87. High Key and Low Key Images: let us now look at processing the high key and the low key images. So obviously the concept off high key is where the background is completely blown out. It's completely over exposed. And then the concept off Loki is the bathroom. Listen, shadows subject is in spotlight, so 100% getting a nice high key Loki made out of the camera is not possible. So that is where again, the art off post processing comes into picture. Let's look at how to do that. So let's open the first image. The Tiger. This is basically Sherman Lee from the Bijani area off Korver Tiger Reserve, so she's quite bold. So what is the first thing? So where they look at the inmates? So the contests, I need the contrast in the tiger. Cool, get but the contrast. So then the highlights. If you see the head bush in its or exposed a little bit to take it back, that's okay. Then again, the Y prints are in crystal vibrates a little. Now what happens is in the rod. There is so much what they can do, so you cannot get the complete final output in the row processing so the basic adjustments I doing brought processing. And now in photo shop is where I complete the process. So let's take it to foot the shop now. And this is where the fun nous could. So let me just recess the image. One thing does zero my standard stuff now my going toe, the liberal. So I used my layers and the targeted adjustment. So I go into my level correction and then so No, this is Wade the rial. Finest. Now the whole concept off the low key image off. Sorry, this is Nike. So the whole concept of high key majors the background is going to be completely white, as much weight as possible and that we achieve using the levels and then the technique in level. So you hold on the old killed option key. And then you see that area So doctors, it means it is over exposed. That area is over exposed. I start from scratch and then I increase it so you can see the layout of the tiger. Overall, Tiger, you can just see the outline. If it no problem, take it up. Take it up. No problems up to this extent. If you see, the parts of the tigers are also are exposed. Absolutely friend. So what I've done is the levels I hold down. I'd remove the old key. This is what you see. I pressed the old or the option key and I get this keeping it pressed. Of course, all this is explained in my post processing tutorial. So once I do this so this the background. This is what I want. So let me just put it down a little if you want. Okay. Fair enough again. It's all rough things. What? I want to show you Soaps come back. So once this is done, I do the command. I okay, so just the mean Take it everything as it is Then I use the brush increase the size of the brush And then I pressed the X So let's open the layers. Let's go back to the hind tool and the layers. I want us to be open. There you go. So come and I will sit are even the other way. They use the fresh tooth. Increase the size X Yeah, there you see on the level started. See, it's the bad. Grown is or exposing the bad problem. There you go. Now the bankrupt is completely over exposed. And of course, you got to be really careful. Reduce the size of the brush when you're walking around the tiger Terry, go! Okay. And then one more Level off. One more open. Well, now I want to play around with just the tiger. So the color of the tiger Little bit like a part of their tiger. I want this so again I in Los Commander in Waas Andi use the brush. So where they were dark it at the tiger. I want the skin just a little bit over there. I brush. Is that all the targeted adjustments? What you should be doing on then? The main thing. One last tip. Let me finish it here when I want I to pop out. So? So I won't try to really pop out. Of course. Obviously in a balanced way. And then again in Wasit Command, I used the brush ready. Is the size dirty? Go on then the other one. So this is the before after before, off a little bit. Brighten it up. So cool. Of course, Now the rest of the steps off sharpening and then again, a little bit more off targeted adjustment. Those are the standards things. But when it comes to creating the high key image overall, Bagram being white, this amulet let me quickly show you another example. So let's go back to bridge. Let's take this the most amount of gear off. So again, the backdrop, if you see, is the overcast sky. So increase the contrast in the giraffe. A little bit off, right exposures. I want to keep this as the standard. Then I opened this in photo shot because doctors were I want to do everything. So for now, let me just reduce the size too. 19 to 0 pixels on my layers levels and let's have some fun. There you go again. Now the background is completely white. Okay, so let's close this Well as a youth, go back to the level since the background is fine. But the giraffe. I want the original thing back in the air. If I don't want to jet off to be overexposed, so I just do a little bit off this. Only the giraffe rests. Let's make it lit with creative but rest. Let it be as it is. I don't want to make any other changes to any part of the image. Lo portion is 70 or exposed. Letter B as it is. Let's do this. Let's have some other fun. The man j I create the on the layer. So what I want to do is this looks OK. So I go to the bad grown command. Jake, we had a copy of that. And then how about we don't it into black and white? Terry, go Beautiful. Lana said OK. And then let me get another earlier. Terry, go increase the contrast off the giraffe. Come on. OK, that's nice. Okay. Then again opened the layers and then use Come and I come and I used the fresh because too much also is not good. I think those little or done, I want the cheer after bay. Still nice. Black and white on a little bit off those brushing I do on the giraffe over here. I don't like it. I wanted to be dark in most selection and make it dark. That's the fun off targeted adjustment. There you go. Okay. Of course, you can still further find you Nate off some of the other areas. But overall, if you see where we started from and then a creative way off converting this into black and white hiking image. So let's flatten layer. So layer flat in the image. And, of course, the regular sharpness. Other things we can do. Let's look at the original image. So open the 1,000,000 for the shop. Yes, please. There you go. So this is the original image off. Of course, With this original image, the little bit corrected. They made in adobe camera raw, which we got it for the shop here. This is the process. Black and white, high key. So this is how you process a high key image and even plan on how we can basically get it to black and white, More artistic way to represent it. So now let's look at the low key part. Okay? Just stay here. Now let's go back. So these two are basically Loki. Let me just take This is my favorite to Mitch. So the bag blown off this image is the stagger. So this is spotty from Banda. Got a grizzled. So she just want across, like in the woods completely shadow area in the early morning, I saw this one particular patch off flight basically on, and what happened is basically my exposure was not fully correct, but still I under exposed it a little. Got this, So let's fix it. Explosion radios increase my compressed highlights. That is the highlight so that it is not over exposed. Then why? It's really so. It's a little because the contrast again bring back the exposure a little bit. Increase the Y prints, a little shadow. A little bit of the shadow went on The fees That's good and the rest I looting for the shop . Open the image. Open it's image. Let's reduce the size toe. 192019 to 0 pixels. And I used my layers levels. So this is fine. What I want to do now is basically the background. I want to take care if anything is still visible. There you go. So the bag bonus all the past. What you see bright. It is under exposed area. So this is OK. Looks cool. What else? So I want to create another layer and let's see if I can bring a little bit off brightness onto the other side of the face. Um and I know, sit used the brush tool, extra struggle. They regard this area. It is still in a little dark area. I want Brighton. It not the top part. There was sick. I will give it the Steri go. So again, Lear like in the image and of course, the rest of the things sharpening and any other minor adjustments I want to do. I go ahead and do that. But this is how, for a high key made in the low key image, you need to get it into post processing to get the final output. Because out of the camera, sometimes it's very tough because the dynamic range there is so much plea in the dynamic range in the camera, it's difficult to get it right. So hopefully this was helpful in trying to understand how you get the final hiking low key image using post processing techniques
88. Ethics of Wildlife Photography: the ethical aspects off well, a photograph e, obviously one of the most important aspects off. Well, a photograph. Eat. Let's go through some of the issues, what we have seen in the forest and how to avoid that or what to do, What not to do when it comes to a left photography. The most important point, obviously, is the safety off yourself as well as the safety of the subject that is the first and most important 0.0.7 years out there in the wild. Make sure do not approach the subject to close, which causes disturbance to the subject. So what we call as the circle of fear now generally, if you understand animal behavioral aspect, so every animal has what you call us a circle off year, you suddenly enter that circle. Two things will happen. Either the animal will get afraid it'll run away off, for that matter, it may charge or attack it You. So keep this in mind and give it distance. Give it space and slowly you need to enter your why I left the circle of fear. Next comes with respectable wherever in a lot off tiger results when it comes to tiger photography. I want to talk about that now. What happens is obviously everybody wants to see a tiger, and especially some of the well known national parks, where the tigers are easily seen a lot off crowd. A lot of vehicle gathers now. This is where we need to balance, so we need to make sure we give chance to. Others also view why life now it's not necessary that we, as wildlife photographers, re deserve to see the tiger or decide to see the way I left first. And then there are regular tourists, and so they're okay. No, everybody should get it. Sounds to see that. Take it right from kids. Elderly people toe anybody who loves who comes into the suffering. So keep this in mind. Respect your other photograph for friends. Respect the other crowd. Other people who have come to see why left now same aspect. When it comes to my left photography, you need to make sure to respect your by left photography friends. Now, generally a lot of situations. What I do is no matter if I release the place first for my photography, and there's one particular angle I'm getting to get the shot and I placed my vehicle. I get the shots. It could be any subject, any animal with a clear view, only for my vehicle and then other photographers. They come here. So what? I generally tend to Lewis. Once I get my shots, I loose, miss, let others photograph. I mean, like their chances with the subject, The tiger. Any animal may get up, walk. Anything can happen. But that is a small chance I take where I move away. And once I'm done with my shot, I make sure I give others also an opportunity to shoot. So this is something which share to keep in mind to make sure you respect your fellow for President Lis. Then comes the other ethical aspect off flash photography, especially early morning when you're into the park. Late evening off, for that matter, a lot of photographers when you shoot in or two more chances of the flash pops up. So flash photography, What tends to happen is it agreed, rates the animals, especially I've seen Olyphant starting or even a lot of other mammals with the flash return to renovate or again charge. So flash photography is a big no when it comes to while a photograph e and then some of the basic rules here to keep in mind, to keep distance from the subject now again, when it comes like tigers walking head down. So there, multiple times which happens if they don't A lot of vehicles which are already part, and then the Tigris coming had done, and there is no way for you to back up, then chances that the Tigers looks at that. And then it walks away from the crowd. It walks off, whereas, like other situations, were not too many because the tigers walking head down, please make sure to give good amount of gap. Of course, some in why left. We try to maintain it least, like 30 meters from your subject, like keep some distance so that even from your photographic point, a few for your composition, you need that space. So if you look at all this various aspects videos, things, what were discussed, make sure you keep why left first less disturbance, no shouting around in the park and obviously cannot get off from the vehicle, walk around to shoot so and follow the park guidelines so a lot of parks have their own set of guidelines and certain parts you do. They do alot tracking and said the document either is us. They do alot to track inside the park. But that doesn't mean that taking a solo inside apartments, you can get down from the vehicle and shoot a big no. And even when there are multiple vehicles lined up for your photography and the subject is that said, you're not able to get your short sometimes what happens? People tend to jump the vehicle, go to the other vehicle and get the photographs again. That is something which I would not recommend. So and most importantly, if you ask me like during the safari, always sincere guides and drivers because they're the ones who know the rules of the park, the guidelines. What needs to be done? What? No, we need what need not be done. They know it very well and especially as well left photographers. Other thing What I would recommend and suggest and request for that matter is do not put the drivers and gets under any kind of pressure because for us, like fine, we come just for one trip or a few safaris and we go away. But the drivers and guys that inside the park through the season, they keep driving every single day. So if you imagine, like, each time, any photograph or they come they start putting pressure on the driver and the guy saying, Get close and I need this angle or overtake this vehicle. Go fast in the safari. I need to get there. I need to get this angle. So if you keep putting pressure on the drives and guides, chances are like they stopped responding to you, and then you may not get your shots, so please cooperate. Work with the drivers. Great. Respect. What? The sea. At the end of the day, this is the final call. They take a coastal waters. Okay, what is not OK. And I request you to respect those guidelines. Talk to them. Okay. And, uh, that's it. I mean, overall, if you see, like, the whole all this various ethical aspects off my left or turn it off when it comes, it has to be there to enjoy your safari. Enjoy a while a photographic at the same time, not compromising your safety or animal safety. So always keep conservation in mind ethical aspects and enjoy your wildlife photography.
89. Conclusion and Way Forward: what next? So I believe you have gone through. The entire editorial spent time on understanding the various concepts with these chapters, right from your animal behavioral aspect to understanding what are the locations for safari , the technical aspects, the compositions shooting from the vehicle, the different shooting techniques. I mean the whole lot off things by this time, what you have understood, and it comes to wildlife photography. So, as you have seen, while a photograph is not easy, not simple and at the same time you can balance your I love photography with not making it as a very expensive hobby. So as a next step forward, what I would recommend, they see how we conform groups. So there are a lot of social media platforms very can associate it very can associate with like minded people, form groups, plan your safaris, plan your trips to go together, find out the destinations, do some homework conduct and get going off course. Apart from that, to get your concepts right, you can practice all this concept during the weekend near their home itself. You're under to go into the white, where it's more off understanding the concept, the technical aspects off photography, understanding your equipment itself, understanding your lens, the combination, everything put together. Apart from that, another way, you can learn photography. Learn while I photograph er to take it forward. You can come to us. So we organized react. SSP organized what we call us, the photography learning tools, the wildlife photography, learning toes. So where we covered a lot off aspect. So we have indoor learning sessions sessions outdoors where we're staying. Apart from that, the actual learning session in the wild itself, in the safari vehicles are in a place like this on foot. So we have different combinations off my left photography learning stores. So we have different combination off wildlife photography, learning tools. You can say the four or photography learning as well as you can see these other different ways in which you can take your my left. Photography learning forward. Apart from that, as I said, don't worry too much about what equipment you're having, what they were equipment you're having. Aiken got into You followed all this video steps, what are shared, and then you can definitely become a better photographer and actually start doing good. Well, a photography with whatever equipment you have later point of time you can start looking at the equipment upgrades based on the limitation brought back and the frustration what you get with what you're not getting. So hopefully this particular course helps you to become a better while a photographer and take your learning forward. Good luck.
 Sudhir Shivaram, Wildlife Photographer,Photography Mentor