Transcripts
1. Introduction to the course: Hi, guys. I just wanted
to quickly jump in here to explain what this
course is going to be about. Firstly, I'm going to provide some general information
about virtual assistance, how it works, what
do you expect, provide some tips and recommendations from my
own personal experience. Also, I'm going to
be digging into some particular tasks and
explain how to do them. It's easier to pick them up when you're
working with clients. And lastly, I'm going
to explain or just advise how you could be starting your virtual assistance
career from scratch, how to price yourself,
where to find clients, how to build your social
media, et cetera. If this is something
you're looking for, I would highly
recommend reviewing the scorse checking if you
like it and I really hope to
2. Who is a VA: So let's start from
the basics and let's talk what a
virtual assistant is. A virtual assistant
is a person who helps other professionals
and completes some of the tasks
on behalf of them. They simplify this professionals
workload and there isn't one type of education that you have to complete before
becoming a virtual assistant. But that's also a nice part of it of this
profession because you can really customize
your offerings and the services you
offer depend on you. So you could be doing variety of the tasks that I'm going to explain in more
details later on, but it's going to be anything from administrative
support, research, travel planning,
financial assistance, social media
maintenance, et cetera. So I'm very, very excited to tell you how everything works and just for you to see what you could be
offering in the future.
3. Who needs a virtual assistant: Now I also want to touch base on the market and basically
where to look for clients. We're going to have
an entire lesson learning how to reach out to clients and where
to search for them. But just so you get some inspiration where
your market could be, I would always recommend looking for busier
people, of course. Looking at any small
business owners perhaps that need help
with certain tasks, but they wouldn't want to
hire a person full time. That's where you could step in or it could be ecommerce, um business owners, right? You
could also be helping them with product listings and
any other ecommerce support. What else I could
think of consultants. Let's say business consultants, perhaps they would
need your help to do some research or
let's say startups. Perhaps they don't want to
allocate an entire salary for a full time employee
and they would be interested in hiring
a virtual assistant. Or also digital agencies that are focusing
on social media. If social media
is your strength, perhaps you could be targeting them because perhaps
they would need your assistance with certain tasks as
community engagement, any other social media
maintenance, content creation, or even outreaching to influencers and
this type of tasks.
4. How did VA change overtime: So now I also want to talk about how much virtual assistance actually changed over the years. The tasks that AVA
was responsible for ten years ago are very much different from the
responsibilities at the minute. We've seen AI coming
in and we've also seen some trends emerging
in recent years. Let's talk e. First of
all, AI already mentioned, I feel like it works in virtual assistant
favor in some sense, but it also took away
some of the tasks that the virtual assistant was responsible for previously. I believe that the
most affected tasks were quite easy to do
tasks like data entry or even customer support
because we've seen quite a few AI chat box appearing and they're getting
more and more popular. Um, but as I mentioned, we can also use it to our advantage because
we can do research, let's say, way easier
than we would previously. So, it depends basically which perspective do
you have and go for. Um, but then also we've
seen some trends emerging. The first thing that
I've noticed is that virtual assistance in
a particular niche are getting more popular. If let's say you have
a finance degree, perhaps you're mostly
going to focus on financial responsibilities
task or perhaps, let's say, if you
speak a few languages, perhaps you're going to target certain markets that
are looking for that. Having a niche market is seen, um, quite beneficial these days. I also noticed that quite a
few companies are looking for people who are very
proficient technically. So you have to know
how to use AI, how to use Excel, how to use other platforms. People want to work with virtual assistant that have
experience with these tools. I feel like right now we have so much
information around us, given to us for
free and YouTube. There's pre courses or even
quite inexpensive courses on DM that you could
take to actually learn how to use a
certain platform. I believe that we shouldn't find excuses anymore since
there's so much information online and we should just
be getting better and then we're going to
become more relevant to people who are looking
for virtual assistance.
5. Using ChatGPT as a VA: Right now, I'm going to
show you another tool which I love to use
on day to day Live, which is called Cha QibT. Perhaps a lot of you already
heard of it or even used it. But for those who haven't, I just want to show and
give some inspiration of what you could be using it for and basically how to use it, even though it is very easy. But, yeah. You can find it. If you just Google the name, it's going to pop off one of the first ones and
how to use it. You have this little
field task question, and the questions you could be asking could be basically
anything, to be honest. You could ask for more information or how
to use a certain tool or, for example, draft an
email template, et cetera. So let me just ask
them to give examples of what we could be using ChatwT for as
virtual assistance. So as you can see, I just
entered my question here, hit Enter, and I got the answer. So we could be using HA JT for any content creation and
social media management. So basically, drafting
any captions, perhaps, asking for what hash
tags do you use, et cetera. Then for any customer
support, VA TAs, so drafting any safe replies,
macros, basely templates, making fax sections,
um making any replies, even translations, right,
or resume support. But let me give you a
particular example. So let's say I want to
ask my Asha GPD to draft an email that I
could be sending to my client to forward me the invoice they
received a week ago. So let me just enter
my question here. So as you can see, I just
popped my question over here and let's just
click on Enter. As you can see, ChatGPT already provided me a response saying,
I hope you're doing well. I wanted to follow up on the emails you received last week. Would you kindly send me a copy at your earliest convenience. If that's not something
you're looking for, you can also go back
and tell hatiwt, please do not use
this and these words or can we change this
to that, et cetera. So it is a very handy tool. Of course, the example
wasn't the best perhaps, but whenever writing
a larger email or but never making a
dozen of safe replies, it could be a very handy
tool to use to save time. Of course, you can also ask
any informative questions, right, to receive the answer to the question that you
need to research ph, but I wouldn't rely on it
100% because Ajit, of course, makes mistakes, and it's
better to use it with caution. But overall, I
think it is a very, very great tool.
We did I cut off. I think overall, it is a very
great tool that simplified our lives already and
continue to do it. So check it out, try it out and see if you
can get a hang of it.
6. Where to find clients as a VA: So now let's talk about find clients as a virtual assistant
who is just starting out. The first one would be
through the word of mouth. Seeing if there's anybody
in your network that would benefit from your services or to whom you could be
offering your services. We better it would be
your family member, the friend of a friend. Basically, ask them to spread the word and see if any
clients come through that. And the second way I would recommend looking for clients would be through social media. As mentioned previously, having a strong social media
presence is very important. You attract clients to
reach you directly, but you can also use
social media to outreach to the potential clients and just offer your
services as well. You could be using LinkedIn
or Facebook, let's say, to send direct messages to them and see if you could
attract anybody like that. Um I would also recommend
joining the groups, especially on LinkedIn
and Facebook. There are some groups that
are particularly from, let's say business owners or any other professionals that are looking for virtual assistance. Perhaps if you see
a post like that, you could jump in and say that I'm available for
this and this task. I could help you out with this. Um, another way would be through the outreach very close and very similar to what I
mentioned about social media, outreaching to the
potential customers. This could be done
through the message through Linked in Facebook, but this could also
be done via email. I'm going to be attaching some templates that you could be using to outreach these
potential customers via email. But basically, just
finding some emails, let's say, from perhaps you're already
following some, um, business owners, perhaps
you're frequently buying some products or services from some business owners and you already have their
email addresses, perhaps you could be reaching
out to them and just, um, explaining that you
are virtual assistant. You are offering this
on these services and you're wondering if they
would benefit from them. Besides these, you would also have some clients coming
to you from referrals. Of course, this is
usually later down the line whenever you have
some clients already, you may be asking your
existing clients to see if there are
other people they know that would be
interested in your services, especially if your
existing clients are very happy with the
services you provide them. That could work perfectly. The last option that I
would recommend exploring, especially when you start
as a virtual assistant would be the freelance platform. The ones that are quite
popular are fiber at work, and one more missing
people per hour. You could be looking at those platforms and seeing if that would work out for you. Usually, you just need to
register, create your profile, complete all the
relevant information about your experience,
portfolio, if you have one, and then
you would be bidding for projects that are
available on that platform.
7. How to price your VA services: So first things first
pricing and how to price your services as
a virtual assistant. There are three main ways on how most of virtual
assistants are pricing their services
and the first one is by introducing
an hourly rate, charging per hour basically, and the second one is
having a tiered package. Let's say 10 hours of
my work is this amount, 20 hours is this amount, 30 hours per month
is this amount. Um, and then the third way
would be pricing per services. Let's say I only provide financial assistance to
you and I price this much, or let's say I'm only
going to be helping you with any social media
and the charge is that. Once again, it is
completely up to you. You're working for yourself, so you can set up your own pricing that works
best for you once again, but these are the main ones that are quite common
in the industry. How to find that
price that would suit you so there are a few suggestions
that I have for you. The first one would be checking what are the prices
in the industry and specifically the country
that you are located in or the country of your
target market as well. I would consider that firstly, you would also use SGBD to do it just to get
that overall idea. Would also review
my competition. Let's see what prices they have set up and see if
that would also suit me, would I like to go below, would I like to go up? I would also consider
my experience. Let's say if you have
years of experience, of course, you're going
to be charging more. If you're just
starting, perhaps, you're going to be
charging a little bit less to gain that experience
in the first place. Whatever you decide,
just keep in mind that you can always adjust your
pricing but later on, you don't have to stick
it for years to follow. I would just recommend
being extremely straightforward and clear with your clients and just
having this transparency.
8. How to specialise as a VA: So I already mentioned
this previously, but I want to quickly
repeat myself and say that virtual assistance
changed quite a bit over the years and what was relevant, the tasks that the
virtual assistants were doing and the
tools that they were using are very different currently from how they were
ten years ago, let's say. I feel like as a new
virtual assistant, you need to keep an open
mind about learning how to complete certain tasks or about learning how
to use certain tools. And just remaining very, very flexible and of course, have a few suggestions on how to stay on top
of these things. I would firstly
recommend just trying to identify your strengths and see what you're good
at and from there seeing what type of tools
could be relevant to that. Let's say you're very good
at managing projects and perhaps you could then have a look on what tools are
relevant to project management. In this case, it would be Asana, Drello and if you don't know
how to use these tools, perhaps you would like
to go ahead then to YouTube and watch some videos of other people
explaining how to use these tools or
complete a UIMI course or find some information
online about these tools. I would always recommend just looking at your
strengths and then identifying the tools that
you may find very useful. Another thing is just
learning as the time comes if you're asked by the customer to complete a certain task that you
haven't done before, or use a certain tool that
you haven't used before, as long as you keep
transparent and as long as your client still agrees for you to complete it using
that tool or that task, you can go ahead and
research how to do it and try to do your best and complete it or try
to do your best and figure out how
to use that tool and get this practical
experience so that you can also go ahead and use this experience for offerings that you will have
in the future.
9. How to track time: So another thing that you may want to consider
before starting as a virtual assistant
and before starting to offer your services
would be time tracking. The reason why it
is so important is because you have to start time tracking whenever you begin one task or whenever
you finish the task, and it can become a bit tricky whenever
you're working with more than one client. I would always
recommend investing and paying a few euros a
month for an app where you could be tracking your
time a little bit more efficiently and just have everything on the record
for different clients. Of course, you don't
need to do it. You can do everything
by yourself and just do the timer and
write everything down. It is completely up to you, but there are a few apps
that I would recommend all of them have a
free basic version. If you want to use
it for more clients or you want to use
other features, you may need to
pay a monthly fee, but those apps are the harvest, clockifiT doctor, rescue
time, and toggle. I think that's how you
pronounce it but it's DOGGL as I mentioned, all of them are free of charge, at least the basic versions, and they can make your
life a little bit easier as a virtual
assistant because I know that a lot of
virtual assistants have the same problem of
forgetting to track their time or forgetting
to write it down somewhere and not getting
paid for those hours or not knowing how much
time they should add up. At their invoice, it
is always useful to have an app or a very clear way on how
you're going to do it.
10. Social media presence as a VA: Another thing to consider is a strong social media presence, especially if you're just starting as a virtual assistant. I believe even if I
try to put myself in the client's shoes
and if I would be looking for a new
virtual assistant, I feel like I would put
a little bit more trust into the accounts which have quite strong
social media presence. They're talking quite a lot
about virtual assistance, the struggles that
they're having, they're sharing
the testimonials, et cetera, rather than
an account which doesn't have anything virtual
assistance related. There. I believe that's why having strong social
media presence is so important and the
platforms which you could be using would be LinkedIn
because on LinkedIn, you can find all type
of professionals from business owners to just
consultants at ARBs, to real estate
specialists, et cetera. It is a really good place
to network and to also outreach to your
potential clients and offer your
services later on. Another platform is Facebook. Quite a few people are still on Facebook
and Facebook also has groups for different type of businesses or even
virtual assistant. It is also a great place to be. You could of course, later on, once again, same as in LinkedIn, be reaching out to people and offering your services
or perhaps you're going to create Facebook
group and promote your services there and invite other people who may be interested in your services
to join that group. It's completely up to you. The third platform
is, of course, Instagram and the
fourth one is TikTok. Both of them have very large audiences that
your post could reach. You could also be doing some
ads on these platforms. The ads are also quite cheap, so you could be reaching
even more people and you could be getting
more clients later on, so these are the main
platforms to consider. Whenever you decide which
platforms you're going to be using to promote your
services, your business, I would also recommend just staying consistent,
keep posting, keep commenting on
other creators post, keep yourself involved in
different discussions. Also join the groups
that could be relevant, whether it would be virtual assistance groups
or whether it would be any groups of
your target markets, perhaps small business
and spin groups or any other country ride
that is relevant to you that you could be
perhaps targeting later on. I would also recommend joining these groups
not only on Facebook, but on LinkedIn as well in
case I haven't mentioned that. On LinkedIn, keep in mind that you can connect
with people and network. Whenever you're trying to
connect with different people, you're also going to be allowed
to send a small message. In that message, you could be just basically
briefly saying, hi, my name is Natant Um, I'm a virtual assistant
and I'm wondering if you would be interested in
my services and et cetera, you could be also outreaching to different people and promoting your services just like that. Then we're posting
your content as well, I would highly recommend sharing your testimonials from different clients in
case you had those. I would also recommend sharing the difficulties of
being a virtual assistant or the perks of being
a virtual assistant or the other topics that could be relevant and could attract people to
read your post, follow your profile, and promote your business to
a wider audience.
11. Time management and productivity: Right now, I would
like to talk about time management
and productivity. This usually is
quite relevant for people who have more than
one client to manage at a time and perhaps they have another business or part time
job going on on the side. The first thing
that you want to do is set clear expectations with your client in terms of the deadlines in terms of how long that project
is going to take you. If you're seeing that it's
going to take you a little bit longer than you mentioned
firstly to the client, following up with the client
and explaining reason why that project is
taking longer than expected and just keeping
everything very transparent. Also, I would recommend
setting clear boundaries. Let's say you're working
this and these days, let's say Monday to Friday
and this and these hours. If the message from them
comes outside of these hours, you're going to be
responding on the next day. Also, I would recommend just
mentioning a time frame. Uh, when they should expect
a response from you. Perhaps within 24 hours, within 12 hours, whatever
you could offer, of course, mentioned that
you're going to be trying to respond to them
as soon as possible, but that may not
always be possible as well if you're managing
several clients. And all of them are
quite high priority. That is very
important to manage. I would also recommend
prioritizing your task, the projects that
you are expected to complete based on the
deadlines and priority. You could be finding the
system that works for you, let's say, booking some time or your own calendar to
work on different tasks. Let's say today from
9:00 A.M. To 1:00 P.M. I'm going to be working only on this and this project
and then from then, going to work for 2 hours on
another project, et cetera. You have some structure
in your day and you also know that it's going to work
out towards the deadline. If you have more
than one client, I would recommend subscribing to Trello or to Asana because it is easier to manage the
projects you have going on the different clients to see what tasks still
needs to be done, which tasks have been
completed already, so you can cross them out. So you don't forget
to do something or you have an easier way to follow up on things later on. The last thing that I would
recommend is batching up simple tasks together and
doing them at the same time. So you don't get
distracted and you just have different projects and different tasks going on on
different times of the day. You don't start one
and then move to another 15 minutes later
and then get back. As you don't get as
distracted and you complete your task and your
projects in a timely manner.
12. How to get client testimonials: So now let's talk
about how to get testimonials and reviews
from your existing clients. So the first way and most effective way is by simply asking your
customer to do so. You could ask email, you could ask what message. I'm going to provide
some templates in a separate file for you to use. But of course, simply
asking, let's say, after a project or
whenever client express some gratitude or that they
like the work that you did. Perhaps that would
be a great chance to outreach and ask for
a testimonial from them that you could
later on use on your social media platforms
or your portfolio as well. Um, another way would be
once again outreaching, but also offering
something in return. This is also very effective, especially when you have
perhaps more clients as well that you
may be offering, let's say, a couple of hours of your work for free in
return for a review. You could also consider making different types of testimonials. Let's say, um, written testimonial and
a video testimonial, you have different
formats to then share on your social media platforms
or on your portfolio. Of course, there are tons of other strategies that you may be using that would
work for you. I would just recommend
testing them out and seeing what works
for you and what doesn't. But these are just a couple that could help you out and
gather those reviews. So later on, you could
be looking more credible
13. How to grant inbox access: Alright, so another
very important thing that your client
needs to do before he can start managing their
inbox is to share the access of the inbox with
you as a virtual assistant. So if they would like to do
it with their Gmail account, they would need to log
into their account and then go to the Settings
option over here. They would need to
select CO settings. And then from there, they would need to select
accounts and import. And they will have grant access to your account
option over here. So they would need to add
another account by click on it and entering your
email address over here. What this allows to do is
to delete their email, send emails on their behalf. The only thing that you're
not going to be able to do is modify any of Google
account settings or change their password, but when it comes
to anything else, you're going to be able to
do it on behalf of them. So once you enter the email
you want to give access to, just click on Next step. And send email to Grant Access. That's it. You're going to get a confirmation that
access is granted, and the person who you granted access to
is going to receive this email where they're
going to be able to accept the request
or reject the request. Of course, if it's a
virtual assistant, you're always going to accept the request by
clicking the link. You have to confirm and then as you may
see in the message, it may take up to 30 minutes
for it to be action, but once it's done, you're
going to be able to see the inbox of your client.
14. How to delete emails in bulk: You most likely already know
the option on how to delete the emails by simply selecting them and clicking
on deep option. But I want to show you another very handy option GML
and Outlook already have. It's basically deleting
emails in book, and you can do it
for older emails. Let's say, any email which were sent six months and
older, for this example, I'm just going to
delete anything, which is a week and older. So all you would need to do is enter this little formula
in the search bar. Here you're going to have
before year a month and a date. Once you enter the date, you simply need to
click on Enter, and then you're going to have
all the emails which were sent to you before
January 19 of 2025. So right now all you'll
need to do is click on Select Option and
delete all of them. They're going to now
appear in your bin. So if you would like to
delete them permanently, you again have an
option to select all of them and click
on Delete forever.
15. How to create an email signature: Okay, so let's create an
email signature together. So once again, we're
going to go to the settings option over here
and click on C O settings. Under the general,
you'll need to scroll down until you see
the signature option. So for me, it would
be, am I missing it? Yes, I'm almost missed
it, but I found it. It's over here for me. If you haven't had the
previous signatures, you're just going to
see no signatures and create a new one over here. So let's get started. Click on Create New signature, put the signature name. So and click on Create. Usually what you
want your signature to always have is your name, your job title,
your company name, your contact information,
so email, phone number, website, and any relevant
social media links or images. So you can discuss
everything with your clients of what
exactly do they want in their email
signature as well. For the sake of this example, I just entered a quick template. So best regards your name, job title, jump company, email address, website,
and phone number. So you can now choose for when the automatic
signature should appear. So for example, would it have to appear for any new emails, I'm just going to
click my signature, and on the replies
or forward, also, I'm going to click that
it should appear on this, and I'm just going to scroll down and click on safe changes. So let's just put it
to the test right now. If I click on Compose email, my signature is
already over here. So it's a very
useful thing to have if your client or you are
emailing several people throughout the day and
you don't want to keep inputting your or your client's full name
and other details.
16. How to schedule an email: So right now, let
me show you how to schedule an email to be
sent at a later time. So this is very useful
when you need to follow up on something or your client needs to
follow up on something. So let me just show
you how to do it. You would start the same way as just composing a regular email, so you would click on Compose. You would select your receiver. Would simply put the subject and the body in and click on this little arrow button
to see more CNN options. If you click on it, you're
going to see Schedule CN. You'll have an option to pick from what GML is offering you, or you could also select your
preferred date and time. So that's what we're
going to do it. Let's say I need to
follow up in a week, and let's say I need
to do it at 12:00 P.M. And that's it. I enter the date. I enter the time, and I'm just going to click
on Schedule send. As you can see, the notification
appears saying send schedule for Sunday
February 2 at 12:00 P.M. So now let's say I don't need to send
a follow up anymore. I want to cancel it. You can all the time do it, or you can always edit
it to a different date, different time by clicking on the scheduled inbox and
clicking on Cancel SN. And just like that, your
email is just going to pop up in front of you once again and you could
edit it again, click on the Schedule
SN and just select a different date if
let's say you need to modify the time of
your follow up.
17. How to create saved replies: So right now, I'm going to
show you how you could be creating your safe replies
on your Gmail account. Perhaps you want to
create some templates for yourself to use when
replying to clients, or perhaps you want to make your clients' lives a little bit easier and create some
templates for them to use. So let's just get started. All you need to do is log into your GML account and then
click on the Settings button, see all settings,
click on Advanced over here and make sure that
the templates are enabled. So if you had the Sable, just switch it to Enable
and click on safe changes. Once this is done, you can go ahead and create the template. So you would be creating a
template the same way as you're creating a new email
by clicking on Compose. Um, make sure that the signature is deleted whenever you're
trying to create a template, just so you don't see that duplicate signature
appearing whenever you use that template. So yeah, just delete that, enter the template
you wish to use. If everything looks correct, you can go ahead and
save this template. So you could just be clicking
on the three dots for more options, templates and save draft as template and
save as a new template. The template name usually
appears in the subject. So if you want to, um, save yourself some time. You can just enter a very neutral name that could appear in the subject and would still look
professional and good. So let me just save
it as a follow up. Once it is saved, we can go
ahead and use the template. So all you would need to do is once again, click on Compose. Click on the Tree dots the same way as we save
the template, right, and click on the follow up the template that
we just created. And as you can see, the subject
is going to be follow up, and the template
is going to appear in the subject in the
description field. If you no longer
need this template, you can once again go to more options templates and delete the template
you choose to delete, just like that, and
it's going to be gone.
18. How to create automations and labels: So whenever you're working with your new client and you're
managing their email inbox, your client may find
it very useful if you would create some labels
and folders for them. So this is where I come in to
show you how to create it. So all you would need to
do is access your GML or your client's GML account
if you already have them and click on the option
to create a label over here. Um, you can use
labels for anything. You can find your own system and basically what your
client would benefit from. Just to give you a few examples what labels you could
find useful is, I don't know, urgent emails,
high priority emails, anything your client
subscription related, right, or let's say anything customer
communication related, or for this example, I'm going to create a label for any invoices your client
may be receiving. So all I would need to do is enter the name and
click on Create Option. And as you can see, a new label appears over here
on the left side. So if you would like to transfer some existing emails
into your new label, all you would need to do
is simply drag them here, and you could see them appearing over here in my new label. But there's another but there's another very
interesting but there's another very handy tool
that you could also find on the GML account
whenever you need to sort the emails automatically
to save your own time. So, for example, I
need all the emails which have invoices attached to them to go to my new label. I can try and set it up automatically for
the system to do it. So all you would need to
do is click on settings, see all settings, filters
and blocked addresses. And create a new filter. So perhaps your client has invoices coming in from
certain suppliers. So you may have their
email addresses already, and you could input it here. But for the sake
of this example, I'm going to use
this line only has the words and put invoice as
the word I'm looking for, and click on Create
Filter option. So this will create a filter for basically any email which has invoice within it to go
to my new label, inbox. So to finish off the setting up, I will need to click on, apply the label and
choose invoices label as the one I want to and
click on Create Filter. So right now, let's
put it to the test. So I email myself simply with the world so I emailed myself simply with
the word invoice. And you can see it
appeared over here, and it was automatically
transferred to my label called
invoices as well. So yeah, and you can also see that it was marked
as invoices as well, which is very handy
because it stays on the main inbox as well, so it doesn't transfer
to the label only. Um, so yeah, this is
a great tool to use. I wouldn't rely on it
100% because things happen and some emails
could be sorted wrongly. But for these very basic emails that perhaps are not as urgent, and you can perhaps this
option could be great to use.
19. How to grant calendar access: So before you start managing
your clients calendar, the one thing that
you need to do is to get access to their
calendar as well. So of course, some clients are okay with sharing
their passwords, but I would rather just have them share the access
to the calendar. This is a safer way
to do everything. So all they need to do is log
into their gmail account, go to the Google calendar. Click on the settings option, go to the settings. And over here, they're going
to see their calendar. So here, they're going to see their name, if they click on it, and if they click on share with specific people or groups, they're going to
see this option. So you can add
people, for example, you as a person to share
their calendar access to. So let me just show you how to. Just click on the person
you want to share the access with,
change the permission. So you can choose. Your client can choose what they want you to be allowed
to do in their calendar, whether it's just
simply view it, whether it is to edit as well. So if they don't mind you
editing, creating events, changing up everything
in their calendar, I would recommend going with Make changes and
manage sharing option, and just click Send button. What's going to happen right
now is that the requester, this email is going
to receive a message. I'm going to shortly
show you which one. And from there, they're
going to be able to have access to your inbox,
your client's inbox. So this is the email that you as a virtual assistant is going
to receive from your client, and all you would want to do
right now is click on Add This calendar and simply
click on Add Option. Once done, you're going to see your client's meetings popping up in your calendar as well.
20. How to schedule a meeting: Alright, so I'm going to show
you how to create an event, a meeting on the
Google calendar. There are only a couple
of options to do it. I'm going to show
you both of them, and I'm going to briefly
explain how everything works, so you can easily
create an event or a meeting for your client
or for yourself as well. So the first option is if you
open your Google calendar, and if you see the
entire calendar, you can just simply go ahead. And click on anytime
in the calendar. So let's say, I need
to schedule a meeting for later today at 5:00 P.M. I would just click here, and this little window
would pop up for me. So I could either
continue here and fill in all the details,
including the title, the timing and the
length of the meeting, I could add guests as well here, location, and just click on
Save, and that would be it. But there's another
option which you can go to from here if you
would click More Options, or you could also
simply click on Create event and simply click
on more options as well. If you click on it, you're
going to be redirected to a larger window with more
options as you may see. So let's just talk about all of these options and everything
you can select here. So as you can see, the
first one is the title. There are certain
templates that I use, and I'm going to add them either in the resources or
somewhere on the screen. Um, but, yeah, you
could simply make a title describing what this meeting this
school is about. So let's say it would be one
oh one with insert a name, or it would be progress review
of and the project name, or it would be interview for
and the position, right? So just basically describing what we want to achieve
with this school, so it's clear for the receiver. And underneath a title, you're going to have an
option to select the date. So if you want to
adjust the date, you can simply click
on the date and select your preferred
one in the calendar. You can also select the time over here and the
length of the meeting. Don't forget that you
have an option for a time zone just in case you're scheduling meetings
for your client who doesn't live in the
same country as you do, have a look at that
because it can become tricky if you're working
with international clients. And then underneath the time, you're going to see
the event details. So as you can see, I can make this meeting either a Zoom
call or a Google meet. The reason why I see the Zoom
meeting option is because I have an extension of Zoom installed into
my laptop already. If you don't have one, I would highly recommend
installing it, especially if your
client has a preference for Zoom meetings instead
of Google meetings. So yeah, discuss this with your client prior to see what is the
preference there. And if the preference
is Zoom calls, then I would highly
recommend installing them. It's really easy
Google Zoom extension and follow the
process from there. And, um let's say right now
for the sake of this example, I'm just going to add
it as Google Meet. Then you can also add location. You can leave it blank
or also just say Google Mat as well depending on where that meeting
is going to take place. Perhaps it's going
to take place from your client's office with
other people as well. And perhaps you're going
to be talking with somebody who's located in
different country, right? It could be an option. So if needed, also pop
the location over here. Underneath a location,
we have another very, very useful tool, which is
a notification or an email, 30 minutes or 10 minutes or whichever time frame you
prefer before the meeting to give your client or yourself a heads up
that this meeting is scheduled and they need to
attend a simple reminder. I always put it as notification.
That's what I prefer. That's what makes it
easier for myself, and usually it
pops up over here. You'll also have an
option to color code it. So whether you have an
accomplished system with your client already or not, but perhaps you color
code, let's say, one on ones and one color and the interviews
in another color, that could be a very
useful system to just see what the client has in their calendars and
basically what they need to prepare for without having
to analyze the calendar. And then we have an option
to select busy or free. What that means is if I
would select busy and nobody else could schedule under a meeting to
overlap with this one, if I would select a free option, then somebody else could
basically schedule another meeting
in the time frame of this meeting if
it makes sense. And then you also
have this option, which makes your calendar
either private or public. So either everybody can see that you have
this meeting or not. And lastly, you just have
a description option. So I just like to provide further details to say something like as
discussed previously, I'm scheduling a
meeting for this and that to talk
about this and that. You could also include
some discussion points or any relevant details what this meeting is
going to be about. So the person who receives an notation knows
and prepares for it. And the last thing you need
to do after you get all of this information filled
in is to add the guests. And the last thing that you
need to do after filling up all of this information
is just adding the guests. The only thing that I believe I haven't
mentioned that is quite useful to know is this does
not repeat an all day option. So all day meeting is
quite self explanatory. It just basically says that the meeting is going
to take the entire day. Your client is busy
and that's about it. And another does not repeat option can be adjusted to daily, weekly, on Monday, monthly,
annually, or custom. So for example, let's say, if your client has the
same meeting every week, you would simply
schedule at one time and select weekly
option and custom. That makes it a little bit
easier since you don't need to schedule since you don't need to schedule a meeting all
over again every week, so it just saves a little
bit of time for yourself.
21. How to modify already scheduled event: Now, once you created an event, you can also reschedule it. You could also adjust it from
the calendar once again. So if let's say you
need to extend it, you could simply
drag it to whichever hour you would like
to extend it to. You also have an
option to double click on it and edit the
event from there. Once you modify your event to your meeting, you
just click Save.
22. How to find a good time for a meeting: So let's talk about how to email other participants to find a good time to meet for
them and your client. I usually tend to offer them three time slots
that work for my client. I also consider a bit of
buffer time because I know that some meetings may
be a little bit longer, having that buffer time
really helps and I tend to, of course, use my template. So my template, I'm
going to drop it somewhere here is high name. I hope you're doing well, could you please let me know if any of the following time, would work for you and then
I just mentioned the times that work for my client and just say looking
forward to your response. I also add my client as BCC only because I want my client to be informed that
I'm working on it, that I'm trying to find the
time with this participant, but I don't necessarily want the participant to
know that I'm busy seeing my client in the emails
that works perfectly and I also have some tools that
I use whenever I need to find the right time and whenever I'm working
with a bunch of people. I usually use Google Forms, Doodle or Microsoft Fine Time. I'm going to have the
entire video explaining on how this could be arranged
with Google Forms, but have a look at Doodle and Microsoft
Fine Time as well. They're free of
charge if nothing has changed and it's also
very easy to use.
23. Finding good time for a meeting using Google forms: So another tool which I like to use when scheduling
a meeting with a larger group and
trying to establish the time that suits majority of the group
is Google Forms. So all you need to do is
simply go to Google Forms. And once you see the following, click on Start a new form. Once you click on
it, you're going to see this template appearing. So it's pretty self explanatory. All you need to do is simply create the
title of the form, explain briefly what
this form is about, what's the purpose of it, and enter a few options
that the responders can choose from and as well the question
that you're asking them. So this is how it looks after I entered all the
relevant information. So as you can see, it has the name, meeting
date selection. It has a brief
description, saying, please select your preferred
date for the team meeting. The most popular choice
will be scheduled. Then you have a little
question and three options. I usually only tend to give three options because when
we have too many of them, it's very difficult to find the one that would
suit majority of the group. So it's easier just to have only a couple or
three options available. But once I'm happy with the
selection with the form, with the poll, I could go ahead and share this with the
responders I want pad. So I would simply enter the
email address over here, make sure that that person is marked as a responder
and click on Share. I can then go ahead
and publish the form. As you can see, I have a few
options available for me. So for the responders,
basically, I'm saying that anyone with the link can respond
to this form, and I can share the link. Let's say if my team is using SPAC channel,
I would share it there. I could share it via email. I could share it in any other communication channel
that we all use. As you've seen before, I
could also share it with the responders by clicking on this and entering
their email address. So if I have everybody
already at it, I could simply click on this, notify these responders option and click on publish and Notify. Once I've done that, all of
the people who were marked as responders are going to receive this f with these
options available. So they will all be able
to select one option. So let's say February 13, 9:00 A.M. Works for
me and submit it. Their response is then
going to be recorded, and then I'm going to be able to review the answers
that preferred timing. So if I would go to the same
form and click on responses, I would see which day one and when I should
schedule the meeting. So this is extremely useful
and extremely easy to set up.
24. Project management: Now task and project management. You may be assigned
a certain project to complete by yourself or with
a group of people as well. You may be asked to set
deadlines to communicate with other people and set clear expectations of what
is expected from them. You may also be asked
to follow up with these people and
see where they at, how they completed the task they needed to be done in time. Um, and the sort of
tasks of coordination. And usually for these ones, Asana and Trello are
the most used tools. I would just recommend
having a look at YouTube or just subscribing to the services and seeing how everything looks, the outlook, and
just playing with it before you are assigned
this by your client.
25. How to use Notion: As you can see in front of you, we have Notion website open, and if you don't know what Notion is and what
it is used for, this lesson is for you
because I'm going to walk you through the main
questions of what notion is, what it's used for, what
can you do with it, basically, and who benefits
from this platform the most. And basically just going to
show you how to get started. So first of all,
Notion is all in one workplace for
organizing information, managing tasks, and
collaborating with others. It combines features
from no taking apps, project management tools, databases into one
single platform. Everything in Notion
is built inside pages, as you can see on the left side of the page in the
private section. And every single page can
hold either text, images, checklists, calendars or
structured databases. And now, what can
you do with it? So I already mentioned a few things that you
can do with it, but you can also create do
list, build project trackers, store meeting notes,
plan content databases, or even set up a knowledge
base for your team, let's say. You can also view
the same information in different formats, let's say, a table, board, calendar, timeline,
and filter and sort data to focus basically
on what matters most. This platform, at
least in my opinion, reminds me Asana and Trello
because those are both project management tools
or also confluence because it has the
knowledge base that you can share
with the team. So I feel it's kind of holding everything that you
could need in one place. And there are a lot of people
who could benefit from it. But I see lots of
students, writers, content creators benefiting from it, project managers,
freelancers, virtual assistants,
startup owners, small business owners is just a great platform
to learn how to use and organize everything in so now after we learn a little
bit more about notion, what it's used for what it is basically and who
benefits from it most, right now, let's get
to the practical part, and let me show you
a few functions that you have with Notion and basically show
you the basics of notion and how to
use this platform. So before we start
with a free version, I actually don't
remember if you only have the first welcome to notion tab available
and everything else blank because this
is a paid version. So you may not
have these options over here like project planner, job application tracker,
personal website, travel planner, et
cetera over here. I'm just going to assume
that you don't have it, and I'm going to show you
what you can do with Notion, basically from scratch, right? So let's get started. As I said previously, in Notion, you have
everything in pages. So what you want to do first, if you want to get started
is create a new page. You can do it by clicking
on this pencil icon, and here you have
your first page. So of course, you
have the option to customize it based
on your preferences. So either you want to add
any type of background, the cover, if you want
to add an icon, you can. Then you have that
title over here. What you write over
here is going to reflect here as well. So right now, let's
say we're going to create a to do list
underneath it, all options appear
when you start by typing a slash, and
as you can see, we have a suggested options, which are the ones that we're
going to use in this case, a to do list, right. But besides that, we also have other options such as headings, bulleted list, numbered list, toggle list, pages, quotes,
translation even options, images, video, literally endless options with notion you can do
anything you want. You have so many different
options to choose from. So I would really recommend
having a moment and exploring all the options and all things that you could be doing with
notion because once again, they're endless and it's
up to your creativity, it's up to your preferences. It can be very simple, right, but it can also be something very complex and
nice looking, right? So if I want to do a to
do list, this is it. I'm going to write
a few things here. For example, I need
to email my employee, I need to send an email. Once I'm done with this list, I can come back to this page
and just mark it as done. Then we can also go ahead
and create a new page saying notes on the important
project and keep this page. Basically just for
the notes that I want to keep for
this project, right? And you can just keep creating these pages, anything
that you need. You can also create
your own dashboard. I'm sure that you've seen it maybe on Instagram
or Tik Tok even. A lot of creators have it, and they really customize
it. Very lovely. It looks very neat,
looks very unique. And yeah, it's very,
very useful to have. So basically, I could just type Gabby's dashboard
right over here. Now what we want to do a little bit
differently this time. So instead of just
typing a slash, we're going to type Ed because
we want to redirect and go from this page to let's say my do list or
to my notes, right? So I'm just going to enter Ed and I can link it
to another page. So what happens in this case, once I have it all linked it
could be a full list, right, but it could be kind
of like a table of contents in some sense. And if I would just
click on that, it would redirect me to
the page of M to do list. So once again, this
is a super, super, super useful function as well, because you have everything
in one page in one dashboard. You don't need to
scroll through all of your pages to find
something that you need. Once again, it's kind of like a table of content in a book. Now let's move on to
something else that is also very cool about Notion
is creating a database. Once again, I'm going to create a new page, and right now, if you just type database, you have these options, I'm just going to create it
as a full page. And here's what you
have in front of you. It could work for
different purposes. Let's say you need to track the deadlines of
different projects, or you need to track even your habits of the
day or anything else. So if you would click here, it would become a page
within this page. So let's say I'm working on one project and I want to
have it tracked over here. So let's say I'm just
going to type project X, and over here, you
can add a property. It can be a status. Let's say I haven't started
it and progress done you can also edit to
different statuses as well. You can add another
property that could be something like a date, right? So I need to complete this
project by this this date, and you can add all these different properties
as many as you want. And basically, it opens
a page within a page, meaning that if you click
on the actual project, you can also make comments. You can basically add
anything else that you need to add about that
project about that task. So it is also super super needed and super
useful tool to have, especially in virtual assistance
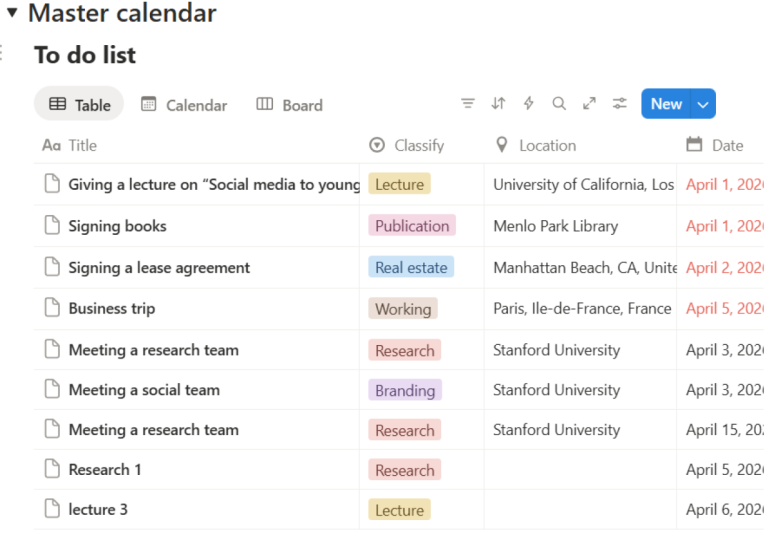
or in content creation. Two fields that I'm
heavily involved in. And one more thing
that I'm really, really excited to
show you is that you can see the same database
in different formats. So not only as a table, but also, let's say, as a
board over here, right, very again similar to Asana and Tre if you work
with them previously, or you can also see it, let's say, in a calendar, right? So you can see by
which day do I need to complete and he's
just once again, such a useful tool
and thing to know. So I think this is all I
wanted to show you guys today. Of course, the options, as I said, million times before, are endless, and you can
explore all the options. You can have the
templates over here and just create new windows based
on that helps a lot, right? But yeah, just take
your time exploring it, take your time playing
with it before. And once you get used to it, you're going to see how
useful this stool is. If you have any
questions about it, just let me know in the
Q&A section or message me, and I'll be happy to answer
26. Setting boundaries as a VA: I believe that another very important bit to mention
at least in my opinion is setting up boundaries and clear expectations
between you and your client, especially when managing social
media because I feel like certain clients could expect you to create content from scratch, do the copywriting,
upload videos or other type of content, and basically do
all of the work. Sometimes all of the work, creating content gram
scratch may be more of a social media manager work rather than a virtual assistant. I believe that it
is very important to draw some boundaries
and explain to the client what they could be
expecting from you and what you're
willing to do and what you're not so
comparable with doing a lot of virtual assistance
tend to still create content. However, they
request a client to have a topic or
copywriting already done. You already know what content they're expecting from
you and you just need to visualize it or other
way around so that you're not doing the
entire work from scratch, but you're just taking
over one bit of it.
27. How to use Kayak: So another website we're going
to be exploring is Kayak. Kayak is very similar
to sky scanner. You can look up flights, stays, cars, or even
packages over here. And Kayak has very similar functionalities
to sky scanner. But I also find that
some filters and some functionalities are a bit different and even more
convenient on kayak. So it's very
interesting to compare both of these websites and
see what they can offer. So let's just get started. We're going to be looking
for flights once again, just as an example. And as you can see, from the search part, it's
pretty straightforward. You just have the starting
point, your destination, the dates, the number of travelers and the class
you want to travel in. The options that you also have available is if you're looking for round trip or whether
you're looking for one way or even multi city, meaning that you're
traveling, let's say, me right now from Malaga
to Palma de Majorca, and then coming back
to Sevilla that would be possible as well by
selecting multi city option. Then we can also
choose if we want a carry on bag and how much
that would cost as well, or do we need any
checked in bags? So that just makes it easier for us to filter
everything beforehand. And I don't know if I
mentioned this already or not. You can also filter out
the direct flights only. If you don't mind a connecting
flight and stopping, you can just leave
it blank for now. So if I'm happy with that, I would just select
search button, and I would be provided the
options that Kayak has. Another thing about kayak, very similar to sky
scanner is that if you don't know the city
you want to fly in, you can also select the country and just look up the options. For the entire country. And for the dates as well, you have, as you can see, it color coded, meaning that the green ones
are the cheapest days, the yellow ones are average, and the red ones are
the most expensive. So you can just see which ones would work the best for you. Besides that, you also have an option to filter
the entire month. So let me just give
you an example. Let's say your client wants to travel to Italy for
a week in March, and they haven't mentioned any
specific particular dates. You can just explore which dates are the
cheapest perhaps, which dates would be
the most convenient. So you could just simply select the month option and change the duration to
the preferred one. In this case, that
would be seven days. And you could simply go ahead
and filter the options. Another thing if you don't
have particular dates in mind, but you can still allow
some flexibility. There's an option over here for departure
and return flights. You can select them to
be the exact dates. So from the first
to eight of March, or you could even allow
some flexibility. So let's say we can spare three days here and
there, two days here and there, one day here and there, you
could simply select that and see if the flight
from I don't know. February 28 or March 2 would
be the cheaper one, right? So if you have that flexibility, also use this function.
It's very handy. Once you click on
the search bar, all the options are going to be provided as mentioned before. On the left side, you're going
to see even more filters, larly anything you can imagine, so you have the stops option. You can once again, if you
haven't selected back before, you can select it here. You can update the time for
departure and for landing. You can select the airlines if you have any preferred ones. Um the duration of the flight, the price, et cetera, anything you can imagine. Once you find the deal
you're happy with, you can simply
click on View Deal, and you're going
to be redirected to the website of the providers. So in this case, it was
Ryanair themselves. If you click on this
little arrow over here, you're also going to be
able to compare the prices. Again, very similar
to sky scanner. So how much it would
be buying from Ryanair directly and how much it would be buying from
the third party. I always recommend buying from the airline, if
possible, directly. It's easier to
cancel, reschedule, or if your flight gets canceled
to get back the refund or the credit rather than having a third
party to deal with. But yeah, going
back to the Rinair, once again, you're going to have all the dates and
everything set up for you. As you filtered
on kayak already. A you'll need to
do is again select the flights and fill in
all the information. But yes, going back to kayak. You also have, of course, an option to filter
from the cheapest, quickest and best flights. You can also get automatic alerts for the
prices whenever they change, go down up, et cetera. So I would just recommend
going here and exploring all the filters and all the
options available on kayak.
28. How to use Skyscanner: So the first website that we're going to be exploring
is Skyscanner. I'm not sure if you heard
about it before or not. If you haven't, Skyscanner is a very handy website to use
to look up for flights, hotels and car hires. In my personal experience, I usually just use
it for the flights. The reason why I use
it is because it provides quite a bit of options, and I don't need to go into individual airlines
websites to look for them. So it gives you all the available
options for the flights, including the
connecting flights, direct flights, basically any
flights you could think of. So yeah, as with any other
airline in the search bar, you're going to see
the from options. So your starting point, you're also going to
have a destination, departure date, return date, and then you're also
going to have to select the travelers and the
cabin class you prefer. The useful thing with sky
scanner is that you can also select at nearby
airports to your search. That means that you're going
to also see the options, for example, in my
case, let's say, flying from Malaga and
returning to Sevias airport, right, something that is
still quite close to me. For perhaps a cheaper price, and perhaps I would like
that option better, right? So you can choose this option for both your starting
point and your destination. And you also have
an option to choose the direct flights only if you don't want a
connecting flight. Another very useful
function with sky scanner is that let's say if your client asks you to find a good destination
for their travels, their holiday in, let's say, three months time and they don't really know
where they want to go, you have an option to
choose explore everywhere. What does that mean? That
means that you're going to have all the options
available for you to all the countries for
the dates you picked up. So let's just try it
out as well right now. Oh. So as you can see, if I choose everywhere
as my destination, I'm going to see
multiple countries appearing and I can just choose. And I can select any country
that looks attractive to me. So let's say, if I want
to go to Portugal, I would just click Portugal, and then I would
see all the flights available to the Portuguese
towns and cities. So let's say we're
going to Porto, we just simply click
on this little arrow, and I'm going to be
shown all the flights. Another useful thing to know
with sky scanner that in case you don't have a
preference for the airport. Let's say you live in
a very small country, so it doesn't matter which
airport to fly from. You could also choose
the entire country. So let's say Spain, that's not the best example, but just to show you
this functionality. And let's say I want to go to Portugal, but I
don't know which town. I would just enter
Portugal over here. And once again,
clicking on the arrow, you would see all the
options available, and you could see the
departure locations, the airports you could fly from so now I selected
a very short flight, and there's not many
options available for me. There's only this one, but usually would have multiple
options available. You could also choose
from the stop. So let's say you
want only daybreak, or you wouldn't mind flights with one stop
or two stops even. And then you could also
select the departure time. So let's say your client doesn't want to have a
really early flight. They can only fly from 11:00 A.M. And they
want to return, let's say, before 7:00 P.M. And you could also
choose the journey duration. The airline if you have a preferred one and basically
fill everything like that. You also have the SR pie option, so showing you the best, the cheapest, first,
fastest first, um and other ones. You also have an option
to explore other dates. So let's say if
you're more flexible, you can just go ahead and
explore other dates, let's say, 2 February, basically compare the prices and understand which dates would work
a little bit better. And once you found a
flight that you like, we just click Select, and you would also see
the flight details. So again, the airports, the flight duration,
the airlines, on the left side,
as you can see, you also see the prices
on other websites. So whether you would
buy directly from Ryanair or if you would buy
from other websites as well. So if you decide to buy
directly from the airline, you would simply click
on Select once again and be redirected to RNair's page. You won't need to
do anything else. Everything is going to be
already filtered for you. You're just simply going to need to select the flights once again and complete all the
information over here. So this is how you do it.
29. How to book with Airbnb: Another website,
which I'm going to show you how to use is Airbnb. Once again, is a
quite popular website to use when booking
apartments, homestys. Usually wouldn't find
hotels on Airbnb is mainly just apartment and all different stays
you could think of. So let's get started. Once you are on Airbnb website, you're going to see a function to explore stays
and experiences. Stays are, of course, apartments and homes
stays to choose from and experiences speak for themselves are different
experiences such as food tours, perhaps boat tours, perhaps some yoga
classes, wine tasting, et cetera, so different
experiences that you could be exploring when
visiting a certain destination. As you can see, we have quite a bit of
options to choose from. You also have a filters
option over here, but you can also
explore it based on the destination and the dates and the guest you're going with. So let's get started. I'm going to be looking for
stays for the destination. For the sake of this example, I'm just going to be
choosing Barcelona, the check in dates, once again, similar to literally all the website we've been exploring Skyscanner Kayak. And booking.com. You have an option
to be flexible, so stay for a month, a weekend and basically any
months you would prefer. You can also choose your
preferred exact dates. So let me just choose a
few days in February, and you can also choose from either exact dates or allow
a few days here and there. So let me just also
click that right now. Once you are happy with
the check in checkout ds, select the number of people
you're going to be going. So let's say we're looking for an accommodation
for two adults. So once we're happy
with our search, we just hit Enter
and we're going to be presented all the options. So on the left side, you can see everything
that popped up based on the information
we provided Airbnb. You can also see that
we're shown a map, which makes it a little
bit easier for us to see how far the
apartments are located from perhaps city center or certain attractions or if we prefer one type of a neighborhood, we
can also select that. Before we go ahead and
explore accommodations, I would always recommend
to filter it further. So perhaps your
client is coming with a pet or they once again
need a free parking, or they prefer a self check in. Let's say we need a parking and we also need
a self check in. You can also choose from three
types of um accommodation. So whether you need only a room or the entire place or it
really doesn't matter for you. In this case, I'm just going
to choose entire home. And then, of course, you
can choose the price range, whichever you prefer,
the bedrooms, beds, bathrooms, et cetera, the amenities, if
there's something very, very important for you to
have and you can also choose from standout stays
so stays that were guest favorites or
luxury homes as well. If that's your preference. You also have a host language. I mean, majority of them
speak English, of course, but if you have preferred
language, you can choose that. So once you have everything set, you just click on Show Homes, and you're going to see
all the options that are available for you for these days for two
guests in Barcelona. So over here, we're going to be seeing the price per night, and over here, we're going
to be seeing the total. But Airbnb, it's
extremely important to read the reviews and make sure that the
apartment accommodation actually has sufficient
reviews to begin with. We don't want to send our
clients to an unknown place. I also usually tend to choose from super host as
well because that just makes me extra
secure and confident. That I'm booking something extremely good for my
client. Let's just say that. And another thing with Airbnb, I'm not sure if you know
this already or not. Perhaps you've already seen some tips and tricks
on Airbnb previously, but you can actually text
the host prior to booking. So let's say, if you're staying with them or you're planning to stay with them
for more than a week, let's say, two, three
weeks or something, right? You could also just
get in touch with them and negotiate the price. They can create
discount code for you to secure a booking
with for a lower price. So it's always nice to try it out and see if the
host agrees with it. You can also just text
the ghost and ask them any questions that you or your client may have prior
to booking the stay. So make sure that everything is set and
good to go for you. Once you've chosen the
accommodation you like, you can explore the
pictures, of course, read all of the reviews, see more information about the place and how
everything works. See, of course, the amenities
and everything else. If that's right with you
and you want to reserve it, you can simply just
click on Reserve. Once you click on Reserve, you're going to be able to enter your payment details
and book your stay.
30. How to book with Booking: So another website which I'm excited to show you
is booking.com. If you've used Booking before, and you know
everything about it, you can simply skip this lesson, but if you want to learn a
little bit more about it, you haven't used it before, or you've used it,
but perhaps you want to learn a little bit
more, just keep watching. So booking.com, it is mostly
known for booking stays, but they also have an option for for the combination
of a flight and a hotel, for car rental attractions
and even airport taxis. So just keep that in mind when booking a trip for your
client or yourself. I mostly use booking for looking for stays and
also for car rentals. Stays is self explanatory. Booking literally has
everything you could think of car rentals, I discovered it quite recently when booking
thrips for myself that sometimes car rentals through booking.com are way cheaper than even booking the same car from the same car hire directly. So yeah, it is very
interesting to see, and I think you should keep an eye on this as well in the future if looking
for a car rental. So let's get started. If you're looking for a stay, you're going to simply
need to select stays, and then you're going to be
shown the following filters. So you're going to
have the city or the country you want to stay in the check in
and checkout days, the number of people staying, the rooms you need to
book up, et cetera. So let me just put something here just to show
you how everything works. So let's say I'm looking for a one bedroom apartment or a hotel for one
person in Malaga Spain. And you can also, of course, select I'm looking for an
entire home or apartment. If that's your preference, you can also select I'm
looking for flights as well to get those flight
options shown to you. I'm just going to keep it
with the days only for the date if you know the exact
days, you can select them. If you don't, similar
to Skyscanner or Kayak, you also have an option
for some flexibility, so you can go and be
completely flexible and just say that you want to travel
somewhere in May or April, or you could also just select one month you don't have that
flexibility, don't worry. You also have these options
available over here. So if you selected
some dates, let's say, February 3 to ninth, and you can just allow one
or two days here and there, you can just select
that option as well. This is going to show you
the dates, let's say, from February 5 to 11th
or from February 4 to 11, et cetera, it's just going to show you basically
a similar duration, but perhaps a more
attractive price. So let's look it up. This is what you're going to
be seeing in front of you. You also have the
filters over here. An important thing to know
about booking is that booking has a mobile price
and a website price. So right now I'm
looking at all of the apartments and hotels
from the web from my laptop. So the price are what
I'm seeing right now. But if I would look
up the same hotels, the same apartments from iPhone, the price may be lower. So all the time, when looking for a
hotel or an apartment, double check the web and
double check the phone as well to see which price is the
most attractive for you. So let's get back
to the filters. You have the filter
for the price. It's usually per night. You can also select from one of these more popular filters. They also have some AI
available right now, which is something
new and exciting to make our stays even
more personalized. But yeah, then you have
the property type options. So, let's say, perhaps your client doesn't want
to stay in an apartment. They only want to
stay in a hotel. You can simply
select hotels only. Then if you want how many
bedrooms do you want? How many bathrooms do you want? Perhaps you need certain
facilities available, such as 24 hour front
desk or a parking. Perhaps your client
is coming with a car, so they need that
to be available. Then, of course, you can
also filter the meals. Perhaps you want to book a
hotel with breakfast included. So it's more convenient
for your client. You can select that option. You can also sort
it out by reviews. The function that I
also use quite a lot, I usually look for
anything above eight. But, yeah, also highly
depends on the price, right? So yeah, once I
have that sorted, I have room facilities,
property rating, neighborhood. If you already are super
familiar with the town, city, your client, or you are going to you can
also select that. To see the restoration
policy as well. This is extremely useful if you're booking
for your client, usually want to keep that
flexibility available. I would usually
recommend booking with free cancellation option, so you can cancel a few days
till the actual stay and just avoid any issues
for your client. Going back the distance from the city center,
beachfront, bed preference, literally anything
you could think of once I selected
these filters, I can explore my options by
just scrolling down below. I can also explore my options on the map if
that's my preference. I prefer exploring
on the map, as well. It just gives me a better
understanding where the hotel is located and how
far from everything is it. But if you don't prefer
exploring on the map, you can just go ahead and explore all your options once
again by scrolling down. Always keep an eye on is the distance from usually
beach or city center, whichever preferences I have
for my client or myself. I also, of course,
look at the reviews, and I read them through, especially the negative ones, just understand what went wrong, and perhaps once again, avoid it as much as
possible for my client. Once we are more familiar with our clients and once we
know their preferences, this is what is best to do. At least in my opinion, once you find a suitable option, all you need to do is
click on C availability, then you're going to be
redirected to another page. With more information,
so information and prices over here, I
can see the pricing. I can see what is included. I can see the type
of the room, right? I can also read the
description of the hotel, how far it is from, let's say, the City Center, beach, I don't know, airport, the popular facilities
that they have or anything else that I
want to know about them. Once you found the
option that you like, you simply click on Select room, change it to one, and
click on IL Reserve. You can see what is
included once again, and you're going to be
redirected to complete other steps including filling in your information
and other details, but that's pretty
straightforward. So this is how you could
use Booking once again, if you selected a flexible
cancellation option, it's going to be very
easy for you to cancel, so make sure you do that,
especially for your clients. Once again, I would
just recommend familiarizing yourself with
the website and how it works and just exploring
all the functionalities available over here so you
can find better deals.
31. What is a portfolio and how to make one: So today, I would
like to talk about portfolios for
virtual assistance, and I would also like to show you how you
could create one in a format of a website
and in a format of a PDF. But before we get started, I just want to
quickly define what a portfolio is for
those who don't know. So basically a portfolio is
a collection of information about you that usually present
to your potential client. Once again, it can be
in different formats. It could be a link to
your website portfolio. It could be a PDF
that you just send to your potential
client via email. But the information within a portfolio is usually
very similar every time. Usually include any basic
information about you. So your contact details may
be about section as well. So you briefly can
explain who you are, what you do, what you
help people with. Then usually have
a section where you explain the services
that you provide, the tasks that you
can help to complete. Then, of course, a pricing
guide is also important to have just so there's less back and forth between
you and your client. Then everything
else is optional, but you can include your
previous work samples that make you more credible. Same goes with reviews. If you have any previous
clients testimonials, I would also include it
into portfolio as well. But now, since we defined what the portfolio is and
what it contains, we can move on to making one. So I'm going to be using Canva, and I would highly recommend
using Canva for you too, because it's free of charge. Of course, they have
a Canva option, but lots of templates are
still completely free. And there's a bunch of
templates for you to use, even if you're not
super creative, let's say, so you don't need to create something
from scratch. This was a big
shout out to Canva, but let's get started with
a portfolio creation. So once you're in Canva at home section
or Create section, you're going to be seeing
the search over here, and you can just enter some keywords of a
template you wish to find. So in this case, we're creating a portfolio, so perhaps you could enter a portfolio or virtual
assistant portfolio, VA portfolio, or I would also highly recommend looking up
business proposals as well, because I feel that a
business proposal is basically kind of the same as a virtual assistance
proposal portfolio because you kind of just offer your own
services the same way a business proposal
does, if it makes sense. But let me just look it up to show you what
I mean by that. So as you can see, I just entered business
proposal and looked it up, and I can see a bunch of different very good looking
templates in front of me. So of course, some
of them are paid, but lots of them are
completely free of charge. And you could look them up. You could scroll down, see if
anything catches your eye, you can also favorite them as well so you
don't lose them. And, of course, keep
in mind that you can change all the pictures
or all the fonts, all the pictures, the
dimensioned pictures as well. But yeah, you can change
basically everything about them. So if they don't meet
your requirements, your vision 100%,
don't worry about it. You can still use it and
just adjust it a little bit. And what I was talking about business proposals and
why I love looking them up is because they have the same kind of template that we need as
virtual assistance. So they have a very
nice front page. They have a you
section, usually. So you could be
explaining who you are, what you do, what you
help people with. Then of course, have what
do we do section as well. So you could be explaining
what services do you provide. You also have meet
our team section. So that's not quite
relevant to us, but you could be changing
it to, let's say, pricing guide and listing
different tiers over here, and then you have
a thank you note, of course, which
is extremely nice. So you could add pages
over here and customize to suit you and your needs, but it's just a good
starting point, I feel like, and all of
them are quite similar. The reason why I don't
necessarily promote looking up virtual assistant
portfolio keywords is because there's not so many templates
for exactly that. So you may find some with a resume or some with
a front page only, but there's not much more. So I feel like if you're not
extremely creative person, perhaps that wouldn't
be as ideal, and I would highly
recommend looking for business proposals and editing
these templates instead. Now, how everything
would look like. So you would just click on
the template you want to use, click on customized template, change up everything
within here, so different pictures, right. Here, it would be virtual VA, let's say, proposal, whatever, you can delete any parts
that you don't like, change the phone to
whatever you prefer, add any other elements, texts, pictures that you prefer, right, delete some pages, add some pages as well, and just basically adjust it to how you would
like it to look. And once you're done, you can simply click
on Share Download. Download SPDF standard,
and it would be with you, and you could then send it to your potential
clients as well. Now, I also want to show you an example of a template
that I created. So it's easier for you to just imagine how portfolio
could look like. So the one I created
looks like this. And so it has once
again a front page. It has table of contents
about me section. It has services offered list. Then it also includes, how does it work section? This is completely optional. You don't need to add it,
but I just edit it because I believe people would be benefiting from knowing
of how everything works if they haven't worked with virtual assistance before. I could just briefly
take this chance to explain everything
about your process, right? Then I also have an optional
part for task delegation, where I explain
how they could be delegating tasks because I know that a lot of people
struggle with it. But once again, that's
completely optional. Then I have a pricing guide, and I have three
different tiers. But for you, you could
be changing it to your tiers to your packages
or if you're working hourly, you could be explaining
this here as well. And then I also included
the work samples pages, and I have three different
pages over here, but you can include as
many as you'd like. I wouldn't make my
portfolio too long as well because we want to just give a client a summary of your work, and if they want more
information, more samples, they can always reach
back to you and you can always give them that. But basically one of them
could be before and after, let's say, you could include, let's say you worked and did some admin tasks and you
organize somebody's inbox. So you could include
a screenshot of how it looked before and
how it looked after. You could include any
screenshots, let's say, of templates for
customer support, or have you done a listing
for online shop, right? You could be including that. And you could be also,
as you can see here, just basically explaining
what you did so your potential client can also understand what you worked on, not only see those screenshots, and then let's say you
worked on social media, you could be including some samples like that
with phones right, showing the pose
that you created, the image of it, right.
Maybe you edit it. Maybe you also had to
write a caption for it, so you could include
it over here as well. And then I had the
review section. It just makes you more
trustable, reliable. So if you have any
previous reviews, you could also feel free to include them in
your portfolio. And at the end, I just
have a quick thank you note with my contact details as. Before we move on, I
just want to say that my portfolio can look very
different from your portfolio, and that's okay because a
portfolio is very individual. Our styles are going
to be different. The information that we think our client is going to benefit from is going
to be different, and it's just a basic template
that you could find as an inspiration and
that I will be adding to your resources section
just for you to look at. But once again, this is not a one and only template
for a portfolio. You can edit it your way. Now, if you don't
want to create a PDF, you can also create your
portfolio as in website. You can also do so once
again using Canva. I don't think enough people know that you can create a
website using Canva, and it's completely
free of charge, but it is super easy. So let me show you how. So once again,
you're going to go to create or home section, and you're going to be looking
for the same keywords. So right now, we can
look up for something as Virtual Assistant portfolio
this time, right. Just click Enter,
and in front of you, you're going to already
find the websites. If you can find them, you can also sort
them out by website, and it's going to
be in front of you. So once again, you can create a website
completely from scratch, or you could be using one of these amazing looking
templates over here. So let me just click
on the first one and let me show you how
you could be adjusting it. So once again, just click on customized Semplate and
once you clicked on it, it's going to be
in front of you. And what I want to
do first is to show you how everything is going to look like in a website, right? So as you can see, if
I scroll down here, I have about me section. I have my services section, what people say about
me review section, and get in touch
section over here. So if I click on preview, this is how it would
look like in a website. So as you can see, everything's looking very neat,
very beautiful. And it would be in one page. If you would like to just have cover page and then have
sections over here, you would need to
add different pages. So once again, let me
just delete these ones. You can delete them by only clicking on this delete button. You can also duplicate them by clicking on
Duplicate as well. But let's say this is all I want to have
in my front page. I would also go ahead and
rename it to let's say home because that's what our clients are going to
be able to see, as well. And then in the second page, I would add something
like this one, right? A M section. And I would also go
ahead on entry dots and rename it because this will
be visible for everybody. So I would rename
it to About Me. And if once again, I click on preview, you can see I can scroll down
and I have a home section, and I have about me section. So once again, it's up
to your preferences, whether you would like to have everything in one page
and for your client to only have to scroll or whether you would like to have it here, you can, of course, have a
combination of this as well. It's up to your preferences
and how to edit it. It works very similarly to
how you edit I don't know, any other document, social
media posts, et cetera. You just click on whatever
you want to edit. You can change the fonts. Over here, you can
change the size. You can change the picture by just clicking on Upload and
adding a new one from here. You can adjust it to
your preferences, and you can always use the
same elements from Canva and basically just have a bit of fun and just see
whatever you like. You can also go back to design section and
find different designs that could still work for you on other pages as well
and go from there. Once you're happy with
your website and you adjusted everything to
how you would imagine it, you could click on publish website and you could be adjusting
the name of it. Of course, once again, since it's completely
free of charge, the actual link is not
going to look amazing. It's going to have
my Canva site in it, but it's free of charge,
so we can complain. If you would have
the pro version, then I believe it
allows you to have your own link and
customize it completely. But for now, that's fine. I would just name it, let's say, Virtual Assistant portfolio, and I would just click Publish, and then the website
would be up and running. So once again, let me show you an example of a template
that I have Uh, once again, I'm going to
show you where was it. I'm going to share with you
the link to this example, just so you have some
inspiration if you need some. So this is how it
looks very simple. It just has a basic
cover picture, low pictures about me section,
the services section, where I just basically explain
what I'm willing to do for my client, then
pricing section. Work sample section,
right, client testimonial, and just please reach out with this contact
information section as well. Of course, it doesn't
look perfect right. I just did it very
quickly in 5 minutes, just to show you some sort of example of how it
could look like. Now, if I just go ahead
to the published website, this is how it would look like. Um, so once again about me,
section, services, pricing, work samples, client
testimonials, and please reach out section. So you can use this one as
inspiration and once again, empathizing throughout
this entire lesson. Your portfolio is going to look very different
from my portfolio, and what I like is not going to be what you
like necessarily. So feel free to include the
information that you'd like to include and choose the designs that you
fell in love with. Once again, if you
have any questions, make sure you use
the Q&A section, and I'll be happy to
answer them, as well.
32. How to use Google Trends: Okay, so I'm going to show
you another tool which is widely used and
called Google Trends. I don't know if you already
heard about it or not. If you haven't Trends is widely
used for market research, let's say so whenever
your company or you are releasing a new product into the market and you want
to see where to place it, what product is even relevant
to the current market. Then you could be
using Google Trends to get any ideas of what you could be creating your content
about or getting some, um ideas for hash tags as well. So there are plenty of ways you could be
using Google Trends. And I believe this
is a great tool to master for virtual
assistance as well. So it is quite easy to use too. All you need to do
is enter a term you're interested in over
here and click on Explore. So for this example, let's say we're working
with a content creator. Beauty influencer
who is interested in creating some content
about glass skin, but they don't have
any particular ideas what that content
could be about. So yeah, our term is
going to be glass skin. Once you entered your term, just click on Explore. Then you're going
to be redirected to this window with quite a lot
of filters and information. The first thing
you want to do is make sure your filters
are all on point. So right now it
is set for Spain, my current location, but you can change it to any other country. Perhaps you're targeting people
in a particular country, or if you don't have that, you can also just
click on worldwide and search what trends
are relevant worldwide. Then you can choose
the duration. So are you going
to be looking into the trends um,
from the past day, or are you going to be
looking into the trends from even past hour
or seven days, 30 days, 90 days or even some years or you can even customize
the time frame, right? So I'm always trying to
keep it quite relevant. So look for what trends are relevant within
the seven days, 30 days, um, so let's just get started from 30 days and
see how it goes. Then you also have the
all categories option. So you can also categorize. So the search is even more relevant to
what you're looking for. You can also select
where that information, where that data is
going to come from. So whether it's
going to come from the web search or let's say if YouTube is a more
relevant platform for you, you could just
switch it to that. And once we're happy
with our filters, we can go ahead and scroll down. The first thing that
you're going to be seeing is the
interest over time. So this means how many times people Google looked up glass skin over the time
frame that you selected, and then you're going to be
seeing interest by region. So you can see which
countries were the most interested in glass
skin in this case. So you can just see all appearing
here based on interest, and then lastly, we're going to be seeing the
related topics and queries. This is a section that I'm exploring the most,
to be honest, that is the most relevant in this case as
well because we're looking for the content ideas
that would include Glascn. So as you can see, people looked up the glass skin foundation
brush. What else? How to get glass skin
in three days at home. That had a really,
really huge interest. So perhaps we could note
it down that your client, content creator could create
some content about that particularly and perhaps have a hook in the beginning
of the video saying, This is how you get glass
skin in three days at home. So this could be very relevant. And then you can see there
are certain products, perhaps the sunscreen that
they could be using on video when creating
content and reviewing it. So perhaps that would also get wider audience um involved. You also see products
for Glaskin. Perhaps that could also be
something that your client could create, um, content about. Then on the left side, you have the related topics. So it's basically um
showing you the topics that you that users were searching for as well when
we're researching glasskin. You could also be
looking at this section and seeing if you could combine both topics or if there's
a product that could also help you achieve the
glass skin, let's say. So yeah, just keep an eye on it, try to experiment with it, research different terms and see how you get along
with it because it is a very useful tool for yourself and for
your clients too.
33. How to edit using Canva: So one of the content
editing tools that I'm excited to show
you guys is Canva. Canva is a very well
known website that you perhaps heard of or perhaps
worked with in the past. Canva is used for various
types of content, including any PDFs,
proposals, portfolios, any social media content,
including photos, including any ads, any
videos you want to create, and anything in between
you could think of. For most part, Canva
is free of charge. Of course, they have
a CVO Pro option that allows you to
use the paid designs. But once we work with
it a little bit, later, you're going
to see that there's plenty of free of
charge designs to use. So if you're just starting or if you have only a couple
of clients so far, perhaps you could
still continue with the free version until
you decide otherwise, but it's completely up to you. So to start using Canva, all you need to do is simply register and get
into your account. And once you get in, you're going to see the view that you're currently
seeing in front of you. So all your previous designs, project, templates, et cetera. How I prefer to look for the design is to actually
use the surge bar. So if I know that I'm going to be working on a new project, I would go to templates and I would look for a
template over here. You can use the search
bar, of course, or you can explore the
templates from this bar. So as you can see, they have different sections for
business, social media, education, video, marketing, print products,
cards, and invitations. Literally anything you can
imagine, as you can see, there's quite a few options
available on KindWa. That's why everybody loves it. So for the sake of this example, let's say we're going
to create a logo. You can scroll down, and you're going
to see this option available with logos here, or you can also
just type in logo. And here you have it plenty
of designs to choose from. Of course, you can create a blank logo as well and just
do everything from scratch. But if you see something
that catches your eye, you can also re edit any of
the existing logos from here. Another function that I love to use is all filters option. Because from here, you can decide which style
you want to go for, which team you want to go
for basically any topic. If you only want to see free
designs or Cava Pro option, that means pay
designs once again. Which colors do you want
to include, et cetera. For some of the logos, of course, you can
change up the colors, but it's just a very nice
filter to use to just get more relevant options
to what you're looking for. So let's say we're
looking to create a very minimalistic
logo for ourselves, for our business, and we want something which
is black and white. And we're also going to be exploring only the free
of charge options. So you just click
a fly and you're going to see all the
options in front of you. From there, you can
just scroll down until you find the
design you love. So let's say we're going
to work on this one. All you need to do now is just click on Customized
This template. If you don't want to
use it straight away, what you like it, you can also stir
it and come back to this template later on. Right now you're going to see
the design in front of you. Let's have a look at all the options you
have on the left side. So design speaks for itself. If you decided that this is
not your cup of tea anymore, you can just simply
change it from here, as you can see, the
ones with the crown are the paid options and the ones without are
free of charge options. Then we have the
elements option, meaning you can add
terly anything you desire to your image or
to your logo right now, that could include frames,
grids, mockups, even, or any other details
and shapes then you, of course, have the text option. So perhaps you want to add a little bit
more text over here. You could just simply click on the one you
would like to add, add the text, move it
around a little bit. Of course, you could change
the font and the size. But yet this one
is used when you want to add any further text. Of course, they have different
designs here as well. If you don't want to
use this anymore, just click on delete and
that's going to be it. For the existing
text on my logo, all I need to do is click on the actual text
and change it. Let's say I want to change it to my initials,
that would be it. The same with the
text over here, you could simply go
ahead and change it to your name extended. Move it around and
that would be it. Going back to the options
on the left side, if you have more
clients or if you have a brand that is
a little bit bigger, you may make use of the
brand option over here. It is only available
for those who have pro option, of course, but it basically stores all your brand
identity in one place. That includes the logos, the color palettes
that you usually use, the fonts, brand voice, even photos, graphics, icons. So basically, everything
would be saved here, so it's easier for you to
use later on when editing. Then we have the uploads option. So if you need to add a picture, you could simply just click
on the picture you want to add and just move it around wherever
you need it to be. The same goes for the videos. You could simply add it over here and just
apply it like that. You also have a draw option
in case you need to use it. In that plows option, I didn't mention that
you can, of course, upload your own files, or you can use the existing
ones from Canvas BL. Then the projects, once again, if I just need to jump from
this project to another one, I could technically
jump from here. Then you also have an
option for for the apps, magic media, Google Maps. So perhaps you're creating a guide or itinerary
for your client, and you want to be extremely
nice and add a map into it, so they could just
simply click on it and be redirected to their maps. That's also very
useful and great to know and add then you
have the Mockups option. That's super great,
especially if you have a physical product
or even a digital one and you just
want to promote it in such a great and unique way. That looks very neat. So yeah, just explore
these options. It's very, very easy to use. All you need to do
is literally click on the one you want to use. And for example, in this one, you could just insert
your business card or anything else or
your business card. Do so you would just go back to the uploads and you will simply drag the picture
you want to use, and it automatically
applies. You can see. If you want to re
edit it, of course, you can just simply drag
it and apply the changes. So it's extremely easy to use. Going back to the design, let's say I don't like
it, I want to change it. I can always do that. You could add a template as new page or replace this
one with a new one. I'm just going to
replace it real quick. So I'm just going to put on my initials and then my
full name over here. And instead of jewelry, I'm going to add virtual
assistant, right? And if I just drag the text, I could also move it
and position it in the middle somehow like this. I could also, of course, make it a little larger, smaller, whatever
is your preference. Keep in mind that you can
also change the font. So let's say you
like the design, but you don't really
like the font. You could also simply adjust it to your preferred
one. Let's say this one. And the same here, anything of your preference. Besides that, we can
also change the color. So over here, you
could just change it to anything you
once again prefer. You can even change the
spacing between the letters. So if perhaps you
want them to be closer to one
another or further, you can also do line spacing. This is good for whenever
you have a larger text. You also have an option
for transparency. So if you want your text or your image to look
more transparent, you could also just
change it up from here. You also have effexs
option, of course, animation option if you
like your text to be typed, et cetera, which is
great for the videos. Once you're happy with
the design you create it, you could simply change
the name first and then go ahead and click on the share option and
click on Download. Of course, it recommends
me to download it as the image PNG, but you can change it to
PDF or anything else, basically anything
of your preference and simply click on Download. And just like that,
you would have the logo already with you. Once you're done editing, it's going to be in your
recent design. So if you need to come
back to it and re edit, you could always do it if
you haven't deleted it. And of course, you
can use Cava for not only the purpose of
editing content for yourself, but also for your client. You may be asked to create some content for their
social media platforms, so feel free to explore it and familiarize
yourself with it.
34. How to edit using Capcut: Another tool which is
great for content editing, especially for
video reels editing is CAPCOt, in my opinion. They once again,
similar to Canva, have a pro option and
a regular option. So the regular one is
completely free of charge, but you're not allowed to use all the
functions that they, of course, have for
your video editing. And with the pro option, I believe you pay around 12
euros, if I'm not wrong, and you can use it freely, and you're going to
see all the options that are available for
the paid accounts. So let's just get started. So first of all, if you want to create a video, we just need to click
on Create a project. And once we've done that, we're going to be seeing
the following window. I know it looks a little
bit intimidating, but it's not as difficult
as it looks like. But basically, you have the media option where you
would import your video, you will just simply click on
Import and add your videos. Now to connect your
content to one video, you would simply need
to either drag it or just click on this little
plus sign over here. Once I have them all added, I could simply adjust
which video goes first, which one goes second. I could also just drag and
make it a little bit shorter. You can see the
seconds appearing over here when I try to do it. So that's one of the ways on how you could actually make the
video a little bit shorter. Another way is just move this little arrow to the
point you want to cut the video at and simply
click on the split option. So that's going to
split your video. You can simply remove the bit that you're
not going to be using. So just click on
the bit you want to remove and click on Delete. So you could do the same
for other videos as well. Let's just do this and this. And as you can see, already, your video would just
simply play out like that. Now, let me explain
what other functions you could find useful
on Capcod as well. So you have the audio option. You could add some
audio from here. Again, you can see a lot of
it is for the paid option. So for the P one, some of them are completely
free of charge, so you can go ahead and use it. You have the songs option. You can also add any effects and transitions from over here. You also have an option to import the music and the sound you want to
use as well over here. If you decide, let's say, on the music you want to use, you could simply click on it, and it will be
automatically added if you click on the
plus sign over here. As you can see, my video is
shorter than the entire song. So all I would need
to do is again, go to the point where I want
to cut my music at and just click split and
delete the bit that I'm not going to use once
again, just like that. Keep in mind that
if you're creating videos reels for
Instagram TikTok, you could add the songs
at a later point. Whenever you extracted the
video from Capcot and already are uploading it to
Instagram or Tik Tok, that's what I prefer. But you do you. Then you have another option
for the text. So let's say you would
like to add some text to the beginning
radio and video, throughout your video,
wherever you prefer. And you could just simply click on the full text and the
plus sign once again, and you could just
simply edit it here, name, last name, blah, blah. You also have an option to change the font to
your preferred one. Once again, you can see a lot of these pro boxes appearing, meaning that a lot
of fonts are paid. But there's also options
that are free of charge, so feel free to
utilize them as well. The font site is
accessory, the pattern, color, Larly anything
you can imagine, alignment, preset
style of the text. So perhaps to make the text
a little bit more visible. You also have the
animation option, so similar to Canva, you can make the
text to be typed out instead of just
being static there. Then you also have an option
for the text to speech. So if you would like for AI
to read your text out loud, you wouldn't need to
record it yourself. You can choose one of
these options once again. If you want to do a
voiceover instead, you can simply use
the voiceover option over here and just click on it, start recording, and it would look like that.
Let me just try it out. One, two, three, one,
two, three, one, two, three. Let's go. So here we have it. A voiceover would just appear over here. If you no longer want to use it, we can simply click on the delete button and
that would be deleted. Then we also have
a stickers option. I don't use it quite often, but it may be necessary
for you to use. So just have a look and
see what they have here. The effects option
speak for themselves, Slurrly all the effects
that your video have. A lot of them are
paid once again, but you can see there's also a few free of
charge options. Then you have transitions. What does that mean?
It's basically the transition in
between the video. So over here and over here. So if you would like your
video to, let's say, mix or fade, you
could simply add it. So how to do it, just simply
click on the ad sign, and I would like to
add it here as well. That's it. So how it
would look like, and. Yeah, you can see those two
assertions, the mixing up. Another very useful function to use is the
captions over here. Once you do voiceover, you could simply
click on Generate, and it would simply
generate you the captions. And once again, some of
them are Once again, if you're using Tik Tok, remember that you can add captions on TikTok free
of charge as well. So you can just wait out and not add it
straightaway here, but just add it
later on as well. Just equate them from my side. The last options are the filter. So once again,
speaks for itself. It's just the filter on your
video or your pictures, and you also have the
adjustments that you can add. That's basically just color
corrections for your video, the clarity, sharpen,
as you can see. Once you're happy with
the video you created, you can go ahead and
select the ratio. So if you're creating for Instagram real or TikTok
Reel, just choose this one. If it's for YouTube, then perhaps that one, just look at the ratios as well. So right now, I'm just
going to keep it as this, and then I can go ahead and
export the video by clicking. Here, you can choose where
you want to export it to, change the name, and, of course, select the resolution
you want to change it to and
click on Export. And just like that, your video is going to be with
you right now.
35. Market research: So the first one is
market research. It is a quite lengthy
research and I don't expect your client to
ask you to do it entirely. Perhaps they would ask for your assistance to
complete one bit of it. But, it's basically used whenever introducing
a new product, let's say, to the market, a new service to the market, and just trying to
find more insights of what market your
product could be appealing to or what your
competitors are doing, what are doing good,
what they're doing um, not so good and seeing how you could differentiate
and how you could be doing better to resonate with your market a
little bit more. It's also about finding out what trends could be
relevant to your product, your service, your client. For that, you could be
using Google Trends. Later on, perhaps I'm going
to show you how to do it. It could also be
gathering data from, um, the potential clients, perhaps using service with
some questions, pinpoints and other relevant
questions that you may ask a potential client to
answer to understand if that product would
really resolve the issue they're having. It also includes analyzing the data you actually collected. But that is once again done
by marketing department, usually, so I don't think you're going to
be asked to do that. To help you out a little bit, I'm going to provide a
template which is going to explain what exactly market research
contains of and how to complete every step in
a little bit more detail.
36. Content research: Other research is
content research. Just identifying the topics you should create your content about and perhaps analyzing your target market once again, I perhaps you're selling
a service or product, analyzing what pain points
your potential customers have and trying to find
out how your content could resonate
with that audience and how you could visualize the resolution of a
problem that would be appealing to your client
and that would result in purchase. Yeah, I
could include that. It could also include analyzing your
competition once again, seeing what content
work for them, what content didn't
work for them, what they're doing good,
what they're doing not so good and seeing those content gaps
that you could be filling in your product, your service, your content. It could also be
researching and finding what keywords work for
your competitors or what keywords are relevant
and what boost your post be exposed to a larger
market or a larger audience.
37. Comparison research: A very popular research is a comparison research.
I speaks for itself. It's basically just trying
to find the best option and comparing to different
products or services. Let me just give you an example. Let's say your client
asks you to find the cheapest shipping
provider from X to Z, you would then go ahead and find all the shipping providers
that ship from X to Z. You would then identify
the pricing differences. Perhaps you would also look at other factors such as reviews, such as the shipping duration and present your
findings to your client. I'm going to be providing
a template with an example below for you to review and understand
it a little bit better.
38. Event planning as a VA: So now let's touch base
on event planning. You never know, perhaps
you're going to be working with a small business and the business owner
is going to be asking you for some
assistance to organize a team gathering or let's say
your client is going to be organizing a birthday
for their kid, themselves, their husbands
wives, et cetera. It's always good to know
what steps you could be suggesting for your client to take or what steps you
could be taking yourself. Um, so let's just
quickly talk about it. The first thing that
I would do would be to discuss the purpose of that party event
with the client. It's quite self explanatory and perhaps it would
come out either way, but it's always good to know that because
you would then know what kind of venues are
expected and other details. The second thing, I would
always make sure we know how many people are going to be attending that
event, that party. We know once again, what kind of venues are we
looking for and the capacity. The third thing would
be looking for a venue, seeing perhaps
what is around us, also communicate with the
customer how far they would be living to travel to
get to that venue, you would then also
plan the agenda of the party or the event to understand what
kind of suppliers, resources and
vendors do you need. You would then also go ahead and try to
find those vendors, those companies that provide those services and once
everything is confirmed, you would then go ahead
and send invitations. Before the date of the event approaches,
you would, of course, follow up with each vendor with the venue and make
sure everything is correct. Everyone is ready, nobody forgot anything and
everything is on point. So these are just a few steps quite general that
you should be looking at whenever organizing an event and after the event happens, if that event that party was, let's say, business related, you would go ahead and also
suggest that your client will follow up with the attendees
to see what is the feedback, and what we could be
doing better next
39. How to book an appointment on behalf of your clien: So now let's talk about how to book an appointment on
behalf of your client. The first thing you want to know is your client's availability. So you could be communicating this
directly with your client, or you could also be looking at their Gmail and outlook
calendars as well, just so you reduce the back and forth between
you and your client. Could then go ahead and
email that third party, whether it would be a clinic or a specialist and see if
those times would fit them if they have availability during those times
before booking, I would also double
check with client. If nothing has changed, if I can book it for that particular time and
everything is still okay. Once book, I would confirm it with my client and
I would also pop it a meeting as an event in their Gmail or
outlook calendars, so they have it there and nobody else can schedule a
meeting during that time. When scheduling and then
creating that event, I would also schedule
a follow up, let's say 24 hours beforehand
or a few hours beforehand, whatever your client prefers. Just so they get this
heads up that they have this appointment scheduled and they haven't forgotten about it. If any changes happen and that third party clinic
specialist get back to you canceling the meeting
or making any changes, I would once again make sure that my client is informed
and I would also make sure that event on the Gmail or outlook calendar is also adjusted accordingly.
40. How to create an invoice: Alright, so let me show you how you could create an invoice. It's very handy to know
whenever you're going to need to send an invoice to your client for your client
to pay for your services, or perhaps you're going
to be given a task to create an invoice for
your client as well. So it's very, very
handy to know. So as you can see, all
I've done so far is just gone to Google and Google free invoice
template generator. So as you may see, there's plenty of options
to choose from, and you can choose
whichever you prefer. The one I've been
using and I find very easy to use is the free invoice
generator, the green one. So if you just click on it, you're going to be redirected to a page where you're
going to be asked to fill in all the information
needed for your invoice. Once again, it's
completely free of charge and very easy to
use, as you can see. So all you need to do is
enter the company's logo, enter the company's address. If you have one,
the physical one, bill two, that's going
to be, for example, if you're sending an invoice to your client to pay
for your services, that's going to be
your client's name, address, details, depending. Then you're going
to have to enter the number just for
clarification reasons, the date, the terms, due date, PO number, if that's applicable to you. Down here in the items option, you can either describe
your services, for example, virtually assisting or perhaps you need to specify the
projects you worked on, whatever you decided and
agreed on with your client, or perhaps you're creating an invoice with physical items. So you would just enter
the names over here. You would specify the quantity, the rate, and the amount
would calculate by itself. Um, for the amount,
as you can see, at the minute it is in dollars, but you can change it over here to the preferred currency. They have literally everything. And then in the notes, any notes, you need to add, perhaps the product
that you sold has specific instructions
on how to use it. You can also enter terms if
that's what you need to do. Um, and yeah, the subtotal
would calculate by itself. Once again, you can
add any discount, any shipping information,
and let me just complete it real quick for you so you can see how
everything works. So I've just gone ahead and entered a little
template for you. You can just
screenshot, save it, and I'm also going to add it in the resources or
underneath this lesson. But yeah, basically, as
I mentioned, over here, you would provide your
company's details, here, your client's details. You would say which date it is, which invoice is it? You would describe the service, the product, the quantity, the rate, and the amount, as I mentioned before, would
calculate automatically. The notes you can provide. It's optional, of course, as in this case, payment is due within this and
this many dates. Late payments may
be subject to X Y, that percent, late fee, place contact, this and
this for any questions. You can also, as I
mentioned previously, just place some instructions of how to use the
product as well if, let's say the invoice
is already paid and we just need the receipt
in the terms, I also put the
payment information in case the invoice
still needs to be paid. If it's paid already, you would simply
just go ahead and delete this part, both of these, and you would also
change the amount paid to 225 in this case. Oh, my God. And then the
balance due would be zero. So this invoice would
become kind of a receipt. But once you're happy with
your invoice and you double checked and all the information is correct and good to go, you can simply go ahead and download it over here,
so just click on. And the invoice is
gonna be with you. This is how it's going to look. It looks super
professional and very, very easy to create.
So check this out.
 Gabija Raizyte, VA & Video editor | Content & UGC Creator