Transcripts
1. Class Introduction: Hello, everyone, and welcome
to another drawing class. And I may say this might
be different because all the other classes
that I've done previously because for
one simple reason, those other classes
where I talked about perspective using simple shapes, human anatomy, I was
presenting something that I was fairly familiar with
and worked on many years. In this case, I'll be
trying something different and learn alongside you as we progress through this class because the subject
for this class will be drawing a manga character or the portrait of
such a character. And the main reason that I've decided to make this
class is because of this. Berserk has been one of my favorite mangas and animals that I've watched
throughout the years. So when I finally bought all these beautiful
deluxe editions of the comic after the passing of famous Gen taramura
now I decided to take a class and see how he
did the work that he did. But I wanted to delve
a bit bit deeper and see what consists of
drawing of this kind. So in this class, after I went online and talked to other artists and
discovered things on my own, I decided to create
this class and go basically from the start to create a beginner's
class where we talk about the main principles
of drawing in this style, drawing frontal view,
the profile and three quarter view going
through these exercises, then doing some further
development in this area. We'll talk about a little
bit quicker drawing. We'll also look at the
materials that are used, and finally go through a project that will
inspire a couple of panels from this manga to show you my process and
what I learned along the way. So basically, this will be beginner's class for all of those that want
to learn something about drawing these types
of characters and then slowly going further and learning few things
along the way. Nowadays, of course, there's much easier way you
can use an AI and stuff like that to create your own anime or manga
characters if you like. But I think we are all here
on Skillshare to learn things differently and not just
copy things that we observe also to understand what that entire
process is all about. So I hope this books
class help you with that. And after you've seen all the materials that
are prepared for you, you will come after
that with the knowledge of how to approach these subjects and
what it all entails. And course, have
fun doing the work. It will be not just
manufactured like that, but it will be I hope, deeper understanding
of the entire process. So if this is to your liking and want to
draw more in this style, you can watch the videos
that I prepared for you, the exercises, do the projects, and come on the other
end of this class with a better understanding of this topic and more
fun with drawing. So if you like what I prepared for you, see you
in the next video.
2. Materials: Hello, everyone, and
welcome to the class. I hope you enjoy it. And for start, we have to find out what materials
we'll be using. First of all, we can
use pencils and I have here two pencils that
I'll be using a B pencil, four B pencils, if
you don't know, these are markings
that explain us how soft or hard the pencil is B pencils are mainly for drawing because they are much softer from
any other pencil. And the larger the number, the softer pencil is and
the darker the line is. So this here is B and
this one is four. So this pencil here will
have much darker lines. Besides that, we have charcoal, and we have a couple
of charcoal options. Here, I have a
charcoal and a pencil, a stick of charcoal that
I've put in this holder. And like you see here, also woodless charcoal
pencil that's hard because it comes in
different types of harness. We have soft and hard one, and we also have a brush pen. Brush pen will be
for some later uses, and it is a very good tool
because like you see here, it has a canister that
already has ink inside. So you don't have to dip
into your ink all the time. I always there. So if you want to put more ink, you just squeeze this part
here and the ink flows more to this tip and tip is made
of brushes, bristle. So depending on how
much hard you push, you can make some
really thin lines. And if you push harder, it can produce some
very thick lines. So it's a very good
tool to learn. But before that, it is always, of course, recommended to
start with these B pencils. And when it comes to the
materials that you'll be using, I always recommend students to use certain sketchbooks here, I have a pretty large
sketchbook here, many pages, and the paper is very thin, but I think it's very
good for drawing. So I'll be going through many
of these pages I have here. I use it in my
previous classes for drawing humanistic figures
hands, as you can see. Here, you can even do
it for the anatomy. And like you see in
these examples here, these are lines that
are made with charcoal. And you can also or here, but you can also use pencils. So it's a very
versatile sketchbook, and like I said, you can use even pencils. So I think this kind of
sketchbook with, let's say, a very smooth surface is excellent for both
of these cases, and it doesn't have to be
a very expensive book. Sketchbook because
we'll be going through a lot of pages very rapidly. And why I recommend
doing this instead of some sheets of paper is because then you'll have all
your work in one place, and it will be very
easier for you to go back and revisit all the stuff that
you've done before.
3. Warm up Exercise: So now that we have
our drawing materials and the surface that
we'll be working on, it's time for us to do a
simple warm up exercise because there will be one
shape that will be very, very important for
all the drawing that we'll be doing
in this class, and that is the circle. It all starts and
ends with a circle. And just getting a good warm up to make some circles is very important.
So that's what I do. And also, while I'm
making these circles, you'll see that I'm moving
the entire hand and not doing it like this and that
makes drawing circles, at least for me, you
should try for yourself a lot easier. Let's start. These circles don't
have to be perfect. But for start, try to make
bigger and smaller ones. You can do it in one go. And also, you can see, they can certainly
overlap each other. It is just, at least for this
exercise here to get into the flow and make as many circles as
you feel comfortable, so you can go on
to the next stage. Next step that you would like to have is to when
you draw a circle, And like you see, it
doesn't have to be at first try is to divide it into a half. So try it for a few
times, divide it force. So you can try going
in all directions. But like I said, it
will be a lot easier if you like this. If you move your entire hand. So this is the second part
of the warm up exercise. Oh, this is a bad circle. This is another one bad circle, so you can try a different one. Okay, this is better.
And then just rapidly. I will use this one as well. Go over these circles
and divide them into Oh, this is This circle is a mess, but as you can see, that's why it is good to have
a form of exercise. And you can see you
can do it trying to have that or you
can do it in half. Why is it important to
divide these things in half? Because in the next
part of the class, that's what we'll be doing. We'll be dividing the
circle to make head shape. So warming up in
this way to draw circles will be beneficial
because we'll be drawing a lot of these circles. So now that you warmed up, we can go straight to the next part of our
class, the next video. We'll talk about four
variations for, let's say, styles that we'll use, and we'll also use this circle to explain things
further along the way. I hope you found this useful, and let's jump into
the next video.
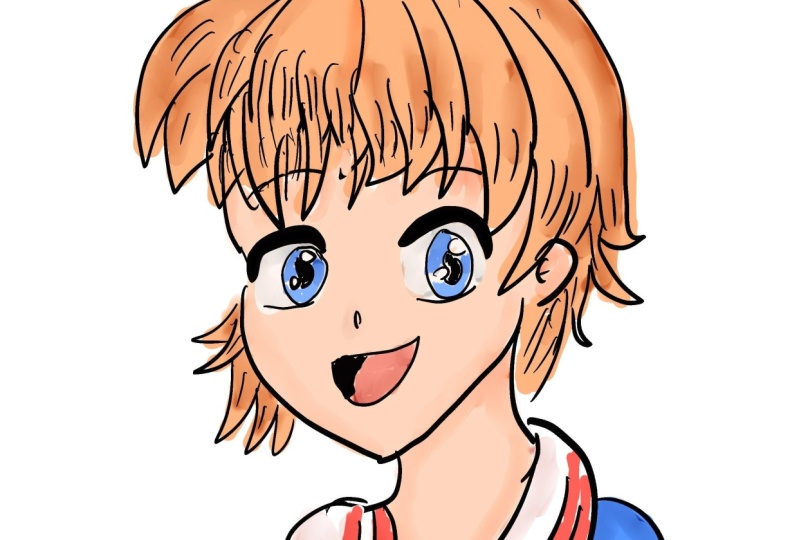
4. Styles of Portraits: Before we go any
further in how to use the circle for
drawing and characters, let's step back and have a few examples and
changes in style, which will lead you
to these outcomes. So let's start. Here we have two examples. With basic construction of the head that has
semi realistic, let's say, proportions, and I used the brush pen
to add the lines. So this is basically
the same process that you're probably by
now, very familiar. And in this case, we resume the circle for the
top of the head, making the central line. And then based on that, heading in blue here shown the key features of the face
and probably you can see, like always the eyes are
in the middle of the head. We have one eye distance
between the two ones, the position of the nose, proportions of the head, and stuff like that, ears
all the key features. And that will help me
make this drawing here, which, like I said, is,
let's say, realistic. But if we want to push
things further and draw the characters that we used to see in
anime and mangas, we have to do a little bit of change
in these proportions. So we here have a bit of change, and that is mainly
the proportions. We'll talk about
why are we dividing this circle in these quarters. But for now, let's
take a look at it. Also, as you can see, I made a mistake in
the previous drawing is that I used brush pen
and ink to ink this. And since this is really
thin paper, it goes through. So for the next one, I'll be showing you only in charcoal. But what we can differentiate from the first
example is that we see that eyes are bigger
and they are no longer, let's say, straight in
the middle of the head. We have here a little bit changed the
proportions and we'll talk about all of this as we
move on through the class. But I just wanted to include
this video and show you how things change when we're going from semi realistic character, drawing, and how
these things change. And that also includes
on how to draw eyes, making things bigger, let's say, cuter and stuff like that. So still proportions
are slightly similar, but the position of the eyes is much more, let's
say, different. And as you can see here, they're basically in the
same part of the circle. But what changes is
this space here. So in the previous one, it was like this, much,
let's say, taller. And in this case here, we see how much smaller
this place is. It's like three of these
measurements from the circle. So that is very important thing when it comes to drawing
this character is that you change proportions
to a certain amount. And you see that how to
draw a character and make it more look like what you see on the characters that
you want to take. And in the next step, we see
even eyes are even bigger, and now they are basically
like two parts of this circle. And instead of four parts
here that I divided, in this case, I
divided it into five. And also, as you can see
in each step with nose is closer and closer
to the circle. That will be all
the stuff that we will discuss in
the next chapter, as we will see how to draw
a face in frontal view, side view on three war view. But for now, let's
just stop and think about the proportions
and how they fit the new drawing
that we make. And which step, it will
be a bit different. So the years are smaller
and they're moved down, so we can create
something like this. Like I said, I'm not professional mango draftsman or someone who does it for living. These are just my explorations
and going through the process and
learning about it and sharing my
experiences with you. So to create stuff like that, you change the proportions in
order to get what you want. And finally, this is the last let's say example for
now that I'll show you. And that is that we see
here that we are again with four parts of the circle, and eyes are even bigger, and it doesn't have
to be or shouldn't be that the eyelids are
drawn closer together. There are gaps that is enough to see you
understand the eyes, but you as a viewer, can understand the
shape of the eye. And we see that these
eyes bigger and nose is probably maybe even
on the line or inside the circle that is, like I said, very
important and that will be very beneficial to
create your own work. And even the eyebrows
are even higher. We see here this line here
beneath the middle point. And in this case,
they are just way, way further away even
in these quarters here. The ears are smaller, the mouth, the nose, and eyes
are compensating for that. And as they are made
larger in this area, that's above the eyes. So that's basically
it for this video. So we'll be moving from
realistic, let's say, proportions that we
used to draw and see how by changing
some proportions, we can make our characters
look more like manga. And practically, this is a good example of this
it was for me to study how these changes
are made and how I can do a better job of drawing
these sorts of characters.
5. Front View Portrait: In this video, we'll go and create a frontal
view of the face. And like you see, circle. Then after that, divide it into half and again into half with the lower two quarters dividing it further
into smaller parts. And that will be important
when it comes to overall proportions of the face. And for this exercise, I'll make two drawings because I wasn't happy or satisfied
with the first version, so I made another one. That is also one of the
things that I wanted to say that you should
make mistakes, try to learn from
them as this is no straightforward
process because if you only try to
do things once, you are destined to fail because you have
to repeat repeat, and then try again some until
you completely, let's say, understand, and have a better
vision of how things are really just playing and
how things will turn out. So I'm using a soft pencil. I think it was like some eight
B or something like that. And just now, adding further
details on the face, thinking about the
size of the neck. And that was always a
good reference eyes. So the neck is with just
the space between the eyes. And finally, adding
some basic shapes, basic lines to help me determine
what will be the hair. So you don't have to connect
those lines at the start. But it always I think
it's a good idea to mark the main lines
for the hair. And after you've done
that, then you can simply put those lines together and create the shape for the hair, as you can see me do it here. Once you're done with
that, you can then change, try to use some inking material, some pens or in this case, I'm using a brush pen
and create those lines. It's a good tool because
you can do and create both thin and thick lines without much worry or
changing the tools. And as this is just an exercise, it's also way to
quicken your process. And think about all the
details that you need. In the next drawing
for this video, I'll go maybe deeper
into details about how the proportions are
and other stuff like that. But that's always
a good exercise anywhere to put the nose
like I'm doing here. Further finishing the lines. So I think for me, at least, this is the most fun part of all just putting these lines. And as you will see, as I go further on this class, I do more Exercises, drawings, it'll
all become better. And of course, if you want, you can then use the eraser and remove all the access lines, so you can have a better
view of the things that you draw and maybe see
mistakes that you made. But it is always a good idea
also to leave those lines, so you can have
an entire process on how to make these drawings. So you have a reminder of sorts. So the last step with erasing is not, let's
say, obligatory. And once again, we have circle. Divide it into half, another and quarter and then divide that into
half, the lower part. And again, again, you
have four equal parts. You measure two parts are below, and then you connect and
create the lower draw lines. On the third line, we add
eyebrows, and in the second, you put on the eyes, and you can see you
can also measure to have one eye distance
between those two. And of course, the nose is
on the bottom of the circle, the tip of the nose. Ears and for this instance, I created a male portrait with the neck and all those other
things that are important. And again, hair.
Just like I said, in the first example, first create those
lines that will, let's say, tell you how the hair would look
like, and then connect. You can even add additional, let's say, place for the
shadow below his chin. And of course, the eyes, the shape of the eyes and the shadow depends
on how you want it. But basically, this is
the entire process. And of course, we're going
back to to the brush pen. Of course, this step
is also not mandatory. You can use a pencil and make harder lines and then
use the needed eraser or whatever eraser that you
use to make the final look. Also, what I recommend
is to keep one of the drawings the way it is
before putting on the brush. So you can have, let's say, sort of process that will
inform you in the future, how you did what and have
plan for your other work. As I said, this is an exercise, so you are free to
experiment and try out and do as many as
you feel like doing, just to get a better
understanding of how to achieve
certain things. So I tried a few times and then decided if I can
go further along. These are the last steps, and the last thing that is
there to do are the eyes. And finally, maybe even erase the parts
that I don't need. And always when
you're drawing eyes, think about the parts
that bounces light and those reflections and try not to go with your brush
pen over those parts. So I'm finishing it here. And that's basically it for
this look, the frontal face. And soon we can move on to the second view in
the next video.
6. 3/4 View Portrait: Next up, we have
three quarter view. And like you'll
see in each case, we start with the circle. But this time, the process
is a little bit different, and I'm using a compressed
charcoal for this exercise. But we start the same
using the circle, dividing into four parts, and also dividing the lower
part into four equal parts. Again, measuring how
long it would be. In this case, it will be
three so distances of the lower parts and then adding jaw line from
one side to another. And it is very
important that line on the right side that
will inform us about the nose and
position of the eye, as you will see, eyebrows. On the second line, we have the other eyebrow around the middle of the circle. And then adding eyes. When you're drawing
this, in this case, that eye should be smaller and this one
should be a little bit bigger because we see more of it and because
of the tilt of the head, and nose is always
on the circle line. Adding eyebrows. And you see, in this case, when I'm using the charcoal, the line is much darker, but I'm not using much pressure. It's just that this tool is
in such a way that it can create much darker lines than I would use with pencil I just wanted to try
different materials. And when you're
doing this exercise, also think about trying to use different
material and see how they work and how
they behave on paper and see what you like more. Maybe this is not
the perfect tool for drawing these
types of drawings, but always, I think, good, especially when you're having exercises to try
different materials and see how it will fit. This is no means like an illustration that is finished for sale or
something like that. It just to exercise and
get better at things. But it is always good to go
and try out different ways. And like in the previous case, I go over with brush bend over the lines that they
created in this case, with charcoal and finishing because I'm not explaining
much of the process because it's very similar to the frontal view we had
in the previous video. But the main
difference when you're drawing a person in tri
word view is that line that's on the right side and
that determines where to put the nose and and where
to put the eyes. That's the main difference.
Everything else is the same as in frontal view. We have the circle,
divided into four parts, and then the lower two quarters divided into even smaller parts. So you know where to put
the eyebrows and the eyes. That's let's say the
crucial step for creating those works and
positioning the very, I think, important in whatever
portrait that you do, if it's more realistic or in
this style or everything, it is very important to
position the eyes correctly. Everything after that is
much easier to handle, and you should try to exercise
and do those as well. And finally, finishing up
with the rest of the hair. Also a little bit of the
shadow beneath the chin. And after that, we can
move on to the next video. Well, we have a profile drawing.
7. Profile View Portrait: Repetition is very important when you're trying to exercise. And again, we're doing it with a circle, dividing into half, and again into half and lower two quarters into even
further more parts. We difference when it comes
to profile is this line here. It goes there, and then you decide where
to put your eyes. And you can see I'm
constructing those things here. And adding the ear
and you watch where I position those things and try to when it comes to your
drawing to repeat those things. I'll provide you with
additional book or PDF, something that you can use that will be
accompanying this class. You can have in written form
all these steps as well. And hopefully it will be
beneficial to look at those and accompany
accompany those written, let's say, stuff of this class
with the video material. So you can have a reminder, not just in video shape, but also in written form. So you can use that
as a reference. I think it will be
beneficial for you to go a couple of times through these drawings and
do it yourself, figure out things for your own. I think just watching videos or stuff like
that, is one thing. But repeating the steps
and learning it for yourself is much
more important as, of course, you have your own experience working with those stuff and see what
works for you, what doesn't. And when you have
it in written form, it's much easier to have as a reference point
for your own works. So I think that will be
helpful for you as well. Proportions are very important. And in this case, CI did DI, not in the lower part of
the lower two quarters, but in the upper part
of the lower quarter. And added other details
that are there. Now for the neck,
as you can see, I changed the
thickness of the neck because I didn't feel
ready to be that thin, but that also changes and shows you that not everything
is written in stone and that you should change things where they
need to change. So in the next video, we'll talk finally about
the project for you.
8. Class Project 01: Welcome to the video
where we'll talk about our first part
for the class project. I decided for this class to divide class project
into three sections. And now that we finished with drawing and
making exercises for these three basic
format of the portrait, frontal view, three
quarter view, and profile. Now it's time for you
before we move on to the next segment
of this class to give a try and make at least one A for paper
with these drawings. So you can do it separately, like I did it here on
one page, one portrait. Including this first one. Or you can put all of these three types of
portraits on one a paper. But it is important
to try at least one to create this type of drawing. Where we'll start
from the circle, add other elements and go from bigger shapes to smaller
one. That's key shape. That's the key feature when
you're drawing like thing going from bigger ships to smaller ships and adding
details along the way. So if you need, take a look
at the previous videos. Try out some smaller
sketches to create. But for your main
project, at least, first part for this class
is to create these three, send them to the
project gallery, and I, take a look at it
as soon as I can and talk about
what we see there. So with that out of the way, let's move on to
the second segment.
9. Exploring Variety & Finding Your Style: To the project section
of this class. And like you see here, when you finished
drawing and making all these exercises
about faces in frontal, three core review, and profile, you then use that
knowledge to fill up a couple of pages with the
drawings maybe smaller, but try to fill them out with as many drawings as
you can to figure out and put into practice the stuff that we talked
about in the previous videos. And that's what I'm doing here. In this video, you'll see
a couple of pages, too, actually, that I've done for this class, among other things. And I didn't record the entire process
of the second page, but you will get an idea what you're supposed
to do after finishing the three important
views of the head and then maybe use
some references or inspirational draw
from your own head to figure out those things. But having in mind to use the guidelines that we used
in the previous video, start with the circle and then move on to everything
else and see where the main important
features of the face lay. That means the
eyebrows, the eyes, the mouth, and the nose, of course, the ears. So that's what I'm doing
here in this second example, and also what you
see is that you will get better along the way, the more you draw. So don't be discouraged if your first drawings
made look horrendous or you think you didn't do it right because
it's important to push through these moments and continue to
learn and improve. And what is also when it comes to these exercises
is important is to keep those construction
lines and then later on, compare them and see what
did you do maybe wrong or what you didn't like and see how you can change
that in another drawing. So that is why I also say that it's important to have this type of sketchbook that you can draw and have all the works
that you do in one place. You can revisit it later and
try to figure out how to improve on the things
that you did and make another drawing and push
your knowledge further on. And also maybe a good idea, which I didn't do here
is to put a date, mark when you did something, so you can have a
reference in time. When did you do that
and how much time has pressed and did you
make other exercises? This will be a good
reminder of what did you do in the past
and the way you draw now. So for this exercise, I moved on from charcoal
on some thicker pencils, using a technical pencil. But because the drawing is a bit smaller than
in previous cases, and lines with this pencil
are a little bit thinner. So I can then make for
this size, a drawing. So it also forces you when you're switching
drawings and sides of your drawings in different
way forces you to think about what tools should
you use and what are the best tools for the job that you're
currently doing. So when I started working
these small ones, I realized I would do a
much better job and have a better exercise if I
change the drawing material. And that is also,
let's say, important. But it's also good thing to think about when you're
drawing and thinking, why is this not working? Why is that working? Sometimes it's just the
materials that you're using. So it is always good way to think about what
should you use? And this is the fourth
drawing for this page. I think that will be the
last one for this page. And you can see that I use the three
quarter view for this one. It was like in the
first example and look at the positions of all
the features of the head, where they all lay and it doesn't matter if the head is tilted or
something like that. You can always draw the first two lines that separates the circle into
four equal parts on an angle. So it doesn't always have
to be straight lines, divided horizontally
and vertically. Sometimes, depending on
the pose, the posture, or the figure that
you're drawing, sometimes these lines are tilted on one or the other side. But what is important is
that all these parts. These four parts
are equal in size, as that will help you to
determine where to place the main landmarks
of the face and do the drawing that would
be satisfying for you. Also using this smaller pencil and thinner pencil allows you to get different kind of lines than you used in
the previous exercise, but also the face is smaller. So I think this is
much better choice of the materials when it comes to these drawings in this size. So these are four female faces
that I did for this class, and soon when I finish
erasing construction line C, the other four that I
did on the other page. So here are the
male figures that I drew on the second page. And as you can see,
there's a difference between drawing male
and female let's say figures in this
style because male are much more lines that you
draw male figures are much more sharper and angular, but I wanted to draw
a younger person. So you see that in that case, the eyes are much
larger and the lines, overall lines are
much more softer, so we can have the younger face. But it's important to try to exercise to make even exercises in faces that are more realistic and or cartonish either way. So thank you for watching
this video and see you in the next part of the video that will be
most interesting, I think.
10. Class Project 02: Okay, by now, you
probably know the drill. We've moved on and finished the second part of demonstrations
that I've created. In first one, we had these
three basic let's say, types of portraits,
the frontal view, the three quarter
view, and the profile, and in the videos that
I've shown you previously, we had shown these two pages. I hope you can see them
right. Let me see. Yes. Okay. So for
your class project, as part two for this class, take another two pages, for paper, and create a couple more characters
in different poses so you can familiarize yourself with that thing as well and how
to approach these subjects. Again, using everything we talked about in the
previous lessons, go from circle, then make shapes for the
lower part of the face. Think about the eyes
thickness of the neck. And of course, when it
comes to hairstyle, start with these
smaller lines and then finish off
the entire piece. Afterwards, you can go male portraits and see how it difference when
it compared to female. That's it basically for
this part of the class. And in the last one,
hope you enjoy, we'll see this type of work, but that will be for
the next videos. So create your work, post it in the project
section of the class, and I will be more than happy to take a look and
go on from there.
11. Deconstructing a Masterpiece, Part 01: In this video, like
I said earlier, I will show you how I go about drawing one of my favorite
anime characters that is guts. And you can choose to work to exercise with the ones
that you find most useful. And you'll see that,
like I said earlier, after we learn the basics, we can understand
how certain shapes are made and how to
approach this subject. But also, you know,
when we know the rules, you kind of sometimes
have to bend them or go against them to enjoy the process
that you make and have this enjoyment
of creating art. And as you can see here, I've done just that I decided
to draw this character, the guts in a way that I would
draw any other character. I may that be im manga
or anything else. But knowing those
initial steps when one creates an manga style
drawing or character, it's really helpful to understand the position
of each element. And you can feel much
fear when you drop. So main takeaway from this drawing is to
create smaller shapes, divide them into easier parts. And when you're done, then you can go into inking. And by the way, you will see me later on struggle
with certain elements, and that is also why I kept this video in this class
because I think it's important for you to
understand not to see that the teacher is doing
the perfect maybe job, but also struggle sometimes. And that struggle is important when whatever that you're doing what
I mean by that. I mean, most of all, the hair. Hair was the most
problematic thing to draw. And I was trying to limit my time when I'm
doing this exercise. And you will see that I have, well, that's my opinion, having a lot of problem
with drawing hair, but I think as more I do
it, it will better be. So right now, I'm using the brush pen to go over all
the lines that I created previously and
simply try to make the drawing that I see and try not just to draw
the things that I see, but to understand the
placement of the line, their direction,
their thickness, and how each stroke is important to whatever
that you're drawing. And first of all, like I said, and like you noticed in
my previous exercises, going from bigger shapes to
smaller, doing those lines, especially when it
comes to hair to give the guide to
guides how to draw it. And then add details. I think that was in three
quarter view or in all of those previous lessons
is to first map out the main position of
the hair and then draw, let's say more detail, look. Now that I've used that
brush pen for details, I started using 07 marker
and adding further details. And of course, I'll
later be adding also lines for the shading
on the face and having, let's say, just fun making
this entire drawing. That's also very,
very important is to think about having fun
and making this journey, trying journey in the
manga art enjoyable and, of course, learning
something new on the way. Because if you're
not having fun, it will be very
difficult to progress. Of course, there
will be hard times or something that you
will see is not working, but that's the
pleasure or that's the excitement of overcoming
a certain challenge. And this was a certain
challenge for me because after all these years of just
enjoying these comic books, these mango creations, I decided to try to draw these
characters myself. So it was a pretty
good challenge, especially when you're doing all this line work and figuring out how the master
created all this stuff. So it I possess a
certain challenge, but like you said, if
there is no challenge, then there is no
enjoyment in succeeding. It's like a building,
let's say, a video game. And if it's too easy, then I don't think
it's very much worthy. So that's it, basically
for this drawing. I'll be finishing soon. And
this is the final look.
12. Deconstructing a Masterpiece, Part 02: Here we are at the
second drawing, and repetition is the key. So I decided to take another panel from the
comic book Berserk. Like I said, my favorite, one of my favorite comic and try to as much as I can
recreate this image. Nothing has to be perfect like I mentioned in
the previous video. But in this time, I started with looking at certain shapes that I've noticed on the face and
with light pressure, just adding those shapes very roughly because
I know I will be going over this drawing with a brush pen and
some markers later on, fine tip pens and
polishing those. So at this stage, the main goal is to put all the main parts of the face in their place and then
move on from there. Occasionally, of course,
you might use the brush, the eraser, but that's normal. What's important is
not to overdo with lines in sense of the press. Just use light pressure
and go on about your work going from bigger
shapes to smaller shapes. And of course, the hair. In this case as well, I'm not using standard
approach that I thought in the previous videos when we had a profile view, the three quarter view
or the frontal view. But I got so familiar
with those things in the previous exercises
that I felt, let's say, more free to just
jump into the work and not have to start
from the very start. And that is why one of the
reasons why we've done all these exercises
because you have to well, that's what I think at
least to know the rules, apply them, learn them, and then when you feel
comfortable, break the rules. So it's not always just blindly
following certain steps, but then implementing and thinking how we can
go beyond that, get better at the craft, have more speed and
stuff like that. And these videos are sped up, I think, six times. So you don't have to
waste too much time looking at video at every
brush stroke that I make. But there may be sometimes
for some people, thinking, How can this
be so quickly done? It is very sped up, and I was very careful when
I was making those lines. I had some music on there, and I just listening to music, watching my reference image. Seeing, thinking, how
can I do this work? Like in the previous
one, I really am not satisfied with the way
that I'm doing here, and that is something
that I will have to get better in the future. So even if you are a
beginner or let's say, a little more on your journey, far on your journey when
it comes to drawing, when you're working and watching the work of
masters like Taro, it is sometimes okay
to not feel bad when certain things don't end up the way that you
think they should because, you know, there's only one
guide that created this piece, and that was pure genius. All that you can do is
to try to get better at your craft and
enjoy the process. And if you can do that, and
you find satisfaction in that and think about
your let's say, your limits and where are
you in your drawing journey, it will be beneficial very well. So you can see me here
make those thinner lines. I'm using three fine tip pens. They are 07, 04, and 02 to make all those lines. I start with a brush pen
with the biggest tip, and then go to 07 that is a
little bit smaller than 04, and finally 02, going from
thicker lines to thinner. And in this case, as I've
noticed in the panel, I decided to add also this
shadow with a great colour.
13. Final Demonstration and Class Project 03: In this final video
for the Brzerk manga, we'll see two drawings that I've created as part of the
exercise for this class. And you'll see me
make those too. The expression, especially on this first drawing
is not the same as you will see when it comes to the panel
that's on the right. But I think it was an okay drawing and the way
the hair looked, and you see, I was using all the knowledge
and stuff that I learned in the previous exercises
and customizing it, customizing that knowledge
for this particular case. And that is also
one of the I think, good lessons to see. In which cases will you
apply what knowledge. So you don't just
exercise blindly, but you think about how you
can use the knowledge that you acquired in each
specific situation. And I think that
is that is one of the main takeaways that you
can make from this class is to have an open mind and
to think about the process that you learned and how you can implement it
in different ways. So even if we in this class
talk about manga drawing, there are things in this class, of course, that you can use on whatever other drawing
projects that you doing. And if you want to get better, maybe a drawing with the brush pen or line
weight and stuff like that, I think it is very
good to just exercise, but thinking from the same way how you can use technology
and other projects. The main thing you
can see is that the process on all
these is similar. We start with some
rough line art with pencil or
charcoal or whatever. And then after that, go over this drawing with brush pen just for
the main lines. So you don't do everything
with this brush pen. And then as you progress
and go into details, you start using thinner
and thinner markers or these fine tip pens. In this case, I even as I've
noticed that on the drawing, I added these shadows. And the final drawing, again, I wanted to start
with the circle, adding the lower
part of the face, and then added eyes. I chose this one because
it has a lot of hair, and I struggled really a lot with hair in the
previous exercises. So I wanted to make
a challenge for myself and dive in into
that most problematic. And I think that's something
that you might try as well, is to try to figure
out the stuff that you're having problem with and think how you
can overcome it. Maybe you won't overcome
it in first try, it will take more times, but it's good thing to not feel, let's say, in your
comfort zone and work only on the
things that you are familiar with or are not not judged or
something like that, that is very problematic to you. So try to work with things
something that may scares you, you don't feel comfortable with. And that, I think will
be very good for you. In this case, I wasn't when I finished this drawing
satisfied with the hair. So like I said, it will take me more time
to get better at this part. So even the eyes were a little bit wonky
because I think at this point, I was drawing for more than
a couple of hours ago, and I was standing
while I was doing that. I was to get the better view of the of the reference and
add all those details. So you'll see me
create struggle. And if you watch the
reference on the right and the way that I drew
the hair on the left, you'll see there's major
differences between those two. But as I work, I will try to get a better understanding
of this entire process. Now I think it's a good
time to talk about the class project for
this part of the video. In the previous
three video saw me, make drawings from the pages of Berserk, and now
it's time for you. It doesn't have to be Berserk, but choose manga or anime
that you like the most, have some screenshots or
pages from the comic book, and by going through all
that we talked previously, make your own drawings. What I would recommend is to
do 2-4 drawings on a paper, well, you don't have more than
two portraits on one page, just like you see me in
these previous videos. And of course, after
you've done with that, post it in the project
section of this class. And in the final video, I'll go over the
entire class project for this class. So s there.
14. Class Overview: Finally, we're at the
last video of this class, and I hope that this
class was useful, fun, and that you learn a
few things along the way. And learn, of course,
with me, as I said, this is my, let's say, first serious attempt at
drawing in this style. So the main important thing
from this video, of course, is to let you know that you will get the most
of this class by finishing your
project and posting the project section of this class because
I don't think it is enough just to watch the
instructor as he explained things and do the work and
tell you what should be done. But after watching those things, make to use the pencil for yourself and see how
things move from there. Because in my experience, just in that moment, when you start working and
start having problems, you will only by that,
make a breakthrough. It is much easier just to
think I can understand that. But in actual work, it is quite much more difficult. So by doing that, you
will create your work, but also expect a feedback from me because in those situations, when you have a problem, it is important to have someone to respond to your questions or feeling troubled
and stuff like that, and I will gladly be there
for you if you need my help, advice, or review
of your drawing. So please take part in that, and I will try to answer
as soon as I can. And also, finally, if you'd like to check out some other
classes about drawing, I have 20 of them on my profile, and you can take a look
about classes about anatomy, using simple shapes, portrait, leveling up your skills, perspective and stuff like that. So we can see you
also there as well. So have fun drawing and
leave us your projects, and I will be much grateful
to take a look at that.
 Milan Glozić, Painter, illustrator, Designer