Transcripts
1. Welcome to the Course: Welcome to this exciting word of T D character design in plunder. In this course, I will
take you on a journey from two D Pro prints to print in your character sal
life, textured, animated, and use it to
build your own game and play it on both PC and
your Android mobile phone. In Section one, will dive
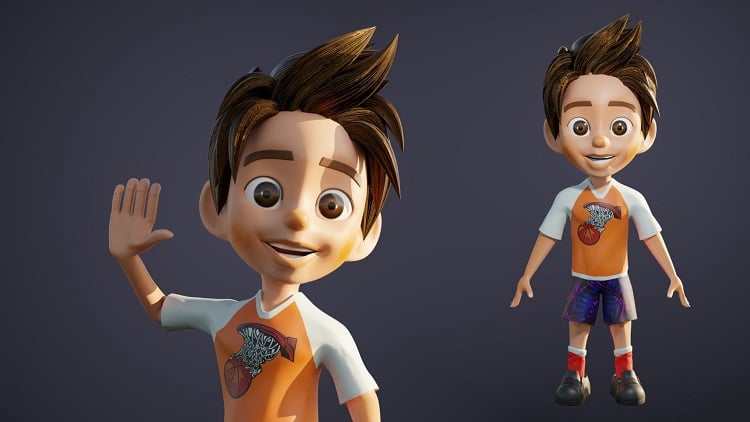
into character creation as we carefully modeled
ahead from the eyes, nose, and mouth to the
refined phase structure. You'll learn all
the techniques to create unique and
captivating characters. You will also cover the body, including the upper body, the arms, hands, and legs. You'll develop the
skills to shape your character physique with
high precision in detail. In section two, we'll explore character clothing design where you will learn to create styles, t shirts, pants, and shoes, that's going to
seamlessly complete your character's
individual style. Moving on to Section three, we'll dive into the
art of texturing. We'll learn to paint the
skin of our character, refine the mouth, lips, and add texture to the eyes, the hair, and the eyebrows. Section four will
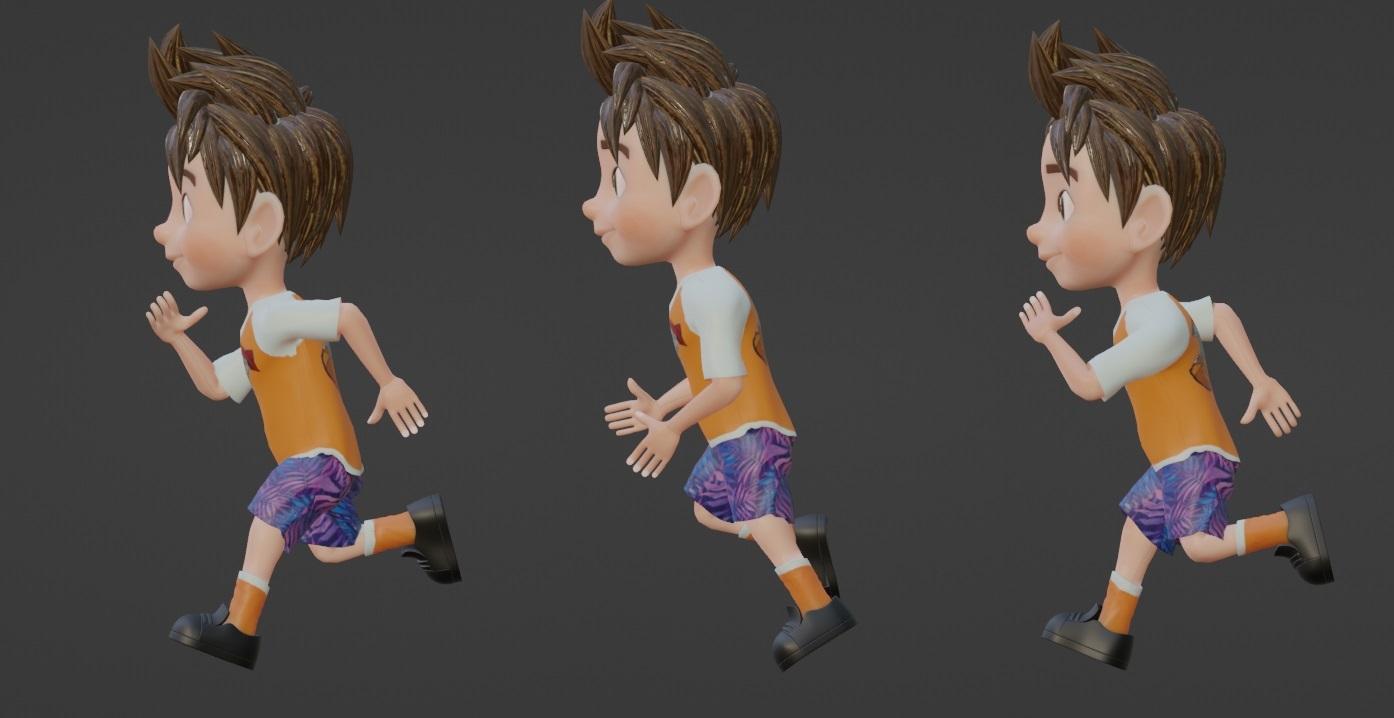
introduce you to the word of rigging
and animation. You will master the process
of rigging your characters and creating dynamic walk one, jump, giving your character a vibrant and
expressive presence. In Section five we'll
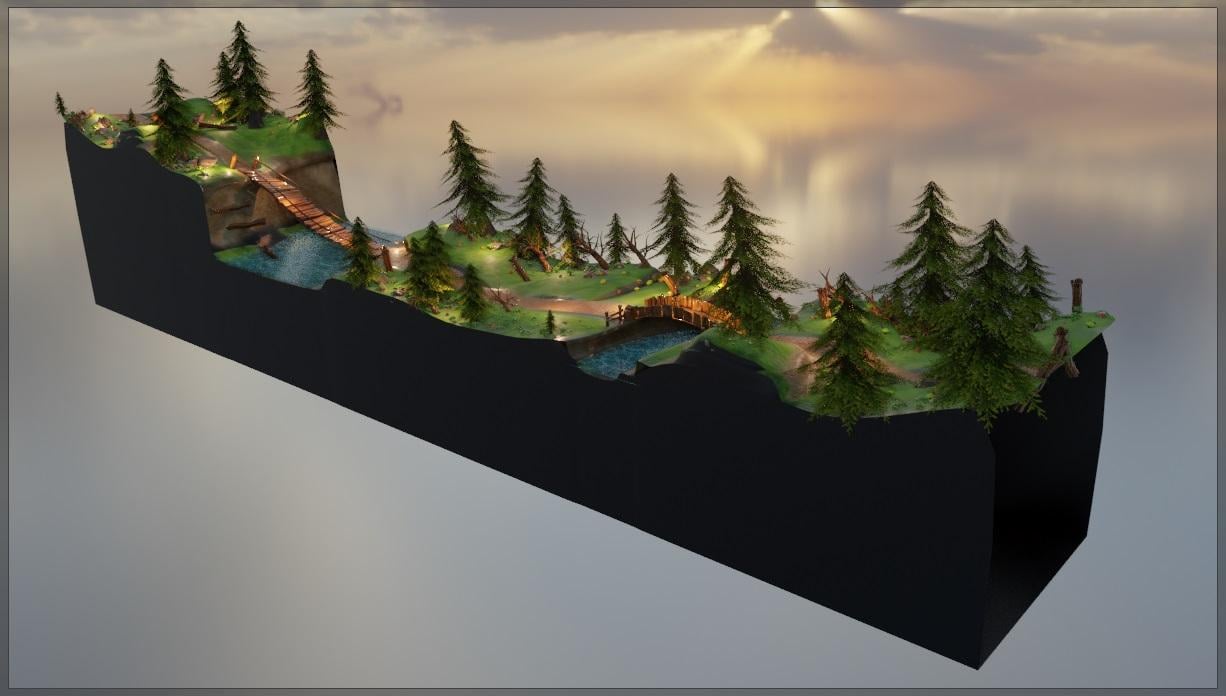
focus on building a captivating game
environment from scratch. You will learn to construct
a visually stunning word, complete with essential
elements, such as trees, wood bridges, vans, racks, and so much other stuff. Section six will
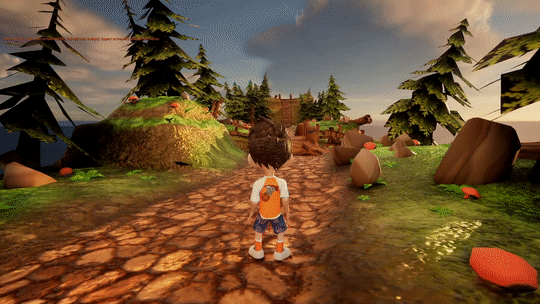
take our character into the world of game engines. You will explore the
character you've created to both unity and real and make it playable
in both game engines. So with intuitive
game controllers and seamless animations, you will see your
character come alive and interacting with the immersive gaming environment
you've created. So if you want to take your character design
skills to the next level, join me on this exciting journey where you will refine
your abilities, craft captivating
environments, and bring your characters to life in a remarkable gaming experience.
2. Aligning Reference Images of Character: We can start modeling
our character. I'd like to align our
reference images. For that, I have these
two reference images, we got the front and the side. Basically, that's all we need
to create this character. I'd like to go back to my blender scene and I'd
like to delete everything, so we can press A, x,
delete everything. To jump to the
front autographic. We can press one. Here we are in the front
autographic view. What I'd like to do right
now is to simply track and drop our front character
reference image. After that, let's select it. We can press to go
to this transform. I want you to reset, we
can select left collect to select all these locations
and press zero, press ner. Just so that we
can have it right at the center of our scene. After that, we can go to the move tool and
simply take it up. But we aren't going
to be able to see through this
reference image. What we can do is to go to
the abject data properties. Let me just scroll or expand this window a little
bit to the left side, and we can check this opacity so that we can see through
our reference image. I'd like you set this
opacity something like 0.85, just so that we can see
through our reference image. Let's press one. Next, I want to make sure that
it's right at the center. Let's simply take it
a little bit hoops, move it back,
something like this, I have it at the center
and also on here. Let's take it a little bit up, so the feets must be
sitting on this red x axis. G, z, the shortcuts
for moving up or down. Let's take it a little bit up. There we go. It's at
the right location. After that, I would
like to simply drag this reference image backward because we need to
model right here. If you press one, you can
be able to have the front. Next, I want you to press three so that we can jump to
the right tographic. And I want you to simply drag and drop our
reference image, which is the side reference. Let's repeat the same steps. I'm going to press n. Let's
go to the transform location. We can select all these values, press zero, to have
them aligned here. Let's check it up. But also let's go to the
objects of properties. Let's check the
passage here two. Let's set it two
ero 0.85 and we can take it a little
bit up like this. You can have it centered ops, not the scale. I don't
want to scale it. I just want to move it to the center like this,
center for our body. As a last move, all
you have to do is just move it a little bit
back, something like this. To just this out,
we can add cube. Shift A, let's go to mesh,
we can add the cube. Let me press one,
to go to the side, we can jump to the s mode. We can try to scale it on the x. Try to move it up like this. I shot y frame, and let's take the top all the way to
the top of our character. This is for the front, we can jump to the side
by pressing three, and we can select everything and try to
scale it on the y. As you can see,
we're ready to go, our reference images are well placed in the
right location. Let's get started in starch
more in our character.
3. Modeling Character Eyes with Socket: Steps to model our character
is to work on the eyes. I'd like to delete this cube. X just. We don't
need it anymore. I'd like to press one
to go to the front, and we can zoom into the eyes. I'd like to right
colic right here. Shift A, go to mesh, and we can bring a plane. I'd like to spin this
plane on the x axis, so our x, we can spin
it by 90 degree. Let's press one, let's go
to the front like this. I'd like to drag this plane and put it right at
the center here. On the mode, I want you
to sketch real down, sketch way down, so like this. Right now, I like to use the mirror modifier.
Let me explain. As you know, faces
are symmetrical. All you have to do
is just work on the right side and let's blender take care
of the left side. To do that, I'd like to split
this plane into two parts, so we can press control r, right at the middle to ins
ge group, we can press ser. I'd like to delete
these two edge lines, these two versus, we can
press x and delete them. Now we only have the
right left part, the right part of our plane. We can go to the modifier properties and
let's click on it, and we can add and search for the mirror this
modifier right here. By default, we're having the
x mirror set to the x axis, which is the right axis. Now if we try, for example, to model the right side, the same thing is going to be
happening on the left side. Let's select our
plane by pressing A and we can scale it real down. But you can see this problem. Also, let's try to reduce
a passage of our image, so we can reduce this
passage something like 0.5, reduces real down, just so
that we can see our plane. Let's select our plane
and we can scale it down. But we're going to
see this problem. Our plane it's not connected at the center at this location. We want to stop right
at the center here. To do that, I want you to check the Clapp in the
mirror modifier, so we can click on C pin here. Right now, if we take
it for example here, we want going to be able
to transpass this point. So it's going to be locked
right here at the center. So let's go ahead and scale this plane real down,
something like this, and we can take it
to the left side over here. Scale again. Basically you follow this
nose line that we got. Let's do that, we can take
to the left side like this, scale this down, and we
can start extruding up, so we can press E to extrude. It's extrude, for example, something like this all
the way to the top. Samthing here, extrude double
times, something like that. The next step is going to
be to grab these three s, and we can extrude
them this way. E x, let's extrude
them outside. Perfect. Now we need to keep an eye
on our right orto graphic. If we press three
to go to the side, as you can see it's going
to be just a flat plane. But also I'd like to
flip my reference image. I want my character to be
facing the other side. We can select this
reference and type S y, and let's type minus one. Now it's flip to the other side. Also, I'd like to split
my sto two parts. From here from this corner, you're going to see
this plus icon, I want you to click and drag it. Now we're having two windows. The first one is going
to be for the front, we can press one. Let's have it dedicated
for the front, this parts right here, and this part is going
to be for the side. On the edge mode, let's
select everything, try to move it forward. Let's try to align these
vertices with our face. We can try to move the forward, something like this.
Can tack this one up. There we go. That's fine. Sitting here on the top,
let's select these vertices, try to align them forward. Perfect. Also, I prefer
to add a third window. For example, I'm going to
go to this right menu. We can click and drag up, and we can switch this
to the three D viewport. Basically, this
one is going to be for our three D viewport. Let me just zoom on it. This is our progress so far. For the eyes, I'd
like to select these three versus s and
let's simply drag them, little bit down, and
let's better align them, so we should push
them like this. This one a little
bit maybe forward. Good. From this
front autographic, I want you to extrude this
vertex to fill this i loop. We can extrude like this and keep extruding and
aligning with the i loop. So let's continue all the way to the top. A little bit more. Finally here we can select these two sits and
press F to fail them. The next step, we need to align these verss on the right
autographic. Let's select them. We can try, for example, to
select each one over here. Such align it. Then,
continue our alignment. Pretty much good, but also here we should move it
a little bit back. It doesn't need to
be 100% perfect. We are having some differences
in our reference image. The next move is
going to be to grab these vers and we need
to extrude them up. Let's extrude them up,
for example, here. We can scale them up a
little bit, check them down. We can push this part
a little bit back, but let's just do it first. Let's select also the bottom, can extrude it down, scale it a little bit up. Like that. For example,
this right area. Can select these four verts and press F to fill that scap. Here, let's try to move
this one to the right side. Sthing on the other side here, we can insert an e group, Let's side control r. Can
slide it to the right side. Let's select these four vers. Press F, L sthing
on the bottom side. Select press F to fill Perfect. The next sep is going to
be to take these sites all the way to the top until
we reach the eyebrows. Let's select, for example, these five verts, and
we can exude them up. Can scale them a
little bit up and also here we can
push them outside. Let me try to bring these
inside just a bit like that. Perfect. For the nose verses, I don't think we're going to
need this extra edge mage, sketch it of the two edge loops, and we can check this one up. This vertex, we can slide
it a little bit up, it reaches that point. For this one, you can take it
a little bit to the middle. This you can put it right here. Also keep an eye this
right autographic. Let's align these even better. Right here, we can
select these four verts and let's press F to fill them. Here on the top, we can
insert another edge loop. Control R here and let's
select this vertex, shifts like this vertex, we can press, merge at the center. We can take this one
to the left side, and we can do the same
thing to these two verts. Let's press and
merge at the center. Basically, the less
vert is the better, just that is going to be
having too much to deal with. So here I'd like to check
this right to graphic. We can try to push these
backward just a bit. They should not be
completely flat for the nose. There we go. Looks perfect. For the
bottom of our eyes, we can grab again the
same four vertices. We can extrude them down, scale them a little bit up, and let's push them a little bit forward in the
right autographic. Here I would like to
grab these four vers, and we can press F to fail them, and here we need to.
Let's take this one. We can push it a
little bit down, and touches the nose, and we can add an
additional loop. Let's these three edges, we can extrude them down. Scale them again a little
bit up, push them outside, and we can grab
these three edges and press F to fail them. Perfect here, let's do
some better alignment. Pretty much good. Let's work on the
right area right here, we can grab these, push them a little bit
to the right side, and we can start filling these gaps. Let's
select these two. We can press F to fill them, and we can also add an
additional edge line right at the top. Let's them up. We can take these two edges,
push them to the right side. Also let's check the front. We can take this one a
little bit back like this. Here let's push them
to the right side. Show us a little bits,
and we can grab these four versus Cs press
F to fill them. This can push it
to the right side. Take it up, maybe. There we go. Here we are having that. We
finish working on our eyes. It's pretty much ready to go. We can right click and
shade smooth that part. I fix this bad geometry. All we have to do
is to just flip the normals. On the Es mode. I want you to select
everything by pressing A and type shift and control space right here and let's try to work
on our mask a little bit. I'd like to switch
the edge mode. We can press all right here. We can extrude this
area on the inside. Let's press E Y. We can exude inside, just a little bit like that, to give it some depth. So we got our eye socket. I call it the Zo mask
because it looks like it. We can continue our work in
the next coming lecture.
4. Modeling Character Nose: Having the ice sockets modeled, the next step is going
to be to add the nose, this particular parts right
here. Let's work on it. I'm going to press
three, and I'd like to grab these vertices. I'd like to maximize this window by pressing control space, and we can switch
to the wi frame. Let's try to take
this up a little bit, for example here, and
we can start exuding. I want you to exclude here
exude a to this location. Down. Can try to spin this
one just a little bit. Send the let's try to spin it. We can press R to spin it, and let's extrude
down double times. Perfect. We got that
edge loop of our nose. We can press control space, and let's check the front.
This is the front side. We can take these last vertices, push them down to fill or to match that same
curvature of our nose. Here we can try to make
it go with the flow, something like that, looks fine. So the next step,
it's going to be to jump to the three D
view port right here. I want you to
select this vertex. We can press one to
go to the front. You can take it a little bit up right here and extrude it. For example, three times. Let's select these
last two vertices, and we can press F. Let me just check. I think
that's right. It's not right. Obviously, we
have to slide this vertex, we can double g to slide it
like that, we can take it up. Perfect. So like that, we
can also slide these vertex, a little bit to the
middle. L that. Let's select vertices,
try Sy press zero, to have them completely
flat on the z axis. You can push them a little bit forward, spin them on the x. Something like that
looks reasonable. Next, what we can do is to press shifts and select
these vertices, and we can press F
to fill that gap. Perfect. Control space, and let's continue
working on our nose. We can insert an extra edge
loop by pressing control R. Let's try to push it a little bit outside,
you can press one. Check that size. Try to push
this one back. This one. Yeah, let's just
leave it like that. Here on the top, you can
select these four tics, press F to fill them. Same thing here, let's select these four press F.
Here on the bottom. I'm going to select
these four, press F. Here we don't want to fill
this one with the triangle. We always need to have
at least four vertices to fill a phase. To fix this problem, we can
insert an edge loop right so control r. We can slide
it a little bit down. This way, we're going to be
having a four phase versus. We can press F to fill that gap. Perfect. Let's press three, and let's check the
size of our nose. I we can try to take these
a little bit up like this, spress one. It looks reasonable. Basically, that's
it for our nose. I'm going to just keep it
like this as a simple nose. We can work on it later and
add more details to it. See you in the next
came of lecture. Hack.
5. Modeling Character Mouth : The next step is going to be to work on the mouth
of our character. But as you can see in
our reference image, we don't have too much
details to work with. This is just a simple line. Instead of relying on this, I'd like to rely on
different reference image, this mouth reference. I've put this one as a test. I want to use it
in our character. I'm going to simply
drag and drop our reference right here
so we can press one. Also, I'd like to hide my
current reference image, we can select it and
press H. Hide it, and let's go ahead
and drag and drop our new reference
image of our mouth. I'd like to scale it down until the reference fits the
shape of our mouth, something like that, and we
can take it a little bit up. Also, I'd like to make it a little bit transparent
so that you can see beyond our reference. We can scroll right to
the object that are properties and we can
check the opacity. Same thing we did with
these reference images. We can take it just a bit to the right side
to the left side, to have it centered, and now we're ready to
model our mouth. First, what I'd like to do
is to select our objects, switch the edit mode, and I want you to select
one single verse, Shift D, and we can put
it, for example here. Let's go ahead and
start extruding, so we can extrude like this, go down to this location. It's not perfect here,
but don't mind that, so we're going to work
on it even better. Extrude down like this,
continue that lip. Actually, this slip, we
should follow it downside, down here a little bit,
something like this. Here on the top, you
can extrude down. This is the basic
shape of our mouth. You can try to trim, or take this one, push it
inside the little bit. I'd like to go to the side
and start working on it. This part can push it outside.
We can also try this. I'm going to hide the
right reference image and simply duplicate the mouth. Shift, to duplicate
this, escape, to cancel that movement, and we can try R z, and let's spin it by 90 degree. And we can push it
a little bit back until it touches our mouth. Here, those are the lips. We can try to push them
like this outside. Perfect. For the
second vertices, let's push them like that, this one should be backward. We can continue like this. This one like that. This one, I think it's at the right place. Continue aligning
all those vertices. That is perfect. This is the first step of
modeling our mouth. The next step, we need to
add an extra edge loop. Let me just select
these four vertices, and we can extrude them up, slide them a little
bit sideways. Here we can take
all these vertices and move them backward. That's nice. We can also
do the same thing here, Let's extrude this one, for
example here to the middle. Select these four ts, press F. Let's slide
this one backward. Nice. Also, I'd like to drag my reference image
a little bit to the back. Same thing for this one. Let's
just move it to the right. This is going to interfere
with our modeling. Here, I'd like to do repeat the same step for
these s on the front, so let's extrude them down
like this. Select these two. Extrude them a little
bit like that. Take this one to the middle. C select these four
press F to fill them. We can select this
vertex, extrude it up. Here, take it to the pack. Can select these four pres F to fill them and right to be
able to fill this loop. One's going to be
able to do this because this is just a triangle. What we can do is this. I'm going to just insert an op, control r, right
here let's take it, for example, here, and we
can delete this phase, x, delete this phase. And we can drag this
one a little bit down, select these two edges
and press F to fill them. That's for the
second edge group. We can try to
investigate the shape. For example, this vertex, we might want to move the
top a little bit forward. A seems right. Let's work on the inside.
Here for the inside. I'm going to let's press one. We'd like to grab these vertices
and we can extrude them. For example here to this area. As we can drag these down. Like this, we can check
this one down a little bit. Perfect. Check that out. It looks perfect. And also here you can do the same thing. Let's extrude the parts upward. Stretch to align these vertices. Let me press one to
go to the front. Can select this vertex
extruded to this location, select these four vertices, press F to fill that gap. At this location, I'd like to insert an extra edge
loop so control R, like this we can be able to
connect both of these phases. One, two, 34, it's going
to go for the bottom. Here I'm going one,
two, three, four, it's going to go for the
lip for the top lip. Yeah. You can take
that to that side. Let's check we seem to
be on the right track. Let's work on the final edge
loop on the inside here. Let's can check this one up. Slides to the right side. Let's select these four vers, and we can extrude them here
on the inside. Push them up. There we go. Looks nice. We can push this one back. And Let's do the same
thing for the top. You can select these four s and extrude them down until the touches with
the bottom lips. There we go. Nice. Try
to push it even back. Basically this is where
it's going to get a little bit frustrating.
Just take your time. You can repeat the
same steps again if you got the wrong results. Basically I'm going
to select these verts and let's go ahead
and extrude it. Let's select these four
press F to fill them. Can go to the inside to
see what's going on. I'm going to insert an
additional edge loop right here. Check this one, double G, slide it a little
bit down, this one, this vertex, we can try to
push it here to the middle. Let's like these four, press F to fill that gap for the top. It's a little bit messy. I admit that. We're
having one, two, three. We should be having four. We can also do the
same thing on the top. Let's add an extra edge loop, right at the top, and let's try to make this one a
little bit close. We have one, two, three, and what is the fourth? Yeah, fourth reference, the
fourth verte is this one. You can press F
to fill that gap. Double g to slide it. You can apply some
optimization here. L et me just go to the
front and check this out. It looks reasonable. We can try to add the solidify or the subdivision surface
modifier, so control space. Let's go to the modifier
properties and we can add the subdivision surface
modifier. It's applied. We can also increase
it to two for the level pers,
right shade smooth. Our mouth looks a
little bit fluffy, so what we can do is to add some edge loops to
define the lips. Control R right at the top, you can take this a little
bit down like this. I also want you to add an
extra edge loop right here. Control R, something like
that, looks reasonable. Here at the bottom,
I don't want to have this defined edge for the lip. I don't want you
to be this strong. We can select the
first vertex and go for example, to this vertex. Let me just hide this
subdivision surface modifier, can press control right
here so that you can be able to select all
these vertices in between and we can press double G. We're going to be
able to slide it up. We can try to do
the same thing for this one, two, that vertex. Let's prem pack the
subdivision surface modifier. As you can see that edge
is not strong anymore. And basically that there we go, we got our mouth modeled. In the next time election,
we're going to go ahead and fill our face.
6. Finish Modeling Character Face: In this new lecture,
we're going to be connecting the mouth
to the top section, the nose and the eyes, and we're going
to fill the face. We can continue that face loop. To do that, first,
let's just delete these references that we got
from the previous lecture. Basically, I'd like to apply some optimization to our
character to our mesh. On the edit mode, as
you can see we're having too much geometry here, especially at this area. We're having some
dense vertices order. You can also hide subdivision
surface for just now. We got to optimize this. For
example, check this out. If I press ols right here and press x and dissolve
that vertex. Going to have too
much of a difference. I'm going to just go
ahead x also here, dissolve those edge lines. Sything here, let's x dissolve
this one on the bottom, and we can also get rid of this edge lines,
x dissolve edges. We having one, two, three, four, which is perfect. As long as we're
having this loop connecting from here all the
way to the end, we're good. Symeth here on the top. If we go with this amount
of tics like this, it's going to be a
little bit too much. I prefer to combine this part. Show you. I'm going to
select these two vertices, press M and merge at the center. Same thing here, press M
merge and continue like this. Basically, the less
vertices we got, the more control we're going
to have over our mesh. That is pretty much good.
I'm going to press three. Let's see. I'd like
to select our face, our mouth, and let's push
it a little bit outside. Can also press old He to bring
back the other references. And let's align our mouth, just like our reference image. L to take it a little
bit up, spin it. We can press R, to
spin it on the x axis, spin it like this, and now it seems to be a right. Let's go ahead and start
connecting these verts. We can press F to fill that gap. Let's take this a little
bit to the right side. I'm going to select this vertex, and we can extrude it, for example, all the
way to this location. Let's select these four verts, press F to fill them. Here we can add an
extra edge loop, so we can press control r. This and let me
slide double G, slide these a little bits
up, give it some room. To connect this part, I'd
like to take this vertex, shift, select this vertex, press, and we can merge at the last selected
vertices at the last. Let's do the same thing
here, select the last one, press M, merge at last. Basically as you can
see at this location, we're having four verts, I'm going to press F to fill them, and let's do the same thing
here, one, two, three, four, press F to fill that gap. Perfect. You can take
this one little bit up. Let's investigate our geometry. Whether we have to
push these outside, or we can take these inside. I think that is the right way. Let's work a little
bit on the chin. I'm going to press three
to go to the side and can switch the y frame and let's
select these three vertices. Let me check. We can
go here to the front to make sure that we are
selecting everything. Can also include this
fourth reference. Can extude it down
and exude like this. Let's check that. Seems
to be reasonable. Here on the front, we can simply align this vertex with the rest, let's take this one
a little bit down. You have that circular face. For example, these, we can
push them a little bit inside, tack them down a little bit. Nice. Next, I'd like
to go to the forehead, Let's select the top tics
and we can exclude them up. For example, here,
let's slide double g, slide this one to
the right side. Let's exit the front and
let's check what we got. We can try to push.
Let me show you. I'm going to select these
four tics and try S Y, and we can flatten them a little bit and
push them outside. It looks fine. I can
take also this one. We'll just leave it as it is.'s press stach
go to the side. I think should not belong
there. There we go. For this vertex, you
can take it like that, and we can select it and
extrude it all the way here. Let's select these four verts, press F to fill that gap. We're having this
sloop. This loop must be continuous
until the end. Til it reaches the
end of our face, must be connected with this one. We can do something like this, let's select these two vertices, extruder to push
to the left side, extrude again, a
line on the front. Something like that,
and we can connect it, for example, to this part. Let me try I can select the
four press F to fill them. I can try to expand these. Take this one a little bit up, this one to the left side. Nice. You can see we're
having this entire loop, which is awesome, so
it's ticking from the chain all the way to
the top of the forehead. Awesome. A Let's fill this
space that we got here. We can start from here. Let's
select these four verses. Press F, can select also
these press F to fill them. Here we can insert
another edge loop, Control R, like this. Can select this vertex, extruded here to the middle. Let's check the position. That vertex can push it outside. Select these four s, press F, continue
to the top perfect. Now we're left with this
area. How can we handle it? These four verse is
going to go together. Pretty much good, and we can insert an extra edge
loop right here. Let's select these four, press F. And the four
press F. Perfect. There we go. The important
thing, let me just show you. We're having one
loop for the mouth, this loop right here. We're having a loop for our
entire phase. There we go. And we're having this
loop for the eye, and the final loop that we
got for this ye socket. These are the essential loops that we must have in your face. Now I'd you work a
little bit on the cheek. I'd like to make it a little bit fluffy so we can select
grab it from here. We can press O to activate
this proportion energy. This is the shortcut for
activated eng and we can push this part a little bit outside. We can take
it to the right. This way, we're going to
be having acute character. Let me just activate the subdivision surface
modifier and let's see. I'd like to reduce the size of the mouth, so
we can press one, and Let's take the mouth
a little bit inside. You can take it a little
bit down. There we go. Seems fine. Can try
to push it outside, or actually we can
take these inside too. Let me just check
it from the side now I think we're
on the right track. We can lift that section up. There we go, control space
to maximize this window, and let's work on it even more. I'd like to pop up this
part so can bring it up to have a big cheek. For this area, I'd like
to take this part, push it inside, but one's going to be able
to do it this way. I'd like to click here
on this connected only, and let's push that
area inside our mouth. I think I'm going to reverse
back and leave it like that. Here for the nose, I'd like
to work on it a little bit. Let me just deactivate
this proportion gen, and also we can hide or disable the subdivision
surface modifier. Let's see here, so we
can work on it better. I'd like to drag these
backward, these. Basically, I would like
to insert check its g, can slide them back like this. This way, we're going to be forming the shape of
our nose even better. Let me just check these back. I'm just trying to have the right space between
these vertices. So I'm just using the double
G to slide them over. All right so let's
print pack the subdivision surface
multi fair, let's see. As you can see, our face
looks cute and fluffy. It's ready for the next step. Also we let me just
the forehead a bit up. You can select these,
extrude them up. So they reach the forehead. We need to finish that pas loop. Here, for example, we can
select all these vertices, extrude them on the y axis. We can fill this gap that
we got on the bottom. Here for the top, we can make these a little bit
close, and let's select them. Press press F to fill. Now we're having the
second edge loop, the first, this is
the second edge loop. Let's press one.
Obviously, we have to slide those Like this, we need to make our
face a little bit circular and that's nice. Let's press three,
to go to the side. We can tweak this area. Let me just show you. We can finish the cheek section. Also here for the top, just make a room for this part. Slide it a little bit down. Then let's check the solid. I'd like to show you
some final tweaks that we can apply to our mouth, to make it look
more interesting. First, I'd like to add an
extra edge loop right here, so Control R. Let's add this edge loop to define
the ps even better. Can you see that? Now it
looks much more better. As we can add an extra
edge loop to define this edge the top lip. Ps lip. You can also try to slide it
a little bit to this side. Activate the proportion editing, but also make sure that you are checking disconnected only, so that you are going to be
affecting the entire mouth. We want to affect the top. Let's check this connected only. We can slide this
a little bit rough the left side, perfect. We can make our character
a little bit smiling, so G, can take it
a little bit up. I want you to select one of these vertices that we got
in the corner of our mouth, or even we can take this one, and I want you to
push it inside. Let's call the mouse and
take this part inside. There we go. We're
going to be having this fluffy smiling cute face.
7. Modeling Character Head: We got our face to the next
step is going to be to extrude and build
our entire head. We're going to follow this
line that we got on the top. To do that, let me
just select my face. I don't want to have this
proportion edit and enabled. Let's select these top
s, the top four s, can press sreech,
go to the side, and let's extrude
it up like this. Etude a here, and I
want you to spin it, can press R, to spin
it sideways like this. Also, I'd like to introduce
you a bunch of tools. It's going to be really helpful in the
process of modeling. Let's go to Edit preferences, and I want you to search
for loop loop tools. I want you to check
this box so that we can have access to these tools. On the EDS mode, if you press N, If you go to dit,
you're going to have access to these loop
tools. Check this out. We can go to the
top, as you can see, it's a little bit messed up, so we can select, for example, these verses, and we
can try to relax them. Nice. Let's also do the
same thing here on the top. We can try to relax these
vertices. Check them up. I'm going to press here and
try to spin this like that. Let's see, we need to
investigate before we can move on and render and
extrude even more. We need to check our geometry. Obviously here in the forehead, we have to slide these
vertices bit down. Double G. Let's select
this vertex, double g, and we can slide it down to make it go in flow
with the other vertices. Let's continue our turn. I'm going to press all to
select this entire edge group. Let's press three, and
we can spin it a bit, make it a bit vertical, extrude it again here, can start to spin it. Continue until the finish. We can stop here to check
the head turn on the top. Seems to be reasonable.
Let me just press one. We might want to take this
part down a little bit. This part also, let's
try move it down, and let's check again. I think that's a
little bit too much. So we have to check
it down, but not that much. Let's carry on. I'm going to press
here. But also I want you to from
this position here. If you extrude, I want you to make once you
spin it like this, I want you to make it
a little bit smaller. We can try to scale
it on the x, S x, str to scale it and push
it to the right side. Also here, I'm going
to scale it on the y. Let's press three,
and let's scarry on. Obviously, we have
to push it ale bit back. Can press old here. You can try to spin it on the x, our x, let's spin it a
little bit like that. Press again extrude
down and scale down, scale and push to
the right side. This part can
right, let's check. I know this area
here looks weird, but once it's going
to be connected, it's going to make sense. Let's carry on, press
old here, extrude, and we can spin it, we can press R and spin it a
little bit like this. Then, now let's start
filling these gaps. We can select these four verses. Press F to fill them. We can select the extruded down. For example here,
let's also make sure that it's on
the right location. Let's put it outside. You can select again
these four, press F, same here, select these, press F to fill
them. Let's check. Can push this one outside just a bit to have a smooth head turn. Let's carry on. I'm going to select this vertex, extrude it. Down here, let's select
these four s press F. Same thing here, can press F, and let's take this
one. Push it back. Nice. Let's press three again, can press old and try to extrude this
part down. Can spin it. There we go. S Y,
Something like that. Here we might want to push it to the right side
to the left side. Here we can extrude down,
extrude this vertex, and we can select
these four verts, press F to fill them. Let's do the same thing
again, can extrude the, select these four, press F. Str push this vertex outside, select the last vertex, extrude it down,
select the four vert. Also we can hide
subdivision surface motif, so we can see what we got. Let's press F double G, slide this one down,
a push it back. Seems reasonable. I'm going to take these two, extrude them. Let push them on the x axis, just a little bit
inside and after that, we can connect them with the rest. Let's do
the same thing here. I'm going to exude the port, select these four because I'm trying to create this
edge line that we got here. Finally, I'm going to grab these press F to fill
them. That's nice. Let's check control space, let's go pack and activate the subdivision
surface modifier. Let's see what we got. This section here looks
a little bit weird. So let me check how
can we make it better? I'm going to try to
push these inside, same thing for these. Looks a little bit better. I'm going to push them backward, I think that looks reasonable. The bottom of the cheek
must be continuous. Let's find a way to do so. I'm going to try to push this
one back, push it outside, let's select the four vertices, press F to fill that gap. Now it seems to be
continuous like this. Awesome. Now we're
left with this hole. What I tally do to it, let me just check it from I'm going to press tree,
to go to the side. We're going to press and
shift to select these, and let's push these here. Without this one. I
don't need this one. Let's push this one
to the extreme right. You can better line this part. We can also press old here, and let's try to
smooth this section. You can press n, go to the loop tools and
we can try to relax it. By relaxing it's going
to look like a circle. Now extruding it down, it's
going to be much more easier. Let me just scale it
a little bit down. We can go to the front. Let's check it from here. Obviously, we have to scale it. Can scale it on the
x, S x and push it to the right side to
the left side, extrude. And we can do
something like that. Let's check it from
all the sides. It looks right. All we have to do right now is to add the ears. That is the subject of
the next coming lecture.
8. Modeling Character Ears: To work on the ears, I'd
like to grab this edge line. I'm going to try to extrude it. But actually before doing that, we need to align our ear
with our reference image. Let's press, can press
and stretch to push it. This is the starting position for our ear and this is the end. Need to end here. You can just push
this like this. I also like to add L et
me try to push this back. I'm going to insert
another extra edge loop. You can insert it here, and I'd like to delete this phase. These two phases, we
can just delete them. Double g, slide it up, double g, push it inside. I can check this one like that, and I'd like to start with
this single edge line. What I'd like to do
is to extrude it. Spin it and ext and continue
that loop. Till we finish We can select these
two final edges, and we can press F to fill them. With the next step, we
need to spin our ear, so we can grab this last
vertex and activate the proportion edition
to the connected only, and we can try R Z
and let's spin it. Select both of those.
Spin it push it back. Let me also go to the side. Let's check that. Obviously,
we have to push it way back. Same thing here, let's push those backward, we
can push them back. Let's deactivate
the proportions in. We can slide these like this. Then with that part done. Let's move on to the next stage. I would like to select
these external. Without the last one,
and we can extrude them inside. I can
scale as part. Let me just hide the subdivision
surface modifier again. I'm going to just get
rid of this edge in. Let's press here,
x dissolve edges. One, two, this one is on the inside,
let's push it outside, one, two, three ops,
three, and four. Let's press F to fill it. Same thing here, let's
select these four s, press F That's nice. You can press again
on the inside, and let's extrude this
area and scale it down. We can try to relax
it, let's press n, go to edit, and we
can relax these vers. Try to scale them a little
bit up. That's nice. After that, we can
fill these gaps. Select this vertex, extrude
it, one, two, three, press F, fill this gap, one, two, three, fill that gap again. Can extrude this section again. Let's select these two. Three, let's fill them. And we can do some
better alignment here. G. Seems to be right,
but let's continue. I'm going to select
these four press F. One, two, three, four, press F again. You can slide this
one up, so double g, slide it up, and finally we
got the final phase to fill. Press F to fill that. Let's activate the
subdivision surface motif. Let's switch the edge mode. I'm going to press here, and we need to extrude it. Let's exude it inside, scale it way down, hide
this subdivision again. Scale it real down,
let's push it outside, and we can select these
four or three edges, press F, one, two, three, press F, and same thing here, press F. As a last step, I would like to add this
particular section here. I don't know what to call it, but I'm going to just show you. Let's select, for example,
these two phases, you can extrude them outside, and we can scale
this section down, and let's push it
inside our ear. Can select the middle.
Take it outside. Oops, not like that. Let's see it with the
subdivision surface modifier. Can slide these letters back, make it just a small
objects inside our ear. Basically, that's
it. This is our ear.
9. Creating Stylized Character Hair: Now it's time to start
modeling for our character. First, what I'd actually do
is start by adding a curve. Shift and right click right
at the position of our hair. I'd actually start by
creating this hair particle, can do right click right here. Shift A go to curve
and we can use a path. After that, I'd like to
spin it on the z axis. Let's not on the z,
let me press one. We can spin it on the
y axis, so our y. Can spin it to
something like this. Also let's skill it real down, until it fits the
shape of the sir. We can put it for example here. Select the bottom, can press to activate the
proportion tigen. Make sure it's stri
connected only, and I'd like to switch
it to the sharp. You can check it like this. Push it sideways, or actually
can do it the opposite way. We can select everything,
put it at the start. Here and select the top
and drag it down here. This is the first hair particle. Also for this location, we can try to push it
a little bit backward, and we can switch back to
the is mode so that we can see the location of this
hair particle. Perfect. The next step it's
going to be to add some depth to this hair, align right now, we need
to go with some depth. To do that, I want you to go to this object that's properties. If we scroll down,
you're going to have this geometry tab. Click on it, and In
the Bevel setings, I want you to
increase this death. Increase it up like this. But you're going to
see the problem, so you can see our hair
looks like a pipe. We don't want that. We want
to create our custom shape. What I'd like to do, shift A, can go again to curve, and let's bring a circle. I'd like to take this circle to the right side,
for example, here, can press seven to
go to the top and let's tweak this shape. First, what I'd like to do is to switch these and make them
a little bit sharper. L et me just deactivate
the proportion addition. We need to make it
them sharp like this. There is two
ways to do this. You can even scale
this one down, or you can press V and
switch it to vector. Now it's set to sharp end. Also, I'd like to do the
sameth on the opposite side. Press V, set it to vector. For example, on here, we can just scale it down, so scale on the x.
Actually, let's scale it. On its own, something like this. Can you take this one a
little bit backward here. Next one, I'd like
to do is to add some warp effect to these edges. Let's select these two vertices, go to segments and subdivide, select this middle one. T to spin it by pressing r, spin it a little bit, push
it here to the middle. As again we're having
this nice warp effect, that's going to make it really good when adding it to
the shape for our hair. Let's sing to all
these locations. You can spin this one
around like that. These two segments
subdivide, spin around, and do the same thing
here. Something like this. Also we can try to
make it aligned. So we can press V
again and to align. I want to have it sharp
sing for this V lined. Now the next step
it's going to be to use this object as a
shape for our hair. Let's select our hair, and I want you to
go to this object. In the object, we have
this eye dropper, we can click on it and pick
this shape that we created. It's really huge because
the shape is big. On this mode, we can select this unit and try
to scale it down. Like that. I'd like to show
you two tricks that's going to allow us to handle hair particles in a
professional way. First one, it's going to be
how to scale these particles, how to scale these
vertices of our hair. If you press S, you're going
to be able to do anything. But if you press old S, S you're going to be able to
tweak this end of our hair. Same thing here, for
example, of the middle. You can press old S, try to
scale it a little bit up, and here for the bottom, S, let's make it a
little bit smaller. Here for the top old S.
Let's get it real down. Perfect. I can try to make
it a little bit interesting, give it that nice end nice. For the second trick, it's
going to be how to rotate our hair particle without
distorting its shape. Check this out.
If you press R z, you're going to be moving it from its location.
We don't want that. But inside if you press control, can be able to spin it on
its own on its own axe. This trick is really
useful in order to get that differentiation
in our hair particles. So now, let's go
ahead and scatter our hair particles
across our head. First of all I do is to
duplicate this hair particle. Let's first try to align
it a little bit better. Al as to scal it
a little bit up. Something like that, we can
press to select this unit. Shift the duplicated, and
let's push it sideways here. Can scat it a little bit down. Al to scat it on its own, and we can press control t to spin it a little bit around. Something like this
looks excellent. Can Let's activate the
proportion edition and we can take it
a little bit down. Sounds like that,
looks reasonable. Next, I'd like to add two additional
particles on this side. Let's select this
unit. Shift the two duplicate it and
elect you spin it y. Let's spin it like this.
Also as to scale it down, select the top, push it here. Tick this one up. We can remove the proportion edition tool
just now. Tick this one up. Something like this. Let's check that out. Looks excellent. After that, we can press elses
like this unit, Shift D, duplicate it, and move it here, spin it on the z
axis a little bit. Als can make it a
little bit smaller. Drag this down. We're
doing fine so far. Next, we can add
a particle here. Shift, duplicate this,
Z, spin it down, and I'd like to scale
it a little bit down. And push it inside. Next, let's select all
these three air particles on the left side, and press d, to duplicate them, right click, S x and minus one, to invert them, and we can
put them on the right side. Can spin them a little bit on the z axis to make them
a little bit different. Also, we can try this,
we can try control t, and let's spin them around. Something like that
looks awesome. This is for the
front of our head. Now let's add hair particles
to the side of our hair. To do that, it's going
to be really simple. On the mode, I want to press
A to select everything, and you can select this
particle, this hair unit, Shift D to duplicate
it and press y, can tack it sideways. Also, I want you to press three or at control t to jump
to the other side. Can just hide our
reference image, select press H, and let's
continue to taking this. We can drag this one
down a little bit. Span it sideways. Shift D can. Do
something like this. Check this one up, this part, shift, push it backward
and continue like this. Also sometimes it's good
to do this control g, to spin it around, make it
look a little bit different. Same thing here, let's do
the same thing again control g. All right, Seems. We can carry on like this. A A, this part, shift to duplicate,
spin it around. Also we need to take
a look at the top. Our hair should not be
going straight like this. We have to select this
part for example, try to push it inside. Same thing here,
Let's push this one, make it a little bit
around it. Perfect. Let's continue our turn. Let's those duplicate R z, spin it around, and
continue this way. Shift again. Until
you finish that loop. And sometimes it's good
to check the progress. Shift the finally here. Next, I want you to select
every other hair particle. Press L, keep selecting L, but jump, one is selected,
the other one is not. Basically just keep
selecting every other one till you finish,
something like this. After that, we can
press control T. Try to spin them around, make them a little
bit different. Can scale them a little bit
up or scale on the z axis. Old S scale them
a little bit up. So like that. Now they
don't look the same. For example, here, we
can try to make it a little bit close. To the head. Something like this,
that is perfect. After that, here for the
back to select everything, you can select the
back particles, shift the, to duplicate them, and we can push them
downside a bit. O X push them inside. I don't like this
clipping to be honest, Let's activate the
proportion sin, and let's srt a check it out. We can select this unit, control t, can spin it around. We still have the clipping. We can take it keep playing with the location of these
hair particles. Now it's time to
work on the top. For the top, can select
this main hair particle, A. Let's grab this one. Shift D, duplicated, and we can take it sideways
or backward, can spin it on the z axis like this to make
it look forward. Al S just sce it down a little bit because
it looks a little bit and we can orient our
hair forward. Like this. We can select this
part, shift D, duplicated, push it sideways. Z, shift D and
continue like this. Can try to improve the orientation
of these ir particles. Shift D add extra forward,
additional units. Let's see. As you can
see our hair looks good. Such perfect, but it's
going to do the job. If you have any
questions, let me know and I'm going to see you
in the next lecture.
10. Modeling the Upper Body of Character: Now I'd like to work on
the body of our character. Let's press one. I'd like to add work on this mid section. Let's select our hit and I'd
like to start from the side. I'm going to grab these 33
versus these, press one, go to the side,
and we can extrude sideways to reach the shoulders. Right here, for example. After that, we can press one, or actually three,
go to the side. Let's take this one
a little bit up, can ski it up like this, and we can try to
pin this circle. I'd like to let's move it a
little bit backward here, to make it align with
our reference image, and we can start
extruding like this. Make sure you have
fewer edge lines. Let's press F to fill that gap. Let's press one, and I'd
like to select this part. You can switch the frame, and make sure that we are
selecting everything, and we can try r y and spin
it a little bit like this. We got this section ready. C try, for example, to align
these a little bit better. Now let's work on the front. For the front, I'm going to
select all these vertices. You can try to smooth them or
actually lets go to vertex. Smooth vertices. Can try smoothing them.
Yeah, something like that. Try to push them back forward, can press st, go to the side, and let's extrude this section, first, second and the third. Let's exit that mode and we can select them
again, select the first one, control the last one,
can press n and go here to the loopholes and we
can try to relax those s. Let's do the same thing here. Try to relax them. Same then for the last edge line,
contractual axis. Perfect. The next step, it's going to be to
fill these gaps. Let's select this for
this press F and continue filling these gaps like this. Let's do the same
thing on the pack. I'm going to be selecting. We can hide the subdivision
surface modifier just so we can see our geometry. Let's select this part, contract push backward, or
actually let's select them, the entire line,
contractual relaxes. Yeah, seems to be right.
Push it back, press three. Kick the single versex back. Si frame, select this part, can extrude it here. Before extruding, we can push
them a little bit backward. Let's select them all,
relax them again. Let's take a look. Seems to be fine. Control
first one, t the last one. Let's relax these two. Select these four s, press
F, can tick this up. Select the first one
control the last one, double g, slide them
a little bit up. You can extu this
part again down. Let's select these four, press F. But also, I don't want to keep
it flat like this. I prefer to push these
outside, this a little bit. Just a little move.
Let's carry on. Select again this entire edge
loop, extrude it down here. Press three to check if we were aligned, here,
actually we are. Let's select these four, press F. We got that top part covered. Next, let's work on
the arms for the arms. Also try to align
them even better. We got to press old. Make sure you
include these verses at the bottom, press, act one. Et like this. Can spin it, scale it down. Etude, scale down again here. Also, let's make sure that our geometry is fine,
can select Ften. Try shift n, to
flip the normals. Also here, we can try
to make it circle. We can click on circle, to have it circled, like that, and Let's ext Here,
spin, scale down. Extrude scale up.
Extrude, keep it up, and here let's scale it real
down. Let's check that out. It looks a little
bit off our arm. Roly we have to scale this part. Let me just check it
from this view port. Spin this section. Tre
spin it a little bit up. Push it down. Let's see now. We can check it with the
subdivision surface modifier applied. Right. That's fine. Let's carry on, can press old here to select that
entire edge loop. Can try to smooth it,
should not be flat here. Let's press n, can
try to relax it. Push it to the right
side, press one, and let's extrude this mid
section like that, exude down. Let's press again, try to relax those vertices. Let's
check this out. Here I'd like to
select this part, try to push it a little
bit back, so the p. It's not straight. Same here we can push it
a little bit outside. There we go. I like this
gap that we got here. For the front, I like to work
a little bit on the chests. Looks completely flat
here. I don't like that. We can select this
line of vertices, dou G to slide them down, and we can push them forward just a bit to form the chest. I think that's a
little bit too much. Here we can check this one back, and basically that's
it we got our chest. Let me try to push this
part also outside. The mid section looks fine. Also here on the
back of our arm, I'd like to show you
something. Let's press one. This area right here, I'd like
to duplicate or subval it, control B. I show you a cool
trick that you can apply. After that, we can insert
an extra edge loop, sce it a little bit up. After that, I want you to grab these four faces and
press to create an inset, and we can push it outside. Let's get it down.
Push it like that. Let's try S. Ct make
it a little bit. This, and it should
not be cubicle. You can switch the
vertex mode, select. These vers try to
scale them down. We've got the upper
body of our character. In the next coming
lecture, we're going to be working
on the hands.
11. How to Model a Human Hand: Welcome I've to this new steal. Now we're going to
be working on the hands of our character. For the hands, let's
get straight to it. I'm going to click
and click here, Shift click, and shift A, we can go to mesh, and we
can start with a circle. For the circle, I'd like to set it to just eight vertices, and we can switch this mode, try to scale it down. Let's put it right
here at the center, and let's spin it down. After that, we can
extrude this section. Strategic Car. Something like that.
And here at the front, we can try to fill these gaps. Let's select these two
verse press F to fill them, control R in switch
one edge group. We can switch the edge mode. Let's select these two press F. Samething on the other side, let's press F over there. Select these two or three edges, and press F to fill them. Here I'd like to
select this part and try to push it outside. Let's press one. I'd
to tick it over there. Let's work a little
bit on the top. We can also strike trick
these, push them down. Something like that, we
can select these and we can try to scale them
down, push them backward. G, can check a little bit up, this part this vertex, can you can press double g to move it a little bit forward. This is the basic
shape of our finger. For example, here, we can try to this parts a little bit back.
Tack this one like that. Let's see that from the front. Also here, I'd like to scale
this parts on the axis. Let's press S Y to
widen that area, Sathing here on the top, S Y. That's nice. We can also double take this one a
little bit backward. After that, I want
to select my nail, so this is going to be the nail. Let's also check the wi frame. I think that's about it. I can try to check it a
little bit back here. Teck these verses
forward, just a bit. Let's select our nail. You can extrude it or
first, we can press, create it as an inset, and I'd like to spin it so R Y, let's spin it inside. Let's add the subdivision
surface modifier to see how it's going to look like. If we push it inside. What's going to happen if
we tare insert control R? Insert an extra edge loop. The right click sheet
smooth. There we go. Our finger looks acceptable. Let's press one and we can
continue working on it. For example, at this area, I'd like to piv this, Control B, can piv and inser one, extra edge loop, press all
here and try to pop it up. In our fingers, we're
having these pumps. You can check your finger. That's the beauty of hands. You can always check your
hand when working on this. The preference is your hand. That's a good trick. Let's carry on here, so we
can extrude it one more time. Let me just It is to see. I think we have to push
this parts a bit back here. For example, here we can take
this parts a little bit up. It seems reasonable.
The next step, I'd like to duplicate
this finger four times on this axis. On this mode, select everything, shift d, to duplicate. You can take it but I think our finger looks a
little bit short. We can try to
expand it a bit up. Forward here. I'd like to do the same thing
with it here. Control B. Let's pivle out, press old. We can take this part
a little bit up. Here, let's expand this
one a little bit up. This part, we have to ack it
atle bit close to the nail. Then I'm going to just
delete the second finger. Delete it, select the first
finger, shift to duplicated, let's move it sideways, and we can scat it
a little bit up, so S by 1.1. I think that's a
little bit too much. Scat it down, move it
forward, scat it on the y. Something like that
looks reasonable. I don't like this part here. It looks a little bit ugly. Let me also select the
one on the back and we can try to push it backward. Have it in the reverse
way. Same thing here. L et's select all
these vertices. Push them back, let's press one. I'm going to go with this. Let's duplicate
this finger again. Shift you can duplicate it, or actually let's just
use the second one. Shift, scal a little bit down. Shift can move it here and
let's scala it way down. That is for the smaller
finger in our hand. Finally, we can select this
finger shift, duplicate it. We can spin it on the x. You can press one, and
let's put it right there. This finger is usually a
little bit smaller in height. But actually let just press, double g, slide it down. Perfect. That is
for the first step. Next, what I want you to do to simply bridge
between these edges. Control E, bridge edge
loop, same thing here. Control bridge edge loop, and let's continue bridging
between these edges, Control E, breach edge loop. That's good. After that, I'm going to press old here and try to extrude this part up. We can extrude it
for example here. We got to do something
between we can carry on. Let me just hide the
subdivision surface modifier. Basically, I actually do. We can we can insert
some edge here, control. We can take these vertices. We can take them up like
that, and let me show you. Here we can also
exclude these parts up. This is a way of the
wind sum optimization, Let's press F. Instead of
having this amount of vertices, we can only have three on
each top of our finger. Press F. And let's
continue this way. Select this part, G, or G, just move it up. Exclude this one up.
Select the four press F, and we can continue this way. Let's check the statistics, we can go here and check
actually at this location, we can check the statistics. We only have 16 universities, which is really reasonable. Let's press one, we can extrude. We actually let's just try
to scale down these fingers. They are a little bit hue. You can scale them,
spin them here, scale them on the x, and bring them back
where they belong. 02, we can press old.
Extrude this section. Sce it on the x. Spinach. We can also
try to relax it. Let's press n, go to
relax. That's nice. Press one. I'd like to grab
only the top and extrude it. Actually, select this part, extrude it double times. Let's check this part. I'm going to select
this vertex, press. Print it to the side, but also we must
be on the sharp. It's also the same thing here. That's nice. Can take
this down a little bit. After that, we can try to bridge between our hand and
this last finger, the fifth finger, control. Without the proportion
individual, we can tick it up. Can press F to fill that gap in between, select this vertex, exclude up, select these four, press F, and let's
continue this way. We got that part connected. This finger still looks big, so's s from here. I can try to make it
a little bit close. Also press old, I'd like to
delete these edge lines. I can try to play a little
bit with this part. The hand is a little bit tricky, so just give it some time. Here I want to do this. I'm going to select this edge, and I'm going to extrude it. Like this. So some
kind of a bump. You can check that in your hand, so we have in some
kind of a bump. After that, we can fill
these gaps altogether. G. Let's select this four press F. Also let's do the
same thing here. Select the four
press F. Let's see. Let's also select these
two s, extrude them up. Try to connect the
top part of our hand. Then. Also here we can select
this vertex, extrude it. Select these four
press F to fill them. We can also add this
entire edge loop. Extrude up, and let's
fill the top part, press F to fill it. O hand it's going to be formed. We're on the right track here. Here I'd like to do this. I'm going to select this
edge, extrude it down. And let's fill it with the rest. Here we can select these four
vertices, exude them up. Exude the can. Let's
try to connect those. You can select these two points, press M, merge at the center. Stritch to fill the space here. We can insert an
extra edge loop. And let's try to fill this
gap to press have to fill it. Let's check our hand. Probably here we have to push this area a little bit backward. Let's this middle part and
you can push it inside. It's a little bit tricky,
so just keep working on it. You can repeat the same
steps again and again to re got it right. Press F. Look at the top
part, press F again, and we can press F at the top. Let's try to bring these up. Let's figure out a
way to handle this. What happened one,
two, three, four. Let's go ahead with
this. Press F. Right. Here at the top, we can
press old. A old here. We can press n, try to relax this section. It has 16 vers. I think it's the same as
what we got in our arm. Let me check here.
We can press old. Now this is only 11. We got to tweak that a bit, more to make it fit our hand. Oh, let me just see it with the subdivision
surface Mifier. It looks a bit bad here. We got to take the front. Can make it pop up. L et's activate this subdivision
modifier to the smooth. Can push it outside. This finger needs some care. Let's select these, try to scale them down without
a proportion into. Let's push them inside. That's the way. Probably that's a little bit too small.
We just reverge back. It can go to this location, select entire top part. Without the top here,
select the top. Can try S. S just a bit, can take it to the left side. Let's see. Los fine
for the ch character. No big deal. Now we need to work on our arm. You can see the scale of our
hand looks pretty much huge. So we got to scale it down. Something like that
looks reasonable. Let's push it here.
Now we need to find a way to connect
it with our body. We can scale down,
exude miss everything, figure out a way to we cant circle this area,
stretch to circle it. Also without the
subision surface Mifi let's do the same
thing here, tr circle. This G can scale it up. As on the z as on the x. Let's activate a
subdivision modifier. Our hand looks decent. This finger it still looks long. For example, try to push this area outside. Maybe. Let's see that again with the subdivision surface modifier applied. I'm going
to go with this. Here we're having 16 s. But
here we're having only 11. We need to find a
way to do this. We can add, for example, some extra edge loops here. You can press here and
try to baffle this area. There we go, we added 13. Let's see this. Side the subdivision
modifier, and let's see. We can press also old here. Control B, Let's pivle
that section again. Press old, we are 15. All we need is just
another extra pivl. Let me do it, for
example here, Control B, and we can reduce
the mouse to only once. Let's press old. Now we having 16,
which is perfect. Ska blend with our
arm perfectly. Let's put hand for the arc. Sc it just ale bit up. After that, we can select our, shift selects our body, and press Control J,
we can join, J join. And we can press old
here, shift les, and we can press control E, and let's choose this
bridge edge loop. Also that to press old and
delete this extra edge line, dissolve edge, and
basically that's it. Let's prim pack the
subdivision surface motif. Let's sect our
character with his.
12. Modeling Character Legs & Feet: The next step is
going to be to work on the lower part of our body, which is the x, the
pot and the leg. To do that, I'd like
to press try S Z. We can flip this one to
the other side and let's move it down.
Something like that. After that, I want you to
jump to the solid mode. We can select these four
vertices or these two edges, press F to fail them. Also, we can insert
double edge loops, Control R, insert
double edge loop, and we can take it a
little bit down like this. Also, we need to add,
let me just try to add insert an edge loop, and
take it down like this. Perfect. X, I want you to take this vertex
to something like that, press all to select
this entire edge line, and we can try to smooth it, or let's just relax it. We can relax it like
this. Try to get it down. That seems to be fine. Let's check this area. I'm going to just disable the clippin we can
be able to freely move this point,
move it like that. Let's sing it back, press here. You can press one,
to go to the front, and we can extrude this part. Let's ex, spin it a little bit. Etude one more time and we can
scale it right here. Okay. Here on the back, we
have to tweak this area. Let's stretch relax
these vertices. Same thing here, let's
structure relax those. You can try to move them a
little bit to the center. Push them outside
to form the butt. We're going to go back and
work on the bat in details. For now, let's check the front. The front, you'd actually
take these little bits up. It seems to be
fine on the front. Let's work on the butt. Here for the pot. I'd like to reduce the number of
verses that we got here. To do that, we can do this
step. Let me just show you. G to take this part up and we can delete
these three phases. After that, I want you to select this edge
shifts like this edge, and we can press F to fill it. This way, we're
going to be having only two versus easier. I'd like to delete these phases that we got
on the bottom. And let's select these four. Versus press F to fail. Same thing here on the bottom. Let's press F to fail. Let's press one,
press control here. Let's extrude again here. We can press three to go to
the sign and let's take it down and can all the
way to the bottom. We've got legs,
here in the front, it looks a little bit funny. L et me bring back the
subdivision surface. Let's see. This look that's good. Let me try to circle this
part, press one. That's placed over there.
Press all it again here. Try to circle that first x line, scat it a little bit up
insert an extra edge loop. Try to scat it a little
bit do to form the culves. But they should be
pushed backward. Here for the front, we can grab. Let me try to relax
this part two. We can try to select
these four phases, can press and let's
push them outside. Let's see how it
goes. It looks fine, but it's a little bit long. What we can do, can take these double G
and slide them up. Probably looks a little bit big, so we can try to scale down. This part insert an extra
edge loop, pick it up. Let's just take it
down a little bit. Cut it press one, press tree
two, check it from the side. Press S Z and press zero, to have it completely
flat. There we go. Here for the butt, we have
to tweak it a little bit. Let's hide this subdivision
surface modifier. Let's push this
particular part down. We can also insert
next edge loop, control r right here. You can try to scale
it or push it forward. As bring back the subdivision
surface modifier. Nos not yet. Strike to push these inside. G Z ale bit up. I'd like to organize
this entire edge line. Express, can try to relax it. I select this edge
treasury axes. No, ks only for vers. Probably we have
to push it a bit down. It's looking good. I'd like to add the feet. I'd like to just create a
basic feet for our character. I should not leave it like
this. I don't like to leave it like this with the
feet cut down. So to do that, I'm
going to press reach, go to the side and
let's select our leg. And we can select, for
example, these versus. Let me just press A to make sure that we are not selecting
anything on the top. Let's press, select that part. You can extrude it all
the way to the bottom. Something like this, can try to push this section till
it reaches this area. After that, we can select
this front versus Cs, and we can spin them,
for example, like this, extrude all the way to the top, all the way to the
toe for our foot. Okay. Let's check this
out from the front. Obviously, we have to
scale this part on the x, Smetin, let's scale it. Press all again,
let's press three, and we can extrude
down like this. Let's spin this one sideways. We can press all
here, Let's spin it. There we go. That's nice. I think I'm going to need
to leave this part flat. S z and express zero,
should be flat. Let's exit this mode and
start filling these gaps. I'd like to select this vertex. We can extlude it here. We'd like to push it
outside a little bit. And you can extrude down
again. Double times. A next. Let's go ahead and start fill start
filling the gaps. Select every four verts. And we can press F.
Here on the side, can do this, can
extrude like this. One, two, three, four. We can insert an extra edge loop right here to a little bit down. One, two, three, four, press F, press F to fill,
and let's continue. Here on the front, I don't think let's just delete
this front edge. We can press, x in dissolve it. Let's select these
four vertices, press F. This is going to
be just the basic foot. I'm going to pay too much
attention to these details. You're going to press
X, delete those phases. Let's also work on the inside. We can exude like this, select these four vertices. Press F, sameth
here on the front. Select this vertex
we can take it down. Let's make it close
to the center, and let's select this four
press F and continue this way. You can also exclude
this section. G Z. Press F, select this edge, the town. Try S z and press zero. Can grab these edges, press F and sthing
here on the front. There we go, looks acceptable. I'm going to press old to
select that entire edge line. Zero. To have it is
completely flat. Let's press and
let's see if it's aligned with our reference
image. Yes, it is. All you have to do right
now is to fill the bottom. We can select these, t EY, extrude them all
the way to this location. Can try to fail these
two faces altogether. Let's select these try and
pre zero to have it flat. A let's carry on.
Let's select again, these three edges, E Y and we can go all
the way to the end. Here we can try, for
example, select, these two press F
continue filling. One, two, three, press F to fill those gaps, one, two, three, press F. We can slide these
vertex to the middle, so do g, slide them. Like that. Here, let's
fill this entire phase. This is the biggest
phase of our character. Here we need to find a
way to connect us parts. Let's see. We can select these
two vers to slide them up. Let's select this
phase and press F. Now we're left
with just one phase. Press F to fill it. There we go, looks fine. Go ahead and apply the subdivision surface
motif to see our foot. Simple. Scale this one. L. Also, we can switch
to the wire frame. Let me select A, d
select everything. C switch the vertex mode, select this section here, and we can spin it on the
z axis z, spin it this. There we go, we got
our foot, our feet. In the next time
lectur going to start making the clothing
for our character.
13. Designing a T Shirt for Our 3D Character: Let's move on to the next step. Now we need to design the
clothing for our character. In this video, I'd like
to work on the T shirt. For the t shirts, it's
pretty much simple, all we have to do is just
duplicate the same body shape. Let me show you. I'm going
to switch to the w frame. Let's select these
verses or these faces, should not be selected anything. A. Let's try to select again.
I can select this part. Here on the top, let's
see how it goes. Can I just hide the
subdivision surface modifier. Can select those s, shift and let D
select these phases. We're going to press one.
Let's check the y frame. It looks acceptable. That's
about it for the size. Shift D to duplicate this
object, right click, and I going to press
old S to scale it up. Basically the old S, we're
going to be scaling it, so check the difference. If we just press S, can scan up. If we press old S, It's going to be a better way
to scale objects. There we go. Here I
want you to do this. I'm going to press old and
scale this section up. Can try to take it down. Let me just see, just
a bit like that. For this location, let's
scale it even up on the y, take it a little bit on
the x, and we can do this. I'm going to try to
delete these two phases, and let's give our t shirt that V shape right at the neck. We can keep pressing V. I think I'm going to just
sketch rid of these two. G, slide this back. We can try something like this. There we go. OG shirt
looks clean and tight. I can try, for example, scale
this one on the y by zero, to have it completely flat. I also I'd like to
separate this object. Let's press selected
by pressing. We can press through
separate selection, and I'd like to give it
some solidify modifier. Let me show you. I'm going
to add the modifier. It's going to be the
solidify modifier. Basically, I'd like to
give it some de fear. 0.01 seems to be reasonable. Next, I'd like to add, let me try to put it before the subdivision.
Looks even better. I'm going to just go with
this. We've got our t shirt, in the next lecture, we're going to be
working on the pans. Also here for the shoulder, we can tweak the parts
a little bit down. Something like that
seems reasonable. Let's continue our work
in the next lecture.
14. Designing Pants for Our 3D Character: L et's go ahead and
model our pants. We got the T shirts, now
let's model the pants. We're going to press one,
switch the edge mode, and let's repeat the
same the we did before. Press olds. Let me
check olds right here. Select this entire section. Press one, switch wi frame. Actually just the top. Shift D right here. Can press separate selection. Let's select that part,
can switch the solid. Switch mode, selects
everything and press old S. And you can move the
mouse, so it like that. It looks like a short. And we can select
press old here, go to the front, get
extrude here, Sket it up. Even like this, it looks acceptable. I
really like it like this. We're having a church. We can duplicate this. Let's call it. We're going to press F
two, let's call it church. Hide it. Let's continue
the creation of our pants. I'd like to extrude
the can, scale down, can press here, take it down, scale it up, press all again. And we can extrude
down like this. Can spin it on the y, perfect. As we can insert an X edge loop to define this edge even better. Double G, take it up, press old, r x, and y. Can slide them sideways. After that, we can
press E and scale down. Let's push it inside like that. We can also take care
of it on the side. Let's press old
here, move it back, shift old, press shift again, let's push it like that, we can try to take this part
down a little bit here. We got our search, and it
looks pretty much good. I'd like to add some couple
details to our pants. First, I'd like to add the seams that we got in our
pants right here. In that mode, we
can, for example, press here and sing
on the inside, shift select the inside, and we can press control B. To Pavel this section. And we can insert, for example, here control R, insert
on horizontal edge line. Let's pray all S, and you can sketch it inside. That's for this side. You can do the same
thing on the other side, to control r and shift and
let's slide it forward. We got that same so next, I'd like to add some
pockets. Let's do that. For the pockets, can simply
tracks down. Slide it. We can add extra edge loop. Or we can simply take
these two phases, we can press I, create an inset, and we can push it inside. On the top, we can try this, control r. Let's
search that edge loop. We can try to bring this vertex outside to not have any calepN. Also here on the top, I
would like to do this. I'm going to press old to
select that entire edge loop, and we can press E to ex and old to scale it or
actually let's move it up, can press and scale it. So that you can push it inside. We can lift this section
a little bit up, so G Z, move it a little bit up. Basically, the shirt
must come outside, so we can scale it like this. Probably move it a
little bit down. Something like that
looks awesome. We got the pockets
and we got the seams. We can continue our work
in the next lecture.
15. Using the Cloth Brush to Improve Character Cloting: In this lecture,
we'll be improving the look of our
character clothing. Specifically, we'll be using the cloth brush to make our character clothing
look more realistic. So let's get down
to it. I'd like to get started by our t shirt. Let's select my t shirt and we can apply first the
mirror modifier. Also, I want you to apply the subdivisions of
modifier like this. Let's go back, let's jump
to the sculpted mode, and Here in the sculpting mode, I want you to scroll your
mouse here all the way to the back find this cloth brush. Click on it and let's
start brushing. I want you to press
F to scale up a little bit this
brush, the size of it. Like this and let's
try this out. You can see this effect. Let me just control
z or verge back. We can decrease the strength, and we can start
taking like this. I want you to wobble a
little bit your hand. For example, here
in the shoulder, I want you to take
it a little bit down. Sthing here on the back. You can take these parts up. We're going to fix
the scalping problem, so you can just swab
a little bit here, samthing here on the top. All you have to do is to keep
dragging down like this. For example, here, we have to smooth this section
a little bit, so we can go to the smooth. Let me just show you this one. The smooth brush. You can smooth this
area a little bit. Should not be tense. Can reinforce that V
shape for T shirt. Let's go back to
the cloth brush, and I want to add some
weakens here on this side. Let's see. I think
we're all good. We're all set for the T surch. On the Edit mode, so we can
select all these points. I'm going to just scroll up
until I find the move tool. You can select, for example, these points, and we can activate the
proportion individual, and we can try to
bring them outside. Let me just increase the mouse, something like that, just to
avoid any kind of clipping. We've got some clip in
here, sick it outside, Sath for the shoulder, a little bit here on the
front, and that's nice. That is the trick to get
rid of the clipping. Now let's go back to the layout, and I want you to select
the second piece, which is the short. We've got some clipping
here but we're going to fix that in the next cm lecture.
Don't worry about it. Let's select our short
and I want you to apply the mirror modifier, as well as the
subdivision modifier. For the Bible, I don't think
we're going to need that. I'm going to just get rid of it. Let's select our short and we can jump again
to the sculpting, and let's start sculpting
it using the cloth brush. I want to take
these pieces down. We can just swave
a little bit here. Something like this,
something on the back. You can do some wobbling. And we can start checking up and we can start
checking up like this. Let here on the top
on the left side, let's strate check it
a bit up like this. You can do some wobble here. Let here on the side,
on the back to. We got that, so let's go
back to the layout and let's fix these calpan problems. We can take this piece up. Something like that, let's
bring this part outside. The last step to do is to add some socks on the bottom
here. Let's do that. I want you to select our
character and on the S mode. We can switch to face mode here. I'm going to press z to
switch the wi frame, and we can grab the
bottom section here. Shift to duplicate this part, right click, and we can
switch back to the solid. And I want you to press old
S to scale it like this, but actually, we're still
using the proportion dual, Let me just disable it, and we can press old S again, and we can scale those
socks a little bit up. Like this. Nice. Let's switch
again to the edge mode. We can press old
here on the top, press E S, and let's scale
it inside, like this. We can insert some edge loops. Control R, let's take this
edge loop at the top, and we can insert
a few edge loop because for that cloth
brush to work properly, it needs some geometry
to work with. We got that, so let's fix the clipping that we
got here on the front, can activate the
proportion in this into and let's drag it down. Drag this one inside. That is perfect. The next
step it's going to be to separate the
socks from the body. Let's press to select
this unit and you can press P separate selection. Let's exit this mode, select this part only, the sx only, and we can jump to the sculpture mode and
let's start working on it. But also I forget something, I forgot to apply the subdivision modifier.
Let's apply it here. Let's go back to the sculpture, and let's start
sculpting our socks. We can just take these
pieces up like this. As you can see, immediately, we got that effect
that cloth effect, which is really nice. Take the pieces up, can drag
this down a little bit. Just feel free to adjust the shape of this
cloth as you see fit. There we go, we use
the cloth brush to improve the lock
of our clothing. In the next com a
lecture we're going to start texturing, see soon.
16. Preparing Model Make Your Character Game Ready: All right. Before we can dive
into wrapping texturing. We need to optimize our
character to make it game ready and also
ready for animating it. The first step is going
to be to get rid of any hidden parts of
our character body. Our character is
wearing a T shirt for the upper body and
a shirt down below. There is no need to keep
this section of his body. The first sep is going to be to delete those hidden parts. I'd like to press one,
to go to the front, and we can select our character, and let's press tab to
jump to the edit mode. I'm going to press z
and switch a wireframe, and we can use the face mode, and I'm going to press
C and let's start selecting those hidden
parts of our body. Let's go all up till
we reach the neck. Same thing here for the arms. And we can delete those parts. Now I think should keep that. Here for the arms, I don't
want to make it reclose. We can keep this loop here. You can press all shifts to reverte or to
keep that section. We got that selected. Let me just
investigate the back. Obviously, we have to
cover these those faces. Let me just also shift. To keep those phases. A x, and let's
delete those phases. You can press z,
switch a wireframe, can press A to see how
much objects are selected. Obviously, this one
should be deleted too. L et's press one. Here for the bottom we have
in these socks. What I'd like to
do is just delete the bottom part of our
leg, this section. X, and let's delete it. Let's select everything,
and this is what we got. We've got this small
section of the leg, the knee, the arm, and the head. The head we need to weak it a little bit, we need
to work on it. We can press to activate
this proportion energy, and we can drag these
points sideways. Let me press one, can press one. And let's tick this one sideways
like this, check it up. This point, we can
drag it sideways. We can go with this V
shape of our t shirt, sing here. Let's go down. Perfect w is solid, and
let's check that out. Go all good. This one. Let me back and
basically that's it. All we have to do
right now is to start connecting all these
elements together. I'd like to start first by
the T shirt and the short. Let's select them
both and we can press Control A to
reverse the selection, select everything else, and
we can press H to hide them. For these objects, we can press tab and let's try to
can press all here. To select this edge line. I'd like to know the number
of verts that we got here. To do that, you can
check the statistics. You can go to this icon here. Click, actually not this one. But actually this overlays, you can click and
check the statistics. Over here, we're going
to be having an idea on how much vertices
we are selecting. The entire mesh entire
short has 1,600 verts 19, and we're only selecting
120 out of that. What I'll actually do is
to optimize this short, so we can select it by person A and we can go to face
or actually edge, and let's click on n subdivide. We cut down that number
of vertiti to only 433, which is very huge. We can press d here on the top and let's see how
much vertity do we have. We're having 60 right now. 60 seems to be manageable. Let's exit and let's
select the top short, and let's press all
actually on the bottom. L' having 120. Let's select everything, go
to edge and end subdivide. If we press, we can be having only 60, which is excellent. Next we'll actually
do is to push the T shirt or the shirt
underneath our t shirt. On this mode, we can try to take this one
a little bit up, increase the mouse, can try to scale it on the X
to push it inside. Sameth for the back.
Tack this point forward, little bit down. Let's
check the front. Let's take this one way back. Little bit down inside.
That is perfect. The next step to do is to connect these two
points together. Let's select them
both, we can press Control J to join them. Now there are one piece. On the Edit mode, I
want to press old here. Let's go inside, shift old
to select the edge line. If you press Z, you can see
that I'm selecting both, so the bottom edge line of the T shirt and the top
section of the shirt. After that, I'm going
to press Control E, let's bridge edge loop. Each line has 60 vertices. The total is going to be 108 20, which is perfect
for matching it. Control E, and let's
bridge a loop. As you can see we're
having some clean, perfect geometry. This
is exactly what I want. Let's press z and switch
back to the solid, and let's investigate the scene. For example, this problem here, we can try to smooth
this a little bit. Let's select this object, and we can jump to the sculpture, and here for the smooth, we can click on the smooth brush, and we can smooth this section. Just a bit like
this. That's fine. Let's go back to the
layout on the edit mode. We can press on this edge, and I want to pivle
it just a bit. Control P. Let's pivle it. We can insert one
single edge line by scrolling the
mouse. That's all. The next step is
going to be to bring the rest of our character. Old H to bring back
any hidden parts, as you can see we
brought this pants. I'm going to just
delete, deleted. Weren't going to use
it in this case. Now what we need to do, I'm going to just get
rid of the solidify. We need to connect the legs with the t shirt
with the clothing. Let's select the body, and I want to apply first the mirror modifier because
here it's already applied. Here we should not leave it. Also for the subdivision, I'd like to reduce
it down to just one for the level view
parts. Let's apply that. Let's see if we can
select this bar section, can press all here. To select those edge lines. We're having 28 vertices. Let me select my shirt. C press old. Let's
side we're having 28 because this short is
derived from our character. What we need to do
right now is to select these two pieces
together and let's press Control J to join them. On the ES mode, press old again, shift, Control E, and
let's bridge edge loops. I'd like to do the same
thing to the other side. Let's press old here. Shift old. The total 56 28
multiplied by two, Control E, and let's
bridge edge loops. Now it's all connected, and
we're having a perfect go. Want to check if you're having
a good geometry or not, you can try to
insert edge groups. You can see it's perfectly
allowing us to do so. We're going to have any problems with the rigging later on. The last piece that I'd like
to connect is the socks. We need to connect the
socks with the leg. For the sock, I'd
like to first apply the mirror modifier because
here is already applied. Here, we're having
some dense geometry. I'd like to select this part and we can go to
edge and subdivide. Go to be sacrificing
some details, but for the sake of keeping everything organized,
go to do that. Here, I 122, let me just check. We can select this one,
shift select the legs, Control J to join them. Now they are born piece. But they are not connected. To know that, we can press
L. This unit is separated. Just get rid of
the proportion it. Can see that. What we need to
do is combine it from here. We can press shift to
select these two lines, and we can press control
E and bridge edge loops. Now it's connected,
but we need to get rid of this bottom edge
line. This one. Let me just show you. It's
way hidden in the back, so we need to just let it. X, let's dissolve edge. Now it's clean, we're having
some clean geometry here. Let's do the same step to the other side,
can press old here, shift and old inside, control E, bridge edge loops, and we
can press old again here, x and dissolve edge line. Now it's all connected, so we can jump to the age mode, and if we press L, so we're going to be
selecting the entire section. We still need to do the
same thing for the arms. I'd like to delete, get
read, press old here, shift old, X dissolve
those two phases. I'd like to perform the same
step on the other side. Let's delete the last
two rows of our arms, X delete those phases. After that, we can
check the number of verses that we got.
We can press here. We're having 30 s.
Old on the inside, dirty, it's the same. Shift old, control E, and let's sch edge loops. Let's do the same thing
on the left side, old shift old, control
E, Pach edge loops. Perfect. I'll let you bevel
these edges that we got here, just so that we want
going to keep them sharp. Let's press old here shift old. Same thing here
for for the shirt, Shift old and shift old again, and we can press control B to vl that and we can insert
just one edge line. You can score the
mouse to add it. I mean this one. All right then. Now our jump tree is clean. The last time to
do is to connect the neck or the
head to the shirt. Let's press old or actually
let's hide our shirt vers, and we can press old
here, shift old. Let's keep pressing shift old until we select that entire row. We can press,
switched wif to make sure that everything
is selected, perfect. The number of vertices
is 40 vertices. Old H to bring back the rest and we can
do the same thing. It's do some calculation
to the shirt only. We can press to select it only, press control I, H
to hide everything, just so that you can shift
old Let's select the si Row. It's set to 40 vertices,
which is perfect. Old age, let's bring
back the rest and we can connect them to old like this. Same on the inside.
A little bit hard to know that, but just proceed. The total must be 80 s, which is the case because 40 for the neck and 40
for the T shirt, or it's a control E, and
let's bridge edge loop. Z, let's switch the wit
frame, and let's see. It's not bad. We can try
to vol it to control B, or let's select it only. Control B to bevel it, can reduce the number
of counts to just one. All right. Our chatter
right now is one piece. In the next coming
lecture we're going to start texturing it. So see soon.
17. Let's Unwrap our Character: On its time to unwrap our character to make
it ready for texturing. In order to unwrap it, we need to expand
the bottom window, and let's switch it
to the UV editor so that we can track the
UVs of our character. M I prefer to put it
here on the side. Let me just right click here. You can join this area, and let's split our scene
vertically like this and we can switch this
menu to UV editor. So in the EIS mode,
I'd like to start. Let me select my character
on the Edit mode. I would like to
start by the head. Let's select the top section of the head. We can press old. This is the part that separate
the T shirt from the head. You can keep pressing
shifts old to select that entire part like this. Just take your time with it. It might be challenging.
We've got that loop. Here, let's shift
shift old again. Let's select these last two
edges, and I think that's it. Let's p to switch
to the frame to make sure that we are
selecting everything. Perfect. The next step
is to mark the seam. Think of it like if we're
going to be cutting this part. Control E, and we can
click on Mark seam. This line is going
to be highlighted in red just like this. It's control space,
let's go back, and the next step is
going to be to add another seam on the
back of our head. Switch switch the solid. We can start, for example, from here and go all
the way to the top. I prefer to hide the
hair. On the mode. Let's exit di mode,
select the hair, can press H, to hide it. Let's select our character,
and let's start. This is the first edge line. You can go all the way to the top here to the
end of the neck. You can press control and click. This way, you're going to be
selecting all the edge lines between the first edge
and this last edge. You can include this one to. Control E, and let's mark
Sm. We got the head. All we have to do right
now is to unwrap the ears. For the ears, let's start with this. Can select this part. Continue that loop. There we go, this one. There we go. Control E and let's
mark C. Let's do the same thing on the other
side because we're not using the mirror
modifier anymore. Let's select these parts, we can press all shifts to try if we can select
the entire row A shift. Can go this way. All shifts. There we go. We got
the entire line, press Z, switch y frame. See we got the entire loop. Control E, and let's mark SM. Press press Z, go back to solid and now we're ready
for unwrapping it. We can switch to the phase mode. Let's press L to
select this unit. It's only selecting the head
because we did a cut here. We mark S. All right, so let's go back and also
let's select the ears. Should include them
in the unwrapping. Let's press U, and we
can click on unwrap. As you can see it's
perfectly unwrapped, so we got the mouth, the eyes, and here we have in the ears. I'm going to just select it
all and g x to move it aside. Now let's select the t shirts. We need to unwrap the t shirts. For the T shirt, we need to
highlight these edges again. Let's press old here
to select this edge, and let's grab the
other edge here. Old shifts, select
that at another edge. Also we're having this
bottom old shift. Now we're highlighting the
territory of the t shirts. Control E, and let's mark C. Next, we need to cut our
t shirt in this area. Let's select this edge,
and we can continue, and keep pressing control
to make that turn. Right all the way
here to the bottom. Let's zoom in to C, so we still need to
include this part. Control E, and let's mark C. I would like to do the
same thing on the other side. I should not be perfectly
aligned, but that's fine. Let me do it here. I'm
going to grab this edge, keep prison control and keep
going up. Okay There we go. Let's zoom in here a little bit to include that last piece. Control E, and let's mark C. The last cut that we need to do is going to be for the top. We need to select this part, select these edges,
press control. Keep pressing control until
you reach the bottom. Let's zoom in, let's
select that last edge. Control E, and let's mark
s. I would like to do the same thing on the other
side. We can zoom in here. Let's select these
press control. Actually I think we
should go with this line. Not a big deal. Let's zoom in, shift and click left scalck. Control E, and let's mark them. Next, we need to switch
to the face mode, and we can grab press
L to select that part, to select the back
of our T shirt. This is what we
got as UV map it. It's really bad, so
let's press U and wrap. We got the front and the
back of our T shirt. I'd like to spin it,
so we can press R, and let's spin it
by nine degree. Let's place it up here. Scale it just a bit down. G x, and we can move it way back because
here we have the head, and here we have in the T shirt. Nice. All right. Let's wrap the shirt
of our character. For the shirt, let me start from the bar
here, we can press old. A we need to be on the edge
mode, we can press old here. I think we need to go inside. Yeah, Let's mark
this as the scene. Shift old. Like this because this part
should not be skin, should be parts of the T shirt. We can press Z switch wi frame
to C to make sure that if you are selecting the
entire edge, shift here. We got it covered
here, control E, and let's mark s. Next, we need to cut these edges. In order to make this selection easier, I want you to do this. I want you to jump
back to the face mode. Old A to make sure that
everything is selected. We can select our short and
let's press H to hide it. After that, we can do the
same thing to the xs, let's press L, and we
can press H to hide it. I need to add three seams. The first one need to be
here, so we can press old. Here, shift old on the
inside, shift old. We need to have a
cut from the inside so that we can separate the
front short from the pack. And lastly, we need to
have another cut here. All shift, let's add that cut. So Control E and let's
mark C. All right. Let's switch back
to the pace mode and we can grab this port, and we can grab this
short by pressing L, and we can press U and unwrap. We got it unwrap. This is
the front and the pack. You can press A and add
it spinach by -90 degree. And we can move it, so G x, let's move it way back. We're having here the head.
We're having the t shirt, and we're having here the shirt. A let's sprint back the rest. What I'd like to do right
now is to work on the legs. For the leg, we need
to add two seams here. I'm going to press
old like that. Shift old control E, and let's mark seam, can
go back to the face mode. Let's select these two knees, can press U and
unwrap. Let's see. The type of unwrapping
is not perfect. You can see that edge loop. What we need to do to
make it perfect is we need to cut it from these sides. Let's press control I,
H to hide the rest, and we can press old,
for example here. We press old here, control
E, and let's mark seam. Now if we select them
both by pressing L and if we press U and unwrap, they're going to be
unwrapped in a better way. I think we didn't
do this one here. Let's press old, Control
E, let's mark Seam. Let's select everything,
press U, and unwrap. Now the knees are
better unwrapped. Perfect. It's old H, let's bring back the
rest. Now for the sick. Let's switch back
to the face mode. Let's press L highlight these two points,
these two objects, control I, H to the rest, and let's unwrap them. I'm going to press
old right here. Emptiner, let's press old, Control E, and let's mark sm. Also here for the bottom. Let's highlight these two areas, Control E, and let's mark sm. For the bottom, press one, you can switch y frame. I'd like to select
the entire bottom. Actually what I'd like
to do is to just delete this bottom part, so
we can press old. Let me press C and shift to
de select those extra phases. You can press delete as parts, select L by pressing L, select the rest, and x delete. Same thing for this
one, x delete. Because we're going to be having the sneakers
on the bottom. We don't need to
have this long socks to select them both, press U and wrap. I'm going to press GY
and let's sick them up. Old so bring pack everything. Here we're having the knees. L et's select them, G Y, let's move them sideways. All right. The last section
to unwrap is the arms. Let's press H. To bring back
H to bring back everything. Let's select the arms. We can jump Images
press which is solid. We can press to select the arms. Control I, H to the rest, and let's work on the arms. I'm I'd like to press
control space to maximize this window
and let's work on it. Basically to have better
unwrapping off the hands, we should go like this. We need to cut it
into two parts. We can press here and let's see, as you can see it's cut into two parts from here,
which is awesome. At this section, we can deviate go the other side so that we can include
this finger two. You can press all shifts and
include this finger two. After that, we can simply
go here to the top. I'm going to stop right here. Now I'd like to press and let's press shift to de
select this edge line. A let's pres to switch the wi frame here.
Let's see what we got. It's touching from here,
it's going all the way through the fingers, but it's going to stop here. Let me just try to connect or to take these
parts all the way to the top. We can also press old
shift to select this row. Let's add those. Control E, and let's mark C.
For the fore arm. Let's select this edge, we can press old, and let's
go all the way to the top. But I prefer to go
from the middle. Let's start from
the middle here. But before doing that,
let's hide the hand, we can select the hand
and press H to hide it. Yeah, actually it's already
been selected from here. All we have to do
is just continue. Can select these two,
control E, mark. Perfect. Let's unwrap the
left hand with its forearm. I'm going to repeat
the same steps. Let's go ahead and repeat the
same step with it before. All right. So as
time to wrap them. Let's select both hands. Can select this
hand and the arm. And we can press, and
let's unwrap them. Now they are
perfectly unwrapped, so we have the hands and
we have the foe arms. Control space is go back,
and we can try this. I'm going to select everything. All these pieces. I'm going
to try to unwrap them all. Press, and let's unwrap them. Now they are all combined inside this UV space,
which is perfect. Our character is perfectly unwrap and now it's
ready to be textured. That's going to be the subject
of the next of lecture.
18. Texture Painting Stylized Skin: It gets our character UV map, so now it's time to texture it. I'd like to start with the skin. I'd like to paint the
skin texture to it. First, I'd like to
select my character, and we can go to the
material properties and we can add a new material. We actually we can
collect here and we can choose this material here. I'd like to call it, let's call it character text. So here on the left
side, I'd like to switch this UV menu to
the shader editor. We can press n to hide this panel and let
me just zoom in. Here we're having two notes. We're the principal SCF connected
to the material output. What I'd like to do is
to add a new image. We need to add an image texture. Shift A, let's for a new
texture, and let's put it. Also, I want to
show you something. Here I let you press z so that we can switch to
the material preview, so that we can see that
material in motion. Right now, if we play a little
bit with the base color, you're going to be changing the color of the
entire character. Here, let's go to
this image texter. I want to click on new and
let's create a new image tax. For the width, I'm
going to go with four k because we're
having a big map. Let's say it to four k. Same thing for the height,
let's multiply it by four. We here for the name, let's
call it character text. The color of this image
actor is going to be black, so let's keep it like that,
and we can press okay. Now let's go ahead and connect the color to the pase color. Our character is black because this image
texture is black. We can take a look at it, so we can divide this
menu from the bottom, tack it up, and we can switch
it again to the UV editor. Here in this icon, we
have the possibility to choose this character texture. As you can see it's black. If you press tap over here, so you're going to
see all those UVs. Since our image
texture is black, so black is going to be
projected over our character. What we need to do is to start
working on the scan only. Here on the top, we're
having this objects mode. I want to switch
from the object mode to the texture paint. We can switch for example
to the texture paint here, but I prefer to do it all here. Here we're hing the
shade editor to UV map, and our two DV port. Now we can start painting here, we can start painting the white. We don't want to paint white, but instead, we want
to paint the skin. The X code, let
me just show you. I'm going to click
here and the color. I would like to
switch to the X code. For the color, I want
you to write this. This is the X color
for the skin. It's going to be e8b, e A C. And we can press er. This is the color of the skin. We can start painting
with it like this. Actually, we need to paint
it only on these areas. What we can do is to
jump to the edit mode. We can press all A to
D select everything. Make sure that you
are on the face mode and we can press L to select only those parts. We're having the
head. Let's make sure that the entire head is
selected. We're having the arms. And finally we having this portion of the
legs, the knees. After that, we can
exit at this mode, and I want you to
click on this mask. The paint mask is
going to allow us to only paint on in this area. Right now, we can start
painting like this. But it's going to
take some time. I have another way which is
to use this bucket fill. We can click on it,
and we need to reset, we need to write that
code again, the hex code. E8be A C, this precenser, and we can simply click and that color is going to be applied
to the entire character. Excellent. The next step is going to be to add
some variations. I'd like to make, for example, the cheek, a little bit reddish. We can give it some
red tint to them. Let's go back here to
the draw to the brush, and we can start painting with For example,
reddish color here. You can start painter like this. It's a little bit strong, and it's also not inverted it's not duplicated
on the other side. What we can do, let me just
control zero verte back. We can activate
here this mirror. Let me just show you, can
scroll all the way to the end, and you can check the x mirror. I'm using the x because this is the x mirror here, x axis. If your character
is facing this way, you can set it to the y axis. Now if we brush on
the right cheek, we're going to having the same
effect to the left cheek. Control zer let's reverse
back and let's touch first by reducing the strength
to something like 0.15. We need to have some very subtle effects here,
something like this. Also, I don't want to have
some hard shadow here. What I'd like to do, let me
just control verge back, and we can go to the fall off. Actually, what I'd like to
do is to switch this custom. I'd like to make
it way smoother. Let's choose this smoother here and we can start
paint like this. I can make the center more
red, something like this. Probably that's a
little bit too much, let me just servers back. Just take your time with it. Try to make those
cheeks, reddish. Saething here for the nose. Instead what I prefer to
do is to go to our UVs, can press control space. Let's zoom in, and we can switch this menu to the image editor
instead of the UV map. Here for the view,
let's make it paint. Now we can paint here. We
can zoom in to the nose. Also we can press F to increase
the size of our brush, and we can start
painting here like this. Something like this.
Control space, go back, and let's say a look. I think that's a
little bit too much. Our cache seems like if
he's having the flu. Let me just control
zero back a little bit. You can do it to the side b, something like that looks fine. We can also do the same
thing, same effect, for example here
for the eye prose. Les interesting. For the neck, let's make it a
little bit darker. Also here for the ears. Let's try a darker color. I'm going to just revert back to the color and let's make
it a little bit dark. Let's paint here with
that dark color. Okay Let's make sure we
got it on the other side. Perfect. Now let's
work on the lips. For the lips, I prefer
to use the mask again because I don't
want it to be messy. On the edit mode, I want
to grab only the lips. We can press old here
actually down below. After that, you can press C and you can select
the entire lips. After that, let me just
control space to go back, we can exit the edit mode, and we can start painting here. It can be much more easier
to get accurate painting. We can make it a little bit
more dark here by brushing another layer of
that brownish color. Now we need to
work on the nails, the arm and the nails. On the tis mode,
what I want you to do is to select only the nails, we can press, select that row. S, keep selecting all
those rows like this. Same thing here on the top. Let's exit the dis mode, and we can jump to
the fill bucket, and we can make it
completely white, and Let's click here. Now the nails are white. Is you work a little
bit on the knees. Let's select both of
the knees and I want to make this area
a little bit dark. Let's pick a darker color. And we can make the knees dark. Just a little bit like this, sthing on the other side. We've got the core of the skin, but there's something missing
to make it truly realistic. When it comes to light and how it interacts with our skin. For example, this hand
that we got over here. The light here doesn't just
bounce off the skin serf. Instead, it actually
penetrates and scatters beneath creasing
that soft and natural load. Basically, that's where the subsurface
scattering comes in. In blender we having
this option to make the skin look realistic. If you go to this
principle, STF, if you scroll a little bit down, we're going to have the
subsurface value here. I'm going to try to increase
it to something like 0.3, Also for this third, let me just expand
this principle PSTF a little bit to the left
side that you can see. We're having here the
subsurface color. I'd like to click here and
let's pick, for example, some kind of a reddish
red red color. You can see immediately
that our color. Our skin looks much more
realistic right now. It looks natural. Especially if we try,
let me just go back, we can switch our menu from
the texture painting to the objects mode and we
can try to add some light. Shift A, we can go to light
and we can use some point. Let me just move it
outside, can press Z, and let's switch the render
Now you can see how this subsurface scattering
makes our scan looks much more realistic. Basically, that
subsurface scattering is applied to the
entire texture. She is the clothe
and everything. What we need to do is to
apply only to the skin parts. Let me just go back here. To fix this problem, we're
going to be creating a mask. The mask that's going to
highlight only the skin parts. Let me show you, I'm
going to do right click. Let me just maximize
the shaded editor. We can do right click and let's search for an image texture. I'm going to click on you. Let's keep it to four K, and I'm going to call it scan. We can call it scan subsurface. Let's press and click here. Actually what I'd
like to do right now, we can select the skin text, control space to go back and we can jump to
the textur paint. Or actually the don't need to
jump to the text or paint. We can just click here and
choose that skin subsurface. It's going to be
completely black. So we can switch the menu
from the objects mode to the text pain back
to the text paint. What we need to do is to
paint only the skin parts. Anything that is not
skin must remain black. This is is going to
be excluded from this subsurface
scattering effect. With this skin surface
texture selected. I want you to click
or first let's select the skin parts to make sure that you are
on the face mode. I press edit. Old A two
d select everything, and let's select
only the skin parts. Having the head with ears, Sameth here for the arms, the hands, select
all these parts. The center for the knees. Let's exit edge mode, and we can click on
this paint mask, and we can paint with
this red orange color. Let's use the filled bucket. We can click. Check this out. You can click here, and we're going to be
filling these spaces. These are the skin UVs. The other objects
must remain black. All we have to do
right now is to use this skin surface and connect
to this subsurface color. Let's connect it straight here. As you can see the clothing are excluded from this
subsurface color. You can see the difference
on either orange. Now it's back to black. One less important
point to keep in mind is to save these textures. Once you've finished them,
you can see this we're having this dot beside the image. All you have to do
is just save it, so let's go ahead and save it. C charactere Textor,
I'm going to save it. Also we need to save
the second map, which is the skin surface. Let's go mag, save
as skin surface. Because otherwise it's
going to be lost once you close oplendy sin.
Basically, that's it. So we got that subsurface scattering effect
applied to our skin and it make it look
much more realistic you can switch the rendering
to see that effect. We can continue texturing data sections in the
next communitorial.
19. Designing Shoes for Our 3D Character: This new strial, we're
going to be designing some cartoonish shoes
for our character. I'm going to be using
this two reference image, so the side and the
top of our sneakers. Let's go ahead and put them
inside our blender scene. In my blender scene, I'd like
to start by pressing tree. This we can jump to the right orthographic
and after that, I'd like to bring
the side image. After that, we can center
it, put it at the center. Also we can go to the image that's a properties, this one, and we can check the opacity, so we can see through our image. Let's put it at the
center like All right. After that, we need to go to
the top by pressing seven, and let's bring the
second reference, which is this top
reference image. I would like to put it also at the center, something like that. We need to scale it a
little bit up until it fits this end of the
second reference image. But to do that, there is
an easy way to do it, which is to rely on some cubes. Shift A, let's go to mesh,
we can add the cube. On the S mode, we can move
this cube a little bit up, for example, here, and we can switch pres Z, switch
to the wire frame. Let's take the sides of the cube to the borders
of our sneakers. Something like this. After that, we can press seven
to go to the top. Now we're having an idea about the shape length of our shoes. You can sect the top reference
image and press G Y. Let's move it a
little bit forward, and we can scare
it a little bit up Intil it fits these borders. This one here, and the
other one on the bottom. X so now, our references
are well set. Now we can take them sideways, so we can move, for example, one on the x axis like this. So one's going to matter.
Same thing for this bottom. We can simply take it down. Dt is going to interfere
with our modeling. The first thing
that I'd to do is to start with this area. I'd like to model this part.
I'm going to press shift A. Let's go to mesh, and I'd
like to start by a plane. On the S mode, I want to select one single vertex,
press control I, to reverse the selection, and we can press x
in the lit the rest because all I need is
just one single vertex. Let's select this vertex
that we got here, and I'm going to press G to
move it to this location. We got it here, I'm going to
press seven to go to the top and we need to move
it on the x axis. Let's move it here
to the center. We can start extruding
to make this turn. After that, I want
you to press tree so that you can go to
the side and we can grab these first three verses and extrude them up. We
can extrude like this. Extrude in spin, we can press
r to spin the parts around. Extrude spin and
finally exude here, and that spin, and
we can try S y and press zero so that we can
flatten this surface. After that, what I want
you to do is this, we can select these two vers. Let's press one, to
go to the front, and we can extude
them by following this edge line until we reach the bottom,
for example here. We can exit this
front autographic. We can select these four,
press F to fill them. Let's push this one
a little bit to the left side. Same thing here. After that, we can select
this single vertex. We can extude it up like that. Select these four s, press F to fail, Sameth
on the left side, press F. Can press seven to go to the top to investigate how
we're doing so far. Thank we're good. Finally we can extrude another
extruion on the top. And we can fill these
four vertices, press F, Sething here on the top press F, and let's fail this space. We can press z, to
switch to solid. Let's check this out,
right click, shade smooth. All we have to do right now is to add the mirror modifier, so that we can make it
because as you know, our sneakers are symmetrical. This object selected, let's go to the modifier properties, and let's add the
mirror modifier. This one right here. As you can see the mirror
is not perfect. What we need to do is this. I'm going to press old
here in this area, and we can take it
to the left side. As you can see this edge line goes beyond the center,
we don't want that. All we need to fix
this problem is to check this clipping in
the mitral modifier. Once we check the clipping, you're going to stop right
at the middle excellent. The next step is going
to be to model the body of our sneakers, this
area right here. On the S mode, I want you to
grab these three versus es, shift t, to duplicate them, and we can extrude them. E, y, Let's extrude,
for example here. We actually just tack it
all the way till the end, and let's insert an edge
loop for this middle parts. Another one, for example here. Let's try to check these up. So Let's select this
one. Let's sick it up. We can activate the snap
toool to the versax. We can snap to the
same level here. Same thing here. Let's
insert another edge loop. Let's stack without
the snap tool. Let's take this
one to the bottom. We can insert, for example
here two edge loops, and you can to understand why. Also here, let's add some
additional edge loops. I'm going to press
seven to go to the top, I'm going to press old
to grab this area. I want you to activate this
proportion addition tool, and I want you to
set it too sharp. Right now we can take this
one and close that loop. Can close it like this, take
it a little bit backward. Can press old here, try to
bring it outside, press old. That's deactivate the proportion
titin, can press old, try Z to spin this part around, and Let's extrude
it until it finish, until it connects
with the other side. Perfect, Let's press old here. You can try to spin this
one around on the z, z, spin it around. Something like this.
Let's investigate the shape for our sneakers. We can do right click,
shade a a smooth, or right click shades smooth, so that we's going to
have any weired edges. Looks press much good. The next step is
going to be to add the base for our sneakers. Let's press three
and on the bottom, I'm going to press
old right here, shifts old to select
the entire gine, shift d to duplicate it, can right click and try to
extrude and z to go down. Like that. Right
click Shade smooth. And here it's not connected. If you press L here,
this one is connected. Let's select them
both, and we can press and merge by distance. To versus the are removed, one is here, and the
other one is on the top. Perfect. The next step, it's got to be to
add some modifiers. The first modifier that s
you add is the solidify. We need to give this
sneaker some depth. Let's do that from here.
Let's go to modifiers, and let's click
on this solidify. We can increase this thickness
to something like 0.2. After that, we can add new modifier is going
to be the eval. Let's take these to
the sign just so that we can see
what modifiers bee. We got first the mirror and the solidified to add
thickness to our sneakers. The third modifier is going
to be the Pevl modifier. Let me just show you.
The Bevel is going to give us some nice
details on the edges. We can reduce this amount a bit down, something like 0.03. Also we can increase
these segments, for example, three.
Looks better. Let me also try to add the subdivision service
modifier. Let's try to add it. It gives some nice details, but we still need to work, for example, in this
seams that we got. What we can do, can take these inside, like that, perfect. For example here
at this location, let me just press
sch go to the side. Stry to trim it even better. C take it down like that. Perfect. For example,
here we need to find a way to not keep
this point point. We can add str to add
some tra edge loop. Tack this one. Add another one. Check it like that. So we can press double G
to slide these over. Double G, slide this part, check this point a
little bit down. Now it looks much more better. Now let's add the third or
last piece of our sneakers, which is this area right here. I'd like to select my sneakers
and on that this mode, I want to select these I'm
not selecting the right one. We can select this
part, press control I, and press H to hide the rest, just so that we can be able
to grab these four vertices. Shift D to duplicate these, and let's press t, to go to the side and
we can extrude them. Let's we can spin
around like this, spin and continue until
we reach the top. We can try to scale this
part a little bit down, but actually we can
do it later for just. Here on the top, we can press to activate the
proportion it in, and we can scale this part. We can scale it only on the x, so S x, scale it
something like this. Sick this one to the side here. It looks a bit creepy, but we got to work on it. Click shade smooth. Let's get rid of the
proportion vital and we can check it backward,
Soth like that. Same thing here. That's nice. Here for the top, can
check this one backward. Soth Lastly, for this point, can either check it backward or we can be vol because I prefer
to check it just backward. The last piece of our sneakers, it's going to be the ties piece
that we got on the front. To do that, I'm going to
select These four vers. **** t to duplicate them, try Sy press zero, to have them flat, can
push them, for example, here to the start and try E
Y, extrude them like this. Sick them a little bit up, can select this entire
part by pressing, press P, separate selection, and let's operate on it. I'm going to just get
rid of the bevel. I can just remove it. Right click Set smooth. Let's select it
all by pressing A, G Z, let's sick it up. Can grab this part, easy
to extrude it like that. Perfect. On the de mode, we can insert some edge loops to define the edges without
the bevel modifier. After that, we can select
this part, express sch, go to the side, Shift D to
duplicate it like this. Another time we can select it Shift D. Spot here,
we can spin it. Spin it sideways like this. Let's try to spin this
one round to like this. That is perfect. Let's
check it from the outside. Looks pretty much good. We might want to scale it
a little bit on the y. Let's select all
these three ties, and we can switch
the pivot point to these individual origins, just so that we can scale each
one on its own like this, and we can try to scale
it just a bit down. We can try also to
scale it on the x. Let's see There we go.
Looks pretty much good. Let's put these sneakers
in the right place. I'm going to press old age, bring back my character. Let's select all
these components and I want you to
check them sideways. Before we can proceed, I
want you to do something. Now we don't need
that mirror modifier. I'm going to show
you. We need to distinguish between the
right and left sneakers. We should not leave
it like this. To do this, I want you to
apply the mirror modifier, so we can apply it here. You can also apply
to this object here, the mirror modifier. After that, select them both. I should add this
mode, press old e to bring back any hidden parts, and I want you to
grab this edge line. Press old, saething
here on the bottom, press shift old, and we can press seven to go to the top and I want you to
push it inside. Basically, this
one is going to be the right shoe or
the right sneaker. It should be like
this from this side. You can take it even
more inside like that. After that, we can select it. Let's put it here. Can get it real down. Les press street go to the side, place it at the right place. R z end its spinach by
ten degrees, or even 15. Let's make sure
it's well aligned. Scat it up a little bit. Nice. Shift to duplicate, and we can move it here, can try S x and minus one, to invert it to the other side. Let's try z, and we need
to spin it by -30 degree. We spin this one by 15,
this one should be by. Basically that set,
we got our sneakers. Looks good on our character. In the next lecture we can text.
20. Texturing Character Eyes & Eyebrows: Our next move is going
to be to texture the is. We didn't add the, now it's. Let's switch back to
the objects mode, can select our head. On the EIS mode, I'd like
to switch to the edge mode. Can press old to have
that circle selected. Also, we need to switch
the pivot point from here. Let me just score a little bit. I'd like to put it
on the median point. Two shifts S and
cursor to selected. I'm going to exit IS
mode and shifts A go to mesh and let's use a UV sphere. I'd like to scale
this UV sphere down. Something like this, and we
can spin it on the x axis. O x, let's sinish
by nine degree. Basically, I want
this area to be in the front. All right. Let's do right click
in shade smooth and we can push it a little
bit inside here. Can scale it a little bit up. Let's press one to face
it from the front. What we need to do is select our body and switch
it this mode, activate the proportion
in this in tool here. We can select these
points, for example, this point here, and
we can move them a little bit forward, like this. Let's select the top
pushes a little bit sideways till it covers the
entire Ii. Push it forward. Also, we can select the I and try to scale a
little bit on the y, S y to make it a little
bit flat. Our is. Perfect. All we have to do
right now is to textura it. With our sphere selected, let's add a new material, and let's call it I. Here in the principle SDF, we need to bring
a texture image. You're going to find
this in the resource. I'm going to be using this. We're going to simply
connect to the base color. Let's switch the dS mode, and also here we can pick, can click and
choose that texter. But actually we must
switch to the UV editor so that you can be able
to control our UVs. Let's press one. I'm going to press U and projects
from view bounds. Immediately, we got our I. All we have to do is just
set it a little bit down. I'm going to press old here to select or actually press
C, select this line. I think I'm going to need
to select this entire part. We can press F to
scale it up or down, so make sure to activate the
proportion in this into. We can scale it a little
bit up like this. We got our. Now it's on to duplicate our
i to the other side. I want to show you a
cool track to do so. You can select our character, can switch it at its mode, select one of these diversities. This vertex must be
right at the center. Shift S and cursors
to select it. After that, we can
put this pivot point, we can put it to
the three D cursor. Let's select our I, shift D, to duplicate it, right click, and try S x and minus one, and it's going to be inverted
to the other side. Perfect. We have to work
little bit on the I. First, what they should do
is to add some roughness. Shift A that serves
for color ramp. Control space that we
maximize this window, and we can connect
the eye to the factor here and the color
to the roughness. Control spaces go back and
we can tweak these nodes. Now it's transparent,
something like this, and we can make that color
a little bit less shiny. There we go. The last
thing I'd like to do is to add the
reflection in our eyes. I'm going to show you.
On the edge mode, I want you to pick this circle. You can press slightly circle, Shift D to duplicate it, and let's put it up here. A I'd like to deactivate
the proportional ind. I can scat it a little bit down, but it should be scaled on the medium point. We
can scat it like this. For the UV mapping,
let's select the UVs, can scale them way down, and we can put it in a
white area like this. We can do the same
thing to the other eye. Now I'd like to add the eyebrows in a little bit of
the eye lashes. Let's select our body. I want you to select these
faces. These phases. Shift D can duplicate
these parts, press P, separate selection. Let's select these objects, and let's go to the materials. I'd like to add a new material and I delete this character tex. Let's add a new material, let's call it eyebrows. You can make this
material brownish. Let's give it the same color, we can use the eye
picker to pick the same color that
we got in our eyes. After that, we can add
the solidify modifier to these objects so that you
can make it pop up outside. L et me just reverse
this offset to one, and basically we got it. We can add right now the
mirror modifier to it. Can apply some weakens to
the eyebrows and ma press one and we can
switch the w frame, and we can drag these versicle
bit to the left side. Let's push them outside
a little bit like this. Also, I'd like to do is to add the subdivision
surface modifier. Just to make it a
little bit better. O at this moment, we can
insert some edge loops to sharpen those ends like this. I'd like to add some
eye lashes that's going to surround our
eye, only from the top. Let's select this face. Can keep pressing
control until we finish that edge loop all the
way to this location. Select that phase two,
shift d to duplicate, and we can press P to
separate selection. We can select this object. Shift select the eyebrows, and you can press
control J so that we can have the same
effect applied here. At this location, or
for this second object, let's assign the eyebrows. We have to t weak
them a little bit. Let's push them a
little bit outside, so we can press G Y or
actually let's press old here, try to take it
that edge a little bit to the outside, like that. That's nice. For the is,
we have to fix them. But we can press G Z and try to take it a little
bit up like that. There we go. Nice and basically,
that's it for the Pro. We're going to continue our work in the
next time lecture.
21. Texturing Character Hair: So to texture the hair
of our character. Let's select the hair and
we can add a new material. Let's call it hair. Here in the shader editor, you can scroll back
to see those nodes. I'd like to bring a
new image texture, it's going to be
this hair texture. You can find it also
in the resource. Let's put it here and we can connect colors
to the base color, and immediately,
we can see that. What I have to do is to invert the location of this texture. What we can do is this,
we can select this node, we can press control T to have the mapping and
the texture coordinate. In order to have this
shortcut working, you need to be enableing
this nodangular. We can go to edit preferences, and under the add ons, we can search for angular. This node rengular. You can
make sure to check this box. Let's score a little
bit to the rotation, and I want to spin around
the z location to 90 degree. Let's search to 90 degree. Now the orientation
of the hair goes hand in hand with these
hair particles. Perfect. All you have to
do right now is search we a little bit the roughness. Control space to
maximize this window, you can take these
nodes backward. Shift A, let's
search for a color. L press enter, and we need to connect the color to the factor. And cut to the roughness. Control space is go back, and let's tweak these handles. We can make them close
to each another. Zoom, I don't want you
to be glossy like this. Something like this
seems reasonable. For the black color, we can reduce it, make it less black. Black represents glossiness, you can take it a little bit up. Or even up, something like that. The last sep it is going
to be to add some bumps. Shift A let's search
for a bump node, and let's connect the color of the hair texture
to the height, the normal to the normal. Control spaces go
back, let's see. The bumps are crazy high, so let's reduce strength
to 0.1 or 0.25, 0.2, it is going to be fine. Then we got our hair
and it looks fabulous. We can continue our work in
the next time we lecture.
22. Texturing Character Clothing - T-Shirt: Now it's time to start
working on our t shirt. I want you to select
our character, switch the edit mode and
be on the face mode here, and we can press L to select our t shirt.
Something like that. After that, we need to go to our material, the
character texture, and we need to select
our character texture, not the skin texture. Make sure to select
the character texture. Here we can also switch this texture to the
character texture. We need to be painting here. After that, we can
exit edit mode, and let's switch to
the texter paint, and we can activate this
mask, the paint mask. Before we can proceed,
I'd like to use a reference image
or the final result that we're going to
be able to achieve. Here on the right
side, I'd like to split my scene upward like this, and let's switch it
to this image editor. Next, let's bring
that reference image, can simply drag
it and drop here, and we can focus on our T shirt. First, let's make
our T shirt orange, so we can pick this
color orange color, and let's click using
the fill bucket. The next step is
going to be to paint these white strips,
these white lines. We can switch back to the draw and let's keep
it white, this color. I'd like to press one, and we can start starch painting
here on the bottom. We can press F to reduce
the size of that brush, and let's start painting. Obviously, we have to
increase the strength to one, start again. But this line here
is not perfect. So I'm going to press
control Z to reverte back. We can use the
stabilized stroke. Let's go to the stroke, and
let's use this stabilize. Also for this fall off, I'd like to keep it. Let's pick the constant. There we go. This is
exactly what I want. Control Z, and let's make that strip a little bit smaller. Let's press three,
go to the side, and we can brush this up. Next, we can go to the top, and let's work on
this neck strip. For example, here we can
take this point down. Let's press F can start from here and go all the
way to this location here. Then, we can switch
to the back here. Let's continue that line. Til it connects from the back. Also here, let's press F to
reduce the size of the brush. You can take that point, til
it reaches and shoulders. Now all we have to do
is to fill this space, and we can continue brushing that space until they finish. Also, we can press control
space to maximize this window, and we can work on it here. It's going to be
much more easier. Let's switch to
the image editor, and Let's keep this
mode to the paint. Now we can just
keep painting here. Until you finish those spots. We got our T shirt texture. The next step, I'd
like to show you how can we put a logo, for example here and the middle? How can we do that?
First, I'm going to be using this logo here,
this basketball logo. Feel free to choose any
logo that you want. I'm going to scroll a little
bit down here and I need to scroll all the way to
this texture properties. Click on it and let's add a new and we can score
a bit to this open, and we can open that
a tture that we want. We're going to be
using this basketball. Keep in mind that it
must be a PNG format, so that's going to
have those edges. The edges need to
be transparent. We need to scroll here until you find texture, and
we need to pick it. We need to pick this texture. For the mapping type, we
need to choose tencel. That's going to be visible. That texture is
going to be visible. We can do right click, so
that we can move it around. We can zoom in a little bit, or also you can press
shift and right click so that we can
scale it up or down. Let me just put it right
at the center here. Also we need to check the color. The color needs to be white. Otherwise, you're going to
be affecting that logo. Let's press F to
scale that brush up, and we can start brushing this. You can see this
problem to be cut. Our texture or our logo
seems to be mirrored. That's happening because
we're still using that x mirin. Let
me just zoom in. We can just check
this box, X mirin. Let's zoom in here a little bit. Also I want to go to the stroke and get rid
of the sabized stroke, and let's start painting here. We can paint that texture. After that, we can press control
one to jump to the back, can move our character
to the left side, and let's paint that
logo again on the back. Basically, that's it. We
got our T shirt textured. You can switch back
to the objects mode, and let's take a lookal
looks pretty much good. Again, make sure to save
this image texture, so let's go ahead and save it, save as character texture. You can just overwrite
it. In the next time, lecture going to start
working on our short. See.
23. Texturing Character Clothing - Short: Our next move is going to be to texture our character short, this piece of clothe
that we got here. Our do first is to
replace this logo, this past logo
with this texture, this tropical text, we're going to find this
in the resources. Also you can feel
free to use your own. Back to the textural properties, you can click on this image. Here, and let's choose that tropical mage
ttcture that we got. Now we can switch this menu to the texture paint and
we can start painting. As you can see, I'm still
using that stencil, the texture as a sencil. If you lost, you can just check the previous lecture
to how to set it up. Basically it's here,
you can collect here, choose that texture, this one, and you can set the
mapping to sencil. Let's zoom in and we can start
a brush in here like this. But actually we
forget something. Control Z, we forget to
highlight only the short. On the edit mode, we can press A and let's select our short, the front on the
back, exit edit mode, let's activate the mask, and we can click to
scale down that texture, and we can start brushing here, let's press F to reduce
the size of that brush. Let's start a brushe like this. We can do right click, and
let's move that texture down, and Let's continue like this. Basically that says, we
got our short texture. You can see that's
highlighted in the in the character
texture image. All you have to do right now
is just save this image. Let's overwrite it.
It's the same image. Basically that says, we can continue our work in
the next lecture. Just reach back to the object
point to see got the short. We're going to continue our
work in the next lecture.
24. Texturing Character Shoes - Sneakers: Now it's t to start texting
the shoes for our character. Let's select our shoe and we
can add a new image tuture, a new material, so we
can go here to material, add the new material,
let's call it sneakers. Here in the principal BS ZF, we can press shift A, and let's serve for an image texture, and we can click on you,
and let's set it to two k. Let's multiply the width
and the height by two. 24, multiply by two. That's it, and here,
let's call it sneakers. Check sir. All right. I'm going to just leave it
as black, ands press okay. Next, let's connect the
color to the base color. What we can do is to select the sneakers and push
it backward here. Try R z spinach by -15 degree
to set it back to zero. So let's press s
to go to the site. What we need to do first is
to apply all the modifiers, we got in the
modifier properties. Let's go to modifiers. We can apply them all. What actually we can do
is to go to this object, converge into a mesh. All these modifiers are
going to be applied. After that, let's
select our sneakers, we can jump to this
mode, select everything, and we can press U and smart UV projects.
It's all UV map. You can just do
this, let me just switch this to sneakers texture. We're good. For this sencil, let me just remove it. I'm going to go back
to the object mode. Going to go back
to the text paint, and we need to
scroll a little bit to the text and
just get rid of it. Our next move is going to
be to paint some strips. We're going to let me
just use the draw tool. Can press F to reduce
the size of that brush. We can zoom in a little bit, and we can start a
brushing like this. Let me just stroll z, we can activate We can activate
the stroke to stabilize. On the ES mode, we can select
only the parts by pressing, and we can exit I
mode, and let's check. We can check this mask. Now we can take press F to reduce the size
a little bit down. We can add first line like this. We can add three lines. Let's press control t to
jump to the other side, and we can do the other
thin in the opposite way. The next step is going to
be to work on the back. Let's press Control
one, to go to the pack. What I'd like to
do right here is to add some of a circle. Let's brush that circle. Like this, and we can add
small tip on the bottom. Basically we can draw a
circle here. So like this. Let's continue brushing that. Sound like that
seems to be fine. On the edge mode, I'd
like to highlight, let me select these points here, you can press old to
select these areas. What we can do, you can try to give them
a different color. Okay exit ts mode, we can use the fill bucket, let's keep it edge
white, and we can click. So this makes it looks
much more interesting. All right, so let's go back and put the sneakers in
the right place. Can place it right there. R z, let's spinach by minus
or by spinach by 15 degrees. Can push this one
backward a little bit, push it to the right side to
the left side, like that. After that, I would like you
delete this left sneaker, and we can simply
duplicate the right one. Let's select our character, select a point that's
going to be in the center. For example, this point shifts a put the cursor to selected, and let's switch the pivot
point to the three dcursor, and we can select our sneakers, snit to duplicate
it right click. Let's try S x and minus one. It's going to be inverted
to the other sides. All we have to do is just
spin it by 30 degree, which must be on
the median point. R is Z, spin it by -30 degrees. There we go. We
got our sneakers. Now all we have to do is just texture the socks. Let
me just select them. On the Edit mode,
let me just pick them using the face mode. You can press L,
select the sock. What we can do is jump
to the texto paint. Let's exit Edit mode. I can jump to the
texto paint here. B for the sx, I want to
give them the orange color, so we can pick here the orange. Let's click here to text
that. Let's press one. You can switch again to
the to the brush tool, and go to the top and I'd
like to draw with the white. Let's add that strip on the top. Let's make it white like this. We need to make
sure to have that x mirror enabled the
met reverted back. We can check here the mirror, the x mirror, to the x, and let's start painting. Basically, that says we finished
texturing our character. All we have to do
right now is to save that texture image again. The character check sort
is fully text sort, so I'm going to just save it. We got our character in
the next coming step, we're going to start
the ging process to make it ready for animation. If you have any
questions, let me know, we're going to see you in
the next coming section.
25. Fastest Way to Rig Your Character Easily with Blender: In this oral, we'll bring our character to life
through rigging. We'll explore the powerful
technique of waist painting to address any rigging issues you might encounter.
Let's get down to it. To rig our character, we're
going to rely on an add on, built in add on in blender. It's going to make
the process of rigging our character
much more easier. This add on is called rigifi. We can go to edit preferences. In the add on step, we
can search here for gifi. And I want you to check
this box that we got here. After that, I'd like to put this cursor right here at
the center of our origin. Shift S, let's put the
cursor to the board origin, and we can press one
to face our character. We can select our character, try to move it a little
bit down until it touches this red axis. GZ, We can take it
down like this. Perfect. After that,
let's press shift A. We can go to armature and
basic basic human metal ric. Click on it, and you're going
to have this human metalic. You can press Z to switch to the fi frame
to see this rate. All we have to do right
now is to scale it up until it fits the shape
of our character. We can scale it up like this until it reaches the shoulders. After that, we can switch the edit mode, we
can press edits, and we can start aligning these
bones with our character. For example, this
one for the knees, you can take it to
the right side. The problem that we got is this. If we move this bone
to the right side, so this bone is going
to remain in place. Since our character
is symmetrical, it's going to be very useful to use the mirror modifier here. Instead of using the
mirror modifier, we're having this
option here at the top, this x meter, you can
just click on it. Now if you move this bone, the head of our bone
to the right side, you cannot perform the same
action to the left side. Let's select the bottom
bones, we can switch. Let's use the move tool
and we can move them, drag them to the right side. Example here, and let's
continue for the waist. I'd like to drag these bones
a little bit down here. Same for this mid section, can drag it a little bit down. The same thing goes
for the waist bones. I'd like to drag them
a little bit down. Also, we can check the
top for the shoulders. Let's select the head
of these two bones, and we can drag them
to the right side. For the arm bone, this
bone here needs to be placed exactly on
top of the arm joint. Otherwise, it's result
some weird arm movements. For this last bone, we cannot place it on
top of the hand. For the head, you can
just expand this bone all the way a little bit to the
top, something like this. After that, I'd like to jump to the side so we can press three, to go to the side, and let's align these bones
from this view. I'm going to grab this bone, try to have it centered, and let's go like this all
the way to the bottom. We can select those, move
them sideways, Sameth here. Same thing goes for the
hips and the waist bones. Let's just track them backward until they are
inside our character. For the knees, perform the
same ing, press three. Select those and move
them to the center. There we go. Seems perfect. I'm going to just switch
back to the solid. Our bones are not visible, so we can do something
to make them visible. We can go to this bone data. We can collect here and we
can go to viewport display, and I want you to click
on this in front. The infront can make
the bones appear in front of our character,
which is great. So now it's time to
reg our character, but before doing
that, we need to make sure of some things. I like to do is to
select, for example, the yes, and shifts, let's make them part
of our character. Same thing for the eyebrows, let's select the eyebrows,
we can go to the modifiers. Let's apply all these modifiers. We can go to objects, convert into a mesh. After that, we can press shifts, select our character,
press Control J to join all these
pieces together. Now for the eyes,
selects both ys, shift, selects our
character, control J, and now it's all connected. Let's do the same
thing for the hair. For the hair, it's a little bit different. I'd like
to do is this. I would like to optimize
it first because it's not a mesh, it's a curve. If I press d, let me just duplicate it and
check it sideways. If we go to object and convert it into a
mesh, check this. If I press, to go to das mode, I I press to select everything, we're going to be having 154000 vertices in just the hair. That is really huge. I'd like to do first is
to optimize our hair. We can select our hair, can
go to this data properties. For this resolution preview, I'd like to reduce it down real down to
something like four. Or even three, three
is going to be fine. You can see those edges
that we got here. I think it's going to be
four is going to be better. Also, we need to optimize
this busier circle. Let me just bring it
back this one that we used as a canvas for
shaping the hair particles. I'd like to do introduce
this resolution, two, four. Now if we select our hair
and if we go to object, converge into a mesh, On the edits mode, we
can select everything. It goes down to only 18,000. It's just delete the rest. I'm going to just
delete this easier because our hair is now a mesh, sameth for the other hair. Let's select our hair,
shift, select our character, and let's press control J to make it part
of our character. Sameing goes for these sneakers, so we have to make
them part of our ct. But I prefer to do
something here. Let me just select this
sneaker. We can hide them. I want you to do
this. I want you to drag, can press here, can press O to activate the
proportion addition tool, and you can simply drag
it a little bit down. I'm going to explain why. Let me just exit at this moment, Control H to bring back
to press. I were good. Let's select our sneakers. Shift select our character,
and press Control J. Now it's all set, so
final two weekends, we need to check the
transform of our character. Let's select our arte, we
can press n, go to item. The rotation, set
90, should be zero, so you can press Control A, and let's apply the rotation. Also, we need to do the
same thing to our RC. The scale is St 1.5, it must be set one. Control A, let's
apply the scale. Basically, this
happens if you scale your object on the object
mode, not on the dS mode. If you scale it
on the edit mode, es can happen, but that's fine, you can just apply the scale. So let's select our character, shift selects our armature, and we can press control P, and let's set parent to armature deform with
automatic weights. We're having some problems,
the bone heat weighting, fail to find solution
for one bone or another. This problem happens
because of our geometry. I'm going to show you how
you can fix this problem. Let's select our character. We can switch the dit mode. Let's select everything. We can press and
merge by distance. This is the first
cleaning method. As you can see 2000
vertices are removed. She is fine. So let's try
again, select our amateur, character, shift
select our amateur, control P, add such. Let's repeat that parenting. Now it's working just fine. Now we can select our
amateur and we can switch the objects
mode to the pose mode. Let's try, for example,
to spin this arm. We can press r, x, and let's spin it like this. There we go. It's working
perfectly. Let me check ahead. We're having some problems here. So hair particles
are not included. We can fix that next. By the way, I want
to let you know that rigging a character isn't easy, so I just consider
myself lucky this time. If you're having trouble
rigging your own character. Let me know in the questions
section down below, and I'll do my best
to help you out. I switch back to the
object mode and I want you to fix the
problems that we got. The first problem
that we got is this. This hair particle it's not
included in the process. Sometimes blender gets weird, so we have to deal with that. To get this problem fixed, I want you to select
the armature first, shift select our character. We can switch the objects
mode to the weight pains. I'm going to just get rid of
this mask and let me select. I'm going to press control
and click on this bone. Let me explain how
this weight map works. Basically, the weight
map is arranged between the red color
and the blue color. The red color means that that bone is going
to control 100%, that geometry, the red geometry. On the other hand, if it's blue, it means that this bone bone is going to affect this area. The problem that we got here
is that this bone is not controlling these eye lashes of character and some of
these hair particles. Check this out if I try R X, if I move it back, you can see that these elements, the blue elements, what's
going to be moving with it. For example, this green, the green is in the middle, toe is going to
be affected 100%. What we need to do is to
make all these elements red. To do so, you can press one. And I want you to
grab this gradient, and you can make sure that
the weight is such one, same thing for the
strength, one, and you can drag from up down. You can keep going
down like this. You can redo that, ag same thing here for
this eye lashes. Everything now is affected.
Let's strike this out. I'm going to press R z, and you can see we don't
have that problem anymore. All these elements are
affected by this bone. The second problems we
got with this shoe. I'm going to select
the press control and click on this bone. So for example, this tie
here that we got on the top, it's not affected,
should be green. What we can do is
to use the mask, we can click on the mask. Let's press all A two
d select everything and we can select
only this portion, and what you need to
do is to paint it. But it should not be blue, red, should just be green. You can just paint
just a little bit. Actually, it's a little
bit difficult to do that. I just control z
to reverse back. What we can do is to just reduce the strength to
something like 0.5, and we can paint here like this. Now it's green, just
keep it like this. L et's try this out. You
can try to move that bone, and it means you don't
have that problem anymore. Once you fix your gon
using the height map, what I suggest to do is to generate the g. You
can select a rig, and let's go through this icon, that that's objects properties, and we can scroll a little bit
down until you find gi fi. Here we're having
this generate rig. We can click on it,
and as you can see, we're generating a rag. This g's going to be much
more easier to control. Let me just s I'm
going to select it, press control tap to
switch the pose mode, and we can for example,
select the hand. Stretch move it. But as you
can see it's not connected. What we can do is to
redo that connection. Let's select our character. Shift select our new armtur, and we can press Control P, and let's set parent to armature deform with
automatic weights. Now let's select our
new arm, Control tab. Let's select the
hand, for example, as you can see it's
working just fine. Can select the middle
section, can take it down. Perfect. We can just go
back to the objects mode. Let me just hide this meta. We don't need this
anymore, can just hide it. Let's only work on
this new armatur. Now it's working just fine, we can select the legs. Let me just switch
the wit frame, this portion here, we
can try to ick it up. It's working, but the knee, it's not going in
the right direction. What we can do to
fix this problem is this. I'm going
to show you that. Let's use first the
x miller and we can select this bone with these
rows, and we can spin it. Let's spin it. Let's
make it go forward here. R z, can spin it like this. Now if we select
that bottom bone, If we try, let me just
switch back to me preview. If we try to check it up,
it's going to be working. Let me just get
rid of the x mere. The legs are working just fine. For example, these bones, they are not used in this rig. What I suggest doing is
just just get rid of them. Here again in this data
object properties. We're having these layers. This layer is this one, the one with the dots
with not the t dots, but the fool dot. You can shift and click on that. So Let's do the same thing
to their side, this one, shift and click on it,
to just get rid of it. For example, these bones, you are not
controlling anything. You can just get rid of them. P shift, click, to remove
them, same thing here. Basically, I want to keep only the bones that are working. That's why I select
these layers. We got our character rigged and it's ready for
the next move, which is animating it. If you're having
any trouble with this rigging process,
you can contact me. You can send me
your project file, your character, and I'm
going to help you rig it. Thank you for watching,
and I'm going to see you in the
next come of lecture.
26. Make Walk Animation: In This eorial, we'll
bring your character to life by creating
our first animation, which is the walk cycle. Let's jump right
in. The first step is going to be to
brain reference image. I'd like to press three to go to the side of our character, and we can simply drag this walk cycle reference
image into our T viewport. After that, we can scale it up. Let me just scale it up until it fits the size of our character,
something like this. We can just take it sideways. Turn out, the first
step it's going to be to create this pose, the first pose of
our walk animation. To do that, I want you
to select our rig. Also let's make some distance. I like to just drag
it a little bit down. Also we can go to
the data properties, and I want you to
check the opacity. Now our image is transparent. Let's select our g and we
can switch the pose mode. The shortcut is the control tab, and let's start working on it. I'm going to press
three, go to the site and let's set the legs
to these positions. But as you can see, these
bones are not visible. The leg bones are not visible. If you're having this case, what I want you to do is to
select these invisible bones, and we can switch this
mode by pressing tab, and I want you to scale them. We don't want to
scale them like this. We want to scale them on
their individual origins. We can go to this
pivot point and we can switch it to these
individual origins. After that, we can
just scale it up, to scale it by
three, for example. What actually just control z, I'd like to scale it by two. So we can type S and
two. Can press enter. Let's exit EIS mode. As you can see that those
bones are pretty much visible. I'd like to do the same
thing to the other bones, for example, the two
bones. O S mode. Let's scale them by four
because they are really tiny, now they are visible
on the front. Sameth for these on the pack. We can switch at this mode, try to scale them by tree, exit at this mode, and the we
got them right on the back. I'm going to press t
to go to the side. I'd like to select
this leg front leg, and we can simply take it
backward. Match this pose. You can also try to spin it, so let's press R, spin
it and take it up. Basically the toe must be
touching the red axis. We can use this red axis as a floor for our character walk. We can press R, try to
spin the toe a little bit. You can see this
problem, I don't want to expand it to this area. Spin it just a little
bit like this and we can take a little bit down. For the front leg, this
leg here on the front, can simply drag it forward. Take it a little bit up until it locks this lock here,
and we can spin it. Let's try, can
spin it like this. As let's try to play a
little bit with this bone. Just keep it like this.
Let's drag it down. But we're going to
see this problem as we got. This problem here. One of the ties here, it's
not connected with our shoe. What I'd like to do is to
go back to the object mode. Let's select our rick
first, rig shift, select our geometry, and we can switch to
the weight paint. Now what I want
you to do is this, I want you to go to
the data properties, and you can find the bone
responsible for this object. You can just keep going down
by pressing it down a row. There we go. This one, this one, this one here. As you can see the first, this tie here is green, but this one is not green. What we can do is to make
it green to put it here. We can deactivate or use
the masks of images. You can use it. Press all
A to deselect everything. We can select this tie only, and we can activate can
go to the gradient, make it radio, click on it
and you can simply drag. But I don't want to make it red, so I'm going to just increase the strength to
something like 0.4, just to make it green. We can just click and
drag and as you can see, it's taking place here, which is the right place of it. Perfect. Turn let's go
back to the objects mode and we can carry
on our animation. We go let me just press
tree to check the legs. Leg seems to be fine. I'd, I'd like to
take this back leg. Let's switch back to the
pose mode, can select this, contract spin it, so r X or actually just take
it a little bit up. So like this. Contract
spin it on the bottom. Take it a little bit down. Perfect. Now for the arms. For the hands on arms,
let's select this bone, this bone right here and we can take it a little bit forward. Let's press t, to
go to the side. We can press r, to spin it, sick it up, let's make it close a little bit to
the body of our character. You can spin it,
press R to spin it. We can also spin it on the z z, spin it, to go inside. Let's do the same thing
to the other hand. Let's press t, and let's see. Obviously, we have
to push it backward. For example, here.
Just make it close. We can select this bone
and we can spin it, so we can try R Y,
spin it like this. We can take it a little
bit down like that. Press three, spin it. Just take your time with this first pose because
it's essential. This part down. Let me
check it from the front. Seems pretty much
fine. I like it. All we have to do
right now is to insert or to save
this key frame. To do so, I'd like to click
on the bottom and drag up. I'd like to switch this
menu to this timeline. Basically I want you to think of this timeline as actual time. If you go here to this output, you score without going
to find this frame rate, it's set to 24 FPS. FPS stands for frame per second. Meaning that 24
frames from here. 24 frames. Let me just find
it. Yeah, this one, 24. This 24 1-24, it's going
to represent 1 second. Same thing for our walk. I'd
like to set it to 1 second. You can control it, you can make it for example 2 seconds, just multiply this
number by two. It's going to be mount to
48 and so on and so forth. I'm going to just
lock it here to 24. You can do it from
here from the end, you can just set the end to
only 24. This space here. I'm going to jump
to the first frame, you can do right click. We can press shift and
right click to jump to the first frame or you can write it here, right number one. And since this is the first
pose of our animation. I'd like to save it here
in frame number one. We can press A to
select all the bones. Everything needs to be selected, and we can press I to
access this key frame menu, and we can insert two elements. We need to insert the
location and the rotation. Let me explain. If you
select, for example, this bone here and
if you press n, you're going to find
this transform. Basically, we need to
save the location. If you press J, we're going
to be moving the location. If you press r, we're going
to be moving the rotation. We need to save both of these values. This
is what I did here. After that, what I
actually do is to do the same key
frame on the end. In cycle animation, the start and the end must be the same. Otherwise, it's going to work, it's going to look abroad. What we can do, we
can do right click, shift first and right
click into frame 24. After that, we can
press A again to make sure that all the
bones are selected, and we can press I and insert
ocation, and rotation. It's now we can call our
animation cyclic because the start at the end are
the same if press space, weren't going to have any
change, but it's cyclic. The next step is
going to be to add the opposite position. For example, at the middle here, so our character is
going to be swinging his hands or his arms
in the opposite way, same goes for the legs. Luckily, we have an
option to do so in Pender without having to
repeat the same steps again. We can press old here. Make sure that everything is
selected here all the bones. We can press old and
click left click. So we can select the
entire row, can see that, and we can press right click, and we can click on copy. You can also click on Control C. Copy that and since we
are on the 12th frame, which is the middle,
I'm going to do right click and I
lecture paste flipped. Now as you can see that
position is flipped. It's going to give us
this position here. We can press space,
and basically we got our basic walk animation. This is what we did.
We start from here, which is the same as the end, and at the middle we flip that, it's flipped. That's all. Next, I'd like to
work on the middle. I'd like to work
on this pose here. For this pose, we
can set it at six. We're starting from one, six, 12, 18, and 24. Here at six, I'm
going to press three. Let's try to make it
look exactly like this. I'm going to press control
space to maximize this window, zoom in a little bit, and
this is the front leg. Let's select the front leg. Push it forward, and
let's keep it straight. So I'm going to try, spin it a little bit to
make it straight. For the toe, let me just
push it back like that. We can select this bone. We can take it down, but as you can see one is going
to allow us to do so. Our leg is going to be
stretched, stretched. We can do is to
take the hip bone, can drag it a little
bit down like this, to give it some room,
and after that, we can take this leg
and drag it down. Sounding like this. We
got that first leg. After that, let's
create a second. Let's work on the second leg. I'm going to pick this bone and let's take it press
G, take it here. You can press r to spin it. Let me take the front leg a
little bit backward here. That's fine for the arms.
Can select this part. Can just make it relaxed here. Let's select the back arm. Push it a little bit forward, let's spin it upward. Control space, let's go back. Make sure that you
are in frame six. I'm going to select
everything and press I and inserg location
and rotation. Now we got it. Let's investigate that first part
of our animation. Can press shift,
and right click, keep pressing right
click so that you can go from here to here. I think it looks a
little bit inverted. It should go backward like this. But we're going to fix
that's another big issue. What we need to do right
now is to add the 18 frame. To do so, I'm going
to press old, we can co here to reset
to not select anything. You can press old right here, this entire row. You
can do right click. Let's copy that. Go to frame 18, right click, and
we can paste flip. All right. So let's press space, and let's see our animation. Our animation is better, but as you can see is flip. Our character is going backward. To fix this problem, we can
go to frame number one. We can select everything,
all the bones, all the key frames, and we
can try S x and cy minus one. So that we can invert it to the other sides.
Now it's backward. After that, I'm
going to press g x, let's move it like this until
it's in the right position. A let's press space, let's see. As you can see we
got our cycle walk, and it looks fabulous. The next step right now is to pick our animation and save it because we're going to be using
it later in game engines, Unity, and nal engine. Let me select my rig
and press control taps. We'll jump to the edit mode. With all these bones selected, I want you to go to pose
animation and big action. But before doing that, I'd
like to show you something. I'd like to separate
or to split my senior. I can split it to two parts. First, we have in
the timeline here, I would like you switch
to this dope sheet. I'd like to change the dope
sheet to action editor. So that we can add
a third panel. Let's just click down
below, lift it up, and let's switch it to this
non linear animations. Also, I'd like to change
the name of this animation. Here in the c action, let's call it capture Walk. L et's go ahead and
select all bones, can press A to
select everything. Also here, I want you to select
all these keys so you can press A to have all
these keys selected. After that, we can go to
pose animation, big action. Here let's work on this. We're having the
Scian frame 1-23, but I need to check that. This is the first frame
all the way to 23. I don't want to
jump to 24 because actually 24 and
one are the same. You can see that. There is no change in the in
the character pose. So the sting frame is one
and the end frame is 23. Let's go ahead with that. Let's go again to
pose animation, Bake action and here one to 23, I want you to check
this visual key in and basically that's it. Only selected bones will
selecting everything, which means that everything
is going to be selected. Let's go ahead and click on. All we have to do
right now is to just push it down to clear this area. But before that, I'd like
to change the name of this non linear animation
or the baked animation. Let's call it animation walk. After that, we can just click on push down as you can see, it's saved down below
and the top is clear. Now we are ready for
the next animation, which is the run. Se
27. Make Run Animation: So we got the walk animation. The next step is
going to be create the run animation.
Let's get down to it. Control space to go
back to our scene, and I do I'm going to press
space to stop the animation. I want to get rid of the walk animation or
just save it aside. I saved down in the
non linear animation. All you have to do is
just uncheck this box. Now we're going to have any of that animation, the
walk animation. I'm going to press
shift and left row to jump to the first frame, and we can select all bones, go to pose clear transform
and let's clear everything. Now archcter is set back
to the original location, and it's ready for the second. So let me just go back
to the object mode. We can press reach, go to the
side, control space here, and simply drag and drop
our second reference image, which is the run cycle. Simply drag it and drop it here, and we can skate it up until it matches the same size
of our character. There we go. A control space. We can select our
reference image, go to this data, be properties, and let's
check the opacity. Now it's transparent. Let's select our character, the rig of our character. We can switch to the pose mode, and let's go ahead and create the first pose of
our run animation. Let's start with this front leg, so we can grab the front leg, we can try to move it
forward like this, take it a little bit up, just exit that mode. We can try to spin this
one on the y axis. Spin it forward like that.
First we can to go back. Let's select the bottom, for leg, take it up. It needs to be
touching the ground. Got to do that in just a second. Let's take the back leg. Can spin it like this, tick it up, and also
let's try this. R y, and let's push it down. L et's press again
and let's check. So we have to release this. This won't make it like this. After that, we can
select everything. We don't need to
select the bottom, so I'm going to press shift. We can just click on
it, to de select it. S how's de selected. I'd like to drag this
part down until the heel. Of the shoot is going to
touch this green line. Z, sick it down like this. We got it for the legs. Now let's work on the arms. For the arms, let's take
front this arm here. Obviously, it should be
pushed back like this. We can spin it sideways. Stick it backward like this, we can select these two rows, and we can spin them like this. Let's select the other arm, and we can push it like this. Let's see. Obviously we have to kick it backward like that, r x R Y, There we go. Three. The next step is to make our character lean
forward like this. We can select this waste bone, this box here, and we can try can click on r and x
so that we can spin it. After that, we can
select the top top bone, this bone here, and we can
left his head ale bit up. We got the front or the first
post of our run animation. I'm going to select everything. I'd like to press and insert
location analyzation. Make sure that you are
on the first frame. Okay. After that, with
everything selected here, I'm going to press old here, to be able to select
all these key frames, control C. Let's
jump to frame 23, and press Control V. Now
actually frame 24, 24. We're going to be excluding that this last frame because
we don't need it. Let's go to the
middle, which is 12. And you can do right click
and it's paste flipped. Let's play the animation,
to see where we got. Let's press space.
It's going backward. What we can do is to
go to the center here. We can select all the
key frames by pressing, and we can try S x and
minus, can type minus one. Let me try that again
minus S x minus one. We have to move it just gx
let's move it by one frame. Okay. We got it. Next, I'd like to work
jump here to frame six. We have 613. We actually, just take this one
a little bit back. G x, take it back. Should be at 12. At frame six, Let's create the second
pose, this pose you. Control space to
maximize our window, and we can try to
relax those hands, make them a little
bit like this. For the legs, stretch this
leg all the way like that. You can take it a
little bit like this. For this leg, we can take
it up and try to spin it. Get a stretch, take
it a little bit up, and these we can
move them backward. Here, a little bit stretched, so you can keep it like this. Push it back. Then can take this one forward
a little bit. Let's select ever
again, control space, and we can insert a
new key frame here. Let's press I insert
location and rotation. I'd like to press all to select this tire row of
frames, control C, and let's jump to frame 18, and then the right click
and paste flipped. Let's see. I'm going to he
seems to be running backward. But first, we have to fix He seems like he's
going back here. He should remain in place. Whether we have to move
the first pose backward, or this pose we have to move
it a little bit forward. Let's first. As
you can see we're having just one cube here.
Let's keep that in mind. We can jump to the second
pose, select everything. Shift, can de select
at the bottom, click on it, don't need it, and we can move it forward here. Until just one e is left. Let's select
everything, press I, and scation, and rotation, can press, control
C. Let's go here, right click and paste flipped. All right. Let's
run that animation. It seems fine, but like I said, it seems to be backward. Let's slack everything
by pressing A. You can be on the middle. We want to take these the key
frames on the right side, put them here and the ones
on the left, put them here. We must be on the
center. Let's say 13. S x and minus one, you can try g x and move
it just by one key frame. There we go, so we got
our running imion. It's acceptable. We can
definitely improve it, make it look even better. For example, we can work
a little bit on the head. Let me just take the
reference image, can press one to
face our character, and we can try this. Let me try For example, when our character is going
to be in the first position. I can try to lean a
little bit sideways. R Y and let's lean sideways
by minus ten degrees. Sound like this. Let's press I insert location and rotation. We can press old just like this entire rock
control C to copy it. Let's go to the
middle, right click, paste flipped, and at frame 24 we can do right
click and just paste. Let's play out. It seems good. I think ten degrees is a bit too much. Let
me just go back. You can just reduce that amount. Let's say it to minus five. Click replace last minus five, and here it's going
to be just five. R Click replace keyframes. Let's play our animation again. We're going to be looking at
our character from the back. The run imsion seems
to be fine. That's it. All you have to do
right now is to just bake our animation and save it. I'd like to do right now
is to bake our animation. Let's select all these
bones by procin A. You need to make sure that
you are on the pose mode. Let's go to pose animation
and bake action. We're starting 1-23, only selected bones,
selecting everything. Let me check this visual
key. We can press okay here. Let's call this new action, animation, and we can
simply push it down. Now we have two
animations down below. Let me just show you
that. This is the run. We can check this box and check the walk if you want to
switch between animations. In the next same lecture,
we're going to start working on our jump animation. See soon.
28. Make Jump Animation: Now it's just touch working
on our jump animation. I have this reference image. I' going to be
using. I've divided the jump animation
into seven sections. If we exclude the starch
frame and the last one, which is a default
pose of character, we're going to be left
with seven poses. Let's get down to it. First is just and
check this animation, the run animation, and we
can start press shift. Canon press shift and recolect
to go to the first frame. What I want you to do is to
go to pose Clear transform, and let's clear everything. Now our character is in
the default position. Then Let me also switch
to the objects mode. We can just delete this
reference image and I'd like to press one to be
facing our character, and simply drag and drop this
jump cycle reference image. You can s just set it a little
bit up, push it sideways. Let's tick it a
little bit backward. Here. This is the first frame, second, third and so on. Let's press one, control space. Let me select my rig and we
can switch the pose mode, and let's start working on it. This is frame number one. You
can see that number here. This is the number of
frames that you are on. We are on frame number one. I'm going to just press I and we can insert the location
and the recision. We need to start our jump
animation from the fault pose. It's set yellow, meaning that we have inserted
these key frames. We can press control
space, check that. You can see it here. L et's jump to frame 25. We can do it from here, can
click and set it to 25, control space, and let's
stretch create the second pose. I'm going to select
the waste bone, the cube here, and we
can simply take it down. Something like that. We
can select these rows, can press r y, Let's pin
them forward like this, send it for the other row. Can spin it like that. Nice. After that, we can select the hands and we can left
them little forward. Let me check sound like that, but also we need to lean
our culture forward. We can select the
hip bone again, we can try x, and we can drag it
forward and for the head. Left it a little bit up, toy to press r x so that
we can spin the head. Let's press one and we can
select everything by pressing A. I think the shoulders
are a little bit stretched. We can just select the hands, stretch to move the shoulder
is a little bit down like this. We are on frame 25. Let's select everything, press I and insurge
location in rotation. It's a control space, and
let's work on the third frame. This one right here. We
need to jump to frame 35. Let's do it from here. Frame 35, control space, and
let's work on this. Basically, we have to
lift the waist up here. As you can see, our case
is going to be in the air. This is the beginning
of the jump animation. I'm going to select the legs, take them up a little
bit like this. And let me lift the
hands up. Set like that. Let's select everything, press I, insert, location,
anurization. We can press control space and let's assess what we got so far. We can just scroll back. Also here we can set the end. The end frame here is 91. We can set it here. You can set it to 90 because the last frame is the same as the first frame,
should not include that. We can press shifts and
rightly so that we can move on from first frame. It's going down. We need to fix this
here, but that's fine. Let's just carry on.
Let's press one. And let's see. Probably
that's a little too much. On frame 45, right here. Our tory is going to be jumping
in the ir, control space, and let's take select
all these bones, except the one on the bottom. Let's press one. I let
you take it up here. Select the legs, lift them up, and we can try stray r y, try to spin, these
sideways like this. Can spin this one,
let's press r, or x, Syth in here, our x. That's fine. Let's press one. You
can select them both, try to have them centered, and for the arms or the
hands, just tick them up, push them forward, spin on the x or x, spin
them like this. This is our jump. You can take the head,
try to make it down. This is frame 45. You can select all bones, press I and insert
location and rotation. Let's move on. We can
just keep collecting on the right row until
we reach frame 55. Here in 55, the average
much the same except a little bit hands and the
height or the jump height. We need to start sing. We can just take it a
little bit down here. We should not be selecting. Shift and double click on that. We can take it this part a
little bit down like this. I believe it's on
the same level. I'd like to as tick it up. Let me just change the
position of the hands. Our so for the legs, g, make them a little
bit different. Let's, press I, insert
location, and rotation. Now frame 63. Rise a row till we reach 63. Now we're going to be a landing. This is what we're
going to be landing. For the landing,
I'm going to just take my legs like this. Hands, let's move them down. Probably they should be up. O x. Let's squares one and
let's take a look. As I'm going to
select the hip bone, I'm going to drag it down. For the hands, tick
them a bit down here. For this arrow,
let's press or y, can start stretching up
those legs like this. We can press I, can press
A to select all the bones, press I, and less insert
location and rotation. Now we're left with
the last frame. For the last frame, can I just copy the first frame,
control space. Let's go to frame 991. You can do this. I'm
going to click here. Let's press old, select the entire frame
control C to copy it, and we can re click
and piece that. Okay. Let's play out animation, Control space to
maximize this window. Let's see. I looks promising, but we have to work on
it. Let's press one. For example, the jump
here, it's not good. He's jump in before he leave
his legs leave the ground. That should not be the case. For example, at 35, can simply expand his
legs down like this. Let's select everything, press I insert location and rotation. Let's see that. There we go. Control space, let's play
the animation to see. The first part looks good. But landing doesn't that's good. Seems like if we are missing
something here 63-9091. I think for example,
a 75, we can do this. It can be landing down
like this.'s press one. We can take the legs down
until they touch the red axis. Our character is going to
be bouncing off the ground. Let's just take this part down. Press A, everything, press I, it is inserted
location and rotation. Control space. Let's play
our animation again. The jump, go down. Seems fine, but
for example here, these legs are not working well. We can select these rows, ry. Let's direct them forward. L. Let's select everything, press, insert location and rotation. I believe we're having
the same problem here. For example, let's frame 12, let me just set them so r
can make them face forward. Select everything, press I
insert location and rotation. But actually here on the front, they should be like this. Let's select everything, press I inserted location
and rotation. Since we made adjustment
to the first frame, we have to do the same
thing to the last frame. I'm going to just click here. Press old and left click. You can do Control C to
copy this key frames. Let's jump to frame one, right click and past that. Et's got the jump. I'd like to do is to speed up our animation because it
looks a little bit slow. Let's press space. I
can see it's slow. Control space, and let's go
back to the first frame. Can press A to select
all these key frames and we can press S
to scale them down. Make sure that you are
on frame number one. I'm going to scale them
down until they reach 60. The Stute position
is going to be from one all the way to 59. Like I said, we should not
include the last frame. Let's just set it here to 59, Patrol space, and let's
play our animation. See from the back.
Pretty much good. We've got our jump animations. All we have to do right
now is to just save it. I'm going to select
all these bones. Let's go to pose animation, and we can pak action. I'm going to check this
visual key so starting 1-59, and let's press. O animation is picked. I'm going to call it here. Animation Jump. After that, we can just click on push it D. Now it's down.
29. Make Idle Animation: This torial, we're
going to be making an idle animation
for our character. This idle animation will be used during moments of
inactivity in our game. Basically with our character, one's going to be performing
any specific action, we're going to be playing
this idle animation. It's just a repose that
we're going to create. Let's jump right in. I'd like to bring
a reference image. Here on the right side, we
can simply split our scene vertically like this and we can switch it to this image editor. I'd like to bring this
idle animation, Idle pose. Let me just drop it here, and let's try to create that. I'm going to select my rig and we can switch here
to the pose mode. We can select everything,
all the bones. Let's go to Pose clear
transform and clear all. This is the default
pose of our character. I also want you to
uncheck all these boxes, if you're having, for example, this walk, I want
you to check it. So that each one's going to interfere with our
new animation. Let me just set our animation
to one, slot from one. We can start by creating
this pose here. Just try to make some space, take all these down like this, and Let's right in. The first position,
I'd like to t weak a little bit the legs or the foot. You can just move it
a little bit forward, can spin it sideways
by pressing R Z. Let's do the same thing
to the other foot. R Z, spin it sideways. You can take the middle box. You can try to tack it down, just to make our character
a little bit relaxed. Can select these
rows and contr r y, and let's spin them a little bit forward. Same thing here. Something like that
seems to be fine. For the hand, we can just relax them. Let me just take them. We can make them relaxed, R x, can spin that sideways, move it's a little bit forward, sin it for the other hand. Just take it, move
it a little forward, r x, can take it even down. All right, something like
this, take this one back. R x, Ry. Now it's completely relaxed. For the shoulders, I'd like
to spin them just a bit. I can select this
shoulder, try R z, can spin it sideways like
this. Just a little bit. For the head, You can either
try to turn it sideways. Let's keep it like this. This
is for the default pose. Let's press A to select all these key frames,
all these bones, and we can press I
to creating inset, and we can insert
location and rotation. Keep in mind I'm on
frame number one. We can set the end to B eight. I'd like to expand
our animation. This is the length of
our animation to frames, and we can jump, for example, to the last frame. Also we can press all here to select all these key frames, can do tcl, copy, tcl here and paste. Like I said, all these
animations are cyclic, the first and the last frame needs to be identical, the same. Here on the middle, can
jump for example to frame. 20, can try to take this
box a little bit down, so GZ just a little bit down. As if our character
is breathing some. We can press, let's insert location and
rotation. Check this out. It's got to be going
down like this. Can bring him up
like this and we can spin them a little
bit sideway zero. Let's press I and insert location and rotation
for only that queue. Let's try that out. Let's play. It's going to be spin I think that's a little bit too much, can bring it back, press I, insert location and rotation. Basically, just keep
twisting these key frames, inserting the first ones. Keep experimenting
with this animation. For example, at frame 40, we can play a little
bit with the legs. Let me just Let's
select these two bones. We can try r x or
R z, can press R, and z can spin it sideways, press I, inserted
location and rotation. Now we're going to be
moving that leg just a bit and back to
its original pose. For the hands, we
can tweak them, for example, at frame 20. Let me select both hands or
actually just this hand, move it backward, just a bit, press I in cert location. Probably that's too much.
So we can press old here. Let me just make sure that
everything de selected, we can press old, and we can
try g x and we can type 20. We're going to be moving these
key frames by 20 frames, just to make it a
little bit slower. S like that. It's moving. Let's do sthing to
the other hand. C try to spin this hand, so R Z. Spin, take it a little bit in, press I insert location
anitation. Let's try that. Nice. We're having
some movement here. Good. At frame 60, try to check it a
little bit backward, press I insert location and
rotation, Syth in here. We can move it forward instead, Ication rotation.
Let's try that out. Our dal animation is
going. It's going down. We can also try this. Let me select the middle
box, the hip bone. We're going down here
and we're going up. We can go again
down a frame six. Let me just try G Z. Take it down just a bit ps I in search
location and rotation. Try that out. It's
going down again. We can play a little
bit with head. Let me just select
the head bone. For example, a frame 20, can try to spin it a
little bit sideways here, Spress I, inscation,
analytation. Straight that out. He's going to be spinning
his head and going back. Seems to be fine. But
I think I need to exaggerate this animation
because it's sarely visible. Let me just select
the middle bone. The hip bone, we can try to
take it a little bit down. G s down like this, press I instcation rotation. We can also do the
same thing here. G Z, sick it a little bit down, I insert location rotation. For the hands, let's
also take them down. We can try R Z. We need to
be on the median points, Z, just to spin them
forward like that. Let's press I inication rotation for both of those elements. Same thing here, we can
do the opposite, geez, take it down, press I insert
location and rotation. Splay that out. There we go. For the shoulders, we can try to move them a
little bit forward and backward to make our
characteral lian sideways. For example, as frame 20, you can move the shoulders
a little bit forward, press I intercation rotation. Here at the middle, we can
try to spin it a little bit. Press I again insert, save that. Key frame. Okay. Here we can try our Y, spin it on the y axis, let's press I inserted location. Let's see. Pretty much good. I like it. We've
got our animation. Let's go ahead and bake it. Ctrol space, go back and let
me select all these bones. Let's go to Pose
animation. Bake action. We're going to be baking 1-80, but I don't want to
include the last frame. You can just bake it to 79. Let's go to Posimation,
bake action, set it here to just
79, press enter. Let's click on this visual
key in. Okay. All right. The last sep is going
to be to click on Push Down to save our idle
animation down below. Let me just expand these jobs. As you can see, we have
all the animations here, control space to
maximize this window. We're having the idle
to jump, run, and walk. In next time, lecture, I'm going to show you how can we export our character with these
animations. See soon.
30. Export Character with Animations: Al, I will show you
how to successfully export your character
with its animations as FBX files and make them ready for game engines like
Unity and real engine. Before doing that, I'd like to expand or to minimize
these panels, these windows, so we can
do reclck join areas. All we need is just this non lineary animation
tab, this panel here. We can just recli
join areas like this. Basically, we need to
export two FBX files. The first one is going
to contain the skeleton, and the second FBX, it's going to contain
the animations, our character for animations
that we got here. Let's start first
with our skeleton. What I'd like to
do is to switch, let me first go to
the object mode. With our skeleton selected, we can go to this
object data properties, and I want you to switch the skeleton from post
position to rest position. Basically, this is the default
pose of our character. The next step, I want you to check any animation
that we got here. For example, the
idle is checked, let me just check it, so
everything needs to be checked. Perfect. After that, we can
select our character first, shift and let's
select our skeleton, and we can go to file on
the top export export FBX. First, let's call our FBX
file character model. We can press enter and
here for these settings. First, all I need to include
is just what is selected. We can check, we can
limit this selection to only this selected
object because we don't want to have the
MT and other stuff, included in our FBX file. We can also make sure of
that in this object types, we can only include
the amateur shift, and let's include the
mesh. That's all. We can scroll a
little bit down here. For the geometry, let's
expand the geometry. I want you to switch the
smoothing from normals only to face down below
here for the amateur, I want you to check
this add leaf bones. We don't need them. Finally, since we are
exporting our skeleton, we don't need to have
any baked animation. I'm going to just
check this box. Let's go ahead and
click on Export. Px. We got the first FBX
exported, character model. Next, we need to
export our animations. Let's select again
our RC and we can switch back to this object
that's our properties, and I want you to switch to
the post position right now. After that, in this
non linear animation, I want you to check all these
animations that you want to include. Let me just
check them all. After that, we can select
first our character, shift select our amateur, let's go to file, export FBX. First, let's change the name of our FPX to character animations. Next. For these settings, I'm going to leave
them just as they are. All we have to do is
just scroll down, and we need to check
this bake animation. Let me just expand it. Now we need to export these animations. Also, I don't want you to
check this all actions. Because sometimes we might be experimenting with more
than these animations. Basically we have to limit the export to only
what is selected here, to only the animations
that are selected. Let's go ahead and
export our animations. Basically that we got
the two FBX files. We got the model, and
we got the animations. Also, I want you to
bring that texture, this texture, the
character texter. If you lost it, I'm going to show you how you
can bring it back, so we can go back to your scene, and you can switch
it to Image editor, and F here we can click and pick you can search for
your character texture, the texture that we created
and painted before, and you can just go ahead and
save it wherever you want. Now I want you to
save these files and put them aside because
we're going to be needing them later
when we're going to start working in unity
and in real engine.
31. Game Environment 1 - Base Mesh: So we're going over into
this nets and to show you how can we design
our game environment? Specifically in this storia, we're going to be
designing the base of our game environment. First, I'd like to use
this reference image, this is going to follow
to build our base. I'd like to simply
drag it and drop it in our blunder scene. Here on the right side, I'd
like to create a new menu. It's going to be
an image editor, so we can click here and
switch it to the image editor. This you can be able to
drag and drop images. Let's bring our base
game environment. You're going to find
it in the resources, and let's start working on it. First, we'd like to do is to press A to select everything, x and delete all the assets
we got in our scene. After that, we can
press shift A, go to mesh, and we can
start with a plane. For the dimensions of our plane, I'd like to give it 160 on the
width on the length of it. S x, we can give it or
actually let's do it from the n. We can press n to
access this transfer. You. On the x, we can
give it 160 meters for the length of our
base mesh, and for the y. For the width, we can give it, for example, 20 to 25 meters. Feel free to choose any
size that you'd like. Let's divide our game
environment into three sections. We' having this section
that is divided by river, and we're having
this mid section that has an earth crack, and we're having
this small river, and finding this section here. Let's go ahead and divide
it into three parts, we can insert two edge loop, or actually let's start
with first edge loop, can take it sideways here, and we can insert the second
edge loop so that we can be able to grab this
face and move it up. You can take it up,
something like that. After that, we can insert an edge loop to
define the river, control out again, and
let's add it right here, we can take this
face and move it up. For this location, we're going
to be having this river. After that, I would like
to add the third river. We need to have it,
for example, here, control B to pv this
part like this. We can scale it a little
bit up and extrude it down. Also we can activate
the snap tool, we can switch it to the verse x, and we can snap this
phase to this phase. So that we can have the same
verse at the same height. Let's delete these faces. We can select them
and delete them. I can also I'd like to
scale this phase on the x, S X, scale it a little bit
down like that perfect.
32. Game Environment 2 - Adding the Walking Path: Next step is going
to be to define the path where our character
is going to be walking. Let me just show you that
in the final result. This path here,
I'd like to define it a little bit better. On the this mode, I
want you to insert two edge loops of Control R. First one right
at the middle, can click and Control B, and we can pavl it,
something like this. After that, we have
to exclude it down, but I don't want to
exclude everything. I'm going to select this face. And let's press to
creating inset. But as you can see this inset, the dimensions of these
insets are not even. We have a big gap here
instead of this small gap. Let me just reverse back
and we can exit this mode, and we need to apply the scale. The scale it's not even. If you press n, you can see that the scale is set
to 80 versus 12. We have to do this, control A, let's apply the scale. If we go back and press I again, we're going to be having
an even the distance for these inset edges. I would like to track this
one a little bit down. We can delete the start, x deleted, select this edge, and we can snap it to
the end like this. Here, let's think this over. I think that's fine, I'm going to just
leave it like that. After that, let's do
the same thing to all this path, so let's press I. And we can tack it down. Let me just remove cat
rid of the snap too. C tack this one down like this. Finally leads to the same top. I can select this face, press I, and let's drag it down. I'm going to delete this face, and let's grab this image and
we can snap it to the end. Can activate the snap, activated or snap it like that. Perfect, so we've got our
path, and it looks perfect.
33. Game Environment 3 - Adding Cracks: Third step is going to be
to add some earth cracks, just like what we got here. Let's do that. I'm going to
press seven to go to the top. Basically these can be used as obstacles for our
character to jump on. We can insert, for example, an edge loop right here, control R. Horizontally, we can add another edge
loop, and we can try this. I'm going to try to select
these two vertices, try to scale them real down. We can take these
to the left side and try to expand this one,
a little bit like that. We can insert, for example, extra edge loops here. I can take this one like this to define that
crack even better. Sound like this. After that, we can let me scale
this on the x. And we can grab these phases, and we can exclude them down. We can select this
phase x deleted, and also here at
the middle control R. We can try to
randomize this section. You can go to mash transform
and choose randomize. We can access this tab
that we got on the bottom, and we can increase
this amount, like this. Now we randomize that edge line. You know, cracks are
not symmetrical, so we need to add that
randomize effect. Smthing here on the bottom, we can repeat the same stem, can press old, shift old, select both of these edges, and let's go to mesh, transform, randomize, can increase that amount,
something like this. But we must be careful. We should not have any
clipping whatsoever. Here we don't have.
Let me just see. Think we're having a clipping. Let me just hide the
subdivision the snap tool. Can check this one should
not have any clip. Next, I want you to repeat
the same steps that we did, for example, here, we
can add another crack. Let's repeat the same process. We got the second crack
added to our pace mesh. In the next coming
lction, we're going to continue working on
our game environment.
34. Game Environment 4 - Adding Up Hills: Next s, is to add these
uphill that we got here. Let's do that. I like
to on this mode, I'd like to insert
some edge loops. Let's insert, for example here, four edge loops, or even five, can press enter to
apply that and we can grab these faces
that we got here. Let's just see. I think
that's a little bit too much. We can just use on this part. I'm going to press
I secret inside, exclude it up, can
scale it down. What I'd like to do, we can select these vertices on the corners and we need to
scale them a little bit down. We should not have everything
in a cubicle shape. Let's do the same thing
to these vertices, can scale them a little
bit down like this. Also, I prefer this method. I'm going to just
delete these phases, and let's select
these on the side. You can try S Y and press
zero to having them flat, Let's activate the snap tool, and we can snap it like that. Perfect. Next, I'd like
to create the top. Let's again se phases. We can press I again,
secret inside. Exude up, we can scale this part down like
that. There we go. Let's add the second uphill. I'd like to add it
here on the top, so you can add it here
on the other side. Let me insert another edge loop. I can remove get rid of the snap Tool,
something like this. Let's just insert
some edge loops here. I'm going to grab these verses, express I, ext up. And we can select these
edges on the side, can try S shift z to scale
them down like this. After that, we can
add the second layer, press I again, sd up, and let's scale down. Also here we have to spress, shift old, can try to
scale this part down. Select again the top, scale it a little bit down. Also here for the side, I'm going to try to align
this edge S y p zero, activate the snap tool and
let's snap it like this. After that, we can select these phases, push them outside. Perfect. Here we can slide this
35. Game Environment 5 - Final Tweaking's to the Game Environment Base: The next move it's
going to be to add the subdivision surface
modifier. Let's do it. We can go to this modifier
properties, the ranch icon, and let's add a new multifer, it's going to be the
subdivision surface. From here, we can apply
some improvements. Ric sheet smooth, L's like
this, Ric shade smooth. For example, here on the crack, we can insert extra edge
loop so define edge, just catch it of the snapse
Du G, slide this one up. There we go. We can
also define the bottom, because that's a rocky
space as we got here, control r, something like that. Let's do the same thing
to the other crack, insert some ra edge loops, same thing on the
bottom. That's fine. Also here for the river. Let's make it look
like this shape. On this mode, I'm going to insert an edge
loop, take it down. On the top, let's
do the same thing. I can insert two edge loops, press old, and we can
bring this one forward. There we go,
something like that. You can take this one down by I pressed all here just
like the entire row. Can insert an extra edge loop, can push it outside. We can add the randomization effect to make it
look like this. For now, let's
just make it work. Here, let's insert
extra edge loops, sameth here on the bottom. That's nice. Sameth here
for the second river. For the second ver, I'd
like to add this trick, this inset that we got
here. I really like it. What we can do to do this, let me just hide
the subdivisions of ros modifier and let's figure
out way to add this inset. We can insert an
extra edge loop. Press all shift, and we can bring this one
forward like this. Next, let's bring back
the subdivision surface, and we can add plenty
of edge loops. Let's check the uphills. I'd like for example,
to add some edge loops, we can define this edge
a little bit better. Also, I'd like to get rid of these corners that we got here. I don't want to have
this curved corners. To fix this problem. We can go to the advance in
the subdivision properties, can calcre, and in
the boundary smooth, we can switch it from
all to keep corners. Now we kept the corners
of our game environment. Also here, let's insert some edge loops to define that
edge a little bit better. Now for the last step
that we must do, which is to randomize our game environment,
as you can see here. The river is not perfect. We're having some cracks, we're having some imperfections. We need to apply the same thing to the base of our
game environment. To do that, we're going
to be relying on one of the most important
tools in Blender, which is this proportion
addition tool. I want you to enable it. I'm going to just
keep it smooth. Let's start working
on it. For example, let's work on this river. I'm going to select this part and we can increase the mouse. I can slide it a
little bit like this. I can add some imperfections. Same thing here for the river. Let me just push
this let ***** back. This one forward,
something like that. We need to add that
randomization. Symeth for the
road, for the road, I'd like to insert some edge
loops to define the end of that edge of the
road, like this. At the middle, let's
in some of ee, just so that we can play with
it. Can check this one up. This one, we can move it
down to make that twist. Here, let's take this one up. Fly same in here. Let's
play with this orientation. That is perfect. Also
here at the end. Just take your time and try to randomize this
shape of our road. The next step, need to randomize it on the z axis this way. We can for example,
select these, G Z, take it down a little bit. We can select random, GZ, to lift them up. For example, this uphill, I would like to push
this section inside. Something like that,
Let's push this one here. The better, the more randomization you add the better your scenes
can look like. For example, here we
can tick this one up. Take this one down.
Just be flexible. I can take these two edges,
slide them like that. That's perfect. I'd like to repeat the same effect,
for example, here. It's a little bit
challenging here. Let's do it instead here. That is fine. Over here, we can insert an edge loop, select two random
position, take them back. This one, we can
push it forward. To have that rocky space. Sing for this second uphill. Can try to deform
it a little bit, make it look interesting. Basically, that is the trick,
just use this proportion indigent tool to affect the shape of your
game environment. As a last trick, I'd like to define the road a
little bit better. So you can add some edge loops
to both sides like this. Now the road is a little bit
more clear. That's perfect. This is the part
where we're going to be adding some bridges. We're going to be doing that
in the next gaming lecture.
36. Game Environment 6 - Design Wood Bridge I: We onto this news are also, now we're going to be designing the assets for our
game environment. I'd like to start by
creating a bridge that's going to connect
this part here, point A to point B. This is the bridge as
we're going to be created, this one, going to be text
to make it look like this. Let's go ahead and
create this asset. First, I'd drag and drop
our reference image. Going to find this
into resources. L drag it and drop it here. I'm switching to
the image editor, not the image editor. Let's go ahead and create this. First, I'd like to
create a basic mesh. Shift A, let's put cursor. We can slash with the plane, Shift A in a mash plane and I'd you take it
a little bit up, and we can scale it ale
bit up on the edit mode. Let's switch it edit mode. Scale it on the x. We can
press seven to go to the top. Let's put it here,
we can scare it up and scale on the y axis. Something like this. After that, let me just trim
it a little bit. It seems to be fine. Some next, I'm going to just hide my environment and just
focus on our bridge. The first step, let me just
get it a little bit on the x. The first step is to bend it. We need to bend our plane. To do that, I'm going
to press control r to insert an edge loop
right at the middle. We can take it up like this. A little bit up, and we
can try this control B. Let's pve and we can insert few edge loops,
something like this. Now we're having that bend
effect applied to our plane. We can do right and shade
smooth, to have it smooth. The next step is
going to be to add these side planes
that we got here. To do that, I'd like to
select these versus, so we can select
every other one. Like this, Shift d to duplicate this part and we can
exude it up so easy, sick it up, something like that. After that, we can
do the opposite, we can select the other edges. Let's press shift d
to duplicate these, collect and type E
z, and let's go up. The next step it
is going to be to randomize these
versus a little bit, so we can go to mesh, transform, randomize, and
let's increase that amount. Something like that seems fine. Now it's random enough. We can select the rest, the ones, and we can
apply the same effect. They are straight if you
switch if we press three. Can I see that
they are straight. We have to randomize
them a little bit. Let's go to mash,
transform, randomize. We can increase that
amount or a little bit up, and basically that's it. I also like to randomize
the bottom here. A, to select everything. We can select this
part by pressing, we can hide this by pressing H, and we can select
again the bottom here. Go to math, transform,
and randomize. Increase that a little bit up. That is perfect. A H, let's sprint pack
the main plane. Next, what I'd like you do is to give this
plane some depth. To do that, I'd like to add
the solidify modifiers. We can go to the modifiers, and let's add the
solidify modifier. You can increase this amount. So. Also we need to add
some trach weakens. Let me just show
you, for example, we can insert an
edge loop, control, take it up, can
take this vertex, slide it a little bit back. To have some of cracks
and stuff like that. Let's do the same thing here. You can add some random a little bit hard
to add this here. Let's tick this one up.
At some random positions, and let's select them again, and we can randomize them. Mash, transform, randomize,
increase that amount. For example, e having some cap, should not have any
capian, can switch wrame, should be able to select
this part easily. Okay. That seems interesting. Let's do the same thing
to the other side. We can insert some
edge loops here. L et's keep them random. If you can insert an edge
loop at this location, you can go to the other side and which frame is
going to be better. Let's switch to the edge mode, and let's select
all these edges. Mash transform, randomize. Increase that a little bit. There we go. I'd like
to randomize the base, can insert two edge
loops, select the base, go to ma transform and
apply the randomization. This increases the amount. Something like
that. We got that. Now let's add this part here. We can also try to insert
some edge loops on the sides to fix this bad
geometry. T dark spots. I'd like to add the
supporting columns at the start at the
end of our bridge. To do that, we can select this phase, shift touplicate it. You take it for example here. C extrude it You can
extrude in x edge loop, try to scat it on the
x, something like that. In order to have this
effect that we got here, we need to pavl some virtues. We can s this versex,
press control, shift, and B, and it can pvl it. You can reduce the mouse
count to just zero, to have that effect perfect. Here we can push it inside. I'd like to let's do the same thing on the side
so control shifts and B. Can bevel that corn two. I don't think I'm going
to need this edge line, x, let's just gets rid of it. Here we can push it inside, push it back, control shift B. That is nice. Let's
select this part. You can press one, or actually
three, go now just one. You can sketch it on the Z axis, and push it inside. For the base, can
make it a bit flat. It's going to depend
on the environment. I take it this one back. Let's duplicate this shape. You can select it duplicate
it for each year, can scale it on the y, S y
minus one to have it inverted. But you can see that it's
a little bit bigger, so to fix this
problem, you can press shift n to flip the normals. Now it's back to
its original place. Also, for example, I would
like to get rid of this phase, we can press M, s
merge at the center. Checks a little bit like that. That seems reasonable. Let's see. Now let's duplicate. I select these two columns, shift d two duplicates, and I'll check them here. We can try R z and spend
them by 110 80 degree, to make them a little
bit different. There we go. Right click, shade out a smooth. Now it looks perfect. We
got our first bridge. The next step is
going to be to put our bridge inside our
game environment. We can press old He to bring
any hidden part of He. Let's just tweak it
just a little bit. I think it's almost
in the same place. But we have to fix, for example, the start. We can try x term a
bit on the x axis. For example, here,
we can Let's tack this first x up here. Something like that. It's
pretty much connectable. A little bit to the left side. We got our bridge. In the next time lecture, we're going to be adding
these barriers.
37. Game Environment 7 - Wood Barrier: The next step it's
going to be to create these barriers as we got on the front and the
end of our bridge. These barriers adds
much more details and makes our environment
looks interesting. To create this barrier,
I'd like to start first by defining the top. I'd like to put cursor, for example, at the top.
Shifts right click. Shift can go to mesh, and let's start with a circle. We got this circle here. I'd like to reduce the
number versus just eight. We have in here. It's a little
bit of a low poly mesh. Let's sick it up. Can
drag it sideways. Let's start working on it. First I to press F to fill it, and it can press easy. Scale it down. Til it reaches the bottom. Let's just get rid of the
proportion of in for now. I think this is about the
height of our objects. Next I in two edge loops, can press all here, can
slide scale this one down, move it a little bit forward. That is nice. Here at the bottom, I'd
like to show you something. I'm going to press control R, can take it for example
here, push it back. What we can do is to select
this vertex, this edge, and we can press V. The VT is can be splitting
it into two parts. After that, we can
select this vertex, can push them a
little bit sideways. After that, we can
just get rid of this bottom face, like that. Perfect. Next what I'd
like to do is to pl. Let's apply or a this
effect that we got here. We can press control shift
and B to pavl this part, actually just press control B. To beval it. We can
select this vertex, this edge, slide it down, press here, sick it up. It's a little bit interesting
to get the same shape. I think if we try to
scale press here, try to scale the
middle little bit down, put it at the center. It's going to be fine. We just need to
have a wider top. Sending here on the bottom. Let's press old. Can
scale that one up. That's nice. For the next step, we need to duplicate
this object. Shift D, it's duplicated
and let's move it sideways. Also on the edits mode, let's select everything, go to mesh, transform, randomize. We can randomize this
a bit like that. Let me press here at the center. Try to randomize only the
center. That seems fine. I'd like to do is to add
this middle bars of food. I'd like you use the same object that we got for example,
this one, Shift D, duplicated, move it here to
the center to the center, can spinach on the y by. Let's say, something like this. We can scale real up, scale on the Z axis down R z. Also, we can try S Y, to make it a little bit flat and we can extrude it outside. Let's not keep it straight
so we can select this face. Drag it a little bit up. This one we can push
it a little bit, Z, make it smaller. This one we can make it bicker. After this, we can
select this part, shift to duplicate it, drag it down, S Y. Something like that
seems to be fine. We got our first barrier. All we have to do
right now is to put it at the same at
the right place. Let's combine everything,
so we can press control J to join all
these pieces together, and let's put it here. I'm going to spin
it on the z axis by minus nine degree,
can press seven, to go to the top, skate it down, put it here, where it belongs, we can spin it a little bit. G. We can also go to
objects such origin, origin to Geometry,
something like that. You can spin it on the x r x, and on the edge mode, you can select these, push them a little bit forward. What about spinning
this one on the y axis? It seems interesting. Then we've got to salt it a
little bit down. Sk maybe on the y. That's perfect. Shift D and let's put it
on the other side. I can sketch on the,
spin it on the. Let's place this one here. I can spin it by
minus or 180 degree, or actually just
leave it like that. After that shift d duplicates.
Let's put this one. Right here, x g z to
take it up, x again. Basically, that's it. I'd
like to apply some demsation. For example, here
we can S minus one, can scale it on the
z and drag it down. Just to make it look
a little bit better. We got the barriers
with our bridge, so we can continue our work in the next com of
lecture. See you soon.
38. Game Environment 8 - Bridge II: We're going to be designing the second bridge
that you're going to be using it to connect these
two points that we got here. Point A to point B. Let me just show you the
reference image of this bridge. This we're going to
be build this one. Let's go ahead and build it, so I'd like to bring
this reference image. Simply drag it and drop it here. First going integrate these
w pieces that we got here. To do that, we can do shift and c here and shift a mash plane. Let me tack this plane up, and Let's operate it
on it on this mode, we can skit it on the y, and I'm going to insert an
edge loop right at the middle. And two edge loops one
is going to be here, and the second one is
going to be right here. After that, which we can do, we can select this edge, and we can press
V to separate it. Same thing here. Let's press V to divide
that section two. After that, we can select this vertex without the
proportion in this in toe, can slide it sideways. Something like this. After that, we can
take this part, can switch wide range, be
able to select everything, can push it to the side. And Let's make it that
cut at the top. Perfect. After that, what we can do is we can select
these two points, press M, merge at the center. Same thing in here, because
these are disconnected. We go we need to connect them, so let's press and
merge at the center. Now it's just one piece. The next step to do is
to exude this phase, so we can press A to select it. We can press E and
let's exude a bit up. Something like this.
Let's press seven, to go to the top,
can switch wi frame. We can try this. I'm going to try R z, spin it a little bit sideways, just to not make
it that perfect. For the next step, we can
grab, for example, this verse, control shifts and B, and we can svel it like this. Let's do the same
thing this point, Control shifts B, sv that. You can do it for example
here to the bottom. Control shifts B, a little bit. Perfect. Let's do the
smething on the other side. Control shift B. Control shift and let's pel all of those. That is nice. For example, here, we can expand this one
a little bit forward. That's nice. Also at the middle, I'd like to insert, for
example, two edge loops. I can press here, drag it
a little bit to the side, can scat it a little bit
on the y, press here. Scat this one at bit big. M it bit bigger. Not that much. We've got our plate
and it looks perfect. All we have to do
right now is to duplicate it a lot of times. Let's duplicate this part, if d, to duplicate, can move it on the y axis, but we need to modify it
tricky should not be the same. What we can do, go to the top. Can take this one
a bit down here. Something like this.
Let's check that out. Looks fine. I can
try to make it a little bit big on this edge. That's nice for
the second plate. Shift, let's duplicate
it, let's move it here. For example, here we
don't just get rough it. Select these two phases. What actually we can do is this, to try to merge these
two points together. Press merge at the center. Two, press merge at the center. Let's do the same thing
here at the bottom. Select two M merge
at the center. Okay. Got that. Seems fine. But we need to tweak
this parts again. Let's make it smaller instead. But let's take this one. We can try this S
x and minus one to put it over to
the other side. We've got three plates so far. What we can do is to create
one without any deformations. Let's try to connect
these points. Perfect. I can put it as the third one. That's nice. I think
that's enough. We can duplicate
this one again here. S x minus one. Shift the tick is one forward. I think that's good order. We can just duplicate
of those plates. We can select them
all, press control j to join them to make
them one piece, and after that, we can
add the ray modifier. The ray should be on the y axis. Let's se it to one on the
y axis and zero on the x. We can increase it just a bit. And we can increase
this amount or discount number to something
around five or six. We can press seven
to go to the top. We can spin this one
by minus nine degree. Let's put it at the start here. And we can scale it
a little bit up. That's nice. All
we have to do is just reduced count,
something like four. G Z, and let's
tick it down here. The next step to deform it to make it look like this,
you have to use the curve. But before doing that, I think it's going
to be better if we add these ropes that
we got on the side. Those are ropes. To do that, I'm going to select this
single ver d, to duplicate it. Let's sick it up, and we
can extrude it on the x. Til it reaches this point.
Select this point again. I can extude it on the y. I select this piece,
Etude it down. We can try to bevel it insert
an edge loop horizontally. S y. Set it down,
and and control.
39. Design Environment Assets - Modeling Plants: Now, what I'd like
to do is to design some particular ***. For example, we're
going to design the plants, the mushrooms, some mushroom some dead trees, and some wood trunks
and also some rocks. I'd to start with this plants. I'm going to simply bring
this solid reference image, and we're going to drag it and drop here and let's work on it. I'd like to select
everything and just hide it, and
let's start fresh. I'm going to press shift
as and put the cursor to the word origin and
shift A mash right. Let's start by forming the
shape of our leaves here. I'm going to press
seven to go to the top and we can switch mode. I'd like to insert
some edge loops. First, let's scale
it down on the x. S x, we can trim it a
little bit like this. Let's insert some
horizontal edge loops. Let's say four, four is going
to be fine. Let's press er. We can do this. I'm going to
select the top two versus, and let's activate
the proportion gin. We can keep it at smooth, and I'd like to scale it down. Can scale it down like this. Can increase the
mouse a little bit, something like
that, let's do the same thing here to the bottom. But actually should
not be too connected. Let me just chuck
this connected. Let me just reverse
back. But the smooth, it's not working well. Let me just switch it too sharp. Scale it like this there we go. Can try S x only. Sening here on the bottom, can scale this particular
part like this. We've got the shape of our leaf, for example, here, let's
scale it real down, S X try to collapse like that. After that, I'd like to insert some extra edge loop. It's
going to be this way. What we can do is to add two
other edge loops like this, and we can take press
old, select this one, or actually we can select
these two on the sides, and G Z, and let's lift
them up a little bit. That's it for the second step. Lastly, what we
need to do is this. I'm going to select the end, let's press at three, and we can try to spin
it on the x axis. O x, let's spin it, and we can increase that mouse. Now we got one leaf. We can try right click sheet a smooth and basically that's
it, we got this shape. We can try, for
example, to reduce this one little bit down without
the proportion editing tool. We take it down like that. Next we need to do is to duplicate this leaf
multiple times. Let me also try
this. I'm going to try to lift this one
a little bit up. Let's not make this one
straight here at the end. I can move this a
little bit forward. Sound like that looks fine. Ample to duplicate this object, but first, I'd like to
put the sensor here. Let's select this vertex. Shift a cursor to select it. We can exit at this
point by present time, and let's go to object, says origin, origin
to the d cursor. Now we can duplicate
this object, so Shift D, we can duplicate it, and we can spin it on the Zax. R Z, can spin it like this. But also, I think we need to
make it a little bit fatter. Let's at this mode, we can select it all. Try S x. Let's get it a bit, make
it a little bit wide. Let's select this
object, you can, shift D, and let's press R Z. And we can try double r to
have that free rotation, something like that,
and we can scale it a little bit down. Let's
do the same thing. I'm going to select these
two, shift to duplicate them, R z, can spin them
around a little bit. Try to scale up and we can switch here to
individual origins. Let's press double r so that
we can move them freely. Nice. Scale them a little bit down. Let's do
the same thing. Again to finish this sloop,
can select these three, shift to duplicate them, R z, and let's spin
them around like this. This order, we can
spin it like this, just to make some room. Scale this particular
leaf, little bit down. Double r, something like
that looks perfect. We can add another one. Let's select this big leaf. Shift to duplicate it r z, and let's spin it like this. Scale it just a bit down. We got our leaf and
it looks fabulous. We can take this one. Just
take your time with it. You can add extra
leaves, shift, can add, for example, this one here, just to make it look enter
sin. We got our leaf. I would like to work a little
bit here on the bottom. Let me select all
of these leaves and press control J to join
them into one piece, so now it's one piece. I'd like to grab the center, activate the
proportion addition, and we can take it a bit do. Sc the mouse because it's going to be touching
the ground from this point. We got our plant.
40. Design Environment Assets - Modeling Mushrooms: The next asset that we need
to model is the mushrooms. I'd like to create
two mushrooms, just for the variety. I'm going to simply drag and
drop this reference image and I'd like to put it or
replace it with our plants. Let's take the plants sideways, shift as curt to
the world origin. And let's switch the pave
point to the medium point. What I'd like to do is to add new let's start
with the cylinder. Shift A can go to mesh
and let's use a cylinder. For the cylinder, I'd like to go with a low amount of vertices. Let's go with eight.
Eight can be fine. Let's scale this
one a little bit on scale it down without
the proposal edition. We going to need it. I'm going to insert an edge loop here. Check it up, scale it a little
bit down. Check this face. Take it up and we can
exclude this again, scale a little bit up, and we can s again, let me just get
rid of this phase. I can press old just
like this part. Try let's press tree,
go to the side, can extude it as scale it down, and we can take it
down a little bit. And we can exude up,
probably try this. Scale this one down. Something like this. You can take the little bit down to make our mushroom little bit rounded on the top and we can
press F to fill that gap. We got a perfect mushroom. I'd like to get some
deformations here on the bottom. We can take this one like this. Let me probably too. It's good to add some variations here. We can try to take
it to the left side. So like that, seems fine. Let's select our mushroom
right in sheet a smooth. Basically, we got
the first mushroom, so let's add the second one. They are not very different. Shift, let's duplicate this. Let's give this
one. For example, you can scale these parts a bit. And we can make the trunk
drog a little bit smaller. G Z, let's take it
up, simeth here. I think I got it. We need to scale this part a
little bit down. Control again, skate it down. We can press shift so
that you can select both of these ranks and
GZ to tack it up. We got our mushrooms. Let's continue in the
next coming lecture.
41. Design Environment Assets - Modeling Rocks: The next step is going to
be to work on the rocks. I'd like to bring the reference image that
we're going to be using. This reference
image, solid rock. Let's start working a it first. Let's make room.
I'd like to just take these to the right side. Design a I'd like to start
with the sample cube. Shift A let's go to mesh, and we can bring cube. I'd like to add some
extra edge loops. We can add, for example,
geo right here. You can try to sket
on the x axis, something like that, and we can add an extra edge
loop right at the top. Control R like this. We can take these a
little bit outside. Now we actually do is to
randomize the shape of our rock. We can press old just
like this entire row. Let's go to mesh,
transform, and randomize. This way, we're going to
be randomizing this line. Let's increase the amount
of the randomization. We can make it
something like that. We can try S Z to lift it a little bit up,
something like that. Here for the top,
you can just keep playing a little bit
with these vertices. Try to randomize their
position. Same thing here. They should not be
organized at all. After that, all we
have to do is to add the bevel modifier, and that's to right click
and shade a smooth. Now we got that
shape of the rock, we can increase the segments, probably three, or decrease
that something like this. Let's increase that amount
to something like 0.2. We got a rock, we can
generate multiple rocks. We can for example, duplicate this shape shift
to duplicate it, and we can try. Let's try, for example,
to press here, go to mesh, transform, randomize, can randomize
this even better. Something like that.
As you can see, we have different rock. G Z, you can take
it as part down. We should not be having
any strong clipping here. Let's see. Just keep experiment with
the location of these s to generate different outcomes. That's for the rock. If
you have any questions, let me know so I can continue or work in the next lecture.
42. Design Environment Assets - Modeling Wood Trunk: Now it's time to
design this drunk. This is we're going to
be putting in our scene. It looks really good. Let me just simply
drag it and drop it into our reference
image part here. Let's take all these assets and we can drag them
to the right side. First, I'd like to start
with a cylinder shape. Shift A,'s go to mesh and
we can bring a cylinder. You can change this cap
fill to just nothing. We need to keep it
empty like this. And I think eight, we
can just calculate here. We're having one, two, one, two, three, four, five, six, seven, eight, nine, increase that to nine,
nine can be fine. Let's spin this on the x axis, O x let's spins by 90 degree, and on the S mode, we can sce it on the y to get the
shape of the trunk. I think that is a
reasonable shape. Next we need to do is to work
on the end and the start. I'm going to insert
an edge group right here and another
one on the pack. Now we need to make these
cuts that we can see here. To do that, we can select,
for example, this edge, and I want you to go to mesh, split, and faces by edges. Now if we select
one of these ss, if we slide them
over, you're going to have that cut right
at the middle. I want you to do the same thing, for example, two edges. Let's do the same thing here. Actually, we can also
select one of those. Let's select this
one and this one. Or we can make three here. Let's go to mesh, split, and faces by edges. Now it's going to be a
little bit difficult to spot that. That's fine. Let me try to scale down. Can scale them up just to make them a little
bit different. Let's select these
edges. Separate them. Something like that, too much, and we go lastly
we got this one. Let's check that.
Seems to be fine. We got to push the entire line. Let's ps old, shift
actually here, old, shift old, the entire rows, and we can scale them
a little bit up. Something like this. Let's
do the same thing here. Let's first split
these two parts. We can press old, shift old, and let's get it
up. That's fine. Next, we need to add some extra edge loops right at
the middle here. Let's add, for example, three, can press old here, try to
push it a little bit down. This one, we can take
it a little bit up, not that much.
Something like that. Also, we can use again that randomize to
randomize this line. Let's try to randomize it
a b, something like that. Same thing here. Mash
transform randomize. Can randomize it like
that, and finally, this one. There we go. Seems to be fine. We can try to scale this part a bit down. Same thing here, Let's try
let's select all of those. Can scale it down and push
them backward. That's nice. The last step to do is to give
this wood tree some depth. I can see here right now
it is pushing sharp. To do this, we're going
to be relying on a new ad's called the
solidify modifier. I adds some depth here. Also let's press
and check the item. The scale is fine
but porrisation. Let's apply it to Control A. Let's apply theorization. Let's just so that we
want going to have any weird issues
with our jump tree. In the solidified settings,
we have the thickness. I controls how high,
you're going to go here. How thick you want
that root tree to be. Let's set it to I think
0.16 is going to be fine. We might want to scale down
this, so let's select it. Try S shifts y, sc it a little bit
down like that. We've got our wood
tree. To do is apply. Let's do this shade auto
smote, right click, Shade auto smote like that, and now we are ready
for the next asset.
43. Scatter Assets in Game Environment using Particles System: This net. I like to show
you how can we scatter all the assets that we built
inside our game environment. We need to put them spawn
them in our game environment. By the way, we're going
to find all these assets in the resources, you can download
them and use them. To scatter our assets inside our game environment,
there is two ways. I call it the hard way
and the smart way. The hard way is to simply
keep duplicated one by one. Let's do this. Shift, can
duplicate it like this. Place it here, you can spin it around and place
for example here. Shift can put it
on the other side. Spin it like this
and keep doing that. This way is not the
best way because it's going to take a lot of time and it's not controllable. On the other hand,
I'd like to show you a better way using
the particle system. Let's do that. For example, we can start with a tree. We're going to start
with the trees. We're going to scatter the trees across our game environment. To do that, I'd like to
select my game environment, this part, control space, let's go back and we need to
go to the particle system. This icon particle properses. I'd like to add a new
particle properses, and let's call it trees. I'd like to switch it to here
instead, not an emitter. Now it's scatter across
our game environment. I'd like to reduce the number
to something like 210 50, and we can scroll a little bit down here til we
find the render, can click on it, and we need
to render as an object. The object, you can
pick it from here. You can use this
instance object. You can use this eye dropper, click on it and pick the tree. As you can see, we're using the tree we scatter on a tree, the tree across our
game environment. We need to make
sure of something, Let me just select
our game environment. We can press n, go to item. The rotation and the
scale must be such one, one and one, and tree
triple zero here. Otherwise, we can
do this, Control A, and let's apply
rotation and scale. Same thing need to
go for the tree. Let me just check the tree. As you can see it's not right. The scale is a mass
as well as rotiion. Control A, let's apply
rotation and scale. Now it's a little
bit different here. So let's go back to
the particle settings and we need to work
on it a little bit. Let me just tweak the scale. F the scale, let's
increase it up. I'm going to set it to 0.75
probably that's so much. For the scale, let's reduce
it a little bit down. Let's just keep it just
like this just for now. Next what I'd like
to do is this. I want to tell blender the areas where we
want to have trees. This is an important aspect. To do that, I'm going to select again my
game environment, and we can go to this
objects of properties, and we can add a
new vertex group. Let's click on it here, and we can call
this vertex trees. On the edit mode, I'm
going to press seven, go to the top, and
we can select, for example, some areas. I want to have, for example, the trees here,
something this here. A little bit here on the top. Basically, I want
the trees to be on the side of our game
environment, not in the center. Let's just, for example, these couple, I think you got the idea.
Let's also do this. Select these. A. Now I'm going to assign this vertices that we selected to this
vertex group called trees. After that, we can go
back and after that, we can go to the particular
properties and we can choose this vertex group
that we just created. I'm going to scroll
a little bit down. Here for the field weights, I'm going to click on it
and the factor collection. I'm going to click
and choose the trees. I'm going to scroll a little
bit down here until I find the vertex group
and for the density, I'm going to click on
it and choose trees. As I can see the trees are scattered only in
this vertex group. The next step is
going to be to tweak the settings of our
partical system. I'd like to go up a little
bit and that starts by tweaking the number of trees because I
think it's too much. Let's reduce it down to just 25. I think that's reasonable, probably a little bit
higher or about 50 or 75. Can reduce that manul this. After that, we need to set or to fix the orientation
of our trees. They are laid flat
on the ground. We need to make them vertical. We can go back to this object. Let me just we need to go to the top and we need to
check this advanced slot. Right now we can have a
new tap called rotation. Let me just find it. This one, ation.
We can check it, click on it and we need to
change this orientation axis. Let me just keep changing
until we find the right. Global x, global x works best. Let's go back to the scale. Let's increase the
scale a little bit up, something like that, and also
for the scare randomness. That increases ale
bit just so that all these test have
the same size. We need to have bigger trees and smaller trees,
something like that. Also for the orientation, I would like to not keep
them all straight up. Let's go to the randomized phase or the randomized orientation, and we can randomize it
a little bit like this. To 0.25 is going to be good. As you can see the trees
are not perfectly up. So let's go with 0.15. That's nice. We've
got the trees, so we need to do the same thing to all these other assets. For example, we need
to add the rocks, scatter on the rocks and all these other
assets. Let's do that. I'd like to select
my came environment, and let's go again to the
particle properties and go up. Let's call this one trees
just to make it different. Trees and we can add a
new particle system. Let's call it, for
example, rocks. For the rocks, I'm
going to scroll, let's live it down
and we can use the same particle system
for this. Let me just see. For the render, first, I'd like to check make it here. Let's set it to advanced, and we can go to render as, I'd like to render
it as an object and we can pick the rock objects. This rock object. We've got the rocks scattered
across our environment, but we need to tack
tack it a little bit. I'd like to use
different vertex group. Let's go back to object
that properties, and we can add a
new vertex group and we can call it rocks. Or actually we can
call it main area. We're going to be
using this main area for all these other assets. For the main area,
what I'd like to do, I'm going to select,
for example, all this porch except the road, something like this, and
we're going to control the number of
particles randomly. Same thing here.
Let's sign that. Also we can insert, for example, two edge loops here,
and we can select them, select just one edge loop. But actually just make
it a little bit random. Now if we press select, we can be able to select
all those this main area. This main area, we're going
to be using it for not just the rack for all
the remaining assets. Let's go here to
the particle system and we are selecting the rocks, we can set it here, rock. Let's scroll a bit
down for the object. We're using rocks. And for the vertex group in the density, I would like to
pick the main area. Now let's go back and
let's tweak the scale, can increase the scale
to zero point 0.1. Scale randomization, we
can increase it real up. So like because the rugs,
they are not the same. Also we need to
check this rotation, and we can randomize
the rotation. Let me just set it
first to global x. Something like that. Looks fine. The phase just play
let be with this. For the scale, let's
increase it up, 0.15 and for the
number of the racks, I'm going to cut it by 250. I looks fine, but I
think I'm going to just go with 150 instead. For the scale, I just want
to scale it a little bit up. There we go. Seems to be fine. Let's do the same
thing. I'd like to add. What we got next? We have the, the wood trunk. This one, let's add it,
let's call it Wood trunk. Going to copy this
control C and control V. Don't know why plan that does not do
that automatically. Let's repeat the same step, it must be here advanced. Let's go to the render,
must be an object, and we can pick
this trunk object. We've got it scattered
across our game environment. In the density, let's
pick the main area. So for the number, I think I'm going
to just go with 50. It should be really low. Now for the scale, we're
having some particles here. For the scale, we need
to increase it real up, something like that, 2,002,600.260, and
also for the rotation, let's check the rotation. It must be laid flat. Let's try this on the y axis, something like that,
randomization. Make it random, like that. Should not be having
flying trunks, something like this can be fine, but also we need to
reduce the number to something like 30. 20, 20 is going to be fine. Lastly, what we need to do
is to add this or actually, we need to add the
mushrooms and the plants. Let's do that. Let's add plants. And let's check here advanced, scroll down to the render, render it as an object,
and let's pick. Let's pick the plants.
This one here. We got the plants, so
it should be scattered only on this vertex
group, the main area. Let's increase the scale up, something like point 0.2 can be fine or
something like 0.15. Scattersation. Also for the
rotation, check the tion. Can keep it at global x. Can randomize it a little bit. I think we have to push
it a little bit up. What we can do, we can go
to our plants on the mode, selects everything and
try to move it up. G Z, try to lift it up. If you control, if you
edit this main plant, all the particles
are going to be edited as well.
That's been done. Last thing, we need
to add the mushrooms. Let's add h rooms. Let's copy this name.
Let's pace it here. Switch your hair advanced, scroll down to the render, can render it as an object, and let's pick the mushrooms. Fungus or mushrooms. Density, let's choose
the main area. Yeah, we have to
tweak the scale. Skip it at 250, and for the scale, a the
scale a little bit up. We need to randomize the scale, but also for the rotation. Let's skip it at global x, probably spin it a
bit sideways like that seems to be just fine. For the phases just
keep it at zero. We can also go to the top
and end change in the seed. We can increase the
seed number to scatter those mushrooms in different
areas, something like that. We got our game environment with all the assets
scatter in them. In the next game lecture,
we're going to start texturing our game environment. If you press Z smeric review, so all these assets
are textured, but our game environment is not. We're going to be texturing
it in the next game lecture.
44. Unwrapping Game Environment: This new lecture,
we're going to be texturing our game environment. For the doing that,
we need to unwrap it. To unwrap it, I prefer to hide all these particle
systems that we got in our particular
properties. Can just hide it from
here that we can focus only on our
game environment. Here on the bottom, I'd like to split my scene into two parts, so we can split it
virtually like this, take it up, and we can switch
this menu to the UV editor. Also we need to split it actually split in
the next storio. Now what we need to do is
to switch to the edit mode and we can select the
entire game environment, and I want you to press you As choose the Smart UV project, and you can click on
O K. As you can see, our game environment
is unwrapped, C press control space. This is all the UVs of
our game environment. In the next time lecture,
we're going to start the texturing process of
our game environment.
45. Texture Painting Game Environment using Rocks, Mud & Grass Textures: Now it's time to start
luxuring our game environment. First, I'd like to
switch this menu from the UV editor to
the shader editor. I'd like to click on you. Make sure that you are
selecting our game environment. Let's click on you, and
we can call it G E, meaning that game environment. We got here the principle BSDF, connected to the
material output. Let me just take this one to the right side just so we
can have enough room here. If we try to change
the base color, if we click here and try
to update this color, I can see our game environment
is going to be changing. If you're not on the meteror preview,
let me just show you. I you see this, you must press Z and switch
the metric preview. If you are, for
example, in the sold, pret going to be able to see that change that color change. Let's, switch back
to metery preview. The first thing we
need to do is to add a new image texture
that we're going to be painting on.
Let's do that. Shift A, let's search
for image texture, can press enter here, and let's simply connect
color to the base color. Here for the tract,
let's click on you, and I'd like to call it,
let's call it GE paint. GE stands for game environment. So for the width, so we can
just multiply it by two, press enter, same
thing for the height. Let's multiply it by two. I'm going to keep
the color as black. You can keep it, make it
any color that you want. Let's click on OK. So now we got an image texture assigned to our
game environment. The next step is going to be to start painting our
game environment. I'd like to start first
with this texture. We're going to be
using the rocks, this rock texture,
we're going to be using it to paint the road. To do that, I'd like to create, let's add can scroll here down
to the texture properties, and click on it, and
let's add new texture. I'm going to just click on pen, and I want you to
pick the textures. All these texture, you're going to find them in the resources. Double click on the
rocks. Now we got it. If we jump, for example, to the texture paint,
and Let me just go back. Basically, here we have
to choose that texture. I think it's down below
for the text mask. Text, where it's already picked. You can click on it
and pick this texture. If we start painting here, we're going to be
painting that's rock. I'm going to press Control Z, to revert back and press seven, to go to the top and let's
start painting here. Let's start painting. That's rocky rote.
Something like this. So Let's continue all
the way till the end, can press shift in
middle mouse to zoom in. Make sure to not zoom back or in just so that we can keep it, keep the scale of our
texture consistent. Let's keep taxona like this. As a last move, I want
to show you something. I want you to scale the
brush a little bit up. We can press F to scale
it a little bit up, and we can add some
randomization here. Scroll that a little bit down. Just need to add that
effect of randomization. Also here for the strength, we can reduce it down
to something like 0.4, and we can increase the scale. I'd like to have some
variations here. We should not have
the same effect. The same texture
repeated itself. We want to add some
randomization. Sound like this. It's check out from here, control space, so
it seems perfect. Now for the second texture. We need to add, let me just
show you the second texture. We need to bring the mud Also, as a next step, we're going
to be bringing the grass. Let's use the mud instead. Let's go back here,
control space, to go back and we can pick or go back again to
the textur properties, and we can choose
the second texture. It's going to be the mud top click on the mud.
Let's try this. As you can see now
we're painting the mud. But since we are since we
reduce the strength to 0.4, so it's not shown correctly. Let's increase the
strength to one. Press seven to the
top control space, and let's start
painting the mud again. Something like this. We can
press F to scale up tax. Saething here on the bottom. Just take your time and do
some quality brushing here. And press F to scale
up the tax brush. We can exit that mode
and try to brush these hidden areas that we
couldn't brush otherwise. Control z to verge back
in case you messed up. A L little bit here
on the inside. We got the second
map. As a third map, we need to brush the grass. Control space, and let's
go back to the checks or paint and I'd like
to pick the grass. Double click on the grass and let's start painting
the grass again. I think for the grass, it
should be on top here. This area here it
should be all grassy. Something like that.
A little bit here. Control space, verge back. Let's start painting these. Let's continue brushing
the sides of uphill, like this should not be perfect. L et's carry on until
we finish that turn. Something like this. Let's
check it from distance. It looks fine, looks reasonable. I'm going to press seven,
go to the top and end, let's continue brushing here. Also I'd like to reduce a
little bit of strength, and we can brush a little
bit here for the side. Actually here, we should not
be brushing that grass tex. Let's increase the
strength to one. And we can brush
here, for example, we can press F, scale down the brush, sometimes
increases up. That's fine. Let's go back and let's do the
same thing here. Can reduce again the strength, control z to verte back.
And Let's paint that. We've got our grass text control space to
go back to our C, and go back to the layout, and I'd like to bring the
rest of our particle system. Let's select our object, go to the particle system, go back to the top and let's
bring back everything. Control space, and
let's see. Lo go. All we have to do
right now is to fix or to add the bumps
to our normal map. Control space, let's go
back to our GE paint. Let's go back to this GE paint, and I'd like to
add the bump node. Shift A, t's for a bump node. I'd like to connect the color to the height and the
normal to the normal. As you can see it's ale bit
bumpy and it looks fabulous. As a last step, I'd like to add some variations in the
reflection of our map. Shift let's search for tor ramp. Spot here, we can
connect the color to the factor and here the
color to the roughness. We can tweak this color, these handles a little bit. Tweak them a little
bit sideways. Like this. Seems to be fine. Let's try to inverte
these to the other side. I can put the plaque here. Seems to be interesting. To make its grass a little bit glossy. I like that. As a last move to finish texturing
our game environment, we need to texture this
bridge and these barriers. To do that, we're going to be relying on this wood texture. This wood. We're going to find
it also in the resources. Control space. Let's
select our object. Can go here and add
a new material. We can call it wood material. Here we can simply drag and drop that texture
that we just saw. This one. Let me just drag it and drop it here and we can connect it to
the base color. We got it by de fold. What we need to do is to jump to the ds mode, select everything, can press u, and let's try Q projection. It
seems to be fine. I'm going to just increase
the scale of our texture. I'm going to select
this texture, press control t to have the mapping and the
texture coordinates, and I a to increase the
scale to just five. I think that's so
much. What about two? We can just take it a
little bit up like this. Increases only on the x axis. That's nice. We can
also add the bumps. Shift and let's
add the bump node. Control space to maximize
this window and let's connect the color to the height and the
normal to the normal. Control space, go
back and let's see, we're having the bumps
and it seems perfect. Let's see what we got next. We need these barriers. Let's use the wood material. On the Edit mode, select
everything, press Q projection. But we need to create a
duplicate for this material. Let's duplicate it from
here because we need to affect this mapping differently. Let's make it wd material. We can add a dash and
let's call it barrier. For this barrier, I'd
like to just reduce the scale to something
like 0.8, can be fine. Let's do the same
thing to all of those. Wo barrier. On the Edit mode, selects everything,
press U, Q projection. And lastly, let's do
the same thing here. Barrier, this mode,
select everything, press Q projection. There, perfect. Same thing here for
the second bridge. We need to use the same wood. Let's use the wood.
Barrier. Let's see. I think it looks perfect
right off the spot. Yeah, I like it. I'm
going to just go with it. For these objects, let's
use again, the wood. On the edit mode,
selects everything, press U, Q projection.
There we go. It's wrapped. The last step, we need to text, we need to add the river. Let's do it this way. Shift and right click and
shift A can go to mash plane. On the edits mode, we
can scale it real up, and let's type G, and we can lift it up,
something like that. After that, we can scale
it a little bit on the Y. S Y. Trim it here. Let's select these two s, push it here to the right side. After that control spaces go back and to the shader editor, we can click on you and let's
call it River material. We can press A and period on the numpad so that we can
bring this principle PSTF, and let's assign to it
this river texture. You can just assign
it like this. Select this river control T, and we can increase the
scale on the x and y to two. It looks reasonable. I might want to scale it a little bit. I think I'm going
to just leave it as it is. Seems to be fine. Also for the glossiness, I'd like to reduce the roughness to zero so that we
can make it glossy. I'd like to duplicate the
same river, on the Is mode, selects everything, shift de, to duplicate it, and
let's push it here. Let's salt it on the x axis. Something like that
looks reasonable, so control space, and
let's take a walk. Everything looks great.
It cuts our river. All right then. Perfect.
As a last time, we need to save that paint
text that we were working on. To do that, we can switch
here to the UV editor, and I'd like to pick
we call GO E GE paint. This mage text, the UV map
of our game environment. We got to save it, otherwise, is going to be
saved somatically. Let's click on Image and save as and you can save it under
any name that you want, and basically that's it.
46. Unreal Engine - Let's Install Unreal Engine 5: The first thing you're
going to need to do is to search for real
engine in Google, and I want you to click on the first website that comes up. After that, once it loads up, I want you to look for this blue download button
in the top right, this button right here. Next, I need you to
scroll down little bit to refind Epi game Launcher. Click on Download Launcher
and wait for it to download. Next, just make sure you
install the EP games launcher and wait for
the verifying updates. After that, the EP games launcher is going
to launch itself. It's going to ask you for
an EP game account so you can look in using your own G
mail account as I did here. So once you've signed into
the EPI games launcher. You're going to find
a bar in the top. So I want you to
click on library, and then in the top right, you're going to see
this installed engine. Click on it, and the
launcher will ask you about the location where you want
to put real engine files. So basically, the
en real engine is going to be several gigabytes. This version is
around 20 gigabytes, so make sure you
have enough space for that in the
diretory you've chosen. Once installed, you'll
have this launch button. Click L launch to
open n real engine. And once it loads up,
you should be looking at the startup screen that
looks exactly like this. That means that you
are good to go to start your own and
real engine project.
47. Unreal Engine - Import Game Environment to Unreal Engine: I help, we'll be creating our first and real
engine project. Next, we will import
our game environment, and we will also work on the
lighting to make it better. Let's get down to it. Let's go ahead and create a new
and real engine project. I'd like to choose
the type games, and I'm going to
just keep it blank. After that, I want you to set this quality preset to scale. After that, we can just
call our game project, we can call it character game. Let's go ahead and create our new and real
engine projects. Here we are in real engines. I'd like to do first
is to expand or to scale up the funds because
it's really readable. If you want to do the same
and scale up your interface, you can go to tools and D bug, and you can go to this
widget reflector. Here in the application scale, we're going to have
the scale of one. I'd like to sell to 1.25
in its press enter, and now it's a
little bit better. So next, I'd like to go
to this contents browser. In case if you are not
seeing this content browser, let me just lese it or close it, you're going to see
it down below here. I want you to click on it and click on this Doc in layout. This can be fix right here. After that, we can
expand this menu. Let's take it a little bit up, and I want to do right click, and let's create a new folder just to keep
everything organized. And we can call it environment. Inside this folder.
I'm going to be bringing that game environment
that we exported before. It's called the game
environment to optimize. I'm going to simply drag
it and drop it here. For the settings, I'm going
to keep it as they are. I'm going to just scroll
a little bit down, let me just take this menu up
and we can click on import. Just give it some
time to be imported. Let me just close this window, and we got our game
environment here. What I want to do is
to do a right click again here inside our
environment folder, let's create a new folder
and we can call it Tax. Inside this folder, I want
to put all these assets. This is our game environment. I want to put all the
textures inside that folder. Let's select, for example, this one first, shift, select the last object, and we can simply drag it and drop it inside the
textur folder. You can click on Move here. After that, let's
do the same thing to this fungus materials, let's select them
both and we can put them inside, move here. Perfect. So the next step is going to be to drag
our game environment, and let's put it
inside our scene. Can drag it like this. Let me just take this manual
a little bit down. We can double click on this game environment so
that we can zoom on it. I want you to do
right click and you can press W so that
you can move in. You can score the mouse, if you want to increase the speed, and basically that's it. We are inside our
game environment. I'd like to go to the
Soching position, which is right here. The next step it's going to
be to delete our environment. I don't want to keep
these landscapes, so they don't match our purpose. I'm going to go to this
outliner and we can scroll a little bit down
until we find landscape. You can select it and
you can press delete. If I press delete,
I cannot delete it. I think because it has
too many elements. This is just for
security reasons. What we can do, you can expand this folder and we can
select the first element. Can scroll a little
bit down, shift, and click here, and
you can delete. English do the same thing, you can select again the last one. Go all the way to the top, select the first one, shift, and click on the lite. Now everything is deleted. You can also delete this
folder, the landscape folder. Excellent. The last thing I'd like to do is to work a
little bit on the legion, as you can see it looks
dim and not that good. Which we can do first, we
can click on this sky light. We can go down a
little bit here, we can scroll a little bit down until we find the intensity. L et me just find it first. This intensity scale. We can click and
let's set it 25. Let's press enter. Now as you can see our environment
looks more vivid. I really like these colors. We can also click on this
exponential height fog. Basically, I'd like
to make the horizon looks a little bit clear. This one selected, you can
go scroll a little bit down. We can score a little
bit down until we find this fog density, and we can reduce it to
something like 0.001. Now it's less it's clear. There we go. So we got
our game environment. In the next coming tutorial, we can bring our
character so that we can build our game. Son.
48. Unreal Engine - Import Character to Unreal Engine: All right. The next
step is going to be to import our character. I'm going to go
back to the content folder and let's do right click, and let's create a new folder. Let's call it my character. Let's press enter and
let's enter this folder. Here, I'd like to
bring those two FBX files that we
exported before, the character animations
and the character model. I'd like to start with
the character model, let's simply drag
it, drop it inside. For these importing settings, I want you to check
the skeleton mesh. Make sure to check it.
For the animations, we don't need to have any
animations for the skeleton. Let's just go down and
import, click on imports. Let me close this
window and we can bring our second animations. This for the right here.
Character animation. We can simply drag
it and drop it here. For the settings, I want you to check this import animations. For the skeleton, we
can click here and we can choose the skeleton
we imported before. Let's just click on it,
and basically, that's it. We can just go ahead
and click on imports. That's going to just
close again this window and we can bring one
of these animations. Let me bring, for
example, the jump, can put it here, L's
sick our character up. We can select our
character and we can double click on it
here in the outliner, so that you can focus on it. I want you to press
and press left click so that you can spin around and let's check our character. It looks fabulous. We can bring the
other animations. This is jump. We can
bring the run here. We can bring the walk. We have the idea. Let
me just put it here. Now we can play our
game just so that we can see if these
animations are working. As you can see everything
is working well. In the next time of lecture,
we're going to make our charactere playable. See soon.
49. Unreal Engine - Adding Custom Collision to Game Environment in Unreal Engine: Before we can start working on our character and
make it playable, I would like to address the collision of our
game environment. I'm going to press
right click and let's press S to
revert back here, can press W two, go forward, A d two goside. I want you to go and
click on this level. Let's click on it. Now if we try to go inside our
game environment, We aren't going to
be able to do so. There is some
hidden block that's preventing us from getting
inside our game environment. Basically, this is what
is called the collision, our game environment collision. By default, let me just press escape so that you can
stop our gameplay. By default, when you
generate or when you bring a new object
to real engine, engines going to
generate a collision. I'd like to show you that. We can go to content,
this environment folder, and let's double click on this game environment FBX
file, double click on it. It's going to be like
this, you can simply duck it in the top like this. If you want to see the
default collision that y engine has generated
for our game environment. We can go here to collision
and you can choose this 26 DOP
simplified collision. As you can see,
this explains why we cannot enter our
game environment. These green lines are
like a shield that prevents us that prevents
us from getting inside. This is a really bad way to generate collisions
for our game. Our environment here looks
like that ship in the bottle. Our character's going to
be able to walk in it, neither interacts with it. What I want to do is to generate a different kind of collisions. A type of collision that's going to allow us to go inside, but also collide makes
architecture collide the ground, as well as all these objects. To do so, let's first delete. We can get rid of
this bad collision. Let's go here to
collision and we can just delete this collision. Here on the right side, you're
going to have the details. I want you to
scroll a little bit down and to define collision. This tab right here, you can
click on it to expand it and down below here in
this collision complexity. By default, it's going to
be set to project default. I want you to switch it
from project default to use complex collision as
simple. Let's click on it. And now as you can
see, we're generating a different kind of
collision, a better one. It's matching exactly
all the assets that we got in our environment. Meaning that our ct is going
to collide with this rock, it's going to collide
with all these objects, and also is going to
be colliding with the ground. That's really good. All we have to do
right now is to save this asset, can save it. Let's go back to
our game project. We can just delete this
window here, close it. Let's play our game environment. We can play, and let's
stretch to go inside. So now there is no
block, we can go inside. But also if you try to hit,
for example, this rock, it's going to be an obstacle, what's going to allow
us to go inside it. Samin goes for the ground. So you can see the
ground is colliding. This is exactly what we want. In the next comment lecture, we're going to make our
character playable.
50. Unreal Engine - Putting Camera Behind Character: In this story one,
we're going to be making our character playable. The first step to do so
is to create a game mode, put the character inside it, and then we'll place a
camera behind our character. Let's get down to
it. The first step is going to be to
create a player start. The players start is what
the camera is what you're going to see once you
play here, co a Q. If you don't have it
in this outliner, what I want you to do is
to go this plus here, quickly at the project. Go to basic and we can
click on this player start. This player starch is
in form of a capsule. I want you to put
it in the place where you want your
capture should be. Let me just place it here. This is the starting
location of our game. I want to start from here. Now if we press play, we're going to start our game from this location.
Let me just show you. We're going to be seeing
this. Let me just show it. I'm going to go back
here and it's play. We goals so we are matching
our gaming environment. The next step is going to
be to add some blueprints. I want you to go to
this content folder. Let's do click, and we
can add a new folder, let's call it blueprints. Inside this blueprints, I
need to add two blueprints. The first one is going
to be our game mode. So right click, and let's
go to Blueprints class, and we can choose
this game mode base. Here for the name, let's
call it my game mode. Presenter. Here in
the ward settings. If you don't have this tab here, you can go to window and click
here on the word settings. Here I want you to scroll t you find this
gay mode override. Here for the none, I
want you to click and choose this blueprint
that we just created. It's called my game mode.
This one right here. For the next step,
now we need to create our character blueprint.
Let's do right click. You can go to Blueprints class, and I would like to
click on this character. We can call it
here my character. Now let's go back to
the world settings. We set the game mode, and now for this pond. For the pond class, I would
like to click here and let's choose my character,
my character. The same blue print
we just created here. Now we're all sets.
What I want to do next is to double click on
this my character blueprint. We can simply drag it or
dug it here at the top, and we got this capsule. Basically, this capule is the same capule
that we have here. So we assigned it
to be the same. This is the same capsule. Like I said, in the
intro, we're going to be putting our
character inside it. So I want you to select mesh, and we can scroll a little
bit down to define machine, the skeleton, and you
can click or none. I want you to choose
this character model and not arture animation. Carat model, skeleton. Let's click on it,
and we're going to have our character
inside this capsule. Barely, so we have
to scale it down. I want you to press E so that
we can jump to the scale. Actually R, not E. Also that you can scale it down and we can
grab it from the middle. Can keep scanning
it down like this. Can press W, can track it
down, something like this. We got our character
inside our capsule. So the next step is going
to be to add a camera. Like I said, we want to track our character from this
location right here. Let's do that. This camera must be attached to the capsule. Let's go to capsule, and
we can click here on. Let's search for a sprain arm. Sprain arm, this one right here. We got our spring arm. Let me just zoom back,
can take a look at it. It's facing this direction. Actually, what we need to
do is to make our character face the same this blue axis. Let's select our character, we can press E, and we
can spin it by 90 degree. There we go. Now it's
facing this blue arrow. Let's select our spring arm and we can take it
a little bit up. Let me press W again. We can take it a
little bit up here. Let's press E, we can try to
spin it up by ten degrees, and after that, we can
add to it a camera. Let's select our spring arm. We can click or and
let's add camera. This camera right
here. Now we have this camera right
behind our character. We can press W and we can try
to tack it a little bit up, press E, can spin it just
by ten degrees. Let's see. Probably let's tick it even up. Back. There we go. A now let's compile and we can go
back to our project. So we can play so that
we can see where we got. As you can see, we
have our camera right behind our character. I would to a little bit, so let's go back to this
michcure blueprint. Can try to take our camera
a little bit backward, so that we can cover
more of our character. Let's compile this, go back to game projects, and
let's play this. Basically that's it. Now we have our character ready
for the next step, which is to make it movable.
51. Unreal Engine - Move Character Forward Backward and Sideways: In this new reteral, I'd like
to make my character goes forward backward
and also sideways. If you press play right
now, this is what we got. Our character is
going to be fixed, it's going to be locked
in this position. What we need to do is to set
first our input controllers. To do so, I want you to go to the settings on the top right. Can click on it and go
through project settings. On the left bar here,
I want you to scroll a little bit down,
tally find engine. After that scrolled
down, tally find input. Click on it, and here
we're going to be finding this action mapping
and the axis mapping. To explain the difference
between the two. Basically the axis
mapping is used to bind continuous
input actions, like moving a
character, forward, backward, or even
accelerating a vehicle. On the other hand,
for action mapping, I want you to think
of it like a trigger. That's going to start
searching action. After that's going to
turn it off like jumping, firing with a weapon or a check. Our case, we're
going to start with this access mapping because we want to move our character. We can click on this
plus icon right here. I'd actually call it first. Let me just give it some names. We can call it forward,
backward. We can press enter. For these controllers, I'd
like to start with the W. You can click on
non and press W, we can search for it, this one, the keyboard W. Basically what
I want is when I press W, I want Mc go forward. We can choose any
key that you want. For the scale, I'm
going to just keep it to one because we
need to go forward, and we can click on
this plus icon ratio, so that we can add the reverse
which is using the S key. We can click here
and let's search for S. Let me just scroll down here, this one, the keyboard
S. For the scale, as you might guess, it's
going to be minus one. As press enter, and now we set our access
mappings. Right. Let's go back to
our game project, and I want you to go to
the character blueprint. Let me just expand
the bottom window. Inside this blueprints,
we're having this my character blueprint.
Let's stop a click on it. Inside this tab, we're going
to be having three tabs, the viewport, the
construction script, and the event graph. I want you to be on
this event graph. Let's scroll a little
bit back and we can select all these nodes. I'm going to press delete key so that we can delete
them and start fresh. The function that's
going to allow us to go forward and backward, it's called add movement input. I'm going to do right click
and let's search for it here. Add movement. Input. This one right
here, this f function. Let's crick on it,
and we can zoom in. For this function to work, it's going to need two informations. First is going to need
the word direction, which is the position
of this game mode. What is it in the map? The second, it's going
to be the scale value. Basically how fast you
want your character to be. We already set it
be four to one, so the scale is going
to be one and minus one based on each key
going to be pressing. So now we need to bring
these controllers that we created right here. The forward backward, let
me just copy this name, Control C. Let's go back
to my character blueprint, right click, and we can
just paste that here, and I need to have this axis event that
we created before. Let's click on it.
For this value, this axis value, I want you to connect you to the scale value. We already set
this x value here. Let me just show that,
this one and minus one, and we can also connect
the main slot to the top slot of our
ad movement input. Next, what we need to do is
to add the word direction, meaning that the position
of our character. To do so, I'm going to be adding a forward vector. Right click. Let's search forget
actor forward vector. This one right here. Let me just take it aside and
we can go ahead and connect the return value to
the word direction. Let's compile this and we can go back to our game project, and let me play my game. It's an mic press W, as you can see it's
moving forward, and if you press S, we're
going to be going backward. It's working just fine. If we try to move sideways, so if we press A on or
D, Joe is going to work. Let me just stop my game,
I'm going to press Escape, and let's go back and add
these functionalities. Here in the project settings, I'm like to add another
access mapping. Let's click on Add
access mapping, and we can call it
here right left. Present. For the first key, I to press A. L et me just search for the keyboard
A, this one right here. I'm going to keep it minus one. It's going to be to the left. The left is minus and
the right is plus. Let's add a second axis mapping, it's going to be the d. I'd like to use the d to turn right. This d right here. For the scale, let's
just keep it at one. Let's go back to our blueprint, this character blueprint, and we can score a little bit back. We need to add the same
movement input, right click. Let's add a movement
input, this function. After that, we need to
add the input axis. R click, let's bring
the right left. This event axis event as we
created here, second one, and we can connect it
like this one here, and this axis value is
connected to the scale value. Now we need to get this actor, but it's not the forward. We need to go sideways. This function is
going to be this. Let's do lick, and let's
get a right vector. This one. Let's
take it sideways, and we can connect it again. Connect the return value
to the word direction. Let's compile this and we
can go back to our project, and let's save this and
we can play our game. We can go forward backward. I I press A, we're going
to be moving sideways. Perfect. Also, in order to
keep everything organized, let me just go back to my character
blueprint, and we can, for example, select
these three nodes, can do right click,
right click here, and we can add creates
comment from selection. You can call this one
character movement, sideways. Let me just put the
sideways first. Sideways character movement. For the top nodes, let
me just select them. Right click, creates comments, forward, backward,
character movement. As presenter and now we
got everything organized. In the next time lecture, we're going to continue working on it. We've got our character
movable right now. It's going move forward
backward and sideways, so we can continue our
work in the next lecture.
52. Unreal Engine - Add Mouse Controllers Make Camera Look Up Down, Left and Right: In this torial, I'd actually have some control
over my camera. Let me just play my game
so that we can see. The camera is going
to be fixed or locked behind our character.
We don't want that. I want to have some
kind of control. We can spin around,
we can direct our character based on the
orientation of our camera. Let me just press escape, and we need to go to our project settings engine and put and we need to add
some new axis mappings. Let's add the new ax mapping, it's going to be to
lock up and down. A Let's press enter and for the key as
we're going to use, it's going to be the
mouse Y. House y. This one right here. For
the forth xs mapping, I want to look right and left. Let's add a new x mapping, and we can call it
here, look right left. For the key, I'd like
to use the mouse y, mouse x, not the
mouse y, like this. Here for the scale, I'd like to set the mouse y to minus one. L can just do which here. Now we are ready, let's go back to my character blueprint. This one right here,
you can just to click on it if you
lost this tab, and here we need to
add a new controllers. Let's first bring the x mapping that we just Here it's look up, up, down, right click,
let's search for it. Look up down, this axis event. And that's the right click again and we can bring the other one, which is to lock down up down, right left, this one right here. In order to connect
these axis events, we can have three
options to choose from. Basically in real
engine is going to provide us with three
functions to use. The first one is the ya,
this one right here. It's going to allow us to turn
our camera right and left. Basically we can rotate
around the vertical axis. The second function is
going to be the pitch. The pitch will turn our
camera up and down. It's going to be similar to just nod in your
head up and down. The third function is
going to be the roll. You one's going to
be used in our case, but it's going to
allow you to roll your camera to a certain degree. This is mainly used to roll your camera if you are tracking
an airplane from behind. For the look up and down, we're going to be using the
pitch function. Let's use it. I'm going to do right
click and let's search for ad Controller pitch. Pitch input, this
one right here. Let's connect the main slot
to the main slot here. For the axis value, let's connect it to this
value like this. For this look right and left, we're going to be using
the second function, which is the ya. For the second input axis, we're going to be using
the Yaw function. Let's do it, right click. Let's add controller. This one, the input. Let's go ahead and connect
this slot tough this slot, and for the acess event,
can connect it like this. It's very switch forward, so let's go ahead and
compile this and we can jump to our game object
and let's play our game. Let's try right now
to move our camera. As you can see,
the move left and right is working just
fine, just fine. But up and down,
it's not working. We cannot move up and down. To fix this problem and make our camera look up and right. I want you to go to this
mycharacter blueprint, and I want you to
check the sprint and Here for the details. Let me just scroll
down a little bit. We can find the camera settings. I want you to check this
use bond control rotation. L just click on
it. Now it's true. Let's compile this and let's go back to our game object
and we can play. Now let's test this out, so we can look up and write and we can also change the
direction of our character. Really nice. If you have
any questions about this, let me know, so I can see you in the next come of lecture. Thacker.
53. Unreal Engine - Add Jump Functionality to Character: In this torial,
we're going to be adding the jump functionality. Basically, I want when I play
my game, let me just show. If I press space, I
want to be jumping, I want my X to be
jumping in the air. Let's do that, and
just press escape, and we need to go to
project settings. For the jump, we need to add an action mapping and
not an access mapping. Let's add a new action mapping. Let me expand it here
and we can call it jump. No press ger and for
the key axe space. Space bar, this one. Let's go back to my character blueprint
and let's set it up. Also for this camera, for the camera notes. Let me just select
my camera notes. You can do R click, and
let's add the comments. We can call it camera movements, just to everything organized. Now for the jump functionality. Let's bring first
our action input. R click, we can bring that jump. This one R the
action event jump, and it has two notes. It has two slots here. When pressed, it's going to
perform a certain action, and when released, it's
going to do another action. Luckily, in real engine, these functions are ready to
be used. Let me just sure. I'm going to just click on Prest and we can
drag it like this. I'd like to search for the jump. This function right here. Jump. For the release. Let me just drag it
like this and we can add the stop jump. Stop jumping function. Let me just select
all these nodes, right click add or
create a comment, and let's call it
character jumping. Press enter, and we
can compile this, and let's go back to our game project and
let's play this. Let's go forward and
we can press space, and I can see our
character is going to be jumping, which is awesome. Now we got everything, we got all the functionalities, we got the camera, we got
the forward sideways, movements of our character. Next, we're going
to start working on assigning the
animations. See so.
54. Unreal Engine - Assign Idle Animation to Character in Unreal Engine: Now it's tied to assign these animations
to our character. This is a big step. Let me just show you and explain what
we're going to be doing. I want the first animation
play is the idol. If nothing is pressed, charac needs to be i, this first animation
that we got here. If I press W, I
want to be walking. If I press space, I want to
run this jump animation. Let's perform these actions. The first step is going to be to add an animation blueprint, that's going to control
all of our animations. Let's go to animation, and you can click on
Animation blueprint. I'd like to choose the skeleton, our character skeleton,
and that is to create. For the name, let's
call it my animations. Let's press enter, and we
can double click on it, double click on my animations. As see we're having the
event graph and anim graph, which is the output pose. Before we can start
working on our animations, I would like to assign
this blueprint here. This is my animations. I'd like to jump
to my character, so let's double click on it. On the left side, we're
having this capule component. I want you to click
on this mesh. And here on the right side,
you can scroll a little bit down until you find
this animation tap. For the ym class, I
want you to click here, and let's search
for my animations. This is the blueprint that
we just created here, this one right here,
my animations. We can just compile,
and let's save this. Let's go back to my
animations blueprint, and what I'd actually do
is to add a new state. In this anym graph, I want
you to do right quick. Let's search for state machine. State machine, this
one right here. Next, I want to connect this new stage machine can connect it from this
character pose, L's connect it straight
to this result. After that, we can double click, double click on our
new stage machine, double click on it. As you can see we're
having the entry. This entry node. This entry
node means what you can see, you will see when you
first play your game. The first state that
you're going to be in, your character is going to
be in. That's the entry. Let's go back to my emissions. If you take a guess, what's going to be the
first entry state? Obviously it's going
to be the idol. What I actually
do is to connect, let's connect to a new state, let's the new stage here, and we can call it idle. Press enter, and we can
double click on this idol. Note, and what I actually do
is to bring our animation. On the right side, we're having
this assets and browser. The first animation is the idol. We're going to simply
drag it and drop it here, and let's go ahead
and connect it to this result. Let's compile this. Now it's running. Let's go back to our game projects
and let's play our game. We got our character id here. This idle animation
plays only once. We have to make it continuous. We have to make it loops
over and over again. Let me just press escape. Let's make our idol
animation loop. Let's go back to my to
my animation boprint, and we can click on
this idol animation. Let's just search for
that here in details. You can just scroll a little bit down and define this
loop animation. I want to check this, it true. Let's compile. Let's go back to our game projects
and we can play. There we go, so it's working. We got the first stage
of our character, which is the dal state. In the next coming lecture, we're going to work on the walk and run and the
jump, so see soon.
55. Unreal Engine - Assign Jump Animation to Character: In this orial, I'd
like to assign the jump animation, this
animation right here. Once we press space, I want to play this
animation. Let's get to it. Press escape to cancel that. Let's go back to my animations, blueprint, this one,
just double click on it. Actually I'm in the graph. This new state that
we created before, so let's double click on it. Here we're having the idol. What we need to do is to
take the idol and let's drag this line like this
and we can add a new state. Let's call it jump. We're going to be
running the jump animation from the idol. That's the rule. Let's so a
click on this jump animation. Inside the jump stage ethic, you bring that jump animation. Let's simply drag it and
drop it here and you can connect it straight to the
result for output animation. We can just compile and I
want you to revert back. Let me just make some room here. We are in the jump
state, and we just go back to the new
state machine. In our new state machine graph, we're going to see this icon, this double flash icon.
This is the rule. Basically we can be playing the jump animation based
on a certain rule. The certain rule that we're
can be using is the jump. If our character is in the fly, is flying, it's not
touching the ground, we can play that animation. Let's stop a click on this
double flash to set the rule. We need to create a variable. Let me just soll
down a little bit he until you find variables. You can just click on New
and the variable we can call it in error.'s press enter and we
can simply drag it. I'm going to keep it as bleion. Boling has two values,
true or false. If he's in r, or if he's not. We can simply track this
bully. Let's put it here. Let's get it and we can simply
connect it to our result. Let me go back to the
new state machine. We need to go back from
the jump back to the idol. If that animation is
finished, we need to go back. Let me just take it
like this, go back. For the second condition,
as you might guess, we're going to be
doing the opposite. Let me just bring this variable. This volume variable, get ir. I'm going to check if this
variable is true or false. Let me just drag it here. Let's bring the the nut volume, if this variable is not true, let me just connect it here. Basically if this
variable is not true, I want you to stop
the animation. Let's do that, I'm
going to just compile. And I want you to set this in er variable because right
now it's just bol in. Let's go back to
this event graph, and I want you to
use this get owner. This trike is bond owner. Let's connect this
original value. I like to connect it
to a get movement. Component, this
movement right here. After that, we need to
connect to a new variable. It's going to be is falling. Let me just connect it is
falling, this function. Is falling means that our character is not
touching the ground. After that we can just
connect it to that variable, this in air variable, in air. To wrap this up.
This variable is going to be true if our
character is falling. If it's not falling,
it's going to be true. That's the main subject. Let me just go ahead and
compile this and you can go to our game project and
let me just play this. Let's press space. Still nothing is happening, so I think something
is not working well and just go back
to my animations. Here I forgot to connect this event, Blueprint
update animation. We need to connect it straight to this set to this variable. Aon is going to be working. Let me just go ahead
and compile this. We have this red flow
going on over here. It looks nice. Let's go back to our game project and
display our game. So we have a problem here. Our animation doesn't run
fully, doesn't play fully. Let me explain what's
happening here. The jump animation plays only
if our character is flying. Since our character comes
back to the ground faster, it doesn't give enough time for that jump animation
to play fully. We have two solutions
to fix this. We can delay the jump
functionality time or we can shorten
the jump animation. I'd like to go with
the second one. I'd like to shorten
my jump animation. To do so, I'd like to jump
to my animations here. Here in this SS browser, let me just find
my jump animation. You can double click on it.
It's a little bit slow. What we can do is we can
go to this asset details, can scroll down and to
define this rate scale. I want you to double
it so let's say it two. I can press enter. Now the jump is faster. Let's go ahead and
save this assets. I'm going to just close this
window and let's go back to the game object and
we can play our game. Let's go forward,
we can press space. Now our ate is jumping 100%.
56. Unreal Engine - Assign Running Animation to Character: In this torial, we're
going to be making or assigning the
walk run animation. Let me just play to show you. Once we press W, I want to play the run animation.
Let's get down to it. Let's jump to my
animation blueprint and I'm in this new state, No invento graph, the
new stage machine. I'd like to add a new
state from the idol, so we can simply drag it right here. Let's add a new state. I'd like to call it running. And we can also make it
both ways because we can go from running back
to the idol like this. Let's just connect
it back to the idol. Can simple it side here. Let's set the
condition for running. I'm going to start
with this condition that's for the idol to the
running. Top click on it. What we need to do is create
a new variable that's going to determine the
speed of our character. Once the speed of our character
is greater than zero, we can play the run animation. One it's equal to zero, you can go back to the idol. Let's go here to variables, and I want to add
a new variable. Let's call it sp. Speed one is going to be b, it's
going to be float. Float is the number
is the number. So I you bring this
speed variable, let's put it here, and
I get it. Get speed. I'd to connect it
to a greater value, so let's connect it to
greater than greater this. If the speed is greater than
zero, play the animation. That's the condition that
we're going to be use it. Let's compile this and can
go back to the new states, and we can jump to
the second condition, which is go back from
running to idle. Topolic. Bring the speed. Like I said, the
speed must be zero, so that we can go
back to the idle. Let's take it from the speedier and we can search for equal, this function right here, and let's connect it
straight to the results. Let's compile, and let's go back to the new state machine. We need to apply some changes. I'm going to just delete these two conditions
for the jump, and we need to connect them
straight to the running. Let's bring one to the run, and we can go back
from running to the jump. Center this one. For the conditions
for the jumping, let me just start with running
to jump, so double ck. I'm going to bring
the in air variable. Let's get it, and we can connect it straight to this result. Let's go back and let's go
back to the second condition, which is to go back from
the jump to the running. I'm going to bring
that in air variable, and it should be not pulled
in. This one right here. Let's connect it
straight to the result. Now we set the jump. Let me just go back
to the event graph. No, A to the new state machine. We got the idle connected to the running and the running
connected to the jump. The last thing to make all of this working is to go back to the event graph and let's set our walk or our
run animation here. First, I'd like to bring
an e value function, right Click, let's ss value. Not this one, but the one with the question mark,
this one right here. Let me just take it
up a little bit. After that, I want to to
press control so that we can deselect this point
so press control, can drag it and put it in
this top socket, execute. Next, I want you to drag
this returning value. We can take it and connect
it to this input object. After that, we can do
the same connection. Let's bring this return
value right here, and we can connect
it to get velocity. This function right here. After that, let's connect this returning
value, can drag it, and let's connect it
to vector length. This one here. Finally, we need to connect this
node to the speed. Let me just drag the speed. We can set it here, and let's connect the return
value to the speed. Here for the top, we
can bring this value to the set and let me connect
the set to the set like this. Let's go ahead and compile this. Let's go back to the
game object and we can play our game. Let's see. We're having the idle.
Something is not working here. So we didn't set the animation. The jump is working, but for the running
we didn't set it. Let me just press escape, can go back to my animations. Here in the new state. Let me just click double
click on running. We need to assign here
that running animation. This one here. We
can simply drag it. Let's go ahead and
connect it to the result. After that, we can just compile, go back to the game project, and we can play our game. The one animation is playing,
but it's not looping. It plays only once. We need to make it loops
forever. Which we can do. Let me just press scape, can go back to my animations. Here we can select
this animation. Let me just scroll down a little bit and
define animation. Loop animation. You
can just check that. Compile, go back to game
project, and let's play this. And it is considering
out of running. So we can press space to jump
and basically that's it.
57. Unreal Engine - Finalize & Publish Character Game Project on Windows: Welcome to the final lecture of our unreal engine game
development journey. In this sorial, we'll learn the entire process of
publishing our final game and witnessing it come to life on the windows platform.
Let's dive in. First, I'll actually
apply some cleaning. I'll actually delete
these characters that we put first as a test. I'm going to just delete them, character animations, right. I'd actually play my game to see those how it's
going to look like. We got our character is running. We're having this
problem with the shoes because we did I didn't feel that in
the previous lecture. But as you know, this
is not a big deal. Always go back and we can fall the bottom of our sneakers. Hopefully, you don't have
the same issue in your game. Once you're satisfied
with the game. Let's go ahead and
publish it. To do so. I want you to click on the
settings on the top right, and we can click on
project settings. We are first in the project
tab, the description. I'd like first to change
this project thumbnail. I'm going to provide these
images that you can use. Let me just click on these
three dots and you can go to my folder here. This one, the project thumbnail. T's topical gage and
it's going to be garage. For the description, we can
call it, let's call this. This is my first character game. No. For the project name, we can call it my
character game. For the company name, you can put the name
of your company. I'm going to put mine, so
it is a reality fakers. The next step, I want you to
go to this maps and mode. This is really important here. For this default game mode, I want you to make sure that
you are using our game mode. Let me just show you
this blueprints, this one, MG mode. We call this MGA mode. It's not selected, so we have to select it.'s search for it. M game mode, this
one right here. For this default maps, we're having the editor
Stop and this one here, the game default map. We have to choose the
level of our game. Let me just go back
to the content. This is the level that
we got. Game project. If you don't see it,
you can click on file and save current level as, and you can call it
anything that you want. I'm calling it here game
project. All right. Let's go back to our
project settings and we can choose it from here. It's called game projects, this one right
here, click on it. Same thing goes for
this game default map. Let's choose it from here. Nice. Next, we can jump to the packaging and let's
see what we can do here. Down below in this
built configuration, I would like to switch it
from development to shipping. We're going to be
shipping our game. For the staging directory, we can choose the
directory where we want to put your game. Let
me just put it here. Let's click new, and we
can call this folder. Game my game project. Let's click on it and we can select click on select folder. Now it's select it. Next, we can jump to the
supported platforms. I want to be publishing
my game on windows. We can check all
the platforms and I want I want to keep only that windows,
this tab right here. For this target hardware, let me just click on it and see. For the target hardware, we're targeting the desktop
and for the quality, I'd like to set it to scalable. Just so that our game can adapt based on each setup performance. It's the last step is going
to be to go all the way down here t we reach
this platform, and I want you to
click on windows, and we need to do
some changes here. For this editors slash, this is what you're
going to see when you launch this project in IRL. It has nothing to do with
publishing your game. But I'd like to put it here. Let me just put my image. This game splash. D click on it. For the game splash,
the actual game splash. This is what you're going to
see that first cover that you're going to see
when you're going to be publishing our game. L star, I'd like to
pick this game splash. Dlo we have the icon. The game icon, I
think it's important. We have to set it.
Let's click on Choose File from computer
and we can pick our icon. Like I said, all these images, you can find them
in the resources. Now we're ready to
publish our game. I'd go back to my game project and here I'll click
on platforms, and let's go to windows, and we can click on
this package project. Let's click on it.
We're going to need this SDK because we're not publishing our game on Android. We're going to do that
in the next section. Let's just click Continue. And we are on this document, my game project that
we selected earlier, so let's just
select that folder. You can see the
packaging projects for our game has started.
Just give it some time. I think around it's
going to take some time, 15 minutes to 30 minutes
based on your game. The packaging has completed, so let's check our game. Inside my document, we've
got this MGAme project. This is our game, so
double click on windows. As you can see this icon, let me just click view. That's extra large,
can choose this extra. This is our game. I'm going
to just double click on it. And let's play our game. You can see that's covered
that I told you about. Let me just allow access here. There we go, so we got our game. We can play it on windows. Isn't that really awesome?
58. Unity - Export Game Environment into Unity: In this section, we'll be taking our character into unity, building our game and publishing
it on our mobile phones. Let's get down to it,
so here we are unity. I assume that you have unity
installed in your computer. Basically, this is the install. This is the first
der install, 20222. I want you to make sure of
something really important. Since we're going to be
publishing our game for mobiles, we need to check something. I want you to click here
and go to add modes. Here if you scroll now, you're going to have
this Android built. If it's not, if you
don't have it installed, just check check it here
and start installing it. Once you have all
these three models installed, you are good to go. Let's just go back. I'm going
to just jump to projects, and I'm going to create a
new project. Let's call it. My game character,
my character game. I'm going to just keep it at TD and let's create a project. The first is going to be to
bring our game environment. So I'm going to just try
to organize the folders. Let's do right click. Let's create a new folder, and I would like to
call it character game. Tsress enter, double click
to enter this new folder. Let's start with let's
create a new folder. Right click, create folder. Let's call it game environment. Double click and we can
bring all these files. We got the FBX file and
we got the two texts. I'm going to simply select
everything and drag and drop them inside our game
environment folder. We got our game environment
or I'd you do is to just track it and drop
it into our scene here. I'd like you set here the
position to zero and zero, so let's just type that, so zero here, and zero
on the Zax Perfect. Now I'd like you
do is to assign, make the material a
little bit better. As you can see the normal
map is not applied. If we select our
game environment, and if we scroll down, to define the material, going to be able to change
these informations. We have to do is to
create a new material. Let's do as collect here, create a new material, this material here, and we
can call it GE material. GE stand for game environment. Here, we have the Albedo. I'd like to bring this albedo. The Albedo is the
fuse or the cat map, Tex For the normal map, let's just drag and drop this. Drag it here, and we can
click on fix now so we can fix this normal
map. Perfect. Also for the smoothness,
we can increase it. We can set it for example 2.6. All we have to do
is to simply track this material and assign it here. You can
see the difference. The new material
has the normal map applied, which is great. Also here, like I said
for the smoothness, if you want to make it
a little bit glossy, you can increase that value. Let's set it 2.6. There we go so we got our
game environment, so in the next comment material, we're going to start working
on our character. Se.
59. Unity - Export Character into Unity: The next sep is
going to be to bring our character and
put it in our scene. What I'd like to do
is to go back to my character game folder, this one and we can create
a new file on a new folder, and we can call it character. Let's press enter, double
click on the character folder, and we can bring those
two files, BX files. My character and my
character animations, three exported previously
from our blender scene. Let's simply track them
and drop them here. Next, we can drag and
drop this mychar file, can drag it and drop it here. Let's work on it a little
bit. For the character. We're missing some
textures here, so we need to make sure
to bring them all. These are the text
surs, or electri the first is to create a new folder here
inside my character. And we can call it textures. Inside it, let's
assign or let's put all these textures
that we got like this. That's great. As you
can see by the fault, we got the skin applied as well as the eyes,
which is good. We can work a little bit. On these materials,
Let's can call care on plane and let's scroll down until we find
the materials. We get the Ii. The scan. For the scan, I prefer to
work on it separately. Let's write click, create, and we can create
a new material. Let's call it scan. I'm
going to just assign, let's put in this texture. Having improved the
is on the third one. I'm going to simply drag it
and put it in the albedo. Also, I'm going to just delete these two textures.
We don't need them. Here in the skin material,
we've got albedo. Let's go ahead and put
this one right here. Can work a little bit
on the smoothness, can reduce it a little bit down. Something like that looks
reasonable for our character. For our t shirt, we can
create a new material. Let's create material. Let's call it T shirt, and we can assign
this in the Albedo. Let's track it and drop it here. This is how our character
looks like. Looks fine. We can tweak a little
bit the smoothness, or reduce it at bit do, and Let's do the same
thing for the genes, right click, create
a new material. Let's call it genes. I'm going to just assign the
genes texture here, and let's go ahead
and put the genes on top of our pants. Perfect. All right. So now, our
character is ready. So in the next coming lecture, we're going to start
working on it. See soon.
60. Unity - Add Joystick Canvas to Control our Character: It's tonight signed
to make our character playable in Unity. But before doing
that, we need to install a p, Joystick package. There is a free Joystick
package that we can use. I want you to go to
this Asset Store and let click on
this search online. Make sure that you
are logged in in this asset store
website for Unity, and let's search for Joystick. Pack. This press enter, and basically we got this. This green thumbnail.
Click on it, it's free, 100% free. We can click on Download. I already did that. So I'm having this option
to open unity. I'm going to just click to pen. And t just wait for
it a little bit. There we go, we
got the Joystick. We can click on Download. Like I said, I already did that, I'm going to just
click on nport. And we can scroll down here, and let's import everything. I'm going to just
close this window and let's go back to my scene. In my scene, as you can see, we got the joystick
pack added to our character game
folder to our scene. What I actually do is to go
back to my charactere game and I need to do is
to add a new Canvas. I'm going to do right click
here and let's add y, and we can go to Canvas.
Let's press swer. Inside this canvass, I'd
like to put this joystick. Let's search for it, so it's
going to be in the prefabs. I'd like to use
this fix joystick, can simply drag it and drop it inside our canvas.
Right now, we got it. If we switch the game, you're going to be able
to see this big joystick. But we go we need to
tweak it a little bit. This is the joystick. We can change its
position from here. You can change the
position of our joystick. Also you can change the
width and the height of it. You can scroll down a
little bit to the scale and let's set the scale
for example to 0.2. 0.2 like this. I think that's a little bit too
low, so set it 2.5. From here, it's easy to control. We can play our game. Let's see. I'm going to just
go back a little bit here. As you can see the joystick
is working and that is fine. All we have to do right now is to assign it to our character. That if we take it up. For example, if we
take our joystick up, I want my character
to be moving forward. We're going to be doing that
in the next matoral. S.
61. Unity - Make Character Playable in Unity: So it's tied to make
our character playable. To do that, we're going to be
creating a C sharp script. I want you to go back to the character game and I want
you to create a new folder, let's care it scripts. Just for the sake of keeping
everything organized. Scripts and Inside the scripts, let's create a new script. It's going to be C sharp script, and let's call it
player controller. Let's double click on this
play Controller script, C Sharp script, and just
wait for our VS to launch. To save your time,
I already provided the script that's going to
make your character playable. You're going to find
this in the resources, so just download it.
This is the one. All you have to do is
just copy everything. Copies and let's
paste it down here. Control V, can paste it here. Basically, the name of this class should be the
same player control. If you change it, make sure
to change it also here. If it's the same, you can just go ahead and
delete the top. Basically this function here, this fix updates function. It's going to see if the
joystick is moving or not. If it's moving, we can
do something here. Otherwise, we can
apply something else. We can save this script and
let's go back to unity, and what I let you
do is to select my character, this
character here. We need to add a component. The component is going
to be the script. We can simply track this
script and put it here. By default, you're going
to have the rigid body. Basically the rigid body. Added here is added here, the required component
type of rigid body. Down, we got the script. For the rigid body, I would
like to assign my character. We can simply drag it and
drop it into the rigid body. For the joystick. We can
use this fixed joystick. Let's simply assign
it right here. For the animator,
we're going to be doing that in the
next cama lecture. Here for the speed, we can
increase the speed to five. Let's press enter. We can
play our game, and let's see. I'm going to just take as you
can see, it's falling down, our character is falling
because there is no collision for our character. As well as the ground
the game environment. What I'd actually
do is to select, click on my character. Let's add a new components
going to be capsule collideer. Not actually the capsule, but let me just
find the other one. Collider, let's search for
capsule. Yeah, this one. Let's scroll a little bit
down and we can increase the radius of this
capsule for the height, can increase it up,
and let's sick it up. It must be matching the
dimensions of our character, Let's see that from the side. You can also switch
to the two D. Actually it's a little bit
difficult to spot our cache, but that's fine, we can
just do an estimation. Let's increase
height by 4.15 0.5. I think something like this
is going to be reasonable and can drag it a bit do. Perfect. We've got
the collision, the caps of collider
for our character. We need to do the same thing
for our game environment. Let's select our
game environment, and we can go down here and
it's add the new component. It's going to be the mesh
collider. Click on it. I'd like to keep it.
Let me just try first. We can hide the mesh render, as we can see here the
collder. The spring pack. The mesh rendered. Now let's play our
game and let's see if we're going to
be falling or not. There we go. We're on
the floor right now. No perfectly. I fix that, but let me just
try our joystick. It's working, but
not that perfect. Let's go back and let's
see what we can do. I'd like to select
my character and we can go first to the rigid body. I prefer to increase
this mass to something reasonable like 15 or 20. Let's just keep it at 20. And we can go down
for this interpolate. I want to change to interpolate, so that we can have
a smooth movement, also for the constraint, just so that we can avoid
having those rotations. I'd like to freeze the
rotation on x, y, and z. Let's go ahead and play our
game again, and let's see. We can use joystick. It's a little bit better. I can see some improvement here. A. Let's go ahead
and play our game so that you can
see our progress. I'd like to cut it down here. Let's play that a little with this joystick, move it forward. Good. It's working just fine. But you can see this glitch
problem that we got sometime. It happens with the
collision of our ground. The collision it's not smooth
at all. We got to fix it. Basically to fix this problem, we need to lock this rotation, this degree here. Let
me just show you. For example, if we are here. Our character, it's not
vertically aligned. It should be always
set to zero like this. To do that, we
need to go back to our script and work
a little bit in it. First, we need to create a
new variable that's going to represent the locked angle. Here at the top, so
Let's double space here. Let's double enter to go down. We can start with the public
float and let's float, let's call it fixed rotation. And we can call it, we can
assign to it the number zero. Or actually let's assign
to the number ten, just so that I can show you. We can close that
with the semicolon, and we need to create
a new function. It's going to be the
update function. We don't have it here
because we need to keep updating that
value again and again. Let's go down and torch
by private void updates. Let's press to
accept that change. Here we need to start
with the vector. Let's write this vector angles, and let's make it equal to transform point equal
angles like this. Down below, let's
write transform, transform point ar angles, and let's make it equal
to new vector three, and let's open the
parentheses here. We can close that
with the same com. Inside these parentheses,
we need to put we have in the x and y and z
values of the rotations. For the x, we need to set
it to this fixed rotation. I'm going to just
copy this variable, control C, and let's
spaces inside, and we can add a coma and let's bring the ar angles point y, let's add another coma and ar angles point z.
C. Let's save this. Let's go back to our game. We're having a problem.
Vector two does not contain a definition
for Z. Let me just see. The problem is we're
writing vector two, should be vector
Tory, so let's just let out and replace
it by vector. Control S, let's go
back to our game. Sit for it to compile. Now we don't have any
problems. Let's play our game. Let's see if the rotation
of our game object for our characters can be a
log ten. That is the case. Let's play a little
bit with the joystick. Let's see. As you can see, we don't have that problem anymore. Our character is going smoothly. All we have to do
right now is to just go back to our scripts. And set this angle, the fixed crotion to
zero instead of ten. T S go back. We can score a little bit down here and here we have
the fixed crotion. Because we set our variable to be public here. That's fine. We can just keep it at zero. Let's play, and basically
we're good to go. In the next lecture,
we're going to start assigning the animations, the idle and run and
the walk animations. See you in the next
lecture. Take.
62. Unity - Assigning Animations to Character using Animator Controller in Unity: All right. The next
step is going to be to assign the animations
to our character. Basically what I'd
like to do is this. Let me just play the game. I want when we take the
joystick up like this, I want to make my character
one. Let's do that. And once we drop this or
release the joystick, we want to switch to
the idol movement. Let's get down to it. First, I'd like to go back
to my character here, and we can do right click and let's create a new animator. This animator controller. Let's click on it and we
can call it my animator. We can assign this
animator to our character. So let's click on our character, scroll down to our script. We're having this animator slot. We can simply drag and drop
this my animator here. It's not possible yet, but we're going to work on it. Let's double click
on my animator to having this state, the entry. I'd like to do is to put the
idol animation as the entry. We can go to my
character animations, this one, animations. We can click on this icon so that we can have
all these animations. We're having here the idol. Let me just change here this. Having the idle to jump, run, and walk. Let's try the run. We can simply track it here, so it's going to be
connected to the entry. This means that once
we play our game, we're going to be seeing
the first animation, which is the run. It's not yet. We going
to be able to see TTS because we have to
assign our animator. Let's go back here and let's see if it's going to be
possible right now. Click still nothing. What we need to do is
to add a new animator, so we can select
my character and add animator here, this one. We can take it all the
way to the top. Top here. For the controller, we can use my animator and for the Avatar. The Avatar still not possible, but let me show you
how can we do it. We need to go back to my
character animations and let's double click on
it. Just click on it. No need to double click. Here for the g. I want you
to switch to the g here. We're having the type
of animation generic, I want you to switch it to
humanoid and we can apply it. Let's apply it right now. After that, we can go
back to the generic. I want you to do this
step so that we can make this animator
visible by unit. I don't know why it's happening. Just do the same thing and
you're going to be fine. Now let's go back
to my character, and we can scroll down here. Now if we click here, we're going to be able to see this my character animation. Now it's visible. Let's also assign
it down below in our scripts for
the animator here, so we can select my character. Then. Now if you play our game. Like I said, we're going
to be seeing this entry, which is the run animation. Let me just go here to my scene, go back, and let's start again. We can take, let's
play this one again. We're having the run animation. But it's only running once. What we need to do
is to go back to the run animation,
double click on it. Select the run animation, and here I want you
to click on edit. If we scroll real down, we can have this
option the loop time, I want you to check it and
go down and just apply it. Now if we play our game, The first animation that
we got in our animator, which is the run, it's going to keep looping over
and over again. But as you might guess, we don't need to have the run animation right of the spot. What we need to do is
to have the idle first. But I prefer to do it
differently, m just so you. I'm going to just select
this run animation. I'm going to just delete it. Let's do right click and
we can create a new state. It's going to be a blend tree. So let's click on it. We can select this plant tree,
and let's call it. Movements movement. We can scroll a little bit down, double click on it,
select the blend tree. Here in this list,
the motion list, we can add three motions. Let's add the first
one, the second motion, and the third motion. The first motion is
going to be the idle, second going to be the walk and the run. Let me
just show you that. Here for the idol,
I'm going to just simply drag and drop the
idle, to be the first motion. For the second motion, I'm going to drag
and drop the walk, and lastly, we need
to bring the run. As you can see, we got
it all connected here, which is fine. Check this out. If we double click here
under this node blint tree, you can see this character
that we got here. Let me just maximize
it a little bit up. If we play this and if we
try to take this value 0-1, we can be easily moving from idle to the walk to
the run in a smooth way. You can see that. This is one of the best ways to set your animations is by
using this blend tree. Now it's going to be easier
to address this variable, this blend variable
from our script. But before doing that, we
can change, for example, let me just We can change, for example, this bland,
let's call it speed. Caracter speed. Now we got it. Let's go back to our script
and inside this fixed update. We got the joystick function. If the joystick
function is running, if we are moving, so I
want to do something. Basically what I'd actually
do is to change this value. Change this value 0-1. I want to set it for example
to one. Let's do that. Here, let's set, I'm going
to bring the animator. Same variable that you've got
on the top, this animator. Imater. Nimter, is going
to be point set float. Let's open the parentheses, and we can call it speed. Let's bring the speed comma, and we can set it to one. We got this and elsewhere. Let's just copy this value.
We can go to the else. Meaning that the joystick,
it's not touched. If it's not touched, let's
set the speed to zero. Control S, let's go back here. Switch for it to compile. Let's play our game. We'll go back to our scene. Now we're having the idle,
and we're having the run. Perfect. But for the idle, it's not loop in, so what we need to do is to double
click on the idol. Let's here to edit, scroll down. For the loop time,
let's set it to loop. We can apply this. Let's play our game again, and let's see. The idle keeps running.
Let's just go. There we go. It's
walking just fine.
63. Unity - Best Trick to Make Character Smooth Animation Transition: To show you a quick
track that we can apply to our animation. If we play, if we take
our character forward, we can see this transition from idle to running to back to idle. It's completely sudden. We don't want that. We want to have some smooth transition. Between these animations. To do that, let's go back to our scripts and inside
the set float animation, I'd like to add the
third parameter. Let's add the comma here. I'd like to add
first the speed or the timing to go back
to the zero animation, which is 0.1 f, and for the third parameter. Let's add the point Delta T. Let's copy the same line. Let's go back, go down
here to the zero speed. We can add the comma
and pace that. Control as to save our script, and let's go back here, let's switch for it to compile, and we can play our game, and let's see the difference. Now if we go forward and drop
and release that joystick. Our cache is going
to be going back to the idle in a smooth way.
64. Unity - Make Camera Follows Character: In this story, I'd like to make my camera follows my character. Now if you play our game, so this is our game
here on the right side. As you can see the camera
is really messed up, we're not able to
see our character. We have to fix that. Let me
just go back to my game here. You can go to tur game scripts, and it's create a new
script for our camera. Let's do right click, create
a new C sharp script, and we can call it camera. Follow orbit. Let's
double click on it. Here, I want you
to copy and based script that you that you're going to find
in the resources. This script right here. You
can just copy, for example, just what is inside
this public class, Control C, and let's go back here and we can delete
everything inside, Control V, and control
S to save this. Can go back to our scene. After that, I want
you to select the, the main camera, and you can
scroll all the way down. Let's bring this
camera follow orbit. Can simply drag
it and drop it to be the last element here. So the target, it's going
to be the character, so we can simply drag and
drop the character here, it's going to be the
target of our camera. For the follow of speed,
it's such a five, and the offsets, we need to adjust that based on the play. Let's play our game. Let's see. We're it's following from here. But we need to set work a
little bit better on the angle. Let's just scroll. C jeck
this one here to the side. For the camera, we
can scroll down, and let's check it a little bit. Let's check the z
back a little bit. For the Y can check
it like this. I would say four here and
nine or minus nine on the z. Four on the y and
minus nine on the z. Let's set that, we can
exit the play mode. Four here n minus nine. Let's play out game
again, and let's see. It's working just fine. I think we need to increase
the speed of our character. Let me just do do. I'm going
to just exit a game mode. Let's select my character.
Score the down. To the move speed,
let's set it to 15. Let's play our game, and
let's go down there we go. Let's actually have to invert the z location to
the other side. Let me just show you. I'd
like to put it like this, but before doing that,
let's invert our character. We can set it to -180 degree
on the y axis like this, so this is can be
facing our environment. For the camera,
you can set it to nine instead of minus nine. So let's play our
game, and let's see. Now it's perfect. Now the camera is following our character. In the next lecture,
we're going to continue working on our
game. See you soon.
65. Unity - Add HDRI Lighting in Unity: Industrial, I'd like to
work on our environment. I'd like to add an
HDR map so that we can change this lighting
that we got in our scene. To do that, I would like
to bring an HDR map. We can go to Carature game here. Inside our game environment, we can bring this new HDR map. This one. You can find
it in the resources. I just put it over here. And we can click on it. In the text of shape, I want to switch it from two D to cube. After that, we can
score a little bit down and we can click on Apply. After that, we need to
create a new material, so let's do right
click, create material. Let's call it H DAP. For the type, the shader type. Let's click on here. Let's
choose a cube map, skybox. Basically in this cube HDR, we can simply brand
this HDR map, can drop it right here. After that, we need to
go to the lighting tab. If you don't see it, you
can go here to window, panels, and go to Lighting. Here I want you to go
to the environment. Under this skybox material, we can simply drag and drop the material that
we just created. Let's drag it and
drop it right here. Basically we got it,
we got our HDR map, we can work a little
bit on the intensity. Let's reduce it to 0.25. I like that, real time shadow. For the resolution, I'd like
to increase it to 1024, and I'd like to get rid of
this directional light. Go back to the inspector, Let's try to set the
intensity to 0.25 or 0.75. Let's improve the
lighting in our scene. First, I'd like to take
this intensity multiplier to something like one.
That's going to be fine. For the resolution for HDR map, I'd like to take it to 248
to have better quality. Down below, I'd like
to activate this fog. You need to have some fog
right in the horizon. Nice. Let's give it the
same color of the sunset. This color, for example. Can make it a little bit dark, something like this here. Yeah, something like
this. Also, let's go back and we can
increase the density. Let's increases the
density to 0.15. Or I just stick to one. Let's go back to the environment to this directional lighting. You can switch back
to the inspector. Here I want to do
some two weakens. Here for the intensity, let's set it to zero
point t set it to one. T one is too much, so let's set it 2.5 or 0.75. For this strength,
the resolution, I'd like to take it
all the way to one. For this resolution,
I'd like to pick the very high resolution to
make it really high quality. For the type of the shadow, we can experiment a
little bit with it. Let's switch from
soft to hard shadow. I'm going to just go with soft. Also here for the
color of the sunset. We can make it a little bit
bluish. Let's try that out. I think I'm going to just
go with this orange color. Fine, Let me just go back to
the environment lighting. Can reduce a little bit
this to 0.5, the intensity. Or actually just keep it
keep this one at 0.85, but reduce this intensity multiplier to
something like 0.5. Let's play our game. Let's see. Now it looks much more better.
Can I just go with this.
66. Unity - Finalize & Publish Character Game on Android: What I'd like to do is to build our game and publish it
on our mobile phone. We need to publish it as an APK format so that it can
be readable by our phones. Let's go to a file and we can
go to the build settings. These are the build
settings of our game. What I'd like to do is to
switch from windows to Android. Down below here, we're
having this option to switch platform because we are
set first by the windows. We need to switch to Android. Let's just click on
switch platforms. After that, we can go
to the player settings and we can tweak a little bit the name of our game as
well as the company name. For example, let's call
it reality figures, and for the product name, we can call it character game. My character game,
something like that. For the version, that's fine, I'm going to just
keep it like this. For this icon, you can pick
the icon of your game. Basically in order to change this icon, what we
need to do is this. We need to go back to
our assets folder here. I'm going to simply drag
and drop this icon. It's a PNG file, so we can simply drag it
and put it in our assets. Let's go back to the
publishing settings. We can go to file,
build settings, go to player settings. Here we can click and
let's search for icon. Same name that we got this one. Tab Carcon, and as
you can see it's set to the icon of our game. So all we have to do right
now is to build our game, so I'm going to just
click on Build, and we can put it, for
example, to my documents. Click Unity and double click and let's save our
APK format file here. Let's call it My game. My character game. Let's save. I'm going
to be saving my senior. I'll just switch for
it a little bit. I'll just switch
for it to finish. Finally, we got our game
exported as an APK file. Now it's a mobile app. All you need to do is just
copy it into your phone, install it, and play it. Thank you so much for watching. This is the end of this course. If you need any assistance, I'll be glad to help you out. Thank you, and I
hope to see you in future projects. Take care.
67. Final Lecture Conclusion: And congratulations, you've made it to the
very end. We did it. We officially built our
own game from scratch. It was a long journey. We started from two
D blueprint and went all the way to
modeling, texturing, animating our character, designing our own
game environment, and building our final game in both in oral
engine and unity. Hopefully, the knowledge
in this course did and will help you
in year to the journey, so right now you
should be ready to tackle any character
project thrown at you. By the way, I'm providing
all the project files here for you to download and
compare with your own work. It's going to be the
character fully rigged with animations included
the game environment, and the final game that
we created together. So if you need help,
just message me here, I took the promise to make
my students my top priority, so just don't hesitate to
contact me anytime you want. So I hope this course was exactly what you
are looking for. I wish you a lot of luck in your career as
a tit designer. Also, if you can take please the time to
rate this course, that encourages me
to keep improving it and add more projects. So thank you so much for
sticking with me till the end. I really appreciate that, and I hope to see you in
future projects. Have a fantastic day.
 Abdelilah Hamdani, 3D Photorealistic Designer