Transcripts
1. Introduction with Gamma AI: Let's be honest, creating
presentations sucks. You know the real spending hours picking front,
aligning textboxes, Googling free icons, and still ended up with
slides that looks may. If you wasted hours
of your time on PowerPoint or Google
Slide just like me, then you love this AI tool. It's called Gamma app and I can guarantee you that it will
save you hours of your time. Using AII, you'll be able
to turn vague ideas into structural visually
stunning slides with AI within a
couple of minutes, customize themes that matches your brand and
looks professional. No design degree required. Adding interactive
elements like pull, buttons, donut charts, and videos to keep
your audience who. Collaborate with themes and track who engaged
with your work. Whether you're
pitching a startup, teaching a workshop or
building a portfolio, Gammas AI tools will
save you hours. So grab a cup of coffee or tea, and let's turn your next idea into a presentation
that looks wow. Ready? Let's dive in.
2. Project & Resources : You for joining this class. So the class project
is very simple. Follow all the lessons
and pick one of the topic that you'd like
to create the presentation. Once you create
the presentation, take a screenshot
and upload a link so that we can see and
get inspired from you. And you will find the link to GI under the Project
and resource folder. So go ahead and click on.
3. Getting Started: Setting Up Your Gamma Account: So when you click on this link, you'll be landing on this page. And depending on when
you are watching this, this could be slightly
changed because these new AI website tend to change their user
interface very often. However, you will have
an option to try for free or sign up
for free for sure. So go ahead and click
on Signup for free. Once you're here, you
have two options. You can provide your
email address and continue or which
is my favorite, just continue with Google. So when you choose Google, you'll have option to
choose one of your email, select and continue
the signing process. Once you are signed in,
you will be coming here. And this will pop up a
couple of uction just to understand your intention
with this website. So here, how do you
plan to use Gamma? So you can go ahead and click for whichever reason
you are here. So I'm going to use
for personal use. Continue. And then select what kind of work you are
doing and then continue. So you can go ahead and select whichever more
appropriate for you. In this case, we are going
to create presentation. So I'm going to create
presentation from scratch. And then click Continue. Here, you can select as well, whichever option
you'd like to. And
4. AI-Powered Drafting: Generate Your First Presentation in Seconds: This AI page is very simple. It doesn't have lots of
unnecessary information. So now it's giving
us three options. From these three
options, you can choose any to start working
with your presentation. Here, if you have
already outlined your plans for this presentation that you are going to create, you can go ahead and click
Paste in text, and then here, you can just provide
all the details of the presentation that you
have already written. You can do that
and then continue. Next, we have option
Import or URL. Click on it, and you
can see that if you have already
existing PowerPoint, Walt PDFs, Google Slide, and Google Docs,
even Notion Doc, you can bring them here, and then you can create
PowerPoint from those. This is very interesting. If you already have
notion templture and then you can just enter the
URL, you are good to go. However, bear in mind
this is in beta. So you might have
some slide problem, so you have to figure out out. My favorite is this option, the main one in the middle. Generate with one line
prompt in few seconds. This is great. So
you can go ahead and click on Continue,
which is I'm going to do. Here, we have a
couple of options. First, presentation that
we are going to work on, and these three
couple of options, web page document and social. Then first, we have
here, eight cards. So it's like eight slides. However, depending on
information that you provide, here, describe what
you like to do. This might change, but
with this free plan, we have up to ten cards that
we can select initially. Then this is the size, how you'd like to have
the presentation. There's three options, but I'm going to
leave it to default. That's the best outcome. Then we have the language. Depending on which
language you like to create your presentation,
you can choose. Here is what you
actually provide as a prompt that
you probably use hatchiPT or other chatbot that you normally put the prompt,
and then you get an answer. So this is like that. So you can go ahead and do that here. But before we do that,
another option here, it's example prompts. You
can go ahead and check. So, for example, digital
marketing trends, and then you can see that other options that
you have here. Don't like something, maybe you want to get more
idea of the pumps, you can click on shuffle to
see a few more examples. If you are doing
something similar, you can go ahead
and click on that, but I would like to go ahead and describe what I
would like to do. So there are a few
information to know here. As of now on 29th of January, which I'm creating this video, allows you to put up
to 500 characters. However, you can only put one sentence. This
will work great. But from what I
experience using this, as much as information
you can provide, it gives you better and
more details presentation. That's why I would say, try to give as much as
details you can. Obviously, within
500 characters, then it will provide a great
presentations for you. So I'm going to paste
my prompt hair. This is my prompt. I have
provided information for five free AI tool
for content creation. To be honest, you can just cut these bits and leave this hair, L A for creators, five free tools to lab up
your content creation game. But I would like to provide more specific tools such
as tool number one, AOB podcasts to
enhance Aido quality. And then tool number
five, on the AI for image generation two
for you get the idea. Don't have to do all this, but you can just provide one
sentence with more details. But I would like to provide a bit more details so that you can see the next
part which we'll do. This will give you
more outlines. Go ahead and click on
Generate Outlines. So these outlines,
you can think of each of these
outlines as slides. So as you can see,
this is providing us more than 20 cards, which, to be honest,
I don't need. So what I'm going
to do, I'm going to delete these options
because as you can see that I only have limit up to ten cards at
this current plan. You might less, you
might get more. Another thing which
you can do if you don't like these outlines, you can see that
some of them a bit more over details provided here. So you can go ahead and click
on Regenerate Outlines. And you can see that it's
giving us nine outlines. So it mentioned first outlines, which is for creators five free tools
content creation game, just introduction
sort of things, and then few other options. Then it describe each tools and then gives us
a final thoughts. As you can see that
this is providing us with some details
presentations. However, as I said earlier, that we selected eight cards, but it depending on how many it requires from the details you it will generate
that many cuts. Before I jump into
customizing and then theme, I need to mention one thing here that you will
see that initially, you'll receive 400 credits. The presentation itself
that we are creating now, it will cost you 40 credits. So let's move on.
Next, we have theme. So you will see these
are the theme initially provided to us based
on this prompt. However, you have lots of them, and these themes are
absolutely professional. I love all these things. I'm sure you will
find a theme that goes with your product
or your presentation. Moment, I'm going to just
leave it to this one pitch, but you'll have option to choose different one that
we'll go through later. So you choose one of the theme, probably you will
see different themes here depending on the prompt. Then we have content.
This is very important. Content is here. You need to understand the
amount of text per card, as in par slides. So here you have brief, you can just get brief text, then you have medium and
detailed text in each slides. So I'm going to
leave it to medium because this is the
best because it also provides you
with some images and then with some text as well, combination of then
we have image source. At the moment, we have
a images selected. You can go ahead and select various different options
that it provides us here, but I would suggest leave it
to A images because let it generate images which absolutely beautiful images that
will generate for you. And then later, we can talk about how you can change images and also how you can import yourself from different website
and from your computer. Next, we have A image model. Since you selected A images,
this is the option for you. And here with the basic plan, we have three AI. First is this black forest lab, and then second, we have
Google and then playground. This used to be Leonardo AI and other options used to be
under the basic models. However, now we have
these three options. If you go ahead and
upgrade the plan, you can select
different ones as well. But this works perfect. And to explore with it, I would suggest just
use this one for now. Then we are going to
click on Generate. Before I do that, let's go
back to this option again. First, you select the number
of cards, how it looks, and then you have
options for language, and you provide the prompts. I generates outlines for you. You can go ahead
and review them. You can also edit them
however you like to. And if you don't like it,
you can regenerate again. You can add more
cards if you like to. Then you choose a theme, then you choose content
and the source of image. We are going to
click on Generate. This will take 40
credit from us. Now you can see that
in front of you, it's generating automatically
within a couple of seconds. Professional looking slides
presentation for you. So let's see what
it created for us. I'm going to go
ahead and click on present on the right hand side. You can see that this
has been generated. Can use the arrow key on your keyboard to go
to different ones. As you can see, this
is automatically done. The animation as well, you
can see that it's provided us with very relevant
images, AI generated images. For example, this tool, we're talking about
Adobe podcast to elevate your audio with AI. So this also gave us a very nice picture
of an audio studio. Then we have next Adobe Express background
removal made easy. You can see that it also gave us an image removing
the background. This is very good with
some extra details which we didn't provide it
automatically generated. It's not like random. It's actually relevant. Adwxpress uses AI to
automatically remove background from images and professional ing
visuals, which is true. So next we have this
three number tool three prom taker.co.
Oh, look at this. They also generated
image that goes with this prom taker.co to
refine a generated content. And then it provided us
with these options as well, and this beautiful
shape as well. We have a pyramid,
looks like a pyramid, and then realistic voices, natural speech for
less integration. So this is 11 laps AI voiceover. And then the fifth
one is the Leonard the AI also provided
us a staircase. We could explore
a little bit more about this option that you
can add yourself as well. Then we have the fifth
one final thoughts, embracing the future of
contration with five tools. This is nice, as well. So this is the end
of these slides. Let's go back and
see how it looks. You can see that this
looks very professional, and it's generated
automatically, and then you can continue
to edit as well. So let's move on to
choosing a theme for
5. Design Mastery: Customize Themes, Fonts, and Branding: This lesson, we're going
to choose a theme. Let's familiarize with this option on the
left hand side first. So as you can see, this
is giving us an option to choose each slide with the preview as well.
So this is very easy. If you want you can go ahead and click on the second
one List view, and you can see the
list view as well. You can move around
however you like to. It slides up and down wherever
more important for you. So I'm just going to go ahead and click on the first option. You can still change up
and down the first option. Now going to change the theme. So you can go ahead and
click on theme and then you will see that these
are theme as of now. I'm not sure if they will
keep it free in the future. Here, you can go ahead and
select different theme that goes well with this
presentation theme. Then you can choose
different types of. You can see that it
changes automatically, and then text, as well, text style, front style. All these options, it
changes automatically. One of my favorite one is
actually, I'll show you. So let me see this one. This is a good one. This is
really nice one. To be honest, this goes really well with this type
of presentation. Can also expand this and
see a little bit more. You can explore all of them. And then if you want, you
can also new custom theme, you can build yourself, as well. One of my favorite is
this 1 atmosphere. So I'm just going to
click on this one, so as you can see, this
brings very vibrant color. So this is how you
choose the theme. Let's move on to
the next lesson.
6. Advanced Editing: Outsourcing, AI Images, and Media Integration: This lesson, we're
going to see how we can improve images
by editing them, adding them, removing them, and other options
that are available. The image that you can see
here are all generated. You can see these images. So let's say we'd like to change this first image here
on the right hand side. So click on Select
and you will see there is blue line
all over them, and then also a blue line
just to cover the image. So when you click on that, you have a couple of
options coming up here. And click on Fit image. Let's say you have generated
a really big image or you'd like to just fit
it within this frame. Then you can click
on that and you can see that this also changes and brings the background with
this image automatically. Let's say you generated a big image or you
imported a big image, then you can center it. Let's say you can focus on
different parts of the image, click on this circle and then you can move this point
wherever you like to, and you can see that
the background image is moving here and there, focusing on one and
then it's moving here let's say we're going to reset it because it looks
better, however it is. Then third one is to
remove background. I'm not sure how it will look on this one because it's actually the background
is really nice. So I'm just going
to give it a try to show you how it looks. So it will take couple of
seconds to remove background. Mostly, if you are
using your own images, then it will automatically work. So this looks like it
just removed the outside and then it left us with the
blank space on the back. If you want, if it looks better, you can leave it
without the background. Then we have the third
option is to surprise me. So if we give it a click and it will change the picture
automatically, as you can see. So these are the images they
are automatically giving us. I'm going to go back by Control or Command Z and go back to the
original picture here. Next, we have this one to edit image. Theise
important bits. Before you do that, you
can also remove the image, you can click on
this and this will automatically remove the image. There's no image going to be. You can upload yourself
image from your computer. You can search for image. As you can generate image. I'm going to go back Command
C and click on ditimage. This is very important bits. So in order to generate
this image, as you can see, this is an AID image generated, that's selected earlier,
the prompt is here. So based on whatever the
details you provide, it uses this as a prompt and
generate a prompt from that. So that's why initially, it's better to provide as
much details possible. Obviously, it don't have
that much characters, but utilize as many characters you can to provide more details. So from the prompts, it provided us a hand and you can
see that these prompts. Let's say you would like to change and have a
different image. You can go ahead and
click on Enhanced prompt. And this will give
a better prompt. Or if you want,
you can also type yourself to improve a
better quality image. So I'm going to leave
this enhanced prompt because we're going to generate,
let's see how it looks. But before we do that,
we have a style. So at the moment,
the theme is pitch. Okay. So from the theme, it's automatically
selected this image. You can go ahead and
click on custom, and then you can
provide style as well, how you like I'm going to go back and go ahead
and go to the theme, and then you can
see that this has changed because initially
our theme was pitch, now it has changed
to atmosphere, the one at the
moment we're using. Next, on this side, you have the aspect
ratio, the size of it. So sometimes you probably use an image probably
bigger than this one. So maybe it covering
the whole image. Who area, then you can change how you'd like
to generate the image. At the moment, it's
only a part of it is with a generated image. So let's go back
and enhance this, and then we have theme. You may put none, and
then go back to them. This will automatically
update the current theme. So we're talking
about the pot trait. So you can choose however you
like to square landscape. And the model that we have, obviously, you can
choose different model. From here, I'll just
leave it as it is. And you can see that if we
generate this new image, this will cost us ten credit. At the moment, we have
355 credits left. So I'm going to go ahead
and click on Generate. Let's see how it brings. So give it a couple of seconds. This will automatically
generate a new image. So as you can see, this
is generated new image. I will leave as it is. This one, maybe this
next one from here. Let's see how it
looks. Okay, so this looks better. I mean,
this looks fine. Then, Okay, let's
go back. And let me show you these images are all already generated
generated images. Then you can find them here. Okay? You can select different
ones if you'd like to. This will be automatically stored for you once
you generate them. Next, you can just
click on here, and then let's work
on a different image. Let's say you like to bring a new image
from your computer. So you can click on this
image, as you can see, and then click on this
edit as well again, and then you can
change the media. Now, you can click on
image, Upload or IRL, and then you can drag and drop or click on here to
bring a new image. This is one of the best option if you already have images. Let's say you're working
for a company and you have some particular images that you received and then you'd
like to add that. So you can do that. Next, let's say we need some
realistic image, not air generated, and then
you can use splash images. If you don't know,
Unsplash is one of the free images website that
you can use any images, and then you can find all
these high quality images. Obviously, if you go
directly to Unsplash, for example, if you go directly
to the Unsplash website, you can just search
Unsplash and First Link, and you can see these images, high quality images are here. You can just click on
Download to download them. Obviously, you will
see the creative photo created by this person. And you can download this. You can see these
high quality images. You can look for
different image category. This is one of the
best website for free images with high quality. You can go ahead
and download them. Obviously, some of them
are you can't because these are part of S plus plus, so you can download them. But you can see
that lots of them would be free available
for you to download. Here when you go back, this gives a very
limited option, but you have a search this
search option, keyword. So here, let's say we search AI. And this will bring
images related to AI. Obviously, you'll be
able to load more. But if you go back directly to the website, download them, and as I showed earlier, you can go back and
click on Image Upload. This will allow you to upload them manually from
your computer, okay? So you can see that
you can select different images from here. Let's say we choose this one, which is not a good picture, but I'm going to show how we
can do the center of focus. So click on center of focus, and you can bring this one here, and then you can show different
parts of this as well. So let's go back and let's
generate a nice image. Let's see what we can find. Let's see this one. Not really. Okay, let's go back and
just select an image. You do have option for gifts and illustrations and
all sort of images, search from web
and you can bring them going to go back to AI. Let's it generate an image. Let's first get the prompt,
and then you have this, let's generate
another ten credit from us and see how it looks. As you can see that this
selected square image. This looks really nice.
I wish it was landscape. Let's see if we can generate a landscape image for
this. Okay. Let's see. These are really good pictures. Okay, let me just select
the center of it. Okay, I'll just leave as it is. This looks nice next. And this is about
unlocking efficiency. You can see that you
have lots of options for images to generate edit them, delete them, or bring them more. Provide an image for the whole slides,
background of these slides. So as you can see, at
the moment, you have a pink gradient color
atmosphere theme color hair. But if you want, you can
go ahead and click on this color palette and
click on Backdrop, add a picture, and
then select image. You can see that
this image is cover all the background of
this whole presentation. So if you click on presentation, you can see that this
background image is still visible
at the background. If you want, you can do
that, something like that. So we're going to go
back and I'm going to press Control Command Z or
Control C, and then go back. So this was another way you can bring the images
at the background. Let's move on to
editing our slide
7. Gamma’s AI Toolkit: From Basic Tweaks to Pro Features: It very important lesson. I'm going to show you
some of the basic to advance features
that makes Gamma AI different than any other
presentation and this will forever change how you
create your presentation. So let's dive in. For the text, you're free to edit them
however you like to. You can just select and
delete, add more text. You can click on these
three dots to select all these images and select
that type of heading title. You can select and
do that as well. Let's say you'd like
to edit these bits, this line here, you can select then we want
to change the color. You can click on
this A and then you can select different colors
that goes with this. I'm just going to leave it
with let's say this one, and then let's say I'm
going to make it bold here. Probably I should change
it to different color. As you can see this editing
with the text is very easy. Now, let's say we would like
to add one more point here. So the content
creation landscape, evolve possibilities
and challenges possibilities with this and
then challenges with this. Let's say we would like
to have one more options. You can click on Add Column. This will add another column
on the right hand side. If you already have another
option at the bottom, it will adjust automatically
depending on when you click. Now you have two options. You can just use forward
slash like this, and then it will give
you lots of options that you can use from
here, all these options. You can use them.
This is unlimited, all these options, and
you can use them as well. Hover, there's another option, which is you can just
click three plus buttons, and this will automatically AI generated option
will be for you. So you can see that
this automatically generated an option with
lots of text for you. Obviously, you need to edit. Let's say we are going to use this challenge here as well. So you can click
copy and paste here, and then you have a new point. Let's say, ignore
this text for now because I'm just showing
you how it works. So as you can see this, you can add another option here and then click on present. This is presented
in front of you. So this make a lot easier. You would be spending
hours and hours to do something like that on
a traditional PowerPoint. So I'm going to remove this, just click on these
three dots and delete. So you can see that you can
add these sort of options. Now, let me show you
some advanced features that this Gamma apps has, and you'll be surprised how amazing these features
on the right hand side, you have more options. So the first option
is basic blocks. So if you want, you can bring these
blocks and imagine doing this with PowerPoints
or Google slides. It will take ages and
not very professional. You have to spend a lot of time to bring it more professional. Let's say we'd like to have
some sort of table here. So you can just bring
it here in the bottom, and this will automatically
make table for you. As you can see that this
is giving you an option, table heading sort of things. So let's say you'd like to add this option as
possibilities on this one. So you just paste it here. You can also click on
select on this and change it to different
type of text. As you can see, and you
can change as well. So just copy this hair as well. You can imagine how
this table works, and then you can add more row or if you want, you
can add more columns. This will automatically adjust for you and then
you can see that these options for you
to look and explore. You see, this is a beautiful
table automatically created. For you to do
something like this on Google's or PowerPoint,
it will take ages. Obviously, you can import and create a table straightaway. To design it professionally,
it will take ages. So you can imagine that you can just bring a table from
these basic blocks, and then you generate and
put your content here. I'm not providing content at the moment. I'm just
guiding you on. So you can just click
on these three dots on the left hand side to select,
and then you can delete. You can select the whole table
and then you can delete. Let's see what are
blocks available for us. Then you have toggle button. Let's say you would like to have a button hair on the top. You can provide a link. Let's say you can provide link
to every YouTube videos or different options
that you'd like to have can provide the link here, and this is like two
different style you have. So this is a solid button
that we have selected. You can do the outline
button as well, and then you can
change the color, different colors, different
options you have. Then you can also
change the alignment. So let's say we put it in the middle or on the
right hand side. And let's say we say play. So we need to get rid
of the text from here. Play, and then we put in YouTube or some sort of
videos link as well. You can see that this
will work as a button. So let's say present, and you can see this
working as a button. So whenever I hover over this, it's working as a button. So this is another
way we use button. This is very interesting. As I said, it will take ages for you to do something
like this on a PowerPoint. So I'm just going to delete this one here because
I'll show you how you can import YouTube
videos and other videos, Let's explore a
few more of these. Obviously, you can do
heading back code, and all those sort of things. You have toggles, buttons, code blocks that if you
want, you can do that. Map blocks, footnote, let's say, your teacher would like
to provide map Block, you can do that as well
and the divider as well. So you can see that
divider brings here, and then you can create
a table on the top, and then you can provide
more option here and there. This is the basic blocks, and then we have images
we explore already, then video and media. So let's say we'd like to
bring in YouTube video here. So you just select
and paste it here. Put the YouTube videos link. So let me find a link
of YouTube video. I got a YouTube video link, so I'm going to paste it here. And then, yep, so you
can see that this will automatically generate the whole YouTube
video in front of you. You go ahead and click
on presentation, and then you can play
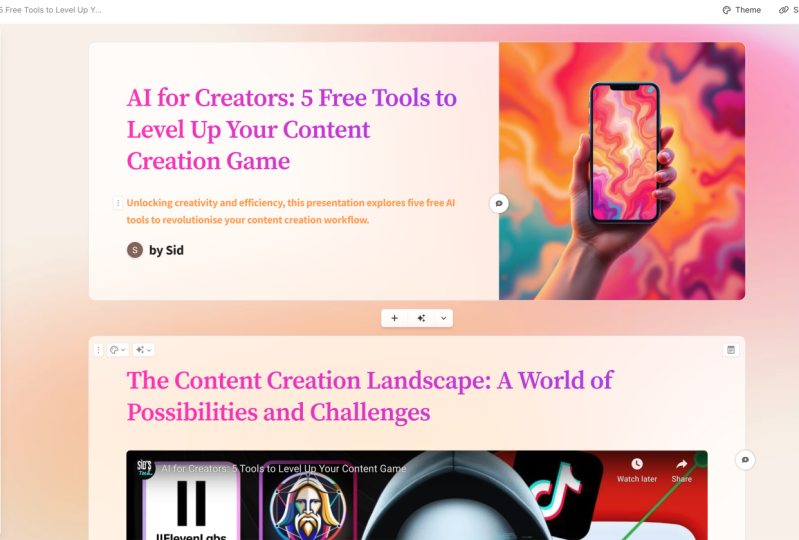
it from here directly. This is AI for creators five tools to level up your
content creation game. So you can play
these YouTube videos and other options that you
have within this presentation. So you don't need to go to
another website to show. So you can just
click on ESE cape on your computer to get out
of this full screen. You can see that this
is AI for creators, five Tools to level up your
content creation game that we are doing this presentation
about so next, let's see what other
option you have. You can see that
TikTok, Spotify, video, audio URL, probably not
the options you have here. You can just click on URL
and then bring it here. You can also bring a gallery, and then from there,
you can do that. So let me go to this one. Click on here and then
drag and place it here, and then you can
add multiple video you can see this is great. It will take save
hours of your time to do presentations like this
one, and professional one. Next, we have embedded
apps and web pages. Let's say you would like
to provide your Instagram, Figma file, and Twitter, X, whatever you like to call, and all these
options that you can see can also put your
own website page. So you can go ahead and
just to your website. If you are someone who would
like to leave your website, you can do that maybe at the
end of this presentation, and probably you'd like
to add your own website, your social media and you
can do that, as well. Next, what we have here
is Charts and Diagram, and then I'll talk about Charts and diagram in the next lesson.
8. Engagement Boosters: Add Diagrams, Forms, and Interactive Elements: Welcome to this lesson. I hope you've been enjoying so far. And if you've enjoyed and
learned something valuable, please go ahead and
leave a review. So in this lesson, we're going to go
ahead and check on charts and diagram,
charts, diagram, donut charts and all
these things that you can do on PowerPoint
on Google Slide, but it takes a lot of time to adjust and all sorts of things. Here gives you very easy. Some of them are not even
available on PowerPoint, so you can go ahead and do that. Use this program, so staircase. So staircase is this one. So this is staircase.
So one, two, three, and then each
option is explained here. And then you have options such as donut
chart. It's very important. Interesting. You can
just place it here, and then it you the
options how you'd like to. You can see the glaze,
chocolate, jelly, and then you can
add more options, and you can change the count. You can see that this
is very efficient. You don't even need to
do with lots of changes, it will automatically
adjust for you. Let's say we change this
11 to let's say 20, you can see that this adjusts
the jelly automatically. So the jelly part is this
changes automatically. You can change the color, different options
you have to change, and you can choose the colors
that goes well with it. And then you can also show the
value however you like to. Then you have more options
that you can choose from. Obviously, we started
with the doughnuts, then you have the pie, and then we have the line graph, and then we have the columns. So as you can imagine,
this is great. It takes literally
less than a minute to update your types of donuts, obviously, depending on
what you are creating, and then you can add
more columns like this. I added cookie, and then
I'm just going to leave, let's say, five of them. This will automatically adjust. As you can see, this will
automatically adjust and then position however
you like to position it. And then you can
just click on this. This will automatically provide this presentation for you. So I don't know what
you can ask for. This is a great tool. I've been using it for the
past couple of months. So you can see that
we can use these. Obviously, I'm sure you will
come up with better options, better way to deal
with obviously, this doesn't go with the topic that we are
creating this presentation. But what I'm trying to show
you the endless opportunity, endless ways you
can use, obviously, these donut options, and then you can click
on presentation, and you can see how
beautiful it is comes up with this we
have created here. Now, let's go back,
and what you can do, you can also click on this plus button to
import a blank space. Then you can import a
few blocks from here. Let's say you don't want
to have an empty box, empty card here, so you can just come to Command Z, go back. And then I'm going to just click on this chart in diagram. And then I'm going to bring this one icons with
text and layer. So I'm just going to put
it here in the middle. You can see this line growing, and then you can
just leave it here, and then you can see
that this gives us an item description on. I'm
going to fill this one. See you provide all these
details here in each item, then you can go ahead and
click on this item box, and then you should be
able to have an image, edit image, click on here. Then you can select
different options from here. But what I'm going
to choose is icons, and then you can search
different icons. I'm just going to randomly choose icons like this one here, and then you can also search here we're just going to search for a microphone
and let's put it here. So as you can see that you
can bring one of these box. Doesn't matter which
one you're bringing, and then you can
make a card itself. And you can also go ahead
and add more items. This will automatically adjust. If you want, you can move around different
options here and there, and I'm just going
to bring and leave it up to three of them here. You can add title here
if you'd like to. As you can see this also
becomes a cardio itself. These charts and diagrams, use as many of them as
possible weekly calendar, Band diagram, target diagram. This is all you need to create professional
looking presentation. Let's move to next lesson. Now, let's talk about templates. So if you click on these car templates at the very top on the
right hand side, this button here, then you
can see the blank templates. This gives you a template
of how you'd like to have a new card or
presentation slides. Let's say we are going to
choose this one, the timeline. So we can just bring it
here and leave it here. This gives us a new
card with items, and then we can just hype
and then add our items here. So as you can imagine, this will automatically
add more options for you. You just need to click on plus. You can see that
these templates, they are already built,
just not updated. So you can click on this
template button on the top, and you can bring
different templates. You can just only bring one template just regarding
YouTube video hair. So I'm just going
to bring it here. You can see that this will
be automatically added. Can also bring this inside. So this would be a nested one. So within presentation,
within a presentation, you have this like nested card. So you can click on it, and it can expand and see
what's in there. I'm going to take a
couple of minutes to edit this and
see how it looks. So as you can see,
this automatically provides us with the
animation as well. Okay. So with this page, now we have the options. So let's say you would
like to have a video, but you'd like to
have it hidden, not within the full page. So you can just click on
this and then bring it here. Let's say you watched,
and then you can also put it back,
collapse it back. And then you have the tools. You can go ahead and
explain it to your class. Whatever the reason you are creating this presentation for? And let's see a few more
templates, cut templates. So you can see that
you have pyramids that we have already installed
here on this pyramid here, and you can edit them,
add more pyramids, more slides of the pyramid. So you can see it automatically adjust This is very important. It automatically adjusts
however you like to. You see this already here, but you can also get it from pyramid with different
types of pyramids, step t pyramid,
left step pyramids. You can see that
these are lots of options with just
the card itself. So you can just print drag
and drop the donut chart, circle chart, all of
these options that you have at the options as well. So from here, you can
just edit them and get a very good looking professional looking
presentation for yourself. Next, we have forms and buttons. So let's say you'd like
to get your students or your user of your
product or you'd like to have some sort of answer
from your Google phone. You already have a
Google form and you can use Google Form
directly from here, import it itself
or within a card. So you can just depending
on how you like to have it, you can just put
it here, and then just select the URL here. This will automatically
import the Google phone. I'm just going to bring
a random Google phone to see how it looks to
show you how it looks. So I just created a random font which I
would like to add here. So let's actually move
it to itself and block. This will give us
more space here. So you can just click on
this and then click on Edit and then just
provide the link here. And when you paste it, it will automatically load this for you. So you can go ahead and
use this option as well. And then you don't even
need to do anything. You can get directly reviews, whatever the reason you are
want your Google form to be. So you also have other
options from here, you can select the other
foam that you can. You can just select
the type foam, and I'm sure that Gama this AI tool is bringing
more options in the future. So this is it for this lesson, and let's move on
to the next one.
9. Teamwork & Analytics: Share, Collaborate, and Track Performance: So let's say you'd
like to invite someone to work with you
on this presentation. So you can go ahead
and click on Share. Then you have collaborator. You can add their
email and send them, and you can also give them the access if they would
like to have editing access, full access or just
to come and comment. You can share with
people how you like to anyone with this link
will be able to view, or if you want, you can
let them edit as well. Then you can export
this as PDF PowerPoint. You can take it
to the PowerPoint and then edit it
over there as well. Not only that, once you
share with your colleague, or friend or people, then you can also see
the view analytics. So when you go there,
you can see that people who access and
their email address, all these options that you
want you can see here. You can also go to
the card engagement, and you can see who spent
most of the time where. You can see all these
options when they checked this content and which
one was mostly viewed. So you can get some sort of overview of this how
it's working for you and you can also embed it to
website if you want to, you can leave it to website and when they click
on this source, they will be able to
come and see so this is important bits as you are going to probably
work with someone else, or if you want to you
can share with people, and then you can also
see the views of it. Let's say you don't want
the last edited time hair, you can just get
rid of this hair. And also, if you'd like
to change this name, you can go to the setting
and change it from there. And also, you can
change the alignment, however you like to
just leave it here on. So let's go ahead and see how it looks. So click
on presentation. This comes with this full page and then use the arrow
key to see how it looks. I'm sure you will come up with better looking presentation
for your own work. These are very interactive
slides as well, so you can see that it also shows the count number
of counts here. You can just to the next one. You can see this circle and then you have other
options at the very end, you have this, and then you have also these slides which
you can leave review. You see that they don't need
to go to anywhere else, open and go to a new
webpage or anything. They can just directly
submit it here. You can also put spotlight
to make it bigger, and then you can go back
to its slides as well. In the next lesson, I'll
show you how it can work on multiple presentation
at the same time.
10. Pro Tips: Organize and Access Multiple Projects Like a Pro: Working on multiple
presentation, how are you going to access it and how are you going
to create more of them? So you can go ahead and click on this home image and you
can come up with this one. So here all these
PowerPoint that you are going to
create or you've already created will be here. So you can go ahead and click on Create New and obviously go back to these options
that we started earlier. You can generate more and more. From here, you can also
see shared with you. So other people
who worked on it, they will be able to
share with you as well. You have options for templates. You can go ahead and explore other templates and obviously
you can use them as well. So you can click on Preview, and let's see this template. This looks very nice, and you can go ahead
and use them as well. Next, what you have here
inspirations such as these, you can go ahead and check
how other people used, and then you can get
inspiration from them. Teams, obviously,
you already use them and you can import themes,
which is, for example, you have already created
Powern slides, Google slides. You can import them,
and this AI tool will automatically create a new theme based on the existing templates. I love this feature.
And I'm sure if you already someone who
is using templates, and you can you will
be able to do that. So go back and custom fronts, you can bring more fronts. Obviously, for this, you
have to use the pro feature. If you have a particular
custom fronts, let's say you already built
your own custom fronts, you can also upload it here.
And there you have it. I have locked this tool
for past couple of months. It's been amazing using this, and I'm sure you are going
to go ahead and use this. And there is lots of features, lots of op themes, and then you can use it. I'm sure you will
come up with better looking, professional
looking presentation. You will see how it will
help you to save time, save lots of time to
bring all these images, all these texts, and this will help you to increase your
efficiency in the work.
11. Congratulation and Next: I hope you enjoyed
this class so far. Please go ahead and submit
your own presentation. I would love to see
what you have created. This will inspire others and also you can get inspired
from other people. So go ahead and submit
your presentation. You can do it multiple ways. Take a screenshot, and then
share the link from here. And we'd love to see
what you create. And if you have
found this lesson, this class, any helpful, anything that you can
take out from here, go ahead and leave me a review. If you're struggling
with anything, go ahead and start a discussion, then I can help you, as well. And if you're
someone who actually wants to level up your
content creation game, go ahead and click
on my profile, you'll see a course for AIF creates five Tools to level up your content
creation game. So go ahead and give it a try and I will see you
on this next lesson.
 Sid, Teach Skills That Make U Money