Transcripts
1. Introduction: Hi creators. I'm Karen. Today, you will learn how
to create ads like this. Now, this ad is totally
generated using AI. You are hungry to unlock the professional level power
hiding inside Adobe Firefly, Photoshop, and Pam Pro, then this advanced course is exactly what you have
been searching for. This isn't another
beginner tutorial. This advanced course is designed specifically for creators
who already know the basic but want to master the professional techniques that separate good work from
extraordinary work. You will learn advanced
AI workflow in Adobe Firefly that most
creators don't know pro level Photoshop composition
technique that is AI within Photoshop and cinematic editing workflow
in Premiere Pro. That will make your
work look like they came from professional
production house. This course is perfect
if you are already comfortable with the basic
tools in Adobe Firefly, Photoshop and Premo Pro. You should know how to
navigate these application, work with layers,
and have completed at least a few project
in each program. Your class project
will be creating a complete creative campaign that combine all
four application so if you are ready to stop being limited by
basic techniques and start creating work
that truly stand out. So let's dive in s in the
2. Select Product and Environment for Inspiration: Right now, I'm using this
image as a reference. I have used Pintrust for
the ideas right now, once you go to Pintust and right click of any of the place it and right click
Save video frame as simply have to click it
and it will save into PNG. So I have used this ad for the reference and
for the inspiration and right click Save
as video frame, and these all are frame
that I have saved so far in the ad for
creating my ad sequence. Right now, I'm trying to
rebrand it using nanobanana. How we can do that,
go to Google Gemini. And upload this image. Now using Freepik,
I'm generating image. Basically not generating,
I'm finding an image of a city view city bade View. Right now it's in icon, so I have to go to Freepik. As we can say, let's try to find so what I'm trying to do, I'm trying to search
for image that is give me a space where
I can put my product. And also, first of all, I thought I could place this
product in a city view, but I think that
would be unreliable with my product because my
product is related to nature. So after that, I have a thinking process of
creating a forest, not creating a forest, finding image of a forest and then place my product
within the forest and animate that particular image that I have created
using Adobe Firefly. So this is what I am
thinking in my mind. This is also AI generated, but let's find another one. Yes. This looks cool. Let's download this image
into the size of medium, save it in our
particular folder. Now this is the image
and this is the
3. Select Product for the Ad video: So now let's try to add image
of beauty product that is. It is a full workflow, how I am thinking, I'm sharing what I think, how you can select your product. If you want to generate your
product, you can do so. If you want to find
that product and re edit that particular
product, you can do so. It's totally depend on you. If a client shared the
image of the product, you can also use that product. In most of the cases, the product has given
with the client. Right now, this is just an imaginary product we are using. Let's try to add this one. Download this image.
4. Using Ai Feature in Photoshop: Now let's try to combine
both these images. But before that, let's try to it this specific image
in the Photoshop, and I believe you know
the basics of Photoshop. Within the Adobe subscription, we got the Photoshop. That is why I'm not using
directly nanobanana or Google Gemini because
I know the Photoshop. By using the basics
of Photoshop, you can also edit
your own images and edit according
to your needs, you don't have to type
prompt each and every time for each edit
in your images. Right now, I'm using a Photoshop and this is also save your credit within
your subscription. That is also important. So let's try to right now I'm using Adobe
Photoshop Beta version. You can find it in Adobe
Photoshop Beta version. I recommend you to use Beta Version or install
Beta version to find exact same option given
in this particular class. By using selection tool, I simply select
the product within the image and try to replace
it with my brand project and generative fill
use image generation, Google flux, let's try to use let's remove this
one generative pill. Remove. Remove. It will automatically remove
within the Photoshop. It is obviously AI features
right now in the Photoshop. As you can see, it's
completely removed. A little bit of image
we can see here. Let's try to remove it again. As you can see, I have
not selected our area. Now it will remove completely. Let's try to remove it. Wait for some time, and it will automatically
remove. Now it's remove
5. Compositing product with the background in photoshop: Now let's add this image here by using tool. Let's try to remove
background here first. Within the Photoshop, there are so many AI tools now available where you can remove the background with just
one click Add image, adt with just one click
using prompts and so many more things
available in Photoshop. Import background
harmonize. Right now, I'm trying to harmonize it, not importing a background,
try to harmonize. Once you click harmonize, it will automatically adjust the image for you
with a background. As you can see, it's harmonized, but a little bit of shadow and highlights has
been inverted. Let's try to add up
brightness to this object. Yes. Yes, a little bit whiteness can make a
much difference here. Now you can see it
looks dull before, right now, it's perfectly
fine. Now let's save it. Save this project. Beauty cream, I have saved this project, so you can use directly
in your project. You can play it out with
6. Compositing the product with new background: Now, let's try to add a
background here also. Now let's use Google and
no banana for what I am thinking about of a second
frame that is this and this. Add this here, and by clicking
this, this is the image. Let's try to export this image. Quick Export as PNG, done. Now, ask Google Jamie that place this VAT product into the forest image size of product is big for the
Advertisement purpose. Give it a three D L for realistic image. Now let's see what it
will give us purpose. Now, let's wait for some time
and see what it will give. Yes, it gave us okay result, but I think let's try to
download this image and again, why not harmonize this
image with this again? Let's try to use
Photoshop again. I'm not actually happy with the result,
create composition, the forest and our
branded cream in Photoshop because I don't like the result
in Google Gemini. This and this product here. And try to harmonize this. I'm thinking about
different results, so I think the result
that we get from this generation is
not really good because I think
AI is not capable of the thing that we are
thinking in our mind because we do have to
tell the AI what we want because they don't
understand or think like us. Basically, AI is not perfect. We have to create a perfect. It looks okay, but
not that much. Now let's save this project. Let's try different
image so that we get a better visibility
for our product. I want this type of bouquet eat. For the inspiration, you can use any medium from
free pick to pints. It's totally depend on you. Right now, let's change this forest image
to different one because I don't
really like forest. Guess. We can use this one
because it has a clean area, so we can directly
put our object here. As you can see, and now
harmonize this, click it. All these AI features are
in Photoshop Beta version, or within the Photoshop, you have to simply install
the Photoshop Beta version, and you must have the
Adobe subscription. So this is our second frame
that we have generated. And right now, let's
try to This is okay. Let's try to add the
brightness on this layer also and change the color
level color balance. Yes, now it's look a little bit of natural, not like greenish. Now let's try to
save this image, J PEC, export, and
save this image here. Right now, we have
two images with a different background.
Here is the image. Let's try to add this image here done and save
this image also. Try to save this image,
beauty cream two, that is B UT Green two, this is our second
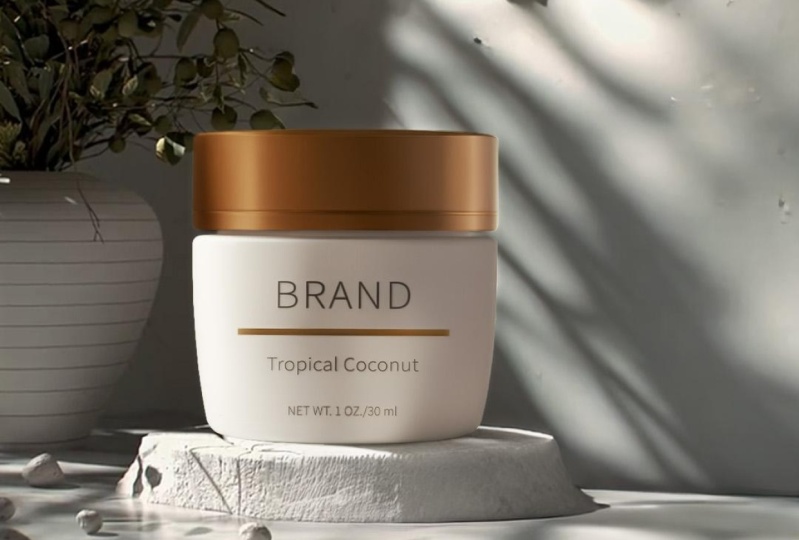
image and first, second, it has a coconut,
tropical coconut. Let's try to think differently in this
particular sequence. Let's try to first
7. Product shoot with character consistency: And done. Now let's try to replace
this in nano banana and use this product image place the product with the coconut from hand of the model. Let's see what we will get. It enting the image. No, it's totally bad. I don't know why can't
happen sometime. Let's not replace the
product with a coconut. No replace, it
doesn't get detrit. Let's not use this new chat. This one here. This one here. Now, let's change a prompt
a little bit so that we can explain the gemini that this is the product,
this is the character. Character is holding
the product. The character is holding the
EAUT product as shown in the image for and character is using the cream on its face as for product shoot. Let's see what we will get. Now this is the
image that we got. Let's try to save this image
and we have this image. This is the image and
this is the image. As you can see, these are
both the same person.
8. Using Google Gemini generate prompt for Adobe firefly: Let's try to first use our workflow in F fly
within the fiply. Let's try to add a video here, 420, let's try to
add CS 720 is okay. We try to add a wide portrait vertical 24 frame seconds and let's create it
five second of video. Let's try to ultimate
professional quality and realism. Let's try to use
this of physics. Let's try to use this one. Now with the frame,
what we want, we want as first
frame this has to be a first frame done this
has to be a second frame. Let's try this done. Describe your video generated. What we want, we want to be the image that is ask
Google Gemini, that is, give me a prompt for Adobe fire video generation that is from one frame to other. For the better result and
better understanding, let's try to add both
the images here, understand both the images, and give the animation prompt so I can use in the adope Fire, fly, simply wait and
see what we will get. Let's try to use it and
see what we will get. I'm not using 1080 because
it might take so much time, 720 is better for me. Let's try to generate this
one and wait for some time. This is the result that I got. The results are really awesome, but the transition is really
9. Animate 2 Frame using Gemini and Adobe firefly: Try to first of all,
save this image. First of all, let's
save this one in our particular folder
so that I can share all these material
with you directly and you can obviously find
this in the project section. Now, we have a first
frame that is animated. Now, let's try to remove
this one and this frame and add this image and ask Gemini
to give me the prompt fold. Simply ask as we have the
cream as product and it is coconut cream we are going
to let's give the prom that the cap open cream levitate on air and a open with so many coconut coming out
from the product. Now let's ask for the
prompt from Gemini, a magical smooth transition. No, this is obviously
not we don't want. The product jar label topi
gently in the center of frame, golden cap and this white. You can read it out. I'm
just reading it very fast. You can read it
out, but it says, let's try to place this here. Let's see what we will get. I think this might not work. As of the beauty of the label to gently enter the
faint golden cap, slowly open and cares the minus perfect from
coconut taste tumble out and dip into the air
cating natural aura. Let's keep this one only
because understand, AI always work in a
step by step manner. Not in a way like we think, we simply think about
the whole sequence in one go because our
brain works like that. But AI, its work only with
one command at one time. If you ask it to do so
many things in one time, it's got hallucinated and give you a result that
you really don't like. Let's wait for some time again. I really don't like the result. It's look funny to me. Now let's try to add
10. Understand Prompt Engineering for the video generation: Now let's try to
add a prom that is in the TD environment, the product levitate and trees and animal come to see. No. Animal come to see. Let's see what we will get
here and generate again. The TD environment, camera
zoom out. Not animal. Let's give a specific
prompt that is deer, that is deer, come to see. Small deer come to see,
let's see what we will get.
11. Animate 3 frame for the product demonstration: I like this result.
Like this result is really much
aligned to my vision. Now let's understand that the Gemini prompt
is not that good. We have to think a
better way and give a specific instruction
to these images. Now let's understand and create another image
with the brand. Example, let's try to add this one and try to
use it in Photoshop. Right now I'm using again
a Photoshop and again, this is the image and I want
to increase the size of the image that is I'm using I want to use
generative Pill pot. Let's try to add
this image here, and again, generative pill. Control D, I'm using
generative, generative fill. Let's not use any protein simply you have to
click the generate. It's perfectly okay. Now, use generative
fill here also. Let's select this one and
use generative fill JPG. Now we have perfectly
aligned frame here. Now let's try to
save this frame, export and save this frame. You t three, and save it. You can also experiment
out with different from, so I will give you
a different result. It depends on the variation. Sometimes it's not give the exact results
that I got here, it will generate
different result for you, it doesn't matter. If you want the
exact same result, I can't promise that, but you will get the similar
result that I can promise. Right now, let's try to
create another prong that is product come on
the surface and cap of the product open in the open and zoom into the
product surface with cream drop wave, cap of the product open
and zoom camera move from bottom to up
into the product. Let's see what we will get here. In the end, we will use all
these video that we have generated into the
Premiere Pro and create a perfectly
aligned product. Video. Let's wait for some time.
12. Animate new frame for product: Now let's play this out. Can you imagine how
this really work? It's awesome. Once you fast forward it,
it's really awesome. Let's save this one. Yes, now let's again
change this product. And with this product,
now let's change. Again, right now, I'm using another image that I have
shaped before so that we can create awesome effect
using this virtual aura, we have to remove this one. Again, we are using
Photoshop here. Let's try to remove
this one again and remove it looks
really bad to me. Now let's try to remove this particular
Control D and done. Try to remove this one, remove. Yes, now it's working. Now add this produ The Let's not try to harmonize this because
it looks perfect for me. Now, let's save this
image cream four, save, and let's this is the image and try to
add this image here. Remove this one from here
and again, add here. Now let's add a prong to
what we want is that, give it a natural look. That's 200, give it a look with coconut, burst behind the product, burst behind the product, keep it simple as possible. Ken give it a natural
roof, move camera. Zoom into the product. That soul. Now let's
generate again. Have we saved this video? Yes, we have saved this. We have this. I have tried to create another one here
and it looks cool. This is the video that
I have generated. This is the frame
that I have used from Pin trust itself and
I've just animated this. It's generating again.
Let's wait for some time.
13. Download extra material for the advertisement video: This result is not really good, but let's try to give
it a natural look not natural because of the
natural looks green thing, coconuts behind burst
behind the product, let's water is perfectly fine. Move camera zoom, move the camera from zoom
into the scene. That's all. Let's try to
generate this image again. Now let's generate it and
wait for some time again. Now, let's see what we
will get into the scene. It's actually moving
out of the scene. No problem, but it
will work it out. We will make it work it out. Let's save this one.
Let's group it by type and we have four
different scenes. We have four different
scenes and let's try to add a different scene from Piza if you don't have
a free pick plant, let's try to add a pix. Pixel is a free website
where you can coconut, try to add a coconut and
with the video, select it. Let's see what we get here. Do we have coconut,
coconut, coconut? Let's see if we get a coconut
here, mushroom coconut. This is AI generated video. Let's try to add yes,
this is what we got. Yes, this is what we wanted and let's try
to add this one and let's download this in a high
quality. Save this here.
14. Generate Model for product: Create image within
the Adobe Firefly. Now let's try to create age Adobe Firefly image
for our newest model. What we will get here, Adobe models that are
standard features. Let's see, do we unuted
XA Adobe models? Premium features
usually ten to 60. We have a quality of, let's try to generate image that is pretty model
within the Adobe five flag. Let's try to generate
image, pretty model. Holding a coconut
in her hand pose as for duct shoot and change the dimension to vertical and
let's generate it. Oh, it's a naught generated. Let's see model
holding a coconut. Let's see if we get to Cool. It looks awesome.
I like this one. Let's try to save
this one. Save.
15. Animate Generate the model with the product: Now let's try to animate this with our
Adobe firefly again and. Let's not take it girl
because A I don't understand. Let's call it character holding
the coconut and smiling. That's all smiling. Let's try to generate this. This is a result that we
got and it's awesome. The image that we have generated within the Google Gemini, I just drag it here. Again, I've used
a prom character, apply the cream product
on her face with smile. Let's generate it and
wait for some time. Our video is ready. Let's play it out. Whoa. It's awesome. It looks natural. Cool. Let's save this. Now it's time to move
into Premiere Pro, and let's see what we
will create using this. And we have to find
some music from the Internet for our
advertisement video. Let's find some music.
16. Select right music for the ad video: So right now, I am
using Envato elements. Let's see what type of music we will get
from Envato Elements. By the way, if you
don't know how to search for I Wato element, and if you don't know how to
work with N Wato elements, you can simply check my course that I have already
created on In Wato elements that is very helpful course for the beginss if you
don't know how to use N vato elements because you will learn how to
create your website, advertisement video using
Iwato element itself, how to create images, videos within In Wato elements. There are so many things in the I Wato elements you can try it out and experiment with. Right now I'm using a sound that is with the length of
at least ten to 15 second. And let's see advertisement. Let's see what we will get. I think it looks cool, right? Coconut NF and coconut, I think we should
find a natural voice. Advertisement. This is
the sound that I like, like a fashion week sound. Now let's download this
sound in our main folder. You can find this sound within the main folder that
I have shared with you for your specific
project so that you can use it and create
your own video. This sound is only
for your project, you can't upload this directly into social
media if you do, then you might get a social media strike or
content copyright strike. If you don't want
that, you can find your own sound within Pixa Bay or similar
sound you can use. This is for demo purpose
only and for your project. Because if you get
your copyright strike on this sound, then
you might talk. Know how to remove
this strike or you don't have access to
remove that strike, then you probably have to remove the video or post itself. Right now, let's go
to Premiere Pro. Now let's go to Premium Pro. Now in the Premium Pro, let's create a new project. That is, this is a project
that I'm working on, so please don't mind it. Let's try to create
Cos Mt add word tian. This is the latest
version of Premiere Pro. If you have a
subscription of Adobe, you might have this access. I will be sharing this project in the project section with the course material itself
so you don't have to worry about the sequence, and you can practice
it out directly. Right now, let's try to
change the sighting to 108 1920 and use Sequence
name is main video. Now let's double clic it. Yes. Within a timeline, let's import our sound here. Postopl, let's import this
pen in second sound. And see. So I like this sound.
17. Edit the ad in Premiere Pro: I'm using this exact process
that I use for my client. Right now, let's try
to add the video that we have used and if you want to generate more
videos, you can do so. Now let's save this image. Sorry. Now let's add this image. Yes, sorry, not
image. This is video. This is the video that
we have generated. This is the video that
we have generated. This one, this one, and this one coconut. Now let's try so let's try to combine all the videos
that we have created into one sequence within
the Premiere Pro and I believe you know the
basics of Premiere Pro. Let's try to right,
click Export. Let's click scale to frame size, and as you can see, there is not much different
within 1018720 P. Let's try to add this this and keep this one is here. One more thing,
let me let me do. I have enabled these
features so you can understand what I'm doing within my computer and which shortcut I'm
using what I'm doing, you can check it out
by watching this. Right now, let's drag this one. I simply did the cut here, how we can do that
with the razor tool, you can do so control that. I have created a shortcut within my keyboard that is
K for directly cut. Way more easier for me to
edit videos very fast. And let's see coconut
cream, and this one This one. After that, I want this to be from the nature, coconut. After that, again, coconut. Again, I want this to be This is how you can add here. First coconut appears,
then coconut. Then within this
cream, this appear. Then I want this to be appear. Right, click, right, click. Speed duration.
Diverse speed, click. This has to be here, ten here. Ten oh Tun Indian. This is the brand. That's all. Now let's see how we can
arrange it with a beat. Let's lock this one. Increase this one. Four speed up, or you can do simply right click
speed duration. That's all. One more
thing you can do. As you can see, they
are three beats. And move fast. One more thing we can do here. Right, click speed
duration reverse and then War let's do this. Now, move it. It's come directly from
the nature, Ccnect
18. Professional Color Grading and finalise the result: And let's try to add a color correction here.
How we can do that. That's tometric color
with the temperature. Yes. Now exposure, contrast, highlight, now it looks
better and shadow little bit, white, yes, little Black. With the creative, let's sharp bit of it
and keep it vibrant. Now, as you can see, the difference with the color. Let's move it a little bit fast. And here. Let's check it out. Let's move it a little
bit faster here. And hair, also tongue, fast. It looks too fast to me. Let's slow it down with
the art and stretch it again. On the beat. Let's and R again and
move it gain here. And let's fast forward. R. With this, now let's fast forward over
it again with the R. I see what we will get. Does it look nice? Let's
see out and press Enter. Move fast forward. And done this. Desert this. Applying the dream and after
that, let's move forward. And and today. That's all. Let's see. With the nature sound, let's add a background sound
of the nature, give it a realistic approach. Go to music, sound
effects and nature. And download this one,
current download. Now let's save T one, nature, extract all
and at the sound here. Get a bit of. Yes, done. H Yes. Perfect. So we have created an awesome ad using just AI,
artificial intelligence. Now let's control and render this out and
see what we will get. So add video final.
I've saved it. Let's render it out with the
duration match sort setting. Now let's render this. So now let's see our ad. So we have created
our very own EI generated ad for a brand, but the name of the
brand is brand. So we have created a perfect ad of our cream, a coconut cream
19. More inspiration for firefly video: Right now, I have created
another image just to give you another example of how we can use perplexity
in the perplexity, I have used this reference
image, as you can see. This is the reference
image that I have used from within the Pinterest, I have searched for
advertising video and this come up in front of me and I took a screenshot of it and upload it
in the perplexity. After that, I have asked perplexity to
change the color to blue and with the
example like this, generate this reference with blue cloth and cosmetic
brush all around. This is the cosmetic
bloods with a blue. Now after that, I have opened
the Adobe Firefly with the RAT selected and all the brush moving around a character in a three D
environment levitating. After that, simply
click on Generate. Somehow right now this
feature is free with zero credit so I can use
it for unlimited time. There is a offer
within the firefly. You can use any kind of
video, you can create it. One more thing I have for your reference and
for your creativity, I have downloaded and save
so many examples so you can use it and share with me
anytime in the project section. I just want to see the
creativity in your mind, so you can share any
example with me, animate any of this frame or you can generate your own within Firefly
and share with me, saved all the frame from
within the printerest. You can find them too
with your new example. It depends totally on you.
20. Project Details: For the project, you simply
have to follow the step. All the step that I have
taken in the course, you have to simply
follow all the steps, and you will find that
course material within the description or in the
course material section. And one more thing,
don't forget to leave feedback for this course. And I want to see your project within
the project gallery. I will personally give
a feedback on it. I will see you in
the next course. Thank you for watching.
 Karan Rathore, Creative Technologist: Video Editing, AI, and 3D