Transcripts
1. Introduction: Creating motion graphics
like this used to require an army of animator
and week of rendering. But the wall between
the great idea and a final render
just came down. Hi, I'm Karen your
instructor for this class. I have spent my career bridging the gap between complex
software and creative vision. And in this class, I'm showing
you the ultimate shortcut. We are going to master AI
native motion graphics using the cutting edge power of magnific formally
known as freepik. This class is for digital market content creator, video editor, and a TD artist and
anyone who has ever felt locked out of motion design
due to technical complexity. You don't need a high end
studio or years of experience, your computer and
your curiosity. Your project for this class, you are going to build
this exact intro video. I'm pulling back the curtain and giving you the exact prom, the visual ideas that feel cinematically effortless
and time transitions needed to recreate exactly what you are watching right now, you will learn how to master
high and AI prompting, cinematic upscaling
and slimless scene transition. We will
go step by step. We will use magnific to
generate our base scene and establish a rock
solid story line or we can say storyboard. Then we will breathe life into those assets to create a professional motion
design sequence. Don't worry, take a deep
breath and just jump right in. I will see you on the top floor. Our first lecture is
waiting. Let's get started.
2. Understand the interface of Magnific Spaces: In this particular lecture, we are going to learn how
to use Magnific Spaces. After that, we will go to Advanced version of
creating images and videos. I'm sharing the UI with you so that you can interact
with it later on. So once you go to
magnific.com or freepik.com, they will redirect
you to same page because Freepik has been
rebranded to Magnific. Now, when you go to Spaces, you simply have to go to new space and you have
to click on New space, and it will generate a
brand new space for you. What you have to do is simply have to change
the name of the space. If you want to
create a new space, you can do so and if you
want to create or rename it, you simply have to demand it. That is sample. So the space has been created
and it will show up in your front page of your magnific account
when you go to Spaces. When over over this, you can see the nodes, cut, stick node, anything you
want to go to a PV section, undo it, redo it. If you want to do
anything, you can do so. From here, you do not
have to do anything, you just have to drag a simple image or if you
want to drag a node here, simply have to right
click or select here, right click or select here, it will open the same thing. Image generator, if you want to generate a
image, you can do so. That is cute cat jumping. On building anime style. Okay. Now, this is a
image generator node, and this is a video
generator node. If you want to give
a reference to it, you can simply upload. You simply have to drag
and drop the image just like this and connect it like this. That's
all you have to do. And it will automatically
connect it like this. You can see this
is a connection. And if you remove
the connection, you can do so like this. It's really easy to do that. If you want to add
external text, if you want to add
external text, like right click text, you can do so like this. Simply have to type
anything here. If you want to add assistant, right click, add assistant here, you can do so like this and
assistant will help you with the generation just like this, double copy and paste
it like this, paste it, and now this is free, meaning, and once you run it, it will run on this node. With this, you can simply
connect it, and after that, if you want to run
the prompt here, you can do so simply
have to run it. And if you do not
want to run it, you simply have to if you want to generation
two or three generations, it's up to you. I just want it one generation. Once you click will see so many, you will see so many
models available here. I'm using Nano Banana, so we are going to
use Nano Banana and some of the GPT
models in the course. If you want to
change it Image size you can do so simply have
to run it. That's sold. Once you run it, just
like image generator, it's generating a image, and just like video generation, it will generate the video. And if you want to connect
a reference frame here, you can add a start image, you can go to image, you can add reference image. If you want to add input, audio input, you can do so. If you want to reference
image, you can do so. Once you say will see the
image has been generated, and it looks cute. So this is just a
basic so that you will understand how to use the
spaces in our upcoming lecture. Once you understand
this, I recommend you to practice at least 15 to 20
minutes after this lecture, how to add all these things. It is really easy to do that. Once you get the hang out of it, you will going to love
the upcoming lecture. See the upcoming lecture.
Thank you for watching.
3. Getting Inspired from Pinterest and Create your unique character: This lesson, I want to show you how powerful Pinterest can be as a source for inspiration for your
creative projects. All the inspiration I'm
using in this workflow, it all started from Pintrust. That's where I
found the reference that helped me build
this character. Here what I did. I collected reference images from
Pinterest and then I took those reference into
Gemini Google AI tool. I simply uploaded my Pinter
reference and asked Gemini to create a character for me that would fit
my course style. After a few trials, Gemini gave me an output
I really liked. So I took that image
and drag it into my magneific workspace
that we call spaces. Now, alongside the AI
generated character, I also found a character
reference on PintrS. Using that reference,
I generated a prom inside the
image generator. And for this, I use
Google nanobanana too. I connected both reference together and the
AI character and the PintrT D reference and added a simple prom to
guide the generation. Now the original image that Google's image generator
gave me was low quality, but I love the green
version the most. So I worked on building
a mood board around it, and then I explore different
background in Photoshop. To see what look best
with my character, I exported it as a PNG, which you can also do
directly within Magnific. It's completely up to you. Once I had the background
and the character ready, it was time to upscale the image because the original generation
was low resolution. For this, I used magnetic
AIs image upscaler. A is the key technique
I want you to remember. When you use magnetic AI with
multiple reference images, you need to clearly tell it
three things in your prompt. Which image to use as
the style reference, which image is the best
subject you want to transform, what background you want to use. Once you give these
three ingredients, magnific AI works like magic. It combines everything
intelligently and generated a
beautifully unified image. After upscaling, I replaced the low quality version with the new high
resolution image. Repositioned it and fed all three references
the main character, Toby, his background, and the painter's
texture reference. My goal was to give Toby
the same kind of texture and three D feel I found in
that painters reference. I dit a prompt, recreate into style and three D, and now we wait for
the magic to happen. In the next video, we will see exactly what output
magnific AI give us, and I think you
are going to love.
4. Convert 2D Character to 3D Character: Right, so let's look
at the result we got. And honestly, this
is not what I was expecting and the character looks like it's
made out of clay. That's clearly not the
TD render quality. So the problem here
is not the tool. The problem is our prompt. We need to rewrite it
and be more precise. Let me show you
something very important about how prompting
works in magneific AI, and this applies to any
image tool you use. When you are using
multiple reference images, you must clearly tag each
image in your prompt. You need to tell the AI. This image that is Image
one is my style reference. This image that is Image two is a character I
want to transform, and Image three is
the background. If you do not tag them clearly, the AI gets confused, and that's exactly what
happened in our first result. So I have now rewrite the
prompt, and this time, I'm also switching to chat GPT two image model to guide the image generator
with better control. Let's run it and
see what we got. This second result is better, but still we are
not quite there. The character is now rendering
in two D with some shadow, but I want it complete
full three D render. The D and volume are not coming through
the way I want it. So let's try one more time. So this time what I'm doing, I have add a new box
that is image generator, and I'm using the
generated image that we have already generated, and I connected this image
with a new generator and I'm asking it to create it into a three d style render.
Let's see what we got. This time, with a simpler,
more focused prompt, sometimes with AI tools, simpler is actually better. When you over explain
the AI tries to do too many things at
once and loses focus. Wow. Look at that. This is the result we want it. The character looks amazing. Proper TD render, gate depth, clean lightning, and the
style feels consistent. This is exactly what
I was going for. No AI generated images is over 100% perfect
stay out of the tool. There are always small
things you want to fix, a little color correction, small adjustment, a
small detail there. I'm bringing this into Photoshop for some
minor touch ups. On the final image,
and this is actually a great habit to build
into your workflow. A generates a heavy lifting and Photoshop handles
the finishing. So what's the big lesson
from this section? A bad prompt gives you clay. A clear tagged focus prompt gives you a stunning
three D character. Don't get discouraged. When the first result isn't right, that's completely normal. Rewrite, simplify and try again. That's a real creative
process with AI tools. Same in the next lecture.
Thank you for watching.
5. Using Photoshop the output for enhanced version: Now I'm working inside Photoshop
to enhance our design. I'm going to take advantage of its built in AI capabilities. Photoshop utilizes
Adobe Firefly to handle generative tasks directly
within the workspace. I'm trying to do here is to add the letter T onto
character T shirt, giving this character a
distinct recognizable identity. The base character looks
incredibly cute as it is, but adding custom writing will elevate the overall resign. Let's run the generation. As you can see, the letter T
has appeared on the shirt. However, the initial
style doesn't quite match what I have in mind. To fix this, I'm going
to refine my prompt, state that I want the
letter T to blend seamlessly with the
fabric existing texture. Now I'm going to
switch models to try a different approach similar to how we utilize upscale tools. Let's test this
alternate method, look at the workspace. Now this is
significantly better. To make it look flawless, I just need to brush
up the edges slightly so the branding looks perfectly integrated
into the clothing. When we zoom out,
the latter t looks completely natural and perfectly blended into the graphic. With that fix, I will save this image and upload
it back into magnific. At the same time, we can
clean up our project space by removing the old
placeholder elements. Just like this, I
increase the size of it, and let's select all
of them and move them aside so that it will not
take up my space. Clean
6. Using Gemini for Story board and visual ideas: And right now, I'm asking Jem
andi that, let's meet Toby, and we are going to
learn how to meet Toby. Basically, what
I'm trying to say, I'm trying to create a script, and I have a small script. In my mind, I'm sharing
it with Gemini, and Gemini will give me a
complete script out of it. And it will help me a lot, and we are going to create a video and out of this script. You can read it out easily. All these information that
I'm typing right now, it's totally simple to follow. This is the script that
we got from the Gemini, and you can read it out. It's really easy. And also Gemini has given me that visual information like what type of visual we can
create with using the AI. And now we are going to use
it in our video generation. Next, let's head over to Gemini to generate our
next sequence prompt. To give you some context, I gather these initial
visual ideas from Printerst. Now using those references, we are ready to generate
our main image. I have already uploaded the modified character we customize in our previous
photoshop lesson. Next, we will push this workflow forward by using our image
generation tools. I'm adding the image
generation node and inserting the core descriptive
prompt text right here. This text is based on the narrative sequence we requested from Google
Gemini earlier. Gemini provided a beautifully structured
layout sequence for us. I'm setting up the text using exact word for
word instruction. To guide the AI effectively, our main objective
is to visualize the specific scene concept
in a motion design style. While maintaining absolute
character consistency across every single frame. As you look at the interface, you will see exactly
where and how to tag your reference images within
the prompt structure. Telling the AI exactly
when to leverage specific reference
points is crucial. Depending on your
active workspace model and available system credits, you can select the best variant
to render out the shot. The generation process
is now complete. The tool has delivered an absolutely perfect
storyboard layout for us. Every detail we requested
is clearly defined here, including how the text integrated with the
visual elements. This turned out
exceptionally well, but I want to show you
how we can push it even further to add
extra distinct details. For establishing a basic layout, this is an excellent
starting point for our video project. I will go ahead and download this image and then re upload it so we can utilize it as a continuous stylist reference. This workflow gives you
a clear strategy for using Gemini to build
baseline prompt concept. Now let's head back to
our printers to pull out next set of composition, references for the
upcoming sequence. I will see you right
there in the next video.
7. Using Nano Banana 2 for Image Generator Node: Of this sequence,
I spent some time brainstorming concept
direction over on Printerust. I had this vision of creating a stylized motion
graphic scene featuring a cute character Army busy
at their workstations. To bring this to life with
high quality vocabulary, I asked Gemina to build out
a detailed prompt sequence. Now let's jump right
into our canvas. Here, inside magnific spaces, we are going to create a
fresh workflow from scratch. First, I will spawn an image generation node and immediately link it
up to our baseline. Character reference sheet. Next, I will take that complete high descriptive
prompt sequence we got from Gemini and paste it directly into our
prompt input box. For the heavy lifting
on this render, we are going to deploy the brand new Nanobrana two
image model with our node connection logged
in and model selected. Let's hit generate
and see what we got. And look at that. The final render is
absolutely incredible. Let's break down. How the model handle the composition details. I have created a new node that is image netter
node and connect it with our image reference and add a new prompt that
is by addressing the image by tagging
it at the rate and tag the image that is toby I have asked that
change this character to Rm outfit with lots of same character
setting on computer. Computer with gaming computer high end computer in a studio, keep the background
color consistent. By selecting a nano
Banana to model, I have hit Gent again. And this time we got an
army of our creator, and you can see this is
absolutely stunning. Mean while generating the image, I have been storm some ideas
from the Pinter itself. Again, I like this
character sitting on the computer and very
tired working on it. For this reference, I have simply copy and paste
it into spaces. Here is the character I added. And again, I have added a new image generator with the reference image
connected with it, that is our Toby and now, again, a second reference image
that we have copied just now from Pintrus have connected
with the image generator. So now we have connected two reference
images here and ask our image model that follow
the style of the image one, that is, this is the image that we have copied
from Pintrus and change the character to Toby with same background color
similar to Toby. This is a simple prompt, we do not have to be a
master in the prompting. Simple enough is good. So this is the image. And again, I am creating an image for another
sequence because we can generate
up to eight image in a queue or video generation in a queue at the same time. So it is really handle to
use this much generation. And in the second generation, I'm using Toby as
a reference for the image generator character looking from left side of f, looking like watching at camera only had visible,
but little test. Meanwhile, it's generating
the third image, and this is the image
that we have got here, and it looks really amazing. The texture is good and the
character is consistent. Right now it looks
happy while working, but I want it to be very
tired working on the desktop. Let's hit again. And right now, meanwhile, this generating
the second image. I have left check our
later generation. It's work, and it
looks really cool. This is what exactly I
wanted and it has created. So right now, our image generation is
working really fine, and it is working according to my imagination that
I have thought of. Let's get to our
next lecture and create some more images
for our new sequence. Same in the next lecture.
8. How to copy one concept of image to another image: Following the exact same
node based process. Creating a brand new
image generator node. We will start by pulling a reference connection directly from our main character, Toby. Next, I'm bringing in that new composition
reference asset. I discovered and copied
over from Pinterest. Just like our previous setup, we will link its image
output line estate into our generator node
to combine our asset. Now let's look at the specific
prompt I have added here. We are telling the AI to
place Toby right into center of our new
reference image image. We want to visualize
capture a sense of total confusion with
elements revolving around him and add a stylised black flower
right on his head. I have also included
a cleanup command to strip away any stray
hands and ensure the entire composition is rendered with absolute
sharpness and clarity. Let's hit the play button, run the model and wow
take a look at that. The final output we got
is absolutely amazing.
9. Using character sheet for combining your face with the scene: This time, I wanted to head in a completely different
creative direction. While brainstorming on Pintrs, I decided to move away
from modern workspaces and go with a retro old
school max style instead. Following up user step, we will simply copy and paste that design asset
directly into our canvas. Now, things are different and it's getting
incredibly excited. Because we are connecting three distinct
reference images into a single generator
node simultaneously. We are linking up a
main companion Toby, my custom face character sheet, and the vintage style
reference we just brought in. Let's take a look at the custom prompt layout and
structure inside the node. We are directing the AI
to place my character set persona into
the scene dressed in a sharp profession suit
with a clean haircut. Sitting comfortably
surrounding by a multiple computer setup inspired by our retro reference. We also want both characters, myself and Toby
looking directly into the camera lens for
the generation engine. We are sticking with our
heavy hitter, Nanobranat. The first render came
out incredibly solid, but to unlock its
full potential, I went ahead and took a tiny bit of prompt
detail for added flavor. Let's execute the final random
node and see what we get. And now, look at
this masterpiece. The blend of character
consistency, wardrobe adjustment, and that retro
coomputer environment turned out absolutely brilliant.
10. Using different share and scene combine them into 1 scene: For our next sequence, I found some incredibly
abstract shapes on pinters and brought them straight into
magnific spaces. Following the exact
same steps as before, we are going to connect three completely
different visual assets into our new generator model. Our retro computer, the
new geometric shape, and our main character, Toby. The key to getting
the pascalit from AI models is keeping
your prompt simple, but making sure you tag your reference images precisely
every single time. You tell the model
exactly what you want, drop the tags in the
right spots and let the engine weave them together. Now, honestly, the final result was something I wasn't
expecting at all, but it turned out
absolutely amazing. The way it planted the hard
tech of the intagmc with the flute shape and toby
design is incredible. That's the beauty
of this workflow. Every single time
you hit generate it, it sparks brand new ideas for
your next video sequence. Let's keep this momentum going, move forward and complete our entire
storytelling sequence. I will see you right there
in the next lecture.
11. Understand Variation node for better image generation : In this lesson, we
are stepping things up by exploring variation nodes. While it function similar to
standard image generator, it is vastly more advanced and operates on a
completely different level. Once you see the final output, you will immediately understand the true power of this feature. To get started, you first need to configure
your node settings. Here you can select the specific node variant
you want to deploy, customize your expect ratio, set up your grid
layout and define the generation resolution
for your output images. What makes this
tool so incredibly powerful is its ability to take just a single
reference image and automatically generate
multiple distinct camera angles from it. For a filmmaker or storyteller, this is the ultimate tool
for instantly creating extra role to plug into
your video sequence. Now that the generation
is complete, look at these frames. Each individual shots tell
a unique story of its own with stunning
consistency and detail. It is a really cool work for
you to add to your tool kit. Let's keep moving forward, and I will see you
in the next lecture.
12. Change the character and create similarly looking world : From Pinterest, I have
copied this frame. As usual, for my next sequence, drag another node from
our main image that is toby and ask it to generate
a new image generator node. With this connected,
I have connected the new reference image that
we have just copied from. In Pinterest, now, let's add
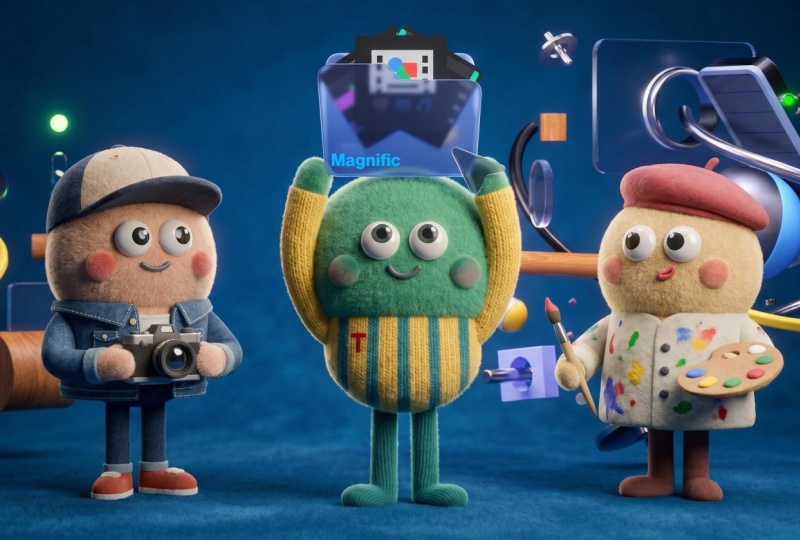
a simple prompt here again, that is our main character
holding the folder, that is the image
that we just copied, all the character and some
character looks designer with cap holding camera artist looks similar to
our main character, Toby, but different
get up standing beside the main character
that is holding the folder. On hands on hands and hands
are above the shoulder. Hope you get the idea that
how I used the prompt here, and this is the
image that we got. This is exactly what I wanted, and it's exactly created
the image that we wanted. A simple prompt
yet powerful one. I'm adding a new extra detail that is magnific on the folder, so we can just spot it out that we are talking
about the magneific. It's up to you if you
want to add it or not. I totally depend on your
sequence and your choice. I love to add small details
on our images and videos. That is why I always try
to make it more exciting. So after updated, after
adding the small details, I have uploaded into our spaces. See you in the next lecture.
Thank you for watching.
13. Why Reference Image is important for story telling: Trust help me so
much for the ideas. So I use regularly for the
frame ideas and using these as a reference images
and combine it with our sequence and
create our own sequence. Right now, I have used two images that is
our main character, Toby and the reference image I just copy from
the Pintrust again and add a small prompt that is character sitting
in the middle, thinking, levitating
eyes, close and tag our main image that we have just copied details surrounding
the character. So what it does, it has created an amazing image that is our main
character is levitating. After that, I have tried to add a background I have tried it
with these different models, but it's not actually working. Until unless I give the
reference to our image model, it will not work that way. So you have to keep
in mind that you have to use a reference so that you can tell the AI that you
want this type of animation, videos, or visual ideas. Once you give the idea, you will get the exact same
result that you want it. But
14. Creating Series of images for sequence and transition : Sequence video, I have copied
this motion graphic image. I have saved as frame
for our next generation, and again, using the same
step and a simple prompt. I have generated this. It looks very excited. Our Toby is very
happy in this image. I've tried to generate
it with a different sty, change a little bit
of prompt in it, and it's generated like this. Now with the image that
we have created already, the toby looks really stressed. And I have in mind that
once the toby is stressed, it will go into its
meditation states and everything feels calming
and it feels really calm. You can see the expression
has been changed. Now, this is the image, this is the image, and this one, I have also created another
image with this jumping into the air and all
the tabs remove them. But it's not looks that way. So I have to give the
reference to image or that Toby looks exactly like this because once
it opened the eyes, the eyes has been changed. So the character consistency
has been loose also. Also, meanwhile, I
have tried to add another sequence image or
story line or we can say story board that Toby is with his friends standing in the lift that is
standing in the middle, the image, this is
the image and Toby, all the characters similar to Toby with different
colors, size, outfit standing in
the lift, happy, and we have to remove the human
in the image that's sold. And you can see
the similarity in this frame as per this generation is
almost almost similar. So it has generated
really good result. The image is also changed here. We have the toby after graphing the
toby, the actual toby. I now generated a perfect
toby for us that is jumping on the stage.
Or the platform. Now with this image generation, I have created another
image that is instead of some tabs at different flower and
beautiful smells in the air. I have created another
variant of this image. What I'm trying to do,
I'm trying to create another variation of
same images so that we can change the frame in our video generation
from start to end frame. We will talk about it in upcoming lecture for
the video generation, and for this lecture, for the image generation part, we have actually created
so many images using the same method of
ptrast getting ideas, and created a small prompt
changed into the character, the style and the
main character. Now, again, I have
created an image with the two reference images and
the image generator that is character is sitting like the man is sitting in
the reference image. You can see all this web has
been created one by one. At first, it looks really messy, but once you start doing it, it's actually
become really easy. And now you can see the
similarity in the frame, the Atbi and the
reference frames has been almost similar, but I love everything that
we have created so far.
15. Clean up the interface: For this lecture, everything
has been created. The image has been created. Now, I'm trying to
clean up everything. I'm trying to separate
all the generation on the right hand side and all the reference images on the left hand
side so that we can use them in video
generation as the sequence. You can see from
the start to end, I'm arranging all the images. It is really helpful so that
you don't have to so that all the frames that you
have generated will not miss out or
will not get lost. See in the next lecture,
we'll talk about video generation in
our upcoming lectures. Thank you for watching. See
you in the next lecture.
16. Understand Video generation using Seedance: Now let's move on
the video section. Creating videos here is
actually quite simple. Very similar to image editing. It can be a little
tricky at first. Right now, I'm using the first and last frame
style for video generation, and we will be
using C dance too. Let's select five second here, and as a five second duration is perfect for this animation. Before we hit generate, let's use prom assistant to use let's use prom assistant to see if it gives
us a better result. Inside the assistant, I will connect both nodes
we used earlier. I'm using Opus 4.7 today. I'm just going to
explain it to the AI, exactly what I wanted to happen
between these two frames, and then hit run. Now we have our
generated prompt. Let's see what it came up with. I have a feeling it's
going to be good. Next, let's connect
all the nodes back to their respective places,
and there we go. Look at this output. This is exactly what
I wanted to see. It's honestly not
rocket science, just a simple
explanation to the AI. A does the trick. We are going to keep using this exact workflow for our upcoming video
generations. See you there.
17. Understand Text Assistant using Claude for video generation: We are going to generate
our very first video here. How we can do that, just
like image generator, we need a video generator here. Here is a video generator
once you add the node, and we have to connect it
with the reference images. There are different
type of that is the first and last frame or the reference
images you can add. And right now we are
using for the seed dense, and we will work with the five or six around seconds every time because we need the
duration of animation. So right now, let's
so what we are doing, I'm using a first and last frame here with the video generation. And selected both the frame. Right now, I have selected this simple frame and the
three D character change. And I have asked JaminiO
we can say I have asked the assistant for
my video generation that help me with the
generation and give me the exact prompt
that I am asking for. So what it will do it will simply regenerate my prompt and elaborate or add vocabulary or we can say it
extend my words. That's all it will do. And add its own creative vision in the process and sometimes it will work and sometimes
it will not work. We have to look about that. In our mind that if
it will work or not, according to the prompt
and if it will not work, then then we will lose
some cart, obviously. Right now, I have used
first and last frame, set dense 25 second generation, and this is the text I
have used at the rate, start walking from
left to right. That's soul but right now I need the help
of the Gemini also. For this generation,
I have used Opus 4.7, and in the open second, it just generate
the image for me. First, I have used
the assistant, and then it will
give me the video. So this is the video
that has been generated.
18. How to get better prompt using Google Gemini and teach the model: Let's add another
video generator node here and select C
dense as usual. After that, connect the node of the image that we
have already in two D. Now I'm trying to add the node of our army with
the first and last frame. And I have in mind that my character Toby will
come to the frame and the frame will change
into the army of Toby. They just come from upside,
just like helicopter. I have this thing in my mind. So for this one, now I'm using assistant again
with the help of assistant. This time, I'm
using GPT 5.4 and I have connected the assistant and the image node with
the video node. Both the reference
I have adjusted with the assistant also. Now let's type a simple
prompt that this is what I wanted generate with this hit generate
and it just give me a specific prompt for
my video generation. Now with this, I'm using
Gemini so that I get confident with my prompt that
I will get what I wanted. Why? Because we have
to save our credits because they are really expensive in video
generation, right? So we have to make sure
that whatever we generate, we generate our video
in just one go. So this is what I wanted. I have simply type
what I wanted, and you can check that this
is just a simple language. You can also write it down and ask Jamna to give
you a prompt for it. Now a second by second, Jamini has given me a prompt. Let's copy this prompt and
paste it into our text area. Let's copy and paste
it into our assistant. Also, it is just
an overview of A, we can choose the prompt, the type of from that we wanted, and we can also teach Gemini that this type
of prompt I wanted, and it will give us according to our prompt example
that we have shared with the Gemini or any
chatbard if you have in mind. So I'm using OpenAt and
you can say there once you login and try to open any of the Imago
generation or video generation, they just give you they
show you the prompt, what prompt you wanted. Also, so there is one more
website that is Higgs field, and you can copy this
prompt, the complete blog, the URL of any blog
on the Internet, you can upload this and
share it with the Gemini and Gemini will give you
the prompt according to what you have given as input. Now what I have done, I have tried to add a text
and working as a tag. I have added a text node here
and try to tag my images, but the tag system is not
working in text mode. I have used, again, our assistant node for
tag that with this image, I wanted the change, and I simply copy what
I get from the Gemini. That's all I have done it. And tag all the images wherever
they mention my image. Now, I simply hit
the Run button, and this is the example of good prompt. Let's check it out. Also, I will show you in
the upcoming lecture, the good example of bad prompt.
19. Good example of Bad prompt: So for this sequence, I'm thinking of changing
a new frame that is we have already created from our first
filame to second frame, that is from two D to three D and get back to Army of Toby. Now, the Army of Toby
will get back to our vintage computer scene
that we have already created. For this one, I'm going
to connect both the node just like this is the
same exact same step that I'm following here. And what I wanted, I simply type in our
assistant box that I want this transution like this and
connected my both images. That is the toby and the Vintage computer
again here connected with the assistant and assistant node will connect it to
the video generator. An assistant has
given me this again, same step, and I have
to tag them once again. The reference images, I
simply have to tag them. If if there is any
change I wanted, I simply have to change that and connect it
with the video node. Right now, I'm trying to use my prompt without
any assistant help and without any gemini help. And with this one, so
this is what I got. So this is the good
example of a bad prompt. I simply tie what
I have in mind, and the AI has not understand
what I trying to say, and it has generated this. And this is really
bad generation.
20. Good video generation output using Gemini Prompt help: The next generation, I have uploaded both images
in the gemini. You can see the
variation in one frame, it just looking into the camera
and in the second frame, it's looking into the computer. And the shape that we have used and generated
is in the frame. I ask Gemini. I want it very detailed prompt how each
elements work and video work. With a good example, I have
asked Gemini and Gemini given me a perfect prompt for it and it has
generated the result. You can say it is really good.
21. When to use simple prompt in video generation: So for the next sequence, I simply again, ask
Gemini to help me. And this is the video generator. I'm adding again and connect
it with the new sequence that is Toby and the computer
and the vintage computer. What I wanted, I simply type
it into the text prompt, and this is what I wanted looking onto the skin like
someone is talking in monitor can feel calm
and happy flower on his a glowing and clapping
natural movement. Simple text I have
added again with a simple image and
the reference image, you can actually create a video. I have not used any start
and end frame here. I simply use the
reference image here. Let me tell you reference image will work perfectly
with sed tens, but with the cling, the reference image
will not work that way. For this one, seed
tense is the best. I love you so much and
I'm so proud of you.
22. Use many variation and reference in 1 video generation: I hope you have remembered that we have used a variation node in one of our image and see the different
angle of the image. The nine variation we
have already created, we are going to expand them into a separate
image so that we can simply use all the images
for the reference. For this one, you simply
have to click on the arrow. A simple arrow you can see
on the right hand side, upper right hand side.
This is the arrow. Once you click it
and it will expand into the space automatically. If you want to download it, you can download
it and upload it. So both are the
option you can apply, and it's depending on your need. Move forward. Like this, it will just expand it
at a separate image. Now, whatever image you like, you simply have to
expand them one by one. Or either way, you
can simply select the image that you have generated and you
can select them, and it will
automatically appear on the front end of your spaces. Select the image, and
it will automatically appear and connect it to
your video generator. So all these
references that I have connected with the Sed
tense video generator, and I like this frame. There are so many
images that you can connect with the sed tens. And right now, what I'm
looking at the animation, a better animation that will
work for my generation. But right now, what I
have added, I have added, create complete sequence using
all the Japanese images, shapes coming out
from the monitor. And I hope this will work. A sim transition images
if I want to add, tag the image
sequence 10 seconds. Right now, I'm selecting the
10 seconds sequence here, and once I select it, you can see the credits. It's very expensive.
Meanwhile, it's generating the video. Let's download the video that
we have already generated. This is how you can
download the video. So I have downloaded
all the videos here that we have
generated so far. The step is same. So now the video
has been generated
23. Perfect transition video using simple prompt: Video has been created, exact same step I have used
before for reference images, put it into C dens,
tag the image, ask in the prom that I want to transition from
this to this to this. That's all. And it
has created this, and this is the C dens result. I have used Google Veo three, and this is the result
of Google View three. I like the result of CDns although it's really
expensive to use.
24. Kling Video Generation for sequence transtion Start and End frame: This is the killing animation,
and it is really good. I asked you from start frame to end frame, and
this is the prompt. You can see on the left
hand side, right hand side, the image I have used and
below is the animation. The animation is
good. I'm satisfied.
25. Wan Google Veo 3 and Kling Video generation difference: By reference to the
main character, Toby, I have created image of it
eating popcorn in the cinema, and it has created this,
and it is really good. You can see I have
used Nano Banana. After that, I have created a video out of it
by using reference, and I have used first, I have tried an 2.7, and it created this. The generation is
not good at all. Right. So after
that, I have used. After that, I have
used Google Veo 3.1, and Generation is also not good. Now I have used Kling with
the Kling three point oh, mini I got the animation, and the results it's fabulous. This is expected with the
Kling and the result, I'm satisfied with this also.
26. Most advance feature complete storytelling using 1 click Seedance: Last, I'm sharing very
advanced feature that I have discovered within the
CDNs and using GPT two. I have asked GPT to
create a storyline or storyboard for the ten
to 15 second animation. You can see this is the storyboard with the
frame by frame creation, simple prompt I have used, and it has generated
this story line. After that, I have connected this story line just like
any reference image, I have collected
this story line with the seed tense because it is specifically
Wawa seed dense, so I recommend you to
Wawa see dense also. Then you have to add
it with seed tens, and this is the result I got.
27. Project: That brings us to the
end of this fool. We have covered a lot
of ground from setting up our initial nodes
and workspace in Magnific all the way to engineering high level
prompt with gemini to save our valuable
rendering credits and nailing that perfect
video generation. But your journey
doesn't stop here. Now it's your turn
to take action. Right below this video, you will see the project
and resources tab. I highly encourage you to
take the video sequence or the storyboard frame you created during this class and upload them to
the project gallery. Don't worry if it's not
absolutely perfect. The Skillshare community
is incredibly supportive, and I will personally be
jumping into the gallery to take a look at your work
and give you feedback, seeing what you build is honestly the most rewarding
part of teaching for me. If you found this
class helpful and feel like you have level up your
AI creative workflow today, please take just 10
seconds to leave a review. Your feedback helps other
creative students discover this class and helps me create even better content
for you in the future. Don't forget to hit
the Follow button next to my profile name, so you get instantly notified the moment I drop my
next creative course. Thank you so much for
learning with me. Keep experimenting,
keep creating, and I will see you
in the next class.
 Karan Rathore, Creative Technologist: Video Editing, AI, and 3D