Transcripts
1. Mask intro : Welcome to mask and essentials in Premier Pro. Who is this for? This is for anyone wanting to know about how to make masks and understand them. So what is a mask? Or a mask is nothing more than taken, a shape tool, and then being able to cut out an object in your video footage to either isolated or show a layer below are multiple layers below. You can use it for things like cloning itself. Also track in a mask. So if you obscure someone's face, for example, and they move, it will track the mask with the face. We also have text effects that you can use where texts can be behind an object or come out from behind the mountain or different things. You can use a mass to replace a sky. If you have a great scene and the sky is very dull, you can replace it with whatever you want. You can also use mass to remove an object or a person from a scene that's unwanted. You can also use a tracking mask to replace someone's eye color, for example. Also, they're really good for transitions. If you're a videographer and you're making a film, and you're doing different types of camera movements. Masks are really useful for that transition look. We're also going to take you through the basics of using the pen tool. And the rest of the mask tool is they're quite tricky and premia, and they seem to have a mind of their own sometimes. So we're going to show you that little tips and tricks on how to use them. All right, so let's jump into Premiere right now. And let's get started.
2. Mask basics: So in this lesson we're going to take a quick look at last basics. The tools, how to draw one. Premise. Tools for mass are quite quirky, sometimes have a mind of their own. So we're going to show you the tools that you need, how to manipulate the different points and what happens when they sort of jump offline. And then you want to put them back or maybe add some points in the line. So let's get into this and never look at all the ways you can manipulate the mask. So we're going to start with this graphic right here. And then if you go over to the effects control panel, this is where and the opacity is where you must. First of all, we have a circular tool or ellipse. Once you click on it, it will make the mask and you can move it around to anyway you want. You can also grab one of these little nodes here and change the shape of it. Just like so you can make it bigger or smaller, can use the hand tool to move it around. There are some other tools you have underneath here, such as mass path, mask, feather, mass capacity, a mass expansion and inverted or get into these as we move forward. If you want to remove the mask, what gender effect off? Just go to opacity FX and click down at once. And it will remove the effect is turned off. Click it again to turn it on. You can see, you can see a mascara and you can move it around. If you don't want to see the outline, just like anywhere off the mask. And again, we can see the effect here. If you want to see the blue outline again, click on Mask. So let's get rid of that one for right man by clicking on the mask. Click on your Delete key. The next one you have is a square tool. It's exactly the same as the circular tool or ellipse. You can move it around. You can drag this to make it bigger or to make other weird shapes. Just by grabbing these nodes here. Same thing. If you don't want to see that you just click anywhere off, you don't see the blue mask. Back on the mask. They will come back up and you can turn the effect on not just like before. So they're exactly the same. Let's delete that one for now just by taking a mask, press Delete. Next is click on the Pen tool. So we're gonna click on that. Once I noticed that nothing comes up on the screen, because these are premade, the square and the circle. Just click anyway, you want to stop making the first. And then we wanna go and make a 2.3rd.4 points. And every mass must be close so you can make a few more points. And then once you make complete the mask, it will be just like the circle or the other one. You can drag these again anyway, you want to like so if we click on the inverted button here, this acts like a black hole without video on video too. If we have something underneath it, that is what we can see underneath it. And then I can move this around underneath. So it's like a hole in the upper video to be able to see something below it. If we go back to the top video, the first one here and click in bert it off. Then we won't see that. We just see this part of it that we masked out at this guy was bigger, like so. Then the little mass that we made on the top one up here is just a section on there. If we click Inverted again. This is that little section that we made in this top layer. And it's showing what's on the bottom layer here underneath it. So let's get rid of that for now. And then also let's get rid of this mask and stop back from, from the beginning. So we're back to square one. So now let's say we wanted to mask out the sky. So we wanted to keep these mountains and they're quite curvy, so we'll keep the sea. He's dark mountains and we were going to replace this guy. For example. One of the other things that you do in Mask and in Crimea is if I want to make a curved line and not a straight line. So up to now we've just been making two straight lines. So if I want to make a curved line, you click once. You go to your next point, and then click and drag. And then what this does, this is not your mask. This is a tool to be able to adjust the curviness on the line. So they wanted that to fit over a curve, isn't what you could do. So one other thing here is this top line here. If I hold the Alt key down, they'll change it to this arrow. And when I move this, they'll just move the top half of the curve. If I go to the bottom arrow, hit Alt, it will affect anything that was below that. So this is what we can do to make nice curves. Let's get rid of that. So let's say we were going to mask out this area here. So the first thing that we would do actually is to zoom right in. So you can get as clean of an image as you can. And this has lots of trees in Django. We're not going to be able to get around all these little feathers and the sailboat post. And it'll take a long time to do that. But to give you an idea, you can take your time here. We'll use the pen tool. And then I click off the screen here to stop. And then I can click down. This is fairly strange, so I can come through here. Now if I come down here, click and drag. And then if I come up here, click. Now you can see if I grab this and do Alt, I can affect the curve of this line on this side of it. If I click on this one. And is anything that happens, this is normal in priming other control Z, control Z a couple of times. You want to get back. So if I wanted to go here to that again, click and drag. Again. If I want to move that, press ALT and Y1 to add fact, this guy you see nothing happened on this side, tracked all to miss one. And then this one will allow me to manipulate this. Another thing that happens here. Now, don't go back here and ever click on this. If you do, it will make a mask tool. And it's created a second mass. If it does that, you can just do Control Z. I'll click on mass tail and do delete. We sell on mass one. And then we're going to click on here. And if I go here and here, and here, sometimes this thing will jump bigger. If I want to go over the flagpole, say it's jumped around there like that. So just do a Control Z and Control z another time to get rid of the last point, go past that point, and then drag that one back to where you want it to be. And then go up here and here. And we can move these in. We want to adjust them better. And here, again it jumped. Control Z. Come away from it, come back to it. Come away from it. Bring it into a one air. Come away from it. Bring it into a want ad. And then you take your time and work your way over the entire terrain of this. Take your time. It takes a long time. Fay wanted to be accurate as you can. And those little jumps and things that you see normal, normal in Crimea. So if you do that just Control Z or Command Z. If you're on a Mac. And then take your time and work your way all the way along all the terrain of the way you want to go. Once that was all done, you then would go all the way around. So I go to 25 percent and I would click all the way around to finish the box. So I do all over that terrain, all the way to the end. Click outside, and then click up here, click over here, and down here. And we're going to see that in the sky replacement later on. Okay, couple of extra little things here. Let's get rid of that mask. Let's go back to fit. Now if you whatever you click on, if you click on this one and you want to add a point. You can add a point just by clicking here. And it will add some more points for you. Just like this. One thing to do is just go over here and click on this again. As again, it will make a new mask and we don't want that. So do Control Z. If you want more points on this, go down to here, and click on this, click on your mask. And then you can click a new point right here. Like so. And then again, you can move that out. You can move this and you can see you have these little nodes here where if I do all that again, you have full control of what you're Moving. She's very flexible. We just got to be patient so you can work your way around all these different shapes that you might be trying to move, such as this. So one last thing if we're here and we want to and manipulate this may be we gone around is mountains, but we have some other things here. We have a mask path. There's another lesson coming up. We'll just show you where you can track some mask for moving object, mask, feather. This will take the edges and feather them just like this. So you see will feather the edges. So it's not so harsh. You can see it's more feathered. Then if we take them back to 0. So that's also good to do a little bit of feather. Well, sometimes you might want to do a lot of feather Fang home if you're what you're trying to blend into the background. The other one you have a as Moscow prosody. Normally we keep this at a at a 100 percent, but depends on what you're trying to do. But normally that's not touched on the other and the other one you got if we click on massless here again, is mask expansion. And you can make the mask a little bit bigger or a little bit smaller depending on what your needs are if you made the mask and for some reason you've cut off someone's feet or something right at the bottom of the image. You can use Moscow is expansion to just to expand the mascot a little bit, maybe with some further as well, just to blend it all in. And we'll get into using these as we move through the tutorials. And that's it for mass basics. Let's move into doing some practice.
3. Practice files: So there are materials for you to follow along with. As we go through each course, somewhere in the resources download area, comments section here, there's a link to the files and stuff that we were using during the course. So download them. And then all you have to do is go along and unzip them on your computer. And as we do each course, you'll see a folder that's labeled with the same name. And inside of that folder is the media. Just drag them media that video, clip or picture, drag it into Premiere project and follow along. That's really is the best way so you can get some practice and follow along with what we're doing. All right. So let's get into it.
4. Cloning effect with masks: In this section, we're going to take a look at coning itself. So let's jump into Premiere and see how to do this. First step is to fill myself into three different locations that we need. Double-click on the video clip. So it opens up in the source panel. Here we can see this is one continuous clip where I moved to position one, then moved to position two. And finally moved to position three. We need to cut this up into three separate clips. Move the play head until you get to the first location about here. And then click on the Denmark. Move to the frame where it's just before I start to move off to the other location, position two. So right here we'll do and click on the outcome. Ok. Drag the video clip down onto a video line one. Let's do the same for position to move the timeline over to where I'm setting on the wall about here. And you can just do i for n. And then let's move it to where I just look over. But just before I move right here will do and do O for out. Drag this to video 2. Let's do the same for position three. Right about here. For position 3, 2, I for in, O, for out. Drag that video 2, position 3. Next, just drag them so that they're all the same timeline and stacked over each other. So here we can see by disable in each line, there is position 3, position two, and position one. Let's enable Clip 3 and 2. So we see the top layer. I'll click on that layer and then go to Effects Controls. Go down to opacity. And let's click on the Pen tool here. Let's zoom in a little bit so that we can see what we're doing. Use the pencil now to make a mask around the first subject. Just like so. Thereby making a mass. This is a hole in this layer and this is why we see the layer below. So if I disable this, you can see what's also important here is make sure that you get the shadows. I can turn the effect off by going to the FX in opacity and just click in on it. And this means that we stay on video 3 clip. I'm able to see the mass that we made by clicking on the mask. And if I want to remove this or just not see it that actually remove it, just click anywhere else. And if you want to see it back up again, we can just click on Mask. Now if I turn the effect back on again, we're seeing this as a whole. Rest of this is removed and we see the layer below it. If I disable those layers. You can see this is what we are looking at. The next thing we can do is go to Mass feather and feather this so that the edges are not harsh. They'll blend in with the shadow in the tree and the bushes. Let's enable clip to here. And we can see the layer here underneath. So now we have to make the same mass for that. So make sure that you are on layer 2, a little video to go to opacity. Once again, click on the Pen tool and let's make a mask around here. Just a simple mask. I'll try to move into the shadow area so that we pick that up. Also. So now we have one mask on layer 11, mask on layer 2. We'll do the same thing and just feather this. So it blends in with the grass and the bushes and isn't the harsh flat line. Again, let's turn the effect off by select an FX and clicking on it once. So we can see everything. If we click anywhere else, the blue line mask will disappear. It's still there, but we don't see it if we want to see it again and click on Mask. And next we're going to enable the third clip, or in this case, video clip one, the lowest one on the bottom. Then you might be wondering why you don't see the first person on Clip 1, it's enabled. And the reason being is that we are on Clip 2. We left the effect of if we turn this back on, we now have the three same clones all in the same space. So let's get our head around this effect. It's a little bit confusing sometimes for people to understand. So what we're seeing here is obviously it's this little pancake of top down. So on the very bottom one, if we disable the other two, this is what we're seeing in this was shot on a tripod. So this is, everything is here. If I enable layer 2, we see me sitting on a wall here. If I click on the mask, it's because that is the only part that we must out. If I disable the lower path. That's the whole. In layer 2, I'm only showing this through 10 onto the second, onto the, sorry, onto the first one. That is a whole in this second layer clip, just be allowed to come through on to this one, the lower one, the lower one. Same thing for the upper one. The upper one is here. But if I look at the mask, for the upper one, I click on a mask and I would disable the other two. I've just got a hole here that's showing that through Jang on to the first one for a enable this one. These are the two holes in each one, the mass that we made. And then we enable the lowest layer. We're seeing. These mass that we created shine through or being allowed to lay it down on to the first clip. And the effect is that you see a clone in effect. So let's take a look at the final result.
5. Animated masks: In this session, we're going to take a look at the masks and had to animate them. We're going to take a look at change in the sky effect in the first clip. And the second one, we are going to take an animated mask and follows a lady's face as she submerges into a lake. So let's jump into it and see how mass can affect different color that you want to change when it's just part of an image. All right, let's do it. So the point of this lesson is to talk about masking this image. It's a drone image. Would actually we would color correct it first like normal. But I wanted to just show you how we can mask out the sky, for example. So one thing to notice here in the effect controls, we don't have a Lumetri section. So just do anything on here, drag this back and forth, reset it, and that will open up the Lumetri color over on the Effects Control. Now what we can do once that's open is go to 25 percent. Just we have room. Click on the Pencil and we're just going to draw a mask right over this. Like so. Then we're going to mask feather by quite a lot. Because we don't want it to be a straight line because this is moving, then we can now color the sky a different color from the sea. So if we want the Skylab boot bluer, we can go to Color Wheels, for example. And then take the mid-tones, maybe take a more blue, take the highlights, drag them more blue. So before and after. And if we turn the mask off, like so, you can see the difference. And when we run the video, the sky is much bluer than the original. So that's one way to use masks. In this next clip, we see a lady in a lake and she's going to submerge down into the lake. It looks quite the mood of it is quite serious. But it's very, very, very, not very saturated at all. So to say, we wanted to brighten up her face just a little, just a touch. So goes with the mood of the scene. But maybe you can see she actually does have makeup on here a little bit. So let's say we wanted to emphasize that just a little bit. So how would we do that with a mask? So the first thing again, in our facts, we have no Lumetri area, so we're going to just move this. Double-click. So now what we can do is use this elliptical here. Here's the Ellipse tool to create something around her face like this. We can adjust it to where we need it. Like so. Bring that down. Just a touch. Like so. Don't forget to also feather it quite a bit here so that it's not a solid line. All right, next thing to do is we're going to use the mass path. When I click on the wrench tool first. Make sure that preview is sad if you don't have this on and you press this, you won't see the mask. So make sure preview is set to on. And then with this on the first frame, press Play. Now this isn't a go and make keyframes here. And go frame by frame through the clip. And it's going to track her face wherever we chose that mask. Now if it gets out of, this is do an actually a really good, but if it's not doing such a good job, you can actually stop it at any point. And then you can make slight adjustments for that area and then continue to press play. And then it will continue on. So I'm going to speed this up. Don't forget that. If you need to stop it, if the mask is going off somewhere where it shouldn't be. And if you watch his kinda go off her head that goes off the screen, the masker. So we're going to track the face. So that's actually doing good. Now if you wanted to do this next with the neck comes out of the water, you'd have to do a separate Lumetri, make another Lumetri panel and do a separate mask as it's moving out of the board or G14 neck. But we're going to leave it just like this for the example. So I'm going to go, I'm going to speed this up. Okay, So now you can see that the mask and is done, all the keyframes are made here. And it did pretty good with tracking her face. So what we wanna do now is then do color grade. So if we wanted to do a little bit of midtones here, just a maker phrase so we can see we Google crazy. We want to just do that a little bit just to give her a little bit more skin tone. So before and after. And now if we turn the mask off and we just go over here, and then we take a look at that. It actually did just brighten their phrase up from before. And not too much. And it looks totally different than it's just to show the way you can do with the tracking mask. So that's how you can use the tracking minus an animated mask. And we can use the mass for is if you want to obscure person's face or an object, a license plate. So go to the first frame. Click on the image or the video clip you want. Search under effects for Gaussian, put the Golgi and blurred effect onto the video clip. Now, we can select the ellipse or circle fact here under opacity on the Gaussian. And just make it a little bit bigger than his head. Then we can change the blurriness to about 70 some detail. And then that mask is now blurred. If we press Play, you can see that some of it actually moved away from his face. So we can make an ellipse bigger. But what we can use is if we go back to the first frame, make sure this tune is onwards says Preview. And then we can use the Mask Path Tool, click on the mass so we can see it. Press the play button. And this will work its way. Showing you the mask. If you have to stop it at anytime you can buy, you can see the keyframes of BMA. I'll speed it up. And now that said actually did a really good job. I can click anywhere to go off the mask. And if we play it back, his faces now obscured. So quick and simple way to blur an object. Buffets.
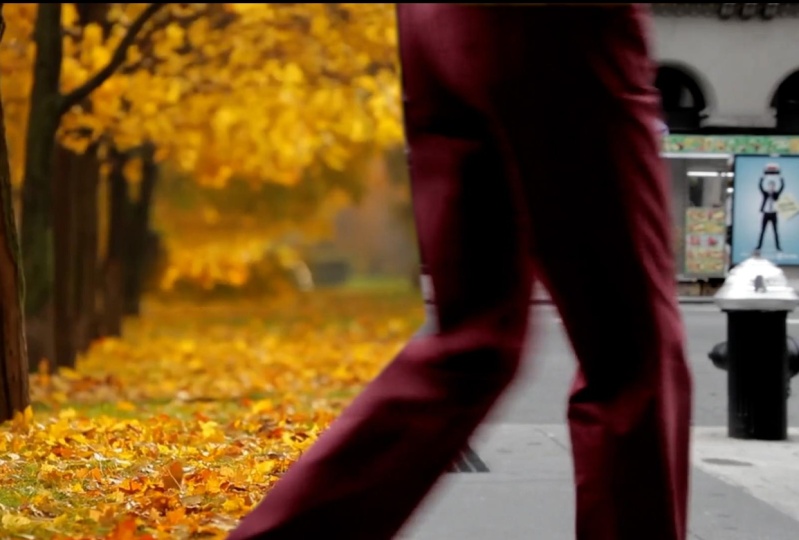
6. How To Remove people from video: Have you ever been to the beach and someone's sitting on the sand there in the ocean and dispose your view. Well, today we're gonna do some magic and make them disappear. So in this section we're gonna talk about what happens. You're at the beach and you see a beautiful sunset. You're the only one on the beach except for one person in the ocean. So this will spoil your whole shot, right? So not necessarily. Let's look how we can remove that person from the sea in Premier. So the first thing we're gonna do this is a clip of this lady and the ocean here. The rest of the beaches open, like we said, first thing to do is click on this video one panel, press the Alt key, drag it up, released the left key on your mouse, and then the old key. All right, and then we have two layers exactly the same. Make sure that we're clicked on the top layer. We're going to go to opacity. And then we're going to click on the Pen tool. And we're just going to make a mask around this person here. Little bit up into the sand. Just like so. Next thing we'll do is we'll turn off the layer for the lower area. And then we're going to click back on the top one and then do invert. So now we can see this is our mask area. Okay, what we can do too is click on mask feather and mass expansion. And we're just going to move mask feather a little bit more. And nothing too big. An expansion, just a touch maybe. Okay, so now we'll come back down here, turn this layer back off on the lower layer, and it looks normal. We've made the mask click on the lower layer, go up to the x axis and just move her out of the way. Like this. We'll also see that I wanted to show line to match. So I'm going to just bring that down like so. And then that will show us that effectively we removed her. But we need to play around with some other little things here. So what we need to do is you can see that this area here, and you can see the square of the mask. So we need to click on the lower layer, go to the color effects, and then just try to manipulate this a little bit. You can see it's lighter and we're going to do our best to match the color of the background of the, of the top layer, I should say. So you can just, you know, because a FREC, the rain, what we've done is copy the layer from over here, paste it in here, and this color in the ocean isn't exactly the same as this. So you just can play around a little bit until you get as clear as you can. With it being the same. And then if we go back now, they go, she's pretty much removed. I can still see a little bit of the square of the mask. So we click on the top one and you go back to the mask itself. You can see it. And we can just play around with, we do that same thing. If we turn off the lower layer here by clicking that, you can just maybe increase the feather a little bit. And if we turn that off here again, no, maybe that will give us something where sit a little bit more feathered, turn this off and they go, you might have to play around a little bit more with the colors and things like that. But you remove the person from the scene. And then you've got the beach T-cells. So let's take this one step further and we'll do another one where it's a little bit more difficult because a guy stretching over the sea and then we'll see what we can do with that. So for this one we already have and this guy on the beach here. And notice that when he stretches though, he stretches up into the mountain area up here. So be aware of that. So let's click on this first, hold down the left mouse key, press Alt, and then drag a copy up, or remove your leftmost key first, and then the key, and that makes a duplicate layer. Then what we're gonna do is click on this top layer. Go to opacity here. Click on the pen tool and just somebody go above the clouds here, just the bed, the mountains, I should say. And come down to about here. Make her box around them. Like so. And then if we go down to turn off the lower layer, and then we say invert, we have this. I'm going to click on mask feather, a mask expansion, lameness and a feather a little bit, it's already at 10 percent. And besides you a little bit more and see what that looks like. 13 or something. And expansion just a little bit maybe. Okay. Now what we can do is turn this back on and then click on the lower layer, layer here, and then move the x value and the position. Move that to that he will disappear. Well, I'm looking for here is just that we can match up sort of these mountains a little bit. Now if we scrub through there, we want to make sure that these axis are present. You can see right here, just see as his arm here. So again, all we have to do here is click on where your maskers. She can see it. In this case, we can just either increase the mass, you can move it so he just disappears. Like so. Or we can just expand it over back to this area. So now if we click off the mask again here, and we scrub through this, we will have a guy God. Again, we can see this box that we made here. And what you can do is also a friend of this a little bit more. See if we can blend that in. Like so. That's pretty good, Exactly right there. He also might have to go to the color section as before, and click on the lower box here. And then, just as you can see, tried to play around with the colors to match them as best you can. Play around with their begets as near as you can to the same colors. And you can play around with the other effects on the mask as well. So I've said you can increase the father a little bit more as well. And see that was not too bad at all there. Okay. And let's see what that looks like. So now it's time for you to take your ago. What we want you to do is this clip is in your practice files. And I want you to remove this lady from this scene. So using the same techniques you've just seen, practice along and see if you can remove the lady from the beach area. And good luck.
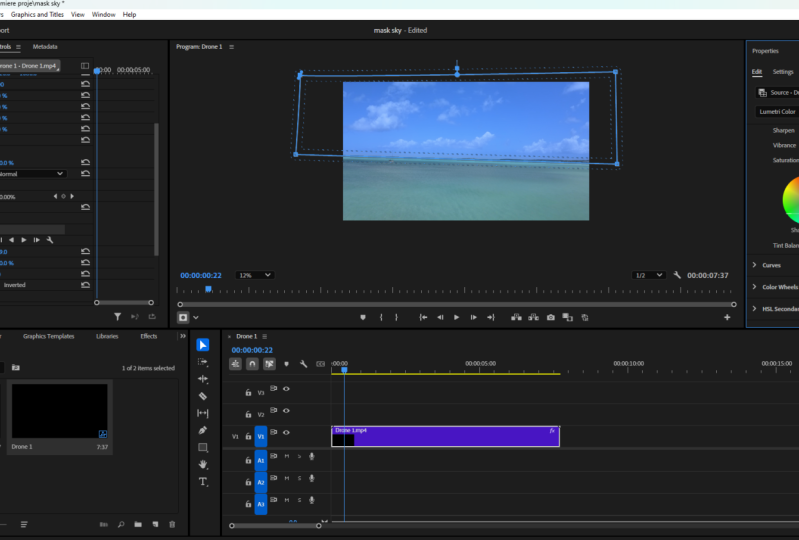
7. Mask sky Replacement: In this lesson, we're going to use a mask to replace the sky with another one. So let's jump into Premiere. This effect. We're going to replace the sky using a mask. So we have two clips on V2, we have this drone clip rising up into the sky. And on V1 we have a picture in this case of a moon, a full moon at night. Click on Video 2 on the drone clip. So make sure you're on the first frame of the slide for the video clip here, go to Effects Control. Before we do that, we need to go and zoom in here. So we want to get all of these mountain edges. And he had to do that. We need to magnify it. Okay, so next what we need to do is also go to the Pen tool that's going to create a mask. Soon as we click on this to see a mosque again, just click on the mask one. And you have your pointer back. So now just follow the edge of this mountain area. Now it's very rounded. So take your time and remember that when you click on something and you want to sort of curve it, you have to click and hold. When you do it will create these little nodes. And this note here, if you remember, will affect this side. This one will affect a curve going this way. So that allow you to manipulate the curviness of this area. And the other thing is, this isn't a way to neatness here. So click off it and then just drag it back. Like so. Same thing up here. And then drag it back and then come down here. Click and drag. And then we can move this back to where we want it. Like so. And then just keep making adjustments. You can see we, we wanna go the other way here. So what we can do is we didn't click and drag it. So we can hold the Alt key down. It'll change to this arrow. And then you can get a little nodes back. Let them go. And now you can change your effect that you want to. This is just a premier thing, but does that have to do Control Z? And just keep on taking your time. Again, lots of controls is click away and drag it backward. You wanted. And then down here and work your way down. Again if it does add a rotation thing, Control Z, take your time. Scrub along and just be careful and do the entire section for the entire mountain range here all the way along. As you get to the other side because it's panning. Just keep that in mind and make a full mask. So I'm going to speed this up so we don't have to watch him 12 or this edge. Go back to 25 percent. Click off it. Over here. This Famigo control Z, a couple of times I sort shift, go back and add a little bit more, maybe 75. Zoom over, click off it somewhere here. And then go back. Pop over here my quota, 25 percent. Click off. Again. Try to link them up. Just like that. So now we have a mask which is showing that the sky will be replaced. And the rest of the video is black at the moment. So we want the opposite. So if you come back over to effects controls, you can click on inverted. And then inverted will show through 10 to the moon picture below. And the other thing we want to do now also is feather. The mask feather a little bit here. We want to do a mask feather. Let's make it quite big. Just sort of blends in. So what we've got now is looking at the original. The mind is a very hazy. So that's because it was sunny sky with haze on these main dendrite seem like they're quite far away. So when we have our effect with the moon, they almost a gray now compared to the rest of the image. So we could do is put a second mask over this and tried to cover up the mountains, maybe some reflection from the sky. This case because the maintenance OK, so gray. Add another mask. Can you go over to the Lumetri Color panel? You do add the metric color effect. And then it adds another Lumetri over here in the effects control. I right-clicked and renamed it to mountain. So basically if we look at that mask now I just made a square mask over the mountains. And I just added some color in to try to reflect the moon into the mountains. They don't look so gray. And then our final effect is that's what it looked like before. And this is our final effect where the magnet is get some highlight from the moon. You can just play around with whatever you want. In this case where the mountains are so faded, I probably would have made the mask just square directly like this, so that the moon shines and take the mind and desired. It just get this flat area because at night you maybe wouldn't see the mountains anyway. So continuing with that theme, we've taken another picture to change the sky factor, this Northern Lights type of fact. We can do this very simply and very quickly. On the top video, we can go to 25 percent. And then we are going to make a mask with the opacity tool. Just come along here, cut out, make more of a straight line, and then just draw around very quickly. That's father the mask. Just a little bit about that much. Now we're going to do invert. Click anywhere off the word mask and that will get rid of it. Now let's go back to Fed. And here we can see if we play around with the, with the feather, you can see we can just drop that down. Just a little bit of a haze. Now you have it.
8. Mask Text effect in Premiere: Okay, For this first effect, we're going to use a mass to create a text animation. So the first thing to do is to weigh your in graphics. You can select the Text button, click once and type the text in. From here. If you change to the selection tool, you can just make this a size you want. If you use the alignment tools over here, you can center it in the frame and also change the color I'm on. Leave mine to white and then select your font by here. I'm going to leave it as railway light. We can then go up to the pencil here. If you hold down on the little arrow, will select the rectangle tool and just draw a line underneath here. You can then use the horizontal button here too. Align it to exactly where he wanted. And this moves at the center. We're going to move it just a little bit down below the text. And I selected a red line. So if we just click on that again, you can see that you can change the color here to whatever you want. If you want it to be yellow or what have you, it will be whatever you want. Now you can see that it made the shape called Shape O2. We're going to just click on this slowly and change this to line so we know what it is when we go over to the effects controls. Okay, now, going over to the Effects Control, you can see there's a shape called line that we'd labeled over a year. Now we're gonna go over here and it come down to this rectangle tool. And you can see it makes a mask. So now we're just going to reshape this so it fills a line area that we want. Just like that and make it a bit more square if you want. Really doesn't matter. Now drag your timeline to where you want the line to appear in the animation syllabi right here. And then just click the stopwatch and mask path right here is sets a keyframe right here. And then what we're gonna do then is go back to by using the up arrow, the beginning of the clip. Now to see the mask again, click on the mask right here. And then over here you can simply drag this over here so it won't be sane. And you can see up here it made another keyframe. So if we breast, just press the Play button now, you'll see that the line will be revealed from left to right. So next we're going to animate this. Welcome to my staff to come out of the line. So go over here and collapse the shape line just to give yourself more information and go to the text. Welcome to my stuff. Click on this little arrow. And then we have the same sort of information. We're going to select a rectangle again here. And this time we're going to select the mask again where we want them. But this time we want the bottom here to be in the middle of this yellow line. So if you just double-click on this panel, it'll bring it up here. And then what we're gonna do here is just when I'd be in the middle of that yellow line. Like so. Just intersecting it just like this. If you need more accuracy, you can zoom in, for example, to get it even better here. So that's to that. And that looks pretty good. And then just double-click on this again to bring it back down to where you were. And to fit again. The other thing you wanna do is for the mask feather. Here we just wanted to type in 0. So the next thing we wanna do is see where we want this text to be revealed from. So if we just click on this text here, you'll get rid of the mask itself or CNN. You can click on this again to bring it up. So I'll just click on this. We're going to come down to the line here to the play head and see when that yellow line gets revealed. So when it gets revealed, I'm going to hold it right there. That's when the tax should be real. Next thing we wanna do is scroll down and click on the position stopwatch here. So this is the point where it's fully revealed. If we move the play head here, the line will stop. And if you look up here, we're not quite at that point. And we made a point here couple of just like a second further for the line to be its final position. Then we're gonna come back a little bit to where line just finishes. And that's where the tech should start coming out. So this point, this is where we want the text not to be here. So we're gonna go to the position and just move this below the line. And you won't see it right there. And you can see it makes another keyframe. So if we just use the up arrow to go to the beginning of the animation press Play line is revealed and then we'll come to my stuff pops up. You can then if you want to go down to where your two timeframes are on position, you can make this a little bit smoother by just highlighting over both of them, right-clicking. And say in temporal interpolation. You can do is in, this shouldn't make it a little bit smoother between the movements. Okay, for the outro, we're just going to go in the opposite direction. So a cylinder position, we can move the play head for however long we want that text to stay on the screen. Let's say here, we're going to then hit another keyframe here. So that's where it's going to reveal itself. If so, if we go back using this little toggle previous keyframe, it's gone. It will appear that it stays on the screen to this point. And then move the play head from that point to when you want the text to disappear. And then we're just going to move this again to make it disappear. From this point. Go up and minimize the area here. For the Welcome to my stuff. Click on the Shape line. And then you're going to hit the Mask Path again. In the starting position you wanted this data, which will be this position when the, when the text does gone, she doesn't hit a keyframe here. And then you can hit the mask itself, move a little bit further forward, and then just use this guy to move the text out the way. And now if we play that back, Let's see what that looks like. And there we have it in a nice little text graphic animation using a mask. Let's move on to another one.
9. Transitions using masks: So as long as it is, in this lesson, we're going to be doing transition. We're going to take two clips, a Moscow second clip. So that as it moves across the screen, it reveals the second clip underneath it. Let's jump into primary and do this one. So we have two clips. One of some traffic, a truck pulling a trailer. And then we also have the second clip, which are broadly is some flowers a bush. And they've been filmed both going left to right. So the same direction. Basically. What's important here is that if you want to do a transition, the object that you want to transition through should film or should take up the entire top and bottom of the frame. That's quite important. He tried to do back here. That's just taken up the frame here, but it's not this section and not where the truck was. Like this is only taken some of it up. So what you want is somebody cutting the transition through the entire frame such as the back of the trailer. The other thing that works is that when he tried to get clips or if you're filming yourself, the first clip is filmed going left to right, and so is the clip underneath. So move the clip along the timeline here until the trailer. Just thoughts to leave a gap like here. So we can go one more frame over here. And this is where we can stop. So we're now ready to start our mask. So set this down maybe to 25 percent. Come over to the pen tool. Click Okay. And that's drawer, our first mosque. The other thing I'm gonna do here, we click on Invert. We see the truck and the rest of this is black. It just makes it easier to see. I'm going to set a keyframe by clicking on mask path. I want to see the mask again. So I click on here. I move our truck down by going right. And then what we're going to do is drag the mask. So each point you can zoom in if you need to and see that it's better or not. This is quite quick and rough for this tutorial. So I'm going to just keep going. Click again. And then I'm going to try and note down where it should be. Again for this one. Like so. And then repeat. I'm going to keep to that line that I started right here. And just keep doing this all the way down. I'll speed this up and keep doing it until you're off the whole map here. I'm going to also feather the MAP test and a little bit like so it made our keyframes here. Now I want to just go back to this first keyframe. So we can zoom in and a little bit here. And if I drag the head back right here on the first one is aware, we can then put our clip underneath where we want it to come in right here. So we've already done the feathering. And now as we move through clip, you'll also notice that the black boxes here, because there's nothing underneath here, but we don't want it to stop that. We want it to start when the trailer is exactly here, and then it pulls the new clip across the screen. So what do we need to do for this piece? But what happens here is as before the key frame, Let's click on the mass so we can see it. And we're just going to drag this guy off and green. And that's going to make a keyframe here to keep the mask off the screen until we wanted to come on. Which coincides to where we started the keyframe mosques right here, like so. So let's take a look at that if we do fit. And then we take a look and bigger play. And there we go. That's a simple quick transition. And they're quite effective in in videos. And just keep in mind if your film itself, where the transition is from one to the other, it looks strange if the truck is going this way, but then the push or the next effect is going the opposite way. You want it to really be, go in, in the same direction for it to be effective. And it can be top to bottom, left to right, whatever you wanted to be. All right. I think that's good. And we'll move on.
10. Summary wrap up: You've made it, you made it to the end of the course, well done. Hopefully you've benefited from living mass skin. It's not as intimidating as you thought it was. So what we want you to do now is create a transition and post it somewhere here so that we can see that love to take a look at it and see how you did. I'm also check out a lot of our other courses that are available. And hopefully we'll see you in the next one.
 William Buckley