Transcripts
1. Intro: Hello everyone. My name
is Victor Hughes and I'm a visual effects
artist and a director. You might recognize me from my YouTube channel
called Big Vic Media where I have a bunch
of VFX tutorials as well as some
vlogs and podcasts. Today I'm going to be teaching
you the top three ways to isolate an object or a
character in after effects. More specifically,
those three methods of isolating an object or a
character are masking, rotoscoping, and keying out a green screen and their VFX
are as bread and butter. Not only in this class, we
learn those three methods, but I'll also be
teaching you how to do this bubbled
distortion effect to transport your character object into a new scene and
comp it all together. In case you're unable
to get your hands on footage to work with
for this class, I provided my
footage so that you can follow along and
learn a new skill. In the next episode, I'll explain why you
would need to use these methods and how it can benefit you as a VFX artists. Also, if you guys have any questions throughout
the entirety of the class just let me know down
below and I'll do my best to respond to them
as soon as possible.
2. Why Isolate?: Why would you need to isolate
an object or character? Well, the easiest way
to put it is it gives you unlimited creative control over any shot as
long as you have a clean plate or can
create a clean plate. A clean plate is basically an empty shot of the background. Take this shot in this room, for example, if I want
to remove my head, I would need to have a clean
plate to fill in the space that lies behind my head that the camera can't
actually see right now. I'd have to get up, leave the focus and the camera
exactly where it's at, and then just let it film the background for even
just a split second, and then you can extend
that as your clean plate. That would change, for example, if you're outside
and you could see the grass or the trees
blowing in the wind, you wouldn't just be able to use a photo because it
would look wonky. When you isolate
objects or characters, you can make them float, disappear, distort, you name it. Learning these three methods of isolating an object or a
character can open doors for you to new project
opportunities as well as further your future
growth as a VFX artist.
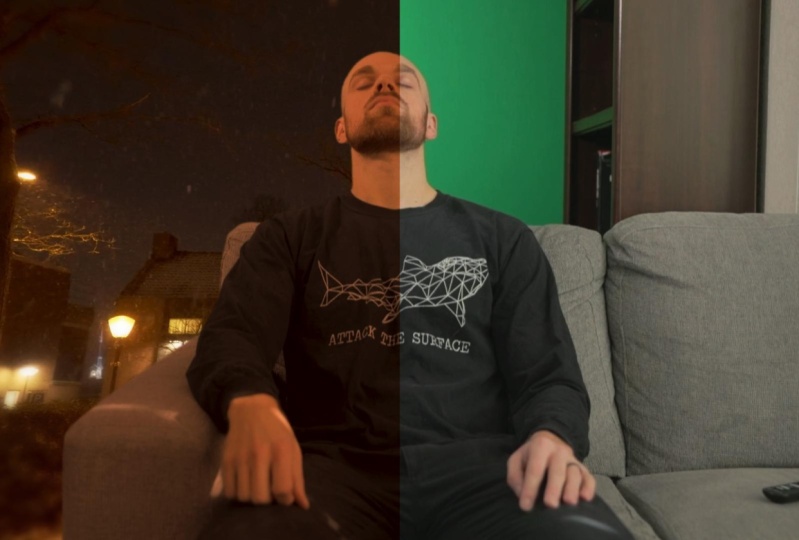
3. Filming our Scenes: In this episode, we're going to be shooting the footage
that we're going to be working on for
the three methods of isolating an object
or a character. We are about to film the footage for the masking and
the rotoscoping. We're going to use the same
footage for both of those. Something that I'm
going to do because I know I'm going to
be masking one of them is to try and not move that much because
the more you move, the more you're going to
have to adjust the mask, so that's something you
should definitely keep in mind if you're going
the masking route. I'm going to close
those blinds behind me and then we're
going to film it right here on this couch. Now we're going to film the green screen version and as a good rule of thumb, you should bump up your
shutter just a little bit. If you're shooting at
24 frames a second and you're obeying the
180-degree rule, then you'd be at about 50
on your shutter speed. So you just want
to bump it up to something like 60 or 70 or 80 just to cut down
on the motion blur so we're not picking up
any of the green screen. There's not going to be
a ton of motion in here, but it's just a good
habit to get into. Also, when I set up
this green screen, you can see that
we can see through the green screen to the
bright window behind. If you don't have
a negative fill or a black cloth or anything like that to just cover that up, then you can use something as
simple as a sweatshirt and a potato chip clip and
hang it on to the window or something like
that so we're not seeing anything through
the green screen. Then also when I set
up this green screen, you can see that it's
not very evenly lit. What we're going
to do now is get a light to shine onto it, to fill it up a little bit more evenly so we can get a good key. If you don't have any lights, then you could also use a
bounce and bounce any of the light that's coming in from a window to try and
put it up in there, or you might just have
to shoot somewhere else where you can
get light easier.
4. How to Mask: We're going to get started
now with learning how to mask and isolate a
subject or an object. Once you open up After Effects, you're going to be
met with this green. Instead of using this to
create a new project, I always exit here. Now we've got this green. On the top-left, I just
clicked Project and then double-click right here
to import your footage. Here I've got my roto mask
footage because I used the same footage for the
masking and the rotoscoping. Click that open and then I just drag it down onto this
box here to create a composition that's based on that exact length and the specifications
based on that footage. If we drag it in
there and here we go. You're always going to want
to first thing go File, Save As to create a new project. Because if you don't save
this as a new project, it's not going to auto
save on your behalf. If After Effects crashed
for some reason, you are SLO unfortunately, so go ahead and
save it right now. I'm going to do Skillshare Mask. Here we've got this
footage of me closing my eyes and putting
my head back, and you saw what we're going
to do at the end of it where a bubble grows behind me and then expands out and
now we're transported into a new location but I'm still
sitting on this couch. We're going to start right
here and we're going to go up to the top-left and
grab the Pen tool. We're going to make a basic mask around this subject here. Hold H on the keyboard and that will allow
you to click and drag, and then you can use the
scroll wheel to zoom in. Now when you're masking, it's a good rule
of thumb to click, drag slightly and that will
extend these little handles, but that will allow your
mask to curve a little bit. Now that we've made
that first point, let's go up to this next area. Click, hold, and drag, and then now we can
adjust these handles to adjust how this curves, which gives you
complete control. Rather than if I just click, now I can't adjust any handles
over here to curve it. I would only have
this one over here, so Command Z to undo that. But if you decide you want
to later adjust these, you can hold Alt and that
will curve these points. That will add the
handles or you can hit Alt again to flatten it. Say you're like, I don't
want this point right here. You can then hold Command with the Pen
tool still selected, that is, and then click and that will
get rid of that point. You also have to make
sure that if you go back and you start
adjusting this mask, it's not going to just pick
back up from right here. When that happens, I'll create
a new mask, so undo that. Then you're going to have
to go to the one that's on the edge and then click. That's the basics of masking, and it might take you a
little bit to get used to it. But once you do, you can make quick
work of all of this. We've got this curved and you just go point-to-point
wherever you feel like you really need to make
that turn and add a point. But you do have to keep in mind that depending on how
much your subject moves, that is completely going to decide how much work
you have to do. Honestly, the more
points you do, the more defined the mask is, but the more points you do, the more adjustments
that you might have to make due to the
subject moving. It's way easier to
mask something like a circle or like a
sign on a building. Even with movement, it's not
that hard to match the mask. But when you're working with something that's
this complicated, this many edges, it's not ideal, but that's why I
knew going into it that I should not move that much so I don't have to
create a lot of work for me. Hopefully all these mask
points I'm making around my body and the
couch don't move. Hopefully it's only my head that is going to have to move, so we just keep
jamming through here. I'm not super worried if
I miss a little bit here. I mean, you can, if you want, get every little intricate
crevice that is on here, but it's not the
end of the world and no one will
probably even notice. You just got to get it
pretty stinking close. But you also have to
keep in mind like once you get to the face
that that is important, and you're not
going to be able to feather this mask very much. At most, you'll be feathering
maybe three to five. You can always go back and
change how these handles look. I will check back in with you once I'm done masking
this subject out. You can see my head is a tad lumpy and we've got
little clippings here. What we can do now, let's double-click M
on the keyboard, MM. Now let's boost the
mask feather to three. That is a little too
much, so maybe two. Now let's just smooth out
the head and you can turn your mask mode back
to none so you can better see the outline. Really the reason why it's a
little lumpy is just because his handles weren't
extended out very far. There's a lot of points
going on because honestly my head's
a little lumpy. No way getting around it. The way you can just
select this one, you're going to
want to hold shift and click on this point. Otherwise, the entire
mask is going to move and that is a huge
problem, so Command Z. Now hold Shift, click that, and now we can adjust this. Then you can also
select multiple points, hold Shift, and click
on these mask points. That way we can move
them altogether. So these ones were showing too much outside of where
I wanted them to. We're just going
to select all of these and then just
pull them down now. Voila, that saves you
a good amount of time. Now let's change this
to add. There we go. Now, without moving
anywhere on our timeline, we're going to turn on
the mask path keyframes. That means now when my
head moves we can make adjustments to this mask and
it will animate the mask. Also if you don't like
the color of the points and the line that's being
made with this mask, you can change that color
right down here to anything. Say that pink blended in
too much the background, now we can change it blue. I like to move forward just a few frames and then make any
necessary adjustments. I really don't want to go
frame by frame unless I absolutely have to if the
movements are that specific. Let's just scrub
through a little bit to like right there, so 12 frames forward. I'm going to change
this back to none. Now, let's make these
adjustments because look, the body staying pretty
well inside of that mask, so it's really just this head. Now here, I do adjust
point by point because even though the
head is a solid object, if its angles are changing, it might not just
be as simple as highlighting all of those points and then pulling them down. I'll check back in
with you once I'm done making these adjustments
to the head. We've made those adjustments and turned the mask back to add, and now we can move back to see how well our
mask sticks to it. You can see that there's a
little gap right about here. That's when I would go in and make more adjustments
right here so they animate in-between
those points and stick to the subject's
head the way it should. I'll turn this back to none and make the necessary
adjustments. Just click on that mask if
it's not showing up and then I will check back in with you guys once I'm done
making this adjustment. The mask is set back to add. Now we can scrub through
and see how that looks. That's looking really good. Now let's just go right to where we're done
moving, so right here. Make another adjustment and change that back to
none so we can see. Then after I make
this adjustment, we might be done, so I will check back in once I'm done just sliding
these points down. The mask looked like it
was going to be complete. But then once we get to
the other side over here, you can see that I've drifted away from the mask a little bit. Just a little bit more tweaking and then the mask
will be complete. Here's the thing though
is that I don't start drifting away from the mask
until right about here. I don't want it to
start animating until I absolutely needed to, so I'm just going to click this button right here to
create another key frame, which means there has been no changes in between
these two keyframes. Now the changes will
start from right here. We'll go to about where
it stops right around here and then we'll just
mask one more time. Then here you go. This
is the mask clip. But you can see in the beginning
the mask is still there, but it doesn't need to be there. Here's what we're going to do. We're going to
duplicate this clip. Now that they're both the same, we're just going to cut one
of them right where that mask starts and delete
the other side. Then now on this bottom clip, we are going to get rid
of that mask entirely. Now we've got our
isolated subject and then our clean plate. So basically when we go to add that location transportation
bubble effect, we're going to put
that right in-between the subject footage and
the clean plate so that the bubble will start
to grow from behind the subject and then eventually consume the entire screen, except for this subject
who is on the couch. Now in the next step, I'm
going to cover rotoscoping and then the next one after that is going to be the green screen. But if you just wanted to see the masking and you
already know how to rotoscope and work the
green screen in this scenario, then you can definitely hop
over to the bubble effect. But if you don't know
how to do those, I encourage you to check those out and learn something new.
5. How to Rotoscope: Now I'm going to go
over how to rotoscope, but the first thing
I did was open up the After Effects
Beta down here. The reason I don't open up the normal After Effects
is because for some reason this normal After Effects can't
handle rotoscoping. I don't know if it's just an After Effects issue or if it's with my computer
specifically, but if you run into
the same issue and you want to try the
After Effects Beta. You just open up Adobe and look, we're already in the
Beta apps right here, but you can see it on
this left-hand side. They have all these Beta apps for apps that they already have. Here's the After Effects Beta. You would download it
and then you can just open it up and it
works the exact same, but a lot of the third
party plugins that I have don't work
here on the Beta. If I wanted to use
those plug-ins, then you would have to
save out this project, and then reopen it into the
normal After Effects app. Let's go ahead and
import this footage. Here it is same footage
that we masked on. Now we're going
to click and drag down into here to create
a new composition. Now the first-order
of businesses is to scroll to where you want
the effect to start. I'm going to start right
here and then we're going to make a cut. I'm going to hold Command
Shift and D to make a cut. Then we're going to duplicate this newly cut clip by holding Command and pressing D. Then I'm going to hide this
bottom layer for right now. Then on this top layer, I'm going to double-click it to bring it into the layer panel. Now, up here on the
top left-hand side, you can see that this is the Roto Brush and the
basics of rotoscoping. As you can see, we've got this green like crosshair right now, and that's actually a brush, but you just can't see it
because the brush is so small. The way that you can change the brush size is
by holding down command and clicking
and dragging up or down depending
how big you need it. Of course you can still zoom
in with the scroll wheel and then hold H on the keyboard and click and
drag to maneuver around. Before I show you
how to rotoscope, I'm going to save this project because if you
don't save this project, then After Effects will not
auto save on your behalf. Go to create a new project. Lets go, skillshare roto
example. Save that out. Basically now we're
just going to click and drag to paint this subject. That's going to create
a pink line around everything that is going
to stay and be isolated. Click, drag, want to make
sure we get up on the head, and then the entire couch. Now you can see it's doing its best to figure out what
you want to select. But obviously there's
some mistakes here. It's selecting the wall behind the head and
behind the couch. If you want to get rid of it, you're going to hold down Alt, click and drag and you'll
see that brush turn red and that will deselect that area
that you are highlighting. Now let's zoom in here
with the scroll wheel, hold age, click and drag. Now we can make the brush
a little smaller too, by holding command and
clicking and dragging down and then hold Alt to click and drag to get rid of
this wrongly selected stuff. Now you can see the ears left out such as
another click and drag like normal. Fix that up. Here we have a rough selection. Now if we go back to the
composition before we move on, you will see that it's not
the prettiest mask around. You can see that there's
definite issues, but it's good to see what
it looks like before you start to propagate
this rotoscoping. Propagating is basically
just when you move forward, and then this rotoscope mask makes its own key frames
and tries to keep that subject in
there instead of you manually doing the
mask path key frames. Let's go back into that layer and get some
of this head back. Zoom in, hold H on the keyboard. Move up right there. I'm going to make this a little smaller by
holding Command, clicking and dragging.
Get rid of that. That looks much better, and
again, it's not perfect. But the thing about
rotoscoping is you might start getting
these choppy lines. You can see how this
is a little jagged. If you do too much with it or if the
scene is too complex, you're going to get this noisy, choppy chattery outline to your subject and
no one wants that. Now, I will show you the Refine Edge tool
depending on my scene. I don't like to use
it because what the Refine Edge tool
does is once you use it, it will start to determine what is completely transparent, partly transparent, and not
transparent on this outline. If we go up here
to the top left, click and hold, now you can see that Refine
Edge tool pops up. Here we go, it says
this bluish purple tip. We can make it a little bigger. Move in. This is what
it's going to do. You paint around an area that
might need some refinement. Then it's going to
go black and white, and so what is pure white
is not transparent. What is pure black
is transparent and what is a little gray
is partly transparent. If we go back to the
composition and zoom in, you can see that it basically
just softened up this edge. To me, I don't feel like
that really looks better. It works a little bit better
when it's on actual hair, but I don't want to do
that because then we'll have this weird feathering
going around my head. Sometimes it looks good, a lot of times it doesn't. If you want to get rid
of that Refine Edge, you could either Command
Z to get rid of it. But if you're too far
in your project and you can't command Z to undo. You can go right over
here to the render Refine Edge and turn that off, and that'll just go away. Or you could hold Alt
and you see it goes from plus to minus and that will
allow you to erase that. But you can see that the
black and white disappeared. If you want to see
exactly what you painted, you can come down here to this little black and
white x-ray look. Click that on and it will
pop back up and hold Alt. Now we can paint that
back out and that will give it that hard
edge that it had before. But rather just turn
it off completely or Command Z to not
have that on there, because the refine edge
also has to propagate. It'll take twice as long for
you to get a good rotoscope. Now you can see that on the right side of
my neck here we're getting that weird choppiness
and that is not ideal. I already know from
earlier when I was doing this, it
wasn't correcting. Sometimes you're just stuck with a frustrating roto
mask that is going to require a little
finessing by using a mask. I know it's not supposed
to be the mask one, but like I said, this is the nature of the beast. You know what, due
to the complexity of this scene for the roto, instead of starting the effect while my head is still moving, I think I'm going
to start the roto right around here
where I'm not moving. That's a workaround to not have such a
headache, otherwise, we would have had to
make a mask around here or just fine
tune that roto, which can be incredibly
frustrating. I'm basically just changing
the lengths of these clips. It's going to start here, and I'm going to
just start it over, which won't take long to do. We'll just basically
highlight this stuff, and paint out that and this. Now everything that you want isolated is inside
the pink line. You can now move forward and see how well
it's propagating. You can scroll to the end
if you want it to just propagate the entire
thing and here it goes, you can see it right down
in here, 123 frames. This is a great thing
about the Roto Brush is it's so quick, it's ridiculous. Now if we go to the composition, we can see how this looks. For some reason this first frame
look super wonky, so we're just going to cut that out because this can be really hard to match, there we go. Now it's going to
propagate again which is the annoying thing is when
you make one change to that, it's got a repropagate the
entire thing, and here we go. There are some definite things that need to be cleaned up. Look at this, it's lumpy head. There's a few different
things that we can do. We can change the
quality from standard to best and then it's going
to propagate again, but it should be a
more precise roto. Now it looks a
little less lumpy. Something else you
can do is adjust the feather or shift the edge, the reduced chatter,
all that stuff. We'll pull this up here. Now over off to the left you can see the feather if
we crank that up, how that looks it
really softens up. But you don't want to crank that up too much because that's just going to make it
look very unnatural. You can also shift
the edge of this; so extend it out or bring
it in a little bit. If you bring it in a little bit, I would definitely
recommend that you boost that feather up a little bit
just to compensate for that. Then you can reduce
chatter which will hopefully cut down on the amount of bumpiness
that is there. If we go to zero feather
and then zero chatter. Look at how much chatter
is going on in there. But if we crank that reduced
chatter up to 100 percent, it smooths out those areas. I'm going to have
it on 100 percent, have that feather back on five and this is
actually pretty good. Once everything's finally
compton together, these blemishes
will be a lot less noticeable and you
just got to keep in mind too when you're
working on these projects, how close are we going
to be to this face. If this were reframed
here I would definitely be worried
about these little edges and you could even mask those things out or you
can just fix the roto. But this is not that bad considering how
many frames we have here and how smooth it is
rather than being super noisy. Here's an example
of something being noisy right here
on the right side, the couch is a little
noisy, it moves. What I would do to combat
that noisiness and to fix up just these tiny little
things is create a mask. It looks like this
couch actually extends all the way
out to this side. Duplicate this bottom
layer again so now we can create a mask
to leave that in. Just make it like that. I'll zoom over there so now
this mask will auto-set to add and if we put that on top of our roto clip just like
that and then hide this. Now that looks a lot
better but we can even extend it throughout the
entirety of the couch. Mainly this isn't moving, so this is not that hard
of a mask to adjust, might as well it
takes two seconds. Here we are that looks much
smoother, that looks great. Then if you want to get
rid of this up here, just for good measure
I would pre-compose this layer because if we make certain
adjustments on this, it's going to propagate
and that's just going to take a lot of time
that is unnecessary. I'm just going to right-click "Pre-compose" move
all attributes. Now we can get rid of
these little corner parts. At the beginning
of the pre-comp, let's go ahead and make
little masks and it's got auto set to add
so that's going to disappear just like that. Type M on the keyboard
and select it to none for right now and turn
on the mask path because even though
we're staying still, you might still have to adjust
these masks appropriately. Now over to here, again change that
mask to none and turn on that mask path keyframe and we can even make
one right here. Mask to none, mask path keyframe and then on all of these
I'm going to just double-click "M" to bring up all their stats for their mask. We're just going to
boost the feather by one just to soften up
those edges a tad. Then now I'm going
to move along in this pre-comp and then adjust
the masks as necessary. Right here we'll just
move this a tad down. I'm just double-clicking one of these mask points and
then moving them down and same with this one and then
you can play it back and see how it's adjusting
with the head movement. Now I can see that
the top blue mask was getting into the ear
so we're going to just make another adjustment just to make sure we're
not chopping off the ear. The less key frames with this subtle of
movement the better because it will interpolate between these so it's
not super choppy. It'll just move in a natural manner to
that next position. Now to the very end,
make another adjustment. Now let's set all these
masks to subtract. Now if we play this back and see how it
looks, that's much better. I just boosted the rotoscope
feather to 11 from five, just to smooth out
those edges just a little bit more because
I did shift the edge. That looks really
good and that is the basics of rotoscoping
and the reason I left this footage down here is because this is going
to act as the clean plate. When we do that bubble location
transportation effect, we're going to have that
layer right in-between the clean plate and
the subject footage. Basically as that bubble
grows and we get transported into a different
scene that will cover up all of this clean plate here. Now in the next episode
I'm going to go over how to do the
green screen version of this but if you're happy with the rotoscope version
or the mask version, then you can just move right
onto the bubble effect.
6. How to Key out a Green Screen: Now, I'm going to show you how to do the green
screen version. I double-click over
here to bring in the green screen background, the clean plate. Open that up. Then we are going to grab the green screen shot and
drag that down right here to create a new composition
that's based on that frame rate and
everything we need there. So first order business, we are going to be
making a basic mask. I know this is the
green screen part, but unless your
green screen covers the entirety of behind the couch or behind
whatever you're sitting in, you will probably have to mask. We are going to be
masking around here, up and around the green screen down and then around this couch. Grab the pen tool to mask and now you can use a
scroll wheel to zoom in, hold H on the keyboard, and then click and drag to use that hand tool to move around. I'm going to create
a first point here. Then click hold, curve that mask like we went
over in the masking, if you watch that video. It doesn't really matter how much of this green
screen you get in there as long as it's
filling up your subject. Honestly, it doesn't
take that long, that took me less
than a minute to do. So now we get to move on to
king the green screen out. Normally, I like to use
a third-party plugin from red giant
called primac here, but I won't use that
because you do have to pay for that effect from
red giant and max on. We are just going
to use key light 1,2 that is native
with after effects, so just drag and drop
it onto your footage, and now can go over here to this little eyedropper
and we're going to select the color of
the green screen, and I always try and choose the most consistent
green on this screen, so like right here, it's good. That already looks okay, but if we were to add
our footage behind this, you would see the flaws
of this basic key. You can see a [LAUGHTER], there's a clear line
difference right here and that does
not look good. So what we're going to do is go back to
that green screen clip, go back to the Effect
Controls and change it from final result to Screen Matte. Now, you can see why it
looks the way that it looks. So ideally, we want
this green screen to be blacked out and then
everything else to be white. Hit that drop-down arrow
on that screen matte, and so now we're going
to raise the clip black and lower the clip white. You just have to do some playing around with
this and we should probably zoom in so we can get a better look at
what we're doing here and then lower
the clip white. That looks good for right now, but really we don't know
until we switch back, but we are going to now change the view to intermediate result. The reason I don't
do final result, even though it looks
like it's better, like decent that looks already. You will see that there's
a bunch of noise created down here in the shirt and
the rest of the footage. Look out choppy and chattering that looks, that looks horrible. So we're not going to do that. Before I forget,
I'm going to save my project because if
you don't save it, it's not going to be
making auto saves. We'll do green screen, so now it should be doing
automatic auto save. We're going to switch the
view to intermediate result, and now what we're going to
adjust is the clip rollback, the screen shrink slash grow and then the screen softness. Basically, that's going to be changing the mask
around the subject. If we lower this, you can see that it's
pushing into the body and then raise it
and it's coming out. We're going to want to lower it, just a tad because we want to get rid of
all that extra that's on the side and there's going to be a few ways that we do that like these three things I'm
just talking about and then one more effect
it will add on here. Then the screen softness. You don't want to go overboard with this
because that's going to be feathering the mask and look
how horrible that looks. I'm just going to do
something like one. Then the clip rollback. You can see it's
moving that hard edge, so I'm going to move that
to one and then maybe lower the screen shrink row to negative 1.5 actually,
there we go. Now that looks way better. You can't see the edges, but still you can
see that there is some green circling
me and that is an instant tell of a green screen and there's
nothing more distracting in any video project than when you can tell
it's a green screen. So we're going to look up
Advanced Spill Suppressor. Here it is, drag it
onto our footage. Now that already does a phenomenal job at getting
rid of that green outline. Maybe it's a little harsh, maybe you don't want
it to completely wash out that spill from the
green screen or that bounce, so what you're going
to want to do is lower the percentage
of the suppression. If you don't like it all the way up at 100, so
that looks pretty good. In the next episode,
we're going to cover how you are going to
make the bubble effect and we're going to be
incorporating that clean plate as well for the green screen or if you did the masking
or the rotoscoping, you already have your clean
plate involved in there, so then we're going to have
that background to store and bubble up like you
saw in the example video.
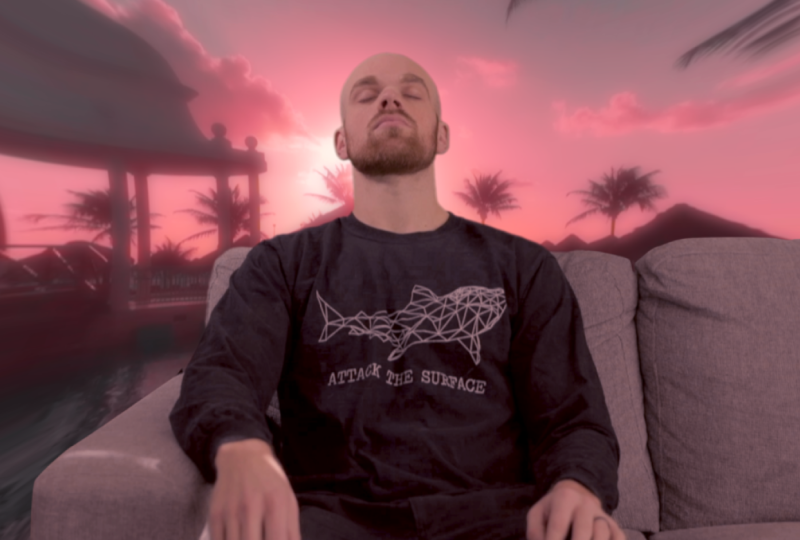
7. Create a Bubble Distortion Effect: Now it is time to bubble up this background
and have it up here. From the green screen 1, we're going to add
the clean plate. Right now we'll hide
that background as well. Now we've got our
clean plate here. My clean plate is
only one frame long, so we're going to right-click, go to time, and
then freeze-frame. Drag it for the entire duration. I'm noticing one
problem right here, and that is that because
I'm sitting on this couch, the cushion is bending, and once this background grows, this is going to disappear, and so I don't really want that. What we're going to do is
scale up the subject footage up to about 105 just so
we can cover this area. Go to the green screen
subject footage and hit "S on the keyboard
to bring up the scale, and then we'll change it to 105. Boom, perfect. Our plate is in there. Now let's show the
background again and we are going to now look for the
effect called CC LENS. I feel like this is one of the most powerful plug-ins
in after effects. Drag it onto your
footage and look, oh my goodness, it already
looks beautiful and trippy. What we're going to do now, and the only thing
we even need to do is keyframe the size to go from 0-500 over the course
of a handful of frames. We're going to
scroll to where we want the effect to start, and that's right
about where my eyes are closing so maybe right here, and we will turn on the keyframe stopwatch and
change the size to zero. Now we don't see that that
is behind the subject. Now we're going to move forward 24 frames, so one second. You can hit the page down arrow to move forward
one frame and the page up arrow to move
backwards one frame, or you can hold shift and page down to move
forward 10 frames, so 10, 20, 1, 2, 3, 4. Then boost that all the way up. Oh yeah, that looks great. You could even
leave a little bit of that lens distortion
on the side. You don't have to go
all the way up to 500 to make it look like that. You could keep it trippy and
just leave it curved in. I think I like
something like that. Let's go to 250 instead. Boom. Oh yeah, because I intentionally colored this sunrise to be a little more trippy because the effect doesn't make sense and it
doesn't happen in real life, it looks like some trip. If you want this to grow a
little bit smoother or slower, you can hit the drop-down here, let's bring up the effects. You can extend out
the key frames, and then you can also put a
speed interpolation on it, so highlight them, right-click, keyframe assistant,
lets go easy ease. Perfect way to transport your character
into a new scene. Now that we've got
the background here, we want to make it look like our subject is actually
in this area now. That means we're
going to have to comp this subject footage to
match the background color. That is what we're going
to do in the next episode.
8. Compositing the Footage: Now it's time to comp
our subject footage to match the background
that we're putting in. We're going to have to do a pretty intense
pink coloring to our character and then
lower the exposure because it's not nearly as bright out
there as it is right here. First order of business, let's add two different effects. We're going to do tint, and we're throwing this
on that subject footage. Now this process, whether
you did the green screen or you did the masking
and rotoscoping, is going to be the exact same. Then let's go with
Lumetri color. Now in the footage
I'm providing you, this background footage is
already colored, graded, and corrected, but I have not touched this subject footage. You can definitely add some contrast and lower
the blacks a little bit. But the most important
thing is we're just trying to make
it match this scene. Not only are we color
matching this stuff, but we are going to
be key framing it to go from normal to down here. I know it's black
and white right now. We're going to start coding
where this bubble fills up the entire screen and
probably just go forward a couple more
frames right there. That's where all of our key
framing is going to end. On our tint, we're going to
hit the stopwatch key frames. Now let's select map black to this and then map
white to adapt. That looks like
trash, obviously. You're going to lower
that amount to tint. This is just normally a
good starting off point. The reason I chose these two
colors is the map black, I try and choose what
is black in this scene. You can see that the blacks have this very dark pink in them. Then the white, I just choose something that is a bright area. I don't want to do this over here because that
would just be white. I want to get the actual hue of some of the
highlights in here. That's what I did and then just lowered that to 45 percent. It already looks a
little bit better. I mean, if we turn this
off and then back on, this one looks like it belongs
way more than the latter. Now we're going
to Lumetri color. My go-to for my camera
specifically is to always boost 35 on the contrast, and then lower the blacks
just a tad normally. But I'm more concerned about how the blacks look
in this background. But we don't want to absolutely crush it to where we're
losing all this detail. That is horrible. We'll do negative 5. Now let's go down to the
saturation and boost that a bit. Let's go 110 to where
that puts us at. That is better, still not there. Now let's see what
happens when we adjust the highlights so it's
not as bright here. Maybe lower the
shadows a bit too. That way it doesn't
look like I'm being lit as bad from the
front like I was here. Now that's also
something to be said, is that if you want to
go above and beyond, you can light your scene
or have someone control the lights to where
they are changing as the effect
should be starting. That's the best way to do it. But I had to film this on my
own so I couldn't do that. We're just going to lower
that exposure actually, and then I think we'll put
the highlights back up. Now, don't forget everything that you're
adjusting you're going to have to hit
that keyframe stopwatch. Now let's drop down the Creative tab and
turn on the vibrance. Let's go maybe 35. Now this is looking a little bit oranger than I would like, so maybe we can try and adjust the
temperature and the tint. I like lowering the
temperature just a tad. Definitely looks like it's
fitting a little better. Turn on that keyframe stopwatch. Now the tint probably make
this a little bit more pink. That means boost it. That's looking better.
That's too much. Now look how dramatic once
I select both of these. We just off on. Wow, big differences
going on here. Now we've got the shadow
tint and the highlight tint. Now based on how I colored
this footage here, I know that I lower this
down a little bit over there to a darker teal and then I raise the
highlights up in the red. Now that we're doing this, we could maybe change
the tint back to five, but you want to make sure once again that you turn on
that keyframe stopwatch. We can scroll back to where this effect starts
and then keyframe it. Let's move it back start
at maybe right here because it would be
affecting us a little bit but not a tan, so zero. Just reset everything
back to where it started. Zero. Actually, we shouldn't be changing the contrast
or the blacks. That's because I hadn't
corrected the footage yet. I'm not going to change the
contrast or the blacks. Honestly, we can
just turn these off. Now let's see the shadows, I will still change zero. The vibrance we will
go to zero as well. I will leave the
saturation actually too. If you want to reset
the split toning, you can just double-click, double-click, and then
let's reset the tint. Black was black and
white was white. Actually, we forgot to
turn on the amount tint, so I'll go back to that right here and turn that
on to 45 percent, turn this one to zero. As this moves on, you can see the color changing. It looks like we
are being engulfed into this new environment. That is what we want. We could probably even extend this just a
little bit more, just to make it more
of a subtle change. Let's hit the drop-down on all of these effects
that adjusted the color, so that being the tint
and the Lumetri color. It's a pain here to
extend all this stuff. I think that is everything. Yeah, let's select all of
these key frames here, holding down Command as well. Once we lose sight of this,
it doesn't unhighlight. Then drag it out a
few more frames. Cool. Then highlight
everything again, hold down Command or maybe
your Control if you're PC. Right-click Keyframe assistant, easy ease, and let's watch back. Yeah, that's awesome. That's pretty sweet.
Let's say you want to customize
this even further. You totally can. You can customize
the background, scale it up, reposition
if you want. Maybe you didn't like the
angle that it was at. You want this up higher, you can totally do that. Then something that if you wanted this background to
be blurred a little bit, you could also go and create an adjustment layer and
create some fake blur. Trim that up. Now we can go to Gaussian blur and we can create a circle
mask back here. You're going to have to move this under the green
screen footage. You can crank up
that blurriness, but you're going to want
to go subtle with it and then you'd have to
boost the mask feather. Again, M to bring up mask
and then F for feather, and then change the
feather a little bit. But you would also want
to customize this to actually fit the scene because
you got to think depth. The sky would be the same out-of-focus as the entire sky, but it gets a little
fake here because the sky should be more
out-of-focus than this tree. This would be closer into focus. That also helps with the
mask feather because it will slowly become more in focus, but this looks a
little too intense. Maybe you could go
something like six. This is the promise. It's actually now affecting
our clean plate as well, which we don't want. What you could do is just
pre-compose these together. Let's click back
into there because this needs to be turned back on. Now it's only affecting
that footage.
9. Challenge: Congratulations. You now know how to mask, rotoscope, and green screen. Now it's time to put what
you've learned to the test. I challenge you
guys to choose one of those methods that
you just learned, and transport your
subject or object into a new location using that
bubble distortion effect. I also encourage you to use
your own footage so you can experience that entire
process from start to finish. Don't worry if you can't go out and get your own footage, because I have provided my own project
footage to you guys. Once you're done making your
own version of this effect, I'd love it if you
posted it down below so I could see what you
created. Thank you.
10. Outro: Thank you so much for
watching this class. If you're interested in
learning more from me, you can check me out on YouTube and subscribe at bigvicmedia. You can check me out on
Instagram @bigvicmedia. If you enjoyed this class
and learned something, I'd appreciate if you left
me a review. Thanks again.
 Big Vic Media, VFX Artist | YouTuber