Transcripts
1. Why I Decided On this Approach: you guys and girls hope you're good and well, and in this video walk through staffs tutorial we are going to be talking about. I'm creating effective close simulations for your animation characters, and I know it's a bit of a lengthy title, but you know, the title just keeps changing from from topic to topic. But essentially our aim is to have believable cloth that renders beautifully on said character. Now, if you are watching this video introduction and you just purchased this course, then there is a set off characters available in the folders that come with this as well as marvelous designer holders as well as Miocene files. Now there's just a few things that are going to cover, or I just want to off line before, you know, getting into the main event off. Why, you know, we are doing this in your standard pipeline. You have. You have concept, and then you, uh, production only a reproduction production and postproduction. Preproduction is planning your concept art, uh, you know, like scripting in stories and stuff like that. And then your production is where you have. If if it's ah, if it's a three D um set up for three D type of pipeline. Then you have your modeling. And then you said, You have movies and you have animation. No. And then you have lighting rendering. You know the list goes on and on, and then post production. You have your sound. You have video 18 and you have sort of like a final touch ups like color correction and etcetera. So we are going to be focusing mostly on this because this middle point pretty much tapes. What has Bean conceptualized here and sort off becomes the bridge to this final step? So if you're an artist and you are born in another sweetie department, you are really important essay. And it's in knowing what works and what doesn't and being able to make the right choices at the right speed at the right hon for the right reasons. This becomes really, really crucial. So this little pipeline that I created a pipeline, it's It's sort of like a step by step, how I've wins about avoiding using n cloth in Myer. And for those who aren't familiar with Maya, my uses an enclosed system to render out, not render out, but to simulate close on characters or on objects so initially would have either a plane. And then you subdivide the plane and you go to I think it's N dynamics in any name dynamics used to this piece off geometry into any cloth. And then the simulation happens. And when simulation happens, you have your nuts or you have geometry behaving like a piece of crap. And then if you go to the attributes settings, you can, um, choose whether you want to behave silk, uh, leva and ever sittings as well. So this is both good and bad because you get to really customize how you want your geometry to behave. But if you were to model, say this Pootie in in Maya, you know how to get it to look like this is a bit of a mission on you would be personal time, because with regards to your modeling and using, this has to be taken to the Effects Department where they are going to be working on cloth simulation. And if it's gonna get Thorn, you know, stuff like that has to be taken into count. So if we are then going to use marvelous designer to create our clothing. There's marvelous designer to essentially create our building. And not only do we create the clothing, you guys have to excuse my head writing. My brain works faster than my hand. So if you're going to create clothing, we also have to decide what sort of material goes on to the clothing we have created. That way it behaves as it would in real life, and one other cool thing could do is we could run a simulation, marvelous designers algorithm. It's super awesome because you can sort out your problems in real time during simulation. In my things are different you you simulate the end cloth, and if it's not the way you want it to be, you have to reset it so that it becomes your plane again little with the settings and then simulate the enclosed again. And hopefully this time around you get it right in. Marvelous designer. We get to do that in real time, So if you want, maybe you want to make the woody a bit longer. You know, we can sort that out in real time and simulate that in no time. So this is why marvelous designer is favourite for this one. So if I go back to Z Brush, you can see that this is one little snippet from the actual simulation and I will show you the end product just now. This was going to be used for promotional purposes, but I thought I could just use it as a still shot and, you know, give you sort of my notes and why, You know, I think that it would be cool to have this sort of approach in a complicated pipeline. So the end result that we're getting is something like this. As you can see, the cloth renders beautifully, you know, and it's quite believable. You know that, plus the animation frame rate and also good animation book. I will show you also way to get, um, you know, good animation presets, because, remember, this is all initial testing, and it's not for actual animation work. If you are in an animation pipeline, then maybe you can speak with the animator on you can hook up and already animated character Andi popular too marvelous designer on, you know, for a long. So this is quite a lengthy introduction, but I just needed to get those points across that number one. The reason I I felt I had to create this is, you know, to save a couple of people a few headaches with regards to creating cloths and combining it with your animation. So this means that we are going to be easy. Marvelous. Zeina, we are going to be using, uh, my, uh we also going to be using a rush just to get our our scaling. Right. But you can also do that in my as well. And we are going to be using mixing bowl for this example. All right, so having said all that, it does help being difference part off the toy.
2. Part 01: cool. So let's talk about the first thing before we get into the meat and potatoes. Um, off this tutorial, let's talk about scale. So if I bring in an avatar right now, you will notice that this avatar has its own, um, units. These come, uh, these companies presets with marvellous designer. So then maybe building quick it all right? And at some point, if this takes a while to populate, I will cause it. So ignore the jumps. And also this this is not a perfect off it at this. It's just a point that I want to make. So just make this quick. Little It was a quick little dress like this or is entity, you know, here we go have a simple piece of clothing that we have. He ate it. You can adjust. And how this is like sitting on is able to No stuff like that is because off scale. So we're going to use this model in terms off scaling our character. So if you are not using the resources that are provided with this video and what you can do is that you can take a no VJ file off your character on do whatever software you are using . Um, just popping this model, which export now and we are going to use it as a measuring, um, is a is a unit of measurement. The reason we are doing this is because if your character comes in a small right, the way the cloth is calculated, yeah, it will not work out. It will not work out good at all. Then you give you another example? Uh, they used to have kid advertised as well produce. No, I mean, just use sing the same outfit As you can see, the material works quite differently, and we're starting to get these jagged lines. This is because of the size off the model on this one. It doesn't show as much, but with the clock behavior all right, this fuels if it's stiff. And as you can see, we're starting to get these corners. So we need to have a scale on point. That way our cloth translates very beautifully and very realistic. It's not realistic. So it is going to bring in the female ever talk again. Then I am going to closes file export over J selected. And then once you have selected to export. So BJ, choose the location and then we will open it in software. All right, so this is part two off the scaling. I mean, Z brush. Now you can use my can use, Max. Like I said, it depends on the software. So I'm my a and Z brush predominantly because I kind of pushed things a bit quicker over there. So this is the base that I'm going to be working on. And just to show you how to quickly get your scale, you are now going to look for the my pen. So you're not going to look for the model that you have created. So if we go to marvelous designer, what events said waas, we are going to export this. Sometimes it doesn't work as an organ, j So to be on the safe side, you will export it as and there be X. All right, enough already done that. I have marvelous every talk. Um, don't If so, if I go back to Z brush also, I'm in terms of my exports. Eighteens, just in case way don't have the same sex Corvis zero to All right, I sent it out as a single object. And these are welded, all right, and unified UV coordinates. All right, you can fiddle around with the settings, but the thing that we are after is the scale, uh, the model. All right, so just make sure that it is on millimeter default. Don't temple of the cities, then you see? Okay. And then it's exported. So now I'm jumping back to Z brush and in Z brush, I'm gonna go Z plug in Fbx import. Then I'm going to go to import on. As you can see, these holder on it will bring pretty much or the missions. Okay, Now, I'm not a thing. I could do you in my subtitle 16. You can see I have white stuff. I conduced use this all right, And everything else doesn't matter. So with this addicted, I'm gonna go back to my base and I'm gonna go insert Andi. I have a body shape, skin. I was gonna pop that in. And as you can see, the scale is more or less the same. If I could just get this right, you will notice that there is a great sighs relation, so their skin work more often than not, you'll find that your characters are really, really, really, really, really small, like that small. Okay, on this happens a lot of times. So doing this is really good for us. And if you are going to send this to you guy to read all you haven't auditory ago just gonna do you read yourself, then work on this scale because the scale is what we are going to use in marvelous designer . So now that we have talked about the scale and how important skill is, we can now rest easy and we can just say this out as a different ball size. And also, um, the initial posing as well can be done with it This
3. Part 02: so in terms of reference, I just wanted to be, um you know, going up to something that's very, very cool. The very casual gives an impression that the wearer is active, you know, like like you would make a correlation to either a hole or an athlete type of lifestyle. And I went to Pinterest on Yeah, being God interest invested, if you know, I'm paying Trace kid on trace, okay? And these, which is some off, uh, some of the clothing items that I got and I pretty much decided to mix and match. Um, these clothing pieces. As much as I wanted some form of accuracy, I didn't want to sacrifice mobility for accurate because remember, these have to be calculated is well known me oneself in another software is about So I mostly took reference from this jacket. And as you can see, these are just some of the sold in patterns. Then I popped over to marvelous designer Andi. So don't put something together. No, it's it's not. It's not spectacular, all right? It's just ah hoodie on and some sweat pants and this repents back. Also, I created different types of fabric so that my color coordination is on. I just don't have, like, everything the same, but it's a bit confusing. So this makes for an interesting title. Look, even though this isn't the final scene and also I didn't want to fiddle with, um with Greece, it's much a C C. I'm still under, like to default, uh, fabric in both. Right, if you want to, like, push it further, you know, just to get a more realistic field and you can come to presets, then select the top material that you want to sweat pants to be made off, and then you can roll. Um, this is unnecessary as well, because at some point, I referenced. I wanted to create this sort of a friend pocket, but yeah, also, one other thing that I want emphasize here is quality versus I. This is the camera. Okay, if this is going to be happening, like way back there, Okay, I personally don't see a need for a lot of stitching. Top stitches and overlooking pattern and I containing on like like readings and stuff like that. If the character sole purpose is to appear somewhere here, Okay, If you can come out the silhouette, all the character. Then you can get away with a lot as I will show you as time. Christie's and these are simple. It's like simple clothing. Alright, then. As you can see, there is nothing fancy happening with stitches. And it's just one item, all the other. And this is how I would pretty much use my reference. So if you want to build this from scratch, are getting you I'm some material, uh, pattern that you can import into marvelous designer and so trace over all. You can just work on this by I and have your own cool. I said so if I didn't have reference, I was just gonna spend an even longer time, you know, trying to get this, uh, look in my head. Okay, so it's really it's really imperative that you have reference and good references that and yet So now we are going to talk about, um, animation are how did I handle the animation aspect of it? Because one of things that we can talk about issue animation sources if you aren't in an animation, if you like in an animation studio or you are struggling to get some animation filed work. So let me just quickly explain what I mean by animation sourcing animation. We have to make this cloth and and a normal said way would be using, um, in my case. But using Maya and admire abusing in court and essentially how n cloth works is you have simulation, and then you you have sittings for your simulation as to attack clock you want to have. And then, um, you can start animating it from that. The reason we bypassing Meyer is because it takes a really long time, you know, to achieve something like this. Okay, in terms are modeling it out. All right, you can cheat the system here. They're ever going to Maya, but it's gonna take you longer and also in terms off UV coordinates as well. Marvellous designer just does this off the bat. So now that our clothing is sorted right, we are going to talk about animation. So it's either you have animated character, and if the character is animated, character has to be read, and that has to be, uh, some sort off cash that comes along with it. Okay, so we are going to go into these for the sake of us off this lesson, I would advise, um, mix Imo. All right, uh, mix. Imo has preset and nations. So I have a new information presets so and in presets. Excuse my handwriting. It has animation presets and makes them more. Also has an auto maker. It's not the best or to Riga in the world, but, you know, for the sake, off lesson or demonstrative purposes, April work just eyes fine. So the process would be go to mix em O right and a blown the character that we have scaled and have used in marvelous designer and on LBJ form it. Dan, once that is done, you select a simple animation, and then I want to You are happy with that animation, and you tweeted, um, in your browser, you will download it as an fbx. All right, so we are going to do that now, for those who haven't, um, used mixing
4. Part 03: right, I'm in in I mean mix M o right now on. If you're wondering how to access site, it's w w w dot mix imode dot com on it is essentially an online or toria. It is absolutely free. If you have an adobe account, that's even beta you can just access. But if you don't, you can still sign up. No hassles works within minutes. So what I'm going to do now is I am going to lock in Still loading. Also, depending on, um, the servers at a given point in time, it might work slower. Andi, on average day, so are we. Going to do now is we're going to upload a character, and we have a pop up window that piers. So one other thing to be weary off is to keep your mission is simple as possible. That way you're reading time happens quicker as well, and also have your model as humanoid as possible as well. Um, for the sake off attaching points to your auto weak. So now I'm just gonna go select a character file and navigate to my file is so in. Mrs. I'm gonna go to O. J and I will select my base. And like I said, once again, depending on how simple image is this affect the up time and interval, so affect 13 process. So I'm just pausing it in between. No, it's still Percy seen character. They will say just a moment. And then after that, we will get a window where we are going to attach our reading points. So here we go. Now, what I'm going to do is select next. And as you can see, because off how my measures created on how everything just mirrors, I will then start attaching these points. Um respectively. So just go with the star, the elbows going to reveal Czar, the unions go to you are and growing goes to the growing area he's And the growing area is a bit tricky because sometimes it is a big to know you'll have some years deformations happening. And also just make sure that you symmetries on the way. You can just have a mirroring function like whatever happens to live, it happens to the right, Andi, I normally select standard skeleton, all 65 phones. All right, And this will create also, uh, What's that? It will create a A reading will create joints for your fingers as well. So when Sacristan sitting next, then it's going to altering itself. So this is the equivalent of putting food in the microwave. And this is good if you really want to hammer out, like concepts quickly, such as in this tutorial. So I'm gonna pauses again while it calculates there's no money takes about two minutes, and on a really sucky model, it would take a coffin hour to 45 minutes on. Guess what? We now have a real character, so as you can see pretty quick and easy. So now we can go to next, and it will say that your character is being uploaded. Proceed with character. Your previous character he saved, depending on what you were doing before this. As you can see, I've used it before. Um, just say next or safety previous character and then proceed with this one. So now you will notice that you have different types off animations this side okay, and you can choose one that you feel more or less comfortable with. And let's say sport, if you select the sport option, it will load the animation presets that correlate with sports, and you can choose whichever one you like. So the scroll down and also once again, depending on how good the server time is over there, um, these images might load quicker. Sometimes they don't. So I'll just, like, pick something from the top, Maybe because did that load and you can rotate. Move. All right. So if you have an animator in your team, you can just give him, uh, the folder with the character rig and create some animation presets for you. The most important thing. Bill escape. Okay, So once you are happy with your character, you can then go to download right and select f Yanks fbx skin gnocchi from reduction and make sure that it's steady frames per second, and then you hit down.
5. Part 04: in this part. We're going to be talking about the animation. All right, If you were at mix Imo and you have downloaded your file as and if the X, then that is pretty cool, because we are going to import it right now. So you're going to navigate to where the file is, and we are going to import, so have mine open, and I'm just going to quickly navigate to wear my file. So in cloth animation on the FB X Files, I have the area of a fbx Rich was the animation that I have selected from mix Imo Don't bring that, and the first thing you'll notice is that you don't see anything off the bat. So when you press a all right kimbap pulls out to encompass, uh your entire model and agree to open the outline, Er, just to give you a rough idea of what it happened. So we have certain groups were complying and group to the reason we have these groups based because off UV ing, uh, purposes. If I were to go to Z brush right now and hit Polly frame, you will notice that this jaw he's in it's own separate groups. So ideally, you would want to have you're you These combined just to avoid our problems along the road . But this isn't so much of an issue. So I have these two missions and I also have the joint structures broke in a swell. So if I was to scrub through the animation, you will see that everything just transit translates beautifully. But the thing is that it's not really a perfect uh, you know, it's really a perfect information. So baggy clothes in this instance high a lot of this thing like a lot of these year deformations. Okay, so no one's but is this, you know, narrow or you don't have, like, such, uh, shop angles. So once again, you can just scrap through to make sure that everything is working, okay? And also, I normally have my timeline going to something like 300 or so just so that I can see where my animation stops, stops at 110 and this is all that I'm going to need. So what's gonna happen now is that I'm going to cash this animation, and I'm going to bring it into marvelous designer and how I'm going to do that is I'm going to go to cash Olympic cash, an export or two Olympic. All right, just make sure that you have reset your settings. I don't feel much with this. So once again, cash, Olympic cash export all to an and big, and it will take you to wherever you want to save it. And as you can see, I want just pop it in there. And I called it, uh, my twist. And once he hit export, all the animation, more playing. And there we go. So now I'm going to hop into marvelous designer and discuss, you know, one of a few problems that we are going to be in countering. So the challenge here is to bring in the animation right? And hopefully everything just it's in and ages flows. This works, but not all the time. The problem we are going to encounter is the starting positions off these characters. If I'm to look back to Maya, you will notice that the start position off this guy is quite different, as opposed to marvelous designer. So what I'm going to do too quickly leading this because let me just show you practically what's gonna happen. I'm to go to animation and when a file, then I'm going to import my Olympic fund and my twist. Then the settings are cool as it is because remember, from the onset we had it at millimeters, and at no point did we fiddle with the settings. Very frames is fine because it will correlate with mixed Amo able correlate with your frame rate, admire as well, so watch what happens. And immediately you notice that we have a problem. Okay, because the legs I sprayed further apart and the shoulders or the arms are now dropped in the head. It's like tilted forward so you could manually come in right before I address that. This is what will happen if you play. You see, the clothes are going to stay there. And if you try to actually simulate it with the clothing, what's gonna happen is even more disastrous because, as you can see, it's still currently draping. And now watch what happens if we are to try two enemy. The clothes do not stick. All right? They do not wraparound character. They are barely hanging on. And yeah, this is a mess. Okay, so who are we? Good. It is. Um devise a solution to start off, alleviate this mess. So I'm just gonna import LBJ my base again. So I'm just gonna know it as never talk. And everything just fits in properly because this is what I based my clothing on. And then I'm going to go to Z brush and what I did in Z Brush waas I brought this guy in that resembles the starting three off my animation. And I could use this in marvelous designer. But the problem now is that the points do not coronate. Okay, so you have 47,000 police close to 48,000 policies, and this guy is 48 parties. Okay, so they need to be exactly the same. So what I'm going to do is I'm just going to duplicate it, even if I don't duplicated, uh, use a layer. All right. And what I'm going to do now is match it as close as possible. So you go. - I'm going to select the legs. So without make sure that not selections our point. So do you see now why we are opting for a mesh? That's as low res. You know, in this simple as possible just so that when we run into problems like this, three can quickly come up with solutions, and we have with less headaches as possible. So just gonna have this done as long as it is in the ball park. No arms. So Okay, so we can polish and refine this as much as we want, but we just want to get just a position way are beginning to see me all sorts of issues and that to me. Here we go. So we have it. Mauris. Well, we wanted to be, so I'm going to export this right As modified face No one sets exported. I'm gonna hop into marvelous designer and a marvelous designer. I am going to import modified base as a more tart. And then because I just want a nice transition off clothing, the frame rate come, I won't change it from 30 to 60 that way. It just doesn't rush to the next post. All right. It gives um, my my pieces of cloth more time to simulate, but also at the same time the higher this goes, the longer equal take for it. to reach disposed to the next post. But the good thing is that with your clothing, all right, it will give it more time to calculate and you get an accurate representation. So this is noted, It's more target 60. And once again, I'm making sure that the units are always consistent. So when I hit, OK, calculated, drape it. And this is what you get. So that's cool. So we can now save this as a modified file and see if this is a project. So we're gonna say maybe, um, reposed files. But if you working within the pipe like you guys, a Miss Yumi should have a naming convention of some sort. So it's gonna holders reposed file and I saved. And now I can go ahead and bring in the f b X animation rich. I've converted to Olympic in mind someone about to simulation Mr To my animation tab. Then I am going to import my Olympic file my twist. 30 frames per second. Very, very important. Okay, okay. Does it conceal? It's just a slight difference, all right. And what I can do is I can just take these and pulled him back. Let's make sure that they cover the character before I around the simulation and, you know, same way, uh, with patents as well. Get used to this. And as you can see, this position is way better than the one that we had before. And if you still would like to refine this, you can just go into Maya and then select the the mesh itself at the start position and then exported out into Z brush and in repose, you character. So I'm just showing you different options that you have when it comes to, uh, working this. It's always good to have more than one a viable solution, just in case one doesn't work or maybe one works better and the other for you. All right, so now I'm going to hit simulate. As you can see, the almost got it right. We just have to sort out, um, the cuffs. There you go. - Here , crops is sometimes a bit of a problem. So you have to, um, hold on, Dermish. Just a little tug here in there. Eventually we'll sit company. There you go and decide as well. Cool. So now we are ready to begin the simulation
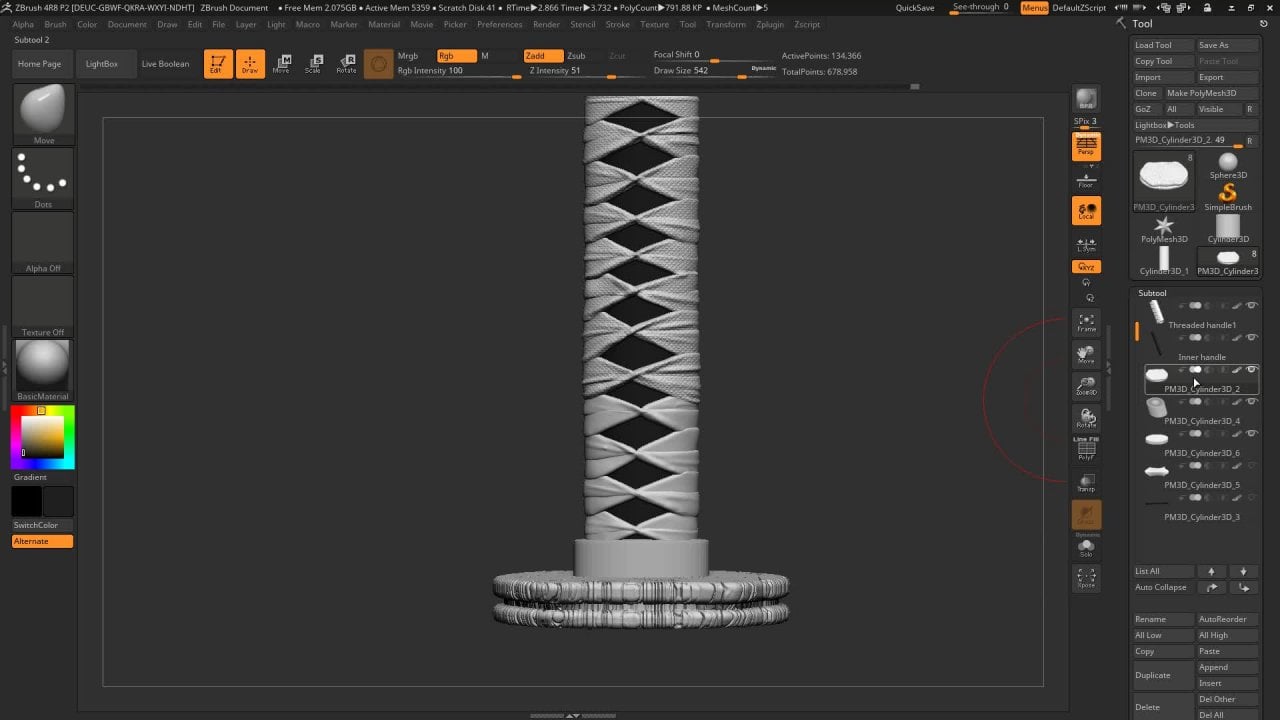
6. Part 05 Fabric Fixing: So before we begin to run the simulation with the clothing on in marvelous designer, there are a few things that we should be mindful. Number one is that the cloth itself is still in triangles and not in quads. So what I'm going to do is that I'm going to city everything and under miscellaneous, I'm going to make sure that it's in quotes. All right, so it takes a while for the command to go through. And once it is done, I can just run the simulation. Yeah, and let the clothing sit. And quad quad style triangles. This will help us. We are in Maya when we are reducing the mesh in Z brush. All right? And also, it helps for like, a smoother simulation fixing up, uh, things like this as well. So now what we're gonna do is I'm gonna go back into our animation, and we are going to begin to run Dan this simulation. So we are going to hit this button which will record the cloth on top off this, um and then big cash. So depending on how often the machine is, depending on how um how clean you're your pieces of cloth are This could take a little to no time to really a long time. So also in this happens down a few things that I want you to notice that the cloth is gonna be behaving a bit different depending on how you have speech did. Because, as you can see, I really have parts of the clothing beginning to fall off. All right, I have, um the part of the woody is well, but this isn't so much of a problem. The problem is yeah. Okay, so I'm just gonna wait until this is done running. So this would be quite embarrassing if it was to happen in real life. So there you go. So now when we play this back, it looks cool. But, you know, way have this to sort out. So based on the previous performance, we can make a few adjustments, and we can sort of, uh, break the process down so that we have more control over the clock. So what I'm gonna do is show you how to do the pants, and then you can push. We, um So I'm just gonna freeze this and moving up. Where with a simulation or the animation won't affected and essentially, what it happened Waas. The pants were beginning to fall. So what I can now do is I can come in here to the fabric and I can make it into a question . All right, this will help me in terms off, um, stiffening the the fabric up so that when he's doing stuff like flips in stretches, all right, pants don't slide off. So this is one another. Another part that we can fix is the the belt or the elastic part off the waist. So what I can do is I can make it a bit slimmer as well, so that it hugs his waist Bickmore during the flip so that he's pants don't fall off, have you? So I think that's it's high enough. So now what I'm gonna do is I'm going to come into animation. So what we're going to do is we going to disrupt the the animation baking. Uh, let me just rephrase that we are going to disrupt the animation baking process by re simulating the clubs while it's still okay. When I show this to you. Practically so if I hit this court button What is that? He starts to get in position. So if I move around, you notice that those minor tweets that we did they are helping out a great deal. Yeah, just pause. This, uh, keep checking on it. So, you know, to start, we're starting to have a slight problem here. So if you have areas like this that are giving you a problem, you can just run the simulation and just put it that. And then you can either stop the simulation or you can just carry on recording as well. So you know, and as you can see, it doesn't give us a lot of problems. Young issue is that's slipping that's happening here. But this we can fix up in post as well because it also has to do away the particle distance . Also, another thing that helps is if you run the simulation more than once is too minor. Treats around the simulation more than once. You will get and nice result than the one we gave before. So now if I take it back, that baby is you will see that you get an even better results. There we go. So we can do the same way. That would be as well as do some minor tweets changed the fabric type. And when you run the simulation, you will get a different and hopefully a better results. Now that we are at, uh, the final stages in marvelous designer, I've went about and I cleaned my my mesh. All right, on, I am having a cool simulation with, uh, minimal, you know, clipping happening. Okay. And I'm quite happy with it. So what I'm then going to do is I'm going to go back into simulation, Frank. I'm going to select all the clothes, single file export, Olympic O G A. That means Allah or God. All right, so once I've selected this, I'm just gonna say clothing Olympic. And also make sure that it's been I will explain why and also make sure that it's welded and you are running at 30 frames per second as animation. And also make sure that you scale is in millimeters only. Okay. And there we go. One last thing that I continue here is I'm going to hit this button every sets, all my clothing here to look like this. So it's like a reset to the arrangement. And this is gonna come in very handy in Maya with regards to making my seen a bit lighter as well. So just gonna select this is Well, then, clinical exports LBJ selected. And I'm gonna say, uh, that's comments presents. There we go. And also make sure that it's thin and our scale is corresponding. So once this is done, I'm just gonna hop over into Z brush and in Z brush. I am going to import my flat Garmin patterns. I'm just gonna going from out in it and it's changed, Shader. And as you can see, this is what we have and cool enough that this is also how how are you these, um, correspondent. So one thing that I can do yeah, is I can lighting up the mesh as well by reducing politics because right now only know we are sitting at 12,000. Yeah, right. About 12,500 bodies. And if I can remesch it, we'll have 66666 Okay, so once I'm happy with this, I came been Go, export, and I can just override this fire. Well, I can just create a new one, so in Maya, I can begin to build my scene. So the first thing that I'm going to do is in my cash when I go to a big cash and I am going to import a number. So 1st 1 is the Maya Twist and once again because of the size entities. Then my little back began to Olympic cash. You report cash and this is the clothing Olympic from marvelous designer just sits right there on top. So to make sure that everything is, uh, working on par, just gonna scrub through my animation through my animation slider. There you go. So one more thing that I'm going to do is import that government file that I taken from marvelous designer and modified a bit See rush file import, then just kind of describe up. My mission is let patterns and Syria. So the next step is to match. You've ease off this. The clue items with the ones that I have listened, and I will show that to you just now.
7. Part 06 remaking pants and transfer Attributes: all right. Here is one really quickly to ensure that you have nice measure consistency. And when you are eventually going to merge over dis ease, everything just lines up beautifully. If RC switch on the lie, Afraid you you will notice that on some points my mesh does do this like this. There we go on on some points my, my verdes do line up beautifully. But then some way, somehow I do, miss, um, a point. And if I was to alter this, this would require me to, you know, pretty much, um, remake this because I want nice even quiets running across the surface. So one thing that I could do for the pants is an example is with that the shape is more or less the same. It's like a simple pattern that was duplicated many times so that it sits at the front of the back open, Um, the names off the character. So what I can do is just this, you guys and and this is well, because the mesh from the brash isn't really that clean. And this is going to give us problems along the way. So here's what's gonna happen. Number one is that we are going to go into a mode and then we are going to select and then funds The edge is selected. I'm going to go to to modify, and then I'm gonna go to convert, and then I'm going to go to Polygon ages to cope. All right, So we selected again. You know, I got the subjected, but a modified convert Polygon ages to curve. And you will notice now that I should have Baker created. I mean, there you go on just didn't come up properly. Alright, let's try it again. By only done ages to come. There you go. So this I can now do you believe I'm gonna delete this on? I have a simple Okay, So now what I'm gonna do is I'm going to go to surface. Yes, Les, now and in my options, I'm going to make sure that the end result is Taliban's right. And I have quads. And with my count selected was normally it's in general, which my count selected. I want about 400. Um, Poly's. And as you can see, I have a nice clean mesh running. You're okay. And I have Nice Um even quads as well. So this is an advantage for me because I can now come in and and just coating miss display then reversed my normals. Here we go. So I can get in on my knees. My editor, my editor and I can make sure that this becomes an appropriate size. We're not matching it against, um, this The reason I'm doing this is so that you ve you ve islands line up on top of each other, and it will make sense just now. This is cool enough. Did you know? So once this is done, I can then go to object mode because now I have a consistent, um, you need running across. So what I can do is simply, um I can duplicate it, and then I can flip it so amenable to it. It duplicates, then modify center pivot. And I'm just gonna turn us around, you know? I want to be, have you know, and I can just do what I did with the mesh display regressed in normals. Been like in Now move this guy. You shall then can just this, Then I'm going to flip it, so I'm gonna go to it's Yeah, modify. You don't. And that's pretty much it. And then what I'm gonna do is duplicate these in these four cars bond with the beauties, the back. So once again, you shall and I will select used to and dry. Oh, then I just need to I just need to modify It's good. Appreciate spending more, you know, There. I think that. Okay, So, in theory, what we can now do is we can transfer the attributes, okay? And essentially, how that work is that I will transfer the position off these pants. All these parts to read depends are currently okay. And because we have lined up the polygons according to the movies of his pants, they should just sit beautifully on top. And also before that, I want to Yeah, I want to emerge. Missed you somewhere, never to combine. Then I'm going to merge. The verdict sees. No. The process seems to be a bit tedious spot. Trust me, this saves a lot of headaches in the long run. All right. And as you can see, I'm getting extroverts in other places. So what I can do is ready. Ages need to form the bird take this and then I can come in. I didn't this afterwards. So gonna push this for a bit and then when oppose this and unpleasant. Okay, so my points are combined, and now I'm going to go to my transfer attributes options. I'm going to select pence an animal to select the object that I want the attributes to be transferred on. You go. I mean, like this man, I think you just have to play my normals and based my pants. Okay, so I'm going to do the same. What? These vows just pulls the video. I'm actually very disease. And then I was which it on transfer attributes and show you what to do from. So we have our underpants. Um, So? Well, so what I'm gonna do now is find my transfer attribute window. I'm gonna go to mission and then transfer attributes. So, like, this transfer attributes? Yes. Uh, I'm supposed to select destination first, then the item, and then transfer Patrick. And how this works once again is have your vertex position selected. Uh, have your sample space on movies. That is why I look 16 r movies on top of each other. So that day. Pastor Vertex information, um, sort of missile together and combine really nice. So if I was to like this and interesting normals, you will notice that I have a decent a pair of pants and I can just delete it as well. Can you need history on the curve? Needed to be type? It's me. I mean, So now my points are more this matching. And another cool thing is that because off the Olympic information that I transferred the attributes to I can still and they made this pair of pants. And as you can see, it's relatively fast. So what I can do now is combined this mish and then stitched together despair, pets, and you do the same with the hoodie. You do the same with waistband, and that is pretty much it. So what's cool about this work? No. As much as it's intricate, and you can't fumble up a few steps, you can get away with a lot in terms Off animation lies with God's to clock. I could just have your animation and popped into marvelous designer. You can then just work around the clock behavior in Myer and use a relatively small mesh. Because, remember, this is like 400. We have about 400 quants. I'm making up this object. So this is like All right, So these pants are under my 1000 in terms of poly count, and we still have really good animation.
 Azariyah Radebe, Digital Artist at Your service