Transcripts
1. 001 INTRODUCTION: Hi there. My name is Bello
and welcome to my tutorial. In this walk through, we
are going to be going over how we make a poppy dix. This tutorial is done
100% in Maya and we are looking at organic modeling as well
as inorganic modeling, interchanging these
modeling techniques. Throughout this tutorial,
we are going to be looking at how to make
things like buttons, how to make beveled edges, and we're also going
to look at how to make our work look
and feel appealing. Even though we haven't
textured anything, we haven't, uh, done UV
mapping also on that. This is exclusively
a modeling tutorial. We do not cover things
like UV mapping, lighting rendering,
or texturing. If you want to hone in
on your modeling skills, if you want to take your modeling skills
to the next level by making something that
is unassuming at first, but really puts your
modeling skills to the test, then this is the
tutorial for you. And without any wasting of
time, let's kick it off.
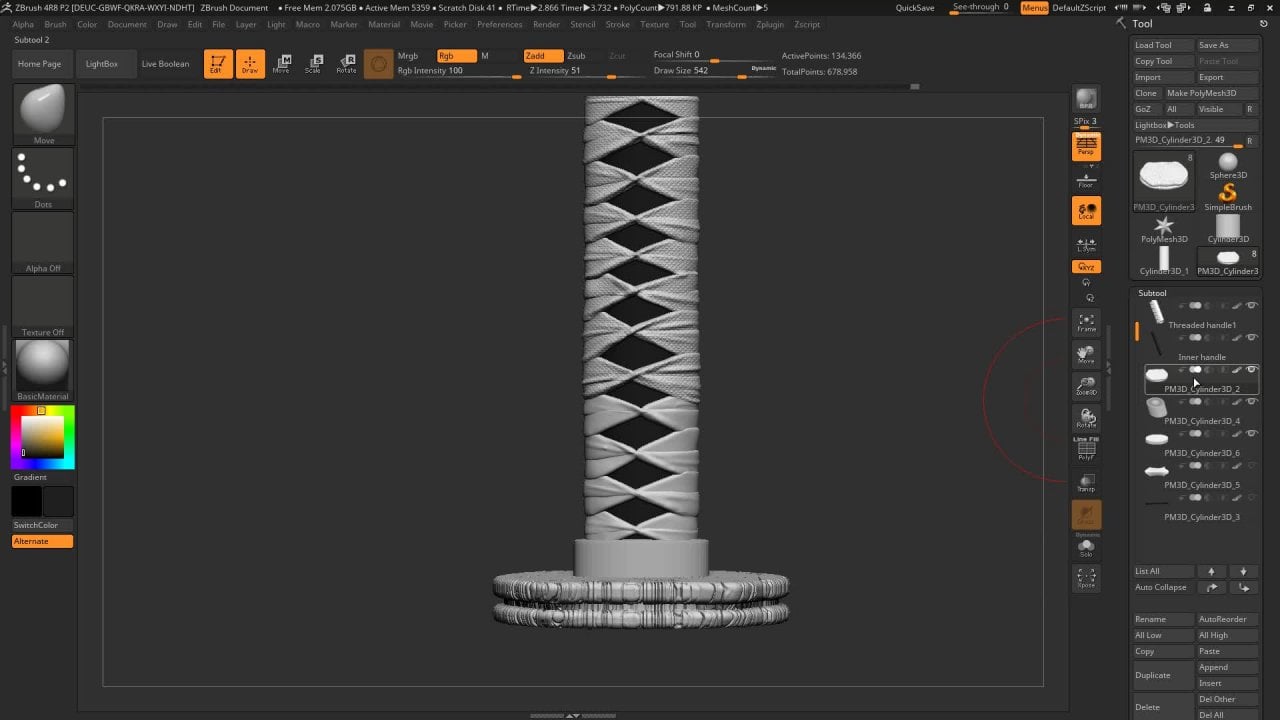
2. 002 Blocking In the main feature: In this part, we
are blocking out the main parts of our Pope Dig. Right. This is one of those
situations, if you want, you can have a slow where
you can place your stuff, or you can just build
stuff right off the bat. Generally, I tend
to have this and I keep switching it off and on. Just going to switch off. Also kindly in general, you can also use the
general wood space as well. If not, then you can use
the modeling the standard. All right, so the first
thing we're going to do is create a plane. Go to polygon primitives
and then I'm going to create a plane
from the top view. I would like this plane to
encompass this entire view. And then what I'm
going to do is I am going to count one to 123-456-7810 So I can count 3.3 and have four to four, and then
the rest can go. We can also do five as well. Let do eight. Okay? So I'm then going
to delete these. And then I'm just going
to, what we're going to do now is model this in portion would be the
first part of it. Right. And what makes
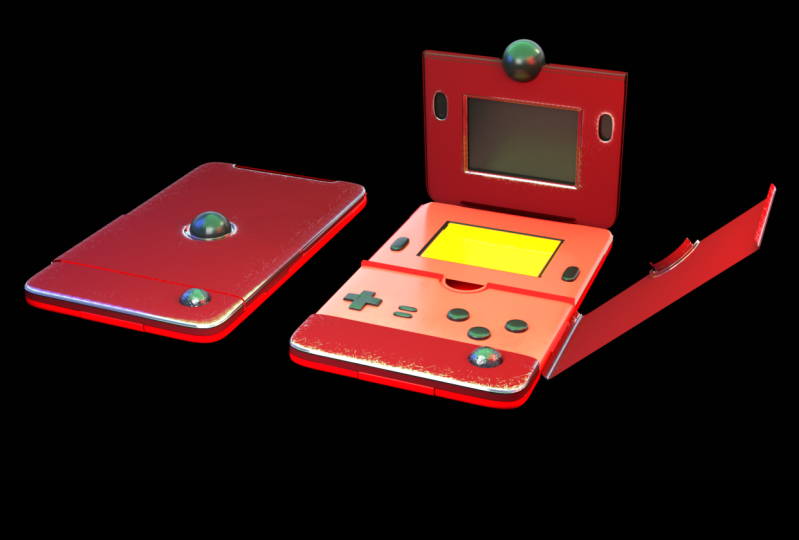
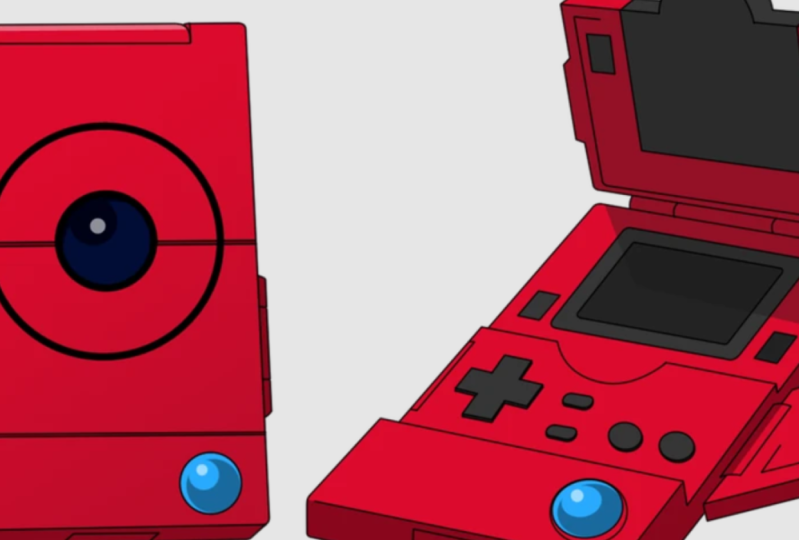
a Bogiex unique? I have one right here. We are going to
be a similar one. Yeah. We're going to be modeling a similar one to this Joe. As you can see, they have a game boy type of
aesthetic to it. Some have a game boy type
of aesthetic like 1.2 And then you have some that have a flip phone aesthetic
like these three. And you have like a
technophone or a smart tablet. Then you have the ones that look like PSPs or
Nintendo switches. This one is nice because we can break this
down into panels. We can break this down
into specific portions. We are going to start with
the big shapes first, so, so notice that when
it's open, right, it has this really
thick and wide U, a Game Boy smart
phone hybrid, right? And then it has an interesting
design in the middle. And it also has other interesting
designs as well which we are going to attend. So the first thing I want to do is just get the overall shape in with the top part selected. I'm going to duplicate this, and this would make
the bottom part right. Then let me hype. Now what I'm going to do is
I am going to extrude this. Now before I extrude it, I am going to create a cylinder. This cylinder in my
polycylinder history. I'm going to give
it eight points. Notice how it's aligning
perfectly with my well almost. You're just going to scale
it down a little bit more. There we go. So what we are doing
is this closed part, I'm going to move
rather quickly as well. And I want to make
sure that this is flush with the surface. The next thing that I'm
going to do, there we go. The next thing that I'm
going to do is I'm going to delete the portions. I'm going to delete
1234, these four faces. Then the next thing
that I'm going to do is in vertex mode, I am going to snap these vertices to these
edges on the cylinder. By pressing and holding V, I can select a
vertice, press hold V, and then I can move the stuff to the points which I would
like to have it snapyp. You will notice that I
have a perfect circle. Pretty cool. The next thing that I want to
do is I'm going to extrude. Let me just make sure
one I'm going to, I'm going to extrude
inwards just like this. There we go. Now I hit three once again. You see that my hole
is looking good. The other thing that,
the other thing that I want to do is
I'm going to insert edge loop and then I'm
going to select the faces, and then I'm going to extract
them in words as well. There we go. Now I'm going to insert
an edge up to make sure that our edges are holding nice and firm there. There you go. There we go now. And I hit three. We did
something like this, right? It Janky, One way to make sure that it's
what you are seeing. It looks Janky and
not the object itself is in your view port settings. You can come down
here antialiasing, then you can switch
on smooth wire frame and multi sample anti aliasing. I'm going to bump this up to 16. Notice that things look better, but they could be tighter. Now in the attributes
of this part, one shape, I'm going to go to a smooth mesh option and I'm
just going to dialed up. Now you see we have a nice
kill hole or indent, cool. The next thing that
we are going to do is if we look at this, you realize that it has
a beveled surface area. So what I'm going to do
is I'm going to select the edges and I'm going
to extrude stairs, just going to make the
first one very thin. Then repeat the same
action at least twice. There we are. If you want
to have a team quad, right, then you can just do this and then you can
play with the deficients. Cool, So now I'm going to select the top edges and
unveil spring to it. I'll move them like so. And you'll notice
that when you are moving them in a right, your mesh starts to the stod. You can easily fix that by just double
clicking on the edges. It's sad for these
ones because they are holding the shape of the circle. There we go. This is why it's important
at this stage to work. When you move your edges a lot, it distorts the mesh. And as a result,
should you decide to, your textures might
come across as a bit skew because
your topology is skew. So this is why we fix
this ahead of time. He is just still is just, is abito cool now, And I hit three. You see that We have this
cool looking surface, right? So we are going to push
this even further, right? And we still have this
nice clean mesh, right? In the next video, we
are going to be creating more panels and pretty
much discussing how we shape them
up to look similar, if not identical,
to the poky decks.
3. 003 Blocking in additional shapes: In this part, we are going to be adding more subdivisions
to the mesh on top of that, what we're going to do is
we are going to split this. There is more than one way
in Maya to do one thing. We're going to keep things as simple and as
concise as possible. The first thing I'm going to
do is select this object. Then I am going to go to mesh. And then I'm going to select the smooth option,
which is this one. Certainly. Click here,
Subdivision One. If your settings
are not like this, then you can just hit Edit, Reset Settings, and
then just hit Smooth. This amount of
subdivisions is fine. Now what I'm going to do, in the interest of working
non destructively, let me just unto this then I'm just going to duplicate
this and then hide it. Then I'm going to
smooth the mesh. Now what I can do is select these faces
from the top of you. Then I can either hit
Delete or Extract. Let's see which one works best. Let's go to Edit Mesh
and select Extract. Now we have polysurface one
and polysurface two, right? When I smooth them, everything still
looks good, right? We do have a bit
of wopping here, but I can show you how
to easily attend that. Normally, when you split
measures that go in a circle, what tends to happen is
that there's a bit of shifting that happens because you are essentially
creating your vertices. Now what I'm going to
do is in vertex mode, I am going to select just this. I'm going to select
these guys. These guys. Then I'm just going to scale it inward just a little
bit. There we go. It's not going to be a perfect
circle like we had before, but it still looks good. Also remember to save,
it's very important. Okay, so as you can see, I've already saved mine. Now if we look at our
image once again, we have split this. And this almost looks
similar to this, but ours is a different version. Like, albeit similar, yeah. Now what I'm going to do is
I'm going to create a sphere. And look at how nicely the
sphere just nestles in there. Also, the other thing
that you can do is remove it slightly so, so you have this
little gap here. So this is still a bit higher. I'm just going to
ton it down to ten, and then I'm going to scale it all three. I'm going to press four
on the keyboard so that I can see through my model. What I realized is that
I wanted to cut this. But then I noticed that
when this poky Dex is open and there is
this little latch, I'm not sure what this is, how it connects to, how
it connects to them. To the poky decks. For now, let's regard
it as a camera part. So I'm just going to now it is. There you go. I have five. Now the next thing
that I want to do is let's see what we can. 12. Now we are to
make this third part. I think the third part is pretty simple because
if you look at this, once again, this groove
runs down and then in, and then down again. That's why we are separating
our models into sections because it's much easier
to construct that way. Let me just say the
bottom part and that top co summate this back lower cover and duplicate this. Billing me go into
face mode and in face mode and let's do
away with that much. Also, one other fancy thing that I would really
like to do is just give this like some
definition as well. All right, let me just
center the pivot here. And then scale this, our puts, then just bring
those and more it like. So if this part
doesn't work for you, then what we can do is we, we can break this
down even further. Let me delete this, then
I'll take the same part. Let me first start by doing the incident H loop around here. The same story four. Just make sure the align or not. But this button that shows you wire frame unshaded Ben, I'm just saying too, I'm going to just
over a little bit. There we go. So now I can
do this and there we go. And in face mode. And face mode as well, what I'm going to do is select going around and
then I'm going to extrude. What's nice about this is that we extruding going in order. And then we can come
in and insert an loop. So we do the same here. So when you hit, you get these faces. So what you can do
is select them. Delete. Delete. Delete
this one, same story. Delete. Delete
this side as well. Select colet, let slit, let me switch to our
frame off if you want. You can add a
different color just to make it feel a
bit more distinct. Cool. So this is what we have. Now what we can do
is just borrow this, bring it here at the corner. And then I'm just going
to make it a small, I'm not going to make
a hole here yet. And then the next thing that
we're going to do is this. Opening and closing.
4. 004 Making the side cover flaps: This time around, we are
working on creating the. Now what I did was I moved this so that I have
enough space to cut it. I see that little space there. You have this little cut
that comes through there. I'm going to select my
insert H loop tool on here. Then I think this much will suffice. Then let me select this, Let me just make sure that
everything has been selected. Now what I'm going to do
is I'm going to extract, go to Edit, Mesh, and
extract once again, the other thing that I can
do is to bake these edges. We just like the photo sayings serious, this really
is necessary, so I'm just going to delete it. There we go. That's
three switches off. Three here. It's looking
good so far, it really is. Now what we can do is we can fiddle around
with the pivot point. All right, on my top view, so this is upside down, so my top view, I'm just
going to take this. And then little bit this side, moving the pivot point gives me the illusion that this
opens on its own right. And I can also go further
by adjusting it and go, okay, if we put it here, then when you have
something like this, if we bring it
closer around here, then it's also different. But bottom line is that this
has got to change, right? So what I'm now going
to do is look again. This has a hinge
that connects to it. And this hinge is
somewhere here. Because remember, this is like the top half of it.
Let me just do this. E to the, I just pay that. Well then same goes for here, wait, let me into this. Then there, and now we are
coming to this art. We help and decide it's
the same story is, So we can go, cool. So this is what we have. Now also we can move this pivot point
lower as well. So just. Yeah. All right, and now the next
thing that I'm going to do is create hinges for this. I think I'm going
to do an extraction again so that I'm just going to extract this
part extruded that way. We have this range once again. All right, let me first
count my points or my faces start Mika. Since 12345678, it's perfect, stilted, these eight faces. And then now I know what to do. So what I'm going to do is select the lower faces as well. This is a top view. There we go. I am going
to hit extract on. This is extract and
we have an option of messing it up three. So I can let me send a pivot first and then
I can being it in, so then I can slip all the edges endex. So this can move it
slightly bad, left out. That can also do something about in these ******. There you go. Uh, I think I'm doing still
a lot of damage here now, so let me first extrude
and then extract. So let me first and then I will get some
edge loops in there. So I'm just going to bring mind outwards
and outwards like so. All right, it's still words
because if you hit three, let's see, it's a bit flat. Who? And then I'm just going to then let's insert so at the top and part and then get this. I think, I know it's
messing this up. When I hit extrudes, the mesh blows up in of itself. We're going to come
back to fix this. If this doesn't work, then we can always add
a cylinder as well, or a portion of the
cylinder because it would be a much cleaner
way to do this. Let me get rid of this Now,
come in with a cylinder. So let me create
a cylinder first. Let me once again give
it ten subdivisions. I'm going to 98 degrees. I hope I can and get rid
of the subdivision caps, Debbie, right? So we can show this, right? So let me just delete these now. Face and you it there. Now go check. When I hit three, everyone
is smooth, all right? We can also bevel these, we can also give this
a sharp edge as well, so I can move it like this, closer, upper and there. So we face, face, face. We go the other thing that's worry, you know, let me
deal with this when I do the bottom part. Yeah.
5. 005 Blocking in the back cover: Now we are going to work on
the underside of the poker. What I'm going to do first
is select this portion. Let me just open my
channel box editor. I'm going to delete
the type history. I'm going to duplicate this. I'm going to rotate
it 180 degrees, then I'm just going to
pull it down below. There we go. Now what I'm going to do, let me just isolate this. I'm going to select the edges and I want to
select the edges at the end. But you will see that it selects also the edges moving
in this direction. I'm going to press Hold Control and then click and drag across. Now it only has this edge selected right now, just
showing everything. I also want to make sure
that Wi is displayed. Now what I'm going
to do is I'm going to this moving forward, I'm going to go to Edit, Mesh, select Extrude, and
just center it. And then I'm just going to
pull it forward like so. Then the next thing that I
want to do is make sure that the divisions more or less line up with the edge
flow at the top. I'm just going to crank this up until they somewhat
align just like this. I'm just going to go
into object mode. Click, drag everything,
smooth it by hitting three. This is what we have so far. Looking pretty cool. So the next thing that
we are going to make is a battery slot. For this, it could
be a battery slot, it could also be a USB port, it could also be an HDMI port. All right, that's why I'm
saying we are only borrowing from this design and we are not doing the exact
same thing, right? We are trying to follow the
logic as well as our logic. So now what I want
to do is select on, I select four, then
I have 12341234. Okay? So this four will do. Let me just switch my grid of, I think also it's not when I hit four
and I'm going to drag select just like this. Also note that the camera is
in such a way that I don't have that edge selected because if I do and I do my drag select. It will also select the
edge on the opposite side. If I do this, it might
select that as well. Just double check that you have only the faces that you
want to work in selected. Another quicker
way of doing this is just drag select all your faces like so
they will be selected. Now what I want to do
is go to Edit Mesh and select extract t five. Then what we can do is also
and we enter the pivot. We're going to make this a bit smaller then mean
just isolate this. We are going to
ext this inwards, so I'm going to select these edges from the top. I'm going to press hold control. Just select until I only
have this border selected. And then now what I'm
going to do is I'm going to select Extrude
under Edit Mesh. And I'm just going to shrink it inwards like so it sort of tapers in. Do you see that? Let
me just do this. And then 1234 per, just pull them outward type. Now I'm going to insert H loop. There we go. There we go. Let's see in terms of the mesh
being smooth. There we go. Now we have a nice tight edge. We have to ex this
inwards as well, so I'm just going
to isolate this. You could either exes or you could make it
thicker as well, but I want to work
as low as possible. First, let's do this. Here we killed and
this is what we have. I will refine the edges as well by inserting
an edge loop tool. There we go. Maybe also just on the edges, but not there we go. Just so that we have
these rounded corners. Now I can select this edge and pull it up,
there we have it. I'm also going to
make this height as well and maybe move it up and outwards. That way is sort of
like a little ridge. So when you switch this off, we now have this, right? It looks very nice. And in fact, we could do the same this side as well, right? We could just harvest
this top part. Because if you see in
the picture right, this is similar, but it
also functions as a hinge. So now you have to ask
yourself in terms of modeling, like how functional do
you want this to be? Is it going to be for animation or is it going to
be a nice portfolio piece? So depending on how detailed
you want to make it, you then have to start
thinking of stuff like hinges and how they sit and pretty much how your objects
parts connect to each other. So yeah, let's work on
the next part of the
6. 006 The Top flip cover and button panel: In this section, we
are going to work on the top part of our poke decks. So if we look at the top
as compared to the bottom, they are similar, right? But the difference is
that this could be a lid of sorts that you have to like squeeze
with your finger to pop out. All right? It could also be a USB slap to cover
up the USB port. But we know for a fact
that it's a hinge, right? Because this open. So what we can do without
overly complicating things, we can just lower this and also scale it down
a little bit more. So something like
this. So if we go to the top, there we go. Then the next thing
that I'm going to do is just isolate this, similar to what we
did with the flat. We are going to select the edge and we are going to extrude it. I'm just going to
select, there we go. And then while pressing
and holding control again, I'm going to select the areas that I don't
want to have affected. All right, now what
I'm going to do is I'm going to go to Edit,
Mesh, Select Extrude. Just going to send to this
no scale it inwards first, then we're going
to bring it down, maybe push it a little inwards. So something like this. You will also
notice that we have these vertices that
are going out of line. We will sort that out as well. In fact, we should do that now. I'm just going to go
into vertex mode. Select to if I can save them in any other view and just lift them up so
that align like so. Then the other thing
that you can do just to make sure that
everything is aligning properly is select
all your vertices that make up your
edge and then scale, scale them on the Y axis so that every one of
them is aligned. There we go. Now
that that's done, I can then use my insert edge
loop tool, the mesh tools. There we go. And
there we go now. And I hit three. I have this solid edge
going through and so that looks to be
sitting much nicer. We can come in and
trim the cylinder, even moving it even more
inwards or even lower. You can even play around
with the Verdi seals, but I'm not going
to do much of that. There you go. I like how it's going so far. So the next thing that
we want to make is the button console
system, right? And the button,
button console system would be these little
buttons over here. So you'll notice that we have the combination of rectangular and oval and also these are perfectly circular as well
like the entire model. We still have agency over
how we want to tweak things or what things would be easier to execute in
terms of modeling, right? And easy execution things that
are aligned with the mesh. Things that fit in with
the overall design, right? Things that don't
necessarily have to take us a really long
time to fabricate. Because as you can see, we
started this with one plane, more or less, right? And we have been
just running with it since in one of the
previous videos, I did shift the pivot point
so that when I open it, it opens up like a hinge. As you can see, it's
still not perfect, But it's good enough for this. Yes. If we look at
our picture again, you'll realize that
these cuts, right? They are pretty much the same. Oops. So these cuts
are the same, right? We can duplicate this and
then just bring it lower, or we could make a new one that doesn't have
this edge on it. And we can pretty much
see how that fa off. Let's duplicate this and
then bring it lower. Then let's open this. I think it's a nice little
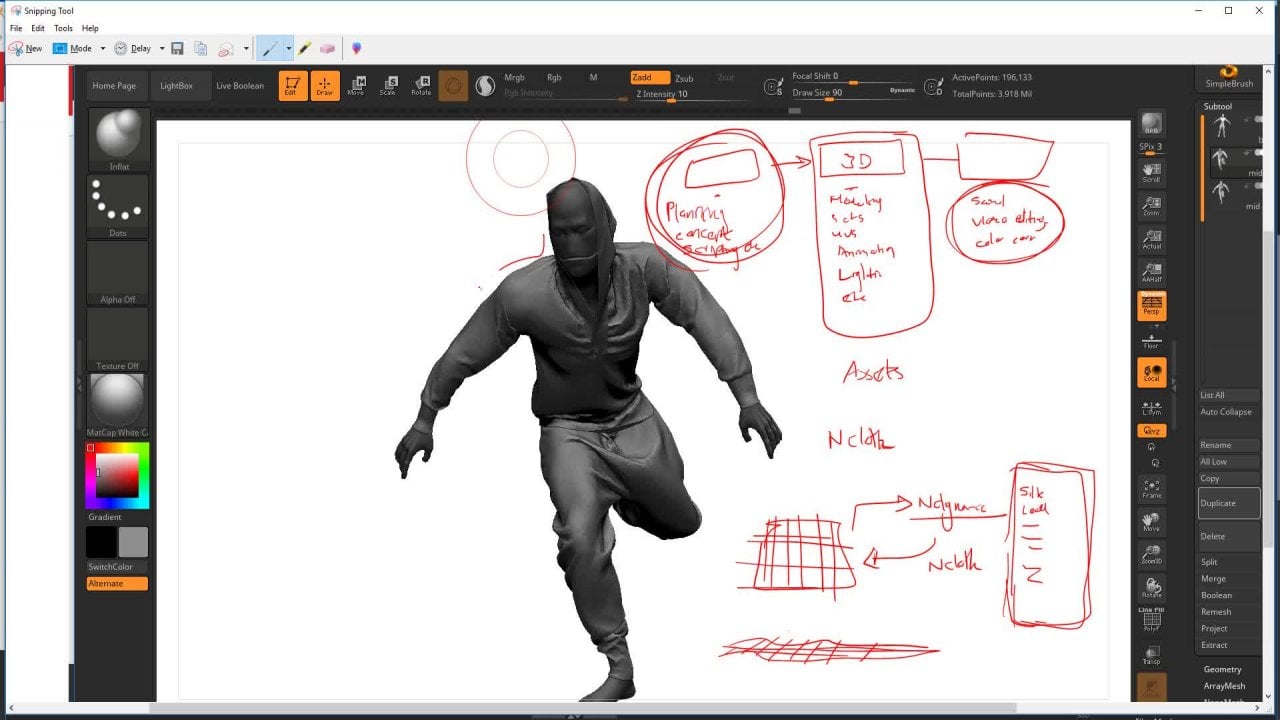
design and it's going to work. Let's see. Then bring out my snipping tool so that we can map up where exactly we want our buttons to be while looking at this
object from the top. Okay, so my snipping tool
took me a while to find it. Just going to drag over this
and then I can take a pin. And I don't have my Wacom
hooked up here as well. Let me take this and go
like towards the edge. So we'll have 1234, and then we will have those
two buttons over here. And then maybe, maybe if we
moved everything to the edge. Okay, so let's start over here. So we have one to three and this will function as
the, the joystick. All right. I don't
think it's called joystick, so there we go. And now I have enough
space to either have the first round button here and then the last
round button here. Okay, so this sort of makes sense for me
in terms of layout, right, And also with the amount of real estate that I have here. So let's proceed with
making these buttons.
7. 007 Blocking in the buttons part 1: In the previous video, we did a screen grab
and we pretty much plotted out where we
would like our buttons to be right now. We get to pull that off. I'm going to isolate
this once again. We want to see just how
much of real estate to, I really have 34212 and then 1234234 might need to make just
a little bit more space. All right, let me first start with inserting lot, then let me straighten this out as this one to also some areas where there are some areas where the squares are not even. I could either do it for the whole or just where I would like to have my squares B.
Straighten that out first. There we go. There we have it. So now I can immediately
come in and go like, okay, this is nice. And even now. All right, let me pick on
these 2 " as well. Quan. Just make sure that the stuff
is aligning more or less, it still feels a bit
thin t, that's perfect. So now I'm going
to extract these very let me push this upwards and then the next thing to do
is these two buttons. So these two buttons
could be 12. Yeah, let me this edge so we put in because
I don't have space. Let me see. All right. 1212. Okay. So this this will work just as well. All right. If you are un seing what's
happening right now? It will all make sense. All right? I am just
making sure that I have enough space for the
next couple of buttons. There we go. Just straightening things
out on top of that there. Cool. So here's what
we up 12, right? And the other thing
that we can do is we can minimize
it like so, right? So I am not going to
extract this first. What I'm going to do is
I'm going to extrude it inwards in and of itself. This is what I'm going to do. And I'm just going to bring this a bit more inwards and then
I'll do the same once again. And then just like that, right? If you are super
specific about your Edges lining up,
you can simply do, they will easily line up. Now I real estate
for the two buttons. All right. If we want, we could make the smaller. We can also do a mesh extract. There we go. Also remember to
keep saving as well. Now what's left is
the circular buttons. With the circular buttons, we will do the same
thing that we did with our camera lenses as well. Let me select an edge. I would ideally like
these buttons also to be too big and they should, you know, just be
more or less in the same proportional sizes
as the rest of the buttons. Like they shouldn't
feel out for lack of a better explanation.
There we go. Okay, so this is the first one. So the first thing
I'm going to do is, let me see, 1234. So let me create a cylinder. Let me create a cylinder. This cylinder is going to have eight subdivisions on
the subdivisional axis. Then let me get rid
of these top edges. There we go. It's not an object mode. I'm going to tip for, just bring it up
slightly. There we go. So this over here can be
where the first button is, and then over here can be where the second button will be. All right, so once again, the first thing that I want
to do this is going to work slightly different because I'm not going to do an extract here, I'm just going to hit the gate, and then I'm going to
extrude the edges inwards. Before I do that, let me
just shrink this a bit more. There we are now. I'm just going to extrude this inwards so I'm
going to go mesh. This much is more than enough, meaning the rest will just be putting the buttons together. I just want to make sure
that I'm exactly at the top view so that
everything aligns properly. So there we go now, it's just a matter of
bringing it low enough so that it's flush
with the surface. We can also come here
and do the same thing, going to vertex mode
and I'm going to slap the vertices
on the cylinder. Some pressing and holding V, just snap these points. There we go. Now I'm going to do
the same with this. In the next video, we will tackle extruding these points and just making the
button slop. Nice.
8. 008 Blocking in the buttons part 2: I went ahead and I did
the second button. And this is what we have so far. Now what we can do is
isolate this portion. You can make stuff line up if
you would like to do that. This is if you are going to be pasting images when
you are mapping. All right, it might be
in your best interest to just a your things properly. So something like this
can align it like so. And so there we go, way there. Now what I want to do is select all these edges and I'm going to extrude once again, I think this much would do. And I'm going to come in with my insert edge loop and
begin to tighten things up. So we are going to do the
same for the buttons as well. Here we go, and there we go. So this is what we have. We have it looking
like so far, right? I love the shape of these
buttons and the circular shape, but we still have
to fix up. Right. With this selected,
I'm just going to smooth it even more. Then what I'm going to do, I introduce some
more edge loops. Right? And this is where
things get a bit diicy, right? If it doesn't work the way that we would like it
to work out with, you know, sharp edges and stuff like that, then we might have to extract this entire surface and then just tighten it up on its own. So let's see first if this
method will work out for us. This worked rather well. We could introduce other
edges running like so, but they will disrupt the
circles and they might begin to distort the nice shapes that
we have going on over there. So those pieces looking
nice and solid, right? Let's see how it looks. With everything back in there. Everything is looking nice. And clean our
cylinder over here, we can rotate stir negative on 80, then it's in certain H loop. It also needs to feel
much smoother than that. So yeah, remember we are keeping things simple. Let me just push to sew it lower and then I
will duplicate this across once again in 100% sure. If you're on the right track, then you could just se, hit one, select your button, hit one, and then just make
sure that body edges sort of line up right. Then when you hit five, you'll see that it's sitting all right where you
want it to sit. The same goes with
these ones as well. What we could do,
let me first center the pivot and then let me just see what would
happen if I just extruded it on that. Look at that, it's going to
make it slightly bigger. And then I'm going to once
again insert an H loop. Here we go. Object mode fits beautifully in there. We could also insert
another edge loop. We could have a much more solid or much more
rigid looking button. There we go. We can delete and we can just
duplicate and move lower. Right then if you
aren't entirely sure. Once again, make sure that wire frame
unshaded is on the way, every one of your
edges aligns more or less can bring this. The last button to
do is this one. Once again, modify center pivot. And let me just scale it just a little bit
down. There we go. When you hit three,
this is what we hit. Let's extrude, here we go. So we will do the same loop
inserting that we did. There we go. And then we will do edge loops towards the end. Now for the bottom, and this is how it looks, So if you want a softer
edge or you want to lean more to the design
with your hard edge, with the circle in there, you can do it as well. Now if you want
to make a circle, then it's going to be
the same principle as creating a hole. And then you can extrude it
and then you can fill it. I think for me this
looks good enough. There we go. And then I'm just going to
put that it there. Let me just do this. I'm just imagining if someone
wants to operate this. There we go. So let's
switch to solve. Let's see how everything looks. Everything looks nice,
like it belongs. Um, let me extrude this like so it's like, so wait there. But I think now
since I did that, then I should come in again with the age loops and I think I'm doing
more harm than good. Now there is a bit of pinging. Wait me and this called Lesco sits one edge to edge. Minutes three edge, minutes four edge. There we go. Yeah, I had an extra edge and it was causing some pinching. Now it's left is to clean this up and figure out how
it connects to this. This is not an issue, we can just delete those edges and we
can tuck this inwards and there we go is some el **** on them and nor rotate this back. Cool. I just it save and let's
work on the next thing.
9. 009 Blocking in the screen area: So I'm really loving the
paths that this model is on. The next thing that
we want to do is the screen and those little
indents for the speaker. Let me just bring
this image right. This is what we are going
to be working on now, without complicating
things once again, we are just going to work
with what we already have because it will align with
what we have already done. And making all these
sit together or snap properly is much easier if we are working
with extracted parts. I'm going to duplicate this, I'm going to isolate it. Then what I'm going
to do is I'm going to select the faces that go. Let's start with
this. Let's start with this one for size, see if it goes all
the way through. No, let's do this one. All right, let's do
this one. There we go. So I'm just going to delete so that all
the faces are deleted. And then I'm going to
select just islands themselves and delete
them over here. Just going to select one phase, press Hold Shift, and
then just double click. Here we go. There we go, this
is what we have now I also want to delete this. There we go. And
deleting this island. Now the next thing to do
is to select these edges. We go, everything is
nice and aligned, all right, with the exception of some edges that
are not straight. But we can quickly
fix that as well. There we go, nice and straight. I will leave these
two for now because they are essentially
holding this curve up. Now that this is on, we are just going to
take this slower to level and then I can proceed to open the
pokey decks up like so. Notice that we still have to
deal with this hinge once again and decide how does it connect to
this flap over here. One way that I can think of it connecting to this flap is
rotating it down like so. And pretty much
taking it low like this and then just
scaling it like this. When we clean this up, we can then just come in and
do our last minute tweaks. Let me just open
this up as well. Now what I'm going to do
is I'm going to extrude these edges to me. Up over here. All right? Because remember
this sphere is supposed to be moving up and down
with this flap. So still not sure what the rationale is
behind that, huh? Okay. So. I'm going to go to edge mode
and I'm going to select these edges and then
switch this back on. And wire frame unshaded as well. And I am now going to extrude, hold on, it wasn't supposed
to hop like that's strewed. Send to that and then take
it all the way there. Then I can add my divisions. There we are. Okay. So now what I'm going to
do is I am going to to take a picture of this like
we did with the buttons. Somebody just seeing you. And let me just pull
out that image again so we can bring in our screen over here. That way we have three edges. 123123, Okay. And then we can move it down. So, and so we can wait, well, I think this
much is good enough. There we go. And then this
edge can just go away. All right, so this
is what we have. And then we know that the edge, this is where we have
the edge come in. Then this is either our speakers or that little
cushioning device, those little rubber pads. So that when you slam this, it doesn't crack the screen. Aside from that,
that's pretty much it. So in the next video, let's create the screen for this and these little
monitor things.
10. 010 Detailing the panel: All right. According to the sketch that we did
in the last video, we are going to make sure
that we have three aside, bill one to 231. Then let's see how things will look if we just selected this much.
This was the screen. I think it does
work. Let me see. Yeah, I think this
much does work. Because remember this, oh, this is not visible in
the artwork, right? So we get to see a whole
lot more real estate here. All right, so once again, same song and dance. I'm going to extract, I'm just going to
lift this up a bit. Now for the first
time in a while, I'm just going to assign a
specific shader to this. I'm just going to assign new material and it's
a standard surface. Let's just make this, let's pump the roughness up there, I like it. The next thing to do is pretty much secure
an edge for this. Now, considering that we still have those speaker things to do, what we can do is deviate a little bit from
this sketch, right? Because this just serves
as a guideline in terms of minding our topology. I'm this in words just like this, and then
just spring it a bit lower, that way it sort of feels like it heaps inwards, cool. And then I'm going to
make this super smooth. The next thing that I
want to do is create that border once again. Let me pick on this one edge. Let's see what happens
when I scale things up. They become a bit distorted. All right? Now I'm
just going to select, I'm going to select
these edges, right? I want to see first what would
happen if I hit extrude. No, this is a horrible idea. So. This will be where I can put like an edge or
a border. All right? Let me let me then
do this instead. Make these faces. Let's
see what happens. I'm scared. I'm not like this. There we go. Not too much. Then there we go. So this is the part that I want to have
extracted as well. I'm going to go mesh extract. I can move this inwards. There we go. So these parts, let
me just say de by type history now I can tighten
in these ages and I see, there we go all. Now let me just center pivot, I can move this inside. The last thing to
do here, hold on. The last thing to do here
is to lift this up a bit because it's showing parts
of the screen underneath. Let me send her pivot. Then, here we go. Let's make the little
pads for, for the flap. When you close it,
these little things, these aligned with your corners. I think the approach
should be the same as when we were working
with the buttons over here. Simple. Let's do an extract. It's just lift up. There we go. Then what we will
do is in edge mode, we are going to extrude and then we are going
to insert edge up. Right. Also, bearing in
mind that this makes these pads all right
because if they were much more solid then it's going to distort this beautiful rounded
corner that we have. All right, as it makes the
design feel more organic. So let me isolate that and then insert edge loop at the top
and at the bottom. Same here as well
at the top atom. There we go. And
there we have it. So now let's work on
the buttons themselves. You can decide which one
you want to do first. Normally I will work on one button and then I will
just duplicate it across. I'm extruding it once again. When I hit three, you realize that just like
these buttons over here, it fits in very nicely. You're just going to make
the a bit more distorted. And then I'm going
to insert Loop. Hey, check my. Let's hit one and then let's repeat that
again. There we go. Cool. So I can delete and I'll just make sure
that I'm at the top of you. Then I'm just screen to
cops crosse like this. There we go. What's nice is
that we can pretty much duplicate this and flip it. This. And then we can just
close that hole and it will become like
some padding for it.
11. 011 Blocking in the inside of the cover: In this part of the project, we are going to do the
underside of this flap. All right, notice
that we have kept things fairly simple and we have also
maintained the appeal. Also smoothed a bit
of the edges as well. Now what we can do is still
keep that momentum going off. Smooth round corners
and appealing shapes. What we're going to do is
I first want to close this and this as well, safe. And then I want to
select this part, and this part, and I'm just
going to isolate them. All right, so this
is what we have. Now imagine that this is how
it looks when it's opened. All right, so what
we can also do, let me delete first
edit by type history, modify, freeze transforms, and then I am going
to duplicate. Then on scale x, let's see if this works. We'll say negative one, I think it is S. We can
also rotate it as well. We don't necessarily
have to flip. It's negative 180. Here we go. And then
I'm just going to bring this lower is somewhere there. I'm just going to move it
also slightly as well. There we go. Now let me
switch everything back on. The me flip I didn't and rotate it properly versus make
this 100 degrees. Then I want to shift the
pivot point of this. I want to move it to
where the pivot point of this object is. Let's do that. I think it's easier
from the top view. I'm just going to press
hole D. I'm just going to this to over here. And then when I rotated,
this is what happens. Let me switch the wire
frame and shade it off in. Let me open this. Gonna lie? I'm liking
how it's looking a lot. Um, let's hide this. See how it looks without
it looks very weird. What we can do is extend this portion to move
even further in as well. That way this black
gap is taken care of. I think now we can also begin
to tighten the model up. By tighten, I mean we need to start thinking about
gaps like this, the hinges as well as
these hinges as well. And after that we
can call it done. We can also decide whether
or not we would want to have a socket for this
sphere to stick out through. Also, if you remember at the beginning we
had a flaw created. All right, and the
other thing that we can do to sort of see where the quality of our model is and isn't is in your
renderer options, go to report 2.0 and then
click on the window, and then you get Hardware
Renderer 2.0 settings right when you scroll down you will see an option
for screen space, ambient occlusion, and
we will enable that. You will notice that now we are seeing occlusion in
real time in our scene. I'm just going to take it to the higher setting
also of this depends on your hardware capabilities. All right, and then the other
thing that we are going to fiddle with is
the anti aliasing. We make sure that smooth
wire frame is one. If these are both off, notice that were starting
to have these jagged lines, but when you switch it on, the lines are much
straighter and we can also crank up
the sample count. Once that is done,
you can close it, gauge the quality of your model. All right, and you also notice that we have things
popping out here, this model, so we
can push that in. We can also play
with the vertices when we are cleaning stuff up, but this is how it
is looking so far. Now in the last video, we are going to create our hinges and we are also going to start to
fill in these gaps.
12. 012 Cleaning things up: In this section, we are
cleaning things up, right? And part of cleaning
things up means that when we decide
to animate this, if ever, we would like
to have this open. But we also want a few
things to come along for the ride when we
open this, right? So what I did was I
took this sphere, I parented it to this
top flap, right? So select the sear, and then select the object
you want to parent two. And then hit on your
keyboard for parent. All right, so once that is done, I can then move everything up. So all right, I'm
going to do the same with this bottom flap as well. The knee hide the floor and
these components as well. Knee hide those. Want
to make sure that poly surface 22
and me look for it here and there it is. So I'm going to
take poly surface 22 or we can even begin
to name stuff now. Let's call it the screen guard. Here we go. So we're taking the
screen guard and we are parenting into the top caps. Hey Pete, there we go. So now we should have
something like this happen. Also, notice that
the screen guide right has moved up a
little bit on the Y Xs. We will have to fix
this manually as well, so we can come in and
sort of move it down. And so I'm not beginning to look much better. Our cleaning will go
much quicker because we opted to work on me and just extract
various parts that we need. You see that it's easier
to align stuff and it's easier to parents,
stuff like that. Now let me is open this. What I want to think
about first is how does this hinge connect to
this side of the model? All right, so what we can do, let me first clean
this up here with you. Put on the same tune
in words like there, you know, so this
flappchek mode, in flat. In good, sitting here like so. So let me just, I
want to extrude this. See how that looks? You remember now, I ain't going to do this. Oh. Paul. Okay. So let's bring us in. Let's sit, yeah. And then when we were
rotated and this is my, it cool. So we now state the sky is not here. No. There you go. So now I'm opting to take
this edge down like so. And then I'm going to
insert edge coups, so all and then rest of my
face is selected. And now my four tapes select. There we go. There
we go. There you go. There you go. This edge. Oh, here the bowl. Let me insert my gable on here, and I'll get a chase. Two errors, no there. So, once again,
remember to be this finicky if you are going
to be animating this. All right, so now what I'm going to do
is these two edges, I'm just going to exclude them, downwards like this. And then I'm going to join as vertices. There we go. So I'm going to carry on
fixing this over here as well. We can do the same
with the edges. Soul as it it strewed. Just take it down like
this. There we go. Then say Edit. Mesh. Merge hand
over here as well. We also need to play
with the rotation and the elevation
of this as well, because we still would appreciate
a little gap over here. Oh, we can even move
this and be lower. And there we have it. So now we can select top cover. I want to close it down
and we can proceed to do a lining right that
sort of sits mistled there. Let me pick on these
two and extract. And then the thing
that I want to do is I want to let me, I'm thinking of an
easier way to do this. I'm going on face mode, and then just going
to select this. Right across there we go. And over here as well. What I'm going to do is
I'm going to go to mesh. And I'm going to
say mesh duplicate. I know I got an error
combo something. Hey, they go here. Do we have any here? Nope, It
only happened on one item. So let me show you what we are going to do th this. So I'm just going to move it up and let me just go face mot. Let me just cut what I w, then with my vertices selected, I'm going to rotate it. I like so. And then I am going to shrink
it like this. So open all this up. This is a top cover. Let's open it up as well. This, we're just going
to apply new material, make it a standard surface, and we're just going
to make it black. So this is now going
to sit like soap. And then guess what, I'm going to extrude, sorry tha stole vertices
in object mode. It met extrude 'just upwards. And then I'm going to do the
same thing that I did with those buttons chain here you may. Now we have a thing, right? We have this rubber lining. It's called modifier to pivot. And then we can just
stretch it out like so. Now when we bring
the top cover down, we can then spread
this move it pods, there we go, so we
can close as well. This is how our pokey decks is looking because now we have this rubber in there and we
do the same side as well, and we do the same for
this top cover as well. And there you go. There is
your pokey *****, right?
 Azariyah Radebe, Digital Artist at Your service