Transcripts
1. Welcome! : Hey guys, welcome back. My name is Dave Reed and thank you for joining me here and we'll put Glen New York. So ever really exciting class, something that I'm thinking about making for a long time. I did a few Instagram posts of syrup, augmented style reality artwork. So if you don't know what augmented reality is, basically for taking your camera and you look at the floor or a table and you look through your screen, it looks like there is. But through your screen and you look at your screen, it looks like there's something there that isn't. We're going to think outside the box here and the box being the iPad. So the first thing we're gonna do is take photos. Now you can use my photos if you want to or you don't want to take your own. But I'm just gonna show you some techniques so that you can go outside, maybe the kitchen, anywhere. You can take some photos and use your own photos for augmented reality artwork. It's really fun, It's really cool. It's really simple. And I'm looking forward to showing you how to do it. All right. See you in the next video.
2. Getting Started with Photos: So I recommend using my photos for this tutorial. It'll just make it that much easier for you to follow along. But I do want to bring you in on the process of the photo of the photo taking photography. Photography. I just want to show you all of the different parts of my process and I think it's important that you know, why I'm taking pictures of certain things a certain way. That way after this class is said and done, you'll have a much better understanding of how to take the best photos to use with your art. I have I have nice lighting. Like, I mean, some people might not think it's nice. Now I have Procreate open and all I'm doing is changing the color of the background and the canvas sizes screen. That's just to get some color on my iPad. And so even though I'm taking a photo of this scene, I'm making sure to keep my camera low. So instead of taking here, you taking it all the way down here. Instead of taking just a photo as is, I'm tapping on the bottom. So the things further away will get blurry. Ok, so now I found a few things in the kitchen. I think my work. So let's go take some photos in the kitchen. Of course, if you don't want to leave your desk, you can always take a photo of your hand.
3. Class Project & Motivation: What I really want you to leave, remembering from this class and then leave and continue to think about and moving forward in your career, whether it's professionally or not, it's just how to think of things differently. How to take something that's sort of mundane, a normal photo, and just make it way more interesting. I just want you to take these ideas and make them your own. Take the things that I'm doing. And in build on that creativity. You can take photos, have anything. You can use my photos, you can use photos that you already have. So don't be overwhelmed. Just have fun with it. Be creative. And I can't wait to see what you come up with. Just take it to the next level. That that's really what I'm looking for. I want you to follow, but then I want you to say, oh, okay, so I can actually do whatever I want with these photos. That's that's what I want. Hopefully we're sort of on the same wavelength. So let's get started on the first photo. I think I'm going to start with.
4. The Skillet - Part 1 : So let's go ahead and go to our iPads or wherever you get your your photos from. I'm using the photos app, I guess it's called or my iPad. And here, if I hit this little arrow, then I can, I can share these options come up. So I'm just going to hit Procreate. And my photo is going to head over to Procreate. So now I'm just gonna hit home again. And then I'm going to open Procreate. And my photo would be here. So now we have our photo in a new project. And the easiest thing to do would just be to bring in a little I'm using my finger for everything. Now we can just import the other photos. So I've tapped the wrench, insert a photo, and then just find your other photos. So we have this one. We have the glass the glass platform. We have our iPad with a computer in the background. And you can go to the wrench again and bring in any and all photos that you'd like to work with. Insert a photo. We'll do the hand next. Wrench. Insert a photo. You had a fridge wrench and insert a photo and our egg. So now we have five layers with the images that I took from my apartment. And feel free to do any images or any pictures that you that you have or you can use mine just to kind of get your feet wet. Okay. So go ahead and name your layers just so there's no confusion. Egg, fridge and make this one desk. Okay, so now I'm just going to hide all of these so that we can start with the first image that we want to work with. So what I'm gonna do is make a new layer. And I'm just gonna drag skill it above this layer. And I'm just going to group them so that nothing gets lost. So now I have a new layer. I have a group, and I have two layers in the group. And the blank layer I'm going to bring above skillet. So now what you're left with is just a photo in your imagination. I was used my own brushes. And right now I am in my favorite brushes and I just put another brush in. So you might have to download this new version. So I'm gonna use a brush called butter blade. And it's just a regular paint brush, like so. Okay, so we have our little group here and I have a new layer. I'll name it AIG, just so there's no confusion. So I have a new blank layer above our skillet. Because when I see a skillet like this, I think of bacon and eggs. If you're vegan, you can do like tofu and something else. You can be creative, tofu and Bok Choy. So I'm going to sort of use this pan as my, as my canvas. So if I had an EKG, let's say the egg was a little too, something like that. And I kinda wanna make it look like maybe like some holding the pen the way I am. This a little bigger. I'll go ahead and make some just some little details. So it sort of looks like it's falling down. Okay, that looks pretty good. So I'm gonna make a new layer and we'll make some bacon. So I'm going to choose a bacon ish color. I don't know if everyone might have a different color there. When they think of, when they think of bacon, I kind of, I sort of think of a, that's sort of works. Sort of like a brownish, reddish, yellow. We'll see how that works. So I'm gonna use the same brush. I'm on a new layer now. And I'm just gonna make a sort of shaped like bacon. I'm not a bacon kind of saw or when it comes to drawing. So, so this pen is round, so I'm going to sort of rounded out and then we'll sort of do something like this. Now it looks, it looks pretty good. And I'll bring it underneath the egg. That way it'll be a little bit, the little egg will be on top. Just this little bit here. Okay, so we have our two shapes here. Pretty simple. Still kind of a boring picture. But what we do with these can really make the image a lot more exciting. Okay, so let's start with the egg. I'm going to, I'm going to add a new layer. I'm going to go to a nice rich yellow. I'm gonna go a little bit more. Orange. I like my jokes to be sort of orangeish. So I'm on a new layer now and we're just going to make a circle here and hold it. And you can feel free to make your yolk is big or as small as you please. Okay, that looks pretty good so far. And now I'm going to make a new layer. And we'll just kinda have some fun with these characters. Okay, so we're gonna keep this simple. Like so. So I'm just making an arch and holding it. So it does a little snap. And then I'm gonna make a little mouth here. And it's going to look like a mouth. I did not look like a mouth. Once I look, it looks better. Okay, so we have our little face here. We want to get crazy. We can add some, can add some more details. So we have our little face there. I'm going to do the same thing. Let's make sure this is dark enough. I'm going to do the same thing for the bacon. So we make him upset. So our bacon is a little bit upset. That's okay. And should we give him will give him some little leaves. I'm a little something there to actually like this color better. Okay, so now we have our little egg and our little bacon. And they're looking pretty good. So we can go ahead and add a little bit of details to them. And wherever character you draw or whatever you make, just do a little bit of light shading. So for the egg, I'm going to alpha lock it. And since it, since this is white, I usually do my shading on like a a kind of like a sandy a darker sandy color. I'm just going to use the soft brush. So you can use any soft airbrush. Me show you this brush I'm using. So now that your egg is what's it called? Alpha locked. So now you can just use the air brush and lightly shade your egg and you shade your little spots here. And the reason why I'm shading more on this side is because by looking at the photo, you can tell the lights coming down from here. This is all this is really dark. It's really dark underneath this rim. So I'm just going to assume that the light would hit these guys here. So this part is going to be darker. So I'm actually going to even make this a little bit darker. And I'm going to make it slightly darker on this side. Make my brush a little bit bigger. Okay? And now to make this joke a little more 3D or like stick out a little bit more. I'm going to add a shadow right next to it. So it's like the light is hitting and then light is bouncing off this yoke.
5. The Skillet - Part 2: So now I'm gonna do the same thing for the bacon. I'm going to color pick the bacon color. And I'll go a little bit darker. I will alpha lock the bacon. Make sure I'm on my airbrush, soft airbrush. And now I'm just going to just darken up the edges. Even on the opposite side. I'm just going to just darken them up a little bit. You always want to shade huge when it kinda give. If you're, if you're putting something in a real space, then you want to have the light and the surrounding areas sort of reacting to it. So also for the bacon, I'm going to take another color drop of the original color. I'm going to make it a little bit lighter. And if you're using something else you want to eat using another application or a different brush. You want to make your brush a little bit opaque, like see-through. So this is what I'm gonna do for the bacon. I'm just going to, so all I did was just make some some sort of opaque lines and shapes on it. Just so it looks a little bit more like bacon. And I'm just gonna go back to that dark color we were using and make it a little bit darker. I'll go back to my airbrush. And I'm just going to mix some, some darker spots. And since this part is in the shade, then I'm just going to shade this to make that darker. Okay. So now we're gonna do the same thing for the yolk color. Pick the yolk and make the color a little bit darker. I'll alpha lock it. So, um, so I don't go outside of the yolk airbrush. And I'm going to airbrush darker that same side that the shadow is on. And now I'm gonna go back up a little bit lighter than this original yellow color. And I'm gonna make a little bit of a it's going to lighten that up right on the edge so it has a little bit of bounce. And that's just, that's just a trick. If you did my other shading course, then you kind of understand why I do that sort of light rim even though this side is in shadow. So I think that looks pretty good. So let's go back to the egg layer, the white layer. I'm gonna go to white. And I'm going to go to the soft brush. And now I'm just going to add some some white in here. So this is where the light is hitting. So I'm just going to add a little weight. And then I'm going to take a harder brush. So for example, I'm using graffiti brush. And this is what graffiti brush looks like. I'll make a new layer just so I can show you. So which is a thick brush. But I'm going to lower the opacity of the brush to 30 percent. I have a brush called shadow 30 and that's all it is. It's graffiti brush, but I keep it at 30%. I'm going to bring it up to about 60 percent. And I'm just going to make some white bring it down to 40. That looks better. So I'll bring it down to 40 percent. Okay. Then it looks okay. And I'm also going to do one right on right over top of our little egg here. And early maybe I'll do a little bit on the bacon as well. I'm going to lower the opacity of that brush. And I'll do a little bit on the bacon as well. Just a little bit. Okay, so our little food characters, they look pretty good. And the next thing that we can do is I'm just going to merge everything. Duplicate. And now the bottom one, I'm going to take it off alpha lock. So I've just made two of the same layers. I'm gonna go to hue saturation and make that layer, the bottom layer black. So since I added all the shading on this side, I'm gonna go to my arrow tool. And then I'm just going to tap outside of the square to nudge everything over. So now you see that black drop shadow. And I'm going to go to the Adjustments tool, Guassian blur layer. And then I'm going to just kind of just blur it out a bit. And now I'm gonna go to that layer. And I'm going to tap on Opacity, and I'm just going to lower the opacity a little bit. Okay? All right, so now we have, so now what did they look a little bit more settled into the pan because of the drop shadow and things like that in our, in our little shading. So whatever you're drawing, if you're drawing these guys, just the shading is very, very, very important because it'll just kind of it'll make it live in this space. Maybe you can get the lighting and the shading, right? Okay, so now that you have this, you can add some fun extras. So I'm gonna go with my graffiti brush. I'm gonna make a new layer on top. And you can just have some pops to it. Like that. You can add text. You can use your text tool and you can add some text here. You know, I don't know if you do calligraphy that you can add text around it. And this is what I did when I practiced this before. I kinda did a little bit of a just a little something. And you can always you can always try to match some of the colors. I use. Butter plate, it's a little smaller. You can max, you can match some of the colors and just sort of just have fun. Just make, just use some of the colors in here and then just be creative. Make shapes and things like that. Don't forget last but not least, you can also change your photo. So we have the photo here as well as its own layer. And it might look better if you go to Adjustments, Hue Saturation. Maybe it looks better if you pump up the hue saturation. Maybe it would look interesting if you dial it down. Maybe all the way black and white. Something like that. Might look better if it's a little lighter or a little darker. One thing that's could be interesting, we can try it out is even for these little marks, you can give them outlines to that. Actually it looks kinda cool. That looks kind of interesting. Another thing that you can do is I'm gonna make a layer underneath those. And you can sort of make it as it though. I'll just use black for now. I'm going to make this a multiply layer. So now I'm going to use, I'll use the soft airbrush. You can kind of pretend as though these things are sort of making a shadow. I'm just doing the shadow like right underneath or not right underneath. But like if the latest hitting here, then all of this stuff, the shadow would fall a certain way. So like if the light is hitting here for this little thing. And I'll make the shadow here. This one, I'll make the shadow here. This one will make the shadow here. A little bit of a shadow for that one. And now I'm going to go back and I'm going to erase this so it's not going outside of the skillet. So that sort of makes it look like there's other shadows moving it. And of course you can go to the layer and you can adjust the how much you one of those shadows. You can add little speech bubbles. So let me go back up and I'll just make a new layer. And I'll go back to the white color. Can add speech bubbles. Go to black. And I'll go back to portably or any, any small brush. And he's probably upset, right. So let's do something, something like that. And wonder what everything would look like. The flatness, I just wanna see what everything would look like if it was all black and white. That's interesting. But there's so many fruit, food, vegetables, things that you can fry in a skillet, you should have more than enough things to kinda get. You, kinda get your inspiration flowing. So and your creative juices flowing. So once again, let's move on to the next video.
6. The Glass Platform 1 (DFD): Okay, so now we're going to use the photo that I took of my desk. So the first thing I'm gonna do is add some text. Well actually the first thing I'm gonna do is group these two, group this layer. And I'll just name the group disk. So it's good to name your groups just to make it easier once you get finished. So now I have the photo and I have an empty layer. And what I'm gonna do is add some text. So I hit the wrench, add, add text. And this font is what does this font? And actually sure what font this is on, see if it shows up as the default font. So I'm not sure what the font is its default. You can really use any text that you'd like. But for now let's just stick to the default text. And I'm gonna go with D. F, the for now, you can do any name, you can do your name, you can do your pet's name. But for now I'm going to do DFD. I'm gonna make this bigger. Make it a little bigger. Okay. So as you can see, is sort of placed it in the middle of the iPad. Like so pretty boring so far. So the next thing I'm gonna do is sort of, I'm going to try to make the bottom line sort of align with the iPad. So the first thing I'll do is I'll tap the arrow and then I'll just rotate it a little bit like that. Now I'm going to go to distort. So I'm going to tap on to store it. And since the back of the d should be going away from us a little bit, I'm just going to bring this corner down. Some it doesn't have to be too much. Maybe it'll bring this corner up and I'll do the opposite on this side. So I'm going to bring this up, maybe the bottom down a little bit. So you might have to fiddle with it. You just want to make it, you just want to have it look like there are letters that are resting on the iPad. Move the whole thing up if you want to move it back and space. So this might take a little, a little adjusting. But essentially, let's see here. It looks pretty good. That looks pretty good for now. And after I did the distort and everything, it did rasterize the text. So just make sure you have the text, the text right the way you wanted to or just deleted and do the text again. But right now I think that looks pretty good. It kinda looks like it's sitting on the iPad. The only thing that I think that I could do is make it stand up a little straighter. So I'm gonna go back to this tool, and I'm just going to drag this middle node just so it's a little more straight up. That looks better. And this is a good way to sort of mess around with the distort tool. You can, you can mess around with it and you'll see if I, if I bring this node all the way down, it kinda makes it look like it's flat. So this is different ways that you can distort it to make it look like it's taking different occupying different space. Which is, which is very useful, especially in things like this. Okay, so now the next thing we're gonna do is hit the, hit our little layers. We're going to duplicate this layer. And let's see. For the back layer, for the bottom layer, I'm going to color, color, pick whatever color this green is, wherever call you made the screen, or if you're using this one. And then I'm just gonna make it lighter. And I'll bring it closer to white. Not white, but closer to white. Make it a little bit, little bit lighter. And I'm just going to alpha lock that layer. And then I'm going to hit fill layer. So now we have two of the same, but the one behind it is a little bit darker. So now we're gonna go to the one behind it and just move it, move it back. So I'm moving it back and over to the left just a little bit. And it looks pretty good. So all I did was take the bottom one. And moved it up and to the left a tiny bit. Okay. So the next thing, the next thing we'll do is we're going to, I always say that I always, I always express that we're gonna do something next instead of just doing it. I don't know new, that's maybe that's good or that's bad. So let's take this off alpha lock. We'll go to our brushes. I'm going to use butter blade, but I'm gonna make the brush really small. So now we're gonna go and close. And this actually might be easier if you have, um, I think three letters is good, three or four letters. You don't want to have anything really, really long. It'll just take you longer to do the step that I'm about to do now. So if you wanna do it, go for it a 100 percent. So now I'm gonna go in and I'm just gonna draw a line from here to here and I'm going to hold it so that it gets nice and straight. I'm going to do the same thing here. So any point, any two points like this, I'm just going to draw a line from one to the other. You can get a nice and close loops and just try to stay in the paint. Just hold it there and then bring it across. Same here. Hold it. Same thing down here. Oops. Hold it. Hold my head isn't getting into frame. And my head is notorious for getting into frame. So I'll just do that for all of your all of your two corners need to be joined. I think that's it for mine. So now here you can have a little fun with the lighting. And we're going to do most of the lighting on this back layer. And that's why we that's why even though it's in the back, it's underneath. So let's take some of this light purple will make it even lighter. And we're gonna call her right on this beige layer. So I'm going to go up to soft airbrush. So the light is here. It's going to be hitting hitting this. Right? Did I alpha lock that? I didn't. So alpha lock this layer. You can have alpha lock the first one too. Just so I don't make that mistake again. So now we're on the back layer, soft airbrush and just give it some and make sure you don't get underneath here because that part would be in shadow. So just sort of give some, given nice bright gradient too. The bits that are going to be that are closest to that purple. So I'll give a little bit here as well. And I'll make my brush smaller so I can get a little bit on the front, little bit more on the, on the front side. And I'll even do a little bit, it'll taste here as well. Okay. That looks pretty good. So now I'm going to take the color of this nice kind of yellow, ocher, golden. I'll make it nice and bright. And I'll do the same thing with the other side. So this side is closest to the light ball. So I'm gonna give this a nice little touch, their nice touch here. And I'm not pressing hard at all on my brush. I'm pressing very, very softly, maybe a little bit here. And I'm actually going to give, I'm actually gonna put some inside of here. And I like to just do my gradients like by going in circles really softly. That's some in there. Maybe a little touch in here as well. Okay, I think that looks pretty cool so far. Alright. So now this part and this part can get a little bit of a shadow. So what I'm gonna do is I'm going to color, pick that beige and I'm gonna make it darker. I want to be too dark. I'll make it a little bit richer too. And I'll usually say saturated, I usually say richer. Okay, So I just want to make sure we're still on that layer. And now underneath. Give it a nice little, nice little shadow. I don't even give some along this white here. So I'll do some here as well. And each wanna make sure you don't eat. It doesn't go over into this part because it's not going to look right. So we'll just do a nice gradient. You can make it darker towards the top. Oops. And actually doesn't look too bad. And I've said a little touch down here against this white, just to sort of make that white pop. Do the same thing here. A little bit. Just to kinda make that white pop a little bit. If you really like what you have, then you can go ahead and merge these two are so I'm going to duplicate DFD. The bottom one, I'm going to take off alpha lock. I'm gonna go to my transform tool. And I'm going to flip vertical. And I'm going to bring this, bring this one down, and then we're still in distort. So I'm just going to stretch this node and this node until they're a little, a little closer. Okay? So this doesn't have to be doesn't have to be exactly perfect. You just want the letters to be flipped and sort of underneath the top layer, the top layers. So all of the lines fairly line up. It doesn't have to be perfect. Another trick that you can do is you can now go to adjustments and liquefy. And then if you want to make these little changes, like bring that closer, push this down some. You can do all of that with liquify. Just enough so that they kinda match up. And it's a little bit better. See the more that this matches, see how this matches that. That's what we want to go for this matches that. So this might take you some time to sort of play around with. And that's okay. Because that's part of kind of learning how to do things like this and making reflections. So if you need to take some time to figure that out and to make it look right. Then take the time. But essentially it doesn't have to be exactly straight going down. It just wants to be that look mirrored. So you want everything to be directly underneath. That looks pretty good. Okay, So now we're gonna take the bottom one. We're going to tap the little n and we're going to bring the opacity down to 50. Will go to the eraser. Soft airbrush. Make the brush fairly big. And the first thing we're gonna do is erase away the reflection on the actual iPad. And then I'm going to get a little bit softer. And I'm just going to slowly erase more of the letters away. But you still want to see them. So just really light. It's pretty good. You want to make sure you can still see your your reflected letters. Okay. So now the next part is we're going to add a little bit of a shadow underneath. So we're gonna make a layer in between our two layers. We're going to choose, we're going to color pick the screen. Make that a little bit darker. And then we'll go back to our little airbrush. And I'm going to turn my screen just because it's easier for me to shade that way. So I'm going to turn it vertically. And remember we're in a layer in-between, so there's nothing on this layer. And I'm just going to softly add a shadow underneath the layers. Really, really light. Don't make this shadow too dark or make it too dark. Maybe you like it better. But I personally just like a very subtle shadow underneath the letters. I think that looks cool. And once again, all I did was bring in the lights from the scene. So even if it was if this was outside and it was the sun, I would just make one side really bright. And then I would I would take this light color. I would make a layer underneath and I would use my soft airbrush. And we just sort of airbrush, you know, some something like that. So if it was if this was outside, then I would do it really bright like that, I would make that That's shimmer. If this was a green light, this would be green. So there's a, there's a ton of options, is a ton of things that you can do with different colored lightings and things like that. Or you can just add your own lighting. But yeah, I think it's really fun to kinda use the iPad as a, as a, as a platform. So this was the letter one. In the next video, we'll do a shape will make a little, some short, a little easy, simple character. And we'll do the same thing. We'll add some colors to it and things like that. Oh, another thing that's fun. Let's see, I like this. I'm going to merge them all. And I'm going to see what these two. And that's cool. Always interesting.
7. The Glass Platform 2 (Cactus): Okay, so let's try something really simple, really easy. So we're gonna, we're gonna, we're gonna start with a green color. For now. Sort of a cactus green. And what we'll do is take the graffiti brush more. You can take a rotor blade, doesn't really matter. Matter of fact, I use butter blade. Where is it? Make sure your layer is not hidden? Brush can be a little bit bigger. The first thing I'm gonna do is make a circle and the middle of the screen. Okay. Now, oops. I'm gonna, I'm gonna make a cactus, but watch the way that I do this. So I'm going to start inside, kind of bow out a little bit and then come back in. It's not bad. So now I'm going to start here. And I go out up, down and see how my sort of make it smaller. I don't know why I do that, but I just feel like they look a bit cuter. If where they connect, It's a little bit smaller. And now we'll do another little one down here, come out and have a go. It's not bad. I'm just gonna use my eraser and clean this up a little bit down here. Hopefully you can hear the outside being a rascal. Okay, so now I'm going to alpha lock the cactus, our cactus, I'm going to color pick the green that I chose. And then I'm going to make it a little bit darker. And now I'm gonna go back to graffiti brush. Just make some stripes. And I actually think that the stripes are a little bit too, little bit too dark. So I'm just gonna lower the, lower the opacity. Here. There we go. So I'm going to lower the opacity and make some new stripes. That's a little bit better. Oops. Okay, I think that looks right. It's like a watermelon cactus. And you can make your stripes. However you wanna make your stripes. Okay, so let's make a new layer above. And now we're going to go to our green, but we're going to go really, really bright, almost white. And I'm going to use butter blade. And I'm gonna make the, I'm gonna make the brush fairly small. That's pretty good. Maybe a little bit smaller. Okay, so we're on a new layer above our cactus. And now we're going to put the cactus spines. Prickly is whatever they're called, needles. And we're just gonna make some lines. So nothing too crazy. Nothing too difficult. I'm going to leave a little room here for maybe some eyes or something. See. Didn't worry about that too much. Black. So just keep your cactus some lines. Have fun with it. You don't have to be super straight. Isn't going to just make these quickly. Maybe you know a lot about cactuses and you want to add some flowers or whatever sprouts from cacti. Sure, world. I think that looks pretty good so far. Okay, so now let's pull in some of this background again. You can see a common theme. So I still have this orange color in my history. So I'm gonna go to soft brush. First. I'm going to merge these two. So it's just all one cactus now. And I'm going to hit Select, make a new layer above. And I'm just going to bring in some of this yellow light. And let me get a little bit brighter than it looks nice. And you can go ahead and use your eraser if you happen to get some on your on the side of the cactus, shouldn't be. I'll give it a little, I'll give this a little more love here. Here we go. So I'm going to use this pink or this sort of purple is from our history where you can just color pick it from here. And I'm just gonna do the same thing on the other side. Okay? Okay, I think that looks pretty good. So the next part I'm going to do is just because I love doing this in actually, I'm not gonna, I'm not gonna move too fast. I'm going to slow down. So the next bit, I'm going to make a layer underneath everything except for above our background. And this is going to be an Add Layer. Now I'm going to color pick the background. I'll go to my colors, bring it all the way up so it's nice and bright. Excuse me. A little bit brighter maybe. And then go to airbrush. Okay, so I'm on my new layer, that's semi new ad layer. So now I'm just going to softly just make a nice bright circle here. But just very soft. Okay, I think that looks like that looks good. Okay, so we're gonna do the same sort of thing right above the cactus layer. So I'm gonna make a new layer above the cactus, just the green cactus, not the colors. I'm gonna change it to add layer. And I'm going to color pick the light, the lightest part of the green. I'll make it a little bit greener year, little bit lighter. And then go back to the soft brush. You've seen me do this in other videos. So this bottom part, I'm going to just make sure that I'm doing this right. The one thing that I forgot to do is select the cactus. I knew I was forgetting something. So I've selected the cactus now I'm back on the add layer. That way whatever I paint won't go outside of the cactus. So now I can light I can That's her brighten up the bottom. And if you'd like, you can bring this glow all the way up into the middle. So it looks like it's sort of emitting light. You can even do it with these little sprouts here. And it looks really cool. All right, so last but not least, if you want to, you can put some put a little face on him. I like to make a new layer above. And we can go with we'll just go with graffiti brush for now. So we do. Let's see. Let's see what happens if I hold it. And it's a little bit better. So we'll do one I like that. I do when I open. What I'm going to use my circle, since I'm bad at drawing circles with paint brushes. And I'm going to take my eraser and just make them a little happier. And you know what, Why not? Let's give them some. And we'll give him a little mouth or her. And we'll go to we'll we'll do our little since we did it. On the other thing, let's, let's, let's do it here too. As matter of fact, we're going to choose a little bit of a blush color and we'll use the airbrush. Lets see what that looks like. I'm gonna do it on a layer underneath so it doesn't get on the black. All right, it looks cute. And we'll finish this off with we'll make a new layer above. Or you can actually do it on this layer, will go crazy. We'll do it on this layer. I'm going to take butter blade. You can take any brush. And we're just going to make, we're just going to have pure white. And we're just going to make our little a little circle there. And then I'm going to use a thicker, I'll stick with this brush. I'll just make it 30 percent opacity. I'm just gonna do this. Just make a little, can make it my jelly bean better than there. Just a little jelly bean. And the last step, we want to make it underneath our cactus, will go back to that green, make it a little bit richer. And then we'll go to a soft airbrush. So we're on a new layer behind our cactus. And then we're just gonna give him a nice glow since we've been there, since we did that glow in the middle. We just want to show that, that he's admitting that light. So we're gonna give them a soft glow around, around him. Maybe we use the light pen and just sort of add some little bit of little bit of texture. You can even, you can even use the noise brush tool. I'm just going to add a little bit, a little bit of texture. And then you have your little cactus coming out of your iPad. Okay, So I almost forgot the most important thing, the reflection. So it'll be the same thing that we did in the other video. I'm going to go ahead and merge all of these. The only, the only layer that I'm not merging is of course the background layer and this little bit of light, this Add Layer, because you don't need those. So all you need is, you need to do is merge your cactus layer. Okay? So now we're going to duplicate. Click on the bottom one, go to our Transform tool. Flip vertical. Bring our little cactus down. Now, here's what I, here's what I usually do when I make I'm when I'm when I do a reflection. So although I'm going to store it, I'm just going to go to free form and I'm going to make it really squat. And now you can even go back to distort. And I'm going to drag these two little nodes just to kinda, just to kind of match it up, just to kind of kind of distort it. So these are perfectly Underneath each other. You might have to play around with some of these things. But that's usually what I do is I I should have done that. I made a mistake there. What I should've done was leave it. Once I, once I take this layer and I tap on that and I do Flip Vertical, I have to be careful if I bring it outside of the square because once you, once you click out of this, all of that part is gone, it's cut off. So that was one little mistake that I made. So just be mindful of that. So again, I'm gonna go to free form and just make them squat like so. Sort of match that up. And now I'm just going to go to distort. And I'm just going to drag these two nodes just to kinda straighten them out a little bit. And then, and now he's pretty much matched up fairly well. And if I want, I can do liquefy and just sort of make it sort of perfect into a bigger. So you can see, this is, this is really just, you know, you don't eat, you don't need to go that crazy with it. So pretty good reflection. Now we wanna go to that bottom reflection layer and we're going to bring the opacity down to 50 percent. We're gonna take our eraser as always, and just erase most of this stuff outside of the ipad. Get rid of that. And then we can slowly just sort of just erase away a little bit. So it's nice and blended. Okay, that's much better. Now he has a nice, a nice little reflection there. I'm actually going to merge these together. And one last cool little trick that I found is I'm gonna take this rascal, this whole layer. I'm going to tap n. And then we're gonna go down to which one was it? Hard light looks really cool. Pin light though. That looks, that looks like amazing. I love it. I kind of just stumbled across changing this thing to pin like when I practice making this and I love it. So I'm going to save this one. Save I like hard light. Hard light is pretty cool too. It's nice and see-through. Save that one as well. And make it a habit of saving, saving things, even if you finish with something to save it. I'll save the normal one. All right, We're all good. So that's a little cactus. Let's move on to the next photo.
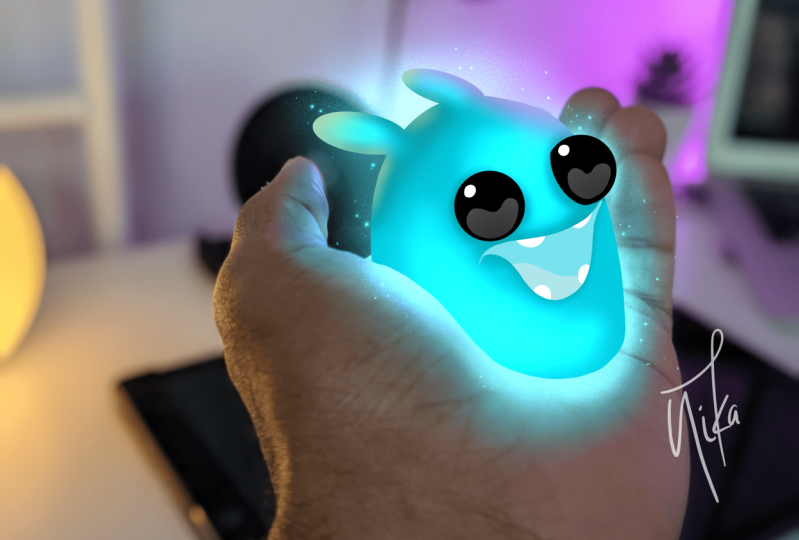
8. The Glowing Hand: Okay, So now we're gonna do, is we're going to make an image using my hand. And I'm going to try to keep this simple problem is I love character design, so I'm going to try to keep this pretty simple. Okay, so now we have a group with our hand. I'm going to make a new layer above so we can do all the drawings on top of our photo. I'm going to choose this nice blue color. And I'll probably just use graffiti brush and butter blade. Okay, so now on the new layer, I want to use the curve of my hand. So I'm basically going to use this curve here. Come up a bit. And then I'm just gonna make a big swoop like that. So it looks like, um, hold on like a scoop of ice cream or something. And I'm going to fill it. Clean this up a little bit. Okay? Okay. So you can leave it like this or you can just make a really simple face, but I always have to go that extra, that extra little bit. So I'm going to put some little ears on him. All sort of ears. I don't know if it's going to be a, Hey, we'll call them years. So I'm just making one loop off the back and then another one little bit center over here. Actually, I think I like it. I like it without the auto went out the auto snap. So don't worry too much about matching exactly. Just sort of feel it out. It'll be your character too, so you can change things around if you want. Thermally. Let's give him some eyes. So I'm going to use black. I'm going to make a new layer above. And I'm actually going to use a solid circle. So that just makes a simple circle like that. So I'll put one there. I'll put one a year. And maybe for this one, I'll sort of her race off a little bit just to sort of since this one is on an angle, That's the reason why I'm, I'm I erased some of this. And this one we're looking straight on this one, we're looking sort of at an, at an angle. Now I'm going to go back to the original layer, make a new layer. And let's, let's use our main color and then we'll bring it up about halfway. And make sure I'm on a new layer. And then we'll make a little mouth. So I'm going to make loops. We want to get out of the solid circle. I use butter blades since it's a smaller brush. So I'm gonna make a line like that. I'm going to bring it down over to a point. I'm going to come back here and swoop this down and back up like that. And then I'm going to fill that. So then you have a little mouth. So now I'm gonna go back to the color. I'm going to bring it up a little bit more. Not white, but about halfway through from where we were to wait about halfway through. So it's a little lighter than our last color. And I'm going to alpha lock the mouth. So now this is awful lot. I'm going to add a little tongue in there. Okay. So he's got his tongue silly me, make it I don't want it to bleed into that mark there. There we go, That's good. So now I'm gonna go to pure white. Same brush. I'm just gonna make some tea. So now we have a little, a little blue character. If you want, you can make some teeth up here. Whatever you'd like. You can give them a different color, tongue. But there is a reason why I made the inside of his mouth and the tongue and the teeth are all lighter than this blue color. Okay, so now let's fix up this. So it really looks like he's sitting in our hands. So I'm gonna take the eraser. And I'm going to, I'm going to turn it. And I want to use this line of my hands or I'm basically going to someone the wrong layer. We want to go back to our blue. So I want to basically trace. There we go, That's nice. So I just want to trace this line so it's nice and straight. Going down my hand in actually. I'm just going to fill this a little bit of a just going to fill this in a little bit here. Okay. I think that's pretty good. Okay, so now we're going to make some we're going to make some blue light on our hands are in my hand, I should say. So I'm gonna make a layer underneath our blue, so new layer. And I'm going to change that layer to overlay. So the layer should have the little over a year. And now I'm going to drag this up about two there. And I'm gonna go to airbrush, soft brush. Okay, so now we're really just going to put in this light around our character and overlies good because it kinda keeps, it keeps the details from my, from my finger there. Can make the brush a little bit bigger and kind of blend this all out. And then I'll make the brush smaller. So we get a little bit back here to where my thumb. And we did it on its own layer. So if you need to brighten this up a little bit. So if you need to, you can erase. If the light gets off of the the thumb, you don't want it. You don't want it on the background really. Okay, that looks pretty good so far. So now we're going to make a layer above that. And we're going to keep it the same color, maybe a little bit, little bit lighter. And we're going to change that layer to add layer. So add always makes your lights really, really bright. So this is going to really make it look like he's, he's giving off light. So you want to start off really soft because the brightest areas are going to be the areas right close to him. I'll make the brush a little bigger so I can have a nice gradient of light. Make it a little brighter up here, too. Little brighter up here. I really want to make it bright here is little light is really coming from underneath them. Can break this up a little bit. Okay, and we fix this might be easier for you to see and make it a little darker. Okay, that looks pretty good. So I'm just gonna make it smaller. I'm just going to make it a little bit brighter. And the ear, and it's going to add some pops of light here. Maybe here. And I'll maybe make it a little brighter up here as well. So we really want it to look like this thing is really given off some light. Make my brush bigger and just sort of blended in a little bit. So you can see sometimes I go back and forth if I'm not sure if I like something, I just go back and forth. Okay, So the next thing we're gonna do is we're gonna go back to our blue layer here. And I'm going to color pick. I'm going to make this darker. Going to stay with the soft air brush and we're just going to air bush around the eyes and a little bit under the top part of his mouth. So here, just gonna do the dark airbrush, make a little smaller to the dark airbrush around his eyes. Oops. One thing that I should do is alpha lock that layer. So now he's, this is Alpha locked. So when I'm brushing over here, doesn't go off of his blue. I'm gonna do a little bit up here. And a little bit on under the top part of his mouth. Maybe a little bit down here too. Ok. Ok. So now I'm going to add a new ad layer. I'm gonna make it above this blue part. So above his MS blue but underneath his mouth and underneath his eyes. We're gonna go back up here. So what's light? We're going to make sure we're on our soft brush. And we're gonna make sure this is an Add Layer. Okay? I'll make the brush pretty big. And another thing we're gonna do is we'll hit Select on the blue layer. So we've tapped on that layer, we've hit Select. And now we're gonna go back up to the blank layer. This way we can only draw on the blue area. So now we're going to use this Add layer to make it look like he's loops a little, little heavy, lower the opacity a little bit. So now we're just going to color in and just lightly give him a little Inner Glow. And you want to make it light because you want to be Silvio to see his mouth. So just be very careful. I'm going to put a circle up here. And I'm just going to add just want to steer clear of his, of his mouth. Because you want to be able to see the mouth. And you can actually do some small ones. Up is little ear areas. So it looks like he has little e or glow 0s. Okay. I like that.
9. The Fridge: Okay, so now let's tackle something like the fridge. Now you can see I used a portrait mode, depth of field. So I focused on this part so that all of this would be blurry. And that makes a really cool effect. And it makes it really fun to be able to incorporate that into your art. And to keep it simple, I'm just going to use shapes for this portion. Let me we're going to draw the shapes, but you understand. Okay, so I'm gonna make a new layer. So now we have our background and we have a blank open layer. The first thing we wanna do is figure out a color. So I think a nice green will work. As green looks pretty good. And we use butter blade. Okay. So the first idea I had was to kinda have something like sitting, like it's sitting on the shelf. But we don't have that much room on the bottom. I should have probably took it vertically then I could I could have made something like sitting with like leg type things coming up. But for now we'll just we'll just use this space in here. So the first thing I'm gonna do is make a circle, sort of make it look like something is sitting on the shelf. That looks pretty good and make a clean it up a little bit by using the hold. Okay, and that looks pretty good. So now I'm going to just give it some height. Okay. So not every now and again, I like to I like to make sure that I'm on the right layer, the my, my new layer. I'm just going to move this back a little bit. That way. It's not on the very edge of the, there we go. That's better. I wanna, I wanna see this edge here. And you can feel free to sculpt the shape to make it as you like it. I kinda like, Hey, we go. I just wanted to make it a little, a little rounder, little more sleek. Okay, so now I'm also just going to make another, another little plop on top. You know what, I'll use? I'll use butter plate. I'll just do it the old-fashioned way. Here we go. I'm going to make the whole thing a little bit smaller. And I'm going to make this a little bit bigger and move it up a little bit. There we go. So just an interesting shape. But the lighting around in the things around it is where it really can make this simple shape interesting. So the first thing that we'll do is add a shadow, so the lightest here. So the shadow is going to be here and down here and around here. So we'll go to our green color and then we'll just make it darker. And we could do this on a different, on a different layer. But I think for the sake of simplicity, we'll just do it right on this layer here. So will alpha lock that, will take our airbrush. Here we go, okay. And you slowly just want to shade in the areas that should be shaded. So if the light is coming here, then all of this back here should be darker. And never pressed very hard on your, on your iPad. Just keep going over it and it's only going to get as dark as how dark we've made it. So if you need a darker, just make this make it darker here. I'll make my brush bigger because I want a nice gradient. I don't ever want to see the separation of light to dark. I want it to be a gradient. Okay, and it looks pretty good. Now I'm going to make it a little bit darker and really hit that edge. If the places the bits furthest away from the light, just make those a little darker. And I'll do the same thing with this up here. Maybe even a little darker and make the brush a little bigger and then go really light. Just so it's a nice gradient. Okay. I think that looks pretty good so far. Okay, So now the next thing that we're gonna do is add a little bit of that, that 3D flavor to the shapes. So the way I'm gonna do that is go to the original green and make it a little bit lighter. And I'm actually going to make it a little bit more yellow. And the only reason I'm doing that is because this is here. And I sort of want to bring in a little bit of these colors into our shape. Same brush. I'll make it a little bit smaller. And now I'm going to lightly just keep that edge. A little kiss of that light color and get a little smaller even. You don't want to cover all of your shadow. Okay, and that's looking pretty good. And do the same thing up here. Make it big. So you can see standing a little light touch of a light edge. Make it a little smaller. There's always lights and refraction and things in, you know, in a space. And this little trick will really make things look 3D. And the reason why it looks 3D is because, you know, when our eyes see things, we may not perceive this light edge on certain things. But that's just what makes it. That's kinda one of those tricks that just makes it look really good and really believable. That a little bit more here. Okay. I had a little bit more to this guy. And it's really important to just practice your, practice your shading, and just go slow. Don't know it. Don't try to rush. Don't try to rush it. Okay. That's looking pretty good so far. I'm going to take this little bit darker green. I'm just going to softly just add a little bit over here. Okay? Okay, so next we're going to start adding some light. So let's make a new layer above our green shape here. We're gonna go to white. I'm gonna go back to regular graffiti brush at 100%. And I'm going to make the layer 15 percent. That way. I can. I don't have to worry about it getting lighter and lighter if I go back over the same line. So new layer layer is 15 percent graffiti brush, white. 15 percent. I might have repeated something there. Okay, so let's make our nice jelly beans here. And we'll sort of like sort of conform it to the shape. Okay, that looks pretty good. Let's just make the brush lighter and we'll just make a light one down here. Just to kind of I don't know if I like that. We'll just leave it here for now. I'm going to carve some of this. Okay. That looks pretty good. And we'll do the same thing up here. Let me bring the opacity back up to a 100 percent and then make a nice jellybean here. Now another thing we can do is you can also adjust the opacity. I think it'll actually looks better if it's a little lighter. I think that looks it looks better. Okay, so now for our highlights, so we're on a new layer. You put a nice big pop their year. Okay, so now what I'd like to do is tie in some of this blue. Because the surroundings, the surrounding color will really help this look like it's in the space. Okay, so I've selected that blue, I made it a little bit, a little bit later. And I'm gonna make a new layer. And I'm going to bring that layer opacity down to about 30. We'll just use graffiti pressure now. I can bring it up to 50. 50 is good for now. That way you can see what I'm doing. So it sort of looks like it's a square. So I'm going to keep that dense square shape. And now I'm gonna take my eraser and we could just use butter blade. And I'm going to lower the eraser down to 50 percent. And then I'm just gonna make some lines in it, just some little just to sort of make it look like it might be reflecting off of this. And I'm just gonna lower the opacity on that. And also I'm going to take this color, make it a little bit brighter. And we'll keep it on the same layer. And I'm just gonna make sure gonna do that. And then I'll just erase a little bit of there to erase a little bit here. Just to sort of tie in, just this sort of tie in this orange here. And something else we can do is bring up these white. So I'm going to use white. I'll use footer blade and I'll bring the opacity way down to about 30 or media about 20. Let's see how that looks. And I'm going to take some white there, make the white there, maybe a little bit for that one. And I'm gonna take my eraser and I'm going to use the airbrush. And I'm going to airbrush the top. That way it looks like these are reflecting off of that. Now the reverse of that, which is also really cool. And I'm gonna make a layer underneath our green and on top of our background. Black. I'll use this soft brush and I'll make it really small. I'll lower the opacity to about 50. And I'm going to color over these black, are these white bars. So this is the reverse. This is making it look like there's a shadow from the green thing. Okay, and actually should make, make some white on white and the white thing there too. So I'm gonna go back up to our layer with the white, That's this layer. And I'm going to go back to, I think we used butter blade. And I'm just going to make another little white line there. And I'll do the same thing and erase the top. I think that looks pretty good. And once you, once you're happy with this, I'm gonna go ahead and merge all of these layers. Notice I didn't merge these with the dark. Shadows had emerged that layer, just my green. So now I'm going to duplicate it. I minimized, I hid the one on top because we're working with the one underneath hue saturation layer. And we'll just change the color maybe to like a nice turquoise blue color. Okay, so now when we bring this one back, it'll be in front. We're going to take the blue one now off of alpha lock. I'm going to tap the arrow. We're gonna make it smaller. So uniform make it smaller. And then we're going to move it back, make it a little bit smaller, and move it back in the fridge. Okay, so now what we'll do is go to the Adjustments gaussian Blur layer and then blur it. So this way it matches all the things around it. And of course this can be a character. This could be anything you want it to be. But these little tricks just having, making sure that the light is hitting things the right way and things like that. That's what really make things look. That's what really sells it. All right, so let's move on to the next and final photo of the egg. I have no idea what I'm gonna do for the egg yet. But we're going to figure out some fun things to do together.
10. The Egg - Part 1: Okay, so the egg is really fun. I've been looking forward to figuring out what I wanna do. And I'm just gonna, I'm just gonna sort of do it loose. Now I did practice right before this. So we'll see how it turns out. And I think I'm going to really want to make something with the egg sort of opened up, opening up and then with some lights inside. So I am going to attempt a little chick too. So okay, so same as before. We have our egg layer, then we have a new layer that we're going to work on. So the first thing we're gonna do is we're going to highlight a piece, color, pick part of our egg, make sure I'm on that new layer above. I'm going to use butter blade about that big. Okay, So I want to make an opening in the egg. So I'm going to start, going to start about here. I'm gonna go up, make a dome and sort of curve it so it sort of matches up with the edge. And then I'm going to go down the edge to about here. May redo that because I don't want to go outside of the edge that I want to be right on the edge, but sort of on the inside edge. So I'm gonna do a little closer so you can see. And so I can make it better. I make sure I alpha lock. There we go. Just wanted to Alpha our exposure lock the phone so it doesn't get brighter and darker. So I'm going to go along the edge on the inside. That looks pretty good. I'm going to meet up with my other line. Okay. So I'm liking that so far. I think that looks that looks okay. All right. So another thing I'd like to do is I'm going to use it a bunch of different layers. That way if we mess up, we can just get rid of the layer if we need to. So I'm gonna make some little steps. So what I'm gonna do is I'm gonna start about here. Make a line up and then I'm going to do a little curve. Just a little curve. So you can see, you can see it now It's the same color. And actually I'm going to make it a little bit darker. So I'm just gonna, I'm just gonna make this darker and I'm going to I'm just going to fill it so you can see the color I'm working with. I'll take it off alpha lock so you can make that a just a, just a darker color so you can see it. You'd thicken this up at the bottom for r little r, little ladder type thing. So I'll do the same thing here. Little curve, like so. Not bad. And then we can just make our little steps. So now we have some little steps that are going up to the thing. But actually is Tips don't look right. I think they have to be a little more tilted. So they're a little more parallel to like this. The bottom of the egg shell where it's open. I think that looks a lot better. And actually I feel like I can cut a little bit of this off as well, just to sort of keep that parallel line. So now let's work on our little r, little chickadee. I'm going to make a new layer because I'm definitely going to mess this up. But I'm going to try for you guys. So we're gonna make them really simple. So I'm gonna use butter blade again. And I'm just going to make, I wanted to be like a little chubby little chick chickadee. Okay, So we have that there. Let's have another one here. And what? We're just gonna do a circle. Okay? So that's pretty good. And then I'm going to use Liquify. So I'm gonna go to adjustments liquefy. And as you guys know, I use local file lot, make sure the brush is nice and big. And then I'm just going to flatten that flatten that bottom out. Because anything that's on like a like a table or something like that, I'm just going to move this down a little bit with the transform tool. Anything that's on a table, if it's soft, then the then it's not going to be round, like it would be here. It's going to be a little bit flat where it's touching the table. Okay, so now let's make him a different. I don't know if I want to make him white per se. I might want to just put a little bit of color on him. We'll make them a little bit. I'll just alpha lock this so I can so I can fill the color, but that'll be the same thing if I was to not alpha lock it and drag the color over. Same thing. But okay. So let's give him an eye. And we'll do, we'll do almost black for the eye. I'll make a new layer for all of his face accessories. So I'm just going to draw a circle here. Okay. And now we'll go with sort of a rich deep yellow. Maybe, maybe like a deep gold is yellow. And I'll use butter blade because that's a bit of a smaller blade. And I really wanted to look like he's, he's smiling. So you're gonna make a little line there and make this bigger. So you can see I make a little line there. And I'm gonna come up here like this. I'm going to go down and then come back up to that line. Just so it's sort of resembles a little, a little beak. Okay, it doesn't look bad so far. So now I'm going to, I'm going to do this in two parts. Actually. Go to like the reddish take like a reddish color. That's pretty good. Kind of like the inside of the mouth color. And I'm gonna make a layer underneath, underneath this. So I'm going to start here and I'm just gonna make a little bit, little something like that. And then I'm gonna go back up. I'm gonna go to the last color that we used. So I'm gonna go to that yellow color. And then I'm going to make the rest of his beak around that. So that's not so bad. And if we want to, we can go back to our eye color. And then we can actually add it right here. And this is just extra. You don't actually have to add this. I, but I'm sort of a perfectionist, so so now he's got his little other either. Okay, he's looking nice. So I'm gonna go back up to the color of him. We can color. We can grab his color and we can do it on the body layer, butter blade or any brush you like. And let's give him a little bit of a given two little things right there. Maybe some bigger ones here. And it's not bad. Maybe a couple little things there. And now I'm going to drag the same color of his skin but darker. I'm just gonna make it darker. And we'll just give them some little some cute little leaves, her leaves, cute little wings. And then for his little feet. I'll make another layer underneath the body. And we'll just make some cute little phi. I'll use graffiti. Graffiti brush. Just can't even talk. So notice make some little fees there. So one thing I want to do is I'm going to alpha lock the body. I'm going to go back to the color of him so you can color pick it or go back of a cylinder history. And I'll make that a little bit darker. And I'll just use my soft brush. And I just want to sort of did I alpha lock it? I did. So as long as it's awful lot, I just want to give it a little bit of a shade here. So I'll give it a little bit of a shade and then I'm going to take the color of the floor, make it a little bit lighter. I'm going to sort of add that here to the bottom of him.
11. The Egg - Part 2: So next, I'm going to take the color of this, this shadow here, which is pretty dark. And we're gonna make a new layer underneath his feet. And we're just going to use Shadow 34. Now let's see how that looks. We use Shadow 30. And we're just gonna make a circle. We'll make another little circle here. And then I'm going to pump it up. I'm going to raise the opacity of the brush just so this is darker. Maybe that's a little too much. So about 30 percent. And then I'm just going to add this little bit of a darker shadow there. So basically I just want to match this. And it actually looks like the shadow is coming a little bit more on the side. So I'm just going to rotate this and sort of move it over. Because I really wanted to match this layer. I really wanted to match the shadows here, because if he's in the same plane, then this has to match. And while I'm doing that, I'm going to duplicate the ladder. I have to get rid of some layers. Give me 1 second. Okay. I just had to get rid of, get rid of a few layers here. I'll go ahead and merge his beak in his mouth and all that stuff. And it's okay to merge it now. So now I'm going to duplicate the ladder. And I'm going to change this one to black, layer black. Then I'm going to transform it. And I really just want to, I'm going to distort it. So I brought it down but I wanted to store it. So it's nice and skinny. But it's straight. Here we go. You might have to play around with the distort, but all I did was sort of tilt it and then I just stretched it out using the Distort these little n nodes. So you made it to play around with that a little bit. But you just want it to be sort of flat and straight. And then I'll use Liquify. So he's adjustments liquefy. And I can just sort of just bring it down a little bit and keep it touching. And I'll just lighten that up a little bit. And we'll just use some Guassian blur. And we'll do the same thing with the shadow layer for our little chick. Adjustments gaussian blur. Ok. Now if we need to, we can duplicate that and make it darker. If it should be darker. That's one of the tricks I always do. If you, if you need something darker like that and it's light, and it'll just make it darker. And then you can actually just adjust the layer. So it's how you want it to, how you want it to be. Okay, looking pretty good so far. So now let's just put some light inside of the shell. So we're gonna go with this layer that we made on the tip of the shell. Will alpha lock that. And that will make a new layer above it. Will tap that layer and hit Select and then go back to the new layer. And I think I want to just use a little bit of this yellow and just make some nice light in here. So I'm me, I'm using my soft brush again. We're on a new layer above where we made this opening. And I'm just doing some soft circles in Psych. I'm doing it far away from where it is, but the edge, the edge of my brush, the soft brush, will slowly build more and more. Okay, that looks pretty good. So now it just looks like there's some light in there. And if you want to experiment, you can try add that might be a little too bright. Um, but actually looks good. What I like about ADH is it sort of gives us nice haloing. That usually looks really nice. So now what we can do is we're going to alpha lock our ladder. And we're going to use the soft brush. And we're just gonna, we're just going to lighten up the end. Maybe the first couple steps. Just to kinda give it, just going to give off the lightning little more light right on the steps. And actually it looks like he's walking into fire, which I guess isn't really that wasn't really what I was going for. I kinda just wanted to make it look like it was a light. But let's see, maybe we can change the color of that. So we'll go to that layer of the light hue saturation. That's kind of interesting for making like a nice pink color. Let's stick with pink, light pink. And does not like he's going to walk into I walk into the walk into the fire. So I'll go with pink. So now that we change that, we just have to change the colors on the ladder. Okay? And now we have to change the colors on our little guy here. Put some pink on his little loops when alpha lock the beak. And then we'll put some paths right on the eye. So we'll just use butter Blade Server. You can hear my fiancee. And actually, I'm gonna do a little circle and it's probably better. Okay, and I'll be back when it's a little more quiet to finish this up. Okay. So last but not least, I just want to add a little bit of atmosphere coming out of this little shell. So I use my soft airbrush and let's try to do it on this Add Layer. And a little bit of there, maybe I'll add a little noise. You can add a little noise in there. And let's see. Light pin little touches. If you want, you can do some windows here where there's some more light coming out and you can change the colors. You can make little creatures walking in or walking out. You can make like a little, a little a antenna or something. Let's see, Let's have some fun. Before we finish up. We use butter blade with a little round part coming out. And then what's, what's really fun about that is. Make it darker in little details like this. Copy them down, copy them like this. So I did this on a new layer. I'll even make it a little bit darker. So let me, let me change the hue saturation a little bit darker so you can see it. And then I'll add a Guassian blur. And then you have your little shadow. Things like that really, it really sells it and like using shadows and the self-identity. So much fun, I love doing it. And I'm going to just going to add a little bit more darkness underneath our little chick. So I'm gonna use soft brush. And I'm on the same layer is this shadow. But I'm just going to add a little bit darker, right? Underwear he's he would be touching the ground. So just a little bit darker there. Maybe we'll give him some light. It's a little lighter on this side. So maybe let's, let's Alpha lock our little chick here. Soft airbrush. And we'll just add some white to sort of represent the light coming from here. Okay, let me make a shadow a little bigger. And another trick. I see that the texture in the egg, if you want to have a little bit of that texture there. I'm gonna go to the layer here. And let's see if I can add, if I can merge these down. No, I don't want to merge them. So I'm going to just this little texture here. And I still have it alpha lock. I'm just gonna go to Adjustment loops, adjustment and noise layer. And just add a little bit of noise there. So again, I'm just using this, this layer. I just wanted to adjustments and then noise is here. And that just adds a little bit of texture to hear whatever it is that you use the noise for. A little bit of noise to our little chick to merge all this. Even the shadow. I'm going to add a little more, a little noise. So we're going to adjustments, oops, and adjustments noise layer. I'll add a little noise. There we go. Because our photo has a lot of noise in it, will merge the ladder. And then we'll do the same thing with a ladder would just add a little noise to the ladder. Here we go. Okay, that looks pretty good. And now I'm going to merge everything. Okay. I like that. And so if we wanted to if we want to adjust anything and get darker, more saturated, change the color slightly. Let's see, I think I know what I might wanna do. So I'm gonna make a new layer above. I'm going to use my selection tool. And now I'm going to draw a circle around our little chicken and the egg. Like that. I'm going to feather it about 29 percent. And then I'm going to hit invert. So we're on a new layer still. I'm going to hit black. Actually, I'm going to go with a dark, really, really dark red. And I'm going to bring that over. And that's so that's what happens. But of course that looks weird. So I'm just gonna use my eraser, my soft pressure ratio eraser. And I'm just going to get rid of that edge. No one likes an edge. Okay? So now it's nice and smooth going around. And I'm going to take this layer, I'm going to lower the opacity to about 60 percent. Now I'm going to check and see if we can get anything that looks cool. And I do this a lot. I just experiment. That actually looks kinda nice. And you can always take your eraser and you can always sort of dial back that vignette of sorts. Okay, I'll make another layer underneath that. I'm going to take this nice color here. So now I'm just on a new layer. And if I want, I'll bring the opacity way down on the soft brush and just sort of give this a nice, more of a nice glow. Just add a little bit more glow. You can experiment, see if you get anything nice caliber and looks nice. Looks really nice. Color Burn. Color brain looks nice.
12. Thank you!: So this was a long one, this was a long, long course. And I appreciate each and every one of you for hanging with me and John with me and just having fun. Anyone who takes my class has like I want you to see everything like that. The photographs are a big part of making this type of artwork work. You don't I mean, you have to take good photos. So I just felt it was necessary to really bring you in and let you know what I'm thinking when I take these photos. If you're gonna take my class, then I want to give you a mile. These are really fun. I really didn't have that much of an idea before I did the drawings. I would sit down before I recorded and sort of just do like a little test run. But I wasn't really sure what I was gonna do. So and that's a lot of times that's how I work. And you just have to be creative on the fly and make things work. Now that the tricky part is making it, making it into a tutorial and making it clear. So hopefully I was clear enough, Hopefully I was slow enough. And I tried to give a lot of examples because as some of my other classes, I think one or two comments about not having a lot of examples of things. And sometimes it's tough because I don't want the videos to be too long. But I decided to miss one to just see how it will be if I just didn't worry about the length. And I just kinda played around the way I normally would when I make artwork. I think one of the most important things to do is just play and have fun. And really, and really just get into it and try to make some happy little accidents. And once you do, it's just remembering those accidents. Again, I really, I'd really love to see things that you make yourself. I would love to see you do things from this tutorial. Please tag me and them on social media. But it would be really cool to see you take some of your own photos, then just be creative in your own way. I want to see what you come up with. Hopefully, what I did in these videos is interesting. And hopefully you'll take it and make it your own and develop it and make some cool art. Because that's what I really want to see this or I really want you guys to come away with is just new ideas and ways to make really, really cool. So again, I, I can't thank you enough. I appreciate it. I appreciate you guys. And I can't wait to see your art. Be sure to tag me. And like actually like tag me like an Instagram and Facebook, join my Facebook group. All of that fun stuff. And I'm not sure what the next class will be. This was kind of a long one, but I'll see what happens. I have some ideas brewing, so we'll see what happens in the next one. So keep drawing. And I'll see you in the next video. I don't know. I always feel like I should do that and my turn and draw, but I mean, I don't know. I don't have any pants on right now. Listening. See you in the next one.
 Dave Reed, 2D & 3D Illustrator - Brooklyn, NY