Transcripts
1. Character Design Exercises to SMASH Art Block! : What's up, guys?
Welcome Dave Reed Here, AKA drug-free Dave. And today I have a brand
new fun drawing class, a 2D drawing class. It's character design and it'll
help you smash art block. We all have our block. It's a big issue. It's annoying. I have it, I go through it, but this exercise
always helps me. So I'm gonna make some shapes
and then we're going to fill in those shapes
with character designs. This is something that
forces you to look, to think outside the box. It'll serve help you to think differently, to
create differently, to come up with different
things and not just draw the same old thing
over and over again. You can get bored with. This will help me draw
a new characters in new ways and think
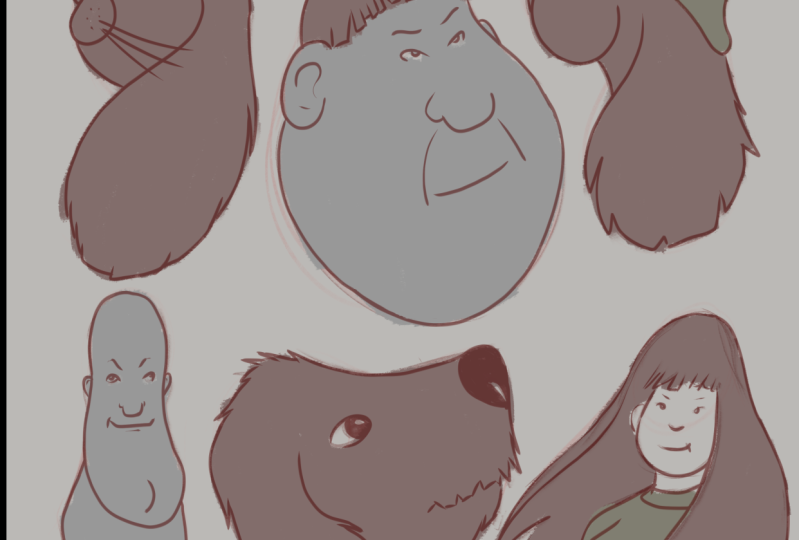
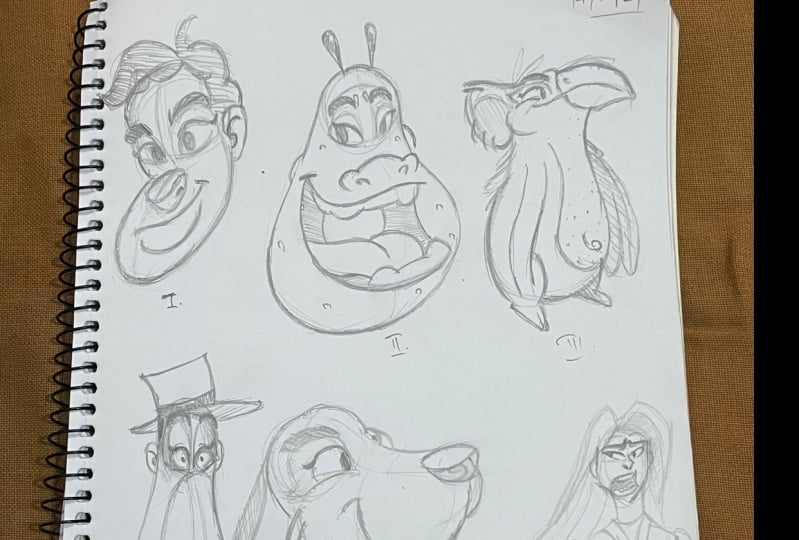
in different ways. So as you can see,
I did six shapes, very different, very
distinct shapes. The first thing that I do is, okay, I see the shape. I'm thinking bird,
I'm thinking dog. I'm thinking a girl
with long hair. I'm thinking a guy
with short hair. I tried to plug in
what my brain thinks of and tries to plug
in that empty space. And it forces me to make sometimes really
weird characters. But I like doing
weird characters. I like doing the Disney thing. I like doing my style. But then I also like doing these weird characters that
I can bring my style into. And that's, that's the key
with getting rid of art block. You just have to be, you
just have to be reignited. You just have to have
something that's going to that's going to ignite that. Luckily for you without
saying rightly, you just want something
that's going to boost your creative juices, boost your mind and buoy, booster and boot in, boost your thought
process and boot your butt back to business. Alright, so I think that's it. That's all I'm going
to say for this video. The next video is going
to be the class project, where I'm going to
tell you about what's required of you in my class. But of course you
know how I am doing. My class projects are. So let's move on
to the next video. Class project.
2. Class Project: Alright, welcome to video
number two, the class project. Okay, so there's two
parts to this class. And also this class is
going to extend forever. In a sense. Now hear me out. So you can follow along everything that I'm doing
because there's gonna be a lot of tips and tricks. There's a lot of ways that I opened up my brain
into how I think. And I want to impart that on you because there's just lots of little things
that I don t think about because of muscle memory. I just, I've been
drawing forever. I've been doing this type
of thing for a long time. So there's a lot of tricks. So you'll notice in this class
I'm going to pause and I'm going to go back
and I'm going to explain why I do certain things. I feel like that's the
most important thing with these classes and
that's what I love to teach, is why I am doing certain things and making certain decisions. So that's number one. After this class, I have
something in my teeth. So after this class, how many shapes,
what different kinds of shapes can you make? You can make a lot. You can make a ton, you can
make a thousand shapes. Then you have to make something
that fit in those shapes. And that's how you can get
yourself out of habits. And sometimes bad habits
and sometimes good habits. But it's good to break out of them and just do
something different. I want you to see things
the way that I see them because that's the only way that I know how to teach. So I want you to do that. And then I want you to just
make your own go crazy, make your own shapes, do
wherever you want to do. This is exciting. This
is the fun part of art, is just doing what,
wherever you want to do. Alright, so what else? Let's get to the next video. Let's get to the drawing. Make sure that you
download the templates. So I have my sketch shapes and I also have my
finished sketches. You can use them, you
can reference them, you can trace over them, whatever makes this
easier for you. However you like
to learn, however you'd like to draw with it. I just want you to
draw and have fun, and I appreciate you
being with me for class. Let's move on to the
next and third video. Yet the third video,
getting started. All right. I'll see you then. You can tell I don't I don't
script my script these. I just like to go off the cuff. That's just my style. Okay, cut next video.
3. Getting Started: So the first thing I'm gonna
do is just make some shapes. These shapes are already going
to be provided to you so that you can just use
these shapes to work from. Okay, so we have a
bunch of shapes. Now I'm just going
to organize them. I'm going to choose six of them. And then we're just
going to start sketching and we're going to see
what we can come up with. Okay, so these are
gonna be our shapes and that's the beginning
of the journey. Okay, so let's start
with our first shape, sort of like a peanut shape. And you really just
have to really use your creativity and just think about different shapes that
can go inside of the shape. They can sort of make something, make something
visually pleasing. And it will always work. You just have to
humanity with Humana to scrap it and cut and do
a few different types. A few different kinds, which
I might have to do here. But let's see. So when I'm drawing, see this first circle, I always think about
where I want the head to be and where I want
everything to be facing. So let's just say
that this is the, the head of the skull, the top part of the head. So I'm gonna do a line here. And I'm going to do a line here. So what that does
is it makes it a 3D object now that I
can, I can work with. So if that's the case, then this mid part would be sort of where the
eyes are gonna go. So I'm just gonna do a
kind of a light line here. And the nose would be
probably around here. So I'll just do like a light circle just to sort of give me a reference of where
the nose should go. So for the nose, I'm gonna
do shaped like that. And I do, uh, my, my nose is all I kind of look like that. Even humans, they
look like cat noses. But I always like this, this shape for a nose. Sometimes you can do the
mark for the nostril. But essentially I
made another shape. See the lines sort of
makes it, you know, I do think in 3D when I'm
doing, when I'm working in 2D. So now the next
thing I want to do is sort of like the eye sockets, like just sort of figuring out the section of the head
where the eyes are gonna go. So I'll just do another line here to sort of give me
a frame of reference. Then I'll make my two lines
underneath like this. And these circles. Notice I'm using, I'm still using these
lines, these center lines. So this is the center line. So if this is one eye
socket than the other ones, sort of gonna be
even to that one. And then we make the two eye
sockets sort of like this. And these eye socket lines like these are, these
are the sheets. So now, so now
let's do the eyes. So we do a circle there. I'm going to make another
little line here. Let me do a circle here. These are just sort
of half circles. But you notice
they're all pointing in to the center spot here. Okay, I think that
looks pretty good. Now you can just
add some details. Like I always do. I always make those
big eyelash thing is this is stuff
that I normally do. That's when your style
sort of comes into it. When you start doing things
that you normally do, you find that you just
like doing them in all your different
artworks for the mouth. So we see this angle, so the mouth should be. So here's the center line, although I'm making
the center line different since
the nose is here, the center line for this face is probably more about here. I'll just erase it just
because I'm explaining it, but it's not really that
important for the mouth. So let's do a line here
and let's make it go up. And we'll do a little
little cheek cheek action. Then if you want, you
can do like another like a lower lip just to sort of give it that
little that little kick. And then we can do
some eyes to another. I hear. Now eyes are tricky. This one you see is sort of in
the middle and then this one is sort of on the
inside part of the sky. So just, just remember that. But another trick
that you can do is, although I really like those, I will, you know what I can do? That's fine. Another trick that you
can do is just make a new layer and just
put it underneath. And you can do your eyes on, on a layer underneath. So let's say you, you have your character looking
a certain direction. So if you, if you make
a new layer underneath, then you can either move
them around slightly. If you want. Which always looks kinda cool. But it just gives you
that, gives you that that option to not be tied
down to eyes and just to work, keep working and
make sure they look good because eyes are tricky. So if this character was
looking off this way, then it would be, this one
would be deep over here. And you see it's not
completely circular. Since I haven't so far over. It's more ovular like that. Then this one would be the same, would be pretty slight
because you're not going to see that
much of that eye. So something like that. We can get back
to my other eyes. And I liked I can't. But we'll stick with these. You know what, I'll make them
make them looking at you. Looking at camera, I should say. We'll do one here. And then we'll do one there. I think that looks pretty good. So now we'll just
do some eyebrows just to sort of give his, his or her face a little shape. And maybe we wanna do, we wanna do a little
bit of upper lip. Just a little bit of a shade. Can do that. Maybe I just like without it. So I think that
looks pretty good. So now you always want to leave some space for the forehead. So we want this shape here
to be for the forehead. Got to have a forehead. You don't have to have
an x on the forehead. And see how and see
how with this line I sort of give the side
of the face some shape. So this is like the side
of the back of the skull. So now I'm just going to do
just some simple ear shapes. Can do it here. Kind of
an ear shape over there. And as far as hair goes, we'll just do some want
such curly hair though. Let's see. What kind of here do we
want for this character. Let's do, let's do
some curly hair. Curly here fits this character. Really curly hair. If it's this character,
let's use Disney brush. And we'll just color in
this hair a little bit. Okay, so now we have our
first our first face. As you can see, like I went through a lot of
different hairstyles. But, you know,
sometimes you just have to keep going and just keep
trying new things and so you get something that
you find that you like. And remember, we're
constrained to these shapes. So I'm constrained to this little bit of space,
but that's part of it. Trying to get something
that you like that fits into these these things.
4. Pudgy Alien Face: Let's see what we
can do with this. This shape will go back
to Disney sketch light. Alright, so I'm doing
the same thing. You can see I have
this circle here. So this is going to be the
front part of the head. And then we have this whole
rest of the body or the face. So let's maybe give him a let's do the line is sort of make where
the whole front of his face is going to be. So I'm thinking
maybe a wide nose. So I'm going to do
a wide circle here, which I might change. But I think I wanna do a, I think I might want to
do a big open mouth. I might look cool. So maybe I'll do the mouth shape first. So this obviously is
going along with this. We're making this
whole thing 3D. So this goes around the front and then when it comes
around the side, it goes up for the cheek. Let's make a little cheek here. So now we're just going to
follow this line all the way across or all the way
along the bottom. We're going to come up
there and we can just cheat where the other,
the other cheek is. Well, let's see. Let's cheat. So let's make some teeth. And teeth can be very
complicated as well. I think I'm very, very simple. I tried to keep the
teeth very, very simple. So let's do two lumps here. And then let's just do a
line across like this. Now of course you have
this line going through. You can erase it. Erase brush. So you can erase it if
that if that bugs you. So we have the two bottom
teeth they're in for here. What I'm going to start. So sort of the same thing, I just added a
little tip here and then just this curve and then this curve and I'll erase
inside the teeth as well. So now we have our teeth. Let's do a tongue.
So for the tongue, I like to do the
two section tongue. So something like this. Then I like to do like a circle like where the back
of the throat is. So I'll just put these lines
here to sort of be like the back of the throat just
to make it like clear. So this is all the
inside of the mouth. So I'm just going
to color this in. I'm going to color over
here as well because that's the inside of the mouth as well. And down here, we'll color this in other kind of
looks like teeth, but we'll make it the
inside the mouth. So this one, I want to
make darker because this is going to be like
sort of like the throat. So I'm using Disney
or am I using? I'm using Disney brush, which is nice and textured and you can
continue to go over it. It'll just get
darker and darker. Make these a little darker too. So that just sort of gives
like a little bit of depth, like it's going
inside the mouth. Okay, So what kinda
knows that we want? So normally I would do a circle. I'm just gonna do the top half because it just,
just feels right. So then I'll do some
sort of nostril shapes. Let's see how this looks. Like a little dinosaur
sort of character. But I like it. So now that we have that, so this is the front
part of the head. And I like to I like to sort of make the front part of
the head including the side. It's kinda, it's
kind of confusing. But here I'm going to come
up and then I'm gonna go over and I'm going
to come back down. So what this does is
it sort of frames out the head a little bit. And in here, in this bit
here within this circle, that's where I'm going
to make the eyes. So I always like to make this bottom line kind of
going to the nose. And again, if he has,
his nose is here. So we want to just
do a little bit of these would both be equal. Sort of do that eye socket. I like my eyesight gets
quite big as you can see. Maybe I'll just get rid
of this line and bring it down a little further down. So something like that. Now that we have
the eye sockets, then we can just make our eyes. So I'm gonna make sort of
like football-shaped eyes, almond-shaped eyes for him. And I'll do the same
thing that I always do. I make the top really
dark pink a little line above the eyelid. And I actually think
I might want to make these little higher. We'll just make the eyebrows,
something like that. And then you can do the
thing where you make a new layer underneath
if you want. Or you can just you
can just give him some eyes look over like that. So what the type of head
that he would have? Maybe he has he would have
like horns or something. Or maybe you just have like
little cute little ears. Maybe you wouldn't
expect cute little ears from this character. And maybe he has
little orange as well. But that's where the
fun comes into it. You can make any you
can mix and match.
5. Bird Face: This next shape, I
immediately see a bird, like a bird's beak, but I
also see the top of hair. So let's, let's first, let's sort of play
out this bird shape. So if this is the beak, will bring the mouth, sort of like that. So we can try that. You can try that out. We can make a little
line for the cheek. And then I would be
something like that. So we do this, the
I circle sort of resting right on this,
right on this cheek. So I'm gonna do the
line that I always do. Like so. And then I'll do the
eye right in front. So we'll do the eye socket. And eventually you could
erase this sketch line. But I always like to, the eye
socket is very important. The space around the eye, because that is, that
holds, that holds the eye. So I do like always
adding this sort of eye socket type shape. So let's make the beak can
be something like this. Looks decent. Need to do a little
nose on the beak. And this, what do
we want this to be? This conservative, be
like sort of plumage. Let's do so I'll do two little hairs
coming off like that. And then maybe with this, you can see I'm implying the hair or like,
even like feathers. But I'm just implying
it. I'm using this shape and I'm just implying these these feathers. Okay, so we have the back of
the back of the cheek here. So maybe we'll give him
some shape like that. I'll give them a
little belly button. And so maybe his
He's little babies, little hand feathers comes off like that and we'll
give them another one here. Sort of like this. Maybe he has really stubby like these little stubby
legs, something like that. We'll do the other eye
on the other side maybe. Since it's on the other side, I'll just make it darker. Same thing with this leg, the forelegs. So
I'll make it darker. Same thing with this wing. Anything on the far side? Let's make it a little darker. And then maybe the inside
of his eye socket. It's a cute little bird. But just to show you the other, the other shape that
I was thinking. So we'll make a new layer. And I'll just do
this one quick since we've pretty much
finished this one. But let's say that the
head is about here. And so let's say we make
noes sort of like that. And I'm gonna do the nose slower because I know knows this
can be kind of difficult. And for me it's sort of
muscle memory when I do them. But I don't wanna I
don't wanna do that for, you know, since I'm
trying to show you guys how to do certain things. So the thing that's important about the
nose is the center. So this is the center. A good way to do
it is to just make a circle with the
shape of the nose, even if you want the nose
really, really big. This. So you make that circle and then you make the center of that. So this would be the center you want to make everything
sort of think in 3D. So this is the top. So if this is the
top than the other, one of the nostrils
might be here. And the other one,
this is the top. So the other one might, it
might show a little bit here. And this part is the
underside of the nose. So that's why I always do
this sort of line here. You'll notice when I do noses. So I drew this line here that makes the
underside of the nose. And you can now go back
to Disney sketch light. You can even sketch this part
of the nostril and darker, but this is the
underside of the nose. So now that we have
that, I guess we'll keep it and since I
made it really big and we'll make it let's make
his mouth pretty small. Since his nose is so big. Give them a little smile. Maybe we'll make,
make his mouth open. Click that, and then maybe we, maybe this is actually hair. So obviously it's a
very weird shapes. So I'm just going to same
thing I did with the bird. I'm sort of implying the hair. And notice how I just sort of
turn it in that direction. I just sort of alternate all
everything is sort of in this direction which closes
that off, not closes it off, but it just gives you
the impression that all of this is coming
from the same direction. Same thing here. And maybe his eyes like maybe it's very slanted
eyes, something like that. Something like this. I can do maybe a few little
more hair plumes on top. And you can do ears. I'm gonna do the
ear shape again. Because again, a lot of
times when I do ears, I do them really fast. So for ears you want to make
sure that sort of right at, you want it below the eyes
or you want it too high, up above the eyes. Just two simple shape
like this, not really. A circle comes out a little bit and then
it comes a little bit closer here than
I do this little, that little nugget we
have in our inner ear. And then I just do this line. So I keep it very simple. I don't do I don't go
crazy with the eyes. And also don't forget that
you can move things around. That's the great thing
about digital art. If you want to try different areas of the
mouth, where the mouth is, you can always move them
around and just be creative. You can make them a really
small nose, really big mouth. But we already did
a big mouth here, so we'll leave we'll
leave that there for now.
6. Long Face: Let's work on this shape here. So this is a very long, obviously very long face. A lot of these you
can sort of get away. It's like Timmy,
these look like hair. So we'll see, we'll see what we do is what
we can come up with. So let's start out. I think I'm going to
make a really long nose. Actually almost looks like a really big nose, to
be honest with you. Um, oops, what did I do? Okay, so let's figure
that this is the, this is the skull here. So this is always my anchor member of the
circle is always my anchor. So let's do the, let's do the lines. What we think we want the
front of our shape to be. Something like that. So it does look like a nose. So maybe let's just try
to accentuate that. So instead of this, the
circle with a wall, it's still a circle, but it's
a very elongated circle. So I just made this
whole other shape here. Inside of our shape that
I think I want the nose. I think I want that
to be the nose. So let's see if this is
the underside of the nose. Because at the
bottom I always put the underside of the nose. And maybe the, maybe
this is the the nostril. So this is the nostril
and maybe we'll do, always do that little
nostril shape there. So for the lips, I'm gonna erase a
little bit of this. I'm going to bring this
under see this line. This was for the whole head
but since it's for the nose. So I'm just going to
bring this under. So it's almost like the
nose is going under. So that's, that's
the sort of 3D ish, like when I, when I think
about things in 3D. So this is the line
that's going under. So and also for the nostril. See how I make this
whole bottom plane just by adding this line here. I make this whole bottom part
of the nostril and I use Disney brush just to sort of make it clear what
I'm talking about. I'll make this
bottom part darker. So it sort of gives, it sort of gives another
dimension to the nose. And it really, really makes, it really makes a big
difference when you start thinking about and
adding lines like that. It might be, this nostril
might be over here. Since it's further back, since it's like the
back side of the nose, then i'll I'll call, I'll
shade that in darker. Okay, So again, this is our
anchor, anchor point here. So we want the eyes. Again, they always
come to the nose, to the right, to the
bridge of the nose. I'm bringing this
out a little bit more because I want
them to be even. And I'm just going to make
a nice curve around here. This is gonna be our eye socket. So let's make, let's do a little bit of a
different expression. So I'm just going
to do two circles. Again. I'm using this
middle line to separate these so that they're
sort of even. Now I'll go and do my
thing that I always do. To the other line, coming
off. Sort of like that. And let's make the inside of
the eye sockets like that. And we'll do a little
eyebrows, just very simple. Eye socket line,
eyebrow line, like so. And maybe we'll do
some eyes like this. Okay, so for the mouth, I kinda feel like I do want
to stick to the shape, but well, let's
just stick to it. So let's say we have
this shape here. And I'm going to bring it
around almost like it's coming. Our lips sort of extend
from our nose coming down. So I'm going to do
that and then I'll do, I'm gonna do a shape
underneath like its teeth like that. And I don't even
know if I want to if I want to finish
this like I could finish off the shape and just sort of do
something like this. If I want to add
onto this shape. Which is, which is fine. I kinda like those teeth, but in the spirit of the class, I'm going to try to
stick to this shape, stick to what I've done here. So maybe I want to just use this little space
for like a mouth. So maybe I'll just, let's see. Let's see how can I, how
can I use this space here? Erase that line too. So I'm gonna, I'm gonna
erase just to give me as much or actually it's on a different layer so
I can't even do that. That's okay. We're going to we'll
get through it. Maybe we'll just make a really
tiny little mouth here. We'll make a little tiny mouth. And maybe we'll cheat up
here and we'll add some, will add something, Let's add, Let's add some like
a hair shape here. Maybe some ears. So something like that, which
is super weird looking. But I kinda like it sometimes
you get weird stuff. But let's try something else. Let's try. I kinda like that. I kinda like those
teeth that I did. So how about this? Let's use this shape. Let's cheat. Let's make it a little wider since
we add this extra space. We'll do what we did before. So we'll make this and then
we'll and then we'll do a mouth sort of like that. Can do a lip roughly one. And then maybe we'll do let's make some teeth in there. Super weird. But I actually like, actually like really weird stylized like
features like that. So it doesn't really bother me. I think, I think
it's kinda cool. Maybe do like really big
teeth, something like that. And then we'll do up here
will do little ears. Same ear-shaped
that I always do. Then maybe we'll do a hat. Maybe we'll maybe
we'll do a hat. I always do the same way. I don't I don't usually do them just exactly super straight. I always put a little
bit of a curve in him. He just come around the back. Like so. And maybe we'll
just do something like this. Maybe there's, maybe
the hair is darker. And then I'll use Disney brush
and sort of color this in. And also color in the the top part of the eye socket because that's always like sunken
in more in the head. We have a weird
shape, but I like it. I like it.
7. Pup Face: Okay, so for the next shape, I really see a dog face. So this is obviously our anchor here and
make a new layer. This is our anchor. And first and foremost,
let's do that. Let's do the nose. So a lot of times
for my animal noses. Let's first think
about triangles. When I do them. Even though this is, this
is more of a diamond shape. But always think
about triangles. What I'm doing when
I'm doing noses. So let's do that again just
to kinda show you a little bit more. Another way. So this is, this is the
thinking behind the thinking. So when I'm making, if
I'm thinking of a dog, so if this is the, this is the muzzle, Then obviously the
muscle is gonna be sort of kind of like this. This is sort of like
the head would work. So like if I'm, you know, I always think about how
everything would be. This is the side of the head. So i'm, I'm, I'm
making it a 3D space. So if I'm doing the nose, the nose would be like this. It would come off like that. But then it would
also come down. Then it would come back up. The nostrils would be dogs. I think dogs might have
like mushroom type noses. But I just want to
show you why I'm sort of thinking about
this triangle shape. Because you always
have to think about all the planes like this, this front section,
decide section. And I've been drawing
for a long time, so I think about those without
having to really show it. So that's why I'm just kinda slowing down and doing a lot of these little tricks to sort
of show you how I think. And again, this is our base. And another, another easy trick. Another easy way is to make
the muzzle by using a circle. So again, we have the head
and this will go like that. So let's just do an easy sort of diamond shape for the nose. And then here, go like this. And we'll do a little, we'll
do a little mushroom knows, right? I think that's how it is. For dog. They have little mushroom noses. Do the middle part of the nose. I'm bringing those back
a little bit further. So something like this. And to make it even clearer, I sometimes I shade the bottom, the bottom part, just to
kinda show that, that depth. So go back to sketch light. And so here we'll make it, I'll make another little
thing here for the mouth. So I'm going to use
this circle for the know where to put
my rest of my cheek. So I'm gonna bring
this up like this. And I'm going to bring
it out like that. Notice I bring it almost up
to this circle, this base. So we're gonna do
the same thing with the cheek that I always do. Come off like that
with the cheek. Now that we have our cheek, we can make our eye socket. Notice this little, this little shape that I do with
the eye socket. You can just do a
semicircle around. But I like to do
this little edge. I think I got that from like Aaron Blaise or something,
watching some videos. But now I just do it
all the time because I think he used to do it
for his lines and stuff. But now I just do it all
the time. I do that. So that's the eye socket. We have the cheek here, which is gonna make them very happy. And so notice we have
this round eye socket, so I'm going to match
that on this side. So it sort of looks
like the same thing. Even though this
is the head here. Want to have that same thing. So here's how this is all cheek. So maybe we'll, we'll sort
of imply that that's like, you know, some hair coming off. And dogs have like these, they have like black
like lower lips. So we'll make this
really thick here. And okay, this looks
pretty good so far. So now let's just add an I O, we should add an ear to, we definitely should have ears, but there's no space for years. Maybe we'll give them
a little ears. Now. We'll just, we'll just we'll save them the dignity
of giving him such small ears will
give me ears like this. So normally we would make
the back shape of the head, but we could, we could always do that if
we make the eye smaller. So maybe let's try that. Let's give, let's, let's make, let's make his eyes sort of
small and towards the front. I'll do my thing
that I always do. And might be a little too. Let's see. It doesn't look too bad. And I just wanted to extend
the back of his head a little bit and will make his
ears sort of come down. Like so. Just so you just really
Haley Haley's has some ears. Notice sometimes I'll
just do the same shape, but I'll just put it in a
slightly different position. And that's the
beauty of sketching. It doesn't always
have to be the same. So maybe we'll make the other eye and we'll make the other. I feel like it should
be a little bit lower. So that should actually
be around here. Maybe we'll do the
other cheek like that and give them a few little pops of hair there. So something like that. I like it. And we'll color this
whole know since his nose would be darker anyway. If you can color the
whole thing and we can just color the bottom
one a little bit darker. And of course we'll do
the inside of the top of the eye socket. And even this half, we can do all this half
a little bit darker, equal to the inside of the
ear, a little bit darker.
8. Warrior Face : Not least, I sort of
see this sort of grand, sort of like a, like a warrior. So let's make this the
center on our base. Let's do this line will
sort of give us the eyes. And let's do a nice
little semicircle that'll be the top of the
eye sockets like that. Let's give her just
a triangle nose. And I feel like she would be She's like a warrior
or something. So we'll do the math.
We'll do the mouth open. We want her to be angry. Then we'll do we'll do like
this, something like this. And I really use these, the eyebrow lines to really shape the eyes and to really give that
expression in the eyes. So let's do another
sort of line, sort of pointing towards
the nose like we always do. We can make the underside
of the nose here. And we'll sort of just kinda
color that in a little bit. So since she's got
this expression, Let's see what do
we wanna do here? Let's make the eyes very
slanted, very closed. I'll do the same thing. Really thick eyelash. I'll make these stick to,
these will be the eyebrows. And we'll do this little
line across just to sort of give this some, some space here. And I wonder looking
this way, I think. So I'll just make both
the eyes at the corners. I for both the pupils
at the corners, teeth. I'm going to keep it simple. Round there. Maybe we'll make the too little, the two little bits like so. And the tongue will just do a little, little bit like that. We don't have to go too crazy and we'll just color in
the inside of the mouth. And so for this face, I'm going to keep it
really, really simple. So we'll do straight lines coming towards the
bottom of our circles. So straight lines like this. And then I'll just
angle it out like that. So for the hair, since this really
looks like hair, Let's do, let's
do a little neck. We'll do a little
neck like this. And then we'll do so we'll
turn this into, let's see. So I'm gonna do these
shapes like that. And what's nice about this
is you can sort of make it. So I probably didn't even
need to put this line. Let's start again
and let me start. Let me do it slower. Although I hopefully
you guys are loose enough to
make you can just sort of like play
around with this. But let's think about this. So her forehead would be here. Let's make, let's make the
lines for her forehead. So this would be the forehead, which means that the hair would be starting in the middle. So I'll do a line
coming off like that. I'm going to do a
shape here like that. So I've just
accentuated this shape. So that's the first shape. The second shape, I'm going
to come up like this. It's going to come
down like that. Maybe we'll make
another line like that. And then maybe we'll just
go right into the shape. Or maybe we can just
go right into it. Here. We'll just make some
lines that come off from that front section and then
just go over to the back. And notice I'm not
even finishing these because it's a lot
of it is just implied. So don't think that you have to finish everything and make it perfect. These are sketches. These are the
beauty of sketches. So up here, again, here's our center line
where the hair starts. So I'm going to come like this, make a really heavy line. So this is gonna be the shape. This is all underneath. So this can all be underneath. And let's use Disney brush
for anything underneath. I'm just going to color
it a darker color. Just so it shows my point
of the, of the depth. And even you can do a little, you can do some
strands that come off. Can probably just some strands
that come off like that. Now here we have all this hair that we can just take
advantage of like this. And just want to follow. And maybe let's see. Like she would have some sort
of armor or something on. So let's make like this. And I think this is,
I think this is cool. And we'll do some ears here. And maybe like here
it will just imply some arms with some
armor on them. Something like this. I'm going to include
all these too. So you can obviously, if you want to do what I do. But the most important thing for these things is to really get you out of trying to
maintain certain rules. Because you can think
about, you can think outside of the rules. And sometimes doing
things like this. You'll make characters
that you wouldn't normally make if you're
thinking straight, hearing me, like if you're
just thinking of them, you probably wouldn't make
characters like this. So it's a good place to
sort of warm up and to get your mind loose and
get your mind ready. I love doing things like this. This is especially good with like when you
have art block, just make shapes and just make characters
in those shapes. I think it really helped. It's, it's really fun. Allow yourself to make mistakes. Allow yourself to just scrap
it and just start again. Don't be, don't be afraid
of just just starting over, starting from scratch until
you get something you like. But yeah, hopefully this was
fun. Hopefully you liked it. I really had a good
time making these and I hope that I
didn't go too fast. Just stay loose with it. Stay loose. Try things. Try to make different shapes than
I and I've made. Make your own shapes. There's so much you can do. But I just wanted
to do this exercise because it really helps
with our block and it really helps with
just loosening up your mind so that
you can be creative. And you can just start
thinking more outside the box. Because sometimes
we can get really, really locked in and we can really, really
pigeonhole ourselves. So it's good to every now
and again step out of that and just do
some loose fund. Our work.
9. Thank You! : All right guys, thank you so
much for taking the class. I really had fun drawing these,
these character designs. It's a challenge if you're
not always getting like commission work and
professional work, sometimes you don't really
get challenged like enough. You can get bored and you
can get tired of drawing certain things and you
can get frustrated. But you don't really
get challenged. And this is a way to sort
of challenge yourself. And this is a way, even, even for me, it's,
sometimes it's a challenge. Sometimes I'm forced to
cheat and make it the best that it can be an honestly,
it just is what it is. Sometimes it is what it is. That's, that's where your magic comes into it as the artist, sometimes you have to
make executive decisions and you have to
do we have to do, to make the art look, right? I hope you had fun with this. I hope that you were
creative and I hope that you picked up some things that I do. And I hope you picked up some of my habits because that's how that's how I got
to where I am today. That's how I learned.
I have to pick up what people are doing when I watch other artists that
I really like, I pick up things
that they're doing, which I'm sure you've
heard in this class. Even the little,
the little I think that I did that I got
from Aaron Blaise. I take things from
other artists, artists that I like
use what they do. That's how, that's
how I learned. I laser-focused on
every little thing that they're doing,
why they're doing it. Even if I can't figure out
why they're doing something, I might do it ten
times and be like, Oh, okay, this is
why I like the way this looks because sometimes
it's just very small things. But anyway, I don't I don't even know what I'm
rambling about. I appreciate you taking
the class. This was fun. I hope you got
something out of it. I appreciate you guys. I love that you're
here with me drawing, please upload them to class. I would love to see them. You can say what's up to me on Instagram, drug-free to aid. You can say what's up to
me in the Facebook group. Also, make sure you
follow me on YouTube. I do a lot of live videos, 2D work and 3D work. Because I love 3D now. I just got into it
last year. I love it. But I also do drawing stuff. I also, I still draw animals. I do lots of stuff
on YouTube live, so please catch me
there and then you can chat with me live. So that will be fine. Alright? So as always, keep drawing, keep sculpting, and I will catch you all in the next video. Peace.
 Dave Reed, 2D & 3D Illustrator - Brooklyn, NY