Transcripts
1. Trailer: Hello there. I'm Lizzy on dime, a polymer Klay artist and illustrator on In today's class, I'm going to take you through the process off, making a cute koala character with polymer clay. I'll be showing you how to prepare your work surface all your workspace and I'll be taking you through each elements individually so that it's a nice, easy process. Really ons perfect for beginners. The principles off the sculpture can be used to make a whole host of different animals, actually, so feel free to get creative. Andi, I hit you. Enjoy.
2. What you'll need for this class: So in terms of what you need for this glass, I'll be using some great play. Some black play some whites on a small amount of pink for the Kawana. But it's on target to you. If you wanted to go for a slightly different character design with different covers found, in fact, that encourage ons for the okay, I'll be using some green play something a dark peach tone along with the lighter peach tone . But again, you can use whatever colors you like, really, And in terms of tools, I'll be using this little lot here. So I've got a tiny cookie cutter. It'll here in a nice shape on acrylic roller. Or you can use the past the machine. A medium size bowl tool. A needle toll, a blade cutting tool on some Kraft wire to uses a basic amateur had also recommend that you use a suitable work surface that's non porous, so I'll be using as well ways my glass sheet here
3. Preparing your work space: before starting any projects with polymer clay. It's really worth investing just a few minutes of time into cleaning your work surface and you tools, so I'm just using a wet wipe here on some kitchen roll. It really helps in terms off any color contamination with clay, so it's always worth just investing that little bit of time. It's also useful just to have a small sacrificial piece of clay arounds just to go over your work surface to collect any tiny pieces of debris or dust kicking arounds on. And I'll just roll that around my hands as well, just in case.
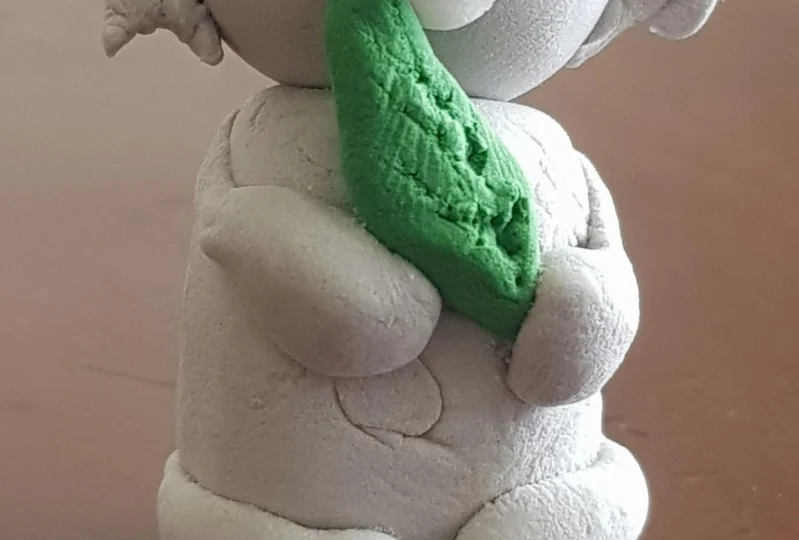
4. Making a bouquet: So if you like your koala toe, hold a okay. It's probably best to make it before your co Ana. Just so you've got it ready to go when you need it and had a slight disaster while I was recording this in that the overhead footage corrupted. So I actually made two bouquets for this particular part of the class if you wondering why they look a little different at times. But I'm going to start off with the pink play on, and I rolled out her nice and thin, and I need to create two strips of clay and I'm very gently pulling the ends off one of the side. See, huh? So it's nice and thin, and then you can begin to roll. It's like so and this is probably the easiest way to make flowers or roses. But, sir, there are numerous ways that decodes interpret your okay as well. So I need to make two of the pink roses, and obviously you can choose whatever color you like, really. So I'm going to move on to a dark peach toe. Andi. It's the same process again, really. Just two strips of clay. And again, I'll just curve them round, like so hands. Lastly, either lighter peach tone here and again. Just make two of these. So now fade my six roses. I now need to creates five leaves with my green play here. I'm using a tiny cookie cut little, but because they never come out beneath test, I'm just kind of meeting them off with my hands. Really? So now I need to build my okay. So I just attach the flowers Kind of randomly, like So I'm trying. Where possible? Not toe. Have two colors next to each other just for beneficial interest, Renee, but obviously the lighter peach tones until have to sit together, like so. So I'm gonna press those all together with my fingers, and I'll take the end off with my blades. Cutting tool there or a scalpel would work now to make the bottom look a little neater. I'm using some of my spare agreeing play here, too. Great. Just a little strip to go around the bottom of the okay. Just so you don't feel the color through any, just squeeze that together and again, I'll just take the end off, and now I can place my five green leaves around, Okay? And I'm just popping each one between two flowers, so it looks nice and needs, and I'll just press down firmly. So that's all done. Now on. I'm just gonna place that to one side while I made my koala.
5. Making the koala's face: I'm gonna be making obviously a Graco. Ana. Andi, I've ordered in this dolphin gray, which I'm not used before, actually are usually mixed my great colors. But this is really quite pretty, actually. Yours quite surprised. So I'd recommend that's so I'm using just the tiny sacrificial piece of clay here just to again go over my work surface on my hands. So now I need Teoh roller ball of play into a kind of koala head shape, like so ons with my medium sized portal I need to make just to eye sockets like so ons for the Kabbalah mouth. Got some white clay here. So I'm making a very basic semi circle shape here for the bottom of mouth hands. Just the very short line of play here just to give over for the top lip. And it might just take you a few attempts just to get the precision that you like. So I need to make a darker shade of clean off of the eyes ons for the Kuala snowshoes. So I'm just mixing some of the dolphin gray with some black play here, and I'll start by making the nose just pop down like so I'm not gonna press down to phone me in case I need to move its want to the eyes of situated. So for the eye sockets are need to make to small balls of clay. I was just position those, like so on what? You're happy that they're fairly symmetrical. You can go in with the old medium size bolt hole again, just press down. So now any just some whites Pieces of clay for the eyes. I think by using the darker shade of gray around the eyes, he asks more of like a cartoon effect, Really, almost like it's been drawn on on just that in some tiny pieces of the dark grey play for the peoples. I say we can, Officer, you might use a completely different character design. So if you wanted to add in some you know, some eyebrows, you could do so like so again, it's completely down to yourself. Ready? I don't think I'm gonna use them on this one, however, So now I'm just gonna be gone to the years. So are circular piece of play here on, so I just need to ensure that it's nice and clean. That's always the cleaner you are with your work The chances of the kind of Nieto sculptor the end Really? So I just need to cut this straight down the middle and I'm gonna add in just some details . Like so with my blade cutting tool, You could do this with a scalpel. Actually, if you've not got, say at all like this stands on with my needle tool, I'm just going to go into the creature's here just to ensure that they're nice and needs to reduce the chances of the breaking or cracking during baking or afterwards on. You can also ask some detail in a while if you like. So I'm happy with the years so those can be attached to the side of the koalas head like so it's entirely up to you if you wanted to use a thin craft wire here just as a basic armature to attach the ear to the heads. But I won't bother today I'm just gonna try and rely on pressing down firmly. Really? If for any reason your ears did fall off after baking, they could always be attached with a tiny amounts of epoxy glue. I can't diet or such like and I think to contrast the gray, I'm gonna have to just a couple of tiny pink cheeks here. So there he is on is pretty happy with him, Aunt. As always, it's really good just to go in with what wiped at the end of a project's before baking just to ensure that the piece is my sin clean and it's free of any debris. Miss polymer clays kind of renounce for picking up all sorts of airborne fibers, etcetera. So now the faces done, I'm just gonna place it to one side. Wanna work on the body?
6. Making the koala's body: So now I need to move on to the Balti. So at this point, so I'll just make a very basic our body shape, really with the Dolphin. Great play. Andi. I'll use a wet wipe here in there to ensure that the play is nice and clean. As for this model, I'm going to make a very basic armature just to ensure that the heads attach is really well to the body. So I've got some craft wire here and any fairly sturdy craft. While Teoh you could even use a cocktail stick if you haven't got any craft towns. So it's just a case of just popping the graph, wiring both pieces ons for some extra security. I tend to use some liquid female as well, but that's entirely found yourself. Don't worry, if you haven't got any times and again, I'd recommend just keeping using a wet wipe. One of you see any debris that shouldn't be on your piece. So now I need to make the arms on the Lexx for the koala, so I'm just making some very basic shapes, like so, until just attach the next first, like so just wrapping them around the side of the Kabbalah. So now it's time to add to the okay to the koala house. This is my original. Okay, on that just pops onto his little belly, like so always chest. Really? And I'm just gonna add on the arms, like, so pressing and quite firmly, actually, So that, sir, everything feels nice and secure. And again hope going with a wet point just on the back here on day. Uh, it helps this move down the base of the arms and the legs as well. And again, it's always worth investing as much time into cleaning. Your peace is possible on. There we go. I'm pretty pleased with him on. Yeah, I think he's ready to bake.
7. Baking your sculpture: So now your little provider character. It's already to bake, so I tend to use a bacon sheets that I use purely for the purposes off polymer clay baking . As you know it's not good Teoh to mix up your bacon sheets with those used for the cooking food as well on, and I will say, use parchment paper. It's keeps your level separate from your bacon sheets. Uh, so you know it doesn't stick to its after baking on dancer. Yeah, At this point, you'll need to refer to your own brand of polymer clays bacon instructions.
8. Using gloss: So now my Qala is all better calls. I think I'm gonna want just the tiny amounts of scoping plays just to the leaves of the Okay. You could fossil the flowers if you wanted to, but I'm just gonna keep it Leaves today it's often useful to use two coats of sculpting clays, just in case you miss any areas and I'll just do his cheeks as well, I think.
9. Conclusion: Well, I hope you enjoy that on. Do you feel a lot more confidence when it comes to making your little koala character on? Remember that the principles can be applied to make a whole host of different animals. So feel free to get creative. Also, I'd love to see your creations. So by all means, lever an image down below. Who, Andi. I'd also be really keen to hear your feedback about this class to. So by all means, feel free to leave that to. And I hope to be back with another class soon. Take care. Bye bye.
 Clay Disarray, Artist & illustrator