Transcripts
1. Introduction: Hi, Melanie Heflin's animator. Welcome to this class. In these videos, I will show you how to quickly start choosing to be paid animation 11 and making your own handrail animations. I studied in an old school making animations and video games, and later I worked at two pain development, giving trainings to students and animation studios about the software. The class is made for. Anyone who wants to animating TV, paint animation and make Kendrell traditional like animations. Once you've gone through all videos of this class, you will be able to make your own hand drawn animations using the basic tools. The project of this class is to make a small animation of a bouncing ball, which will become a bouncing animal or anything that you can think of. And we walk you through all the steps to make this animation from the understanding of the interface to the export of the final animation. So let's dive right into Mr First Lesson
2. Before I Start: before I start, let's have a look at some settings in the preference panel of the edit menu. You can also open this panel with Shift D in the general tab. You can set your language, but make sure to click on OK and restore the software. Otherwise, the changes would not apply in the tablet option. You have to parent is winter an ink. Use the winter option or any other kind off tablet that uses the same technology. Use the ink sitting if you have a Windows tablets like, for example, a Windows surface that uses the Windows Inc technology. When you use the winter mode, the sub pixel option allows you to have more precision. When you draw, however, it disables the right click, so I would not advise you to use it. So this is what I work with. I have HP Spectre 3 60 a welcoming Open and the Microsoft Foldable Key Bold and because of recent windows of dates, I lost the right click into me paints for the Windows Inc mode. But what fixed it was using the wind up driver, which you can find easily 09 overwrites. The Windows Inc mode in TV paint and allows me to use the right click again, which is important because there are tons of options which you can get with right click. Most important, one for me is to zoom in and out with the right click using the button off the stylus. Maybe the most important thing you have to do before working with TV pains is to set up the auto save by default. The auto save is inactivated, so I advise you to activate it and set the number of minutes you want between each photo safe. I said it every five minutes, but you can set it to 10 or 15 minutes if you want. The multi backup is useful if you computer crashes and corrupts your file so you can always go back to those backups. If you have a serious issue with your file, I advise you to set your multi backup directory in the Project Safe Directory because if you set it to another directory, then it might not work very well in the display tab. You can activate and deactivate the options to get the interface that you like. However, I advise you to do that after having uses software for a while. So then you will know what you don't need and what you want to keep their just so you know that you can disable the drawers in the left and rights and change the display of the timeline in Salon. In the interface top, you can change the resolution scaling. If you think the Aikens are too small or too big, you have three different sizes that you can use and just like for the language you will need to to Greek on Okay and restore the software for the changes to apply. If you wish to personalize the interface, you can change the color scheme to any colors came available in here. I have many because I got them from the TV Paint Forum, where the users can share some contents with each other. So if you want to find more color schemes to go to the TV Pain Forum in the topics questions about TV paint, content sharing share your interface. Look, you can change the type of fire request so you want to use by default. It uses the system fiery poster so you can also use the TV paint fire requester, which looks like this. So if you like the way it looks and the way things are organized there, you can choose this by requester. Otherwise, just stick to the system fire requester. In the start up tab, you can set how the software behaves when it opens by default. The salt of configuration. They said to remember last year's configuration, and I advise you to leave that option checked, because then every change you make in the interface will be still there When you open this software again, I like to use open last use projects at startup because then I don't have to look for my file when I start working. So now that I've showed you the main perimeters we needed to see before starting working, let's have a look at the shoulder cut panel, which you can access by clicking on edits and short cuts and also by pressing control K. So on the left you have all the shortcuts available on your keyboard that can be linked to tools and features of the software. You can see that some of the shortcuts are already assigned, but you can change everything that's on the list. The only short cut you can't change is the old case. So in the search bar, I can type the function I want to sign. So here I would look for the razor to, so I just type in the Rays. So here in the tools option, isolate a razor. So let's say I want to assign it to the E, which is at the top off the list on the left. So I select the E, which is already assigned to twos. Option next. And when I have the two options selected, I click on the sign and then on. Okay, so that's strides. I'm gonna draw something, and then I press eat and I get the E. Raisa. So now that we've seen the main sittings, let's have a look at the drawing tools in the next video
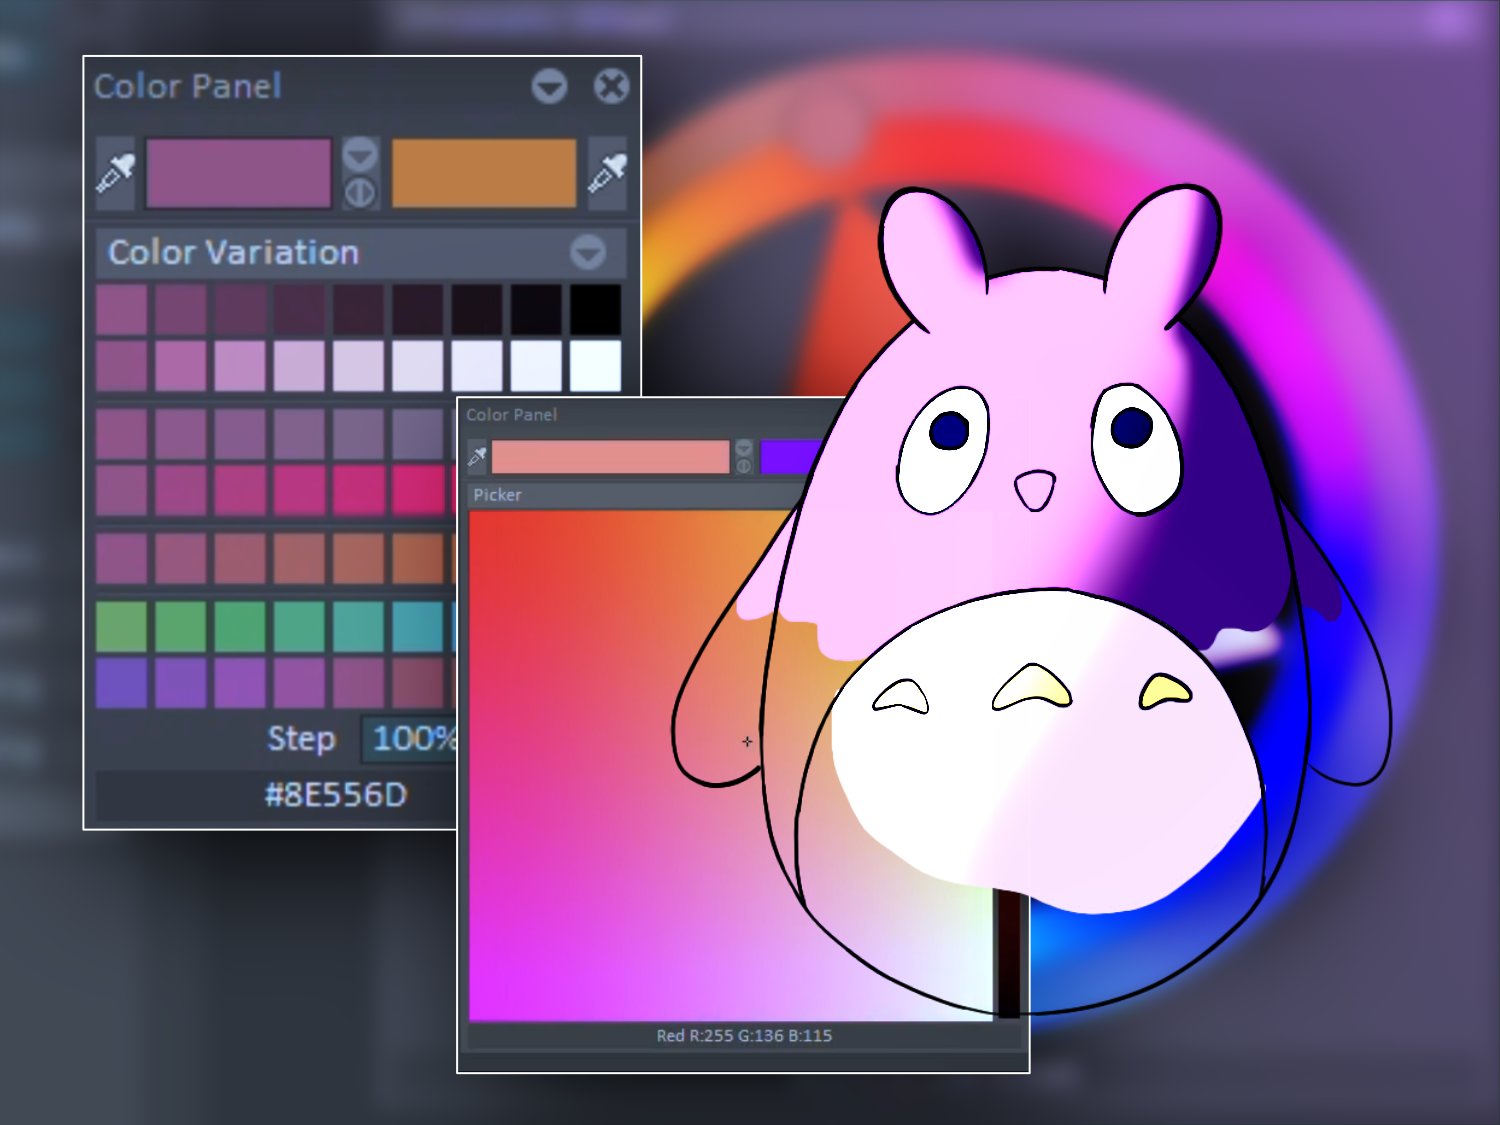
3. Drawing Tools & Shortcuts: before she knew the growing tools. I will tell you about navigation. Troll cuts Keep all too pressed to pan around your workspace and use old and right click to zoom in and out. You can use the right click of your stylist for more convenient assuming on a wacom tablet , just press old and the right click of the pen and only Khobar over the tablets. But on the windows tablet, you will need to touch the screen while you press old and the right click at the same time . You can also pan with the squirrel balls at the bottom and at the right of the workspace. You can also use this button to burn around freely. If you can't use your key bold, the button right next to it allows you to rotate your workspace. You can also use control and old for the rotation right click on the same button, jury said. The rotation. You can also press the answer key if you have it on your key. Bold. The plus and minus buttons allow you to zoom in and out as well as the arrows on the side, and you can see the zoom value in the green rectangle area. The navigator in the top bar can give you another way to pan around and zoom at the top off the left drawer. You have the main panel. You can change your drawing tools. Making long click on the tool will get you more options so you can get a free hand. Strokes, lines, tangles, ellipses busy. Er's the feeling tool. The cutting tool allows you to get a form that you've made and use it as a brush. Use this girl beneath to erase everything in your image. This option allows you to go back to a brush that you used before in this case, the pen brush. The select tool allows me to isolate apart off my drawing and raw pixels only inside this area. And if I use the planning tool, I will only move the selected area. If I make a long click, I can see other options along with the planning toe. The transform tool will allow me to resize. My shape on the small handle here allows me to rotate it. The perspective tool allows me to move freely that handles off the shape in order to create some perspective effects tools like perspective and transform need you to apply them. If you do not apply them, then the changes will not take effect in order to apply. You can also press the return key when the change is not applied. The edge today's red and when it's applied its green. In order to clear the selection, you need to make a long click on the selection toe and taken clear selection. Note that depending transform perspective Tools can also be used without selection. If ever you want to make a change in your line, you can use the warp two, and with this tool, you can change the line to whatever you want. Just don't forget to pressing the return key to apply the change. The punning tool on the contrary doesn't need you to apply the change. You can see that you also have some zoom tools in the main panel. If I get to draw a line that I don't really like, I can still get to activate the lines moving, which smooths the lines as I make them right. Click on the icon to get more options, uses checkbooks to activate or deactivate the line smoothing. If I deactivate these options, this moving off the line will not be in real time but will take effect after I drew the line. If I check the rial time books, then I can see that the smoothing of the line happens when I drove, but with some kind of delay. Check the show a treaty books in order to see the tool that helps you smooth in your line. That's where you would not have the impression of delay will be more in control off the line that you draw, the higher the value is, and the longer the cold that pulls the line will be. There are different types off lying smoothing. So I've been showing you the average distance type. Let's use the pool strain. This type of line smoothing can be used to make peaks and point occurs, and the average points type needs a lower value and has the option to catch up to where your cursor is. When you stop your lying, I will give the value to 20 an average distance for now. In the color panel, you have speakers for the A color and they be color, which will change the color Accordingly. You can also use a short cut semicolon to change the color. A. The down arrow lets you access all the colors that you've used since you opened the software. This car will erase all the colors in the Caribbean and Lee of the current A color click on the double arrow to change the color A to call a B and since the color a changed the blue can be found in the Caribbean, you can easily navigate in. The chromatic will change the nuances in terms of your color. By moving the circle in the triangle and in the ellipse around, we need the color panel. You have the tool panel in this panel. You can choose between some different pretty find precious the pen brush, the pencil, a brush, the eraser, the mechanical pencil which draws with only one pixel raj. The oil fresh, the airbrush, the wets brush the special brush, which basically mixes the pixels and alfa together. And you can try different options of this brush the text brush, which allows you to draw with a text. But if you want to just paste a text somewhere, just change all the connections to Constance and changed two words. Perimeter. And there I have my text, which I can pays just anywhere I want. The last two brush is the custom brush. The custom brush is any tool that you have created yourself. You can create a custom brush by using the cutting tool like I showed you before. Simply select the drawing that you want to use as a brush, and it will become a brush that you can use straight away in the right drawer. Off the interface, you have the two percents, all the 2% B two, which are custom brushes that have been created for the software so you can create brushes like those or use them and change their settings to your liking. They are Koreans. Acrylic always painting watercolors, pens, talks smudge and spreads, which all men to alter the pixels already there and mix them with other pixels or alfa. And beneath it there are dirty shadows, dark smokes and clouds and nature brushes. If you want to make your wrong brushes, I advise you to choose the brush that you like and study how it is made in the tool panel on the left. There are a few permits is that you can play with, so don't hesitate to test them out. I just put the panel's back in that drawers. But if you ever lose a panel, but closing it don't panic. You can find them in the windows and custom panels menus. For example, if I close the tool panel, I can find it easily in the Windows menu. And that's the case for every panel that is on the left and at the bottom of the interface . And for the custom panels, they can be found in the right drawer of the interface. For example, if I close the tool percents panel, I can find it by going to custom panels milieu Right here two presents B two and all the custom panels will automatically appear on the right drawer. If you want to change the size off your brush, you can do it in the tour panel in the left drawer in the size perimeter. But you can also use the short cut C and change the size with a left click. The rightly can be used to erase with the same tool as you troll. But if I draw with another tool I won't be able to erase with the right click. In that case, I need to check the drying option in the tool panel. That way I will be able to use the right leg to erase just anything on the image. So this way of erasing is different than the razor itself, as it is using the current brush in the Rays mode.
4. Start Animating: first, I will draw the floor with a simple line. The timeline is at the bottom of the interface. You can display and hide the timeline with this button. Double click on the name of the layer to rename it. Click on you to add another animal year on top of your first layer and rename it Bull. I activate the lines moving in order to draw cleans trucks, and I used a freehand drawing stroke and I can start drawing my first bowl. I used to panning to to place my balls slightly more in the middle, and I can pick my drawing tool again. In my timeline, I would add one other image. Let's see how it works to navigate in the timeline, I click and drug at the top off the timeline to go back and forth to select one or several images, I click and drag at the bottom of the image where the numbers are and that the bottom of the timeline you can also navigate back and forth. So that's Creek on the second image, and I can see that the icon next to my image is not the same as beneath this is a post behavior. It tells you what happens after the image. If the drawing can still be seen after, if the animated drawings loop or if you can't see anything, so here I won't be able to see anything after. If I click on the hold, I would be able to see my image after. So here I want to draw after my image, so I don't want my first going to be seeing on my second image. So I just choose none. I activate the light table by clicking on the black circle Beanie, the label which allows me to see my previous image in Green. And now I can draw a second bowl that is not very far from the first. And then I can go to the third image and I want to see the two images before in green. And to do that, I click on the lightbulb icon, which opens the light able perimeters. And there I can see what images all its and which are not, so I can activate the two images before, and I will see to images before my drawing, and then I can go to the next image and I activate the third image on my light table, and I can see three images before and go to the next image. You can see that every time I draw the ball further, apart from the previous one. That way the ball would speed up as it falls, and as it falls, the board stretches and changes form and as it hits the floor, the ball world squash and get a move around for Let's activate the previous energies in my light table so I can see what the ball looked like before, and I can see that I need to make it bigger. Too much the initial bowl, and on the next image, I really squash it, and as it bounces, it rises again and I can start to stretch it. And then it flies up in a stretch position, and as it rises, it slows down. So the images get closer to each other and the ball starts to transform into its initial phone and loses its stretch. Now I want to see my first images after the ones I'm drawing in order to make a loop. So I want to join the last images with the first image to do so I changed the post behavior to loop. That way I can see the first image, and now I display on my light table on Lee, the two images before and the two images after. But the drawing is present where I am, so I need to erase it first. The previous images are green, and the next images are orange. So every time I need to erase the image, I press backspace and I continue to slow the bowl down by drawing the images closer to each other. And now that images are really close to each other, I will only display the image before and the image after. And now I hit play to see how my animation turns out. I can also scrub like this to manually playing my animation, and as my animation is a loop, I can still see it. After the images. I want to increase the lens off the squash so I click and drag on the little square at the bottom left here, and I can move my images back and lengthen the time off the squash. So let's see how it plays. These manipulation changed the timing of the animation. For example, if I had time to the six image, this is how it plays. So playing with the timing is important, and it will change the look of your animation if I want to change the time coat from seconds and minutes to the number of images, I just need to click on this icon here, and it will change the display all the time code above and under my images. If I want to add an image between the fifth and sixth image, I simply need to move back the six image to the right click on this new fifth image and hit backspace to create an image in between. And now I can draw in between these two images and have the light table as a reference, and it slows down the full a bit more. So this is our bouncing ball, and let's see what we can do with it. In the next video
5. Manage Your Layers: Let's have a look in more detail how you can manage a layers. I'll just take the example of a field rectangle. Activate the light table beneath the light bulb in the layer sack. Enable the light table options to activate more images to this plate before the current frame. The preserve transparency option is next to the light table option in the layers stack. If you activate it, you will only be able to draw on the big sells off the image. Note. In the transparency. The option next to it is the Stansell. When the stencil is activated, you can draw on the layer in which it is activated. You will need to draw on another layer. Because the first layer is active as a stencil, it becomes a tool and not imagine which you control. The first position off the stencil allows you to draw only on the pixels present in the stencil layer, and the second position off the stencil allows you to draw outside of the pixels present in the stencil layer. If I display only the current layer, I will be able to see it layer separately when you're finished working with a Stansell's don't forget to deactivate it. Deactivate the layers by clicking on the circles beneath the I to delete a layer right click on its and choose Delete klier and confirm. When you create a new animal area, you can see that you can move the image in the timeline. To extend an image, click on the little square at the bottom rights and drag it to the right. If you go outside of the image and click on this girl or hit backspace, you will extend the first image and create another one where you currently are press control Z or you to undo. If you click and drag at the handle on the top rights and dragged to the rights, you will get a papa Stretch extends a lens off the image and the number of its exposures. For instance, here I have 21 exposures of the same image. Repeat exposure will have the same effect because it will repeats the same exposures of the image at empty instances will create an instance for every image on the chosen lens. Add empty exposures. Create a new instance with exposures. The little square on the bottom right allows you to lengthen the time often instance, and the square on the top left allows you to shorten it from the left side. If I create a new instance and use a square on the top left, I can move it from left right inside the exposures. But if I go too far on the right, oh, too far on the left arm, I clears the image or overwrite another image. So be careful. On my first image, I create a Bluefield rectangle, and then I go on the second image, and I used backspace to clear the image and create a new instance. If I press the return button, the last action that I did will be repeated. In this case, I would create a new rectangle, but because I changed the color, it will create a new rectangle in red. So now if I pull the right handle to the rights and to stretch, then the two images are evenly distributed in the lens that I said. Now I go back and repeat the same operation. However, the time I choose inter Pilates, and now I can see that it created an instance for every image and ingredient from blue to red. If I click on the right handle and put it back to the first image, I get a new pop up. I live Frink Inter Plate. My rectum goal would be of a color in between blue and red. If I do the same operation without the inter plates, then all of the images after the 1st 1 are cats. The hand option stops you from moving the images inside the layer. The option right next to it is the auto brake instance. It allows me to break an instance anywhere I want by hitting backspace or clicking on the skull or simply by trolling. And if I deactivate it on, only be able to increase the number off images in the first image. If I deactivate the option on the right, then the new creation off images is deactivated, which means that outside off my image, I won't be able to do anything. So that's with the creation and auto brake, and here it only adds a new exposure and draw in the first image of the instance and here only creation, and here it only adds a new exposure and draw on the first image of the instance and with only OTA break activated, I come to anything outside of my images because the creation is deactivated. I can only draw on the images that are there. So choose the best configuration of options according to what you want to do and how you want to create your images. Post behaviors are handy to, for example, if I use opposed behavior, hold then I can get my previous image in the new one and just add stuff to it. That way I don't have to redrow or copy paste the image before here. So now I will take the example of a background. So I will draw a simple house with rectangles and I will go a little further in the timeline and said to my post behavior on hold So we'll see what happens before, and whatever I draw outside off, my drawing will just be drone on the first image and add exposures of the same image after . So let's have a look at the brushes on the right stroller off the software so I can pick something to make the green of the tree. I'm going a little further in the timeline and then you see that when I draw it just increases the lens of the image. But I still draw on the first image so that way off working is really grateful. Backgrounds click on you, and you can see that there are different types off layers, with parameters that are pretty find to make backgrounds or simple and in layers all colorization years. So you can see that the background layer as only creation activated and not caught a break , which is grateful, background and not animation. And all the animations layer would have caught a break activated because you need to create a new instance every time in order to make it move. The color and texture layer is a very special layer, which is only available in the professional edition of the software, so the software is more expensive if you want that in it. But it's really grateful colorization, and to show you duplicate structure, I will just pick a layer that has already a structure in it. And it creates a new anti layer with the same structure than the one beneath it, and you can create your own layer presents with the option open new layer presents and give it any parent er that you want so that you can have a new, easy access to your favorite players.
6. Building My Character: in the layer stack. Now that I have my bouncing bow before creating a new layer, I will change the colors of the existing layers and I lower the opacity off the bull layer . And because I would be using the same structure as the bull earlier to make my character, I duplicate the structure off my current layer. I choose the burst that I want to draw with in the crayons of the custom brushes, and I will draw with a reddish color. So I start to make the eyes like this a nose and I simply follow the shape of the bowl so I would have a bull like anymore. So I will be making a kind of jumping to Touro. Why add a belly? Nine, some ears and simple arms inside of the eyes. I draw more detailed eyes, and now I will choose a kind of landmark in my animation to draw the next image. I increased the number off images before in my light table so I can see the initial total role that I drew in my first image. So this pose has a bit more of a stretch, so I will try to stretch the body parts off the tutterow stretch the belly, the eyes and the nose, and it's looking down when it falls and I draw the ears more in the error like thou stretched in the air when it falls and the arms are up in the air and drugged up by the movement off the full. And then I choose. Another key posed another landmark where the total is changed. So when you cleanse, it is not stretched anymore, and it kind of gets this shape together. So I draw. It's more round, but it's rounder that it should be, so its eyes are higher than they should be because it's landing and everything is kind of deforming and its ears are still drugged up because the movement is not finished and the arms are slightly up as well. And now I draw the extreme squash on the animation when it's really at the lowest on the floor and there everything will be deformed, everything will be squashed. The belly is also squashed. It always follows the shape off the party. The eyes are slightly higher than the body because it's really pressed on the floor that it's as if the eyes are coming out because of the false off the bounce, and it's already looking up to where it's gonna go. So after that it goes up and the arms and the ears are still falling. What's already going to go up and their noses higher than should be because, like the eyes, the body is like turned back by the squash, and we can see with the playback that it's already coming together, and now it is do the next image least one of the extreme stretch. So it's really similar to the stretch off before the body stretched, the bellies dressed the eyes, and I make it look straight ahead this time because it's up in the air and it's beginning to slow down and contrary to the fall. Now it rises and the arms they are not up in the air but really down stuck to its body, and so are the ears. And now I'm going back to the full and I draw the frame off extreme stretch and everything you stretch and very exaggerated. The ears are really up in the air and the arms are high, almost touching the side of its head. Always take time to play your animation and see the advancement. It's always rewarding. You can also scroll the animation manually to see it more slowly, and now I'm going to draw frame a little bit before it loops, and I'm going to need to see the first frame. But at the end, after where I am and to do so, I will change the post behavior to look. And that way the first frame will appear after in the light table. And keep in mind that I don't roll an image in between. And I know that the Totoro has already almost got back its shape to a round shape. So the image that I'm drawing is almost the same as the image to during the air, so I'm not doing it in between. But I'm rather doing breakdown where I show a different step. Other totoro. So the patrol is up in the air and it's going to slow down, so that would be more images before it reaches its top states, so you can see that it's almost the same as if it's really higher. But the ears are still down. The ears are still drugged by the movement. So there you go. In the next video, I will show you how to make it full and rice properly and also make some adjustments to the timing.
7. How To Make It Fall: let's now focus on the fall off the character. I will draw the third frame and show the beginning off the full, the shape. It doesn't change yet. It's still a very round shape. The shape will change only when the movement speeds up as it falls as the character knows that it's gonna fall. It's already looking down. It's years off straight at that point, as if just come up and are going down. The tip of the arms remain at the same position as before. Even though the body is going down now, I will draw contact pose the very moment the body touches the floor. The body is still in his stretch position because it hasn't gone totally down yet. To show the difference between the full and the rise, I will quickly draw the total roll rising up. You can see that even if the body is up, it hasn't had the time to change back to its initial shape because it is still rising up and stealing. It's oval shape, like an egg shape, and I can see that the shape is too small. So I'm going to use a transform tool to increase the size and I press returned to apply the change. The ears else you're stuck down to its body and the arms are still down. Two. You can see that the animation is starting to take shape. I'm just going to redraw the eyes for this one. As it's not yet looking down. It's just starting to look down. Don't hesitate to school back and forth to try the animation. Then you would know if you're missing something. What kind of shape to give it. You just get a better overview, and here I can start making the ears bigger and higher because they are dragged down by the weight of the body. All the loose bolts of the character are dragged down by the body as it's looking down. The arms are really high up. - So now that we've animated the full off the character, we can make the rising and finish the animation
8. How To Make It Rise: do you ask? The body is starting to rise. I add a little distortion in the eyes to show the sudden change of shape for this frame. The body is at its extreme stretch, so everything shall be stretched. Let's try it with the arms like this. No, I'm just going to draw the arms really close to the body to really stress out the stretch here. All right. I like to give some a symmetry to the body to make it more convincing. No. - Let's get rid of all the images we don't need in the light table, do you? Yeah. There. - Okay . - Yeah . And there you go. A bouncing total.
9. Adjusting The Timing: we could leave the animation to where it is, but we could also improve it a little bit. So first I'm going to add more frames where I want to the animation to throw down when the characters quashes on the floor. I wanted to take more time to go back up, so I'm gonna add a frame here and draw any major between these two. And now I'm going to draw another image in here. - I think the ears are not long enough. I can give it a bit more exaggeration. The position of the arms here Don't fear writes. I would draw them closer to the body, even make them go over the sites of the body. So now we need to change the OEMs on the next frame. This is way more convincing. I'm just going to make some more adjustments. So here I want the years to be longer. I just want to give them a round shape, like on the other frames, and here I want them closer to one another. It's much better. Hear that years shouldn't be raising like that. They should be closer to the body way down. They must follow the movement. I think it's quite all right. What else would we add?
10. What About Feet?: I'm going to add feet to my totoro, so I add a new layer and I can start drawing my feet. Let's choose another color as the character is going down, the feet are high up and stuck to the body, and as the character is going up, the feet are under the body, dragging down. They stretch and squash like the body. When the body is quashed, the feet are pressed down on the floor by the weight of the body. So let's make them small here, the total lands on its feet on its heels. Here I give the feet really stretched for a moment, and they will be scores to back in place. At the top of the jump, they start to get back in place. I'm just adding a little a symmetry here. The stretch a little as they fall there . I see that I have some double drawings, which means that I didn't pay enough attention to my friends. I forgot to clean some images with backspace before drawing. I would just rise the feet here when they land on the floor. I need to fix the orientation of the feet here. No, don't hesitate to go back to the drawings that you've already made. And there you go, a jumping Doctorow
11. Final Thoughts: Once you're done working on your animation, it's time to export your work to export. Click on file export to and choose the clip display. Click on browse to choose the location of your exported file and export as an animation in every I o. Move if you exporting, Move Jews The Compressed RGB option. If you want a light fire, you can lower the resolution if you want, but do not increase it. Otherwise, you will lose in quality. Keep the background up to inject. To keep a white background, you will be able to find the TV Pain project file in the resources you can use it as a drug for your own. Animations were free to upload and share your work. You can follow me on Instagram to see my animations and ask me questions about making animations into debate. I hope to see you soon in the next class
 Melanie Do Monte