Transcripts
1. Intro: This class, I will guide you through the foundation of how to use a synthesizer to build
your own sounds from scratch. Instead of tutorials creating complicated sounds by
just copying settings, I will give you an
understanding of how to use each section of
a synth to truly be able to create your own
sounds and send you on a journey to becoming
a pro sound designer. We will be using vital an incredible free
software synthesizer that is also used by numerous
pro music producers. However, the techniques you
learn in this class are transferable to most
other major synths. We'll be creating the following
five essential sounds in order to learn a variety of synthesis skills, a chill pluck, a beautiful pad,
a moody res base, a bounty techno base, and finally an epic lead
sound. Let's get into it.
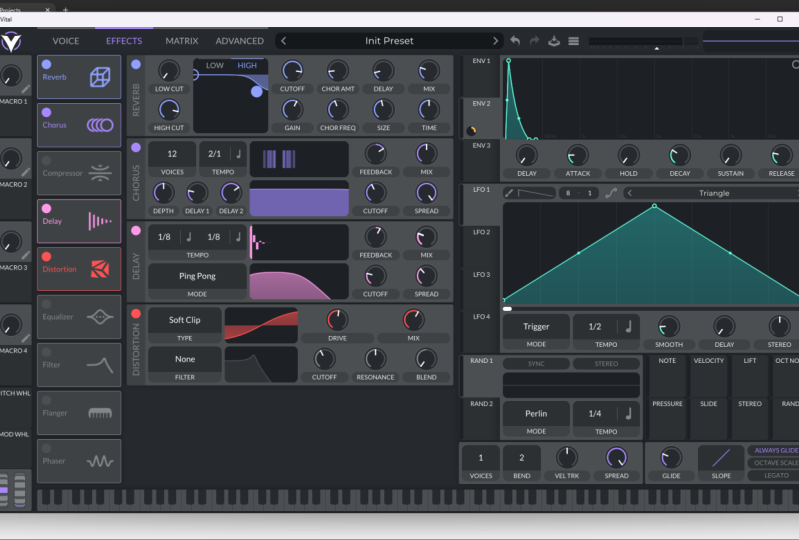
2. A Quick Overview of Vital: First, let's look over each
main section in vital. Most popular synths will have
very similar sections two. To begin creating a sound, you'll start with
choosing a waveform. A waveform is the
core sound wave that a synths sciator produces. Vital has three oscillators, so you can select up to three waveforms to play
at the same time. The next step in creating a sound is usually to
shape the amplitude. In vital, you control the master amplitude of the
sound using envelope one, where you can set the attack, decay, sustain, and release. Tack controls the
time it takes for the sound to go from
zero to max volume. Decay controls the time it
takes for the sound to go from max volume to
the sustained volume. Sustain controls
how long the sound stays at that sustained
or resting volume. Finally, release
controls the time it takes for the sound to
return to zero volume. The most common step after this would be
to run it through one of the filters here and to start getting the tone
of sound you want. Then the next thing we would go to is the effect section here, where we can apply things like reverb, delay, and distortion. Course, you can
control the master volume of the sound here. As we go, I will
also show you how to use some of the more
complicated sections. Let's move on to creating
our first sound.
3. Make a Chill Pluck: Again, we'll create a really chill pluck sound
using a sine wave. A sine wave is one of the most common wave forms used to create a
multitude of sounds. First, let's lay down a C
note in our piano roll. I'm also going to be testing
the sounds throughout the class by playing notes
using my computer keyboard. Now in vital, first, let's set Oscillator
one to a sine wave, using the basic shapes. Now let's start shaping the
sine wave to become a pluck. We start with envelope one, which controls the
overall amplitude. Set a sharp at, short
decay, and sustain, and then you can adjust
the release to taste, but I'll keep that
short now too. Next, let's add a low
pass filter to the sound. This low pass filter is
a filter that allows the lows to come through and
cuts out some of the highs. H. I'll also bring in
some drive to add a little bit more
character to the sound. As you can hear now, even this simple
sound could work in the context of a track
using a nice melody. But with most pluck sounds, you would add
reverb and possibly delay to make it more
spacious and chill. Go to the effect section, add a reverb and delay, and then we can play around with the settings until we
get something we like. You can of course use a separate bi plug in to do this too, which is often what I do. And here is the final result.
4. Make a Beautiful Pad: Next sound, we'll
create a beautiful pad. Here you'll see how to use each oscillator to create a
different part of the sound. To get the sound
going, I have this inverted a major chord laid
down in the piano roll. Let's first shape
the sound to start forming our pad using
the amplitude envelope. Setting a slow attack
so that it ramps in, and then a full sustain and
a long decay and release. Next, we can start building the different layers of the
sound using each oscillator. For Oscillator one, I'll
leave the default so wave, but bring it down by an octave, which is 12 semitones. You can hold shift to go
up and down an octave. For Oscillator two,
I'll set it to a rounded square wave
and leave the pitch. For oscillator three, let's use a pulse width wave and bring
the pitch up by an octave. And bring the overall volume
down so it doesn't clip. Now feel free to solo each layer and play around with the
volume of each layer. Then apply an
analog 12 dB filter and make sure it's activated
for each oscillator. I'll bring the resonance down. I'm also going to activate this great key tracking feature, which opens the filter more as you play higher frequencies. Another part of making a great pad sound is
adding subtle movement. Let's do this by
assigning one of these random sections to
modulate another filter. I'll turn on sink and leave
the default settings. Then drank random one to
the cut of the filter, and it will now modulate
it and add some wobble. You can adjust how much of it comes through with
this circle here. Make sure it's activated
for each oscillator two, or experiment with
only having it applied to specific oscillators. Adjust it to taste as well
as adjust the filter. Now a pad will usually
always need some effects. Let's add a reverb and delay and eke out
some lows and highs. O. Here is the final result. However, you'll
often want to use some external plug ins to
take it to the next level. I really like using a free
plug in called Valhalla, Super massive or
my favorite revert in Ableton, called Cathedral.
5. Make a Moody Reese Bass: We'll start creating some base, starting with a long sustained bass sound called a re spas. This type of sound is often associated with drum and bass, but you'll actually hear it in different forms in
various genres. To begin, I'll lay down a low
B note in the piano roll. Then let's set Oscillator one to a vital sine two wave and bring the pitch
down by an octave. To start creating the re sound, we'll add some unison
here to detune the sound and create
that re effect. Next, let's shape the sound
in the amplitude envelope. I'm going to bring
up their attack a bit so that it ramps in. And I'll keep a long and
sustain so that the note holds. For Oscillator two, I'll add
a higher pitched basic sine. And then for bass sounds, you always want them to
be in mono so that you can't play two notes
at once like a chord. To do this, bring the
voices down to one here. Then I'll bring the glide up, put on always glide and add Lg so that when you
play the next note, it slides into it like this. Which is a cool effect. And finally, let's add some distortion in
the effect section. Here is our final result.
6. Make a Bouncy Techno Bass: L et's make a
plucky techno base, which can be used in all
forms of house and techno. I have a techno kick lay
down on every beat and this grooving midi pattern on the F sharp node to
get the vibe going. In vital, set Oscillator one to a square wave using
the basic shapes. Then I'll bring down
the pitch by an octave. Next, we'll add an analog
24 dB low pass filter. To get the bouncy pluck sound, we'll modulate the filter
using envelope two. Shape it to be short like this so that it looks similar
to how we shape the plug. Then drag from here
to the filter. This will now the filter cutoff. L et's bring the lops
filter down overall, and then you can adjust how much envelope two
modulates the filter. Adjust it until you get
something that you like. Again, for the bass sound, let's bring the voices here down to one so that it's a mono and can only play
one note at a time. Now let's move on to
the effect section. I'll add some distortion, dial in another low
pass 24 dB filter and then let's also push up the mid frequencies with an E Q. An ene. Here is the final result.
7. Make an Epic Lead: Our final sound wheel
create an epic lead sound. I have this melody laid down in my piano role to
get things started. Feel free to copy it
or lay down your own. Let's begin by setting Oscillator one to a
classic blend wave. And bring it up to this shape or wherever you
think sounds good. Then again, shape the sound
with envelope one with a shorter sustained and bring up the decay and release a bit. We also usually want
to lead sound to be in mono and not play more
than one note at a time. Set the voices to one, click on Always glide and
push up the glide. Next, turn on filter one. The thing that will really
make this lead sound epic is of course the effects. Begin by e Q out some
of the low frequencies. Then I'll add a
multiband compressor. As well as some reverb, delay, and a bit of chorus. A. To add a bit more
interest to the sound, we can add some modulation to the filter using
envelope two, as well as some subtle noise
using the sampler section. I'll make sure that the filter is active on the sampler to.
8. Bonus Feature + Class Project: Essential tool in vital for helping with creating
interest in your sound throughout a whole song is
to assign the macros here to certain parameters of
the sound so that you can modulate it as
the song progresses. To assign a macro, just drag it to the parameter
you want it to control. The most common
thing a macro would control is the
cutoff of a filter. Let's assign macro one to the cutoff of filter
one of our pad sound. Name the macro cut off. Now we can bring in
more high frequencies we needed to create tension
throughout the song. Lastly, for your class project, I want you to post a screenshot, audio clip or
screen recording of your favorite synth sound you've created
during this class, and I'll give you some tips on how to improve the
sound if needed.
 Jonathan Fisher, Music Creator & Sound Designer