Transcripts
1. Let's Get Started!: You love making collages, but have always
believed that making collage paper requires a lot
of fancy or expensive tools, then it's time to
bust that myth. Hi, everyone. My name is Ride, and I'm a multi disciplinary
artist from India. I'm a top teacher over
here on Skillshare. In this mini class,
I'm going to show you three different ways of
making collage paper inspired by the ancient
Japanese technique of fabric dying called Shaboi. We're going to talk about
folding techniques, inking tips, and making
beautiful patterns. Without further ado, let's
dive into this inky adventure.
2. What You'll Need: All right. The supplies for
this class are fairly simple. We need ink, which is used for refilling ink pens,
a paintbrush, and some watercolor
or handmade paper, that's at least 140 GSMth. We basically need paper
that absorbs water well. Something as thin as copy paper might not
work for this project. As an alternate to the pen ink, you can also use acrylic ink, which will give you
similar results.
3. Rectangle or Square Pattern: So the first type of
fold that we're going to learn will give us the rectangle
or the square pattern, and you can do this with a rectangular sheet or with
a square sheet of paper. We want to fold it right in the middle to get a nice
crease in the center. Then we want to fold
the paper inwards once again from both the sides to get equal creases once again, and then we want to convert
it into an accordion fold, which is also known
as a fan fold. Once you open the paper and
see it in a zig zag style, that's when you know
that you've got your fan fold or your
accordion fold successfully. We're going to repeat the
process the other way as well. Now on this vertical strip, we will fold it upwards, get an ice crease in the
middle, and then again, we fold it once more on both the sides to
get equal creases. Then once again, we're
going to convert this into an accordion
or a fan fold. You want to press this really
nicely so that your creases are crisp and clean and that will give you
a clean pattern. Once you have this ready, we want to soak it into a jar or a bowl of water for
about a minute or two. Usually watercolor paper or handmade paper soaks up
the water pretty quickly. So you won't need to do it for more than a couple of minutes. But in case you're using
a different paper, just experiment with
the various dations of soaking to make sure that
it's completely wet. I like to keep holding this and I keep dipping
it in a couple of times just to make sure that the water is evenly
spreading out on my paper. So I don't leave it to
float inside the bowl. Otherwise, it gives me a very inconsistent
dampness across the page. Once it's out, we basically
just want to press this gently with our palms to
remove all the excess water. At the end of this exercise, you should have your
paper damp to touch, but it shouldn't be
dripping with water. You want to get all
that excess water out. Then you just want to double check that all the creases are aligned so that you get a
nice crisp and clean pattern. And then you can start king
it on all the four sides. Now, you can experiment with the pattern a
little bit over here by king just three sides or
two sides or just one side, and each of those experiments will give you a
different result. For this one, I'm doing all the four sides and we
want to make sure that we do at least a couple
of passes so that the ink really goes in nicely
into all of those folds. Make sure that you're holding
this bundle from the middle so that you're able to
ink all the sides easily, and you're basically creating
a resist with your fingers. And once done, we want
to leave this aside for 15 to 20 minutes
before we unfold it.
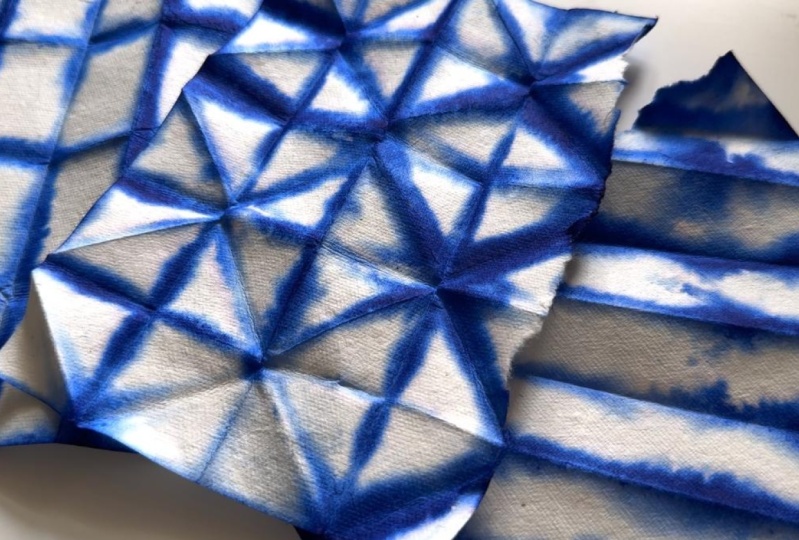
4. Triangle Pattern: All right. So let's look
at the triangle pattern. Now, the first few steps that we're going to do
for the triangle pattern are exactly the same as what we did for the rectangle
or the square pattern. So we start off with a
basic accordion fold on whatever paper you're using. And once you have that
accordion fold ready, we want to start folding it into a triangle using
one of the corners, and we want to do this
triangle fold also in an accordion style so that we're going back and
forth with the folding. And this will give us a
nice triangular pattern when we open up the paper. So this can be a
little tricky because your bundle is going
to get fatter and thicker with each
progressing fold. You want to take
your time to get those creases nice and crisp. And once again, you can open up the band just to check
the Zia pattern, which will confirm that it's
an accordion or a fan fold. And then we bundle it
all back together, and we do the same steps, which is that we soak it in a bowl or a jar of water for at least a
couple of minutes, and I like to hold it and
dip it in a couple of times. I also open it up slightly
every few seconds just to make sure that the water is going all the way
in the inner folds. Then once again, we
want to squeeze out the excess water and make sure that the bundle
is not dripping, then we apply the ink
on all three sides. Again, you can experiment
with different patterns over here by applying the ink on
just one side or two sides, and each experiment will
give you different results. Once you're done, keep
the bundle aside for, 15 to 20 minutes after
which we will unfold it.
5. Diagonal Pattern: Right. Let's move on to
the diagonal pattern. For this, the basic
principle for the folding of the paper
pretty much remains the same. We're going to be doing the
accordion fold once more, and we're going to be doing
this diagonally this time. You can work from top to
bottom or bottom to top, whatever is easier for you. Over here, I'm doing bottom
to top accordion fold. It's okay if your lines are not entirely 100% equidistant, but more or less you'll get nice diagonal stripes if
you're somewhat there. Just give it a couple of tries and soon you'll
get a hang of it. Just like the triangle fold, this one will also become
a nice thick fat bundle. So you want to make sure that
when you're dipping it in, you are soaking it properly
for at least a couple of minutes so that the water can go inside those inner
folds really, really well. And once it's out, you want to double
check all the folds and the creases and
just make sure that everything is in
perfect alignment and squeeze out all
the excess water. And then we can start
applying the in. For this pattern, we
apply the ink only on the left and the right side
of that horizontal axis. We don't apply it
on the triangular folds that you see coming out on the left side
and the right side, and that's because we're
going for a diagonal pattern, so we're not going to be
inking all the four sides. And that's pretty much it
for this particular pattern. So once again, just give
it a couple of passes of ink to make sure that it's
going inside all those folds. And then we just let it sit for 15 to 20 minutes
before we unfold it.
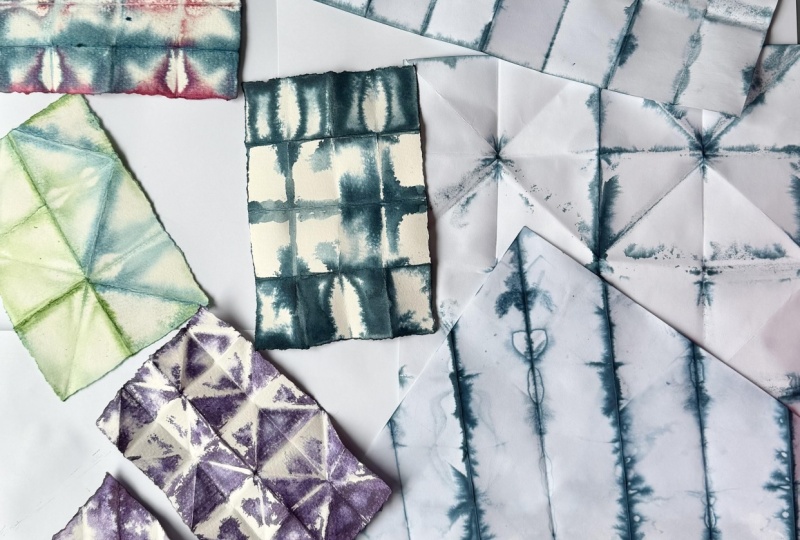
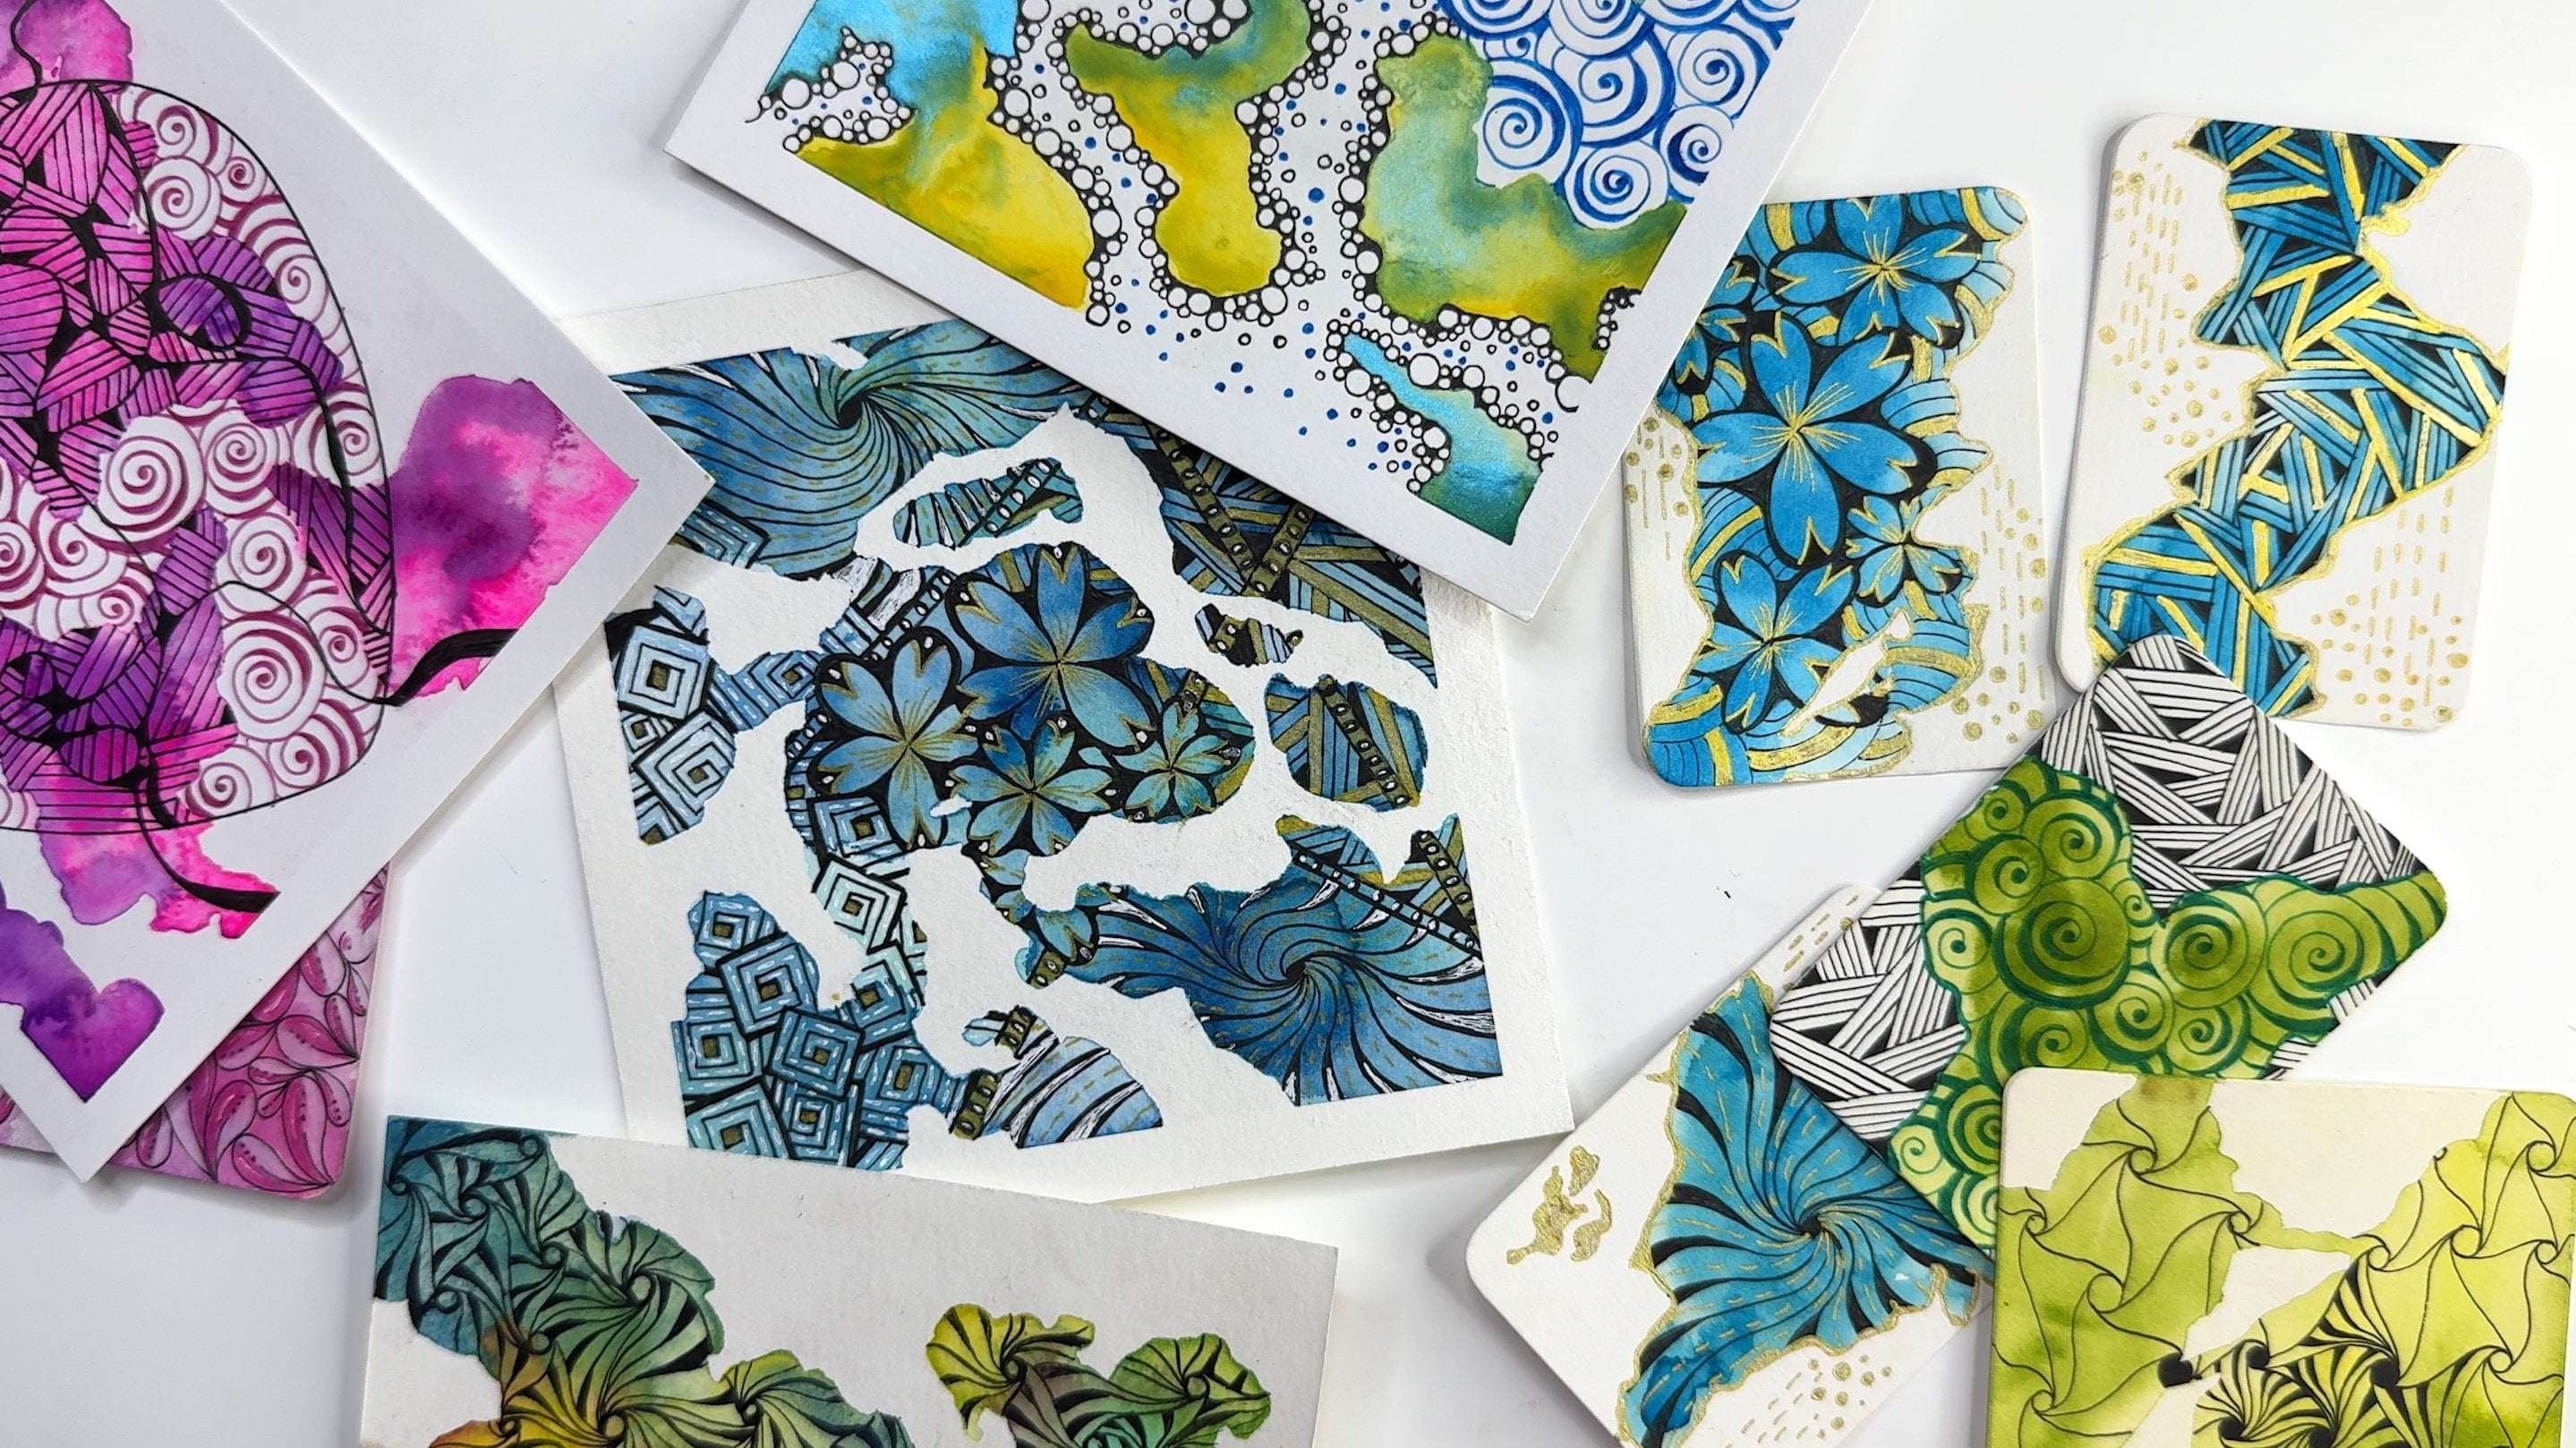
6. Unfolding & Reveal: It's time to open up these
beautiful inky bundles. Let's start with
the rectangular one and this one comes
out in a grid style. If you like as a variation, you can increase the number
of folds on your paper to get a smaller grid size and that way your pattern
will be slightly more dense and intricate. Then here's what you'll
get when you ink only two sides of the rectangle instead of doing it on
all the four sides. Then this is the triangular one and this one has come out
realty, I quite like this. Then let's open up the one with the diagonal
pattern as well. And here are OLA papers
after drying completely for about four or 5 hours.
Now it's your turn. I'd love for you to create your own Iki collage
papers and share a picture with me
in the projects and the resources section
of this class. I can't wait to
see what you make.
 Ridhi Rajpal, Artist + Film-Maker + Educator