Transcripts
1. Introduction: Hello and welcome. In this course you're going to learn to brew flavorful, well-balanced, smooth coffee with the arrow press coffee maker. This course is intended for beginners, but we're going to dive deep into the press and there'll be information that even experienced coffee brewers it might find useful. In the first section, we're going to go over everything you need to get started from choosing the right coffee to the right grinder, to selecting the proper brewing water. In the second section, we're going to break down what's happening inside the arrow press during an extraction. This will give you insight. It helped you develop your technique and recipes brewing the perfect coffee. I am Tom Platz and I have been a barista at a coffee roaster and coffee consultant for over eight years. So join me today because there are beans Debreu, and let's explore this amazing coffee maker, the arrow press.
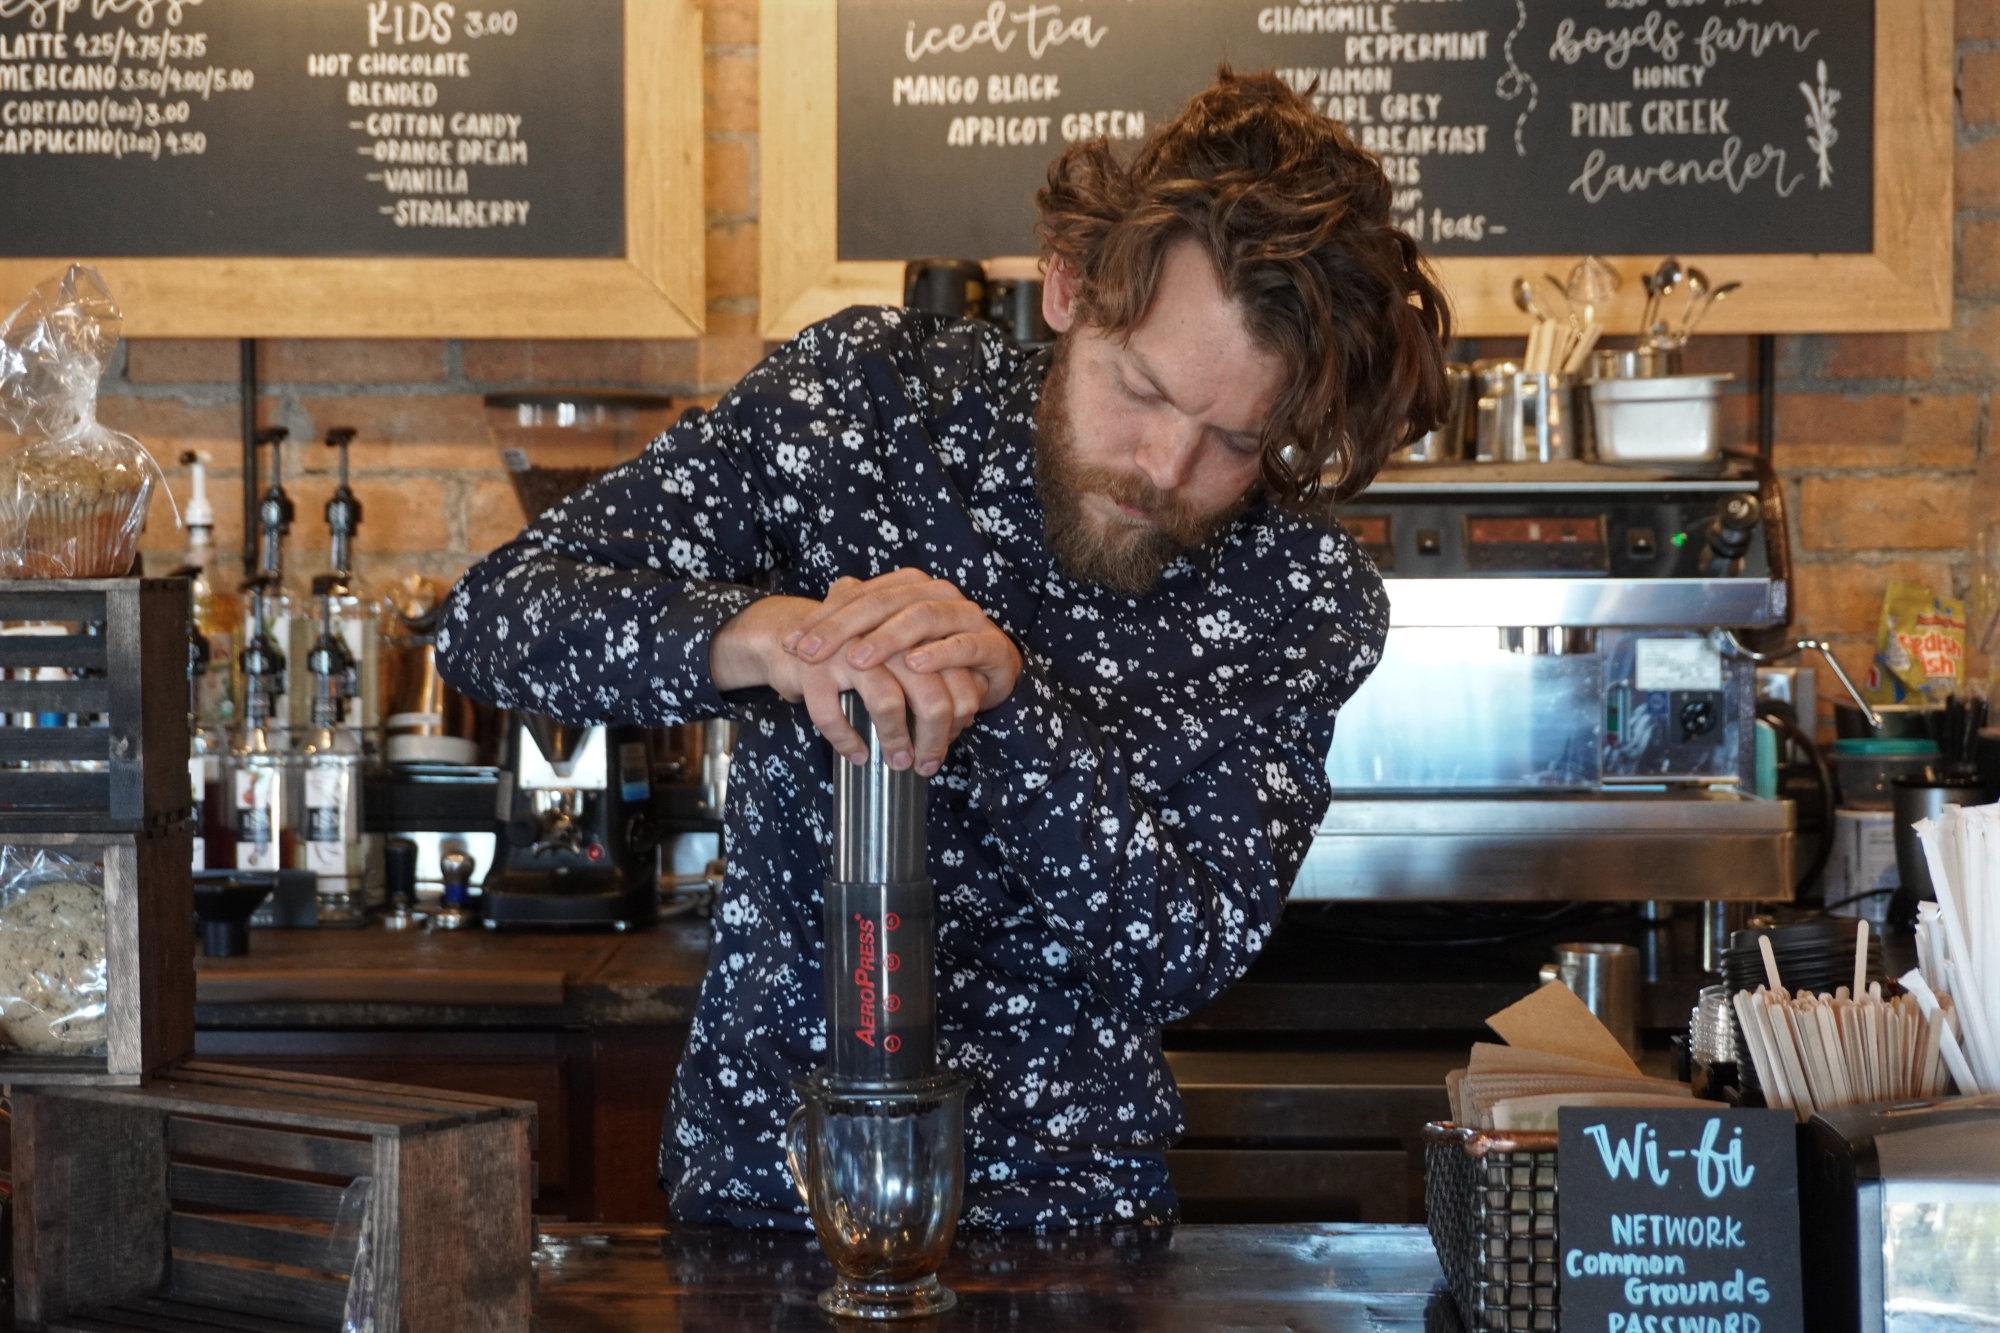
2. Unboxing: Let's unbox the arrow press. As you can see, it comes with a lot of useful accessories. We've got the arrow press itself, of course, which consists of a base tube, a plunger, and the filter holder. The markings on the side are useful in measuring the volume of water added during a brew. The space between the middle of each number is approximately 60 milliliters or 60 grams. It comes with a scoop for adding coffee grounds. A full but not overly heaping scoop is about 14 grams of ground coffee. Throughout this course, however, we will rely on measuring the dose with a scale which is far more accurate and consistent. But this is a handy reference when you're travelling or don't otherwise have access to your scale. This piece is the final, is great for transferring your ground coffee into the arrow press. It can also be placed on the bottom of the unit to allow pressing into a narrower vessel. It's a bit of an unstable configuration, so be careful not to spill if you use it like this. Finally, we have the stirring paddle. It works great, is easy to clean and fits well into the arrow press for third poster. Also included is a manual that describes the basic recipe for making coffee. This method works well, but it doesn't nearly reach the full potential possible with this fantastic Brewer.
3. Equipment: First and foremost, we will need a coffee grinder to turn our coffee beans into brewed coffee grounds. A manual bird coffee grinder makes a great companion to the arrow press. They are portable like the arrow press, economical and capable of giving quality results. They also are a satisfyingly hands on way of grinding your coffee. This particular one uses ceramic birds, but metal or ceramic will work fine. Make sure it is capable of making fine adjustments to the coffee's coarseness. This way we will have full control over our brew. Keep in mind, however, that grinding coffee by hand can take some time and it can be rather tedious. This is where an electric bird coffee grinder will win convenience. However, to get a electric grinder of equal quality, it will generally cost quite a bit more. And of course it's not as portable. A good digital kitchen scale is essential for brewing consistently and precisely with an arrow press. While it is doable to measure things by volume in a pinch, it is far more accurate to measure things by weight. You will want to scale that is accurate to 0.1 grams and can weigh up to about 500 grams total. We will also need a kettle for heating our water. A gooseneck kettle, either electric or stove top, works great for this purpose. Ideally, one with temperature control or a thermometer will give you the most flexibility and convenience for dialing in your brew. The arrow presses capable of brewing excellent coffee with a wide range of water temperatures. So having precise control of your temperature will allow you to experiment more and keep your results more consistent. Good extraction requires precise timing. A basic smartphone timer app ward grape, or any stopwatch or timer that counts up. Be careful however, as a smart phones, radio can interfere with a scale and throw the readings off. Make sure you don't put your phone too close to your scale. Or temporarily turn on airplane mode. You don't want anyone interrupting your brewing anyway. While you can prove the arrow pressed directly on your cup, I like to use a dedicated vessel that won't risk damaging my favorite mug. This also allows me to dilute the final group, distribute multiple servings. This wide mouth mason jar works great and is transparent and allowing me to see the coffee brew. It also makes for great pictures.
4. Coffee: Owing to its great flexibility, the arrow press control just about any type of coffee into a delicious brew. Single origins, espresso blends, light roast, stark roasts. It's possible to devise a recipe on the arrow pressed that will get great results. Whatever the coffee you are using, any TV, freshly roasted coffee beans are very volatile and lose the aromatic compounds quickly after roasting. It is best to use coffee that has been roasted within the last four weeks. Fortunately, reputable roasters usually put the roast date right on the bag. I would avoid chain grocery store coffee and instead look to local coffee shops and local coffee roasters for your bean supply. You can also get your being shipped right to you through many online distributed isn't roasters. I encourage you to try brewing many different kinds of coffee and the arrow pressed and experiment drawing the best out of the beans.
5. Water: Good quality water, what the balanced mineral content is vital to brewing a good cup of coffee. It must be free of any chlorine and have no unpleasant odors or tastes. Depending on where you live, your tap water might be just fine. You can substantially improve the quality of your tap water using a pitcher based water filter. This is a simple and efficient way of getting good water for growing. Bottled water is another option. Look for something labeled as spring water or purified drinking water. Ideal option is using mineral additives to give you complete control of your water. You simply add the minerals to water filtered with reverse osmosis or distilled water. These are formulated to extract the coffee properly without imparting to which flavor of their own.
6. Filters: The basic paper arrow press Filter is excellent at producing a crisp, clean cup with low sediment there sustainably produced and make cleaning the arrow press a breeze. There are some third-party paper filters that are thicker and producing even cleaner cup. But you can actually double the stock filter for a similar effect. Another option is a metal filter. There are many sturdy, reusable mental filters available for the arrow press. Metal filters allow larger particles pass through, resulting in a cup with a bit more texture and sediment. I liked this option for imitating expressive with the arrow press as the Willie texture is reminiscent of shots from a Puerto filter. Take a bit more effort to clean, however.
7. Basic Espresso: This video will serve as a basic overview of brilliant what the arrow press. This will be a quick, small yield extraction that is very strong and somewhat imitates espresso. This is pretty much the method described in the arrow press manual. Start by weighing 16 grams of whole being coffee grinder, these army find setting heat about 300 milliliters of water to around 85 degrees Celsius. Now that our water is ready, we want to go ahead and take a paper filter and rinse it. This will make sure that there's no paper taste getting into our coffee. Careful not to burden yourself. Get your brewing vessel ready. We're gonna put the arrow pressed together, put the filter into the bottom of the bottom part of the arrow press. It's going to be standing upright in the standard position here. Put it on a scale and tear it, adds your coffee. Makes sure to tear it again. Start your stopwatch as you add hot water. We're going to add 50 grams of water. Stir the water and coffee grounds a good solid ten times. We should be at about 30 seconds on the clock at this point. Now placed the plunger into the arrow, press. Apply firm steady pressure. It should be just a little bit more pressure than the weight of your arms resting on top of the plunger. Press until the plunger reaches the bottom of the arrow press. That should take about 30 seconds. And there we have it. A very strong, expressive like shot of coffee. So either enjoy it as is, or add a little hot water about eight ounces to make it a drip coffee strength. Cleaning is super simple. Simply press out the grounds and filter into trash or compost and then give the rubber plunger a little bit of a rinse. Let it dry and you're done. Enjoy.
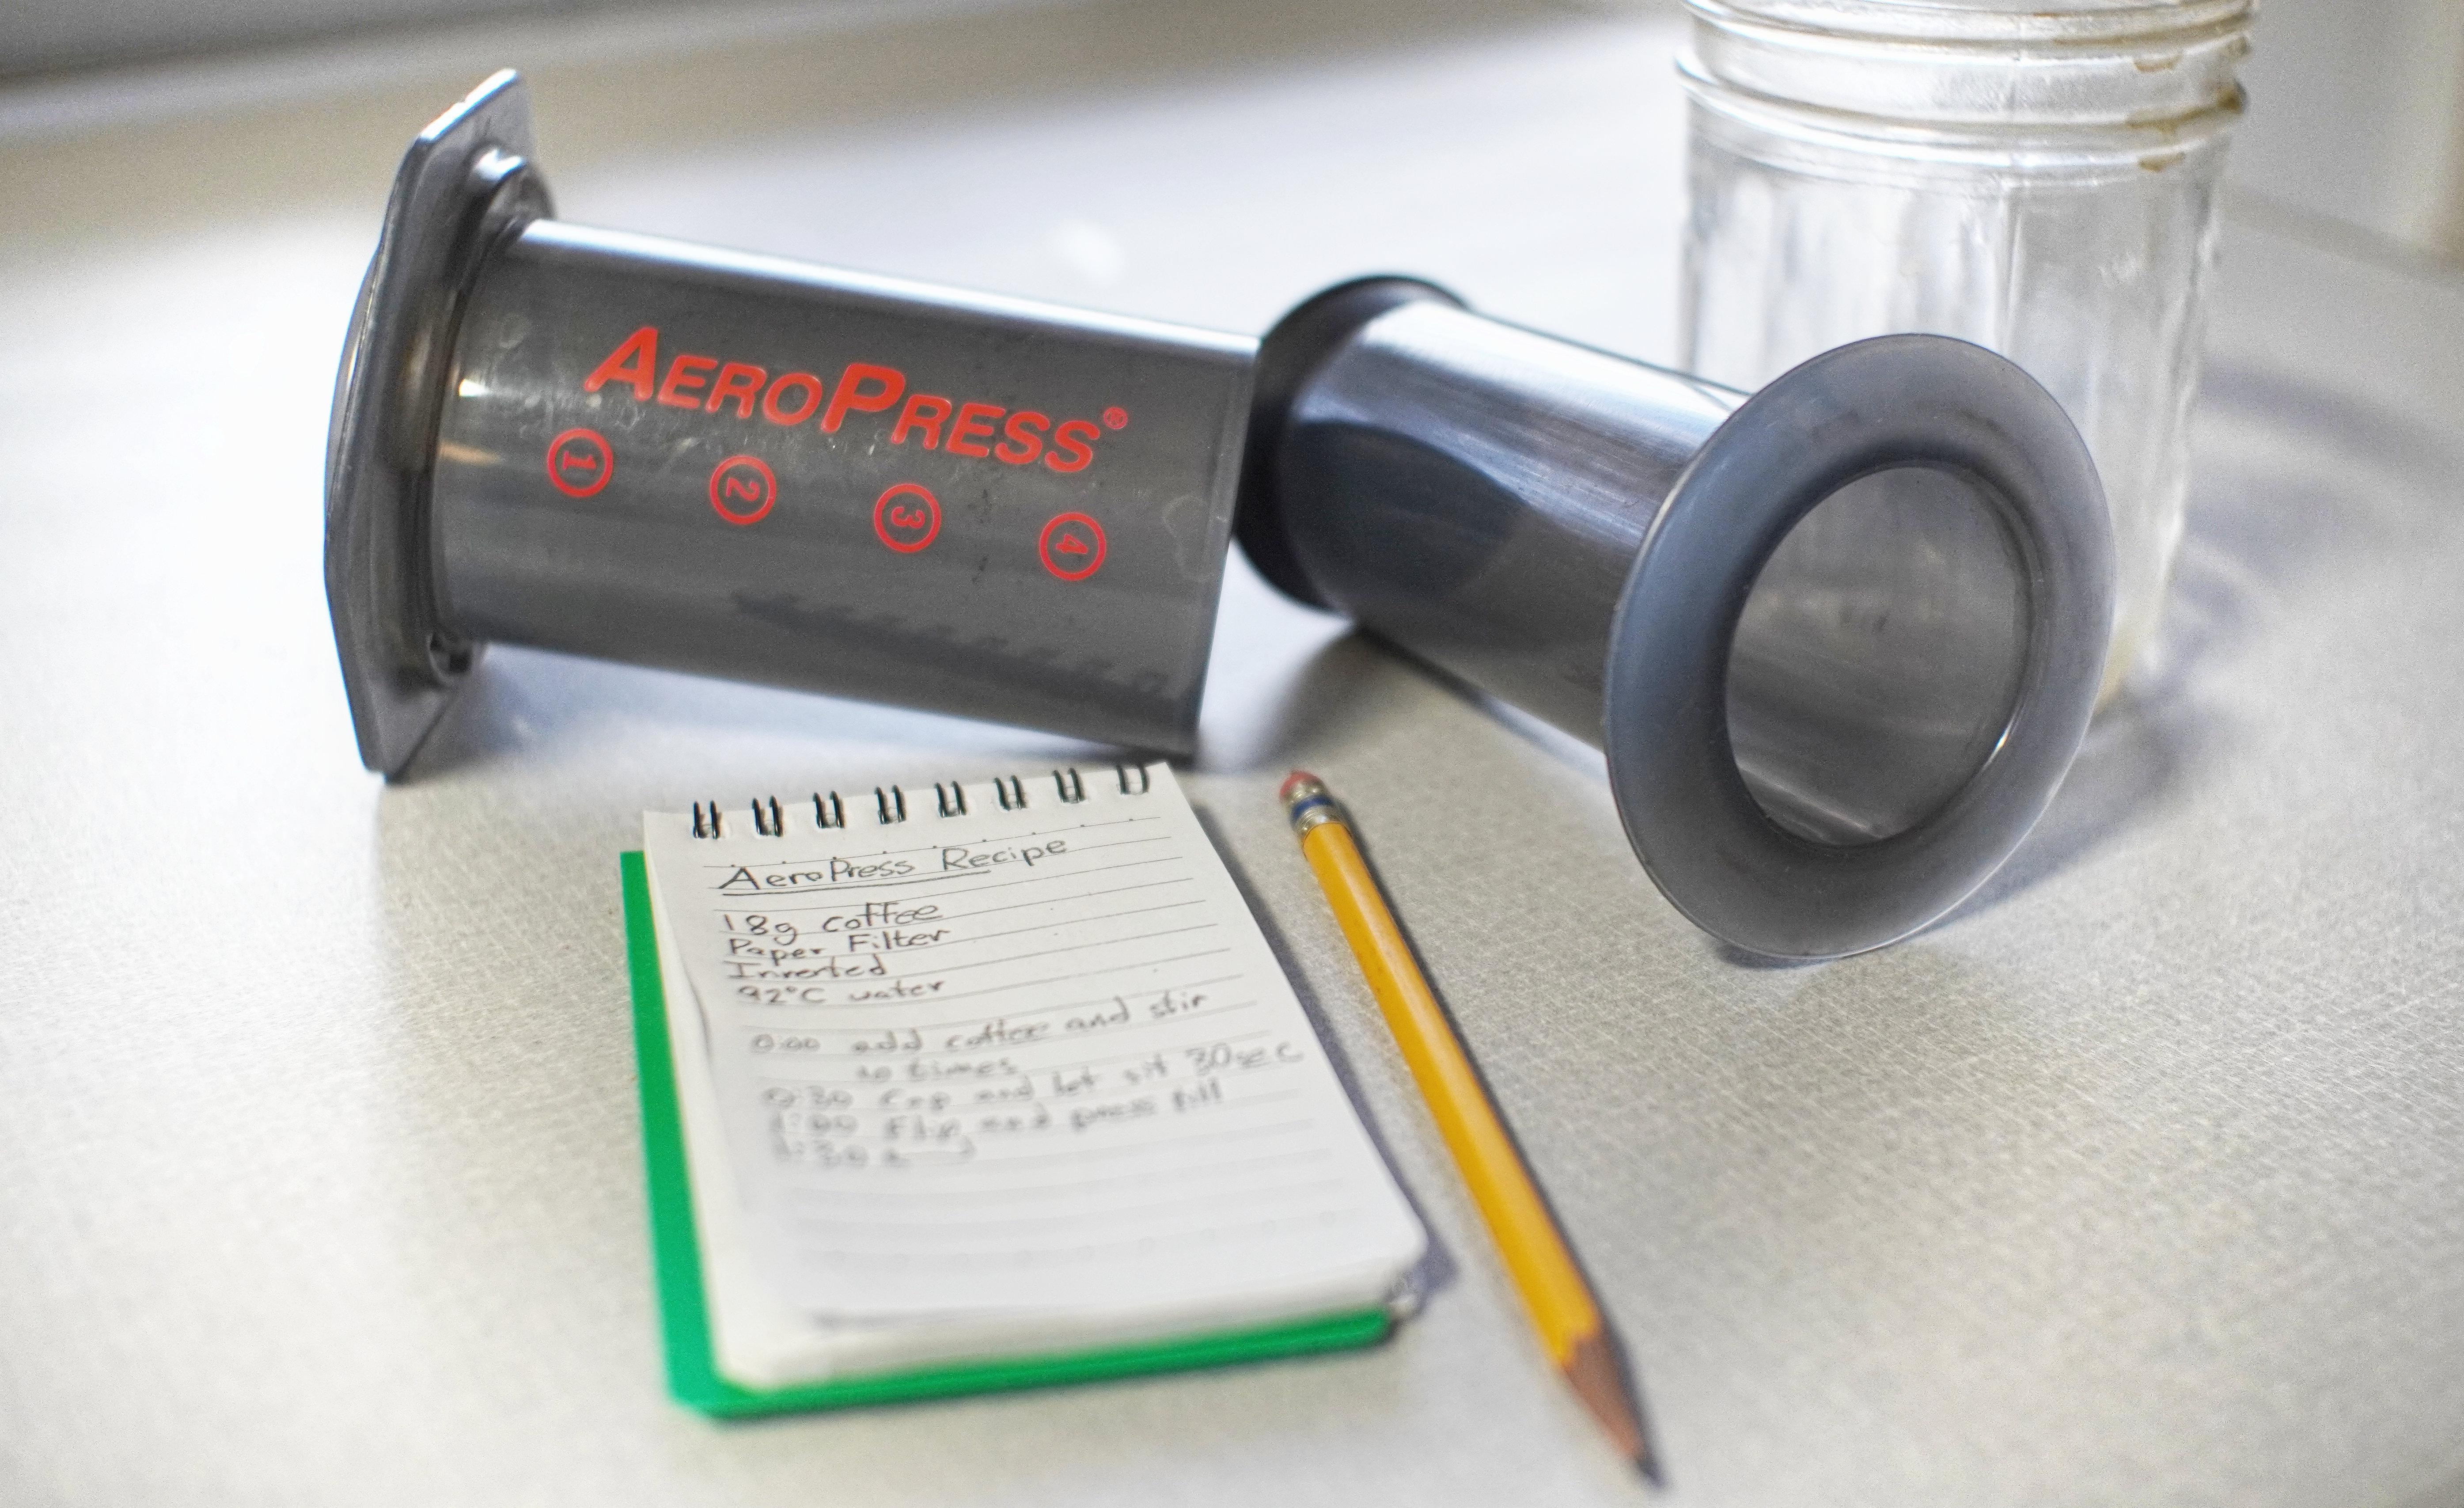
8. Basic Inverted: Now let's brew up some coffee using the inverted method. For this recipe, we will start with 16 grams of coffee. Grind on a medium fine setting. I usually grinded slightly coarser than I do for the standard method. Now, place the tube over the plunger and push it into about the four marking on the side. Place the inverted arrow, press honest scale and add your coffee. Tear your scale. Start your timer as you add 50 milliliters of water. Gently swirl or stir the arrow press for about 20 seconds. Place a paper filter in the filter holder and pour a little water through it to rinse it. Place it on the tube of the arrow press. Carefully grab the inverted arrow press and flip it over onto your cup or brewing vessel. Now we press for thirty-seconds. The total brew time from the moment you added the water should be about a minute. Math. You can drink it as is, or add a little bit of water. I prefer adding about 25 milliliters of water. Pour it into your favorite mug. Enjoy.
9. Extraction: Coffee beans are comprised of many small sells. Millions of them, in fact, locked away in these cells are compounds of different sizes, different properties. When we talk about extraction, we're talking about using water to remove compounds out of these cells. The goal being to extract the compounds that are most beneficial to the flavor and aroma of our final cup. Fortunately, these compounds dissolve into the water at different rates. And they're also limited by the filter size, whether they will fit through it or not. So we have quite a bit of control in our extraction. Here are some examples of the major constituents of coffee and the relative size to each other. Before any reasonable extraction can occur, we have to grind the coffee, that is break it up so that the water has an entry point. To remove those compounds. We're increasing the surface area that the water has to work with in dissolving and removing compounds from the grounds. The finer the grind of the greater surface area the water has to work with. So we'll increase the extraction of all compounds. Water temperature is also critical as the hotter the water, the more energy and allowing the high-energy collisions to remove more compounds. The length of the extraction is vitally important to. The longer the water is in contact with the grounds, the more that we'll get extracted and vice versa. All of these processes are occurring inside our arrow pressed chamber. The error press adds another unique variable and that is pressure. This greatly decreases the amount of time required to extract the coffee. As the greater pressure and forcing the water through the grounds speeds the extraction and extracts different compounds. In the next few videos, we're going to delve deeper into each of these variables influences the final taste and quality of your coffee.
10. Dose, Grind, and Time: Dose, grind, and time. Three of the most important and inexorably linked variables in coffee extraction. The dose is how much coffee we're using. Higher dose means greater potential dissolved compounds means higher perceived string, or greater final volume if more water is added to compensate. Our grind is going to determine how many particles are doses broken into. The finer the grind, the more particles and greater surface area are brewing water has contact with. This will generally lead to higher levels of extraction in a shorter amount of time. Coarser drives are useful for extending the extraction time, leading to higher potential volumes and a shift in the balance of flavors. It is important to maintain balanced between dosing grind as the timing and pressure of the plunging phase in the press plays an important role in the overall extraction. Too coarse of a grind width, too small of a dose will result in a sloppy press. Likewise, too fine of a grind with too high of a dose will make it nearly impossible to press. The total time of a brew is partly dictated by dosing grind. Higher doses may require more standing time to reach a balanced extraction. A small dose and the area of 12 to 20 grams might extract very quickly. The key is to find a balance between all these factors that results in a final cup you prefer the most. Just make sure each step of your arrow press recipe is carefully timed so that you can get good repeatable extractions when you have all the variables dialed in.
11. Water Temp: The arrow press is capable of brewing well with wide range on water temperatures from about 80 degrees Celsius to 97. It's actually possible to brew with room temp or cold water in the press too, but more on that in a later video. The ability of water to extract coffee is directly proportional to its temperature. The higher the temperature, the more efficiently compounds can be removed from coffee grounds. The temperature affects the balance of your cup differently than if you were to just change the time. Agitation or DOS, severe extraction. The temperature of your water can change the flavor profile of your coffee at certain compounds extract more or less efficiently at different temperatures. Excessive temperatures can result in more astringency and bitterness. Well, inadequate temperatures can result in sour flavors and a bland or weak cup. It is necessary to experiment with each different type of coffee you brew to optimize its flavor.
12. Agitation: Agitating the coffee grounds in contact with water is a vital step to achieving a balanced extraction. It helps waterflow into and interact with the ground is more evenly and timely. There are various methods to agitate the coffee grounds in an arrow press. The most common being stirring. But it is also possible to achieve agitation through a swirling motion of the repress or even a shake. I've had success with all of these methods. I found a steady swirling is a great way to agitate for a long period, gently, especially for relatively lower doses. Also swirling Nero press is very fun, showy, and fancy, which is obviously important to the experience. A slow and steady pouring phase can also be used to help agitate the coffee grounds. Stirring always works great and gives you complete control of the water distribution. In some extractions, I stir twice, once, right after adding water and then before pressing. Especially with certain roasts, this allows a lot of gases to escape and breaks the grounds up. Eating in a very steady, clean press.
13. Press: Now, for one of the most fun parts, The Press, this step gives the arrow press much of its uniqueness and flavor and style. Usually a steady even press taking between 3060 seconds produces the best results. The pressure required to push the plunger down is determined largely by the grind and dose. A fine-grained will offer much more resistance. The added pressure in this situation and cause more insoluble to pass through the filter, texture to the cup, and sometimes excessive bitterness. A coarser grained will result in an easier plunge. This can help accentuate the assets of the coffee as it leaves less than the latter part of the brew out of the cup. There are different ways to push the plunger. You can use one hand or both hands on the plunger and press firmly. You can also rest your elbow on the plunger and allow it to fall slowly under the weight of your arm. One of my favorite techniques is to use both hands with my dominant arms, elbow up at 90 degrees. This allows me to be most consistent and have the greatest control of the pressure. It is also possible to adjust your extraction by stopping the press before the plunger reaches the bottom of the chamber. Stopping earlier can reduce the chance of over extraction or of adding excessive texture. You'll see some recipes recommend to stop pressing when you start hearing a hissing sound. That is, the oppressors run out of water and the remaining air trapped is escaping. Very little is added to the COP at this point, and I don't think it makes too much difference. I don't use this technique much as I don't find it a very reliable method to adjust the balance. And I would recommend adjusting other variables first, Such as the total time of the press. But it is worth mentioning and feel free to experiment with this technique.
14. Bloom: Blooming is a term given to the process of wedding the coffee grounds before a significant amount of water is added. This is done to activate the extraction by allowing the water to fill in the gaps between the grounds. This also permits some gases to escape the coffee that might otherwise be absorbed into your brew. While this can be an important step and pour over brewing, it is far less impactful in the immersion style of the arrow press. Starting soon after adding water overcomes the possibility of water not making sufficient contact with the ground. I do usually add a smaller amount of water initially to my arrow press brew to allow more thorough STR without fear of spilling. But water I add next also ensures that any grounds playing to the side of the chamber are flush back into the bed of coffee. There is some room to experiment with blooming in the arrow press, but I wouldn't be overly concerned with it.
15. Bypass: Bypassing is the term given to adding water to your final brew. Given the volume limitations of the arrow press, it is a common technique to make a very strong extraction and then diluted to a higher volume of acceptable strength. It isn't necessarily just for stressing the maximum volume has brewing a small yield extraction and then diluting it kinda avail flavors not present in a similar extraction of equal volume. Adding even just a little bypass water to an extraction can have dramatic results in the overall flavor experiment with adding different amounts of bypass water, I would try increasing the final mass by 2650%. See how it affects your recipe. Always carefully weigh your bypass water so you can recreate the good results and avoid the bad. Remember you can also bypass with water cooler than your brew water. This will get your beverage to optimal dream temperature quicker.
16. Outro: Thank you for brewing with me today. I hope this course will help you get the most out of your arrow press. If you have any questions or comments, please feel free to post in the discussion area or reach out to me if there's anything I didn't cover in this course that you would like to see. Please let me know and I will do my best to add it. I appreciate reviews if you have the time to leave one. Thank you again and happy brewing with your arrow press.
17. BONUS: My favorite inverted recipe.: Join me by the light today as I make my favorite arrow press recipe. We will use 20 grams of coffee, ground, medium, fine. Heat the water to 97 degrees Celsius. This recipe uses the inverted method and a metal filter. If you don't have a metal filter, a paper filter will work fine to add 50 milliliters or 50 grams of water. Stir for thirty-seconds. Now add an additional 125 milliliters of water. I like to rinse the coffee grounds off my stirring paddle. As I add the extra water, place your cabin filter on the arrow press and then press down on the tube to remove the extra air between the coffee and the plunger. Flip it over carefully onto your brewing vessel and press for thirty-seconds. Your favorite
 Tom Plets