Transcripts
1. Introduction: Hey, Dre. I'm Eliza with
Ancestral Evolution. And today, I'm going to be
teaching you how to make your very own fun
belted garland. These things are great for
basically any holidays, special occasions, baby showers, birthdays, pretty much anything. You can customize your
colors and your shapes and create something that is gorgeous and unique
for your event. I'm a fiber artist and a
homesteader in East Tennessee. We have a small
flock of wool sheep, and we've been shearing them
and processing the fiber and making fun things out of their wool for over
ten years now. In this course,
you're going to be learning several basic skills related to how to create
things with wool. First, we're going to
talk about how to select the right wool for
your felting project. Second, we're going to
be talking about how to acid dye wool roving. Next, I'll show you how to wet felt your roving into
different shapes. And finally, we'll
be putting together our garland and admiring
our final product. This class is geared towards
the excited beginner, meaning that you're
ready to jump in there and learn some new skills and
figure out how to do this. As with anything, the more you practice these skills,
the better you'll get, and the better you'll
be able to fine tune what you want
to create with wool. So I hope you stay with
me and join this class. It should be a lot of
fun. Let's get going.
2. Project and Materials: Your project for
this class is to create your own felted garland. You can pick whatever
colors you want. You can pick whatever
shapes you want, any size, any length you want. When you get done,
make sure you upload a picture to the projects
tab and let me have a look. I'm excited to see
what you make. Let's talk about what
you're going to need. First and foremost, you're
going to need some wool. Today, we're starting
with wool roving. Now if you are starting
from a raw sheet fleece, please see my classes
on how to wash raw wool and also how to
card wool on a drum carter. That's can be really helpful to you before you get
to this class. If you're just
starting with roving, great, you're all set. Next, you are going to
need a pot of some kind. This is my dedicated
fiber dyeing pot. I only use this for dyeing, I do not put food in it. That brings me to dye. You're going to
need some kind of acid dye. What does that mean? Today, I'm going to be
using Dharma acid dyes, um I think they're great. You can find them online. But if you do not have this, you have a couple other options. Aid works really
nicely as an acid dye. It has acid already in it, so it's great, ready to go. The other thing you could
use is just plain old food coloring or Easter egg
die will work for this. Again, if you are using
something like Dharma dies, something that is not food safe, you're going to need a pot or you can also use a
slow cooker for this, that you can just use dies in it and does
not have food in it. If you're going to be using
ku aid or food coloring, you can use your normal
cooking equipment and you can use it with
food afterward. No problem. To go along with that, we're going to need
some white vinegar, plain old distilled
white vinegar is fine. Next, we're going
to need some soap. I like using castle soap in
a bar form for this project. I think it's the
easiest to control. Some filters swear by palm
olive disp that can work too. Pretty much any soap
will work, to be honest. You just want to avoid the
soaps that have tons of bubbles because
that's just going to be annoying in the
filtering process. Castle soap tends to produce
a little bit less lather, so it tends to work a little
bit better for this project. Next, we're going to need
a needle of some kind. Today, this is a weaving needle. It's actually a six
inch weaving needle that actually came in it. For those of you who
are familiar with a Zoom loom, it came with that. I find that this works really
well for this project. But really, you can use
any needle you want to. I'm going to be using a thin. This is 100% cotton string. You can use thread
if you want to. I don't like using
thread just because it is a little bit more
prone to breaking. I like the stronger
string material, especially if I want to keep my garland around
for a long time. Especially with kiddos around, things get put through
their paces and having something
that's a little bit stronger tends to
hold up better. You're also going
to need access to a sink and some warm
water. Let's get started.
3. How to Select Wool: Let's talk about what kind of wool you're going to
be starting out with. To pick wool for your project, you're going to want
something that is 100% wool, not something that has
other fibers added into it. You don't want something
that has polyester blended in with it or
cotton blended in with it. Things like alpaca and
llama will felt eventually, but you're going to have
to work a lot harder. I'm going to recommend
that you start out with something
that is 100% wool. The other thing to keep in mind is you want to avoid anything that says super wash. Super
wash wool is Franken wool. It's been treated with chlorine gas and has been
dipped in a polymer, the parts of it normally
felt don't felt. Super wash will not work for
this project, do not use it. I'm also going to
suggest that you use a lighter color wool. It doesn't necessarily
have to be exactly white. You can use shades of gray too. You can get some really nice
variations of color using gray wool as your
dying material. Um, I would avoid using
the really dark wool. You can use this
for your felting and for your final balls, but do not use really
dark wool obviously for your dying because you're not going to see the colors
very well at all. But like I said, feel
free to play around with those shades of wool
that are kind of in between the grays
and the browns. Sometimes you get
really nice colors when you over dye those things. So be creative. I want to
see what you come up with.
4. Acid Dyeing: All right, so I've
got my die pot on the stove and I've just filled it with warm water from the tap, and I'm going to turn it
on and bring it to a boil. So our water is boiling now. I'm just going to turn this off. And I'm going to add
some white vinegar. Now the rule of thumb
is about a fourth of a cup vinegar for
a pound of wool. Now, I'm just going to be
dyeing a couple ounces today, so I don't need quite that much. To be honest, I don't
usually measure this. I just give it a generous glug. It's better to have a little bit more than you need
than not enough. If you are using citric acid, the ratio is one tablespoon
per pound of wool. If you're using lide, you do not need
vinegar or citric acid because if you look on the back, first ingredient is citric acid. We got a built in acid for kola. If you're using
regular food coloring, you will need
vinegar. All right. So today, I'm going to
be dyeing some red. This is fire engine red. And I'm going to use probably about a quarter of
a teaspoon total. I'm gonna put that in our
dye bath with the vinegar. I just stir it up. We want to get this really
well dissolved, so we have a pretty uniform dye. It's foaming a little
bit. That is good. We don't want any
clumps or anything. Here. As far as temperature
for dyeing goes, we want this just under boiling. I find if I heat my
water to boiling, then add my vinegar and the dye and by the time I get the wool in there, it'll be the perfect. I have some roving. This is a Shetland cross
roving here, whitish. I'm just going to
gently put it in my die pot and I'm
just going to press down to get it
underneath the surface. Now remember we've
selected fiber here for its felting abilities. We don't want to felt it before we're ready for
it to be filtered. Just be very gentle
in this part. You don't want to agitate it, just gently push down
until everything is submerged. Looks pretty good. I'm just going to
let this sit and come pretty close to
room temperature. By that time, you can see already some
of the colors coming out of the water here and
the fiber is picking it up. All right, so we'll come back
when this is nice and cool. All right. So this is cooled
off now and you can see there's almost no
dye left in the water. This is ready to go. This water has a little
bit of vinegar in it, as you remember, we need to
rinse the vinegar out of it. To do that, what I'm
going to do is I'm going to fill up my sink with just some room temperature water and I'm going to
transfer my wool into it and just
gently let it soak. Again, we do not want
to agitate this. I just lifted my wool out
of my pot with my spoon. Just going to transfer
it to the water. Again, just let it push
down a little bit. Just let it soak for a minute. Now, if your wool is
still a little bit warm, do not put it into cold water because that's going
to shock the wool. Again, we don't want to filt it before we're
ready for it to filt. So the goal of this is just to get rid of
that extra vinegar wool, if you let it sitting
in vinegar or leave vinegar on it for
a long period of time, it's not real good for it. It will damage the wool. I'm going to just
repeat this process. I've got my wool out of there. Now I'm going to fill
up my sink again. Never let your faucet
run on your wool because that's going
to agitate it and you're going to get felt
before you're ready. Okay. Just push it down again
just a little bit. If I were dyeing
yarn or if I were wanting to use this roving for something other
than felting, I would either use
a little bit of syntropol or a little
bit of do soap in my rinse here just to get
all of the extra extra dye. But because we're going to
be felting and we're going to be using a bunch
of soap on this, anyway, I'm not so concerned
about it at this point. This point, I'm going to
take it out of here and I'm just going to
hang it up to dry. Hangers work nicely for this.
Just going to hang that up.
5. Wet Felting: All right, so let's
talk about how to wool felt your wool roving
that you just dyed. Got these pretty colors. You're going to
start by pulling off a piece off of your
piece of roving. I recommend it
starting with a piece about this size. I see that. As you're getting started, you may want to start with
slightly larger pieces and then you can
work your way down. But the slightly
larger pieces are easier to handle as
you're beginning to felt. I'm just going to start
at one end and I'm just roll that end in. Now, once I get a bit going, I'm going to shift
that about 90 degrees, doesn't have to be perfect. I'm just rolling it so the fibers are lining up
in different directions. It's not just a single
direction coil, it's a jumbled mess. When you're filtering,
jumbled messes are good. There we go. We got a
jumbled mess. Very fluffy. I'm just going to submerge this. This is warm water, just tap water that came out pretty much as
hot as it can go. I'm going to dip it in
there and get it wet. I'm going to get my hand wet
and then I'm going to get a little bit of soap on
my hand. From my bar. Like I said, you
can do this with liquid soap too if you want to, and then I'm just going
to start rolling it in a ball just like you would
roll a ball of playdough. You can see it just
beginning to come together. Now, as you're starting out, you just want to be
very gentle at first. You don't want to push
very hard at all. You just want to put just
a tiny bit of pressure. As you feel the outside of
that ball starting to form, you can use a little
bit more force. You can see I'm getting
a little bit more soap as I go. O. See that starting to
come together there. We're just going to
keep working it. Like I said, the
more you work it, the more solid your
ball is going to be. Now for the purposes
of a garland, we don't need this
to be super compact. If you're familiar with wet
felting, if you keep going, you'll get a super solid
ball and you can do that, but it's going to make
your life a little bit harder as you go. If you need a little bit more
liquid, you can do that. All right. That is
looking pretty good. I'm just going to give
a couple more rolls, a little bit more soap. If you find that you've gotten too much
soap on your hand, you can rinse them off in the warm water and
that helps reset. If you get too much soap on your hands when you're
trying to do this, the ball will just slide around. I won't actually roll in
the way you want it to, and then you won't get
that spherical shape. You'll get a pancake instead, which is not what we're after. If you find that
that's happening, rinse your hands off in the
warm water and then reset. That should give
you enough friction to where you can
roll it in a sphere. All right. That is looking pretty good.
I'm pretty happy with that. After this, I'm just
going to rinse this under some cold water in the tap
and set it aside to dry. We've talked about how to create a spherical ball shaped bead. Let's talk about how to
create an oblong bead. I've got a piece of blue here, again, something
about this size. But you can play
with the sizes and do different variations
as you want to. I'm going to start at
one end like before. Just roll it a little
bit and then shift it around so it's not just
rolling from one direction. Ideally, you want your fibers at 90 degrees from each
other, more or less. We got our roll
here. Same thing. I'm going to dip this
in my warm water, get some soap on my
hand, get this going. Now I'm going to start out doing the same thing that I did
with the spherical ball. I'm just going to
roll it and create the beginnings of a sphere
here. A little bit more. Again, put a little
bit too much soap, so I'm going to get some water. It's less slippy slidy. Also, like I mentioned before, you don't want to
soap that has tons of bubbles because that's going to make this part of the
process more annoying. I've got the beginnings
of a ball here. Instead of continuing
to work on this ball, what I'm going to do
is I'm going to pinch it like this and loosen it up. Now it's oval shaped,
egg shaped, if you will. I'm going to keep
going. But instead of doing like you
would a Plato ball, I'm just going to roll it
back and forth in my fingers. The process of the soap
and the warm water helps open up the scales in the wool and helps
them bind together. You see it's forming.
It's not quite done yet, still If you see it, it's still fuzzy, keep
going a little bit. All right. You can shift
where in your palm you're rolling it if you
find a Plato snake, pardon the Plato references. You want to shift it
up and down to even it out because obviously you have bumps and grooves
in your hands. You can do this on
a surface also, but I find it's easier and less messy just
do it in my hands. All right. See? That
looks pretty good. I'm pretty happy
with that. You have a little bit of a
tuft on each end. I think that's all right.
That's going to be partially hidden when we get the beads on the garland anyway, or you can continue to work it. You make your own artistic
choices at this point. Again, I'm just going
to rinse this under some cold water and let it dry.
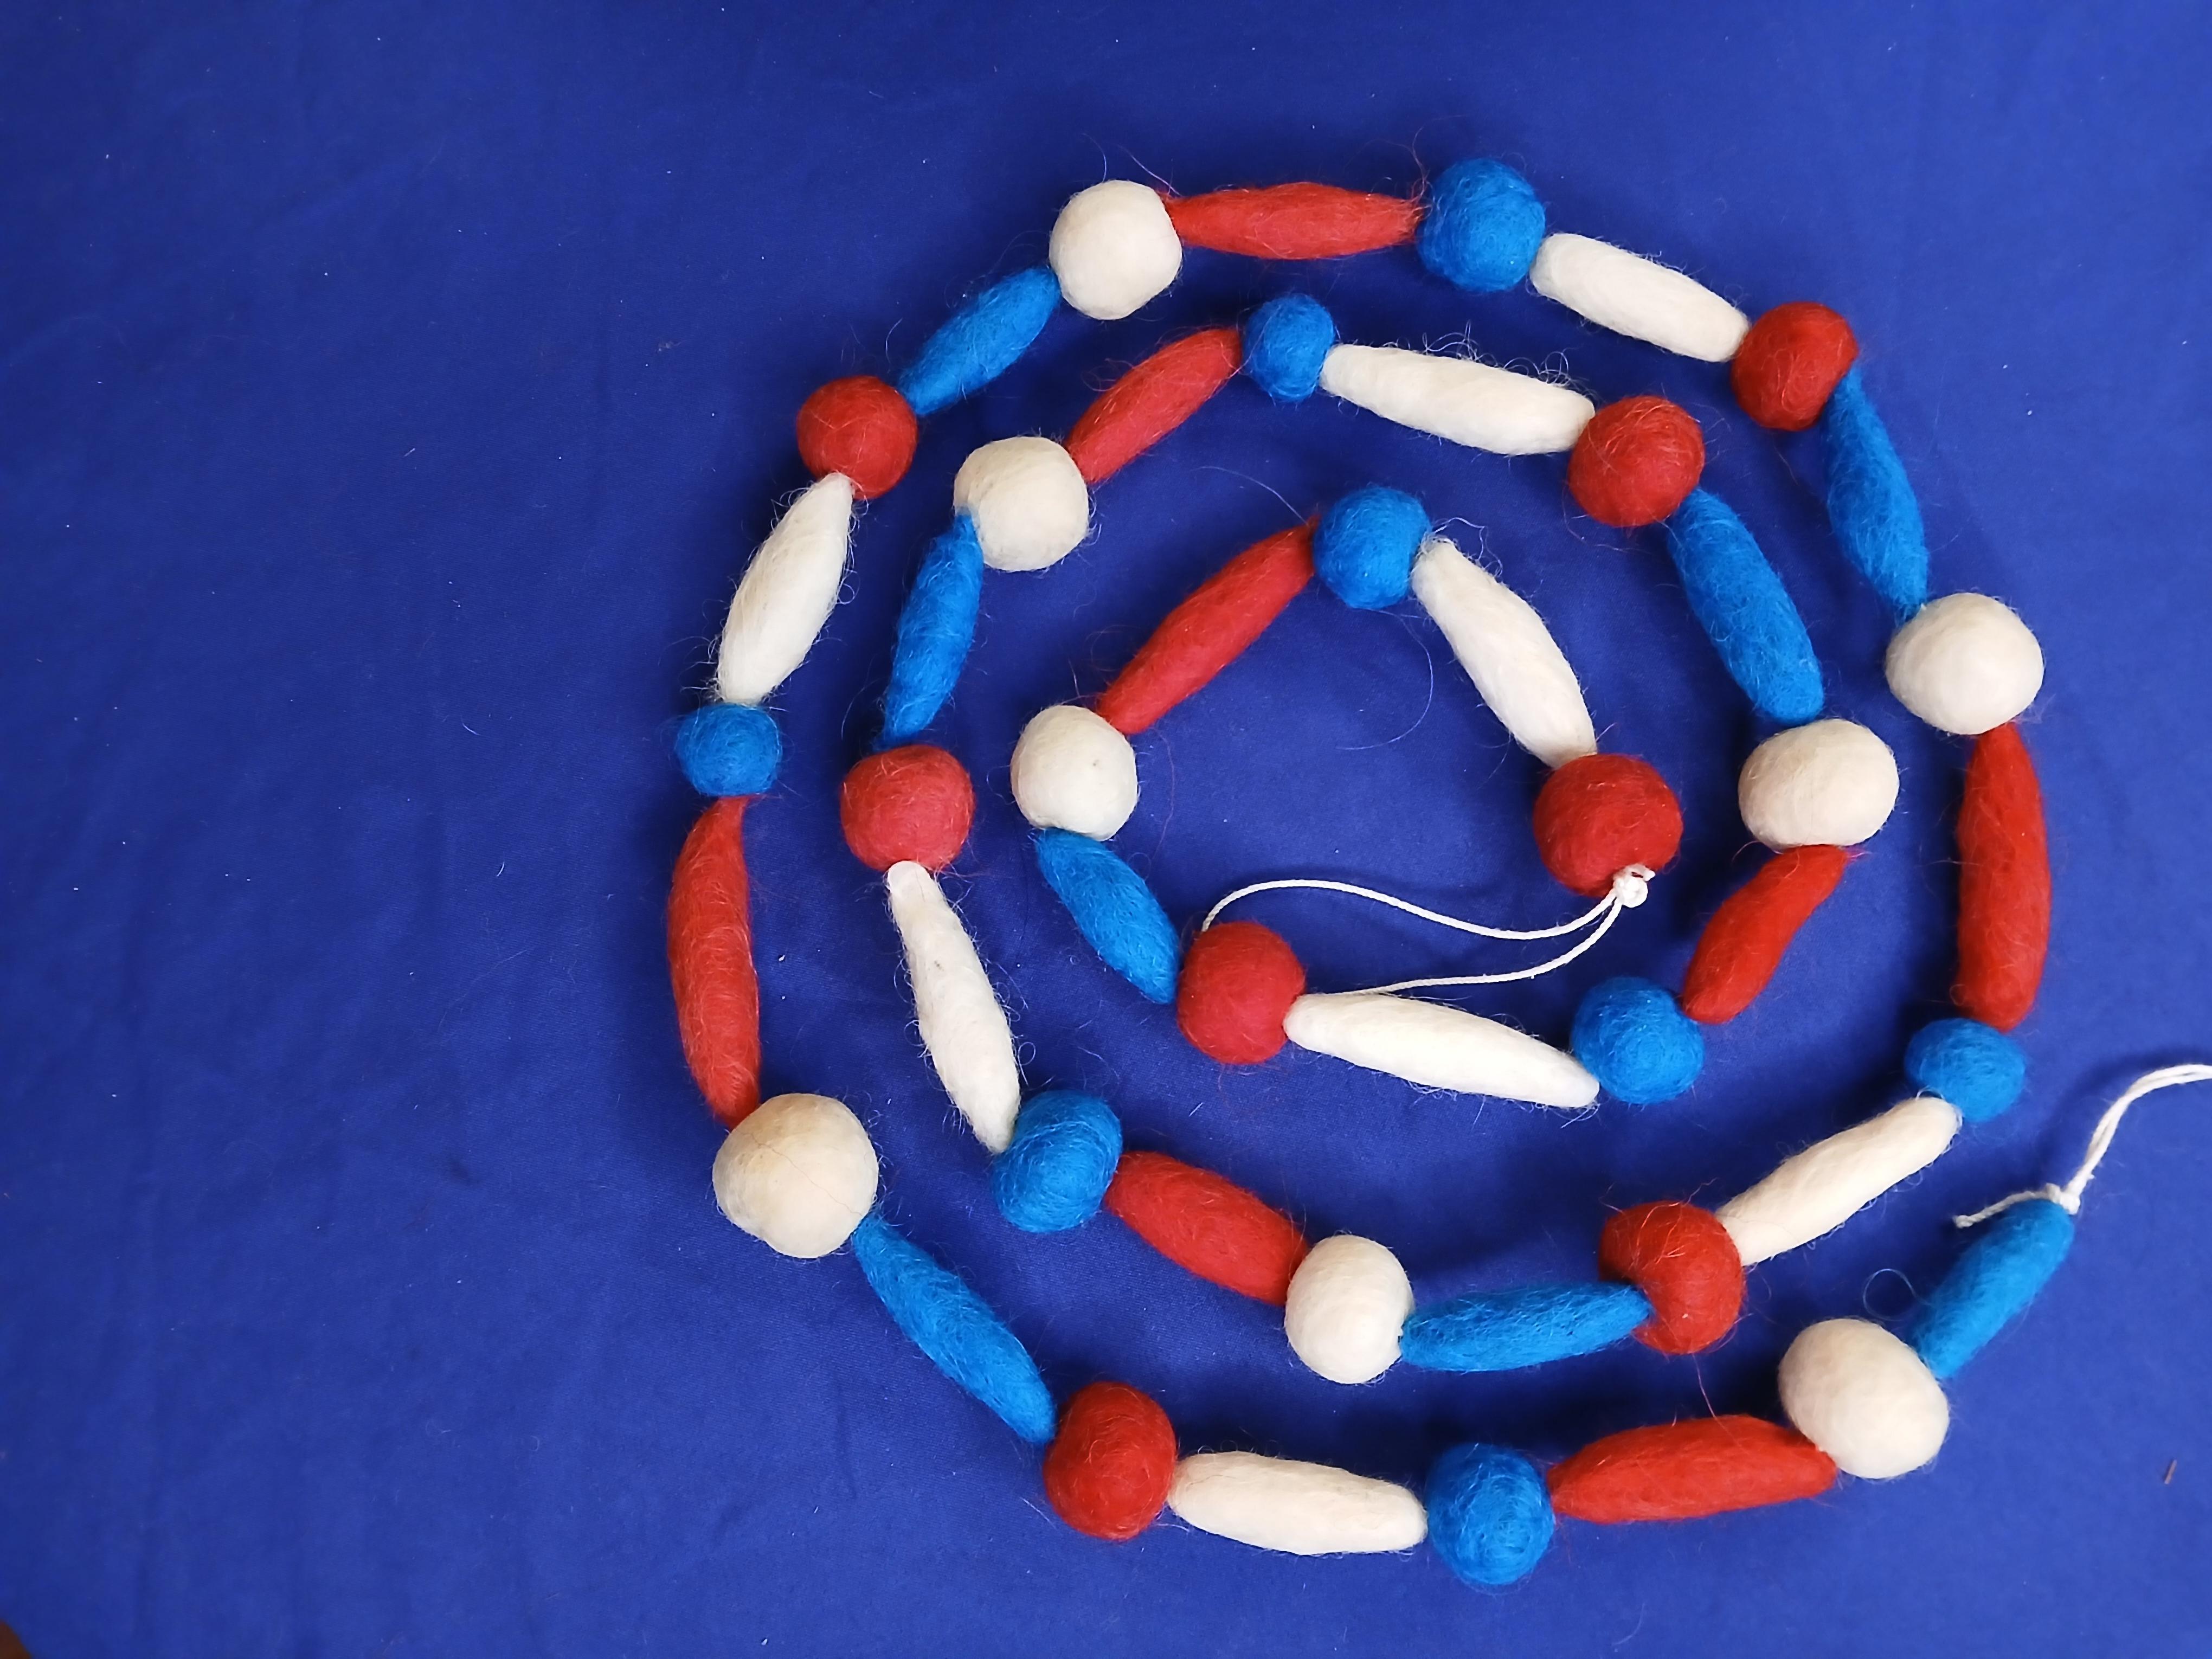
6. Making Your Garland: All right, check out our beads. Aren't these pretty? I
think they're pretty. Now we're going to
need our needle. Like I said, this is a
six inch weaving needle that I like to use
for this project. You can use any kind of needle, but I find that this
works the best. If you have access to
something like that. I've got my string, and what I did is just tie a pretty
good knot at one end of it. Like I said, I
like to use string because it's thicker
and heavier. I can get a pretty good knot at the end that'll
stop the beads. If you're using just
regular sewing thread, it's a little bit trickier to
get a good knot at the end that's going to stop your
beads, but it's doable. I'm going to thread my
string on there. Get it on. You're going to pick
a bead to start with, and you're just going
to stick it through. Now, this is where it is helpful
if you have not filtered your balls a super large amount because if you've just
filtered them a little bit, you can see this ball is
still a little bit squishy. It's not super hard. It's going to be much easier
to pierce through these balls that are a
little bit squishy than the ones that are super compact. We'll start here. I'm going
to do a red white and blue. Scheme here since it's
almost the fourth. Now, these long ones,
I go from the end and go down to the
tip, just like that. Pull it on. Keep going. This one is a little
bit more compact. It takes a little bit
more doing to get through it and you may find
it's a little bit tricky. What you can do if that happens is just twist your
needle back and forth and it'll make its way through eventually as long as your needle is sharp enough. That's another reason I like this particular
needle is because it has a pretty nice
point on the end. I do have a five
inch weaving needle that I also use sometimes, but the point is not
quite as poky at the end and it has a hard time getting through
some of these balls. This one works really nicely. Again, I'm going to go
through end to end. Another thing to keep
in mind is that whether you want your beads just spaced
right next to each other, or you can separate them a
little bit separating them. Gives you a nice effect and it doesn't require
quite as many beads. You can see that
looks pretty cool. This works better on
the thicker strings. If you're working with thread, this is not going to work quite as well to separate
your beads like that, but it is a nice effect. You can also play around with
different colored string. That's a neat variation also. I'm going to put mine together
for our purposes here. I'm just going to keep going and I'll meet you back
in just a minute. We got it all strung up. Got about five feet
worth on this one. You can obviously
make it however long you want to make it. But when I go to the end, what I like to do is to make a nice loop so that you
can hang this up easily. I just double it over and
tie a knot on this end, and tie another knot. You can do two or
three depending on the weight of the string
that you're working with. But that should be
fine to stop that bead and also to give us a
nice loop on this end. When we go to decorate, we have something to
hang it from. All right.
7. Final Thoughts: Alright, there you have it. Now you know how
to make your very own felted bead garland for any occasion. Don't forget to
take a picture of your project and post it
under the project's tab, so I can have a look and
see what you've made. Also, if you have
any questions or you run into any
issues along the way, post a question, and I will
get to it as soon as I can. Also, don't forget to
leave a review for this class so others
know what to expect, and it also helps my
classes get noticed. So, take care. I'm so excited to see what you make
with your new skills.
 Ancestral Evolution, Traditional skills for the modern world