Transcripts
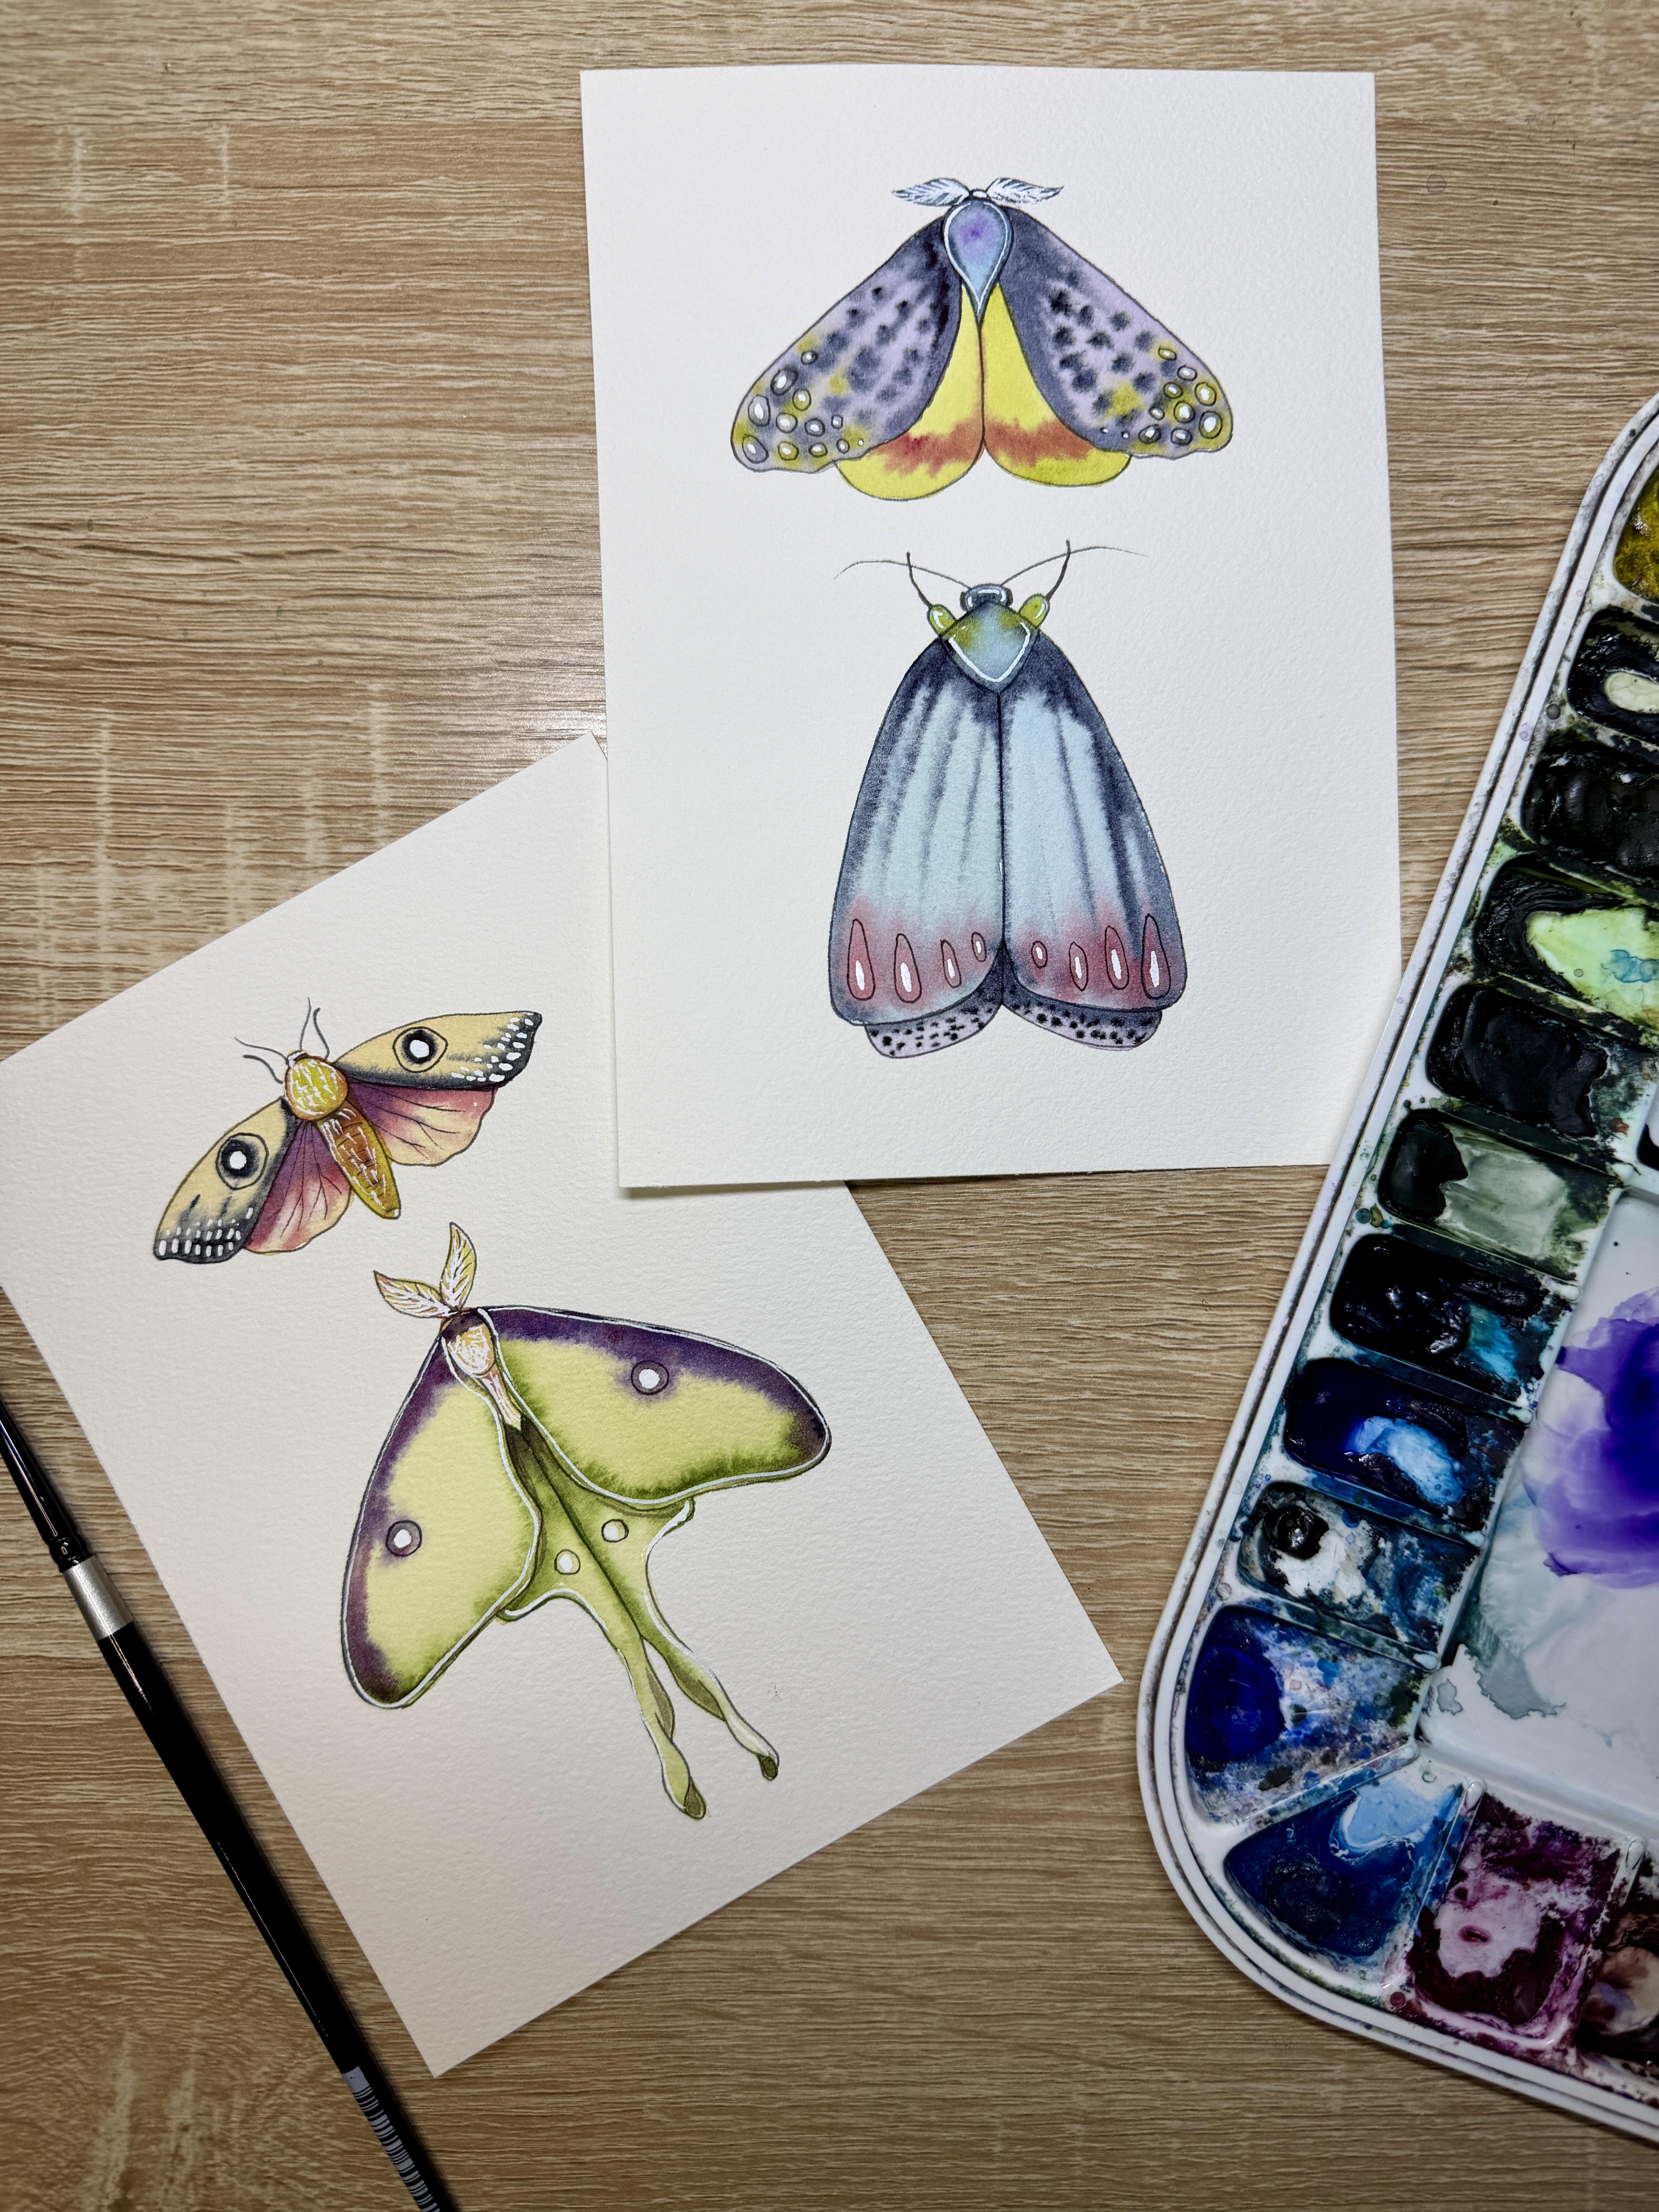
1. Intro: Magical Moths in Watercolors: Hello, and welcome.
My name is Emily, and I'm an artist and instructor based in Madison, Wisconsin. In this Skillshare tutorial, you'll learn how to paint
four different moths using only a
wet-on-wet technique. We'll practice how to make
lines, dots, hash marks, splotches, all using a
wet-on-wet technique so that you have really
soft, blurry edges. We'll then take a black Micron
pen and add some details, and at the very end, we'll use white gouache to accent the antennas
and some of our spots. You'll have access to a tracing template
included in this tutorial, as well as some color
reference photos and printout instructions that will teach this
tutorial step by step. So grab your supplies, and let's get ready to paint.
2. Supplies: Alright, let's talk about
our supplies really quickly for magical
moth tutorial. So let's talk paper
choice first. I will be painting on
arches cold pressed paper. I like to buy the pads
of ten by 14 inch paper. And then I will cut
them into four, and I actually will get
out you'll get out four, five by seven just with
one piece of paper. Or you can also paint
both of your sets of moth on 18 by ten inch
sheet of paper as well. Um, once you have
your pages set, I do suggest that
you tape them down onto some sort of plastic
board or your desk. And then that way, you can avoid your paper from buckling
or bending or warping. If you're using a paper
other than arches, make sure that it
is 100% cotton. I should say it on the pad. I do suggest using a cold pressed paper instead
of a hot pressed for this tutorial because we will be doing all wet-on-wet
for our first layers, meaning that we want to keep that first layer nice and
wet so that we have time to drop in all of our
lines and our dots and our hash marks before
that layer dries. If you're using a
hot press paper or a paper that
isn't 100% cotton, you might not have
enough time to drop in your more concentrated color, and it also might not bleed
and spread the same way as 100% cotton cold
pressed paper. The next thing
that you are going to need is a variety of brushes. I will be using a
round size four, silver limited black
velvet brush for pretty much the
majority of the class. I might switch to a
slightly smaller, finer brush for the
head and the antennae, something like around size two. I also might be using a
round size zero for some of the smaller dots and things
around my around my moths. But I'm going to be sticking
with round size brushes. So a variety of round
size brushes size zero through four. At the very end of the class, once our layers of
watercolor are dry, we will be using micron pens
to add some black details. You don't have to use
pigma micron as the brand, but it should be waterproof, and I do like that it has a felt tip pen so
that it's really nice and smooth on our
cold textured paper. You also have the
option of adding some white gouache details
around your moths. There is some fine line work. And so for the very
long line work, you have the option of using
a script or liner brush, sometimes also known
as a Bigger brush. It has longer bristles. It just allows for
a longer amount of draw time without needing to dip your
brush as many times. However, for all of
the dots that you see and the small dots
and the oblong dots, I would suggest using
just a small round size zero as dots are a little bit more tricky to do
with a rigor brush because you have a lot more wiggling
on the tip of your brush. For our watercolor, I am using
all Daniel Smith colors. You can see a full list of the exact colors that I'm
using in the supplies guide. However, you can use whatever brand of
colors you would like. I'm sticking to kind
of these jewel tones. So I've got this really
bright neon green. I also have a yellow, a red, a purple, and a light blue, and kind of the mix of all of these colors on all
these different moths. So I kind of have
a limited palette. But I have seen this
class done before with soft pinks and
purples instead. So you're really welcome to
switch up your mots colors. We'll be talking about some color combinations
and how to look at combining colors in the very beginning
of this tutorial. All right, once you have all of your supplies ready,
let's get started.
3. Testing out Color Combinations: Alright, so we are
going to start off this tutorial with testing out a few different color
combinations wet-on-wet. So with this moth project, we are only doing
one layer of color, and that layer is going
to be wet-on-wet, where we're allowing
the two colors or three colors to blend with
the water that we put down. Alright, so I'm going to mix a base layer of
color with water. That's going to be what
I paint down first. And then while
that color is wet, I'm going to take another
color directly from my pan, so it's nice and concentrated, and I'll drop that color
into the wet section. And I'm gonna allow it
to bloom and bleed. Now, if I want the
color to expand more, I'm going to have more
water on my brush. If I want that second color
to not expand as much, I'm going to have my brush
be a little bit drier. Um, I can test out a few
different types of dropping in. I can drop in little dots. I can drop in little hash marks. I can drop in, like, little and pull little
lines and veins out. So I'm kind of testing out a few different
color combinations. But each time I'm
testing these out, I'm making sure to not
over mix my colors. So when I lay in that
second color, wet-on-wet, I'm not going in and
blending those two layers, I still want those
colors to stay separate.
4. First Set of Wings: Wet on Wet: Alright, now that I have some color combinations that I like, I'm going to start painting
my first set of wings. So I'm going to choose
either the upper set or the lower set of wings, and I'll paint those first. I'm starting with this
moth on the upper right. I have a new gamboge
mixed with water, and that's going to
be my base layer. I am doing this one
wing at a time. You can do this two
wings at a time, though. So after I paint
that yellow down, I'm going to go and
grab a little bit of quinacridone red on
the tip of my brush, and I'm going to drop it in where it would be the darkest. Now I can also add a
few little lines there. If I want it a little darker, I can drop in and dot a
little darker pigment. And then once I have that
pigment placed where I want it, I can wash my brush, dry it, and use a dry brush to lift
wherever it got too dark. Now, you'll notice
here that it's working well because I have not washed my brush in
between my colors. So I'll show it to you again. I'm going to start one more time with that base layer of yellow. And then once I have my
base layer of yellow, I'm not washing my brush
before I grab my red. I'm grabbing that red using
whatever liquids on my brush. Now, that's important because
if I were to wash my brush, I'm going to have
too much liquid on my brush to drop in that red. If there's too much liquid
on my brush with the red, then that red is going to
push all into the yellow. So you really need to this class is all about
working on control of how much water is on your brush for dropping in your
colors wet-on-wet. So we really want
to be cautious. If your color is
expanding too much, you want less liquid
on your brush. Maybe you tap it on
your paper towel first, and then you put it
in the wet section. If your color isn't expanding enough and it just stays there, you either need a wetter
first layer or you can add just the tiniest
droplet of water onto your brush so that it expands just a
little bit more. Now on both of
these set of wings, when I'm done dropping
in the extra color, I wash my brush, I dry it so that it's
mostly damp and mostly dry. And then I use that
dry brush to lift in any segments where the
color expanded too much. We're going to continue
on all of our moths. I'm doing the
underside of the wings first just because it's
a smaller section. I want to gain a
little confidence before I move on to
the larger wings. So for my una moth, I'm using green gold
as the first layer. That's a Daniel Smith color. And I'm going to drop in some dioxyine purple and a little bit of magenta
around the outer edge. Now, for the underside here, where we don't have
those purple colors, I'm using a deep I'm using a sap green directly
from my palette. And that sap green is going
to expand around the edge. Now, I do enjoy how the
expansion of that sap green, it's different all
the way around. So some sections it's going
to be a little thicker, some it's going to
be a little thinner. I enjoy that. I think that variation makes
it look really great. Alright, so I'm going to leave the second side
of that una moth. I'm going to leave this first
side to dry a little bit, since they are touching
on such a large section. So I'm going to work
on another moth. Now, all the other three moths, other than the luna moth,
they're all made up in colors. So choose whatever
color combinations that you liked in
your practice round. I really enjoyed this
combination of palo blue, a very light thalo blue, very transparent with indigo
and anthraquinoid red. And so that's what I'm
going to do for this moth. Now, when I paint these
larger sections of wings, I go back to the beginning
where I first started, and I make sure that the
whole wing is evenly wet. This is going to make sure that the second color that
I drop in is going to expand in the same sections in the same way because
it's all evenly wet. So when I go to grab
a little indigo directly from my
pan with my brush, I haven't washed my brush. I'm using just whatever liquids left on my brush
from that first layer. And now I'm adding a little
bit of that indigo along the top end and then pulling a few lines through
the wet section. Now, remember, wherever
you lift your brush up, is you're going to
have a little puddle of that color wherever
you lift your brush. So I don't mind having a little bit of that
indigo in the base because I'm covering it up now with a few dots of anthraconoid red. Now, you notice I did add
a little water to my brush because I wanted that
anthraconoid red to spread slightly. So here's where you
can kind of practice your water control by adding just the slightest
amount of water. And if it doesn't expand
enough, add a little bit more. Alright, we'll go back
to that una moth now that that first section is at least a little bit dry and we'll do the second underwing using that green gold and dropping around the
edge with sap green. Mm. Alright, now for my last moth, my base layer is going to be a watered down diaxysine purple. And so I have that layer first. I'm going to paint
that first wing. Now, another thing to
kind of mention as you're painting
your first layers here since our first layers are really important
to make sure that we have really nice clean edges. So I always want to
take a little bit of extra time and make
sure that my edges are really nice and clean because it's going to be
really hard to come back and clean my edges after
this first layer has dried. Now, because I take a little bit longer painting the edges here, you'll notice that I go
back to where I started, and I'll move the
pigment around, make sure that that first
layer is nice and evenly wet. Now, when it's evenly wet, I'll go and I'll take
some indigo on my brush. Once again, I did
not wash my brush. It's whatever liquid was left on my brush from
applying the purple. And then I'll add that indigo along the outer edge of my wing, just the center and the top. And now I'm adding just
some dots in the center. And I decided that those dots kind of looked a little
too poke dotty for me. So I washed my brush. I cleaned it off, so I dabbed it so
it wasn't so wet. And now I'm just gonna pull some lines through those dots, using a damp brush so
my brush is not wet. It's just gonna kind of soften
those dots a little bit. But it's still missing
a little something. So I decided to
grab a little bit of green gold using
a damp brush. It's not soaking wet. And I dropped in a little bit of green gold along the base. Now, you notice that all of this is happening
quite quickly. All of these colors have to come together while that first
layer is still wet. If that first layer starts to dry and it's starting to turn
a little matte in color, you've lost the ability
to add any extra colors. This is why we practice these color
combinations before we paint because we
want to make sure that we aren't wasting
precious time, that we know exactly what
colors we're going to lay down because we just don't have that much time to paint.
We want to do this well. It's all wet. Alright, so I'm going to leave the video
running at normal speed. I don't want to speed this up because I do want
you to see just how long I am taking to paint
these wet-on-wet layers. So I do take my time, but I'm also not
taking too much time, so I'm doing it while it's wet. So watch as I add my
secondary colors. I'm going to finish
up this purple wing, and then I'm going to finish
up the blue wing down below.
5. Second Set of Wings: Wet on Wet: Alright, now we're
ready to paint the second set of wings, wet, unwet still using
the same exact technique. And now we're starting back
on those first few moths that we did because the under
set of wings are now dry. So going back to my una moth, I am using that first layer of green gold mixed with water. Once again, I'm making sure that that whole wing is
really nice and wet. I'm making sure my edges
are nice and clean. I'm not going to paint the
head or that abdomen there. I'm just doing the wings here. It then I'll go and grab some sap green using whatever liquids
left on my brush. I'm not washing it, and I am dragging that sap green along the inner edge of my wing. So I do want that green
to expand slightly. But then I'm gonna
wash my brush, dry it. So it's a damp brush. It's not soaking wet. And then I'll grab some purple. And this is dioxazine
purple that I'm going to then drop in along the
upper edge of the wing. Now, if your purple
expands too much, that means you have too
much liquid on your brush. You're gonna want to tap
it on your paper towel. And if it doesn't expand enough, you might want to add just
a little bit of water. After I lay that purple down, I'm going to wash my brush, dry it, and use a dry brush to clean
and blend those edges. Now, you might like that
little spider veiny look of that purple kind of
veining into the green. I don't mind it so much, but I did want to just kind of clean up some of the edges. Now, remember that when we are cleaning edges wet-on-wet
between two colors, we do not want to
reintroduce water. So your brush when
you clean edges, has to be dry or slightly damp. So it's never going
to be soaking wet. Alright, we'll do the same
thing with the second wing. Once again, I'm not
going to sweet it up, so you can see in real time how long I take for each layer and dropping in and how long I
take for lifting and blending. And because sometimes I can't
leave little details alone, I just grabbed a little
purple and I added a little bit of shadow on the
underside of these wings. Probably not something you
should do at this point, since those wings are still wet, but sometimes I push
the boundaries. So I added a little
bit of shadow along the bottom of the wings
there using that purple. And now time to lift
with a dry brush, so I clean my brush, dry it, and then use a clean
dry brush to lift. Now, this process of
lifting sometimes removes too much liquid
and too much pigment. And so then you might
need to go back and drop in more pigment to make
it a little darker. So we kind of go back and forth with lifting and dropping. Alright, we'll move
on to the upper moth. So I'm going to
use the same color combo as I did for
the first one, a little bit of that new gamboge for the first layer of the wing. And then instead of
dropping in red, I'm deciding to use a
different color that I used on the mos on
the left hand side to just kind of connect the two. So I'm going to use indigo. So I'm grabbing some indigo. I did not wash my brush. And that indigo, I'm
dropping in along the center line of the wing. Now, here I'm going to add a few lines towards the bottom. You'll notice, though,
that I added those lines. I pulled the lines down instead
of pulling the lines up. Remember, wherever you
lift your brush up, that's where a little pool of that pigment is going to
be left on your paper. So if I want a clean line in the center of starting
in the center of the wing, I have to start the line
in the center of the wing. I cannot pick up my
brush in the center of the wing or it's going to leave a little pool of liquid there. I just added a
little extra dot of indigo in the center of that wing using very
concentrated indigo, very, very low
amount of water on my brush so that that indigo
stays where I put it. Alright, now for these last two mos on the
left hand side, I decided to do the upper wings first instead of
the lower wings. So now I'm going
to do the reverse. Now, with the set of under
wings on these left two, they are pretty small section, so I'm going to do
both of those wings at the same time instead
of one by one, just because I know that I can paint both of them
at the same time. And I know that I'm
not going to have any of that second color bleed
where I don't want it to go. So I'm going to do both wings at the same time just to make it
a little bit easier on me. This first moth in
the upper left, I'm using green gold as the
base layer mixed with water. It's just a little bit
more concentrated of pigment than for my luna moth. And then I'm going to go in. Without washing my brush, I'm grabbing a little
bit of well, I lied. I am going to wash my brush, but I'm tapping it
on my paper towel so it's not too liquidy. And then I grab some
anthraquinoid red. And now I'm doing hash marks
along the bottom here. So they're just little
hash tally marks. And that's going to create
a little bit of texture. You notice that I grabbed
a little bit more pigment, now that my red is spreading
a little bit more. And these hash marks
are really great way to add almost like a furry
look to my moths. I do like adding using
different marks, wet-on-wet. And, of course,
after I add the red, I dry my brush
completely and use a dry brush to blend any edges
that I need to blend out. It's one that expanded a little
bit more than I expected. And so I'm adding another I'm continuing to add hash marks until I've got
these hash marks in a location where I'm
happy with them, and then I can let them sit. You do tend to need to babysit
your wet-on-wet layers for a little bit longer because that pigment is going to
expand slightly with time. Alright, the last set of moth wings is going to
be these lower wings. I'm using a dioxyine
purple mixed with water. Now, this is a very
small section. So I just want to make
sure that I don't have liquid pooling anywhere because I am going to.in some indigo. And if I have any pools of
liquid in that purple section, that indigo is just going
to expand, like crazy. So when you're working on a
smaller section like this, I'm still using my
size four brush, but if you're a beginner, I would suggest using a
small detail brush for this. So you have less
liquid on your brush, and that way, your
indigo will expand less. Now, I'm doing a
little bit of shadow under the wings
first using indigo, a little line there, and then I'll come back and add the dots. I'm doing shadow first so that I don't mess up and blend
my dots if I were to do the dots first and then the shadow. No.
6. Painting the Heads and Antennae: Alright, now it's time to paint the heads
and the antennae, and we're going to do that the
same way we did the wings, doing wet-on-wet where
we have our base layer mixed with water on our
palette and then we'll drop in concentrated
pigment directly from our pan so that that pigment
will slightly spread. For the luna moth, I started
with the same green gold and dropped in some new gamboge
and a little bit of anthraquinoid red
around the points of where the antennae and
are attaching to the head. For my moth, in the upper right, I have my watered down layer of new gamboge for
the base layer. And then I'm using anthraquinid
red in little hash marks, like little lines
across the body, as well as around that abdomen section or
that thorax section, the upper section of the body. Now I can also drop
in a little bit of indigo or purple if I want to make the head or where those little sections connect if I want to make
them a little darker. And a little drop
of green gold in the center of the head just to give it a little
bit more color. Now this video is sped up, but I'm doing the
same exact steps that I did for the wings, just in the smaller section on the bodies where I'm laying
down that base layer, dropping in concentrated color, then washing my brush and
lifting and blending. With this moth in
the lower left, my base layer is going
to be thalo blue, and then I'll drop
in some indigo around the outer edges
and around the head, just to give it a
little bit more shape, a little bit more curved
three dimensionality. And then I'll use a little
bit of green gold and drop in some green gold near the legs just to give it a little
extra boost of color. And for the moth
in the upper left, the underlayer is the blue, and I am dropping in some indigo around the outer edge of
the head and the antennae, and then dropping in
just a dot of purple in the center just to kind of
connect the body to the head.
7. Black Micron Pen Details: Alright, so when my moths
are completely 100% dry, so I've left them drying
for at least a few hours. Now I can come back and add
any black Micron pen details. A lot of these details are
going to be little circles or mostly circles or kind of maybe a few
lines here and there, but most of them are
gonna be circles. Now, as always, I end up finding little tiny details that I
wish I would have changed. So here with the luna moth, I realized that the purple in the luna moth covers on
top of the head as well, so that when they
open their wings, it looks like one solid line of purple across the whole body. And so I decided to
add that last minute. Then I'll go back
to my pen and add a few veining lines in
the upper right moth. So you can either add circles or you can add
little tiny veins. You can also add dash marks. I'm not adding any dashes here. I'm mainly adding circles. And then I know I'm
going to go back with some white gouache and
add some white details. So I'm just trying to kind of make these moths a
little bit more unique. I'm not adding a second
layer of pigment. I want all of those beautiful blends of
wet-on-wet to shine through. But my hard edges, instead of having a wet
on dry layer of pigment, my hard edges are
now my Micron pen. And as a rule of thumb, when you're adding
concentric circles to any sort of animal,
it tends to be, at least for moths,
it looks nice if the ones that are
further away are larger, and as you come
inward into the body, they get a little bit smaller.
8. White Gouache Details: Alright, now I've decided to add a little white gouache
details to my moths. Now I'm using doctor PH Martin's bleed proof
white for this. You can also use white gel
pens or white colored pencils. But I feel the white
gouache actually is very opaque and it leaves
a really nice contrast. Now I am using a rigor brush for some of the longer,
fiiner details. Rigor brushes are also known as either script or liner brushes. They're very long. Um, now, you get quite a lot of
pigment in the liner brush, and so they're great
for long lines, but they are a little
harder to control. So I wouldn't recommend actually doing the dots
with the liner brush. I would recommend doing
dots with a detail brush, but, you know, do what I
do and not what I say. I am using this
liner brush, though, for a thin white line of pigment of gouache around the outer edge
of my luna moth. And so I just decided to do all the other details using this rigor brush. But any of the smaller
white details, I would suggest a detail brush. For the antennae, I kind of outlined the lines that
were already there, so a line down the center and a few lines radiating
out from there. And I decided to add a few
hash marks to the body. So right now I'm outlining just the left side of the body
there kind of to act like a highlight and adding a few little dash dots in the center so that it
looks a little hairy here. And I'm going to do
that to a few of my moss to kind of help them look a little
bit more hairy. So the rigor brush, doing long lines with
the rigor brush, I'm making sure that I
have enough pigment, so it's really nice
and full of pigment. And then I'm able to do
a really nice long line here around the upper
wing of my luna moth. So rigor or liner brushes are meant for these really
nice, long lines. It takes a little
bit of practice. So if you have not
used one before, make sure you practice
this on a test strip before you are doing it
on your final piece. Alright. And when you finish
with all the white guash, you'll notice that I added
a little bit of details on the antennae around the
bodies and the heads. And then I did add
quite a few dots inside those spots that I added, those circles that I
added with my Micron pen. You can also, like I
said, use it to add a little bit of hairy
texture to your moss. A little goes a long way, so it's hard to know when to
stop using the white guash. But I think it's a nice addition
to these majestic moths.
 Emily Marie Watercolors, Watercolor Artist and Dog Lover