Transcripts
1. Intro: Australian Shepherd in Watercolors: Mm Hello, and welcome. My name is Emily, and I am the artist behind Emily
Marie Watercolors. Welcome to my home studio
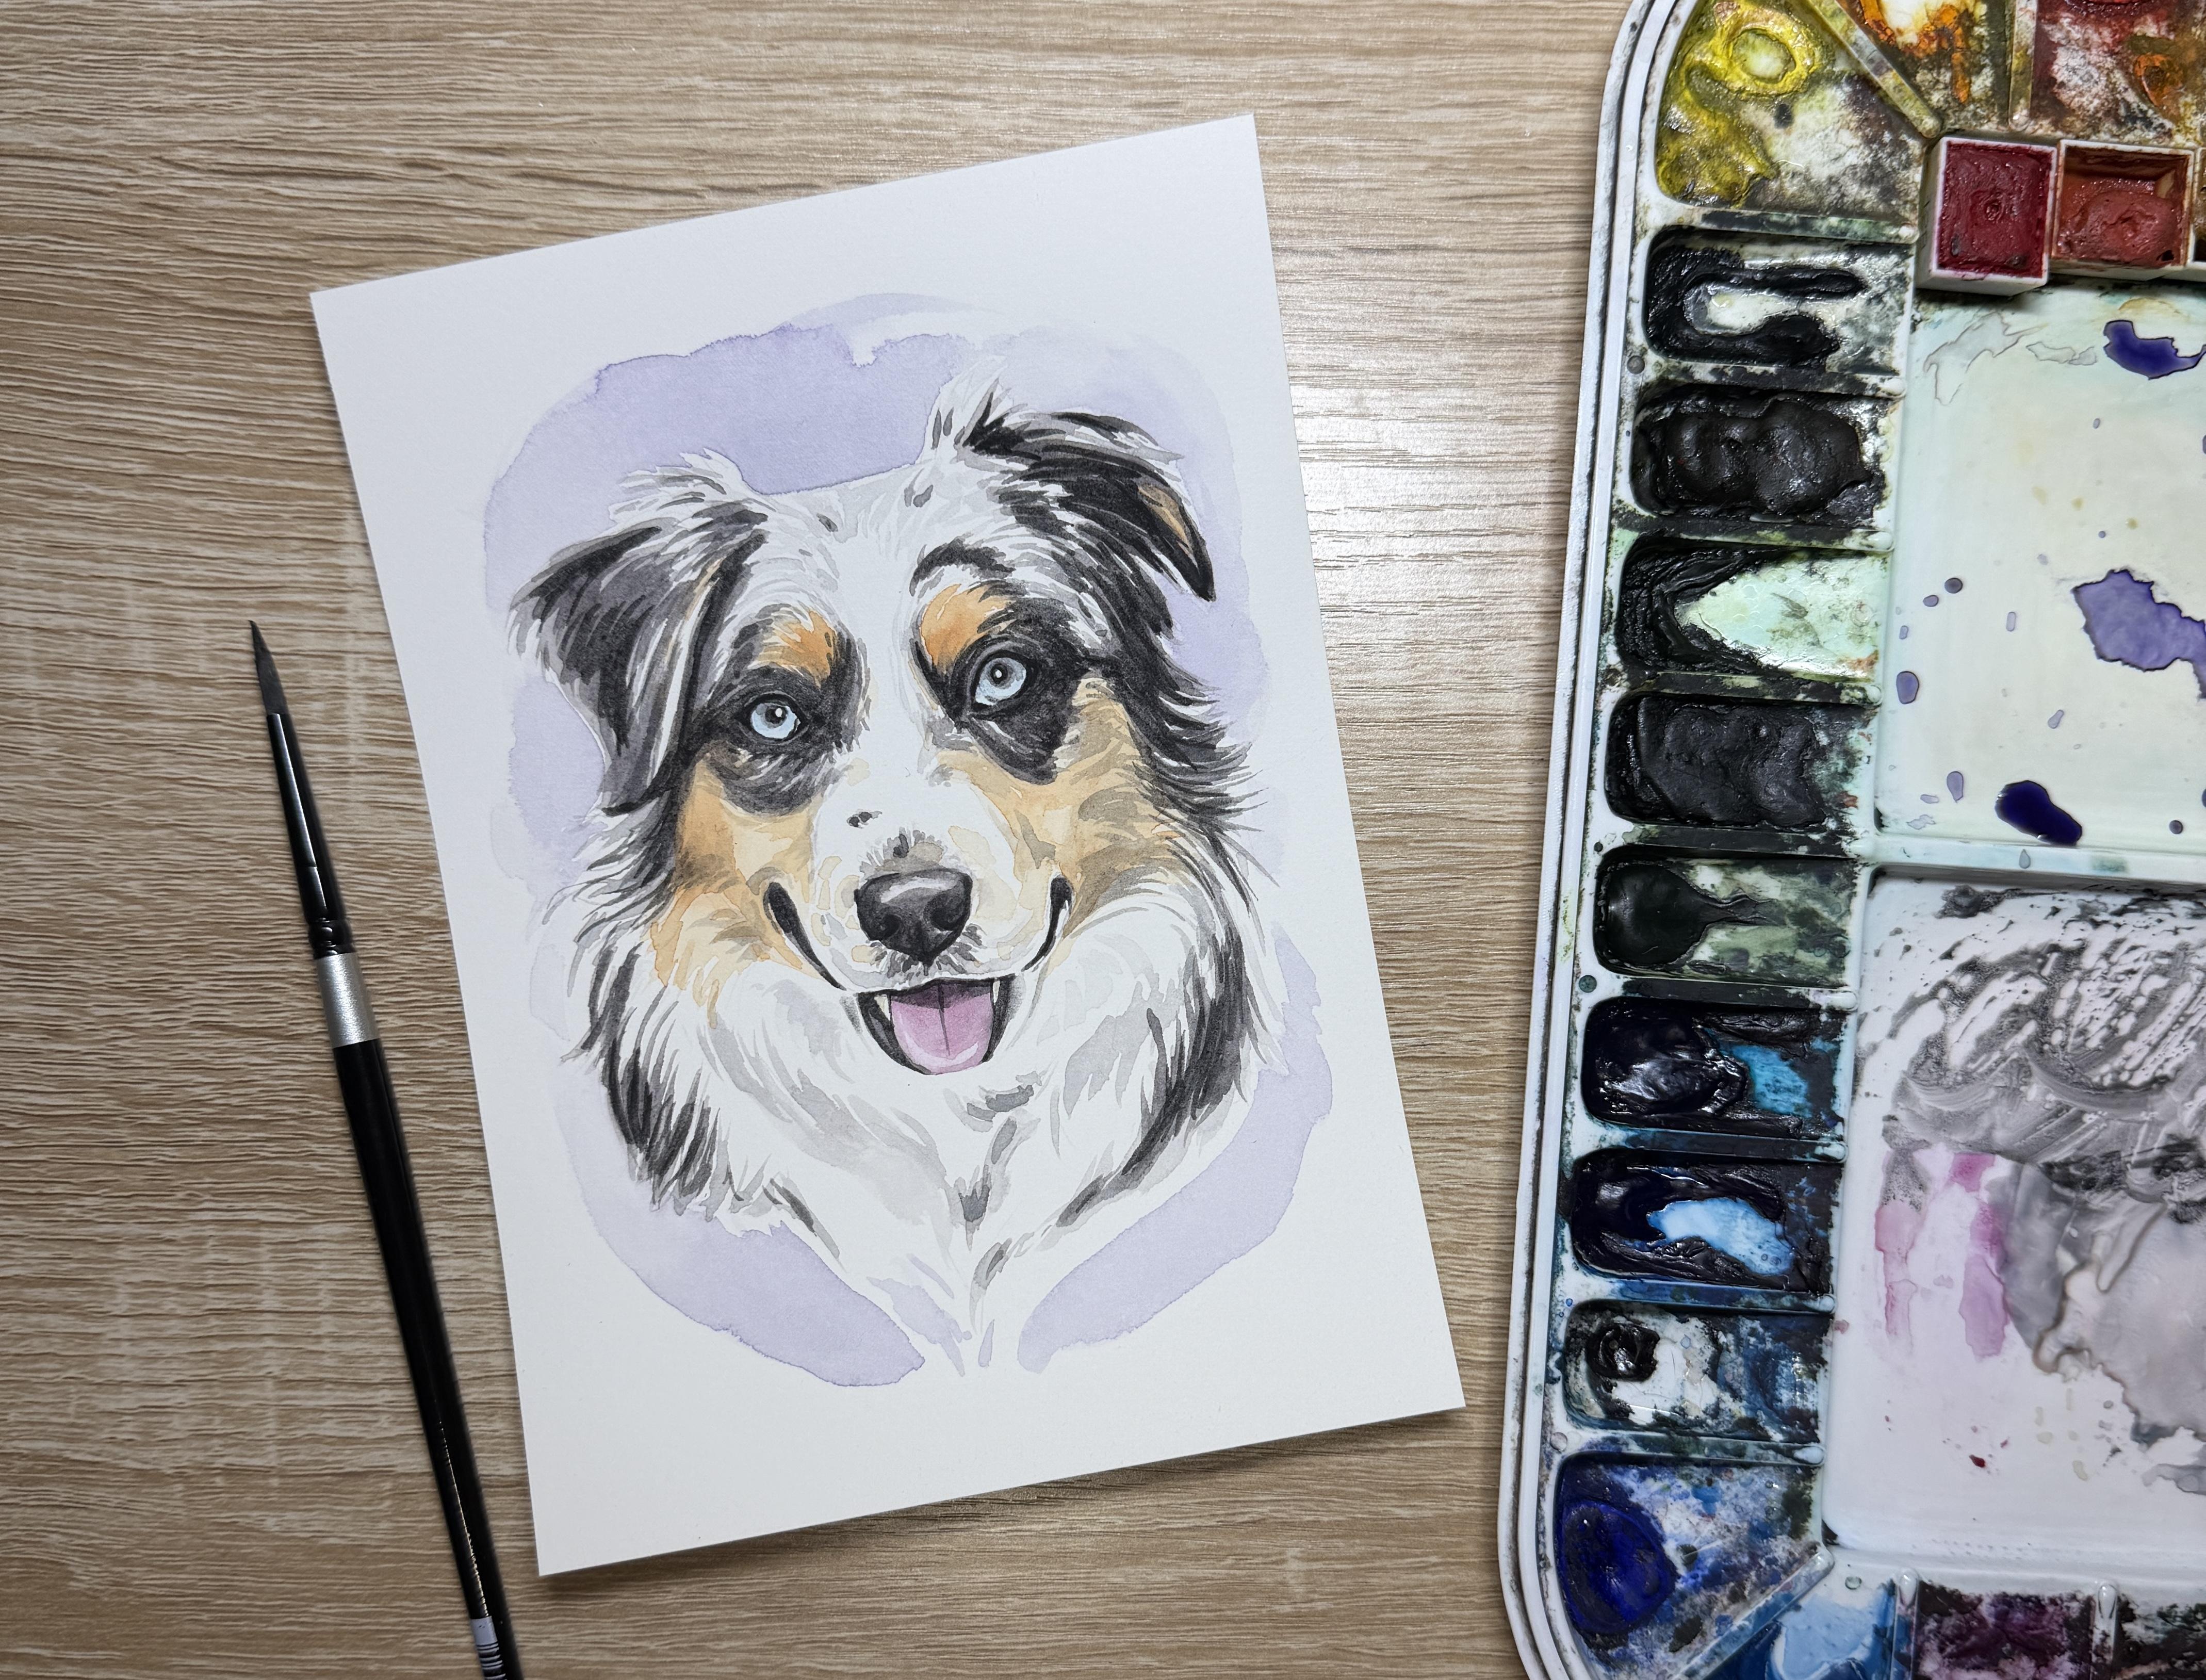
here in Madison, Wisconsin. In this Skillshare tutorial, you'll learn how to paint Twyla and Australian Shepherd
using watercolors. As a watercolor artist, I have found a passion for
painting pet portraits. If you already know the
basics of watercolor, painting pet portraits can
be a great way to turn your hobby into a part time
or even full time career. My style is characterized by adding details to
the mouth, nose, and eyes, but not
getting caught up in painting every
single hair or curl. In the resources tab, you'll find supplies guide as well as color guides
for this tutorial. Use the tracing template and color reference photos included in this tutorial to trace out and paint Twyla or use your own reference photos of your own Australian Shepherd
and paint along with me. In this hour long
tutorial in real time, you'll learn how to
gradually build up color through two
layers of gray. We'll look at the
ideal time to paint your orange fur and how to color correct the intensity
of your orange, so it looks seamless and
not like an orange mask. You'll have the option to add a colorful splash at the end, and we'll talk about
final details like adjusting the highlights
in the eyes and teeth. As an added bonus, I've even included a quick
guide with step by step pictures so that
you have an easy way to see how all these
layers come together. So grab your supplies, and let's get ready to paint. Don't forget to upload any
questions that you have, and I'll try my best to answer them along the way.
Let's get started.
2. Masking Fluid: Alright, so we're going
to start by masking some of the highlights and
the eyes and the teeth. I'm using Windsor and
Newton masking fluid and an old brush. So I'm going to start by
highlighting just and masking those two dot highlights in the center of the pupils. It's kind of not in the
exact center of the pupils. It's kind of off to the
right just slightly, but it's within the black
center of the pupil. And then I'm also going
to mask the teeth. I'm going to let this dry, and then I can be
ready for painting.
3. First Layer of Color: Iris, Tongue, Nose: Alright, so I'm
going to start off by painting the lightest of colors first in my Australian
Shepherd in Twyla. And so I'm going to start out
with the blue of the eyes, the iris, the nose,
and the tongue. So I'm starting out
with a thalo blue mixed with quite a lot of water because a lot of our
Australian shepherds have these really nice
light blue eyes. Now, I'm not worried about
going over the pupil. I can go over the pupil
because, of course, that pupil is going to
go on top of the blue. So I just want this nice light blue color
as a first layer. And then I'll switch to adding a little bit of
pink to the tongue. So for the tongue, I'm using
a quinacridone magenta. I'm going to start by painting a full layer of
quinacridone magenta. Now I am painting
on hot press paper. So remember, if you are
on hot press paper, you also will not have
quite as much time to lift highlights unless you're working on cold press paper. So I'm using kind of a lot of
this quinacridone magenta. You can see kind of
that pool there. And then afterwards, I'm
going to lift a highlight from the bottom end
of the tongue there. Before I do, I might drop
in just a little bit of darker quinacrato magenta
at the top of the mouth, and then I wash
my brush, dry it, and lift kind of a ring along the outermost
edge of the tongue. It's not exactly to the
edge of the tongue. I still have that magenta. It's kind of just this just before the edge of the tongue. And now I'm going to do the
first layer of the nose. So for the first layer
of my nose, for Twyla, Twyla has more of a black nose, and so I'm going to use
gray for that first layer. This is a shadow violet mixed with water.
Now, same thing. I'm going to work quickly
here to drop down a full layer of
that shadow violet, and then before it dries, instead of dropping
in dark color, I'm just going to
lift highlights. Usually, you're going
to find highlights along the top of the nose. So I'll wash my brush, dry it, and lift that highlight here
along the top of the nose. Once again, it's not
along the complete edge. And then I'm also gonna try my best to lift two
little highlights. They're kind of coma
highlights under the nostrils. If you're not able to lift
these highlights, that's okay. I tend to enjoy lifting highlights instead of
dropping in shadows, especially when I'm working on cold press paper or
hot press paper. I tend to not have enough
time to drop in shadow, but I have just enough
time to lift highlights.
4. First Layer of Orange Fur: Alright, so now we'll move on to the first layer of orange. So we're going to do
that before any of our brown or any of
our blacks and grays. I'm using a quinacridone it's similar to a
quinacridone burnt orange. Any sort of burnt
orange will work here. You just want to make sure
that it's not too bright of an orange so that your or you just don't want
your orange too bright here. If you notice just how
watered down this layer is, that's really important
because on top of this orange, we're going to be adding
some grays and some shadows. So we want to make sure
that this first layer of orange is not too bright. Now, I am using the second reference photo
that the client sent me, where the coloring
is a little bit better than the one that
I used for the pose. I am trying to drop in just a little bit
of darker orange, but I'm noticing that it's
gone too dark for me, so I actually lifted
quite a lot of that up. So I would tend to go
overly cautious on this stage where you're adding
in less amount of orange. You will have a chance
to drop in and adjust the orange once you have all of your layers of gray painted. So we will be adjusting and
adding a little bit more, but we are going to just place this orange first before
we add our grays. Now, it's important
that wherever you see any tiny bit of orange, you're adding that orange and
the gray is going on top. So if you notice right here
on the corner of the eye, you've got a little bit
of orange coming in, and so I'm going to add that
right away to this layer.
5. First Layer of Gray, part 1: Alright, now that
our orange is down, now we are going to paint
our first layer of gray. So I am using shadow
violet again. The key here to some of my
accustomed pet portraits is to continue to use a gray color
across your entire portrait. So in the fur in the eyes, nose, mouth, in the white fur, so whatever gray you decide to use for underneath your blacks, use that same gray for
your white shadows, for the shadows on the tongue, for the shadows in the eye. You don't want to
be switching up your grays because you want to have a solid connected painting. So I'm going to
start in the ears, and I'm going to try my
best to kind of leave open a few of those
sections where you're noticing some light
or white highlights, so towards where the ear
connects and then where the ear kind of
flaps over the head. I don't get every single
highlight kept out, that's okay. I'm not concerned about
all the little tiny, itty bitty white splotches,
just the main ones. Now, I'm still working
really quite wet here. So the mixture of shadow violet is
actually quite liquidy. And then I'm going in the
direction of the hair. So wherever you're
noticing it's quite dark. I'm just painting it solid. And then wherever it
starts to lighten up, I'm leaving just a little bit of paper out from between now, on the ears and along
the side of the head, I do tend to clean up these
areas just a little bit. So you want to make sure that your ears are
triangular in shape. So I'm not choosing
I'm choosing to not paint every single
hair that I see. I am being a little bit more meticulous about which
hairs I'm painting. Along with the hairs
on the side of the head on both
sides of the head, I'm making sure to paint them in the same curves of
the head there. And when it gets to be
about the neck line, instead of swooping up, I'm then swooping
the hairs down. So I'm going to do
the same thing on this left side of the head. So I'm going to start
with adding a little bit of grays coming
swooping up and out. And then once it gets
to that neckline, I'm going to start to
kind of swoop downward. All right. I think that's a good stopping
point for this left side. So I'm going to continue then up through the eye and cheek here. Now, remember that
this shadow violet is really nice and transparent. My goal is to go over that orange only
where it's shadowed. So kind of in that corner of the cheek and around
the eyes here, I'll be going over this orange. Now, obviously, around the eye, it's very apparent that it's
dark here, around the eye. So I'm going to do one
solid layer around the eye, and then I'm just going
to make sure that my hairs are going with
the shape of the eye. Now, under the eye here, if I can leave a few of the little slits of paper to
shine through, that's great. I don't need too many, though, but just a few is going to give this concept that it's kind
of a gray under the eye. Now, remember that
it's important that we do go over
the orange here. You don't want to
butt up against it. You want to actually
go over the orange. Now I'm going to paint a
little bit of the shadow that I see here along the smile line. Remember that we can always go in and add more
orange on top of it, and we're going to be adding
more layers of gray, too. So this first layer of
orange and first layer of gray is going to look awkward because you don't
have enough depth, but continue painting
and push through. All right. So now that
I'm moving up into this lighter area
on the forehead, I'm using a very,
very light touch. I'm keeping my brush
in an arch shape. And when I grab more pigment, I'm actually touching my
brush to my paper towel to release some of that
pigment so I don't have quite as much on my brush. If your gray is too dark here, add a little bit of water to your brush and then
keep painting. So I'm going around
the eye here and adding these little almost like hash marks that are
coming around the eyes. This is going to give that impression of gray fur
and white shining through. And then I am noticing
that there is quite a bright white down the
center of the nose, so I'm going to try
to keep that open. Then along that white in between the white
and the eye section, there's a little
bit of that gray. So wherever I'm
seeing that grain, I'm going to add some
of these tally marks, making sure to follow
the shape of the eye. Now, I picked up some
darker shadow violet and now I'm going to continue painting some of these
dark sections that I see. I don't need to let that
lighter section dry because I can have some of those darker sections bleed in. That's totally fine. Now I'm working on the right eye the same
way I did the left. I'm going to be
adding a thicker gray around the eye and
then making sure to paint over the
edges of the orange. So Once again, when I'm wanting to
add some shadow on top of the orange here on
the right side of the face, I added a little bit
of water to my brush, and now I'm going to just control how much liquid is on my brush with
my paper towel. You can see that it's
really nice and watery. Here's where I'm going
to add a little bit of that shadow along the
right side of the cheek. Make sure that it's
on top of the orange. This is why we did
the orange at first. And then when it's wet, if I decide that I need a little bit more of
that orange along that cheek gray along
that cheekline then I can drop it in right away and make it a little bit darker. Sometimes as I'm looking
back and forth between the reference photo
and my painting, I notice that I forgot
to paint certain spots. I forgot to paint the part
on above the eye here. I'm going to take
a little bit of that darker gray and pause from the neckline and
paint on top of the eye here.
6. First Layer of Gray, part 2: Alright, let's move on to
the nose and below the nose. So above the nose here, I've got a little bit of a
fountaining effect happening. So I'm using that
same shadow violet that I used for the fur, and I'm doing little hash
marks above the nose. I'm going to connect
those hash marks when they touch the nose, but I'm going to leave them
jagged along the tip top. It's kind of like a
fountain, if you will. And then it is going to come around the edges of the nose and down into the smile between
the nose and the smile. So whenever I'm working in between the nose and the mouth, I'm doing these
little hash marks. I'm noticing that these
hash marks are darkest, closest to the nose. And then I'm trying to
leave a little bit of paper to shine
through in between. The other thing that
I'm also trying to do, which is very important
is I'm trying to leave a little edge of white between paint the gray that I'm painting and the lip. There's a little line of white
along the lower lip there, and that's going
to make sure that your eye reads it as a lip. If you have that gray
touch the edge of the lip, you're going to lose
the shape of the lip. You need that
highlight down below. Now, as I come outward with that gray, it's
going to lighten up. And so I'm adding a little
bit of water to lighten up that gray as I pull
that gray outward. It's also going to follow
that same smile line. I do notice a few little spots on the nose area with this gray, so I'm going to add
those in right away. And then I'm remembering
that I can always darken it, but I want this first
layer of gray first, just to kind of place it. Alright, now for the
white fur on the chest. I'm still using the same
combination of shadow violet. I'm going to start
where it's the darkest. And so I'm noticing this kind of line triangular downward line angle below the tongue here. And so I'm using really
nice and broad strokes. This is definitely something
if you have not painted long fur before that you should practice on
a practice sheet. So I'm trying to not connect where the fur is starting in the neck
and where it ends. I'm trying to just paint
where these shadows are. The goal here is not to have
one long strand of hair. It's to paint where the
curves of the shadows are. And then I can take some water
and kind of lighten up in between so that it's not so stark of a contrast
between light and dark. So you notice I took a
little bit of water, and I'm going in between and
adding some lighter grays. I'm going to do the same
thing on this right side. Now, I know your reference
photo might not show the exact symmetrical
symmetricalness on your pet portrait, but I do suggest trying to edit your reference photo
and still make this section of your painting a little bit more symmetrical. So I am adding in grays
along this right side, and then I'm bringing
it down into a point into a low V.
I usually like to have the chest come to this low V point because it mimics the nose and
it mimics the mouth, and it really kind of makes this circular
shape to the painting. I keep my paper towel handy in case I need
to lift anything. And remember, I'm
remembering here that wherever I'm seeing
these darker colors, I don't need to add I don't
need to add individual hairs. I can paint solid shapes. So if you notice on the
right side, the shape
7. Darkest Gray in Eyes, Nose, and Mouth: Have a few layers done. I want to focus on my details. So I'm going to start
with the darkest layers of the eyes, nose and mouth. So I'm adding a little
bit more shadow violet to that puddle that I
had used for the fur, and I'm going to start anywhere, really, I can do the eyes,
nose or mouth first. So I decided I'm going
to start on the mouth, and I'm going to be painting wherever I'm seeing that black. Now, after I do the smile
line and the lower lip, I'm going to take a
peek at the tongue. Now I want to make sure
that I'm using, once again, the same gray that I'm using everywhere else in
the painting for shadows on top of all my colors. So I'm going to come in
using that shadow violet, and I'm going to paint a shadow along the roof of the mouth. Now, I can either leave
this edge hard or I can blend it out
whatever you prefer. I'm also going to
pull a little bit of a tongue line center line here. I'm not going to blend
it out. I think it looks great without
needing to blend it. And I'm also not
used to painting. I don't really want to
paint too many shadows in the tongue itself, or otherwise, that I've found personally painting all the
shadows you see in the tongue makes the tongue
look a little dirty. So I'm going to move
on to the nose now, and I'm painting the
darkest sections first. So I'm gonna paint
the nostrils and whatever other dark lines I'm noticing around
the outside edge. I'm doing this because
I don't want to lose the pencil line that
I already drew in. Now, with the lightest layer, I can still see the pencil line. But if I were to move on to my medium layer that covers
the majority of the nose, I'm gonna lose those nostrils. And so, and then it'll be a little bit
harder to free hand it. So I'm going to do the
darkest sections first, let that dry and then
do my medium tones. Alright, so moving
on to the eye. At this point, I'm still
using my round size four. I've gotten really used to using the same brush
and not switching it. Make sure you switch out to a smaller brush here
if you would need it. I'm going to start by outlining around the eye using
this dark gray. It tends to be a little bit thicker in the
corners of the eyes. I do also notice there's a little bit of the white of the eye that's shining through, so I'm going to do the ever so slightest of a line in between the white of
the eye and the iris. And then I'm going to also
fill in the pupil here. I'm going to start lighter, and then I can always add
in a little bit darker. Now, because the pupil is a little bit lighter and has
this fuzzy hazy edge to it, I washed my brush, dried it, and then I lifted
a little bit of that edge to just soften
the edge of that pupil. I'll go back and add
darker on the inside, but I want that kind of haziness
around the pupil first.
8. Second Layer of Gray: Alright, now that we have those darker areas of detail
around the eyes, nose and mouth, now I'm ready for my second layer of gray. Now, this is going to be the last layer of gray
before I add black details. So I'm adding a little bit more shadow violet to the color. I still want it to
be transparent, but I do want it to
be significantly darker than the first layer. And now it's good to note
here that I don't want to cover up all of the first
layer of gray that I painted. So I'm using a very,
very light hand here, and I'm looking at where are the areas of dark gray or black, and I'm going to add
color on top of that. I'm also going to
try my best to leave a little edge of this lighter
gray to shine through, just so that I've got the
two tone color there. Oh After a fairly solid gray
around the eye, now I'm going to use a very, very light touch below the eye, and it's kind of
in this e pattern, and I'm going to leave some of the under gray to shine through so that it's
not completely dark. So once again, it's
kind of leaving a little bit to shine through using a very,
very light brush. Because of the
long haired manner of these Australian shepherds, we're actually not
going to be doing that much blending in
any of our layers. We're going to be using that the underlayers to shine
through as our blender. So with short haired dogs, we tend to blend some of our
edges a little bit more. With long haired dogs, we tend to not blend
because you want to be able to see those brush strokes and have them look like fur. Now, I added some water to my brush and I'm tapping
it on my paper towel and I'm adding just a little bit of lighter gray shadow
around that orange, around the outer
edge of the orange. I want to help blend
that orange into the fur instead of
sticking out so much. So this last layer of gray, I'm not only doing
the darkest of gray, but I might also be kind
of toning down some of that orange and making it
blend in a little bit better. Now, I'm going to
add a little bit darker of gray along
the outer edge. I know it doesn't show too
much in the reference photo, but it's gonna help
to kind of encompass my pet portrait to make it a
little bit more rounded out. And I do notice more of the darker grays
along the back side, and so it's going to help kind of round out my pet portrait. So as I continue working here, I want you to really notice just how wet my brush is
that I'm working with, even though I'm working
with darker colors and more opaque, it doesn't necessarily mean
that my brush is any drier. And this is important
because at least to me, when I paint with a juicy brush, even though it's a dark layer, what happens is that I get a really nice
clean edge on my brush. Sometimes if we have
too dry of a brush, the fine lines that we
make are going to look rough because there's not enough pigment to
do that fine line. And so you end up having a lot of texture in
your painting, which is fine. But I tend to work a
little bit wetter and then my line work is a lot nicer because my brush is
a little bit more juicy. You can see it really
well here around the eye that wherever it's the darkest, I have almost like a puddle of pigment and then
from that puddle, I can then pull some of that pigment into the
lighter sections. And it works really well for me if you're somebody
who does not work for you might be noticing your painting look slightly different than what
mine looks like, and I think the main difference
is because I still work fairly wet even on
these last few layers. All right. Once again, I'm
going to kind of round out the face again by adding some darker grays
around the outside edge. Now, I'm making sure to not completely overlap, what I did. I want to let some of that
lighter shine through. And then I'm also going to
pull some of that darker gray around the outside lower
right section of the body. So, I'm going to pull along this lower right and it's
going to mimic the same, um, the same hairs that you
have on that left side, it's going to be kind of
mimicked on the right here. And so you're going to have this really nice overall
circular look to your painting. Then I'm also going to use
this dark gray to add some of those darker tones to the
eyes, nose and mouth. Here I'm working in the
very center of the nose, adding a few hash marks in between the nose
and the tongue. Then when I take a
peek at the nose, now that these nostrils are dry, I can go in and add
that medium tone. It's not going to be quite
as dark as the nostrils. But I am noticing that
the lower edge of this nose is pretty much
covered in darkness, and the top has this little
highlight along the top. So I'm going to try to
keep that highlight. And if I accidentally go over some of the highlights
under the nostrils, I'm going to try my
best to lift those, remembering that I'm
going to go in with black where it is the darkest. And then if I need to add a little second layer
of gray to the mouth, I can do that wherever
it would be the darkest. I'm not painting all of the highlights that I
see in the mouth here. I'm trying to kind
of simplify it a little bit instead of
having it be so complicated. And then I'll add a little bit of dark gray to the pupils. Now remember that I tried to have this really
nice soft border, so I'm not going to extend this dark gray all
the way to the edge. I did try to soften the edge between the
iris and the pupil, so I'm trying to add that
gray just to the center.
9. Color Corrections: Alright, at this stage
of the painting, before I add the black details, I'm going to color
correct my colors. Now, from the time that we
started with our orange, we've allowed it to dry, and we've also added layers of gray and darker gray on top. So now it's time to add a little extra orange in the
sections that we notice. It's a little bit darker. So I'm still mixing a water down orange because I still
want it to be transparent. And this is going
to be more of like a glaze over these sections. So I'm still noticing
a highlight of lighter orange kind of in the center of the cheek, so
I'm going to leave it there. But remember that
I can also glaze this orange over my grays. So if I'm noticing any
oranges around the eyes, particularly around the
corners of the eyes, I can add and glaze some of this orange on top
of those grays. Once I add this darker layer
of orange over the eyebrows, if it needs a little
extra darkness along that lower corner
of the eyebrow, I can always drop in a little of that orange
directly from my pan. You might also
notice that there's a few little hints of
orange here and there in the ears or around the chest
area depending on your pat, so this is a great time
to glaze that orange. If it's just a little
tiny bit of orange, I would rather glaze it than
start with that tiny orange. It's always easier to adjust
in this layer when we color correct versus lay down
too much orange right away and then have the
whole ear look orange. I'm also going to add some of those light orange
patches on the nose at this time and just kind of add whatever other
little sections of orange that I notice. All right. Then the last color correction I'm going to make is just by adding a little bit more
pink to the tongue. So I'm mixing up a little bit
of quinacrido and magenta, and I might add some of that quinacrido
magenta to the tongue. I might also add
it to the lips if you notice a little bit
more pink in the lips, and I'll add it to the
center of the tongue, but I'm going to try to keep a little bit of a highlight
around that outer edge. Now this is also the same
step that you can add a little bit of extra blue or whatever color
is in the iris. I am adding almost
just a little halo of blue around the
pupil so that it's a little bit darker of
blue around the pupil. But I want to make sure that
I'm not going too dark here. I really want that really
nice light blue in the eyes.
10. Layer of Black: Alright, now, the last layer
that we're going to be painting here before we do our colorful splash
is a layer of black. I am using lunar black
from Daniel Smith. It is a granulating black. I like using it because you
can still see the layers underneath when I have a little bit when
I add water to it. So I'm going to start
around the eyes. Now, when I started painting
this black around the eye, it went into the iris, and so I quickly used my
paper towel to lift it up. But since it's still wet, I don't want to move I don't want to
continue with the eye. I want to let it
dry a little bit. So instead, I'm going to go
and move on to the nose and add my darkest of colors
to the nose and mouth, which is going to be
inside the nostril and in that bottom V. And
then I'm going to outline a little bit the lips and the upper lips and the
lower lips using this black. Now, as I was painting, I noticed that the
orange here on the right cheek started
drying with a hard edge. So I washed my
brush and dried it, and I'm using a damp brush to soften that edge before
it continues to dry. So this is a good reminder to everybody that this
happens to all of us artists that we have to
continuously be kind of checking dry times as we're working and noticing if any
of these hard edges are starting to form to try and fix them
before they fully dry. So I'll use this black,
and I'm going to continue on in just the darkest of areas. Remember, I don't want to completely cover all of these really nice grays
that I just painted. I want to use this black in
the areas where it really, truly is the darkest. All right. Now, around the I, I am once again using
a round size four. I probably should
be switching to a detail brush though to be able to get these
really fine lines. So you might want to
switch to a detail brush. I'm just being stubborn. I'm going to high I'm
going to outline around the outside of the eye
here using that black. It's going to be a little bit thicker on the top of the eye, and it's going to be a
much thinner black line on the bottom of the eye. With dogs, particularly, we want the top to be thicker and
the bottom to be thinner. I'm going to also
add a little bit of that black just to the
center of the eye. Once again, I want those grays
around the outside edge. And now I'm going to
water down my black just slightly and paint
around the eye. Now, I'm trying to leave a little sliver of that gray immediately
closest to the eye. It's going to act almost like
the eyelid, if you will, and then I'm going to be using a very light touch
to add some of these darkest of black hairs that will come into the
orange and into the gray. Here I'm noticing that this right cheek over the
gray is not dark enough. I added a little
water to this black, and now I'm going
to use a very water done black to add a
little bit more shadow to the gray to the orange
section of the cheek here. I'm also going to use
this black that's slightly watered down to add just a few extra
little details here. So you'll notice
now that I'm adding a few very thin hairs that are following along the
curves of the body. I'm going to add some of these little hairs on the right side. Then I'm going to come
in and add a few of these little hairs coming
out on the left side. All right. Once again,
you're going to see me adjusting some of the
in between colors. So I added a little bit
of water to my black, and now I'm going to be going over some of
these sections of orange and white that need
to be a little bit darker. So in this right
corner of the face, it looks like it needs to
be a little bit darker. I'm noticing a few shadows here and there that
need to be added. And so this is kind
of the final step that I take when I'm painting where I'm trying to
take a step back and see, look at the full
painting and take a peek at what
shadows am I missing? Is there any section that
seems to be standing out in a bad way that I
need to kind of tone down? Or are there any spaces that are too dark that I might
need to lighten up? Honestly, this is probably
the most challenging step to my paintings because there's so many details that I have
the possibility of adding, but I don't want to
add all those details. So it's kind of
knowing when to stop. And that's a challenging,
challenging part. My advice to you
would be to stop when you kind of when you can squint at the reference photo and notice that you have all of the shadows and all the darkest and
lightest areas correct. Then you you can stop. So here's where I'm adding a little bit extra
darkness to the nose. I'll add a little extra
darkness to the mouth. And then I'm starting
to find myself going over and adding details where maybe I
don't need to add details. So I'm starting to kind of
adjust these shapes a little bit and kind of do little fuzzy
things with the painting. And that's kind of when it
tells me as an artist that I'm nearing the end where
I need to stop is when I'm kind of futzing with some
of these little tiny lines.
11. Colorful Splash in Background: Alright, so I'm going to start with the
background splash of color. So my client, when I was
originally received this order, she had shown me a different
portrait painting that I had done and liked
the color of that one. And she said that she
liked the purple, but to tone down the
purple just slightly. So here I'm using a
Carbizol violet and then I am toning it down
with a little bit of indigo. So it's closer to a periwinkle, but still leaning more purple. Now I'm going to start by wetting the area that I
want this liquid to go, and I'm going to make sure
that any of the sections of my pet that are whiter
around the head, that I am also adding pigment there so that it's a nice contrast against
that white fur. Any of these little
tiny hairs that are coming out of the ears, I want to be really
careful to not have that color overlap the grays. So I'm trying my best to do a little bit of
negative painting here, and I'll pull in a little bit of that purple into
the negative space without overlapping it. Now, of course, you
are more than welcome to choose whatever background
color you would like. However, I do strongly suggest that whatever
color you choose, that you have it be very watered down so that it's
nice and transparent. The reason why is because we're painting long haired dogs. When you have such
long haired dogs, to get into all of those little tiny hairs that
are coming out of the head, if you have a very
opaque dark pigment that you're trying to put
in between those hairs, you're going to notice a lot of white that's that's going
to be shining through, or you're going to accidentally
overlap that color. And so to avoid that, we're going to be using
a very transparent color that's very water down. That you can still see the
color in the background, but we don't have to
worry so much about accidental overlapping or
white shining through. Now in the section
around the neck, I do tend to leave a little bit of white
paper in between, so I'm not budding the color up completely next to
the white neck line. And then if the color is still
that section is still wet, I can drop in a
little bit more of that pigment in certain areas to help balance out the overall
weight of the painting. So I added a little bit of extra purple along close to
the body in this lower left. So I'm going to add
a little bit of that purple in the
upper right to kind of help balance out the
weight of the painting.
12. Final Details: Right, I let my painting
dry completely. Usually, I let it dry
overnight for this stage. And then the next
day, I take off the masking fluid and adjust
any of the highlights. So I'm using a
needed eraser here, and now I can go back to my
detail brush, if I'd like. I'm going to start
with a little bit of black on my brush, and I'm going to just adjust
the highlights in the eyes. I might round them out if the dot was a little
not so round. I might also adjust how much of that black
is around the edge. So in this pupil on
the left hand side, there's not enough black
on this right side, so I'm going to just kind
of adjust it slightly. Now, I'm also going to do
the same to the teeth. If any of the white butted
up against the lip, I'm going to make
sure that the teeth are under the lip, not on top. And then I'm also going to add a little bit of a
black line along the inside of the teeth there just to separate
it from the tongue. I'll add just a little bit of water to that black or gray, and then I'm going to use that gray very
watered down to add just a line of that gray
along one edge of the teeth. I just don't want that whole tooth to be
really, really bright. Then this is also
where if I lost any of these really
fine black details, I can go back and adjust
some of these black details.
 Emily Marie Watercolors, Watercolor Artist and Dog Lover