Transcripts
1. Lesson 1 Introduction: Hi, I'm Victoria Wells. Welcome for my class. Magic Sugar cookie dough. That's right. This sough is magic! In this course I'm going to show you how to make four different types of cookies from a single batch of dough. Like I said, Magic, I first developed this recipe many years ago with the help of my three kids. Each time we make cookies, everyone, including me, would want to make their favorite. I certainly didn't want to make four batches of cookies. That would be a lot of dough and a lot of work too. So I wondered, How could I make everyone happy? And was that even possible? Well, with magic sugar cookie dough, it is. My eldest got his favorite, and he was the absolute best at making each cookie exactly the same. He was very precise with each one. My next eldest well, he's the artist in the family and his favorite cookies. He would make shape by hand into a work of art. The baby of the family. My daughter was amazing at pressing the peanut butter cookies with fork times to make a perfect crosshatch design, and she always has lots of suggestions for new types of cooking. We always had a blast making these magic cookies together, so I'm sure you'll have a great time making them with your kids or grandkids, too. In this class, I'm going to show you how to make two basic doughs; vanilla and butterscotch, each of which could be used to make four different types of cookies, per batch. You'll be able to make, from a single batch - peanut butter cookies, chocolate chip. pecan Sandy's, sandwich cookies, and that's just a taste. I'll walk you through each recipe, showing you how to mix the dough by hand or in a stand mixer. You'll learn the magic of making four different kinds of cookies from each batch, and I'll also give you lots of options for many other kinds, simply by altering a couple of things. I'll demonstrate how to shape each type of cookie, depending on which sort you've chosen to make, and how to bake them, too. Each batch of magic sugar cookie dough will make about four dozen, depending on how you choose to shape them and what size you want them to be. That means you can make a dozen each of the four different kinds of cookies. That should keep everyone happy, hopefully. in the next video, we'll go over everything you need for your first batch, including the ingredients as well as the equipment required. Along the way. I'll also make suggestions to make the process easier and stress-free. And I'll be sharing a few tips and tricks that I've learned along the way. Thanks for joining my class, and I'll see you in the next video.
2. Lesson 2 Equipment: Welcome back, in this video we're going to go over the equipment you need in order to make these magical cookies. Some items are required and some are optional. Don't worry. We'll go over each of them and let you know which ones you will definitely need and which ones are optional. Naturally, a mixing bowl, measuring cups, measuring spoons are required. The rolling pin will be needed for some of the cookies, but others will be formed by hand. So if you decide to make only the types that are formed by hand, then the rolling pin won't be needed. If you choose to make cookies that are rolled out, then you'll also need some cookie cutters. But not to worry. If you don't have any, there are easy workarounds. For example, a tuna can thoroughly washed, of course, is a nearly perfect size for a cookie. Or simply use a glass or something of similar size to cut the dough. When we make the turnover cookies, we actually need a fairly large cookie cutter. I've discovered that the lid from some of my glass storage um, dishes are the perfect size for that. A fork is also required to help you mix the ingredients together. And if you choose to make, say, the peanut butter cookies we'll be using the fork tines to make a pattern in the cookies. In addition to that, you'll need a baking sheet at least one, but more than one is always helpful so that you could be preparing the next batch to go into the oven while the first batch is baking. You'll also need a spatula or lifter to get the baked cookies off the baking sheet when they come out of the oven and transfer them to a cooling rack while the cooling rack is optional, it's a good idea to help the cookies cool evenly, but if you don't have one, just transfer the cookies to a plate to cool. Now let's talk about some other optional equipment. I love parchment paper and use it for a lot of my baking. However, it is not required, but it will make life a lot easier. I like to line my baking sheets and pans with parchment paper. It makes things release without sticking and makes cleanup a breeze. Parchment paper is also reusable, so don't throw it out after just one use. I just fold it up and put it in a baggie and place it in the freezer until I need it again. A kitchen scale is also useful for a lot of things. In this case, because we will be dividing a batch of dough into four equal parts, a kitchen scale can help us be more precise in dividing the dough as we can do it by weight and not just by eye. Don't worry. If you don't have a kitchen scale, dividing the dough by eye will be close enough. While a stand mixer. It's certainly nice to have it's not required. I love mine. But then I've never met a kitchen appliance that I didn't like. In this course will mix the first batch of dough by hand, and when we make the second batch, I'll show you how to use the stand mixer for that. So that covers the equipment. Both required and optional that you need before you start making the cookies in the next video. We'll go over all of the ingredients you'll need to have on hand before we start making the dough. That will include having all the mix-ins is ready, too, so you could make four different cookies from a single batch of dough. Thanks for watching. And I'll see you in the next video.
3. Lesson 3 Ingredients: Welcome back. In this video. we're going to go over the ingredients you're going to need to make your first batch of magic cookie dough. We're also going to talk about the add-ins you'll need to make four different types of cookies. First, you'll need some butter or margarine at room temperature. The reason we wanted at room temperature is because we're going to cream the sugar into it, so the butter needs to be soft and pliable. In order to do that. That brings us to the next ingredient. Sugar. After all, these are sugar cookies. For our first batch we'll be making a standard batch of vanilla sugar cookie dough, so we'll be using regular, granulated white sugar. Our second batch of sugar cookie dough will be butterscotch, so in that case will be using brown sugar instead of white. You'll also meet some vanilla on hand. if you have. If you have it, real vanilla is preferred. I know it can be expensive, so if you have artificial vanilla on hand, that's fine, too. Next up for the eggs, they're going to need two eggs for each batch of dough. It's also a good idea for the eggs to be at room temperature, too. But if you forgot to take them out of the fridge to give them enough time to warm up, that's okay. They'll still work. I like to take the eggs out of the fridge at the same time I get the butter out so they can both warm up to room temperature at the same time. I have, in a pinch, microwaved the butter to warm it up. If you do that, be very careful as it doesn't take much to actually melt the butter, and we don't want that. Never put eggs in the microwave. However, if you do want to warm them up quickly, you can always place them in some warm water. But that really isn't necessary. It's okay to use them right from the fridge, but if they're room temperature, they'll mix into the dough better. Now we're going on to the flour. All purpose flour works best in this recipe. I like to get the unbleached kind if I can. We're also going to need a little bit of salt, some baking powder and some baking powder. They'll both get mixed into the flour before we combine the dry ingredients with the wet ingredients. That's it for the dough. Now let's talk about the mix-ins for our four different cookies. For our first batch, I'm going to show you how to make chocolate chip, peanut butter, rum raisin and sandwich cookies. So in order to do the same, you'll need to have on hand some chocolate chips, some peanut butter, either smooth or crunchy, will work, but I almost always used crunchy because that's my favorite. For the rum raisin cookies, you'll need to soak the raisins in some rum or rum flavoring for a couple of hours before making the cookies, So now is a good time to talk about that. To get them ready, soak 1/4 cup of raisins in a small dish with enough rum or rum flavoring to cover them, Set them aside and let them soak for a couple of hours. For the sandwich cookies, we're going to use jam as the filling, so pick a jam you like and have it available. It can stay in the fridge until after the cookies have been baked and cooled and then we'll assemble them. Okay, now we're ready to start making the dough and I'll show you how to do that next. Thanks for watching. And I'll see you in the next video.
4. Lesson 4 Making the Dough: Welcome back. In this video. we're going to be making the dough, and what we're using is a cup of butter or margarine. We're using raising a cup and a half of sugar, two eggs - room temperature, teaspoon and a half of vanilla. We're using 3.5 to 4 cups of flour. Now I've got 3.5 cups of flour, ready and in some extra flour, because when you start mixing it, you'll find that you'll, you know it could be a little too wet, and you want to add a little more flour. And, into the flour, We're gonna add a teaspoon of baking powder and 1/2 a teaspoon of salt. So we're going to start by creaming the butter, which is also room temperature. We mentioned that on the previous video, that you want to know everything at room temperature. Basically creaming the butter just means mashing it up with a fork. And of course, before we started all this, we want to make sure that we've washed our hands thoroughly because we are going to be getting in there with our hands to mix it up. So and you also might notice that I have my hair pulled back and the reason for that is nobody likes an errant hair in their cookies. It just doesn't go well. So we creamed the butter somewhat there. Now we're gonna start adding the sugar half a cup of the time. There's a cup and 1/2 in there, so but in 1/3 of it, you want to get that mixed well into the butter. So, this will take a little while mashing it in. The last bit, the last third. or thereabouts. In the next, when we make the next batch of dough,
,
00:02:44.750 --> 00:02:50.150
we're actually going to do it in a stand mixer and that will actually make some of this process a lot easier. But not everybody either has a stand mixer or wants to use one. So we're gonna show two different ways and in this way is by hand. Okay, so that's pretty good right now. Now we're gonna add the two eggs, which are also room temperature, and get them mixed in there well. Now, when we get this to dough, don't be tempted to taste the dough. I know, it's really tempting, but you have raw eggs in there, so it's never a good idea should be eating raw eggs. But it's going to smell really good once we get the vanilla in. Okay, now we're going to mix in the vanilla, and that's the end of our liquid ingredients, or, wet ingredients, And get that well incorporated. You could also use. If you have it, you could use white, vanilla or clear with so that you don't get a little brownish tinge to your dough. But, once it's cooked, you really don't notice. All right, now we have the flour and we're going to, and we have the salt and baking powder. So we have a teaspoon of salt, no 1/2 a teaspoon of salt and a teaspoon of baking powder. It's one teaspoon of baking powder and 1/2 a teaspoon of salt. We're gonna mix that into the flour. It doesn't have to be sifted or anything, because we're gonna mix this really well. but you want it, you know, somewhat, incorporated into the flour. Okay, so we're going to start adding this a little bit of time. Just a third to a half of it there. We're gonna continue mixing with the fork, but only until it gets too difficult to do that. That's when we're going to get anywhere with our hands, and get it mixed up well. If you try to put your hands in right now, it's just gonna stick to you too much. You don't want that. So when we're down to about 1/3 of the flour left, that's the time we're gonna get in there with our hands. This is going to get a little more difficult and try and mix it a little more slowly, otherwise, you'll get flour flying everywhere. That's getting in there pretty well. Now. It looks like it's getting pretty dry. It's really not. You'll find out when you get in there with your hands, that it's not as dry as it looks. Alright. It's time to roll up your sleeves and get in there because baking can be a contact sport. The rest of the flour is going in. And, like I said, in case it's still a little too wet, I have a little bit of flour ready just in case. Now we want to just get in there, get underneath the dough, pull it up, squeeze it underneath, pull it up, squeeze it. That's the best way to get everything incorporated and just keep turning the bowl, a little bit at a time. You'll notice the flour disappearing and that's what you want. You want the flour totally incorporated in there, Now, it likes to hide underneath, so get in there, scrape some of it out and throw it on top. Keep mixing. I don't think we're gonna need the rest of the flour. This was 3.5 cups all purpose flour. If you can, preferably get the unbleached flour that's better for you than the bleached stuff. Yes. Some of this dough we're gonna roll out. We'll, use this little bit of flour, or some of it that we have aside here. Now I still want to get underneath and get some of this. For when we roll out the dough for the sandwich cookies. The other cookies that were planning to make with this batch are all going to be formed by hand so we don't use the rolling pin for them. But we're going to use the rolling in for the sandwich cookies. There we go. We have got this dough well mixed now. So, there's how you create the dough and you see, not much of it is sticking to my fingers. And in the next video we are now, we're going to divide this dough into four pieces and we're gonna make four different types of cookies. We're gonna make rum raisin. Now you have to soak the raisins in the rum. You're gonna want 1/4 cup of raisins, a couple of tablespoons of rum or run flavoring. What I've done, mine are already soaking, I've used a couple tablespoons of rum and a teaspoon of rum flavoring. Just a bump up the flavor. We're also gonna make peanut butter cookies, and for that you're gonna need 1/3 of a cup of peanut butter either smooth or chunky. We're gonna be using crunchy, chunky or crunchy. Whatever they call it. We're also gonna make chocolate chip cookies. For that, we're gonna need 1/4 cup of chocolate chips and we're gonna make sandwich cookies. And for that, we're going to you need some jam to create the sandwich. So I'm gonna be using raspberry jam. But you can pick whatever jam you want any, any kind, that's gonna work. So that's it for this video. I'll see you in the next video where we continue making the cookies. Thanks for watching. See you in the next video
5. Lesson 5 The Magic Happens: Welcome back. Now we're gonna make the four different types of cookie doughs. This is where the magic happens. So we need to divide this dough into four pieces. I'm just going to do it by eye for this one in when we make the next batch, we're going to use a kitchen scale so we'll get a little more accurate, but it's really not that important, the dough is generally pretty forgiving that way. So, we're just gonna divide it in four. Be careful. There we go, Now, I've got jam out here just to show you when we make the sandwich cookies, we're just going to spread some jam in between two cookies, so we don't actually need this to mix into anything right now. So we will just hand it to my assistant. And there it goes. So one cookie dough is just going to be for rolling out. So we're gonna remove that from here right now, too. These ones require mix-ins. One of the types we're making peanut butter. We're gonna need 1/3 of a cup of peanut butter. I'm using crunchy, and we're gonna mix it in here. This dough - a little bit over a little bit less is fine. A lot over or a lot less is not fine. So, let's get that mixed. We will get in there with our hands in this one, too. But I don't want my hands to be totally covered with peanut butter. So I'm going to use the spoon until we get some of it incorporated. And now it's time to get in with the hands. Should have left this one for the last. Okay. Now, this is where we're gonna need to add a little more flour. Because the Peanut butter is making it a little wet. Just not much. Just be really careful. You don't want to dry it out. That's much better. So that was probably about a tablespoon. Maybe a little bit more now, And now just knead it a bit. Turn it and knead it with your palm or the heel of your hand, Actually. And you want all of that extra flour that you just added to disappear. And there we go. Now that one's ready to be formed into cookies. So we're gonna put that aside for a little while. The flour's incorporated. There isn't much left there. We're gonna put that aside. The next one is chocolate chip. You need 1/4 cup. Just dropped a chip in here. So same deal, just put the chocolate chips in there, I worked in into the dough. We shouldn't need anymore because the chocolate chips are dry. We should meet anymore. Again, knead it in, turning and using the the heel of your hand works very well. You just want to make sure that the chocolate chips get into the dough. So when you start forming the cookies you're not losing chocolate chips. And there we got that mixed in fairly, well, peanut butter in there, too. But that's OK as long as everybody can have peanut butter. And the last one that we're going to do is rum raisin. Now you did remember to. soak the raisins, right? In the two tablespoons of rum and maybe some rum flavoring, You'll find that there's a lot of liquid left in there. I have poured off the liquid. But save it. You can use it as a flavoring for something else or you could even drink it if you want to. So we're gonna add the soaked raisins to this batch of dough, still a little bit of liquid in there, so we may need a little bit more flour in this one, maybe not. It depends on how it feels. That's the thing with baking too, a lot of It will go by feel, but you'll get used to that. If it feels too wet and it is starting to fell too wet, you'll know it, so we're gonna add probably another tablespoon of flour to this one, too. Again, it's better to err on the side of too little flour. You can always add a little bit more. If you put too much in there, you can take it away. Get is all mixed in there. Rum Raisin happens to be one of my husband's favorites, and he's my official tester, so he'll get to try all these cookies. And, there we go. That one's all mixed together. Again, it was feeling a bit wet. It's dryer now that we put the extra flour in, So, that's all the cookies. We're going to stop here, and when we come back, we're gonna start forming cookies and baking them. Thanks for watching, and I'll see you in the next video.
6. Lesson 6 Hand-Formed Cookies: Welcome back. In this video, we're going to be forming the cookies and getting them ready for baking. We're gonna start with peanut butter cookie dough, and I've already tested one. So, we're gonna be using just a regular tablespoon for a guide as to how much dough you need. You want it to fit on there kinda like that. Then we're going to roll it and slightly flatten it with our fingers. We're going to leave that there for now and put a little hash design in it, like this one. Once we got them all on the tray, just very slightly with flat fingers, sort of into a ball. There's no wrong way of doing this. And, again. this smells really good. Don't be tempted to eat raw cookie dough. It contains raw eggs. It's not good for you. And, they don't have to be perfectly the same size each. All of the ones that are formed, by hand are cooked at 375 for about 10 to 12 minutes. The ones that we're gonna be making a sandwich cookies, they're going to get rolled out, so they're gonna be a lot thinner, so, they take a lot less cooking time, So we're gonna be doing them separately.
,
00:01:49.470 --> 00:01:52.780
We can get the hand formed ones in the oven, while we work with the, ones that have to be rolled. So. normally we should get about 12 cookies out of here. That, of course, depends on what size you make the cookies. We'll see how many we get out of this batch. Unfortunately, we should have made them a little bit smaller because it looks like to me like we're going to get 11. not 12. And that's OK. No, not to worry. You know, You want to press them evenly. So put some fingers on the on the edge of the fork. Press down. And take it out and carefully press in the other direction. This was something my daughter was good at doing. She always made them perfectly. This is a traditional pattern for peanut butter cookies. I'm not exactly sure why, but generally when you buy store store-bought peanut butter cookies, you'll find that they look like this. They are as far apart as they are because they are going to spread as they cook. Not a lot, but they will, and you don't want them to. Uh, run into each other. Now I'm gonna add a couple of the rum raisin cookies to this shape as well. I want to use up all of our our baking sheet real estate. You'll notice that I'm using parchment paper. I love parchment paper. It makes cleanup a breeze. You don't have to use a parchment paper. And you don't have to grease the cookie sheet because these have so much butter in them that they're not going to stick unless you burn them. Um, so now we're going to do some of the rum raisin cookies, cookie dough. And I'm going to press them a little bit witha glass and some sugar from sugar. It's my system. And I need a spoon back, please. I'm going to o the same thing - you can tell this is real, right. Okay, so we're gonna do the same thing. We're gonna take a just standard size tablespoon roll it a little bit, flatten it with our fingers. These smell really good. Now, instead of putting a hash pattern in these, what we're going to do is use a little bit of sugar, I'm going to put the bottom of a glass in there. Some of it will stick. If it doesn't stick. Yeah, just turn it so it sticks a little bit. Then lightly press down. the other way, and I'm gonna do it this way instead, is you can take take the sugar, and sprinkle it on top before you press them. That way, you get more sugar on top and your glass shouldn't stick. This glass appears to be indented a little bit, so we're going to have a little dome on our cookies. That's fine. Now we're just gonna get another baking sheet, and finish off the rum raisin ones. We'll jst do the rest of the them. We've got four on the other cookie sheet. So let's see if we can get a dozen out of this batch. Remember, we only divided the dough by eye. We didn't weigh it, so we're not sure. You know, if each piece is, um, each section of dough is exactly the same size. This is a larger sheet. I'm gonna be able to get hopefully the rest of the cookies on here, including my chocolate chip ones. And those are gonna be all of the hand formed ones. And then while they're baking, we can move on to the rolled ones. Okay, we're going to get another 11 out of this one, too. At least I'm consistent. All right, so, we going to start with some sugar, on each on of these, Press them down. Now we're gonna do the chocolate chip. Okay. Now, these are the chocolate chip ones, and we're aren't going to be pressing them with sugar as there's chocolate chips in them. So we're just gonna press them a little harder with our fingers. But kind of the same idea. Just kinda just like that. Yeah. You got the little ridges there. That's what we're looking for. The reason we roll him into a ball is as you. Press them down, they'll tend to stay round. Um, if you didn't roll it into a ball first, well, you could get different patterns. Of course. My artist son used to actually take his his batch of dough and for each cookie into some type of shape, or character, or whatever. And you could do that, too. Keep in mind that the thicker the cookies, the longer they're gonna take to bake. The thinner. of course, the less time, and as long as you don't burn them, however they come out, they'll be good, Good ingredients. And we did use butter. You can use margarine that's entirely up to you. Whether you want to use butter or margarine. I prefer to use butter because I just like the taste better. Then, using margarine. These ones we're only gonna get nine. So obviously dividing my hand is, uh, not nearly as accurate. And like I said, in the next batch, we're gonna use the kitchen scale to to divide the dough. But also, when you're just using a tablespoon, not all of the cookies are gonna be exactly the same size, either. It's just really doesn't matter. So not to worry. So there we are. We have the three different kinds. We have peanut butter. We have rum raisin and we have the chocolate chip. These are all gonna go in the oven for 375 for 10 to 12 minutes. Once you pass the 10 minute mark, you really need to start watching them. Maybe even a little before, because you don't want them to burn. But that's about what they're gonna take. The rolled cookies are actually only take 6 to 8 minutes. So let's get these in the oven. And, in the next video, we're going to actually roll out the, um, the sandwich cookies ones. So they're gonna be fairly thin, and we're gonna need to use cookie cutters for them. So we will see you in the next video. Thank you for watching.
7. Lesson 7 Baking the Formed Cookies: Welcome back. We're about to put the hand formed cookies in the oven. Right now they're going into 375 for about 10 to 12 minutes. So let's get them in the oven. You'll notice that I'm doing these on two levels. And because we're having two levels, halfway through the baking, I'm going to switch the trays, So we'll set the timer for six minutes. Switch the trays. And then we'll set it for another six minutes. So we'll be back in six minutes when we switch the trays. The time we're just went off at six minutes. So baking is not exact. So they may not be done in the next six minutes, but we'll be able to tell. So we're just switching these around. We're gonna set for another six minutes and we'll be back. See you when they're ready to come out of the oven. Okay, the cookies have been in for 12 minutes total. Now let's have a look. Those definitely look done, because they're dry but they still look a little puffy, but that's OK. Careful with the parchment paper. They can slide right off. Here's the other ones. They're looking pretty good, too. We're going to shut off the oven for now. Get these on some cooling racks and then do the rolled cookies
8. Lesson 8 Rolled Cookies: Okay. Welcome back. We've been keeping the last bit of dough moist covering it with some plastic. So we could take that dough out now and we're going to start rolling this out. It needs to be rolled fairly thin. We're going to do it in two lots, so kind of form this into sort of a disc. It's not. We need to flour the surface. If you have a young of these rolling maps, that's great. If not, you can use like a cutting board or something. You just want something that dough is not going to stick to. I like to just press that out, move the four around again and turn it over. So, We're going to start rolling it, I like to. You don't want to roll back and forth. What you want to do is push one way, push the other way, you need to do it side to side, too. Push one way, push the other way. Now because these are sandwich cookies, they are, each cookie has two pieces and you put jam between them. So we're probably only going to get about six finished cookies out of this. If that happens, just press it down, it's always by eye to see whether it's thin enough. I can almost see the pattern through the dough, so that's probably thin enough. So try and get the most out of your dough as you can as you're cutting it. I'm just using heart cookie cutters because I like them. That's 1, 2, 3, 4, 5. Can I get one more? Six and another one here. but I think we're only going to get six altogether. Anyway. So then remove the excess carefully. We're gonna have to transfer these to a cookie sheet. Now we're reusing the parchment paper because these are the delicate, so you don't want to be like just lifting them by hand because he could hurt them. Remove the excess dough. We can rework some of this dough, but you want to be careful that you don't rework it too much, You can really only rework it maybe, maybe once, um, and then it will just get to dry because don't forget. as we roll these out, we're actually incorporating more flour into the dough so they can get dry pretty quickly. And you'll notice how thin these are. That's why they're going to bake, much faster than the hand formed ones. Okay, now let's put this aside and roll out the next batch. Now, if you feel the dough is too dry, what you can do is you can actually put a little water on your hand and then flick it all off. Just just leave the minimum amount on there and work that water into the dough to make it more pliable, But never very much. It's very easy to make the dough break down. And when it actually does that not easy to recover from that. All right, Again, one way, then the other way. And side to side, gently. You are applying pressure, but you're not applying a lot of pressure. Ooops! I just ripped some dough there. That means it needs a little more flour on there, because it's sticking. All right. I don't think we're just gonna get as many out of this one. Yeah, we're only gonna get 5 out of here. So you know, there's seven on the other one. We're gonna get a dozen all together, and I'm gonna rework some of this. But we're doing this because because they're sandwich cookies. We want some of the jam to go show through. So we're gonna do a heart cut out for the top cookie. Get that tray back again. - You're going to be really careful with this. We'll try and get a few more cookies out of the left over dough. But it may become too tough to work with, too dry. And we're gonna cut the center of one of these, so at least have six bottoms and six tops. That didn't work out really well, the joys of baking. It should bake okay. It's not gonna be perfect. All right, so we're gonna mix this, put this is dough back together. And see if we can get a few more cookies out of here because they're still, as you can see, there's still a fair bit of dough left here. I am just going to go wet my hands a little bit. Be right back. Now, as you can see, my hands are just barely wet. I shook off as much as I could. We may actually have to. It's still probably a little too wet now, but, we'll put a little extra flour, and try and roll these out and try and save these ones. Because the more cookies. You can make the better, right? Yeah. It looks like we're gonna be able to rescue a few cookies out of here. That's probably thin enough. Again. I am just starting, just barely starting to see the pattern of this under the dough. So let's see what we can do here. It looks like we're gonna get it another six cookies out of here. Now, the rest of the dough around there that isn't cut it's now going to be too tough to rework it. It'll just fall apart. So cut the center of three of these, get the tray back, the baking sheet back. You could try baking the little centers if you wanted to, but odds are they'll just burn because they're so small. I generally don't do it. All right, Now, these are gonna go in the oven, and I forgot to move the, I need to move the tray. or the rack because we're only putting one in. So we want these to cook exactly In the center of the oven. There we go. So, I'm only going to set the timer for five minutes and check in five and we'll see you back in five. They've been in for seven minutes, and a couple of them are getting pretty brown, so it's time for them to come out, And, we're going to very carefully use the lifter. We can't. We aren't gonna be able to work with these until there completely cooled so that we can put them together. And, because these were thinner than the other cookies, I actually got quite a few more out of here? We're going to end up with nine sandwich cookies. I counted. Yeah. Okay, so we're gonna do a little bit of clean up, and then we're gonna come back and put the sandwich cookies together. We'll see you in the next video,
9. Lesson 9 Sandwich Cookie Assembly: Welcome back. Now we're going to assemble the sandwich cookies because they've cooled down now, and they're nice. You can pick them up, so that helps to be able to assemble them. And we're just using some raspberry jam store bought raspberry jam. So we're just going to, the best way is to use a teaspoon. You're not gonna need a lot on here. Stick a little bit. Not even a full teaspoon there. Then you want to spread out, It's best to use the back of a spoon. Using a knife may actually make it more difficult. So we don't want to get too close to the edge because you're gonna press the top and it could spill out the side. There we go. There's our first two. Now, you'll notice that I'm doing this on top of parchment paper. This is the parchment we actually used to bake it on. Parchment paper is not a one time use product. You can keep using it. I wanted to use it in case I spilled some of the jam on here. and make it easy Clean up. But we can also you know, when we bake with it, we can keep baking with it. I like to, um just fold it up and put it in the freezer for the next use. You'll be able to tell when you can't use it anymore. It gets pretty brown, and one thing you don't want to use it for is broiling that takes it past its burned temperature, and we found that out the hard way. It didn't actually burst into flames, but it got pretty black. So you know, just don't ever use it for broiling. - This is actually pretty easy and what they make you know somewhat impressive cookies, and you can use any shapes you want. But when you're making a sandwich cookie, you want at least to leave, some type of little hole on the top so that you could see the sandwich cookies and it gives a hint of what's in there. And there we go. We now have nine sandwich cookies, Um, and we'll, uh, we'll see when the next video we'll recap everything. And then I'm gonna set you with your project. See you in the next video
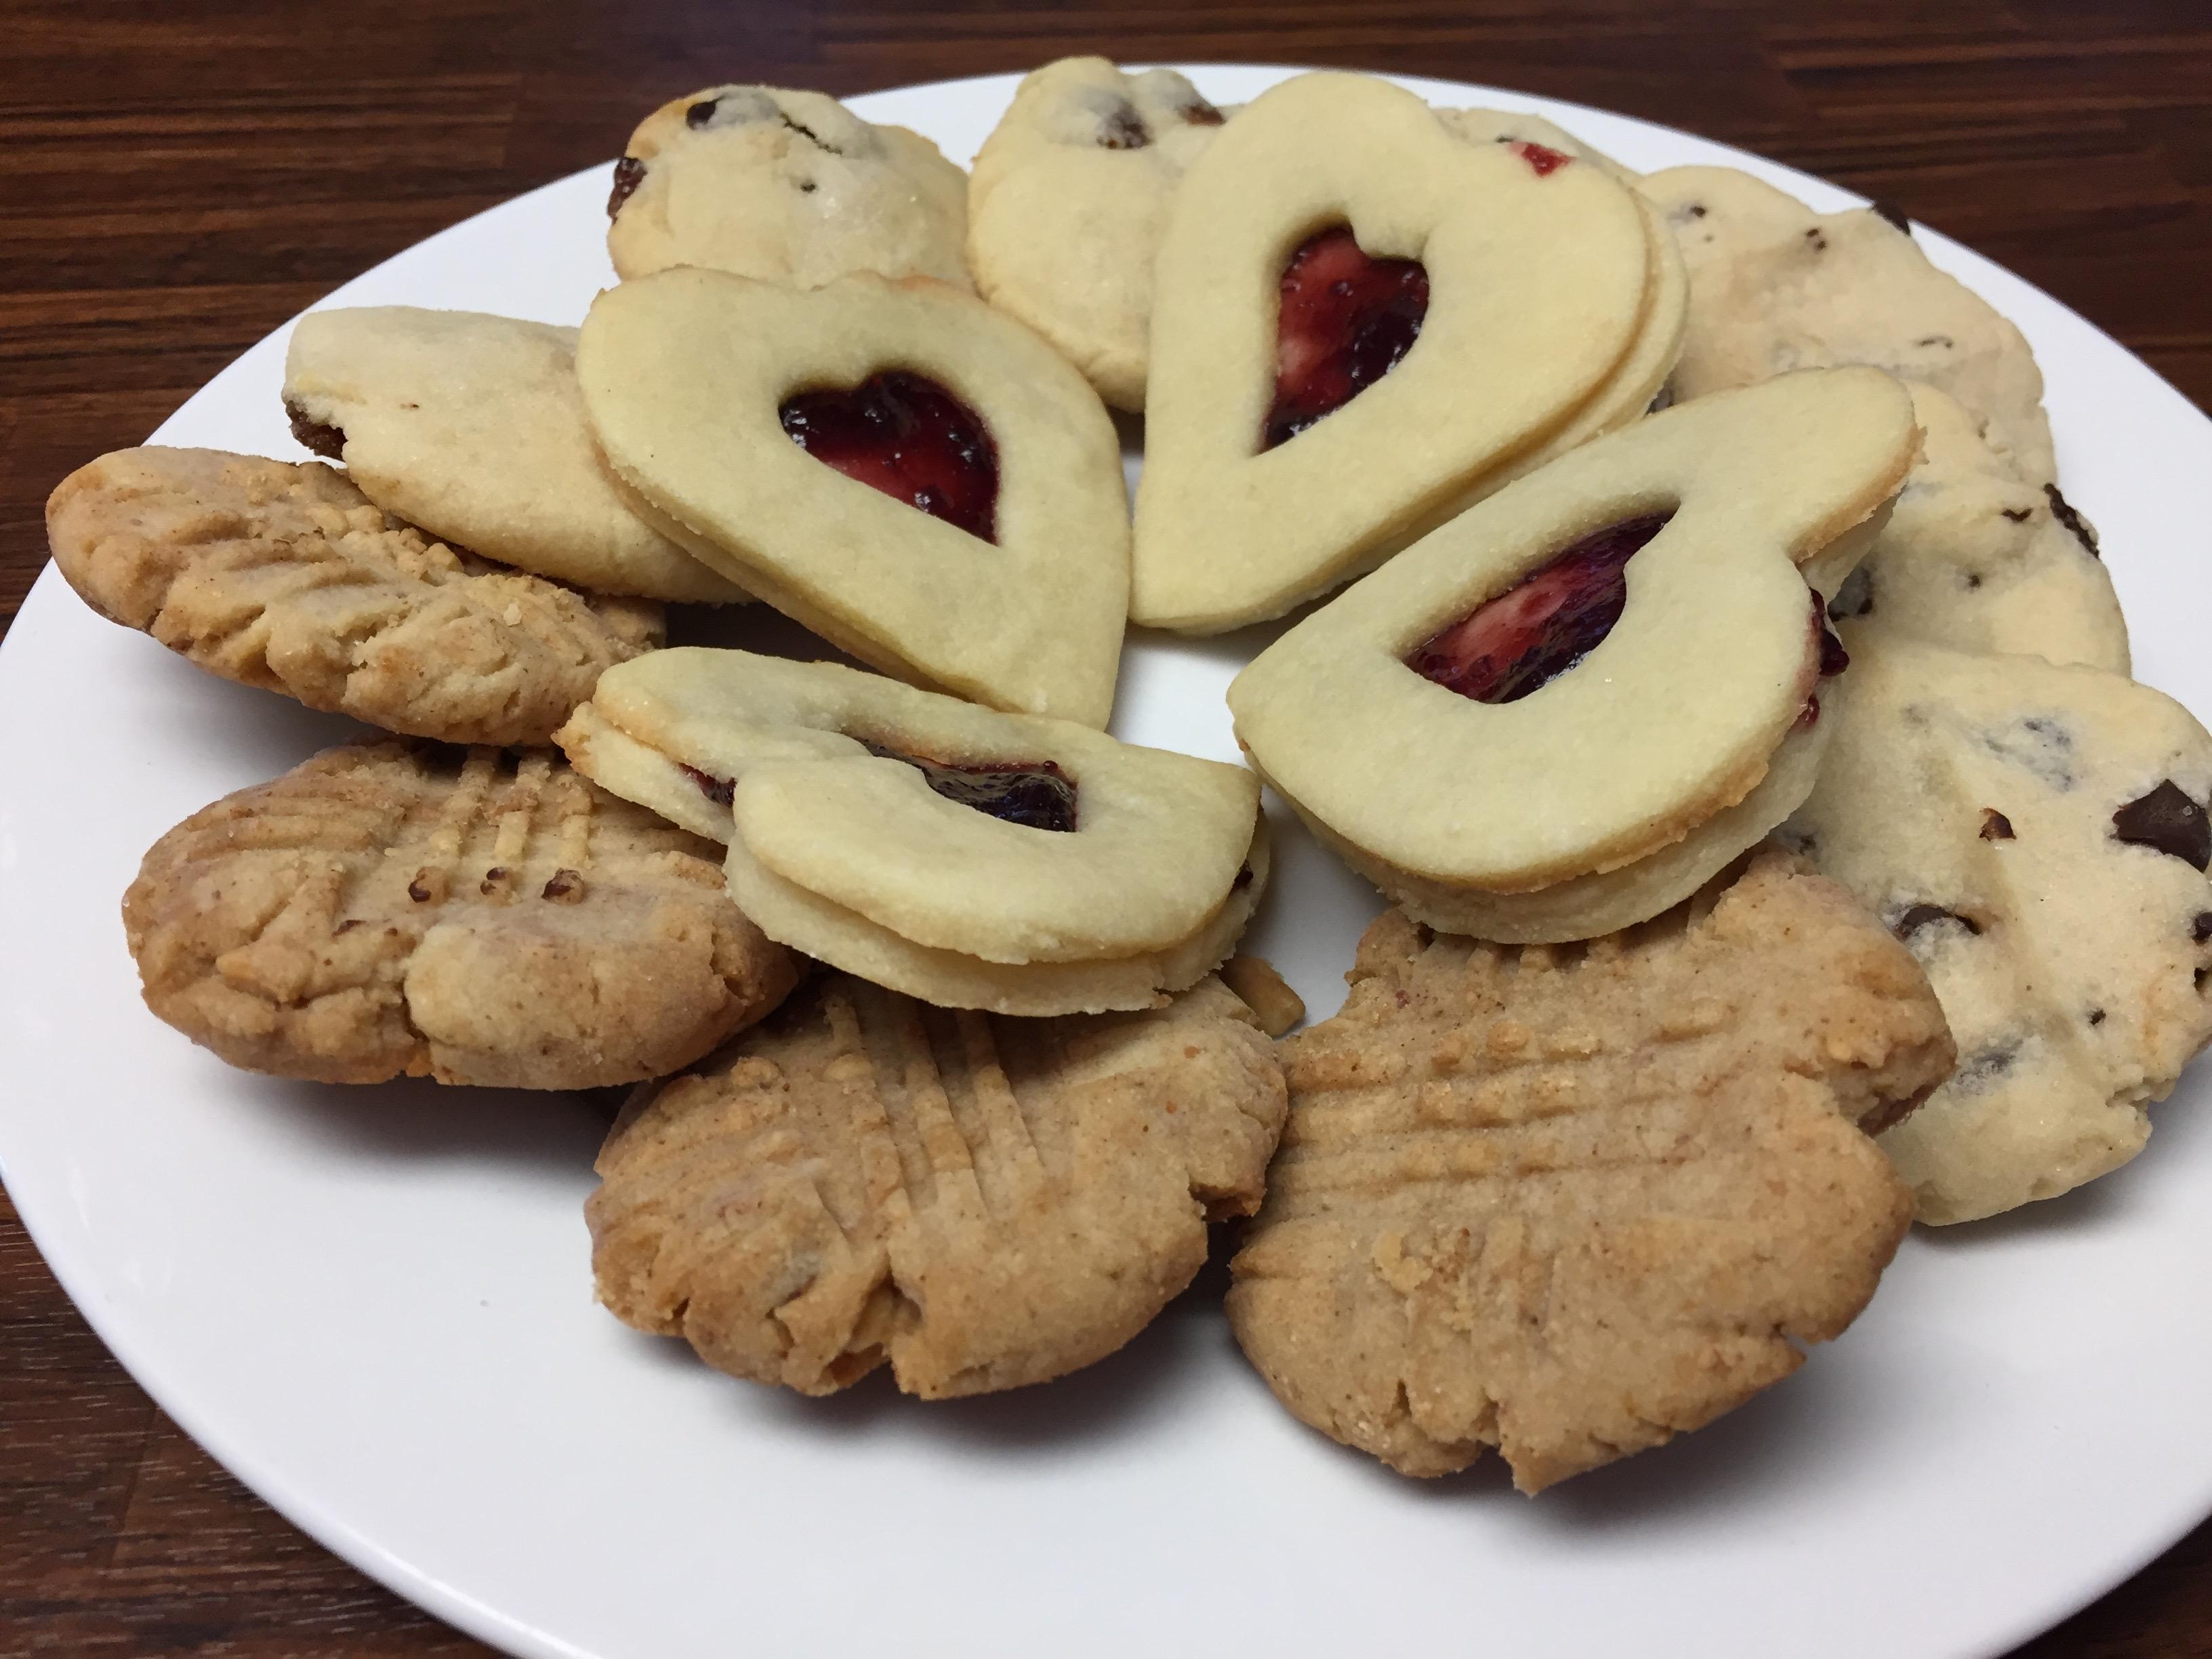
10. Lesson 10 What We Learned: Welcome back. Well, this brings us to the end of magic Sugar cookie dough, Part one. I hope you're not, covered in too much flour. Just to recap, we made a single batch of vanilla magic sugar cookie dough. We then divided that dough into four equal pieces and used each piece to make a different kind of cookie. We made rum raisin cookies. We made peanut butter cookies, chocolate chip cookies and sandwich cookies, heart shaped ones with a raspberry filling. We learned that making the dough works best if all of the ingredients are at room temperature, we learned how to mix the dough by hand. We learned how to divide the dough by eye, and we learned how to mix in all the additions for the different kinds of cookies. We discovered that the hand formed cookies, which are thicker, need to bake much longer, 12 to 15 minutes. However, the rolled cookies, which are much thinner, bake for only 6 to 8 minutes. I hope you have enjoyed this course and will join us for Part two. Where will make butterscotch magic sugar cookie dough with four brand new add-ins to make four more cookies. Here's the cookies that are planned for Part two: pecan sandies, date & nut, turnover cookies filled with apricot jam. Crisp sugar cookies dusted with cinnamon sugar. Also, we also hope you'll join us for magic sugar cookie dough. Part three in that course will be making chocolate magic Sugar cookie dough with even more exciting new cookies like chocolate fudge filled cookies, chocolate banana cream filled cookies, chocolate chocolate chip cookies and chocolate mint cookies. So if you're a chocolate lover, you're not gonna want to miss this one. Thanks again for joining us. And don't forget to check out your class assignment in the next video. Thanks for watching.
11. Lesson 11 Class Assignment: Welcome back. Now it's time for your class assignment. I hope you have enjoyed following along and are excited about how simple changes to a basic recipe can make a big difference. So here's your assignment. Make the basic magic sugar cookie dough and then pick four different add-ins of your own. For each quarter of the dough, you'll need about 1/4 of a cup to 1/3 of a cup of your selected add-in, or for the filled cookies. It's just a small amount of whatever filling you have chosen. Let us know what you've done and be sure to take pictures to upload, too. Be brave, Be bold, be fearless and remember, even mistakes are edible. I look forward to seeing all the amazing choices you're going to make. Once again, thanks for joining us on this course, and I hope to see you again soon.
 Vicky Wells, Kitchen Gadget Aficionado