Transcripts
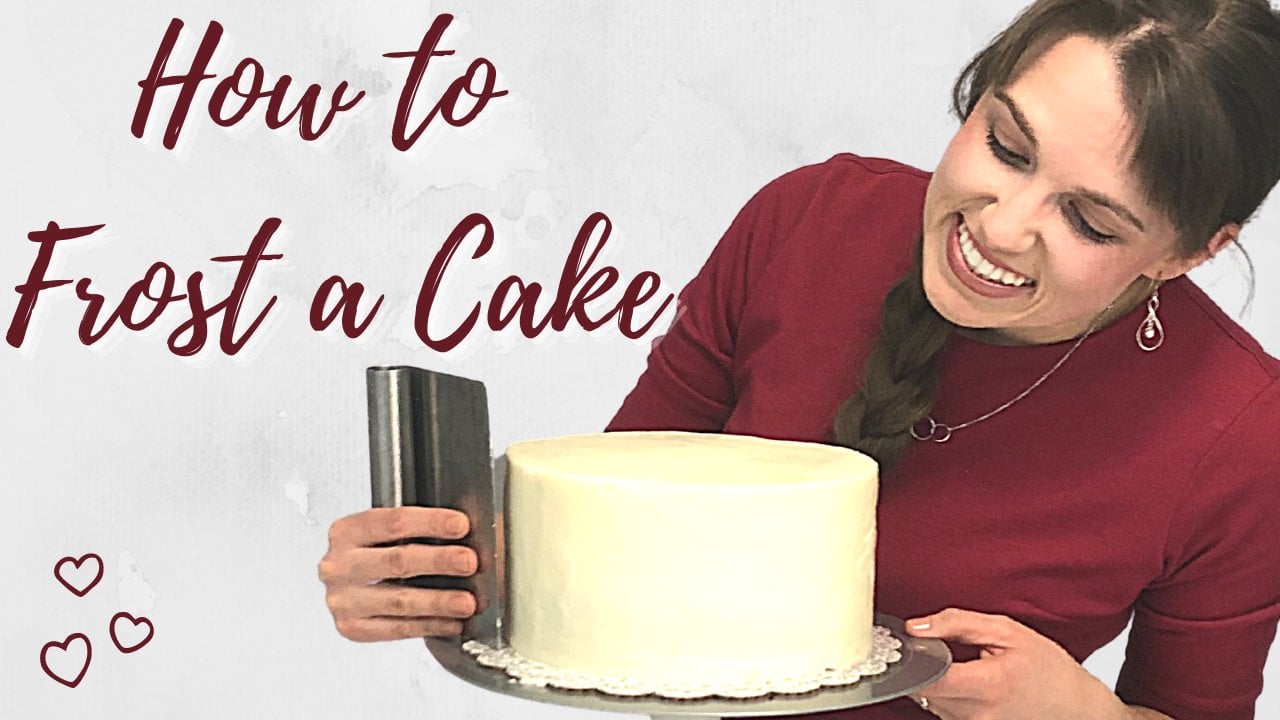
1. Intro Carrot Cake: This carrot cake is absolutely to die for. It is filled with lots of delicious flavors and yummy extra goodies such as pineapple, coconut, raisins, nuts, and of course, carrots. This is literally the best carrot cake. It's completely bakery worthy, and I'm so excited that you are here to learn how to make this cake step by step. We're going to start off with a couple of tips on how to successfully bake a cake and then we'll dig right into the actual carrot cake recipe, which we'll actually be doing by hand. We'll follow up by learning how to make a delicious cream cheese frosting, and then we will ice our cake, add some nuts on the side, a few carrots on the top, and then the best part, enjoy our yummy cake. Welcome. I'm Michelle Schutten, and I have over 10 years experience in teaching cake decorating, as well as decorating and baking cakes. I have a YouTube channel with short tutorials on how to make and decorate cakes. But this course here is much more in-depth on how to make this delicious cake. I also have my SkillShare course on how to frost a cake like a pro, so definitely check out that course if you haven't already. Of course, the project for this course is to bake and frost and enjoy a carrot cake of your very own. Welcome. I'm so thankful and so happy that you're here.
2. Carrot Cake Project: The project for this course? Well, of course, you're going to make a carrot cake. But I don't want you to just make the cake and give it away. I want you to make this cake and eat it. Okay. It's a delicious cake that you really need to try. Make your cake, take some photos, submit them in the Project Section of this class, and definitely take a bite or two.
3. Tips for a Great Carrot Cake: Now before we begin to actually make the cake, here are 10 tips on how to make a great cake. This comes from my video, how to frost a cake like a pro. Now before you can begin to have success in frosting your cake, you actually have to bake the cake. So here are 10 tips on how to bake a great cake. The first tip is to make sure that all of your ingredients are at room temperature. Now this is really important because as you're combining the ingredients together, you don't want temperatures such as cold eggs or cold butter to affect the quality or the end product of your cake. If all of your ingredients are at room temperature, you'll be able to mix the ingredients together properly, as well as have all of the leavening agents in the cake work together to create that perfect cake. Tip number 2 is to measure correctly. Honestly, a lot of people don't quite measure correctly. So if your cake has a tendency to not turn out correctly, well maybe that's because you're not measuring very well. You want to make sure that your ingredients, your dry ingredients are nice and smooth on the top as you level them out, and make sure that when you measure those liquid ingredients that you get way down to eye level in order to see them well. Tip number 3 is to scrape the bowl. Now whether you're using a hand mixer, a standing mixer, or just mixing by hand, it's going to be really important to use a rubber scraper or a spatula to scrape the bowl well so that all of your ingredients are incorporated into the batter. Tip number 4 is to mix just right. Now this means you don't want to over mix your batter and you don't want to under mix your batter. If you are over mixing or under mixing your batter, you might have clumps, or it's over mixed, your ingredients might rise a bit too much or your cake might become a little bit chewy. Tip number 5 is parchment paper. This is something that I swear by. This is just a little parchment circle, you can cut them out very easily, and place it in the bottom of your pan. Your cake will never stick to the pan again, and honestly, you don't even need to grease the sides of the pan because your cake will come out every single time with this parchment on the bottom. Tip number 6, don't open the oven. Some cakes can be a little finicky, especially German chocolate or red velvet. If you open the oven a little bit too early, the cake might drop, and then you have to rebake the cake, which is definitely not something that we want to do, so try not to open the oven until the cake is almost done. Or you could open the oven halfway through, turn it, and then don't open the oven again until the cake is nearly done. Tip number 7, put your cake directly into the oven once you have it next. Once the ingredients have been mixed, the leavening, agents start working together creating little air bubbles within your cake, and if you wait maybe half an hour to an hour before you put your cake in the oven, well, those air bubbles will have already began to pop, and therefore your cake will not rise correctly. Tip number 8 is to poke your cake. Don't prick your cake. So basically using a little toothpick to test if it's done. No, this can cause your cake to actually sink in the middle if you use a toothpick before the cake is done. What I like to do is just use my finger and poke my cake, and if it springs back, then I know that the cake is done. If it doesn't spring back, then I know that I need to have my cake in the oven a little bit longer. Tip number 9 is to freeze the layers. This can be really helpful because it makes the cake a little bit sturdier. If you bake a cake, cool it, and then directly frost it, your cake will be much more fragile and more difficult to frost and decorate. Tip number 10 is to bake your cake early. Bake your cake a day before or two days before. Baking a cake actually on the day off can cause a lot of stress. Because it might not be cool enough when it's time to decorate your cake, and then your frosting is going to start to melt, which will cause a lot of problems. Now here's a bonus tip for all of you that are located at a high altitude. You want to make sure that you follow a recipe that aligns with the high altitude, so that might mean to decrease the sugar and increase maybe the water or the milk. You might also have to increase the flower a little bit or decrease the baking soda. If you are at a high altitude, use recipes that work really well for you. You might need to take a few recipes that you enjoy and tweak them and play with them just a little bit until you get a cake that turns out really well. Now make sure that you follow these 10 tips for great cakes so that you can actually have a great cake so that you can frost and decorate a beautiful cake.
4. Make the Carrot Cake: Now, it is time to make our cake. Follow step-by-step my instructions, and you will come out with a great cake. To start out with the dry ingredients, we're going to need two cups of all-purpose flour. Make sure you measure it correctly. One and half cups of sugar. Two teaspoons cinnamon. One teaspoon salt. Two teaspoons baking soda. Now, nutmeg is optional, but it's certainly my favorite spice, so I like to add fresh nutmeg to my yummy carrot cake. Three eggs. Makes sure they're large eggs and at room temperature. Three quarters cup of vegetable oil or canola oil. Two teaspoons of vanilla. Pure vanilla is definitely the best, but imitation vanilla would work with this recipe, too. Now, we need three cups of buttermilk, which I never have, so I'm just going to make a little bit of sour milk with some vinegar, and then fill up to the three-quarters line with the milk. Let it sit for a little bit, and there we go, our little imitation buttermilk. Now, for the goodies; one cup of shredded coconut. One cup of chopped walnuts. Mine aren't chopped, but I'll show you a trick on how. One cup of raisins, and make sure that you get them, so they're not so clumpy. Eight ounces of crushed pineapple with the juice. I'll be using a little less than half of this can, and then we got carrots because this is carrot cake. We'll be using about two cups of shredded carrots. The first thing I'm going to do is mix all of my dry ingredients together. I really like to use this meshed sieve here to just push my dry ingredients through. I'll start with my flour here. You can see here, it's really easy to just press it through the sieve with our little spatula, and it makes it so that we have no clumps in our cake. We don't want a clumpy cake. I'm just going to add the sugar. Push that sugar through the sieve. Mine is a little clumpy. Add my salt. Really, using this meshed sieve is so handy because I can just put all of my dry ingredients right in and not have to worry about any of the clumps that might be in it. A little extra cinnamon is okay. My favorite ingredient is nutmeg, but it's certainly optional. I'm making a little hole in the center here, and I'm going to add all my wet ingredients. We'll start off with our buttermilk. I don't know if you can tell, but it got a little bit thicker. I'll just mix that in. Add my oil. This is going to make the cake nice and moist. There's quite a bit of oil in here and then my three eggs. Boop, boop, boop. Now, just mix it until it's well-incorporated. Bring in the outside, mix it all in together. I'm going to just trim off the ends of my carrots, and then cut them up into smaller chunks here. You can certainly use a hand grater, and grate these carrots. That's just fine. But if you have a food processor, it will change your life when making carrot cake. It's just so simple to use a food processor. Essentially, all I'm going to do is put my chopped up carrots directly into my food processor, and hit "Go". Here we go, and I'm done. You'll want to take out the big chunks of carrots, but other than that, it took me maybe five seconds. Now, all my carrots are still in here. I'm actually just going to add my walnuts directly in. If your carrots are about two cups, that's what we're going for. It's not one of those essential ingredients, although it is essential in carrot cake, but it doesn't matter if you have a little bit more or a little bit less of your carrots. Add the walnuts, mix it up. There we go. I like my walnuts to still be baked, so I don't want it in here for too long. Of course, if you don't have a food processor, you can always use your hands to just chop your nuts. I'm just going to add my extra ingredients. I have my coconut here, my pineapple, and it still has the juice in it. My carrots and walnuts directly from the food processor, and now, my raisins. We just mix all of this up. Oh, my goodness, it smells so good. All of these extra goodies just really make it the best carrot cake. My carrot cake is well-mixed and now, it's just time to add it to the pans. It's essential that you line your pan with a piece of parchment paper so that your cake pops out every time. We're going to mix it here evenly between two pans. I'm going to pop these pans in a 350 degree oven for about 30-35 minutes or until done.
5. Cream Cheese Frosting: There's no better flavor than cream cheese frosting, and this recipe here is really easy to make. But let me tell you, cream cheese frosting is going to have a bit of a different texture than your regular either American style butter cream or again Italian marine butter cream. Simply put, cream cheese frosting is difficult to work with and you won't be able to do a lot of the same decorating techniques that you can do with other types of icing. However, a carrot cake has a very simple decoration and all of the declarations can easily be done with cream cheese frosting. We'll need softened cream cheese for my cream cheese frosting. One stick or eight ounces of softed butter, it can either be salted or unsalted. Little bit of pure vanilla, one mountain or one pound, which is 16 ounces of powdered sugar or confectioner's sugar. It's really important that our cream cheese is at room temperature. You can use the standing mixer, which I actually prefer, but for this I'm going to use a hand mixer. You really want to make sure that you get all of the clumps out of this or else you'll have clumpy frosting. I did it, I over softened my butter and it melted. We all do it, but definitely try not to, we want softened butter not melted butter, but this is what we're going with. We mix it up again. Now it's important I scrape down the sides here because sometimes those clumps like to hide on the sides. Really just mix it up a couple of times and get those clumps out of the way. It looks like it ain't clumpy at all, it's nice and smooth and even though my butter was a little bit meltier, it's well incorporated. Now we're going to add a little bit of vanilla. If I'm always like to measure my vanilla, maybe it's because I like to actually add a little bit more, but that's okay, and we'll mix it up again. So speaking of no clumps in our icing, I want to make sure there's no clumps in our powdered sugar, which tends to be a little bit clumpy. This is my favorite way to declumplify my powdered sugar. I'm using the same mesh sieve and this time I'm using my hand, I'm just going to press it in, and I like to do it half and half so that I don't make too much of a powdered sugary cloud. Now the rest of my confectioner's sugar right in. What do you call this, confectioner's sugar or powdered sugar? Is it cream cheese frosting or is it cream cheese icing? This frosting is really, really good. But it's a little sweet, so don't too too much.
6. Frost the Carrot Cake: My carrot cake has cooled, I froze it. It's actually really moist, so I'm not even going to add any sweet water to it, it is ready to go. I'm going to just frost my cake on a small little cake board here, because I'll be transferring my cake. My cake is already very level, so you don't even need to level it, because it's just a perfect little cake here. Now, let me just tell you, cream cheese frosting while it tastes absolutely delicious, it is more challenging to work with, so other techniques that you might use for decorating a cake aren't as doable with cream cheese frosting. Add the segment layer there. I'm going to do a crumb coat, which is basically, there's a really thin layer of frosting that will get all the crumbs locked inside the cake. If you'd like a full in-depth tutorial on how to really frost a cake well, definitely be sure to check out my other Skillshare course on how to frost a cake like a pro. Now, I'm going to pop this cake in the fridge and until it hardens up a bit. My cake here has chilled and it's firm to the touch, no sticking, so its ready to go for the final layer. It's important that they put a lot of frosting on the top of my cake because it's not going to be covered. The sides, however, will have a nice sprinkling of chopped walnuts. This is just the right amount of frosting to put on your cake. If you want a little bit more frosting, you might consider doubling the recipe. Now, it's time for those sharp edges. Make sure you have a nice clean spatula and wipe it across the top. Clean spatula, wipe it across the top. Got my walnuts here ready to go, so let's have some fun. It does get a little messy. There we go. My nuts are applied. We could keep our cake looking just like this, and it will be a beautiful carrot cake. Now, this next part here is completely optional, but I like having my carrot cake have little carrots on the top, so I'm going to dye a little bit of my frosting orange for the carrots, and a little bit green for the stem of the carrot. It's really important that you use a gel dye so that it doesn't water down your frosting. Here we go, this is a perfect carrot looking orange. I'm using here a really small amount of frosting. I'm actually not going to use a coupler, I'm going to to stick my tip directly inside my bag in here. To fill my bag, I'm just going to bring it down to just cup it in my hand and then add the frosting directly to the bag, and I use my hands just to scoop it in here. Pull it out. You want to make sure you push your frosting all the way to the end and then twist your bag. Orange is Wilton tip 12, which is a large round tip, and green is Wilton 3, which is a smaller round tip, but honestly you could just cut a hole in the bag and it would work just fine. To make my carrots, I'm going to just make nice little shell borders. Squeeze and then pull it down until I have a nice little carrot. Then I will use my green to make some nice little stems. You can make your stems however you want. Your carrot can have lots of stems or just a couple. Now let's do the technique right on the cake. Again, I start to bring it in. Then I can do my little leaves here. It's going to be a stem for my carrot. There we go. Now the best thing to do to make this so it's symmetrical, is to take each carrot and think about it like a clock. Go directly across. Now, I just do my little stems. I certainly don't want my cake here to be on this on turn table, so I'm to transfer it over to this pretty platter. Just a piece of masking tape so my cake won't slide. It should lift up pretty easily since it's just resting on a little non-skid mat. Here we go. On my beautiful platter.
7. Carrot Cake Closing: All right, here we go, the taste test. This cake here is absolutely delicious. I love the little add-ins such as the carrots, of course, the raisins, walnuts, coconut, and pineapple. All of those flavors just merge together and create a nice spicy carrot cake. In addition, the cream cheese on the top and in the middle just really adds a touch of sweetness and creaminess to the cake. This is a completely bakery worthy cake. Now, my husband can choose any cake that he wants for his birthday and this is the one that he chooses. I made this cake actually for his birthday. Please share your project with us. Put in the description box a picture of your cake. Let us know how it turned out, how much you are enjoying the cake. Thank you so much for taking this Skillshare course. I had so much fun making it and I really hope that you enjoy this amazing cake recipe. Have a beautiful day, and of course, go sweeten the world. Bye-bye.
 Michelle S., Teacher, Baker and Cupcake Maker!