Transcripts
1. Introduction: Hello, everyone, and
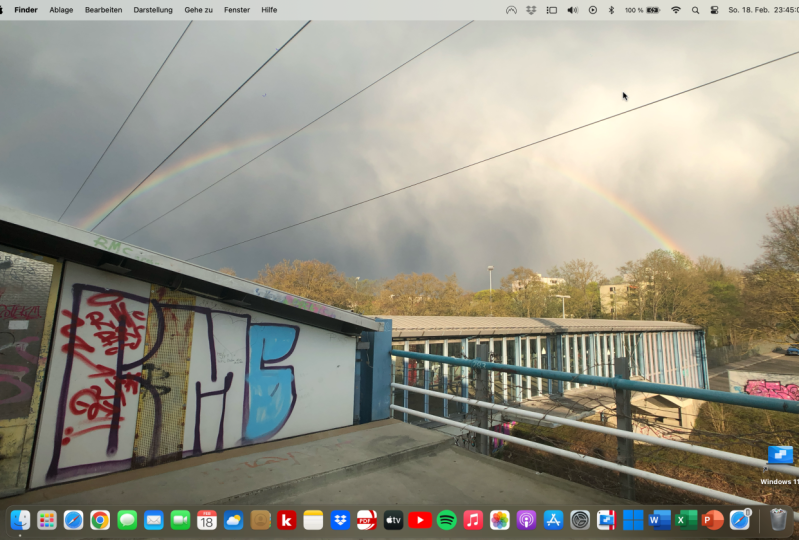
welcome to this course. Today, I'm going to show you how to set up a brand new Mc, focusing on productivity
and minimalism. I've been a Windows user for more than 20 years and I switched to Apple
and I know at first, it can be quite overwhelming, switching from one
system to another. So hopefully, with this course, it's going to be easier for you. In the description below, you're going to find
some of the topics that we're going to
cover on this course. So if you're interested,
please feel free to enroll, and hopefully, I'll see
you on the other side.
2. Initial Setup and Bluetooth Peripherals: Okay. So now that we've unboxed our mac
and plugged it in, we have to turn it on,
so we press the on button that's behind the
mac meani in my case. If you're using
an apple keyboard or an apple mouse, you
shouldn't have a problem. This does not mean
that you can't use other brands for the keyboard or the mouse, if
they're bluetooth. It just means that for
the initial setup, you're going to need a
wire or a USB receiver. In my case, I have this
keyboard and this mouse. They're both blue tooth, but I'm using this keyboard
that has a USB receiver, so I can plug it in to
the back of my mac. And this will be the first
screen that comes up, so we have to choose
our language. In my case, English,
and I enter, and now we have to choose
our country or region, in my case, Spain. We have a screen here that says written and
spoken languages, so we can choose to leave this as is or customized settings. Of course, you can add any
language that you want. We click on Continue. Input sources, we have
Spanish and the US. We click on Continue. Dictation English from the
United Kingdom is okay. Continue. Accessibility. You can choose if you want to adapt
to your Mac for your needs. In my case, I don't. No now, data and
privacy continue. If this is not your
first time using a mac and you have
another mac or you want to migrate from a
Windows PC, you can't do that. In my case, I don't want
to do that because it's a fresh install. Not now. If you already have an Apple ID, you can write it down here or either create a new
Apple ID if you don't, or obviously get your password back if you don't remember it, or you can set up later. I'm going to write
down my Apple ID. We're going to get a verification
code on our telephone. We're going to accept the
terms and conditions. Here, we're going to
create a computer account, fill in the blank
with your details and set up a new password
for our computer. We wait for Cloud to
set up our account. Once we've entered our password
and everything is set up. Now we can set up our
wireless keyboards and mice. Let's go ahead and do
that. We continue. And we have to follow
the steps on the screen. Now our keyboard has been identified and we just
have to choose the layout. In our case, I saw European Macintosh keyboard
and we click done. If you can't set up
your keyboard that way, I suggest coming up here
to our Bluetooth window, Bluetooth preferences, and syncing our
wireless keyboard here.
3. Updating Software: Before we start
talking about the whole interface of your new Mac. The first thing I recommend is to update to the
latest version. We're going to come over here
in the upper left corner. We click on the Apple
logo. About this Mac. Always check software update. And once it's finished checking, it will let you know which
version you're using. And you can also
check this box to automatically keep
your Mac up to date.
4. Interface Basics: Apple Menu: Now let's talk a bit
about the interface. This is a brand new
Mac mini in my case, it's quite similar to what
you're going to see when you unbox and start setting
up your computer. We have three
different things here. We have this menu here and
the upper left corner. This menu here with more items
on the upper right corner, down here, we have
what's known as the doc. Let's begin with the
upper left corner. As we saw before, if we
clicked on the Apple logo, we can also click here about this Mac to update to
the latest version. From here, we can
also choose to put our computers to sleep or
restart or to shut down. But what I feel is the most important one is this one here,
system preferences. We're going to
dive deep into the system preferences
a bit further on, but you have to know it's here. When you click the Apple
logo, system preferences. So this would be the equivalent to the control panel on Windows. So here we have things
like our Apple ID, our notifications, if we
want to set up our mouse, our keyboard, printers, blue
tools, so on and so forth. So if we want to close it,
we'll just click here, the red cross, and we
also have it down here. System preferences
inside the dock.
5. Interface Basics: Notifications and Control Center: Let's talk about the
upper right hand corner. So here we have notifications
and the control center. So for example, if we
click on date and time, some widgets will come up. So we have the events that
we have on the calendar, the weather, some time zones
from different countries, a bit of stock information. Of course, we can edit them. We'll talk about that
in a bit and here we have our control center. So we can turn on or off our
WiFi bluetooth air drop. We can also change
the brightness of our display or the sound. We also have do not disturb
here. Why is this here? Because some of
the apps will show some notifications here
every now and then. If you don't want
to be disturbed and you don't want any
type of notification, you just click here,
to not disturb, and you choose for how long. You can also come here to the
notification preferences. As you can see,
there are many apps that will send you
notifications. So as I said, if you turn on
the to not the start option, none of these apps will
bother you. Here to the list. We have a magnifying glass. This is spotlight. If we click on it,
it shows up here. Spotlight is a tool that
allows you to look for anything in your computer and also in the web
at the same time. For example, if I want to know
how much is $25 in euros, automatically,
spotlight tells me. How much it is.
At the same time, let's say I want to find
something in my computer. I want to bring up the system
preferences once again. So I type in system preference, and spotlight already
shows me some results. So I can click here on
system preferences or on series suggested websites or other related
searches on the web. And you can use spotlight to find pretty much anything
on your computer. So if I want to open up Safari, for example, I can
do that as well. And lastly, here to the left, we have our keyboard
setup, for example, right now, I'm using
the Spanish keyboard, but I can switch to
the US if I want to. And obviously, I can go into keyboard preferences and add
other keyboards if I want.
6. Interface Basics: The Dock: The last part of
the interface or the desktop will be the dock, which would be down here. So, as you can
see, every time we hover the mouse on top
of one of these icons, it tells us what it is. So MacOS comes by default with a lot of
apps and programs. Some of them you might use. Some of them, you
probably won't. But here on the doc
is where you'll find most of these
programs and apps. So, for example, we have
system preferences, we also have the app store. So if you want to download or purchase some new apps that
you don't have by default. You can buy them here. And also, you can update the
apps that you already have. We also have pages, numbers, podcast, Apple TV, if you have one at home, maps, Mao, Safari and the finder. And as it was the case
with the Windows task bar, we can also add or remove some of these programs
and apps from the doc. As I said in the
introduction of this course, I'm going to focus
on productivity, but also on minimalism. So I'm going for the
cleanest setup possible. What does that mean that
I'm going to remove or erase many of the witches that you see here
or all of them, and also many of the apps and
programs that you see here, that way we can focus on being
more productive and also having a minimalistic desktop without unnecessary clutter.
7. Minimalist Desktop Setup: Let's begin the
cleaning process. We're going to come up here to the upper right hand corner, to the control center and
the notification tab. And I'm going to
erase these things. I don't want these widgets. I'll come here to edit widgets. Obviously, if you use them, you can keep them.
In my case, I don't. So I just erase all of them. And when I'm finished,
I click Done. Now when I click here, there's nothing to bother me. Next, I come to the
control center. I click on do not disturb. I click on notification
preferences. Here in the left column, we have all the apps and programs that send
us notifications. What I do is I click on
each app, and one by one, I allow notifications
one by one off, facet off, games off, and so on and so forth, until I finish disling every single notification
from every app. As I said before, if you need to have some
notifications, for example, from FaceTime or
you want to keep your calendar notifications
on, you can do that. In my case, I don't use
them and I don't need them. That's why I turn them off. And when I'm finished, I just click here
on the red cross. In my case, I also disable my WiFi because I use
an ethernet cable. Here, the desktop works
very similar to windows, so you can drag and
drop anything on here, which is not bad, but if you
have 100 different folders, it starts to look ugly. What I like to do is right
click on my desktop. Sort by and snap to grid. This way, it will
act like windows, and when you drag
and drop something, it will snap to the grid. So instead of being here
in the middle of nowhere, it will snap in place. That way, we have a much
more organized desktop. And now let's clean up the dock. So as I said before, we have all the default
apps and programs, but I only use some of them, so I don't need to have
unnecessary apps on my dock. So I come here and one by one, I just remove them. So right click Options,
remove from D. Pages, options, remove. Numbers, I don't use either, remove, and you do that with each and every
app that you don't want. If you want to use Apple
TV or you want to have FaceTime here or you want to have maps here, you can do so. In my case, I'm obsessed with minimalism and clean setups, so I don't like to have
unnecessary apps on my dock. And that's what I'm going to do. I'm going to finish
cleaning the dock. So in my case, this is
how the doc would look. So I have finder, if I need to find any
type of document, Safari, if I need to browse
the web, system preferences, if I need to change
something from my system, the app that I'm
using right now to screen record and
obviously the bin. Now let's move on to
the doc preferences in case we want to change
the behavior of the doc.
8. Dock Preferences: Want to change the behavior
and look of our doc, we come here and right click on the dock and we open
doc preferences, and we can change the size or
the position on the screen, left bottom In my case, I prefer on the bottom. We can also animate our
opening applications. When we click on an app, it does a small jump. We can turn it on or off. In my case, I don't need the
animation, so I turn it off. We can also hide
and show the doc. So if we check that,
it disappears, but when we come here,
the dog pops up. In my case, I like to
see the dog constantly, so I don't have it hidden. And we can also check or uncheck show indicators
for open applications. So if you can see here, we have a small dot
underneath the apps. That means that
these apps are open. So in this case,
safari is open and system preferences is open and QuickTime is also open because I'm screen recording
at the moment. If I want to quit
Safari, I right click. I click on Quit. As you can see, the small dot disappeared. And we can also check or uncheck show recent
applications. Now let's talk a bit about the finder app or program
and how I customize it.
9. Finder Preferences: With finder, as
its name implies, you can find all of your files. So if we fire up finder
and we use this folder as an example where I store my screen recordings
for this course, I can come here to
the left column and edit how the finder looks. For example, in my case, I don't use airdrop. If you have an iPhone
or another Mac device, it might be useful for you, but in my case, I don't. So I just right click and
I remove from sidebar. Okay. Obviously, you can do the same with each
and every option. For example, cloud, right click and I
remove from sidebar. And the same with the tags. I remove all of them
because I don't use them. Right click, delete. Yes, I do the same with
each and every one of them. Now when I open a folder
with the finder app, it looks like this, in my
opinion, much cleaner. But now, let's say I want to edit the behavior
of the finder app, so I close this
with the red cross, and I come here to
find preferences. And I can change the
behavior of the finder app. So for example, show these
items on the desktop. Let's say I want to show
the hard disk. I can click. And here, now the hard
disk of my Mcmi shows up. In my case, I don't want that, but if you need it,
that's the way to do it. I just leave the
external disc checked. So every time I
plug a USB device, it's going to show
up You can also change which window shows up when you open the finder app. So for example, recent or desktop or documents
or any other folder. You can also come here
to the tags tab and erase these if you don't need them because I don't need them, I'm going to uncheck them. If we come to the side bar tab, we can also check or uncheck any of the
options that we want. For example, recent tags,
I'm not going to use it, so I uncheck it and also see
these DVDs and IOS devices. I don't use them, so
I uncheck it as well. If we come to the advanced tab, we can also show the
file name extensions and also show a warning
before emptying the bin. In the next lesson,
we're going to start diving into the
system preferences.
10. System Preferences and Customization: As you can see, we have
many different options. If I had to go over
each and every option, this course would be
over 3 hours long. But if you need
help, understanding what each of these options
are and what they do, you can always click on the option that
you're interested in. And here, there's
a question mark. If we click there,
This shows up. You have an explanation
or user guide of every single option under
each and every one of these. Let's say you want to come
here to users and groups, and you don't know what this is. You can come here again
to the question mark. Okay. And the MacOS user guide will tell you everything
you need to know. So I'm going to go over the
system preferences that I find useful and
that I customize. So first of all, let's
click on Apple ID. And here you have your
name, phone, e mail, password and security
payment and shipping in case you need to add
a shipping address. What I customize here is Cloud, and these are the
apps on the MAC that use Cloud for backup. So in my case, I
do want keychain backup to have my
password stored on Cloud, but I don't need home and
Series I uncheck them. Now, let's go back. Te
preferences. I click on general. Here you can choose
the appearance. So between dark light or auto. I usually leave it on auto, so it automatically
adjusts the brightness. You can also change
if you want to show scroll bars just when
scrolling or always, or for example, which is
your default browser. In my case, I'm
using Firefox now. Let's go back here, D and menu bar. You can come here to the left side bar and
change the control center. Here. So if you want to show
the WiFi or hide it up here. In my case, I'm using
the Ethernet cable, so I don't need the
WiFi in the menu bar, and you can do the
same with these here. If you want to show them
in the control center, you can do that, show or
hide it. Let's go back. Now let's go to mission control. And we're going to come
down here to hot corners. So what hot corners does
is allow you to perform an action when you move your mouse to one of the
four corners of your screen. So for example, let's
say every time I move my mouse here to the
lower left corner, I want to show the desktop. Now, if I click desktop, every time I bring
my mouse here, it will show the desktop, and you can do that with the other corners and choose
between these options. In my case, I just
need that option, but I want it in the
lower right corner. Let's click on desktop. Okay. And now when I come here, the desktop shows up. So let's go back and let's
move on to tracking. In my case, I'm using
an external mouse. But if you're using a track pad, I would also recommend
changing the setting. So let's click on mouse. And we're going to just
the tracking speed. So we're going to
make it a bit faster. That saves a bit of time. Also, I like to leave this
unchecked because for me, the scroll direction
on Mac is not natural. I prefer unchecked. Then when you scroll down, the page will go down
and when you scroll up, the page will go up, not
the other way around. Let's go back to system
preferences once more. And if you're using
your track pad, you can do that as well. In my case, it doesn't find a track pad because
I'm not using one, and I have a mac mei,
you can also change the tracking speed
inside this preference. I also like to come here to display and I come
to night shift, and I turn on this
setting usually at night, like at nine or 10:00 P.M. So my eyes can get used to a warmer light before
going to sleep. And I can also add a schedule. Let's say, for
example, in my case, you're using an external
microphone or external monitors, you'll come here to
sound, for example. You can choose your
output to make sure it's working properly
and your input. You can also change
the input volume. These are the settings that I change when I'm
setting up a NMAC. But as you can see, I only use some of these settings
because there's too many. What I do, I come here to view. And customize that allows me to choose which one of these I see every time I open
system preferences. For example, I don't
use Siri I uncheck it. I don't use screen
time, so I uncheck it accessibility,
I don't use it. I just uncheck all the
options that I don't need. When I'm finished, I come
here and I click done, and it looks much cleaner. But if at some point you need to see each and
every one of them, you can always
come here to view, and all of them
will show up here. Now I'm going to talk
briefly about stacks, which helps having
a cleaner desktop.
11. Stacking Files: My desktop is quite empty because the computer is
brand new, but also, I don't like having a lot of stuff on my computer
because as I said, I'm quite obsessed
with minimalism and it also helps increase
my productivity. In this case, for example, I have two screenshots here, but I can use stacks
to clean my desktop. If I right click here,
use stacks, Okay. Now, both screenshots are here. If I click here, they
show in a drop down menu. If I click here once
more, they hide. This way, instead of having 100 different folders and screenshots and documents
on your desktop, you can stack them together.
12. Minimalist Web Browsing: My case, I'm using Firefox, but this can be applied
to Safari as well. Just keep in mind,
Safari is probably the fastest because it's
the best optimize, but some websites or extensions don't show up or work
properly with Safari. In that case, I do recommend Google Chrome or
Firefox, for example. But what I want to show
you is how to clean up either Safari or
Firefox in this case. This is what shows up
when you first open your web browser and there's too much clutter and too much stuff that we
probably don't need. You just come down here, click. What I like to do is
remove everything. So no reading list, no
series suggestions, no privacy report, no frequently visited
and no favorites, or I just change them. I don't use these
websites. Only Google. So I can also come here, right click and delete one by one. As you can see, when
you delete here, they also disappear from here. Now, let's say we
want to customize the tool bar because we
don't like it like this. We just right click
customize and you can have the default toolbar
by dragging and dropping or you can drag and drop any of these icons
that you want to use. For example, if I want the
tab icon here, I can do that. And when I'm finished,
I click done. Now my new tab icon is
here instead of here. But as I said, I'm
not using Safari. I'm using Firefox. I'm going to quickly show
you that as well. Let's close Safari. Quick open Firefox. As you can see, we have some of the
websites that I visit, but I want to change
this as well. So personalize I don't want to see shortcuts,
so I just turn them off. And manage more settings. Here I can change my homepage
and my new tabs. Home page. I come to custom U, and I just Google, and I do the same
with the new tabs so I want a blank page. Now let's see if that works. Let's close and
open it once more. Now Google is my home page.
13. Browser Extensions: Let's talk a bit
about extensions. As you know, there's hundreds
and hundreds of them. So this will also be a
full three hour course. I just use two extensions. It doesn't matter if
it's Safari Chrome or whichever browser
you're using. And these are at block plus. So I don't see ads all the
time and annoying trackers and also a dark reader to enable dark mode on
every single website. So on Firefox, for
example, we come up here, addons and themes, and we
come here to the search bar, and I write down at block plus. Hit Enter. It shows up
as the first result. I just add two Firefox. In Safari, it's exactly
the same process. This pop up shows up, so I click on add Okay. And I also check allow this extension to run
in private windows, and I click Okay, and if we come here to the
upper right corner, ABP is the icon. If we click there, we can change the settings for the extension. Now let's come to the
upper right corner once again. Ads and themes. Let's write down dark reader. This one is also available
for Google Chrome. I didn't find this Safari has other extensions
to enable dark mode, so it's quite easy to find. In this case, I like to
use this one Dark reader. Add to Firefox, and once more, upper right corner.
Here is the icon. If I click here, I
can toggle on or off. Now it's on. Now
let's turn it off. Obviously, either
Safari, chrome, Firefox, brave, whatever, all of them have many
extensions and addons. You come here, you search
for anything you need, you add it to your
browser, and that's it. I like to keep my browsers
clean like my computer, so I only install these two. Now let's move to the
last part of the course, which is cleaning up your
mac from the inside, cleaning up your storage,
removing unnecessary apps.
14. Deleting Unnecessary Apps: The last thing I do
to finish this setup is to clean up the
storage of my NMAC. That means uninstalling
unnecessary apps and removing stuff
that I don't need. We come here to the Apple logo, we click on it about this MAC, and we click on the storage tab, and then we click on Manage. We wait for the
left s bar to load, when it's finished calculating how much space we have
available, we check one by one. First applications, And here we can erase the
ones we don't need. So in my case, I only
want Firefox and I movie. I'm not going to use numbers, pages keynote, or garage band. Obviously, if you
want to keep them, you can, but in my case,
I don't want them. First, numbers, so I delete. It will ask for my password. I just type in my
password and then I clickk I do the same with the other
apps that I don't want. Now I only have the
apps that I want. But I can also clean more
space from the less sidebar. Documents. In this case, I'm not erasing anything
because these are screen recordings and
documents that I do need. But if you need to erase
something, it's also here. For example, music creation, I'm not going to use the
garage band sound library, so I'm going to remove it also. In documents, I can also
check the download tab. And here I would have everything
that I've downloaded. So if I don't need something,
I can also delete it. That's how I free up
space in my computer.
15. Thank You Message: That's the end of the course. Congratulations, if
you've made it this far. I hope you found it useful. If you did, please feel
free to leave a review, and you can also
follow my profile where I'll be uploading
more courses like this one. Thank you so much for watching and I'll see you
in the next one.
 Dan Prizont, Photographer & YouTuber