Transcripts
1. Light makes the portrait (intro): When it comes to portrait photography, light is at the heart of it. It is almost everything. But how do you find the right light? How do you work with extremes of light on how importantly, delight on the location into play. Today we're heading into Oxford to explore nine completely different locations from the ancient stone walls. He's really are ancient stonewalls, sort of 12 from 13th century stone walls to the town centre parks, green and lush to the alley, ways that, frankly, just grubby, grungy and covered in graffiti. I'll be looking for different types of lighting to create a stunning range of portrait's sharing. How we work with the different types of light as we go, and we're going to be in town during what is not an ideal time. It's June. We're gonna be working during midday on. It's the summer, so the sun at that time if it comes out. Of course, this is England, but if it comes out is going to be right overhead. So how do you handle lighting? That could be, frankly, a lot less than no deal. I'm Paul Wilkinson, a professional, full time portrait photographer. This is the thing. I love doing more than anything else in the world. I'm an international judge on author of Mastering Portrait photography. After watching this video, head over to mastering portrait photography dot com for more content. Tons of it, loads of videos as the forums, lots of things that can help, and they'll help you create better, portray its and start making a living from your photography.
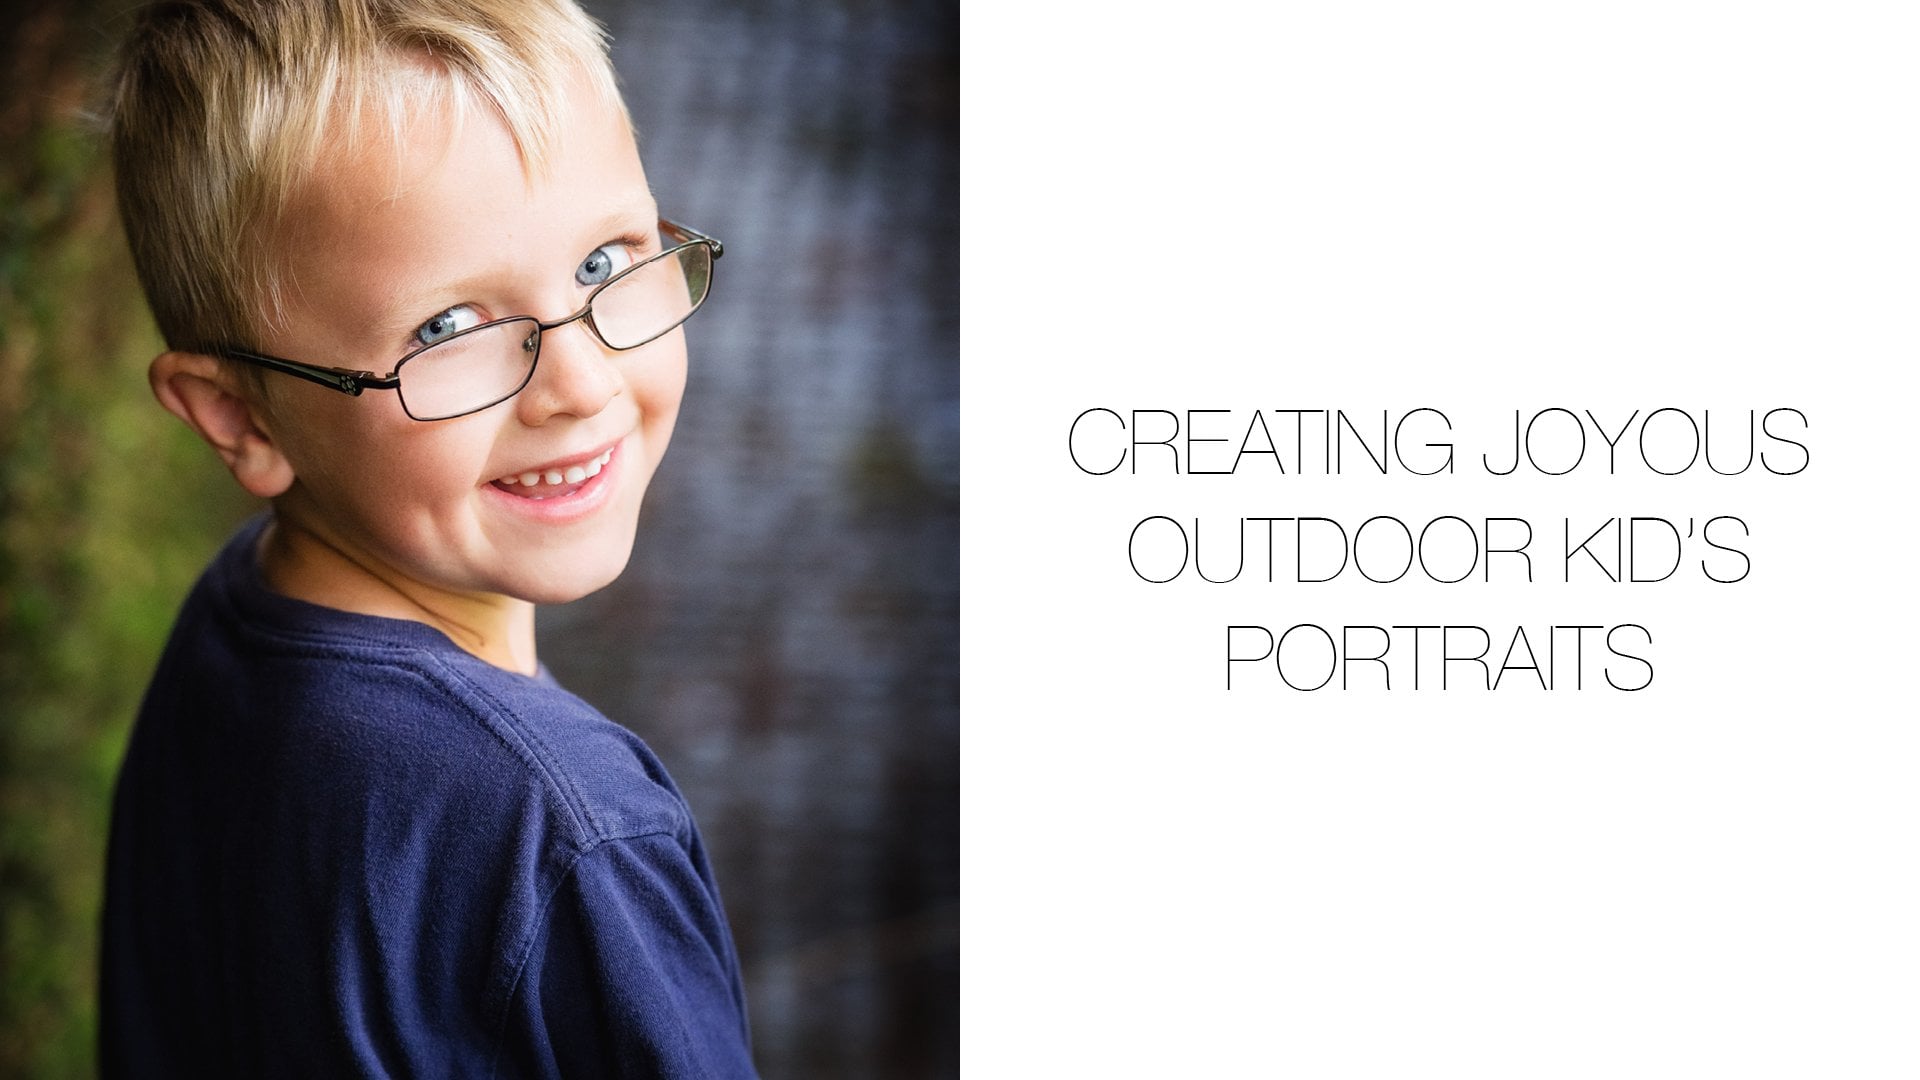
2. Location 1: The Courtyard: So here we are. We are right in the heart of Oxford, next to the body in library. I've chosen this location as a starting point for a number of reasons. One, I think the light would be quite nice to. It's very quiet. And the reason I've chosen it for being quiet is that when I was introduced to Annie, she seemed nervous. She wasn't certain what the day was going to entail and he is not a model. Anne is Anne. She is stunning. She could be a model if she wanted to be on DSO. Actually, what I'm trying to do is build a psychology to you can't just find beautiful light and drop somebody in it and expect that to create really beautiful natural portray its If your sitter, your subject is nervous and shy. So we found what is probably the quietest bit of this area of the city. There are people around, but it's not full. The body and library is right behind us. You can see the windows. You can see the shape in the texture. In the footage you were to see shadows on the floor and where I'm working is just on the edge of that shadow. Why? Well, it means that I'm getting light in a controlled way. I can push on the back into the shadows. On that way, her hair goes dark, but she's still beautifully lit from the light that is coming from behind, coming from behind me straight onto her face. If I bring Anne forwards out of the shadows, then her hair is certainly let because the sun is coming down across the building. It still has a little bit of an angle. It's about midday ish, but this is England, and the sun was never really truly overhead. So the shadows still have some direction to them, and I can use the sunlight then to create cats. Lights this rolling like across her shoulders, and it brings out the texture in the hair. Because, of course, it's a really hard light source. The sun is about as hard a light source as we ever get to work with, and it's dropping straight onto the back of Anne. But the light coming onto her face is soft. Reflected light is the light from the clouds in front of her, and it's the light from the buildings behind me, all wrapping around. I think this is gonna create a really beautiful image. The cat states lovely. They're not quite perfect. I'd like them just a little bit higher, a little bit more. I don't know. There's something about the texture of them isn't quite there, but we can use it. We reflected justic a little bit of kick in if it goes a little bit flat and you can see what happens when we were both with and without a reflector on when we step Anne in and out of the shadows. Still beautiful, still gorgeous, that sheen on her skin. She's got such beautiful skin. And, of course, without backlighting. It just adds that texture, and it's wonderful to work with this kind of person. So with these images, I got them pretty much right in camera. All I've done is just changed. Exposure up a little bit brought the shadows out a little bit, but I've exposed in camera to contain the highlights. Also, if you look, I've warmed the images up. I've had the camera set on auto white balance throughout, and I just thought they were a little bit cool looking and So when I brought them into photo shop in light room, all I've done is just warmed that white balance up a little. A little bit of skin we touched. Remove any blemishes and we are done.
3. Location 2: The Shadowed Wall: for this next shot. Do you know what happened? I looked to my right and there is Dorie. She's just leaning against this war on. I look at the light that she's in and it's fantastic. She's actually in shadow, the wallets in shadow. But if you look at her feet, a toes are almost in sunlight. So all I've had to do is move around a bit. Why is the lights of good is because alot she's in shadow. There's all of these lit areas around us that they're in bright sunlight, the floor, the walls and it's all bouncing around and creating this soft light on Dorie Great cat sites. Almost no contrast. There's no shadows or search the shadows of behind her and the light is wrapping rounder. I've used her pose as it was. I haven't had to change very much, literally. What appealed as I looked across and there she was, looking fantastic, and that is one of the things about portrait photography. Sometimes it's easy to overthink. Don't overthink if it looks great, take the picture. Nobody knows you didn't pose it. Nobody knows. It wasn't your idea. Nobody knows you haven't styled. It's the degree, they will just say That's an amazing picture and all you have to say thanks. So that's what I've done. I've taken a stunning picture. However, I knew I had to work a little bit harder than that to earn my stripes. So I've moved around to the side, planted the camera up against the wall and a story to look at me. And there's that intrigue. I've used the wars, a framed as those leading lights from the rows of mortar going to her face. If you look at her face that lighting honor lightings beautiful. The shadow is richness. The floor just to my left is lighting up because it's lit with some time and all that light is bouncing. You can see that just in her eyes, just in the bottom, left inside of her eyes as you look at it. But if you look at that, cats like that, cats like, is coming from the whole of the back where there's a gate in the sky and that is just giving a tiny little papa light. And you know I love that you know, I will always, always endeavor to get a cat site in the eyes because that gives it sparkle. It gives it character. Walt Disney knew what he was doing when he drew every single cartoon character with a window catch light in their eyes. It makes them alive. So I've managed to get two shots within 10 meters easy in terms of post processing again. Very little to do. If I'm honest, all I've had to do. I've likened it fractionally because always shooting to control the highlights. Very contrast he light around today. So I've tried to make sure they keep the highlights in check. Lifted it a little on with the auto white balance on my d five. It's run a little bit cool because it's looking at these bright, sort of amber brown walls, which are the sandstone in the area. And of course, it's seeing all of that warm tone, and it's cooling off. I'm happy without I'm shooting in raw, so all I've done in post is lifted a little, a few blemishes, a crop and I am done
4. Location 3: Under the Bridge: So now we've been for a walk. This time we have to move location. We've kind of followed our noses a little bit and worked away around to see what we found, and we found a bridge. You've gotta love a bridge like this because I've got, like, going in all directions. But I've got shadow overhead, which means I can now place Annie in the shade, knowing that there's light around me to use. If you look at the cat sites in her eyes, you'll see there's light coming from behind me. Of course, she's under a bridge, so almost anything else is going to be light because she's in the shadows. I've taken a shot along the wall, which is the shot I originally saw, I thought with the bridge overhead, the quality of the light would run the camera along the wall. A slightly more model IPOs up against the world because it seemed to shoot it. But of course, if you find a location where there's light in context, use it. Try crane, different pictures literally. I've walked 90 degrees around the corner and I'm taking an E in exactly the same location. But now the light is working differently. The lights coming from the side a little bit more, of course, because it previously it was from the front. But five moved the light relatives. The camera has moved, and I framed Anne against the door that I spotted in the background. I spent a little bit time moving around, trying to line it up so that she is contained entirely within the frame of the door. You don't have to do that, but it adds a considerations. The image adds a quality to image. They add something thoughtful to the image on. All I've done is just lining up. And then for the final picture, I've done what I nearly always dio. I've walked right up close and taken a beautiful portrait. I took a couple after looking a camera, but I looked and I thought, You know what? There's something gentle and something really sentimental about this whole kind of thing. Why don't I just get you to look down? I guided. I put my foot where I wanted her gaze to go. She's got that wonderful sense of soul about it, and then have created just a final, simple closer portrait. All beautiful times a post production well again have exposed to contain that little bit of highlight on her vest because it's bright white. I don't want that punching out. And so if the 1st 2 images have shot them both at 2.8 for a nice, shallow depth of field, fast shutter speed to contain that highlight very simple. All I've done in post production for those it's simply warm it up a little bit. Bring up the shadow so it feels like it's exposed correctly, but without blowing highlights. And then it's all done for the final image, of course, are black and white. There was never any doubt in my mind that this would be a black and white image on, so it has proved to be on. It's just wonderful of use nick color effects, which is now sold by D X o optics. I use that for nearly all of our black and whites. It's simple, but it has a ton of control if you want it. And, of course, the better. Love most about this, not just the skin tone but that beautiful curl of hair that just drops off a far right down the middle of the image. Ah, beautiful, beautiful portrait photography
5. Location 4: Sunlit Wall: what do we do? We go for a walk. So we've carried on meandering around the city until we found our next spot and you'll always see me doing this because I'm looking and I'm kind of as I'm walking. I must be terrible company because as I'm walking along talking to someone instead of paying attention to their face and their conversation, I'm constantly looking for patterns of light. Terribly rude but terribly effective. And I've seen this corridor of sunshine. It's raking through the gap between two buildings, and it's just striking the war on the other side of the road on really dramatic spotlight of life. Can't wait to work in something like this. Whenever I see it, I've put Dorie into the shaft of light as it runs down that war I've posed her so that her body shape is great and it's got a slight age in a twist to it. It's ever so simple. I'm not doing anything complicated these air, not professional models. I have to show in a lift your heel a bit, bringing the across a bit just to give a little bit of shape. Then what I've had to do is Just tell her head back slightly because, of course, I've got a really high sunlight coming almost straight down. And I don't want those really deep dark eye sockets that you can get in this kind of light , simple trip till the head back. That way, the set the angle of the sun effectively drops down. So it's striking the face on, um, or flattering angle. Very simple to do. I've then taken the opportunity of moving to the side. You've seen me do this twice before. Already on I will continue to do it. I've just moved to the side and I'm shooting along the wall. Of course, Now I've got this really cool sidelight instead of being front on its now striking Dorie from the site, and that makes for some interesting angles to again have posed it it to head back slightly . Really nice, punchy contrast, e fashioning image. And then at the last minute we've dropped to reflect in underneath and then that meat gives me the ability to bring Dorries head forward a little bit more. Why? Because now I've got light coming up from the bottom, and that's helping to counteract some of those dark shadows. It gives me an opportunity to do something with where the head position is a little more natural, a little bit more conventional, a little bit more expected. But I'm still working in the harshest of sunlight. The hardest bit of using reflector like that. You get bit squinty because we've used an awful lot like bouncing in from the sunshine in terms of the final, and it's again, I've nailed the exposures pretty much. They look dark in the outer camera images. Why, of course, because Dorrie has a white top on on. I won't detail in there. I've got to contain it. I cannot let that blow out to block away. If I do that, all of the subtlety and the images gone. Can I do it? Of course I could do it because these modern cameras have really quite tolerant of stuff in the shadows. I know I could lift detail out. It might look very dark on camera, but there's still tone in it, and I'm checking my hissed a gram the entire time to make sure that's the case again. The white balance coming a little bit cool because it's on auto on its seen all of that nice warm sandstone. It's called it off a little bit. I've warmed it back up. I've lifted the shadows. Container highlights in the shot where you're seeing of Dorie straight into the wall. In my mind, in my mind, I wanted this corridor of light down the war, and I wanted shadow and texture on the left. Shadow and text on the right didn't have the opportunity to do that because of the whole load of students bikes all the way along there. While they may have added to the narrative, I checked that it didn't look quite right, so I opted to do a close cropped with as much wall on the left as I could get in camera and then Photoshopped later, I've lifted some of that wall, flipped it across, reconstructed some wall on the right hand side, which is what I actually had in my imagination. Sometimes, sometimes you build an image out of the things you imagine, not necessarily the things that you can capture straight in camera. Simple, simple portraiture in the harshest of sunlight
6. Location 5: Street Corner: So now. Now we're heading down to the parks at the bottom of Oxford. I'm trying to go and look for some green space to work and what do I do? I'm walking along and footed in an editor. You stop and you see it. There it is. There's this light and shade. And who knew? There's a great big lampshades stuck to the wall above, which adds a really nice detail. This is one of those where it's just opportunistic. There's a saying there's a word called chiaroscuro, which is all about light and shade. Look at this wall. What we saw was this light wall against the shadowed wall right behind it. It's just to do the angles of the two walls. One is in some sunlight, one is in shade. So I've got this straight age down the side of the image. I've got this outline of a street lamp above on what I wondered and we tested. It was if I got an E to stand there and just have a nice set of curves. I've got all of this linearity and then I've got the curve of her figure on. I've got this lamp above to add a little bit of detail, really easy to do. The hardest bit of this shot, with the two hardest things that shot the first getting the exposure right again under expose it to cold all of the detail. The second is patience and safety. Because he was stood, Ryan stood photographing across the road and what the roads have in Oxford Road to have tourists, cars and bikes. So you've got to be ever so careful. But it was brilliant. I shot across the road. I've set it so it's almost perfect in the verticals. Simple stuff. Straight line down, and it creates the curve in the bottom. Really easy to do from a post production point of view. Very little to do warming up. Control the shadows, lift a little detail. Don't blow the highlights. Straighten it so it's absolutely spot vertical on that wall, and you are done
7. Location 6: The Park: So we found it. We found the green space. We've walked for miles. We've had to battle it out with tourists. We've had to go through gates a too narrow to get anything through it. All of that wheel, my bag through it took us forever because we're queueing. But here we are. We found the part land, and what I've looked for is some shade. I know. I know. It's sunny and English person. You should just migrate to the sunshine. Most of photographer I'm looking for. Those edges are looking for the gaps between deep, dark shadows and really, really bright, harsh sunlight. Here I've got an avenue of trees on avenue of trees is always interesting to photograph in , particularly when it's like this. When I'm actually working at the end of the avenue, I'm working at the entrance to it. There's grass going off into the distance. I've got leaves going off into the distance. I've got some like pretty much coming top down. The light behind me is acting as a vast, great, big soft box. It's not direct sunlight, it's all bounced off. Well, everything really and so you get this wonderful transition at the edge of the shadows. I've posed Annie just down there in the glass created triangles. So I just used that opposed to create a nice, pleasing triangle turned to face to make. I've gone down right down into the grass with camera. Now I get hay fever, so you're going to see it. I'm sneezing for the second half of the shoot cause I got my nose buried in the grass. The worst place for a pollen suffered to bay. But it gives you this wonderful, wonderful angle to create the imaging from taking a few pictures. And then and then I noticed that there's dappled light. Delight is dancing and prancing rue the leaves, and as they move in the wind, the light is on is off, its on its off, its on its off. So if you look at the video, you can see these patches of light dancing around. And so I've shot a hole in the pictures really, really, really quickly because I noticed very occasionally the light as it danced around, drops straight onto Anne's face and made this beautiful spotlight out of it. And that's the shot we've elected to use. Really nice way of doing it as we're about to leave their it. Waas. There he was. There's something about the light. In this image is the fact that the light behind her is dappled light coming through the trees. It's effectively a back light, and the light is catching her eyes is the sky and the buildings of Oxford in the distance, and you can see I just looked at her face and there it is. You could just see it. This beautiful catch sight, this beautiful quality of light on the skin, the beautiful, out of focus region in the background. And I just get exposure, right? Beautiful, simple image. No posing involved is just me observing a face with a camera in terms of post production. I really have under exposes one, of course, because there's this white top and it's in bright sunlight, and I really don't want to miss the opportunity of having a really great image by blowing out the highlights. So I've under exposed it, as everyone who shoots portrait's in green areas knows the camera has a natural habit to offset that by making it more magenta. Of course, magenta is, and greens on the opposite side of color. Triangle on is pushing the white balance that way, too, because it thinks it's seeing too much green. I know I've got a correct that back. I know that's doable. It's an easy bit afraid of shopping. I've turned into a black of white. Why black and white When there's all that green? Well, because there's all that green, it became dominant. It doesn't matter on some images, but for this I just wanted the beauty of her shape, the beauty of that light on her face. And it's really effective with the second image. All I've done pop it up a little bit in post. Just lighten it, just warming up. Just give a little bit a punch with a little bit of saturation, very little retouching, and it's very simple.
8. Location 7: The Alleyway: one of the great things about like, of course, is it reflex? And if you're in a city and you'll nearly always see this, as long as the sunlight isn't directly overhead, you'll see light bouncing around from the windows and the glass of the office is on. The shops have walked along. An alleyway on I've just spotted on the war are 234 squares of light. And there the light being reflected from a four pains window on the other side of the alley , high upon the building, the sun lights coming down. It's bouncing off there, and it's coming and creating these four areas of light on a war as it happens, right in amongst some graffiti. And I just thought that might be interesting for a shop. So we've play story in there, right into those four quadrants of light had to move around so one of them litter face properly. But once you get that, you get this really interesting effect. I don't know why. Optically this feels different to just using direct sunlight, but it does. I think it's the ripples off the glasses, the light bouncing around you get a slightly different quality, and it's always quite interesting to work with taking a few pictures here of shot against the wall so you can see the graffiti. I've then turned my angle so that the light coming off that window off that reflection is now like a studio soft light crashing down onto her face. Really simple to do. And I've used a profile as well, again using the light as it washes down onto Dorrie's face as a really interesting way of lighting. A portrait postproduction, Very simple, lightened it, corrected the verticals where I got them a little bit off, cropped in a little bit tighter, warmed it up where required tiny little bits of blemishes. And that's it. We're done.
9. Location 8: Office Windows: Frankly, this is not what you look for. If you said to a family, let's go on a portrait shoot. But you can still find patches of light and interest. I spotted these dirty old office windows, and I thought that might be some reflections in it, but in the end, that didn't quite work. But what I did find with some really beautiful light, I've had to move money in and out of the shadows a little bit to make the best of it, because when she came out into the sunshine a little bit harder, light glistening in the hearings, it's really beautiful for movements, the shadows softer light, more gentle, more flattering. Both have their place with someone I can you confront about family in any, like she's gonna look great. But with the shadows on, just that soft, gentle serenity bring into the sunshine a little bit. Everything sparkles and pops, particularly where it likes her. Hand gives it richness and texture. The great thing about a location like this is you've got it. You've got this location in almost any city or town anywhere where the shops or offices were even a village where there's a post office. You've usually got a big window. You got something you could make interesting in the background. And if you can't find shade on a sunny day, get some of the hold of a big piece of card or reflector use. It is a shadow on that way you get that extra punch out of the background. Because, of course, if your subject your face is in the shade, what happens to anything that's in the sunshine behind? Well, yes, it goes bright because you're gonna be exposing for the skin. You're gonna be exposing for the face. You're gonna ignore the background. You're gonna let that blow out if it needs to, because you just creating texture and narrative of shot. These F 2.8, which is the shallowest, is 72. 200 will go because I wanted that soft Boca or Baca in the background on because I've got town in the background rather than leaves. There's something about all of the shapes and the mush, and it's a long way in the distance. I've moved my position around, danced around with a camera because the angles on a long lens when you do that everything changes. You don't have to move very far on. I could have a shop. I could have traffic lights. I could have people I could have some trees on. All I've done is move my position by about six inches at a time, using Annie's faces, a fulcrum around which to revolve. It's a great way of changing the background. It's a simple way of changing your background. Each image has its own characteristic, but the postproduction was very simple. But I've opted for this first image to punch it through as a really nice, gentle, black and white. Look at that skin. Look at the detail in the hair. Just loveliest, like an album cover or a book signing cover. You know something you'd see Johnny Jackson doing on her latest collection, probably showing my age of it by using a Janet Jackson as a reference I should be using Beyonce A or something. I'm sure I've heard there is a modern artist called Beyonce, who knew anyway, I'm using the texture in the shape of cropped in a little bit nice, black and white. The color version warmed it up, both of them quite dramatically. Under exposed because I wanted to hold on to all of my details, popped it back up in light room into Photoshopped. Take off any blemishes, do any black and white treatment or color treatment, and then you are done easy.
10. Location 9: Concrete Pillars: So here we are. We're at our final location on All I've seen is I've come around the corner. In fact, we were heading home. Have seen these pillars. There's this row of three or four pillars in the front of an office in each of them. At least two of them have this raking sunlight washing down hard shadows, hard sunlight. Ah, how exciting could you get? What I'm thinking is, you know what? If I get an E to pose in this triangle of light, it'll be amazing. So I said to her, Go and stand in the light of place to perfectly in the triangle. What happens, son goes in. Well, it is Britain. So when we say it's a hard, sunny day, what we mean by that is variously sunny, cloudy, rainy, foggy, back to sunny assumes. I've set my shot. I've got exposure bang on for the sunshine, then had to readjust really quickly. But you know what? There's something in it. The shadows are gentle and subtle, but there's still that beautiful flat surface, flat surface, flat surface, flat surface. Going off into the distance still makes a really interesting image. If anything, it brings a little bit more texture out in the shady areas. So I've posed Anne front on taking the picture where she's looking away. I've taken a handful of pictures. The only thing I think I've got this slightly wrong is I've cropped in a little bit tight under unease. You do get those moments we all have from the I wish moment and in this I wish I managed to contain will create a little bit more room under those knees. I don't like chopping and quite so hard. Is that my mistake? You live and learn. Then, of course, there son came out and we got the original triangles that I first saw, which is brilliant. So now I could go back to creating the image that I thought I correct. Before I created the image that you've just seen. You know how it is. I turned on the slightly So she's in towards the sun, is lighting a face of little bit, lifted her chin slightly just to create that nice feel on it. And I've exposed for the highlights. Both of these images were shot in camera, slightly under exposed. Both were lifted in post just to create the imagery that I wanted so that there's detail in the shallows. None of the highlights of blown out the first put a slight color wash on its across processing, affecting Nick Color FX. Very simple to do the second, I've had to work a little bit harder in the second image. I've had to create a little bit more space on the edge of that last pillar. If you look at the out of camera image you can see while, in fact is everyone playing in the background, that's what happens when you bring assistance. They mess around and just Jenny cause mayhem in the background. But I wanted those out of there, and I didn't want to crop it down the edge. What I've done is I've simply cloned some extra pillar created the space that I wanted a nice, crunchy, black and white really contrast that seems to be fitting with the contrast e style of the lighting used really easy to do. You have to think you have to react fast, but you too, confined a location like this and create beautiful images
11. What light to look for | Now it's your turn: So you've seen how we've spent a really lovely afternoon in this great city of Oxford. We found light. We found locations. We found different ways of creating images. Of course, the most important thing is the light. Always chase your light. If your light is rubbish, don't bother taking the picture unless there's something really newsworthy going on. If somebody's kissing, it's their first kiss. After getting married, take their picture. Don't worry about the light, but only then do you look for the location. The location is the context, the light, The light is part of the photograph. The light is shaping and creating it for May. Primarily I'm gonna look for great cats, lights in the eyes. Why? Because if you've got great catch sites in the eyes, the face will light up and smile. And you know that lighting that covers the whole of that figure is probably fairly close to the money for you, For us, for everybody. There are opportunities everywhere. What you have to do is just start looking for interesting patches of light and then go and play. Ask us questions. Please leave us reviews and then head out and try these techniques for yourself. We would love Honestly. We say that every time that we would love to see what you create. There is nothing I enjoy more. They're looking a great portrait photography. Exploring those images. Enjoying those images upload yours to the your project tab down below. When you've done that, why not head over to mastering portrait photography dot com Where there's far more content than just this? There's videos. There's articles as the forum, all of it to help you create better poll traits and start making a living from your photography. Thanks for watching. So now we now develop. If you look at the Cats lights, tonight's the whole thing's gonna kill. May Perfect 40. Perfect, Perfect, Perfect New teeth. Perfect portrait. Photography ish. It's not perfect, but bad.
 Paul Wilkinson, Portrait Photographer