Transcripts
1. Logic Pro X Basics: Introduction: Hi, everyone. Welcome to Logic Pro Ex Basics from First
Steps to your first track. My name is Bennett and I'll be your guide
throughout this course. I've been writing and producing my own music for just
over six years now, and I've been
creating my own songs from scratch as an
independent artist. Whether you're brand new
to music production, I just want to sharpen
your skills a little bit. You're in the right place.
Logic Protex is one of the most powerful
and versatile tools for music production. Courses designed
to help you master the fundamentals to
confidently create, edit, and produce your ow track. So, what can you
expect to learn? Throughout this
course, you'll gain hands on experience
with Logic Pro x, how to navigate the workspace,
understand the layout, and customize it to fit your
workflow from setting up your audio interface
and recording your first track to
editing Midi and audio, how to use logics
built in instruments, applying EQ and Reverb, and exploring some plugins, how to structure your
songs and applying automation and preparing
your track for mixing. And finally, how to
turn your project into a polished track ready
to share with the world. Why this course? This course isn't just about learning tools. It's about unleashing
your creativity, whether you're dreaming
about making beats, composing film scores,
recording vocals, or just producing your first DP. These foundational skills
will set you up for success. As someone who spent many
years in music production, I face the challenges
of getting started, so I truly understand how
overwhelming it can feel. That's why I've
structured this course to be simple, approachable, and full of practical
tips that can help you avoid these
common mistakes, but also be able to build your confidence and
your abilities. By the end of this
course, you'll have all the tools to be able to
create your first track. I'm so excited to join
you on this journey. So let's start making music.
2. Logic Pro X Basics: Introduction to Logic Pro X: Hi, everyone, and welcome to Logic Pro X Basics from First
Steps to your first track. My name is Bennett and I'm an independent music
artist and producer. Whether you're a
complete beginner or someone looking to
refresh their skills, this course is designed to
get you comfortable with the basics of Logic Pro
x. So let's get started. So when you first
open Logic Pro, the first thing you'll see is the new project dialogue box. Here we have some few options. So here we have empty project. This is your blank canvas. It's perfect if you want
to build a track from the ground up. We
have templates. Logic offers a variety of
templates like electronic, hip hop or singer songwriter. These come preloaded with tracks and instruments to
suit that genre. For now, let's
select Empty Project to understand the
setup process better. Once you choose empty project, logic will ask you what kind of track you want
to create first, and you'll see
three main options. Software instrument. This is for virtual instruments like
keyboards or drums, audio, which is for recording
vocals or live instruments, and drummer, this automatically creates a drum track
with realistic patterns. Start with a software
instrument track since it's perfect
for beginners. Before we go any further, let's get familiar with the workspace. At the top, we have
the control bar. This is where you find your
transport controls like play, stop, record, and more. Below the control bar
is the tracks area. This is your main
workspace where you'll arrange and edit your
audio and mini regions. Each horizontal line is a track, and this is where
we build our song. On the left, we have the
library and inspector panels. The library helps you browse and select instruments
and sounds. You can open and close the
library quickly by pressing Y. The inspector shows
detailed information about your selected
track or region. Quickly open and close the
inspector, we press the Ikey. Above the tracks area is the toolbar where you can
access editing tools. At the bottom of the
screen, we have the mixer, where you can control
the volume, panning, and effects of each track, and you can open up the mixer by pressing the mixer
icon or pressing X. This is crucial for balancing your tracks and adding
effects later on. Now before we go any further, I know we haven't done much,
but let's save our project. Trust me, you need to
develop this habit. Just go to File and Save
or press Command ands. That's just a quick overview
of Logic Pro x's interface. Understanding these key
areas will help you navigate and work more efficiently as you start your music production. Next lesson we'll start
experimenting with sounds. Until then just
keep familiarizing yourself with logic and I'll
see you in the next lesson.
3. Logic Pro X Basics: Working with Software Instruments: Hi, I'm Bennett and
welcome back to Logic Px basics from first
steps to your first track. Today we're going
to be diving into the software instruments
in Logic Prox. You'll learn how to set up and play and record these
virtual instruments. Plus, I'll be sharing
some useful shortcuts to help you along the
way. Let's get started. Although Logic has already
given us a software track, to add another
software instrument, press Option Command, and end to open a new track dialog box, select software instrument,
and then click Create. The default
instrument is usually a classic electric piano, but we can change
that in the library. Logic Pro offers a
wide range of built in software instruments
from pianos and synthesizers to
drums and strings. And these instruments
use MIDI data. Musical instrument
digital interface. And we'll explore that today. And to quickly open the library, we just press Y on our keyboard. You can browse different
categories like keyboards, synthesizers
and drums. Well, let's stick with the classic electric
piano for now. If you don't have
a mini keyboard plugged in, that's
absolutely fine. Logic provides us
with musical typing. And we get this by
pressing Command and care to bring up the
musical typing window. This turns your computer
keyboard into a virtual piano. And if you have a mini
keyboard connected, logic will automatically
detect it. Now, let's record a simple melody
using a software instrument. You can either press
the record button or press R to start recording. And to stop recording,
we can press space bar. And once you've recorded
your MDI performance, we can edit it in piano roll. You can double
click the recorded midi region to open
the piano roll or we can press P. Here we can adjust the notes timing
and the velocity. Here we can tweak the
notes individually. I can make a note shorter
or make it last longer. I can change it to a different note or remove it completely. Now, as you can see, this
note is out of time slightly. Of course, we can
manually drag it to the correct position or
we can simply press Q, and this will quantize it, and logic just does it for us. Logic Pros instruments also support various plugins
to enhance our sound. We can press I to
open the inspector, and here you can
add effects like reverb or delay to your
instrumental channel. Now before we go any further,
let's save our project. Go to File and Save
or press Command on S. So today, we
learned how to add, play, and record software
instruments and Logic Pro x, along with some handy shortcuts. In the next lesson,
we'll explore basic editing techniques. Until then, keep experimenting with
different instruments. I'll see you in the next lesson.
4. Logic Pro X Basics: Essential Editing Techniques: Hi, I'm Bennett and
welcome back to Logic Px basics from first
steps to your first track. Today, we're focusing
on essential editing techniques
in Logic Pro x. By the end of this lesson,
you'll be able to edit your recordings and set the
perfect pace for your tracks. So let's get started.
Let's start with the two most essential
tools, scissors and eraser. The scissors tool splits a
region into smaller sections. This is really
useful for cutting and rearranging
parts of your track. You can press T to open the
tool menu and then I to select the scissors
tool and just click wherever you want
to split the region. And we can hold
option while using the scissors tool to
make evenly spaced cuts. The eraser tool deletes regions and midi
notes very quickly. To select the eraser tool, we press T and then E. Then we click on the region or note that we want to delete. And if you delete the wrong one, to undo that action, we
just press Command and Z. Now, let's talk about tempo. Tempo sets the speed
of your project. Adjusting the tempo can really change the feel of your track. So let's see how
we can modify it. We can locate the tempo
display in the control bar. You can click and
drag the tempo value up or down to adjust it. Alternatively, we can double click it and type in
a specific number. Now, if we want to change
the tempo over time, we can use the tempo track. You can open the tempo
track by pressing global tracks and tempo
in the track header. Or we can press G. We can click to add points
on the tempo track, and then we can drag them
to create tempo changes. Before we go any further,
let's save our project. Go to File and Save
or press Command NS. Today we covered
essential editing tools and explore tempo control. These skills will help you
refine your recordings and help you find the perfect
pace to your project. In the next lesson,
we'll dive into adding effects and plugins to
enhance your sound. But until then keep
experimenting. I'll see you in the next lesson.
5. Logic Pro X Basics: Effects and Plugins: Hi, I'm Bennett and
welcome back to Logic Pro X basics from first
steps to your first track. Today, we're going to
be exploring how to add some effects and plug ins to
your tracks on Logic Pro. We'll cover essential
effects like EQ and reverb and understanding the mixer's functionality and also learn about channel
strips and sends. By the end of this lesson,
you'll be able to enhance your tracks with professional
sounding effects. So let's get started.
Now, effects are crucial for
shaping your sound. So let's start with EQ, which means equalization and reverb, which are the two most common
tools in music production. So EQ allows you to control the frequency balance
of your track, making it brighter or
darker or more defined. Select a track and open the channel strip
in the inspector. Click on an empty insert
slot and go to EQ, channel EQ and select it. This is the channel
EQ, where you can boost or cut
specific frequencies. For example, let's boost the high end to add
some brightness. To reset the EQ to zero, use option and click
on any EQ point. Now let's move on to reverb. Now, reverb creates some
sense of space and depth, so let's add some to our track. Like what we just
did with the EQ, click on an empty Insert slot, go to reverb and
then space designer. Space Designer is
a reverb plugin, and we can adjust
the wet dry mix. A higher wet mix
adds more reverb, while a higher dry mix keeps the original
signal prominent. Try different reverb
types and see how they affect the overall
sound of your track. So let's explore the
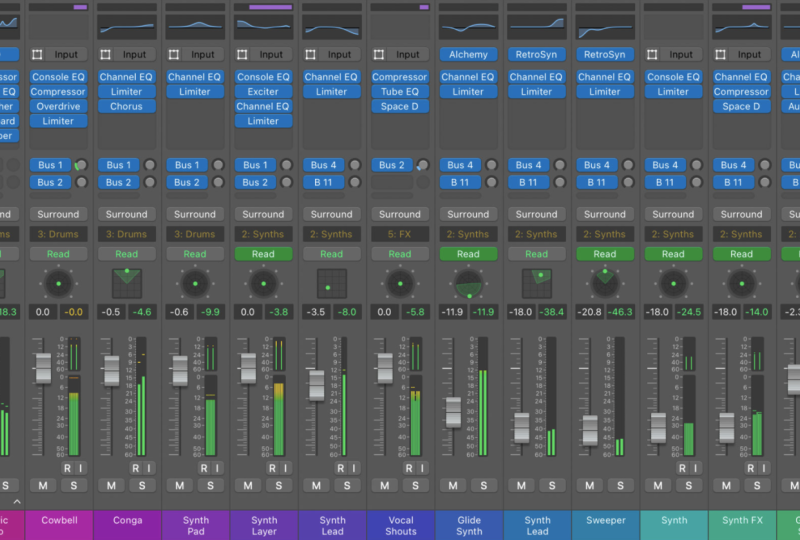
mixer some more. The mixer is where you
control the volume, the pan, and the
effects of each track. We can open the
mixer by pressing X. Now here's the mixer. Each column represents a
track with volume faders, pan knobs, and effect inserts. We can use the faders to adjust
the volume of each track. For panning, we can use the
pan knobs above the faders. Panning helps place sound
in the stereo field. For example, we might
pan a guitar to the left and a piano to
the right for a wider mix. Let's quickly touch
on channel strips. Channel strips are
where you manage all the effects and
settings for a track. So let's add some effects
and explore some settings. So let's open a channel
strip in the mixer, click on an empty
insert slot to add an effect just like we did
with the EQ and the reverb, and here we can stack
multiple effects here, like compression,
delay, and more. Now, the order of
the effects matters, so experiment with
different combinations. Sens let you apply an effect to multiple tracks without adding it individually to each one. Is really useful for effects
like reverb or delay. In the mixer, click on
a send slot in a track. Now we select a
bus like Bus one. This creates an orcs
track where you can add reverb or delay effect, and we can adjust the
send level to control how much of the track signal
is sent to the effect. And we can use these sends
for effects you want to share across multiple tracks like
the drum kit in the vocals. Now let's save our project. Go to File and Save or
press Command S. Today, we covered how to add
essential effects like EQ and reverb, navigate the mixer, and use
channel strips and sends. These tools will
really help you shape your sound and give you
that professional touch. In the next lesson,
we'll build on this by creating your
first complete track. Until then keep experimenting. I'll see you in the next lesson.
6. Logic Pro X Basics: Recording Audio: Hi, I'm Bennett and
welcome back to Logic Pro ex basics from first
steps to your first track. In this lesson, we'll be
covering how to start building your first
track and Logic prox. We'll learn how to
arrange sections like intro verse,
chorus, and bridge. I'll be walking you
through setting up your audio interface and your microphone and getting ready to record
your audio track. Now before we jump
into recording, we need to make sure that
your audio interface and your microphone
are set up correctly. You don't know what an
audio interface is, let me explain it to you. An audio interface is
a device that connects your computer to your
external audio equipment, and these are things like microphones, instruments,
and speakers. They provide a higher
level sound quality, and most microphones actually
require an audio interface. An audio interface has come with a pre amp and vantm power which helps the
microphone work properly. Now, one that's perfectly fine. It's okay to record
without one sometimes, but it does depend on what kind of recording
that you're doing. If you want to improve the
quality of your recording, investing in an audio
interface is really worth it. So if you have an audio
interface, let's set one up now. If you haven't already
done so, connect the audio interface
to your computer. Once connected, in
the left corner, we press Logic Pro
settings and Audio. In the devices tab, select your audio interface for
both input and output. And if you don't have
an audio interface, your USB microphone or your built in microphone will
show up here as well. Set up your microphone.
First, let's create a new audio track. We can do this
quickly by pressing Option Command and N to
bring up a new track dialog. We click on New Audio
Track and click Create, and you should see
your new audio track in the arrange window. Once you've connected
your microphone to your audio interface, select the correct input
channel for your mic in the input section of
the audio preferences. That should be it. Now that your audio
interface and your microphone is set up,
let's start recording. Now, if you're ready to record, we can press the record button, or we can press R.
And when you're done, press Spacebar to
stop recording. Now before we build
our first track, let's save the project. Go to File and Save or press Command S. So in today's lesson, we learned how to set
up an audio interface, a microphone, and record
your first audio track. In the next lesson,
we'll build on this further and create your
first complete track. But until then keep recording, keep experimenting, and I'll
see you in the next lesson.
7. Logic Pro X Basics: Building Your First Track: Hi, everyone. I'm Bennett
and welcome back to Logic Pro x basics from First
Steps to your first track. So now that we've
recorded some audio, it's time to arrange
your track into sections like intro
verse and chorus. So let's start thinking
about the structure. A typical structure might
include intro, verse, chorus, verse, chorus,
bridge, chorus, and Outro. So here's mine, for example. I have in my track
intro, verse, chorus, verse, chorus,
bridge, chorus, Otra. You can do this easily by
pressing Command C to copy and Command V to paste them into the
appropriate sections. But feel free to do
whatever you like. Some songs have a pre chorus, some songs have a post chorus. So songs don't have
a bridge at all. Now let's talk about automation. Automation allows you to change the tracks parameters like the volume and the
effects over time. It's a really great tool for changing the dynamics in a song. First, let's click on the
automation button and the track header or we can press A to open the
automation lanes. When the automation
lane is open, select the volume from
the drop down menu. Now click on the track and
draw your automation points. For example, you might
want to increase the volume during the chorus
to make it more powerful. Also able to automate
effects like EQ and reverb. So let's automate the
reverb for the chorus. Let's add a reverb plug into the track if
you haven't already, and then we can
open its automation by selecting it from
the automation lane. Here we can adjust
the reverbs wet and dry mix or as SN
level over time. Automation is a great
way to make your song feel more alive in the
more static sections. Once your track is arranged,
automated, and mixed, we'll be able to export it, otherwise known as bouncing it. To export your project, go to file, bounce and
project or section. Or we can press Control B. In the bounce window, select
the file format you want, such as web or MP three. And here you can choose
whether you want to export the full song or just
a section of the track. And then we click Okay
to export the track. Now for the last time,
let's save our project. Go to File and Save or press Command S. You probably
know that already. Congratulations on
completing your first track. Today you learned how
to arrange your song, automate volume and effects, and export your final track. Now, before I leave you
to experiment further, I need to tell you
there's no right or wrong ways to create music. The only right way
is the way that works for you and
your unique sound. So keep exploring,
keep experimenting, and having fun with the process. The more you practice,
the better you'll get, and the more confident you'll
become in your abilities. And remember, every
single producer and music artist has
their own journey, so don't be afraid to make
mistakes or take risks. And it's honestly
where we really find our sound and
develop our skills. But thank you for listening.
I'm Bennett and make sure to check out my other
music based courses. I'll see you then.
 BENNETT ELIOTT, Independent Artist, Songwriter, Producer