Transcripts
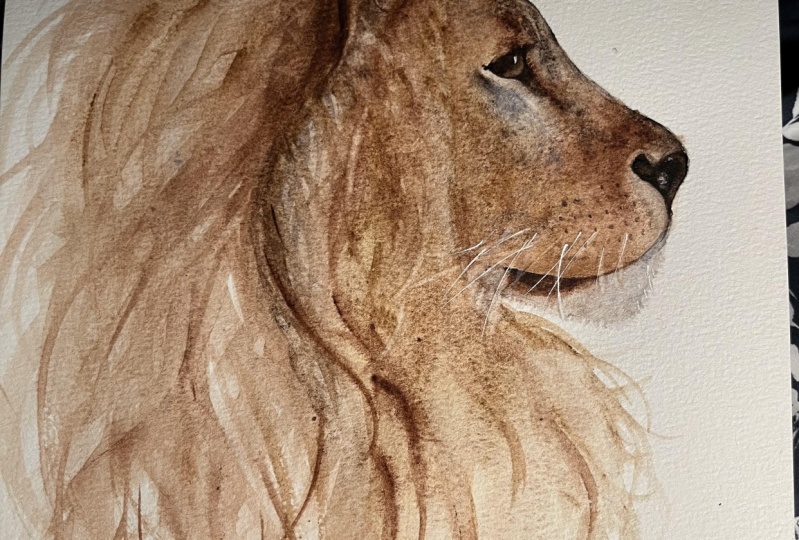
1. Introduction: Hello and welcome to this
intermediate watercolour class. Today, I'm going to
show you how to create this magnificent regal lion. You're going to love
taking this class. It has some wonderful
spontaneous elements with a lovely
liberating feeling. It's also a good reminder just how much fun watercolour is with its magical qualities. But be warned, its gonna put
a big smile on your face. I'm Jane Davies. I live, paint, teach, and walk my lovely spaniels in the beautiful South Downs
National Park, England. Over the last 15 years, I've taught myself the free- flow technique that
you see today. Not having been to art school, finding my own way has been
fun and sometimes daunting, but it has allowed me to
develop my own style. This has led me to
teaching others, either on a one-to-one basis, or as part of a group in a wonderful studio in the
heart of the South Downs. Also run a successful
commission-based business, painting pet portraits and wildlife art in my
own studio. In all my classes, you will follow
along in real-time. I can guide you to
keeping your work loose and fresh
without over fussing. I have over 20 classes
available on Skillshare now If you're
just starting out, my three beginner
classes will guide you. Then you will find
over 20 masterclasses covering a wide range
of beautiful subjects. In each one, I share the techniques I use in
my own professional work. We'll have a lot of fun together and you'll gain the
understanding and confidence to
incorporate everything you learned into your own work. Plus I'll share a few of my tips and tricks
along the way too. I've provided you with a fabulous reference photo of the lion along with a
downloadable template. The template gives you a stress-free drawing so you
can just enjoy painting. I'll be showing you how to
use gravity to your advantage and how it will give
you a wonderful sense of movement and direction. I'll be guiding you through layering and sectioning areas off this will give your lion depth while retaining that all
important light. Of course, I'll share many
of my professional tips, tricks and musings as we work
our way through the class. If you'd like to learn more
about me or my work, please pop over to my website at janedavieswatercolours.co.uk This can be found
on my profile page, along with links to my
Instagram and Facebook pages. I'm very active on my
social media pages. Where I love sharing my art, especially on Stories
with many ideas, works in progress and
tales of student life. I really hope you will share all your paintings on the
Projects and Resources page. As I love seeing your masterpieces. And don't forget,
I'm here to help if you get stuck or
have any questions. I want you to experience
that buzz of painting in his liberating wet on
wet, loose style. So come and join me!
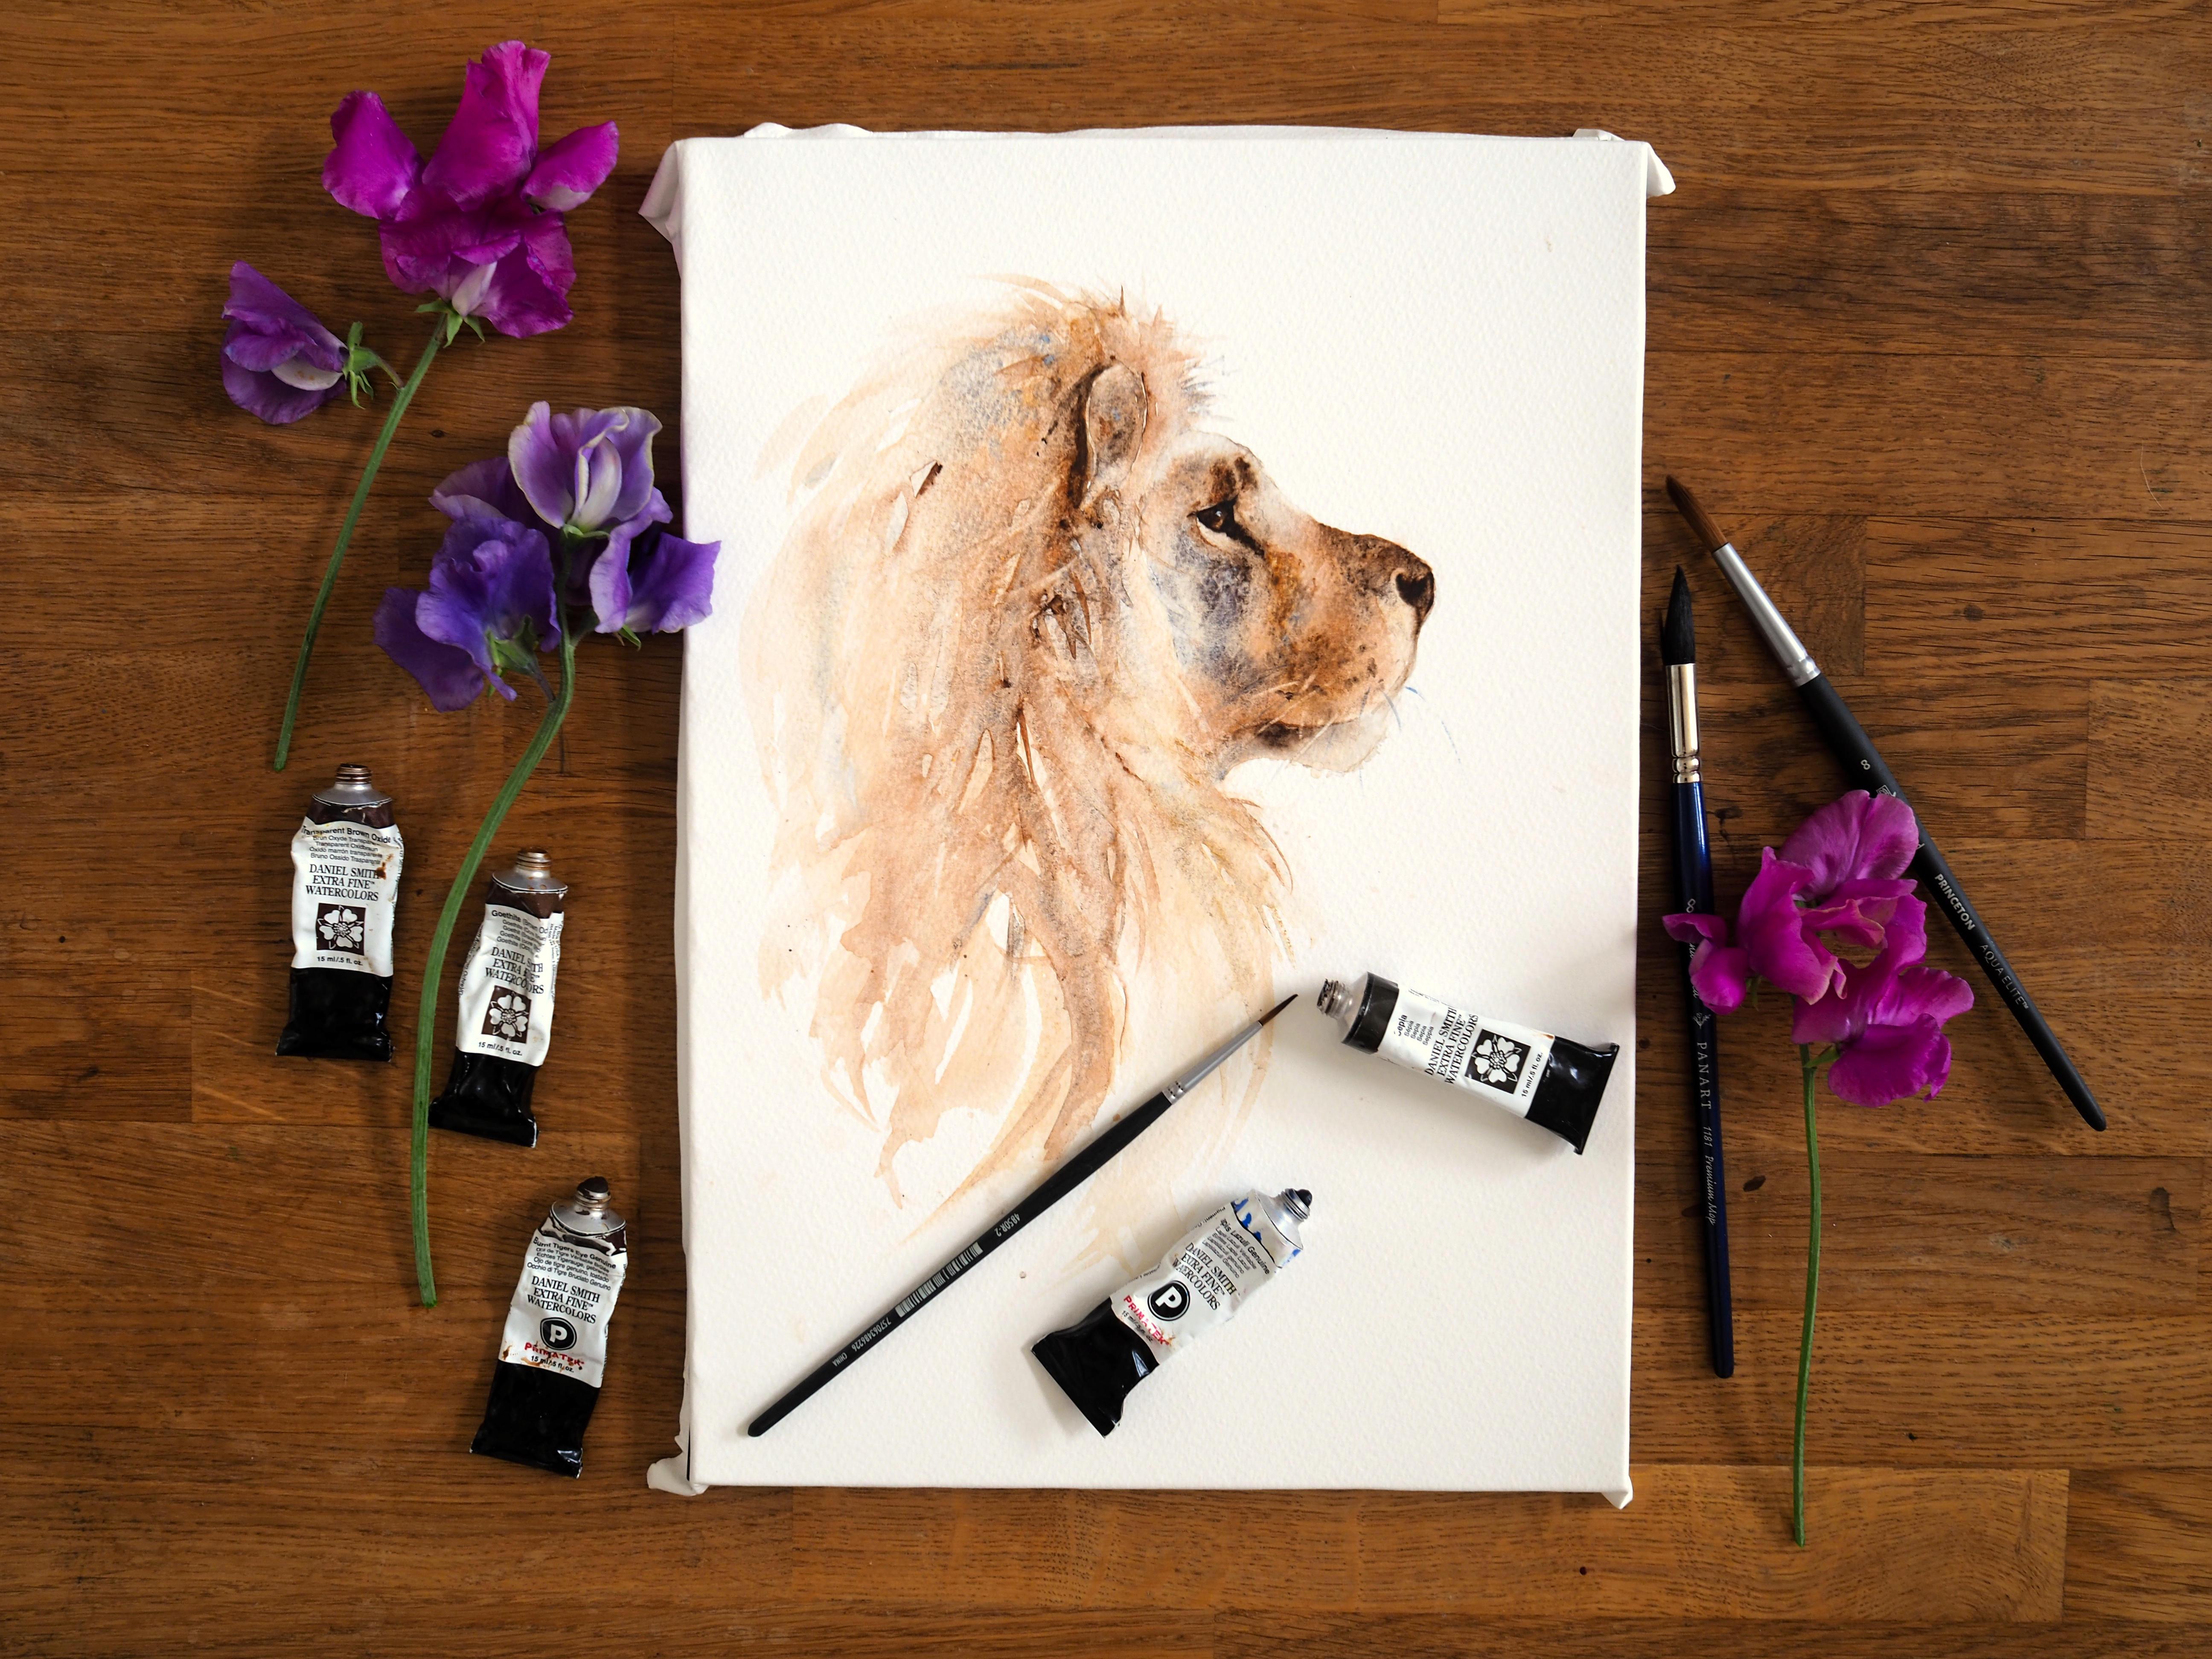
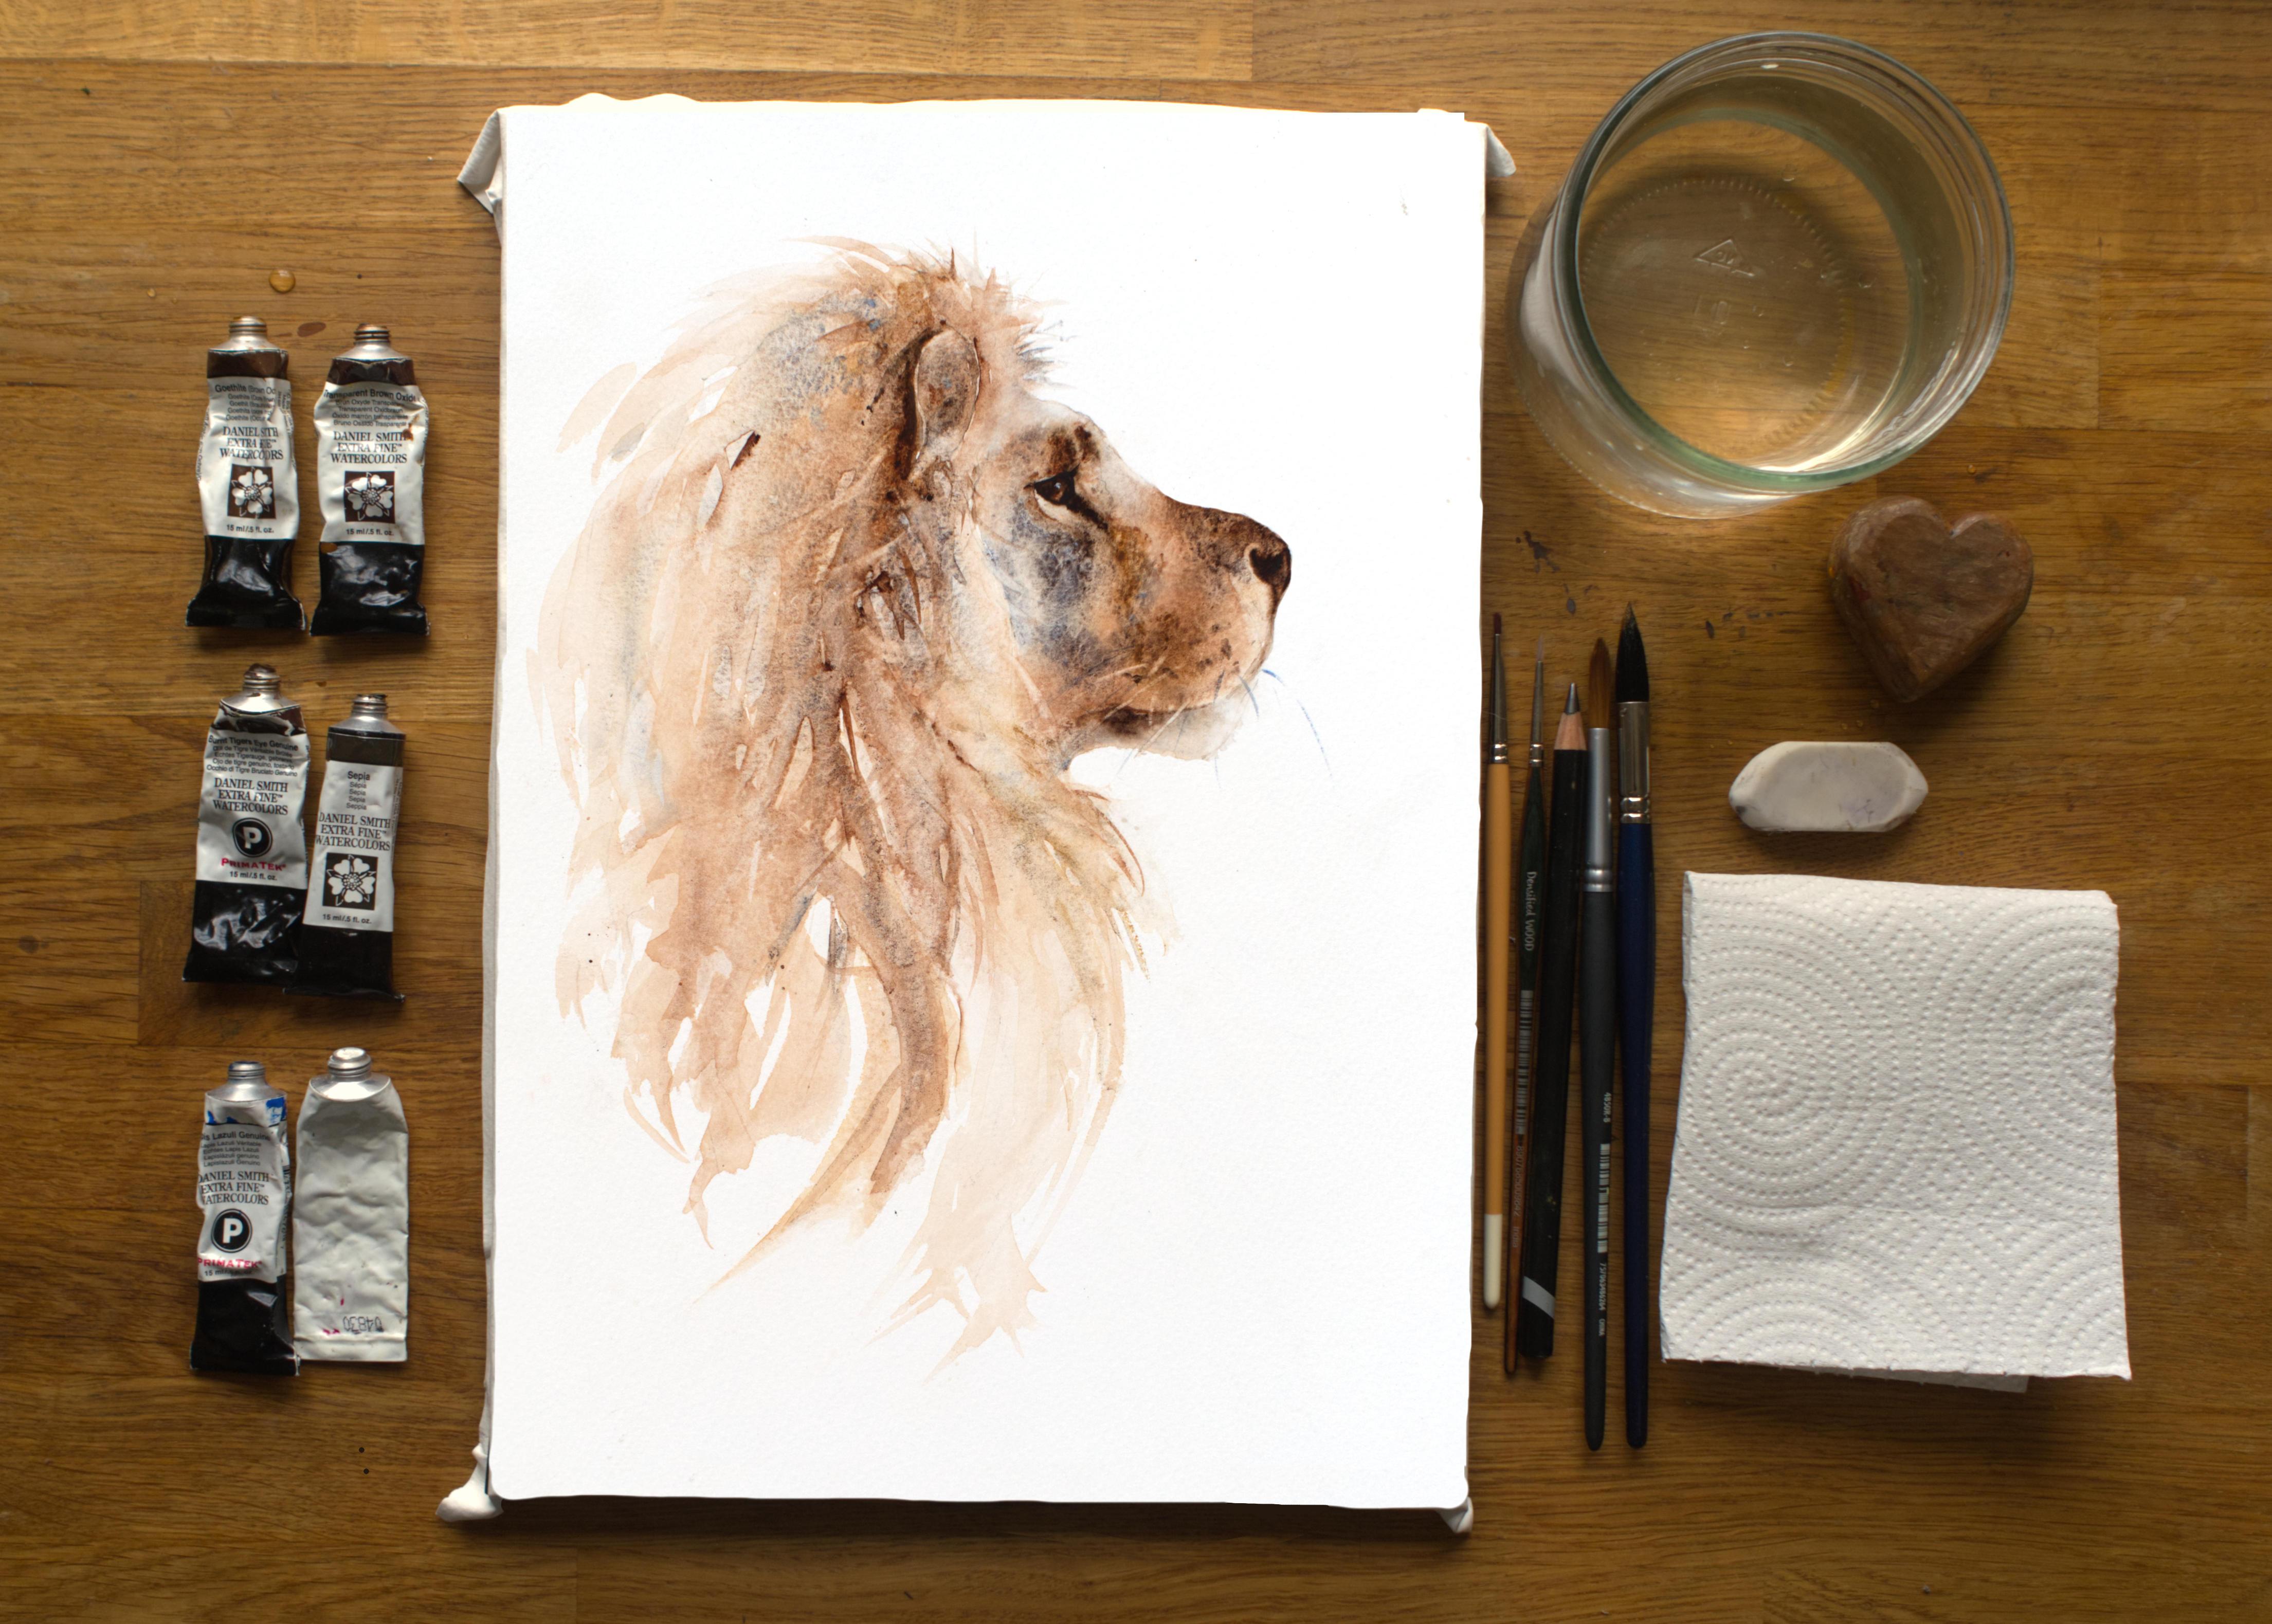
2. Materials: Welcome along to this lovely,
spontaneous lion class. You're going to love this one. So I'm going to run
through the materials that I'm gonna be using today. And I will start with my collection of
Daniel Smith paints. So from the top, I've got Goethite, that's a brown ochre.
Transparent brown oxide. I've got Burnt Tiger's Eye, a
well-worn favourite of mine, along with the Sepia actually. And I've also got
Lapis Lazuli, again, it's another
one I use a lot, so there's a definite
common theme here if you've taken some
of my classes already. And just a little bit
of white gouache, which is just for the tiny hint of catchlight in the eye. The paper I'm using today, this has actually
being stretched. So I would, because this is a really loose piece and we're using quite
a lot of water. I would recommend
stretching your paper or having a gummed pad so
it's fixed a little bit. It's quite difficult on papers unstretched,
though not impossibl, and a lot of my
practice pieces have been, but to get a nice, easier ride on this I would stretch your paper. And that's Bockingford and it's a 140lb NOT. And again these can all be found in the Projects and Resources page, if you're wondering
where to find them all, or you don't want to
scribble them down as I'm as I'm saying this. I've also got my pot
of water and I got a little, what I call little, just a little wedge really, well its a little
wooden heart, and that just helps me to tilt the paper into various directions which we're going to
use a bit of today. So something that is
probably about an inch high, that's not going to
rock around is ideal. I've got a rubber and I've got a
kitchen roll of paper towel. And how many brushes, I've got four and a pencil, I'll pop the pencil down, and work from the top.
I've got a nice big one, it's a size eight,
but it holds a lot of water and its got a nice tip. And that's for doing the mane. Depending how large
you are making this, whatever brush you can
find that it's gonna give you some big bold
marks is ideal. This could, I could have almost upsized maybe to a 10, to give me maybe something
a little bit more sweepy. Be big and bold, find something you're confident to use and will hold a nice amount of water. I've got, going down in size, again, an eight,
but it's smaller, and it's better for the head. It's doesn't hold as
much water as that one. I've got my little
Eradicator brush, which is a favourite. And that's just for taking
little bits of light out, and amazing for taking coat out. So that's a good, good brush. I've got a tiny
diddly size 0, actually. You could
easily have a one or two. I just liked the small, it's just quite nice for tiny little flicks and
some of the whiskers. So something that's
quite dinky. Then I have got a hairdryer. Again, its always handy
but never essential. It just helps dry some of
the layers in between. And a template. If you're not
confident enough of drawing them out and there's
nothing wrong with that, this class is about the
painting aspect. It just gives you, the
template will give you a nice shape to start with. So don't, don't feel you're cheating in any way by using it. So that's it.
Again its a downloadable PDF and you
can download that, cut him out and then plonk
him over and go round. And that can again be found in the Projects and
Resources page. I think that's it. So I think we ought to sketch
him out and get painting.
3. Sketching Out: Now whether you've used
the template that's in the projects and resources pages or
you've hand-drawn him. I'm just going to give you
just a few little hints on how best to get your
image on the paper really. At risk of repeating
myself from other classes. But if you have
used the template, they tend to give you rather blunt edges. So once you take
the template away, just adjust your drawing. It can give you some rather rounded edges I suppose. So go round and
just tweak those. Again, look at your reference photo and flick your eyes back and forth. If there's something
not quite right then you can obviously
adjust from there. The eye's very important to get. Take the time to get that right. The eyeball's actually
really tiny. You can see a lot of
it is sort of a black socket, so it's worth putting
the eyeball in. And then drawing
around the socket as well. I have left, we're just
going to do some sort of little layers really here. So I've left, you can see he's got
some wonderful eye markings here. So in the first layer,
we're not going to paint over that and the same with the nose, white
nose markings. So just pop that in. It's just stops you from from wetting that down
on the first layer. The chin's worth making a
little bit smaller as well. Because once we're
gonna do some flicks, it's very easy if we've
drawn it to the full size, you then flick out
from the full size. You can end up with
a rather hairy chin. So almost make the chin a
little bit smaller than it actually is. The
ears are an odd shape. When I've been practicing these, I kept getting it a little bit wrong. So make sure you get
that shape quite right and in the
positioning of it. Because obviously if you
use the stencil, you've obviously
only got an outline. You haven't got the
the bits inside. So yeah, get that right. And get some lovely
sweeping marks. I'd even go more exaggerated. I think that's what is so
lovely about him, is to get these sweeps. Something that's pleasing. He's quite dramatic, I think,
and quite sort of regal, so if it does get a little bit more pronounced
around his chest, I think that sort of
adds to his character. Don't get too, don't try and do too
much detail here. We're going to keep
that quite loose so don't get too
hung up doing very precise edges
because it can stop you from being expressive. I think if the lines are very containing it stops you
from being free. And also the edges, if you're getting very close
to the edge when you're doing these
lovely sweeping marks with the brushes, if you've got it too close, very close to the edge, that will confine you as well. So keep him nice and in
the centre of your paper. I don't think there's much else
to say about the sketching. Pop his nose in,
that's sort of a useful and the line of his
mouth because again, we layer those up. I think that's it. So I think
we should start painting him.
4. Back Mane First Layer: Right onto the fun bit. So pick up your big brush. The biggest one you've picked, get that lovely and wet. Take the excess moisture off on your kitchen roll. I'm going to pick up
the Transparent Brown, the Goethite and
the burnt Tiger's Eye Let's have those three, that's
nice handful there, and we're going to put
some, I'll show you, that will be easier,
than tying to explain. Showing would be easier. Ok, we're going to get a nice, a nice
amount of paint on our brush. Because this has got to
go all the way down here. So be generous. Just blob it on. It doesn't have to be
anything posh or precise, but we are doing the
back of the ear. So make sure you've got
the back filled in, but not the front, well not
the inside of the ear. If that makes sense. Get a nice amount on there. Okay. Clean your brush off. See, I've already
done a splodge. Let me get that splodge. Okay, start again. Okay, So keep everything
lovely light and my brush is quite full of water. And we're just going to be as expressive as we
can, deep breath, we're doing another layer, so don't worry too much. If you think you
haven't covered enough, It's almost better to be really expressive than it is to worry about the layers
or depth and things. So pop a little
bit more on there. Everything, keep, keep this, hold it right at
the end and just try and keep your wrist and everything as loose as you can. I'm going to try and do a
few flicks up here as well. It's worth doing the flicks as
soon, soon as you can. But while, while the
paper is still wet, if you allow it to dry, you'll find the flicks then look like they've been stuck on. Then you can drop a
little bit of water, water? a little bit
of the paint down. Just let that, and what
we're going to do, I'm going to lift up my board. I'm going to use
my little heart. I'm just going to let
that flow for a minute. You can, sometimes if you've added
a lot of paint here, you may find that it's
starting to dry so you can always add a little
bit more water. Don't be shy to add more water, but just keep an eye. Obviously if we add
more to the top, it's going to flow
to the bottom. So keep an eye on this.
You can either suck it up with a piece of kitchen roll
or with your brush. Might try and, I'm standing, it's a really nice
time to be standing if you're pondering
whether to do that because it just keeps
everything moving, I think, a bit more. I think that's
enough, I don't want to do anymore because I know I can strengthen it
on the next layer. So I don't want to
go outwards anymore, but what I will do, a little bit of
this blue Lapis Lazuli, I'm just going to
touch. Tap it in. All done really
loose, lots of water. And as soon as you, if you step away, as soon as you've got something
you like, stop. Don't keep fiddling. And I am going to try
and take my own advice. Watch the water
at the end there. I'm actually going to leave him on a slight tilt and
allow it to dry tilted. That should give us nice
expressive lines. And we've just got to
allow that to dry. Now, as I said in my other
classes, a hairdryer is handy. But be careful about
hairdrying it too soon. If you do it too soon, you'll blow that
pigment and they all intermingle and
you'll get a sort of a monotone sort of mess. So the hairdryer is only really
useful right at the end, just when you want to get on. And you can still see it's a bit tacky, so hang on.
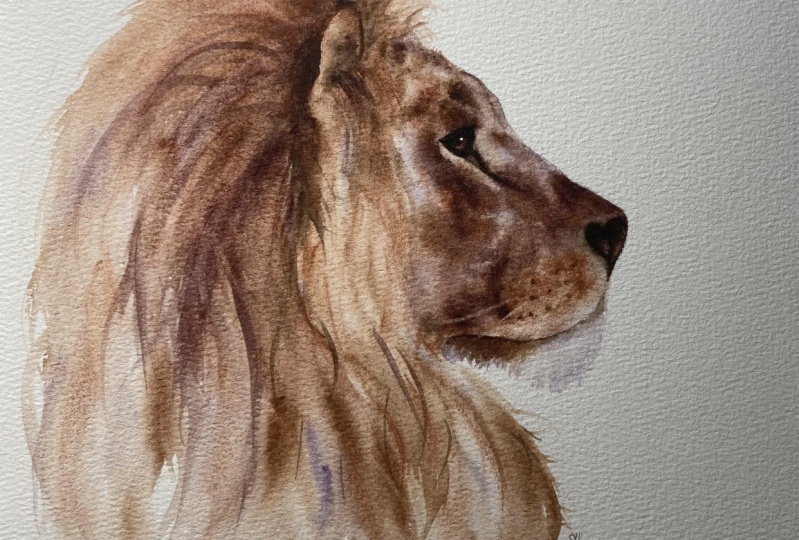
5. Head First Layer: Okay, that's the back
mane first layer done. And that's dried quite well
its a little wishy-washy, but I know I can add
a bit more strength. So what I'm gonna do, I'm going to lay him flat I'm going to take
my little, its not a support, my little heart. I'm going
to take that away. I'm going to pick up,
what should we use? I'm going to use my number eight It's not quite as chunky, it doesn't hold as much water. This is lovely, it holds
a lot of water. It's quite, um, I find it
really lovely and expressive, but it's almost a bit
too much for the head. So I'm going to use this one. So we're going to, we've
laid it flat and we're going to wet
down the head. And we're going to
miss out the eye and also going to miss out, I tell you what I might do, just
so you can see it. Don't don't do this,
this is just for you to see where I've
put put the water, but we're going to miss
out that white marking underneath the eye and also the white markings
around the nose. We're going to
miss out the chin, sort of sweep it round. You see that swept around there. And then up against the, that's
the back main, that's the font main. Not quite sure what
else to call it really It might have a technical term. I'm not sure. Carefully go around, I'm going to go round the nose and we're going to just fill it all in
so it's all nice and wet. Now I used the hairdryer just to finish drying
that little bit off. So my paper is probably
quite warm and it's also quite a hot day here. So make sure it's
lovely and wet. And I've had a few people
saying, why my layers, I can't finish my layers
before the paper dries. If that's the case, just add a little bit more
water. I'll hopefully try and remember
as I go along on this layer to explain, but you can keep adding water and it
allows you a bit more, a bit more time
to play. Okay, so I can see, if I bobble
my head up and down, I can see that
it's nice and wet. You don't want it sitting, You don't want it bobbling on there, but you want it
nice and saturated. I'm going to pick
up my Goethite. What am I trying
to find, Transparent Brown and the Tiger's Eye, same colours really as the mane. We're going to have to have
a little bit of tiger's eye, a little bit of Transparent. I'm going to, if I squint
at my reference photo, I can see he's darker on top. So, I'm literally just
touching. Tiger's Eye is lovely for this because
it really does spread and, I'm doing lots of blobs today, you see how that spreads on its own and that's just the Burnt Tiger's Eye
doing that. So it's a good paint for allowing everything
to move along. Then my Goethite, I'm just going to pop a
little bit down there. He's got a quite a, a tanny-coloured muzzle
hasn't he, or chops. If I squint my eye, I can see
this sort of marking here. I'm just going to
pop that in as well. My papers almost actually
too wet so what I might do, I'm just going to
suck up a little bit. And that's what I mean, if if it's too wet, it it feels like it's sitting
on top and not moving. So it can either be, if you're
finding it's not moving, Sometimes it can be you've almost got too much
water on there. And it's very easy when
you're cleaning your brushes to keep adding water. So you pop a
little bit on there, you clean it off, and
then you don't take the excess water off your brush, you just then go back and apply
it and you can then keep adding too much water
onto your paper. I'm just going to shift
that around a little bit. I'm going to use it a
little bit of Burnt Tiger's Eye because it's really quite
grainy up here, isn't it? Just going to just tap
a little bit in there Remember, we're going
to do another layer so you don't have to get it too dark or too much on this. I seem to have given
him a little bit of a knobble here, on his nose. I'd Like to
smooth that out a bit. I'm also going to pick up the
Lapis Lazuli and pop a little bit there See, I'm doing it, I've just put a whole load of
water on there. I'm doing just what I said is the reason why you can end up with paper
quite saturated. I'm liking this, it's actually flowing
down and it's not, probably out of design, but sometimes if you see something that maybe wasn't quite going to plan or
what you quite expected, but you like the result, then leave it.
Sometimes watercolour, you have to go with
the flow. I think Literally! Bit of a pun there I'm sure. I'm trying to look at
him bearing in mind, I know I have another
layer to put more colour in and put more definition and
I'm liking him at the moment. I've got my tiny brush, probably too small
actually, for this, but I feel I just want a
little bit of control. I'm going to make this
quite neat. I'm just going to start putting, just tapping that
lovely eyebrow arch. Because this is starting
to dry and I've got a really strong concentration
of colour on there. It's not moving very much. Sort of see that? So it's probably one of those jobs really
for the second layer, but I just want to
make sure that stays. It's really a prominent
feature there. And again, I might just,
I didn't wet that down did I, I might just add a little
bit there as well. To start that line off, It's got quiet
a line going down there. And I think I'm going to
let that dry on its own now because there's definitely enough paint on there
for the first layer. So again, same rules
apply really, not rules, suggestions
for the back mane, just allow that to
dry on its on its own.
6. Front Mane: Alright, so it's on with
this lovely font mane. So I'm going to use my
little heart again, and I'm going to
tilt it like this. We're going to put
the support there. She said hoping it doesn't
wiggle around too much. I want it to flow down into
this right hand corner. See if I can hopefully keep it there. Okay. Right. I'm going to use my
bigger brush again going to get it lovely and wet. And I'm going to
start, I'm going to wet the front ear and right
up to the top of his mane, going
carefully around his face Down for that
lovely long sweep. Again, wet it right up. So it's touching that back mane Get down to
probably down to here. Make sure that's nice and
wet up the top again. Then we're going to
pick up my Goethite. Nope, that's where it is. Burnt Tiger's Eye and the
Transparent Brown again, let's wiggle that around, and do the Goethite
pop that there We're trying not to
put too much colour. I quite like it, it's really loose and really
just little touches of it and allow that to run, see what it looks like. That's not quite running
in the right direction. See if we can, kinda wanted to get
into this corner here. So I might have to hold
it up in a minute, but again, just watch that you don't add too much water
but you want a nice flow. So it's going right
into this corner. A little bit of
Transparent Brown, little bit more up here. Doesn't have to be anything specific if you're
just trying to get nice patterns really Something that's nice
and flowy and expressive. Just, again, its really light,
just wiggling little bits down. I can take off the excess moisture
and let's do some flicks, but again before that dries. Try and keep all your,
if you're sitting, it's quite hard to get
those lovely sweeps. So if you can't stand very well. Even if you could just do
it for this little part, it would be really
helpful for the painting. So give it a little go, if you're either reluctant to stand
or you haven't tried, it's a nice nice time. I'm just dropping a
little bit of water. And again, sorry
I didn't probably explain. I said I was going to explain on this first layer wasn't I. But if it's beginning, say
little part's beginning to dry, and the rest
of it is still wet. You can just tap a little bit
more water in that it gives you just gives you more time again because
you've re-wet it, but just bear in mind, make sure the rest of it
is either wet or damp. And I'm almost going
to leave it there. I can see how that
sort of beginning to flow down. That's given me some nice marks.
I'll pop those browns down. Pop a little Lapis Lazuli I just again, just want a
little tint of it. That's probably enough. It's definitely a case of less is more.
Right, downing my brush. And again, let
that dry on its own. Before we let this
completely dry, we just need to do some of these flicks.
I've picked up that very little brush, it might
be a bit too small. Let's try the other one. Make sure it's nice and clean. And again, just try and hold
it so it all sort of loose. Just do a few just a few flicks. Its one of those things,
it's so easy to overdo, that will do me. Just make sure I've got
some nice ones here going on. I think I have enough there. I just want that to be
a really nice sort of chest. Feel his kind of regalness if you get
those lovely sweeps in. So I think we just again, just, just need to let that dry.
7. Chin: Okay, once your front mane is dry, Let's lay the board
flat. Put that back there. Okay, We're gonna do a nice, really easy a little bit and
we're gonna do the chin. So I've got my smaller number size eight, let's call it that. All we're gonna
do, really simple. We're just going to
wet the chin down. Bear in mind, we're gonna
do a few little flicks. So if you've drawn, hopefully you've drawn the chin, what would be a little bit
smaller than it really is Make sure it's not sitting
too much on there. So its just nice and
wet but not saturated. And then we're going to
pick up a little bit of Burnt Tiger's Eye and
a bit of the Lapis Lazuli The Tiger's Eye is gonna
be dropped at the back. Bit of the Lapis Lazuli
at the front. Don't want too much,
just want enough to, obviously we're painting on white paper and
his chin is white. So we need a little
bit of colour just to show that there is a chin, but we don't want too much because it's
going to look a bit odd That it's probably
about enough. A lot of him, is about his lovely lines, so it's getting all those in. Once he starts to
dry, just a tadge, again, we're going to put his mouth
markings on. So I'm going to put down
the Lapis Lazuli and Burnt Tiger's Eye, and pick up the Transparent Brown and we're going to have
a go with the Sepia, it hasn't come out yet, has it? I've got my very diddly brush. Get a nice, what I want is a really
good thick consistency. The Sepia will
help it not move. But I don't want it moving
too much and I want to make sure. This just about right,
I can see, it's just got a
slight shimmer to it now. So I know if I pop
that down there, it's not going to
move very much. Just a little bit. Give me a nice soft edge. Pop a little bit
more Sepia there. Just be careful when you clean your brush off that you take the excess moisture off because we don't want to do
at this stage is add, add any more water because
it will all start running. And that's not really what we want at the moment.
We just want it to give us those markings
and make it really soft. Just a very little bit, just a hint of a line,
I don't want anything too obvious, just a little. Make sure I've got the
curves in there just right. You can fiddle with that. And that is his chin done. No its not! Nearly fooled you then! We need to do some of
these little tiny flicks. I might even nick a little
bit of colour from there. It's really hard because
obviously you can't see any, because we're working on, on, white paper and
a white chin, you just want a few
just something. But I don't want to make it too obvious, like he's got brown chin hair. So it's just just trying to get a little bit of colour and
a little bit of something. But not too much. That
is probably enough. Hopefully, in the finishing off bits, if it
looks too obvious, we can always gently sort of
take some of those bits out. Okay, now that's done. And we've just got to let that dry.
8. Eye: Make sure this chin is nice and dry because we're going
to do the eye and it's very easy to put your fist in it into and
splodge it round your painting. So we're going to pick
up the Goethite and where are we, Transparent Brown. And we're gonna do something
really simple and we're just going to paint it in. So just do the eyeball,
the eyeball is really tiny. You can see he's got
eyelashes which, the paintings too small, we just can't quite get those
eyelashes in. So you can paint the eye ball. Because what we're
gonna be doing is putting the Sepia around to
make his eye makeup. So it doesn't matter if the Sepia goes over the top
of the eyeball. Hope that makes sense. So we just want to paint
it in at the moment. So don't worry if
it looks bigger than it actually is in the
reference photo, that's fine because we
can just go over it. We want that nice colour. So that's just a
mixture of the two. Just painted in. We've got to let that
dry for a minute, which shouldn't take too long. And then we can pick up
sepia and do the eye makeup. Okay, once it's dry, little brush again, just the Sepia. Wake up this little brush. Again, we want quite
a good consistency. I seen to have my Sepia
escaping out of my tube. So working out of tubes doesn't always work
in your favour! Okay. So if you've gone
over... If I paint it in, that might be easier
if I paint and explain... So I'm going to start, this is, this is the part
where the eyelashes are. So I've gone over that bit, but just be careful you
don't make the... what I'm trying to say is
don't make the eyeball and eye socket too big. By getting confused where
the eye ball and socket is. I'm just going to
run a line down there. I've got a bit of a blob, a blob of
water, I don't want that A real bit of painting! Not something I often do! On the second layer on this head, we can soften it all around here so if it looks a bit
stark at the moment, which it will do, don't worry, because it's going to look
a bit painting by numbers. What you want... We kinda don't, don't make this, this little tiny area too big because it sweeps
in doesn't it? Just, it's an eyelash there. I mean, that will probably be put in at a later
stage as well. But sometimes you just need to put something in
to make it look nice. That little dot. What I'm gonna do very
carefully now is just to wet this eyeball again, just so that all softens and
you can see he's got some, he's got quite
an intense stare there. And that's, a lot
of that is because he's got shadowing underneath the eyelash or eyelids. You want something
like that. So you want to wake that Sepia up and encourage it
down into the eyeball. If it all starts getting a
little bit pear-shaped and you think you're
losing control, just stop for a minute. Just let things dry
and go back to it. I just want a little
bit of heaviness. There's, no... we're
not painting an eyeball in Sorry, a pupil in, so he's quite
nice and unforgiving, Unforgiving, actually forgiving I should say, not
unforgiving! I'm just spending a little
bit of time with it and watching how it moves. I can take that little
bit of light out. So if you, if you
don't reserve it, don't worry too much
because it can be taken out just...
So I've cleaned my brush again. Taken the excess moisture of, I'm almost giving it
a little squeeze with my finger. And very carefully, I can lift... See how
that's coming away. And step away. If you look
away from your painting, if you're sitting just
lift your head up, just try and get a little
bit of distance from it and squint your eyes, flick your eyes
back and forth from the reference photo
to your painting. And they almost sort
of super-impose and you can get an idea of what you
need, what needs adjusting. I think that looks all right. Actually. The fatal words, it looks alright, and then I
fiddle and then it doesn't! Clean my brush off and I've just got to let
that dry again and we can put the little catchlight in and remove that light
again if need be. Right, now that's dried. I can see a little bit
more, if that makes sense, I can see how it's all
sort of landed and dried. So I'd like to take out
a little bit more light. Just going to very gently,
tiny little brush, just take that corner out. You see that's
just enough. Again, lift your head away
from the painting. It's gonna look a
bit weird because it's, because we haven't done the second layer
around the head. So it looks like it's a bit
stuck on at the moment. If you're a little
unsure, we can always go back to it on
finishing off stages. So if you're unsure,
you're not sure, leave it and we can always address any issues. But if you are happy, I'm just going to put
the little catchlight... He hasn't got a catchlight
because he's got those lovely lashes. And if we painted him
a lot larger, we could probably put those
lashes in, but we haven't. So I'm just going to put a
little catchlight in there. And although he hasn't got one, I often like to put them in because I just think
it gives them a, another sort of twinkle
and other, other element. That's your eye done!
So, onto the next one. Or next layer should I say.
9. Head Second Layer: Okay, onto the second
layer over the head. And this is where it all
starts to come together. We've done what I think is
sort of the scarier part, getting those lovely
sweeps round. We've done this sort of
more expressive stuff. So we're now, we're, we're sculpting a little bit more now. It's quite a nice, they're all nice stages, but this one feels a little
bit more in control stage. So what we're doing, we're going to wet the head down. We're going to go over that white line around his
eye and you want to touch that Sepia line that we've
put in around the eye If it starts to bleed, that is absolutely perfect because we want
that to soften now so it stops it looking like it's been
stuck on too much. And we will I will probably go back
over that in a minute. I just want to get
this down first. I don't want it to
bleed too much. So we're going to carefully
go around, over the nose, over that white line. And we're going to
go around the mouth at the moment. We're going to
miss out the chin. We will join it up in a minute, but not quite yet. If I do it now. I haven't worked on some
of this area here. So if I if I wet it
down, it's more the colour from the
head that I'm going to apply will start
running into the chin. So I will add
the chin into this layer, but I'll do that more
towards the end. Go really gently
because you've probably got some lovely marks and softness. And if you rustle too much, you'll be rustling that layer. You don't want
that, especially if you've got Burnt Tiger's Eye, that moves so easily and you can, you can lose what you've got. Again, just making sure
it's all nice and wet. But not too wet. A bit of a Goldilocks thing, you
want it just right I can see its a little bit too much down here. I'm just taking
up with my brush. If you take it up with kitchen roll we can almost suck up too much and then you're back to adding more water again. There's no hurry at this stage. Just get it ready and make sure you've got
no dry patches either. You don't want any
want any of those. And actually what
I'm gonna do now, gently just tap this
little part here. This little stripe down his... I'm probably going
to say this wrong. And I'm not sure if that's
right, whether they're scent. I don't think they are,
but this little eye marking, just
soften that now. Okay. So I'm gonna pick up my
Burnt Tiger's Eye, Transparent Brown, and Goethite. Going to make sure my reference
photo's in view. I'm just going to strengthen. Now depending on what
yours looks like, depends where you
need to strengthen. So I'd like a little
bit more colour here, so I'm just tapping
that in and leaving. Don't try to brush, just tap, drop whichever, however, but try not to move your
brush around too much. It's just applying and leaving. A little bit more Tiger's Eye
on the nose, I might have a little bit of the
Transparent Brown on my brush at the same time. Just gently tap. We'll put that nose in a minute. But if if any colours
run in it doesn't matter. If you
squint your eyes, you can see where the
dark, darkness is. I've lost my Tiger's Eye,
there it is, Tiger's Eye and Transparent Brown together are a nice combination. I'm just going to run
that down there That Tiger's Eye is spreading
too much now. Doing the job too well. If it does spread too much, just suck it back up
your brush again. Just keep everything
nice and light. And kind of manoeuvre
it around if it needs to be manoeuvred. Lets pick up the Lapis Lazuli
in my hand at same time. So I just want a
little bit in here. I think. This is probably an
eye socket under here. That's quite nice. Getting that in. Got some nice... lets have
some Transparent Brown He's got quite a marking
here, hasn't he Again that's
probably an eye, where the socket sits Its spreading quite a lot, So my paper might
be a tiny bit too wet, I might have been a bit
eager beaver with this. So just, not panicking,
just gently sort of pull it back, pull up any excess water, and you'll find all of a
sudden you haven't got enough. If you're not careful! As I say, squint you eyes find where
those, those darknesses are. He's got this nice bit
down here. Let's pick up this tiny little brush and put
those down for a minute. Let's have a little bit of sepia
Let's try and get these eye markings. I might have taken this eye
marking out a bit too soon. Pop that back in again. So I want to make
sure I get that... The little top of the eyebrow in
it's quite expressive, isn't it? What I need to keep in mind, and this is actually a
really good example now because this is just
beginning to dry on me. It hasn't dried completely, but it's beginning to. As I say
my studio is quite warm today. So I can just pick
up my little brush and I can just literally
tap a bit of water in. Bear in mind everything
else needs to be wet. If areas have dried,
completely dried, it's best to just let
the whole lot dry and then wet again
and just start again. But as long as long
as your paper is still wet in
all the other parts, then you can just
keep adding water. Just bear in mind if
you've added... I think I've got a
slight slope going on! Don't quite know why! The bench should be nice and flat, but I think I might need to
get the the editor on that. Sounds like a, a,
a, a technical job! Okay. Um, I'm trying to lift my eyes away from it and see
where I'm going with it. This line's gone
a bit high here, that might have been one I put
in on the first layer. So I'm just gonna give
it a little rustle, move it down a little bit. If I'm not careful,
I'm going to risk putting too much colour in. I think he's probably
got enough here. I'm a bit disorganized here
aren't I... Lets pick
up a little bit of the Lapis Lazuli and see if I can just break this
Tiger's Eye up a little bit. It's going to pop a
little bit right on top. Bring it down, I can see There's, if I squint my eyes, I can see there's a
line going down there. So I'm going to give a bit of a little rustle, just try and
keep everything as loose as you possibly can Just going to pick up that...
clean my brush first... Goethite, tap it in down
there and around. Okay. I think he's
looking quite good. And what I want to do
before it completely dries is add that nose in. So if I pick up Sepia and the
Transparent Brown together. A little bit like the eye, I need this to be nice
and really gooey. I've got quite a a nice
amount on my brush Start in the middle or,
on the edge, somewhere so if it starts
spreading too much, you've got a little way
to go and you can stop if you feel like
it's spreading too much, but that's got a nice...
that's sort of the perfect consistency on my brush and it's
a perfect wetness. It's just got a
slight sheen and that will give the nose a
nice softness to it. It won't look like it's
been stuck on. If we were to paint
this in separately, it would look like it's
been stuck on. It will have quite
hard edges. But this way, hopefully, it will blend and
give us a nice soft nose. Now although my white line
has slightly disappeared, I know because I've only
got one layer over it, in the finishing off bits, it will be easy to lift out because there's only
one layer over it. If that makes sense and
the same applies to the eye. You can, if you've got a lot, you can always try and
take little bits out now, but it's almost
as easy to do in the finishing off stages where we go around and
take light out as well. I want to do just
keep an eye on that... where I've softened... itsnice to soften
this line down, but, as it has done, is
the risk that it blends a little bit too much
and you lose that strength. So I'm just going to
tap that back in. Same with the nose, it's that nice thick consistency. We want to try and
keep that shape. Again, some of
it can be taken out, but if we can avoid putting it in and then having to take
it out, that's nice. Have a little look away from
it and it's got a bit of a line going around here where his whiskers are This is beginning to dry so I'm
going to have to be little bit careful I don't do
too much up there. There's almost a tiny little
line isn't there, off The back of that eye. Ooop...
Brush is getting a bit mucky. That was mucky, not Mickey.
Now, I'm taking it away... Okay, that's it, its just a
tiny line off the back of the eye. And actually where the white, that white line
goes up to the eye, It's quite a quite an
obvious junction, isn't it? I'm just going to put a tiny little bit
of colour in there. This is a really nice stage
we're at at the moment, or I'm at at the moment, and hopefully your paper's beginning to dry, just
when it goes a little bit tacky is when you can put some nice... I wouldn't say
detail because here... we don't want to do anything
too sharp, but you can put paint down
and it doesn't move so much. Again, if your eye brows
haven't, aren't very distinctive, those markings there, it's a
time to put it on as well. I think I'm going to
have to leave it there because this is a stage where you can carry on fiddling
because you're enjoying it. So I'm going to
down my tools, down my paints and I'm going to
let that dry on its own. I tell you what we haven't
done, I'm doing this aren't I, forgetting the stages! We're going to wet this chin. So I've picked up my number 8 And we're just going to
wet the chin. I'm just going to allow
that colour from the head. Just to run in.
You can see how that immediately softens and we get away from the
very hard line. Just take a little bit because it's... again here,
the chin is white, so we don't want
too much colour, And especially on the
front of that chin. So we can just watch
it for a minute. None of that should bleed, but if it does...
I'm going to show you, none of mine really
has that much. But if you found, this is now sort of bled
too much and blended, you can always put a really nice sticky amount of Sepia in there. And that will get your
mouth markings back again. It's worth before
it completely dries, just lifting your
head away from it, having a look, try to get a
little bit above it if you can. Ideally, you don't want to move the painting because we've
got it nice and flat. And if you start picking the
paper up and tilting it, we're going to
encourage that paint to run in places
we probably don't want. So just try and stand on your
tip toes, as I'm trying to do now, And have a look from above. I like him,
he looks alright, so I'm don't think there's
anything I've missed out. I'm going to put my
paint brush down and let that completely dry.
10. Back Mane Second Layer: Okay, so we're gonna do another layer over
this back mane. Now, obviously the more... I'm going to give
it a little tilt, but the more you tilt
your board or your paper, the more the paint is going
to run and give you the sense of movement in whichever direction
you've tilted it. So, if you feel like you haven't haven't got a lot
of movement on yours, just tilt it a little
bit more. Equally if you feel like it's rushed down
the page on that first layer, just give it a tiny
tilt or lay it flat. Be a little bit of a judge. Again, if you feel
like you wanted a bit of
movement so it's running
towards the back. So it gives him
maybe a sense... obviously his mane isn't blowing
in the reference photo, but you could have the
impression that the wind is catching the mane, which just literally by tilting you will get that
sense of movement. So I hope that
kinda makes sense. Just pop, pop him back, back in each position. Right, so I'm just having
a little look at mine. I will try and keep it a
little bit more simple. And I will just put my
little heart there. So I'm just, by doing that, I'm just allowing it
to run straight down. It might be quite nice to have a little bit of
tilt, I'll see how I go. But let's pick up the
the bigger brush again. And we're just going
to apply some paint again. I've just got the Transparent
Brown and the Goethite And I'm going to, its gonna go onto
the back of the ear. Hope you can see where the
font is at the moment. So I'm just going to literally
put that on that junction. Just tapping it in, whatever
color, if you feel your first layer was
a little bit heavy, go a little bit lighter. Equally, I feel mine was
a little bit wishy-washy, so I'm going to try and
be a little bit bolder, and I might put a little bit
of Burnt Tiger's Eye in as it begins to run down, but I'm just going to use these
two colors to pop on. Clean my brush. Give it a
little bit of a shakeout. I don't want to get the brush too dry. So that's got quite
a lot of water on. And I'm going to, again,
like we did there, the first one, we just want
a few expressive flicks. Don't do too much, I would say, a few. I haven't got many
going over the top, so I might just flick a few. You see I'm hiding my, hiding him underneath my hand. I'm going to flick a few into the front mane
in a minute as well. But you can see that has given that little bit of ooomph
hasn't it. I just want those nice sweeps as I say, look away, before you
keep working on it, stop for a minute to see
if you need more, it's very easy to do more than necessary
because it's a, it's just a nice
action, isn't it? It's almost getting
some some sort of vertical lines down as
well as horizontal lines. Say if you feel like
everything has whooshed down, just try and get some sort of horizontal lines over
just to break the eye I am going to put... I can't
resist a little bit of Lapis Lazuli, just going to dot
a little bit in that, just allow that to
run down as well. So because I've got that on
the tilt is going to run. Before that dries on us... I don't think I'm going
to want to put any Tiger's Eye. I don't want anymore of that sort of harder brown. That's
not very technical is it! But I don't want that sort of coolness I suppose, I want to
keep it nice and warm. And then I'm going to pick
up my other number eight. I'm just going to flick a few
into the front of the mane. You can put a little bit
of paint on your brush if it's not, if
you haven't got enough paint that you can use from the back mane then just pop a little bit
of paint on your brush. Don't do too many
of these and you can swap to a little brush. Again, just try and keep, hold it towards the
end of your brush. Flick a few out of the top. Watch. Watch any of these. If you put a lot of water in, just make sure they don't run. I'm going to soften
that one down. it looks a little bit hard there. Right, before the paper dries, I need to pick up the
sepia, I've got my little brush. I'm going to go over this, so
at the very top of the ear, you can see it's quite dark, so we're gonna go over,
painting it in, round, follow the the ear line. So you've got something like that. Just shape it until you make
sure it's the right shape. Then pick up your slightly
larger brush. We're going to backfill it, but try and leave, try and leave a tiny little dry line, just so it stops this from
whooshing into the ear. So if I do with the very tiny brush you'll be able
to see a little more clearly. And then backfill
it and then run it down into
the back mane. Make it as slight as
you possibly can and yeah, that's alright. Goethite and a little bit of Transparent Brown, and even a
little bit of the Lapis Lazuli. I just want to pop a little
bit of depth in there. Just to give him a sense of darkness inside that ear. Again, step away,
actually I might do a bit of Tiger's Eye,
a bit of coolness. And then while that's still wet, we want to just pull out, again just a few, from the
bottom of the ear. Sorry, a few flicks, a few
something's? A few flicks! Deep in concentration! Now there won't be any
more layers going on. So we're almost finished. So if you feel... I'm
just looking at him... I might want a little bit
more sweep here actually. Just going to let that sweep in. Just want to make sure
I've got some nice, sort of, sort of movement. That's better. And these where I've run
the brush it becomes a little bit squared off, so I'll just try and flick
those out a bit. Put a little bit
of water in there see if we can make
something run. I try not to be, personally,
too liney. Just going over the top here. Just want that... too many
paints in my hand... let's have Burnt Tiger's Eye
and the Lapis Lazuli. I just want to pop a
little bit more mane at the front there. Not too much because you can make them look a
bit quiffy otherwise. Just joining that up, so that's wet paint gone around the ear. Again, I've left the tiniest
of little white lines there, or dry lines. Use a tiny little brush
to flick a few out. My practice pieces got a
little bit quiffy, so I'm going to try to be
careful and not do that again. Right. I'm taking a little
bit step away from him, having a little look. I think he's looking
pretty good, actually. I'm going to do a tiny bit of Goethite and I might
just put something there. It feels like I need
something there I don't know if that's the
right thing to have done. Yeah, I think that looks okay. Just just given it... I felt like I didn't
have any strength there to break up the front mane to the head. I'm rather winging
it and going off piste here, I must admit, but that's better. Okay. I can see, I'm getting to the stage where
I'm going to start fiddling. So I'm going to be strong. What I'm going to do is, I'm going to switch
the camera off, but I'm just going to make
sure I keep an eye on these little dribbles
here and make sure they don't go any further down. And it just needs to dry
and then we're almost done. We just need to do
the last little tinkering bits. So just, again, just
allow it to dry and I'd allow it to dry on whatever
tilt you've put it on. If you have. So yeah, just allow it to dry naturally.
11. Finishing Off: Okay, so it's on with the nice tinkery,
last little bits. So I'm going to take
this out so I'm laying my piece flat. And firstly, I'm going to have
a little bit of a tidy up. So I'm going to rub out any pencil marks that
I can still see. Make sure it's lovely
and dry before you rub As I'm sure you can picture
the come if it's not! I love taking the pencil
marks out because it often often feels like it's
holding the painting in. I haven't actually got
that many around the chin there
might be some. I've got... this is just
me being mucky... I've got a little spot
on his nose. I've picked up my brilliant
little eradicator brush. I'm just going to scrub it out. That's the joy of these
paints, they're very soft, so they come out nice
and easily as well. And this Bockingford
is a good paper, it lifts out quite well as well. Now I'm really pleased. I like what I've got. So we're just gonna go round and basically
take light out. I'm going to put a few flicks
in here, but not many. So actually let's do those
little flicks first. I'd have quite liked to have
gotten a few more in here. So at the risk of... I'm going
to use Transparent Brown, I'm just going to
use a tiny amount. So it's very weak. If you want to put
that in a little, if you're used to using
a little pallette or something, then make sure it's
nice and watery. I just want... start
on the edge here... I just wanted a couple. I don't want to do too much. It's just needs...
its almost too much, now. Just soften those a little bit. Just want something to come
out from his chest. Again, probably didn't
pull out enough here. It's hard putting
flicks in afterwards because they can look very stuck on if
you're not careful. Just try and do them very weak
if you feel you need this, this is probably
just a me thing But again, I might... I'll put a tiny little line here just up against his ear. I'm going to pull
out a little bit. If I can do a few without
making him look silly. That is probably enough. You can end up... if you do all
these little... you can do a few And then all of a
sudden it becomes too twee and too fiddled,
too contrived. So be careful. Right! So all we're gonna
do is, put the paint down, is to go around
and take light out. So I'm just going
to be careful and mindful that obviously I've
got a little wet patches, so I'm going to start, let's start here. Now, as I probably said, in
some of the layers, there's a nice curve in here. Just goes into his eye socket. I suppose it is the eye socket You want to retrieve
that because that's a nice little part. Go very gently. If you've used tha same paints as me and in particular
the same paper, it all comes out very easily. So be careful. Again there's a little bit
here, the tiniest little bit. Just go gently. That's just to round up
the eye, to give the impression of the eye
socket and make them round. You'll be surprised,
especially around the eyes, the difference it makes
to it in expressions. I will do a little flick, but I'll do that in a minute. Let's carry on with
the eraser brush. I'm just going to take
a little edge out here. I always like taking
energy out somewhere. I'm just going to blot that out
with a little bit of kitchen roll. That's just enough. I'm gonna pop this one
down for a minute. I want a little bit of light
out of the top of the... well not actually
the top of the nose... the edge of the
nose, just here. I might blot this with my finger because that squidges it rather than
actually takes it out. That might be enough to lift. It gives a bit of texture. Good. Pop that down. Let's pick up the
eraser brush again. Let's try and find... I have actually got quite
a lot of white here, but if you found yours
has sort of disappeared, This is a really nice time
again just to sculpt it out. See how easily those
colours are lifting out. Again, sculpt the nose if the
nose is a little out of shape. You can take the colour
out and sculpt in. Working our way down. As I say, I'll probably
take a little bit of colour out of the chin as well. Just very gently. You don't want to lose
too much because all of a sudden the chin will disappear, but just a tiny hint. Step away from
it and have a look. I actually want to put a little line in here and I might do that
in a minute when I'm doing a little flick of
the eye, but lets stay on task. Let's do some whiskers. So I'm going to use this
little eraser brush you could you could have used the masking fluid
right at very beginning. I didn't, just, I felt they tended to look a little
sticked, sticked, stuck on. And when I tried it
in my practice pieces, I've found that the little
eraser brush was better, but you may find you may be more familiar
with masking fluid. I don't use masking fluid a lot. I find it a little bit hard. So again, I'm just going
to take little bits out, giving those whiskers because, again see how easily
its lifting out. So be careful. Step away. Have a look, see if you think
you need anymore. If you don't know
or you're unsure, stop and go round and carry on the other bits and then
come back and assess. Because once you've
taken them out, you're never gonna get
that colour back in again. So it's worth just hanging
on if you're not sure. Right. Equally, I'm going
to stop as well. I'm going tap some
little whisker holes in. But again, I will do
that in a minute. I'm gonna take a little bit... pop a little bit of, of some flicks in
here into his head. Like some mane is flicking in, break up that line as well. Not too many. And again, I've just got to be careful. No, that's dried, as I say, I've fiddled there, so I just need to be careful,
but it has dried. Again, have a look. Say if you've got a
lot of vertical lines, I'm going to try and do some, just a few horizontal,
just to see if I can just break it
up a little bit. Try to be random. I'm sure my Husband would agree
I'm quite good at being random. I'm just looking,
I'm standing on tiptoes trying to get
away from it a bit. So sorry if I've just
disappeared off the mic. I think that's probably
enough of those flicks. You can take, if you're, if you lost that little
white line that you put on, you can take, mine's quite
exaggerated there, I've got enough but you can get the idea. You can take colour
out around the ear, if you
feel you need it. I'm just trying to show you,
I'm sure you get the idea? And the other place? Again, if you lost your, if you've lost your, your white line again,
you can take that out. I think that's it for me. But again, there is that,
any area that you see that you
feel that you've, you've lost the white. You can very gently take it out. This is... if you've got a
eradicated in, you know, how they work, they
do take out quite sharply. So if you want something...
if you don't want an area... that's going to be a
little bit softer and you don't want
so much colour out, just try a softer brush
and just sort of just tap and very gently dab and
see how that lifts colour out. And I'd say there isn't
anywhere particularly that I want
to lift colour out on him. But let's do a little bit here. Let's try to show you. So just just tap and very
gently with kitchen roll, just gently dab that and you'll find that
probably lifts out enough. Okay, let's pop that
down and let's do these little bits with a paintbrush. So first of all, I'm going to pop this little... I've actually managed to
keep that little flick, but you may have found
yours has disappeared. So a little flick... I love that little part there. I don't want to do anymore
to that eye I'll just put a tiny
little line in here. Line is probably the
wrong word because I don't want it to be
too exaggerated. Just that might
almost be enough, there's just something missing
there. Just a little bit. We want to put, again, probably not even a line, just a suggestion of the
back of the ear again, because although we've
applied a lot of paint, we've started off with a lot of paint on the
back of the ear, it washes out as well. So you just want a tiny little
line here, a little suggestion. That's almost too much. Soften it with my finger. I think we're almost there. She says with a big sigh. Yeah. Again, as I always say, it's always worth
looking, looking, going away from it,
looking, looking at it. Maybe the next day, a couple of hours and seeing it with
a fresh pair of eyes, It's definitely you'll see things that you can't
see for some reason now. So if in doubt and you're not quite sure
if you're finished or not, As I say, step away, come back. And it will become apparent
whether you need to do anything or whether
you don't. I like him. I don't think I want
to do any more. Oh, whiskers! I knew that
there was something else! You could put a few whiskers on. Again, a very little brush. I don't think that
probably helping much. But you get the idea. Probably not worth
continuing with that one. But we might do, a little
bit of Burnt Tiger's Eye, try, this is where it's really
hard to be random. Because obviously they are
in a very straight line, but just very weakly, I've only just got a
tiny bit of colour on my brush, just tap a couple of suggestions of those
whisker lines You can see there... I don't like
them being too prominent, but that's just me. So yeah, it's a little bit
of personal, its your painting. I'm just guiding you
along, so if you like it, then pop a few more in. But I think I'm pretty
pleased with him and I think I'd like to see
him again probably with a fresh pair of eyes
and a couple of days or in a day's time and see if there is anything that
needs tinkering with. Yeah. I think I've got as
far as I can with him. So I really hope you
enjoyed painting him because he's been, he's been lovely and
expressive, hasn't he? So please share him in the
projects and resources pages because they make my day when they start popping
up, they really do. And I'm always there to, if you get stuck
on any little bit, just send me a little message. And I, I try to get back
to everybody and try to put it in the Projects and Resources page rather
than the discussions. And thank you for thank
you for joining me today!
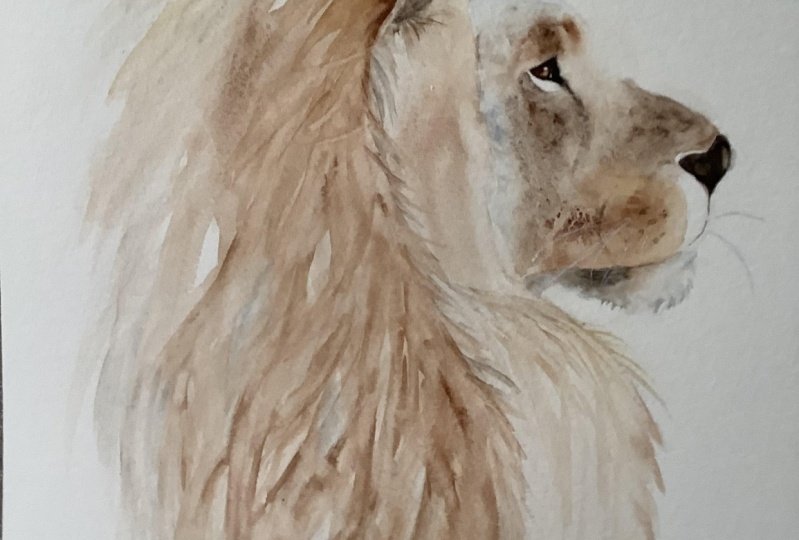
12. Next Day Tweak: Now my lovely lion has
been sitting on my shelf overnight and I've
come back into my studio, looked at him again, again with a sort of a new
pair of fresh eyes and just felt the whole lot looked like it was sort of
falling off the page. I felt I needed a little
bit more going horizontal. So what I'm hopefully
going to try and demonstrate today, or in this class, is just how I go about sort of
seeing whether I need that. So I'm going to use my pencil. That's what it is, its not a
paintbrush, it's a pencil. I'm just going to put,
right on the side, I'm just going to
put a few sweeps over and see whether
I like that. Because obviously I can, if I don't like what I've done. I can gently rub out. And keep this pencil
mark very light. And the good thing about
having it on its side is it shouldn't leave any sort
of indentation either. So just a nice
sweep and I can see that gives me a little bit more horizontal
sort of movement. So what I'm gonna do now, I'm going to actually
paint it in. I'm going to get rid of that
pencil line. I can roughly remember where I was, its not
gonna be a very strong line. It's just gonna be quite weak. I'm going to need the Goethite
and let's do Burnt Tiger's Eye. I don't want a lot. I might find a scrap, a piece of paper to one side. Just an old, old piece. I'm just going to try out. Make sure I haven't got too
much paint on my brush. I don't want any
anything too strong. So I'm obviously adding
it to a dry layer, I don't want it to look like
it's stuck on too much. So hopefully that
should be about right. Again, just keep everything light, paintbrush is damp. Just going to sweep that in
with a little touch of colour. Try and keep that movement. So you probably
haven't made this, this, you'd probably don't
need to do this at all, but I thought it might
be useful for you to see how I may adjust things
the next day. That's probably all I need. I don't want to do too much. I just want to break
out that, break up that vertical line. Gonna dibble some of that out. Its barely noticeable if I'm honest, but its just enough. Again, I'll let that dry and see
see what it looks like. If I feel I need a
little bit more, I can always add more to it, but it's not so easy
to take it out. So I'm going to
leave it at that. And I think that's helped
the overall look of him.
13. Final Thoughts: I hope you enjoyed this class. He was joyous to
paint, wasn't he? Isn't it amazing that by placing paint onto wet
paper and tilting, you can create such
magic and movement. But remember to keep
everything light, your hand, your brush, and the amount of paint you use. How did the layering go? If your flicks of the mane
looked a little stuck on, remember, you need
to do them while the paper and paint
is nice and wet. Those finishing off bits made all the
difference, don't they? But it's worth stepping
away and coming back with a fresh pair of eyes before
you claim him done. So we look forward to seeing
you in the next class!
 Jane Davies, Professional Artist and Teacher