Transcripts
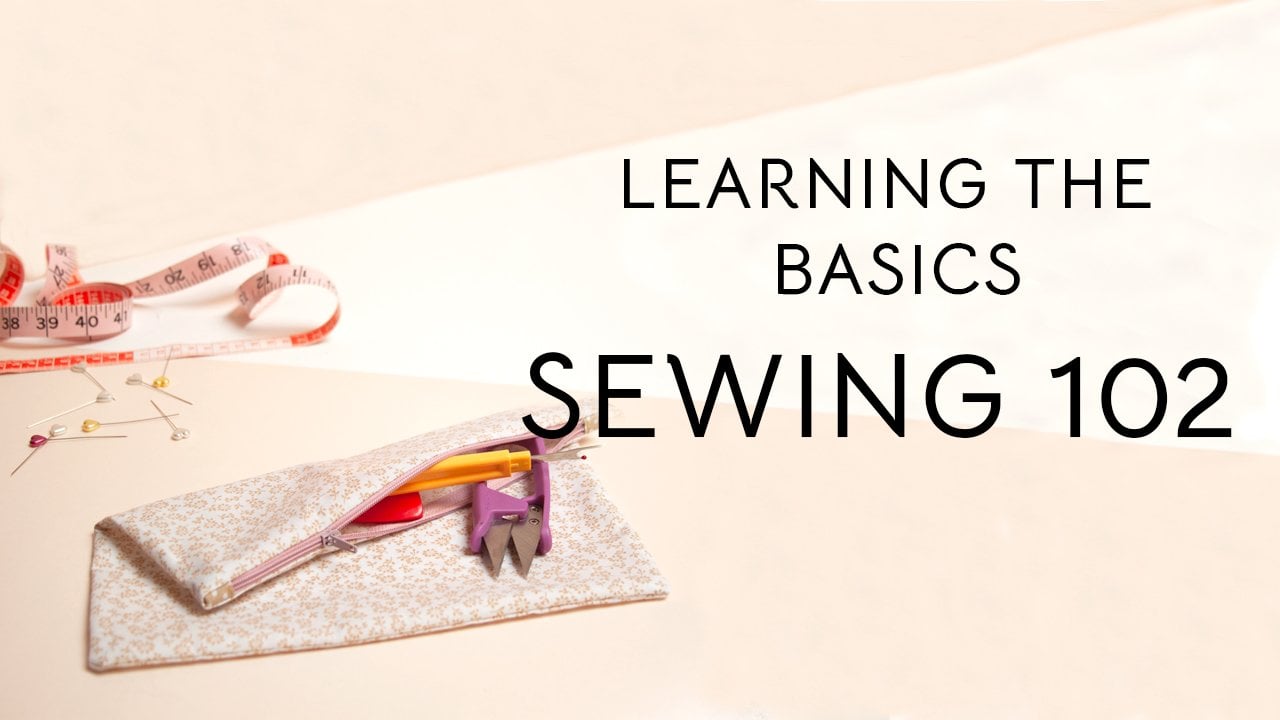
1. Class Intro: How does one event starts sewing lingerie?. Are there certain things you should know even if you already sew? Should you sew with stretch? if some of these resembles the internal dialogue you have with yourself towards sewing. First of all, you're not alone. And secondly, welcome. I made this class for you. I am Valeria In this class we'll be creating a beautiful lingerie set of matching bralette and undies This class is great to level up your sewing skills or to dive right into the Very detail oriented world of Bra Making. During a long period of time I wasn convinced I was terrible at sewing. I actually centered my work all those years in surface pattern design, but I always felt so drawn to garment making. I even found solace in sewing books, but I wouldn't dare to actually sew the garments, until I got fed up with wanting but not even trying. So I started doing garments, dresses and the like with indie sewing patterns. And then I saw people on Instagram sewing their own underwear. And I thought that was so cool and so unique and so intimate that I had to give it a go. And that was the absolute turning point of all my sewing skills. The precision needed, the attention to detail, the delicate fabrics and how to control them. The books, the pattern development, the inspiration. As you can see, I am very much into sewing undergarments. I'm eager to share with you a few of the things I've learned along the way that hopefully will give you confidence in Sewing either lingerie or any other type of gardment. If you want to understand how to work with lingerie and the logic behind it, more than watching just a sew along, I made this class for you. My intention is to break down the world of lingerie to make it more accessible so you feel more comfortable exploring it on your own. so You make even more great lingerie. I am confident that by knowing the overall basic tools, techniques, fabrics, and everything used for a lingerie, you'll be able to identify where to use, what and how to achieve that particular thing you want. Join me as I guide you through some fun exercises that will take you from the theoretical to practical understanding of sewing lingerie. For the main class project, we are sewing a beautiful set of bralette. And undies Along the way, you'll learn some important principles in garment making, including what tools to use for certain projects or sizes. how to deal with delicate and slippery fabrics, How to construct a bralette How to work with stretch and applying elastic evenly to your garments. How to assemble proper shoulder straps. A few key fashion history moments, when to use straight or zig zag stitch And adding seam allowances depending on which elastic you chose. And of course, blurring the lines between what seems impossible to achieve sewing wise, and our newly finished garments, in order for you to move onto more and more complicated sewing projects with time. that being said, my name is Valeria, I am a textile designer, sewist, pattern maker, and anything DIY enthusiasts based in Mexico City. And I am also a teacher here on Skillshare, where I have a few classes including my Sewing 101 to learn the foundations of sewing. I am super happy to share these class with all of you Are you ready to walk through this beginner lingerie sewing class? Me too, let’s go!
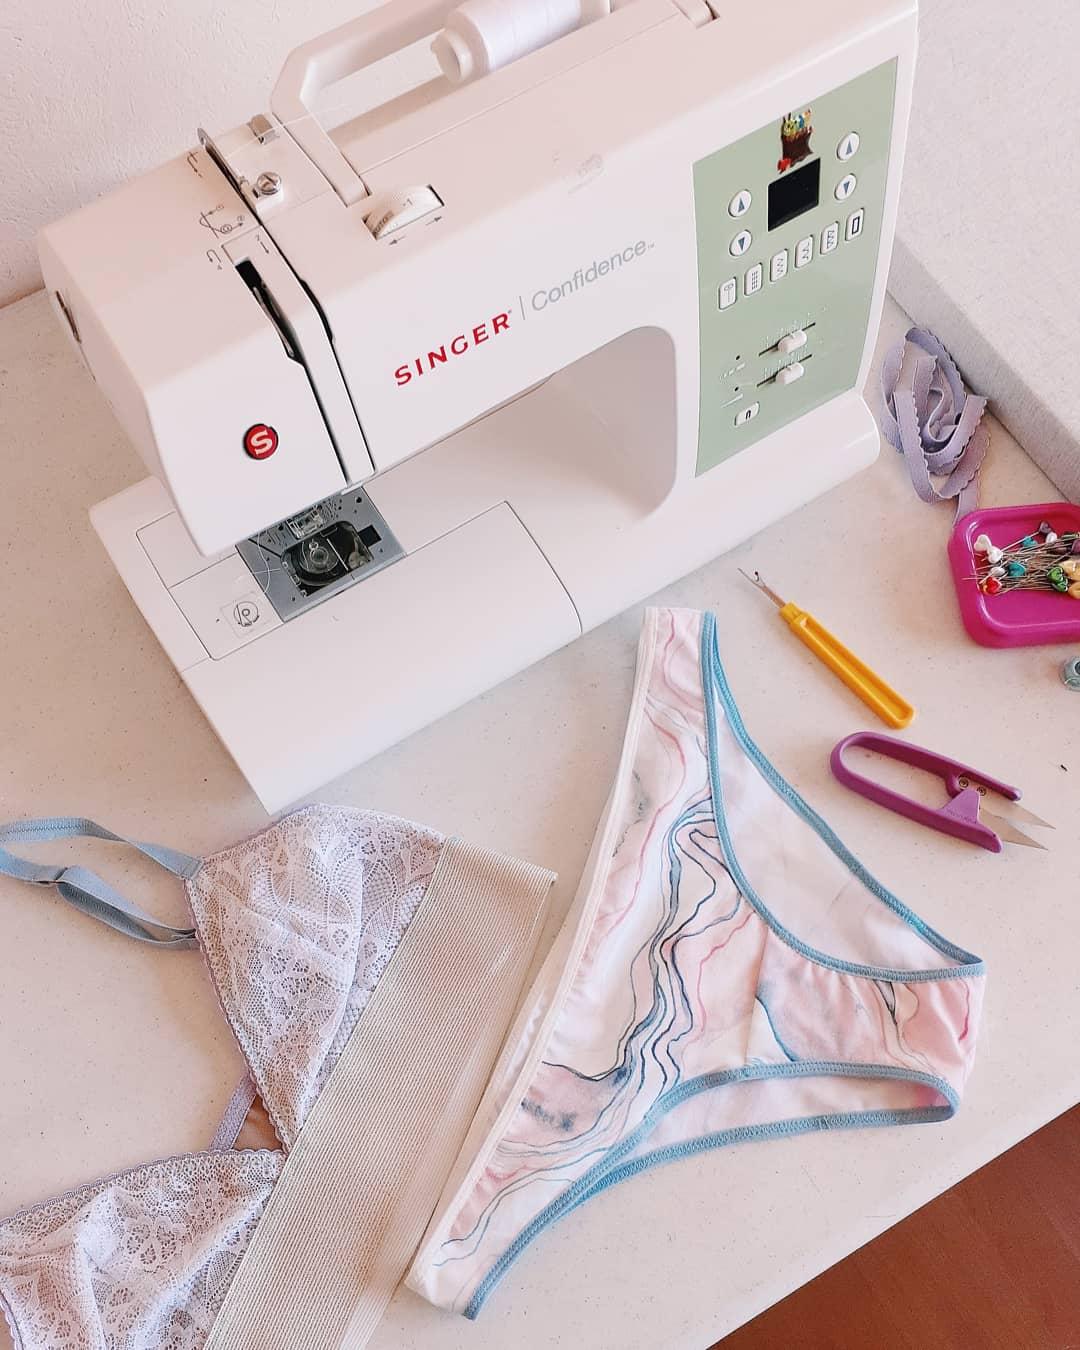
2. Projects and Tools: Thanks so much for joining me. First, I wanted to lay the ground on how we will be working. First we've got a few lessons, then we move onto exercises and then to the main class project where we're going to sew a beautiful set of lingerie to get started, we're going to need the following items, all of which I'll explain in full detail why we need them and what they'll do in following lessons. I'm going to start by using stretch lace, but feel free to use whichever fabric that you are comfortable with as long as it has stretch in 4 directions. If you're not familiar with this aspect, do not worry, we will learn about it in coming lessons. We also use Stretch mesh. Stretch Power mesh, wide elastic for the band, Picot elastic, bra strap with its rings and sliders. And all of that goes for the bralette. For the udnies, we'll use 4-waystretch jersey fabric, ideally cotton. And it would have a tiny percentage of spandex and fold over elastic. Again, all the things needed will be explained in detail in lessons to come. I'm just throwing it out there so you know what's coming. We will also need your regular pattern drafting and sewing equipment, mine includes the following. Sewing machine with zig zag stitch, matching thread, sewing needles, sewing pins, Tailor's chalk, seam ripper, magic tape tracing paper, pencil and ruler, tape measure, and scissors, we are going to use first fabric scissors, then paper scissors. And I also have an additional pair of scissors for everything that is not fabric nor paper. So for trims, elastic and the such, and for lingerie, I highly recommend getting a rotary cutter and a self-healing mat. I know sewists who feel super comfortable cutting lingerie fabric with regular shears, but I find that rotary cutters truly do the work for me. So whichever you prefer, DIY kits are highly recommended at this beginner stage. So you get everything you need together at the same time. Linked below in the class project section, you'll find some suggestions of shops where you can find said kits, including my Etsy shop. Let me remind you, this is a super quick review of all the things we'll be using. If you wanted to start getting prepared or if you're a more experienced sewist, if you're beginning from scratch, do not fret. I will explain in detail every single tool and material use for this class After these theoretical lessons of lingerie history and components. For our next lesson, we'll start soaking up all the lingerie inspiration needed for this class by learning a brief history of LiNGERIE.
3. Lesson: A Brief History of Lingerie: Before we get into all things, fabric and tools and construction, I know I am excited to sew too, I want to talk about fashion and lingerie history a little bit. Putting aside the fact that I am obsessed with fashion history, I deem very important to know what it is we're about to sew. Sewing our own clothing, especially lingerie is a very intimate and personal activity. I do believe that it gives us a deeper understanding of Clothing as a cultural mirror of our times - Underclothes are the most personal garments in our wardrobe, worn right next to our skin, So no wonder why they do more than just support some parts of our anatomy or add extra layers of warmth They also speak volumes to the current culture, our personal preferences and activities, all of which you'll start noticing as we go in this timeline. But first, why do we call it lingerie? Today we associate the word with sensual and luxurious underwear. But the word comes from linen in French, which is linge This is because before the 19th century, Cotton and Linen could be laundered at high temperatures. and were considered more hygenic to wear close to the skin. Okay, so let's start - the first recorded use of undergarments is from 5000 years ago in ancient Egypt were high ranking women would wear a long tunic down to their ankles, held up by two straps attached behind the nick called Kalasiris On its earliest version covering the breasts and later on extended to cover their breasts. In both cases, they were used to protect their clothing from body oils and sweat. During the Roman Empire, women and developing girls would bind their breasts using a garment called Strophium A strophium was a band of linen or leather folded and tucked around the chest. This was also used by women when exercising. Since it was more comfortable in the highly physical sports that they played. There is a very famous mosaic in Sicily, commonly known as the Bikini Girls where this garment can be seen. Then in the middle ages, people would wear a chemise made from linen to add an extra layer of warmth, additional to protecting their clothing from body oils and dirt. Let's note that clothing was highly valuable and you would want to protect it. Bras from this time period were found in 2012 in Austria. They were known then as breast bags, which is not a catchy name if you ask me, but they were made of linen and had two separate cups like we have now. Queen Elizabeth I Twould were her chemise underneath her courset. Its also known as stays for a longer, narrow torso. Queen Elizabeth wanted to communicate her authority through the use of clothing with all these voluminous layers. In the 18th century, Marie-Antoinette introduced the dress la chemise a la reine in 1780, shocking Everyone because that was considered purely underwear So wearing it to court was scandalous. immoral to say the least, she was indeed rebelling against traditional norms. So you see how culture shapes underwear and clothing in general. Now to the Regency Period, we know the classical silhouette of the empire dress right? Corsets made a very brief disappearance during this period, all things ancient Greece were all the rage. So to gain a more natural shape, the corest changed to a more lightly boned garment, rainforced with cordeling accompanied by drawers, which are these loose fitting pants made of linen as undergarments open at the crotch to facilitate all restroom duties with all those layers of clothing. These century, the term lingerie was used to talk about loose fitting garments like chemises and drawers. The term corsetry was used for more shaping items like corsets or girdles Nowadays, lingerie refers to everything inside the underwear, sleepwear, loungewear, shapewear, hoisery and athleisurewear realm. - After the Regency period, Of course, it then made a comeback as the main underwear staple at the Victorian Era, alongside the alongside the drawers, crinolines and petticoats aiming for the hourglass / wasp figure with a waist of ideally 18” / 46 cm, which equals to 46 centimeters. Now, let's review a few quick facts Before the end of the nineteenth-century, vulcanization made the use of elastic possible - storefronts then began displaying underwear, AND photography advertised visual imagery of lingerie transforming it from modesty too glamorous - Lady Duff Gordon opens Maison Lucille, to design lingerie, tea gowns and evening wear since getting dressed was such a task with adding the corset and the petticoats, These tea gowns were less restrictive to lounge around the home. They were unstructured and meant to be worn only while being with close ones, never in public. To begin the new century, in 1908, Paul Poiret promoted the uncorseted figure by designing loose dresses. And in 1914, Mary Phelps Jacob also known as Caresse Crosby, issue that patent for her invention of the modern Bra It was a backless bra divised of two handkerchiefs tied to a ribbon. These was the time of the first world war. Women were working. No one wanted to wear an architectonic, constricting rigid piece of clothing, and the silhouette started to change into a less emphasized upper body. To a more streamlined one. And then the roaring 20s with the streamlined silhouette, another invention occurs. the Symington Side Lacer, to flatten the bust by pulling this straps. By this time camisoles were also worn alongside a corselet which had straps and long panels to achieve the streamline figure, plus french knickers. By the 1930s, the bra is born with the adjustable straps and the biggest invention yet: cup sizes. It was Aida Rosenthal, co-founder of Maidenform, who introduced all these amazing developments to the modern world. Then the first commercial underwired bra was designed by Helen Pons in 1931. The 1930s was truly the decade of synthetic fibers giving birth to Lastex and Nylon. By the end of this decade, World War II started. the teddy, also known as camiknickers then became more popular for women in the workforce because they were wearing pants. This is a successor to the camisole, together with the French knickers, here we have two examples of underwear advertisements, for the corselet and the girdle Please note both have fuller figure advertisement Size ranges from 24 inches to 32 and 38 inches respectively, which now wouldn't get away with calling it the big sized. By 1947, glamour came back in the hands of Christian Dior with the new look in 1958 Dupont patents Lycra, which is made of spandex or elastane which are interchangeable terms. This is a synthetic fiber produced from polyurethane and has super high-performance elasticity and strength. As we've seen, clothing up to this point was a very valuable and expensive, so synthetic fibers were created to truly last and be less expensive. Then for the sixties, burn the bra as a symbol of non-conformity to the old ways. Pantyhose or thighs were all the rage, stockings and spenders were difficult to wear with the then popular mini skirt, Spandex opened the door to bright color thighs - A true revolution of clothing started in the seventies. cotton gussets became more popular due to the better hygine since it is breathable, Rudi Gernreich introduced the No Bra Bra, which was a big change from the very structured older bras, similar to what we would now call a bralette. he also introduced the G string It already existed but was basically for men. We then also have this super weird thing called the nipple bra. And Janet Reger introduced a lingerie catalog called bottom drawer, which was a true revolution for business and sales. And lastly, in the 1977, the sports bra created by Lisa Lindhal, Lisa lindahl, Polly Smith, Hinda Miller called jogbra then champion was created - with 2 jockstraps tied together they started developing this now crucial item of clothing Let's note that Catherine Switzer ran the Boston Marathon 10 years earlier in 1967, becoming the first woman to officially run in the Boston Marathon, even as race officials tried to physically stop her. She managed with no sports bra. For the 80s, we went big, Big shoulder pads, beig her, power dressing and also an increment in workout and exercise activities. outerwear with camisoles and basques and body suits were the staple, as we can see from two iconic runways. First, the 1982 Vivienne Westwood and Malcolm McLaren, Buffalo girls. And one year later in 1983, Jean Paul Gaultier underwear as outerwear as pictured above in red - To wrap up the century we have the nineties. with Jean Paul Gaultier the ever iconic bullet bra for Madonna's blond ambition tour. Then Kate Moss & Mark Whalberghs iconic add comfort and casual looks were at the forefront of fashion, not constricting as it was before. Then a new century. Underwear is more outerwear than ever, trends like the exposed thong, slips and camisoles were the regular clothing, not just for intimate or hidden garments. And then shapewear it is back with Spanx in 2010, we now take a jump to our current situation - huge steps have been made from what we saw earlier about sizing, representation, technology and silhouette. In this era, the Bralette reigns supreme. It can be worn for a loungewear, as statement pieces or regular underwear for the day. The same goes for leggings, sports bras or any kind of athelisure wear In a more fancy note, everything strappy was big in this decade. And my personal favorite trend, there are more options than ever in fit, cut, fabric style and sizing across almost all brands. Being inclusive is one of the main aspects Clothing has turned its head into being and long overdue necessity and also more knowledge and resources to sew lingerie at home. Hopefully this leaves you super inspired and more in touch with how culture has shaped clothing throughout time. Below in the resources you'll find links to articles and more information about Fashion History. Up next, we'll review the anatomy of a Bralette and the anatomy of underwear So we can name all of the parts that make up what we'll be sewing.
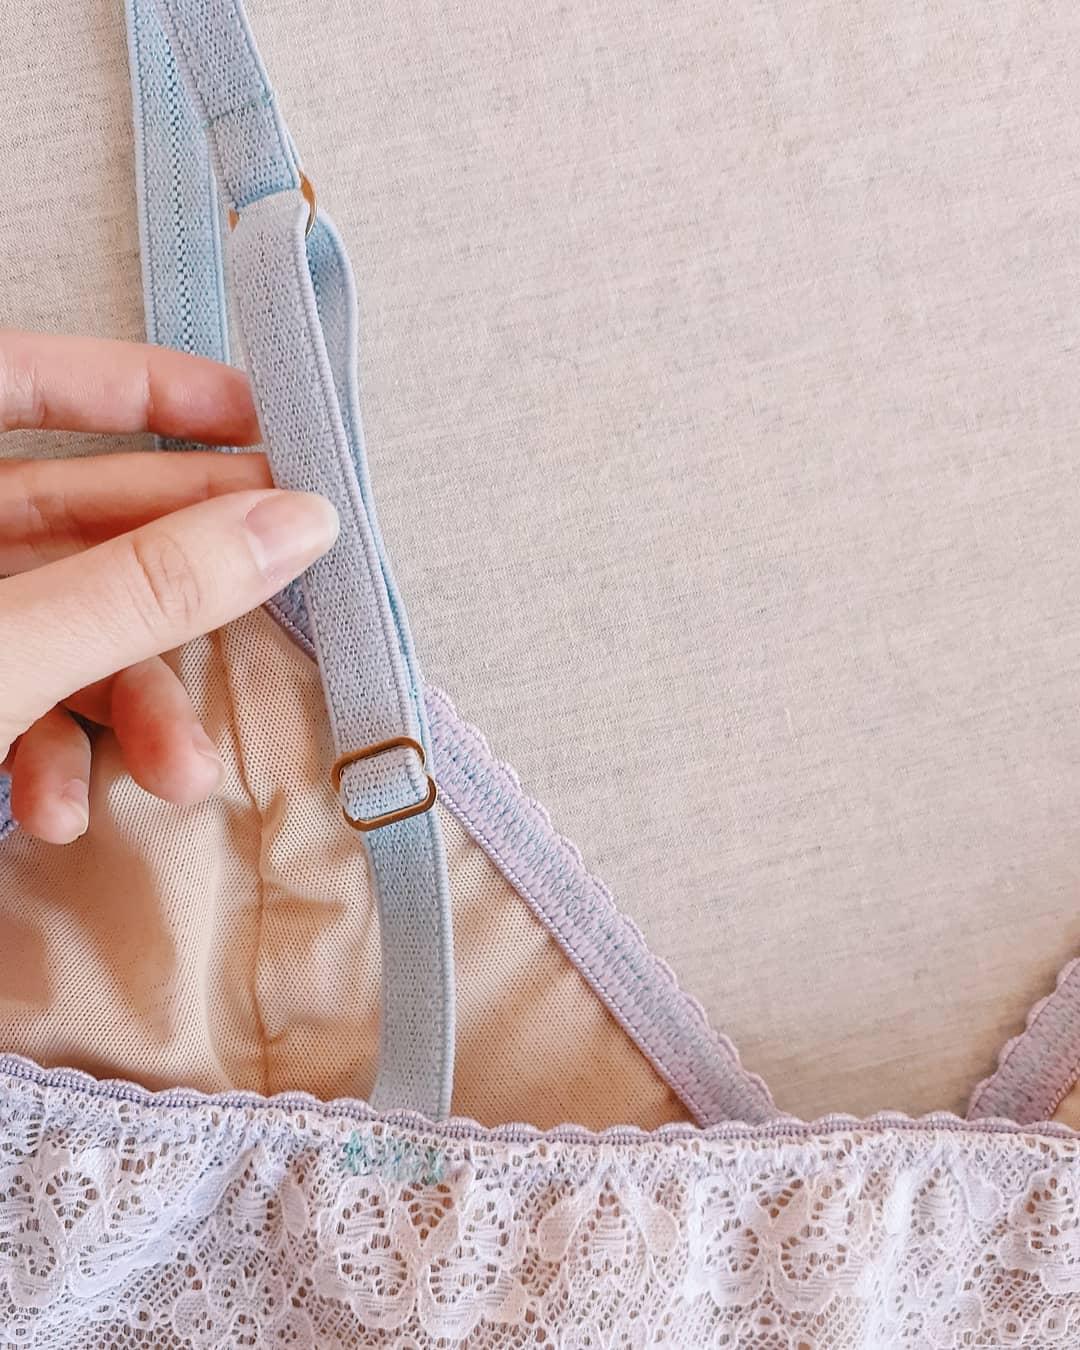
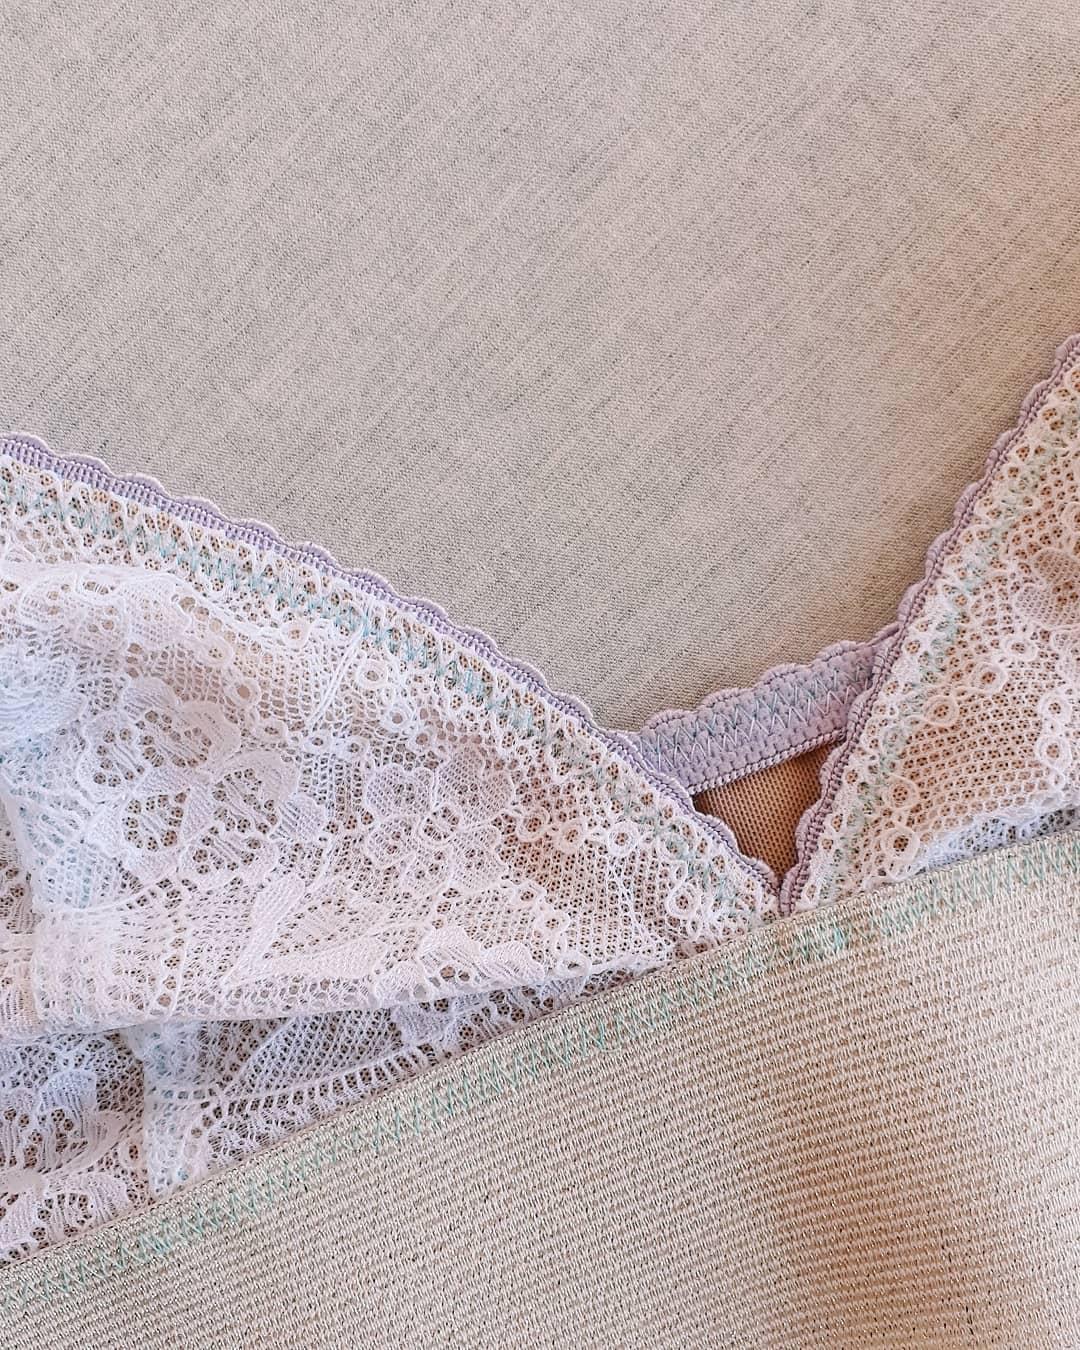
4. Lesson: Anatomy of a Bra: For this lesson, I want to get familiar with the components of a Bralette. Knowing how a bralette is constructed will help you tons in understanding how to sew it, what pieces are needed and what are those called... This will enable you to follow along sewing patterns easily by being in touch with all the terms. Remember that not all bralettes have to have all pieces mentioned. You'll see why in a bit. But first of all, what is a bralette? A bralette is a type of bra, its main characteristic is that it is lightly structured, having no underwires and less seams. This is exactly what holds the breasts Mostly they are separate, but in the case of sports bras or bandeaus, they sit it in the same single cup. The cup can have one or more seams, this is called Cut & Sew Cups. Or it could be a pre molded cup like the ones on a t-shirt bra, the latter are the most popular, but not the most supportive. Cut & sew cups offer more support, the more seams a cup has, the more support it offers using the seams to reinforce the bra structure. Contrary to pre molded cups where your breast needs to fit into an already shaped bra, that will not budge its shape. Think about your own experience with bras. For myself, molded full coverage bras tend to leave a gap in the upper cup. The band, Also known as bra frame or bra base goes around the ribcage, and is the responsible for bringing most of the support to the whole garment, and can be made of 1 or multiple pattern pieces. These components are the following. The under band, the wings, and the bridge. The underband is usually where cups are sewn into going all around the torso. The wings are attached to the side seam of the cups and go all the way to the back. And the bridge, also known as center panel or Gore, is in the center of the bra between the cups. This could be incorporated into the underband or cut as a separate piece. An example of a bralette that has all of the pieces as 1 would look like this. An example of a bralette with only the underband, no bridge and no wings would be a classic triangle style. An example of a bralette with undebrand and wings, but no bridge would be like this one. This is exactly what we will be sewing in this class - and an example of a bralette with an independent piece for the bridge would look something like this. Next, we have the straps and their function is to keep cups in place. Remember that the support must come from the band. They are placed and sewn to the apex of the cup. That's where underarm and neckline meet not to be confused with the bust apex, which is the fullest part of the bust. Usually it's explained that it's the nipple, but you might have a fuller breast at the bottom or top. So your fullest could not precisely land at the nipple. The straps then connect to the wings at the back. And there are two main styles of attachment to the wings. the first is the straight or square back attachment, that lands straight across the back and the other one is the Leotard or U-shaped attachment, named by the rounded shape it creates. Typically used for a larger sizes because the wings needs to be a bit wider Adjustable straps are usually divided in two sections, the front and the back strap - a good tip for larger sizes is to have the front strap with no stretch to help reduce the bouncing. And how would one create an adjustable strap? with the help of rings and sliders! This is hardwear to enable adjustments in straps Most probably you will have at least one ring and one slider per strap The ring is this circle shape and the slider, this eight-shaped piece - below in the class resources, you'll find a Pinterest board with lots of Bralette examples So you can see how different all these pieces can come together and create completely unique looks and feels. Let's move to the next lesson to learn about Underwear in the anatomy of a panty.
5. Lesson: Anatomy of Underwear: For this lesson, we're learning all about the components of underwear. So we get familiar with the terms and aspects we must keep in mind to sew our own lingerie. Panties or briefs are tailored to the bottom portion of the body. When designing or describing undies, 3 terms come to mind: Rise, coverage and leg cut. Rise is how high or low the waist band sits on the body. The highest rise is at the waist, although some shapewear can go as high as the ribcage below the underwire of the brand. The lowest rice can go down to the pubic bone. And between the two we have the mid rise, which usually seats on the hip bones, but can move a bit up or down depending on the style. Coverage refers to how much the bottom portion of the body is concealed by the garment. It can range from full coverage laying over the entire bottom, to no coverage as in a thong. Leg Cut refers to how high or low from the crotch the leg opening is placed. a high leg cut makes a wider leg opening, and a lower leg cut would land closer to the crotch, just like a boy short. Switching between these 3 aspects creates completely different styles when combined. In the realm of sewing, there are other terms we need to be familiar with to follow a sewing pattern. These are front, back, gusset and side seam. The front and the back are pretty self-explanatory, corresponding to where they go in the body. The Gusset is a piece joining together front with back at the crotch - usually comes in pairs, one for the outer main fabric view and another for the lining that goes inside touching our skin. The side seam can change in height, making the rise higher or lower. Although this aspect is not always present in all underwear such is the case of lace boyshorts where the joining seam moves to the Center front and center back, or string bikinis, or styles where cuts are made for extra interest. Now that we know the terms, characteristics and aspects to the anatomy of Bralette and Undies Let's move to the next lesson where we will learn all about tools and materials, used at lingerie sewing Below in the class resources, you'll find a Pinterest board filled with lingerie examples of the styles reviewed. - I highly recommend looking at lingerie either online or in real life and see how it is constructed, what components your favorite styles share, what fabrics are used. These will give you more information in what you are into and how can things be made. Obviously doing so with respect to other artist's work by not copying the whole thing exactly, but taking all the information in and using your brain like a blender to create something entirely your own. See you in the next lesson for all things, supplies and tools.
6. Lesson: Tools - Sewing Machine, Needles, Thread: For the next few lessons, we will learn about tools, supplies, and fabric, in deep detail In my opinion, it is paramount to have an understanding of which tools do what in order to sew our beautiful underwear. Most probably you've heard of some of these tools we'll review. Well some I didn't know until I was full into sewing lingerie. First off, we've got our regular pattern and drafting tools such as paper, could be tissue paper, tracing paper, or even bond paper. What it has to do is be a little bit sheer for us to be able to retrace. I am a huge fan of tissue paper to retrace. This is the same one used to wrap presents with So it is fairly inexpensive. Any sheer enough to let us see through - scissors for paper only, rulers, I love using these, the French curve, perfect to trace curves in arm holes, bottom knickers and anything rounded. A quilting ruler, perfect for seam allowances or draw really long straight lines while drafting. And a regular ruler to measure, Draw smaller straight lines on patterns, etcetera. Pencil, eraser and multiple markers or pen colors to add details, differentiate with colors the original lines from the alterations, and that sort of things. Sewing tools, fabric shears, which you'll only use for fabric. I have other additional scissors for trimmings and things that are not paper but not fabric either. Tape measure, sewing pins, sewing machine, making sure it has a zig zag stitch setting sewing machine needles and matching the thread. I wanted to center our attention in the last three items first. Sewing machine, needles and thread these play a pivotal part in a successful construction of all lingerie garments. Any machine will do as long as it has zig zag stitch setting. Now, there are two types of stitches. First, the regular zig zag stitch which looks like this, that travels through fabric alternating sides. I've encountered that most machines have this one as a given. Then there's another one called three-step zigzag stitch, which gives three tiny stitches to the right creating one zig and then to the left creating the zag. I've seen some machines that don't have this feature. I am mentioning it because some sew at home patterns state to sew with 3-step zig zag stitch But same results can be achieved with regular zigzag stitch. What is the difference between them? You might ask - the three-step zigzag stitch is a bit stretchier. But if you've got only the regular one, don't stress out, it will work perfectly too. Now needles, it is important to choose the correct needle for each project. Sometimes stitches will skip or fabric will pull. And more than it just being the sewing machine, most probably it will be the sum of many factors like the needle used, the stitch, and what type of fabric you're sewing. The main needles used in lingerie are jersey ballpoint. which has a slightly dull and rounded end, which slips between fibers and reduces the risk of snagging the fabric. Stretch needle with medium ballpoint and a special eye section and scarf shape to help prevent skipped stitches, in particular with highly elastic fabrics such as spandex / elastane. Microtex - with a particularly acute, slim point for easier piercing on fabric with a high thread count including silk, microfiber fabric, and anything slippery, stretchy, delicate. And the universal needle, an all purpose needle with slightly rounded point for a problem-free processing of many different types of material. Now, what makes them different? Because if you read the description, the only one that has a distinctive characteristic is the microtex with the the slim pointy end, The rest have slightly rounded points. So what makes them different? That is this scarf. We've seen this scarf in previous sewing classes, like the 101 class. But let me refresh your memory. The scarf is a small notch on the backside of the needle above the eye. This allows the bobbin to get real close to the needle and catch the thread properly once the needle enters below the machine. Now, different scarves are designed for different fabrics and that's what makes them different. that tiny notch at the back, plus the point will work in certain way with fabrics to result in less skipped stitches, and more even seams, with less pulled and ragged fabric, so you’ll get a better overall sewing experience. My go-to for lingerie is always the jersey ballpoint. I range between this size 70/09 or 80/11 or if I know it's bulky and my machine will have a hard time. I'll use a 90/14. I don't use thie stretch needle as much. I am more inclined for the ballpoint Jersey needle. But know, there are these options out there. Above all, the best tip I can give you is to test, swatch your selection of fabric plus thread, plus stitch plus needle. This will save you tons of heartache because that swatch moment is the moment where you get to mess it up. Notice if fabric gets snagged, if stitches are skipped and move your settings accordingly. In my experience, most issues are solved with settings and needles. So the best way to figure out what works for you and your machine is to test, swatch, move settings around. And this way, you'll develop more experience to which settings and combination of factors works for certain projects or fabrics. Lastly, about needle brands I have a singer sewing machine and most of my needles are singer. But I also really like the brand Schmetz If you have other needle preferences, I'm sure the too will work great. For thread, we've got a variety. And this is one of the last things I actually cared about when I started sewing But you'll see is a very valued information to have. My go-to threat is good old polyester. The beauty of polyester Is it has a bit of give. I don't want to say stretch because it doesn't stretch. But it has more, it is more resistant to stretching than cotton polyester is strong and durable and it generally has the largest Color Range. I love to work with the brand Gutermann, but any 100 percent polyester thread will work for lingerie. Now that I mentioned Gutermann one important thing must be noted. The classical spool you'll find in most craft stores is a Gutermann Sew-all, which is a MARA thread with tex 30 you may be wondering, who on earth are Tex and Mara, well, Tex is a sizing system for thread 1 tex equals one gram for every 100 meters of thread. So the finer the thread, the lower the number assigned and vice versa. On the other hand, MARA is just a name for micro core spur polyester thread typically used for construction and decorative stitching on apparel. There is another variety called TERA, which is slightly stronger, used for outdoor fabrics and upholstery in the world of lingerie some sewists like to use a Gutermann called Mara 120, which has a Tex 25, meaning it is finer than the Sew-all which has TEX 30. Now silk. Because it is more expensive and fancy. You want to use it for tailoring work and hand sewing or finishing details like decorative stitching on silk fabric, to get this super lux garment, I can perfectly imagine a lounge set of silk french knickers and a camisole with lace embroidery, that’s where you wanna use silk thread. Then we have cotton thread. I've never used it for garments The colors are more limited and I find this is more common for patchwork or quilting projects. Things that don't get as much strain or wear. Alright, now that we've learned about needles, thread and the stitches we will use in the sewing machine, Let's move onto the materials needed for sewing. I'm going to stop this lesson right here. So I'll see you on the next lesson to review fabrics and trims.
7. Lesson: Stretchy Fabric: For this second section of all things, tools, materials, and supplies, we will discuss fabric and trims, plus the recommended tools to cut, said fabrics and trims to achieve proper results. Choosing the correct fabric for each type of garment is very important. In my experience, there is no such thing as one fabric better than another for lingerie. I wanted to be clear on this because when I first started sewing lingerie, I was told only stretchy fabric would work on lingerie. And I shut my eyes to anything but, just like a horse with those blinkers, I would only care for spandex and stretching And that worked great for some bralettes and some undies but then I tried and sew an underwired bra and woah, was that a disaster! Before talking any further, I want you to think of all your bras and undies, Are they really all stretchy? Probably not, Cupped bras, for example, don't stretch when they are pre-molded. And the middle part of bras don't stretch at all when they have underwires. Even some bralettes can have non stretchable components. So I quickly realized that while completely stretchy materials work wonders for some styles or aspects, they don't work for all aspects all the time. A bustier for example, needs much more support, and structure, hence, it needs no stretch. The same that French knickers benefit from woven fabric that won't stretch with spandex. I am putting it out there so you won't fix your mind only on stretch materials. So my tip for you is to study your wardrobe. How are things made? And don't be afraid of one certain type of fabric nor think only stretch will work with all ingerie. Of course, there are a lot of nuances to lingerie fabric and multiple schools of, schools of thought. My advice is to try it. Don't marry certain information. See for yourself which fabric gives which results. That being said, since this is a beginner class for lingerie and we'll be doing a bralette and undies We will use stretch materials only. So what is stretch? Having a stretchy garment increases comfort while wearing it and moving in it because it can elongate with us. There are two ways to achieve stretch fabrics. The first one is mechanical stretch, meaning that the yarn is knitted by interlocking loops. These loops create a structure that stretches when pulled, even while using non stretchy yarns. This is created with just one strand of yarn knitting itself. Just like you would knit a scarf. These is called knit fabric. The other way to have a stretchy fabric is by adding spandex to a woven fabric. Woven fabric is considered a non stretchy fabric unless of course, they got spandex. Spandex, also known as elastane or by its commercial trade mark name Lycra was the very first artificial elastic fiber created. The beauty of it is it can be stretched and immediately bounce pack to its original shape. This is called recovery. Unlike a knit sweater with mechanical stretch only, That you wouldn't ever hang off to dry because once stretched it wouldn't bounce back to its original state. Spandex, is never used on its own, is often added in small amounts to fabric or yarn for stretch and comfort. It is also very easy to dye and it should never be bleached because it will break apart the fibers. I've found that when retailers lists fabric as Lycra, most of the times it is a blend of polyester with spandex, Approximately 80 to 20 percent respectively. So always check the composition in your fabric before buying. Stretch fabric has three very important aspects to consider. Recovery, direction and percentage of stretchiness. We've covered recovery, which is a capacity of stretchy fabric to bounce back to its original shape. Then next important characteristic is the direction in which it stretches. These divides into 2 categories. First, 2-way stretch, meaning it only stretches in one plane, typically width wise, perpendicular to the grain line and salvage. And the second one is 4-way stretch, going both up and down and side to side, meaning width wise and length wise. in most cases, sewing pattern instructions will specify whether you need 4-way or 2-way stretch. This also applies to understanding the DOGS, also known as Direction Of Greatest Stretch. In some garments designed to stretch, this is used to place the pattern pieces onto the fabric correctly. For example, in the case of band Wings, you want the greatest stretch to go from side to side because that's what will be stretching instead of up and down. Where no stretch is really needed. So on your fabric, once you test the stretch and know which side it stretches most, that's the direction in which your pattern arrows should be placed, parallel to the DOGS. We've learned what stretch, recovery and DOGS are. The last thing we need before moving onto the different types of fabric used for sewing lingerie is how to measure how stretchy certain fabric is. You'll just need a ruler and 2 sewing pins, Lay your fabric on your table and fold it width wise, which usually is the direction with the most stretch. A bit further from the salvage, Place, one of your sewing pins and 10 centimeters apart from it pin another. Your ruler should start exactly where the first pin is, with your hand hold that side and with the other pull the fabric in the opposite direction until you feel resistance, trying not to overstretch it. Take note of where the second pin lands on the ruler. The formula to find how much stretch a fabric has is the following: The amount of stretch you noted, divided by the original length multiplied by a 100 equals the stretch percentage. In this case, since the original length was 10 centimeters and it stretched out to 14 centimeters, then the amount of fabric stretch was four centimeters, which equals to 40 percent stretch. If a sewing project requires a four-way stretch, you can do this exercise width and length wise to find both percentages for each direction. Now that we know all about the stretch, Let's talk about different fabric types commonly used for lingerie In our next lesson.
8. Lesson: Material - Fabrics, Trims and Findings: The first fabric we’ll discuss is obviously lace, we’ll be focused on stretchy lace, lace with spandex, because there is also the non-strech variety of lace of course but we won’t think about that for now, when shopping, stretch it to make sure it will work or if you are buying online check the fiber content so it has spandex. Lace is divided into 2 categories. All over lace and galloon trimming lace. All over lace is the typical fabric that usually is a 150 centimeters wide. It can have either two or four way stratch and straight or scallopped selvedges. The other type is galloon lace or lace trim I've found both names used interchangeably online. online, my advice would be to check the width on these kind of laces, because if you want to use it for the main fabric for undies or bras I recommend going for 7 inches or wider in width, narrower will work great for details. The main characteristic of galloon Lace or Lace trim is its scalloped selvedge. Mesh is a type of fabric which is loosely woven, resulting in tiny holes being present throughout the fabric. for lingerie it is mostly made of nylon blended with spandex and it usually comes in 150 cm (60in) wide and 4 way stretch. I’ve also encountered 2 way stretch mesh but I haven’t had great results with it for bralettes or undies. I use mesh as a soft lining for bralettes, in the cup or as the main fabric for undies. Mesh can be identified by weight in GSM (grams per square meter) A higher number means a heavier fabric. A heavier fabric means a thicker fabric. Which brings me to the next type of fabric, which is power mesh, also known as power net. If the regular mesh I use for soft lining of bralettes cups is somewhere near a 100 GSM, then PowerMesh would be around 250 GSM. I use PowerMesh to reinforce certain areas for bralettes or sizes that will need more support, for example, the back band for larger sizes or to stabilize the bridge in case the main fabric is quite stretchy - Power mesh is still stretchy but less elastic so It is commonly used in form-fitting garments like shapewear too. Jersey, This is my favorite fabric for underwear when it's made of cotton. Jersey refers to the type of knit, not the fiber content. It has a right side and a wrong side Identical to knitting a sweater one side has knit stitch and the other has purl stitch. When cotton jersey is blended with spandex, it makes the softest, most breathable and comfy undies you’ll ever wear. I am a firm advocate of cotton gusset for undies, Even if the rest of the fabrics are polyester lace or anything else, when blended with spandex, it has 4-wy stretch. If it has only 2-way stretch, It's because of mechanical stretch due to the knit. I Recommend working with 4-way in lingerie. To wrap up the fabrics section of this lesson, I would like you to take a look at your lingerie drawer. Which fabrics are being used and where? Is everything stretchy? How is the design working? How many different fabrics are used in the same item? This will give you lots of knowledge and understanding on how to solve different aspects of a garment. Not only by knowing the theory, but also because you actually own a garment that was sewn with certain fabrics. Let's move to the section where we will learn about elastic and findings. Everything that is not the main fabric of lingerie. For this lesson, we'll learn about elastics, trims, and hardware. First off, what are trims and findings? Well, they are everything besides the main fabric. They could be elastic, labels, closures, and there is a subdivision for trims, which are all different materials like ribbons, narrow laces, appliques, sequins and the like. I wanted to start with elastic and finish with the hardware pieces. The first elastic I want to discuss is Picot Elastic. This is an elastic scalloped along one edge, from one side it has a plush / fuzzy quality to it and from the other this plain side, typical to any elastic. The plush side goes against our skin and the other one hidden inside the seam. The scalloped edge is meant to act as a detail while also giving stretch hiding the raw edge of the fabric. These elastics are usually lightweight, intended for undies, So they don't leave any visible panty line VPL but they also work great for armholes in bralettes. Fold Over Elastic is similar to a bias tape finishing, but with added elastic. It has a lighter knit down the middle to facilitate its folding. This goes over the raw edge of fabric to bind it while also giving stretch. It comes in various widths depending on the desired final look of the garment. I personally prefer to use this type of elastic for leg openings on undies, picot elastic for my taste is not as comfy as good ol’FOE. Plush elastic, also known as brushed back elastic. A less stretchy elastic than the two reviewed before, with an extra soft nap on one side and straight edges. I use this elastic to add structure to bralettes, especially for larger sizes. Again, the plush side goes against the skin and I’ve also found it as strap elastic, just making sure one side is soft and plush. The band elastic is usually one inch or wider also less stretchy than picot or fold over elastic. Since we are putting this as band support, we want an elastic a bit sturdier and wider. And the shoulder straps typically come with a satin finish on one side and a softer nap on the other. available in various widths ranging from 8mm to 19mm, used to secure shoulder straps to the garment. For decorative lace or trimming You can use galloon lace that is narrower to six inches. I’ve used for finishing hips on undies, or adding details to the cleavage of bras, depending on the width. I don't personally use them on their own because they sometimes lack strength. But it completely depends on the elastic. So I recommend trying them on their own or with fold-over elastic. rings and sliders, these is hardwear to enable adjustments in straps. Most probably you will have at least one ring and one slider per strap. Usually sizes match those of strap, ranging from 8mm to 19mm. Just make sure you're getting the one that matches your strap. Now that we've learned all about materials, that being fabric and trims, Let's have a final look at the rest of the tools. For the next lesson, we'll review the cuttings supplies
9. Lesson: Tools for Cutting: I wanted to discuss cutting supplies after fabrics and trims so you first know what we’ll be cutting so you understand why certain cutting tools are needed. When cutting lingerie I am team rotary cutter. Yes, you can cut anything with regular good ol’shears but I find that rotary cutters work magic with lingerie fabric because lingerue fabrics most commonly are more sheen, more delicate, more shifty, more slippery, and overall less stable. For this reason, rotary cutters work wonders because you don't need to lift the fabric in order to cut. Just like cutting pizza, fabric can lay completely flat while you cut around your pattern pieces with lots more precision than shears. Alongside rotary cutters, you'll be needing a self-healing cutting mat. Those vary in sizes. Mine is just 18 by 12 inches, but there are larger or smaller sizes. And lastly, to complete the perfect cutting Trinity, we have pattern weights - different from cutting with shears where we secure the pattern pieces onto the fabric with pins, I've found that rotary cutters work best with pattern weights. Why? Because again, you don't have to over manipulate your sheer and delicate fabric. You can just lay your fabric and place pattern pieces and pattern weights on top and get right into cutting. Pattern weights can be anything. Yes, you can buy them online, but I rather use random stuff. I have these pattern weights that were originally designed to wight fruit at markets, but they work perfect Perfect for me. Now that we are talking all about cutting supplies, may I remind you to please have scissors for paper to cut your pattern pieces. Shears exclusively for fabric and other scissors or shears to cut elastics, trims, Excess seam allowance and all those extra things. Now that we have all the theory down, I went to move onto more practical exercises, starting by printing the PDF sample guide to add the fabrics and trims. This way you can refer to it back and forth While you get more familiar with terms and supplies. you'll find the printable pages down at the resources section. For the next couple of lessons, I will show you how I sew the elastics we talked about so we can complete our own sample guide. Once we start sewing our main project, we will review these skills again So they really sink in. Also down at the resources section you’ll find suppliers I like to find all these beautiful materials.
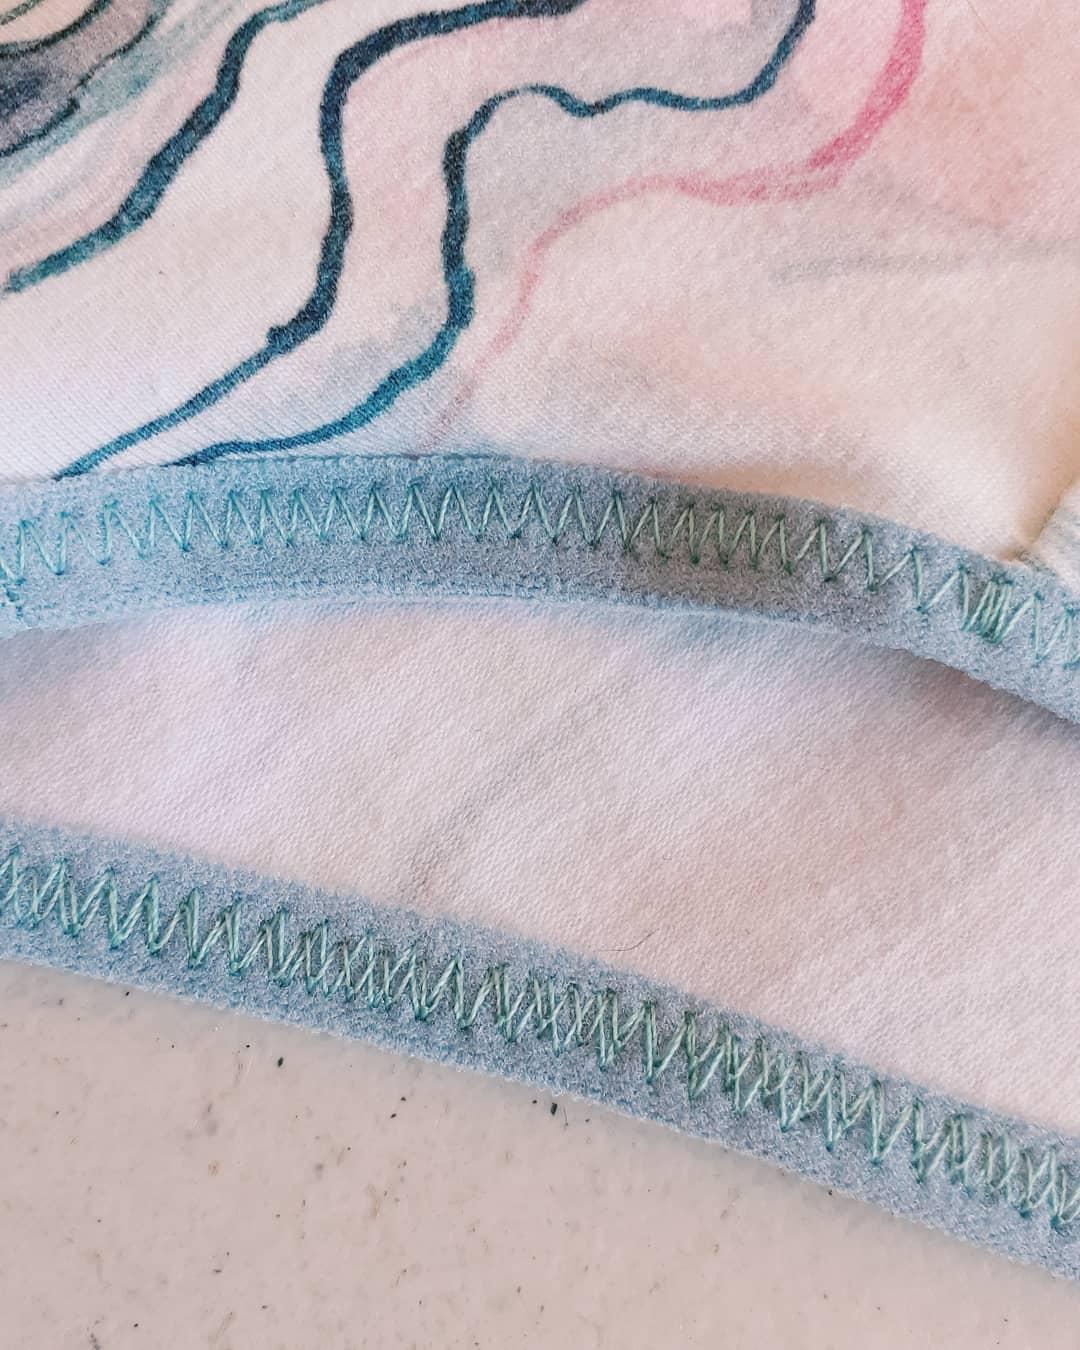
10. Exercise: Applying Stretch: In this lesson, we will learn how to attach the elastic we just reviewed onto fabric. additional to the technique, we will learn more about stretch, how to work with it and tips to develop an intuitive feel on how to handle it. But first, quick anecdote. I remember when I first started sewing lingerie, I took a pair of undies as homework to practice my construction, I couldn’t remember the teachings surrounding elastic so I thought “I’m just gonna stretch it because that way once I wear it, it will stretch with me” and off the machine came the tiniest most impossible shape there’s ever been for a leg opening, it was so, so small that I quickly remembered the opposite had to be done. I didn't have to stretch it until the elastic begged for peace this is all to say, that the more you stretch the elastic while sewing, the smaller and tighter the end result will be. With this lesson and exercises plus practice, practice, practice, you'll develop an intuitive sense of how much to stretch. So all your elastic are even and comfy in all your garments. Now, before we start sewing the elastic samples, let's organize what we'll use. I recommend you start by classifying your fabric with the PDF Sample Guide. This way you'll always know which is which. Secondly, for these exercises will use two pieces of fabric measuring 13 centimeters by 4 centimeters. I will be using jersey fabric with these two very obvious right or wrong side So you can understand the instructions. But I suggest you practice the picot elastic with the lace and the fold-over with the Jersey, just like we'll be sewing in the main project. To understand why we need zig zag stitch when sewing elastic or fabric with stretch I want to show you these examples. If i sew picot elastic, for example, with regular straight stitch, look at how limited the stretchiness of the elastic becomes. Whereas on its own is much more stretchy. So to keep our elastic super stretchy and our stitches from snapping, we need zig zag stitch In comparison, look how much the Elastic can stretch while having the zig zag stitches. Notice how the zigzags are closer together while resting and how separate they become once I apply force to stretch. Not all zigzag stitches stretch the same. Take a look at a longer stitch that is closer to resembling a straight line. It won't stretch that much. Both elastic are the same length. But just by changing the stitch settings, the stretchiness in both changes dramatically. Keep these in mind when selecting your stitches for a better stretchy results. And remember my tip! always test sample. All right, we'll start with one of the 13 by four centimeter rectangles with DOGS side to side and the picot elastic. Everything will be sewn with the zigzag so it can stretch properly. Picot elastic is sewn in a two-step method, meaning you have to sew one passing first and then the other to correctly attach the picot elastic to your fabric. To start, place the fabric with the right side facing up and the picot elastic on top of it with the fuzzy plush side facing up, the scalloped side towards the garment. And the straight edge matching the edge of the fabric. Align elastic with fabric by the straight edge and place it under the pressing foot. You want to Sew this zigzag stitch close to the scalloped edge without actually sewing on top of the scalop. Do a couple of stitches manually to select your zigzag's width and position and then give it a go. I always start sewing without applying any stretch. So I make sure all layers align correctly. After four or five stitches, I start to stretch, very lightly and gentle, the elastic Only! Not like this. I just want the elastic to lay perfectly flat against the fabric by stretching it very, very lightly. Take a look at the tape example. I am only stretching it this tiny bit. Those lines are 1 /8 of an inch apart. So you'll get a sense of how little I stretch my elastic. Remember that the more you stretch, the tighter it will be. I just want the flat elastic to prevent wobliness - and that it snuggly wrap around my body. It's super important to note that you will only stretch the elastic, never the fabric. I put my needle down every time I am about to readjust my layers so they stay put. Take a look at how close the stitches are to the scallop edge while still remaining on the fuzzy side. From tons of practice. I know that in order to sew 3/8 of an inch wide picot elastic like this one, I need to keep my straight edges aligned to the right side of my presser foot window. I recommend you sew very slowly and keep an eye on your needle and stitches to continuously make sure you are sewing close to the scallop without sewing onto it. Here we have the first passing from the right side of the main fabric and then the wrong side. look how close the zig zag stitch is to the scallop edge, and how it can stretch properly in the direction of greatest stretch without any snapping stitches. To start the second passing, we will fold the straight edge of the picot elastic to the wrong side of the main fabric. At the end, the right side, we'll have one visible zig zag stitch right here. Now, if we see it from the wrong side, we have all these excess fabric that we need to trim before doing the second passing. Because once folded, some excess fabric might peek outside and we want to keep the edge super clean, so we trim - close to the zig zag, carefully not to cut any stitch. Once trimmed We fold it towards the wrong side and place it with the right side of the main fabric facing up. I like to place it like this because of the visible top stitch. I want to have better control of the visible outcome by looking at it rather than seeing the wrong side. Make sure your needle is stitching 2/8 from the straight edge of the fabric without taking into account the scalloped edge, just the fabric to ensure that the zigzag stitch will properly Sew the picot elastic from the wrong side too. While sewing, try to flatten your fabric opposite to the scalloped edge, so fabric won't twist and cover the picot elastic. This takes a bit of practice. I would suggest you stop periodically to check from the wrong side if everything is being sewn correctly. From the right side, we get one visible passing of zigzag stitch, a couple eighths of an inch from the scallop edge and from the wrong side 2 passings of zigzag, one on top of the other, both stretching properly without snapping. At the end we have the first passing here in red, closer to the scalloped edge only visible from the wrong side, and the second passing in white, closer to the straight edge visible from both right and wrong side. Picot elastic sample, READY! For the fold-over sample, we'll use the remaining 13 by 4 centimeters rectangle and the elastic. In a close-up, we can perfectly see the middle of the elastic that will enable the folding. Fold-over elastic is sewn with two passings of stitches too. But contrary to the picot elastic, fold-over is sewn with the wrong side facing up first. You start by placing the elastic on top of the fabric. Aligning the middle of the elastic with the edge of the fabric. Then place both layers under the presser foot. And again, test the zigzag width and position. You want it to remain inside of the fold-over elastic, not reaching the fabric nor the middle of the elastic to the right. After four or five stitches, I like to start stretching just a tiny bit to make the elastic lay flat against the fabric. Remember to only stretch your elastic. Never stretch your fabric with it. Your fabric must lay there flat. Try doing it intuitively. Remember that the more you stretch, the tighter it will be, but you don't want it wobbly either. So just stretch to keep it nice and flat. I like to check periodically all my layers are placed by lifting the fold-over elastic and making sure the fabric edge is still aligned with the middle of the elastic. We have this look from the wrong side and this one from the right side. Just like we did before with the picot elastic, we will trim the excess fabric above this zigzag before doing the second passing. For the second passing, place the fabric with right side facing up and fold the elastic towards the main fabric, wrapping the raw edge of the fabric and the first passing of stitches with the elastic. Place your sample under the presser foot with the elastic folded and stitch with zig zag to close it - I keep my eye on the stitches to make sure they only sew inside of the elastic, not to the right outside of the layers nor the left inside the main fabric. Again, stretch it a little bit just to help the elastic lay flat and reach the fold - make sure the middle of the elastic is right at the edge so you get an even amount of elastic on the right and wrong side of the main fabric. Do it as slowly as you want to make sure you are sewing straight, catching all layers. Here we have the fold-over sample. Sorry it's crooked, but I got distracted by filming this side is super neat so let’s just stick with that, regardless, we can see that from the right side we only get one visible passing of zig zag, and from the wrong side we get two. Both stretching without snapping. That was just the first and most traditional method of applying FOE, I want to show you another method that works faster BUT it also requires a bit more practice. I’ll use the same sample but from the other edge. And it goes like this, right side of the main fabric facing up So we have more control over the result in the visible side. And pre-fold your elastic before placing it under the presser foot. Once it's under the presser foot, do a couple of stitches to secure the elastic is folded. Then put your needle down and lift the presser foot to introduce your fabric inside the fold. Try doing so close to the needle. So the next stitch catches the fabric, makes sure to hit the middle of the elastic with the raw edge of the fabric and close the fold to continue stitching. Stretching lightly only the elastic and making sure you're catching the same width of elastic from the top view and from the bottom. Not doing like this. You want even elastic on both sides. Continue until the end of this sample. We have the same result from the right side and different from the wrong side, both stretching correctly without snapping. All right, We've learned to sew picot elastic and fold-over elastic in 2 methods. Let's add these samples to our guide so we can refer to all these methods in the future. Now that we have our sample guide and we’ve learned to sew elastic and started getting comfortable with stretch, Let's dive into our final lesson before the main project, which is measurements. This will lead the way to select your size and begin working on the main prokect - our bralette and panty set.
11. Excercise: Measurements and Ease: For our final lesson before the main event, our bralette and undies set, I wanted to focus on taking proper measurements of your body. This will be super useful for any project you decide starting or even to buy better fitting lingerie in retail, it's very important to remember that sizes are not static. Life happens, bodies change, So do sizes, just keep that in mind. And let me tell you that if you start sewing your own lingerie or clothing overall, you'll find that you'll take your measurements frequently. I take mine every time I'm about to start on a new project, so don't fix your mind that you are at one certain size all the time. And most importantly, I have to mention, sizes are just numbers. They in no way have any say on your worth Please let's leave numbers to what they are, Numbers. An important thing to know about, before taking our measurements is: ease. - ease is the amount of room a garment allows the wearer beyond the measurements of their body. For example, my hips are 104 cm which equals to 41 inches all around. If, let’s say, a pair of pants were 41 inches at the hips and were made from woven fabric I wouldn’t be able to move because they would be too tight, most probably I wouldn’t be able to put them on in the first place so ease is added to the paper pattern by adding a few inches to the hips, So the pants for my size, for example, could be 44 inches at the hip when finished to fit my 41 inches hips. This is just an example and the ease added depends on the fit the designer is looking for, an example of this would be jeans, jeans have less ease than cargo pants. Sewing patterns for lingerie are usually closed fitted They have either no ease or negative ease. Of course, there are a lingerie items like French knickers or camisoles that work based on a looser fit. but for the bralette and undies shown in this course, which are close-fitted, this no-ease policy applies. And how would an item smaller than my measurements fit me? That’s where stretch comes in, by making a garment smaller with stretchy fabric once we put it on, our bodies apply resistance to the garment, stretching it while we wear it. This allows the garment to stay put and remain close fitted. So we want it a bit snug. Now, even in underwear, I prefer a loser fit, not to the point of underwear falling off But I don't like feeling that the the elastic are too tight. So fit is a super personal preference. That's why I always recommend to do samples before your actual final garment so you make sure the fit pleases you. And regarding fit, this is also why we are different sizes on different brands because all brands choose their preferred fit and how much ease they are going to add OR NOT to their garments. That being said, let's take our measurements, grab your tape measure and something to write your measurements on. And I also recommend you do this in front of a mirror. Ideally, you can take your measurements while only wearing underwear. But if you need to do it while wearing clothes make sure they are as lightweight as possible so there's no added bulk. And also trying to wear a bra that has no padding at all. In all measurements, make sure that tape measure is snug to the body. You don't want it super tight or super loose - my tip is to hold it as comfy as you would like your garments to fit, you want a flat tape against your body for more accurate results. A very important thing to notice at all times is the tape to be parallel to the ground. You don't want it straight at the front but hanging below at the back. And my MOST important tip for this section is to take a deep breath, close your eyes, and let it all out, exactly at that point adjust your tape And that's the measurement you should consider. I've found that when measuring myself and others, we tend to change our posture. Tuck the tummy in and get these super stiff posture that will only modify your actual garments. By doing these quick breathing exercise We are relaxing the body and allowing it to be true to itself so we get proper measurements. So let's start from the very beginning. Bust - wrap the tape around your fullest bust while keeping the tape parallel, snug to your body and doing your breath work. Take note of your measurement. The waist. Put your hands on your waist and stop for a second. This is a great way to find your natural waist intuitively, some instructions suggest the waist is above the belly button But how does one accurately know how far to go above the belly button To know if that's the waist. For me, That's a bit confusing and it leaves a lot of room for misinterpretation So by doing it intuitively, we are making sure we are landing on our actual waist. Repeat parallel to the ground, Snug flat measure, and breath work. Hips - place the tape measure on the fullest part of your bottom. This is much easier by also looking to our side in a mirror. Some could have a more prominent back While some could have a more prominent front, whichever, makes sure to place it in the fullest. Take note of your measurement. Remember parallel, snug and breath work. Ribcage. Bring the tape measure to your rib-cage. This is below your bust, most probably most probably right where your bra underwires rests. Repeat Parallel tape measure, snug to your body and your breath work. Chest circumference. These measurement is taken above the breast tissue under the armpit. For these occasion, that tape measure will not be parallel to the ground, will most probably fall a bit at the back. This is correct and you can take note of that measurement. Remember, parallel as much as you can. snug to your body, and breath work. Once you have all those measurements written down, we are ready to select the size to start our main project. Here is that size chart for both bralette and undies, If you are between sizes, I recommend sizing down. Choose your size and I'll see you for our next lesson so we can start with the main project together. Are you excited to start sewing? I know I am!
12. Class Project Intro: The time has come to dive into sewing our very own lingerie set. we'll be creating on bralette and its undies. applying the skills we've just learned like cutting precisely our pattern pieces onto delicate fabric. Assembling both items using the proper names for each piece and process, applying an even amount of stretch throughout both items, PLUS some new skills like assembling a strap with its rings and sliders. Constructing the garment with enclosed seams, when to use the straight or zig zag stitch and adding seam allowances depending on which elastic you chose. By finishing this class project, you will end up with two pieces like these Plus the knowledge of how to work with basic lingerie sewing patterns to sew your own bralettes and undies which will be useful for many more projects or different lingerie patterns, since you’ll be equipped with solid fundamentals to practice more and more. That being said, let's start by printing the PDF sewing pattern. You'll find it below in the class project section You'll notice that the file comes in color. If you wish to print it in color, I think you'll find it easier to follow your sizes line. But if you wish to print them in grayscale, each size has a distinct type of line too. about printing, there are two options. The first is to print at home with a US letter format. These pages have an inner rectangle where the pattern pieces are put inside. If you have A4 or US letter size paper doesn't matter, Both will work. Just remember to make sure not to print to scale. You can print the page with this two inches square, measure it in real life, and if it is true to size, you are ready to print the rest of the pattern. The second option is a copy shop file. You don't have to assemble the individual pages and the whole canvas is 45, 55 centimeters, whichever you prefer, have your pattern ready alongside the following tracing tools. To assemble the pattern, you just need to follow the lines from the inner rectangle to paste onto the other. So you end up with something like this on both the bralette pattern and the undies pattern. The pattern pieces you'll find for the bralette are the side seam cup, the center front cup, and the band wing. They are grouped by sizes from one to five and from six to 12. For the undies, you'll find the front, the back, and the Gusset also grouped from 1 to 11. Let's jump to the next lesson. So we start working on our main project. We will trace our pattern pieces, add seam allowances and cut our fabric.
13. Class Project: Preparing Pattern & Cutting: In this lesson, we will prepare our pattern pieces and our fabric to cut it. While you can always work with your pattern pieces directly from the printed version I encourage you to retrace your seleced size. This is because if you wish to do modifications or a completely different size for a loved one, you would have to print all over again the whole pattern, while retracing gives you infinite opportunities to use the one you already printed and assemble. To make tracing easier, That's why we chose the tracing paper or anything that is see-through. To Retrace, just place the sheer paper on top of the pattern and with the help of a ruler, trace the lines from your size. I like to do it with a color pen So I then add seam allowances with pencil in order to differentiate the lines - A great tip I can give you is to retrace on a window, This will make the lines even more visible and easier for you to retrace. Remember to trace every notch and add the information to each piece so there won't be any confusion in the future to which is which. And it's important to leave enough room between pieces to be able to add seam allowances. All right. Once we have each pattern piece traced again on the sheer paper, we're adding seam allowances. I usually hand out all patterns with seam allowances included And so does the majority of independent brands, But I thought this was a great opportunity for you to further understand that in lingerie, not all edges get the full seam allowance treatment. For instance, in the case of the bralette we will sew for this class, all edges are going to be finished with picot elastic. Contrary to the undies, where edges will be finished by fold over elastic. These two elastics have different needs for seam allowance. Picot needs a seam allowance of wherever it is its width, While foldover elastic needs no seam allowances because it wraps around the fabric. In this lesson, you'll practice adding seam allowances for garments with picot and fold overelastic because I want you to have this skill of adding seam allowances in case you decide to Sew undies with picot elastic and a bralette with fold-over elastic. Just the opposite of what we're doing today. To add seam allowance we need to keep two things in mind. The first is where we need to have them. In this case, we need seam allowances all round the whole bralette pattern pieces for the picot elastic, but we don't need seam allowance for the leg openings in the undies, for example. Because they will be finished with fold-over elastic. Contrary to the side seam and Gusset unions, where we DO need seam allowances. So first, go over your pattern pieces and decide which elastic finishing you want to use in order to know where to add or edit seam allowances. Secondly, we need to know how much to add In the pattern pieces I specified ⅜” because that's how I feel most comfortable sewing in the machine But it could be 2/8 or half an inch. That depends on the pattern brand - In this class, a seam allowance of ⅜” will be added to the union seams, like side seams and cup seams. But in the case of the picot elastic finishing, the seam allowance must correspond to its width. So we need to measure the picot from straight edge, to right where the scallop starts, to know how much we'll be adding. In these case, it is three-eighths of an inch too. - So once we sew the first passing and then fold to the wrong side, we get this scalloped detail right on the edge of the actual pattern piece. You'll need a ruler to add seam allowances. I love to add them with my quilting ruler because you just need to position the three-eighths of an inch mark from the ruler on top of the pattern Pieces line where you’ll add the seam allowance and just draw a new line. Since this quilting ruler has every eighth of an inch marked throughout the whole 2 inches It's ideal to add any width of seam allowance. In the case of curves, you just need to shift the ruler following the original line and trace multiple straight lines. It doesn't matter if it is irregular. We can just refine the curve at the end with a marker free handedly, or with the help of a French curve. If you don't have a quilting ruler or a French curve, do not fret, Same results can be achieved with a regular ruler. By positioning your ruler on top of the original pattern line, choose any number. In this case I chose 8, and from there just count 3/8. And that's where you'll add your seam allowance guidelines. Have as many as you like. you can free handedly fill in the middle or add many many tiny lines to create more of a line. It is very important to prolong the notch lines to the edge of the seam allowance line. Because once we cut into the fabric, you want to go to your notches inside of this seam allowance. Going any further inside of the original line, will only mean you're cutting into the main piece, creating a hole. Once you have the entire pieces with the seam allowances added to where it corresponds, you are ready to cut the paper pattern pieces from the external line. That means the pattern pieces with the added seam allowance. So you can then cut into your fabric. Grab your fabric to cut the paper pattern pieces onto it. I have a printed 4-way stretch cotton jersey for the main fabric of the undies. Plus a pink cotton jersey with only mechanical stretch, meaning two-way stretch for the Gusset lining. I am doing it in pink So you can see which layer is which when we assemble the Gusset and this will be finished with these blue fold-over elastic. For the bralette, I have this white lace for the main fabric, a lilac picot elastic and a blue plush elastic for the straps I will use this beige mesh with a 100 grams per square meter for the cup lining and some power mesh as reinforcement for the band wings. I suggest you use power mesh from size 5 and on. And lastly, my band elastic to work as an under band. Set aside their fabrics for the undies because we will first cut everything for the bralette. According to the instructions, we need to cut the following pieces. For the center front cup, two pieces of main lace fabric, same with sides seem cup plus two pieces of mesh lining for the center front and the side seam cups and for the band Wings, we just need to get one piece of lace fabric, placing the pattern piece on the fold, and another with the power mesh. But again, the power mesh is optional. Set aside your elastic and let's start by cutting into our lace. I am cutting with my rotary cutter, my self-healing mat and my pattern weights instead of regular shears to manipulate my fabric as little as possible. Notice how the dogs are indicated in the pattern. So you'll place your piece onto the fabric properly. I check the direction of greatest stretch in my lace fabric and it goes side to side. - Because we need two fabrics of each cup and the band wing on fold, I’ll fold my fabric to then place my paper pattern pieces so in just one cut I’ll get my two fabric cuts. When working with lace, it is important to place your paper pattern pieces right where the scallop is about to start. Try not to place it at the edge of the scallop, but a bit further from the edge. These will ensure you won't have any holes or less eam allowance in your fabric piece. Place your paper pattern piece onto your lace. Have a pattern weight on top and cut your piece - in a close-up, You can notice these tiny threads that stopped the fabric from separating, Those are micro spandex threads - do not pull them to break them That will only cause your fabric to pucker. Do another passing with your rotary cutter to cut them instead. Always remember to cut the notches in all pieces, staying inside the seam allowance, never cutting into the main pattern piece. This is how it looks when opened if we cut on fold like the instructions states. Cut the remaining paper pattern pieces on the lace to have all main fabric pieces ready. Remember to place them according to the DOGS. Never pull the spandex to break it, cutt all notches and continue with the mesh fabric for the lining. again, test which is the direction of greatest stretch and cut your pieces in that direction - by folding the fabric in half you get both pieces needed in one single cutting motion. For the band wing reinforcement place your paper pattern piece on fold. Continue with the paper pattern pieces for the undies. Remember to find the DOGS and place your patterns correctly with the indicated direction. Both undies, front and back pieces require to be placed on fold For the gusset you’ll only need one main fabric piece and one lining piece, but as you can see, while the paper pattern doesn’t indicate the DOGS, my fabric has them right now side to side This is for the following reason: the gusset piece is so small that even if I used 2 way stretch fabric for it, the final garment would still turn out perfect, because it is not an area that gets much strain or need for stretchiness. The main fabric which has four-way stretch, It's made of 93% cotton and 7% spandex and will be visible from the outside. But for the Gusset lining, visible from the inside only, I wanted to use a 100 percent cotton jersey with no spandex at all. Meaning that these pink fabric only has mechanical stretch, meaning 2-way stretch. So if you wish to have a lining with cotton only like me, you have to position the DOGS going up and down in the lining. This way, while wearing it, you won't need to elongate side-to-side, but a bit of stretchiness lengthwise will be more comfortable. Since the main fabric has four-way stretch You can place it in either direction. But in the case of a two-way stretch for the lining, always choose to have your dogs length wise. Cut both layers accordingly and don't forget to cut the notches on each. Alright, once you have the following pieces cut, set aside everything corresponding to the undies, and just leave the bralette pieces on your table. To assemble your bralette, my tip would be to lay everything just like it will be sewn before moving on to the sewing machine. First, all the mesh lining pieces with the wrong side facing up. That is this, the side want your body to touch facing the table. On top of the mesh, place your main lace fabric with the right side facing up. Once you have this setup, you are ready to start sewing. I am going to stop this lesson right here so we can start a new one to sew our bralette, join me in the next lesson alongside your sewing machine, to assemble our garment.
14. Class Project: Sewing the Bralette part. 1: All right, In this lesson we will assemble And sew our first piece of this set, which will be the bralette. In the previous lesson, we left this setup ready. So now I am going to set the back wing aside for a bit so we can start by sewing the cups. The first step is matching both lace cups with right sides together. This means the side that is facing up right now, which will be visible from the outside, To match the pieces together correctly, we will make use of the notches. First, matching the notches in the middle of each cup and securing with pins on each side of it. We then move to one corner. In this case, I moved towards the cup apex and match it. Then filling the middle with more sewing pins. I like to place the pins in this direction to facilitate the movement when I remove them before they reach the needle in the sewing machine. Lastly, we move to the opposite corner and again, match it, secure with pins and fill in the middle. An important thing to consider while matching the curves is that you might need to stretch them a bit so they match. This is completely normal and correct and it is because of the curve to create the volume. Once you have one cup, repeat with the other, right sides together match the notches in the middle and secure them with pins. Then secure one corner and fill in the middle. Repeat with the other corner. And now you have 2 lace cups ready. Before we move to the sewing machine, I suggest you pin all pieces while at the table, so now we will assemble the mesh lining cups. If we stated in the previous lesson that the side facing the table, is the right side that will touch our body with the mesh lining fabric. Then we need to lift both, to match them right sides together. And that's how we will pin them. Repeat the same skill of matching notches. Securing them with pins, and fill in the middle. Make sure all edges are aligned, not having one laying lower than the other. We now have two cups of lace and two, cups of mesh lining. And we're sewing the curved side We have pinned Now, I want to share with you what some of my students have done in workshops to either feel more confident while sewing or to do so faster. The option to sewing faster is: at this point, pinning everything together. Because these two cups will end up sewn together. You can sew everything in one passing instead of two passings like I like to do. I don't recommend you do this one passing option if you're pretty new to sewing sherre delicate fabrics, But if you feel more confident, you can try this method. Since each cup is pin separately, by overlapping them, you can pin them together and know for sure all four layers will be aligned. Since all edges are already perfectly aligned on each set and just do one passing. The other option to feel more confident is to baste stitch by hand each set. So while sewing in the machine, you don't depend entirely on the pins and the fabrics staying in place. The method I wanted to show you here is like a hybrid of both with two passings. I sew each set separately with a basting stitch at two eighths of an inch seam allowance. That means closer to the edge than our actual seam allowance of three-eighths. And then I bring them together to sew the four layers at three-eighths of an inch, this ensures aligned edges every single time and less shifty fabric while at the machine So I have to struggle less, resulting in even cups with enclosed seems. Now that we have all cups assembled, we are ready to move on to the sewing machine. We will sew each cup set with straight stitch. And why is that? If we learned that zig zag stitch is the one to stretch? Well, in my experience, garments sewn entirely with zigzag stitch tend to have less structure. So I found that having strategic straight stitches creates much more durable garments. At the end of the day If what we want from the cup is support and shape, then the straight stitch will help us in that by reducing stretchiness in that area. Alright, at the sewing machine, I will sew with blue thread So you can see my stitches, but I recommend you do your final garment with matching thread to your fabric. Place your fabric edge at two eighths of an inch from your needle. In my presser food, I know that distance starts from the edge of the clear window. Find something on your machine that can be used as a guide or a tape guide to follow. I always do my first couple of stitches manually, leave threads at the back and my needle down before removing my pins, back tack And sew - I don't recommend you sew with íns because that could cause your needles to break. But look how close to the needle I remove my pins. This is to ensure that my aligned edges will be aligned still when reaching the needle. Towards the end, my top layer shifted and unaligned from the other layer. In this case, I put my needle down, lift my presser foot, and readjust, just helping with my fingers for both layers to arrive together and align at the needle. Don't be afraid to stop and just verify all edges are sown and aligned. There are no holes or skipped stitches, and it still is a bit stretchy. This is what you are looking for. So review your stitches and seams - we repeat the exact same with the other lace cup and with the mesh lining cups, straight stitch at two eighths of an inch, removing pins before reaching the needle and making sure you don't have any edge folded or crooked. I like opening the seems to verify there are no holes or wrinkles before continuing to match lace cups with mesh cups. Once we have the four sets of cups ready, we can match them together too. So to place all layers correctly, you need to have them in the following order. First, the mesh lining cup touching he table with raw seam out and the side seam cup facing up On top of it, the lace cup, both side seam cups must be touching with the wrong sides together. Repeat for the other cup. Then we align edges, match notches and then corners to fill in the middle. Let me show you a close up too. once you have each cup with main lace and mesh lining pin together, we are ready to sew again with straight stitch at the curve, but this time at three-eighths of an inch seam allowance. This new passing of stitches we will sew, will result further from the edge than the first passing. Meaning over here. Let's now move to the machine. I like to place the cups in the machine by making the lace the bottom layer. This is because it's less shifty than the mesh, so less probability of the machine swallowing the fabric at the bobbin align your fabric edge to the three-eighths of an inch mark in your machine. As you can see, I lightly stretch my curve to ensure no puckering or wrinkles are created. Again, notice how close to reaching the needle, I remove my pins. Here we can see the two rows of stitching at two eighths of an inch and three-eighths of an inch respectively. Just like we took them to the machine. I'll return them to the table with lace layers facing up. For the fun part, we get to open the gaps and see the raw edges of fabric enclosed in the cup with both lining and main fabric sewn together. Make sure it has no holes or puckering. With our cups ready, Let's join the band wing together with the cups. The cups needs to be placed at the table with the lace right side facing up. At this point, your band Wings must be placed in the following order. First, the power mesh lining with right side facing towards the table. On top of it, the lace layer with right side facing up. Then we need the lace band wing right sides together with the lace cups, secure both sides, seams with a temporary pin and then place the whole thing on top of the remaining power mesh band wings. These will also result in enclosed seems at both sides seams pin the four layers together, aligning all edges and corners. You should have the band Wings layer as the outer layer and the cup layers together inside. I like to pin one corner then the other and then pin the middle. But add as many pins as you need to feel confident in the machine. We will sew with straight stitch at three-eighths of an inch, repeat on the other side seam. In the case of not wanting the power mesh reinforcement, you only need to place the lace band wing on top of the cups right sides together. You are just not adding the power mesh layer at the bottom. Let's move to the sewing machine. First, let's review the finishing with no power mesh. We sew all three layers with straight stitch at three-eighths of an inch from the edge. Remember to do your first couple of stitches manually and remove pins before reaching the needle. Once sewn open the seam, we have the exposed raw edges of all layers. So to give you a nice finishing, we are doing an additional stitch, similar to a flat felled seam. First, trim down the lace layers. So the cup mesh lining is longer. Then finger press all layers towards the band wing and do another passing of straight stitch close to the edge of the mesh lining. This way you have no raw edges exposed. Instead, you have a neat seam finishing. Threads are very visible for being blue but I suggest you match your thread to your fabric for seemingly invisible stitches. From the inside, I would still trim the excess mesh fabric on this side. In the case of the finishing with the power mesh reinforcement, you just need to sew with straight stitch at three-eighths of an inch, all four layers of fabric. So you get enclosed, seems like these ones. The raw edges of fabric of all layers stay hidden inside. The following step is adding the picot elastic to cleavage and all under arm / back edge. I'm going to stop this lesson right here. So we can start a brand new lesson to apply picot elastic and finish our bralette.
15. Class Project: Sewing the Bralette part. 2: In this lesson, we will finish the braleyte by adding elastics and shoulder straps. As we learned earlier, we need to place the elastic on top of the right side of the garment, aligning straight edges with the scallop edge towards the main garment and the soft nap facing up. It is a good idea to place the elastic about one centimeter above from where we are planning to start sewing. In this case, the cup apex, to facilitate the starting of the stitch in the machine. Remember picot elastic is a to passing elastic. I suggest you do the first passing on all pieces first. That is both cups at the cleavage and the under arm plus back So you can use the same stitch settings for all first passings. This is so you don't go back and forth every time switching settings, before you add the picot to the underarm and backside, signal with pins the notches on the back side that indicates the position of the straps, leave enough room for the elastic to be sewn. Let me remind you the key points of sewing elastic So we can move on to the sewing machine. Here you can see I have this soft nap side facing up and my edges are aligned. This is the moment to switch your settings to zig zag and choose settings that allow you to sew very close to the scalloped edge while remaining on top of the plush fuzzy area. Remember to start without stretching at all. After a few stitches, we can begin to slightly stretch our picot elastic. Remember to only stretch the elastic, never the fabric. You just want a very flat elastic against the fabric. Make sure that all layers are aligned by regularly stopping to check. At the end, Leave the elastic from this side a bit longer too, about one centimeter. This is our first passing of applied picot elastic to one cleavage edge of one cup with both main fabric and lining sewn properly. In this example, we can see how a scallop edge from the white lace is peeking out. To fix that, That's why we trim. After sewing the first passing, trim the excess fabric above the zig zag. While I get the first passing on the remaining cup and underarms done, I wanted to talk about why I don't cut my elastic before applying them. And that is because it usually is either too short or too long, meaning it ends up being too tight or worse, I end up wasting elastic length. So I much rather sew with the whole elastic hanging than pre-cutting. This way, I always get the elastic to the perfect length and stretchiness with the additional centimeter at the beginning and end of the elastic. To wrap up the first passing of picot elastic, I wanted to show you how I handle the elastic in the under arm curve. I start as always, without stretching for the first few stitches. And then I stretch lightly while also stopping frequently to guide the elastic into the curve. I also help the curve by pulling the fabric very, very lightly to the left with my left hand. All these motions are super soft and light. You want to create flowy curves. When the curve gets a bit steep, I put my needle down to secure all the layers, lift my presser foot and readjust the garment to meet the curve. With practice, you'll get a sense of how to follow curves intuitively. So they flow naturally. When reaching the side seems that have more bulk, Help your machine by sewing slowly and oulling a bit from the back. Continue all the way to the other cup apex. And remember to leave one extra centimeter of elastic at that point. Trimming the excess fabric on the cleavage under arm and back, So we can move forward to the second passing by folding the elastic to the wrong side. Let's begin with the under arm and back elastic for the second passing. Remember that at this point we want the right side of the fabric facing up and the wrong side of the elastic facing down towards the machine. We want the edge of the main fabric at two eighths of an inch from the needle. Do not take into account the pico elastic scalloped edge. This way you get a zig zag stitch closer to the straight edge of the elastic from the wrong side. Remember to slightly pull your elastic so it lays completely flat. We wanted to see the right side of the garment while sewing these visible top stitch So we ensure it is pretty. careful here, due to the bulkiness of the side seams. Sew very slowly and carefully and if needed, pull your fabric from the back Super, super gentle to help the machine make the fabric flow to the back. Continue by doing the second passing in the cleavage, overlapping the picot elastic from the cleavage on top of the elastic from the underarm. This is where you most want to start with the first couple of stitches manually to help your machine start the stitches. If needed, pull your fabric gently to help it flow to the back. Continue sewing till the end of the cleavage. Repeat with the other cup. Once the picot elastic is fully sewn with its two passing on each cup and throughout all the back from cup apex to cup apex, We need to overlap the cleavage at the bottom to close the loop. So we can then attach the under band elastic. You only want it to overlap the elastic on top of each other diagonally to maintain the V neck cleavage. This will be secured with one quick passing of straight stitch while at the machine. Sew with three-eighths of an inch seam allowance, I like to start behind the overlapping elastic to ensure the elastics will be sewn from there very start. And I remove the pin as close to the needle as I can to ensure the overlapping won't shift or move. If you rather do this by hand, you can do so. We just need the overlapping to close the loop so we can apply the wide band elastic for the underband more easily. The next step is to add the wideband elastic for the underband - in your PDF pattern, you can find the following chart with the length to cut of elastic for each size. In my case, doing the size five, I will cut 32 inches. We also need to close these band elastic loop by sewing the two ends with right sides together and pin in place. Make sure they are aligned. So we can sew them with a straight line with half an inch of seam allowance It is of the utmost importance to back tack at the beginning and end of the band elastic to achieve a nice finishing. Open the seams and top stitch each side with a straight stitch, back tack beginning and end and trim the excess fabric. Repeat on the other seam allowance - with a closed loop ready I am placing the seam on one side, so it is not that visible from the center front or center back. Taking the seam on your right hand. Fold with your left hand to the exact middle. And then mark it with a pin. Then join the pin with the seam in the Center Front, and pin the new sides. This creates 4 cardinal points in the loop, so we have 2 side seams, one center front in yellow and one center back in white. This helps us in evenly attaching the band elastic to the cups and back wings by matching the four cardinal points to the garment. We want the wideband elastic to be on the outside, concealing the raw fabric edges of lace and mesh. Grab your V neck point at the cups, and pin it to the elastic, matching it with the yellow center front pin Try to overlap the band elastic to the garment by three-eighths of an inch, which is our usual seam allowance. Repeat, matching the band elastic to the cups at the side seams on each side. And then match the white center back pin. You'll start noticing that the band elastic is smaller than the garment. This is correct. and this is done to achieve a snug underband to support the cups - once worn, the elastic, band and cups will stretch and snuggly fit your body. Fill in the rest of the under band elastic with pins to the garment to secure it, stretch it a bit to make the under band fit into the garment. Have as many pins as you feel confident to Sew at the machine. I also switched the pins that signal the strap attachment from the wrong side to the right side. I suggest you that too, for better visibility of those pins. I tend to start pinning the under band elastic to the back of the garment, And then the cups, because the back is super straight and the cups are a bit more tricky due to the volume created. Once we are sewing at the machine, we will stretch the band elastic while sewing so it reaches the fabric of the garment. The stretch will be gentle, but just so you know. And we will do the passing with the right side of the wide band elastic facing up. This is to make sure that the visible side is being sewn beautifully. When the whole garment is pin to the elastic underband, We are ready to go to the sewing machine. My tip is to start sewing at the side seam from the band elastic, never at the center front or center back, Because since we are doing a back tack at the beginning and end, that stitch is heavier, therefore more visible. So we don't want it right at the center. Place your elastic at two eighths of an inch from the needle. Sew it is closer to the elastic edge for a better looking finishing. Remember to sew this with a zig zag stitch too. Remove your pin, and start sewing with your back tack. Do not stretch until at least five or six stitches are done. Then you can start to gently stretch. You only need to stretch, So the fabric between the needle and your closest pin lays flat. You'll start noticing not much stretching is needed. Careful with the bulkier areas, like this side seems, the overlapped center front and the cup seems. Remember these are areas better sewn slowly. I suggest you periodically put your needle down to re-adjust the band and elastic so it is always in a straight line with your needle and presser foot. Try as much as you can to trust your gut and intuition while sewing elastic, ultimately that is the best skill you can develop when sewing lingerie, to get even and comfy elastic in all your garments without overstretching or with those wavy loose elastics - Continue throughout the whole underband loop And when you reach the beginning of the zigzag stitch, overlap a few stitches and back tack. Check all around. If everything is sewn, you don't want any holes or puckering in your garment. This is a great time to try it on and see how it is coming along before adding the shoulder straps. In the next step. For the shoulder straps, we need two pieces of 20 centimeters and two pieces of 30 centimeters for a total of four straps. I chose plush elastic for the straps. As we talked earlier, plush elastic, is a kind of strap with an extra soft, fuzzy nap on one side. I didn't want the sheen from the regular straps, So I went with this one. And we will also use two rings and two sliders matching the straps in width. In this case, they are one centimeter wide. The shorter ones are for the front straps. And the longer ones are the back adjustable straps. Grabbing the front straps and place them in the cup apex right side facing up, overlapping them approximately two centimeters. Secure with pins and repeat on the other side. Flip the bralette and add a ring on the other side of the strap. you just pinned. Fold it towards the wrong side, about to 2 cm and pin in place, repeat on the other side. Grab the remaining straps, the longer back straps, and place them wrong side facing up. Add a slider to one end by entering from above and coming out from below. From the wrong side, you should only see one line of the slider and two lines from the right side. Fold the end towards the wrong side by three centimeters. And pin in place. Repeat with the remaining long strap. Before moving along, we need to sew all these pin ends into the sewing machine. All of them with a straight stitch. Starting with the back straps with the sliders, place one of them under the presser foot with the fold facing up. You need to fit the presser foot inside an area where the raw end of the elastic and the slider are free from the presser foot. Put your needle down and do one manual stitch. It is a very, very important to back tack beginning and end when stitching straps - do a tiny and slow seam Remove excess thread and trim the end. Repeat with the other back strap. For the front straps do exactly the same too. Sew the end where the rings are placed. Remember to have the raw end of the elastic and the ring completely free, trim raw end and cut excess thread Repeat with the other front strap. For the cup apex I like doing 2 passings, the first closer to the raw edge of the strap And the second one closer to the picot elastic end. Again, sew a straight line of straight stitches, back tacking beginning and end. I like to push the elastic to the back to help my machine Repeat for the second, passing closer to the picot elastic. Cut excess thread and trim the excess picot elastic and repeat on the other cup apex. This way we have a secure strap with two passings with neat finishings on both right and wrong side. To finish assembling the straps, we just need to complete the final step - with the wrong side of the back strap facing up, and the slider towards the elastic band, loop the raw edge inside the ring. Then pull it through this slider, entering first from below and then coming out from above. This creates an adjustable strap This will then be attached to the back where we signaled the notches with the pins. Turn the bralette inside out so we can have the wrong side facing up. And we then sew the straps onto the back wings in the machine with a zig zag stitch. I like to place my strap under the presser foot, making sure that the zigzag stitch will so inside the area of the picot elastic that we can see below. Remember to back tack beginning and end. Then cut the raw edge from the excess elastic and the excess thread. Repeat for the other strap. We now have our finished bralette. All the zig zag stitches stretch properly without snapping. We have even zig zag stitches throughout the garment and adjustable and functional shoulders straps. And let's turn it inside out to see how beautiful it is from the insides too- Neat picot elastic and enclosed seems on cups and side seams, even stitches at the under band. And lastly, another look from the right side. How are you feeling with your brand new bralette Hot off the machine? This is a great time to try it on before moving to the next lesson where we will be doing the undies Remember this feeling of sewing your very own bralette! I'll see you in the next lesson.
16. Class Project: Sewing the Undies: In this lesson, we will sew our undies to complete the main project of a lingerie set. Grab your already cut pattern pieces of fabric so we can start assembling. put all your already cut pieces of fabric for the undies on your table. You should have one front and one back in the main jersey fabric. And two gussets, one of them in the main jersey fabric and the other in the lining fabric, which in this case is the solid pink fabric. Place your pieces in this position, So we can start assembling - the correct way to place the Gusset is by putting these double notches in both gussets towards the back piece. Remember that back pieces always have doubled notches. Quick reminder, all pieces are cut with the direction of greatest stretch indicated in the pattern pieces. And the gusset lining has the dogs length wise because it only has mechanical stretch because it has no added spandex. Alright, Place your pieces, just like mine, with right sides of the fabric facing up and the Gusset lining just floating on its own. The first step into assembling the undies is creating the Gusset burrito. This will enable us into getting all seems enclosed between the Gusset. Our guiding star for the burrito is the main fabric Gusset, which won't move - on top of it, with right sides together, place your front piece and align the edges on both pieces. Do the exact same with the back piece and then roll your fabric just like a burrito. So all gusset edges are free with nothing covering them. Finally, place on top of your burrito, the Gusset lining with wrong side, facing up. Again, Align all edges and pin together. My tip is to first pin with a temporary pin so you get your burrito secured. And then you can concentrate in matching everything with attention to detail with more pins. This way you won't have to worry about unwrapping your burrito on the other end. All three layers on the backside have the double notches. So match them and pin together, then pin one corner and fill in the middle. Repeat with the other Gusset edge corresponding to the front piece. We know it is a front because it has no notches. Match your corners and fill in the middle. Once you've got your burrito pinned, we will sew a straight line with straight stitches on both edges at three-eighths of an inch, which at this point we are very familiar with. Place your burrito on the three-eighths of an inch seam allowance. And as always, do your first couple of stitches manually, back tack beginning and end, and keep your threads to the back. For this multilayer passing, I suggest you select a longer straught stitch to help your machine get even stitches with the bulk. Make sure all layers are sewn and that there are no holes or unaligned edges. Repeat on the other side. Once you've got both sides sewn, just turn it inside out to see the magic of enclosed seems with the help of our burrito. You get the main fabric with the right side on the outside and from the inside all the wrong sides with the lining and all seems hidden. Trim seam allowances by staggering them so they don't end up as bulky once you wear your undies. You want the Gusset lining to be the shorter layer. Feel the difference between the staggered seam and the other one, and decide which one you like better for future projects. For me, it is always the trimmed one. But, You can skip it if you like. Now, for me, having straight stitches in the gusset union is much better, not only for the construction, but also for the final look. I've found that zig zag stitch for these seams are way too irregular and leave the final garment looking wavy, but as always, see for yourself by doing a pair of undies with purely zig zag stitch and see which one you prefer. The next step is flipping the front piece to the back piece with right sides together so we can match the side seams, pin them together and take care of aligning the edges. This side seams will also be sewn with a straight stitch because no stretch is needed going up and down. Again, three-eighths of an inch seam allowance and back tacking beginning and end. To give it a nice finish and prevent these raw and flappy seam allowances, We will do another similar flat felled seem to what we did to the bralette with no power net reienforcement. Trim the seam allowances corresponding to the back side, down to half, then finger press the seam allowances towards the back side and top stitch with straight stitch. Trim the excess fabric and verify it is as pretty from the outside view as it is from the inside. Repeat on the other side, seam. With both sides seams sewn. It is time to finish the undies with fold-over elastic. As we learned earlier, we apply fold-over elastic with two passings, starting with the wrong side of the garment. But different to our previous exercise, When sewing undies, we need to eventually close the fold-over elastic loop. For this, I don't recommend you start sewing right at the side seam because it will end up being extra bulky and too visible because of the back tack. I suggest you start to sew close to the Gusset so it is less visible. How I start my fold over elastic for undies is as follows: With only the front piece layer laying on my machine, I leave five centimeters of fold-over elastic, so I can start stitching above the Gusset. Aligning the middle of the elastic with the edge of the garment. I put my presser foot down and do one manual stitch to secure my layers. With zigzag stitch, I start sewing. Sew slowly every time you reach a bulky area, like Gusset or side seams, remember to start stretching your elastic only after five or six on stretched stitches. Continue sewing while gently stretching. You want your elastic to lay flat against the fabric - and prevent your own heartbreak by continuously checking if all layers are being sewn. Unlike the previous seams in gusset and side seems, that were sewn with straight stitch, We want the elastic to be sewn wih tzig zag stitch so it can stretch because it will be placed on areas where stretchiness is needed. When you're about three centimeters from reaching the initial raw edge of the elastic, stop. And back tack, free your garment from the machine and cut the remaining threads Then cut the elastic exactly two centimeters longer than the original raw edge And these two ends will be sewn right sides together. Match them with a temporary pin and put them under the presser foot. Sew with straight stitch a straight line at three-eighths of an inch. The most important thing you will do right now is back tack at the beginning and end. This will secure your fold over elastic from ripping apart Once you wear your undies. Before doing anything else, check that the length of the fold-over elastic matches the length of the main fabric. You don't want it too short It will overstretch the undies, Nor to lose that you will have to stretch the fabric to meet the elastic. You want elastic and fabric mathcing in length. If the length is correct, trim your fold-over elastic excess seam allowance down in half, And then the corners. Open the seams and return to the presser food. Place your needle on top of your existing zigzag stitch, So you can start sewing by overlapping a few stitches. Return your settings to zig zag stitch, back tack and continue sewing. Checking every layer is being stitched until you reach the beginning of the zig zag stitch. There back tack to secure the seam and take it away from the machine. You can see here, the heavier stitch from the back tack. And all layers are sewn correctly. Now is the time to trim this seam allowance above this zigzag stitch. Remember to do so close to the stitch, but careful not to cut this zigzags. Before doing the second passing on this leg opening, complete the first passing in the other leg and hip opening. Once all three openings have the first passing done and the trimmed excess seam allowance, We are ready to move on to the second and final passing. For the second passing try to start near the gusset so it is less visible. Remember, back tacks are heavier Stitches. Fold the elastic towards the right side of the garment to wrap around the raw edge of the main fabric, covering the first passing of stitches too. Sew with zig zag stitch careful to maintain the zig zag inside of the fold-over elastic. continus going until you reach the first back tack stitches and overlap to finish with more back tack. cut all the excess threads. And I'll meet you back at the table with all leg and hip openings finished with the complete two passings. This is our final garment for the lingerie set, our comfy undies. I had to finish my hip opening with white fold over elastic. But it goes to show that you can play with color combinations in your favor. Even if you run out of blue FOE we have all fold-over applied evenly, beautiful side seams and even more beautiful insides. I just loved the accent these pink lining brings to the garment. So there we have it. Our complete lingerie set, sewn from scratch to enjoy. Now that we have our complete lingerie set with bralette and undies, first, let’s pat ourselves in the back and then move to the next section for the final thoughts, Go over your 2 garments, checking that everything is sewn properly, that there are no holes or excess threads hanging. And everything stretches without snapping. And most importantly, try it on. Feel how the straight seams behave differently to the zigzag. Notice how it fits you and enjoy your freshly finished bralette and undies!
17. Final Thoughts / Thank You: All right. Thank you very much for following along this very thorough walkthrough. I really hope you had a great time learning the theory and practicing on your own your sewing skills. Please, if you have any questions, do not hesitate to reach out to me. I love seeing your questions and progress. When you complete all your exercises and projects, please share them on the class project section. It truly warms my heart to see your achievements. Plus, that is the best way to receive feedback and see what the other students are doing. If you wish to share your project through socials, please hashtag it. Thank you so much for taking Lingerie Sewing Basics a total beginner walk-through. I'll see you in the next class.
 Valeria Carrandi, Textile designer & pattern maker