Transcripts
1. Introduction: Hello everyone. My
name is Dana and welcome to the Photoshop
drawing zeros. These drawing course will
contain several classes, each dedicated to
this specific topic. After completing
the whole series, you'll learn the basics of
drawing and we'll be able to embody your ideas into
digital illustrations. Into the first-class,
we're gonna be exploring the
linear perspective, but before diving inside, will get familiar with
the settings, navigation, and interface of Adobe Photoshop
in relation to drawing. Don't worry if you are
a complete newbie. During this class, we'll discuss the
theoretical basics of 123 perspective and make a few exercises to apply the received knowledge
in practice. At the end of the class will complete the first
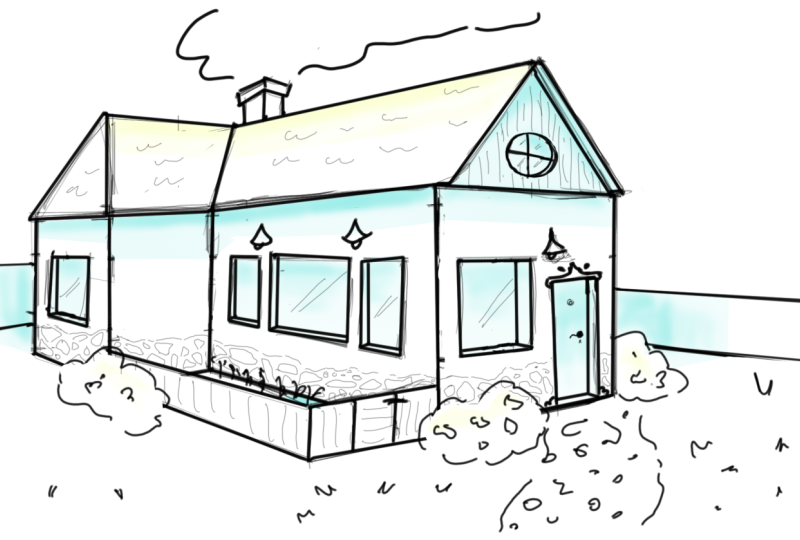
full-fledged work, which is gonna be
a house drawn in perspective for this class and for the whole
course in general, ideally, you should have an Adobe Photoshop and any
kind of graphic tablets. But the knowledge you'll get, you'll be able to apply in any other graphic software or
even traditional materials. So if you're ready, let's begin.
2. Photoshop adjustments: In the beginning, only first-class. Let's talk a bit about the settings, navigation, and interface of Adobe Photoshop. For this series of classes, I'm gonna be using Adobe Photoshop CC 2019, but you're allowed to use any version of Photoshop you like functionally, they all are pretty similar to one another, especially if you're using it for drawing. So let's take a look at the interface and the windows we have on the screen, the mean windows that we're gonna use them most. Color, navigator, layers and history. If you don't have some above-mentioned windows and go to this app window and punditry near the needed roles. Also into this drop-down window, you can notice a shortcuts near the titles that you can use for the quick windows in walking. The good thing about Photoshop is that you can fully customize and adapted to your needs. You can pull in and out the windows, change their placement, minimize and maximize open and height. Just blaze a Windows away you like it, or stick to what you see on your screen. Also, you can change the color of the whole interface and go to the tab aged preferences interface and in the appearance section, choose the color theme that is comfortable to your eyes. If you get back to your workspace and click on the blank background space with the right mouse button, you can change the color of the background in the drop-down window. Use one of the purposes options or choose your own custom color. After that, let's adjust the History window. Adobe Photoshop records all the action steps you are making so you can undo the stamps that didn't work well, the default amount of steps is 20 and it's not enough for comfortable working. So let's go to the top aided preferences performance and in the history and cache section, select the greater amount of history stats. I'd suggest you to set it between free, free and a 104.5. Now, this over the Photoshop adjustments as for tablets, it's overly subjective and case-by-case basis. So just make sure that your tablets drivers are olden loaded and setup and Japan pressure is configured to end. In the next part of the class, we'll talk about the layers.
3. Working with layers: When we're done with basic adjustments, we can move on to the Adobe Photoshop navigation and we'll start with the Zoom too. So let's hit the Z key on the keyboard. This tool will help us to zoom and unzoom the canvas to uses two units to hold down the left mouse button and move your mouse to the left to unzoom and to the right to zoom. Makes sure that describe a Xun checkbox is activated on the output X2 bar. Also, there is another way of using the zoom so you can hold down the Alt key and use a mouse wheel to zoom and unzoom the canvas. If you hold down the space key, you'll be able to move through the canvas. The same you can do by moving the red frame in the navigator panel. The red frame represents the actual size of your workspace in comparison with the whole canvas. Now, let's move on and talk about the layers. Layers contain the images, text, or objects that make up a layered file. They let you move, edit, and work with a content on one layer without affecting quantity on other layers. Here we have five layers form with some content and one with a background. Now we can move on and explore the tools that can help us to work with layers. The first tool is the move to the shortcut for it is V, and it allows us to move the layers one by one. In the upper toolbar, we need to check the outer select books. It will allow us to move the objects by clicking and dragging them, even if they're on the different layers. Let's try to move our objects. When the box is checked, you just hover your mouse cursor over the object you want to move, hold down your left mouse button and drag the object to a different place. If the outer select books is unchecked, you can move only the objects on the layer you're working on now, the one which is selected in the layers panel. So Kim, this box checked because it will help you in the future when you'll be working with a large amount of layers. Also, the Move tool can be easily invoked when you're working with a different tools. For example, if you are drawing something with a brush tool and units and move some object, you just hold down the Control key. Move that object, release the control key and get back to drawing. Now let's take a look at the Layers panel and check out what we have here and how it all works. Let's start by creating the new layer. And you have a few options of how to create the new layer. You can click on the create a new layer button in the layers panel. You can go to the top layer and choose New Layer. Or you can use the shortcut Control Shift. And if you want to delete the layer just selected in the Layers panel and hit delete key on your keyboard. If you want to name the layer, you need to click twice on the title on the layer in the layers panel, n-type and name. Also, layers have options. For example, the capacity. It shows how visible you're layer is. If you move the slider to the side, you'll see the delay becomes more transparent. Now let's move on to the log options. All the buttons in the lock section look different things. You can lock transparent pixels. That means that you'll be able to draw on the in the field with area, you can look image pixels that mean that it prevents modifications of the layers pixels using the painting tools, you can log the position. That means that you won't be able to move the layer. And you can look also, you won't be able to do anything with the layer. The next thing on the agenda is how to duplicate the layers. You can click on the layer where the right mouse button and find the Duplicate Layer option in the dropdown. Or we can use a shortcut Control J. It will make the copy on the layer and automatically give it a name. Also, if you hold down Control outs on your canvas and drag the object you want to move to this side, you'll have the Courbet too. If you need to select two or more layers, hold down the Control key while selecting them. If you want to select many nearby layers, select the first one, hold down the Shift key and select the last one. They all will be selected if you have a lot of layers and you want to easily find important ones among others, you can mark the liaise with the color, click on the layer with the right mouse button and find the colors in the drop-down. If the order of your layers is wrong, you can move any layer in the layers spent on just by using the left mouse button and dragging the layer up or down. If you need to merge the layers, selected needed Layers, click on them with the right mouse button and find the merge Layers option in the dropdown. Or you can always use a shortcut Control E. And the last thing to talk about in this part of the class is the history panel. If you remember, we were adjusting the history states in the previous part and all our actions are recorded into the history panel. So we have everything here from the very beginning. The history panel allows us to undo the previous actions. We can manage the actions through this banner, or we can use a shortcut to undo the previous steps. The default shortcut is control out Z and nasa shortcut, simple controls that will allow us to get just one step back. And if you heat it one more time, it will get back one step forward. For now we're done with the layer. So let's move on to the next part.
4. Working with objects: The last introduction of part will be about working with different separated objects. First of all, let's talk about the free transform to this option allows us to transform the object, make it larger or smaller. Red seeds change the proportions and so on. To invoke it, you just need to select the object with the move to end heat control t. If we want to make the object bringer, We need to drag one of the corners to the side and it will be scaling relative to the diagonally opposite corner. The latest Adobe Photoshop versions, you don't need to hold down the Shift key to change your object proportionally. By default, it will be changing with keeping the same proportions. If you don't need the proportional scaling, hold down the Shift key to their free transform. It all works oppositely for the old Adobe Photoshop versions. Hold down the Shift key to keep the original proportions and transform objects freely just by dragging the corners. If we hold down the Alt key while dragging the corners, the object will be scaled relative to the center. To rotate the object, we need to go a little beyond the object's frame and irritated going around. If you hold down the Shift key, your object will be rotating in increments of 15 degrees. Now let's move on and let's explore the market. So the shortcut for it is m. With a market tool, we can select some area and work only on it. But let's try it out with our example. We have here, select the area, click on it with the right mouse button and choose free transform. Now we are working only with a selected part. And it will work the same way if we choose a elliptical market to. So what exactly we can do with the market too? With just a control. We can separate and move them apart with a control out, we can make the cobia. When you've selected some area, you can't work with any other areas on your canvas until you deselected. So now for example, we can work only in that is small selected area. If you want to add one more selected area, you need to hold down the Shift key. If you want to subtract some selected area, use out. You can use these four buttons on the top toolbar as well. If the first one is irregular selection, the second one we'll add the selection there. Third, we'll subtract the form from the selection. And the last one which you'll probably never need selects the intersection of the multiple selection. Next week we need to talk about is less SO2, the shortcut for it is l. And the one way going to be using the most is the polygonal lesser CSU. By using this tool, we can create some complex selections. So closer shape weeds to go to the starting point until a little circle near the T2 comes up. Or use the double-click when put in the last borns, it will closest selection automatically if he went to deselect all the selections uses shortcut Control D. And the last topic in the next part is about colour panel. By default, it has a RGB sliders and it's not very convenient to work with. So let's change them to the HSB sliders or color wheel. In the most recent versions of Adobe Photoshop, you can get yourself a color wheel for Calla beaking method instead of the Coleman free rows of hue saturation and brightness. So if you want yourself a color wheel and go to the tab, aged preferences, general, click the HUD color beaker on the drop-down and select the few will. All the options of how you Color Piano could look. You can find by clicking on the option menu in the upper right corner on the panel. In the next part of the class, we'll talk about the drawing tools.
5. Drawing tools: When we have sorted out the basics of Photoshop, and we can finally move on to the drone, unrelated topics. The main tools for drawing out and brush to the shortcut for it is be in the areas it, so the shortcut for it is e. So you'd better remember the shortcuts because we're gonna refer to them a lot. Now let's open them brush panel. Firstly, we need to select the brush, go to the canvas and click on it with the right mouse button into this popup window, you can see two sliders and the small window with the brushes. There is lot of basing brushes there. And you may have your own downloaded custom brushes. But for the ease of use and forgetting the pretty same result, I'm going to leave all the brushes that will be used in this class in the project and residues tab. Now let's see how to add the new brushes into your brushes panel. When the Anglican with the right mouse button. And in walking the brush panel, you can notice the little setting gear in the upper right corner. Let's click on it and we will need the row restore, default brushes if you want to delete all the brushes that we already have, and input brushes if we want to add the new brushes into your panel. So if you click on the input brushes, you can see that path to the directory where your Photoshop leaves on your computer and when it piques your brushes from. So you need to copy that bath and put it into your Explorer search bar. When you are into the required folder, just drag and drop or quoted that downloaded brushes. If you did everything right, you brushes will automatically be uploaded into your Photoshop brushes panel. This class will just mean that two brushes, the heart round brush for the lines and the soft round brush for some additional staff. A few more words about the brush panel. If you click on the gear, you can change the brush appearance. In desert panel, you can use a brush name, brushstroke or brushed deep. The most convenient is to use a combination of brushstroke and brush name. And let's also talk a bit about the two sliders in this panel. So it's the size and the hardness. And obviously from the titles you already know what they are for. We're going to be changing the size a lot, but it's not very handy to go to this panel all the time. And that means that we're going to be using the shortcuts for those who want to try to make the lines with a mouse, or for those who programmed one of their Ben buttons. For the right mouse button, you can try to hold down both out key and the right mouse button or alt key and your pen right mouse button and move your mouse to the left to make your brush size smaller and to the right to make it larger. And one more way to change your brush size is to use a left square bracket to make it smaller and the right square bracket to make it larger. Now let's move on to the actual work in with the lines. Let's go to the layer with the pink shape and take the black color for the lines. You can see that here in the toolbar on the left and in your colour panel, there's two color boxes, the foreground color and the background color. So now we need the black colour in the foreground. And if it's not black by default, or if you use the colors before, we can resend the color boxes by heating the D key on your keyboard. So when the foreground color is black, let's finally try to make some lines where on the layer without being figure. So let's try to trace the shape with straight lines. Makes some kind of a black frame on the perimeter. So how can we draw the straight lines? We can hold down the Shift key and draw the line with a pen. And that will perfectly work for vertical and the horizontal lines. So let's trace the beam shaped by holding down the Shift key and by using vertical and horizontal lines. When we're done, we can move on to the next blue shape. It's at an angle so we won't be able to draw straight lines the way we drew them, a being shaped. But if we put the first boy and then hold down the Shift key and pool the next point, we will get a straight line as before, but it can be in any possible direction, not just strictly vertical or horizontal, to make the line Markley and saturated, you can repeat this action back and forth with a held down shift key. So let's try to make this type of lines with a blue shape. Make sure you're drawing the lines on the right layer. Now when we're done, let's talk about the cow panel. You already know that the colored boxes are called foreground and background colors. You can solve them by heating the X key on your keyboard. If we want to pick a different color, we need to involve the color picker window and weekend sued by clicking on the foreground or background color box in the color picker window, you can pick any color you want. And by moving the slider on the right and the pointer inside the big color box. If you go beyond the Color Picker window, you will have the possibility to use the eyedropper tool, which will allow you to pick any Carl you already have on your canvas. Also, you can use the HSB sliders or you can use the color will be exact colors. So let's pick the pink color for the foreground and blue color for the background as you're already held them on your canvas. You can also hold down the out key, which will invoke the eyedropper CSU while you are pressing the key and being the color in that way. And now we have two active colors that we need. And let's try to find one of the phases of our sketch you cubes. Firstly, we need to take the polygonal lesser tool and select one phase. Let's try it with a beam cube, hidden the L key, or find the two on the left toolbar and select the left face of the cube when it's selected. And to close the shape, let's take the salt brush and just slightly weight over the selected area. You don't have to press too much and make it supersaturated and bolt just make some kind of solved gradient. If you made it zoom bright, you can use the error is at two with the soft round brush and you can erase it a bit on the h. And when you're done, deselected with a control D. And let's do the same to the blue cube. Go to the right layer with the blue lines, select the face with a polygonal lesser to take this soft brush, swarm the color boxes with the x key and painted over. This elected when you are done. And one of things to talk about in this part of the class is a feeling with a solid color without using the brush. Let's create one Malaya from the last panel or by using the shortcut Control Shift M. Let's make the foreground and background colors default black and white by heating D on the keyboard, say the heart round brush, decrease the size and draw the rectangle with the lines. And by holding down the Shift key. When it's done, take the polygon tool and select the rectangle, big the different colors for both foreground and background. And if you hit the delete key combination, the selected area will be automatically filled with a foreground color. If you hit control Delete, it will be filled with a background color and also a few mock week things to mention. If you're having some issues or errors with feeling with solid color when you are using the shortcuts, make sure you're using English keyboard layout sets the flow rate of the brush equals 35%. The capacity and flow settings are in the upper toolbar. If you lock transparent pixels and we'll try to erase something on this layer, you won't be able to make it because it will be painted over with a background color. If you click something on, your whole interface looks weird now, like this, for example, don't worry that you ruined ARAF scene ends on painting, just him, that's up key. If it didn't help, hit F key a few times until it gets normal. And that's it for the whole introduction to Adobe Photoshop. In the next part of the class, we'll finally start to learn the basics of the linear perspective.
6. Linear perspective: theory + exercises: Let's finally move on to the main topic of the whole class and it's a basics of linear perspective. The linear perspective is a system of creating an illusion of three-dimensional depth on the flat surface. It is a visual description of how we see objects in real life in gives us an idea of how close or distant objects are in space. Mastering the linear perspective allows us to represent the realistic depths and it has one of the most important skills that artists should have. This cube you now see on your screen is drawn in isometry and we all have seen it before in geometry or drafting, all the edges of this cube are drawn parallel. So let us compare it with a cube drawn in the perspective. Obviously, it's a big difference between them in comparison, that is isometric cube now doesn't look three-dimensional. It looks kinda crooked and crashing. So how exactly the linear perspective works? The thing is that all the parallel lines in the perspective have the vanishing points. In that concrete case, we have cubes, which means that we're dealing with two directions of parallel lines. Therefore, it's two vanishing points and vanishing points are placed on the horizon line. Now to clarify everything, let's try to move this cube counterclockwise relative to the H D, the vanishing points would shift left, the left face will turn to us, and the right mind would oppositely turned away from us. Let's start with Putin, the new vanishing point to the right face on the cube. And we need to connect the top and bottom points of the edge de within you vanishing point. Since the size is turned away from us and the breadth is decreased, we need to draw the new vertical edge quite closer to us. So we drew the turn the wave phase, and now we need to draw the left face, which has turned to us. And that means that we need to determine the new vanishing point for it to, this vanishing point will be far away from our side. But anyway, we can't ignore it and we need to draw these lines are receding toward the vanishing points. We turn this face to us and we can draw the vertical edge to make the plane. Let's paint over the hidden phase to mark the plane. And now have the new counterclockwise turned cube and drone in the perspective, we also can compare it with the schematic view from above that you can see on the bottom template. Let's extend the new lines withdrew and turn the rectangle counterclockwise. As a result, we'll get these projection. So let's move on and try to draw in the perspective in the project and rescue sub, you can find a document with a perspective greet. Their perspective grid is a network of lines drawn in a properly determined perspective. So if you start tracing the lines relying on the perspective read, you'll get the QC drawn in a proper perspective. Let's start by creating the new layer, sake the black color for the outlines, and let's start drawing. But try not to mindless a tracer perspective grid lines to build your own objects. Consider them as a navigator. They're here to help you with correcting the mistakes you can possibly make if you drew annuli and not in the perspective, you'll immediately notice it and can't timely fix it. It is a good exercise. You can just practice and soon you won't need any help from the auxiliary grids to create objects. In the perspective, you can extend the lines for greater accuracy. It's easier to erase the extra parts of the lines, then fix in the whole drawing. The first part of your home task will be to draw an object in their perspective by using the proposed perspective greed. So create an object and tint one face of it to show the depth by using the polygonal lesser tool and the solved brush. The best-practice after drawn with the help of the perspective grid, would be repeating the same objects on a blank canvas without greed and the advanced one when you find on your own and your own perspective and drawn it on the blank canvas without any auxiliary greets, your first figures won't be ideal. They met appear a bit inaccurate, sloppy and crooked. But the more you practice, the better you become. Now let's move on and explore one more basic technique of drawing in perspective. This technique is based on carbon on the fingers from the cubes or other types of three-dimensional geometry objects by cutting out or a11 you'd pieces, you could create new complex three-dimensional objects. We can schematically draw the desired plane figure in 2D and use it as a reference for converting that into the free D-shaped. So let's try it out. Firstly, we'll create the two de-reference and we'll draw it from the side view. Let's start with drawing a rectangle. We'll divide it into free, almost similar pieces with horizontal lines and we'll draw some shape. Let's say we'll cut the central piece out and cut the whole shaped diagonally off too. And let's project is two d sketch onto our cube. Our cube is drawn in the perspective, so it works the same way as a perspective breed that we used before. So firstly, let's create a new layer and divide a cube into three parts. Rely on the already existing lines and create a muted parallel guidelines. When you're done with dividing the cube, let us continue with adding the diagonal cut in line. Let's merge the parts layer with a cube outlines and decrease the combined layer capacity, long delay and create one Molly above. And after that, let's continue by aiding the diagonal cuts in line puts the first to the upper right h, The second one to the bottom edge centre and draw the diagonal line, continue by agents a horizontal line on the bottom edge, repeated diagonal line on the other face, and close the shape with one more horizontal line on the top edge in that new shape will cut the center and create a figure we need. So Ponzi, inner points according to our CSU de-reference and draw the horizontal lines. Now let's trace the lines that will be visible after we'll finish the cotton and make them a little bit more bolts. So now we have two pieces and that can be compared to the reference knowledge, make the shape MAC layer to the view and tin the planes with the color. Creating a new layer under the one with the lines to exit polygonal lesson. So select the new diagonal plane pieces and with a soft brush, Buddhist semi-transparent teens. And it's always good to mark the planes with it seems because it helps us to clearly sees a depth. If you have some complex figures, whether sketchy lines are intersecting the main lines and when everything looks like a complete linear mass into an easier life and help you to define what a drawing and whether blame you need 0s. So we painted over our diagonal plane pieces and we can clearly see our upcoming figure and knowledge row the last piece of the figure. So let's draw the horizontal lines on both faces according to our to dereference. After that, draw the vertical line on the right face. Continue with a horizontal line from the new points we have and finish up with a second vertical line on the left face. Now let's erase the x-rays and leave only the lines that belong to the shape we were creating. And as all this entity into the inner parts. And here we can start talking about the second home task, this time units, or it be in the free figures that we're going to create now and make up one more all by yourself from scratch. So here we have the cube would already divided into three pieces and free premade Blaine projections from the side view. The first shape is very simple, and the second is pretty similar to what we were making before. And the FRD contains two pieces that can be pretty complicated, but we'll try to recreate it. So let's start recreating the shapes in 3D in order for the first figure, create a new layer and start drone the visible lines. Start with the right face. Continue with the bottom horizontal line, bonded us on the edges, connect them with a diagonal line and finish up the whole face. And draw the horizontal line in the lower part and finish up the bottom face. And draw one more horizontal line on the top edge and finish the fever with a second diagonal line. Now, draw all the other Fieger edges. If you messed up with some lines, you can always fix them by creating new ones and by using the arrays of two. And as always create the new Live was by using zip oligopolistic x2 and sold brush adds a semi-transparent College is a front planes to show the depth. And moving on to the second one, create a new layer and hides the previous ones with the first finger and the teamed by heating the eyeballs in the Layers panel. And let's start with the outline right vertical edge. After that, wonder dots, fours and diagonal line. Connect the dots and finish up the right face. Draw both horizontal lines and finish on the diagonal plane. And as the rest of the lines that belong to the Fieger. After that, we need to add this ledge on the bottom. So let's find the center of the bottom piece and put the dots. By using this dots will draw the horizontal line going to the left side ends. We need to elongate this line on the right face of the cube. So we're dividing this bottom part into two pieces, a repeat this horizontal line on the left face. After that, we need to divide this line into two pieces and draw the second inner horizontal line. And that is how we will recreate the ledge. After that, we need to draw the same lines on the upper part. The only difference is that we can't see the inner parts of the soap ledge. So we need to draw only the edges. Now we need to connect our pieces with a diagonal lines. Let's erase the extra lines and trace the visible lines boldly. And as always, select the planes with a budding analysts at x2 and add the gene to create the depth. And now we can move on to the third figure, created a new live firstly, and let's start with recreating the lead diagonal line. After that will raise a line up from the bottom point and finish up the whole right phase according to our to dereference. Now let's draw that suits all horizontal lines and go into the left face and finish up that. So plane by a1, the second diagonal line, draw the bottom horizontal line and finish up the whole figure by connecting the parts with a diagonal line. It's almost done, but we need to add this little God between the shapes. So we'll draw the second vertical line and keep in mind that this phase is narrow, so the cut will be pretty theme. Let's quickly arrays a bottom line between two shapes and finish up the bottom part of the background figure by drawing the tiny horizontal line. After that, we need to add the parallel horizontal lines on the top piece to show that fingers are separated from the intersection on dots. Draw these lines. Let's erase the extras and finish up by eight in the vertical line on the left, which will close a background Fieger. And let's trace the visible lines boldly. So this figure is done and let's Dean the planes to show that deaf polygonal planes and seeing them with a semitransparent collar. And as I said before, the last blank icon is for you to make up your own Fieger. Start with a plane one and recreated in the free d. And in the next part of the class, we'll talk about drone circles in the perspective.
7. Drawing circles: The next topic that we need to review is drawing the circles. Well, most of the time drawing smooth and clean circles is super hard, doesn't matter if you are drawing digitally or traditionally, but Adobe Photoshop has the possibility to stroke and fill the selections. That means that we can create a selection, click on it with the right mouse button and choose feel if the ones who feel this election with color or stroke, if we need just a frame. So now we're talking about the circles and the strokes. And if we want to make a circle, we need to take the L lifecycle market x2, which was briefly mentioned before, create a circle by holding the shift key down, click on it with the right mouse button and choose Stroke into this popup window, we can choose a stroke weight color, location, and so on. So when we're ready, we're clicking OK. K. And now we have the ideal Circle outline. And it would work the same way if we drew an ellipse or any other simple or complex selection. Now let's create an analogy in the perspective and the same cube we used before would help us with that. As we already know, we can carve out the figures from the cubes so that let's us to inscribe the circle or ellipse inside the phases of the cubic elements. So how exactly we are going to do this? Let's create a new layer by using the L lifecycle market. So we agree it's an analogous weak ligand on it with the right mouse button and choosing transform, selection of this option allows us to transform the selection in every possible way. So if we hold down the Control key and drag the corner of the bounding box to the side. It will let us distort the actual ellipsis selection. So now I can inscribe the selection into one of the cube faces. So let's move it and combined the bounding box corners with a cube corners by using the control key. If you went beyond the frame, you need to inscribe the bounding box more accurately. The wages touches the outlines. You can zoom the canvas and fix it with the Control key. Click Enter. When you're done with inscribing the bounding box creates a new layer. And honestly I click with the right mouse button on the Selection and choose a stroke, select the color and stroke width into the pop up window and click OK when you are ready to repeat the same steps on the second phase on the cube, make an ellipse with the right mouse button click Transform selection, combined the corners, click, Enter, click with the right mouse button, choose Stroke, and apply the stroke. And for the top face of the cube, just repeat the same steps with inscribing the bounding box into the frame. Then click on it with the right mouse button, choose Stroke, and here it is. Now let's talk about one more home task. This time you'll need to carve out the cylindrical piece from the l ungated cuboid. Firstly, we need to create a new layer and onto it by using the L lifecycle market. So we'll create the first ellipse. And by repeating that technique we used before, we'll combine the bounding box with the corners of the rectangle. Stroke this election and let's erase the extra straight away. We just need the half of an ellipse and that belongs to the cuboid. And let's make one more ellipse on the other face. So repeat the previous steps. And when they have two halves of the ellipsis, we need to connect them with a straight horizontal lines to get the cuts. After that, let's trace all the visible lines and planes to show the depth. So you select the inner half round shape, go along the outlines with a polygonal assets will XML endpoint the dots pretty close to each other. And in the next part of the class, we will briefly check out their free point perspective.
8. Introduction to 3 point linear perspective: In this part of the class, we'll briefly touch upon free point perspective. The main thing to know about free point perspective is this in comparison to 2 perspective that we talked before, where the lines are either horizontal or racism towards two vanishing points in 3 perspective, all lands receipts award free vanishing points. Two vanishing points are along the horizon Just like in 2 perspective. By the third vanishing point is located either above the horizon or below the horizon, depending on the area you want to draw. So if we're looking strictly forward, is going to be 2 perspective. If you look up or look down, the vertical lines would have the new vertical vanishing. And it's going to be the free point perspective. So let's, you got the examples. Here is a cuboid that we drew before, which is drawn in 2 perspective. So here underwrite wouldn't be the first vanishing point and the seventh one is going to be some that much further on the left. So if we go to the layer without cuboid and use a free transform option, and by using the control key distorted bottom bounding box corners equally on both sides, we'll get the vertical receding affects. And now I can truly say that we're looking at the cuboid from the top down. Let's compare it with the original cuboid so you can see the difference. The second one looks more convenient to their eyes, moralistic and vivid in the same if we look from the bottom up, let's take some cuboid drawn from the bottom user Free Transform option and by using the control key distorted, so bound in books corners equally on both sides. And we'll get the same vertical receding affects. Now we're looking at the cube from the boards and soap, and let's compare it with the undistorted cuboid. That was a super brief introduction to free point perspective. And in the next part of the class will apply the knowledge from the previous parts and will be drawn a house in their perspective.
9. Practice: Drawing a house in the perspective: So we have finally gotten closer to the main topic of our glass. And it's going to be the practical part where we are going to be drawn a complex object in 2 perspective in the project and residues tab, you can find the file called Perspective greet. Here it is the same as you can see on your screen, on your canvas, you can see two vanishing points at the frame and the horizon line, just a classic two-point perspective. If you unload this layers with the vanishing points and select one of them, for example, left. You can use the arrow keys on the keyboard, left and right, and just move your points where you want them to be. When you are done with Blaine, with your vanishing points, you can look this layers again and play it with the frame. We can move it throughout canvas and find the perfect angle to build our object. And as said before, we're going to be building the house. So just move the frame wherever you want. Maybe don't move it to the corners because in real life we hardly see the objects from this angle and you won't be very happy to draw something in this perspective. I'll suggest you to go somewhere in the center, believed the frame bottom part slightly below the horizon. But all the objects that we're gonna be creating, they are going to be above the horizon line. Choose Your Own angle, all leave at approximately in the middle of the canvas. We're going to be working only on this area. And the kindness outside this frame is kinda distracting us. So what can we do? There is a few options of how we can get rid of the rest of the Canvas. The first one, we can use the crop tool, which you can find on the toolbar. And we can just drag the corners and try to select and Chrome the area we need. After that we can hit the check mark, but our selection and cropping 1B very accurate. Quick aside, let's look up to the upper toolbar. There is a checkbox called delete crop pixels. And if a crop alkyne verse for example, like this and in the upcoming future will change our minds and would like to ungroup it. So we'll take the crop tool and incentive enlarge out Canvas will get nothing because we already lost everything outside the area we cropped. So if you don't want to lose a canvas after cropping it, or if you're not very sure that you won't need the rest of your image. Uncheck this delete cropped big SOS books. And now the second way of how to crop the picture vet method will let us crop exactly this part of the canvas inside the frame. Go to the toolbar, say the rectangular market tool, go to the Layers panel and by holding down Control key, click on the icon near the layer where our frame is. Now we have the perfectly selected area inside our frame. And if we choose the crop tool on the toolbar, it will crop only the selected area heat enter two times to get back to the main document. And here's our canvas where we are going to be drawing our house. Now we can log delay with a frame, create a new layer, take the brush tool and start treating our house above the horizon line. We'll start by creating some base shapes. They rectangles will use these grid lines as a navigator and don't forget that to create the straight lines, we need to hold down the Shift key. I'll start somewhere here and draw the parallel to our Greet lines to create the first shapes. Continue to make the elongated cuboid with a sketch lines. And here's our first books. Let's make the shape of the house a bit complex and add one more block here on the left. Don't be afraid to mingle lines longer than you need because we always can go to the error is at two end arrays, the extras. So when we have our first floor, the base of the house, and we need to create the roof. And as you know, the roof ridge shouldn't be located right in the center on the wall below. And to be honest, now we don't really know where the center is and how to position the roof are right in the center. But there is a trick, draw the cross like this inside the rectangle and this intersection points will be right in the center of our Tango. And from the central point, draw the line up m. This will be the perfect center to create our gable roof. You can go with any size you like. I'll stop at something medium, neither too large nor too small. Let's say the gable end will be that large. Don't try to make everything super need, but keep in mind that we're working in the perspective and we need to pay attention on the perspective lines. They need to be built properly. If you are making some mess, it doesn't really matter because we can always fix it. And after all, it's just a sketch. So let's continue making. Our roof will continue by built-in XHR reach line in the perspective, don't be afraid of making the lines to elongated because we can always erase it extra parts. Let's get back to our reach line and let's make it longer on the right light going a little beyond the gable end. So we're creating some kind of protrudes if verge will elongate the reach line and we need to draw the parallel line here on the bottom of the roof and connect this lines with a diagonal and parallel to the roof heap line knowledge repeated on the other side of the gable end, LNG The bottom line and connected with it. So point by using the diagonal line arrays, all the help in lines that distract us and that we don't need anymore. Fix the lines if your array sum of their parts by mistake. But anyway, don't forget that it is just a sketch so you don't need to be very neat. And the first part of our roof is ready. So we can move on to the second part here on the left, saying the brush tool again and repeat the same steps. Start by drawing the gross, raise a vertical line from the center and connected with the corners of the gable ends. So connector roofs and let's add the spread shrews have parts, again, LM gay, the ridge line and the bottom of the roof lines. And after that connect them with a diagonal lines. Now lets erase all the help in lines that we don't need anymore. When we're done with arrays and things, we need to connect to Roofs together. Just find the intersection of the regions and then connect them with a bottom corner. The next step is drawing the Windows OS. For the Windows we need to go alone, offers flow with a straight helping lines that will allow us to create all the windows at the same level. When we're done with the lines in the top part of the walls, let's add the parallel line in the lower part of the walls as well. So when we have all the helping lines, we can just use the Shift key to create the vertical lines for the Windows OS. Now go along the shape and Ed some windows by using the vertical lines. Keep in mind that the closer your object east to the viewer, the larger it will be in comparison with objects in the distance. Let's continue making the windows. And when you're done, let's erase a helping lines. I think that these two windows turned out a B2B and we can fix it by guiding them a little from this side by creating the new vertical lines and byte arrays into extras. The next step is to end the depth to the windows, and we're gonna be doing it in this way. Firstly, by relying on the perspective greed, we need to create tiny line going from the corner which we can use to create the depth. Then we'll draw the vertical line down and after it will draw the horizontal line on the top. And now we have the depth the same here on the other face of the built-in. Let's start by making the line from the corner by reliant on the perspective greed then will connect it with a vertical line. And here we can draw one line on top going through all the through windows to keep them on the same level of depth, raise a extra parts, and keep agents at depth to the rest of the windows. When you're done with all the free windows on these phase arrays, a help in line. And let's move on to the last two windows. And keep doing the same things blend from the corner vertical line and the horizontal line on the top. You can do it in any order you find convenient. So you just try to draw everything in the right way. And according to the perspective, greet. When you're done, let's continue and add the doors. So let's edit some were here will create the horizontal line, the vertical lines. And while we're here, we'll add the depth by using the same method as we used for the Windows. Let's also add some details. We'll add the Nope and little window on the door. When we're done with the x4, let's add one module on the other side of the building. We can create the helping lines as we did with the Windows, but we can also just follow the path and map out nearly the same level of height as a previous door has. I'll put the dough somebody here and it's going to be a little bit narrower then the previous door. And after that, let's add the depth and also let's add the Nope. So the second door, Israeli and pledge beautify our windows by eight in the outdoors seals list grades a horizontal lines under the windows and by using the diagonal lines, create the seals arrays, the extra lines when you are done. After we finish the seals, let's add little protrudes a foundation to our house. Let's start from the left side and we'll need to shift the vertical line a b2 z left. After that, we'll go over the bottom part of the house with the horizontal lines. And it will finish in the same way as we did on the left. When you add a Raisa extra parts. Our first law, Israeli and we can move on to the second floor and we'll add a little tower as a second floor. So let's start by creating the first rectangle using the straight lines. Let's draw the cross in the center of the rectangle to help us create the roof, draw the vertical line and connect the corners with it. So points. And let's continue drawing a roof in the perspective. So LNG in the line and create the verge SVD for the first floor. Continue by creating the bottom line for the roof. And Ellen gain this line as well and also end the line on the bottom left part of the roof. Now let's connect the points with the diagonal lines and make intrusive verge. Lets erase all the help in lines we don't need anymore and fix the lines. If array, some parts. And let's get back to the tower. So finish the walls by a11 more vertical line, and then draw the parallel diagonal line to finish their roof heap, move on to the verge and add one more diagonal line a bit further. Now let's erase the extras. After that, Let's unzoom out Canvas and checkout. If he did everything right. If it doesn't feel like it's drawn accurately in the perspective, you can always get back to it and fix it. And let's move on and beautify our second flaw by agent some depth. And we'll do it by dividing it into two pieces, by creating the horizontal dividing lines in the bottom part of the cube. After that, let's add a bit of volume by shifting the bottom left vertical line a little bit to the right. Guarded the bit on top and draw the second parallel horizontal line going along the cube connected soap tube with a new vertical line. Finish this part by a1, the second parallel horizontal line going along the right face. Let's also try to move the second bottom vertical line a bit to the left and see how it will look if it's not working, we'll fix it a bit later than arrays the extras and fix the building lines. If you cut some parts accidentally. Now we can move on and some windows. So draw the helping horizontal lines as we did on the first floor. When outlines are ready, let's use the same technique as we used before. So create a windows by using the vertical lines. Let's add two windows on each side. Gaza extra lines when you are ready. And let's add that debt for the windows as we did before. So let's start with the left face and draw the line from the corner and rely on the perspective greet. After that, draw the horizontal line the way it goes through both Windows and draw the same line from the corner on the second window. And let's finish up by drawing the vertical lines. Now, erase the extra lines and let's repeat the same steps on the right face. Start by A1, the line from the corner, then draw the horizontal line the way it goes through both windows. Draw the same line from the corner one, the second window, finish up by drawing the vertical lines. So we added the depth for the windows and knowledge and move one and add a little drama on the roof. But firstly, let's erase a helping lines we used for the windows. So getting back to the dormir, let's start by creating the horizontal line on the bottom part of the roof. Then we'll add two vertical lines and finish the rectangle. After that, we need to find whether roof will end. So from the main roof and draw the line in the perspective and it will mark the roof reach. Now let's create the helping cross and draw the vertical line up from its center. Let's connect the dots and create the roof. Now it's time to add the verge. So draw the tiny lines in the bottom of the roof in the perspective and connect the ends with its own points. Erisa helping lines. Now we need to elongate the bottom roof line on the left side. Ed's a diagonal line which will be parallel to the main roof and connect the bottom parts of the dorm with the roof and finished buildings. A roof heap by a1, one more diagonal line ends. A door mat is ready. Now let's add the last week and it will be the round window on the dormir. But firstly, let's fix our lines and array some extra S. So let's get back to the window, will take the elliptical market tool and create the elliptical selection. Click on it with the right mouse button and choose transform selection. And we need to distort it the way the bounding box and the Arabs would be in the right perspective. Try to put it in the center. And when you're done, click the check mark on the APA toolbar or hit the Enter key. Now we're having our selections, so let's click on it with the right mouse button and choose Stroke. Send the stroke width for two pixels and Ming the color a little less black. Click. Okay, and here's our window. Well, we still have our selection on. Let's add that debt for the window. Move the selections, add annelids down according to the perspective greets, Click on it with the right mouse button and choose Stroke. Deselected with a control D. And let's erase the parts we don't need. The depth is done, but let's add one more detail like a window frame cross. So draw one horizontal line and one vertical. The vertical line would be a bit shifted to the left because we are looking at it from the bottom and the walls depth will overlay eats and congrats because we're done with the house, but we can also add the team. It is optional just to show more depth for the built-in. Firstly, Let's unzoom our canvas and see what we got. Maybe we can find some not very accurately made parts and we can fix them. Now, I think that shifted line didn't work well, so we'll just put it back where it originally was. So now we can move on to Tintin, our shadow parts. Like I said before, it's an optional part and you allowed not to do it. We'll treat one Malaya under the layer with the lines and we'll take the polygonal less. So two ends with a less at x2 will select the parts that we want to make tinted. Reminding you that if you want to select more than one area unit to hold down the Shift key or activate the second icon here on the upper toolbar. So let's just go along the shapes and select the areas that are possibly in the shadow. When you add Danzig this brush tool and select the color, make sure you're on the right layer and just softly paint over this selected areas. Let's select once again, the inner births over the windows and the inner parts of the doors verges. Create one Malaya and make them more contrast by selecting the darker color and by repeating the step with painting over with a soft brush. After that, deselect everything with a control D and your house is ready. That will be all for the first dedicated to the linear perspective part of a drawing curves series. I hope you found this class helpful and if you liked it, please subscribe so you don't miss the next part of this series where we're going to be exploring the theory of light and shade. Check out the other classes and leave your review. And thanks for watching.
 Xenia Sorokina, Illustrator & Graphic designer