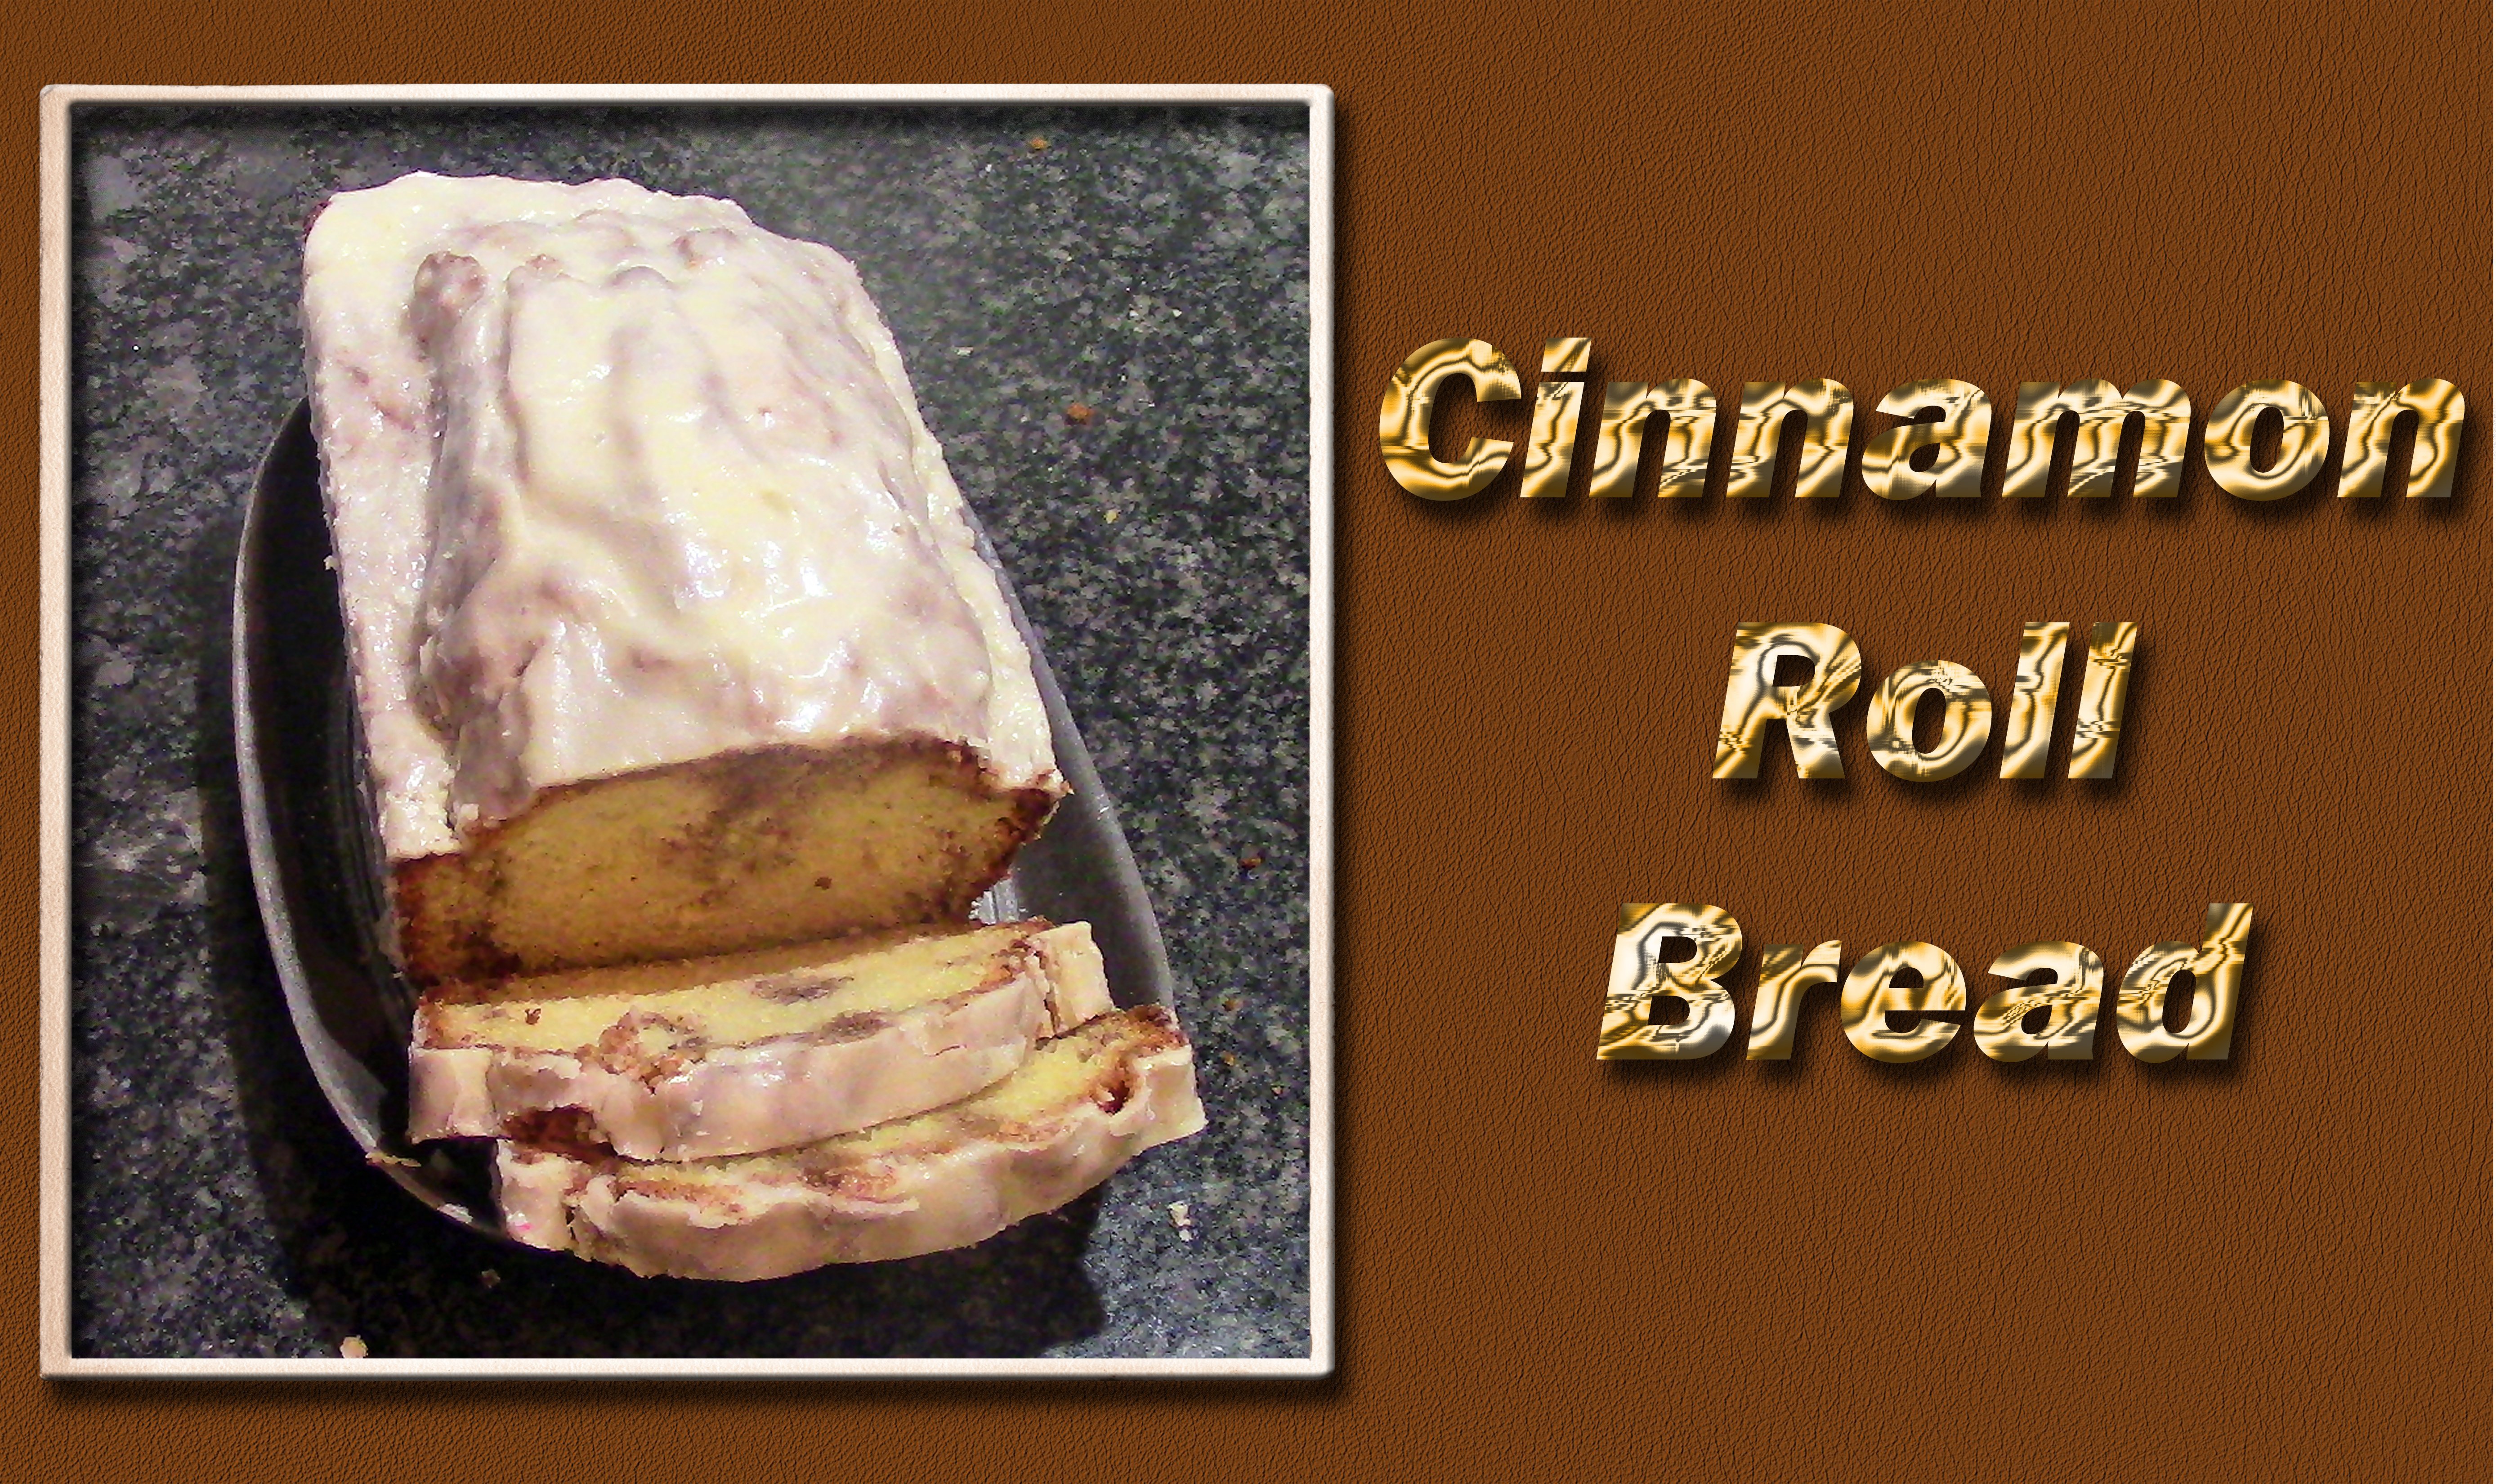
Transcripts
1. 01 Introduction: Welcome to this class. In this class, I will
teach you how to make This lime cheesecake. First, I will teach you how to make the crust for
the cheesecake. Next, I will teach you how to make the cheesecake feeling. Then I will teach you how to bake and cool the cheesecake. Next, I will show
you how to make the stabilized
whipped lime topping. Then I will show you how
to make the candied lines. We will finish up with me
teaching you how to add the finishing touches
to your cheesecake. I am a self taught baker. Many years ago, I decided I wanted to open up
my own home bakery. I had this business for
several years until my husband got a job offer in a different city
across the country. We felt like this was
a good move for us, and so I closed my bakery and we moved across the country. Now in the new city, I do not want to go through the steps to open up
another home bakery, but I still love baking, and as a retired teacher,
I love teaching. So I have decided to share my skills with you
on skill share. This class is aimed at the baker that would
like to learn how to make a delicious
lime cheesecake. I am excited to teach you
the skills in this class. Let's move on to lesson
number one, making the crust.
2. 02 The Crust: We are ready to start making the crust
for our cheesecake. In this bowl, I want
to put my butter, but I want to break my butter up into chunks so that
it will melt faster. And we're going to put this in the microwave for about
a minute at 50% power. While our butter is melting, we're going to get our
gram cracker crumbs ready. To do that, we're just going
to break gram crackers. And put them in our
food processor. And I'm starting by
printing one package in, and I just want to grind this. Okay. There's still a
few big chunks in there? That looks much better. Here is my butter that I melted. I may need to do
it another half a minute because as you can see, it's not quite melted. So we're going to put that back in for another half a minute. While that butter is going, I'm going to measure out
my first cup of crumbs. This has gone
another 30 seconds. We're going to stir this and
see the butter is melting. I'm going to put in my one
cup of grad cracker crumbs. Let's measure this out and see if we have
another cup there, or if we need to
grind some more up. That is not quite a cup that's
about a cup and a half. I'm going to do just three more and see if that's
going to be enough. One. 23. I don't want to
get way too many crumbs, and I can always do
more. Let's do this. A. Let's measure this out. That's basically another cup. Let's scrape all this. I
wasn't quite another cup, but I think it's close enough. Let's add our three
tablespoons of sugar. Then we just want to
stir this all together. Once we have it all st
together, There's no dry. It's all moistened with
the butter, like that. We're ready to put
this into our pan. We are using a spring form pan. That means the bottom comes out. Let's go ahead and
close that back up. And it locks in place. Now, we want to spray our pan down so that the
crust does not stick. And then we're going to
put our crust in our pen, and we want to spread it around. I find at this point, it's just as easy
to use my fingers, and I do want it to
come up the sides. Not all the way up, but
at about an inch up. I'm getting that side
part it's coming up. Once I get it coming up
the side like I want, then I can push it down and smooth the rest
on the bottom. I want it to be as
close as possible, the same thickness
all the way around. I am pushing. You'll see at the
corners where the side in the bottom meets.'s get that firmly in there and not a slope. With that done, We're going to put this in the oven and
bake it for 10 minutes. We'll be back in 10
minutes when that crust is baked to take it out of
the oven and let it cool, so it'll be ready for
the cheesecake feeling. The timer has just
gone off on the oven, so we're going to take it
out and let the crust cool. We're now going to let
this crust completely cool before we add
the feeling to it. In our next lesson, we will be making the
feeling for our cheesecake. O
3. 03 The Filling: We are ready to start making
the lime cheesecake feeling. We need to start by
getting the limes ready. The recipe calls for
the zest from one line. To do that I'm using
this very fine, and I'm just going to
run the line down it. I want to get go there, but do not go into the white because the
white is very bitter. We want to get that green off, but we're trying not
to go into the white. We're just doing a little bit at a time as we work our
way around the line. We're also going to use
this lime as part of the juice for the one
half cup of lime juice. Now, you can totally juice limes and get your
lime juice that way. I find it's just easier
once I've used the amount of lime that's needed in the zest to just
use bottled juice. So that's what I will be doing. Here is my lime zest. I'm just going to cut my lime
in half and juice the lime. That means I want
to squeeze this. And you'll notice
with half of a lime, you're not getting
that much juice. So if I were to
totally squeeze limes, I would be doing many
limes to get a half cup. Because one lime did not
even do a fourth of a cup, it did 1 ounce, which is an eighth of a cup. So I'm just going to fill
this the rest of the way up to a half a cup because
that is what I need. And that is much
faster than trying to squeeze this many lines. I do like using this. I'm not throwing
away lime juice. We're not ready to make the
rest of the lime falling. In this large bowl, I'm going to put my 38 ounce
packages of cream cheese. To that, I'm going to
add my one cup of sugar, my one tablespoon of corn
starch and my lime zest. And we want to mix this
together until it's smooth and. I want to start with it on the lower spe til we get
all of that sugar mixed in. Cora I'm going to just
speed it up a little bit. And I want to scrape down the bowl
and add my lime juice. We're now going to get it
to become a lot thinner. And we're just doing that
until it's combined. Screak that down some more. Now we want to add the eggs. One, two, three. We want to mix this just
until it's all combined. F. Let me scrape that down. And there we have our cheesecake feeling
ready to go in the pan.
4. 04 Baking and Cooling: We are ready to bake
our cheesecake. We need to first get our pan ready because we're going to be cooking it
in a water bath. I'm taking a piece of
aluminum foil and I'm putting the cake on the aluminum foil and bringing that
foil up the sides. This is to help prevent the water from getting
into our cheesecake. With that done, we now want
to our filling into the pan. We want to now put
this in the oven. Before we put it in the oven, we got to get the other pan in there that's going
to hold the water. As you can see, the rack
is in the middle position. I am going to pull it out, and I've already put the
cheesecake on the pan. You're going to put
that down right there, and then I'm going to
pour water into the pan. I like doing it this
way because then I know I'm not going to get too much water in there
or not enough water. Because the cheesecake
has already been has already accounted for
the displacement of water. And I want it to be about half an inch to an inch of water. We're now going to close
carefully because we have water. Our pa. And we're going to
set the oven for 55 minutes. We will be back to check our
cheesecake in about an hour, 55 minutes when the
timer goes off. Our timer is about
ready to go off. Let's take a look
at our cheesecake. There's our timer.
Let's open this up, and we want to pull it out just at I'm looking at
it's really jiggly. So I'm going to give
it another 5 minutes. We'll be back in 5 minutes
to check it again. We wanted to jiggle
a little bit, but we don't want it to
jiggle as much as it was. Our time is again
about ready to go off. So let's look at our
cheesecake again. There is our time. Let's
pull this out a little bit. It's still a little bit
more jibe than I want. I'm going to give it
that last 5 minutes, which will be the 65. Every oven cooks just a
little bit different. So you really do want
to check it at 55, and if it's not done then 60, and if it's not done then 65. I think as 65, it will be done, so we will be back at 65
minutes to see if it's done. Our time is about
ready to go off again. So let's look at our
cheesecake. There's the. Okay. It just jiggles
a little bit. So we're going to go ahead
and turn the heat off, and we're going to let
it sit in the oven with the oven propped open like
that for about an hour. So we'll be back in about
an hour to show you what we do after it
has sat in the oven. We want the oven to cool down, and we want the
cheesecake to slowly cool down so that we hopefully
will not get a crack. It's also going to, while
the oven has heat in it, finish cooking the
rest of the way. Our cheesecake has been cooling in the oven actually
a little over an hour, so we're ready to take
it out of the oven now. I just want to lift
this out of the oven. I also lifted it out
of the aluminum foil. I'm now going to
just cover this with a plastic because I want to make sure
that it stays fresh, and we're going to put this
in the fridge overnight, and then tomorrow
we'll be ready to put the whip topping on it
and the candied lines.
5. 05 Stabilized Whipped Topping: We are ready to make our
stabilized lime whipped topping. It's a lot like cool whip. The first thing we need
to do we do on the stove. In this pan, I'm going to dump one quarter cup water and
one tablespoon of gelatin. We're going to let this just
sit for two to 3 minutes. While that's sitting, I'm
going to get the lime ready. In this bowl, I want
to zest my lime. And I'm just using this
really fine grader and I'm going to grade the line. I only want to get the
green part of the line. I do not want to go
into the white because that part is very bitter. I just keep going til I have
most of the lime peeling, grated off of the line. Then I'm going to when I'm done, just scrape on the
underneath side, whatever is on there. There is my limes es. Now I'm going to cut my
lime in half so that I can squeeze it to
get the lime juice. I need for teaspoons. Hopefully, I can get
that out of one line. If not, you might
just want to use whatever you do get
out of the one line. Four teaspoons is just a
little bit over a tablespoon. So there is how much
lime I got from it. I'll probably just use whatever is there and not
worry about measuring it. Our gelatin has been sitting
for a couple of minutes, so let's go ahead
and look at it. You can see the
gelatin gone solid. So we're going to
turn the heat on. To medium low, and we're
just going to stir it until that gelatin dissolves. We're not trying to
bring it to a boil. We just want it to dissolve, and that's not going
to take a whole lot. Just like that, you can
see it has dissolved. We now turn off the heat, and we're going to let
this cool while we work on some more of
our whip topping. I have another small bowl here, and I'm going to add my half
teaspoon of cream of tartar. To that, it says a tablespoon. I'm not worried about
the exact amount. I just want to pour
just a little bit in there so that I can mix
up that cream of tartar. Once I get it
completely mixed up, We'll be ready to move
on to the next step. We have our stand mixer here, and we have the whisk
attachment. In the bowl. We're going to add that whip topping with the cream of
tartar that we mixed up, and we're also going
to add the rest of the whip whipping cream and
three tablespoons of sugar. I want to take this
and attach it, but put it like that so that
it's touching the bottom. And now I'm going to
put it on a low speed. This way, it's
making contact with the whip topping so that
it can whip air into it. And we're going to turn
it up to medium speed, and we're going to beat
it for about 2 minutes. When I start seeing a
little bit of volume come, I'm going to turn it off to firmly attach the risk
attaching back on. I'm going to turn this
off for just a minute so that I can now
firmly attach that. And we have it on
the median speed and we want to whip it till
it starts to thicken up. You can see it's
starting to thicken up. Now I'm going to pour
in my gelatin mixture. I'm also going to
add my vanilla, my lines, and my lime juice. Now we just want
this to thicken up. L et me stop it for a minute. You can see that stickinged
up quite nicely. Here we have our whip topping.
6. 06 Candied Limes: We are ready to make
the candied lines. We want to start by
slicing our lines. Now, I want to slice
these very thin. I'm going to make the first one thicker because I'm not
going to use that end. And then I want to
do these very thin. As thin as I can. I don't
know if I made that as thin as I wanted it. We'll
just keep going. I'm also going to cut
each one in half, because when I put them
on the cheesecake, I want them to be line halfs. Let's go ahead and
make them halfs. Think that's going to be plenty. We're ready to start
canning our limes. That is going to be
done on the stove. In this pan. We want to put one cup of water
and one cup sugar. And we want to stir this. While heating it on
medium heat until it's completely you
don't see any sugar, until the sugar is completely
dissolved into the water. We're not trying to
bring it to a boil yet. We're just trying to
dissolve the sugar. You can see That's
looking pretty clear. The sugar is pretty
much dissolved. I'm going to quit
stirring up for now, and we're going to place
our limes in our pan, and we want them
in a single layer as much as we can
get it that way. We just keep putting
them in the pan. We now want to bring
this mixture to a boil. You can see along the edges, it's starting to boil, but we want the
whole thing to boil. Really all I'm doing right
now is where I see it overlapping and I'm
trying to overlap it. Once it comes to a boil, which it's almost there, because we want the
whole thing boiling, not just that part there. You can see it's boiling
quite good there. I'm not really boiling over
here. I'm not sure why. L et's turn our pan, see if that makes a difference. We're starting to get the boil. We're now going to
turn the heat down to a kind of a medium lose that we'll just do
that soft boil, and we're going to cook this
for about a half an hour. So I want to set my time
on for half an hour, and we'll let this
simmer and we'll be back in half an hour to see how
our candied limes are going. Our limes have been cooking in this sugar water for about for a little
over half an hour. That should give enough
sugar into our limes. We're ready now to take the
limes out of the sugar water. Because the limes are very warm, I want to use these tongues to put them onto
our cooling rack. I've put wax paper
underneath the cooling rack because I know that some
liquid is going to fall. The tongs weren't working as well as I thought they would. I'm using this little spatula
instead because with this, I can get underneath, as you can see there, my limes and bring them
up and then spread them on the cooling rack. We do want to make sure on the cooling rack that they're not overlapping
each other at all. And now that I have
all the limes out, we're just going to let them
completely cool and let the sugar completely
crystallize on the lines. And I'm just quickly looking to make sure
none are touching. If they are touching, I'm slowly moving them, so they're not touching. There you have your
candied limes.
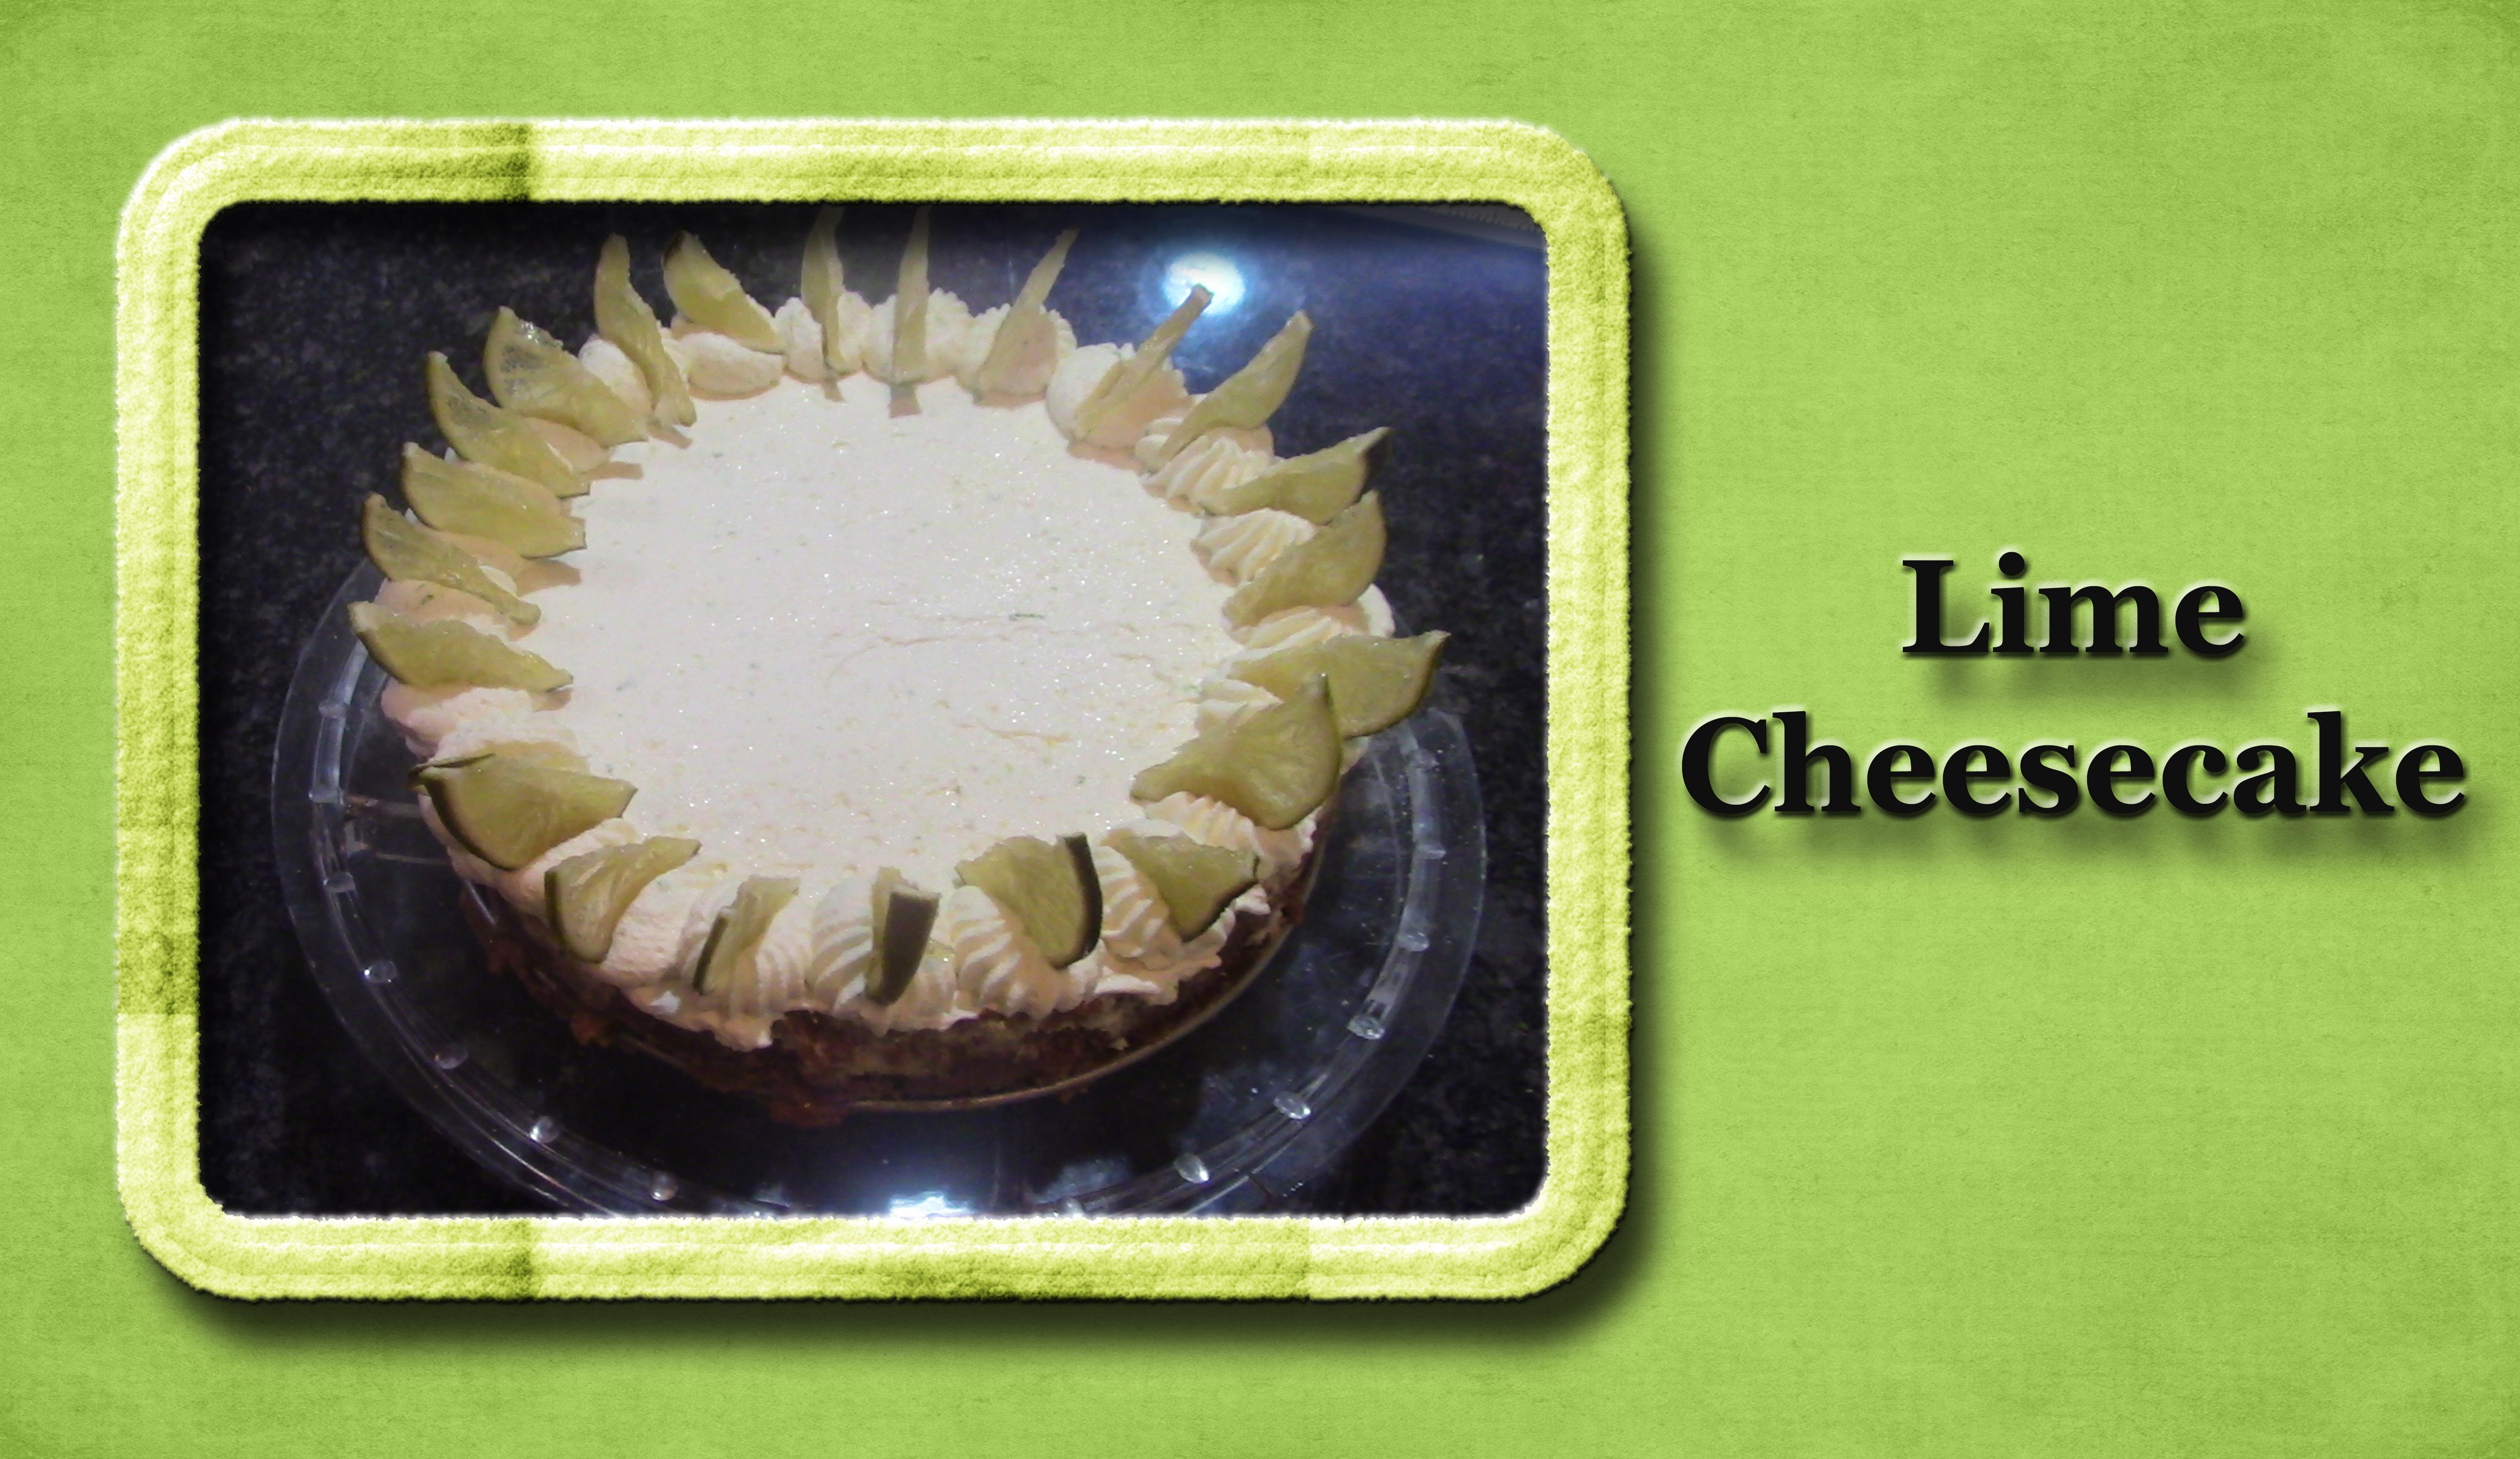
7. 07 Finishing Touches: We have all of our
elements made. The cheesecake has sat
in the fridge overnight. We're now ready to totally assemble and give it
the finishing touches. Here is my cheesecake, and I'm just going
to uncover it. And I do want to
kind of run my knife around just to make
sure that this is going to separate nicely. And now I'm going to
take this part right here and open it. And remove that part
from the cheesecake. Now, what I want to do
is I'm going to put some whip topping on top
and spread it around. I want this to be
a very thin layer just enough to cover it. I have my whip topping on. Smooth it out. You can
now see that's on. Now we're going to
take the rest of the whip topping and
put it in a bag. I want to cut a hole in my bag. I'm sticking this tip. It's like a round tip, but it has a design on the edge so that I
have a little bit of design on my puffs of whip topping that
I'm going to pipe out. You notice, comes right
to the edge there. I'm going to scoop the
whipping into that bag. And that's why I wanted a
thin coat on it because I wanted to make sure I had enough whip topping
for this next part. I'm taking this
and just twisting the bag till I start seeing
that whip topping come out. I'm just going to
go around the edges and do little kisses. Now, what I want to do with these kisses is I want
to stick my limes in. I'm going to go
ahead and stick it. I've got to decide
how I want it. I'm going to stick it so
that it's coming like that. I'm going to start by doing every other one because I'm not sure how many limes I have. And this way, if I
don't have enough, I still get the pretty, and if I have plenty when
I get this part done, I can go back and
fell in between. These lines, while they are edi, chances are people
will just take them off and put
them on their plate. But they do make a nice garnish. I still have over
half of them left, so I'm going to go
ahead and do each one. Now, I also have this
crystallized lime, and I just want to sprinkle some on the top to help give it
that lovely flavor. There we have our
lime cheesecake.
8. 08 Final Thoughts: Thank you for taking this class. We had fun making
our lime cheesecake. We first learned how
to make the crust. Then we moved on to the feeling. We then baked our
cheesecake in a water bath. After the cheesecake had baked, we let it sit in the oven for
an hour as it cooled down. After that, we removed
it from the oven, let it cool down the
rest of the way, covered it, and put it in the
fridge to set up overnight. We then moved on to making our stabilized whipped cream
and our candied lines. With ol of them made and the
cheesecake totally set up, we removed the
cheesecake from the pan, and then we added the stabilized whipped
cream by spreading on top and then adding
dollops around the edges. We then put our limes
into each dollop, and then sprinkle the top
with a crystallized lime. I hope your cheesecake turned out the way
you wanted it to. Your project for this class
is to make this cheesecake. The recipe is in the
project section. And make sure that
when you're done, you post a picture of
your cheesecake in our project section and
tell us how it went. I look forward to
hearing from you from my kitchen to your kitchen. Happy baking.
 Nadine Thomas