Transcripts
1. Introduction: Do you like drawing and you'd
love to draw like this, but you find it
really hard to move beyond drawing like
this? Hi, I'm Ben. I'm an author, designer, illustrator,
and a facilitator. I want to show you a
fantastic drawing technique that has been a game
changer for my own drawing, but for fun and work, and it's called
foundation lines. In this class, I'll
show you how to use this foundation lines
method and help you to apply it to whatever it
is that you want to draw. The drawing will be
more satisfying. You will learn to heighten
your observation skills, which is a massive key to unlocking better drawing skills. You'll learn how
to help your brain translate to your
hand what to draw, whether you're drawing from
life or from imagination. Along the way, you'll also draw lots of different figures, hands, and objects to increase
your visual vocabulary. This class is great if
you're drawing for fun, but it's also really useful for designers,
researchers, consultants, sketchnoters, and facilitators
who want to capture and communicate ideas as drawings
in a smart, rapid way. Will this class help you to be more confident in your drawing? Yeah it will. The
foundation lines methods certainly helped my confidence. But the biggest boost
that I got from it, that I really want
to share with you is that with foundation lines, you can draw just about
anything on this book. And that's a fantastic
drawing super talent to have. Grab something to draw
on and something to draw with and let's
get stuck into it.
2. Your Class Project: [MUSIC] In this class, I'm using the foundation lines. If it is all about
getting you to experience how this method can improve your observation skills as well as your drawing skills. To help with that,
I've got a bit of a fun project for you to do. In this project, you're
going to be creating a dynamic drawing
composition a bit like this. Have several objects drawn together using foundation lines. Now, what you draw is completely up to you
and your creativity. But my aim here is to
help you put something together that not only puts the foundation lines
method to work, but it's something
that you've got to be really proud to show off. You'll start by finding some individual objects
of your choice, and then you'll apply the
foundation lines method to those that aren't fixed by observing them and drawing them. Then the magic happens when
you bring those objects together in a visually
interesting way as a dynamic composition. It's also a great opportunity to use different markers and media that perhaps we
might not normally try. By doing that you get to explore the different
visual flavors that this method can
show and that might end up being part of
your own visual style. Start thinking of some things that you would like to draw, or maybe some things
that you found really tricky to draw. We'll get cracking on
the project soon enough. Coming up next, we
take a quick look at what materials you
need to do this class. [MUSIC]
3. Materials You'll Need: [MUSIC] Let's take a look at the materials that
you're going to need to get the most
out of this class. At a minimum, you're going
to need some blank paper, just plain old office paper
is fine or a sketchbook, if you have one, a pencil, and a fine black marker. I'm using this Artline 200, 0.4 mil black marker, but any fine black
marker is fine. I'm also going to be using
these Neuland FineOne. You'll notice that the tip
is a bit thicker as well. This is a great
opportunity to bust out any favorite color pencils
or color markers that you might have just to
see the range of different visual
effects that you can achieve with these
foundation lines method. I'll be using a few
different colors of these Neuland
markers as well. Digital drawing is
perfectly fine too. I'm going to be using my iPad quite a lot during
this class as well, and my Apple pencil, and the Procreate app. Other drawing apps are perfectly fine too
as long as they have latest functionality like
Concepts or Adobe Fresco. Now that you're all geared up. In the next video, I'll
introduce the foundation lines, [inaudible] What are these, why it helps, awesome
examples from our history.
4. About Foundation Lines: In this video, you
will get to know what this foundation
lines method is. Why it helps you in your
drawing confidence and skill, plus some examples and how others have used
foundation lines. A big part of the
magic of drawing, whether it's realistic
drawing, fine art, comics, animation, product design sketches, and even just simple drawing icons. A big part of the magic I find is when we can see an object, whether it's in front
of us or in our minds. Our brain send these
bunch of signals down to our hand and then the hand
renders that outfit on paper, pixels, or on a whiteboard. I just found that fascinating. Often what gets in the way
of that is the way we see, the way we observe and
understand whatever the object is that
we want to draw. Let me tell you what I
mean. Often we try to draw something as we see in
real life like this horse. We try to draw it as it
looks from the outside, from the outside in. Now you might be able to
draw this horse really well, and it could look really
good but for a lot of us, trying to destroy the outside of a horse can be really hard, and the results, maybe
aren't that great. But here's the big secret, it's much better instead, if we draw it inside out. In other words, if we look into the thing that we're
trying to draw first, we can break it down
into smaller parts and look at how that set of
smaller parts works together. Then when it comes to
drawing the object, we can draw the
collection of shapes first and then draw the object over the
top of the shapes. This makes drawing much easier
and much more satisfying. That's the essence of the foundation lines method
or construction lines method. Basically taking a
complex object and breaking it down into
simple lines and geometric shapes first and then doing a drawing
over the top of it. That way you do a more accurate and most satisfying drawing than you might normally do. I want to emphasize that this construction lines method is seen all over the place, heaps and heaps
of people use it. You see it a lot in a lot
of other drawing videos of faces and hands and
figures, things like that. The thing I want
to emphasize here is that you can take
it beyond that and use it as a technique just to better understand
whatever the thing in front of you or in your mind is so that you can
draw it better. It's like having training
wheels on a bike. Once you've been using a bike with training wheels
for a little while, you don't need them anymore, and then you take them off. These construction lines
work in the same way. Once you've drawn a
particular object with construction
lines a few times, your mind's eye can actually
then see them on the page or on the whiteboard or on the iPad or whatever
it is that you're drawing. Your mind can see them without
you needing to draw them. Then your hand is
more confident in drawing whatever it
is that you need to draw as if the lines are there. That's something I'll really
like about this method. This is a technique that's been around for hundreds of years, and it's fundamental to
any drawing practice. It stems from a system of
drawing perspective created by Italian Renaissance artist and architect Filippo Brunelleschi. In more modern times, his construction lines method
has been told really well by folks like Andrew
Loomis and Frank Reilly. Check them out if they
are familiar to you. Another thing that
really interests me about these foundation lines or construction lines
is that they're more than just a technique to
help you draw better. They have a visual aesthetic, all of their own. You can see it come
through nicely in a lot of product
design sketches. Here we see the process of
a product taking shape. But the drawings are like a
work of art on their own. This makes us appreciate that the process
of coming up with a product is often as valuable as the final
product itself. Time to turn to our projects. What I'd like you
to do is to find five particular objects
that you really want to draw or maybe you find
challenging to draw. Now those objects could
be inside, outside, it could be from nature, plants, animals, any kind of object. All you need to do is just
find five different objects. Coming up next. We're going
to get drawing and put this foundational lines
method into action. [MUSIC]
5. Drawing Your First Foundation Lines: [MUSIC] In this video, you'll learn a
step-by-step process to follow for observing, deconstructing, and then reconstructing any
object you want to draw, using foundation lines
or construction lines. As I mentioned in the last
video, construction lines, or foundation lines
helps us to observe and understand whatever the thing is that we want to draw better, which then leads to a more accurate and
satisfying drawing of it. Now I want to show you how
to do that step-by-step. But first, let's grab some paper and a pencil and let's
warm up together. I always do some sort of drawing warm up
whenever I'm going to draw to get that pipeline
from the brain to the hands, nice and clean and to
limber up the hand a bit. Draw along with me,
and let's warm up by drawing some basic
geometric shapes. Now note as I draw, I'm not rushing I'm being
reasonably precise. I'm trying to let
parallel lines, stay parallel lines and I'm trying to let
corners be corners. I'm drawing several lines
on one shape to find the best location of the line and the corners and
the shape that I want. Notice I'm not drawing a robot and I'm not trying
to be perfect, but I'm after a little
bit of precision. Now here comes Step one of
the foundation lines method. For this I'm going to use
my set of head phones here. Of course, feel free
to draw along with me. You can use a
pencil if you want. Right now I'm just going
to use this color marker. The first step is to
look at the object, really look at it and in
your mind's eye and notice the basic geometric shapes
that make up the object. The next step is to draw the simple geometric
shapes that you see using pencil or a light color pencil or a light color
marker like this one. I really enjoy this step because I don't have to be
correct or perfect. If one line isn't quite right,
I'll just draw another. I don't need an eraser because all of these
lines are quite right. Now I have the foundation
of the headphones, the scaffold, the construction
lines to draw on top of. Let's try something
a little more complex this time, but for this, I'm going to use my
iPad and Apple Pencil. Just as a reminder,
I'm going to be using the appropriate
drawing app, but you can use any other
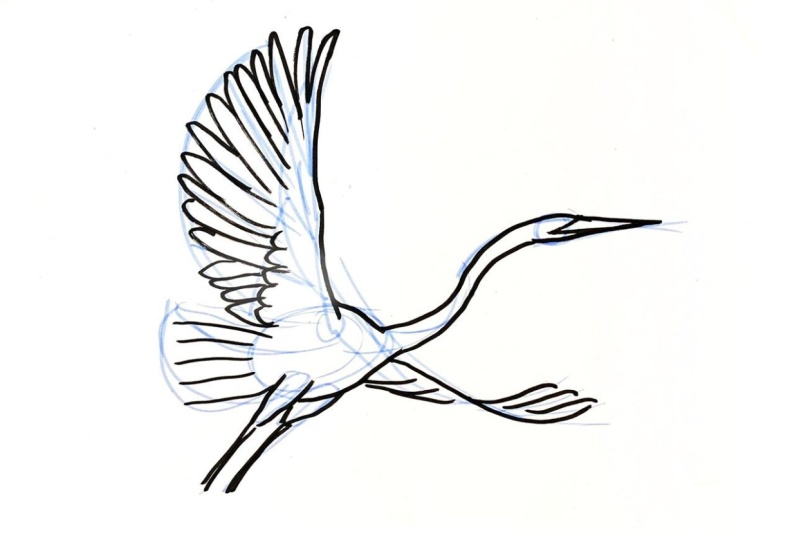
app that uses layers like Concepts or Adobe Fresco. In this example, I want
to draw a flamingo, and I have a photo of a flamingo here that I got
online and I've got the location and the attribution of this in the
class notes below. But I've got the photo of the flamingo on the side
of the layout here. I've chosen a flamingo because
I want to show you how the geometric shapes
don't always have to be within the object itself. Sometimes there are
parts of an object that describe a shape
outside of itself. I'm going to lower the opacity of this photo so that I can focus more on the form
and less on the detail. Now, I'm creating a new
layer on top of the photo, choosing a pen and a color. In this case, this
blue color is fine. Now I can notice the geometric shapes that
make up the flamingo, and I'm drawing those shapes. The neck is a really distinguishing
part of the flamingo, so I want to get
that part right. This way I can draw
a whole circle, which helps my mind and my
hand understand how the curve of the neck relights to
the rest of the bird. Notice if I switch off the photo layer and look
at the foundation lines, I can see that it does indeed retain the shape of a flamingo. Well, I hope you got
the hang of that. Now, it's a good idea to practice that a few more times, so that brings us to
your class project. What I'd like you to do is to take those five
objects that you've got and do the same
thing with each object. Look at each object and
notice the simple lines and geometric shapes that
are inside each object, and then draw those lines
and shapes on paper or iPad, whatever your preference is. Coming up next, we'll build on steps one-two of this method, then draw on top of
our foundation lines.
6. Drawing on Top of Your Foundation Lines: [MUSIC] In this video, you'll draw on top of the construction
lines that you drew before to see how those lines can give
you more confidence. Well, right now you've got
some drawings that look like the skeletons of the
things that you want to draw. They look like the
bones of each object. What we're going
to do now is start to put flesh on those bones. For this next step,
you can stick with whatever you were
using to draw before. I'm going to stick with using this green marker or you can stick with using a pencil
as well. Let's go. Back to the headphones. By looking at the
headphones and using my foundation line as
a convenient scaffold, I can start drawing the actual headphones
straight over the top. As I draw, I'm thinking about
whether a subtle curves and indentations where
I can go in and out of those construction lines. Just like before, each line doesn't have to be perfect and it's still trial and error. It's like my hand
is learning as it goes with each line that
it puts on the paper. I'm still just focusing
on getting the form and proportion right
rather than in detail. Now I'll do the same step for the flamingo that I was drawing. So I'm going to go
back to the iPad here. I'm creating a new layer to keep this drawing separate from the foundation lines layer. [MUSIC] Now you can see I'm following the curves of the
geometric shapes. Again, just focusing
on the form and proportion rather than detail. [MUSIC] Again, if I switch
off the other layers, I've got a nice-looking
flamingo emerging. Now guess what? It's your turn. Time to go back to
your class project and for those five objects and the drawings
you've been doing, do that next step of doing a drawing on top of
the foundation lines. Remember we're still focusing on the proportion and
the overall form, the detail comes next. Speaking of which,
in the next video, we'll do the final step in
this foundation lines method, which is doing a
final drawing on top of the construction
lines in our drawing.
7. Completing Your Drawing: In this next video, we
do the last layer of our drawing so that you
can see the final result. Now we get to the part
that you might be used to starting with
when you normally draw. This is regulatory. It's just that now we're going
to be doing it on top of the foundation lines and light drawing that
we've already done. Now, for this step, you'll need a fine black marker
like an Artline 200, that's a 0.4 mil black marker
or something a bit thicker. I'm actually going to
use this [inaudible] and black marker which
is a bit thicker. [NOISE] Using my black marker, I'm drawing over
the light drawing of the headphones
that I did before. [MUSIC] Now I can add a bit of detail, and I can add a bit of a visual texture at
this point as well. Notice how as soon
as I use black, the black drawing really
jumps to the front visually and the previous drawing
visually recedes. I really like that effect. Let's see how it works
with digital drawing. I'm creating another new layer. Now I'm drawing in
black over the top of the construction lines layer
and a light drawing layer. [MUSIC] Now, if I switch off
the other two layers of construction lines and
light drawing lines, I've got a nice clean
line out of a flamingo. Now, here's the thing, this foundation lines or
construction lines method is great for learning how any given object is put together in terms of interpreting it and
then trying to draw it. By drawing the same object
with this method a few times, as you can see here when I'm drawing the flamingos
several times, you'll find that the
foundation lines gets saved as a blueprint
in your brain. Then, when it comes to drawing
whatever the object is, you'll be able to almost see
those construction lines on the page or the whiteboard or the tablet without
having to draw them. Then, you'll be able to
draw the object in one go more confidently in
a more satisfying way. Well, now it's time to try that last step with
your five objects, that final drawing layer on top. Remember, try to see this
as a way of learning, and training your brain, and giving your brain
a blueprint for how to draw each particular thing so that you can then draw it with confidence without
the foundation lines. That's what we're aiming for. But in the meantime, don't put yourself under any pressure. It's always helpful to do each object a few
different times as well. Have fun with it.
Coming up next, we do all the steps together
and apply to figures, and poses, and hands.
8. Figures, poses and hands: [MUSIC] Now that you've tried the foundation
lines method, let's apply it to various things that we might like
to be more confident in drawing and we'll start
with posing fingers and hands. Now there are lots
of fantastic classes around to help us
draw things like hands and hips and figures and posing figures in a
really lovely way, in a realistic way
and that's fantastic. Now there are sometimes
though where we want to be able to capture and express just the symbolic
night shot of a hand or a figure where it doesn't
have to be super realistic, but it still needs to have enough substance that it's
more than just a stick figure or a hand that looks a bit like a bunch of broccoli
or something like that. That's where the foundation
lines method can really help and help us
to be more confident, especially if we might
be drawing at work. We need to draw on the spot like where we
need to draw figures and hands representing customers and audiences uses things like that, whether it's on the
whiteboard, or on paper. Let's have a look. Just
like we draw things like headphones and flamingos into sets of geometric objects, we can do the same thing, for figures to be
able to draw them in the most simple economic way. But as I say, it's something
that still has to be a substance and character to it. Draw along with me as I draw this simple figure constructed from geometric shapes as
construction lines first. [MUSIC] Then with the black
drawing over the top. [MUSIC] Now that we can understand a bit more about how the figure works, we can look at changing
the shapes and proportions here and there to show figures that
are more masculine. [MUSIC] When we pose figures we can use our imagination to think how the elbows and knees move. [MUSIC] Sometimes there is a
bit of foreshortening, where the thighs in
a figure might look a bit shorter. [MUSIC] Sitting at a desk [MUSIC] What about two figures
sitting on a bench? [MUSIC] All I'm doing here is just using
the same blocks, the same geometric shapes, drawing the skeleton first. That gives us a nice scaffold to then draw a simple
drawing over the top. [MUSIC] When it comes to drawing hands, it's worth seeing
hands almost like different figures with
a body and limbs. Where the palm of
the hand is like a body and the thumb
and fingers are like the limbs that are
hanging off that body. We can simplify the form of the hand into three
basic shapes, a square for the block
of the hand, the palm, a triangle for the thumb, and a semicircular guard and
gate shape for the fingers. Now with that in mind, we
can impose the hand in different ways by manipulating
the square, the triangle, and the guard and gate shape. [MUSIC] Here are some ways to draw hands holding things [MUSIC]. We can use our X-ray vision and draw the foundation
lines of a hand behind an object like this. [MUSIC] We can draw a hand holding a phone. [MUSIC] Well, you're really getting
the hang of this method now. That's good, I hope it's
giving you more confidence to draw well just
about anything really. Now remember, when you think of whatever it is
you want to draw in terms of the simple shapes and you think of drawing
those shapes first, it helps us tackle just about anything
that we want to draw, especially if it's
from memory or from our imagination. [MUSIC] Up next, it's time to use
foundation lines to expand our visual vocabulary
so that you can draw a broader range
of objects on demand.
9. Expanding Your Visual Vocabulary: Well done. You're
well over halfway. In this video, you get to put your foundation lines
drawing skills to the test by drawing some objects from your
memory or imagination. Well, I hope you
still got some paper, and a pencil, and a black marker ready
because now I'm going to tell you several things to draw
with text on your screen, and what I'd like you to do
is pause the video and draw each of those things using
the foundation lines method. Let's go. Try drawing kettle, cactus, car, megaphone, and a guitar. [MUSIC] Well, how did it go? Hopefully you've surprised
yourself by showing yourself that you can draw more things than you probably
thought you could, and maybe draw them better than what you thought you
could by breaking them down first into simple shapes and then drawing a regular
drawing over the top. Coming up next, let's get
creative with some variations. [MUSIC]
10. Some Creative Variations: [MUSIC] In this video, we're going to play with some different
creative directions for where this foundation
lines method could take us. Now, as I've
mentioned, you can use construction lines as a way of learning how to draw
particular objects, so that by drawing them several times with construction lines, then you can get to
the point where you can draw it without the construction lines in
a more satisfying way, a more accurate way. This is great when you
need tutorial on the spot, like you might be
drawing a work, or trying to capture an
idea in your own notes, or with other people
and you just need to be able to draw whatever
that thing is. If you've written that bike with training wheels on it before and you don't need the
training wheels anymore, you'll be able to draw
these things on the spot. That's great. But
construction lines can also be part of your
own visual style. Let's take a look at a few ways that we can play with that. Here's some really honest
examples where we can see construction
lines in action. In this one, we're seeing some construction lines in
product design sketches, where the process of a
product is taking shape. We've hand-drawn sketches
before any kind of computer-generated
graphic specification or prototype is done. This makes us appreciate
that often the process of creating a product is as
important as the product itself. Now I want to show
you some variations using different
colors and media, all badgering the same thing, a fish in this case. Feel free to grab different
kinds of pens, pencils, markers, any kind of pigment, and try some of these with me. [MUSIC] When we play with the color and medium at this foundation line, we can get some really nice
visual effects happening. These foundation lines become an integral part of the artwork. When we see drawing as
a process of layers, rather than only just
being a finished product, we can actually incorporate
this into our visual style. We can flex with a bit more creativity in
each of those layers. We've extra line, shape,
texture, and color. As you can see, foundation lines or construction lines
not only help us to navigate what it is
that we're trying to draw and understand that
better and draw it better, it can actually be a foundation of a
distinctive visual style. I hope that's something
that inspires you and gets you trying
different things, different ways of drawing. Coming up next is the last video and the last
step in your class project. Together we'll look
at how we can use foundation lines to construct all compositions rather than
just individual objects. [MUSIC]
11. Compositions With Several Objects: [MUSIC] In the last
video of this class, we focus on how we can use
foundation lines as a tool for composition rather than just for drawing individual objects. Composition is such
a fundamental aspect of visual communication, not only in art,
but in advertising, movies, comics, you name it. Composition is what
helps us to lead the viewer's eye and
composition can also help us to create a sense of calm or tension for
the viewer as well. Here's some examples. [MUSIC] Now, it's time for
the final step in your class project. This is where all the
magic comes together. It's your turn to create and draw a composition of some sort using at least three of those objects that you've been drawing throughout this class. To do this, first, you're going to draw an
extract layout using simple geometric shapes that represent each of those
three objects or more, and then you'll draw each of
those objects as you like, again, using the
foundation lines. Here's a demonstration
of what I mean. For this composition, I'm going to have my page in a portrait
orientation like this. You can do it
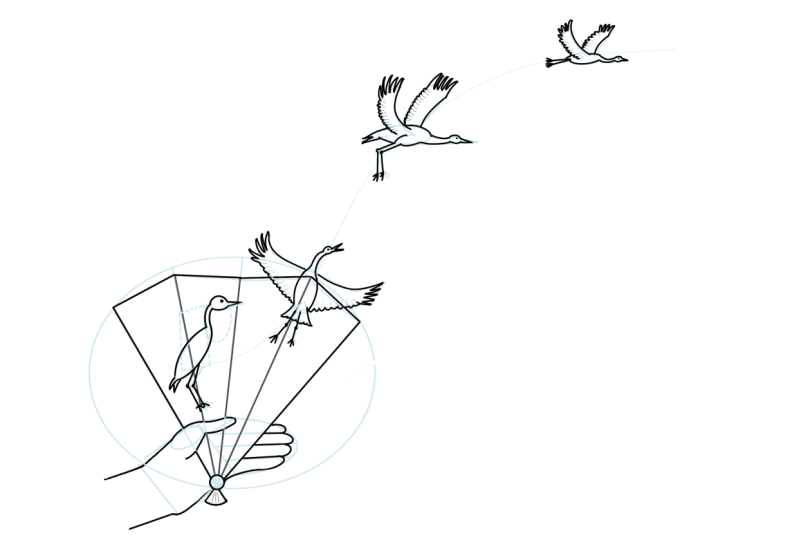
landscape if you like. That's completely up to you. But with this composition, I'm going to go portrait. What I've got in mind
is a hand holding a paper fan and this imprinted some [inaudible]
that are going to magically fly off from that fan. That's what I've got in mind. [LAUGHTER] I'm going to block in where I think the hand
would go at the bottom here, and then I think where the fan will go like that
quarter circle shape, I think. Then I want the
bird sweeping up, so there's my line just
defining where they'll go. Maybe the first bird is
probably about there. The first one taking
flight is about there, and then the next one, and then the next one, so they
get smaller as they go up. Those are the basic shapes for my composition and now
we're going to go back and put in some more foundation
lines for the hand first. Now remembering this is the palm and the
garden gate is at an angle there holding
the fan, is the triangle. It's a bit more there like that. The fan, I've put
a few more lines in to show where the
crisis would go. Then for the birds, I've got a body curve, and then up here I
do some wing shape, and oval for the body and
big triangles for the wings. Sweeping line showing the
neck and where the head is, maybe block for the tail. I'll do the same thing
for this heroin, but it's a bit smaller. The fourth way here
that's smallest, steel tiny up the top there. I'll start with
the hand following foundation lines
there and I'll draw the front part of the fan. Just completely making
up what that would look like and then sides. Then just following the lines from my garden guide
to show me where the fingers would go. Now I'm going to
start on themselves. Not to worried about
too much detail. One, because this
is a demonstration and it would take a long time, but the other thing is I just want to
emphasize more about the technique that
we're doing here and keeping things
in proportion. This bird taking flight and that's the main focus of
this composition, I think. Of course, with this
foundation lines here, it means I don't
have to try so hard, trying to remember
where all the lines go. I'm just following
those lines as a guide. The final one, very small. I better finish the fan here. I'm not even dress
this up slightly with a little splash of color. There you go.
Drawing compositions like this is a great
opportunity to have a bit more
fun with drawing, flex it bit more creativity. I hope that the
foundation lines method helps you to flex a bit more
creativity in that way. Now, don't forget to upload
your final creation. Your final composition
to the project gallery. I can't wait to see it. I know that other people in the Skillshare community here
would like to see it too. If you have any other
questions for me, I'm more than happy to
answer those questions. Please pop your questions into the project gallery as well. Thank you for taking
this class with me. I really hope this
technique helps you in your drawing confidence
and your creativity. Please consider following
me here on Skillshare. If you want to see more of
the training that I do, take a look at my books, Drawing in 4, which has over 100
different things to draw using the foundation lines, and my other book, Presto Sketching, which really goes deep into using drawing to explore and explain
ideas and solutions. That's a great one
as well. Feel free to follow me on
Instagram as well. I hope to see you in
another class soon. Bye for now. [MUSIC]
 Ben Crothers, Facilitator, Designer & Drawer