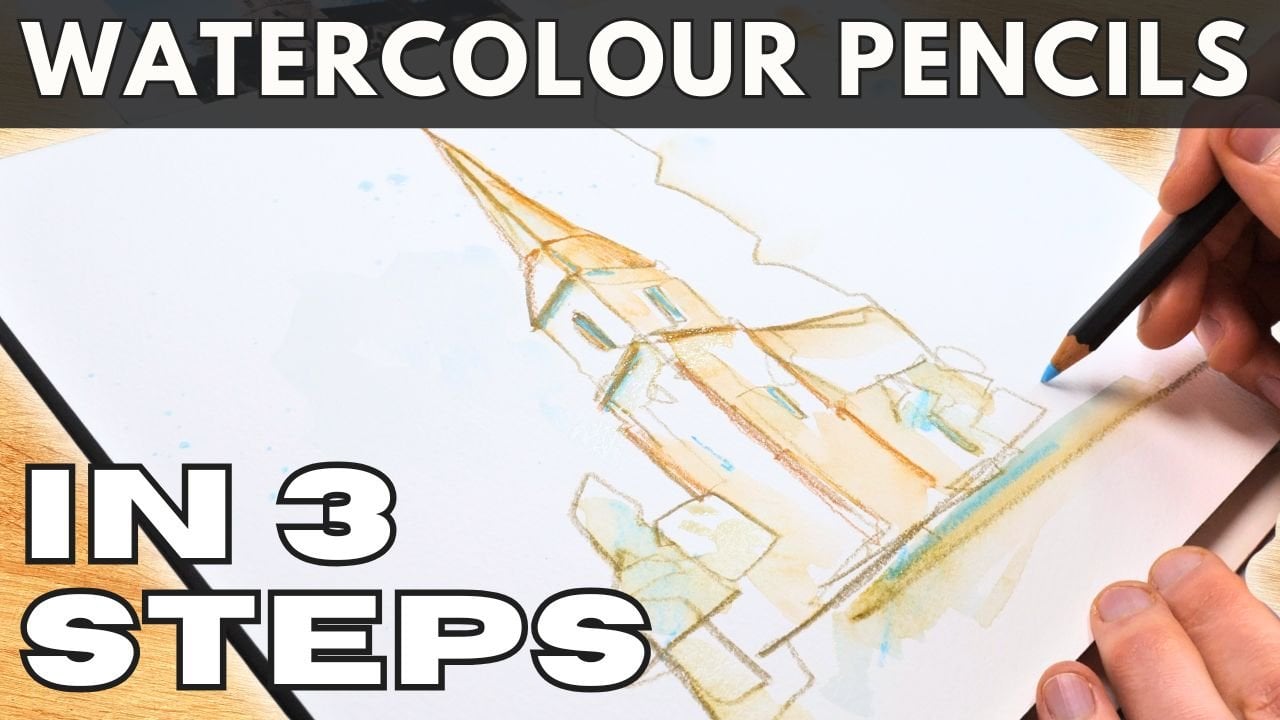
Transcripts
1. Introduction: Or anything like
me, you might have some boxes of
watercolor pencils, just sat in the
cupboard for years. We buy them because they look so fun and vivid, and
you think, Oh, the control of pencils with the spontaneity and
fun of watercolors. But they turn out to be a
little bit awkward to Hughes. Well, today, we're going
to unlock their potential. We're going to be exploring
water soluble pencils. So looking at water color
and ink tense pencils, which are a really popular
brand at the moment. And I'm going to firstly
show you how I use them, give you some ideas, the kind of techniques which
can build up your sketch, and show you why they're
so special and why perhaps we often a bit
wrong when we start. With all of that
under our belts, we of course, going to
create a lovely painting. This time, a rural scene
from near my hometown. It's a Cotswold barn and field. It's going to be beautiful. It's also going to be easy. And I will show you the
different stages to work through that will get you
confident and understanding, trusting the process so you can sketch with confidence with
your watercolor pencils. If you enjoy this class, please do leave a review. And I'd love to connect with
you at Toby Sketch Look across the Internet and
on Sketch loos.com UK, which is my Sketching website.
2. WaterSOLUBLE pencils explained: Here, I have a pack of
watercolor pencils. And over here, I have a
selection of D ink tents, which are water soluble pencils. We're going to be playing
with both of these, exploring why underneath it all, they're pretty much the same. And getting to
understand what are water soluble pencils?
What makes them special? And of course, how
can we use them? Inside all of these pencils, whether it's the ink tents
or the watercolor pencils, we have a pigment. Now in the ink tents, that is an ink based pigment in
the watercolor pencils. That's a watercolor
based pigment like you would normally get
in watercolor pans. That is some kind of binder, and that's what
makes these special. It means we can use any of
these pencils as a pencil. We can draw, we can
sketch, we can shade. And with both of these
varieties of pencil, we get delightfully bold lines, we'll get subtlety of
changing our mark. And we can get really light
and gentle colors as well. We can create subtle effects. But what makes them special? What makes these really
lovely to use is not that we can use
them just like pencils. It's the fact that we can
then come in with a brush, some water, and
look what happens? They activate. They become
bright, they become bold. We can move that pigment around, we can paint with it elsewhere. And all of these colors will
become something different, something softer, something
more saturated often as well. When we apply just a
little bit of water. And that is why water colors or water soluble
pencils are so special.
3. Other Supplies: Now, it might seem
really obvious, but what do you need for your watercolor pencils or
your water soluble pencils? Well, the partner, of course, I selection of pencils, and there are lots of
predetermined sets you can buy. It's the cheapest way to get
into watercolor pencils, buy a simple set of six or 12, and that will come with a
range of primary colors, probably a couple
of murky colors, some browns, and maybe
something special as well. But you can also make your
own selection, of course, and I wouldn't get too picky, pick the colors which
call out to you, and you'll be able
to have a bit of fun and explore your pencils. Ngside that, we need
some kind of water. To create this page, of course, we used a big brush
and a tub of water, and later on, we'll be experimenting with a small
round brush as well. There is, of course,
always another solution. In this case, we could
use, for example, a water brush, and that
water brush means, instead of having
to carry around loads of water in a tub, if, let's say we draw a little loose suggestion of a landscape. What we need to carry
is our water brush. Suddenly, with a few squeezes, we get the water out
of that reservoir. You can see it going back and forward there, get
the water out, and we can just use
this simple brush to activate our colors. There are disadvantages to this. Of course, otherwise we'd all
be using this all the time. The main one is that
this material here, this is a very cheap nylon, and it needs to be because it's constantly being soaked with
water from this reservoir. That means if we are trying
to paint with it, normally, it just doesn't have
the same flow and feel, and it is quite a
dramatic difference. However, all you need to do
to go sketching outside, or even just sketching
downstairs is pop one of these in your pocket,
fill it up with water. Grab a handful of pencils
and a sketch book, and you will be good
to get started. What they lack in
quality they make up for in just being
so easy to use. Now, we can use any paper, but I would recommend
using watercolor paper. For example, in a
sketchbook or like I've got here just as a sheet
of watercolor paper. That means that your colors will have a little bit
more texture because watercolor paper has a
textured surface to it. But it also means that
the paper won't buckle. You can see here,
my paper is almost completely flat despite
the application of water, and that's because
it's thicker and it's designed to take that beating
that water gives paper.
4. Sharpening your pencil: I want to just show
you how I sharpen these pencils first
because there are, believe it or not
lots of ways of sharpening watercolor
pencils and normal pencils. And I don't think any way is
better than any other way. I'm sure they all have different advantages and things like that. But this is the way that
I've always done it. So you might see this rather alarming stanley
knife to one side. And that's because when I was first to learning to sketch, I had a very inspiring
teacher who showed me their preferred way
of sharpening pencils. And here, what we do is
we just use a knife, and we gently expose the lead. Now, the reason that this has benefits is a you can expose a much greater
area of the lead, and you can create the kind of point that you want to create. With a sharpener,
you are very much only going to create one kind of pointy end, and
that might be great. That might be the
control you want. Equally, there's
downsides to this, which are we're using a knife, which we certainly in the UK, shouldn't have a big
exposed knife in public. It's probably not
something I'd want my younger relatives using, and I wouldn't want to
carry around a giant knife, in public spaces and wrist dropping it and
things like that. However, this is how I prefer
to sharpen my pencils. And you can just see, we just
gradually whittle it down, and you can end up with
a really lovely point, but you can also
expose a lot of lead, like I have done here. This gives you a really
wide area if you want to create different
patterns on the paper. For example, with my
nicely exposed lead, I could come and draw and create a nice house on our page really simply from our sharp edges, create little gentle
flicks of grass. Then using this
wide exposed area, I can come down and easily
hatch in some shadows like so, or not hatch so much as shade
because of the wide area. And so, we have different ways that we can suddenly
use our pencil. We'll be exploring a lot more of this in the next
couple of lessons. But hopefully you
can start to see how the control you get from using a knife to sharpen your pencil is
something that I value, but also has downsides. It's not something
you have to do. So just something to consider.
5. Dry techniques: When it comes to using
watercolor pencils, water slable pencils,
We can kind of split our techniques into
two different sides. The first is dry on dry, and the second is wet on wet. Let's dive into that
a little bit more. So I've opened out the full
selection of colors here, and you can see it's a
little bit overwhelming. So normally, I would
restrict myself to a few colors so that I'm
not having so much choice. Today, to be a
little bit playful, we'll make some choices
which seem bright and bold, things which come out
nicely on the camera, so you can get the idea of the possibilities of
all of these pencils. And with that in mind,
let's take a nice orange, red and blue from our
water color pencils here. Now, dry on dry, means we have a dry pencil
and we have dry paper, and that gives us obvious
mark making opportunities. We can do lines, so we can create
shapes on our page. This is obviously drawing, so we can draw people. We can sketch
outlines, contours. We can create
different textures, like we would with Ik, for
example, we can hatch. We can scribble. We can make repetitive
patterns on the page to perhaps be a little
bit abstract like these, or perhaps we have
a tree contour, and we're just creating
repetitive leaf like shapes to suggest the
texture in that tree. Now, this is where
pencils branch out from normal line based media, media, which just makes lines. Because as we saw before, you can also shade. So you can create
a light medium, dark areas of tone. So the value here is
going up from the lightest to the darkest area. Everything we've done
over on this side of the page is dry on dry. Then watercolor
pencils, of course, become rather clever
and rather special. Because we can come
back with a brush, and these little shapes
can become something else. They can be filled in with tone. We can create a shadow
on our little chap here. We can create a shadow
underneath f square, and perhaps now this is a
building coming towards us. We can take this
simple hatching. And it can become an area
of more general tone. We can also move that
pigment elsewhere, so we could take that orange
and pop it in our square. Now we've got a square with two different fields within it. The same things will happen to our scribbled repetitive
textures as well over here. And then of course,
we have our shading, and we could leave that as
lovely texture shading, or we could come
and soften it out. And you'll find even
as you soften it out, that value shift gets from light to dark because
fundamentally here, we have put more
pigment on the page, so there's always going
to be a darker area. The advantage of shading darkly though means
there's more to move. This pigment will move
and move and move. And that gives us real possibilities when
we start to think about how we actually going
to use these to draw a scene. And you might start
to think, Well, I don't need to put the
pigment all over the page, because with my brush, suddenly it can move all over the page after
I've laid it down.
6. Wet techniques: So we covered the first side of the coin, didn't we there. We have our dry on dry textures, and then the bit which
makes it fun, the water, which puts the water in water color or water
soluble pencils. Now though we can explore wet on wet or even a bit
of wet on dry as well. So just for the sake of
completeness, what we'll do? Pop out water color
pencils away, and we'll pick up some
water soluble pencils. So let's take amethyst, which is a nice bright color. We'll take iron green, and let's take chilly red. So we've got some
very varied colors. Now, this is where
we start thinking about how to use
these pencils in very original waves or
ways which certainly wouldn't work with
normal pencils. So the first is a
simple dry on wet. So what we do, take a little bit of
our page, make it wet. And all I've got is a slight sheen to my
page, which hopefully, you can just tell as I
move it back and forth, you can see the light catching
that page on the camera. Now, with any of these pencils, instead of a hard dry line, what we'll get is this
lovely, soft, activated line. You can see how that
changes as we move through. This again, gives us
possibilities for our drawing or
sketching our painting. It's really obvious
with this red. Look at how it goes from
to wow, punch and happy. And we'll get the same with
this rather dull iron green suddenly becomes pretty
happy, doesn't it? Pretty punchy. And
with this green, you can see even the spreading
of it out from that line. And if we watch it for
a little bit longer, I'm sure we'd be able
to see it spread and spread until
the page is dry. The advantage of this
is we could come in, so we've got our
lightest to darkest, and we can actually do more than just dry and dry or wet
or wet, or dry and wet. We can do a mixture
where we come and add layers on top of
each other and we'll be exploring more of that
in our scene, of course. The next option is wet on wet, so we can wet a bit of our
page here, for example. And instead of just
having a dry pencil, we can come in and we
can wet our pencil. Now if I start on the
dry area of the page, you can see that immediately has a bolder line than up here. If I continue that into the wet, we end up with an even
bolder line than up here, really punching because there's extra moisture already
activating that ink. The same should be
true of all of these, get this bright line which
becomes bolder and bolder, and we'll do the same with
our amethyst color as well. And there you go. Now, what other wet
techniques are there to try? Well, if we take
a smaller brush, and is going to wet it. What we can do is we
can actually paint. So we can take our pencil. And we can paint with it now. This is lifting the
ink out of this intense of water soluble pencil, and we can use it just to
create our own essentially, it's like a watercolor
painting technique to the same with the amethyst. Little gentle touches in there. We could do the same with
any of these colors, and this will work with the
watercolor pencils as well. This is not unique to intense. This is something which really works well
with any pencil. And this is brilliant. Be it means we can have fun. We can flick. Look at that. We can flick with two colors, absolutely brilliant and just
create all these effects, which perhaps you
thought were confined to your lovely watercolor
pans and tubes. But no, could you
believe that all of these effects can be created with simple pencil and brush? And there, look, I even managed to splatter a little
bit of my red in there.
7. Finding shapes: And like that, you
are fully armed, fully prepared to start
creating a scene. Now, we're going to be using just our water solu
pencils for this, the ink tense pencils, and creating a lovely
bold landscape. And in this, we'll also be to understand how
the colors might mix on the page or off the page or how we
use negative space. And all of these other
things which come into normal sketching
and watercolor painting. The first stage as ever is
going to be creating shapes, but we can have a bit
of a playful idea of that by creating shapes
using different colors. For this process,
I've simplified the equipment on my
page or in my area. I've just got one set
of intense pencils. Now all of these colors will be listed in the project
description down below. This is a set which
I selected myself. And I essentially
went with the colors, which called out to me, as well as getting some
primary colors. So I've got a nice red, yellow, and blue, then the secondary
colors of a nice orange, a couple of greens, and some sort of
murky orange browns, as well as my
trusty deep indigo, which acts as a tonal
or value color. I'm going to start
with my deep indigo. You might notice it's a
bit blunt at the moment. So as per our original
lesson on sharpening, I'm going to follow through with my my technique and just
sharpen it quickly. Get notice, being
safe with this. If you're going to use a knife, just make sure you're
comfortable and being cautious, and it's a well
sharpened knife so that you're not risking your
fingers in the process. But I do believe it's the easiest technique to get a bit of control
over your pencil. All I'm going to do now is
find the darkest shapes. We've got a lovely
careering downhill here, and then we've got
some dark silhouettes in the background of trees. Then coming forward, we have this silhouette and another
silhouette of a tree. For me, these shapes, that's already mapped out
the main parts of the scene. I'm going to move on then
because with our pencils, we can create lines, of
course, in different colors. Now I'm going to move into
using this is the iron green. Again, still a dark color, but we're now going to be
able to capture some of the closer colors
where things are less washed out and really simply getting those
ideas in there. This is the hedgerow that
comes and juts in and around. Then we can move forward
a little bit more. I'm going to grab a
really vibrant green. Here we can just map in
some of the shapes that we might visualize within this
field coming towards us. A sense of the perspective as the field slopes down
and slopes across here. That's the idea I'm getting in. But notice how I've moved from strictly lines to a
little bit of tonal work. We will do more of that
momentarily. Don't do too much. The moment, just map
in these key areas. Now the last bit that I see in the scene is this foreground. But remember, we have
lots of different ways of sketching of painting. The foreground is quite firm. So if I pop this on now, and then we add water, we have these nice foreground
to plant coming up, what's going to
happen is they'll all wash away, and we
don't want that. So I'm actually going to leave
the foreground till later. So actually, as an initial
skeleton of the scene, I would suggest that
this is all you need.
8. Adding pigment: So next, we are going
to be using our dry on dry techniques beyond
just to lines, doing a little bit of hatching, little bit of scribbling to
kind of build up the pigment on the page before we come in activator and
see what happens. The first thing I'm going
to start with is what are the more tricky ideas in water soluble and water color
pencils? That is the sky. Because we can't just
get a simple flat wash. These pencils leave a texture. But that doesn't mean
that we can't create a lovely version of the sky. So I'll start where
I want smooth color, by just shading a little bit. We can also get our lines, the textures to match the
perspective of the clouds. Notice how they come
horizontal here and they twist up and around.
That's true of all sky. They have a perspective. If you take a little moment to observe the sky, next time
you're out and about, you have some
clouds, then you'll notice the clouds get closer and bigger as they
come towards you. So we've got that idea in, and then we can just apply a little bit more pigment
with some simple hatching. And it's a bit scary, isn't it? It feels very weird
and abstract, but it will build up
to something sensible. Within that, we have shadows, so we have areas which
are a bit darker. So I've gone from my iris
blue to my indigo again, which we used for this line. I'm just going to
do a little bit of shading underneath
some of these areas. And within that shadow, we also have a sense of warmth, perhaps not so much
in this scene, but very often in cloud. So this is an opportunity just to show how mixing can happen. So I'm going to use
baked turf a nice brown, a bit like a burnt umber. And I'm just going
to shade that in. Now, you can already see
as I shade over some of this blue that it mixes like pencils would, it
neutralizes together. You'd expect a warm brown
and a blue to neutralize. But also, when we add it
separately like this, and then we come with our water, we'll find there's even more
mixing that happens later. So don't be alarmed if
your colors feel bitty at this stage. Moving down. Let's come back with
our deep indigo, and we can just add in
these trees, these hedges. Just think about what you're
doing is loading the page with the appropriate colors,
the appropriate ink. It doesn't need
to go everywhere. So it doesn't need to totally
fill all of these areas. In fact, leaving gaps and texture might be exactly what
the scene is calling for. In places you can be
a bit expressive. We have a house in
a distance here. So I'm going to use my red
just to add in the roof, just the roof line
of that house. We'll see what
happens with a bit of water and how that evolves. Underneath, we've got our
brighter green seven weeks. Let's get a couple
of greens out, in fact, three greens. This is the difference
with pencils compared to a palette of colors. You can't just mix in your palette and
subtly change things. Instead, you have to
make do with what you've got and then do the
mixing on the paper. So here, I'm going to
add a bit of this, which is a leaf green, kind of like a sap green, and I'm going to find some of the shadows I'm going to get a bit more of our leaf green where
I want more light, as well as leaving
large areas of space. I'll just take a moment to just observe how spacey this feels, how abstract this feels. That's a normal
part of the process with water color and
water soluble pencils. We're going to use
this same green in this iron green just to
come into our trees. But again, in the interests
of having a bit of space, a bit of negative
space in our page, I'm going to leave a lot of these trees just bright
and bold and white. And that will just allow
our page room to breathe, as well as if we want, we we to spread this pigment all over. Notice I'm using a kind of scribbly hatching somewhere
between that and shading, random marks, but getting
the most out of pencils. And like that, that is
our next stage done. We've got an abstract page
loaded with lots of pigment, and let's see what happens
when we add some water.
9. Activate your pigment: Time then for our water. I'm going to come in
with a big brush. This is a 1 " flat
brush this time. And you'll see over
the next minute or so, maybe 2 minutes that this brush will turn this page into
something completely different. So all we're going
to do, Wet our brush and we'll start
in our lovely sky and start where the
pigment is strongest, so you can move it
around, move it out. And as we wash that around,
we'll get softening. We'll get movement. We'll get these pigments working
and mixing together. We'll still have these
lines underneath, but with water moving
things around, we'll end up with a lovely, interesting and soft sky, something which doesn't
necessarily feel achievable as you're first
laying down all that pigment. It's still got the
marks of the pencils. It still feels like a
watercolor pencil sketch, but now it's softened
and become exciting. Next, I'm going to move
into the foreground, just keeping myself separate
from the sky for a moment. And I'll repeat
that same process, remembering the perspective
of these fields, as we delve down
and forwards and also capturing some of
these shadowy areas with our iron green. And this is where things look, suddenly, the scene
is this bright, punchy, interesting thing, which Perhaps was hard
to imagine a moment ago. Above that, I'm going to just change to a slightly
smaller brush. I can control my marks
a little bit more. And I'm going to activate
all this indigo. And the indigo can
soften into the sky. It can come along here
in front of our houses, and it can create these
nice blocks of color. The same with this sort of
forward coming field here. And then we've got these trees, which we've left
largely at the moment, as a bit of negative space. Just like watercolor painting, remember this is
our first layer. We have opportunities
to fix things, to move things around later. Don't worry if it feels rather
abstract at the moment. We need to add a little
bit of structure, and then hopefully, we'll see a believable
scene emerging. But even now, you can see the shape of the scene
far more clearly. Up at the very top, I'm
going to use my last brush. We have our little red roofs. I just want to activate
them and just create the sense of a couple of
houses in the distance. Now, don't wait too
long here because we're going to immediately start adding a bit of structure. Whilst the page
is slightly damp, jump onto the next lesson, and we'll use a
mixture of dry and dry and dry on wet techniques to just enhance and start building that foreground and getting a better sense of
the whole scene.
10. Bolder colours: Now, I can't keep you long here because my
page is still wet, and I want to dive straight in. All we need for this section. A is our pencils back and
maybe our smallest brush. And we're going to just add
a little bit of structure, some of that foreground
element and see what emerges. So, here we go. Time to
grab our pencils again. I've got my deep
indigo because it's my closest pencil to creating
a kind of bold black line. And I'm going to just add a little bit of texture
in a few places. This allows us to, for example, show where our hedgline
meets our field, just by creating
these shapes again, the shapes which
we've washed away. And do you remember at
the beginning, I said, don't draw the foreground yet
because we'll wash it away. Well, look how much softer
everything's become. Hopefully you can see what
I was talking about now. If we've drawn that
foreground in, we just have this
blurring of mess here. So always good to
remember how our pigments work, our materials work. And with water soluble media, It's always good to
remember layers. They all work in
layers. There we go. That's enough for
me, just a shape, sort of swishing down here. In the distance, I want these
trees just to have a little more from we can see because this page is still
just nice and wet. I can just softly kind of shade in and we get the effect
of an activated pencil, but with a bit more control
and the same up here. This time, I'll leave a
bit of gap because then we have the front
of the color and the back of the color
working together to create the idea of light coming
through more distant hills. Or more distant trees,
sorry, I should say. The houses, we could
even just suggest a couple of windows like. So I think they work well. A little triumph is what
I'm going to call those. It's okay to be proud
of yourself when something grows well. I
think it's important. In the foreground, just
a few little touches, suggest and texture there. Maybe what we should
do is come in with our lovely mint
green, do the same. And some of you may
have noticed there's this purplish tinge in there. Now, again, we're working from a limited palette of colors. It's possible just
to buy 400 colors, have every color available. But with watercolor pencils, water soluble pencils, often, we need to make do
with what we've got. So To get that idea of purple, I'm just going to use some
gently applied red instead. This is a lovely little flower
running for these fields. I wonder if it's a clover
or something like that. Then using a tiny bit of water, we can just soften that out. This is where we're
working again, wet on wet, wet on dry. Somewhere in between, but
just getting nice effect. Notice the gaps in
the paper as well. Big white gaps providing
space to this whole image. Now, the foreground is next, and I think it's a good place
to start at this point. And what we've got in the references coming
up everywhere, we've got lines, lines, lines. Let's just start with a few
and see what it feels like, because probably what we want is a bit of
asymmetry in our scene. So a little bit
of hatching here, little bit of sort of these
flicking up leaves and stems. Some of them all climb all
the way up to the sky. And maybe we just want to gap and then have them a
bit lower down here. And this, we're using
different mark making opportunities and
possibilities with this selection of pencils. Within here, there's
quite a lot of depth. Let's get our baked
turf out again, which is the color
we used up there. Again, an opportunity to mix
here to mix on the page, to mix with dry techniques. Also when we add some water, this will mix a
bit more as well. Let me get the idea of different colored leaves and fronds. And then maybe even just
properly hat in here, get a real feel of it. And last but not
least a touch of our indigo to create a
real sense of depth, especially in this
bold area down here. There we go. Now, to come back, soften things out a tiny bit, use that smallest brush. With that brush,
you'll be able to join together some
of these lines, you'll be able to soften them if they're not
quite feeling right, be able to activate the ones
which are feeling brilliant, and over here, we'll be
able to change the texture. Mix. Create the flicks just
with our brush as well. But also celebrated media. We have these hatching marks, we have these pencil
feeling marks. It's not all about trying
to create a perfect image. It's about working
with our media to create something which
resembles the scene, but also is fun to create.
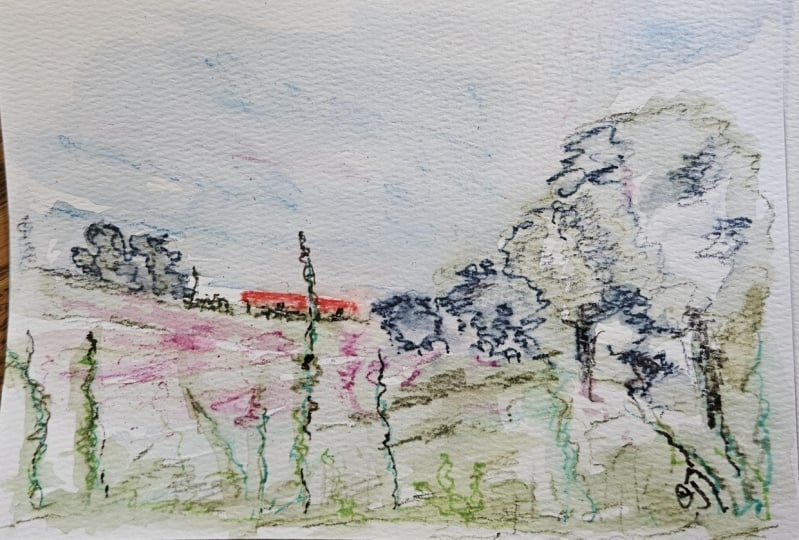
11. Finishing touches: And our pages almost
completely dry. There's a few little bits of
water on, but that's okay. Go to jump back in
now with our pencils, a little tub of water and create those finishing
touches. Here we are. We can see just like
watercolors, watercolor paints, things have settled with time
and with the water drying. What we're going to do now is
come back with a couple of our bolder colors and really create the sense
of this foreground. What we can do is just
trace down some of our lines which are there and working and create a
bit more certainty. I'm using the indigo to start with because these lines
in the foreground, these elements sort
of flicking up are basically silhouetted
and dark, aren't they? Either side, they have
lots of little leaves, so we just add in
those textures. And here, we're now back to our good old fashioned
dry on dry techniques, and there's nothing
wrong with those at all. They add a lovely controlled
texture to our page, and there's a reason
why pencils are so popular because it
really does work. Then we go just a couple more all growing
out from that area. Then we can have a few
more over here as well, increasing the level of business in the
foreground. I like so. Then because we've already
used some colors in there, I will just create some little boulder marks
with our iron green. This time, I'm not going
to activate it much. I may do it a little
bit, but not much, so it's going to stay this
slightly more textural mark. This shaded area,
this darker, well, y green rather than
this quite bold green, adding something
different compared to our normal watercolors. I think what it will do, tiny bit of activation in
places, tiny tiny bit, little touches here and there, just creates more variety, makes it a little
more interesting, and we can create little
flicks coming out as well. Then, since we talked
about it in the beginning, it's one of my
favorite things to do. Let's do some little flix. That will just
finish off the sky. Give it a nice sense of freedom. The flix can come into
the foreground as well. Clean off your brush
and then you can apply some flix
with another color. Perhaps, put this iron green
into the tree, like so. Little gentle touches. And with a great risk
of overdoing things, but also having a rid of fun. Let's get this mint green happily through the field and these foreground
elements as well. And like that. Why not? This mint green so lovely. Let's do our signature
in that color as well. Thank you. My signature
and my initials. A really fun process using water soluble
pencils, in this case, ink tents, which are an ink pigment in a water
soluble pencil format. But this idea, this is
exactly how I would also work with my lovely Winds Newton
water color pencils.
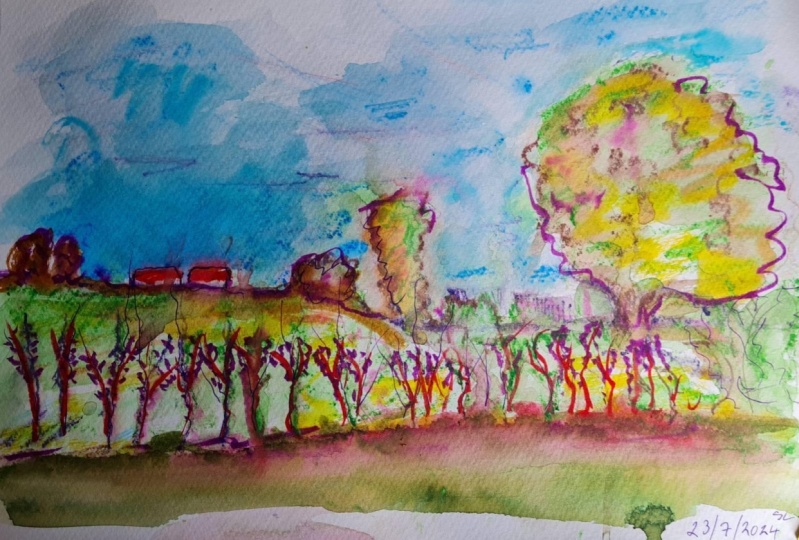
12. Final thoughts: And there you go. We
have finished a fun bit of scribbling to play with
our pencils to start with, and then use those
scribbles a bit of water, build it up into a scam. I would absolutely love you to share your project with me, pop it down in the projects
and resources folder, and let me know how it goes. If you're anything
like me, you had these pencils stored
away for years, and then finally for
I need to use them. If you enjoy these kind of teaching techniques,
exploring ink, exploring watercolor,
and sketching, then do follow me on
Skillsha where I've got tons of classes
very similar to this. Also, you can find me at Toby Sketch Loose across the
Internet and on my website, sketch looks dot code at UK, where I'd love to connect.
 Toby Haseler, Urban Sketcher, Continuous Lines