Transcripts
1. Welcome to the class: Hello and welcome to a new and exciting floral painting class. You will learn everything
that you need to know in order to paint
beautiful sunflowers, everything from
textures, transparency, foliage, and, of course,
color harmonies. This class is specifically designed to guide
you through and encourage you step by step in order to achieve
an amazing result. Hi, my name is
George, and I've been a professional artist
for over 11 years. Five years ago, I've fallen
in love with teaching. Both online and in person classes with
over 20,000 students, I've developed this
interesting way of teaching. That focuses first
on the project and having a great time learning the fundamentals of painting. You will be surprised
by the end of the class with the result that you
are able to achieve. Even though at
first, this artwork might seem complicated
to create, you will get all the
information and step by step encouragement to be able to achieve an amazing result. You will understand
everything from light and dark to
color harmonies, textures, and brush marks. If that sounds exciting to you, let's jump into the course.
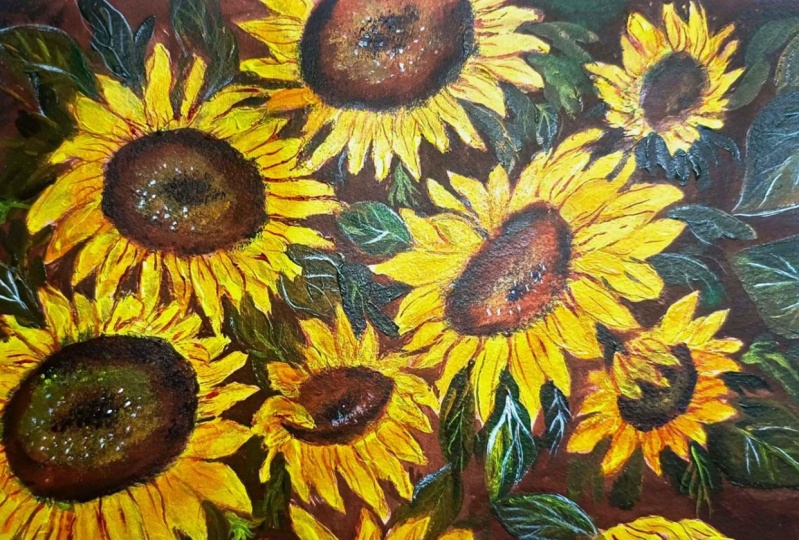
2. Materials needed: Hello, and welcome to
another beautiful course. In today's course, we will make some beautiful sunflowers. These will be very easy to make. All you need is acrylic paint. This is titanium white. This is Azo yellow medium. You can use lemon
yellow as well. This just has a bit
more red in it. This is Amsterdam acrylic paint, some burnt umber,
also known as brown. Some carmine red and a
touch of brilliant blue. Some water, you
will need a canvas, preferably a square canvas. This is 40 by 40 centimeters. You will need a plate
to put your paints, some gloves optionally,
and some water. Do not hold your brushes
in water if they have a wooden Handle. If they have a plastic handle, they're not going to
get damaged at all. The only reason not to keep the brushes in the water is that the wood expands and
you get a ruined brush. You will also need
some paper towels to clean the brushes
and do some washes. I am a wrapper now. For the brushes, you will
need a big, beautiful, flat brush, a medium flat brush, and for the details, a small round brush. That's all you will
need for this course.
3. Brown wash: First step, you will
only need some brown. And a big brush to establish
some beautiful washes. Let's take some
water, not too much, and dilute this paint
just a tiny bit. To be able to stain the canvas because whenever
you don't stain the canvas, the white of the
canvas is too strong, so you will not be able to really see the
colors properly. So you need to stain the canvas. And also, this is a stage where you get used to just handling
the brush, the big brush, try to also practice
some beautiful leaves or maybe a circle and then brush
it over with some water. Taking some more paint, adding some more water
directly onto the canvas. If you see some hairs like this, just pick them up with a brush and brush them on the side of the plate or on the side of the cup or on some paper towels. Just going very
quickly and taking out that harsh white of the canvas. If you paint directly
onto the white canvas, you will have some small blobs of white canvas still showing. It's very hard to get rid of it. This wash ensures that you
are not having that issue. Okay, picking up another hair and almost finishing
with the beautiful wash, taking a bit more water on the corner of the
brush just to be able to spread this paint. Now, you might go from side
to side to spread it evenly. This will help you
because we will be drawing on this while it's wet because there is no reason to
wait for it to dry. You can also go
from top to bottom, just to create this
wonderful texture. Be careful when you
go onto the sides towards yourself so
you don't splatter something on your
beautiful burgundy shirt. Because whenever
it ends up here, it will splatter a bit. Okay, finishing this wash.
And now for the drawing, let's be careful not
to have any hairs. If it's a new brush or a hardware store brush,
just like this one, it will leave more hairs, but you have to be a bit more
careful and take them off. You can also dip in
the water so you get rid of those hairs. Perfect.
4. First sunflower: Now let's make a sunflower. Take more paint. This is a very interesting
painting concept. It's called thick over thin. You are having a bit more
color than just water. And because it's a second pass, it will make you have a lot
more control over the color, and also it will
show up like this. See? Maybe it's too much water, so let's take a bit more paint and start with a
beautiful circle. When it comes to
circles in painting, it's almost always
a good idea to just make them a
bit more squarish. Instead of making it very, very round, make it
a bit more squarish. You can always round it out
in the finishing painting. Notice that this
beautiful circle is not a perfect circle. In fact, let's just
make it a bit bigger. So we get some practice
with the brush. Okay. Making it bigger. Notice how all the brush
strokes are very angular. Don't worry about the fact
that it will spread out a bit. It's fine. This is just
a preliminary drawing. For the leaves of the sunflower, let's start over here. And if you don't have enough
control with this brush, you can go for the medium brush, but I suggest having this
one because working with a big brush really teaches
you about control. Notice that this is the shape that you should be
doing, just to see. Let's take some more paint. Just to see like this. And going the other way, you can always go further
and continuing now making a smaller one just because we want a bit of
dynamic composition. So this one is a bit
smaller than this one, even though it's a
bit to the right. And now let's make a bigger
one just going this way. Notice how it curves
that way. Okay. These are something like a
lemon slice, just like that. Notice how it's like a
banana or a lemon slice. You can brush it
over if you want. You can just take it
and brush it over. If you put too much paint. This is another
learning opportunity. You can take a napkin. And also you can
erase some of this. If you want to
create some texture, it's not really needed, but if it has too much
water just like mine, notice how beautifully
it creates that texture. I'm going to try not
to take more water. Let's redo the circle this time, focusing on the right side because it will have
the darkest parts. This is a very simple shape, a very simple round. Well, it has angles. Notice how I'm leaving out this part to be
a bit more white, and this part will
be a bit more dark. Okay, no more water. Let's continue on this side. Let's make another one
just a smidge smaller. And then a one just coming
out of it like this. Super simple. Try to not make them perfectly the
same all the time. Let's redo this one. And this one, as well. Notice how easy it is to just paint and make some
beautiful petals. Now, on this side, let's go the opposite
way. Why not? Maybe this way, because
it goes to the middle. Notice how beautiful
it has this outline. If you want more control, you can always go
with a flat brush. Flat brushes are
amazing at cutting. Like a cut is something
like this where you let's do it somewhere where
it's more visible like here. Notice how it cuts if you put
it on the side and it can create flat things if you
put it on the normal side. Okay, let's continue
with this beautiful one. This is a very good
exercise for brush control. Let's make this one a bit
bigger and connect it this way. Don't go overboard
with the brown. Just a few dabs of paint is enough to sketch out a
wonderful sunflower. This sunflower is a bit skewed. It has a bit of angle like this. Notice you are noticing
that because of the circle, the middle of the
flower is a bit more squished in the middle and a
bit more elongated that way. It also has a dynamic position because it is on an
angle like this. And let's get rid of
that beautiful line. You can also take advantage of the fact
that the paint is wet to be able to erase some of the paint if you have done something
that you don't like. And you can always add it
back to have the outline. Perfect. Now, let's
concentrate on this line. You can also do something
very interesting, which is decide beforehand where the ends of the petals
are going to go. Notice how this one is closer. This one is further. This one is even further.
This one is closer. So consequently, they all converge to this
point. You can even draw it. Notice here, here, here. Now, here, here, they all
converge towards this point. Well, it's more like here. Now, this one is close, so we need to make
another one like here. I skewed it a bit just because it would be nice to have
a petal going like this. Okay? Let's connect them, maybe make this
one a bit further. And this one behind,
just like that. You can do outlines
like this if you want, or like this, or you can
just do a Beautiful wash. It doesn't really
matter. Well, actually, outlines are a bit
better because you can wait a bit shorter
for the paint to dry. Let's make it a bit more pointy. And now let's make another
one just behind this one, just a tiny bit longer
and connect it behind it. And then let's have it be a bit more bulky and
then going like this. So it's bulky over here,
and then it goes like this. You can really have a lot
of fun on this stage. But, for instance, let's say, this one is a bit
ravished like this, and then it goes like this. And I was saying that
you can have a lot of freedom just because you can
do this and paint it again. Let's make it a bit
more angular like this. And then going and making it a bit more
beautiful, just like that. Okay. Maybe they should
be a bit longer. Let's make it
longer. Because I'm noticing that this one is this big and this one is this big. So now it's the proper amount
of big proper English. And now going and
making some ones behind here because this sticks out very big and
it's very large. We can make a smaller one here. And this side is
going to be a bit smaller because it's the one
that is almost facing us. And the petals are going to
be a bit more close together. Notice how this one
and this one are very close together because they
are coming towards us, so they are a bit more
squished and placed together. Let's make another one
just over here like that. Okay. And these ones
just a beautiful S. Let's connect them together and another one
just going maybe this way. Notice how these ones
go so from here, they start going this way. And on the top, it has a change here that it changes direction
going like this. And let's connect them Perfect. This is the first
beautiful sunflower. In the next step, you will make another sunflower
just about here.
5. Sunflower sketch: Okay, with the same brush, since we have this one, this
is a thing that happens. Whenever you are using
the smaller brush, it will end up just being
in your hand forever. So let's actually change
to the big brush. You can stay with
the small brush, but I prefer the longer brush
because it forces me to be a bit more loose with
the brush marks. And it covers a lot of
area much stronger. Don't be afraid to just
put a mark over here. Let's say the middle
of the circle is here and then making it
a bit smaller than this. So if this circle
is about distal, let's make this
one about distal. Angles. Notice how this
one is skewed that way. Okay. And it's a
smaller sunflower. So let's go ahead and make. This is the middle
of the circle. Let's erase some
of the middle so you can notice where it is. So the middle is here. That means all the petals should kind of
converge over there. This is a bit more skewed. So starting from the top, it will have some petals
that just go like this. Maybe a bit more like curved. And the bottom ones
just over here, two of them, let's
make another one here. So if you start at the
top and the bottom, you kind of don't let your brain think too much.
And that's a good thing. Everybody says that it's
a bad thing to not think, but we tend to over analyze
everything as adults. Now let's go over here, just on a little
bit of an angle. Just to establish one petal. Let's make it a bit more fat and another one
smaller right next to it. Don't worry too much if
it has the right end. You can always just go with the smaller brush
and add it later. Let's add another one next to it and making this
one over here. I think this one is too long. So let's just make
it like this tall. Okay. Over here, they
start to change angles. Notice how they converge
to that beautiful point. Let's make this one longer, and then the last one smaller. If you lost the circle, just go back to the medium
brush and add it once again. Over here, notice
how on these sides, the circle is the flattest. Okay? And it gets a bit rounder over here and a bit
rounder over here. Don't make the mistake of
making it like a football, like an American football it's very important to make it a bit rounder over
here instead of just making it like this. If it has a pointy and it
doesn't look that good. Let's erase this. Who knew you can erase some
of the paint off the canvas. Now it's time if we
have this brush to just focus on the
ends of the petals. End of the petal here. Let's make it a bit more thick. Petal here. Notice how this
brush is more exact, and the other one creates more interesting
abstract shapes. That's a very nice thing to
understand about big brushes. Notice how I'm editing
here and here. Now, on this side, it's going to happen
the same thing that was going on here, which is just putting a
small, beautiful line. You don't have to recreate those concentrating
on the ends first, and then going and
rounding them up a bit. Like this, rounding them. And then these ones, let's make them a
bit more apparent. Like this, let's take
some more paint and make these ones just as normal
and making this one fatter, thicker, just like that. Another beautiful
sunflower. Perfect.
6. Drawing diversity: Now let's make a different
kind of sunflower. Sunflowers come in
different varieties, and this one will be more
of a field sunflower. And let's make it even smaller. This one has the bulb outside. So let's position it not
perfectly below this, just a bit to the right. This is the bulb
just sticking out. And then this one
is a bit more like a football because
it's sticking out. So imagine that it had a circle behind it,
like over here. Notice, this is the ellipse, and this is what sticks out. Perfect. Now, for the let's
go at the middle. The middle is a bit
more to the right because it's in the
middle of the circle that is that we imagined.
Let's actually make it. Like, so Okay. And let's go make this one. The petals are going to be a bit more rare and a
bit more graphic. Let's have this one come
from behind just like this and connect just over
here behind this one. Let's have this one a
bit more caligraphic. So it goes like this, and then let's actually
show you exactly this way, so you can see that it's
a bit more caligraphic, and then it goes a bit more
thick and ends up here. If you lost the
edge of the circle, you can go with
the eraser, well, the napkin and just make
it once again like that. Now, for this one, we're just going to go
imagining the circle here. And let's go just about here, maybe hide it behind
this one. Perfect. I think this one needs
to be a bit thicker. Let's make another one here. Just going a bit to the right and then
making the petal itself. Let's make another
one going this way. Very simple shapes. They are like kind
of wobbly triangles. Imagine a triangle
would be like this. Just add some wobble. And then let's go on this side, just to show that it's behind the whole situation,
the whole center. You will need to make
them a bit smaller, smidge, smaller
and a bit thicker. And this one the same. And let's make another
one that sticks out a bit and then connects
just over here. Just a little bit
of a spider Spider. Spide do man, Spide the man. Let's make this one like this. Sticking out and
another one here. Maybe this one needs
to be a bit longer, just so we are centering the whole situation,
the whole flour. You can also accentuate the circle a bit more
onto the sides just to make that bulb a bit
more pro eminent this way. Perfect. Now in the next
step, you will add another beautiful sunflower
here and another one here. These will be a bit
more abstract and another one here. Okay.
7. Final details of the sketch: For this next step,
you will continue to refine the beautiful Sunflowers, this one will be very easy. We are just almost copying
this sunflower over here. I'm just adding a few more
dabs so it's way clear. So this one will just go from the outside like
this and imagine that the center is
here and it's going to have just going
towards the center. Let's make some lines. Okay. And over here, and it flares up a bit just like this because it's
a sideway sunflower. And then let's connect
it, making the ridges. Don't try to not
make them perfect. Add some wobble. Notice how much more
beautiful it looks. Needs another one here. Notice how this one
is too perfect. Let's add a bit of wobble. And on here, it just
goes behind this one. We're creating this
edge over here, so it goes behind it. Okay. And let's make this one. And this one, you
will be tempted to go a bit faster and perfect. Instead, add some wobble. Wobble, wobble, dub, dub. You can be a bit more abstract and just smudge the
paint like this, take some water, smudge
the paint like this. And then over here, just going a bit faster, just so you loosen
up your hands. Let's make them a bit fatter, a bit thicker and lose
some of this these lines. Notice how it's too
intense the outline. Let's blur it out a bit with the brush and leave just a few just a few Beautiful because it takes too much
from the middle one. Notice how it's still
visible, but not so much. Now, let's add another one. This is going to be
a very beautiful one because it has the
circle just over here, and then just a few petals, one going this way and another one just a beautiful
one just going that way. And a few over here. Let's recreate that so you can have time to do it like that. And this one just goes from
so the circle is here. It goes in the
background around here. Maybe there is a leaf
just going over it. And this one just
goes right over here, and maybe there is another
one somewhere around here. Let's make another one just over here behind this beautiful. So there is another one
in front of it just here. And then for the
background ones, we're just going to play
with the brush like this. Just playing with it. Look. Puck puck puck puck puck. And let's accentuate
that circle once again. Let's make maybe
another one over here, slowly add some dabs. We're going to put some
yellow there at some point. Okay. And let's make
this one over here. This is going to
be a smaller one. The circle is kind of like this, and it's going to have
the petals just coming from the stem just over here, flaring up like that,
and they're going to be also flaring up like that. Let's add a bit more
lines like this. This is just a sketch, so you don't have to
take it too seriously. I'm just creating
some more lines. Okay. And let's imagine a
vase. Where would a vase go? So if this flower goes there, if this one goes here, if this one goes here, if this one goes here, we've decided, kind of, like, this is the middle of
the Beautiful vase. So let's draw a vase. Let's beautifully make a vase
like this and like this. Don't worry if you go over
the flowers. That's fine. It's not very centered, so I'm going to make it a bit smaller so that I can
center it better, smaller on this side,
and bigger on this side. So it kind of is centered. Okay? Well, let's actually
make it centered like this. Okay? And over here, remaking that flower
is just experience. You are building experience
whenever you go over the. So this is the line. It's behind the flower. And over here like
that and this one. So let's actually
take some water and accentuate it a bit more. If I had a bigger brush, this would be so much easier. In case you lost some of
the beautiful petals, just take some more water and some more paint and
paint them over again. Just the essentials. And now let's make a leaf
over here. Big leaf. And another one
big one over here. On this side, leaves are
very, very easy to make. You're just making the
same kind of things, but a bit more big and
a bit more wobbly. Sunflowers sunflower leaves
are very wobbly. Okay. And there you go for this step. You don't need to
let the paint dry. In the next step, you're
just gonna add a bit more brown and some
yellow and some red to start creating that beautiful middle
of the flowers.
8. Middle of the sunflowers: This next step, you will need some brown. We
already have it. So red, just a touch of red
over here and some yellow. Don't worry if you have
lemon yellow, that's fine. We have the yellow,
and picking up the middle brush is a thing
that you shouldn't do. You should actually
pick up the big brush. Start with some yellow
over the brown. Just take a bit of brown and make this beautiful
yellowish brown. Once you do that, you can go
ahead and start filling in the shadow side and this
circle just on here. You've already done this, so
you know exactly how to make this wonderful squarish circle. Perfect. Notice how
much more yellow it is. Now let's take some brown and some red, just
a touch of red. Maybe a bit more. Just to make the shadows. Let's cut a shadow over here
and another one going down. And maybe over here, let's
start adding some texture with the corner of the
brush and on top. Just adding a bit of
a beautiful texture. Once you've done that, take
some more red and some more brown and start
going on this one. Let's make it here and the
shadow part on this side. Make it a bit more angular. Just a bit more angular. Now let's take some yellow. Mix it in a bit more thoroughly because you have a little bit of
red on the brush. And then in the middle, just going this way. And let's re add the shadow. Just maybe over
here as a texture. Okay. Now, let's make
some more of that yellow. To put on the top
side over here. I know you cannot really see it, but once you add
the dark red brown, you are going to see it. Like here. See? Now
it's clearer and nicer. Okay. And for this one, just a dab like that, and maybe erase some
of it on the top. Do we have some over here? Just a small one?
Maybe it's too thick. Let's take some napkin. You can do this
at this stage and erase some of that creating
some more nicer textures. Okay. And some yellow
with the other corner of the brush on this
side over here. Now let's take a
bit more yellow, just dabbing the corner of
the brush onto some yellow and creating some textures just on the almost at the edge, creating some beautiful
sunflower seeds, rotate the brush a bit
only with the corner of the brush to create
some sunflowers. If it's too much, it's
probably going to be too much. You can erase it with your
finger and add it again. Just a few touches and
then going over here, adding some over here as well. And maybe over here
just a few dabs. Okay. And on this
one, we don't need. And that's all for this step. In the next step, you
don't need to let it dry. You can paint already
the sunflower itself, the petals with
the medium brush. So clean it up, and then
let's go into the next step.
9. Abstract petals: This beautiful next step, you will need some
yellow straight up from the tube and start creating
some wonderful petals. Most sunflowers have
the brightest part and the most
colorful at the end. So just focus on the ends,
recreating that drawing, just going here, and being a bit more careful,
just a tiny bit. Yellow is a very
transparent color. That's why you will need
to go over the yellow a few times to make it
a bit more opaque. Also, a good tip is to not be afraid to put a
bit more texture. Okay? This one goes maybe
shorter and pointier. Okay. You can fill in some of the yellow in
between the circle. Even if you pick up the
brown, that's fine. Just go around it and
fill it in a bit. Okay. And over here, it picks up some brown. Well, I actually picked up some brown from here.
But brown is good. We can actually
accentuate some of these, maybe add a bit
more red into it. Just a tiny bit of red. Well, that's a bit more
than a tiny bit of red. And go ahead and
accentuate some of these beautiful leaves and maybe also with this color
over here, fill it in. It's a beautiful orange. We can actually
make it a bit more orange by adding more red and more yellow to
make it a bit more clearer and notice how
beautiful that color is. Just going at the
bottom and connecting, trying to imagine this circle. Well, squarish circle,
just like that. And over here on this side. And maybe we have just
indicated this and this one maybe this
one behind it. Now let's add yellow over here, a bit thicker and going
over this orange, creating a beautiful, pointy
end and another one here, going over the orange a bit to blend it in a tiny bit
with the other color. Now, this one and over here, you don't need to be
very, very exact, but you should be a bit more
careful than with the brown. Now, this one should go behind it just to create a bit
more interest over there. Probably going to edit the shapes over here
because all of them, I lost that edge that
was going like that. They're all this length. So probably going
to make another one of them when we paint
the background. I'm going to make it a
bit more pro eminent, a bit more short. Let's actually make
a short one here. And a longer one here. Notice how much more
beautiful it looks over on this corner than
just the same length. Okay, just to trick our brain, let's go on this side and
do the same over the brown. Notice how transparent it is. But it doesn't matter
because you're going to paint the background and then go over with the yellow again, and some whites, and
you're going to play. This is just like
painting by numbers. You're just making
your own drawing instead of having the outline. Going over here and over
here and inside here, you don't need to
be perfectly exact. Just add a touch of color
over it. That's enough. And let's go over on this one and create those
beautiful petals. One, two, three, and on this
side over here, just going. Notice how they are all
going towards the middle. Perfect. Now, over here, this one, let's make it shorter. Tiny bit shorter, and this
one longer and thicker. Now, this one should
be having a bit of a point to wit and this one a bit
thicker, just like that. Over here on the top, let's decide which one we
make bigger, this one. And consequently, we're going to make
this one smaller and pointing that way. This one a bit bigger,
this one a bit smaller. Notice how the circle is
a bit lost. That's fine. I'm actually going to edit it here and make it a bit smaller. I'm just brushing
towards the leaves, towards the actual petals. Now taking some more yellow
and going on the outside, deciding that this
one is the big one. This one needs to be smaller. They are too not wobbly. Let's add some wobble. This one may be a bit shorter. Touch shorter. And now
going on to the next one. This is just gonna be pointy. And this one just goes this way. Perfect. Now, let's take a little bit of a break
because I need some water. Clean up the brush
before you do that. We're gonna continue with
some more beautiful petals. Just over here and over here, and this one and this one. Well, this is a
leaf and this one.
10. Lighter petals: And now that the break is over, let's continue with
the flat brush, the small flat brush, and add some yellow over
this orange continuing to think about
big, small bigger. Don't be afraid to put a
bit of a thicker paint. This one bigger. And over here. Now, for this one, we're actually going to add some
brown and some yellow, just because it's behind. So we can let's add
some red as well, because it's behind, and
it's a bit more dark on the bottom side. Some red, some brown and some yellow to go in
between these petals. And if you lost them, you can go back
to the yellow and add just a touch near the end. To better accentuate them. Some red, some brown, some yellow going over
here, I added another one, another beautiful
petal, and then smudge some of this
paint over like this, and then going into the
yellow and coming out from the outside with the petals. And from the outside, once again, these ones
need to be a bit blurry. Perfect. Notice how
it blends together because the paint the
brown, it's still wet. So for these ones, instead of coming
from the outside, you go from the inside
just to bring some of that browner color
into the petals. So they are a bit more dark. Let's add some more
yellow for this one. And this one Perfect. Maybe a bit too thick. Perfect. Now, going on to this one and starting
from here and making one, two, and then three over here, four, and then continuing lower. As you go lower, they
should flare out this way. This is the middle.
So they go this way. And then going here, they go towards this
point from the middle. And then here now here, let's compact them a bit on this side so that it can
show that it goes that way. It's a bit too green. So let's add some
of this orange, especially at the
bottom of the petals, just filling in this color and going towards the
petals once again. These don't need a
lot of refinement. They just need to be
sketched out a bit. Let's add some brown and go
in the middle of the flour, add a bit more brown and some
red to make that dark edge. Now, here it's going
to be a bit of a trick because
we're going to make this just an outline circling it like that so that it shows this way and this one, we're going to
have it be pointy. And like that, and then cleaning up the brush
out of this red brown to take some yellow to better accentuate this and also this and
maybe this one as well. Perfect. Now going with another layer on top of
these ones just over here, a touch of yellow to make
it a bit more opaque. Notice how it's almost dry, so it takes the
color a bit better. And let's make this
one bit longer. Now concentrating on this one, making this beautiful petal and making this one a bit
nicer, so nice, beautiful. And then accentuating
that S shape. Let's make the tip of
this one a bit longer. Adding a bit more color
to each and every petal, being a bit more careful this time to color in
between the lines. Just add a bit of
wobble on this side and this side and now going softer
and smaller on this side, notice how it's only at the end of the petal like over here, and the yellow becomes
more dark as it goes towards the actual
middle of the flower. And continuing on this side at the edge and filling
in that one, taking some more color
just so you have a bit of texture to be able to
create this petal. Now, over on this side, this petal is going to be very interesting because it goes over the middle of the
flour, like that. And this one as well, but a bit more pointy. Okay. And let's make
another one here. And then this one
goes a bit more to the right to the left, actually. Let's make this one. Don't
worry if it's brown. You're gonna get rid
of it at some point. Plus, it's in the background, so it doesn't really matter. Now here, let's go ahead
and add the paint. The edge of the paint. And now for this one,
it's going to be very easy to just make one, two, three, and then add the ends and make it flare out this way
and flare out that way. Super simple to do. So it's one, two, flaring out, flaring out, flaring out, and
this one as well. So this one goes that way,
that one goes that way. For the next step,
you will add some blue to the palette
to make some foliage, some leaves, and
some brown things in the background happening.
11. Abstract leaves and background: Okay, you don't need
to let the paint dry. We're going to work in between the flowers and very
close to the edge, just adding some foliage. Let's add some blue right
here on the palette. Taking the big brush, not the middle one,
the big flat brush. Take some blue, not that much, and some brown over the yellow brown that
you've created over here. Maybe add a bit more yellow and a touch of water just to lubricate the paint,
maybe a bit more. Lubricate the paint. And then let's start making some foliage. Let's start with
this one over here, pointy, and then going
curvy on the outside edges. Don't focus on the contact. This is not the brush to make the contacts
with the flowers. This is just the brush to
fill in very fast and loose, just kind of like this. Just fill in the
space over here. You can brush over
some of these petals, these ones over
here just so that they appear more
in the background. Same over here.
And maybe this can go inside of these
petals as well. Maybe there is a leaf there. And of course, let's go
on the middle just over here and add a few
dabs of paint. I'm just scribbling to
get rid of that wash, just a tiny bit of
that wash. Once you finished the paint
from the Brush, you can take some red,
put it over this red, add some more brown, and then you can accentuate. This is going to be a darker. You can accentuate
this leaf over here with a darker accent. And let's add some brown over here and maybe
behind it as well. Being very careful not
to go over the petals. And then just concentrate
on getting rid of some of the interesting colors
in the background. Don't go very close
to the petals. Just try to stick
towards the end. Wherever you don't have green, leave some space for the green. Now, let's take some more water, and let's make this
vase brown. Brown. Okay. Trying to make it round like this and
round like this. It has some green,
but that's fine. Round, round. And over here, being a bit more careful. This is a very simple shape, just a round shape. Now, taking a napkin and
erasing the highlight. So we're just making a
space for a highlight, a bit of a bigger
space than we need, but it's going to dry faster, and it's going to give
us the opportunity to not wait for it to dry. Okay, adding some
more blue and some yellow to create a richer green. This is a thalo green,
a bit more blue. That's fancy speak
for blue greens. Let's add a leaf here, and let's add some dabs. Maybe over this brown
here where you left off. And then let's add some red
into this to cut the color, just a tiny bit and
some yellow to make it a bit more yellow
because it was too blue. Okay, and adding some
more splotches of paint, getting some water
over the yellow, you can go a bit faster, loose. And then as you go here, you can get a bit more precise
with your mark making, being careful not to go
over the wonderful Flower. Now, making another
leaf here, this one, just going this way, making another one here. Don't worry about the outline. In a few seconds
where a few minutes, you're going to make
some of those outlines. Let's get some brown, put it over this and start editing a bit of the
edges and making some darkers. We need some reds
and some water. Red is a very good color to just make the green go a bit away. It just makes it
calms down the greens because it's basically
almost an opposite color. It's literally an opposite,
is it? I don't know. I haven't looked at
the color wheel today. And let's add some more brown. And once you have enough
brown and green to work with,
12. Background contrast: You can go ahead and switch to this brush, add some yellow. Just because we do not
have the greens necessary to make the leaves. Notice how this doesn't
have a lot of blue. It's more yellow in tone. And you can start to add some
nice edges to the leaves, just going over them,
just a tiny bit. We're going to
refine them later. Look, notice how this
one is a bit more blue. Once I add this over the top, it looks so much nicer. And then over here, let's make
another one that's bigger. Let's make one going this way. You can practice. Now it's the time to practice some
leaves and some foliage. They are just like petals, but a bit more big and wobbly. And in case you don't
like something, you can just go
and you raise it. And then add another one on top. Just one going this way, one going this way, but this
one is like half of a leaf. So let's add a bit more. They don't need to
be very visible. So this is quite good that
it's a bit more dark. And let's add this one. Notice the wobble.
Let's add some sticks. Maybe make this stick as well, and some leaves behind it. Now with this brush, if
you go into the brown, add some blue and some yellow, recreating this beautiful thing, let's edit this and
make it smaller. Way smaller. Go in between. You're basically doing
negative painting. Negative painting is fancy talk for going from the
outside into the shape. Notice how it's not small
enough. This is perfect. Now it's perfect. You
can go a bit brown, a bit more brown to
add even more depth. And you can go ahead
and do the same just going around and editing
this shape, these shapes. By this time, the
flowers are almost dry. Don't forget to add some of that wobble wobble wobble db db. Notice the wobble. Now, getting a bit more brown and a bit more red and a touch of blue to
make a dark dark purple. Just because we're
going to go here, so we want that orange to
stick out of this one. Getting a bit darker in
between those edges, you can go over them just a
tiny bit. Let's edit them. Simplifying. And if
you want to go over it with your finger
just to smudge those edges, you can do that. And going in between here
and in between here, just so we create a
bit of depth and a bit of contour for this
one and this one. Let's make this one a bit more inside and going like that. This one is too big, so let's edit it out. Okay, let's add some
yellow this time because we're closer to the green. So we are going to add
some of this green. And then going
back to the brown, going in between, creating
some of this curve. And this one over here, we're going to go
back with the yellow, so don't worry if you are
going to go over the yellow. O
13. Negative painting: Okay. Now, for this one, we have to be a bit more
careful because it's smaller. So editing, flaring
out, flaring out. Notice how I covered some of
the yellow, but that's fine. I should actually just
be a bit more careful. Okay, let's simplify this
beautiful one just over here. And then this one we can
just go a bit more abstract. And on this side, if you go
with the brush this way, it creates a softer edge
than just going this way. Let's add some leaves
like a leaf here, and some leaves in
the background here. Let's cover this edge and this
one to clean up the brush. Okay. Going up here and
editing some of this shape, adding some wobble and some beautiful
motions of the wrist. This one is beautiful, is long and nice. And this one needs to
be shorter and wobbly. Try to not make it
perfectly going around. Try to vary and
change the color to a green because it will look like you circle
the whole situation. This needs to be
softer than this one, as well. This one, as well. So you go with barely
touching the canvas, you go over the petals, and they are going
to be a bit softer. You can also accentuate some of the leaves just over here. You're basically making a
lot more contrast by going close to a beautiful
light color, light yellow, and then cutting
an edge with the black, with the brown, actually. It's a bit more of a brown red. Let's add some of
that red so you can see properly what's going on. Let's go over here,
make it a bit pointy. Notice how beautiful that looks. And on the background
and the same. Don't circle it perfectly. Don't go around it perfectly. Uh, Okay, let's edit this stick, making it more organic
and in between it. Okay. Let's actually go this
way as well to make it a bit more visible and this way. This is a beautiful leaf, so we're going to keep it. Okay. And going in
between those petals, adding some water just so we can lubricate taking
some more brown. Notice how I'm
leaving some gaps. You should do that as well just because you can
go ahead and take some yellow so that you can
go with a more greenish tint. So it doesn't seem
like you've basically circled the whole area. Let's go behind this one. Okay. And over here, it doesn't have a lot of brown. So we're going to
go with the brown. Basically, we're making
this brown mess. So we have a substrate where
to put brighter colors, brighter yellows and
beautiful highlights, changing to another hue, a more yellow hue. Hue. And then going
with the brown, being very careful around the colors around the Let's add some blue just
to change it up a bit. And changing it up a
bit here and here, just finishing up
the touch a touch of this canvas to have that wash. Imagine just having
bare canvas just white sticking out right
now at this stage. That's why you do
the brown wash. Let's take some more
blue, a bit of brown, a bit more brown and
continuing to contour and go around like here
because we need to accentuate that beautiful vase. This is exactly what
you shouldn't do. Like, going around it perfectly.
14. Closing the gap: Add some red to smudge some
of that actual outline. Now, let's go back
to the blue and some yellow to change it over here. Going back to the red and trying to go in
between those petals. Now, there is only
a bit of wash left. That's fine. You don't
need to cover it all. That's why you have to wash. Perfect. And now let's add
to this corner and going a bit further and faster
on this side because this flower is a bit more
into the background. Now going with some water and some of this greenish
color and adding one touch, going to the red, going
over here, going over here. Adding some more colors. Let's add Let's make
a beautiful green. This time, a bit more bright, just so we can add some
beautiful leaves like this. Okay, not too many. Just a few. Okay, one,
two, three, four. And now let's make
one over here. I'm going to make this one
this petal a bit bigger later. Let's add more yellow into it, just to make it a
bit more light. And of course, going just
because this is very bright, let's add it and
make an edge to it. And another one just going here and maybe this
one on the edge. Notice that it's combining with the brown that you have
already on the canvas. Let's do one from the outside
and over here as well. Over here, let's make a small little stick going
down and another one here. Notice how easy it is to just press and make a leaf,
add some wobble. And that's the leaf, basically. Let's actually add
another one over here, right next to the petal, and going back to the red to cut that and add some brown to it, mix it a bit thoroughly just so you can go back into the leaves. It's a bit of a longer step. But it's an easy and
simple step because you've done the drawing
in the beginning, and now it's just child's play. Just circling and
editing a bit of the petals and a bit of the Let's go over here
and accentuate that leaf. Well, it's called the
petal. And over here, And I think that's enough. Well, not really. We need
over here a bit more. And over here. Just over there. Okay. That's enough.
15. Changing the vase: And for the next step, you need to clean
the middle brush, just press and swirl and
then take a paper napkin. We're going to focus
a bit on the vase. Okay, so for the vase, you will need some yellow
and a touch of red, just a touch, smidge of red, some water and start going and making over this brown
just a wash, going slower, a small wash. Let's add some more water and going and going a bit
rounder over here, leaving the space
for the highlight. And now add some brown just so you can add the shadow side. Like, the light
comes from there, so the shadow side
is on this side. Being a bit more careful
around the wonderful petals, you can still edit them. Notice how I added a bit
of wobble to this petal. And once you circle a bit, now, here you can basically circle over everything because this
is going to be a flat color. It's going to be an object
that has that kind of quality that shows the
outlines of things. And then add some water to
just wash in between here, add a bit of texture, and then take it
a tiny bit away. Going in between these, let's take some more brown. Let's add a bit more
brown to this side. And then taking some
green to add a nice, beautiful leaf just
going over here, just so we don't run into the fact that it
doesn't have a edge. I'm doing a bit of green here just to make it
a bit more round. And then clean up the brush, just a smidge and we're going
to add some more yellow, being very careful not
to touch the blue, so we don't make it green, and we're going to end
up making these pointy, beautiful ends once again. You should be a bit careful if you touch the green
or the brown. You should clean the
brush once again just like this and then
take some more yellow. And then being very
caligraphic with it and with a bit
of a thicker paint. And on this side, over here, let's make it longer. It has a bit of that brown. So, oh, no, I picked
up some of the blue. That's what happens if you
have a messy palette Okay. And once we have
some of that yellow, we can go over here just to
mess a bit with our brain. And we're gonna need to
clean up the brush once again because the yellow
is completely messy. Let's take from here. Perfect. And let's
make this one. Does it still have green? No. Okay. And over here
and over here. Okay. For the next step, you need to let it
completely dry, and we're gonna go
add some highlights. Before we do that,
let's just add a bit of brown over here just because
it's almost bare canvas. Perfect. Let it dry completely. If you have a hair dryer, you can go ahead
and hair dry it. And we're going to add some more yellow around here
just to balance out the composition because it's
cut out over here and it doesn't really have anything
pushing the weight this way.
16. Highlights: Since the painting is
completely dry and almost the palletas
almost dry as well, we can add some more
yellow over here. Let's add some white, some lovely acrylic white. And now we're going to pick
up the small fineer brush, the small round brush, and starting with just yellow straight up from
the pile over here, going onto this edge right
in the middle first. Just to get rid of
some of that color, we're going in the middle and
then going onto the edge. This is the time to
refine those edges and make those points better. Go a bit thicker
towards the end, not on all of them,
but on some of them. Like, for instance, this one and this one and let's go over here, heading just the
tip of the brush. I'm gonna go this way so
you can see it as well. Okay. And maybe this one goes over and over here
in the middle, cleaning up the brush, taking some more color to
accentuate the end. The tip. Notice how small it is and going a bit slower to
have more finer control. Okay. Don't worry
about the textures. Textures are very good. They make the
painting look nicer. This one maybe it's broken. It has two tips. Okay. And maybe this
one goes over that one. Now over on this side and finishing the tip of
the beautiful palette. Now notice here
there is a space, and we're gonna
fill that in with a beautiful yellow
just going like that. Okay. And for this one, you're going to focus
just on the left edge, slowly adding it, and
then smoothing it out. Now, over here, notice how this there is this tip
made by the brush. So I'm going to just
adjust the brush to be able to create this
wonderful texture here over the green. Okay. Now let's go a bit
thicker on these ones. Just adding some natural
motion, waviness over it. I'm rotating the brush to
find the tip, and once I do, being careful not to
touch the yellow, you can keep your pinky
finger like this, rotate the brush so
you find the tip and add that texture in
over on this side, finding the tip, putting
the pinky finger down, and making a few
beautiful lines, creating this tip of the wonderful Let's add some
more textures to these ones, adding even more, just because
they are closer to us, so they have a bit more
texture than usual. Usually, texture is used only on the things
that are lighter. Perfect. Now going on
this one and editing the shape. Just like that. And on this one, going outside of the frame, let's also add this
one over here. Let's add just a bit of yellow, maybe a touch of
red, a touch of red. Just to add some kind of, like, a thing going out and now
going back with the yellows. And in case you don't
like the shape, just take some water,
blend it a bit. And you can do the
same over here. If you have some edges
that shouldn't be there, you can just blend that yellow. Don't go overboard
with the blending. Just the touch goes
a long way. Perfect.
17. Turn on the lights: Now going to this one, adding more texture to the
ones that are closer to us. Let's take some more paint. Notice how it makes a
little bit of a tip. I'm going to use that tip, barely touching the canvas. I want to make sure
you're gonna see this. Barely touching with the tip. And then going a bit thicker, a bit pushing a
bit on the brush. Okay? This one over here. If you have a few petals. Notice how big this
beautiful tip is. So I'm just going to put
it, right over here and then start to
continue this petal. If you have a few ones
that are very thick, you don't need to do all of them in the same exact manner. You can go a bit more softer
or just not that thick, just like these ones. This one, I'm going to make
the tip just going that way. And over here and here, let's just clean up the brush. Adding some texture. I
have a lot of texture, so I might as well just
add it slowly here. And also maybe over here now getting a bit
thicker on this side, just so it has more
color, thicker, closer to us and leaving
the rest like that, maybe add some thickness to
this one right over here. Notice the tip and placing it right there, barely touching. And it has created some
nice wobbliness wobbles. Wobble bubbles. Now, let's accentuate that
this is in front. I'm going to erase
with my finger. You can do the same on petals, just going with your finger and blending it in just one touch, and it just blends in like this. Okay, maybe some
lines over here. Just to give that
contour to these petals. Just a few. And this one. Perfect. Now, taking the brush, you can also use
let's actually use the flat medium brush, taking some of that yellow
and showing you that you can do the same and even a better job with
this brush as well. So closer to us
means more texture. This one is going to
have a tip just going down and then slowly
building into an S. This one is going to go up. Whoop. I don't have the tip. Erasing and going back
and making the tip of the beautiful petal. Now going to the
top and adding in a bit less textures as you
go towards the left side. Now, white, add some white
right next to the yellow. Don't go overboard
with the white. Just add a bit almost
more than half or less, about half, 50, 50. And let's just add
some highlights. So thicker highlights. Notice how these highlights
are not really on the ends. They sometimes start at the end, but mainly on the
body of the petal. Getting some more
yellow just to vary the color and adding here and also here and
maybe here as well, going over this side, just to trick our
brain and making a small and Going over here, maybe on this side this time. And over here, let's make this one because
we didn't touch it. And continuing to add
a bit more white, just so we can accentuate
this beautiful one, going towards that yellow, picking up some of the yellow, just to blend it in
and over here as well, just barely touching the
yellows and then going with our fingers to get some of that color out and
build a bit of texture. Getting a bit more
yellow to be able to make this one and this one, and also this one. I think this one needs this one right over here needs
a bit more white. If you go too white, you
can go over with a wash. Okay. And going over here to
add some of this yellow, be careful not to
add it too white because you will take the
attention from this one, which is the main focus area. Let's go over here and add a touch of
white over the yellow. And over here, Let's make
another one behind here. And let's touch up these ones
at the top and getting more yellow closer to the colors
that are underneath, just so we don't
compete with this one. Let's smudge some of the
edges on these colors. And another one here, smudging it just a
bit at the edge. Let's add just a few touches to this one over here and
maybe on this one. And let's add just on
this beautiful one, just a few touches and maybe on this one to accentuate
that beautiful edge. Okay.
18. Vibrancy on the vase: Now going and erasing some
of the color from the brush, cleaning it up a tiny bit, just to have a clean brush for
the highlight of the vase. For the highlight of the vase, we're going to add
just a touch of blue and a lot of white. A lot of white. And then you're going to go sideways with the corner
of the brush and start adding some splotches and then brushing them
splotches, brushing them. And then going down
to smooth that out, you can also go with
your finger maybe adding a bit more color and a bit of blue underneath to
smudge it like that. Let's make a red wash, a redder wash with some
yellow orange wash, a touch of orange wash, just to give a bit more
interesting looks to the vase. Now, being careful not to touch the yellow of the flowers. I touched it a bit, but nothing will
happen that much. Okay, now barely
touching the white, going very close to it,
but not touching it. And then you can smudge over
the edge at the bottom, and then continue
with the swash. Clean the brush just so you can continue with the
wash a bit softer, so it creates a softer
edge towards the dark. Now for the dark, let's
take some brown and add it right next to the
beautiful vase. Let's add some red
to the brown and add it on this side,
a bit more brown. And water, clean up the brush at the bottom
of the container and add this wash right
under the petals, being very careful not
to touch them that much. And combining a bit, you can also go with
your finger here to build some blurry edge. You can add some of this red
on the left side as well.
19. Leaves highlights: And then as long as you
have this wash of red, you can go over some of the
darker sides of the middles. You can also accentuate the
edge over on this side. Add a touch of blue just to make it a lot darker and some brown. And let's make some splotches
right underneath here. Maybe some lines going out. Not too much. Let's
blur them out. And adding some of this blue just to add
some color variety, maybe too much blue. So let's add some brown
over it to accentuate that wonderful dark side. We're only going to
do that on this one. For the highlights
of the middle, you're going to need to
make a beautiful orange, a bit more towards the
yellow side and start adding some beautiful
dots with the corner of the brush and adding some more yellow placing your finger
just to smudge some of them, and then adding
some more yellow. I didn't add white. This is just yellow. I
didn't touch the white. Okay, and for some textures, we need just the corner
with straight up yellow rotate the brush so you can create
some more things and then use your fingers, add more textures on top. Okay, if they are too intense, after it's done, the painting, you can go ahead and add a
bit of a brown wash over it. Okay. And with this orange, we can start to add
some of them here. Just to add some of that
orange there as well. Let's blend these a bit so
they are not so visible. Perfect. Let's take
a step back and make a beautiful green over this yellow white mix
it very well together. Let's add some of this orange
just to cut it out a bit, add more yellow, press
down on the brush, so you put on some of that red, orange and start adding some
highlights for the leaves. Just a touch here and
another one just over here, maybe a bigger one
over on this side. Let's actually just
make a leaf going this way and another one
going this way. And of course, let's
accentuate this leaf, just so it can show that
can also go with the finger and smudge some of that color on one edge, just like that. So it integrates better with Let's add more
color so we can smudge. So it integrates
better with the leaf. So it's not just the line. Let's take a bit more yellow
and accentuate this leaf. Let's make a few sticks right over here, putting my pinky, just giving a highlight
to that wonderful stick, and another one another
highlight just over here. Let's maybe let's see. Let's make a leaf
over on this side, and taking some brown to
cut out some brown and some blue with a bit of water
to cut out that leaf a bit. It's too intense.
And with this one, you can start creating
some more leaves around not too many. You have a lot of light color. So you can use it. Let's take some of
that light color. Now that it has some brown, it's a bit more dull and
accentuate this leaf. And this one over here, and let's make another one here. And one here, just so we
round out those corners. Now, let's make a
beautiful lighter green. This will be only
on a few leaves, on a few ones, not too thick, so I'm brushing
it over the edge. And just over here, notice how intense it is. And maybe on this one, and maybe making
another one just here and another one
over on this side. Let's smudge that in just
so it's not so intense. I picked up some
yellow. That's fine. And let's cut
another one here for the last leaf and
blur it out a bit, making a mess and
making it a bit more pointy. And there you go. The painting is over. Let this dry and go over what you have learned
in this whole process.
20. What do you have learned Thank you: Deliberately started
with some brown and let you do the
whole painting without really talking too much about what you've learned. That is so you can have
the added benefit of the fact that you
are unconsciously learning something by doing. You started with some brown,
you've played around. This is the playing stage, and you've learned how to draw and use the brush
in a very nice way, swirly, making cuts,
making round shapes. You've learned
about round shapes that they look a
bit better if they have a bit more of an
angular feeling to them. You've learned a bit about perspective when it
comes to ellipses, that if you squish them like this and make
them a bit longer, they are in perspective. They seem in perspective. You've also learned that you shouldn't make them
pointy at the end, but rather round them. And then you've learned that yellow is a very
transparent color. So you need more layers. You should test all
your colors to see how many layers you need to
apply to make them opaque. Learned that you can
add a bit more brown around this area to make
a beautiful shadow, just like over here,
over here and over here. You've learned that things
that are closer to you have a lot more texture and you've also learned how to be a
bit more calligraphic. That's exactly why we used
all three brushes to create petals and create smudges
and also create leaves. You've learned how to
control the flat brush, both on its side, on its
corner and on the flat side. You've also learned about edges. These are called lost edges, and these are
called found edges. That's just fancy speak
for sharp and smudged. That's super easy to remember. You've looked at the light and the dark without
even knowing, just adding a highlight, and this is the light part and then going over the shape in a round fashion to
build that volume up. And you've learned that in between the light and the dark, there is a bit of a blur. And then the highlight,
you've smudged it on the end and then went to the side so that when light comes light from outside
of the painting comes, it will immediately
make a little bit of a ridge so that it
looks more interesting. You've also learned
that shadows are more transparent
than highlights. Highlights need to be thicker. That's why you build the
highlights with a thicker paint, and things that are closer to
us have a lot more texture. On top of that,
you've noticed how to trick the viewer to
look in certain areas. For instance, this
flower doesn't attract attention because
it doesn't have contrast. It does not have a
lot of sharp edges. It does have some sharp edges, but not a lot and not
with intense colors. You've learned that
the focal point needs to have the most contrast. So that's why you kept
the lightest colors only here and maybe
a touch around, but mainly focused here. You've also learned how to smudge colors
with your finger. That's a very cool trick and how to do washes and
thicker paint as well. In regards to the leaves, you've learned how to really let loose with the
big brush first, and then adding some cuts
to build these leaves. You've learned that if you
wobble the brush a bit, you get more organic shapes. You've also learned about
colors that go well together, orange, yellow, and
a lighter yellow. These are called
analogous colors, and they are like friends. They play well together, as opposed to red and green, which creates a lot more
contrast and red really dulls down the green
becoming a brown. You've also understood how to do negative painting by
going from the outside, that's what negative
painting is. It's just a fancy
word from going the outside in
towards the shape and cutting out some of the shape to build a better
outline that is sharper. For instance, here, there
should be a bit more brown to define that abstract, interesting petal and some here to add a bit more
depth and clarity. You've also learned how to
build layers on top of layers from green to lighter green
and to even lighter green. And you've learned
that you can smudge one edge that is touching the leaf in order to better let the colors
merge together. That is very helpful to not have to go back
to the other green. You are using the transparency of the color and smudging it. You are basically
creating a soft edge, and that integrates it well
into the body of the leaf. You've done the same
for the flowers. And, of course, you
had a great time creating this
beautiful painting. Thank you for being here and being part
of this community. If you are gracious enough,
please leave a review. It will really help others know what to expect
from this class. Thank you and see
you in the next one.
 George-Daniel Tudorache, Together we will create amazing things.