Transcripts
1. Welcome to another wonderful class: Welcome to a new and simple
acrylic painting class where you will learn how to make this wonderful landscape. This composition might
seem complicated, especially if you
haven't painted before. However, this class is
specifically designed to guide you from zero to hero. Hi, my name is
George, and I've been a professional artist
for over ten years. In the last six years, I've
fallen in love with teaching. Both online and in person classes with
adults and children, I've developed
this wonderful way of teaching that focuses on fun and engaging
projects while learning about key concepts in
painting, such as composition color harmony, brush handling, and, of course, texture. Painting can be one of the most rewarding activities
that you can learn. If you are ready to unlock your potential and
enjoy a new hobby, let's jump into the class.
2. Materials needed : One, welcome to another
beautiful course. In this course, we will
be focusing on using just one single brush to
see what the brush can do, preferably a flat and big brush. You will need also
mixing plates, some water, and a canvas. This is 30 by 40 centimeters, but you can use easily other
kinds of shapes and sizes. You'll also need
some paper towels, as well as some paint. This is Azo yellow medium. We will be using
acrylic paint today. You can use lemon yellow with no problem and add a
bit of red into it. This is just some
titanium white. Some burnt umber,
also known as brown. Some red. This is carmine red. You can use other kinds of red. No problem. And some blue. This is brilliant blue. You can use ultramarine and just add a bit
of white into it. It's very important to learn
what your tools can do. Every brush can do
different things. If you have a flat brush, it can do lines, it
can do big things. I can do textures, and you can use it to
do a lot of things. The same with a round brush.
I can do many things. Even if you roll it like this, it can create different
kinds of textures. So it's important
to learn how to use each tool on its own. That's why this
course focuses on the big flat brush and how to use it to create a
beautiful landscape.
3. Orange wash practice: Let's start by doing a wash. This is a very good
opportunity to learn exactly what some yellow
and some red can do. While at the same time,
learning about brush handling because this white will just go away and be orange overall. You can freely do as many brush handling
techniques as you want. I'm going to teach
you some, and then you explore your own brush. It's important because even the flat brushes are different. So let's mix some orange, a bit more towards the yellow. Let's grab some water. It's very important to grab
water at this point so that it's easier to get rid
of this white. Okay. And let's start with
some brush handling. You can start to see that
you can do some lines. And it's important to
understand that going slower actually gives you more
control than going faster. Notice how it curved, and I don't have as much
control as going slower. So going slower actually
makes you make less mistakes. That's the first line. Now, going on the side, going with the bristles, not against the bristles, we can make a very flat
and beautiful line. You can also change the size of the line by going a bit
on an angle like this. Notice how it's a bit
harder to control, but if you go slower, and you keep that going,
it's almost perfect. That's for beautiful lines, another thing that it can
do is very pointy things. First, you need to go on the plate and brush it over
the color until you have, like, a knife. It's razor sharp. So let's put it down.
And go like this. Notice how this corner is super, super beautiful and sharp. And you can go even
thicker by pressing down, lifting and notice
how beautiful it is. This is very beautiful
for a leaf, for example. Or to go right next. Notice how if you want to go
right next to this shape, I'm actually not
going to touch it, so you see that you
can really go super close by going super slow. Notice, there is a bit of
white still left there. So you can go around
shapes and really, if you want, just go right next to the other
color by going slower. And this actually
makes you paint faster because you
gain more control, so you make less mistakes. And the next shape is a big
flat blob or splotch of paint that you can add
to the beautiful Canvas. You can do these
splotches by going and curving the
brush and moving it a bit faster or a bit slower depending on the abstract shape
that you want to create. Okay. All kinds of shapes. And they can also be pointy. Notice how you can just
move the brush to create endless points a beautiful star or flower or whatever it is. You can do those
kinds of things. The other thing you can do with a flat brush is to texture. First, dab on the palette and notice how the
bristles are opened. So you can start to make
those kinds of things. Imagine that you are adding
some foliage for a tree. So just one brush can
make all of these things. Okay. And now let's just do the wash over the whole canvas. So that's why every opportunity
when you do a flat wash, you can do some brush
handling so you get into the right head
space for painting. You can do this step
really, really fast, but be careful not to spill
any of the color onto the table or pick
up some debris. Let's get some more water
and start adding this color. Don't worry that I have
a bit of blue over here. I edit it by mistake
with some pen. It's called a pen. Yeah,
it's called a pen. When I cut the canvas,
so I stretched it out. Let's go and continue
adding this color. You can go in both directions, both horizontal and vertical. Water is your friend
at this point. Just mix some water and go over. Don't worry if you can still see some of the lines or
some of the textures. It doesn't need to be
a perfectly flat wash. This is going to be quite
covered by the end. So let's add even
more over here. Let's add even more, even more, and go and fill in the rest of the canvas
super, super fast. And over here in the middle And let's add
a bit more at the bottom, focus and see if we have some white spaces on the
edges or somewhere else. We need a bit more color. And after this, you
will need to let the beautiful paint dry for
about five or 6 minutes. It's all you need, depending
on the level of water, but it doesn't really matter if it dries completely or not. Force of habit is to try
to make the color perfect. So I'm not going to really do that because it's not needed. But it's easy to just go at
the end and just go and add a horizontal just wash over everything and maybe a
bit more color at the bottom. Okay. Perfect. And let
this dry for about five, six, 7 minutes while you make yourself a
beautiful cup of tea. Even though paint water
makes us stronger, we have to not drink it
because it's not good for us.
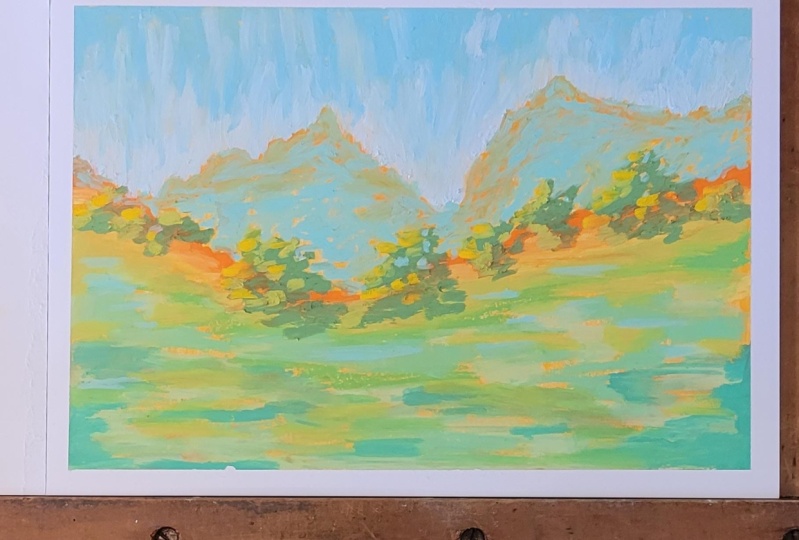
4. Line of mountains: Now that the painting is dry. Well, for me, it's
completely dry, but it doesn't really matter. I use the hair dryer
to dry it faster. Let's add some red. You can also use some
brown at this point. It doesn't really actually
matter. What color you use. We're just going to do
a beautiful sketch. Let's start right over here and make some
beautiful mountains, the horizon line of mountains. To make it very
nice and beautiful, we're going to add
some mountains going up until about here, and then they go down. And over on this side, we're going to make them taller, like some cliffs, and then we're going to go
this way with them. Now, it's quite important to use the brush with its corner to create more interesting shapes, more interesting boulders
or beautiful mountains. Let's go over them once again to better accentuate the edge. Variety of edge is quite important because it
gives more detail. If you have something like
this, it doesn't look right. So things in the distance
have a very detailed edge. Notice how now it looks better, but it needs a taller
one in the middle. So make sure that notice
how this is very round. It does have some
variety over here, but it doesn't have, like, different kinds or
different elevations in terms of shape. Now, let's add some more
mountains overtop these ones. So I'm going to go
start from here. Notice that I picked
up a bit more red so that they
are more visible. Okay. We can change that angle
and variety even as we go. If you want, you
can just go ahead and move to this corner over here and start making
this edge over here. So your mind doesn't continue the shape
from the same side, so it's a bit more logical. It's very good to be a bit logical when you're
painting because our minds tend to do only stuff like this for
mountains where more like this. These don't look
okay. I'm going to make these mountains
a bit higher. Okay. Perfect. Now, the last line
will be a bit more flat, and it will be
kind of like this. Maybe this is a canyon
or something like that. So we can add these kind of
zig zags maybe like this, another one over here. And that's all for
the beautiful sketch. You need to let
especially this part dry because you're
going to paint the sky over it and clean out the brush at
the bottom of the plate. And by plate, I mean cup
of water, squeeze it down, add a bit more water, and
squeeze it down again, so it doesn't really have a lot of orange into it anymore.
5. Painterly sky: For this next beautiful step, if your sketch is dry, that is beautiful and nice
because you will be able to edit the shapes
and make indents. But if your shapes are
not dry yet, the sketch, you can still paint over the orange over here and
not change them that much. The idea is that when
you have the sky, you can start to edit the
beautiful Lines and outlines, like you did when you
went from this side, now you're going to
go from this side. Let's now mix a beautiful blue. I'm going to turn
around the plate because it's going to
make it easier for me to mix quite a bit of
white into this blue. Notice how I'm not going into
the blue or into the white. I'm making another
space somewhere over here to add this color. You don't really need to make
it very combined together. In fact, it's more painterly
if you just add it. And now let's teach
you about more of the reason why
we add that orange. Notice how now
because we are not using a lot of
thickness on the brush. There is a lot of
the orange still showing that is
quite interesting, and it gives this
super nice effect. Whoops. I picked up
some of the blue, but that's remedied
by adding some more white over top and mixing it
straight onto the canvas. Okay. And let's go and
add and fill in the top. You can go very fast. Notice how all brush
strokes go down. This is to give that
painterly feel. It's important that you go a
bit faster because you need the colors still wet by the
time you finish the step, and add to top, you can really go a bit more crazy with the beautiful colors. As you go down, let's add a bit more white into the color, and that's where the colors that you placed onto the canvas already are very important
because you're going to go from them even lower. And a bit lower. So you make a beautiful
soft transition. Can also mix over
the blue to get a deeper shade of blue
that you have over there. If you have too much
orange, like over here, you can go in between, thus creating some more
interesting shapes. Like, notice if I go over here, I'm going to create sort
of like a ridge of white. So let the orange dictate. Don't go overboard
and make it all blue. You actually need some
of that orange to give a little bit of warmth
to the composition. Let's go a bit faster
over on this side. And as you go down, you can move the brush as
we said in the beginning, go with the bristles. Let's mix some more color, make it a bit more light. Let's grab some more
white and a bit of blue. So we have some thickness. And let's start over here. Notice how slowly
you can go and go right next to the Mountain. And of course, you can
edit some of the shape. Even if it's wet, it's not going to really
matter because it's such a tiny amount
of paint because it's super transparent
and this one is so thick. And slowly add this
like, right over here. Notice how it's creating
even a more complex edge, and you can go inside
the color if it's dry, but even if it's
not, that's fine. Then you can go from
this blue closer to the edge to create
a bit of a transition. Now, let's go over here, slowly move our way towards
the end of the cliff. I picked up some of that orange, so I'm going to mix this
color over the sky and then go closer to the edge
with a lot more color. So it looks integrated. Let's go over at the end. Notice how because I have a bit of experience with
handling a brush, I can go this way, as well. But you might need to go this way so that you
have a crisp edge. Like the trick with doing
it like this is to know exactly where and
how to lift it up. It's much more complicated
and harder to pull off. Okay? You can also go this way, but if you go this way, you are entirely
obligated to go and do the wipe up with the brush and
then maybe one going down. But going this way,
as you can see, it creates some small
blobs of paint. So it's better to go
with the bristles. This is the most easy
way of going over an area and filling in with another color is going
right to the edge. And with a flat brush, it's much more easy
than with the round because imagine the round is going to be like
this all the time. Super hard to do a close edge and fill
in a gap like this. In the sky like this with
a brush that is round. Okay. Let's go the opposite way, so I teach you exactly
the proper way to get the sharpest edge. Okay. Perfect. You can
press a bit harder, and then notice
how this paint is very thick over here because I pressed super hard on the brush, so I left a lot of paint, but it's not close to the orange because I
need to pick it up. I picked it up on the
end of the brush, and now I can go towards the
orange and finish that edge. Notice how you can also press into the bristles to
get closer to the edge. Like, right over here, let's edit those white dots. Just press a bit into the
bristles and then go out. You don't need to go super fast. I'm doing it just for effect. You can go like this. It's
almost the same thing. So I'm just doing
it to be fancy. Okay. Perfect. Now it's time if you see some
areas like for instance, this one or this one. If you see some areas that
you don't like on the sky, just touch it with a brush. If you still don't like it, touch it slowly and do it again. And notice and do it again. And the same with textures and things that
you don't really like. You can go a bit faster, depending on what kind
of person you are, or you can go a bit slower. Slower is always better, except for when you
don't need slow. Perfect. Now, in the next step, you will be doing some
beautiful greens over here at the bottom and
going up towards the sky. We're going to go
with other colors.
6. Grasslands: This wonderful step,
you don't need any more colors on
the color palette. You don't need to
clean this brush. In fact, let's just
take some yellow, add a corner of red into
it, and then some blue. Let's add some more
yellow over top. Mix in with this
blue of the sky. And some more yellow, creating a beautiful
light green, maybe a bit more yellow. We need it to be
a green, yellow, not a very, very green color. So it's way more
yellow than blue. And now let's add some white. And some water, and we're
just going to play around with textures just broken color just like you did over here, but this time a bit more crazy. So it's much more much bigger
gaps because this color over on the ground is
perfect for what we need. And then take some more color. Once you finish the whole
area, go like this. All you need to do is go from side to side and sometimes
rotate the brush. That's a bit too much
in terms of color, so it's too much color. I actually needed
a bit more yellow. The goal is to just have some abstract colors
at the bottom. It's much more nice to have a broken color than to
have a flat color overall. Now, right at the edge, you can slow down and go over
the orange or the brown, depending on what you colored. You can even add a bit more
white into this color. Okay. And go. You can also add a bit more
complexity to the edge. And over here, these
corners are very sharp, so let's chill them out by making them a bit
more soft and round, both the inside corners, like over here and the outside
corners like over here. Super easy. And now let's go and finish the shape
over on this side. You don't really need to be
that precise with the colors. Perfect. Now, let's grab some of this light color and
go over the areas of darker green and do a
bit of a blending in between over just where you have the lighter
and the darker green. Now, we are going to
do something very, very interesting, which
is to add yellow. Well, that's quite
a bit of yellow. Jesus. Now, let's add this
yellow over top this color. Okay. And some white. This course also focuses on just letting go a bit and
trusting the process, trusting the fact that
you have a sketch and letting the brush
actually do its own thing. Like, for instance,
right over here, we're going to imagine just another plane of
color of green colour. And you don't even
need to be that careful on the edges because
these colors are friends. They are called
analogous colors, so they are friends. So you don't need to
really focus too much. Notice how in some places, I'm rising up the color, and in some places, I'm getting very close to the other green. Okay, now let's clean the brush. Well, actually, we can
add some of this color onto the deeper green as well
to add more color variety. Okay. But not very
close to the edge. We still want a big
difference, like, right over here
where the edge is. Now, let's clean the brush. Let's grab some some yellow. It does have a bit of green into the brush, but that's fine. Let's mix in this very light yellow over on this
side of the plate. Let's add a bit more
yellow into it. And now let's go even
closer to the sketch. And continue to add it
to the sketch, creating, like, a beautiful light line over here. We don't
know what it is. It doesn't really matter. It's the right shape in the
right place on the ground, almost as green as the grass. Okay? You can still
add some of this green just in some
places over this yellow. Okay? Now, let's go ahead
and create a deeper green. Well, let's do that
in the next step.
7. Treason foliage: This next step, you don't
need to let the painting dry. All you need to do
is pick up some of this blue and some of this yellow and touch on the
corner of the brush of red, a bit more and some more yellow to create a
darker, deeper green. Notice how I didn't
clean the brush at all. Now, let's go with a bit
of texture this time. Maybe these are beautiful
trees, a line of trees. And let's add with the
corner of the brush, and we need to rotate and let some beautiful little edges
for the actual birds, and you need to vary it down. Make this as complicated as you need and leave some space. You can even go into
the green if you want, and then brush it a bit, go into the green,
brush it a bit. And you can pick up and
change this color by picking up some of that green
once you did the brushing, so it changes in color a bit. So it makes it more varied. Notice the little
pockets of light. And you can do the same
over on this side. Maybe we add a bit of a
break into the trees, and maybe we can add a bit more break like
right over here, over on this area. And notice that we can brush
this color over like this. Okay. Don't worry
about the orange of the mountains or the cliffs. We're going to take care
of that really soon. If you have some
white over here, don't worry about that as well. But you can't have
because we've painted over that again. Perfect. Now, let's add just a bit more. We're gonna need to fix these beautiful cliffs
into the next step. But before we do that, let's add some more yellow
into this color. And let's determine a bit of a highlight over on the
left side of the trees. Imagine like these
are individual trees, and they just have at the
top and close to the middle, a bit of highlight
onto the left side. Okay. Remember to rotate the brush and use it with
the corner to create smaller and more
different shapes because if you did
something like this, well, like this, notice
how it's the same shape. And then it ruins the
whole entire thing, the whole entire painting. Well, not really, but
you get what I mean. It's no longer an illusion. Now, no longer creates
beautiful and complex shapes. Perfect. Now, in the next step, we're going to focus
a bit on the cliffs. And we're going to use actually we're gonna
learn a bit about color, and that's going to be
super, super interesting.
8. Secret transparent color Thank you: This next step, you don't
need to let the painting dry. Let's clean out the
brush quite thoroughly, and we're going to do
something very interesting. Let's grab some water. It might have a bit of green into it still or
any other color. Let's add some blue
and some white. With this water. We need
quite a bit of water. But not completely. We need a bit of consistency. It still needs to be like
when we add it here, it doesn't drip completely. When we add it to an edge, it doesn't really drip. Like, notice, if I
pick too much water, it will drip at some point. Well, come on. It dripped a bit. So
it formed a drip. So you need to add a bit of
water and feel this color. You can take
something like canvas or something else and
notice it moving. If you cannot hold it like this, and it will just spread and move and drip everywhere,
then it's not good. It needs to have a bit of
the right consistency. And this you can only learn
by mixing it and feeling it. You will start to see that
it kind of doesn't move. Like, if I go like this, it doesn't move
to go everywhere. Okay. Once you have this
color, let's grab some. Start very slowly, first
by doing it on a napkin, so you take some of the color out and write over the cliffs, but not entirely everywhere. Just add some of this
transparent color. Okay. This will bring the colors much more closer
towards the sky color. Okay? Notice how now I'm
taking a lot more color, but notice if right over here when the brush had
less and less color, it was more transparent. So keep that in mind. And right now, this is just
the first layer of discolor. Can go over in between
the areas of the trees. Don't worry if you go a bit
over them, just a tiny bit, but be careful and try to
add it as close as possible. And now let's continue
just a little bit. Then maybe let's make a little hole over here
and one over here. And now let's clean out the brush a bit so we can
add a bit more transparency. You can dab it, but notice that these beautiful dabs
are more like cuts. So they go into some
direction either down or to the side. Okay? Perfect. It will give that painterly look that you
want for a painting. Don't go over the sky, try to stay to the edge, and you can go a bit
faster just like this and be a bit
more loose with it, but be careful to grab a bit
more and add it to the edge, especially and where
it needs the trees. And over here on this gap, you need to create the
illusion like this is behind. We're going to do some
editing of the trees as well. So don't worry about the fact that you've added the
color overtop the trees. Notice how beautiful
it now looks, and these cliffs look almost like a vango painting
because, in fact, vango used opposite
complimentary colors to create the same effect, the same broken and
interesting colors. But not in this way, he
was more particular just doing small little shapes. This is a more modern way of doing impressionistic
style paintings, but in a very fun
and liberating way. You can use this color
to add it somewhere onto the greens as well, maybe at the intersections or maybe lower it's just a
reflection of the sky, so Okay, once you've
finished the cliffs. But if you want, you
can take some more and do another one
because it dries very, very transparently, and you need to get a bit
closer to the edge. But remember not to make a
full just go around the edge. Just in some areas, it's a lot more thick and
colorful at the edge. And in some areas, it's a bit more
transparent and beautiful. Okay. I'm going to
do a flat line over here just to calm a bit of the textures down where
I feel that it's needed. Once that is done, we can
go and clean the brush. And mix a lighter
version of the green. Just mix a lighter version over on this side
by adding yellow. And with the corner
of the brush, we're going to go over and
add some more highlights. These will be even lighter, and they will combine a bit with the background by going over. And that's what I meant when I said that we're
going to go and fill in those areas so that
they seem more natural. But not everywhere,
in some areas. It's enough to make them
look much, much nicer. If you looked at this painting, you wouldn't be able
to tell that it was made just with one
singular brush. You can go in the middle of the trees a bit as
well if you want. I felt the need
because the color was too flat over there
and over here. So let's add a bit more texture. Perfect. You wouldn't be able to tell that this painting was
done with only one brush because it has so many
types of brush marks and transparencies and textures and lines and all kinds of things. So it's a more
interesting painting. It's going to look
entirely different once this wet turquoise
color will dry. So it's going to be a bit more transparent and
translucent and beautiful. And if you feel like there is something that you need
to change, for instance, here, you can just go over the cliffs with the fingers
because they are still wet. So you can just add
maybe a bit more. The finger will just
brush the things and really make them
a bit more smooth. Like, notice how over here, there is a bit of an
edge that's too orange. If I go over it, it's
no longer orange. Perfect. So you've
learned about color, about texture, about
brush handling, about what you can do to
really make a painting more interesting and
paint a bit looser. You've learned that
you can really focus in and get more control
by going slower and all the ways you can
use a flat brush to create different kinds of things
while at the same time, making this beautiful landscape. Thank you for watching. And
if you are gracious enough, please leave a review. It will really help others know that this course is
for them as well.
 George-Daniel Tudorache, Together we will create amazing things.