Transcripts
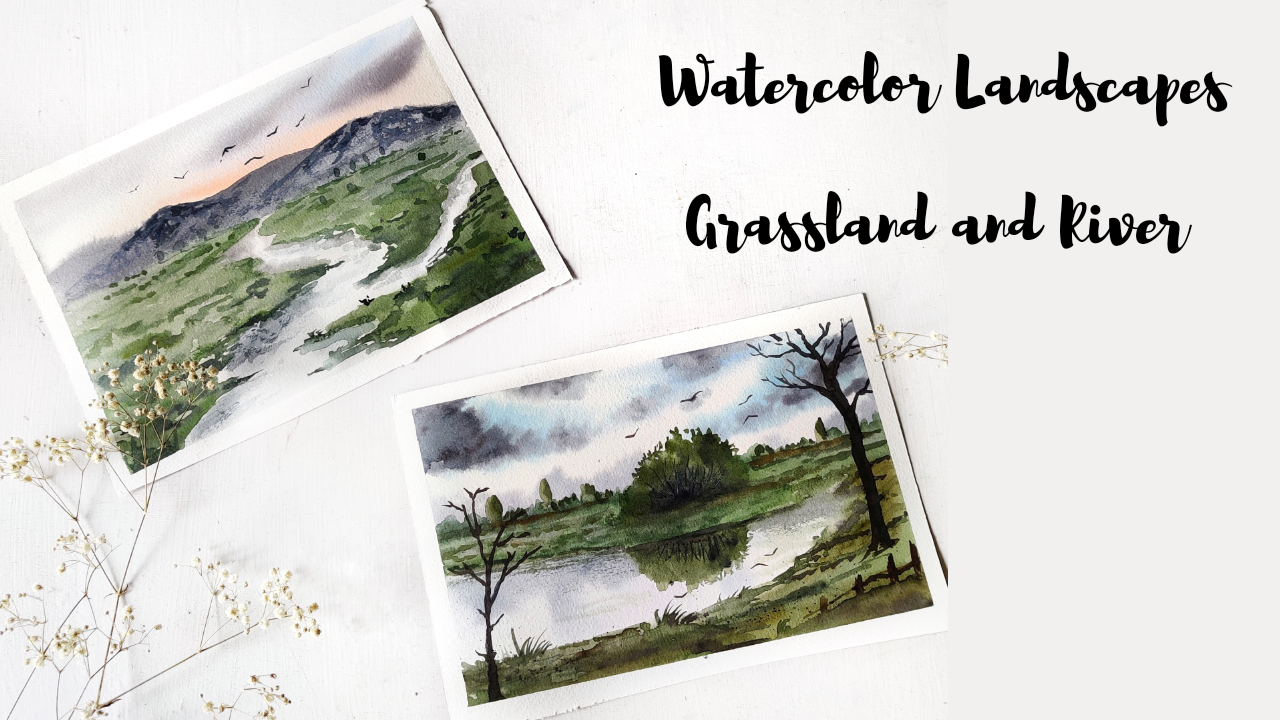
1. Introduction to the class: Hello and welcome to my skill. Share laws on painting grassland and reward. Watercolor landscapes. I'm Shannon, a watercolors and acrylic artist from India. I go by the handle Wartburg girls on Instagram. You can check out my skills, your profile, or Instagram beach to know more about me and my books. In this class, we will learn to pin two different paintings. Both are based on grassland and the work streams. This class will be majorly focused on just printing and we will not spend much time on learning the techniques. I will be briefly discussing the sketch. And though techniques required. If you are a beginner, you can still take my class because I will be explaining everything as we being. So if you are attracted by the beauty of these grassland landscapes, and if you do want to pin these, then do join me in this class. I would love to see your class projects. All right, so without any further delay, lets get started. I will see you in my class.
2. Art supplies : Welcome back. I'm so glad that you decided to join my class. So we'll briefly discuss about the arcs are plays that we will require for this class. You can go with any alternatives applies that is available with you. I'll be using this Lana watercolor paper. So it is a 100% cotton paper. Thickness is 300 GSM. I have got this reshaped into two pieces. So you can go with any similar paper, which is a 100% cotton and d 100 GSM. Coming to water colors, I will be using actual lossy conflict is set. This ballot has 24 colors in it, which is quite sufficient for any painting. Along with this, I will also use banes gray. So I've put this spins gray in this. Well, talking about the brushes, we have Princeton Neptune size for this is a mob brush. And then we have Brinson headed dish, say six down blush. Brinson rhetoric, Dutch, size for Ron. And lastly, grew strong rigor brush of size 0. So these are the brushes that I will be using throughout the painting. Next, I would need doodles of water for cleaning my brushes. To jars because one is four, though D kalos and other one is clean water. Next I will use, so we put W or tissue papers for wiping extra water and beans from the brushes. Masking day to pay down the sides of the paper and prevented from buckling. And lastly, I'm using the ceramics saucer as my ballot for mixing palace.
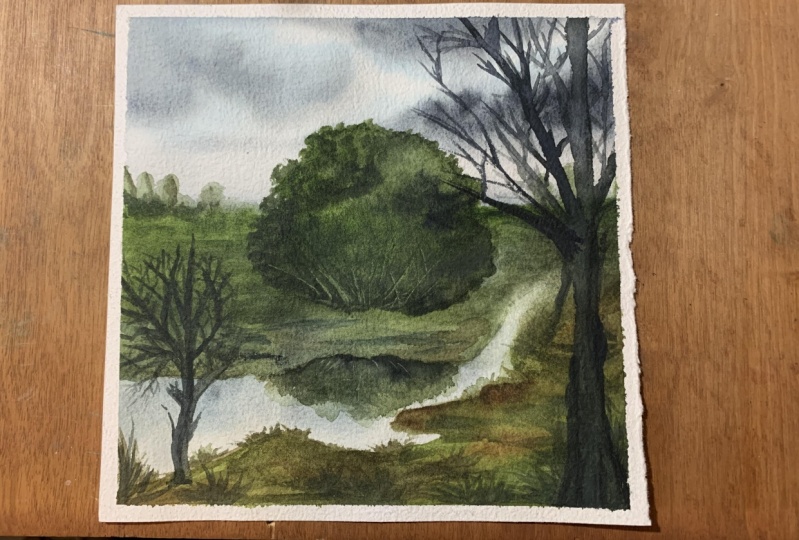
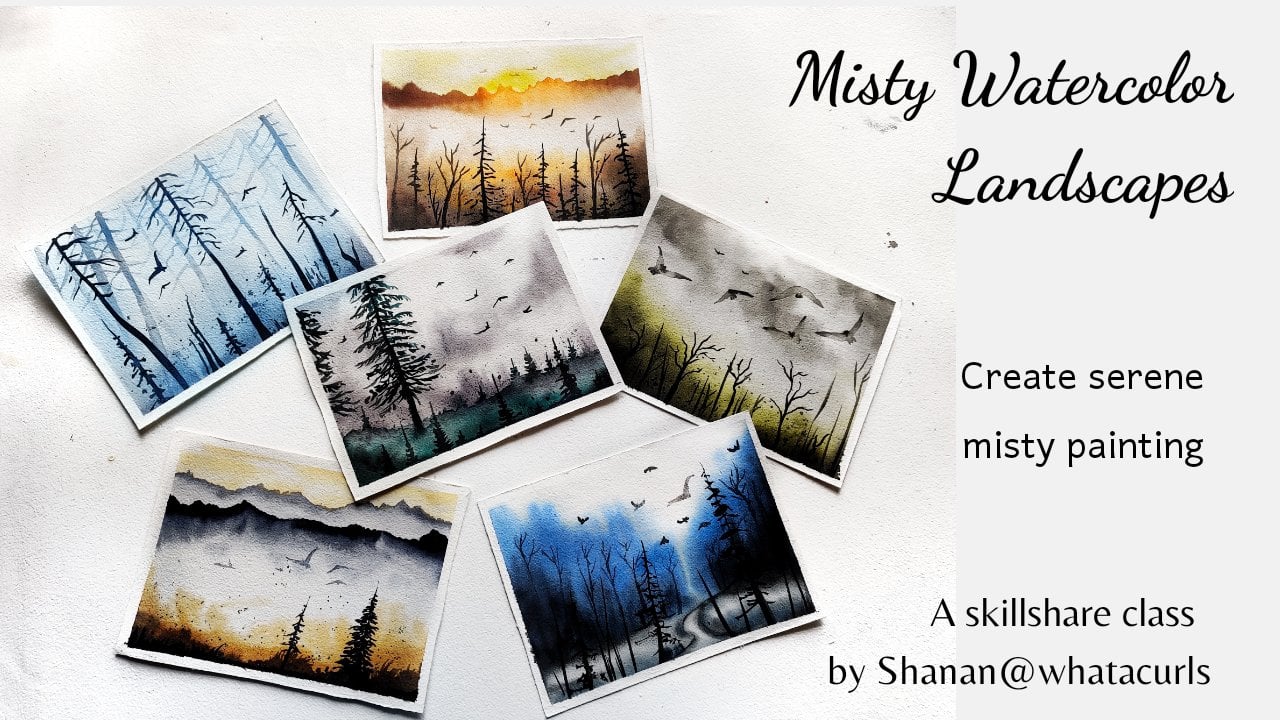
3. Thumbnail for Project 1: Okay, so before starting of a painting process, let us draw the thumbnail of the painting to get a clear cut idea of what we are planning to achieve and how to go about the painting process. Okay, so I have a drawing people, you and I have toolboxes made for these Tom names. First, I'll draw the horizon line in the middle of the paper. About this. We will repainting this guy and below this line is the ground-level. So here we will be ending the grassland. And also the reward area. Draw as little as possible. It doesn't matter if you are not good at making both a chips. It's OK, I just made these three divisions. So the above ADI is for the grassland and the middle one for the reward. And again, we will have the glasses here. So here we will draw a bushy tree and we will also have its reflection on the water. Then in the foreground, we're going to draw some bare trees on both sides. And as you can see, I'm drawing these lines. And this will be being done using darker colors on the grasses. To create adept in doping. We'll make some fluffy clouds in the sky and also hide some boards. Now, let us talk about the colors. So for bending the sky, we will go with blue and paint along with smaller moon dose, one Tiana. And for those grasses we will apply Sap Green and beings could they mix together? So that will give us our darker green color. For bending the tree, I will mix one damper and banes great. Ventral Rubin did with brown color. That is one Tiana. And we will run diluted integrate backs. All the thumbnails were the first frame being. So let us briefly loan to pay in the elements of the painting so that you will get. So Emilio with DOC techniques that I'm using. Firstly, I'll start by bending the sky. I use WAIR don't wait technique, which means I'm applying width pains on wet paper. So I'll apply clean water and then applies the rule in new. Now, i will apply Payne's gray on this circled in blue color. I had more then slope to the cloud. We will add some 1cm along with beans and blend these colors together to achieve a nice fluffy clouds. Make students see how Gilbane, the bass line AD golden technique. I'll first apply clean water and I'll make sap green paint. As I said earlier, it gives us a darker green color. So I'll applied the base layer with this green, darker green. And then we will add more details on this with concentrated colors. You can add some board on board as well to give it a brownish look. You can try to achieve variation painting by adding the grounds and loose whenever you want to. Make sure the award, but we will use diluted pins for the unwanted surface.
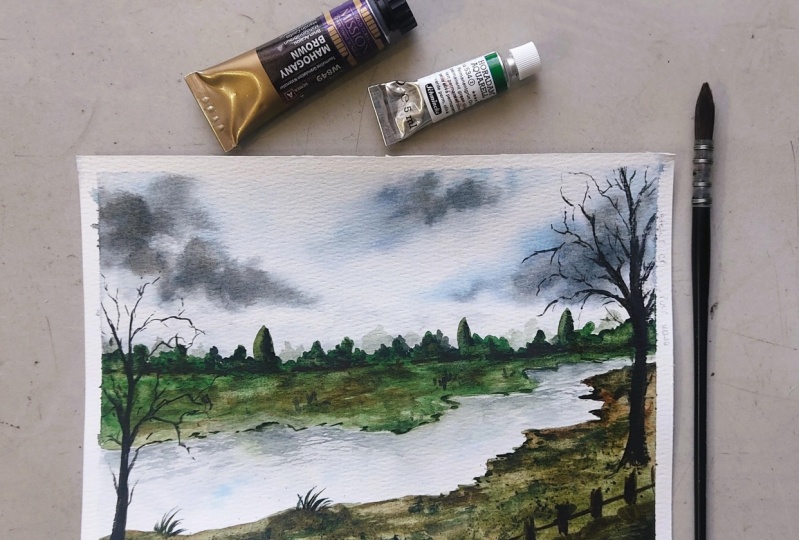
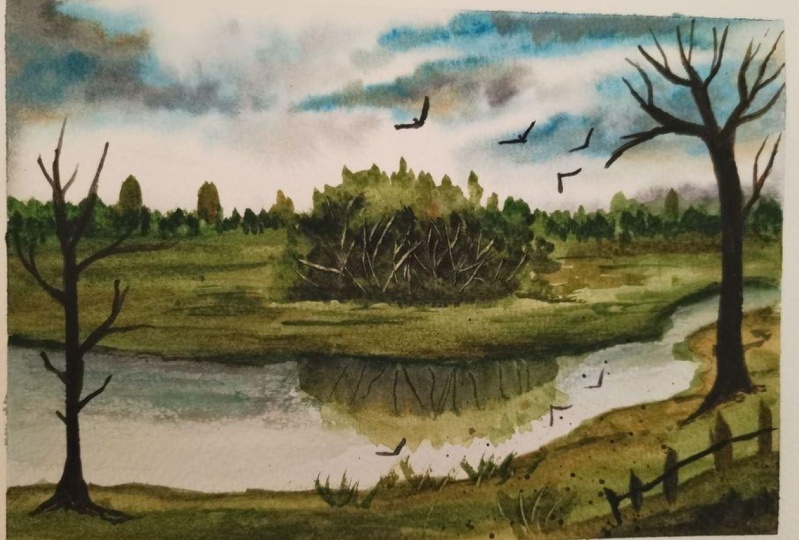
4. Class Project 1 : In this chapter, we will learn to paint this gorgeous painting. All right, like this dark hour glass project. So I have damned down on the sides of debris using the masking deep. Applying masking tape will prevent the papers on buckling up. Next, we will sketch to outlines as per the thumbnails and we have the dude, I'm gently going to draw the outlines on the paper. So here is a sketch. Above the horizon line may really apply clean water. I'm using my brush because it is easier to cover the larger in yours. You can use any big rush dentist available with you. I bought the horizon line and that is so we will apply thos chi Carlos. I first apply. So Julian, I first apply steady limb blue randomly. And bending when we're done merge technique here, which means I'm applying where it rains on red surface to achieve soft edges. No, I'll apply Payne's gray above the horizon line to do pink dot faraway trees. Since it is very far away from the viewpoint, it appeals very hazy. I'm gently dabbing my brush to clean the ship. Often trees. Next time we'll apply beans Green, neon blue area on the sky. So this really MY depicted as a dark clouds or the shadow of the cloud. There is no particular shim that I'm trying to achieve. It is just randomly painting to create organic and natural looking brushstrokes. I'm applying some Bhante or not with the Payne's gray too, that we can get even more darker color. You can go ahead and do your own talent at all with the sky. Item, more colors are the colors using a damn brush. Try something exciting because watercolors are unpredictable as we all know. So it is not an ideal way of learning by just blindly copying what you see. We even from a reference photo. So you can add or remove elements from the reference photo that you are trying to be. So as you can see, I've added these darker colored CON somewhere and feeling that this is really prominent and doesn't go well with the background. So what I'm gonna do is I'll take a damn brush and lived the excess paint that are there on the people. So that it looks really subtle, really soft. Alright, so we are done with painting the sky. Now let us go ahead and been the area below the horizon line. Everybody read the paper only on this grid was dreamed. I'll gently apply water using my brush. So here on this back surface, I'm going to be some shadows or reflections of the sky using beans gray. Next drew the line which is across the river. So I'll pay injured when darker green corner by mixing Sap Green and Payne's gray, applying Jacobians and then diluting it with water. You can directly use. A darker green. So does every library we do. All you can make some lag with the green colour that you have. This green colour near the horizon line. Completely been this idea. Applying lean themes on this end Gaia idea so that it looks to a grassland. I'm rubbing my brush near the horizon line so that it looks like trees. While the paper is still read, I'm applying some more green on this EMEA. And doing this will give us a nice depth in no painting. I'll read the foreground area using my mom brush and Dean water. And again, I'll apply some green beans and lentils, brown on bond, Dumbo to achieve brownish green color. Now I apply some darker colors in the foreground. I wanted to have some brownish color in the foreground. So I leapt like Vendome. I'm not trying to achieve a nipple friction in this painting that I'm trying to create. I will paint in the center of the painting. First, applying diluted beams. And then I will apply darker colors to create a nice balance of light and shadow. So I'm trying to create a bushy tree. In the background. I'm going to paint some small entries. These are very far from w point. Makes every ad some darker color the bottom of the tree. And also painted the reflection in the water. So I have applied clean water on the surface of the paper and then apply beans so that we have solved edges. Applying paint directly on paper gains so gives us a rough and harsh edges. I'm applying some green beans and randomly urine dip. This will help us create some depth and dimension in the beam. Next, I really take our damn brush and then I will solve in these sharp edges, New York Libo going this will help us achieve many soft edges. I'll take some brownish green color and apply it on this idea. And I'm doing this to create some depth and highlights them also to make sure that it does not look like a plane land. I'm applying darker colors on the background trees so that it looks more dimensional. I apply some darker colors on Daqri. Next I will apply outlines on this grassland ADR. This'll give us any illusion all through having some depth in the painting. Or I will apply a darker colors on the reflection of the tree. I will add more darker colors on the bottom of the tree. The reflection and the actual tree. Now a slightly darker green colored and apply lines or grassland 80. So doing this will help us create an illusion of having some hums and ups and downs in the painting. I will use the tip of my brush to create the trunk of the tree. So this is not an individual tree. Trunks present your now, I didn't take nominations green color and create the lines in the foreground. Doing this may create any notion also, ups and downs and 70 deletions in the foreground. Next, really pained and ordered friends. So I'm using Von Gumbert to paint these fins. And then we will pin these tiny grasses here and there. So when you are painting these grasses, I play less pressure on your brush and gently draw the lines. I'm gently swiping my brush with brown color near the horizon line depicts underground area. Okay. Okay. Now in the sky. Next I will paint a tree in the middle of the painting. So I use Payne's gray, rid the one damper. So that will give me or darker brown color. The first clear the outline on the trees and then fill it up with Bain's book layer deep drawn constantly. Make steadily been the branches. Very less pressure. So if you're one more detailed explanation on being increase, then I have an Exclusive class on painting trees, where you can learn to paint more than 50 types of trees. You can visit my profile and have a look at that class. Eight pained and other tree here in the left side of the painting. You can add as many as you want. So I'm keeping both of them bear. I'm not add though leaves your and so if I add them, we are keeping their bread. Doesn't remove the masking dip. Right?
5. Thumbnail for Project 2: In this chapter, we will discuss a thumbnail for us. They can be indeed. We'll we'll sketch DO Tom nil. No. First we will draw the horizon line. 60% is for the line and 40% of the people is for this guy. You can draw the line some value. Above the horizon line. I will draw the mountains. And then I mean gently draw the rivers streams below the horizon line. In zigzag motion, you need not imitate the same shape. Just do whatever you can. Buy. Drawings exactly lines when you are reaching towards the bottom of the stream should become TIBCO Ramsay's. Whereas near the horizon line, it should be really thin. Yeah, it does talk about into colors, no. Quanta sky. We will use screens with an audience about the long dense. I know some bond siano makes Twin, Bain's, Amonton's, Al Gore went beyond belief. Makes weather grassland ATO. You'd go read Sap, green beans. So that when you give us a doubt going green condo, painting, water stream, I will use diluted beans clinics. On the grassland area. We will draw these lines, will now go color to give some depth to doping. Then we will have some clouds in the sky. Then we will have some soft clouds in the sky. And also we will add some words here and there. You can add some texture on the moldings and grassland area. Once the paper dries, we learn more about it. One to paint. Don't do anything, do not let us practice some elements of doping thing. So I don't read technique for industries like clean water vapor and then apply which bins. The light orange color image diluted state so that we get ready light peach color. Then I really makes Payne's gray buoyancy or not, and gently swipe to get a nice brush stroke. Then apply some extremely beam Doug grassland area. Well painting the Augustinian and water stream. I will leave that empty space for the screen. And let's jump the ADME saddening plus beans, Cool. We're gonna go ahead and being 700 neighbors in order to create some depth earned dimension. Ankle Ws stream, we're going to add some dielectric dreamscape. And finally ones to be able to address, we will add all the detail, sweet quiet nucleate predict what has a giant. So this is how we add details. When Dhaka known non-motor Baldrige indoor iTune class project. Ongoing next step.
6. Class Project 2: In this chapter, we will learn the beam, the scenic grassland with diverse team and mountain building. I have all the sides of the paper using a masking tape. So now I will start with sketching using a pencil. It is same as the thumbnail sketch. And I'm drawing Mary Jane Lee. First. I have drawn the horizon line, followed by the river stream in curvy motion. Then I will draw the mountains. Next I apply. What about the horizon line? So I will read the mountain Ada as men gently apply evenly and make sure that there is no extra water vapor is made. And i will apply fellows on the sky. Well, I did not want to apply this pink shared. Intimate. Next I will apply Silurian blue. So this spring will blend with the blue color and create exhaust bulb cliched. Next I will apply audience here, just about this mountain area. Ok, so now we will apply Docker containers. For that. I will make Spain's clay with bronchi are known. And then I'll gently swipe my brush on the paper. So this will be depicted as darker clouds. Alright, i will let this dry for some time and then go ahead with painting mountains. I let it dry naturally. You can also use a blow dryer. Now the sky layer is Trey. Now the sky layer is strike. So I will apply Payne's gray on the lawn and then apply some Dhaka load to create some depth and radiation. Next we're going to go ahead and below the horizon line. So I will read this. Clean water using my mom brush. Next to pain, the green grassland. You make Sap Green with pain today. And applied the diluted version of this scholar to accion diluted version, you need to add more water to DUC page. I will first apply the color on the grassland area and leaving the liver area as it is. So as you can see, that is the dissuade gap in the middle. Now since the whole paper is wet, we will apply diluted Payne's gray on the three worst dream ADL 1-3 health painted go grassland area. Then we will pin this. What the idea. So we have our base layers ready. I've learned the first layer dry naturally, and then we can go ahead and being the second layer. So I really legend dry naturally. If you want, you can use a blow dryer to fast forward the process of drying. Alright, next we're gonna take some beans glee in thick gone to stem and tried to create texture on-demand bunch. So I'm gently sliding my brush in a slant position, achieve this dyadic show the second layer of grassland. So I will retain the area of the water stream. Audrey was dream and beanie alongside this AD. Ok. You can apply various values of the same palette to do it. In the grassland. So this grassland, you can leave some white spaces as a DES. This would have been depicted as being the foreground when a darker color. So I have taken the concentrated color of Sap Green and pains grip. So if you have any they really available in darker color. You can go with that. It has not mandated that you mix up green and integrate if you have readily available darker green fellows, just goal it that if not, you can make your own carlos, you're next. I will pay him the outlines for these. My lines near the river stream. Doing this will give us an illusion of depth or dimension in the painting. As you can see, I'm painting these tiny lines here and this will help us create the illusion of having slopes and humps, basically ups and downs in the grassland. Because if we keep it straight, it will look like a plane land. We don't want to have that illusion. So in order to create variation in the painting, we will add these lines. Next, I will load my brush with beans and applied dynein dodge neon outline of stream. This vertebrate depicted as dynein bushes. Adr submerged in the water. It makes w on this water stream, james cross stream. They will bend on this guy. Now I'm applying these darker green randomly at some HIEOs, nucleate, some depth in doping in the overall idea of the endangers to keep it loose and unpredicted. I'm not applying any forceful strokes, are trying to create any particular shapes from just no-slip intended. And Bain DCE dynein glasses he had ended. Lastly, I'm going to since it is far from the mean. So yeah, masking. And we are done. I hope you liked watching my class. If yes, then please to live at a meal for my class. It will be helpful for me to reach more people and come up with more classes. And if I don't do dry bending this, then though coke straight in the project that audio can even share it with me on Instagram stories and tag me there. I would be happy to CEO walks.
 Shanan Subhan, Watercolor/Gouache | Art Educator