Transcripts
1. Introduction: Hi, My name is Meredith. I'm a landscape photographer and outdoor educator based
in Denver, Colorado. And in this course,
I'll be teaching you how to use Adobe Lightroom to organize all of your
photographs into a simple and efficient
organization system. If you love taking photos, but I've ever felt
overwhelmed or confused about how to organize and
manage all of your photos, then this class is
definitely for you. Light room is one of the
most powerful tools you can use to organize and
manage your photos. One that will
significantly help you to streamline your
editing workflow. We will start from
the very beginning. If you are brand
new to Light room, you will learn everything you
need to know step-by-step, from opening your
very first catalog to creating your first Lightroom
presets and collections. Even if you've used
Lightroom before, or maybe even if you've
used it for awhile, you can still gain a lot from
this course if you weren't quite familiar with everything that Lightroom can do for you, we will dive deep
into how to organize your photos with
ratings, color labels, keywords, and other useful information that will help you manage your library of photos. I will also walk you through the exact system and
work that I use to impart my photos and
move them through my editing stages using
Lightroom smart collections. This class is for anyone who wants to learn
Lightroom to simplify their photo organization and editing workflow so
that you can save time when editing
your photos and avoid the frustration
of a messy, disorganized file
management system. So if you are ready
to get started, then I look forward
to seeing you in the very first lesson.
2. Create a Lightroom Catalog and basic file setup: Welcome to the class. You-all. I am so excited
to have you here. In this first lesson, we're going to talk
about the basic file management that I use, as well as open up our
first Lightroom catalog. Now, I have a very specific way that I organize
and manage all of my image files that I'm gonna be showing you
throughout this course. It's a system that I use, not just to organize my files, but also to streamline my workflow so that when
I go to edit images, I know where everything is and I don't get bogged
down in confused with where my image files are throughout the image
editing process because I use both Lightroom and Photoshop in order
to edit my photos. In this course, we're gonna
be learning about how to use Lightroom to
organize our files. When I first started
editing photos and I first started getting into photography
and using Lightroom. All of my files were saved
all over my hard drive. So I would make
folders and files for different trips
that I went on, different categories
of photos that I had. And over time, they
started to get really overwhelming because
they started to lose where my photos were. And it also created all of these complications
when using light room. If this is something that
you do, don't worry, I'm going to show you how to
transfer all of your photos into the system and
workflow that I use later on in the course. And if you're new to Light room, I recommend that you follow
along and set up your files exactly step-by-step as I show you through the course and
later on down the line, if you'd like to make tweaks, then you can do that. This system I'm going
to show you here, I found over the years based
on trial and error to be the simplest and most
effective way of organizing my photos and
streamlining my workflow. And the reason I really
tried to simplify things is because the more
complicated things get, if your file organization is really out of control
and really confusing, it can take away from
the creative process. So the goal here is to maximize your creativity by just
keeping things simple. So the first thing I want you to do if you're following along, is to create a folder on your computer for photo
storage and organization. So here on my desktop, I have a folder which I've titled photo storage
and organization. And I've just saved
that here again, it's on my desktop. And inside of that folder, I want you to add
these three folders. And you can pause the video right here
so that you can create these three folders and meet me back here when
you finish doing that. Later on, if you'd like
to rename these folders, you can go ahead and
do that, but for now, I want us to all be on
the same page so that you can follow step-by-step
how this process works. And you can also create these folders anywhere
on your computer. I have them on my
desktop just for demonstration purposes
for this tutorial. But if you have a
different place on your hard drive where you'd like to store and manage
all of your photos. Then I recommend that you create these folders
in that location. Once you have these folder
setup on your computer, Let's go ahead and open
Lightroom Classic. Just so you know, this is the most recent version of
Lightroom as of February 2023. So this is Lightroom 12.2. If you need to go upgrade
your version of Lightroom, you can go ahead and do that. But if you have an older
version of Lightroom, all of this should
be pretty similar, so you shouldn't have
too much of an issue as we go through and set it up. So the first thing
we're gonna do is create a Lightroom catalog. And if you've already opened
and use Lightroom before, you probably already
have a catalog and Lightroom will
automatically open for you. But if this is the first time
that you've use Lightroom, then you'll need to set
up your first catalog. If you already have a catalog, I will show you in
just a moment how to set up a new catalog. So you can create a
new catalog and set it up in a way that follows what we'll be doing
in this tutorial. So you can start over
from scratch and set up your catalog in a
way that follows this workflow that I
have set up for you. If this is the first time
you open Lightroom and you get this dialog box, then click, choose a different catalog
and create a new catalog. Now, depending on
where you've saved your photo storage and
organization folder, I want you to navigate
to that folder. So here again, I
have this folder on my desktop, so
I'll click on this. And I want you to save
your Lightroom catalog in this folder that we've
named Lightroom catalogs. And don't worry about
this folder right here. You should have
these three folders. So all raw files, exported, raw files and
Lightroom catalogs. And I will show you what all of these folders mean
throughout the course. But for now, just click
on Lightroom catalogs and create a name
for your catalog. So I'll just name mine. Light room. Catalog 2023. And click Create. Here at your Lightroom
catalog will open. So we can see that this
particular catalog is open because the name that we just
saved it as is right here. Now, if you already have a catalog and you
would like to create a new catalog so that you can replicate what we'll be doing
throughout this course. What you'll need to do is to
file and click New Catalog. You'll just follow
the same steps that I showed you
a few moments ago. I already have this catalog saved here in the
Lightroom catalog folder. But to show you again, you'll wanna go into your photo storage and organization folder
that you've already created and save your catalog
in Lightroom catalogs. So we have our catalog that is currently open here
that we just saved. So you can name it
and then save it. And then you can navigate
to that folder and open it up just by clicking on
this light room icon here. At this point you might
be wondering what exactly is a catalog
and essentially what it is is a database that
stores all of your photos and keeps track of all the changes that you
make to your photos. So things like metadata
and develop settings. So if you decide to edit
your photos in Lightroom, all of those changes
are going to be saved in your catalog. Even though you'll
be able to view all your photos in Lightroom. Lightroom itself doesn't
actually store the photos. It presents them to you in
all of the information about that photo to you
in a way that's really easy to understand
and visualize, but it doesn't store
the actual photo. The physical files are stored wherever you saved them
on your hard drive in Lightroom dislocates
where those photos are and presents them to use
so that you can see them, manage them and edit them. And don't worry, if
this doesn't make too much sense right now as
we go through the course, this is going to start to
make a lot more sense. Now, I personally don't use
Lightroom to edit my photos. I use Adobe Photoshop and the editing software that
shipped with Photoshop, which is called
Adobe Camera Raw. And I find that using Photoshop
and Adobe Camera Raw to edit photos is a much more
powerful way to edit photos, especially if you're a
landscape photographer. And I'll discuss that more
throughout this course and in future tutorials
about photo editing. But I do use Lightroom as I'll show you
throughout this course, to organize all of my photos. It really is one of the best tools in
order to organize and streamline your workflow as
you process your images. In the next lesson, I'm
going to help you set up some basic settings
in light room so that you have everything set up and ready to go for this course before we start importing
and looking at some photos. So I will see you
in the next lesson.
3. Overview of Lightroom: Welcome back. In this lesson, I'm
going to go over some of the general
features of Lightroom. And we're also going to go
through and set up some of our preferences and
settings so that we're all on the same page
throughout this course. And that your light
room looks and operates just like the one I'm showing
you on my screen here. And so there's no confusion
in terms of things working differently on my
system compared to yours. First, right out of the box, you'll see a series of panels and windows
around Lightroom. You'll see the navigator, the folders and collections. On the left and on the right, you'll see additional windows
including the histogram, as well as some other
keyword and metadata windows and all of this we're going to cover
throughout the course. So I'm not gonna go into
too much detail about what all of these windows
mean at the moment, because you will pick
these up as I show you when we start
to import images. And it'll make a lot more
sense at that point then if I were to try to explain
all of that to you right now, but I do want to go through
and set up some preferences so that you can try to match
your light room to mine. And so I can show you what I've found to really work for me in terms of the best settings
for using Lightroom. So let's first come over
here to this main menu bar, and we'll click on
Lightroom Classic. And then we'll click
on Preferences. First, let's come
over to general. So make sure general
is highlighted. And I'm just going
to briefly touch on each of these
preferences mean. As we go through this, feel free to pause
the video and copy these settings to have them
exactly like I have here. And then you can always
come back and change them to your tastes and preferences
later on down the line, if you'd like to
change any of this up. The most important thing
I want to mention here on the general preferences is
this default catalog settings. So you can tell Lightroom
what you want it to do every time you
open Lightroom up. I have this set to load
most recent catalog. I only use one catalog, and that's the catalog
that I'm going to set up and show you
throughout this course. What you'll see by the
end of this course is what I use every time I go to organize my photos. I always have load
most recent catalog on because that's the only one
I'm ever really working from. If you click on this,
you can change it. If you'd like to choose
a different catalog, you can oscillate room to ask you which one
When Lightroom opens, or you can choose a catalog
in a different directory. And right now I only have one, which is the one that we set
up in the previous video. For import options, I just
have these three checked. This will give you
the dialog box to import photos when you
plug your memory card in. And again, this will
make more sense in future lessons
of this course. I check Ignore camera generated folder names when
naming folders and show parent folder
During Import Presets. I don't really use
presets other than the one that I'm going to show
you later in this course, which we will create together. I generally don't touch
anything in presets. External editing, like I
mentioned in the last lesson, I don't edit my
photos in Lightroom, so I don't touch
anything here either. If you do plan on editing
your photos in Lightroom, you can come back and change these settings to your
preferences, e.g. if you want to change the
file format and color space, but Deb, things like that, you can come back
here and change your external
editing preferences if all of this looks
unfamiliar to you, if you're unfamiliar
with file formats, color spaces, things like that, don't even worry
about it right now. You will learn about
all of that when you learn how to edit photos, come over here to File Handling. I also don't touch any of this, so I wouldn't worry
about it right now. Keep it as it is right out of the box from
Lightroom interface. All of this has to do with
how your Lightroom looks. I keep all of these
settings on default, but this will allow
you to change the colors and fonts
in your Lightroom. And I'm not going to touch
any of this right now. But if you wanted to
change some of the colors, you could play around with that. I find the default colors
seem to work just fine. If you come over
here to performance, a lot of this will
have to do with the type of computer
that you have. So it might vary depending
on your computer. I don't touch any of this and you can copy what I have here. But just to point out, I do always want to have this unchecked and I recommend
that you do as well. I do not recommend using smart previews
instead of originals. I recommend that you always
edit the original file. Now, for the rest of
these Lightroom's sink, display and network, I
don't touch any of this. I have never had a need to in all the time that I've
been using Lightroom. So we're just going
to keep all of this as it is out of
the box with Lightroom. And we will go ahead
and close this up once you have your
preferences set. Let's next go to view. Come down here to View Options. View options are going to start to make more sense once we have some images imported
into our light room, which we're gonna do
here pretty soon. But for now, you can copy the options that
I have set here. So in grid view, I have all of this
checked and I have this set to compact cells. For cell icons. You'll want to check flags but keep everything
else unchecked. If you come down here
to compact cell extras, click both top and bottom label. If you click on these, you'll see a ton of settings. And for these on the top, just put common photo
settings on the top. And for the bottom label, put rating and label. And we won't be using
expanded cell extras here. So you can keep all
of this unchecked. You come over here to loop view. You can copy the
settings I have here. These are just the base settings of Lightroom right
out of the box. And if you've never
touched these before, they probably are the
same as I have here. But you can double-check
here by just looking at these settings and seeing if
they're the same as yours. Alright, let's click on
Grid view once again, and we will close this out. The next setting I want
you to look at is photo. You come up here
and click Photo and the main menu and come
down to auto advance. I want you to click
auto advance so that there's a check
mark next to it. And that means it's activated. If you come out of the
menu here and click photo, you can double-check
to make sure that auto advance is checked. Alright, so next we're going to look at Lightroom modules, and that is what you
see right up here. So right here you can see two modules, library
and develop. In light room actually has
seven different modules. And each module offers a specialized set of tools
and features that you can use for different phases of your editing and
organizing workflow. If you right-click
in the modules area, you'll see the entire
list of modules pop up. So we've got library and develop which are already open
as you can see checked. And you also have Map, Book, Slideshow, print, and web. So I only use two
modules in light room. I only use the library module, which is where you can
view all of your photos. And the develop module, which is where you
can edit photos. And I use the develop
module very minimally, as I'll show you later. I do not use any of
these other modules, but if you wanted
to add one of them, you could click on
an unchecked one and it will appear in
this module's bar. I'm just going to turn
this off for now. If we come over
here to the left, this is our nameplate. In your Lightroom. If you haven't customized it, it likely says Light room
or something like that, but you can change it by
right-clicking on it. And go to Edit identity plate. You come over here, you can click on the text. You can write whatever
you want. Right here. I just have my name, but I could add
something like that. And you can even change the font and the style and the
size of the text. If you wanted to make
that bigger, you could. Same thing for the appearance of the texts on your modules. So you can change that here, but I generally keep that
the way it already is. I just customize the nameplate. The next thing I want to
show you is how to hide and show all of the windows and
panels all over light room. So e.g. this panel over here, we have several windows. We have the Navigator, which you can open by
clicking on this arrow. So the arrow pointing to the
right means it's closed. If you click on
it, it will point down and open up this window. Once we have photos imported, we will see the
photo appear here. And again, this will make more
sense in the next lesson. And we can open and
collapse all of these folders in
just the same way. So same thing for over here. One thing I want to
show you here is something called Solo Mode. If you right-click on the
name of one of these windows, you'll see this
option for solo mode and you can see that I
already have it checked. So I'm going to uncheck
it just to show you what happens when you are
not in solo mode. If I open this window, I can open all of these
windows at the same time. And it can actually get a
little bit overwhelming and distracting to have all
of these windows open. So what you can do to
make it a little bit easier is to, again, right-click on the
name of one of your windows and
click on Solo Mode. And what that will do, it. It will only allow one
window to open at a time. So every time you open a window, the one that's already
open, we'll close up. The other thing you can do
is you can hide and show the panels and toolbars that
you see all over light room. So if you look at this
little arrow right here, if you click on that, it will hide that panel again. If you click on it, once again, it will
open that panel. That goes for the left
and the right side. So we can do the
same thing here. We can do that down here to hide what's called
the film strip. And we can hide the bar up here. Now, if you right-click
on one of these arrows, you see I have three options. I always have it set to manual, but you can set it to auto
hide or auto hide and show. These auto modes will
allow Lightroom to automatically hide
the bars and panels. I like having total control of whether it's gonna
be opened or closed. So I always have
it set to manual. And you can do this for
each one of these arrows. So if we right-click
on this arrow, we get the same options. So you could click
auto hide and show, but not a fan of that one. I'm going to keep it on manual. These are all things that
are gonna be personal to you and what you prefer
in your workspace. So what I've shown you so far is not necessarily the
best way to do it, but it's the way that
I prefer to do it. If you're new to Lightroom, I recommend that you just
try it out this way. And as you start to
learn the program, you can start to customize
your workspace born more to what suits
your own preferences. Alright, so in the next lesson, we're going to start to finally import some photos
into Lightroom. And you're going to start to see how all of these panels around this side here start
to populate with information about our photo. So I look forward to seeing
you there in the next lesson.
4. Photo import process - part 1: Welcome back to
the class you-all. In this lesson, you're
going to learn how to start importing photos
into your catalog. Now I'm going to walk
you through this process step-by-step, and show you the exact
settings that I use when I import my photos
into my catalog. And these settings
are going to become important later on
down the road when we start creating
collections and we start organizing our photos
within our catalog. There are two ways that you can import photos into Lightroom. The first, if you come up to your main menu and click File, and then you can come down and click import photos and video. Now I'm not going to
click this right now. And I'll show you the
other way you can do this. The other way to
import photos is to come down here and click Import. So I'll go ahead and
click this here. And you'll see this
import screen come up. The first place that we'll
look at is the source window. And this is going to
be the location or the folder that we want
to import our files from, where we want to import
our image files from. If you look down here, you can see two main folders. So first, I have my hard drive. So if I wanted to import photos that were
on my hard drive, I could click here. But right now I actually
have my memory card storing photos from my camera with the photos that
I want to import. So when you come home from
a photo shoot and you plug your memory card in using a card reader into
your computer. You will see that card pop
up in the source window. If I open this here, you can see that I have a
specific file here just for demonstration purposes
for this tutorial. So this is a location on
my memory card where I have all of the files stored
that I want to import. I'm going to click on this
and you'll see Lightroom populate with all of the
images that I want to import. So again, this area, this window is the
location where the photos are that
you want to import. So wherever those photos are, click on that folder and they
should appear over here. Next, if we look
at the top here, you'll see several options. You'll see copy as DNG. You'll see copy, move and add. Now notice, move and add
our blacked out here. They aren't available
to me right now. And that's because I'm
using a memory card. If I wanted to import
photos directly from my hard drive
on my computer, then move into ad
would be available. So these are not available when you have a memory
card plugged in. And I will discuss these
more in just a moment. For now, I want you
to select Copy. This is the setting
that I always use in order to import
my image files, which are all over
here in this folder. And just so you know,
all of these image files are in the raw file format, which is the file
format that I highly recommend that you
shoot in if you are a landscape photographer or professional quality photos. Now what copy means is that
when I import the photos, lightroom is going to copy
the photos from this file. So all of these photos, it's going to copy them into a new folder or a
new destination. It's not going to change the
photos or move them or do anything other than
make a copy of them and then put them
in a new location, which a location that I will
show you in just a moment. This ensures that we always have the original files in
the original folder. So we always have the original
files on our memory card. So even after we
import our photos, all of those photos will
still be in this location. Now, later on down the road, after we copy these
into a new location, if we want to go back and delete them from
our memory card. So say we want to clean off our memory card for a
another photoshoot. We can go do that with
the peace of mind that these photos are already saved
in a different location. In other words, we already
have backups of these photos. So we're going to select Copy. I don't select copy as DNG. But what this option
means is it has to do with the DNG file format. Dng is a raw image format that was built for
editing photos. Unless you specifically
want or need a DNG file. Don't use this
setting copy as DNG. You can learn more about DNG and then decide if you want
to convert your files. But it's not necessary
unless you're using a version
of Lightroom that doesn't support your
camera and you need to use the Adobe DNG converters so Lightroom can
work with your file. Just something to keep in mind, but that's likely not something that you need to worry about. If we want to come
over here to move. This, like I said, is an option that's only
available if you're transferring photos
from your hard drive. If I came over here
to my hard drive. If I select the folder for this tutorial where I have another set of
these photos saved. So this these are
the same photos. They're just duplicates
stored on my hard drive. You can see that these
options are now available. And what moved means is, if I were to import
these photos, it would physically
move the photos from this location to
the new location, as we'll talk about in a little
bit, our new destination. So once I'm move
them upon import, they would leave this folder. I don t think this is ever
a good idea to do because I always want to keep backups in the original folder
until I'm absolutely sure that they've been transferred to the
new destination. And that's why copy
is so important. We come over here to add, this is another setting that I don't use an I
don't recommend. But what it does is it keeps the files and their
current location. So in this location over here, and it lets light
room know that they exist so that they
can be edited. But it doesn't actually
move the photos. If you're new to Light room, what that means can be a little bit confusing at this point. So don't worry about ad for now. Just remember that copy is really the best setting to use. So I'll close this back
up and come back to the photos from my memory card that I would like to import. We have copies set below this. I want to have all
photos selected. Later on when we do
additional photo imports. I'll just select new photos. So all of the photos I
have here are all knew. If I had say, previously
imported this photo, then it wouldn't appear here if I had this set to new photos. So for now I'm just going to
click all photos right now, for this first import, I only want to import one photo. So what I'll do is
uncheck all photos. When a photo is not
checked for import, it's going to be darkened
with this vignette. So if you want to select photos
individually for import, you can check these
little boxes here. I want to uncheck
these because I only want one photo imported. This photo right here. Alright, so let's come
over here next to this right sidebar to File
Handling, right here. In build previews, I always
have this set to standard, but you can choose from
different build previews. And this is how you're going to preview your images
in Lightroom. Now, one-to-one is the
highest quality preview. If you plan on
editing in Lightroom, I recommend that you
use this option. Again, I don't
edit in Lightroom, so I don't use this option. And you can also
come back later and build one-to-one
previews of your images. So if you don't
select one-to-one right now and you
end up needing it, just know that you can
change that later. Minimal is another option
you can use which will make the import process when light room starts
to import photos, as you'll see here in a
moment, go much quicker. And it also doesn't take up as much room on your computer. So this is a good option if you aren't planning on
editing your photos in Lightroom for
awhile and you don't need as high quality
of a preview. But for now, let's just
set this to standard. You can keep build smart
previews unchecked. I do not check this option. I do check don't import
suspected duplicates. So if you've already imported
a photo into light room, lightroom will be able
to tell if you've already imported
that photo or not. If you've already imported it, it won't appear here with all of the photos ready for import. And this just prevents you from having duplicate copies of an image and avoids things getting cluttered
and disorganized. Right here, you can
make a second copy to a different destination
than the one that we'll be using down here. So we'll decide on where we
want these photos imported. And if you want an
additional destination, you can select that right here. But I do not select this, and I do not select
Add To Collection.
5. Photo import process - part 2: Let's come down here
next to file renaming. I always rename my files using a technique that I'll show
you here in just a moment. In the reason for
that is to prevent my file names from being
accidentally duplicated. Your camera will automatically name your files for
you and you can run into problems when your
camera names of photo and name that's already
been used before. So let's say you go out on
a shoot, you import photos, then you delete your
memory card and go out and use that same
card on another shoot. Depending on your camera, in the settings you have, the camera could potentially
mean your photos with the same names that it
used in the previous shoot. So in order to avoid duplicate names when they're
imported into Lightroom, I want to make sure that each
photo has a unique name. And here's how I do that. If you come over here to
template and click on that, you can come down
here and click Edit. In which you'll do here
is remove all of this, will create a Naming
template like this. So to start, I'm going
to type my name. So you can type your name here. Create a space and a dash. Next, we'll come down here to additional and select
this right here. First I will select this option, so month, day, and year. So select this option
at the top here. We'll come back down to the same box and
select it once again. This time we will select
our will do the same thing. Click on that box. This time we will select minute. One more time, we will select
that box and select second. You can see how this template
is populating right here. So what's going to happen when Lightroom reads each photo? It's going to write your name, but then it's going to insert all of this information
like a template. So each photo has
this information attached to it in the form
of what's called metadata. We'll get into metadata a little bit more later on
in this course. But basically, it's
information that your camera attaches
to the photo file. So when you go ahead
and take a photo, depending on your
camera settings, the cameras should attach
the month, date, year, as well as the time details
to that photo file. So Lightroom will pull that information and just plug
it in into this template. So each photo will have a
unique name based on all of the information related to the date and the time
that you took the photo. Since you generally don't shoot more than one photo per second, at least not as a
landscape photographer. I don't think I've ever taken more than one photo in a second. Each photo will have a unique
name using this technique, using this specific template. Now once you've
created this template, Let's create a preset. So this will be a way to save
this setting so that you can use it for every important
that you do in Lightroom. And it will make the process
much quicker in the future. If you click this box, come down to save current
settings as new preset. I'm just going to call
this raw file import. Now, I've already
created this preset, so it's not going to allow me to name this preset
with the same name. But you can click Create once
you've created this preset, and it should be saved
in your presets here, so you should find it
somewhere in list of presets. So raw file import
and click Done. Now you can see over
here the template is the raw file import
preset that we created. And this is how all of
our files are going to be renamed when we import
them into Lightroom. If you come down here, we can see some additional
settings that will be applied when we
import our photos. So first we have
Develop Settings. If you're familiar with
Lightroom presets, this is where you can add them. So a preset will be applied it to the images when
you import them. If you're new to presets, they're essentially just files
that allow light room to apply specific development
settings to an image. When you start editing
and processing photos, changing things like
saturation, exposure, contrast. You can save all of those
as a preset and then apply them directly
onto a photo. And again, if that's
a new concept to you, don't worry about
that right now. It will make more sense
later on in this course. For now, we're
just going to keep our Develop Settings at none. Next, we'll look at metadata. Metadata is just information that's been embedded
into the image file. And we'll adjust that here. So we'll click on this box and
come down to edit Presets. I have a metadata preset that
is called raw file import, just like the previous one. And I'm going to walk you
through all of the settings here on this preset that I would like you to make when you're creating
your metadata preset. The most important
thing I want you to do is click on the rating, the one-star here
on this rating. Right there, I just
remove the star. But you can see here
there's up to five stars. I want you to just
select one star. Everything else here
can be kept blank. If you'd like to, you can add your
copyright information. I just have copyright my name. And this is just so if someone
gets a hold of your photo, they know who made the
photo and who to contact. You can even add more information
here that someone could potentially see in the metadata if they wanted to contact you. I don't feel any of this out. The copyright is
sufficient for me. Feel free to fill any
of this out based on your preferences and what you
want to add to the photo. I tried to keep it simple and I don't feel any of
this out other than the copyright information
and the star rating here. So make sure that one
star is selected. And once you've created this, click on this preset
box and again select, Save Current Settings
as new preset. I name all of my Import
Presets as raw file import. And you can see again, I already have
that preset saved, so I'm going to click Cancel, but you can click Create
and then I will click Done. Next we have keywords, and I usually don't
add keywords, but you might want
to add them as part of your organization system. Now, keywords are part of
the metadata and they're just descriptive
words that you can use to search for your
photos in Lightroom. For this photo, I have selected
here if I wanted to write some descriptive
keywords that might help me later on if I'm
searching for this photo, I could write something
like Colorado, where the photo was
taken, comma space. I could use a keyword like fall, which was the time of year
that this photo was taken. I could write yellow flowers since that's what I
see in the image. Or maybe something like late since there's a
lake in the image. And again, these are just
descriptive words that can help me search for this
photo later on in Lightroom. When you're adding
these keywords, just remember to separate
them by a comma and a space. Alright, so I'm
actually going to come up back to metadata, and it looks like I didn't
set this preset here. So if it still says none, check this box and
select RAW file import. So we want to make sure
that that preset is that we created is set here
for the metadata. Great, so we've
got our keywords. Now, it's time to choose
destination for our photos. The destination is
going to be the file on your computer where you want
these photos right here, or in this case, this one photo where you want your
photos to be imported to. In the first part
of this course, you created those
three folders in your photo storage and
organization folder. So if you remember, I had that folder on
my desktop right here, I can go to my desktop and look for that folder
which is right here. That may be in a
different location, which you'll have to
locate on your computer. So find that directory
where you have that folder. And you'll see the
three folders that you created at the beginning
of the course. And I want you to
select all raw files. This is the folder
where I import every single one
of my photographs. So rather than keeping them in separate folders all
over my computer, I keep all of my raw
original files in a single folder and then I
organize them in light room. Every time I do an import
of images in Lightroom, all of those images, all of those raw
files are gonna go into this all raw files folder. This is what's going
to happen when you import your photos. The photos on your memory
card or wherever you have them on your hard drive
or other external drive, the photos that you have
selected from your memory card. So in this case, I just
have the one photos selected is going
to be copied into new file with all of these
import settings is going to be placed in this destination
folder right here. All of our original
photos are going to stay in our original folder. So if they're on a memory card, They will stay on
your memory card. A duplicate with all of the import settings will
just appear right here. So you don't have to
worry about deleting or losing any of the photos
on your memory card. You can ensure that
all of the photos were imported before you erase
them on your memory card. Alright, so once you have
your destination folder set, the last step of the
process is to click Import. You will see now that this photo has been imported
into Lightroom. It is currently in our library. At this point, we could
go and check to make sure that this file was copied from our memory card and placed into the all
raw files folder. If we go back into
the folder that we created at the beginning
of the course. This raw files folder was the folder that we just
imported that photo into. That was the destination
folder on our import. So if I click on this, you can see that that file is indeed in the old
raw files folder. As we continue to
import our photos, this folder will start to fill
with all of our raw files. And this is where
you want to keep all of your original files so you always know where they are and you never
lose track of them. So that is the entire
photo import process. We will go through this
process once again. So the more you
see this process, the more it will
start to sink in. But first, in the next lesson, we're going to learn how to
make a Lightroom preset. So the next time we
import photos into Lightroom will be able
to apply that preset. So that's it for this lesson. I will see you in the next one.
6. How to create a Lightroom preset for imported photos: In this lesson, you're
going to learn how to create a Lightroom preset. And we're going to use
this preset when we go to import the rest of
our photos and change some specific development
settings that we want to have applied on all of our photos every time they're
imported into Lightroom. We have here the single photo that we imported in
the last lesson. If we come over here
to our modules, you can see that we're
in the Library module. And that is where
all of our files are going to be shown
when we import them. So all of your photos that are imported are going
to appear here. In order to create a preset, we will go over to
the Develop module. And this is the
module where you can edit and develop your photos. So e.g. this is where we
can change things like the exposure of the photo and things like vibrance
and saturation. All of these settings
you can learn in a light room or an Adobe
Camera Raw editing course. So I'm not going to
cover all of this here, but I am going to show you the specific settings
that I typically change in order to
make a Import Preset. So again, these are
all the settings that I want to be applied on all of the photos that
I import into Lightroom. First, if you come
down here to profile, you'll see a variety
of profile options. If you click on this, I don't want to
select any of these. I would rather select
if you click Browse, I would like to
select Adobe neutral. And the reason for this is I want light room to
show the photo, the raw photo in
its original form. So this is the profile that
does the least amount of change to your image when
it's imported into Lightroom. You can see e.g. if I
select Adobe Landscape, it makes the colors more
vivid and I really don't want Lightroom to do any processing
for me at this point, I want to have the most neutral view
of my raw photo without any processing done
so that I can have complete control over
the image processing. These other ones here
like Adobe Standard, have a little bit more
processing than Adobe neutral. You can see that one is just
a little bit more dull, but this is the closest to the original raw file
that you can get. And that's what I want. So I'm going to select Adobe
neutral and close this up. Now next makes sure that
white balance is as shot. I'm going to keep all of these settings at zero
where they are right now. I don't want to change
any of this because I will change these later in the editing process
when I go to edit my photos in Adobe Camera Raw. Let's close this up. Now. You may or may not
want to add detail. So if you come down to detail, right into the box Light room probably has this set to 25. And if it's not, you
can change it to 25. You might want to bump
it up just a little bit. Depending on your preferences. Sometimes I like to have a sharp bend just
a little bit more. And this is the amount
of sharpening that I will want applied
to every photo. And if I want to
increase the sharpening later on in the photo
editing process, then I can do that. But for now I just
want to bump up the sharpening
just a little bit. We can close detail here and
come down to calibration. First. If you look at process, you want to have this set to
the most current version, it likely is already if
you've updated Lightroom, but go ahead and
double-check to make sure that it's set to
the latest version. We can close calibration
and finally, opened up Lens Corrections. Lens corrections are
an important one and it's something that I
want to have applied to every single photo that's imported into my
light room so that I don't have to go
back and do this later every time I edit a photo. And again, that's the
reason we're doing this because it'll
simplify the process. If you can apply all
these settings to each photo as you import them, then you don't have to
go back and do it for each photo when you
start to edit them. Lens corrections will remove distortions that are
caused by your lenses. So there's two main types of lens distortion that
can occur in an image. So you have chromatic
aberration, then you have something
called barreling that can occur around the
margins of your photo. And barreling is more obvious
with wide angle lenses. But let's first come up to
remove chromatic aberration. And I'm going to check this. What it does is it removes these nasty little lines
that can occur in an image. If I zoom in here, I don't really see any chromatic aberration that's really obvious in this image. But in some photos, especially when you're
using lower-quality lenses, you can see these kinda ugly, different colored
lines that can occur. Chromatic aberrations
are just distortions that occur when light
passes through a lens. And the physics of how that all happens is really beyond
the scope of this course, but you can look into how
that works and maybe do a Google search on chromatic aberration and learn a little bit more
about what that is. Even if your photo doesn't
have any Chromatic Aberration, it won't do anything
to the photo. If you do check it. It's good to always
just check this so that you have some insurance in case there's even just
a little bit of chromatic aberration
in the photo that you might have missed in
Lightroom will remove that. You come down here to
enable profile corrections. What this will do
is it will read the metadata on your file
and it will know what type of lens that you use to shoot the photo and
then it will correct for it distortions
like barreling that can occur around the
edges of the photo. If I check this here, you can see what I mean. You can see how the
photo slightly shifted. If I toggle this on and off. This one isn't really dramatic in how much distortion
that there was. But you can see when I check it, Lightroom knows the make and model of the
lens that I use. And thus because that was
stored in the metadata when the photo wrote it onto the
file when I took the photo. So it's always good to
check both of these so that you remove
the most amount of lens distortions that can occur in an image and Lightroom will account for the exact
lens that you used and be able to plug that
into an algorithm in, accurately removed
that distortion. Alright, so those are all of the developed
settings that I want to change for this preset. I didn't change much. And feel free if
you'd like to add additional changes
to your preset. Say, if you want
to add things like maybe more saturation
or texture to an image, I prefer to leave
that for when I'm actually ready to
edit the photo. But once you get all of your
development settings set, now we can create our preset. If you come over here
to the left panel, you'll see a list of all of
the presets in Lightroom. These already come
pre-packaged with Lightroom. But we're going to
create our own based on all the settings
we've set over here. You'll click this plus button
and click Create Preset. Go ahead and name your preset. I'm going to use the
same name that I use for all of my Import Presets. So raw File Import. Next, you want to make
sure that you check only the boxes of the
settings that you changed. We didn't change any
of these over here, so we'll keep all
of these unchecked. I did not change
any color grading, so I'll uncheck that. I did change some
of the sharpening, so I will keep that selected. Lens corrections will
stay selected and we will keep process version
and calibration chat. We will also check treatment
and profiles since we change the profile and
then click Create. Next we will go back
to our library. And now we will
import the rest of our photos this time
with our preset. So we will go through the
import process again this time we're briefly since
we've been through it before, come down to import,
import the photos. We will select our photos
on the memory card. You can see the original
photo is grayed out here. You don t have the
option to check it. And that is because we have don't import
suspected duplicates. Lightroom knows that
we already have this photo in our library. We can also check this right here just to show all
of the new photos so we don't even have
to see that old photo because it's not going
to be imported again. This time we're going to
keep all of our photos jet. And let's look back over here just to go
through this briefly, we're going to keep all
of these settings the same checking to make
sure that we have our raw file imports
set for our file renaming and for our metadata. Now, I'm not gonna
put any keywords into this import this time. And now we can use our Lightroom preset that we
just created on our imports. So in developed settings
right here, click this box. You go to User Presets. We can see that raw file import that we created right here. I have two of them here
because I already had one previously that I currently use for
all of my imports. This is the second one that
was created in this tutorial. So I will click on that. Let's check on our destination. So we check to make sure that
all raw files is selected. So all of these
files are gonna go into are all raw files folder. Now, this time, before
we click Import, come down here to
this import preset, click on None right here. And click on Save Current
Settings as new preset. I'm going to name this
raw file import tutorial. Again, I like to keep
the name consistent for all of the raw file
Import Presets. And I will click Create. Now if you come
down to the bottom here for Import Presets, you will see that
that preset that we just created appears down here. So what this means
is that every time we go to import our photos, all of these settings
that we've set are going to be implemented
on that import. So we don't have to go through every single time and
change all of this. We can simply select
that raw file import. And now every time we
import our photos, as long as this is
selected down here, we don't have to touch or
worry about any of this. I'd like to mention here that even though for the
purposes of this tutorial, we're going to be
compiling all of our photos into this
all raw files folder. Usually I have this folder
on an external hard drive. I don't keep it on my
computer hard drive. These raw file folders
tend to get pretty large because these raw file
sizes are so large. But for the purposes
of this tutorial, all of these files
are gonna go on my hard drive in the
raw files folder. And then we will click Import. You can see all of
these photos are starting to import with that preset being applied
to the photos as they are loaded
into the library. Alright, so it might take a
few minutes to get all of your images into your
Lightroom library. But once they're all loaded, you can go and
double-check to make sure that they were
all copied into your all raw files
folder by going back to that folder and clicking
on all raw files. And now you can see that all of those files are in that folder, keeping in mind again, that they still exist
on the memory card. These are just
duplicates or copies that are in the new
directory, the new location. But these have all of the
import settings applied, all of the new metadata and develop settings and
things like that. We can even see if we
go to the list view, that the names of the
files have changed, the names are all now according to the template
that we created. So we have my name or would
be your name in the template. We have the date than the
hour, minute, and second. Great. So now that you have all of your photos imported
into Lightroom. Next we're going to
discuss what all of these windows and sidebars mean in more detail so
that you can start to understand and navigate light
room a little bit better. So I will see you
in the next lesson.
7. Windows, view modes, and toolbars: Welcome back. In this lesson, now that we've imported all of our photo files, we're going to cover what these windows toolbars
and view modes are in light room so that you have
a better understanding of how to view and
manage your photos. First, on the left-hand panel, we have the Navigator. Whatever photo that you have selected will appear
in the navigator here, you can choose
different settings here of how you
would like to view your photos so you can
set it to fit the screen. You can click this button
to zoom in at 100%. And you can move this
box around here to select the part of the photo that you want to see zoomed in. Can click again to zoom out. And then right here, you can choose the percentage
that you'd like to zoom in. So we will exit this zoomed in mode by clicking 100% again. You come down here to folders. This is going to show
the folders where the photos that you're going
to be viewing are stored. So remember that Lightroom doesn't actually
store the photos. The photos that you're
viewing here are stored in the directory or the
folder on your hard drive. If you remember, all of
the photos here that we imported were imported into
the all raw files folder. So that is the folder
that we're going to be viewing here in
the folders window. Here we have collections. And later on in this course, we're gonna do an entire
lesson on collections and go into a lot of depth of
how to use collections. But for now, this is
where you're going to organize your photos. So don't worry too much
for now about collections, but you will fully understand
how to use this soon. If we come over
here to the right. Now we can actually see the histogram of the
photo that's selected. We can also see some of the other information
associated with the photo, like the ISO it was taken, the focal length, the aperture, and the shutter speed. Quick develop right
here is just showing the preset that we
have on the photo. If you remember,
when we imported all of our photos in
the last lesson, we applied this raw
file import preset. If you click on this,
you can see all of the other presets that
Lightroom has available. You don't need to
change any of this. We will keep it on our raw
file import key wording. If we open this up, this is where all
of the keywords associated with the image
are going to be stored. Now when we imported
all of our photos, we didn't add any keywords. The only photo that
we added keywords to was the very first
photo that we imported. So if we click on this photo, now you can see the keywords that we typed in on the import. So we have four keywords here. And you could, if
you click on this, you could add more keywords. And I'll show you in just
a moment how you can use these keywords to
search for this photo. I tried to keep
it simple though, and I don't really use keywords. I organize all my photos
using collections, which we're going to learn
about in a future lesson. Feel free to add
these keywords in, but don't let it get
too confusing for you. And also for that reason, I don't use any of
these keywords, suggestions or keywords sets. Same goes for keyword list. You can see all of the keywords
that we've used so far. We've only added these
keywords onto our photos. So this just keeps track of the overall keywords
in your library. Again, I don't really
use this either. Metadata. You open this up, you can see all of the metadata
associated with the file, at least the only metadata
that we have actually added to the file
when we imported it. If you come up here
to this box, up here, you can click on one of
these options and see different views of metadata
associated with the image. I like to keep it simple
and keep it on the default. But that's just nice to
know that that's there. And comments is
something that I do not use because I don't use
some of these windows. What you can do if
you don't want to use them either is right-click on them and just check the
ones that you don't want. If I check comments,
it will disappear. Same for keyword list. And we can keep these
three here for now. Again, the less clutter that you have in your
workspace, the better. Now the next thing I want
to show you is how to change the size of
these thumbnails. If you want to change how big
or small the squares are, what you can do is you can
come down to thumbnails, or you see this slider. And you can slide this
up to make them larger. And you can slide it
down to make it smaller. So I typically keep
it about right here. And a keyboard
shortcut you can use, instead of using this slider, is you can use the plus button to make your photos larger. And the minus button on your keyboard to
make them smaller. Now the next thing I
want to show you are the different view
modes in light room. These are really just
the different ways to view your photos. If you come down here, you'll see several options. Right now we are in
what's called grid view. So whenever you want to be in this view mode that you're
looking at right here. You can either click
this icon right here, or you can press the letter G. The next view mode that
you have is loop view, which will allow you to
view a single photo. If you click Loop, you can see the
photo that we have selected takes up
the entire screen. And a shortcut to zoom
in at 100% IN and OUT is to simply
press the space bar. So if you click the space bar, you will zoom in 100%. And you can move around
your photo and just press the space bar to fit the
photo back into the screen. Now the next view mode that
you have is comparison mode. If you click this right
here, the X and the Y, you will see the photo
we were just looking at and the adjacent photo. If we go back to grid
view right here, you can click here or press G. It will show the adjacent photo. But if you'd like to compare
two photos of your choosing, you can select one photo, hold down Command, and
select a second photo. So now you have two
photos selected. That's Command on a Mac
or Control on a PC, and then click comparison. So now the two photos
that you selected, you can compare
against each other. You can write here, zoom in and out of the
photo that's selected. If you press this
little lock button, they will zoom at the
same amount and you can zoom them together
at the same time. Let's go back to grid mode. This time, let's select
multiple photos. So hold down command on a
Mac or Control on a PC. And select at least
three or four photos that you want to view
all at the same time. Now once you do that, you can click on the
fourth view mode, which is survey view. Now you can see all of those
photos on the same screen. If you want to remove them, you can press the X there. But this is a great way to view multiple photos
at the same time. Alright, let's go back
to our grid view. And just so you know,
this is people view, which is something that I don't use as a landscape photographer. You can look into that
further if you're interested, but we won't be
covering that here. Alright, so back in grid view. Next we're going to look
at some of these toolbars. If you come up here, this is your filter bar. We will be discussing
this more later in the course when we start to
put together collections. But this bar is just a
way to filter your photos so that you can sort through
them more efficiently. We will cover what all of these mean in the following lesson. But for now what I want
to show you is how you can search for
your keywords. If you go to Text right here, you can search right
here for your keywords. If you remember this photo, this was the only
one that we added keywords to on Import. And we want are the keywords
we added was Colorado. So if I type in Colorado, you can see that
this image appeared. It was filtered out from the rest of the
photos that didn't have any keyword metadata
associated with them. If we click this x and remove this filter than all of
our photos, show back up. If you do want to use keywords
to search for your photos, this would be the way to do it. Click on Text and use this search bar to search
for those keywords. Finally, down at
the bottom here, we have what's called
the film strip. This is going to show all
of your photos in series. Whatever photo you
select down here corresponds to what's being
selected in the grid. This is just another way to view and sort through your photos. Alright, so that's a
general overview of Windows view modes and toolbars. In the next lesson, you're gonna learn about other
types of metadata we can add to a photo in the
form of ratings, flags, and color labels, which is
what we have right here as attributes of the
photo that we can filter through in
the filter toolbar. So that's it for this lesson. I will see you in the next one.
8. Ratings, flags, and color labels: Welcome back to
the class you-all. In this lesson, you're gonna
learn how to use ratings, flags and color labels, which are a type of descriptive information or additional
metadata that you can add to your photos
in order to more effectively and
efficiently organize them. And we'll be discussing in the next lesson how to
organize your photos using ratings flags
and color labels in the collections
area over here. And ratings are really the
most important information that I add to my
photos in my workflow, which allows me to track where my photos are in the
editing process. And I'm going to
teach you how this all comes together
in the next lesson. Let's talk about ratings
first and what ratings are just stars that you can rate your photos with on a
scale of one to five. So you can rate your
photo with one star, two stars all the
way to five-stars. And typically one-star is the photo that you
like the least. And 5-stars is the photo
that you like the most. And then you can rape your
photos accordingly based on your least to most
favorite photographs. If you remember from when we imported our photos
into Lightroom, we set the metadata and
our import process to add a single star to every
photo that we imported. So if you look at the
bottom of each of the photos in Lightroom library, we can see one star, which means that all
of these photos have been rated with one star. Now it's actually
quite simple to change the rating
of your photos. So to change the number of
stars that are on your photo, one way you can do it is select the photo that
you'd like to set the rating for and come up
to your main menu to photo. If you come down this main menu, you can see this
set rating option. And you can see here that
one star is checked. If you'd like to change
the star rating, you can choose from one
all the way to five, or you can choose none. And you can see these
numbers on the side here. These are just the
keyboard shortcuts. So these are going to be
really, really useful, especially in the next lesson when you start to
rate your photos, you can quickly decide what
you want to rate the photo and just press one through
five on your keyboard. Let's just change this one
to five stars right now. And you can see that the
rating has changed down here. The other thing we can
do is right-click on the photo and come
over to set rating. Once again, we're
essentially doing the exact same thing that
we did from the main menu. And you can change
that star rating here. You can see how that
changed to three stars. Again, the easiest
way to do this is to just use your keyboard numbers. So I'm going to
change this back to one-star just by
pressing the number one. And you'll see that
every time you change the star rating, the selector or the photo that's highlighted will shift
to the next photo. The reason it does this
is because we have our settings set
to auto advance, which means that when we change
the rating of one photo, it will immediately move
us to the next photo. If I press two here, the next photo selected
is the adjacent photo. And it will keep moving down the line as we
change our ratings. This is gonna be really helpful when you
start to move through your photos quickly and pick out which ones you want to edit. But we'll dive deeper
into how that works, how this system I
have setup works. In the next lesson, I'm going to change
these back to one stars because
we're going to keep one-star as our default. And that will again make much more sense in
the next lesson. The next thing you
can do to organize your photos is to flag them. So you can add two
different types of flags to your photo. One flag is a black flag, and that means that the
photo has been rejected. These are photos that you don't like or don't
want to keep. At least that's how I
use the black flag. A flag built into
Lightroom that you can use to really weed out the
photos that you don't want. So let me show you
how that works. We can change the flag status the same way we did the rating. If you come up here to photo, come down here to set flag. Right now, all of our
photos are unflagging. If we want to access
the Black Flag, which means rejected,
we can click rejected. And now you can see there's
a little black flag up here and that's just indicating that this photo has been rejected. It's still going to stay in your photo library and it's
not going to be deleted. But if you do decide you actually want to
delete the photo, I will show you how to do that towards the end of this course. The other type of flag you
can add is a white flag. That flag means that the
photo has been picked. So if we come over and
select another photo, so let's say this one, we can come back to photo down the menu and set
flag to flagged. And notice here that there
are a few keyboard shortcuts. So x is four rejected. If you want the black
flag to reject the photo, you can press X
on your keyboard. If you'd like to
flag it, press P, and you can remember that
by P, meaning picked. So let's flag this one. You can see a little
white flag here. And to be honest with you, I actually never use the white flag in the file organization system
that I'm going to show you. It just doesn't
really have a place, but it's just something
that is nice to know in case you want to select a photo that may be stands out
for some reason that you want to indicate as
picked or important. So we can start adding flags
to our photos by selecting a photo and pressing X
if we want to reject it. And let's say the next one, I want to pick
this one, flag it, so I'll press P. It's
really up to you, your personal preference of whether or not you want
to use these flags. Again, I personally
don't find the flags helpful other than
the rejected flag. And I use the rejected flag
to pick out photos that I don't want to keep and ones that I want to delete later. But other than that, I
don't really use flags. If you want to remove a
flag from your photo, all you have to do is
press the letter U. You can just press
U if you want to remove a flag from any photo. Just like that. The other thing you can do, just like I showed you before, is go back to photo, set flag, and click on flagged. Again, like star ratings, you can also select a photo, right-click on it, and then set the flag that way as well. Alright, so the third
type of metadata that you can add to your
photo, our color labels. In color labels
really work the same way that ratings and flags work. And you can add color labels
in really the exact same way that we've added ratings
and flags to our photos. So if we want to
add a color label, you can select a photo and come up to photo
in the main menu. If you come down the menu bar, as we saw before, we already did flags, ratings, and right below it
is colored labels. And you'll see on
this sub menu here, we have red, yellow, green, blue, and purple. These colors can really mean whatever you want them to mean. E.g. you can label a photo, read if say that's the
predominant color in the photo. Or maybe it categorizes the photo in some way
that works best for you. So maybe red means that the photo is a
picture of a canyon, or maybe it's even a
specific location. Red can really mean
whatever you want it to be. So if we select red, you can see now that
this photo has been highlighted in red because
we've labeled it as read. For this next photo, we can change the color. Let's click blue. And it works in the same way. So you can use all
five colors to organize and label
photos as you see fit. And again, it's
really up to you to decide what each color means. One thing you can
even do is change the names of the color labels. If you come up here to metadata, you can select color label set. Then click Edit. Now here in this window we can change what the colors mean. So instead of this being red, we can have red
stand for Canyon, and maybe yellow for wildlife, green for forest,
blue for ocean, and purple for wild flowers. Now when you add a
color label to a photo, if you right-click on a photo
and add the color label. So again, you can add it through the photo menu bar
at the top here, or just right-click on the
photo Set Color Label. And now we've changed with
those color names are. So if we want to name this one Canyon and we know
that corresponds to red. Now we've linked the name
canyon with the color red. And remember, you can use
the keyboard shortcuts. So 678.9 to change the colors. So if I use 8.9, we can change the colors
that way as well. Now once you've decided how
you want to rate your photos, and also the color labels
that you want to give them and whether or not you
want to pick or reject them. A really helpful
tool you can use is this filter bar up here. If you want to sort through
your photos by these labels, you can come over to attribute. Using all of these options here, you can tell Lightroom
which photos you would like to filter for
based on the ratings, the flags, and the color labels. Let's start with flags here. If we click on the white flag, you'll see that only
the photos that are picked with a white flag appear. Click on the white
flag and we go back to the unfiltered state. Same thing for the black flag. We only had one
that was rejected. And so that will appear
here with the black flags. And if we want to select all of the photos
that are unflagging, it will select all of
those photos or filter for them that we haven't
rejected or pit. We will click on that again so that everything
is unfiltered. Now the same thing
for the ratings. If we click one-star, all of our photos are
going to show up. But let's say we rate
this one as five. The next one is a five, and that one as a five. So we have these three
rated as a five. Now if we come back up
here and click five-stars, can see that all of the
photos have been filtered to only show the photos that
are rated as five-stars. So pretty simple. If you might have guessed, the same thing works
for it, the colors. So you can filter through the color labels that
you've set for your photos. So if I click on Read, it will show the
photo that we have labeled with a color
label with red. And we can see that color label is outlining the
photo right there. So these are just some
ways that you can label your photos so you can
easily sort through them. I personally don't
use color labels. I find it to be a
little bit too messy and I prefer to keep my
system as simple as possible. So the only labels that I
use are the star ratings. And later, as I'll show
you in the next lesson, you can use your
collections over here to organize all of your photos
based on this rating. We will dive into that next, and I will see you
in the next lesson.
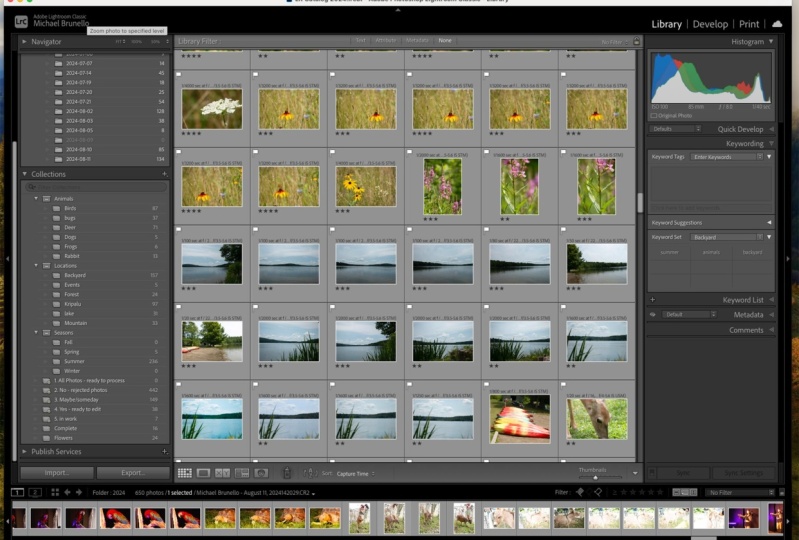
9. Using collections to organize your workflow - part 1: Hey, welcome back. In this lesson, I'm going to show you how to
organize your files within Lightroom in an
efficient workflow. And this is the system
that we've been building towards
throughout this course. And this is where you're
really going to learn how to organize your files in what I believe is the most efficient
and streamlined way. And the way we're gonna do
this is by using collections. So this window right over here that we've saved for last now, collections or where
you group your photos together and organize
them within your catalog. Again, like we've discussed
previously, these photos, when they're put into
collections to group, they're not going to be
actually stored in Lightroom. Lightroom is going to be collecting them in
organizing them, while keeping all of the original files in the
original directories. So all of our files are going to stay in are all
raw files folder. But we're going to be able to group them and
organize them however we like without moving the
files around on our computer. All you're doing
with the collection is just telling
Lightroom that you want those photos linked in some way and viewable together
in a collection, this will start to
make more sense as we create these collections. So the first thing we're
gonna do here is delete this smart collection and I will show you what this
is in just a moment. But we're going to
start from scratch. So I'm going to
right-click and delete this smart collection which you might already have on
your Lightroom as well. So you can go ahead
and delete that. In light room allows
you to create three different types
of collections. You can create
regular collections, you can create smart
collections and collections sets and we'll go
through all of these and which ones I
recommend using. First before we move on, what I've done to my photos here and I recommend you do as well, is I have changed all of the photo ratings
back to one star, and I have removed all of
the flags and color labels. This is so we don't get confused as we start to make collections. To create a collection, come over to collections and
click the plus button here. And we're first going to
create a regular collection. So we'll select
Create Collection. Will name this collection
something descriptive that describes the type
of grouping that we want to create
for our photos. Here I'm going to
create a group for the location or the state
that the photo was taken in. I'm going to start with Colorado for the
first collection. And you can uncheck, include selected photos and de-select set target
collection as well. And then click Create. So now you can see on our collections panel we
have a Colorado collection. In order to start adding
photos to your collection, you can start to work
through your library of photos here and select a photo that
you would like to go into this collection. So in this case, I want to select photos that
were taken in Colorado. So I'll select a photo
and then click and drag that photo into
this collection. And you can see now that the
number one just appeared, which means that there is one
photo in this collection. I'm going to drag these
first four photos, which were all taken in
Colorado into this collection. And if we click on
the collection, we can see now that all
four of those photos are within this
Colorado collection. Again, if you notice, the number of total photos
in are all raw files, folder does not change. They're going to
stay in that folder. We're just organizing them
here in a collection. So let's click back
on are all raw files. And I'll just add a few more Colorado photos
to this collection. Let's go ahead and add an
additional collection here. So we'll create
another collection and I'm going to call this Utah, so we can add some photos
that were taken in Utah. So I've got this one. Remember we're dragging
and dropping these photos. And I will create a third collection and
call that Wyoming. So let's add some
Yellowstone photos. Okay, great, so you can name your collections
whatever you'd like. And again, remember, these are just regular collections
you'll need to drag and drop. Or alternatively, what
you can do is choose a collection and right-click
on that collection. You'll see here an option called set as a target collection. If you select that, you'll see a little
plus up here. And what that means is
that you can more easily add photos using the
keyboard shortcut, which is the letter B, UV, come back up
to all raw files. If I click on this photo, which we haven't add, this was taken in Colorado, and I press the letter B, it will be added to our
Colorado collection. Now one thing you can also
do in order to organize these collections is to put them in what's
called a collection set, which is just like a collection for collections
if that makes any sense. And I'll show you right here. So I will name this
collection set locations. And now you can drag and drop these regular collections
inside of your collection set. You can see here that we have a collection
set that we can collapse and expand when we want to see the
locations inside. And again, if you want to
change the target collection, you can right-click on
whichever one you'd like to be the target and click
Set as target. We could do the same thing for, let's say, seasons of the year. We could create spring. And I will uncheck this
because we don't want spring to be inside the collection
set called locations. We want it to be it's own. One more, just quickly
called Summer. We could create all
four of the seasons. And then we can
create a collection set where we can drag and drop our
seasons. There we go. Now we have two collections sets and we can use these same way. So e.g. this one
was taken in fall, so we can add a fall check inside
collection set seasons. So we want fall to go in the seasons collection
set. Click Create. We'll click on are all raw files there just to access
all of our files here. And then you can click on
the photo that was taken in fall and simply drag
and drop these photos. This was taken in Utah, this one in Colorado, but all in this season of fall. So if we come over here
and click on fall, we have two photos and
our fall collection. But those photos also appear in our Colorado and
Utah collection. So you can start to see how we can organize and so
many different ways. And this can help you sort through and find
photos more quickly. Now, I don't really use these regular collections in
order to organize my photos. I find that it can get
a little bit messy. For that reason, I
use something called Smart Collections and I use, and I'll be showing
you smart collections throughout the rest
of this course. And the exact method I
use to sort and organize photos through my workflow
using smart collections. So what I'm gonna do here is
I'm actually going to delete these collections sets because we're not going to
be using these, but it's really good to know how to do this because you might want to integrate some of
this into your workflow.
10. Using collections to organize your workflow - part 2: Alright, so next we're going to create a smart collection. We'll come back over to
collections and press the plus button and click
on create smart collection. Now what is smart
collection is going to do? It works really in the same
way as a regular collection. The only difference is that Lightroom is going
to automatically add photos to your collection based on certain
metadata filters. I'll show you here
in just a moment. The first smart collection
I'm going to create, I'm going to call a number one. All photos ready to process. I recommend that
you start by using the names that I've
used for this system. And then you can go back
and change the names and modify this
system to your needs. But I found this to be
the simplest and really I think the most
streamlined way to do this. Now once he named
this collection, we're going to keep rating
as rating right here. Don't change that. We're going to click one star. Then we'll select this box. And select is, we're telling Lightroom rating is one star. And really what that
means is you're telling Lightroom that you only want photos in this collection
that have one star. And we will click Create. Now you can see that we have
this smart collection that automatically has all
31 of our photos. And the reason for that, as you might have guessed, is that all of our photos are already rated with one star. So they automatically went directly into this
smart collection, which is why it's called a smart collection and not
a regular collection. Now we're going to make five
of these smart collections. And you can follow along with me and create these
collections with me. Create another smart collection. The second one we'll call
to know Rejected Photos. And our rating is two stars. And click create. Our third smart collection. We will name three. Maybe. Someday. Rating is three stars. Create smart collection. We will name this one for yes. Ready to edit. Rating is this time it
will be four-stars. Create. Our last smart collection
will be five in work. And our rating is five. And make sure that you
have this set to match all of the following rules for each one of these
smart collections. If it's not already
set to all, are ready. We will create our
fifth collection. You can see there
are no photos in these additional
collections we've created because we don't have any photos with a
234 or five-star rating, but we're gonna change that
here in just a moment. Alright, so now
we're really down to the core of how
this system works. You've imported all your photos. They all have a one-star rating. They're all going to
appear in this collection. All photos that are
ready to process. Now, these are all of the photos that say
you come home from a trip and you load all your
photos into your computer, and you're ready to just go through all of these photos and decide which ones you like and
which ones you don't like. And let me show you
how this system works. We'll start with the
very first photo. And if you remember, we can rate photos by changing their stars with numbers
on the keyboard. So the number one
is for one-star, two is for two stars
all the way up to the number five
for five-stars. So when we look at
our first photo, we need to determine whether
we want to reject it, whether we don't want the photo, whether we maybe want to edit the photo someday,
maybe not now. And you're not say crazy
in love with this photo, but you don't necessarily
want to get rid of it. And then you'll have photos that you definitely want to edit. You can say, yeah, this one is a winner. I want this to go
into the collection. All photos that I want to edit. So let's work through
our photos on this one for rating system. This photo right here, I kinda like it, but it doesn't make me crazy. I'm going to read it as a three, so I'm going to press
the number three. And that becomes a
three-star rating. And you can check
that by clicking on our three-star category. And we see that
image appear here. Now back in our all photos, it disappeared from our
All Photos Collection. So I keep these
all at one star so that I know which
photos I've looked at and which photos I haven't looked at yet
in terms of rating them with regard to deciding if I want to edit them or not. So every time I make a
decision about a photo, it will leave this all
photos, smart collection. Alright, so this next photo, this is really just a memory. This is a photo of
my dog and it's not necessarily one that
I want to edit. So I know I don't
want to edit it, but I also don't
want to delete it. I'm going to put it in
the know Rejected Photos. So I'm going to
press number two. This one I do like
so I'm going to press for this one maybe. So I will press three. This one is a yes. So for definitely a yes. So for this one is
a maybe so three. This one, I'm going to rate as to not really in
love with this one. So you can see how I'm going through each
one of these photos, either giving them a
yes or a no or a maybe. And I'm just going
to start to go through these quickly here. And now all of the photos that I wanted to look at after
coming home from my trip. I can look at this
All Photos Collection and know that I've looked
at all of the photos from the trip and I've
made a decision on where I want them to be in
the editing process. So I've selected the ones that
I definitely want to edit, and these will stay here until I'm actually
ready to edit them. Now, the beauty of
this system is that I always have photos
ready to edit. So sometimes I'm not really
feeling super creative. That's when I'll go through
my All Photos Collection. Typically, all have
thousands and thousands of photos in this collection and I never really quite
get through them. But you can sit down and
start to sort through them whenever you maybe just
don't feel like editing. Then when you do feel like
you want to edit photos, you can sit down and go to your yes folder and always
have something to edit. Always be inspired and have your best work ready and
available to start editing. A lot of times I'll come back to this maybe someday collection and go through these photos, maybe months or even years later and change my mind
about certain photos. Sometimes after I let
them sit for awhile, I start to like
them more and more and then I can add
them to my yes, ready to edit collections. So say I actually
changed my mind. I really like this one, so I'm going to press
the number four and it's going to pop over
to the yes Collection. Same say for this
one and this one. I'm going to add it to the yes. And let's say maybe this one just still not in love with it. I'm going to press number two to send it to the no collection. Now, in the no collection, I don't necessarily want
to delete these photos. These might not be
photos I'm in love with. I really want to
edit, but it could be things like a memory, say a picture of my dog or some cool wildlife that I saw that the photo maybe
you didn't come out great, but I don't want to delete them. When I'm in the know collection. However, I might actually
decide that there are photos that I
want to delete. So in that case, what
I'll do is I'll select the photo and I will
reject it by clicking X. You can see, like
we learned before, that this little
black flag means that I definitely reject it. And in my system, I want this photo
to be deleted so I can add this photo and
this photo as well. So I have three photos
that I want to delete. The other ones I
don't want to delete. I just want to keep them maybe on my hard drive for storage, but they are definitely not going to be edited and I don't have to ever look at them
to be edited ever again. And I'll show you how to
delete these photos in the next lesson
because you can't delete them from
your hard drive, from a Lightroom collection. Now let's say you've
worked through all of your photos and you're
ready to edit them. You come down to,
you're ready to edit collection and then just decide which photo
you want to edit. So let's say we want
to edit this photo. What I'll do is change this
to a five-star rating. So I'm going to press
the number five. And now it pops up
in the work folder. This is how I know
that this photo is in the process
of being edited. Once I get through the process
of editing this photo, getting it ready
either to print or to put online when it's
completely done. Then I will remove it from
this collection and I will add it to a new collection
that we will create right now. This is just a
regular collection. This is not a smart collection that I'm going to
call it complete. Again, you can name these
whatever you'd like. This is the system that
just works best for me. So let's say I edit this photo which you can do
directly in light room. You go over to the
Develop module, then that photo
will appear here. I do not develop in Lightroom. So at this point, I would actually export this
photo out of light room. And I will show you how to do
that in a following lesson. But as of now, this photo
is going to hang out here until it's
completely processed. And then once it's processed, what I'm going to do is move
it into the complete folder. Then in order to remove this
photo from this collection, I will just press
the number zero, which will remove all of the
ratings from this photo. Now once I've completely
edited that photo, I don't ever intend to touch it again unless
I want to re-edit it. It now lives in this
complete folder. When I'm ready to go
edit another photo, I will go back to the folder and choose another photo
that I'm ready to edit. So let's say this
photo right here. I will press the number
five to rate it as a five-star rating and
put it in my work folder. At this point, I will export this photo into a
different location so that I can edit this photo in Adobe Camera Raw and Photoshop. And I have a very
specific way I like to export my photos to
ensure that they don't accidentally
get deleted or changed in all raw files folder. I will show you how to do
that in the next lesson.
11. Exporting files out of Lightroom: Welcome back you-all. We're going to pick
up right where we left off in the previous lesson, talking about exporting
our images out of light room when they're all
ready to process and edit. One of my goals when using Lightroom is to
ensure that all of my original raw files stay in a single folder where
they can't be duplicated, they can't be changed, they can't be edited, and they can't be
accidentally deleted. So for that reason, I like to export my photos completely out of
light room into a different folder by making duplicates of the image
that I'm ready to process. Then from that new
folder where I can process them in Adobe
Camera Raw and Lightroom. Now there's two ways that
you can export a photo here. The first thing I'm
going to show you is the way in which I don't recommend you edit your photos and I'll show you why
in just a moment. But just so you can catch
a common mistake that could potentially cause you
to alter the original file, or even worst-case
scenario, delete it. If you right-click on the
photo that you'd like to edit, you can export it by
going down to edit in. Now, if you come over here
to edit in Photoshop, what'll happen is the
photo will open up in Photoshop and you'll be
able to edit it that way. Now, I don't prefer to use this option because
it's possible based on your computer settings and
the settings of Photoshop and Lightroom that you can
alter the original file. So the original file is
still in this folder. I want to keep it untouched. I want to prevent any type of editing that could affect
the original file. So this original file in
my all raw files folder, and opening it up directly in Photoshop could
potentially mess that up. The better way to
do this is again, to right-click on the
photo you want to export. And instead of going to edit in, come all the way down to Export, and then move over this sub
menu and click on Export. And this dialogue
box should pop up. You'll see a variety of options. The first, really the most important is the
export location. And this is where you want the
photo to be exported to on your computer hard drive or external hard drive wherever
you'd like to move it. Or I should say copy it
because we're not actually moving the photo from this
folder to a new folder. We're just making a copy
of it in a new folder, kinda like we did on our import. The folder that I would
recommend that you choose is the one that you created at the beginning
of the course. So if we go back to our photo storage and
organization folder, which I have on my desktop here. If you remember from the
beginning of the course, we created these three folders. We've already used
these two folders. So this is where we start
our Lightroom catalog. This is where we hold
all of our raw files. Now we get to use this
exported raw files. So this is the folder
we're going to send all of our exported files into. So click on that folder
and select, choose. You can ensure that that's the proper directory
by looking here, keep put in subfolder, unchecked, and uncheck,
add to catalog. Now for file naming, we do not want to
rename the file. We already had a system in
place for naming this file, so you can keep that as it is. This should be the unique
name based on your name, the date, and the time. Don't worry about video. For file settings, keep the image format in
the original format, so you want to
keep the original. And for the rest of this, you don't have to
check anything off. Keep all of these
settings below unchecked. Now what we can do is
create this export presets. So every time we export
this photo right here, we don't have to
change anything. We can use it as a preset in
order to create that preset. Come over here to add. You can name it
whatever you like. So I have mine as raw export. I'm just gonna do a
dash for this tutorial. And I will click Create. And you could go ahead
and click export, but I'm going to show you
how to use this preset. So let's click cancel. So we'll go through
the same process by right-clicking on this photo. We want to export
down here to Export. And now you'll see
at the bottom of this sub-menu a preset
that you created, this raw export tutorial. That's what we just
created a few moments ago. So I will click on this. And now you can see there at the file was exported
into that folder. And we can check that by going into that folder
on our computer. So our exported
raw files folder, if you click on that. Now, this photo is inside of our exported
raw files folder, and this is the metadata that
goes with that image file. Now at this point, I am done using Lightroom. I don't use Lightroom for editing unless it's
for minor things. I will open up this image
in Adobe Camera Raw, and I can show you how to do
that in future tutorials. But for now, that is the entire
organizational process that I use with light room. If I go back into my
all raw files folder, I can see that this image is in the original
raw files folder. So all it did was make a new copy into the
exported folder. So now I never have to worry about any of these
files being touched. They'd been completely organized here in this system so I can track where I am in the editing process of the
photos that I actually like. And then when I'm ready, I can export them into
this folder right here, which is where all
go when I want to open them in
Adobe Camera Raw. And that way if I really
mess this photo up, I can always delete it and
know for sure that I have an original copy in my all raw files folder which I can re-export and re-edit.
12. How to delete photos from Lightroom: Hey there, welcome back. In this short lesson, I want to show you how
to delete photos from light room after we've gone
through this entire process. So you want to
delete photos that you definitely
never want to edit. So we'll select on
this smart collection, which is our no Rejected Photos. And if you remember,
in this collection, we rejected a few of these photos that I
flagged for deletion. So the black flag
I use to indicate photos that I definitely
want to delete. Now in order to
delete the photos, you can't delete them directly
from a smart collection. You have to go into your folder, your all raw files folder, and then filter out
the photos that you actually want to delete
and delete them from here. So in order to select
the ones that have been rejected will go back up
to our filter toolbar. Select attribute, then
select the black flag. So now we have all
of the files that we know for sure we want to delete. The next thing I'll do is
select all of these photos. So you will come up
here to the main menu, select, Edit, and select all. Now we've selected
all of these photos. Next thing you'll do is right-click anywhere on
one of these photos. And then you will come down
this menu to remove photos. Now I want to warn
you when you do this, this will actually delete
the photos from your disk. If you are 100% sure
that you want to delete these photos for good and permanently from
your hard drive, then what you'll do is you
will select delete from disk. If you remove them
from light room, they will be removed from
light room from your catalog, but they will still be on
your raw files folder. So if you select
delete from disk, they will disappear from
this folder completely. And now you can see we
deleted those three files. The total file count
went down 31-28. And that's all there is to it. In order to delete files from your computer that you're sure
you never want to look at. Again, that really wraps up the entire organizational system that I use within Lightroom. Now, if you've got photos
all over your hard drive, that art disorganized and
you're wondering how to implement this system
for your own use. In the following lesson, I'm going to show
you how you can take all of your
photos and transfer them to this type of system that you've learned
throughout this course. So if that's something
that you're interested in, then I will see you
in the next lesson.
13. How to transfer your photos to my organization system: In this video, I'm
going to walk you through how to take
your old setup of photo organization and
workflow and integrated into the setup I taught in the previous lessons
throughout this course. If you're interested
in implementing the system that I've shown
you throughout this course. This lesson is going to
show you how to take all of your old photos and transfer them into the system that
I've shown you so far. Now it's very important
if you want to do this, that you watch all
of the lessons so far all the way to
the end so that you have a really good
understanding of the complete import
process and how this entire system works before you start to
use it for yourself. The first thing I want to
talk about here is where I keep all of my files
and their locations. And this is gonna
be a little bit different than you've seen
throughout the course. Now, we've talked about this photo storage and
organization folder, which I keep on my
desktop and we're going to continue to
work off of this folder. If you haven't created
this folder already, you can go ahead and
do so right now. Again, you can keep this folder wherever you'd like
on your computer. I have it on my desktop where it's the easiest
for me to access, but you can place it
anywhere on your hard drive. You'll also see a
separate folder that I've created here on my desktop called the
previous photo location. And what this is, is it's a folder that
I'm going to use to simulate where you are currently keeping
all of your photos. I do not want you to
create this folder. This folder, it just
represents where all of your photos are on your
hard drive right now. This could include all
of the sub folders that contain all of
your different photos. So if you're categorizing your photos in
different folders, e.g. by season and location and date. This folder right
here is going to represent all of those
folders on your computer. If I go into this folder now, I have a few other
simulated folders. Just for this tutorial, just to use this as an example. All of these folders
right here are just example folders
filled with photos that just represent
different sub folders that you might have filled with
all of your different photos. If we go into this
photo storage and organization folder
that I've been using to demonstrate Lightroom to
you throughout the course. You'll see that instead of the three folders that we've been using throughout
the course, I only have two. We still have the
exported raw files folder and the Lightroom
catalogs folder. What we don't have here is
the all raw files folder, and I'll show you where
that is in just a moment. So this folder, storage
and organization folder is still the same minus the
all raw files folder. And if you haven't already, you can go ahead and create
these two folders so that you can follow along with the system that I'm
going to show you. These two folders that I
have here on my desktop. I still use in the exact same way that you've seen throughout
the course. I keep all of my
exported raw files in here that I want to work on in Adobe Camera
Raw in Photoshop. And you learned how to export
photos out of light room into this folder in
the exporting lesson, in this folder is where I also keep my Lightroom catalogs. So if I click on this one, I have the Lightroom
catalog that we created in the
very first lesson. Now, let me show
you where I keep my all raw files folder, and that is on an
external hard drive. So again, these two are on
my computer hard drive. We come down to my external
hard drive right here. You can see that my raw files folder is located on my
external hard drive. In this folder contains
all of my photos, all of my raw files in virtually every photograph
that I've ever taken. We come down here to my
external hard drive. You can see that I have my raw files folder located
on this external drive. And this is where every
single photo that I've ever taken is located. You can see in here
all of my raw files. I have close to 10,000
on this drive right now, and they're all located
in this single file. And if you remember
from previous lessons, even though all of my files are compiled into this
single folder, they're all organized in
my Lightroom catalog, so I never have to worry about where to find
photos that I'm looking for when they're all
combined in this one file, they're all organized
in light room. Let's go back to the
photo storage and organization folder
on my desktop. You might be
wondering why I keep my exported raw
files that I want to work on my computer's hard drive rather than my
external hard drive. And the reason for that is
that when I'm editing photos, it's much faster and there's really little lag time when I'm using Adobe Camera
Raw in Photoshop. When the photo I'm
working on is located on my computer's hard drive rather than on an external hard drive. Even if you're using something
like a solid-state drive, it's still not fast enough
to transfer the data from the external hard
drive onto your computer. When Photoshop and Adobe
Camera Raw are trying to pull that information
from an external drive. It makes it much easier
and faster it just to keep all of your files
that you're working on, all of your raw exported files on your
computer's hard drive, everything else however,
so all of my raw files, all of my photos, I want to keep on an
external hard drive. And that's not just
to free up space on my computer's hard
drive and to make my computer operate a
little bit faster with, without all that memory
taking up space, but it also allows me to more easily back up all of my files. I have systems to backup all of my files on external
hard drives. And that's so I never
have to worry about my photos ever getting deleted. I always have multiple
backups of all of my photos. Alright, so let's
talk about how to import all of your old photos. So if we go back to our desktop, how to transfer all
of these photos. So your photos on your
computer hard drive or maybe even if they're on an external hard
drive, That's okay. I'll show you how
to transfer all of your photos into the system that I've shown you
throughout this course. And again, it's really
important at this point that you've watched this
entire course up to this point so
that you can follow along and do this import process accurately as I've shown
you so that you don't delete or do anything
to your original files. Let's go ahead and open
Lightroom back up. What you can see here is the Lightroom catalog that
I typically work off of. So if you look over here, I have my all raw files
open in the folders window. Instead of just the few photos that we've been using
throughout this tutorial. This is my actual complete
library of photos that is connected to my
external hard drive. So you can see I have close to 10,000 photos on
that hard drive. When you're ready to
transfer your photos from the old locations that you have into the new all
raw files folder. What you can do is come
to import just like you would anytime you want to
import photos into Lightroom. And the next thing
you'll do is locate where you are storing
all of your photos. So in this example, since I already have all of my photos imported
into this system, we can come into this example folder that
I've created for you, which represents all of
your photo locations. So if I click on this
and open this folder up, you can see that I have
several folders filled with just random photos that I've
used for this demonstration. And a lot of these photos
will look familiar to you since we've been using
them throughout the course. Now the key here is to locate where all of your
file folders are. And it doesn't
matter if they're on your computer hard drive or if they're on
an external drive, all you need to do is click on the folder where
they're located. And if you do have
photos in subfolders, you can click on
this button right here to include subfolders. So now you can click
on the parent folder, say if you have a lot
of different folders, organizing your photos and
a lot of different ways. You click on the parent folder. Lightroom will be able
to pull and recognize all of the photos within
those sub-folders. If you have photos in different folders all
over your computer, what you can do is open all of them up in the source window, and you can select
multiple photos by holding Command on a Mac or Control on a PC and clicking the folders
that you want to add. So you can see
there that I added those two folders separately. And I did that by
holding down command, since I'm using a Mac while selecting all of the
folders that I want. And again, that's Command
on a Mac and Control on a PC that will allow you to
select multiple folders. But all of my photos are
in this parent folder. So I'm just going to
select that folder. If you have your photos on
an external hard drive, just make sure that it's
plugged in and you should see the name of your hard
drive appear in the source. So if I open this up, you can see my all
raw files folder is located on my
external hard drive. If I wanted to select this, I can hold down command
since I'm using a Mac and click on that
all raw files folder. And now this folder and this folder are both going
to appear over here, which means that
they are being read by Lightroom and
available to import. In this example, I do not want to import my all raw files. Remember that's a huge
folder with close to 10,000 photos that I
already have imported. So I'm going to de-select that. Next. You want to have all of your
import settings set exactly like I've shown you throughout the previous lessons
in this course. So starting up here, you want to have
this set to copy. And you want this
set to all photos, since you want all
of the photos from here imported into
your new destination. And you'll see that all of these except for the one of my dog, are grayed out because I've already imported
them into light room. It looks like this is the only photo that hasn't
been imported before. And this right here,
if that's checked, that ensures that all
of these photos that have already been imported
will not be imported. Again, since you are doing
this for the first time, all of your photos
should look like this that are not greyed
out and have the checkbox. Because I'm assuming that
you've never done this before. If we come over here to
our import settings, everything is the same as I showed you in the
previous lessons. If you remember
earlier in the course, we created this import setting, which is right down here. If you click down here, we created this raw
file import tutorial. Now, this isn't the import
that I personally use. This one was created for demonstration purposes
for this course. The one I actually use
is the raw file import, which is exactly like
the one I showed you. The only difference is that the destination
folder is different. So I'll click on
this since this is the one that I actually use. And you can see over here
that the destination folder is the all raw files folder
on my external hard drive. If you look up here, you can see all of our raw file Import Presets are all set for our filenames, for our Develop Settings, metadata, everything we
said in previous lessons, and that all should
automatically appear when you select the preset
down here that you created. So we have all of our
import settings set. We have the appropriate
destination folder. What's going to
happen when we import our photos is all
of the photos from your previous locations
are going to be copied and a duplicate is going to be placed on your
external hard drive, all raw files folder. If we go back to
finder right here, and I look at my desk, this is the location that all of the new files are
going to be placed. This folder is the exact
same folder right here. So the final step in this
process is to click Import. And I'm not gonna do this in this demonstration because
I don't want to touch or modify my all raw files folder since I'm showing you
the actual folder that I currently use. So I don't want anything to be touched or
modified with this. So I'm going to click done
and you will click Import. And now all of your
photos should be imported into your new
Lightroom catalog. And remember, if
you want to start all of this over from scratch, you can come up here to File New Catalog and follow the same process that I've shown you throughout
this lesson. And you will see down here, I have all of these
smart collections that I showed you how to create
smart collection lesson. It'll probably take
a little bit of time depending on
how many photos you have for Lightroom to import all of them
into your new catalog. But once you do, you're
ready to start sorting them into these five different
smart collections. And this might take
you some time again, if you have a lot of photos. So here e.g. I. Have close to 10,000
and I have removed all of the metadata just for the
purposes of this course. But at this point, you can start to sort through your photos by rating them
with a 23 or four. Rating them if you
want to reject them. If maybe you want to edit
them and a folder for yes, you want to edit them. If I start to move through these photos giving them
different ratings here. You can see like we
learned previously, that these smart
collections will start to populate once
you start rating them. And once I'm ready
to edit a photo, I can click on this. Yes, ready to edit collection. And I'll see all of the photos
that I do want to edit. And let's say I want
to edit this photo. I will write it as a five by
pressing the number five. Then I will come down to my work collection and
export this photo, just like I showed you before. If we come here, we're ready to export. I'll right-click,
come down to Export, and I will click on
my raw export preset. This will send this file to the location that we've designated for our
exported raw files. If you're a member in our photo storage and
organization file, we have the exported
raw files folder here. So this is where all of
these exported photos, when I'm ready to edit them, they will be exported
into this folder. Again, if this is
confusing to you, go back through the
previous lessons where I walk you through
this step-by-step. And sometimes it takes a
little bit of time to sink in, but if you do it multiple times, it really will start to click
and make sense for you. Let's say now that I have
finished editing this photo, then I will click and drag this photo into my
complete smart collection. I will also remove it
from this collection, the inward collection,
because now I know for sure that I'm completely
done working on it. At this point, I will press
the number zero and it will remove it from this
work smart collection. Now this photo doesn't
have any star ratings, so it won't appear in any
of these smart collections. So I know it's completely
out of my workflow. I do like to keep it here in this complete collection just because I like to keep track of all the raw files
that I've worked on and that's really just a
personal preference of mine. So that is how you
transfer all of your photos from
the old locations, the folders that
they used to be in, perhaps all over your
computer's hard drive and external hard
drives into the all raw files folder that compiles them into
a single location. That's easy to manage, that's easy to backup
and duplicate and can always be sorted through an organized in your
Lightroom catalog, through all of these
smart collections. That about wraps up
the entire system and workflow that I have
from start to finish. Importing photos that I have when I come back
from a photoshoot, all the way to getting
them ready to edit. I hope you've found all this
information useful and can implement at least some of
this into your workflow. And I really hope you
learned a lot from this. And with that, we'll wrap
things up in the next lesson.
14. Conclusion and next steps: Well, that's it for this course. I want to thank you so
much for being here. I hope you got a lot
out of this course. I hope you learned a lot. And if you did, I hope you join me in
some of my other courses. They're all aimed at helping me become a better photographer, especially a better
landscape photographer. If that's the type of
photography that you're into. I'd also love for you to
go check out my website. Ton of free guides, tutorials, online resources that will help you become a
better photographer. I want to thank you
so much again for being here and I hope you continue to learn and
create and explore. And I also hope to see
you back here again soon. So take care for now and
I'll see you next time.
 Meredith Fontana, Landscape photographer & educator