Transcripts
1. Class Trailer: Hey, I'm Laura. I'm a graphic designer and animator based in Belgium, and this Faux 3D animation in After Effects. In this class, I'll be teaching you how to create the illusion of a three-dimensional look inside After Effects using only 2D vector art. Faux 3D is a great tool to have in your arsenal as an animator, because understanding the basics of how to quickly add some depth to an object or a scene can really enhance your animations and bring them to life. Now I personally believe that diving into the deep end right away is the best way to learn animation. In this class I'll be teaching the full 3D technique by walking you through step-by-step how to create this Faux 3D moving car in a fore scene, which is a relatively complex Faux 3D scene to animate. By taking this class and completing the class project, you'll have a pretty thorough understanding of both 3D animation and the techniques that you'll pick up along the way can help you in so many future animation projects. Over the course of this class, you'll not only learn how to take depth in vector animations, but you'll also pick up some cool techniques and tricks along the way, like turning any simple object into a 3D one using just one expression. How to easily create a twinkling night sky. How to quickly animate wavy wind, how to mimic a textured vintage look and lots more. This class is great for anyone who has at least a basic understanding of After Effects. But even if you are a relative beginner, it shouldn't be too difficult for you to follow along because I'll walk you through every step along the way. At the end of this class, you'll have a fully looping Faux 3D car animation. When you finish the class project, be sure to upload it here in the projects and resources section so the other students and I can check out your awesome work. Or if you upload it on Instagram, be sure to tag me. I'd love to see what you've made and I really enjoy showing off my student's work. Whether you're animating info-graphics, making an explainer video, or just want something new for your real. Being able to fake 3D motion is a crucial skill for an animator to know. Let's get into it.
2. What we're making: In this class, I'm going to teach you how to create a full 3D car animation using only a 2D vector illustration. Even better, we're going to achieve all of this using just a few easy techniques. Path animations, position animations, and a simple expression or two. I'll provide the Illustrator file of the car I'll be animating in the resources section of this class. So you can easily follow along what I'm doing with that asset. That's probably the best approach if you're a relative beginner or new to After Effects or animation. But if you really want to push yourself or you're feeling extra creative, feel free to make your own car and see. By taking this class and completing the class project, you'll end up with a fully looping Faux 3D car animation. So when you finish, be sure to export it as a GIF and upload it here in the projects and resources section, so the other students and I can check out your awesome work. Without further ado, let's get creative.
3. What is Faux 3D?: We've all seen 3D animation. Think big animation studio films, the super satisfying GIF loops that come up on your feed, that's a pretty distinct style. But faux 3D isn't like that. Instead, it's the process of faking the depth of an object that's actually just flat or two-dimensional within the realm of 2D animation, like this. Now, adding depth to your 2D animation may seem complex or challenging, but it can often be really straightforward and require just a few keyframes. Let me show you a super simple example to show you just how easy it can be to create some full 3D or 2.5D, if you like, using path animations. But don't worry, if the process seems confusing or unclear at this stage. We're going to be using this technique to animate the car that we're working on, so making animations like this is going to seem really straightforward to you by the end of this class. Here is a simple full 3D animation I made using just a few simple shapes and After Effects. As you can see, the door swings open forward and when it does so, you can see its depth as it comes towards you and shows its sides. Inside After Effects, let me open up my door comp here to show you just how few keyframes an animation like this takes. All it takes is two keyframes for each layer of the door. Really all I did was just adjust the path of each layer, meaning the actual shape of each layer. For the front of the door, for example, when the door is closed here at the beginning of my timeline, it will look like this; but when the door is swung completely open, this part of the door should obviously look different. All I did was set a new path keyframe for the end of the swing when the door is in its open pose by dragging each point of the shape to create that second pose, then I just let After Effects do the magic in-between. As I scrub through my timeline here, you can see After Effects moves each point of the shape from its original pose to its end pose, animating the path of our time between the two keyframes. Then all I did was repeat that same process for the other parts of the door. Then I just add a background color and a rectangle of light behind the door, and for the light leak again, I use that same path animation technique. There you go. That's how easy it can be to use path animations to create some fold depth using just 2D shapes. Path animations are going to be the main technique we'll be using to create our car animation, except we'll be making it slightly more complex object and multiple poses and creating a loop. By the end of this class, creating something like this door animation will seem pretty simple to you. Now, let's move on to what exactly we'll be animating in today's class. In the next lesson, I'm going to show you the car illustration we'll be working with, and what to keep in mind if you want to create a different car illustration of your own to follow along with.
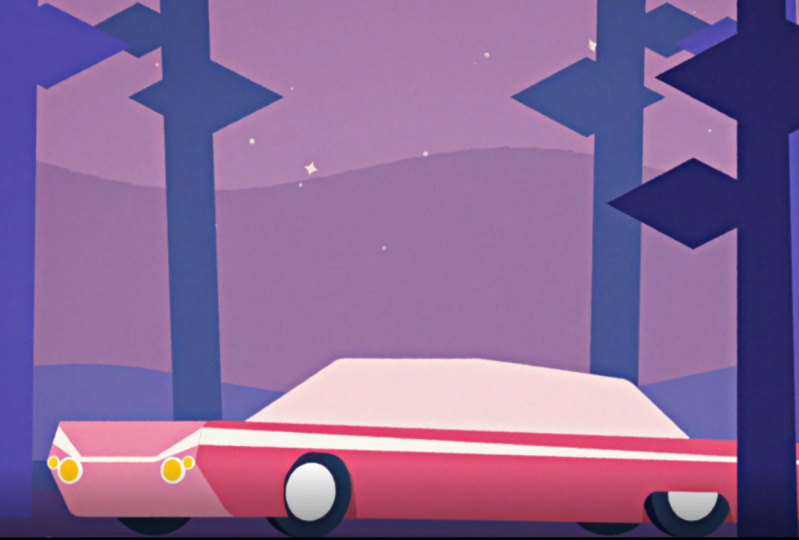
4. Illustration Walkthrough: For today's class, we'll be animating a full 3D car, weaving through some trees. I wanted to go with a retro vibe for this animation so I went mood boarding and created a minimalist hybrid of a few of these vintage cars that I liked. Then I hopped into Illustrator and made this crazy-looking scene. Now, this isn't an Illustrator class, so I won't actually be teaching you how to design this car using Illustrator, but that's all right. If you don't know Illustrator, you can download this car file and use it to follow along this class. You can change the colors of the car and see inside After Effects if you want to personalize it as we're animating the car, or if you do know Illustrator, or you really want to push yourself in this class, feel free to make your own vector car scene in Illustrator. If you do, just be sure to follow the guidelines I'm sending in this lesson while I walk you through this illustration. In my Illustrator file, you can see my car is absolutely refusing to adhere to any rules of perspective. But don't worry, this is part of the process. The reason I illustrated it this way is because I know I want the car to be weaving through a forest. I'll be using path animation techniques like I showed you in the previous lesson, to turn this into a full 3D animation. I drew each of the three parts of the car, front, side and rear. At the widest they'll appear in the animation I'm planning to make. And that's a really important point to keep in mind if you're creating your own car asset or just for future projects. In situations like this, be sure to draw the elements at their largest or most detailed in the asset creation process before moving into After Effects, because scaling elements back when you're animating is a lot easier than scaling them up. Even though it looks odd now, just draw each portion of the car at its largest and trust the process. Another really important tip to keep in mind is to separate the car into all its different layers inside Illustrator. When we import this illustration into After Effects in the next lesson, After Effect is actually going to maintain the layers that we made inside Illustrator. So if you're making your own car, it's really crucial at this stage to separate each element of the scene and car onto its own layer inside Illustrator and name it clearly. If you're following along with my car asset, you can see that I separated every element of the scene onto its own layer. For ease of navigating through it later, I also named each layer of the car to start with the letter C, and beyond that, one of the car's three parts: snout, side, and rear. Now, I'm not really a car person, and in retrospect, I do know that it's not really called the snout of the car, but the point is name layers in a way that's clear to you. If you are following along with my car asset, I'm just going to apologize in advance because I am going to refer to this as the snout of the car. Point is, if you are making your own car, be sure to name your layers clearly in a way that's memorable to you. Another important thing to keep in mind if you're making your own car and scene, simpler and more minimalist, the better. The more detailed your car is, the more time-consuming. If you are designing your own illustration, try and make sure that your layer count doesn't exceed 35 or 40 to follow along with this class. But honestly, the simpler and more minimalist, the better. Be sure to separate the various elements of your scene onto their own layers as well, like the hills, sky, stars. You can see, for example, that I also placed each row of trees onto its own layer. That's how we can animate each row of trees separately. Like I said, though, you can download this Illustrator file in the projects and resources section of this class. Even if you are making your own Illustrator, it's a good idea to go ahead and download mine to get an idea of what elements should be on their own layers. All right, so that's a quick walker of the asset that I'll be working with, and some important tips to keep in mind in case you're making your own car and scene. Now, let's get animating. In this next lesson, I'll teach you how to import the illustrator asset into After Effects. If you're following along with my illustration, be sure to download that now. Or if you're making your own car, be sure that it's complete before moving on to the next lesson.
5. Setup: The first step to starting any animation project is setting up and organizing your workspace. Taking just a few minutes to organize your layers and compositions through naming and color-coding really speeds up your workflow and pays off a lot in the long run. In this lesson, I'll show you how to import an Illustrator file, how to then turn that file into editable shape layers in After Effects, and how to efficiently organize compositions in an After Effects project. Go ahead and open up After Effects and make a new project. Make a new composition here and I'm going to name this one Full Scene. Then make sure that your width and height are set to 1920 by 1080, your frame rate set to 24 frames a second, and your duration is set to four seconds. Then go ahead and hit "Okay". The first thing we're going to do is just some basic organization. Go ahead and make two folders in your project window. Name one Assets, and the other one Comps. We're just going to use those to store our assets and comps. Go ahead and drag Full scene into Comps. Let's save this project really quickly. Go to "File", "Save", and I'm going to name mine Faux3DCar. All right, so now let's go ahead and import that car illustration you made. Come back to your project window, right-click, come down to import, and select "File". Navigate over to wherever you saved your car illustration, select it. Then be sure to select import as Composition with Retain Layer Size selected. Then go ahead and hit "Open". Now let's drag our car into this Full Scene comp that we made earlier. I'm going to double-click this to open it. When I scroll through, I can see all the layers of the scene that we made in Illustrator are separate. But none of them are vector like we want them to be, so come up to the top layer, select it, hold "Shift" and go to the bottom. Select all of them, then right-click, go to Create and select "Create Shapes from Vector Layer". With all of these still selected, drag them up to the top. Now we can just go ahead and delete the old AI layers since we won't actually need them anymore because After Effects made a vector shape of each of those layers for us. Great, so now we've got all of our shapes as vectors in this comp, but it's a pretty messy wall of blue layers. The next thing we're going to do is just go through and organize all of this into much more manageable sections. This is going to take just a couple minutes to do, but I find that spending a few minutes at the beginning of every project to really organize your layers end up speeding up your workflow so much. The first thing I'm going to do to clean this up is make a pre-comp of our car. I'm just going to go through and select all the layers with a C, and then hit "Command" or "Control Shift C" to pre-compose these layers. I'm going to name this one main Car Comp. Now let's drag these assets and compositions into the appropriate folder in our project window, and that's looking nice and organized. Another thing I like to do to keep my projects looking really organized is color-coding layers. I just find that this makes navigating through the project and through a composition so much easier to do. I'm going to select the Main Car Comp I just made, and I'm going to set it to fuchsia, just like the car color. Then I'm going to go through and select some of these background elements and make them purple. I'll probably just leave the traces blue. Then one last nit-picky thing that I like to do is I just like to delete the word outlines. It's something that After Effects adds when you create shapes from vector layers. I just find that it takes up a lot of space on the layer name, and it makes reading it a bit confusing. I'm going to go ahead and really quickly delete the word outlines from each of these layers. Great, that's looking much better and much easier to read. Now let's go into our Main Car Comp and basically do the same thing. The first thing I'm going to do is really quickly just delete the word outlines from each of these layers. I'm actually going to want to make another pre-comp of our car within this composition, because I want to animate the car body and the car wheels differently. I'm going to come up here and I'm going to select the side wheel layers as well as the side interior layers. Those are just the layers at the interior side of the car that you can see behind the wheel. I'm going to drag these all the way down to the bottom with a comp next to the other wheel layers and the shadow layer. Then I'm just going to select all the other layers, and hit "Command" or "Control Shift C" again, to make another pre-comp. I'm going to call this one Car Body Comp. I'm also going to set it to fuchsia. Then I'm going to go ahead and color-code the remaining layers in this comp. Now it doesn't really matter what colors you select here, as long as it's something that's somewhat memorable to you, because the main purpose of color-coding layers is just to make the comps a lot easier to navigate. Great, so this is all set up. Now let's go into this Car Body Comp we made, and again, just color-code these layers into groups. Now that you're all set up and ready to animate, we'll get things moving in the next lesson, where you'll learn how to start blocking out the key poses of your car, and start creating your faux 3D car using only path animations. Let's get into it.
6. Blocking: All right, great. With that done, it's time to move on to blocking. Basically the first thing we're going to do to create our four 3D car is define the key poses for this car through path keyframes. I shot some footage earlier using one of my old toy cars to give myself a little frame of reference to use while I'm animating. Basically it just shows the car moving as if we were weaving through some trees. Now since we want our car to be weaving in a loop, we're going to set three key poses: front, mid, and rear. Then we'll create a loop of that movement by setting these three key poses at 12 key frame intervals. Front, mid, rear, mid, front. As you can see in our reference footage. Essentially, what we'll be doing is editing the paths of the vector shapes of the car at those three points in time and then letting After Effects do the magic in-between those keyframes to make the car look like it's moving between those poses and fake it step. In order to start our blocking, first, let's select all our layers and then come up here and type Path. Now making sure that we're at the start of our timeline, we're going to go through and set keyframes for the path value of each of these layers by clicking the little stopwatch icon right here. Be sure not to skip any since some layers in your animation with multiple elements like this one will have multiple paths. Okay, with that done, it's time to move on to blocking. We're going to start with just the basic shapes of the car. First, let's shy and hide the details. Click the eye here to hide this detail layer and then there's little Kilroy right here to shy the layer. If you don't see that option, just click right down here to toggle between the different switches and modes. Then come up and click this little Kilroy at the top to activate shying. Basically this is going to make the layer invisible in our workspace down here when it's on. Now let's go through and shy and hide all of the detail layers of the car until we're left only with the side of the car, the snout, the trunk, and each of those sections as Windows. All right, cool. That's looking a lot more manageable. Essentially, you want to roughly imitate the reference footage and see how the car behaves and then mimic that motion. You don't have to worry about getting this blocking absolutely perfect on your first try here, and spoiler alert, you probably won't, but that's okay because refining this movement is what the next step is all about. Just make sure at this stage, that you're getting this movement roughly correct. I'm going to start with the side layer. Let's go ahead and hit the circle right here to isolate the side layer so that it's all we can see. Now when we illustrated this car, we illustrated each portion at its widest width, and we know the side panel will be at its widest when it's in the mid position. Let's take this keyframe and drag it to the 12 frame mark. Since we have two main positions in our loop, let's come over to the one second in 12 frame mark and copy the keyframe we have selected using CMD or Ctrl+C to copy and CMD or Ctrl+V to paste it. All right, easy. Those two positions set, so now let's move back to the first frame and make a new path keyframe. When the car is in the front position, we know that the snout will be at its full width and the side is a lot less wide. Let's select the front of the side here and the front wheel well here, and drag it forward a bit to account for the forward facing rotation. We're holding Shift as we're dragging to keep it nice and straight. Not too much, probably about here is good. Then let's bring the rear of the car in to account for the side looking almost a bit compressed in this position. Again, being sure to select the wheel well with it, probably somewhere around here. Now, in my reference footage, you can see that not only does the side panel look as wide, but so do the wheel wells, and the front one almost looks a little bit further back. Let's take the front wheel well and pull it back a tiny bit and then squish it in. I'm just using the points and Bezier handles to smooth all these out of it. We'll do the same thing with the back wheel well to squish it in. I might pull it back just a tiny bit. All right, great. That's looking pretty good. Then since we want our blocking to go front, mid, rear, mid, front, we can duplicate this keyframe with CMD or Ctrl+C and place it right at the two-second mark where we want our loop to end with CMD or Ctrl+V. That way the loop will be seamless because the path positions will be the same at the start and the end. Now we're basically going to do the same thing for the rear position. We know the side of the car is also a bit less wide here, so let's grab the front part and just drag that in, again, with the wheel. Then we'll take the rear and pull that out just a tiny bit to account for the rear rotation. Then just like the front position, let's squish these two wheel wells just a little bit. Then this time let's bring the front wheel well forward and use the Bezier handles to make sure it's smooth at this position. You don't really want to have any of the positions of the path animation looking clunky or not smooth. That's looking all right, so now let's come up to our timeline and grab this handle right here, and drag this back to the two-second mark, so that we can just play back the first two seconds of this comp and see our loop. All right, cool. You might be thinking, wow, that looks weird and you would be right. But don't worry, as we start adding in more of the elements, it'll all start to make a lot more sense visually. Now I'm going to add the side window, so let's click the circle to turn off isolation mode, and that looks pretty insane. But it's fine because we're just going to hide all of our problems for now by hiding all of these layers except for the side and the side window, and we're going to tackle these one at a time. This window should move on the same plane as the side of the car, so we'll use the shape adjustments that we made to the side of the car as the benchmark for the path animation of the side of this window. Just like the side of the car, it's at its full width in the mid position, so let's go ahead and drag this keyframe to the 12 frame mark. Then using CMD or Ctrl+C to copy it and CMD or Ctrl+V to paste it at the second midpoint, at the one second, and 12 frame mark. Now you can see that the back of this window is almost in line with the middle of the rear wheel well, and the front of the window ends roughly about the end of the front wheel well. We'll use those two markers as frames of references to how our window should change in width during the rotation. If you're working on a different car, try to find some points along your car that you can use as a frame of reference as you're going forward. Let's move to the front blocking position. Using those points of reference, I'm going to drag the front of the window forward to write about at the end of the front wheel well, and then I'm going to drag the back to roughly the middle of the back wheel well. Now CMD or Ctrl+C to copy that keyframe. Then let's move to the back of the loop, so the two-second mark and paste it there with CMD or Ctrl+V. Now let's hit the rear blocking right at the one second mark, and again, drag the front and back out to those reference points that we gave ourselves. Now when we play that loop back, it still looks pretty crazy, but in your mind's eye, you can probably already start picturing the rest of the car moving around it in 3D space. Let's quickly repeat the same process for the remaining layers of our basic car. I'm starting with the snout next, so let me unhide that. This now is at its widest in the front positions so that keyframe is great as is. I'm just going to CMD or Ctrl+C to copy that keyframe and place it at the end of the loop, so the two-second mark, with CMD or Ctrl+V. Now at the mid position, this part should really be barely visible at all, so I'm just going to pull this all the way back until just a teeny tiny sliver is visible. I don't want it to be fully gone at this stage because I want to retain that illusion of depth for this frame as well. Just tweaking this curve down here a bit, but yeah, just a small sliver like that is fine. Then let's CMD or Ctrl+C to copy that keyframe and move it to the second mid position at the one second and 12 framework and paste it with CMD or Ctrl+V. Then finally, the rear blocking was just super easy since we want it to be completely invisible here, so just drag it out of sight. One important thing to watch for as you're animating these paths though, is that you want to make sure that each time you're selecting the path points and moving those, and not just selecting the layer and dragging it around because that would actually adjust your position value for this layer and we want to be sure that the only thing we're animating here is the path value. You can tell you're animating the right thing because when you're adjusting a path value without there being a keyframe present, After Effects will automatically place one. If you start moving things around and notice After Effects doesn't have a path keyframe there, you might be moving the wrong thing. As you're looping through this and watching it back, don't be afraid to stop and readjust or tweak points to transition more smoothly. That's the snout all done easy-peasy. Just a few more basic shapes to go. For the trunk of the car, we're basically doing the same thing as the snout. Let's unhide it. Now we know that it's at its widest at the rear, so let's drag this keyframe to the one second mark and bring it out just a tiny bit to account for the rotation. Then moving back to the 12 frame mark, the mid position, let's drag this all the way in until just the teeniest lever is visible. Just being a bit precise here and trying to preserve the shape of the trunk. As you're going through, be sure to maintain the basic integrity of each shape. Don't just necessarily squish everything completely down and hope it sorts itself out correctly. The path animation is basically just telling After Effects where each point along a path should be at different points in time, so the way you manually squish things will affect the way they become unsquished during transitions. But don't worry, you can always tweak and adjust that if you notice the transition is looking awkward as you're going through. Using CMD or Ctrl+C to copy, let's take this keyframe and paste it at the second mid position, at the one second, and 12 frame mark using CMD or Ctrl+V to paste. Then lastly, let's move to the first frame which is at the front position, fully dragging the trunk out of sight behind the rest of the car. Duplicate this keyframe by using CMD or Ctrl+C to copy and pasting it with CMD or Ctrl+V at the two-second mark to complete our loop. That's looking great. Up next, I'm adding in this inner part of the trunk's wing and I'm just moving the path points to match each of the blocking positions of the trunk, being sure that it stays nice and connected throughout. Then I'm just setting a keyframe at each of these blocking positions. Now all that's left is two windows. I'm starting with the rear window here and as you're going through, you're probably noticing that adding an element is getting easier as you're going along because all you have to do is basically just match it to the rest of the car. Here it should be at its widest for the rear position, and then just dragging these points so that the window is barely visible at the midpoint. Then all the way behind the side window for the front position. Again, duplicating these keyframes, so we have a full loop and then finally doing the same thing for the front window. Just moving into place here for the front position. You'll notice that some of these positions shifted a bit. That's because of the change in size of the elements around it. Setting that keyframe and then, again, barely visible at the mid position and invisible at the rear. Again, duplicating these keyframes so that we have our loop. Then just playing it through and tweaking a bit as necessary to get a smooth of a transition as possible. Now when you're looping through it, you should have something like this. If any transitions at this point look odd or wrong, be sure to take a second here to adjust the paths and key positions. But at this point, this is roughly what your current animation should be looking like. Wow, okay, listen. I know that was a really long lesson, but this was definitely the hardest step in animation, so big props for getting through this. It really is all going to get a lot easier from here. Now that we've done all this heavy lifting, let's get this car looking a little cooler by adding in the details.
7. Adding Details: In this lesson, we'll be adding the details of the car to the basic car blocking that we just completed. We'll be using the same technique as the previous lesson, path animations, to adjust the paths of each shape to the different poses of the car and create the illusion that the car has depth. We'll use the basic blocking that we just finished as the jumping off point for adding the paths of the car's details, since it's important that everything stays in the same perspective in order to really maintain that illusion of depth. Let's start adding in the details. Click this [inaudible] at the top here to show all the layers we showed. Now, it's time to start adding them in one by one. We're just going to start right at the top with the side stripe and use the exact same process as the previous lesson, setting three blocking positions at the different intervals of the loop. First hit the eye right here to unhide this layer. Now we know the stripe is at its widest at the midpoint. So let's drag this keyframe right on over to one of the midpoints. Okay, great, and then duplicate it to the other midpoint in our loop using Command or Control C to copy and Command or Control V to paste. That's those two points set. Now let's come back to the front facing pose and drag and adjust here to match the car. Just being careful to roughly maintain the angle of this line. If the car you're working on has angled details like this one, be sure to scrub through your timeline as you're adjusting to make sure that the angle doesn't change much between the different poses. Now just duplicate that front position using Command or Control C to copy and Command or Control V to paste it at the two second mark to complete our loop. Finally the rear pose. Smoothing these points again, always being careful that I'm moving the points on the path, not the position of the layer. As I'm moving through my timeline, this transition doesn't quite look even. It looks like it's wobbling up and down just a bit. So let me come in and adjust the rear pose a tiny bit until the transition's really nice and smooth. Taking the time to adjust your poses at this stage is really important. If you notice the transition is off like mine here, then do be sure to make those tweaks at this stage. That's looking a lot smoother. Now all we're going to do is just go through and unhide these layers one at a time and set them with their different blocking poses, front, mid, rear, mid, front to match the loop of our car blocking. I'm just going to repeat this step for the trunk details next and I'll do the snout details last. Moving on to the trunk line next, starting with the rear and moving that path over a bit to match the rest of the car. Then going ahead and setting path keyframes for all the remaining poses, like we've done with the previous layers, just being sure to match the rest of the car throughout. Looks good. Up next to the trunk lights. Let's unhide these and let's move to the rear blocking position. Here where the trunk is at its widest, and noticing that in my original blocking, I didn't quite leave enough room for the lights on the left-hand side. I'll need to scroll through this comp and find my trunk layer again, just so I have enough room for the lights. Like I said in this step, it's really important not to be hesitant about making tweaks even if it's your basic blocking, because the details are what really help you maintain the shape of your car and create that illusion of depth. They'll help make sure that your car's perspective stays relatively correct. Making sure I'm at the rear pose here, let's move this around to leave enough room for the light. Then I'll need to adjust the rear blocking of the trunk line as well to match this change. Perfect. Now that I have enough room, let's move on to the blocking for the lights. The same principles applies for the other layers. Just making sure that when we're adjusting round elements, we use these Bezier handles to keep the rough integrity of the shape intact. It definitely shouldn't change in height. Basically, we're just turning it from a circle into a flat oval at the midpoints, and then moving the pack behind the car at the front pose. Great. Now let's repeat that exact same process for the other rear light. That's all set. Now let's repeat the same process for the snout details starting with the snout line, just being sure to do the snout lights last because we're actually adding an additional type of depth to that transition. Now, lastly, let's move on to the snout lights starting with the one closest to the camera first. I want these lights to be these vintage lights that stick out. Let's theme the front path keyframes as is, and move to the mid position here and start showing off this depth from the side. I'm going to grab these paths and move the lamps into place. Now the yellow part, the actual light, should be completely flat. Let's do that first. Then like I said, I want the snout light to appear like it's sticking out of the car, not inset. I'm just going to drag the white path shape here to mimic the way this headlight would appear from the side when the car is in this mid position. I'm creating that illusion by turning it into almost a semicircle with a bit of white still sticking out in the front as if that's the rim of the light. Then I'll repeat that exact same process for the little headlight up here. Now just tweak that white path just a little bit more, pulling it even further back into more of a semi oval shape rather than a semicircle. It just looks really connected to the car. Now when I move forward in my timeline, it really looks like this light is gaining depth. Adding in these points in your animation or depth can change or increase really helps sell the idea that this is not just a 2D object, but it really pushes the idea that this is a real 3D object moving in 3D space. Now if you're working on a different car than mine and you can't achieve this effect through the headlights, try to find another point in your animation where you can change the depth of an object in relation to the car's motion. Maybe something like a tire stuck to the back of the car. Adding in details like this really helps bring a lot of life to your animation and really sells that full 3D effect. Now for the rear blocking pose, let's just move these paths behind the car. Again, always being sure we're only adjusting the path values here and never the position values. Then sticking to the same principle, I want to switch the light path in a bit here so that when it's transitioning between the rear pose and the mid pose, it looks like it's gaining depth. That's really going to help enhance that 3D effect. Then just duplicate the mid and front poses, move them into their positions on the loop, and then play it for a few times and adjust the poses slightly if any transitions don't look smooth. Great. Now let's duplicate that process for the other light. If you need to adjust the front blocking position of the snout here a bit, if you didn't quite leave enough room, go ahead and do that now. If you do, be sure to duplicate the now adjusted keyframe of the snout blocking pose to the second front position at the two second mark to keep your loop seamless. Now if you're going through and noticing that some details are bumping into each other, be sure to adjust them. Like right here, this stripe is bumping into the light, which it shouldn't be. I'm just going to go ahead and adjust its poses a bit so that the two elements don't clash in the transition. It's important though, to not add any additional key frames in-between these poses. Just tweak these existing blocking poses until you no longer see the issue. Awesome. That's looking really great. If you've been following along with your own car animation this far, way to go. Check out this awesome progress you've made. Now that you've done all this nitty-gritty work, Let's go ahead and complete the car by adding in the wheels.
8. Completing the Car: Now that we have the car body and its details all blocked out, it's time to start finishing up the car by adding in the wheels. In this lesson, we'll set up some blocking for the remaining parts of the car and talk about how to easily hide unwanted edges or elements using a simple mask. First off, let's close this comp and go back into our main car comp. Everything here is pretty offset as you can see. Let's go through and match each of these items to the blocking that we've set up for the car. First off, since our car animation is on a two second loop. I'm going to make this composition shorter by right-clicking down here, selecting composition settings. Then just changing the length of the comp to two seconds and hitting "Enter". Great, so now this comp is the right length. Let's go through and set the blocking for these remaining elements. First, let's hide everything except for our car body comp and the two-side interior layers using the eye icons right here. At this point, I think you know the drill, a pretty straightforward path animation is what we're going to be doing here. Select both of these layers, come up here and type path. Being sure we're at the start of our timeline, set a path keyframe for each layer by clicking the stopwatch icon and then go through and match these layers to the blocking of the car at the different poses. With both of these done, let's start adding in the wheels behind the car. Unhide these back wheel layers. This time we're actually going to adjust the position values instead of animating the path. Hit P on your keyboard to bring up the position values. Then in each layer right-click the position value and select Separate Dimensions, which splits up the x position and the y position of the layer. We're actually only going to be animating the x position. Making sure that we're at the start of our timeline. Click the stopwatch icon to set a keyframe for each wheels x position only, and then hit U on your keyboard, so we can see the layers keyframes. Now let's set the blocking for these wheels. On the front blocking the forward wheel looks pretty much like it's in the right spot, but the rear wheel is definitely too far back. Let's bring that forward to a little bit in front of this wheel well here, so that it lines up in terms of perspective. Now, let's move to the 12th framework and set the mid blocking. Aligning the wheels is pretty straightforward this time since they should literally just line up with the wheel wells. Lastly, moving to the one second mark to set the position blacking here. Again, keeping this perspective in mind, let's drag this front-wheel to just a bit behind the front wheel well. That there looks right. Let's pull the back wheel to behind the rear wheel well too. Now let's get to the one second and 12 framework and duplicate both of these layers x position values, using Command or Control C to copy and Command or Control V to paste. We have to duplicate them one layer at a time though, because after effects unfortunately won't let you copy and paste keyframes for multiple layers at once. Then we'll do the same thing for the front pose by copying its keyframes and setting them with the two second mark to complete our loop. Now if you're working on a low car like mine and you notice that your wheels sticking out over your car anywhere like mine does right here, you can hide that with a simple mask. With the wheel that's sticking out selected, go ahead and hit Command or Control Shift N to add a new layer mask. Then just use your mouse to drag the mask down a bit, so the wheels are no longer sticking out of your car. This masks also going to move right along with your layers position, so there's no need to adjust at any of the other poses. It's just going to sink right up with the rest of the blocking of your car. Now we're actually going to do something slightly different for the front wheels, since they're a lot more visible and prominent, we're going to add a bit of depth to them because as you can see, as I'm moving them into position here, they just look too flat as is. First off, let's go ahead and delete the front tire. Then select the rear wheel layer and pre-comp it using Command or Control shift C. I'm going to name it 3D wheel rear. Now hit Command or Control D to duplicate this pre-comp and rename it 3D wheel front, and drag that roughly into place as well. Now that we have most of our car completed, we just need to add in the wheels on the side of the car. Like I said, I want these to have a little bit more depth than the rear wheels. In this next lesson, I'm going to show you one of my favorite tricks to create a super easy full 3D shape using just one little expression. We'll use that expression to create the illusion of 3D wheels to really push the full 3D look of the car up another level. Let's get into it.
9. Easy "3D" wheels: Okay. Super easy 3D wheels. Let's get into it. This is actually one of my favorite ways to get a super fast and easy 3D effect for simple shapes. Knowing this one expression, can come in handy in so many future projects where you want to add a 3D element. It'll let you easily make cool stuff like this. First off, let's set the positions for these wheels like we did with the other wheels. Select both of your wheel layers here and hit "P" on your keyboard to bring up their position values. Then right-click each layer's position value and select Separate Dimensions. Now making sure you're at the start of your timeline, click the stopwatch icon and set an exposition keyframe for each wheel. Then, as before, just go through and set the exposition for these wheels at the different blocking poses. This is pretty much super quick and easy to do, since all you really have to do is follow the wheel wells. Now that that's all lined up, let's go ahead and turn these wheels into 3D objects. Double-click one of the wheel comps. I'm opening the rear wheel, but since they're technically the same competence with different names, it doesn't actually matter which one you open, since whatever changes you do to one will immediately be applied to the other. In this comp we can see our wheel and we just zoom in here. The first thing we're going to do is select the wheel layer and turn it into a 3D layer by clicking this cube right here. If you don't see that just toggle switches and modes down below. Now we can see from these colored arrows that it's turned into a 3D layer. Just to show you when I rotate the y-axis, you can see that my tire is now 3D, but since it's just a 2D illustration, it's just super flat. But what I want is to show some depth in the tires when the car is turning, to again really sell that idea that this is a 3D car. What we're going to do here is use this really sneaky expression to create some full depth. First off, let's duplicate this layer using Command or Control D, and rename it Wheel Depth. Then set it to a different layer color, and drag it below the original wheel layer. Then hit P on your keyboard to bring up the position value for this layer. Holding Alt or Option on your keyboard, click the stopwatch icon right here. What this is going to do is bring up a text box inside this layer that we can type expressions into. Let's click this text box and type, value+, open brackets, 0, 0, index, close brackets. Basically what this expression does is tell After Effects that the depth position of this layer, should be the same as its index number, which is basically this layer number on the left, right here. But instead of telling you what it does, we are not going to show you. First, we're going to parent this wheel depth layer to the original wheel layer, by clicking and dragging the spiral right here. Then let's rotate the original wheel layer a bit, so you can see the depth of the wheel, around negative 60 maybe. Now select the wheel depth layer and just keep hitting Command or Control D a few times, and watch the magic happen. As you can see, every new duplicate of this layer is adding a new layer of depth to this wheel, because the expression we wrote is telling After Effects to offset each layer's position, in accordance with this layer number. The more times you duplicate this layer, the thicker the wheel will get. Pretty cool right? Now keep duplicating the wheel depth layer until you're happy with the thickness. I'm going to do about 30 times, but depending on the car type you're working on or the effect you're going for, you can do more or less. It's really up to you. Now select all the wheel depth layers and click the Fill box up in your toolbar here, and set them to a value that's just a bit darker than the original wheel. This is really going to again help us emphasize the depth of the wheel. All right, cool. Now that we've got some super easy 3D wheel depth, we want to rotate the wheel of this car at different amounts at the different blocking poses. But that's pretty hard to do if we can't see the original blocking. Let's come back into our main car comp, and right-click just off to the side here, then come over to New and select Viewer. This is going to make a new viewer of this comp so we can always be looking at it, even if we're working in a different comp. It's a super convenient tool that comes in handy a lot. Now, when we move back into our 3D wheel comp, when we go through our timeline, we'll see where the main car comp is at, at the same point in time. That's going to make setting this blocking super-easy. Since the depth is parented to this top layer, all we have to do is block this wheel, and set the Y rotation at different points in time. At zero seconds, the front position, I want it to be facing forward and really showing off its depth. I'll set this keyframe to the Y rotation, negative 31. Then I'm moving forward to the mid position at 12 frames where I want this to be completely flat, as if the car is just moving straightforward. I'll set it to zero. Then lastly, the rear pose at the one-second mark, should basically just be the opposite of the front pose so let's set this to positive 30. Then, again, just duplicate those mid-in front positions to their second spots in the loop at one second and 12 frames and two seconds. That just like our car blocking our tire rotation loop seamlessly. Now let's close up this comp in Viewer and play through our main car comp again, to see how it looks with wheels. All right, that's looking really great, awesome. You can see how just that one expression and the simple little detail of adding a bit of depth to the tire, really is adding another layer of believability to this car being 3D. Now the very last part of our car we have to animate is its shadow. At this point, I think you know the drill, but basically select the shadow layer, type path, and set a path keyframe at the beginning of our timeline, and then again, just match the shape of the shadow to the shape of the car at the different blocking points. All right, so there you go. A super quick and easy method for giving the illusion of 3D depth to any simple object. This expression is a great one to come back to anytime your future projects might require a bit of 3D depth. Overall this car is looking pretty good, but the movement of the car is still awkward and jolty, not really smooth like an actual car moving through the trees would be. In the next lesson, what we're going to do is smooth out this action and make it more realistic, with some really simple easing adjustments. Let me show you how to do that.
10. Easing: The actual blocking of this car is looking really nice and the car starting to look pretty 3D. But as you can see, the movement is pretty awkward. A real car moving through the trees would be looping a lot more smoothly than this. Another important way to enhance your 3D animation is making sure that all your motion is as smooth and close to realistic as possible. The way we're going to do that here is just with some super-simple easing and a little bit of tweaking in the graph editor. Some of you might not be too excited about going into the graph editor, but don't worry, we're going in together and I promise it'll be super easy. Go into your car body comp, select all the layers, and then hit U on your keyboard to bring up all your keyframes. Now we want the motion of this car to be a bit smoother. What we're going to do is apply some easing to the front and rear positions, but leave the mid positions as linear because that's essentially just an in-between pose between the rear and front-facing poses, so we don't want the path animation to slow down there. Holding Shift, we're going to select all the keyframes at the zero-second mark, the one-second mark, and the two-second mark, aka the front, rear, and front pose keyframes. Now with all of them still selected, right-click one of those selected keyframes, come down to keyframe assistant, and select Easy Ease. Now when we hit the spacebar and play this through, the car motion is looking a lot smoother already, especially at those points. To put it really simply, the difference between a linear keyframe and an ease keyframe is that in a linear keyframe, if you had something changing from 0-100 across 10 frames, it will change 10 percent per frame without any deviation from that and basically just transition in a linear way. But eased keyframes are not linear, meaning that the speed of the change can vary, generally starting off a bit slower, then speeding up and slowing again at the end. Essentially it allows you to adjust the speed ramp of any values you're working on. I've just got the standard Easy Ease applied here and it looks pretty good. But I do want to adjust this easing slightly. By that, I mean just adjusting that speed ramp. With all of these keyframes still selected, come up here and open up the graph editor. Now I don't want this car to slow down quite this much at the front and rear poses, so all I'm going to do is grab this bezier handle here and drag it out to affect the influence, but not too much. I just want a really subtle change, about 35 percent. Since all of those keyframes are still selected, that's adjusted the right bezier handles at all three of those points in time, and now I'm going to do the same thing for the left bezier handle. Just come on over to the one-second mark here and dragging this handle to about 35 percent, being sure to keep that nice and straight. Like I said, since everything still selected, you can see when I'm dragging that it's affecting the other left bezier handle as well. Now your speed graph should look something like this, and you can see when we play through this motion now that it's looking a lot better and the car really isn't slowing down so aggressively at those points in time. Now, all we're going to do is the exact same thing for the other comps that we've made. Let's go back into our main car comp, select all these layers, and hit U on the keyboard to bring up the keyframes. Hold Shift to select the keyframes at the zero-second mark, the one-second mark, and the two-second mark. Then right-clicking and easy easing them. With all of them still selected, just barely dragging the right and left bezier handles out to about 35 percent influence. Lastly, let's not forget the car wheels. Go into one of the 3D comps remembering that they're the same comps, so we only need to do this adjustment in one of them. Inside this comp, we only animated these few keyframes right here. Holding Shift, select the keyframes at zero seconds, one second, and two seconds. Right-click and easy ease them. Open up the graph editor and again, drag these two bezier handles out just a tiny bit to 35 percent. That looks good. Let's close this comp and playback our main car comp. That's actually made a really big difference compared to where we started from, and it really adds that additional layer of believability and slight realism that's going to help us strengthen our 3D effect. Right only one more quick step to go to finish up the animation of the car, and then we can move on to adding in the background. Next, I'm going to add some subtle secondary motion to this car to add just that little more personality to this animation. Basically, we're going to push that realistic movement or after to the next level with one little expression in a simple rotation adjustment. Let's get into it.
11. Adding Realistic Movement: Now let's take this motion up another level by adding a couple of realistic movements to this car. We're going to be adding an engine rumble with a super-simple expression and emphasize the car's weaving with a lean into the turn for a quick rotation adjustment. Adding a couple of little realistic movements like this can really add a lot of life, personality, and believability to your animations. First let's use the spiral tool here and click and drag it to parent both of these interior side layers to the car body comp. Since they're part of the car body and we're going to be adding a bit of movement to the car body comp. We want to make sure that the interior side layers are equally affected. Now if we add any additional animations to the car body in this comp, the interior side layers will mimic that. We don't want to add this parenting to any of the wheels though, because just like in real life, due to the suspension of the car, the wheels themselves shouldn't be affected by the slight bouncing of the car body. Now go ahead and select the car body comp and hit P to bring up the position value and then since we only want it to bounce up and down, right-click and separate the dimensions because the only position we're going to be adjusting is the Y position. Alter Option, click on the stopwatch here to bring up the expression text box. Inside this, we're going to add a super-simple wiggle expression. So go ahead and type wiggle(10, 2). Basically the wiggle expression just tells After Effects how many times to wiggle per second, that's the first number in the parentheses and how large the wheel should be, that's the second number. If you really wanted to emphasize this effect, like if the car is driving over super bumpy road, for example, you could set that second number to something like five and get something like this. But that's a bit too extreme for me in the animation I'm going for, so I'm going to set mine back to 10 and two. Now when we play this through, we can see our car wiggling a bit from maybe the engine rumbling or the road it's on. Adding in these little animated details really enhances your storytelling and again, adds that layer of believability and realism that we're after. Now the very last thing we have to do to this car is add little lean into this turn. Let's select the car and come back into the beginning of our timeline and hit R on our keyboard to bring up the rotation value. First off, let's adjust this car's anchor point, hit Y on your keyboard to bring up the anchor point tool and then drag it over to roughly somewhere around the back wheel, because we're going to be doing a little back lean. The anchor point is just the point of a layer that all transformations are centered on. For example, if the anchor point was located in the middle of car, it would rotate like this and if you move the anchor point to somewhere else, it'll rotate around that point. Now I actually only want it to be leaning into the turn on the rear pose. So let's go ahead and make a key frame at the 12 frame mid pose. For the rotation value, we'll say set at zero because it's not turning and then move up in your timeline to the rear pose at the one second mark, where we're just going to add a tiny rotation by setting it to one. Nothing too extreme, just a really subtle dip as if it's leaning into that turn. Then using Command or Control C to copy and Command or Control V to paste, go ahead and duplicate that first midpoint key frame at the 12 framework to the second mid pose at the one second and 12 framework. Now the rotational value should go 0, 1, 0. Then lastly, we just want to smooth this rotation out a tiny bit, so go ahead and select the rear key frame at the one second mark. Right-click it and choose Easy Ease, and there you have it. A super quick and easy way to add a little more life to a car animation. As you can see, the two tiny tweaks would have really add a little bit of realism to this car and that's a great thing to push for anytime you're making a full 3D animation. Because adding in lots of little details like this really end up adding up in the end. That's basically it for animating the car. Now we're going to bring this animation into our forest scene and start putting everything together.
12. Building the Scene: Now it's time to start putting everything together and build out the scene. In this lesson, we will talk about faking depth through speed by animating the movement of all the rows of trees in this forest scene. First off, let's close this comp and open. It looks like I didn't organize this comp properly. Let's drag this out of the assets folder up here, back into comps and rename it car_with_surroundings. Much better. The first thing you'll notice playing through this comp is that the car disappears halfway through. That's because our car animation comp is only two seconds long in this scene. Comp's four second long. So first things first, let's loop this comp. Right-click it, go to time. So let's enable time remapping. Then holding alt or option on your keyboard, click the stopwatch to bring up the expression text box and type loop out, open parenthesis, apostrophe, cycle, apostrophe, close parenthesis, semicolon. So now it's looping. But if you're playing this back in me are noticing that all or part of your car disappears for one frame on the looping point. Don't worry. That's just one of the after-effects of spicy little bugs. To get rid of that issue, just come on over to one frame before the last key frame. That's the one second and 23 framework and click here to add a keyframe. Then delete the original last keyframe and move your new frame to that spot, AKA, the two second mark. Now when you play through it, you should have a perfect loop. Cool. So that's the loop all taken care of. We're going to be animating these trees, moving across the screen from left to right to make it seem like we're tracking this car weaving through the forest. Now as we start setting the speeds of these trees moving across the screen, it's important to know that objects closer to the camera move faster than objects further away. As we're going through and animating these trees, remember that every row of trees needs to be moving faster than the row of trees behind it, if you want to maintain that realistic sense of depth. First off, let's hide a few of these background layers so we can see our tree animation more clearly. So hide them by clicking the I icon up here, and then shy them by clicking the little calories and activating shying up here. Now let's start animating the trees. We're going to start with the trees closest to the camera. Those are the ones that'll be moving fastest. So select the layer of trees closest to camera, which for us is this top layer right here and then hit command or control shift c to pre-compose this layer. Rename it closest trees, change the layer color and double-click it to open it up. Let's start setting the motion of these trees across the screen. With the trees layer selected, hit P on your keyboard to bring up the position value. Then right-click it to separate those dimensions and let's shorten the length of this layer. I want these trees to move across the screen pretty quickly. So I'll crop this layer by dragging it back to the one second mark. These trees are actually looking a bit too close together for my liking. I'm actually going to select the right one here by double-clicking on it and then holding shift to select its two little leafy areas and I'm just going to drag it over to the right of it. Then making sure that we're at the start of our timeline. Let's drag our trees completely off screen on the left and click the stopwatch to add a keyframe at this exposition. Then let's move up to the one second position and let's actually make this layer one frame longer, so we can see what we're doing. Like I said, I want my trees to move across the screen in one second. At this point in time, the trees should be completely off screen again, but this time on the right-hand side. Let's grab our trees and drag them right until they're all the way off screen. Just like that. I want to create the idea that we're moving through a forest. I don't want these trees to only Chromecast screen once in the four second comp. We're essentially going to fill up this for second comp with duplicates of the animation we just made. Command or control D to duplicate this layer and then just drag it forward in the timeline until somewhere maybe a few frames before the end of this layer. Now be sure not to pull up all the way to the end of the other layer because you want to make sure there's always trees on screen and then just scrub through to see if you like the spacing. If you don't, just adjust the layer placement in your timeline. That looks pretty good to me. Now we're just going to repeat this step until our comp is full of trees. But be sure not to just repeat this exact spacing between layers. You want it to be slightly offset each time to mimic the organic nature of random tree spacing in a forest. Now my comp is full of trees, but it doesn't loop seamlessly here. In order to do that, select this last layer we made here, which should extend at least a few frames past the four second mark. Select it and hit command or control d to duplicate it and then just crop the layer back all the way to the four second mark, but don't drag it. Can you tell your cropping not dragging? If your cursor changes to a line with a tiny arrow at each end, and then just select it and drag it to the very beginning of the timeline. Now we have the timeline starting at the same place. We trim this layer, which makes it a seamless loop. Now let's close this comp and playback our car_with_surroundings comp. Let's just click the I here to hide the other tree, so we can see this one more clearly. Cool. That looks great. Now we're just going to do the exact same thing for the other few rows of trees, bearing in mind the principle that we talked about earlier, that objects closer to the camera should move faster than those that are further away. The next row of trees is the tree the car weaves behind. So command or control c to pre-comp this layer, rename it, and double-click it to open it up. We know that this row of trees, which is further back, needs to move slightly slower than the row in front of it. Let's crop the length of this layer back to 27 frames. Then hit P on the keyboard to bring up the position values. Right-click it to separate the dimensions and set a keyframe at the 26 second mark for the exposition. Now drag the tree completely off screen on the right and let me just turn my layer controls background. Now drag the tree completely off screen to the right. Then move up to the zero second mark and drag the tree all the way off screen to the left. Now this tree moves across screen in 26 seconds, which is slightly slower than the row in front of it. But this time, instead of filling this composition with trees, right-click inside the comp, open the composition settings and change the duration to two seconds, then close it out and go back into the car_with_surroundings comp. This is actually the tree the car weeds behind. So we want to control the amount of times this is present in our composition. Basically, we'll want to time its movement with the movement of the car. When the car is at its mid blocking position, that's when it should be passing behind that tree. Let's move our time indicator to the one second and 12 frame mark and drag this layer over, so that at this moment the car is passing behind the tree. Since our car animation loops twice inside this composition, we'll need to do this one more time. So let's hit command or control D to duplicate this layer and move the time indicator to the three second and 12 frame mark and drag this new tree over, so that the car is also passing directly behind this tree as well. That looks good. Now you might be thinking, wait a minute, this car is moving weirdly in relation to the trees. But don't worry, we're going to tackle that depth in the next lesson. But we still have a few rows of trees to go. For now, let's repeat the same steps as the first row of trees for the remaining two rows of trees with just slight adjustments to the length to make sure we're sticking to the rule that object's closer to the camera move more quickly than objects further away. Since watching me do this is probably pretty boring, I'm just going to repeat those steps while fast-forwarding a bit. For the next row of trees, pre-comp the layer, hit P to bring up the position, separate dimensions, set the exposition movement of the trees across screen to a length of 28 frames this time, AKA, one second and four frames. Fill up the composition with duplicates of this layer. Duplicate the topmost last layer, crop it back to the four second mark, and drag this crop layer to the front of your timeline to set your loop. Now once more with feeling for the last row of trees, which should be the slowest because it's furthest away from the camera. Pre-comp the layer, hit P to bring up the position, separate the dimensions, set the exposition movement of the trees across screen to a length of 36 frames, AKA one second and 12 frames. Fill up the composition with duplicates of this layer. Duplicate the topmost last layer, crop it back to the four second mark, and drag this crop version to the front of your timeline to set your loop. Cool, there you go. It's all starting to come together. But the car looks like it's not moving correctly through the scene because it doesn't look like it has a lot of depth in its movement. In the next lesson, I'm going to show you how to easily fake that depth with a simple scale and position adjustment. Let's check it out.
13. Car Depth: Now, our forest scene is really starting to come together, but right now, the car movement isn't matching the depth of the scene. If the car was really swerving through these trees, it would also need to be getting closer and further from the camera, which will mean getting slightly bigger and smaller. Let's set up some final blocking in this 3D forest space, by adjusting the car scale and position in the composition. Basically, we're going to adjust the movement of the looping car comp inside the scene. Hit "Y" on your keyboard to bring up the Anchor Point tool, and let's move the anchor point to roughly the center of the car. Now we know the car is actually going to be at its largest and smallest points when it's in the mid blocking positions, so that's where we're going to want to put our two keyframes to adjust the scale and position of the car. We'll use the Stopwatch icon on the left to set a position and scale keyframe at the 12 second mark. When the car is at this mid position, is when we know it's at its biggest, so we want it to be a bit larger here. I'm want to make mine about 116 percent. Oop, typo, That's a bit too big there. There we go, 116 percent, but at the same time, we also want the car to hang back a little, to give this idea that it's pivoting and getting ready to spin away, like it's rounding a bend. Let's just drag the exposition of this car back not too much, just about here. Now, let's move to the other extreme. At the one second and 12 frame mark, is the other mid position, and that's when it's passing behind this tree, so the car should be at its smallest. Let's add a smaller scale here. I'm going to set mine to 90 percent, but we also don't want the car this far back. We actually want it to come forward a good amount to show this forward momentum and mimic a forward pivot because the next blocking position, is the front-facing pose. Let's drag this X position out here just a bit and now, I'm scrubbing through this and you can see it's starting to look a lot more realistic. Depending on if you're working on a different car or made some changes to the scene, you might have to tweak these actual scaling percentages and position values, but basically, try to get something that looks like this. If you're watching through this and you're thinking, "That doesn't look quite right," really trust your gut there and try tweaking this until you get something that looks good to you. Now we have to duplicate all these keyframes because this car loop plays twice, and then we'll drag them forward in the timeline to line up with the midpoints of the second play-through. That's the two seconds and 12 framework and the three second and 12 frame mark. Now, playing this back, it's looking pretty good, but the only issue is that it doesn't loop correctly. The issue is that after the last keyframe and to the end of the comp, there's no additional keyframes there, so our scale and position stays static, and the same issue, but in reverse, is happening at the front of the timeline. We need to input keyframes at the very end of this composition and the very beginning of his composition, to make sure our car continues to transition between these scaling points correctly. Let's come over to the two second mark here and place a scale and position keyframe. Because our current animation is a two second loop, these keyframes now contain the values that should be present at the beginning and end of our comp to make it seamless. We'll command our Control C to copy these keyframes and paste them at the zero second mark and the four second mark. Great. There you go. Now you've created a seamless loop and the car is moving in a much more realistic way through these trees. We're just going to add a little bit of easing to some of these keyframes though, because I think that'll make the motion just a bit smoother. Holding "Shift", let's select all the keyframes except those at the zero second mark, the two second mark, and the four second mark. Those should stay linear since they're the starts and ends of loops, so we don't want their speed to ramp or change. Right-click those selected keyframes, come down to the Keyframe Assistant, and select "Easy Ease". That's looking really good. I actually think this car's weaving would be more convincing if we're weaving in front of some trees as well, instead of just behind them. I'm actually going to duplicate one of these passing tree layers here using Command or Control D. Just quickly rename this, and let's drag this tree layer to line up with the other midpoint in our car blocking. Coming back to the 12th framework here, so that placement's looking good, except you can see it's a bit too low. Let's drag it up just a scotch until it's no longer below the shadow. There. That's much better. Now, let's duplicate this trees in Command or Control D, and bring it to the other first midpoint, the one in the second loop through that is, and that's at the two second and 12 frame mark. Then just making sure that tree lines up as well. Let's play that back again. Nice. check that out. It's definitely looking a lot better with that additional tree to slowing around. It's really selling the motion of the car. We're almost done. The only thing the scene could still use, is just a little bit of background animation to really bring it to life. In this next lesson, I'm going show you a really neat trick to make stars twinkle, as well as a super easy way to add in some wavy wind.
14. Background Animation: The very last thing we need to add to this animation before we're ready to wrap it up with some effects, is animating in some details. Adding in just a bit of background animation can really spice up your scenes and bring everything to life. Let's talk about some quick and easy effects to animate the wind and the stars. First we'll have to go ahead and untry and unhide these detail layers. For the wind I'm going to untry my wind shape, I made an illustrator and actually just delete it, since I was just using it as a place holder. Then let's come up to Layer, New, and select "New Shape Layer" and then drag it below the Hills layer and rename it Wind. We're going to add a new shape in here, but first let's make sure we have the right color selected. Click on the fill color and then select the eyedropper tool here, and click on the Hill layer to copy its color. Next, come into to your toolbar and select the rectangle tool. Then draw a nice big rectangle like this, covering a pretty big amount of the background. Now we'll set the blend mode to multiply. Remember, if you don't see blend modes, just click the toggle which in modes down below and then hit T on your keyboard to bring up the opacity. Let's reduce that down to about 20 percent. That's pretty close to the color we're looking for and nothing too intense, just something a bit late in breezy. Now, to create that breezy wind look, we're going to be using the wave warp effect. With the wind layer selected, go into the effects panel and select "Wave Warp" and drag it onto your layer. When we play through this layer now, we've got the short sine wave that's not very fun or windy looking, so we'll need to adjust this effect a bit. Come up into your effects panel on the left and let's start adjusting these settings. We want the wind to be really big and swoopy, so let's set the wave height to about 50 and make the width really big, around 600. That's already looking a lot breezier, but it's still pretty repetitive looking and I want it to look a bit more natural and uneven. We're going to duplicate the wave warp effect up here by selecting it and hitting Command or Control D. Then let's make the settings for the top effect even bigger. Let's set the height to 100 and the width to something crazy big, and I'm also actually going to change the speed this time to something a bit slower, like 0, 5, so it's offset from the other wave warp effect. Now when we play it through, it's looking a lot more organic, almost like it's coming in gusts, but do feel free to play around with these values until you find something you like. For example, if you want a less extreme height shift, try setting the top wave warp height to 75. That actually looks nice, I think I'm just going to leave that. The last step is twinkling stars. I'm going to show you a pretty neat trick to get some really quick but great looking twinkling. First off, let's pre-cut the stars layer using Command or Control Shift C, then double-click the layer to open it. Inside this comp, we can see all our stars, but they're kind of boring and static. Hit Command or Control Y on your keyboard to create a new solid layer and name it Fractal Noise, and make sure that it's above your stars layer. Come over to the effects panel and type fractal noise, and then drag that effect onto this new layer. You can see it creates this crazy cloud shape all over your composition, but when we play it through, we can see that it's static, it's not moving. First thing we have to animate this, so grab your time indicator and come back to the beginning of your timeline. Up in the effect controls panel, let's bring that contrasts way up to 700, leave the brightness at zero, and change the complexity to five. Now, to get this moving, we need to set some evolution values. Click the stopwatch next to Evolution here and then hit U on your keyboard to see all your key frames. That's like your time indicator, and come all the way to the end of the timeline, and then set another evolution key frame here, but this time change the value from zero to two, and drag that key frame all the way to the end of your comp. Now when we play through, we see this cool animated cloudy effect, except it's not looping yet, so toggle down the arrow by the Evolution Options and select "Cycle Evolutions". Here, you can also adjust the slider to increase the number of evolutions per cycle, if you want the stars to twinkle faster. You might be looking at this and going, "This is very Clouds, and I thought we were going to twinkle stars." Yes, that's actually a good point. Let me show you what I mean. Come on down to your stars layer here and select "Luma Matte". Basically a luma matte, under this animated fractal noise layer, means only the space is covered by the white areas of the fractal noise are visible and since we animated that fractal noise layer to move and shift the black and white values around, that's what's making this twinkling star effect. Pretty cool. Look at that. Twinkling stars in less than a minute, in a super easy breezy wind, each created with just one effect. So adding in some minor background animation like this can really liven up your scenes and bring another layer of realism to your animations. If you've been following along with your own project and gotten this far, awesome job, you've just finished all the animation for this project, now the only thing we're still going to do is add in just a few layers of effects to really stylize the scene and then we'll be all done.
15. Final Touches: Look at us, in the final lesson. Who would have that? In this lesson we're going to be adding a couple of effects, which is a great way to texture an animation or create a super stylized look. Now a lot of this lesson is personal preference, so feel free to really play around with the values of each of these effects and create something that you like. Let's close this comp and move into the first comp we made the full scene comp. Then hit "Command Option Y" or "Control Alt Y" on a PC to add in a new adjustment layer. Then rename it Turbulent Displace. Come over to the Effects panel and type Turbulent Displace, and then add this to the new adjustment layer. This effect is actually one of my favorite ways to add some texture to an animation when it's a little bit more toned down than this. Come up into your effects window over here and change the amount to 20 and the size to two. Now you get this nice gray edge to the objects in your scene, and I really love how that looks. Let's add another adjustment layer on top of this one using Command Option Y or Control Alt Y on a PC, and name this adjustment layer Noise. Then let's find the Noise effect in our Effects panel and add it to this layer. I just want to add a little bit of grit to this animation, but not too much. Let's set the amount to something pretty low, about eight percent. Then sticking to the theme with this retro vibe of the car, let's add a vignette. We're going to add another adjustment layer on top of this one using Command Option Y or Control Alt Y on a PC and name this layer Vignette. Now look for the effect curves in the effects panel and apply it to this layer. I want my vignette to be a bit darker than the rest of the animation, so I'm just going to lightly drag this curve down a little bit in the middle, not too much, just about there. Then I'm going to select the oval tool in the toolbar and draw an oval over this comp. Now the uncovered edges are actually going to be where the vignette ends up. Just tweak the shape a little bit until you get a vignette shape that you like. Something like this, and now we just need to invert this so that the curves effect is being applied outside of this oval instead of inside it. Come over here on the left and change this mask to Subtract. All right, and there you go. Except the vignette now is pretty harsh and we want it to blend into our comp instead of having these hard edges. Toggle down the arrow next to the mask and increase the mask feathering to something really big around 200 pixels. All right, that's looking a lot better. But if you want to adjust the darkness of your own vignette, just remember you can do that really easily by playing around with the curves up here. That's looking pretty good, but I still want to add a few more adjustments. Let's add another adjustment layer on top of this one using Command Option Y or Control Alt Y on a PC, and name this one Blur. Now I really want to push the vintage effect a bit more by pushing up the saturation a bit and letting the colors almost look like they're bleeding into each other. We're going to find the Unsharp Mask effect in the Effects panel, and then we're going to push these values way up. Let's set the amount to 100 and the radius to 14. Now you can already see a really big difference in the colors here, and you get this retro bleeding effect. But I still want to add a light blur on top, so type Gaussian blur in the effects panel and just place it on top of the Unsharp Mask. We don't want to make this animation too blurry though, so we're just going to set it to a pretty low value, around four or five. This is just going to get rid of a lot of that real crisp edge you get when you're animating vector shapes in After Effects. Instead, it's going to push this color bleeding effect more and really soften these edges to give a more retro look. All right, now just one last adjustment layer, add it in using Command Option Y or Control Alt Y on a PC, and name this one Time. Then look for the Posterize Time effect in the effects panel and add it to this layer. Another one of my favorite effects is the Posterize Time effect, because it lets you non-destructively play with the frame rate of your animation. Let's set it to 12 frames per second, which is a classic animation standard. Right away, that's looking really fun. There's something about this frame rate that I feel adds so much personality to animations, especially if you're going for that handcrafted vintage effect. There it is. That's how you make a full 3D car animation in a forest scene. If you followed along with your own project and just completed your own car, awesome job. Now be sure to export your animation and upload your project right here so you can share it with me and the other students, and we can all check out your awesome work.
16. Bonus Trick: That's how you make a full 3D car animation in After Effects. Before signing off, I just want to quickly show you one more bonus technique that I find often comes in handy, by teaching you how to create this full 3D spinning globe. I had to include this is a quick bonus since it covers one more easy full 3D technique that we didn't cover in the car animation, which is combining a path animation with a map. This is a super convenient and versatile technique to know if you want to bump your full 3D animation knowledge. Inside this comp, all I did was set an exposition animation for the continents. They move from left to right across the screen slowly. I didn't ease these since I want the globe to be spinning at a consistent speed. Then I added two effects. First off, I added the Set Matte effect. This effect is so convenient because it allows you to add a layer to any other layer you want without having to set Alpha mattes. A matte works similarly to a clipping matte in Illustrator or Photoshop, meaning that the layer will only be visible within the bounds of the map. In this case, I want the continents to only be visible on the actual globe. I'll set the matte to be the circle shape that I created. Just like that, we already have a super-simple spinning globe. But I actually wanted to bump the full 3D illusion here just a little bit more. I added one more effect to this continent's layer called bulge. The way this effect works is you can essentially create a bulge anywhere on your layer. First off, you set it center by clicking this icon right here and placing it wherever you want the center of the bulge to be. in this case the middle of the globe. Then you just adjust the horizontal and vertical radius values by hovering over them until a double-sided arrow appears, and dragging them to adjust the bulge to be the size of the object that you're working with. In this case, I just drag the values to be the size of the globe. Then the very last thing you have to do is set the bulge height to create that extrusion that you're looking for. In this case, I played around with it a bit and ended up sending it to a value of one. There you go, one more bonus technique to make a simple full 3D object. This technique is a really convenient trick to know and can come in handy in lots of projects. Before we sign off, let's quickly recap a few key tips and techniques to take away from this class.
17. Quick Recap: There you have it. That's how you make a full 3D car animation in After Effects using only 2D vector shapes. Thanks so much for watching. If you've been following along with your own car, congrats on finishing your animation. We really covered a lot of techniques and topics in this class, so before signing off, let's just review a few key tips to take away from this class to apply to your future animation projects. Organize your layers and comps. From naming them clearly to color-coding them in After Effects, taking just a bit of time to keep your projects organized really speeds up your workflow and will always make it easier to come back to projects and files after you've put them down for awhile. Find some reference footage. Even if it isn't perfect, try to shoot your own or find some footage online of what you're planning to animate. Seeing how things move or behave, will help you make your animations all the more believable. Nail the key poses. It might take a lot of tweaking, but when you're doing a full 3D path animation, nailing the object in its key poses is absolutely crucial, so don't be afraid to go back and edit the path of layers as you're working. Easing is your friend. Easing your keyframes and adjusting their timing in the graph editor, makes a huge impact on your animation. The speed at which your animation moves from pose to pose, is just as important as the poses themselves. Speed conveys depth. Like we covered in the tree animation lesson, objects that are further from the camera move more slowly than objects closer to it. That's a really great tip to keep in mind anytime you're animating scenes with depth. It's all in the details. From subtle expressions to animating background elements or stacking a few affects, the details are what really push your animations from good to great, so try to look for opportunities to add in some details to bring your animations to life. Those are my key tips to take away from this class. Remember, if you complete a car animation, be sure to upload it here in the projects and resources section of this class, or if you upload it on social media, be sure to tag me. I'd love to see what you've made. Thanks so much for watching, and I'll see you in the next one.
 Lara Evens, Graphic and Motion Designer