Transcripts
1. Introduction: I am Tom Bancroft, and I'm a former Disney animator. I worked there for 12 different years, and then I also created to character design books. After that, we're done eight different feature films for Disney, including Milan, where I was able to design the character of Mushu the Dragon. I hope that you're going to enjoy this. We have something really fun. It's gonna be It's called tooty, hand drawn tips and tricks. And so, in this lesson, I'm gonna teach you a bunch of little hand drawn animation just like here on this old Disney animation desk, doing hand drawn, flipping and everything that kind of animation and this really is useful. All of these tips and tricks still relate to computer animation and to a lot of the traditional animations like like Enemy Adobe animate and things like that, because these are very much basics. So we're gonna learn about timing and spacing and charting a lot of those things that were kind of things that we used in yesteryear but are still extremely used today, but also really good to know it will make make your animation so much better. So I really hope that you enjoy this. That these tips and tricks, This is something. These are things that I learned not only Cal Arts, the school I went to count for needs to the arts. But then later on 12 years of Disney, I've kind of compiled all these tips and tricks together. I really hope you enjoy it. You're gonna see me working on this desk, um, and creating some some animation, so enjoy this and thank you.
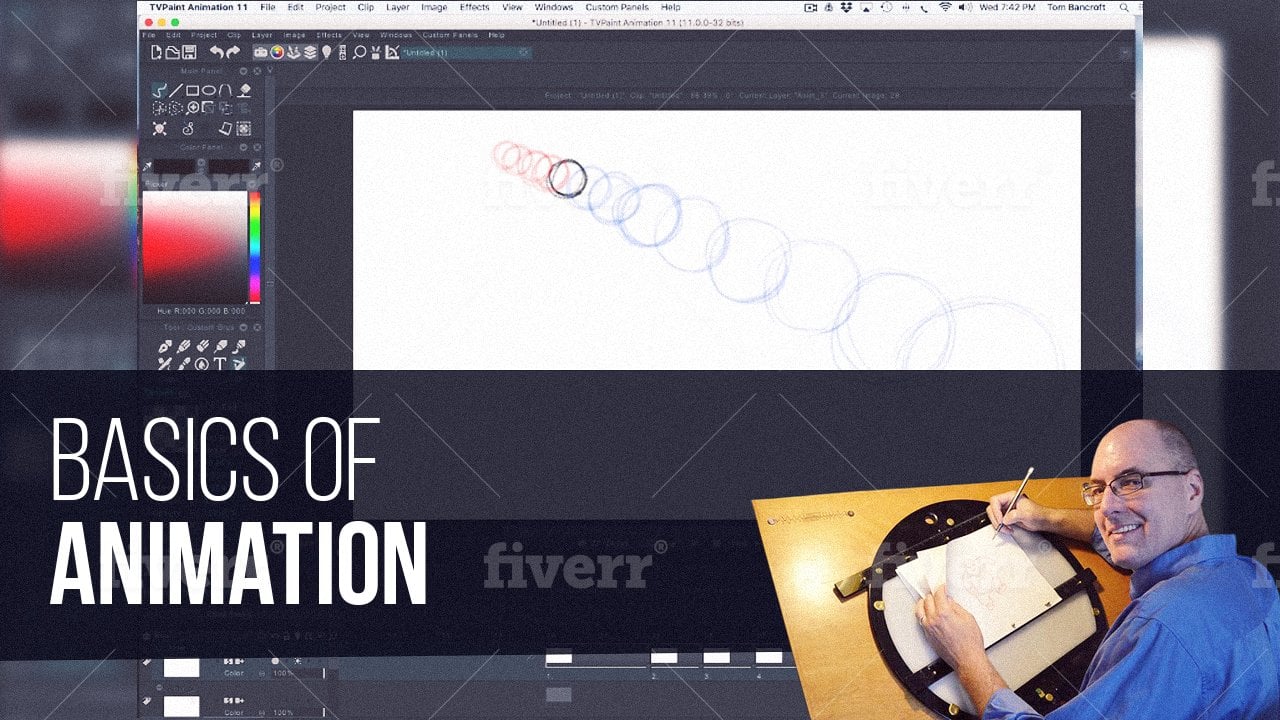
2. 2D Animation Tips & Tricks: I'm Tom Bancroft on today. I'm gonna teach you a little something about two D hand drawn animation. Now, this is really kind of a throwback to I don't know, the eighties and nineties. A lot of guys don't need to know this because we don't do a lot of two D hand drawn animation anymore. Not even I do. I do a lot of tradition tread digital animation. That means that I'm animating on my sin teak and using my computer. But I'm still hand drawn, but I'm doing it on a way comes antique, using a program of some kind to help, you know, capture the images. But I just wanted to do this because I think that there's a lot of people that still want to know about this either from an educational standpoint or historical standpoint, or they just want to really do tooting hand drawn animation on a peg bars and a little bit so this sort of tip and trick that I'm doing right now, this lesson is all about how did draw and do hand drawn animation some of the tips and tricks that will kind of make you make it work better for you and a little bit of what everything is terminology to. So let's dig into that. So first of all, this is my old Disney animation desk and like this is a nice, expensive version. But really, you can have a scaled down version of this, which is just a board. Usually there's a light like table underneath. I don't even use my life tables kind of trained not to train to eyeball it. But what you always have is pegged. So this is your peg system on the bottom. That's really important because, of course, that the paper needs to be pegs to match. And really, they developed. This was the whole reason was so that your paper then is locked in position. If I'm flipping it or looking at my animation drawings, it's never it's still staying locked down, and that is so ultimately important to doing any kind of subtlety animation. You have to have that peg system, so that's super important. But let's talk about that's our pens and paper. Now. The other tools are pretty simple, like I just did a lesson. We're talking about pencils I love to draw with a color race red or a blue, and I like to animate with that. And so if I'm gonna do sketching here of a character as you can see, what I'm trying to do is just get the motion and the movement as much as possible. If this character say walking, it's gonna be a horrible sketch. Get the idea this like it's in front. That means back, but and I'm just using basic shapes. So the idea beings that goal number one is that you want to get your movement and your pose down as much as possible in your drawing and so that that sets you up for the next sketch. What you're gonna do next, OK, and I'm always thinking ahead. That's a whole another tip trick. Do you really talk about how to enemy? But I did want to go through the steps, which is I like to do the color race after of animated, a stack of drawings that I like to go back in and what I what I call the tie down phase that was the rough animation phase, and then a tie down phase is after I've animated. I've shot it. I've timed it out I'll start tying it down, which just means that I have a graphite pencil that might be adding more of the details to . This might even be sometimes where I start adding some secondary animation. I might do that in the hair, say things like that. If I'm feeling daring, I might do that in the graphite also, but in general, it's just to really be able to do the drawing that is now gonna go onto it. Still still sketchy. But it's the drawing that will now go on to say in to clean up where somebody else will then lay down another piece of paper and really tie this down. But here, like I'm adding, you know, maybe I didn't do his costume. He's got a shirt on. I got some pants, you know, not really in my rough version. Maybe he's got a short sleeve shirt. There's some overlap going on in that. Maybe maybe I only did like little balls here somehow, really defining that a little bit more. It's not goals. His hands, I mean some of this you don't want to leave to the last one. I kind of think it through. Even in the Blue Sketch. But in this case, I might have really kind of left a few things. So anyway, that could be my tied up. Maybe it's a little Maybe I'll do it a little bit tighter than that. But in general now everything is there and it looks like my character. And so those air generally my to my to step sous for us trying goes. Now let's go into even more needy, gritty. So in the traditional automation days, the way we would set it up. And this is more for Disney animation than anything is your top right would be your number . So if it was a QB circled and say, This is drawing one so it would be a key. Your first drawings. Always a key, Um, because where you're starting and it's always in the top right underneath that and they'll get to this in a second is charting. I don't know if I want to explain all the charting, but it would usually go right underneath and say, My next drawing in my and I'll get to that in a second is maybe the next one is safe. Number five, and it's a breakdown and a breakdown would have underlying underneath it. And that means if it is on twos, there's only one drawing in between and being number three. So be one into number three and will say that it is halfway in between. So I would put a line there and maybe these hoops here and then put number three there and that would tell my assistant my in between er if there was somebody helping me out, where to draw number three on another piece of paper. So they have a number five on top of this, and then they would foot between the two. So I'm just trying to tell you right now kind of where everything would be. Oftentimes, we'd also put the number down here. And a lot of that was because when we get these all stacked up at the end, we want to be able to kind of come through down here. Sometimes you just see the numbers so often times would put the numbers in both spots and in general. That's why you see most of the real estate over here tends to be sort of what we call instructional. Now, let me get into I have an example here that I really quickly roughed out. The other thing you need to know is flipping now in Europe that call it flipping or rolling . And I think there's a subtle difference between flipping and rolling the terminology, and I'll get to that in the second. But in general, this would be, I think, when you're when you're letting, when you have a whole scene, you have a stack of drawings. This is generally what you call flipping is when you're letting the gravity of it drop and you're seeing the movement. Okay, so I'm just letting gravity take hold as I sort of thumb through it on the top and letting it sort of dropped. And the better you get at this, the more you can really doing a lot quicker and start feeling the movie. It's not an easy thing to do. It does take a little practice. There's also little keys. Just another tip within a tip. You always want us is the best way to flip seeing is to stack it like this. It's perfectly straight on the edge here, but as you grab it here, you want to kind of grab it and then roll it. So what I'm doing here is I'm bending it, getting like a devil to it. And once I have that bevel, then I can kind of let it go a lot a lot easier. And so I can kind of roll my thumb through that bevel and you will drive a lot easier than if it was stuff straight, hard. I don't even know how to do that. But it would wouldn't I wouldn't get him all So I get a see more if I had that little devil to it that's flipping Rolling would be if I put it on the pegs. And what happens with rolling is that you can't see them all, obviously, because you have a limitation and that limitation. Hello. I'm sorry for all. The biggest limitation that you have when you're rolling is how many fingers you have. So you really can only get about four or five sheets of paper. Because how we did that is on this could be called flipping to look. If you're flipping between one or two, then that's flipping. And actually so if I'm looking drying number one and number two here, that's definitely put them looking for the movement. But if I want to roll it, then after that, between each pieces of paper, I stick one finger in there. You see that? And so I can only dio Let's see 12345 piece of paper at a time and rolling is this is now I can see multiple things and watch a whole movement. Now I'm looking for arts and kind of the bigger picture. And I could be fun. Could it this to with practice, I can keep it on the pegs and roll it in their own right. I see a problem here and kind of ad used to see my mentors do this all the time. They were really good at it. Be able to kind of see something go. Okay. And while it's still on the pegs kind of fix it and kind of really nailed down the line, didn't it? Wasn't quite in the right spot doing that, rolling that movement, um, getting to feel that movement. It's really the cute animation. This is also why I didn't need a light table. I need to turn on my life if I got good at flipping and rolling. I could see the movement, and that always is more important than looking between lines. I could see the movement of shapes that's more important. Hey, last tip, which is kind of interesting. Oh, we didn't talk about charts. Charting is a whole nother thing. Let me talk about that really quick, which is once we have a few drawings here. So between say, this drawing, I will say that this is drawing one and that's drawing five. And yes, you can see that all changed this number. Just it's clear, but I'll say that strong number five OK, that's a breakdown because he's squashing. So he's walking along. Any squashes is about to hear something or see something. And so between those two drawings, obviously, I'm gonna want a few in between because to me, that's too big of a jump. So I know that right after that. So what I would do is then I would chart between those and I said, between 11 and five, I wanna have one drawing on twos. But I wanted to favor this one. I want to feel like it's closer to that one. So what? I'll do is I'll put this UN force now put number three here. I don't put X here, and all that means is there is no there is no drawing here. This is just to kind of make it set to suggest to my assistant that on the course this is number five. That this third drawing this drawing that's missing between here needs to be closer to five . That's really all that saying. Is that a feeling? I want to give that feeling that number three drawing would be closer number five. So then that assistant would then lay down a piece of paper. No. Two different sizes of animation I'm using here as they would laid out a blank piece of paper, put number three here and literally split between the two of these and start finding where drawing number three would go. This is how you doing in between, literally. You start looking at the shapes and the lines and you start finding that drawing using right. I remember I wanted favor this number five here, so that knows, has to be closer number five, and he's starting to turn right. So he's more turned in this one he's not in that society. So I'm gonna have starting to turn eyes, you know, he almost shot are completely shot. So I'm not gonna do this hole in between. But in general, that's what I'm doing so that we get that done shoulders coming out arm is moving, Really screwed scribbling. But I'm just trying to get everything where it's supposed to be in. In general, it would be kind of, But then in the end, then you put it back in order and you have your in between. So you have split between 13 and five and that's the three. Is this one? So I could flip it. Any guys enemy. And he is favoring number five. Okay, that's kind of the gist of how charting works and even in between. And I know this is really quick, but it's also because this is supposed to be a really quick take a trip to the other. The last tip that I wanted to give you, which is your cockpit? When I was working in Mark can he always gave me instructions about how to work flow across your desk, and so he would say is don't like I did a second ago. Don't be hunting for your paper and your supplies. Have your pencils ready to go. You know where they are and then be able to grab. Because if you're in the moment of animating flipping, you better grab of here. Hardly enough to look and just grab put your paper on there and then you destroy for is as I flipped and again chunk down by then put that here. And so that's what I mean by cock cock. Your cockpit is where you're sitting, and you're kind of your environment around you and making sure that you're organized. This isn't a good example of that. It's a little bit of a mess, But you know, every paper is and you're throwing it on there. And you could just stay in that moment of animating and not have to think about. I've seen animators where they have, like batches of scenes, like here's the first part of the scene, second parts of here. The third part is over here. He always kept it, you know, grab my paper here. And then it was when it was over here it was done. What was being worked on it was here, So just flow across is his his desk. And it really worked really well. He was the fastest animator, Disney. That's a bunch of kind of old school two D animation tips and tricks, and I hope you got something out of that kind of went over a bunch of things. But I hope you enjoyed that and, uh, animate from the heart.
3. Lesson: I'm Tom Bancroft on today. I'm gonna teach you a little something about two D hand drawn animation. Now, this is really kind of a throwback to I don't know, the eighties and nineties. A lot of guys don't need to know this because we don't do a lot of two D hand drawn animation anymore. Not even I do. I do a lot of tradition tread digital animation. That means that I'm animating on my sin teak and using my computer. But I'm still hand drawn, but I'm doing it on a way comes antique, using a program of some kind to help, you know, capture the images. But I just wanted to do this because I think that there's a lot of people that still want to know about this either from an educational standpoint or historical standpoint, or they just want to really do tooting hand drawn animation on a peg bars and a little bit so this sort of tip and trick that I'm doing right now, this lesson is all about how did draw and do hand drawn animation some of the tips and tricks that will kind of make you make it work better for you and a little bit of what everything is terminology to. So let's dig into that. So first of all, this is my old Disney animation desk and like this is a nice, expensive version. But really, you can have a scaled down version of this, which is just a board. Usually there's a light like table underneath. I don't even use my life tables kind of trained not to train to eyeball it. But what you always have is pegged. So this is your peg system on the bottom. That's really important because, of course, that the paper needs to be pegs to match. And really, they developed. This was the whole reason was so that your paper then is locked in position. If I'm flipping it or looking at my animation drawings, it's never it's still staying locked down, and that is so ultimately important to doing any kind of subtlety animation. You have to have that peg system, so that's super important. But let's talk about that's our pens and paper. Now. The other tools are pretty simple, like I just did a lesson. We're talking about pencils I love to draw with a color race red or a blue, and I like to animate with that. And so if I'm gonna do sketching here of a character as you can see, what I'm trying to do is just get the motion and the movement as much as possible. If this character say walking, it's gonna be a horrible sketch. Get the idea this like it's in front. That means back, but and I'm just using basic shapes. So the idea beings that goal number one is that you want to get your movement and your pose down as much as possible in your drawing and so that that sets you up for the next sketch. What you're gonna do next, OK, and I'm always thinking ahead. That's a whole another tip trick. Do you really talk about how to enemy? But I did want to go through the steps, which is I like to do the color race after of animated, a stack of drawings that I like to go back in and what I what I call the tie down phase that was the rough animation phase, and then a tie down phase is after I've animated. I've shot it. I've timed it out I'll start tying it down, which just means that I have a graphite pencil that might be adding more of the details to . This might even be sometimes where I start adding some secondary animation. I might do that in the hair, say things like that. If I'm feeling daring, I might do that in the graphite also, but in general, it's just to really be able to do the drawing that is now gonna go onto it. Still still sketchy. But it's the drawing that will now go on to say in to clean up where somebody else will then lay down another piece of paper and really tie this down. But here, like I'm adding, you know, maybe I didn't do his costume. He's got a shirt on. I got some pants, you know, not really in my rough version. Maybe he's got a short sleeve shirt. There's some overlap going on in that. Maybe maybe I only did like little balls here somehow, really defining that a little bit more. It's not goals. His hands, I mean some of this you don't want to leave to the last one. I kind of think it through. Even in the Blue Sketch. But in this case, I might have really kind of left a few things. So anyway, that could be my tied up. Maybe it's a little Maybe I'll do it a little bit tighter than that. But in general now everything is there and it looks like my character. And so those air generally my to my to step sous for us trying goes. Now let's go into even more needy, gritty. So in the traditional automation days, the way we would set it up. And this is more for Disney animation than anything is your top right would be your number . So if it was a QB circled and say, This is drawing one so it would be a key. Your first drawings. Always a key, Um, because where you're starting and it's always in the top right underneath that and they'll get to this in a second is charting. I don't know if I want to explain all the charting, but it would usually go right underneath and say, My next drawing in my and I'll get to that in a second is maybe the next one is safe. Number five, and it's a breakdown and a breakdown would have underlying underneath it. And that means if it is on twos, there's only one drawing in between and being number three. So be one into number three and will say that it is halfway in between. So I would put a line there and maybe these hoops here and then put number three there and that would tell my assistant my in between er if there was somebody helping me out, where to draw number three on another piece of paper. So they have a number five on top of this, and then they would foot between the two. So I'm just trying to tell you right now kind of where everything would be. Oftentimes, we'd also put the number down here. And a lot of that was because when we get these all stacked up at the end, we want to be able to kind of come through down here. Sometimes you just see the numbers so often times would put the numbers in both spots and in general. That's why you see most of the real estate over here tends to be sort of what we call instructional. Now, let me get into I have an example here that I really quickly roughed out. The other thing you need to know is flipping now in Europe that call it flipping or rolling . And I think there's a subtle difference between flipping and rolling the terminology, and I'll get to that in the second. But in general, this would be, I think, when you're when you're letting, when you have a whole scene, you have a stack of drawings. This is generally what you call flipping is when you're letting the gravity of it drop and you're seeing the movement. Okay, so I'm just letting gravity take hold as I sort of thumb through it on the top and letting it sort of dropped. And the better you get at this, the more you can really doing a lot quicker and start feeling the movie. It's not an easy thing to do. It does take a little practice. There's also little keys. Just another tip within a tip. You always want us is the best way to flip seeing is to stack it like this. It's perfectly straight on the edge here, but as you grab it here, you want to kind of grab it and then roll it. So what I'm doing here is I'm bending it, getting like a devil to it. And once I have that bevel, then I can kind of let it go a lot a lot easier. And so I can kind of roll my thumb through that bevel and you will drive a lot easier than if it was stuff straight, hard. I don't even know how to do that. But it would wouldn't I wouldn't get him all So I get a see more if I had that little devil to it that's flipping Rolling would be if I put it on the pegs. And what happens with rolling is that you can't see them all, obviously, because you have a limitation and that limitation. Hello. I'm sorry for all. The biggest limitation that you have when you're rolling is how many fingers you have. So you really can only get about four or five sheets of paper. Because how we did that is on this could be called flipping to look. If you're flipping between one or two, then that's flipping. And actually so if I'm looking drying number one and number two here, that's definitely put them looking for the movement. But if I want to roll it, then after that, between each pieces of paper, I stick one finger in there. You see that? And so I can only dio Let's see 12345 piece of paper at a time and rolling is this is now I can see multiple things and watch a whole movement. Now I'm looking for arts and kind of the bigger picture. And I could be fun. Could it this to with practice, I can keep it on the pegs and roll it in their own right. I see a problem here and kind of ad used to see my mentors do this all the time. They were really good at it. Be able to kind of see something go. Okay. And while it's still on the pegs kind of fix it and kind of really nailed down the line, didn't it? Wasn't quite in the right spot doing that, rolling that movement, um, getting to feel that movement. It's really the cute animation. This is also why I didn't need a light table. I need to turn on my life if I got good at flipping and rolling. I could see the movement, and that always is more important than looking between lines. I could see the movement of shapes that's more important. Hey, last tip, which is kind of interesting. Oh, we didn't talk about charts. Charting is a whole nother thing. Let me talk about that really quick, which is once we have a few drawings here. So between say, this drawing, I will say that this is drawing one and that's drawing five. And yes, you can see that all changed this number. Just it's clear, but I'll say that strong number five OK, that's a breakdown because he's squashing. So he's walking along. Any squashes is about to hear something or see something. And so between those two drawings, obviously, I'm gonna want a few in between because to me, that's too big of a jump. So I know that right after that. So what I would do is then I would chart between those and I said, between 11 and five, I wanna have one drawing on twos. But I wanted to favor this one. I want to feel like it's closer to that one. So what? I'll do is I'll put this UN force now put number three here. I don't put X here, and all that means is there is no there is no drawing here. This is just to kind of make it set to suggest to my assistant that on the course this is number five. That this third drawing this drawing that's missing between here needs to be closer to five . That's really all that saying. Is that a feeling? I want to give that feeling that number three drawing would be closer number five. So then that assistant would then lay down a piece of paper. No. Two different sizes of animation I'm using here as they would laid out a blank piece of paper, put number three here and literally split between the two of these and start finding where drawing number three would go. This is how you doing in between, literally. You start looking at the shapes and the lines and you start finding that drawing using right. I remember I wanted favor this number five here, so that knows, has to be closer number five, and he's starting to turn right. So he's more turned in this one he's not in that society. So I'm gonna have starting to turn eyes, you know, he almost shot are completely shot. So I'm not gonna do this hole in between. But in general, that's what I'm doing so that we get that done shoulders coming out arm is moving, Really screwed scribbling. But I'm just trying to get everything where it's supposed to be in. In general, it would be kind of, But then in the end, then you put it back in order and you have your in between. So you have split between 13 and five and that's the three. Is this one? So I could flip it. Any guys enemy. And he is favoring number five. Okay, that's kind of the gist of how charting works and even in between. And I know this is really quick, but it's also because this is supposed to be a really quick take a trip to the other. The last tip that I wanted to give you, which is your cockpit? When I was working in Mark can he always gave me instructions about how to work flow across your desk, and so he would say is don't like I did a second ago. Don't be hunting for your paper and your supplies. Have your pencils ready to go. You know where they are and then be able to grab. Because if you're in the moment of animating flipping, you better grab of here. Hardly enough to look and just grab put your paper on there and then you destroy for is as I flipped and again chunk down by then put that here. And so that's what I mean by cock cock. Your cockpit is where you're sitting, and you're kind of your environment around you and making sure that you're organized. This isn't a good example of that. It's a little bit of a mess, But you know, every paper is and you're throwing it on there. And you could just stay in that moment of animating and not have to think about. I've seen animators where they have, like batches of scenes, like here's the first part of the scene, second parts of here. The third part is over here. He always kept it, you know, grab my paper here. And then it was when it was over here it was done. What was being worked on it was here, So just flow across is his his desk. And it really worked really well. He was the fastest animator, Disney. That's a bunch of kind of old school two D animation tips and tricks, and I hope you got something out of that kind of went over a bunch of things. But I hope you enjoyed that and, uh, animate from the heart.
4. Assignment: Hi. Welcome back. I really hope you enjoy the two D animation tips and tricks videos in these Siri's I enjoy . But putting that together now, I wouldn't give you an assignment. It you know, to me, the best way to learn is not is in steps and the 1st 1 being hearing from somebody that's done it learning from an experienced person. That's hopefully what you just did. You saw these videos and hopefully you got a few things out of that. But now, really, the next very, very important part is to try it out. Right? Do it yourself. Don't just listen to me. And this is how you're gonna grow. And then hopefully repeat, repeat, repeat, keep doing and teeth doing little animation tests and things like that. So in this assignment, I want I want to go easy, but not too easy. I want toe. Hopefully take a lot of what we just learned about spacing and about charting and things like that. And I think you should just be ableto hopefully just get pieces of paper Whether or not you have a nice test like this, you don't need it. Hopefully you have some. You know a strip here with the peg bar on it or something like that. You get those fairly inexpensively in amazon dot com and places like that you can't even get the pegged animation paper so you can use it like that, but then backing up from that if you don't have those two things, you can just get photocopy paper and, you know, put like tape down a ruler and kind of, but it up against the ruler, there's easier ways to do it, then maybe put crosshairs in the corner. So you're always trying to keep it lined up, so there's ways to do it and be a lot easier. But in general, you won't be able to kind of be able to flip it and refer back right, And that's really the key of the set up. And hopefully get a set up that a work that way. Now what you want to do is I want you to create 10 drawings and what those drawings they're gonna be is kind of to you. But I want you to be able to go. Okay? I'm gonna draw a character usually moving across the page is kind of nice. But even if they're stationary, kind of or in the middle of the page, they should sort of do some kind of a movement. Maybe it's it's there holding a ball and it's going down and anticipating and then throwing it up in the air and catching it and then catching it may be a little bit past and coming back. You know, a little bit of that. So it feels like there's some weight and really, you could do that in about 10 drawings and those would be your keys. And if you want to go further than that, and this is sort of extra points, I guess you could chart those keys and try and figure out what can probably need about two drawings in between from here and then the balls up here. You can start thinking about in between two, but that's optional and only if you want to go there and then maybe get a friends of videotape it so that you flip those 10 or you take him off the pegs and you flip it this way and roll it. They could be over here filming it so you can kind of see how it looks and how it moves would be able to share it with people. I hope you enjoy it, Andi. I really hope that works out for you. Thank you.
 Tom Bancroft, Author/ Character Designer/ Animator/ Director