Transcripts
1. Introduction: Hi, everyone. I'm Eva
from Hana Kushi Design. Thank you for taking your
time to join my class today. In this video, I will
show you how to make an adorable wheelbck
charm using felt fabric. I will walk you
through all the tools and materials you will
need to get started. Don't worry if you don't
have a cutting machine, you can absolutely cut
the pieces by hand. We will go step by step through the process from making
the crochet flowers, cutting and sewing
the felt pieces to adding cute little details
that bring your will to life. This makes a lovely
handmade gift, a fun decoration
for your backpack, or a creative way to add some personality to
your accessories. And if you have cutting
machine at home, we're going to
personalize the charm by adding a name on
Acrylic keychain. So let's grab our felt, get creative and have some
fun. Let's jump right in.
2. Lesson 1 : Tools and materials: Hi, everyone.
Welcome to my class. I'm so excited to have you here. Before we get started,
let's take a quick look at the tools and materials you
will need for this project. Don't worry if you don't
have everything yet. I'll guide you through
each item and explain how we will use them in
class. Let's dive in. You will need some felt fabric. I'm using two sheads of
grape for this project. This part is optional, but if you have a
cutting machine, it will make the whole
process easier and faster, and you'll get a precise
cuts effortlessly. You will also need
embroidery thread in a matching color
tone to the felt that you're using and in some other color for the
crochet puff flower. You will also need some
polyester fiber fill to stuff your felt toy and give
it a nice fluffy shape. A key chain to hang
your back charm, a five millimeter
black bid for the eye Nedles 0.5 millimeter crochet hook to
crochet the flour. And for the crochet flour, I use crochet thread number 80. For the puff flower, I'm using the MC embroidery
thread, which I split. I only use one strand for each flower to
keep it delicate. For embllishment, I'm
using Thor round set bits, size eight, and also a four millimeter flat
sequin in silver colour. That's so for the
two sand materials, now we are ready to start.
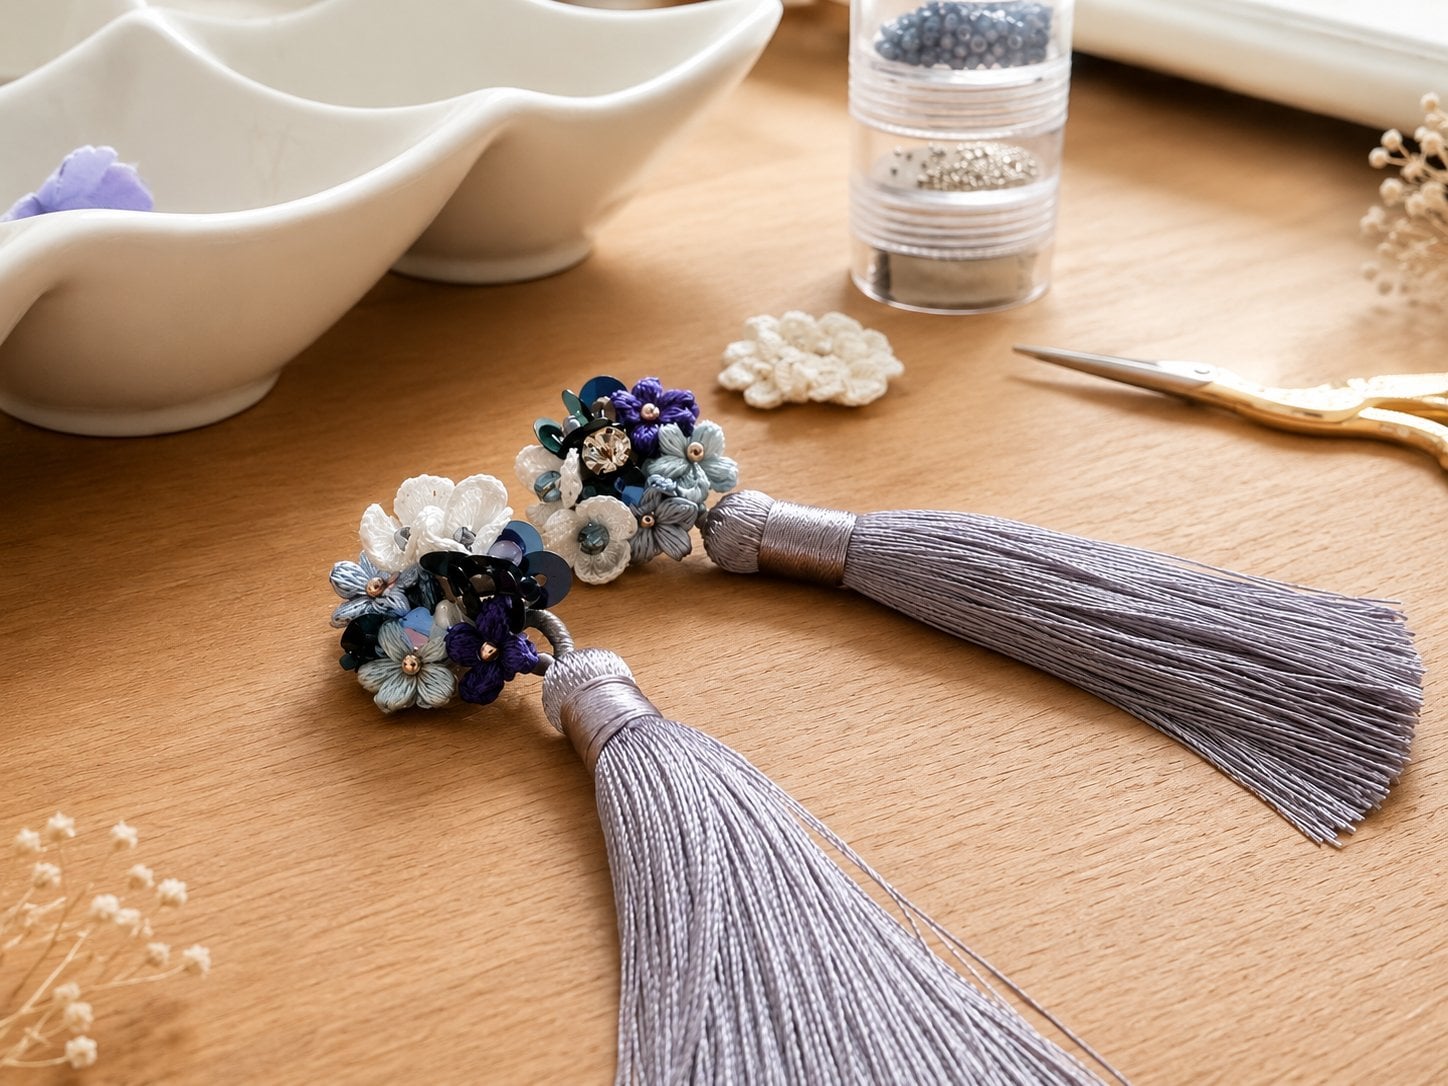
3. Lesson 2 : crocheting puff flowers: This lesson, I'll share with you how to crochet
this puff flower. To crochet this flower, you will need 0.5
millimeter crochet hook and also embroidery
floss of your choice. There are six strands in a
skin of embroidery floss. To make this flower, you
will only need one strand, so you will need
to separate them. To make it easier,
I like to wind each separated strand onto an
embroidery cut like this. Start with a magic ring. Insert the hook underneath
the first tread, pull the second thread
underneath the first tread, twist your crochet
hook and chain one. Gently loosen your magic ring, and we will start
with our petal. Yarn over and insert your
hook in the magic ring, yarn over and pull it through. That's my first loop. And
this is the second one. Yarn over, insert your
hook in the magic ring, yarn over, pull it through. And that's the second loop. Keep repeating these steps until there are ten loops
in the magic ring. This is my third loop, and now I'm making
the fourth loop. And now I'm making the
fifth loop, Y over, insert your hook inside
the magic ring, Y over, pull it through, and
this is the sixth loop. This is the seventh loop. And this is the eighth
loop. The ninth loop. And here's the last one
which makes the tenth loop. Hold the magic ring with
your pinky finger and gently pull all the loops towards
the tip of your crochet hook. Now I'm going to yarn over, pull through all
the loops together. Yarn over, and make
a slip stitch. And make five chains. One, two, three, four, five, insert your hook
into the magic ring, yarn over and pull
through the loop. And that is our first petal. I will make the second petal. Y over, insert your
hook in the magic ring, yarn over and pull it through.
That's my first loop. And this is my second
loop. The third loop. This is my fourth loop. The fifth loop, sixth loop, and this is my seventh loop. This is eight loop
the ninth loop. And this is the last one, which is the tenth loop. Hold the magic ring with
your pinky finger and pull all the loops towards
the tip of your crochet hook. I will yarn over and pull
through all the loops together. And then yarn over and
make a slip stitch. Then I will make five
chains, one, two, three, four, five, and then insert your
hook into the magic ring. Yarn over and make
a slip stitch. And that's it. The second petal is complete. Repeat the same steps for
the remaining petals, and there will be five petals
in total for each flower. Here I'm making my first
loop for the third petal. This is the second loop, the third loop. The fourth loop. This is number five, six loop, seventh loop, eighth loop, ninth loop, and this is
the last one tenth loop. Hold the magic ring with
your pinky finger and pull all the loops towards
the tip of your crochet hook. I will yarn over and pull
through all the loops together. Then yarn over and slip stitch. Then I will make five chains, one, two, three, four, five, insert your hook
into the magic ring, yarn over, and make
a slip stitch. And that's your third petal. Repeat the same steps for
the remaining petals. I will speed up the video and come back once I'm done
with the last one, which is the fifth petal. I'm almost done with
my fourth petal. I gently push all the loops towards the tip of
my crochet hook. And then I will yarn over and pull through all
the loops together, yarn over and slip stitch. We will chain five,
one, two, three, four, five, insert your hook
into the magic ring, yarn over, and make
a slip stitch. And that's your fourth petal. Now I'm making the last petal, which is the fifth petal. And I'm almost done with my last petal. Gently push all the loops towards the tip of
your crochet hook, yarn over and pull through
all the loops together. And we're going to yarn
over and slip stitch. Make five chains,
one, two, three, four, five, insert your
hook into the magic ring, y over and make a slip stitch. Trim your thread here, make
sure to leave a few inches of allowance as we will sew the
flower onto the whee's body. Gently tighten the magic ring by pulling the tail
of your thread. Shape the flour while
tightening the magic ring. Be extra careful as embroidery
thread is very delicate. And that's it. Our puff
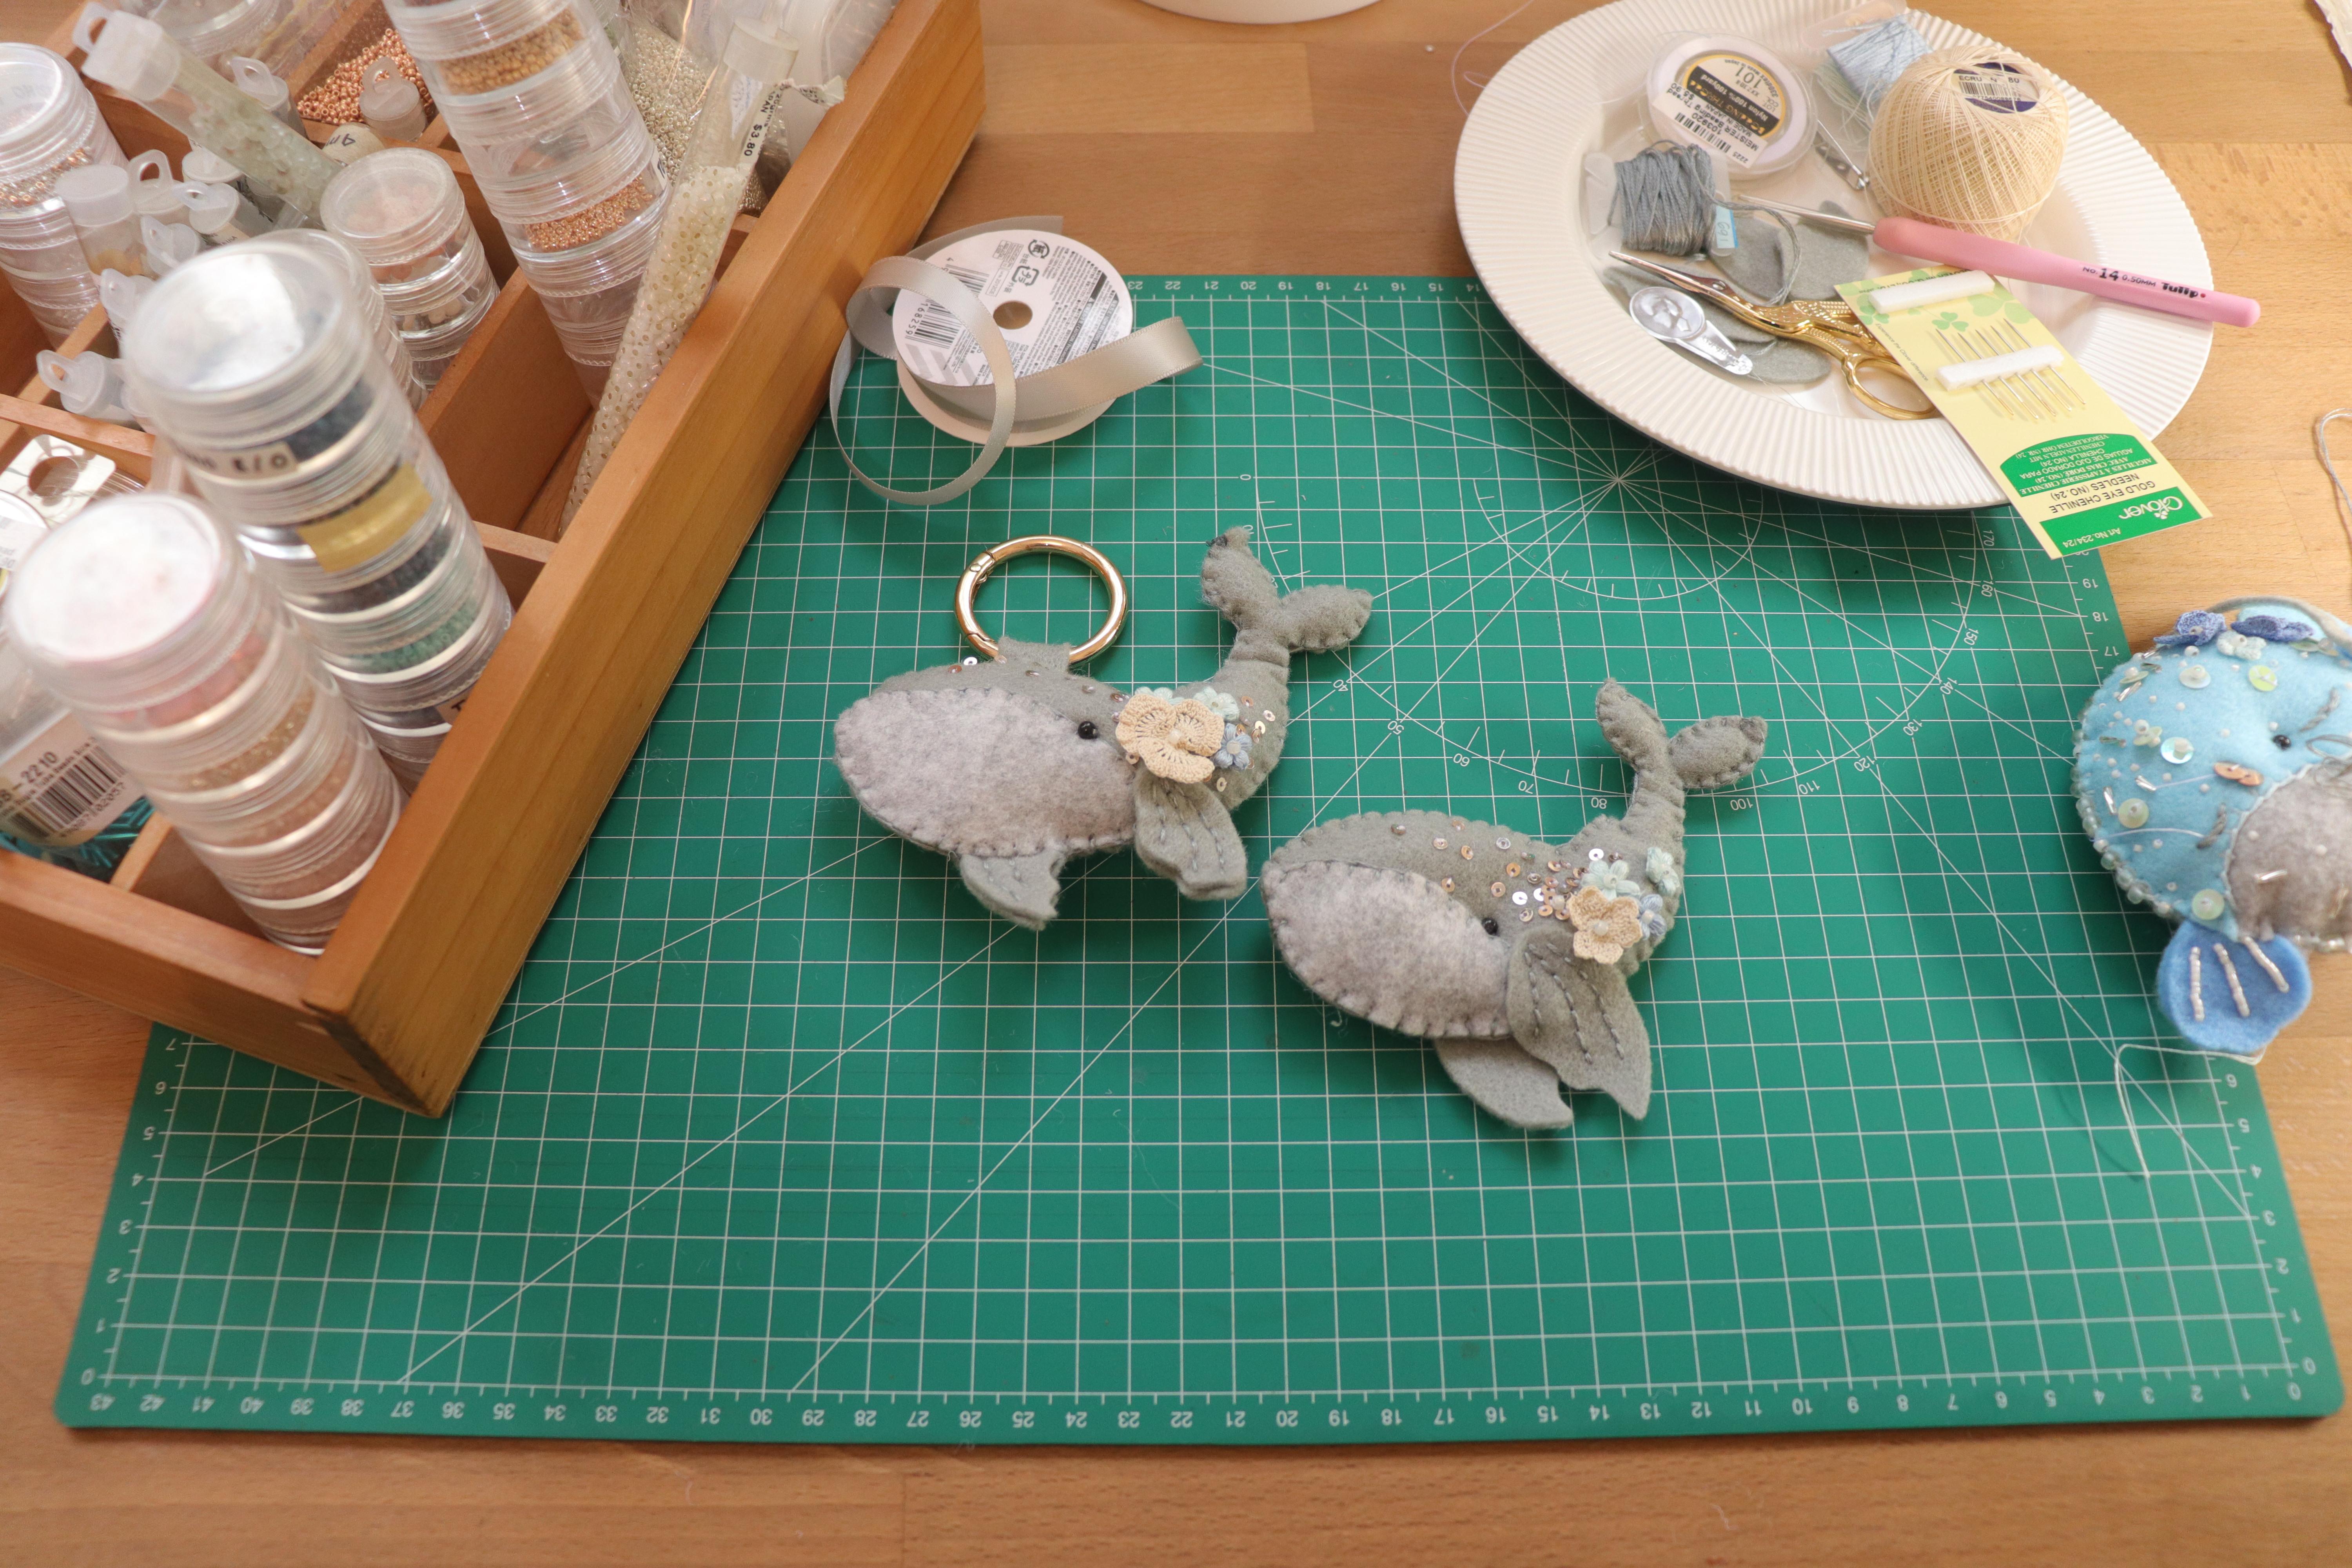
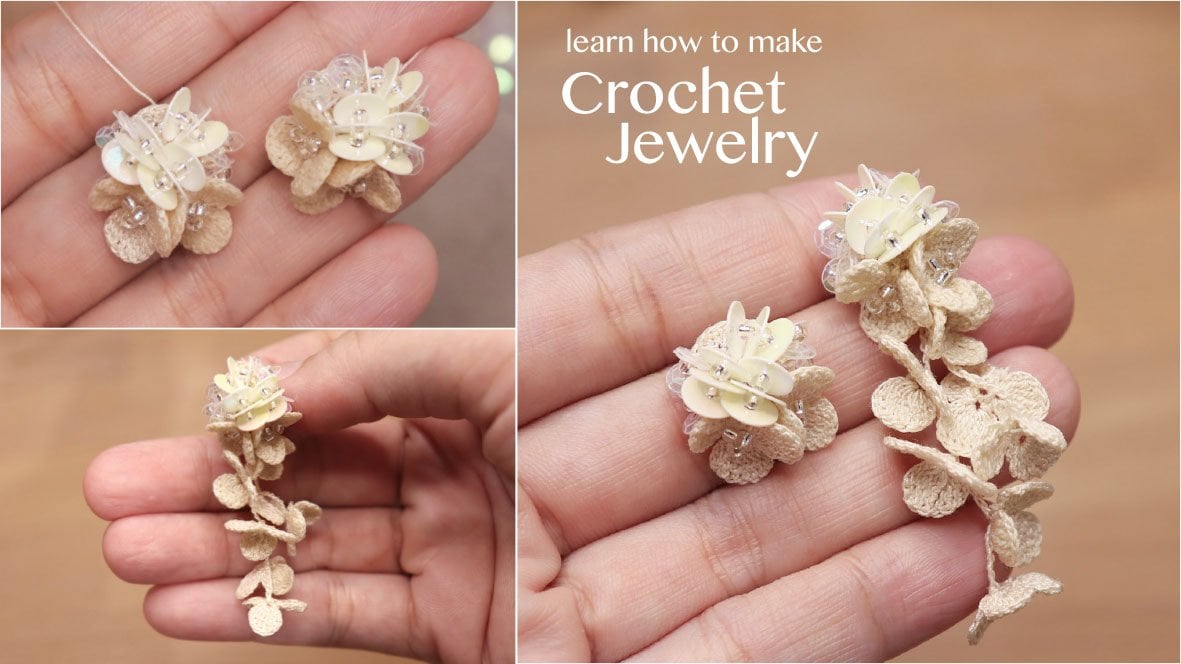
flower is complete. For this whalbg charm, I added three pff flowers.
4. Lesson 3 : making crochet flower: Now we're going to make
this crochet flour. To make this flour, I'm using the MC crochet tread number 80. For this tutorial, I'm using
slightly thicker thread. This is crochet tread number 40, so the stitches are
easier to see on screen. We will start with magic ring. Rap the thread over your
index finger to form an X and hold the cross thread
in place with your thumb. Insert your crochet hook
under the first strand, pull the top strand
under the bottom strand twist the hook, yarn over and pull
it through the loop. We will start with our
first rule, chin, two, one, two, and then I crochet five treble crochet
into the magic ring. Yarn over twice, insert your
hook into the magic ring, yarn over and pull it through. You're going to
yarn over and pull through the first two
loops, yarn over, pull through two loops, and yarn over, pull through
the last two loops. And that's our first
trouble crochet. Now the second one,
yarn over twice. Insert your hook
into the magic ring, yarn over and pull it through. Year over, pull through the
first two loops, yarn over, pull through two loops, and yarn over, pull through
the last two loops. We will keep doing these
steps until we have five trouble crochets
inside the magic ring. That is my third travel crochet, and I'm making the
fourth one now. Y and over twice, insert your hook
into the magic ring. Yarn over and pull it through. Yarn over, pull through the
first tulips, yarn over, pull through tulops
and yarn over, pull through the last tloops. Now, I'm finishing my
fifth travel crochet, and that's the last
one for this row. Now, let's begin
with the second row. Go ahead and flip
your crochet work and then chain two
to start the roll. Here's my first chain, and now I'm making
the second one. I'm going to make two double crochet in the
very first stitch, yarn over, insert your
hook in the first stitch, yarn over and pull it through. Yarn over, pull through
the first two loops, and yarn over, push
through two loops. And next the second
double crochet, yarn over, insert your
hook in the same stitch, yarn over and pull it
through, yarn over, pull through the
first two loops, yarn over and pull through
the last two loops. Now into the next ditch, I will make two trouble crochet. Yarn over twice, insert your
hook in the next stage, yarn over, pull it through. Y and over, pull through the
first tloops, yarn over, pull through the
tulops and yarn over, pull through the last two loops. That's my first trouble crochet, and I'm making the second one. Yan over twice, insert your
hook in the same statch. Y over, pull it through. Y and over, push through the
first tulops, yarn over, pull through tulips,
and yarn over, pull through the last tloops. In the next ditch, I will make two trouble
crochet as well. Here's my first trouble crochet, and I'm working on
the second one now. I'm making another two travel
crochet in the next stitch. That is my first travel crochet, and I'm making the
second one now. Yarn over twice inside your
hook in the same stitch. Y over, pull it through. Y over, pull through the
first tulops, yarn over, pull through Tulops
and yarn over, pull through the last tloops. And finally, in the last ditch, I'm going to make
two double crochet. This is my first double crochet, and I'm making the
second one now yarn over once insert your hook
in the same stage. Yarn over, pull it
through, yarn over, pull through the first
tloops and yarn over, pull through the last tulps. And that's the end for this row. Chain one and then flip your crochet work to
start the next row. I'm going to make a single
crochet in the first stitch. Two double crochet
into the next stitch. This is my first double crochet, and now I'm making
the second one. Yarn over, insert your
hook in the same stitch, yarn over and pull it through. Yarn over, pull through
the first two loops, and yarn over push
through Tuloops. Now, into the next stitch, I will make two treble crochet followed by one double crochet. This is my first travel crochet, and I'm making the
second one now. Y over twice, insert your
hook in the same stitch. Yarn over and pull it through. Y over, pull through the
first tloops, Y over, pull through tloops
and yarn over, pull through the last tloops. Now I'm making one double
crochet in the same stitch. Y over, insert your hook
in the same stitch. Y over, pull it through. We're going to yarn
over, pull through the first tloops and yarn over, pull through the last two loops. In the next stage, I will make one double crochet and
two treble crochet. This is my first double crochet, and now I'm making my first trouble crochet in
the same stage. And this is the second
trouble crochet work into the same stage as before. One travel crochet and two double crochet
in the next stitch. I'm making my first
travel crochet, yarn over twice, insert your
hook in the next stitch. Yarn over and pull it through. Y over, pull through the
first tloops, yarn over, pull through Tulops
and yarn over, pull through the last tloops. Next is one double crochet
in the same stitch. That's my first double crochet, and now I'm making
the second one. In the next ditch, I will make two treble crochet and
one double crochet. This is my first
trouble crochet, and now I'm making the second
one in the same stitch. Y over twice. Ist your
hook in the same stitch, Y over, pull it through. Y over, pull through
the first tulops. Y over, pull through
tulips and y over, pull through the last tloops. Now I'm making one double
crochet also in the same stage. Moving on to the next stage, I will make one double crochet
and two trouble crochet. That's my double crochet. Next, I'm making the first trouble crochet in
the same stage. And this is the second
trouble crochet also in the same stage. In the next stage, I will make two double crochet followed
by one trouble crochet. I This is my first double crochet, and this is the second
double crochet, also in the same stage. And a trable crochet
also in the same stage. Yan over twice, insert your
hook in the same statge. Y over, pull it through. Y over push through tulips. Y over push through tulips and y over pull through
the last tulops. In the next ditche, I will make one trouble crochet followed
by one double crochet. I'm done with my
trouble crochet, and now I'm making
a double crochet also in the same stitch. We are almost done
with this rule. In the last stitch, we will make a single crochet and secure
it with a slip stitch. That's my single crochet, and I will slip stitch
in the same stitch. Now I'm going to connect this stitch to the first
row to join them together. To do that, just chin two, one, two, and then slip stitch into the last travel crochet
you made in row one. I will connect this stitch
into the magic ring. I will start by
making three chains, one, two, three, and then we're going to slip stitch
into the magic ring. There you have it. The
first petal is complete. The next two petals are
made using the same steps. Now, let's compare
these two flowers. One made with crochet
treat number 40, and the other one is made
with crochet treat number 80. Now, I'm going to start
with second petal. I'll begin with three
chains, one, two, three. Then just like the first petal, I will make five treble
crochet into the magic ring. That's my first trouble crochet, and I'm making the
second one now. Yarn over twice, insert your
hook into the magic ring, yarn over and pull it through. Yarn over, pull through the
first tu loops, yarn over, pull through tloops
and yarn over, pull through the last tloops. Now I'm working on the
third trouble crochet. And this is the fourth
treble crochet. And this is the fifth
treble crochet, which is the last
one for this row. Once you're done with that,
we're going to chain two, one, two, and flip
your crochet work. We will start a
second row by making two double crochet
in the first ditch. We're going to yarn over, insert your hook in the first ditch, yarn over and pull it through. Y over, pull through the
first tloops and yarn over, pull through the last tloops. Another double crochet
in the same stitch. Y over, insert your hook
in the same stitch. Y over and pull it through. Y over, pull through Tulops and yarn over, pull
through Tulops. In the next stitch, I will
make two travel crochet. This is my first travel crochet. Y over twice,
insert your hook in the next stitch and over. Pull it through. Yarn over, push through the
first two loops. Y over push through two loops, and yarn over, pull through
the last two loops. And this is the second
trouble crochet, also in the same stitch. Y over twice. Insert your
hook in the same stitch, yarn over, pull it through. Y over push through two loops. Yarn over, pull
through tu loops, and yarn over, pull through
the last two loops. Another two trouble crochet in the next stitch. Y over twice. Insert your hook in
the next stitch. And yarn over, pull it through. Yarn over, pull through the
first tloops, yarn over, pull through tloops
and yarn over, pull through the last tulops. Now I'm making the
second trable crochet also in the same stage. In the next stage, I will make two trouble crochet as well. That's my first travel crochet, and I'm making the
second travel crochet also in the same stitch. And in the last
ditch of this row, I will make two double crochet. This is my first double crochet, and I'm making the
second double crochet also in the same stitch. To begin the third row, chain one, and then
flip your crochet work. We will start with a single
crochet in the first stitch. Two double crochet
in the next stitch. This is my first double crochet, and I'm making the
second double crochet also in the same stitch. Two trouble crochet and a double crochet in
the next stitch. That's my first trouble crochet, and I'm making the second
trouble crochet now. And last one, a double crochet
also in the same stage. A double crochet and two trouble crochet
in the next stage. We will start with
double crochet. That's my double crochet, and I'm making the first travel crochet in the same stitch. And this is the
second travel crochet also in the same stitch. In the next stitch, I will make one trouble crochet and
two double crochet. That is my travel crochet, and I'm making the
first double crochet also in the same stitch. And now I'm making
second double crochet also in the same stage. Two travel crochet and a double crochet
in the next stage. That is my first travel crochet, and I'm making the
second one now. And a double crochet
in the same stitch. Next, a double crochet and two trable crochet
in the next stitch. That is my double crochet, and I'm making my
first travele crochet also in the same stitch. And this is the second
travele crochet also in the same stage. In the next stitch, I will make two double crochet
and a treble crochet. This is my first double crochet, and I'm making the second double crochet in the same stage. And this is a trouble crochet
also in the same stage. A treble crochet and a double crochet in
the next stitche. That's my trouble crochet, and I'm making a double
crochet in the same stitch. In the last stage, I will make a single crochet and I will slip stitch also
in the same stitch. So that's my single crochet, and I will slip stitch
in the same stitch. And just like in
the first petal, we will connect this stitch
back to the first row. Chain two, then slip stitch into the last travel crochet
you made in row one. Chain three, one, two, three, and slip stitch
into the magic ring. And that's it. The
second petal is done. Let's begin the third
petal with three chains, and then just follow the same steps as the
previous two petals. I will fast forward
the video and come back once I finish
with the third petal. And I'm almost done with my third petal. Now I'm making three chains and slip stitching into the
magic ring to finish it off. Now grab the tail and
slowly pull it tight. This will close up the
center of your magic ring nicely. And that's it. Your crochet flower is all done. And here's the comparison
between the flowers made with crochet tread
number 80 and number 40.
5. Lesson 4 : cutting the pattern: Using the pattern template, we will cut out
the whale's body. You can use cutting machine to cut out the whales template or just trace the pattern on your felt and cut with scissors. You will need cricket fabric mat and a rotary blade to
cut the felt fabric. In a new cricket
design space Canvas, upload the SVG whales pattern
file and ungroup them. You will need to cut out
two whale body shapes, one for the front and
one for the back. And these two pairs of fins. This piece is the lower
part of the whale's body, which will be attached
to the main body. All set to cut, click make, and you will see two different cutting mats on the next screen. I will change the matrial
size to 30.5 by 30.5 CM. Do the same thing
for the second mat. Move the design elements
towards the center of the mat and leave some
space between each one. For the material, choose
felt acrylic fabric. If the option is not
in the main window, click Browse Material
and Type felt. There are several types of
felt materials available. Choose the one
that you're using. On the next screen, for
the pressure setting, you can go for default. Next, I will insert my
rotary blade in Clam B. Place your felt on the mat, load it into the machine, and then start to cut. There you have it. The pattern is nicely cut by the machine. If you don't have
cutting machine, print out the printable PDF, cut out the pattern and trace them on the felt
fabric one by one. Using a fabric marker, I will trace the
pattern onto the felt. This marker will fade away on their own after a few hours. Gather all the felt
parts together. You will have two body parts, four fins, and one
lower body part. Don't forget your
crochet flowers. Now we are ready to sew
everything together.
6. Lesson 5 : adding details on to the fin: I'll add some detail to the fin by adding back
stitches along it. Here, I'm using chalk pencil and lightly draw tree
lines like this. Use only tskin of
embroidery thread. Place the two fin
pieces together. And now I will sew back stitches along the lines that
I previously made. I will do the same thing
on the second line. And lastly, I will add back stitches on the
third line as well. And now I will secure the stitches with
knots at the back. And these are the final fin
after I added back stitches.
7. Lesson 6 : attach the fin: Next, we're going to sew the lower body piece onto
the whale's main body. Prepare the wheel's main
body and the bottom part, and we will sew the fin on top. The other fin will be placed below and we will
sew it later on. Pin the main and lower
whale's body together. Using blanket stitch, we're going to sew this
lower body part. Using six strands of the
MC embroidery thread, bring your needle up from the
back of the whale's body, insert your needle through the lower body part
and pull the thread, but do not tighten
it completely. Bring the needle up through
the loop and pull it through. Place the fin on top
and sew them together. I will stitch along the running stitch that
I previously made on it. I'm not going to trim
the access tread, as I will use it to sew the two whale body
pieces together. In the next video, we will add embllishment onto
the whale's body.
8. Lesson 7 : adding embellishment: Next step is the fun part. We'll be adding embllishment, as well as the crochet flower
onto the whale's body. Take your crochet flour and
place it on top of the fin, then sew it in place. Take your seed bits. I'm using round the
whole bits size eight, and I will place the bid and sew it onto the
center of the flour. Run the thread through
the bits several times to ensure they
are tightly secured. And I'm just going to tie a few knots to
secure it in place. Next, I will sew the rest
of the crochet flowers, which are the crochet puff
flowers onto the whale's body. I will take the same seed beads, the bits that I use for
the first crochet flower, place it on the center of the
puff flower and sew it on. And I will secure it with few knots on the back
of the whale's body. Other than crochet flour, I will also add some sequins and bits on the whale's body. This is a four millimeter
silver flat sequence, but you can use any
sequence you have on hand. So each sequin onto the
whale's body individually. Once you're done adding
the embllishment, we will stitch the two
body pieces together. I
9. Lesson 8 : stitching the whale's body: Now we are ready to assemble the wheel and stitch
them together. Place the two felt
pieces together and make sure all edges
are aligned neatly. Using the excess trout
from solving the fin, start stitching the two
body pieces together. Insert the needle
from the inside of the two layers between the felt pieces and bring
it out to the edge. Now we're going to insert
the needle through the two body pieces,
pull the needle through, but before the tread
tightens completely, insert the needle back
to the loop and pull it. Continue making blanket stitches evenly spaced all
around the edge. Now I will grab my
polyester fiber fill and begin stuffing the
wheel's tail section. Adjust the stuffing to
make sure it's even, especially in small
areas like the tail. I will continue sewing around the edges using
blanket stitches, and at the same time, I will
stuff the felt well as I go. Now I'm going to
make a small loop where I will attach the kitchen. You can use the same colour felt or a ribbon,
whichever you prefer. I saw the loop in between the two whale body pieces
before closing it up. Next, I will insert
the other fin, between the two body wheels
and stitch them together. Don't forget to keep stuffing
your wheel as you go. At the final bit of stuffing before making the last ditch, you want your wheel to
look nice and fluffy. And there you have it. Your
wheel is almost finished. We just need to attach a
black bead for the eye, and then it's all done.
10. Lesson 9 : adding the eyes: Now we're going to add a black
bead for the whale's eyes. This is a five
millimeter black bead. You can use a fabric
marker or chalk to likely mark where
you want the eye to go. Inside the needle from
the backside of the felt. Slide the black bead onto the needle and pull it down
the track to the felt. Pass the needle back into the
felt just beside the bed, angle the needle and push it through the edge of
the whale's body. Repeat these steps two
to three more times to make sure the bead
is tightly secured. To hide the remaining thread, I'm going to insert
the needle between the felt layers and bring it out somewhere
along the edge. And that's it. Your handmade
back charm is all done. It is ready to hang on your
back or give it as a gift.
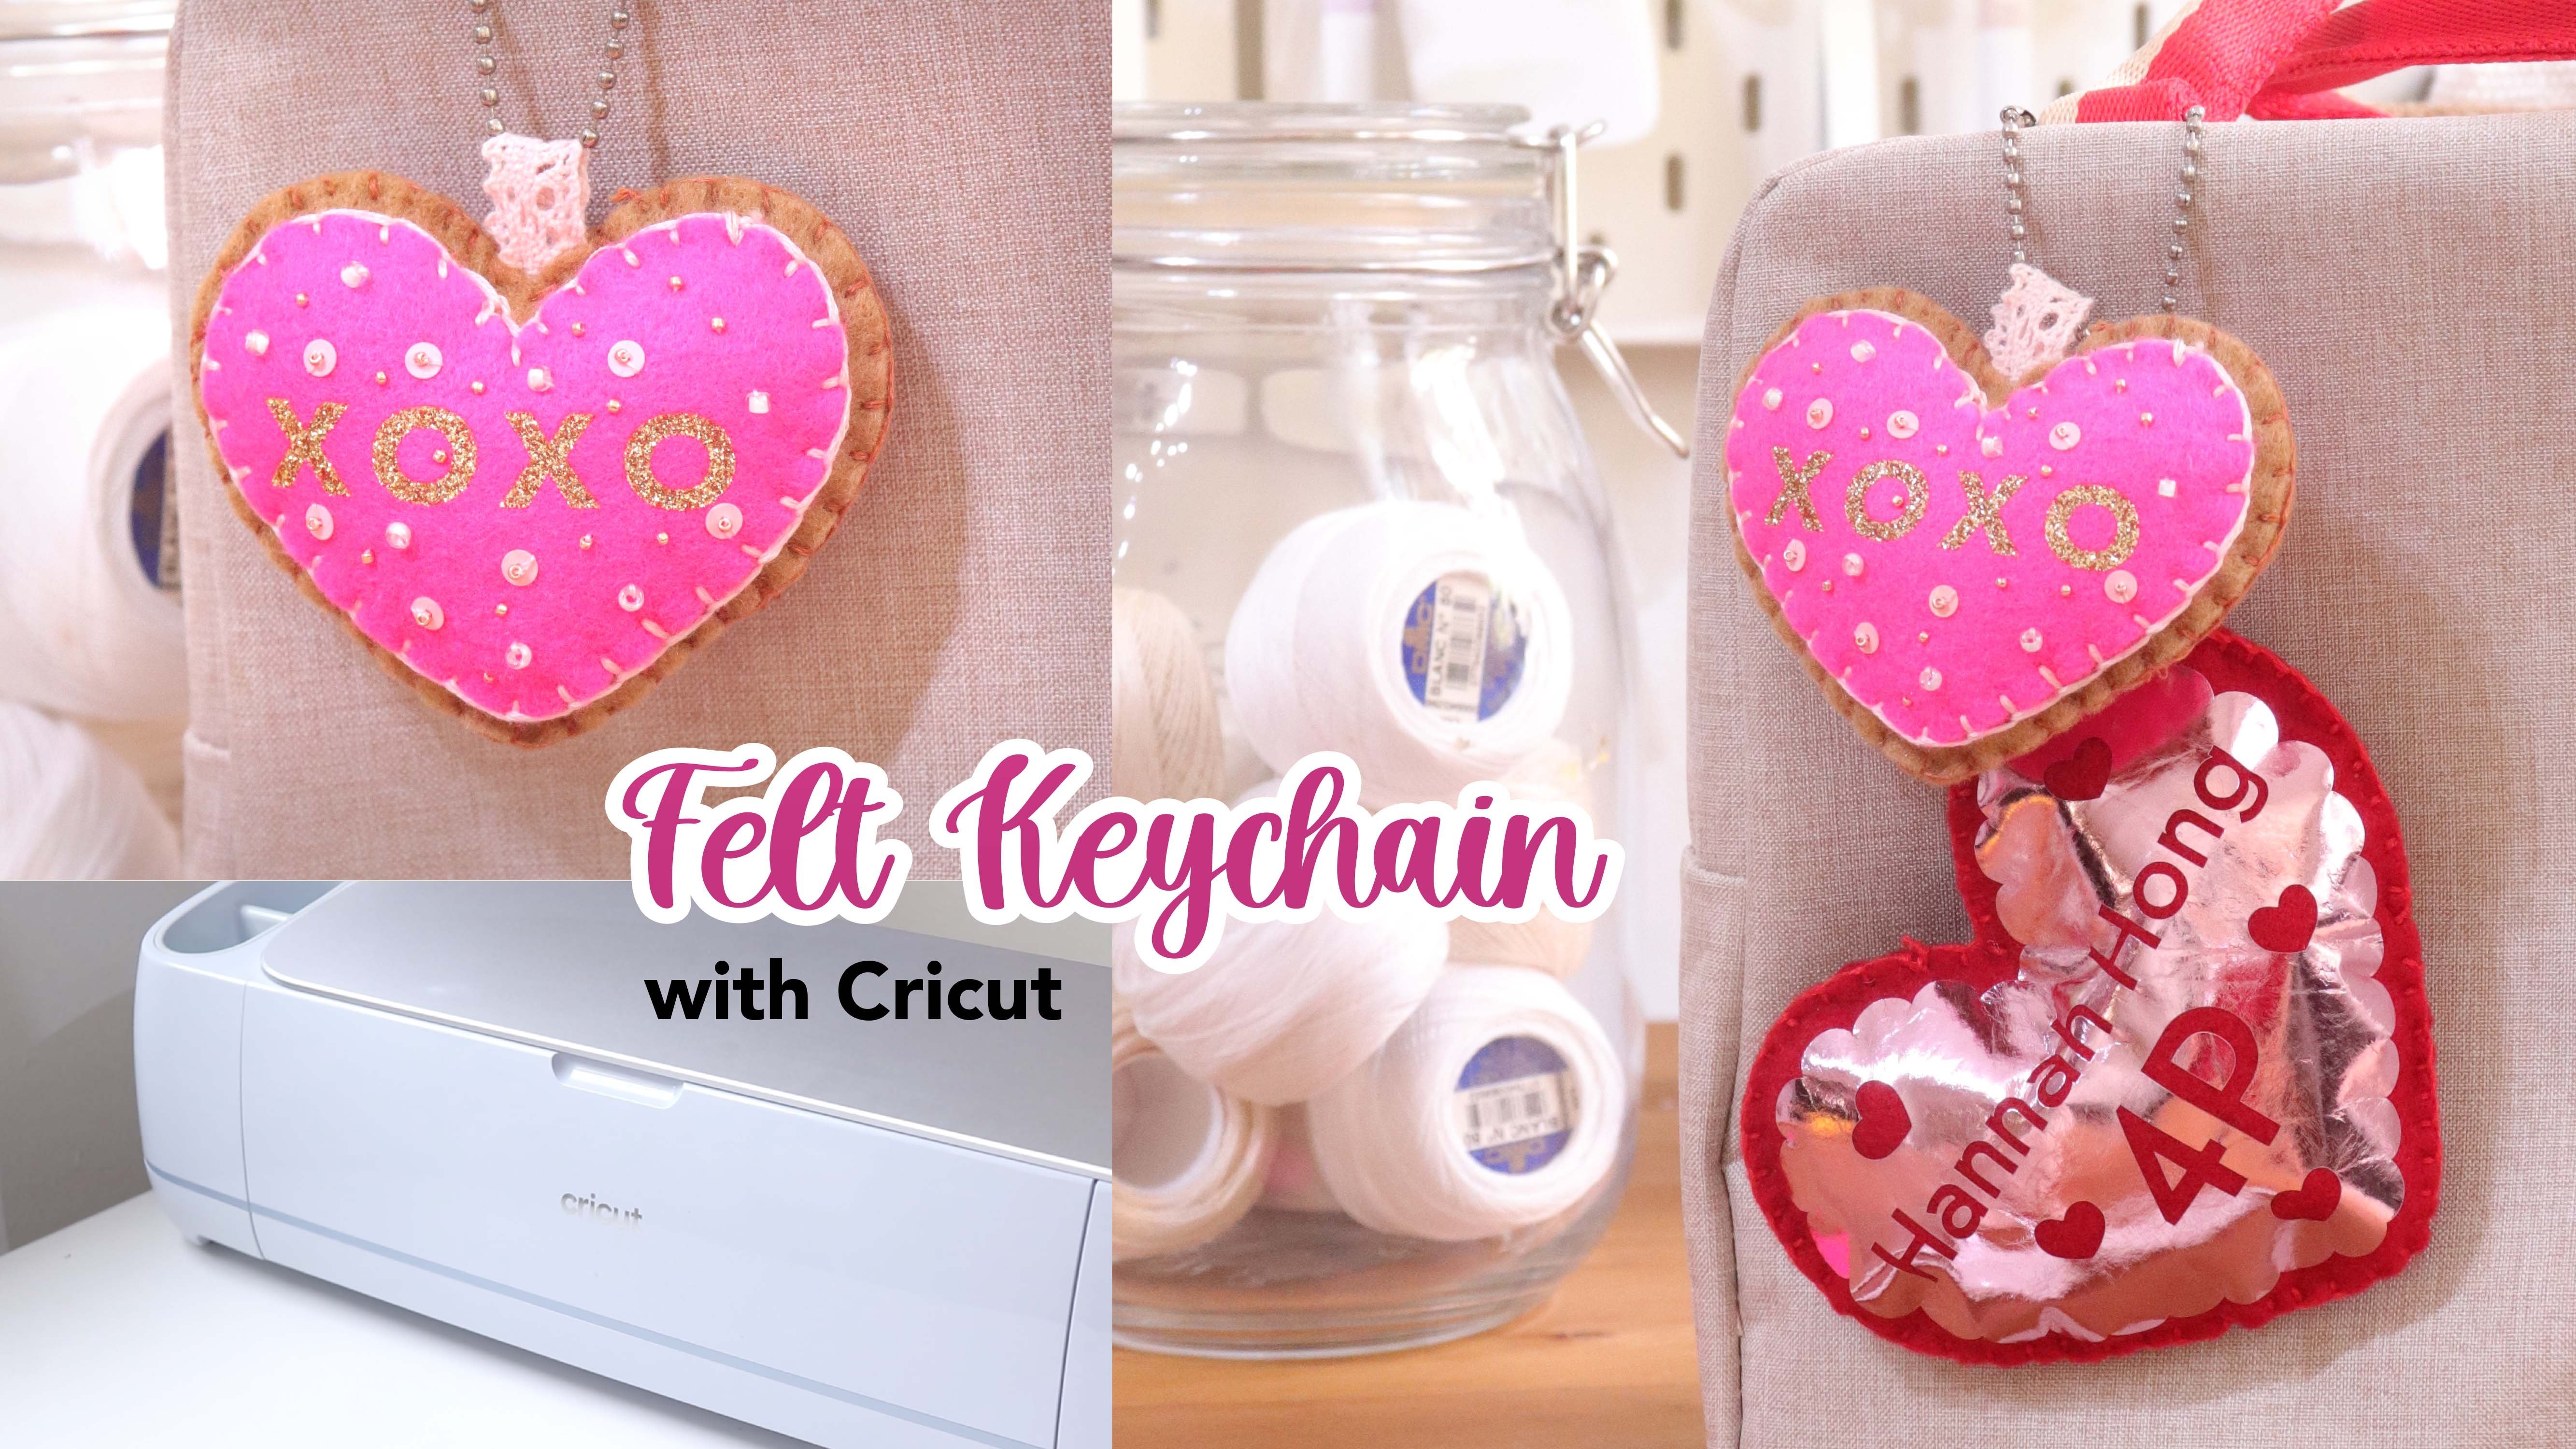
11. Lesson 10 : personalised acrylic keychain with cutting machine: Have cutting machine,
you can take your Bharm personalization
to the next level. I cut out my daughter's
name using permanent vinyl, and I will place it onto
this acrylic blank. Measure the size of
your acrylic blank. Mine is five CM. On new Cricket
design space Canvas, click on the shape button
and choose circle. I will change the size
to five CM by five CM. Click the drop down arrow in the operation menu
and choose guide. Now, any design I want
to add must fit within the circle to make sure it stays neatly on
the acrylic blank. You can choose any
phone style you like, but since my acrylic
blank is quite small, I will avoid curse phones
with narrow strokes. To make sure the name is perfectly centered
on my acrylic blank, I click the line button at
the top and select Center. This helps position the
text right in the middle. I will also add other
design elements like this star shape and some circles to make it
more fun and personalized. Once you're happy
with your design, you're going to
select all layers together and click attach. Click the mic button. On the next screen,
I'm going to change the matrio size to
30.5 by 30.5 CM. After that, click Continue. Choose your matrio I'm
using Adhesive foil. For the blade pressure,
you can select default, but since I'm using an old blade that is not sharp enough, I will select more
for the pressure. I'm using the cricket
standard grip met. I place my adhesive foil
on top and secure it with tip so it will not
shift during cutting. And to cut this material, I'm using premium
fine point blade. After cutting, go
ahead and we the vinyl by removing the parts that you don't want in
your vinyl design. Then to transfer the design
onto the acrylic blank, I'm using this transfer tape. Carefully place the sticky side on top of your vinyl design, and then we're going
to burnish it. Use a scraper to rub the
transfer tape onto the vinyl. This helps the vinyl stick
to the transfer tape. Now that your acrylic
piece is done, we're going to attach
it to the kitchen. And this is the final
look of our wheel Bharm. I hope you enjoy making
it as much as I did. If you try this
project yourself, don't forget to
share your creation with me. I would
love to see them. Thank you so much for
watching. See you next time.
 Hanacrochetdesign Eva Widjaja, hanacrochetdesign